1
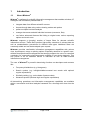
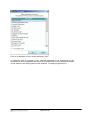
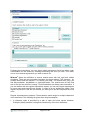
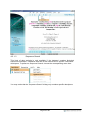
® Wistract The Software for Scientific Information Management User Manual Bayer Business Services GmbH Version 1.2.0 Science & Technology 2005-11-30 Legal Notice: Copyright © 2005 - 2006 by Bayer Business Services GmbH. No part of this document may be reproduced or passed on electronically or mechanically without the written permission of the Bayer Business Services GmbH. Wistract® is a registered trademark of Bayer AG. Please note that following product names mentioned in this document, as well as further mentioned trade marks, are registered trade marks of their respective owners and are used here solely for the purpose of specifying quality and purpose: Beilstein®, DEPAROM®, GenBank®, MDL®, MicroPatent®, Microsoft®, PubMed®, Questel-Orbit®, SciFinder®, STN®, Swiss-Prot® Contact: Bayer Business Services GmbH Customer & Sales Service Center 51368 Leverkusen, Germany Phone: +49 (0) 2 14/30-4 63 60 E-mail: [email protected] Internet: www.BayerBBS.com Technical Support: S&T Servicedesk Bayer Business Services GmbH Phone: +49 (0)214/30-99955 E-Mail: [email protected] Page 2 of 66 Table of Contents 1 INTRODUCTION.............................................................................................................................................. 4 1.1 1.2 1.3 1.4 2 GETTING STARTED ....................................................................................................................................... 7 2.1 2.2 3 INSTALLATION ................................................................................................................................................. 7 STARTING WISTRACT® FOR THE FIRST TIME ................................................................................................. 11 THE WISTRACT® CLIENT........................................................................................................................... 15 3.1 3.2 3.3 3.4 3.5 3.6 4 ABOUT WISTRACT® ......................................................................................................................................... 4 APPLICATION LOGIC ........................................................................................................................................ 5 SYSTEM REQUIREMENTS ................................................................................................................................. 5 WISTRACT® DATA STORAGE LOCATION.......................................................................................................... 6 MAIN MENU .................................................................................................................................................. 15 QUICK TOOLBAR ........................................................................................................................................... 18 HISTORY PANEL ............................................................................................................................................ 19 DATA BROWSER ............................................................................................................................................ 19 NAVIGATION BAR.......................................................................................................................................... 20 TOOL COMPONENT ........................................................................................................................................ 20 WISTRACT® FEATURES.............................................................................................................................. 25 4.1 CREATING DATAPOOLS AND IMPORTING DATA.............................................................................................. 25 4.1.1 Creating a Datapool from File............................................................................................................ 25 4.1.2 4.1.3 Creating Custom Data ........................................................................................................................ 28 Importing data..................................................................................................................................... 31 4.2 VIEWING AND BROWSING THROUGH DATA .................................................................................................... 32 4.2.1 4.2.2 4.2.3 4.2.4 4.3 ANALYZING AND MANAGING DATA ............................................................................................................... 39 4.3.1 4.3.2 4.3.3 Data Mining Functions ....................................................................................................................... 39 Adding Comments to Documents ........................................................................................................ 48 Associating Files to Documents .......................................................................................................... 55 4.4 EXPORTING DATA ......................................................................................................................................... 56 4.5 OTHER FEATURES .......................................................................................................................................... 57 4.5.1 4.5.2 4.5.3 4.5.4 4.5.5 4.5.6 5 Document View ................................................................................................................................... 32 Table View........................................................................................................................................... 33 Histogram View................................................................................................................................... 34 Viewing Graphical Contents ............................................................................................................... 37 Customizing the Wistract® Client........................................................................................................ 57 Using the Data Recovery Function ..................................................................................................... 61 Links to other Applications/Scientific Sources .................................................................................... 63 License Verification ............................................................................................................................ 63 Upgrading License .............................................................................................................................. 64 Getting Source Data from other Applications..................................................................................... 65 APPENDIX: KEYBOARD SHORTCUTS .................................................................................................... 66 Page 3 of 66 1 Introduction 1.1 About Wistract® Wistract® is software for scientific information management that enables scientists, IP managers and information professionals to: • integrate data from different scientific sources • browse through data using various viewing modes and options • perform multiple level data analysis • manage documents and add individual contents (comments, files) • use further advanced features like linking to original texts, various exporting options and much more. Wistract® supports a (growing) number of import filters for relevant scientific information sources. These filters perform high-quality extraction of relevant data as well as standardization procedures for different data types. Additional filters are constantly added and can be developed upon request. Wistract® provides comfortable information management capabilities with various view, import/export, merge or printing options. Especially attractive is a specific userdefined descriptor/content management that strongly supports the use of a controlled vocabulary for commenting single documents, subsets or even whole datapools. This has proven to be an essential benefit in individual as well as team-oriented information management. The core of Wistract® is powerful data-mining functions on descriptors and contents like: • Frequency distributions (e.g. histograms) • Search queries (e.g. left/right/middle-truncated text search with optional regular expressions) • Similarity ranking (e.g. on the basis of patent codes) • Advanced queries (Boolean logic and regular expressions) All data-mining operations and information management capabilities are available within a successive multi-level analysis framework for a thorough drill down into the data. Page 4 of 66 1.2 Application Logic Scientific information within Wistract® is basically organized in datapools which can be considered as simple “containers”: A datapool consists of documents each a representative of e.g. a patent or a journal article which are wrappers of all specific data. Distinct information is carried in descriptors and contents, e.g. the descriptor Company/Organization may have the content Bayer or the descriptor Controlled Term the contents analgesics, antibiotic resistance and antitumor agents. Descriptors may also have non-textual contents like graphical images, chemical structures/reactions, biological sequences or binary data. In summary you can consider a datapool as a simple collection of documents and a document as a simple collection of descriptors with their corresponding contents. 1.3 System Requirements Wistract® runs on every Pentium III system upwards. Large datapools require large memory, therefore 512 MB is required. The application runs on Windows 2000 (.NET Framework 1.1) and Windows XP Systems. Resolution requirements are 1024x768, but a larger screen is recommended. Internet access is required for links to web applications. The availability of certain features and import filters depends on your license. Page 5 of 66 1.4 Wistract® Data Storage Location All internal Wistract® data (settings, datapools, license information, log and backup files) are saved in a specific system folder that can vary depending on the installation of your operating system. This folder is in many Windows XP Systems for e.g. under: “C:\Documents and Settings\<your_profile_ID>\Application Data\Bayer Business Services\Wistract” or in many Windows 2000 Systems under: “C:\WINNT\Profiles\<your_profile_ID>\Application Data\Bayer Business Services\Wistract”. The contents of this folder and its subfolders should never get manually modified, deleted or removed, as this could permanently destroy the data and affect the proper functionality of the application. Page 6 of 66 2 Getting Started 2.1 Installation For installing Wistract®, please start the “setup.exe” file from the directory “Install”. Now you can just follow the instructions. First of all, the setup installs the Microsoft .NET Framework 1.1 on your PC if it is not available or if the existing version is insufficient. After finishing the .NET Framework installation, setup proceeds to install the Wistract® client: Please click “OK” to continue. Click on “Next”. You will be asked to confirm the License Agreement. Page 7 of 66 If you agree to the terms and conditions click on the “I Agree” radio button and then click on “Next”. Page 8 of 66 Now select a folder for the installation and click on “Next”: Click on “Next” to begin the installation. Page 9 of 66 You may take some time to read the “readme” file: After that, the installation ends. Click “Close” to exit the installer: Page 10 of 66 2.2 Starting Wistract® for the First Time To start Wistract®, double-click the Wistract® shortcut icon on your desktop: or start Wistract® via the Windows Start menu. The “Identification" window appears: Enter your personal identifier in the appropriate field according to your personal license information (or any other identifier for the evaluation version). After entering your identifier, click on the “OK” button. Now you will be asked to upgrade your license: If you have a license file for Wistract®, click on the “Upgrade” button, choose your license file and click on “OK”. In case you do not have a product License for Wistract®, please use the contact information in order to obtain one. Otherwise you can try the evaluation mode of the application. However, the evaluation mode has some functional limitations. The “Upgrade License” window will appear every time you start Wistract® without a valid product license. Note: The license information will be stored internally. You can also upgrade your license at any time by using the option “Upgrade License” from the “Help” menu of the client. After a successful identification you will be guided to the “Open Datapool” window. Click on the button “New…” to create your first Datapool: Page 11 of 66 In the next window click on the “Add…” button to add the file(s) you wish to import: Note: Wistract® provides some demo data in the “Samples” folder of the installation. Page 12 of 66 Choose for e.g. the demo file “DemoMicropatent.txt” and select the data type “Micropatent” in the file dialog. Then click on “Open”: The “Create Datapool from File” window appears again. Now enter a name for your datapool in the “Datapool name” field (e.g. “Micropatent demo data”). You may also enter further optional information about this datapool in the additional fields. You now can click on “OK”: Page 13 of 66 Wistract® converts the data into its internal data format. The datapool is opened in the “Document View” and the first document is displayed. Now that you have created your first datapool, please have a look at the following chapters, in order to gain an overview of the most important features and functionalities of Wistract®. Page 14 of 66 3 The Wistract® Client 3.1 Main Menu Many features and functionalities of the Wistract® client can be accessed via its “Main Menu”, which is located on the top of the main window: File: Within this menu option, you can access various file operations like: − creating/opening/closing datapools − importing data into/exporting data from a datapool, merging datapools − data saving functionalities − managing datapools − removing, backing up, or restoring data and local information − printing options and functionalities − exit the application Edit: Various editing operations can be accessed via this menu option: − undoing single/all content modifying operations performed − copying selected text or entire views Page 15 of 66 − deleting items − checking/unchecking as well as marking/unmarking documents/histogram items − selecting/deselecting the whole text (“Document View” only) − setting the document processing status of multiple documents into “read” / “unread” − finding text and replacing individually added contents with new ones − switching between “Document View” and “Table View” − accessing the “Options” dialog View: Under this menu option you can: − refresh the current view − clear all undo operations − edit (customize) the current view − show/hide the “Tool Component” − directly spring to the “Graphics” sector of the “Tool Component” − set highlighting and window size options − view information about the current document set − navigate to the first, previous, next, last or to a specific document Page 16 of 66 Data-Mining: following operations can be accessed under this menu option: − Various Analysis operations − Creating new document sets: Commenting: If you wish to add your individual contents (comments) to documents, use the features provided within this menu option: Page 17 of 66 Link To: Links to scientific sources with original documents for further analysis are provided within this menu option: Help: Under this menu option you can access help, license and additional information: 3.2 − Help Contents − View and upgrade License information − Wistract® Links on the web Quick Toolbar Some of the most common features and functionalities of Wistract® are accessible via the “Quick Toolbar”, which is located below the Main Menu: Open (datapool) Save Print Undo (last content modifying operation) Change Highlighting Analyze Patent Original (link to) Show/Hide Tool Page 18 of 66 3.3 History Panel The “History Panel” displays the Document Sets you are working with. A Document Set is a collection of documents, which is the basis of any data-mining operation. After opening a datapool the first (basic) Document Set contains all the documents of the datapool. Within the History Panel you can switch to the Document View, the Table View, or other Histogram Views that result after analyzing data. 3.4 Data Browser The Data Browser is the main section of the Wistract® Client. Depending on the current View mode, data will be displayed within here as single documents, documents in a table view, histograms (after performing data analysis) etc. See also chapter 4.2 for more details about viewing and browsing through data. If the size of the current view mode does not fit the size of the window, you can use the provided scrollbars to view all information: Page 19 of 66 3.5 Navigation Bar The Navigation Bar is located on the bottom of the Wistract® client and it can be used to navigate to the next, previous, first, last or a specified document (these operations are also available via the View menu). Furthermore, in the lower right corner you can see the index of the currently displayed document. 3.6 Tool Component Many handy features and functionalities of Wistract® can be accessed via its “Tool Component”. You can show/activate this component by either clicking on the right quick-toolbar icon, which is located below the main menu, or by clicking on “Show Tool” in the “View” menu (alternatively you can use the keyboard shortcut ‘Ctrl+T’). The current view will be resized and the Tool component will appear on the right hand side of the window. The accessible feature set that can be accessed via the Tool component, changes automatically depending on the current browsing mode (View). If you are working in the Document View, you will notice that four registry cards are available in the Tool component: “Graphics”, “Comments”, “Descriptors” and “Repository”: Page 20 of 66 Graphics: If a document contains additional non-textual information like graphical images or chemical structures you can view them in the “Graphics” registry card of the Tool component (for more information about viewing graphics, please have a look at chapter 4.2.4): Comment: If you wish to add some content to one ore more documents, you can use the commenting feature that can be accessed within the “Comment” tab of the Tool component (for more information about adding individual content to documents (commenting), please consider chapter 4.3.2): Descriptors: Within this tab you can define the set of visible descriptors and contents in the Document View. Use “Check All” / “Uncheck All” to select/deselect all available descriptors or make your selection manually by activating/deactivating the corresponding checkboxes on the left oft the entries. When you are ready with your selections, click on the “Update” button. From this point on, only the contents of the selected descriptors will be visible in the Document View (Note: this setting will affect all documents, but it can of course be changed at any time): Page 21 of 66 Repository: Within this tab you can associate external files to documents in Wistract®. See chapter 4.3.3 for more details about using this feature (Note: the availability of this feature depends on whether your license supports it or not) If you are working in the Table View, you will notice that there are also four tabs available in the Tool component: “Graphics”, “Comments”, “Columns”, and “Repository”. The first two tabs “Graphics” and “Comment”, as well as the tab “Repository” have the same functionality as described before. Columns: Within this registry card you can customize the visible columns (descriptors) of the Table View. In order to do so, click on the button “Change Columns”: In the “Select Columns” window that appears you can select the columns (descriptors) you wish to be displayed by either adding new ones from the left list, or removing existing ones from the list on the right. By using the Up and Down buttons you can also modify the sequence in which the columns should be displayed. You can furthermore use the “Save As…” and “Delete” buttons in the “My Favorites” sector to manage your own favorites’ list of customized Table Views. After making your selection, click on the “OK” button: Page 22 of 66 The modified Table View will now be displayed. If you are working in the Histogram View the Tool Component changes automatically and contains two or three registry cards, depending on the analysis performed: "Histogram", "Comment" and “Text/Sequence Search”. The "Comment" tab offers you the same commenting possibilities like in the Document View and the Table View. Histogram: Within this registry card you can view statistical information about the analysis results, as well as perform other useful operations, like reducing the length of the characters to be displayed per hit, merging multiple result hits into a single one and more: Text Search/Sequence Search: Within this tab of the Tool Component you can modify your search and update the Histogram View with the new results Page 23 of 66 Page 24 of 66 4 Wistract® Features 4.1 Creating Datapools and importing data 4.1.1 Creating a Datapool from File You can create a new datapool from one or more source files either directly after starting the application when the “Open Datapool” window is shown by using the “New...” button (as described in chapter 2.2), or at any time via the option “File -> New -> Datapool from File…” from the main menu: In both cases, the “Create Datapool from File” dialog will appear: Use the “Add…” button to add the files you wish to import: Page 25 of 66 Note: Please make sure to select the proper file type (import filter) for the files you wish to import, otherwise importing will not work properly. This depends on the source database of these files and on the format they have been exported into. Also see chapter 4.5.6 for more information. After clicking on “Open” the “Create Datapool from File” window will appear again: Page 26 of 66 It is possible to repeat the action of adding files if you wish to import more file types. All files that should be imported will appear in the list: Page 27 of 66 Now enter a name for your datapool in the “Datapool name” field. You may also enter further optional information about this datapool in the additional fields. If you now click on “OK” Wistract® will convert the data into its internal data format, the created datapool will be loaded and the first document will be displayed in the “Document View”. 4.1.2 Creating Custom Data Wistract® enables you to create your own custom documents for either using them to create new custom datapools or adding them to existing datapools. Both features are accessible via the “File -> New ->” menu. For the first case use “Custom Datapool…” to create documents for a new datapool and for the second case “Custom Document(s)…” to create additional (custom) documents for the currently loaded datapool: In both cases you will be asked to save your currently loaded datapool, if necessary, in order to proceed. After choosing one of these two options, you will be guided to the “Create Custom Documents” dialog: Click on the left button “Set Fields…” in order to define which descriptors you wish to use for the contents of your custom documents. The “Select Descriptors” dialog appears: Page 28 of 66 After making your selection, click on “OK”. The grid of the previous dialog now contains the fields you have just defined. Each row represents a single document and each column the descriptor + contents pairs. You can add new documents by clicking on the last row. Clicking on a cell allows you to edit its value: Page 29 of 66 Note: You can at any time add new fields to your custom documents by clicking on the “Set Fields…” button again. The contents will not get lost, unless you remove an already used field. When you are ready with editing you can click on the “OK” button. Please take under consideration that you cannot edit the created documents anymore, from the point on that they have been added to a datapool. If you have chosen to create a new custom datapool (2nd option), you will be asked to give a name and optionally a description for it in the next dialog: By clicking on “Cancel” you can return to the edit mode. Clicking on “OK” creates and loads a new datapool under the given name + description, containing the documents created: On the other hand, if you have chosen to create custom documents (3rd option), the documents you have just created will be added to the currently loaded datapool. Page 30 of 66 4.1.3 Importing data Wistract® also enables you at any time to import more data from external source files into the datapool you are currently working with. To do so, use the “Import” option of the “File” menu: The “Import Files into Datapool” window appears: Use the “Add” button in order to add one or more source files into the currently opened datapool. Important: please make anytime sure to choose the appropriate file type for each source file! Otherwise the file(s) will not be imported. By clicking on “OK” the selected files will be imported into the currently loaded datapool. Note: Wistract® will filter out any duplicates and only distinct information will be imported Page 31 of 66 4.2 4.2.1 Viewing and Browsing through data Document View The “Document View” is the default view mode of Wistract®. To switch to the Document View, click on "Document View" in the History Panel on the left. The current document will then be displayed in the Data Browser: You can navigate through the documents of the current document set by using the navigation arrows of the navigation toolbar at the bottom. You can at anytime configure the set of visible descriptors and contents in the Document View by using the “Descriptors” tab of the Tool Component, as described in chapter 3.6. Page 32 of 66 4.2.2 Table View For a more comprehensive view of the documents of a Document Set you can switch to the “Table View” by clicking the Table View item in the History Panel: Each line corresponds to a single document, each column to a specific descriptor of the document and each cell to the (concatenated) contents of the descriptor. You can navigate through the Table View spreadsheet or alter the column widths in the same way you are used to from common spreadsheet programs like Microsoft Excel. You can at any time customize the visible columns (descriptors) of the Table View, by using the “Columns” tab of the Tool Component as described in chapter 3.6. The red rows indicate unread documents, while the blue ones indicate documents that have already been read (= opened in the Document View). In order to sort the Table View by the read / unread documents, just add the column “Document Processing Status” into the view and click on the title of the column to sort the document set. Note: You can change the “Document Processing Status” of multiple documents via “Edit->Document Processing Status->…” and choosing the option you wish. Modifying this means a modification in the datapool. Therefore the changes will be saved by saving the datapool. This is also the case when modifying the check status of the documents. Page 33 of 66 If you wish to jump directly from the Table View to a specific document in the Document View, just double-click the corresponding row in the Table View spreadsheet. 4.2.3 Histogram View The “Histogram View” is available after performing data analysis operations. To switch to this view mode, click on the corresponding analysis item in the History Panel. The analysis results will be displayed as histogram bars. Each line contains a single analysis result content, a histogram bar for illustration of the count value and the count value itself, which is the number of documents in the document set, that correspond to the current analysis result. The histogram can be sorted according to your needs (ascending/descending) by (multiple) clicks on the column headers: In order to further work with a specific reduced amount of documents (that corresponds with specific result hits of the descriptor analysis) you can select one or multiple hits (lines) of the analysis by clicking on the histogram bars: Page 34 of 66 Then use the option "Document Set from" from the right-mouse-menu to create a new document set from the documents you’ve selected: There are various options available, depending on the characteristics of the documents you’ve selected. In this example, you can choose between creating a new document set from the union of the selected result hits, or from the complement specified descriptor contents included in them. These options are based on the theory of sets. Page 35 of 66 A new document set will be created, according to the option you have chosen: The history panel also contains a new Document set entry. You can further analyze this new document set and create further document sets. This way you are able to drill down into your data as deep as necessary. Page 36 of 66 4.2.4 Viewing Graphical Contents If a document contains additional graphical images you can view them in the “Graphics” registry card of the Tool Component, or via the “Graphics...” menu option in the “View” menu (which also activates the Tool component): Note: Whenever a document contains graphical information, a hint “Graphical content exists” is visible on the left of the status bar If a document contains several graphics, you can activate the option “Multiple columns” in order to make them be displayed next to each other: A double-click on a displayed image opens a window with additional graphic viewing features: Page 37 of 66 The image you selected will be displayed on the right. Use the zoom buttons to zoom in/out or choose a % value from the provided list. All images contained in the current document will be shown in the list on the left of the window. You can scroll through the entries by using the provided scroll bar. In order to browse through the images, you can also use the arrows next to the zoom buttons. The molecule icon on the right enables/disables the list view on the left. Click on the “OK” button in order to close the window. Page 38 of 66 4.3 4.3.1 Analyzing and managing data Data Mining Functions Wistract® provides various Data-Mining functionalities to analyze the content of a datapool or to perform statistical evaluations. All features available for data analysis can be processed via the right-mouse-button menu while working either in the Document View or in the Table View, under the menu point "Analysis": or via the "Data-Mining" menu and under the subpoint "Analysis": 4.3.1.1 Descriptors’ Analysis To obtain the frequency distribution of a specific descriptor in form of a histogram choose the item "Descriptors..." subpoint in the "Analysis" menu: The "Select Descriptor" window appears: Page 39 of 66 Click on a descriptor of your choice and press "OK". A histogram with all contents of the selected descriptor in all documents of the document set will be displayed and a new entry with the title of the selected descriptor is now visible in the history panel (in this example: "Company/Organisation"): Page 40 of 66 4.3.1.2 Text Search To perform a text query choose the option "Text Search..." in the "Analysis" menu: The "Text Search" window appears: Page 41 of 66 Following the instructions, you can select which descriptors should be taken under consideration for the search by checking/unchecking the ones you wish. Then enter one or more textual expressions you wish to search for. Wistract® allows the definition of textual search terms with left, right and middle truncation. There are two truncation operators for simple search: The operator * for multiple letters and the operator ? for exactly one letter. The search term *poly* will find polymerization, polyaddition or copolymerization. The search term te?t will find text or test but not texture or testing. Textual searches are always case insensitive. If you are familiar with the regular expressions syntax, you can use regular expressions for more exact and powerful text queries. In order to do so, activate the option "Use regular expressions" and the text entries you have given will be interpreted as such ones. Regular expressions are patterns. These patterns match single or multiple characters in the document. The following list gives some simple examples: A character class is specified by a pair of open and close square brackets. Example: [abcd] matches a string that contains any of the four characters. Page 42 of 66 An asterisk (*) is a grouping pattern which indicates zero or more of the previous character. Example: foo* matches fo as well as foooooooo. A plus sign (+) is a multiplier that indicates one or more of the previous character. A Question mark (?) is a grouping pattern that indicates zero or one of the previous character. \s is a construct that matches any space character. \S matches any non space character. Alternation is another grouping construct. Example: (song|blue) will mach either song or blue. Examples: abc* # matches ab, abc, abcc, abccc and so on (abc)* # matches "", abc, abcabc, abcabcabc, and so on (song|blue)bird # songbird or bluebird [0-9][a-z]+ # any digit followed by at least on character Please refer to a manual on regular expressions to learn more about the extensive possibilities of this powerful syntax. To perform just a simple query, just enter some search terms (for example *poly* and *ester* and leave the option "Use regular expressions" unchecked. If you regularly need to perform the same queries, you can add them to your favorites’ list under "My favorites". In order to do so, click on the "Save as..." button after entering your search terms, enter a name for your favorites’ list and click on "OK": Furthermore, you can Export your search terms as expression files (.expr) or text files (.txt) or Import existing ones from expression or text files, by using the "Import..." / "Export" buttons of the dialog. Please make sure to set the appropriate file type format depending on your needs (.expr/.txt). Note: the search strings you enter will be validated from the editor. In case they are invalid, an error message will be shown. Now click on "OK" in the "Search Text" window to accomplish the query with your entered search terms. New histograms with the specified search terms will be displayed, that can further be analyzed. The count value shows in how many documents the given search terms have an occurrence: Page 43 of 66 If you double-click on a histogram bar (for e.g. *poly*), a new document set with the documents included will be created Note: The new document set replaces the one from the previous analysis. Wistract® allows no branches in the history panel. You can use the Highlighting feature of Wistract® if you wish the search terms to be highlighted in the Document View. To do so, select "Highlight" -> "Text Search" from the "View" menu, or alternatively, you can use the Highlight icon on the quick bar below the main menu. After choosing "Text Search", all hits of the search term *poly* (your text search) will be highlighted in the Document View: Page 44 of 66 4.3.1.3 Sequence Search This kind of data analysis is only available if the datapool contains biological sequence information. It behaves itself like a text search but on specific “bioscience” descriptors. To perform a Sequence Search, choose the corresponding menu item: You may notice that the “Sequence Search” dialog only contains specific descriptors: Page 45 of 66 Note: in this case, left and right truncation is automatically set. Therefore you do not need to enter *ATC*, ATC would do it as well. The rest functionalities are just like the ones of the text search dialog. 4.3.1.4 Patent Similarity Analysis In order to perform a patent similarity analysis on a specific patent document, choose the option "Patent Similarity" in the "Analysis" menu and then the kind and the level of patent classification you wish to analyze for similarities (you can also use the corresponding right-click-mouse menu on the document): Page 46 of 66 Note: Patent similarity analysis is only available if your datapool contains documents with patent information. The similarity analysis will be performed on the basis of the current/selected document and the results will be displayed as histogram bars (the % values express the degree of similarity): You can now create new document sets from the results just like by the descriptors’ and text search analysis and work further with a reduced amount of data. Page 47 of 66 4.3.2 4.3.2.1 Adding Comments to Documents Defining Descriptors One of the most practical and unique features of Wistract® is a user-defined descriptor/content management that supports the use of a controlled vocabulary for commenting single documents, subsets or even whole datapools. There are two kinds of user-defined descriptors supported, the “editable” and the “cataloged” ones. These indications refer to the contents of the descriptors, not to the descriptors themselves. The only difference between an editable and a cataloged descriptor is that the contents of the editable descriptors can be modified, while the cataloged descriptor’s contents are predefined. Nevertheless as you will see later, an editable descriptor can at any time be changed into a cataloged one and vice versa. Please note: once defined, a descriptor cannot be deleted anymore! In order to define a new descriptor use the “Manage Descriptors...” option in the menu “Commenting”, or the keyboard shortcut Ctrl+D: The “Manage Descriptors” window appears: Page 48 of 66 Click on “Add...” in order to create a new user-defined descriptor. In the “Add Descriptor” dialog box, enter a name for your descriptor and choose a format. Three formats are supported: long text (for text content with more than 50 characters), numeric (exclusively numeric content) and short text (for text content with less than 51 characters). Furthermore you can determine at this point if the descriptor should be a cataloged or an editable one by choosing the appropriate option: Now click on “OK” to create the descriptor. The new descriptor will appear in the available user-defined descriptors’ list on the left: From this point on you can use this descriptor to add individual, editable content to documents (more about this later). The list on the right shows only the contents of cataloged descriptors. These contents are predefined and can only be edited here. Activate the checkbox next to the descriptor you have just created, to change it into a cataloged one. You will be asked to confirm: Page 49 of 66 Click on “Yes”. The checkbox next to the descriptor is checked and the Content list on the right is now activated. Now you can enter one or more short text contents for this descriptor. If you wish to add content to documents using this descriptor, you will only be able to choose from the predefined contents added here. Add some contents and click on “Apply”: Now add a new editable descriptor as described above (leave checkbox unchecked) and click on “Apply”/“OK”: Page 50 of 66 From this point on you can use your user-defined descriptors to add contents to one or more documents. As you maybe have noticed in the “Manage Descriptors” window, you can also save your created descriptors in single files, as well as load other user-defined descriptors saved in descriptor files (.cdc-files). To do so, use the “Save As...” and “Load...” functionalities provided. Furthermore, you can “clone” existing cataloged descriptors by selecting one, clicking on the “Clone” button and entering a new descriptor name. The new cataloged descriptor created this way will then adopt the content of its “parent”. 4.3.2.2 Adding Contents to Documents In order to add comments to documents by using your descriptors, open the “Comment” registry card of the Tool component, or use the “Commenting” -> “Manage Content” option of the main menu: Now you can either choose a specific document or select one or more documents in the Table View, in which you wish to add your individual contents. To add one or more editable descriptors, activate the option “Editable” in the Tool and choose one or more of the available editable descriptors of the list (in this example only one available): Page 51 of 66 Now you can add your editable individual content in the “Content” sector. DoubleClick the first free cell and enter the value you wish. To add another comment, double-click on the next free cell. To add another descriptor click on the next empty cell in the “Descriptor” sector: Page 52 of 66 If you now click on “Current”, only the current (selected) document will be updated with the new content; if you click on “Checked”, all checked documents (of the Table View) will be updated. Note: It is necessary that you either use the “Current” or the “Checked” buttons to update the documents, otherwise no actions will take place. To remove a comment, select the appropriate cell in the “Content” sector and press the “Del” key of your keyboard. To remove the whole descriptor, select the descriptor in the “Descriptor” sector and hit the “Del” key of your keyboard. Consider to update the “Current” or “Checked” documents after doing this, otherwise the action will not take place. “Cancel” always undos all operations performed since the last update. In the same way you added (/removed) editable content via editable descriptors, you can also add (remove) predefined content into one or more documents, by choosing one or more cataloged descriptors and contents. Change the “Mode” option into “Cataloged” to view and choose from the available cataloged descriptors in the list: Now you can only add predefined content associated to the selected descriptor from the read-only list that appears in the “Content” sector: Page 53 of 66 After updating, you can see the newly added contents in the Document View. You can at any time enable/disable the visibility of user-defined descriptors and their contents in a document (Document View) or as columns in the Table View, the same way as with the standard descriptors. Page 54 of 66 4.3.3 Associating Files to Documents One very useful feature of Wistract® is the possibility to associate external files to documents of any datapool, like original patent documents, or even graphics, and any kind of files. You can access this functionality in the fourth tab “Repository” of the Tool Component while you are working either in the Document or in the Table View: All files will be stored in a folder called “Local Repository”. The Local Repository path can be set in the Options of the Wistract® client. In order to add a repository entry to the current document use the “Add” button provided in the Tool Component. Select the file you wish, enter an appropriate description and click on “OK”: Now the new repository entry is added in the list and you can also see a new descriptor “Local Repository” in the Document View with the description you entered. Page 55 of 66 By double-clicking on the entry you can open the file. You can also at anytime edit or delete your repository entries. 4.4 Exporting Data Wistract® enables you to export the content of any datapool into a datapool file. To do so, use the “Export” menu option of the “File” menu: Then select the target destination and the format in which you wish to save your datapool, give an appropriate name and click on “OK”: Page 56 of 66 The corresponding content will be saved in an external file in the path and format you have chosen. 4.5 4.5.1 Other Features Customizing the Wistract® Client Various Settings can be made by using the "Options" dialog accessible via the "Edit" menu: Page 57 of 66 The "Options" Window appears, containing the tabs "Application", "Analysis", "Messages", "Colors" (and "Passwords" for certain Wistract® licenses). Within the tab "Application" you can modify various application settings, like the window position, default behavior by file system operations, Quick Toolbar shortcuts, Local Repository path etc.: Page 58 of 66 In the second tab "Analysis" you can set Data Analyzing options: Within the "Messages" tab you can define if some application messages should be displayed after certain operations: Page 59 of 66 Within the "Colors" tab you can customize the settings for various display colors: The "Passwords" tab provides you the possibility to save some passwords that are often needed, if working with links to other scientific sources/applications: Page 60 of 66 4.5.2 Using the Data Recovery Function Wistract® can be set to automatically backup your workfiles. You can adjust these settings in the options dialog: Every time you exit the application, a backup will be created if changes have been detected. You can also create an adhoc backup at anytime by using the corresponding menu option: Page 61 of 66 In order to restore a certain backup, click on “Restore…” in the same submenu sector and select a backup timestamp from the list: Note: your currently opened datapool and all changes made will be lost! The backup you selected will be loaded instead. Page 62 of 66 4.5.3 Links to other Applications/Scientific Sources Depending on your license you can access a set of further scientific sources in the net associated to your documents. Use the options in the “Link To” menu, to access these sources (or via the right-click-mouse menu either in the Document View or in the Table View): 4.5.4 License Verification There are different licensing models for Wistract®. The availability of certain features and of the supported data source filters depends on the license you have. License information can be viewed via “About Wistract®...” in the “Help” menu: Page 63 of 66 4.5.5 Upgrading License In order to Upgrade you current License, click on the "Upgrade License..." option of the "Help" Menu: In the file dialog select your license file and click on “OK”: Note: The license information will be stored internally; update takes place immediately. Page 64 of 66 4.5.6 Getting Source Data from other Applications Some remarks about loading data in Wistract®: SciFinder®: You can import data exported from Scifinder in the "tagged text" format. MicroPatent®: You can import data exported from MicroPatent PatSearch Fulltext in "RIS"-format STN® Databases: Save your Transcript in STN Express as TRN-File. Use the "display all", "d all hitstr", "d bib abs", "d allg" ... commands to generate the right output. Do not use the indented display formats like "iall”, “ibib” etc. Select TRN File (optionally .GRA Files, or TIFF files have to be in the same directory) in the Wistract® Import. PubMed®: Do your search at the pubmed site of the NCBI. Select "MEDLINE" as display format and the "Send to" under the option "File". Click on "Send to" to start the download. DEPAROM®: Save your search results with the command "Datei/Herunterladen/ bibliographische Daten" select the option "im Anzeigeformat" STN® on the Web: Save your results as zipped html file GenBank®: Select "Send to text" (not send to file) and save your search results as .txt file. Swiss-Prot®: View your search results in raw text format and save them as .txt file. Beilstein®: Export your search results to an .rd or .sd file. Questel-Orbit® Databases: Save your search results as a .zip file. Page 65 of 66 5 Appendix: Keyboard Shortcuts Datapool Open Ctrl+O Save Ctrl+S Print Ctrl+P Document Delete Ctrl+Del Show in Document View Shift+Ctrl+Up Show in Table View Shift+Ctrl+Down Application Show Tool Ctrl+T Manage Descriptors Ctrl+D Exit Alt+F4 Text Processing Select All Ctrl+A Cut Ctrl+X Copy Ctrl+C Paste Ctrl+V Replace Content Ctrl+H Find Ctrl+F Find Next F3 Navigation Go To First Alt+Left Go To Last Alt+Right Go To Next Alt+Down Go To Previous Alt+Up Go To Index Ctrl+G Miscellaneous Undo (Last Operation) Ctrl+Z Refresh (View) F5 (Show) Help Topics F1 (Show Help) Index Ctrl+F2 Page 66 of 66