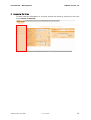
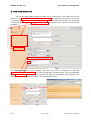
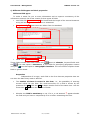
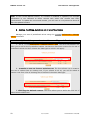
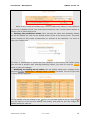
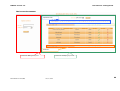
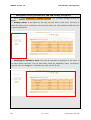
1
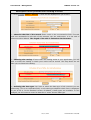
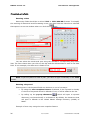
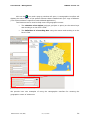
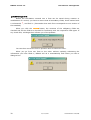
“Promoting the creation of data catalogs for improved sharing of environmental information” User Manual Version 1.3 Management User Manual - Management 2 MDweb version 1.3 04/12/2006 Desertification unit (IRD) MDweb version 1.3 User Manual - Management What is MDweb? MDweb is a generic, multi-lingual, multi-standard application for creating, managing and accessing catalogs of environmental information via the Web. MDweb is built on ‘open source’ technologies (Apache, Postgres/PostGIS, PHP). It uses relational databases that can be accessed via a Web client to manage catalogs of geographical data references, to search for references and to download the listed resources, as well as to manage the catalogs created and the tool itself. MDweb can run independently on the Windows or Linux operating systems. MDweb uses the ISO 19115 standard (geographic metadata) to structure, store and export references (metadata). Its different modules In its current version, the application consists of three modules: - a ‘search’ module for references (metadata) which offers two search modes: one based on data types and another that is multi-criteria. - a password-protected ‘management’ module for entering and updating references and attaching resource files. - an ‘administration’ module that permits configuration of the tool, management of all the references in existing catalogs, import and export of references in XML format, and the customization of interfaces. Architecture of the application Accès libre Recherche consultation Export référence Téléchargement Navigateur web scripts PHP SGBD Service web Apache Accès authentifié gestion des références MDweb Administration SGBD-R : Système de gestion de bases de données relationnel (PostgreSQL, MySQL) Import/Export Xml Gestion catalogue Paramétrage outil Navigateur web Desertification unit (IRD) 04/12/2006 3 User Manual - Management MDweb version 1.3 Concept of roles and associated functionalities By design, MDweb is a multi-user application which necessitates the definition of clearly distinct roles for the use of its different functionalities. Each user is assigned an account to which a role is given by the administrator. This limits the user’s access to only those modules that correspond to the application tasks that have been assigned to him. Five roles are distinguishable: - The administrator is the super-user. He can access all modules for managing the catalogs, users and the tool’s configuration. - The validator is an expert responsible for validating the references’ contents. He thus becomes the guarantor of the quality of the references and data attached to the catalogs. To fulfil this role, this type of user will have access to all the references of a catalog irrespective of whether they were created by him or not. - The cataloger describes the data. This role is most logically assigned to the producer of the data to be referenced. He is the most suitable person for describing the contents and characteristics of the data that he himself has produced. This type of user will have access to modules that allow the entry, updating and management of his own references. - The final user has access to the catalog search-and-access module. Two cases can arise: if the user authenticates himself as a privileged user, he will obtain the rights to use the private-access module. If not, i.e., if he is an unauthenticated user, he will have rights only to a public search-and-access module. 4 04/12/2006 Desertification unit (IRD) MDweb version 1.3 User Manual - Management - The standardizer is the organization or individual from the coordinating organization who defines the structure of the metadata used to reference data. He ensures the consistency in catalogs when several copies of MDweb are being used in an overall distributed sharing system within one organization or programme. This document’s purpose This document is a manual for the user in his MDweb role as cataloger, validator or administrator. It lists in detail the essential concepts and procedures necessary to use MDweb. Who is it meant for? This document is meant for users who are not computer experts. Explanations are provided whenever it is necessary to understand concepts specific to the tool for its use. Desertification unit (IRD) 04/12/2006 5 User Manual - Management 6 MDweb version 1.3 04/12/2006 Desertification unit (IRD) Guide to managing references MDweb version 1.3 User Manual - Management Contents for the Guide to managing references BEFORE WE BEGIN.................................................................................... 9 OBTAINING A USER ACCOUNT........................................................................... 9 ACCESSING THE MANAGEMENT MODULE ............................................................... 9 THE MANAGEMENT MODULE AND ITS STRUCTURE ................................................... 10 MANAGING YOUR USER ACCOUNT .................................................................... 11 SOME ESSENTIAL CONCEPTS .................................................................. 12 ADDING A NEW REFERENCE TO A CATALOG MENU > CREATE ................. 17 1 – CREATING A METADATA RECORD ................................................................ 17 2 – ENTERING INFORMATION INTO THE METADATA RECORD ...................................... 22 3 – MODIFYING A METADATA RECORD’S PROPERTIES .............................................. 33 4 – MODIFYING AN EXISTING METADATA RECORD ................................................. 39 5 – VALIDATING A METADATA RECORD FOR PUBLICATION ......................................... 40 IMPORTING A REFERENCE, IMAGE OR FILE MENU > IMPORT ................. 42 1 – IMPORTING METADATA RECORDS ................................................................ 42 2 – ATTACHING DATA FILES TO A METADATA RECORD ............................................. 45 3 – ATTACHING A THUMBNAIL TO A METADATA RECORD ........................................... 47 MANAGING YOUR CONTACTS, PREDEFINED VALUES AND KEYWORDS MENU > PREFERENCES ..................................................................................... 49 1 – ADDING, MODIFYING, DELETING A CONTACT................................................... 50 2 – ADDING, MODIFYING, DELETING A SET OF PREDEFINED VALUES ............................. 52 3 – ADDING, MODIFYING, DELETING A KEYWORD .................................................. 54 8 04/12/2006 Desertification unit (IRD) MDweb version 1.3 User Manual - Management Before we begin... This part of the user manual is meant for a user having a cataloger’s or validator’s role (see ‘Concept of roles and associated functionalities’ in this document’s introduction). These two types of users can access the references-management module of MDweb. Since this access is available only to authenticated users, you will have to request the organization running MDweb – via its administrator – to provide you with a user account and to assign a role to you. Obtaining a user account You can obtain a user account with password by filing in the online registration form whose link is in the menu on the left on the home page: Register. When you submit the registration form, a confirmation e-mail will be sent to your e-mail address. Subsequently, the administrator will validate your registration by assigning you a role. As soon as he does so, you will receive an e-mail with your log-in name and password. Accessing the management module Use your log-in name and password to access the management module from the Catalog Management, Sign in section on the home page. Desertification unit (IRD) 04/12/2006 9 User Manual - Management MDweb version 1.3 The management module and its structure The management module provides access to a number of sub-modules and commands that allow you to add, modify and import references (metadata records). It also allows you to view references that are private, i.e., those not accessible from the public-search module. Finally, you can manage your user account, contacts (personal contacts directory, used for synchronizing the contacts section of the standard) and predefined values by resource type (default values for data-entry forms). All these features are accessible from the menu on the home page of the management module. 10 04/12/2006 Desertification unit (IRD) MDweb version 1.3 User Manual - Management Managing your user account Go to Menu > Preferences > My account. You will be able to modify all the properties of your account except the role assigned to you by the administrator. You may want to change your password to one of your choosing. In addition, you can, if you like, also change the language as well as the default catalog. The default catalog is assigned to you by the administrator and is your working catalog. It will be displayed by default when you will add metadata records. Note: The MDweb colour is no longer customizable. Irrespective of the colour you choose, the colour of MDweb pages will not change. This option will be removed from this screen in the next MDweb version. Desertification unit (IRD) 04/12/2006 11 User Manual - Management MDweb version 1.3 Some essential concepts Concept of template or metadata profile A template, or adaptation, is a document or schema (in the sense of a data structure) that specifies the implementation options of a standard for a particular purpose. In essence, a template does not contradict the standard to which it refers and does not introduce, in principle, new concepts. Rather, it describes the standard or a sub-set of it so that it can be implemented and used in a particular context. However, items that do not exist in the standard (extended items) can be included in it. These description items will complement the standard and will be useful in the specific context for which the template is going to be used. In addition, a template of a standard allows an international standard to be adapted culturally or linguistically for a particular national or regional context. Cœur du standard gabarit standard A community can thus define templates for particular types of data sets. For example, a template for matrix or ‘raster’ data sets will retain only those items specific to this data type. A template can also manage certain specifics or rules that an organization may want to apply on metadata items. A template, for example, could specify which items are mandatory and which are optional in a metadata record. MDweb includes 8 templates as standard. They correspond to 8 data types: • • 12 Types of data collections: o o Geodatabase Relational database o Digital map Types of data sets: o Paper map o o o Vector theme Raster theme – image Technical report – presentation o Excel spreadsheet – Database table 04/12/2006 Desertification unit (IRD) MDweb version 1.3 User Manual - Management Concept of resource In principle, metadata standards, the international standard in particular, apply to digital data but they can also be applied to analogue documents such as maps, plans, aerial photographs, etc. In such a case, the documentation of the data and its cataloging always reference the actual document. Moreover, data sets of this type usually include a clearly identifiable collection of documents. On the other hand, for digital data, the definition of what is data, or a data set, is more difficult and often depends on the institutional or technological context of the organization that produced the data. In general, digital data can be broken up into a hierarchy, as shown in figure 4 [where is this figure?], going from data attribute to entity type to data set to, finally, data collection. This perspective of data can be more simply described with the general term ‘resource’. It covers all the concepts associated with the data hierarchy shown. Collection de données Cartes d'occupation des terres de Oued Mird:Collection de données 1..1 1..* Jeu de de données carte d'occupation des terres de 1990 Oued Mird:Jeu de données 1..1 0..* Type Entité couche classes d'occupation: Type d'Entité 1..1 0..* Type Attribut % recouvrement ligneux:Type Attribut To illustrate this concept, we have chosen as example the land use maps of a territory, in this case that of Oued Mird (Morocco). This resource, of type ‘digital map’, can be broken up into the hierarchy of resources mentioned above in a perspective of UML formalism. If we consider the highest level, we can speak of a data collection. This is represented here by the collection of maps on the same theme but produced during different observation periods, those for land use in the 1990s, those for land use in the 2000 decade, etc. At the data set level, we will consider just one item from this collection, for example, the land use map of the 1990s. The next lower level, entity type, will correspond to all the thematic layers that make up the land use map of the 1990s. In our example, we have selected the ‘polygon’ layer of land-use classes. Other layers, such as the village layer, can be part of the map. Finally, the most basic level, or attribute type, is Desertification unit (IRD) 04/12/2006 13 User Manual - Management MDweb version 1.3 the set of properties of the ‘polygon’ layer. An example of this attribute type is given by the attribute ‘%age of ligneous cover’. The levels handled by MDweb are limited to: data collections data sets Definitions Data collection: A collection of distinct data sets connected to each common characteristics such as their mode of acquisition or processing images), their spatial extent, the type of their contents, for example, a data synonymous with a data collection. This denomination is used in MDweb for types: ‘digital map’, ‘geodatabase’ and ‘relational database’. other by (satellite series is the data Data set: Set of related data, unmistakeably identifiable as connected to each other by common characteristics such as their mode of acquisition or processing, their spatial extent, etc. A data set can be considered as a small set of data or a sub-set of it. This denomination is used in MDweb for the data types: ‘paper map’, ‘vector theme’, ‘raster theme – image’, ‘technical report – presentation’, and ‘Excel spreadsheet – database table’. 14 04/12/2006 Desertification unit (IRD) MDweb version 1.3 User Manual - Management Hierarchy between data collections and data sets MDweb establishes a hierarchy between data types using the concept of parent and child templates (see Concept of template or metadata profile). In the standard version, this is the hierarchy: Concept of metadata records or references In this document, the concept of the metadata record and of the reference are used in the same way. They both apply to the same object. A metadata record or reference is defined as a set of metadata items filled in by a user to describe a data collection or data set or, more generally, a resource. The concept of a metadata record relates to the structure and nature of the metadata items that it consists of, with these items originating from the ISO 19115 standard. The concept of a reference additionally relates to a perspective of metadata as an item of a data catalog managed by MDweb. Desertification unit (IRD) 04/12/2006 15 User Manual - Management MDweb version 1.3 Concept of data-entry levels of a metadata record The data-entry level relates to the number of items (and their characteristics) used for describing a resource. It corresponds to different levels of metadata usage. In fact, the information required to describe a resource depends on the purpose of the metadata usage. For example, for purposes of searching and locating resources, information that is less detailed and less complete will suffice as compared to for documentation purposes, which will need greater detail and completeness because resources will need to be distributed and transferred. Thus, for cataloging of resources, which is the basis of searches for them, simplified metadata could be sufficient. These different contexts or of levels of metadata usage can lead to the definition of several metadata-detail levels. The international standard defines two levels of details or conformity. The first conformity level or ‘basic’ level corresponds to the purposes of resource cataloging. For this, it proposes a set of mandatory items or ‘metadata core profile’ that consists of items necessary to identify the resource and to provide a summary of its contents. It can only be used for cataloging services and for metadata services designed for locating resources. A second conformity level or ‘complete’ level includes metadata items necessary to fully document a resource. This conformity level defines metadata items necessary to identify, evaluate, extract, use and manage geographic resources. On the basis of the international standard’s definitions, we have identified three levels of detail in the templates for the ROSELT metadata: 9 a basic level, 9 an extended level, 9 a complete level. The basic level is based on the minimum metadata items specified in the standard. The extended level is based on the basic level and additionally includes those metadata items that would allow the exchange and transfer of the resource and the accurate description of the resource’s origins (source data and processes used). This latter requirement is essential for the reuse of a resource for scientific purposes. For data types offered in the standard MDweb version, the extended and the complete levels are one and the same. 16 04/12/2006 Desertification unit (IRD) MDweb version 1.3 User Manual - Management Adding a new reference to a catalog Menu > Create This section shows you how to add or modify a metadata record for different resource types to be referenced. It also provides details on how to synchronize metadata records (contact information) with the personal MDweb directory, synchronize predefined values, and attach data files and thumbnails. Adding a new reference to an MDweb catalog is a two-stage process: • Creating a metadata record in a catalog • Filling in information describing the referenced resource Auxiliary operations, such as modifying a record’s properties, the synchronization of contact information and predefined values, need not necessarily be executed when a new reference is added to the catalog; they can be run independently later. 1 – Creating a metadata record Depending on the type of metadata record you want to create, use the Menu > Create > Data collection or Menu > Create > Data set command. For Data collection, there are three types of resources that can be referenced in the standard MDweb version: • Relational database • Geographic database • Digital map For Data set, the following resource types can be referenced in the standard MDweb version: • Paper map • Vector theme • Raster theme or satellite image • Spreadsheet (Excel) – Database table • Technical report – presentation Note: Procedures for creating a reference of either of the two types are identical. We will describe here the procedure to create a metadata record for a Data set resource type. Desertification unit (IRD) 04/12/2006 17 User Manual - Management MDweb version 1.3 Description of the procedure for creating a record 1 – Go to Menu > Create > Data set. A form will be displayed for you to fill in. 2 – Choosing the title of the record: Enter a title in the corresponding field. This title need not necessarily be the title of the resource you are referencing; it is the title of reference within MDweb. The length of the title is limited to 80 characters. 3 – Choosing the catalog: If more than one catalog exists in your application, you will have to select the catalog in which your record will be stored. The drop-down list will allow you to choose the catalog. 4 – Selecting the data type: You have to select the data type of the resource you are referencing. This is an important field; on the data type depends which form is displayed for you to fill in. In the standard version of MDweb, 8 data types are available. In this example, we will create a record to describe a ‘vector theme’ data type. 18 04/12/2006 Desertification unit (IRD) MDweb version 1.3 User Manual - Management 5 – Selecting a data-entry level: A drop-down list will allow you to choose the level of detail you want to enter for your record. By default, the level is set to Basic. This level includes only those items essential for publishing a reference (for more details on the level of detail, see Some essential concepts at the beginning of this part of the user manual). 6 – Using an existing record to pre-fill the new record: Finally, you can, if you like, create your record with information already copied from another record of the same data type. Click on the Yes radio button and a list will appear (see next screen shot). You can select one of the records from the list to copy information from. When the record is created, all the contents of this source record will be copied to the new record. Desertification unit (IRD) 04/12/2006 19 User Manual - Management MDweb version 1.3 7 – Validate by clicking Submit. The new metadata record will be created in the specified catalog. The first stage in the addition of a reference is now complete. Now the record will have to be filled-in and then validated so that it can be published and become accessible. a) ‘General information on your metadata record’ page Once you click Submit on the form for creating a metadata record, a page will appear with the title: General information on your metadata record. In this section, we will explore this page in detail, which: • lists the record’s properties, • allows synchronization of contacts and predefined values, • provides access to information-entry forms, • allows the attachment of data files, • allows the attachment of thumbnails. Also covered will be the operations you can initiate from this page. The screen shot on the next page gives you an overview of the information available on this page and how it is organized. We can distinguish 5 components of this page which are, from left to right and top to bottom: 20 • The frame on the left, which provides access to the record’s informationentry forms • The frame on the top, which holds the management module’s menu bar • The central frame consists of three boxes: o One box for the record’s properties o One box for attaching data files o One box for attaching one record to another 04/12/2006 Desertification unit (IRD) MDweb version 1.3 User Manual - Management Management module’s menu bar Box for attaching one record to another Box for attaching data files to the record Access to entry-forms broadly according to the ISO standard Desertification unit (IRD) Box displaying the record’s properties divided 04/12/2006 metadata 21 MDweb version 1.3 User Manual - Management 2 – Entering information into the metadata record The resource in the metadata record is described by filling in forms that are made up of fields from the ISO 19115 standard. There is a different form for each data type, i.e., one that consists of description fields chosen for the particular data type. a) Choosing the data-entry level By default, your metadata record’s data-entry level is the one you specified when it was created. If you want to change to a different entry level (Basic, Extended, Complete), select it in the Data-entry level drop-down list and validate by clicking on the Change button on the right of the list in your record’s properties box on the ‘General information’ page. (For more information on data-entry levels, see Some essential concepts section at the beginning of this part of the user manual.) b) Structure of the data-entry forms Each form corresponds to a section of the standard. For example, for the ‘vector theme’ data type and the basic data-entry level, three sections are offered: • The section for the identification of the data set • The section for the spatial representation of the data set • The section for the system of spatial reference At the Extended data-entry level, two additional forms will be accessible, corresponding to two more sections of the standard: • The section for the quality of the data set • The section for the distribution of the data set The sections Identification of the data set, Quality of the data set and Distribution of the data set are common to all data types available in the standard version of MDweb. For additional information on the ISO 19115 sections, refer to the ISO 19115 document: Geographic information – metadata ISO TC/211. You can download it from Management utilities > Presentation and reference documentation > FDIS-19115.pdf. 22 04/12/2006 Desertification unit (IRD) User Manual - Management MDweb version 1.3 c) Accessing the forms To start entering information in a record, access the forms by clicking on the links in the frame on the left. Desertification unit (IRD) 04/12/2006 23 MDweb version 1.3 User Manual - Management d) Data-entry environment The screen-shot below shows the data-entry environment. The frame on the left allows you to return to the General information page by clicking on the title of the record. You can go to entry forms of the other sections or, if you have arrived here for modifying a reference, return to the list of filtered records from which you chose this record to be modified. The central frame (in grey) displays the form. The form is organised in different sections with their titles in bold. The form’s fields are of several types. They are identified by an orange label, corresponding to items of the ISO 19115 standard. By clicking on the field label, you can access a glossary of the standard’s items. 24 04/12/2006 Desertification unit (IRD) User Manual - Management MDweb version 1.3 e) Different field types and their properties Different field types To make it easier for you to enter information and to improve consistency of the information entered, the forms consist of three types of fields: • text fields for free text entry. The format and the length of the entered character string will be verified when the form is submitted. • drop-down lists whose items are taken from the standard. • Fields with assisted entry. These fields include date fields whose icon the opens a calendar, keyword fields with icon that opens a thesaurus, or the fields for specifying geographic extents icon that opens a cartographic interface. The next section explains these using the fields in greater detail. Properties Independent of its type, each field in the form has two properties that are set when the data-entry mask is defined. • The number of times several values for the presence of a + . Click minus icon - to reduce it occurs in the form, i.e., the possibility of entering field. The multi-occurrence of a field is shown by the the + to obtain another field of the same time. Use the the number of fields. • Whether the field is mandatory or not. If it is, a red asterisk * appears beside the field and you have to compulsorily fill it in before submitting the form. Desertification unit (IRD) 04/12/2006 25 MDweb version 1.3 User Manual - Management f) Assisted-entry fields Entering a date Date-entry fields should be in either YYYY or YYYY-MM-DD formats. To simplify the entering of dates and avoid formatting errors, the date fields are linked to a calendar that opens in a pop-up window when you click the icon: You can select the month and year using the calendar’s corresponding drop-down lists. The form closes when you click on the day and the selected date is sent to the date field. In our example, the date sent is 2006-02-14. Note: If you only want to enter a year, you have to type it manually in the YYYY format. Entering a keyword Entering text in the keyword fields can be done in one of two ways: • By using the auto-complete feature of MDweb, if the keyword is already in the list of keywords stored in MDweb. If not, it will be added to the list. • By calling up the pop-up thesaurus which will open a keyword dictionary (not hierarchized) or a thesaurus. By default, the thesaurus that will open in MDweb is the Global Master Change Directory (CGMD) of NASA. Example of text entry using the auto-complete feature. 26 04/12/2006 Desertification unit (IRD) User Manual - Management MDweb version 1.3 In the keyword field, type the first few letters of the keyword that you have chosen for your data set. Below the field, a list of corresponding key words will appear. If you click on any of them, it will be inserted into the keyword field. Example of text entry using the pop-up thesaurus . Click on the icon and a pop-up window will open. You will be able to choose a word from the list of keywords in the thesaurus. Click on one of the words in the list and it will be sent to the corresponding keyword field. Desertification unit (IRD) 04/12/2006 27 MDweb version 1.3 User Manual - Management You can also use the existing thesaurus (1). To do so, load it in the pop-up by selecting the Earth Sciences – GCMD thesaurus in the drop-down list (2). 2. 3. 1. You can browse the thesaurus using the Domain and Theme drop-down lists. For choosing a word, click on it (3). It will be sent to the keyword field in the form. Entering the geographic extent Concept of the geographic extents of data sets For a spatially localized data set (vector theme, satellite image, map), the geographic extent is the spatial extent of the data. For example, if we are referencing the map of French départements1, the spatial extent to specify will be the national boundaries of France. For a data sets that is not localized (report, relational database, spreadsheet, etc.), the geographic extent is the spatial extent to which the data relates. For example, if we want to reference a report on the integrated management of the Thau lake’s watershed, the spatial extent to be entered would be the Thau lake’s watershed. The geographic extent that you want to specify for your data set, or the bounding box, requires the entry of either the four East, West, North, South corners in decimal geographical coordinates or of the toponym. The geographic extent is essential for indexing your data set. It will be used during searches by location (Where? criteria) for your data set. 1 A département is a French administrative region, analogous to a state or county in other countries. 28 04/12/2006 Desertification unit (IRD) User Manual - Management MDweb version 1.3 Click on the icon and a pop-up window will open. A cartographic interface will display the active layers of the spatial reference base installed with your copy of MDweb. (The reference base is specific to each MDweb application.) Two features can be used to help enter the geographic extent: • The selection of an object (polygon, polyline or point) on the active layer and sending it to the form’s field. • The definition of a bounding box using the mouse and sending it to the form’s field. We provide here two examples of using the cartographic interface for entering the geographic extent of a data set. Desertification unit (IRD) 04/12/2006 29 MDweb version 1.3 User Manual - Management Example using an existing geographic object In this first example, the user has an existing data set with the Gironde département as geographic extent. His geographic reference base contains an entity that is the outline of the Gironde département in the Départements layer. Use the information tool . It displays the label of the geometry on which the cursor is hovering. It also allows the transfer of the coordinates of the geometry to be sent to the form. Click the mouse button with the cursor hovering over the geometry, and the East, West, North and South coordinates will be inserted into the fields in decimal degrees and the toponym of the geometry will be copied to the corresponding field. 30 04/12/2006 Desertification unit (IRD) User Manual - Management MDweb version 1.3 Example using a bounding box In this second example, we assume that the user has a data set with a geographic extent that encompasses several départements. His geographic reference base does not have an entity corresponding exactly to the geographic extent of his data set. In such a case, the bounding box tool allows the user to draw a rectangle corresponding approximately to his data set’s extent. When he lets go of the mouse button, the coordinates of the rectangle that he has drawn are sent to the form. The toponym is generated automatically by the concatenation of the four coordinates. Desertification unit (IRD) 04/12/2006 31 MDweb version 1.3 User Manual - Management g) Submitting a form Before the information entered into a form can be saved during creation or modification of a record, you have to ensure that all mandatory fields, those marked with a red asterisk *, are filled in. (Remember that each form corresponds to one section of the standard) When you click the Submit button, the contents of the obligatory fields are checked and all the fields are checked for conformity with the respective field types. If any check fails, a dialogue box informs you of the problem. You can then correct the field in question and re-submit the form. When you go from one form to the other without explicitly submitting the information you have filled in, MDweb will do it automatically and inform you with a dialogue box. 32 04/12/2006 Desertification unit (IRD) User Manual - Management MDweb version 1.3 3 – Modifying a metadata record’s properties The properties box on the ‘General information on your metadata record’ page display the properties of the record and allows you to modify some of them. Except the data type, the modification date, the name of the user who created the record, last update and the data-entry status, all other properties can be modified in an interactive manner. In this section, we briefly cover all the properties that can be modified. a) Title If you like, you can modify the title of the record. The title can be a maximum of 80 characters long. To do so, modify the text in the Title of the record field and click the icon to save the new title. b) Catalog If you want to transfer the record to another local catalog, select it from the drop-down list of the Catalog field. Then click the icon to save your catalog selection. c) Data-entry level By default, the data-entry level of your metadata record is that specified when the record was created. If you want to change the data-entry level to a higher level, select the level you want (Basic, Extended, Complete) from the Dataentry level drop-down list and validate your choice by clicking the Change button on the right side of the list. (For additional details on data-entry levels, see the ‘Some essential concepts’ at the beginning of this part of the user manual.) Note: If you modify the data-entry level, certain sections of the standard may disappear (or appear) in the frame on the left to reflect the new level. Desertification unit (IRD) 04/12/2006 33 MDweb version 1.3 User Manual - Management d) Publication status The publication status of a record corresponds to its accessibility during searches for references by the final user. Two statuses are possible: • Unvalidated, i.e., not published, shown by the • Validated, i.e., published, shown by the icon icon The modification of a record’s publication status is allowed if you have the rights to do so, i.e., if the administrator assigned you a validator’s role. Of course, the administrator can himself change this status. Click on the flag icon to toggle the publication status. With the record in the unvalidated state, the flag will appear red ; in the validated state it will be green . e) Confidentiality status The confidentiality status determines who can access a validated reference. Two statuses are possible: • The confidential status signifies that the record will only be accessible to authenticated MDweb users. • 34 The non-confidential status signifies that the record will be accessible to anyone using the public search module. 04/12/2006 Desertification unit (IRD) User Manual - Management MDweb version 1.3 Click on the lock icon to toggle the confidentiality status. When set to confidential, the lock will be locked open ; when set to non-confidential, the lock will be displayed as . f) Synchronizing default values To simplify and automatize the entry of information on the data being referenced, two synchronization mechanisms are provided in MDweb. The first concerns the synchronization of default values depending on data type. The purpose of this synchronization is to allow, during the creation of a record or before its validation, the automatic filling in of some ‘technical’ fields, i.e., fields corresponding to the items of the standard for which specific technical knowledge is required. For this, when a user account is added, a set of predefined values is made available to him. He can modify them by going to Menu > Preferences > Manage values. These operations will be covered in section 5 of this part of the user manual. To synchronize the default values into your record, the predefined set of default values is available in the drop-down list. Click on the icon to insert the values into your record. On the left of the drop-down list will be shown the date of synchronization of the values and the name of the values set inserted into the record. Note: The actual values inserted into the record will not be visible or accessible now; they are only accessible when consulting the record. They are not shown in the information-entry forms for reasons of simplicity. Desertification unit (IRD) 04/12/2006 35 MDweb version 1.3 User Manual - Management g) Synchronizing the contact fields For the same reasons as for the synchronization of default values, the feature for the synchronization of the contact information of the standard allows the user to create a contact set in MDweb and to use it when creating or modifying a record. The synchronization of the contact information can be done independently for the three sections of the standard used in our forms: • The section Identification of metadata • The section Identification of the data set • The section Distribution of the data set The Menu > Preferences > Manage contacts command allows the user to created and modify his contact set. To synchronize the contact information in your record with the contact set defined earlier for each section, you can select a set from the drop-down list and synchronize into your record by clicking the corresponding icon. On the left of the drop-down list will be displayed the date of the synchronization of the contact information and the name of the contact set inserted into the record. Note: The actual values inserted into the record will not be visible or accessible now; they are only accessible when consulting the record. They are not shown in the information-entry forms for reasons of simplicity. h) Attaching a thumbnail image As contemplated in the ISO 19115 standard, it is possible to attach a thumbnail image of the referenced data to the record. The last item in the properties box allows the user to do so. This operation also fills in the corresponding item in the standard and stores the image on the hard drive of the MDweb server. A thumbnail can also be 36 04/12/2006 Desertification unit (IRD) User Manual - Management MDweb version 1.3 attached to an existing record using the Menu > Import > Attach thumbnails command. This command allows attachment of more than one file. Description of the procedure to attach a thumbnail 1 – Click on the icon to open the thumbnail attachment form. 2 – Selecting the file to attach: The form allows you to select an image file (jpeg, gif or png) containing the thumbnail of the metadata record that you want to import. Fill in the path and name of the file (or Browse to it) and the description field (optional) and Submit. The thumbnail will be attached to the new record. 3 – Validation: The name of the file will be shown in the properties box. i) Attaching data One or more data files can be attached to the metadata record from the Attach resource files to the record box. Currently, this box allows the user to load the files (max. 4) that he wants to attach to the record and compresses them into a zip archive. The loaded files are compressed on the fly in zip format and stored in the ressource folder of MDweb on the web server with the identifier of the record to which the data is attached. Desertification unit (IRD) 04/12/2006 37 MDweb version 1.3 User Manual - Management Description of procedure 1 – Loading the files to be attached: In the Attach resource files to the record box, a form allows you to load the data files from your local drive to the web server. You can load a maximum of 4 files. To be able to specify multiple file names, use the +1 button to increase the number of filename fields. Use the minus -1 button to reduce the number of files. 2 – Attaching and zip compression: Fill in the path and name of the files (or Browse to them) and click Attach. 3 – Verifying the operation: Depending on the size of the attached files, it may take some minutes for all the files to be compressed and stored. Once that is done, a box will appear on the page and display the names and sizes of the compressed files as well as the size of the zip archive and its creation date. Note: The total size of the files to be attached should not be bigger than your server’s storage capacity and should be suitable for the available bandwidth so that the operation does not exceed the timeout of your PHP module. If it does, the attachment operation will fail. 38 04/12/2006 Desertification unit (IRD) User Manual - Management MDweb version 1.3 4 – Modifying an existing metadata record The same page and operations described in the previous section (3- Modifying a metadata record’s properties) are used to modify an existing reference. Here we will show you how to search for a record and arrive at its general information page. Description of the procedure to modify an existing record 1 – Go to Menu > Modify. You can search for a record to modify using three filtering criteria: - the catalog containing the record - the data type - the record’s owner (if you are validator or administrator) 2 – List of records: When you submit your criteria, the list of records that meet said criteria appears. You can see the main properties and modify some of them, notably the confidentiality and publication statuses. The icon allows you to delete a record. Note: If you do not specify any filtering criteria, all of your records will be displayed. Desertification unit (IRD) 04/12/2006 39 MDweb version 1.3 User Manual - Management Click the icon to go to the metadata record’s general information page. See sections 2- Entering information into the metadata record and 3- Modifying a metadata record’s properties for details on modifying the record. 5 – Validating a metadata record for publication Validation is necessary for the publication of your metadata record and of its accessibility from the search module. It is something that should be done according to a procedure that has been discussed and consensually arrived at within the organization or team that is managing the catalog. Even though easy enough to execute – all one has to do is to toggle the red flag to green – a conscientious validation procedure should be put in place by the one or more persons having validators’ roles and who have been assigned this responsibility by the organization’s management. The validation process should consider both the thematic and spatial descriptors that are used for indexation (in particular the keyword fields and the spatial extent) as well as the fields describing the contents of the data referenced (title, summary, for example). Accuracy of the information on the structural characteristics (type of representation, format, etc.) should also be checked. For these reasons, the validation should be entrusted to one or more persons who have thematic expertise on the referenced data and a good knowledge of geographic information specifications in general. Only with this background can a validator correctly validate the contents of the data and its technical specifications. The validation operation itself can be executed from the record’s general information page (red flag > green flag ). The publication status of a record can only be changed if you have the rights to do so, i.e., if the administrator has assigned a validator’s role to you. Of course, the administrator himself can change this status too. 40 04/12/2006 Desertification unit (IRD) User Manual - Management MDweb version 1.3 Click on the flag icon to toggle the publication status. With the record in the unvalidated state, the flag will appear red Desertification unit (IRD) ; in the validated state it will be green 04/12/2006 . 41 MDweb version 1.3 User Manual - Management Importing a reference, image or file Menu > Import 1 – Importing metadata records One or more records can be imported using the Menu > Import > Import XML command. Description of the procedure 1 – Go to Menu > Import > Import XML. A form will appear where you can type in the path and the name of the XML file you want to import. If you want to import more than one file (maximum 20) use the +1 and -1 buttons to increase/decrease the number of files. Either type in the full path and name of the each file or use the Browse button to navigate to the files on your local drive. 2 – Submit and the XML files will be loaded. A summary table will show the details of the XML files and will also allow you to select the MDweb catalog into which each record will be imported. In addition, you also have the opportunity to import a thumbnail and/or a zip archive to be attached to each record. (The Menu > Import > Attach thumbnails and Menu > Import > Attach data commands allow these operations to be executed for records that already exist in the catalogs.) If you want do so now, you can: 42 04/12/2006 Desertification unit (IRD) User Manual - Management MDweb version 1.3 3 – Attaching a thumbnail: Click on the icon and a form will appear that will allow you to load a jpeg, gif or png file with the thumbnail image of the metadata record that you are importing. Fill in the path and name of the file (or Browse to it) and the description field (optional) and Submit. The thumbnail will be attached to the new record. 4 –Attaching a zip archive: Click on the icon and a form will appear that will allow you to load a compressed zip file containing the files of the resource described by the metadata record that you are importing. Fill in the path and name of the file (or Browse to it) and Submit. The zip archive will be attached to the new record. 5 – Validating the XML files to be imported: Once you have optionally attached the thumbnails and data files to the records to be imported, click Submit. The format of the XML files will be verified. 6 – Launching the XML import: Click on the Import button and the records will be inserted into the chosen catalog and the thumbnails and/or data files attached. 7 – Once the import operation is over, the screen above will be displayed. If you want, you can import more files by clicking the Import more XML records button. Desertification unit (IRD) 04/12/2006 43 MDweb version 1.3 User Manual - Management If a record already exists: If, while importing a file, MDweb finds that a record in a catalog is identical to the one being imported (same name and update date), you will have three options: a) Skip: The file will not be imported. b) Update the record: The existing record will be updated by items from the record being imported. c) Create another record: The conflict will be ignored and a new record will be created in the catalog. 44 04/12/2006 Desertification unit (IRD) User Manual - Management MDweb version 1.3 2 – Attaching data files to a metadata record Attaching one or more data files to a metadata record is done using the Menu > Import > Attach data command. You can access all your records from all the catalogs and attach data files to any of them. Once you select the files, MDweb will compress them on the fly into the zip format and store the zip archive in the ressource folder of MDweb on your web server with the identifier of the record to which it is attached. Description of the procedure 1 – Go to Menu > Import > Attach data. Three criteria allow you to filter the metadata records so that you can easily find the ones you want to use. These criteria are: - Origin of the record: Imported XML or from a local catalog, - Catalog which contains the record, - Resource type that the record describes (vector, raster, digital map, etc.). Click Submit to view the list of matching records. 2 – Selecting the metadata record: From the information displayed in the records list, you can easily see which records already have zip archives attached and the dates they were attached (Zip archive column). To attach one or more files, click on the Ok button in the Attach column. Caution: Attaching a data file to a metadata record automatically erases any archive already attached to that record. 3 – Selecting the files to attach: A new page displays a form that allows you to select files on your local drive for compression and storage on the web server. If you want to Desertification unit (IRD) 04/12/2006 45 MDweb version 1.3 User Manual - Management attach more than one file (maximum 4) use the +1 and -1 buttons to increase/decrease the number of files. 4 – Compression of the data and attachment: Once you specify the file paths and names, click Submit. 5 – Verifying the operation: Depending on the size of the attached files, it may take some minutes for all the files to be compressed and stored. Once that is done, you will return to the records list you started out from. A message will inform you that the files have been saved in the zip archive. If you wish, you can now re-run the operation for other records. Note: The total size of the files to be attached should not be bigger than your server’s storage capacity (consult your system administrator, if necessary) and should be suitable for the available bandwidth so that the operation does not exceed the timeout of your PHP module. If it does, the attachment operation will fail. 46 04/12/2006 Desertification unit (IRD) User Manual - Management MDweb version 1.3 3 – Attaching a thumbnail to a metadata record One or more thumbnails can be attached to a metadata record by the use of the Menu > Import > Attach thumbnails command. You can access all your records from all the catalogs and attach a jpeg, gif or png file to each of them. The image file’s size should not exceed 50 KB. MDweb will store the thumbnail files in the images folder of MDweb on your web server with the identifier of the record to which it is attached. Description of the procedure 1 – Go to Menu > Import > Attach thumbnails. Three criteria allow you to filter the metadata records so that you can easily find the ones you want to use. These criteria are: - Origin of the record: Imported XML or from a local catalog, - Catalog which contains the record, - Resource type that the record describes (vector, raster, digital map, etc.). Click Submit to view the list of matching records. 2 – Selecting the metadata record: From the information displayed in the records list, you can easily see whether a record already has a thumbnail attached and the date it was attached. To attach a thumbnail image, click on the Ok button in the Attach column. Caution: Attaching an image file to a metadata record automatically erases any thumbnail image already attached to that record. 3 – Selecting the file to attach: A new page displays a form that allows you to select an image file (jpeg, gif or png) for storage on the web server. Fill in the path and name Desertification unit (IRD) 04/12/2006 47 MDweb version 1.3 User Manual - Management of the file (or Browse to it) and the description field (optional) and Submit. The thumbnail will be attached to the record. 48 04/12/2006 Desertification unit (IRD) User Manual - Management MDweb version 1.3 Managing your contacts, predefined values and keywords Menu > Preferences Managing contacts: some concepts To minimize the work of entering information into metadata records, in particular information of a repetitive nature, MDweb allows you to specify information that you can load into different records easily. Information of this type includes contact information, representing the ISO 19115 standard’s contact information (CI_Contact class). In fact, contact information is used in several sections of the standard, the main ones being Metadata identification, Data set identification and Data set distribution. Thus, MDweb allows you to create contact sets independent of metadata records and to manage these sets. When a new metadata record is created, you can use one of your contacts that already exists to fill in the appropriate fields in the record. You can choose a different contact set for each section. Managing predefined values: some concepts For the same reasons as above, i.e., to minimize the work of entering information into metadata records, MDweb allows you to predefine values of some ‘technical’ items. Moreover, users who are not specialists in the standard will not get stumped when confronted by these fields. These values are also those that are unlikely to change from record to record, such as the metadata language (mdLang item) and the metadata character set (mdChar item). The user also has the possibility of creating entry masks to impose a certain format on fields in the form. A set of predefined values is created for each user when the user account is created. The user can modify or delete it, and can be checked and corrected by the administrator, who has access to the predefined values of all users. In the standard version of MDweb, the predefined-value sets cover very few items (less than 10). Certain template properties can, however, be modified to increase this number. Managing keywords: some concepts When a word is entered into a keyword field in the entry forms and if it is not already part of thesaurus, MDweb provides the option of adding it to its keywords database. This feature is an alternative to the use of the GCMD thesaurus to control keyword entry in the current version. These ‘free’ keywords are stored and linked to the user who entered them. The Managing your keywords section shows how you can manage them, i.e., to correct a spelling, for example, or to delete one or more of them. The MDweb administrator has, of course, access to all keywords of all users and can modify them to ensure consistency amongst them. Desertification unit (IRD) 04/12/2006 49 MDweb version 1.3 User Manual - Management 1 – Adding, modifying, deleting a contact Manage your contact sets using the Menu > Preferences > Managing contacts command. Description of the procedure to add or modify a contact 1 – Go to Menu > Preferences > Managing contacts > Add. The form that appears will allow you to add a contact. You will be required to enter a name for the contact. 2 – Creating a new contact from an existing one: The form allows you to create a new contact from an existing one. If you choose to do so, you will be asked to choose the existing contact from a list of existing contacts. 3. Choosing the default contact: The form allows you to define the new contact as the default contact for one or more sections of the standard. 50 04/12/2006 Desertification unit (IRD) User Manual - Management MDweb version 1.3 When a contact is made the default contact for a section, it will be offered by default in the properties box of your metadata record. You could thus synchronize your record without having to choose the contact from a list. In the example above, we have set our new contact as the default contact for the three sections used for records’ information entry. 4 – Entering the contact information for a contact: After entering a name for the contact and optionally setting it as the default contact, click Submit to arrive at this entry form: Fill in the fields of this form. Some fields are mandatory and are so marked *. When you submit the form, its contents will be saved. 5 – Modifying an existing contact: You can modify the information of an existing contact by using the Menu > Preferences > Managing contacts > Modify command. A list of your existing contacts will be displayed. You can Modify a contact by clicking on its icon. You can also delete a contact by using the icon, but only if it is not set as the default for any of the three sections of the standard. And, finally, from this list, you can change the contacts you want to use thereafter as the default for any of the sections. Desertification unit (IRD) 04/12/2006 51 MDweb version 1.3 User Manual - Management Note: In the current MDweb version, if a contact is modified or updated, the changed information is not reflected to those records with which this contact had been synchronized. To update the concerned records, you will have to re-synchronize them all with the updated contact. 2 – Adding, modifying, deleting a set of predefined values Manage your sets of predefined values using the Menu > Preferences > Manage values command. Description of the procedure to add or modify predefined values 1 – Go to Menu > Preferences > Manage values > Add. The form that appears will allow you to add a set of predefined values. You have to first enter a name for the set of predefined values and then choose the data type to which it will apply. 2 – Creating a new set from an existing one: The form allows you to create a new set of values from an existing one. If you choose to do so, you will be asked to choose a set from a list of existing sets of values of the same data type. 3. Choosing the default contact: The form allows you to define the new set of values as the default set. 52 04/12/2006 Desertification unit (IRD) User Manual - Management MDweb version 1.3 When a set is made the default set, it will be offered by default in the properties box of your metadata record. You could thus synchronize your record without having to choose a set of values from a list. 4 – Entering the predefined values: After entering the name and optionally making the set the default set, click on the Submit button to get to the entry screen. The entry screen consists of three tabs corresponding to sections of the standard; you have to enter your values here. The entry or modification of values and their validation is done tab by tab. Before going from one tab to another after entering/modifying values, you have to click the Submit button to save the changes. 5 – Modifying an existing set of values: You can modify values of an existing set by using the Menu > Preferences > Manage values > Modify command. The list of your sets of values will be displayed. You can Modify a set by clicking on its icon. You can also delete a set by using the icon, but only if it is not set as a default. And, finally, from this list, you can change the default setting for each set. Desertification unit (IRD) 04/12/2006 53 MDweb version 1.3 User Manual - Management Note: The sets of predefined values are unlikely to change very often. However, in case you want to reference data with different sets of predefined values (different language or character set, for example), you can create several sets of values for the same data type. 3 – Adding, modifying, deleting a keyword Keywords can be managed using the Menu > Preferences > Manage keywords command. 54 04/12/2006 Desertification unit (IRD) MDweb version 1.3 User Manual - Management The keywords manager Alphabetic filter Scroll bar Frame for adding a keyword Desertification unit (IRD) Frame for modifying keywords 04/12/2006 55 MDweb version 1.3 User Manual - Management Description of the procedure to add and modify a keyword 1 – Go to Menu > Preferences > Manage keywords. The keywords manager screen will appear. 2 – Adding a term: In the frame on the left, you can enter a new term. You have to assign the new term to a category using the drop-down list. Click Submit to add the term to your keywords list. 2 – Modifying or deleting a term: Your list of keywords is displayed on the right. If you have many keywords, you can filter them using the alphabetic index. To Modify a keyword, click on the icon. To delete one, click on the icon. 56 04/12/2006 Desertification unit (IRD) MDweb version 1.3 User Manual - Management 3 – Modifying a term: A term is modified in the same way as a new one is added. Click on the Modify button for the modified keyword to be saved. Note: In the current MDweb version, the modification of a term is not automatically transmitted to the records already using the term as a keyword. Desertification unit (IRD) 04/12/2006 57 User Manual - Management MDweb version 1.3 6. Advanced operations Concept of hierarchy between different resource types. Linking metadata records one to another. Desertification unit (IRD) 04/12/2006 58 MDweb version 1.3 Desertification unit (IRD) User Manual - Management 04/12/2006 59 MDweb version 1.3 60 User Manual - Management 04/12/2006 Desertification unit (IRD) Contacts IRD / Desertification unit (US 166) www.desertification.fr 500, rue Jean François Breton, 34093 Montpellier Cedex 05, France TEL: +33 (0)4 67 54 87 02 J.C Desconnets [email protected] B. Granouillac [email protected] MDweb project site: www.mdweb-project.org Online demo: www.mdweb-project.org/demo/ MDweb version 1.3 Manuel de l’utilisateur - Aide à l’administration Figures: P.12 Core of the standard Template Standard P.13 Data collection Land-use maps for Oued Mird: Data collection Data set Land-use maps for 1990 for Oued Mird: Data set Entity type Land-use class: Entity type Attribute type Percentage of ligneous cover: Attribute type P.15 Data Collection Data set Relational database Spreadsheet – Table Geodatabase Digital map Vector Theme Image – Raster grid Spreadsheet – Table Vector Theme Image – Raster grid Spreadsheet – Table Paper map Technical report Desertification unit (IRD) 04/12/2006 62