1
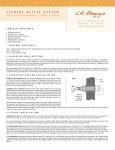
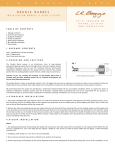
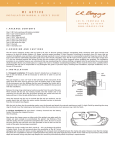
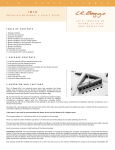
L
.
R
.
B
MICRO
INSTALLATION
A
G
G
S
P
I
C
K
U
P
S
E.Q.
MANUAL
&
USER'S
GUIDE
4 8 3
N .
F R O N T A G E
N I P O M O ,
C A
R D .
9 3 4 4 4
W W W . L R B A G G S . C O M
1.PACK AGE
CONTENTS
One (1) Micro EQ preamp
One (1) Ribbon Transducer
One (1) prewired strapjack assembly
One (1) faceplate
Three (3) screws
Two (2) self-stick wire clips
2.OVERVIE W
AND
C AUTIONS
We recommend that this system be installed by a professional dealer/installer. We do not provide installation advice or support for home or
hobbyist installations. Installers: please read the instructions carefully before proceeding. We will not be responsible for any damage to the guitar
or personal injury resulting from installation, improper installation, use or misuse of the product.
Use of this product requires that permanent modifications be made to the instrument; namely, drilling the side of the guitar to accommodate the
preamp/faceplate, drilling the tailblock for the strapjack, and drilling the saddle slot for the Ribbon Transducer. Verify that this system will work
with your guitar and that everything will fit properly in their intended locations before making any modifications!
The Micro EQ preamp is designed for use with the L.R. Baggs Ribbon Transducer pickups. We do not warranty or guarantee performance of the
Micro EQ system when used with another type of pickup.
3.P R EAMP
I NSTALL ATI O N
1. The Micro EQ preamp does not have a pickup input jack. It will be necessary to solder the output of the pickup to the circuit board near the
output harness. Solder the braid ground wire to the rectangular pad; the signal wire inside the coax is soldered into the hole next to it. Now peel
the white backing from the copper shielding tape on the circuit board and fold it securely around the pickup input connection.
2. Locate a suitable place on the side of the guitar for the control plate -- the area on either side of the upper waist is usually a good choice. Once
you have located a spot, cover that general area with masking tape. The straight long side of the plate should be parallel with the back of the
guitar. Before finalizing the location, be sure to inspect the inside of the guitar for any obstructions (bracing, lining, etc).
3. Replace the plate on the guitar in your desired spot and mark the center of all the holes and remove the plate. There are two options you can
choose from to drill the holes for the face plate:
A) Drill the small screw holes 1/8" and the knob holes 3/8" using a brad point or Forstner bit
or
B) Drill 1/16" pilot holes for all of the holes to be drilled, then, using a step drill bit, enlarge the screw holes to 1/8" and the knob holes to 3/8".
4. We strongly recommend that two cross-grained reinforcing braces be added to the inside of any solid wood guitar. Scrap spruce or mahogany
approximately 3/16" thick by 3/8" wide will do nicely. These braces should be glued inside the guitar on either side of the preamp and should
extend across the entire side.
5. Prepare the guitar for the strapjack by drilling a clean 1/2" hole in the tailblock of the guitar using a step drill. It's a good idea to mask off the
area you are drilling to avoid chipping the finish.
6. Fit the control plate to the curvature (if any) of the sides. The plate may be bent to fit any curvature with the fabrication of a simple jig. If the
side has a 1/16" curve over 3", try cutting a 3/8" curve in a 2" x 3" scrap of wood with a bandsaw. Use this jig (with a piece of paper between the
face plate and jig) in a vice to bend the plate. Do not try to bend this plate by hand as this will cause uneven curvature. This step requires some
judgment because the plate ins springy and must be over-bent to set it in the right curvature. It is unlikely that your first attempt will be perfect,
but modifying the jig is the key.
7. Remove the tape on the side of the guitar. Position the preamp on the inside of the guitar with the knobs through the holes. Place the plate on
the outside of the guitar over the preamp and attach the two using the black flathead machine screws provided. This will sandwich the side of the
guitar between the preamp the the plate. Do not over-tighten as this can crack the side.
4.P I CK U P
IN STALL AT IO N
1. For optimum performance of this pickup, the bridge slot must have a clean, flat surface free of any debris or over-spray from the finish. The slot
must be a minimum of .125" (1/8") deep but we suggest a depth of .187" (3/16") to avoid excessive saddle tilt (see figure 4).
fig. 1
2. Installing a .090" pickup in a .120" slot is not recommended.
3. Do not remove the black material that is affixed to the bottom of the pickup.
4. Avoid unnecessary hard bending of the pickup. Repeated removal and
replacement of the pickup during the course of the installation is not advised.
5. Do not use shims under the saddle or pickup as a remedy for string balance
problems or to adjust the action.
6. Failure to secure the loose end of the pickup under the bridge will produce
bizarre audio consequences and eventually ruin the pickup.
fig. 2
7. The quality of sound, output level, balance and feedback resistance are all
determined by how well the pickup mates with the saddle and the bridge.
Uneven or partial contact between the saddle and the pickup will cause a
boomy sound with low output, excessive body sensitivity and poor string
balance.
Installation:
1. Remove the strings from the guitar. If you wish
height exactly, scribe a line along the front edge
extends above the bridge. The line will later be
removing material from the bottom of the saddle
thickness of the pickup (.025" total).
to duplicate the string
of the saddle where it
used as a guide when
to compensate for the
fig. 3
2. Remove the saddle to drill the hole for the pickup. The drill bit needs to be
as large as the saddle slot will allow. Inspect the inside of the guitar and note
the position of the braces in relation to the saddle slot. Drill at either end of
the slot on the side that will enable you to avoid all braces as you penetrate
the top, as shown in figures 1 and 2.
3. Feed the pickup into the slot from inside the guitar with the yellow side up.
Inserting a toothpick or similar object through the hole from the outside is
helpful in finding the location of the hole on the inside of the guitar. Sand the
bottom surface of the saddle on a belt sander until the scribe line (from step
1) lines up with the bridge top. Leave the saddle just a hair tall and finish
sanding the bottom by hand. It is best to do this against a machined flat
surface with fine sand paper. Use a straight edge with a strong light source to
inspect the flatness of your saddle.
Important: The fit of the saddle in the slot is the single most important factor
in this installation. It is crucial that the bottom of the slot and the lower
surface of the saddle be flat to make even contact with the pickup. The saddle
should fit in the slot loose enough to be able to be just pulled out with your
fingertips. If it is too tight or binds at all, this will have a negative effect on the
string balance. Likewise, if the saddle is too loose, it will have a substantial
forward tilt when under string pressure, causing it to make poor contact with
the pickup (see figure 4).
A saddle that fits correctly in the slot will have a slight forward tilt under
string pressure (see figure 3). It is necessary to compensate for this angle by
intentionally sanding a slight tilt in the bottom of the saddle so that when it
leans forward it sits flat on the pickup (see figure 3). The saddle material can
be a key element in curing string balance problems. This pickup responds
most favorably to a rigid saddle material such as bone. Using softer, more
flexible materials may cause the outside strings to be lower in volume than
the other strings.
proper saddle-pickup contact
(saddle lean exaggerated)
fig. 4
improper saddle-pickup contact
(saddle lean exaggerated)
fig. 5
If you are replacing the saddle, prepare the bottom of the new one as
explained above (see step 3). Place it in the slot and scribe the same line on
the front of it like the original saddle. To duplicate the action, lay the old
saddle on the new one, match up the scribe lines, and trace the shape of the
old saddle onto the new one. We recommend either bone or Micarta for your
saddle. Softer materials tend to sound overly boomy.
4. Insert the pickup all the way into the slot, lay the saddle on top of it and
temporarily secure it with a piece of tape. Remove the backing from the
adhesive on the end of the pickup hanging inside the guitar and attach it to
the bridge plate or the underside of the top as shown in figures 5 or 6. Be
careful not to place the adhesive over the bridge pin holes.
5. Choose a location for the wire clip between the pickup and preamp several
inches away from the pickup. If there is a brace that the wire will cross, make a
little slack in the wire so it does not touch the brace. Secure the pickup wire in
the wire clip.
fig. 6
6. Remove the strap ring from the end of the jack. There should still be a star washer and locking nut on the middle of the jack. Put the strapjack
into the pre-drilled 1/2" hole using the nut and star washer as a depth guide. The jack should stick out enough to tighten the strap ring onto the
threaded barrel of the jack. Once the depth is set and the barrel is in the hole, screw the strap ring onto the barrel until the assembly is tight. Use
caution when tightening the strap ring so you don't crack the finish.
7. Plug the connector end of the output harness into the preamp. Using the wire ties provided, fasten the output and pickup wires to the side of
the guitar.
8. Install a 9-volt battery (not included) in the battery clip on the back of the preamp. Be sure to observe the polarity. Make sure that the battery
snaps in firmly, then restring the guitar.
Note: The output jack has a switch built into it to turn the preamp on and off. Do not leave the cord plugged in when not in use. Before plugging
in or unplugging, be sure to turn the volume down on your amp or PA -- this will prevent a potentially damaging transient (pop) from hurting
anything down the line from it.
The output level of the preamp is quite hot and you may find that it can overdrive some amps, effects, etc. If you hear distortion, just turn down
your volume until it goes away. Your guitar may now be plugged into any PA, sound system, stereo, recorder, direct box, effects processor, wireless
transmitter or guitar amplifier.