1
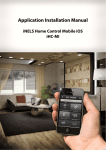
Installation Manual iHC-MIRF
Installation Manual
for the Application iHC-MIRF
Rev.:200214 Page 1 of 14 Installation Manual iHC-MIRF
Contents
1.
2.
3.
4.
Introduction .............................................................................................................................................................. 3
Installing the application on a mobile phone .............................................................................................. 3
Basic settings ............................................................................................................................................................ 4
Control...................................................................................................................................................................... 12
Rev.:200214 Page 2 of 14 Installation Manual iHC-MIRF
1.
Introduction
The applications iHC-MIRF are designed for comfortable control of the RF Control electrical installation using
your mobile telephone. This is an RF Control system accessory, and as a part of the iNELS Smart Home
Solution, its elegance blends in with any modern home. The menu is divided into clearly structured sections
in which the icons indicate individual functions. Here you will also find fast access to your favorite functions.
Thanks to iHC-MIRF (the "application"), you can perfectly control the function of your wireless RF Control
electrical installation. You thus keep complete control over your home lights, appliance switching and
heating, etc.
The application only works with the device eLAN RF-003 or eLAN RF-Wi-003. This element must be used in
your wireless installation.
It is designed for devices with iOS 6.1 and higher.
It is optimized for devices with a display resolution of 800x480
The application language follows the language set in the iOS
Also new is the implemented communication with Axis video cameras, thanks to which you can monitor
what is going on around your home.
It also enables control for multiple users at once (by entering multiple IP addresses).
It does not enable creation of weeklong programming or communicating with temperature actuators.
Downloading
Download the current version (named iHC-MIRF) at the apps store.
https://itunes.apple.com/cz/app/inels-home-control-rf-for/id704493937?mt=8
Installing the application on a device
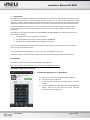
2.
Installing the application on a mobile phone
a) Connect to the Internet using your mobile telephone.
b) Activate the service app store.
c) In the search bar, enter the password "iNELS" and press
"Search".
d) Select the application "iNELS Home Control RF Mobile for
iPhone" from the list and open the dialog box with
information on this application.
Rev.:200214 Page 3 of 14 Installation Manual iHC-MIRF
e)
f)
Click on "Install".
After the application is successfully installed in the phone,
instead of the button "Install", the button "Open" appears.
hjadvf
3.
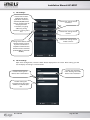
Basic settings
Initial display upon running the application. By tapping "Settings", you open the basic settings menu of the
application.
Basic upper navigation bar of
the telephone
for returning from the function
Tab "Video cameras"
Tab "Scenes"
Tab "Favorites"
The home application
desktop.
After configuring, the basic
"tiles" of the control system
are displayed.
Tab "Settings"
"Help" button
The aim when using the application for controlling the installation is so that after restarting it, it immediately
offers control of the electrical installation. To achieve this with the least amount of presses and so that
everything required would be offered right from the home desktop, you must first set up and configure the
application.
Rev.:200214 Page 4 of 14 Installation Manual iHC-MIRF
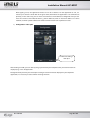
a) Tab "Settings"
Selection for the basic
configuration of the
application and device,
eLAN-RF(Wi)-003 device
settings. Configuration of
the project of the
installation, assigning
addresses, pairing
actuators, assigning icons,
etc..
Selection for setting the tab
"Favorites"
Selection for setting the tab
"Scenes"
Selection for setting the tab
"Video cameras"
Setting the IP address of the
communication interface,
by means of which the
telephone communicates
with the wireless elements
(eLAN-RF-003, or eLAN-RFWI-003).
b) Tab "IP settings"
Upon initial configuration, select the "Add" button displayed on the screen. After clicking, you will
see the display "IP Settings" as shown below.
Field for the selectable
name "Naming" the eLAN
device in the installation
Field for entering the IP
address of the eLAN device
Field for setting the
communication port of the
eLAN device: default port
80
Rev.:200214 Page 5 of 14 Installation Manual iHC-MIRF
After tapping "Save", the application moves to a list of set devices. For the application to run, it is
necessary to select the check box of the given eLAN, with which the application is to communicate
primarily. In this device list, you can have several devices and IP addresses configured. Here you can
have one and the same eLAN, but with e.g. two IP addresses, with an internal IP address in a home
network, and with a public address for remote communication from anywhere on earth.
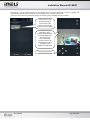
c)
Configuration - floor plan
Button for adding a
floor plan
After clicking on "Add", you can add any image you like from your telephone that you later want to have
displayed, e.g. in the TV application.
Though the floor plan that you select upon creating the room will not be displayed in your telephone
application, it is necessary to select it when creating the room.
Rev.:200214 Page 6 of 14 Installation Manual iHC-MIRF
Rooms
Window for entering the
room name
Window for entering
the room icon
Window for adding
a previously saved
floor plan
Window for
displaying the
selected floor plan
Button for saving
the selected room
You can name the rooms as you like by entering your chosen name into the "Room name" field.
You can select the type of room with regard to the used icon.
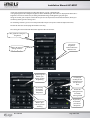
d) Devices - adding RF actuators
Here you enter any name
of the device
Window for writing in the
address of the added
actuator (e.g. 001a2b)
Window for selecting
the type of actuator
Window for selecting
the type of device
Button for saving the
added device
To add a device that you want to control via the application, just fill in the four fields based on the image and
save.
Then after clicking on the device icon, the added device will be displayed.
If you want to remove the device, press and hold your finger over the device until it disappears. If you only
want to rename the device or perform any other modification, tap on it shortly to open its settings.
Rev.:200214 Page 7 of 14 Installation Manual iHC-MIRF
Added device that can
be modified
After adding rooms and all devices, you must still assign the devices to the rooms in which they are found.
This is not a condition, and you can add devices even in every room. You can do this by clicking on the
"Assign" button, where you select the room into which you want to assign the device. Then, by tapping the
confirmation buttons, you select which elements will be in the given room.
Selection of the
room for adding
the device
Confirmation
button upon
selecting the
device
Next button for
continuing and
consequent
i
If you have selected a device for a desired room, continue by pressing the "Next" button in the lower right
corner for displaying the confirmation screens. Here you confirm the added device by pressing "Save". Do the
same to change added devices, only you change the status of the confirmation buttons when selecting the
device.
Rev.:200214 Page 8 of 14 Installation Manual iHC-MIRF
e) Tab "Favorites"
After pressing, the application desktop appears with the buttons "Next" and "Add". After pressing
"Add", a list of configured devices opens, which you select by checking the option. Then after
pressing "Save", it is assigned automatically to the list in the "Favorites" tab.
List of all devices
configured in
eLAN.
Check box for
selecting the
device in the
"Favorites" tab
Button for saving
the "Favorites"
tab configuration
f)
Tab "Scenes"
The list of scenes is used to activate the user's predefined scenes, such as all off, all on, all blinds up,
all blinds down, etc.
Upon initial configuration, select the "Add" button displayed on the screen. After clicking, you will
see the display as shown below.
Field for basic naming of
configured scene
Rev.:200214 Check box for selecting
from all devices for
configuration of the scene
Page 9 of 14 Installation Manual iHC-MIRF
Defined name of the
configured scene
Scroll bar of selected
devices in the created
scene.
Primarily, the device is
selected at the middle
position of the scroll bar under the scene name.
Setting the action for a
dimming actuator. Here you
can set the required
brightness, which is set on
the actuator if a scene is
brought up.
¨
g) Tab "Video cameras"
If you wish to have video cameras closer "at hand", you can add video cameras to the quick display Tiles.
In the iHC application, you can also view the current image (stream) from home security Axis IP video
cameras. Upon initial configuration, select the "Add" button displayed on the screen. After clicking,
you will see the display with Axis IC camera settings as shown below.
The application allows full screen video camera display, and bringing up the PTZ panel for its control
is performed by pressing and holding the relevant video camera view.
Field for displaying the IP
address of the installed
video camera
Field indicating the
selectable "name" of the IP
video camera
Field for entering the log-in
name to the added IP video
camera.
Video camera type field,
here with the selection field
from the Axis manufacturer
default menu
Field for entering the log-in
password to the added IP
video camera.
Rev.:200214 Page 10 of 14 Installation Manual iHC-MIRF
After filling in all the required fields on the display, press Save. The application saves the settings and
automatically adds the video camera to the list of devices in the "Video cameras" tab.
If you want to permanently delete the camera from the list, press and hold the given list item.
"Video cameras" tab
with defined video
cameras and video
camera view in the tile
position on the desktop.
Clicked tile of the
defined IP video camera
in the iHC application.
The video image
(stream) from the
security camera now
automatically reverses
according to the
telephone's approved
PTZ control elements
Rev.:200214 Page 11 of 14 Installation Manual iHC-MIRF
4.
Control
a) Tiles
The main display in the iHC application is formed of so-called "Tiles". This is a general overview of
elements, where you can see at first glance according to the icons, either backlit or not, the active
icons in the intelligent electrical installation.
Based on the previous step "configuration and settings", the initial display shows the application's
default tiles, so that they are assigned according to elements in rooms (such as " Kitchen ") or in
groups (as seen on the display e.g. "Lights or All").
If you wish to go from displaying Tiles to displaying List, just click on the name of the tile, e.g. Lights,
and a pop-up menu appears in the given tile ("rooms").
Basic overview of
configured tiles in the
Applications menu.
Tile "Kitchen"
Tiles - if the configuration is
set up with more than six
tiles on the default display,
moving between them is
performed by using your
finger to drag the display
left or right
Button for configuring the
system and settings from
the application
Tiles for individual devices
in rooms or a group
Arrows for switching
between rooms or groups
Status bar of monitored
rooms or groups, - by using
your finger to drag and
scroll left or right, you can
switch between individual
groups, rooms, and thus see
individual devices located
within each.
Actuator output status
indicator, or device
switched on - brightness at
50%. To bring up the
brightness setting, the
slider must be held on the
actuator tile
Symbol, icon assigned to
the given actuator, device
Actuator output status
indicator, or device
switched on, off
By dragging your finger on
the display, you can scroll
up and down through tiles
Rev.:200214 Page 12 of 14 Installation Manual iHC-MIRF
If you press and hold your finger on individual devices, e.g. for a dimmed light,
a bar graph appears for setting the brightness of the dimmed light. Two icons are displayed underneath it brightness increase and decrease, enabling smooth dimming and brightening of your light.
Using the arrows, you can open a menu where you can set the precise time of these functions, which you
confirm by clicking on the settings icon.
For switching actuators, you can run delayed on/off, and you can tap the arrows to adjust their times.
The blinds actuators can be programmed the same way.
The setting of one time for both directions applies to blinds actuators.
Bar graph for setting the
brightness
Set time of
brightness
increase/decrease
Minutes and
Buttons for the time
setting menu for
h i
f
i
By pressing the
button, you
initiate gradual
brightening
For delayed
on/off, you can
extend the time
for up to one
hour
By pressing
the button,
you initiate
delayed on
Button for
setting the time
of smooth
turning on/off
By pressing
the button,
you initiate
delayed on
By pressing the
button, you
initiate gradual
dimming
Rev.:200214 Page 13 of 14 Installation Manual iHC-MIRF
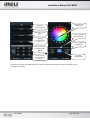
Setting the light
RGB color
Button for
lowering blinds
Button for raising
blinds
Setting the light
RGB brightness
Stopping
movement of the
blinds
Switching off/on
the RGB light
Setting duration
for dragging the
blinds
Currently
selected color
"Circus" mode automatic color
change
By pressing and holding the RGB actuator, you will see the menu displayed for setting color, brightness and
the brightening mode.
Rev.:200214 Page 14 of 14