Transcript
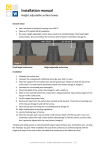
Each box includes:
Step 3. Continued
Rails (6)
Ranch Rail
a) Install Rails clips: Insert supplied rail clips (Fig. 6)
into both ends of the rails before inserting rails into
posts. If trimming rails is required, drill a 1⁄2" hole
at cut ends to accept the rail clip. (Fig. 6)
b) Install Rails: Insert bottom rail into routed post,
left side first, as far as it will go, then slide right
side of rail into the other post, fully engaging the
clip. Work your way up, repeating this step, until all
rails in each section are installed.
Note: Line, End and
Corner Posts and
Post Caps
sold separately
Fig. 6 Install Rail Clips
2"
2-Rail Design
If a 2-Rail design is desired, cut the top 16" from the
posts (2" above middle hole), keeping the caps for
reuse. Follow steps a and b from above.
62"
Step 4. Reinforce gate posts
•
•
•
•
Install hinges and latch prior to setting posts and
pouring concrete. Reinforce hinge and latch posts
with two 6' pieces of #4 rebar (Fig. 7).
Tape off ends of rails that will be joining the
gate posts – this will prevent concrete from
filling rails. Set posts and pour concrete as per
Step 2.
Pour concrete into posts, tamping occasionally to
remove air pockets.
Follow the gate installation instructions included
with your gate kit.
#4 Rebar
and Concrete
Latch Post
Gate
Gate Hinge Post
Fig. 7 Reinforced Gate Posts
Step 5. Attach the post caps
•
Glue caps onto the posts with a UV-rated, “hot glue”
classified PVC adhesive.
Step 6. Clean up
•
Clean off cement splatter with mild detergent and
non-abrasive cloth, then hose down with clean water.
Installation Guide –For more information please contact www.kroyexpress.com or call 1-877-386-5769.
Page 4