1
sat-nms Network Management System Software
Installation Manual
Version 1.3 / 2009-04-21
© Copyright
SatService Gesellschaft für Kommunikatiosnsysteme mbH
Hardstrasse 9
D-78256 Steisslingen
www.satnms.com
www.satservciegmbh.de
Tel +49 7738 97003
Fax +49 7738 97005
SatService
Gesellschaft für Kommunikationssysteme mbH
Table Of Contents
Table Of Contents ................................................................................................................................. 1
Introduction .......................................................................................................................................... 2
Installation ............................................................................................................................................ 2
Installation / cabling ........................................................................................................................... 2
Network configuration ....................................................................................................................... 2
Selecting the LAN subnet address ................................................................................................... 3
Setting the IP address of the NMS server ......................................................................................... 3
Setting the gateways ....................................................................................................................... 4
Client installation ............................................................................................................................... 4
Network link .................................................................................................................................. 5
Java runtime environment installation .............................................................................................. 5
Installing the program ..................................................................................................................... 5
Command Line Arguments .............................................................................................................. 6
Troubleshooting .............................................................................................................................. 6
Adding serial interfaces ..................................................................................................................... 6
Modem installation ............................................................................................................................ 7
Modems for inbound connections ..................................................................................................... 7
Modems for outbound connections ................................................................................................... 8
Mixed communication technologies ................................................................................................. 8
System administration ........................................................................................................................... 9
Checking your mail .......................................................................................................................... 10
NMS password list ........................................................................................................................... 10
Data Backup & Restore ................................................................................................................... 11
Clock synchronization ...................................................................................................................... 12
Manually setting the clock ............................................................................................................. 12
Syncing the clock with a NTP server ............................................................................................. 13
Crash Recovery .................................................................................................................................. 13
Near Hot Backup configuration ............................................................................................................ 15
Maintaining a redundant NMS .......................................................................................................... 16
Redundant NMS Data Backup .......................................................................................................... 17
Configuring a redundant NMS .......................................................................................................... 17
Appendix ............................................................................................................................................ 18
A short introduction to 'vi' ................................................................................................................. 18
Common commands ...................................................................................................................... 19
'vi' in the MS Windows telnet client ............................................................................................... 20
(C) 2013, SatService GmbH
www.satnms.com
NMS-IM-1307 Page 1/21
SatService
Gesellschaft für Kommunikationssysteme mbH
Introduction
This document describes the installation and configuration of a sat-nms network management system. It complements the online
help / user manual of the software. While the user manual primarily explains the usage of the software's user interface including
aspects of configuration and setup, the installation manual contains the following topics:
The chapter 'Installation' describes how to install the NMS server hardware and how to do a first setup of the NMS. In also
includes a description how to install the user interface software on a MS Windows based computer.
Chapter 'Administration' deals with administrative tasks like making backups or maintaining the NMS user list.
There is a chapter 'Crash Recovery' on it's own which explains step by step how to re-install operating system and application
software on a NMS computer where the hard disk had to be replaced.
Version 1.3 / 2009-04-21
Installation
The sat-nms NMS server comes with a ready installed Linux operating system and with the NMS application software installed
and pre-configured. However, some aspects of the software must be configured to integrate NMS system into the environment
where it gets installed:
1. Installation / cabling
As a first step you have to mount the NMS computer into the rack and connect it to the network and to the modems used to
access the VLCs.
2. Network configuration
The NMS will work on it's own, without any network link installed. To use features like operating the NMS from another
computer or remote assistance from SatService GmbH, you will however have to connect the NMS to a local area
network. This manual describes how to do the necessary network parameter settings at the NMS computer.
3. Client installation
The NMS is able to be remotely operated from any MS Windows or Linux based computer. A network link to the NMS
server (permanent or dial-up) is the only prerequisite. A chapter of this manual instructs how to install the user interface
software on a client computer.
Installation / cabling
when installing the NMS server hardware, you are advised to do the steps in the following order:
1.
2.
3.
4.
5.
Mount the NMS into the rack.
Connect monitor, keyboard and mouse.
Connect the network.
Connect the serial interfaces to the modems.
Finally connect the mains power.
Network configuration
The complete NMS system consisting of the server, the VLCs and a couple of client computers is a connected by a TCP/IP
network. If this network shall be integrated into an existing company LAN, it is necessary to plan the IP addressing and routing
carefully.
(C) 2013, SatService GmbH
www.satnms.com
NMS-IM-1307 Page 2/21
SatService
Gesellschaft für Kommunikationssysteme mbH
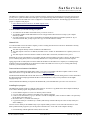
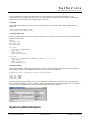
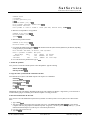
The network plan above shows a typical network topology for a NMS system. The NMS server and two MS Windows based
workplace computers communicates via LAN. The subnet 192.168.10.0/24 used here is an example, other addresses are
possible.
The NMS server acts as a router to the VLCs which are accessed through non-permanent modem links. The first VLC occupies a
16 addresses wide subnet 192.168.100.0/28 with 192.168.100.1 being the VLC itself VLC0002 owns the next 16
addresses and so on. This addressing scheme is hard coded in the NMS/VLC software and can't be changed by the customer.
Each VLC again acts as a router, giving the NMS access to some devices which may be connected to the VLCs Ethernet port.
The example above shows a ACT NetPerformer connected to the Ethernet port of VLC0002.
A router as 192.168.10.1 connects the LAN to SatService GmbH for remote assistance.
Selecting the LAN subnet address
The NMS server can be configured to work within almost any subnet. To avoid interference with addresses which are predefined
by the NMS software, some 192.168.???.0/24 subnets should not be used. They are:
192.168.100.0/24
192.168.254.0/24
192.168.1.0/24
192.168.2.0/24
to
and
These subnets are used by VLCs which are controlled via telephone / modem lines. You never
should use these subnets for your LAN.
These subnets are used by SatService GmbH. If you want to make use of the SatService remote
assistance via ISDN, you should not use these subnets for your LAN.
Setting the IP address of the NMS server
The NMS server computer comes with it's IP address set to 192.168.1.100. To change this address to your needs, two steps
are to be done (for redundant NMS systems consisting of two server computers, see chapter 'Redundant NMS systems'.
1. Change the /etc/network/interfaces file
The IP address of the computer's Ethernet interface is defined in the file /etc/network/interfaces. You need root privileges to
change this definition. Below there is an example for this file:
# /etc/network/interfaces -- configuration file for ifup(8), ifdown(8)
# The loopback interface
auto lo
iface lo inet loopback
# The first network card - this entry was created during the Debian installation
# (network, broadcast and gateway are optional)
auto eth0
iface eth0 inet static
address 192.168.1.100
(C) 2013, SatService GmbH
www.satnms.com
NMS-IM-1307 Page 3/21
SatService
Gesellschaft für Kommunikationssysteme mbH
netmask 255.255.255.0
network 192.168.1.0
broadcast 192.168.1.255
gateway 192.168.1.1
To change the computer's network address, login as 'root', and edit the file /etc/network/interfaces. The lines you need to
change are below the iface eth0 inet static line. The 'gateway' is the default gateway were packets are routed to which do
not match another rule:
If there is no router in the network at all, remove this line.
If the router which is used for remote assistance by SatService GmbH is the only router in the LAN, specify it's address
here.
The there are multiple routers in the network, specify the address of that one which shall act as 'default', e.g. for Internet
access.
After you edited the changes, save the file.
2. Change the /etc/hosts file
The file /etc/hosts specifies names for a couple of network addresses. To make services like the SMB (Microsoft Network)
server run properly, it is required that the computer's name (which is satnms) can be resolved to the address of it's Ethernet
interface. Logged on as 'root', edit the file /etc/hosts and search for the file defining the 'satnms' IP address. Change the address
to the new value.
To activate the changes, save the file and reboot the computer (shell command 'reboot'). The computer will boot up with it's new
network settings.
Setting the gateways
To make a computer in the LAN which acts as a workplace (client) to the NMS server access a VLC, the client computer must
have set the NMS server as a gateway for the IP address of the VLC. The simplest way do do this, is to set the address of the
NMS server as the default gateway at the client computer.
If there is another router / gateway in the network the client computer uses, e.g. to access the company internal WAN, the NMS
server gets configured to use this router as default gateway. As this routes any data traffic from the client computer to the router
through the NMS computer, this should be done with a limited number of client computers only.
A the client computer the gateway address is set in the TCP/IP settings dialog which is available from the system settings window.
At the NMS server the gateway is defined in the configuration file '/etc/network/interfaces'. as described in chapter 'Setting the IP
address of the NMS server.
Client installation
(C) 2013, SatService GmbH
www.satnms.com
NMS-IM-1307 Page 4/21
SatService
Gesellschaft für Kommunikationssysteme mbH
The NMS server computer is able to work as a stand alone system, operated at it's keyboard & screen. In many cases however,
you may want to operate the NMS from another place. Any computer running a Microsoft Windows operating system that has a
network connection to the NMS server can be configured to to run the NMS user interface. The following pages describe how to
prepare a computer for this purpose.
1. Ensure that the network connection to the NMS computer works.
2. Install the Java Runtime Environment on the client computer.
3. Install the NMS client program on the client computer.
To do the installation, you need the following prerequisites:
1. You must know the IP address of the NMS server you want to connect to.
2. You should be familiar with the MS Windows network setup procedures unless the network setup of your computer
matches by default.
3. You need an Internet access in order to download the Java Runtime Environment from Sun Microsystems Inc. (If you
cannot download the JRE, you may request a free copy on CD from SatService GmbH).
Network link
To control the NMS server from another computer, you need a working TCP/IP network connection to this machine. Generally
there are three basic scenarios for this:
The client computer directly connects via Ethernet to the NMS Server
The client computer connects to one Ethernet, the NMS server to another one. Both Ethernets are coupled by some sort of
router.
The client computer connects via modem or ISDN as a RAS client to the network, the NMS server is part of.
Beside this, the network setup suitable for your computer depends of the actual settings you need to connect to the other services
you are commonly using. Hence, there is no universally valid rule how to setup the network options for the client computer.
Typing 'ping aaa.bbb.ccc.ddd' (where aaa.bbb.ccc.ddd is the IP address of the NMS server computer) at a command prompt
should list 4 echoes from the NMS server, then the network link to the NMS server works. If you are working with a dial up
connection, you must start this connection before.
Java runtime environment installation
You need the Java Runtime Environment (JRE), Version 1.4 or newer to be installed on the client computer in order to run the
NMS client software. You get the JRE from Sun / JavaSoft at 'http://java.sun.com/'.
Download the JRE installation file from the URL shown above and install the JRE by double clicking to the icon of the downloaded
file. When asked by the install program include the files for internationalization ('i18n'), even if you intend to use the English
language settings only.
After the installation has finished, you may delete the installation file you downloaded unless you want to save it for later use.
Installing the program
The NMS client program consists of a single file called 'satnms.jar'. You have to copy this file to the client computer and finally to
create a link to start the program. The procedure is as follows:
1. Use the Windows-Explorer to create a new directory called 'c:\satnms'.
2. If you are using a dial up connection to the NMS server, start this connection.
3. Connect a new network drive (e.g. 's:') to the share '\\aaa.bbb.ccc.ddd\public', where aaa.bbb.ccc.ddd is to be replaced by
the IP address of the NMS server.
4. Browse the drive 's:', it contains a file 'satnms.jar'.
5. Copy the file 'satnms.jar' to the directory 'c:\satnms' (with a dial up connection this may take some seconds, satnms.jar is
almost 1 MByte).
You have now the 'satnms.jar' file installed locally on you computer. Finally you have to create a link in the start menu or on the
desktop which starts the program for you. The steps below describe how to create a link on the computer's desktop.
1. Click the desktop with the right mouse button, choose 'New link'.
(C) 2013, SatService GmbH
www.satnms.com
NMS-IM-1307 Page 5/21
SatService
Gesellschaft für Kommunikationssysteme mbH
2. Enter the following properties for this link:
Link name: NMS Client Program
You may replace this name by any other you like.
Command: javaw -cp satnms.jar satnms.gui.NMSApp aaa.bbb.ccc.ddd
Replace aaa.bbb.ccc.ddd by the NMS server's IP address. Pay attention to the case of the letters in
satnms.gui.NMSApp, the command will not work if you use upper/lower case letters other than shown
here.
Working
c:\satnms
Directory: The command will find the satnms.jar file only if you fill in the location of this file here.
3. Choose an icon for the link (The Windows 98 standard icons contain a satellite dish you may want to use).
Additional command line switches are described in chapter Command Line Arguments
Now the installation of the program is finished. You should be able to start the NMS client program by double clicking to the link
you installed. If not, try the trouble shooting steps in the next chapter.
Command Line Arguments
You can add additional command line arguments to the command described in the previous chapter.
option
description
-u [username]
use given username for automatical login
-p [password] use given password for automatical login
-s
suppresses the beeper
-V
enable verbose mode which prints all events to stdout
-v
skip version check at startup
Example
javaw -cp satnms.jar satnms.gui.NMSApp -u admin -p secret -v 192.168.1.1
This starts a client for the NMS at IP address 192.168.1.1 with automatic login as admin with password secret and without version
checking.
Troubleshooting
If the client installation does not work as described, here a summary how to investigate what went wrong:
1. Open a MS-DOS shell window.
2. Type 'java
'. You should see a description of options the java program accepts. If you get an error message instead,
you did not install the JRE program properly.
3. Type 'c:
'
4. Type 'cd \satnms
'. If you get an error message here, you did not create the c:\satnms directory.
5. Type 'ping aaa.bbb.ccc.ddd', where aaa.bbb.ccc.ddd is the IP address of the M&C system. You should see four echoes
from the server, one per second. If the ping command claims something like 'timed out', you network connection to the
M&C system is not properly set up.
6. Finally you can try to start the client program from the command line. Type in the following:
'java -cp satnms.jar satnms.gui.MCFrame aaa.bbb.ccc.ddd
'
Again, replace aaa.bbb.ccc.ddd by the IP address of the M&C system.
If the NMS client principally works, but neither the debug terminal window nor the VLC equipment setup tool can be opened for
any VLC, this might be a problem of TCP/IP routing via multiple gateways. Chapter 'Defining IP addresses and routes' explains
how routing across gateways must be setup to make these functions work.
Adding serial interfaces
With a minimal configuration, the NMS server uses the two standard serial interfaces to connect to telephone modems or ISDN
(C) 2013, SatService GmbH
www.satnms.com
NMS-IM-1307 Page 6/21
SatService
Gesellschaft für Kommunikationssysteme mbH
terminal adapters (one for dial-in, one for dial-out).
Additional serial interfaces can be installed into the NMS server. The NMS server has been prepared to use a PCI serial interface
board to serve additional modem lines. The supported types of serial interface boards are:
Moxa SmartIO C104H (4 ports)
Moxa SmartIO C168H (8 ports)
Moxa C320Turbo/PCI (8 .. 32 ports expandable)
To configure the NMS computer for the usage of an additional serial interface board, do the following steps:
1. At an XTerm window, type the following commands:
su
(password is 'root')
vi /etc/init.d/serial
2. About ten lines from the top of this file, the variable SERIAL_BOARD is defined:
SERIAL_BOARD=0
3. Change this definition to meet the board type you have installed:
0 = no board installed.
1 = Moxa SmartIO C104H installed.
2 = Moxa SmartIO C164H installed.
3 = Moxa C320Turbo/PCI installed.
4. Save the file (
:x
) and reboot the NMS computer.
To use the installed serial interfaces, you also have to configure the ports for the usage with modems for inbound or outbound
traffic. The following chapter gives advice to do this.
Modem installation
The sat-nms software uses modems, ISDN terminal adapters or other 'AT' modem style communication devices to access it's
VLCs. These communication devices are connected to serial interfaces at the NMS server computer. The number modems used
determines the number of online sessions to VLCs which can operated in parallel.
Tee NMS software strictly separates lines used for outbound traffic an such used for inbound traffic. Hence you need at least two
modems: one to connect to VLCs on an operator's request and one listening for calls from VLCs sending a fault report to the
NMS. With this minimal layout, one operator can work on one VLC at a time.
NMS configurations with more modems allow several online connections in parallel. Beside this, configurations using varying
communication network technologies, e.g. to access some VLCs via conventional telephone, other via ISDN, are supported.
The following chapters describe how to configure the NMS server to recognize additional modem lines.
Modems for inbound connections
The modems used for inbound connections are tightly integrated to the Linux operating system running on the NMS server. For
each modem a 'mgetty' daemon process is running in background. 'mgetty' waits for a RING message from the modem, but also
sends an 'AT' initialization command to the modem and checks the reply.
To change the number of inbound modems, three configuration files must be modified or checked. First the '/etc/inittab' file which
launches the 'mgetty' processes, then the '/etc/mgetty/mgetty.conf' configuration file which controls the runtime parameters of all
mgetty processes. Finally, in the file '/home/nms/modems' the modems must be made known to the NMS server software.
'/etc/inittab'
The '/etc/inittab' file controls the behavior of the Linux operating system at startup. It launches a couple of processes which must be
running all the time. The lines which define the mgetty processes for the modem are at the very end of the file:
T0:23:respawn:/sbin/mgetty ttyS0
(C) 2013, SatService GmbH
www.satnms.com
NMS-IM-1307 Page 7/21
SatService
Gesellschaft für Kommunikationssysteme mbH
This line (it's part of the standard inittab file of the NMS computer) defines an mgetty for the ttyS0 interface. Additional mgetty
processes are defined by duplicating this line and adapting the interface name. Please note, that the first two characters in the line
must be a unique label, corresponding with the interface name in some way. Use 'T1' for the 'ttyS1' interface and so on. After
modifying the file (you must be root for this) type 'init q
' at the shell prompt to make the init process re-read the 'inittab' file.
'/etc/mgetty/mgetty.conf'
The file '/etc/mgetty/mgetty.conf' defines the runtime parameters for the mgetty processes. Below an example of an 'mgetty.conf' file
is given:
debug 0
port-owner uucp
port-group uucp
port-mode 0664
port ttyS0
init-chat "" ATQ0E1V1H0 OK
speed 38400
modem-type data
login-prompt @ login:
The file consists of a global definition part (there usually is nothing to change) followed by one section for each mgetty or interface
port respectively. This example defines parameters for the mgetty running a ttyS0. The settings used here are suitable for a standard
analog modem. With an ISDN terminal adapter you might want to use a higher communication speed and a modified modem
initialization string as well. Chapter Mixed communication technologies contains an example for this application.
To add a modem, duplicate the lines starting at 'port ttyS0' to the bottom, change the port name at the copy and modify the
parameters of the new port definition to your needs.
'/home/nms/modems'
The file '/home/nms/modems' tells the NMS server application which modem lines are available for inbound and outbound traffic. It
is read when the NMS server application starts, so you have to stop and start again the server after you changes the file.
# defines the list of modem lines used for ppp connections
#
ttyS0 IN
MODEM
ttyS1 OUT MODEM
The example above shows a '/home/nms/modems' file defining the simplest possible configuration. ttyS0 is used for inbound traffic,
ttyS1 for outbound connections. Both lines are part of the 'MODEM' group. To add a modem to the list, simply duplicate a line of
the list and change the port name accordingly. Unless you configure a setup mixed from analog modems and ISDN adapters, use
the group 'MODEM' for all lines.
Modems for outbound connections
Modems for outbound connections are much easier to configure. They are directly controlled by the NMS service (more exactly
spoken, by a PPP daemon which is invoked by the by the NMS service). The only thing to do is to change the
'/home/nms/modems' file.
# defines the list of modem lines used for ppp connections
#
ttyS0 IN
MODEM
ttyS1 OUT MODEM
To add a modem to the list, simply duplicate the 'OUT' line of the list and change the port name accordingly. Unless you configure a
setup mixed from analog modems and ISDN adapters, use the group 'MODEM' for all lines.
Mixed communication technologies
The sat-nms NMS software is capable of handling connections based on multiple communication technologies in parallel. All
communication media for which 'AT' style modems are available can be used. Actually analog telephone lines, ISDN and GSM are
supported.
You may imagine a network of twenty VLCs, ten of them are connected to conventional telephone lines, the other ten use ISDN
(C) 2013, SatService GmbH
www.satnms.com
NMS-IM-1307 Page 8/21
SatService
Gesellschaft für Kommunikationssysteme mbH
for the communication to the NMS. The NMS provides two analog modems and two ISDN terminal adapters for the
communication to the VLCS (there always must be at least one inbound and one outbound line for each type of communication
media). Below you find examples for the configuration files for this setup:
'/etc/inittab'
The '/etc/inittab' defines mgetty processes for the two inbound lines. They are connected to ttyS0 (analog modem) and ttyS1
(ISDN T/A).
T0:23:respawn:/sbin/mgetty ttyS0
T1:23:respawn:/sbin/mgetty ttyS1
'/etc/mgetty/mgetty.conf'
The file '/etc/mgetty/mgetty.conf' defines the runtime parameters for the two mgetty processes. Line speeds and modem initialization
is different for the two lines.
debug 0
port-owner uucp
port-group uucp
port-mode 0664
port ttyS0
init-chat "" ATQ0E1V1H0 OK
speed 38400
modem-type data
login-prompt @ login:
port ttyS1
init-chat "" ATQ0E1V1H0 OK AT$IMSN=0,\"12345\",\"\",\"\" OK
speed 115200
modem-type data
login-prompt @ login:
'/home/nms/modems'
The '/home/nms/modems' configures the NMS service how to use the modem lines. ttyS0 and ttyS1 are used for inbound traffic,
ttyS11 and ttyS12 (they are on an additional serial interface card) are used for outbound traffic.
# defines the list of modem lines used for ppp connections
#
ttyS0 IN
MODEM
ttyS1 IN
ISDN
ttyS11 OUT MODEM
ttyS12 OUT ISDN
The file also defines that ttyS0 and ttyS11 are part of the 'MODEM' group while ttyS1 and ttyS12 are part of the 'ISDN' group.
Now, at the properties dialog for each VLC, define the modem group which shall be used for this particular VLC. If you request to
connect to the VLC, the NMS software will select the suitable communication line for this VLC.
System administration
(C) 2013, SatService GmbH
www.satnms.com
NMS-IM-1307 Page 9/21
SatService
Gesellschaft für Kommunikationssysteme mbH
The sat-nms NMS computer in fact is a Linux based server, running the NMS process and some other programs in background.
The NMS Linux has been tuned to require as little as possible administration effort. Almost everything you want to do with the
NMS server you do at the NMS user interface.
Anyhow, some administrative tasks should be done at the NMS computer. They are:
Check your mailbox.
The Linux based NMS server provides a local e-mail box where you find messages from the background jobs the computer
does. If a background process detects some failure, it sends a mail to you.
Maintain the NMS user list.
The NMS software uses it's own password protection system. The user / password list for this is contained in a file you have
to edit.
Backup your data.
If you do not backup your data, it will be lost irretrievably if the computer hardware breaks!
Checking your mail
The Linux operating system of NMS server does a lot of jobs in the background. You don't need to care about this. If one of these
background jobs fails, it sends a mail to the 'nms' user. If, for example, you have configured the NMS computer to synchronize it's
clock to a NTP time server in the net, this is done by such a background job. If the clock sync was not successful because the time
server was unreachable, you get informed about this with a mail.
If there is a message for you, the mailbox icon left beside the clock contains a letter. Click to the mailbox symbol and a simple email program starts. If you are familiar with another mail program at your desktop computer, you quickly will be oriented with this
program.
If there is some unread mail in the mailbox when you connect with a telnet client to the NMS server, you get a short note about
new or unread mail when you log in. It is principally possible to read the mail during the telnet session. However, the text based
mail reader (the program is called 'mail') is quite difficult to use. It is recommended to read the system administrator's mail in front
of the NMS computer.
NMS password list
The NMS uses it's own password protection system to prevent the system from accidentally or even deliberately being misused.
The fundamental idea of the password protection system is that each operator has to login with a user name and password to the
NMS to be allowed to change parameters. A 'privilege level' assigned to each operator defines if he may change some sensitive
settings.
Privilege levels
There are two standard privilege levels used by the NMS software:
100
The privilege level 100 is used for normal operators. With this level an operator is permitted to change all equipment
settings but not to modify any configuration parameters.
150
The privilege level 150 gives complete access to all settings in the software. This is the privilege level of the NMS system
administrator.
The privilege level regulates the write permission of the operator to software parameters or device settings. Read-only access is
permitted to every operator, even if he is not logged in.
With a customer designed (a.k.a. 'task oriented') user interface additional privilege levels may defined. In such an application
specific setup it is possible e.g. to give a group of operators the permission to work on the receive equipment only, while other
operators may change the settings of the transmit equipment, too.
(C) 2013, SatService GmbH
www.satnms.com
NMS-IM-1307 Page 10/21
SatService
Gesellschaft für Kommunikationssysteme mbH
Password file
The list of users together with the password and privilege levels is stored in the file '.users' located in the home directory of the
NMS application. Please note the leading dot in the file name, it makes the file hidden in a directory listing. The NMS system
administrator logged in as (Linux) user 'nms' is permitted to modify this file. NMS operators cannot change their passwords, only
the NMS system administrator can do this by modifying the '.users' file.
The NMS comes with a default user called 'anonymous' in the '.users' file. The entry demonstrates the format of the password file:
# sat-nms password file
# name; password; level
anonymous; anonymous; 150
A user entry of the password file consists of three or four fields, separated by semicolons. The first field defines the login name, the
second field the password and the third field defines the privilege level for this user. An optional fourth field defines a (comma
separated) list of VLC groups this user may control. Omitting this field lest the user control all VLC groups. Empty lines and lines
beginning with a dash ('#') are ignored.
Example for a more sophisticated .users file:
admin; topsecret; 150
jack; passwdxxx; 100; DSNG1,DSNG2
joe; passwdyyy; 100; DISTRIB
The user 'admin' has the privilege level 150 (required to configure the NMS) and has access to all VLCs in all groups. User 'jack'
has the standard operator privilegele level (100), he only sees the VLCs in groups DSNG1 and DSNG2. Finally, user 'joe' also
has privilege level 100, but he only sees VLC of the goup DISTRIB.
Data Backup & Restore
The NMS is prepared to do a backup of all individual data stored on the NMS computer either on a regular basis or at an
operator's request. For this purpose, the NMS computer is equipped with a ZIP disk drive.
Manual backup
To do a backup manually, insert a ZIP disk into the drive and select System Administration --> Backup to ZIP from the start
menu. The NMS does the backup and ejects the ZIP disk when the backup has completed. The backup process writes one file
called 'backup.tgz' to the disk, each subsequent backup overwrites the old file on the disk.
Doing the backup manually is the recommended method if you primarily want to backup your configuration files. They need to be
saved only after they have been changed. Once the NMS has been set up, the configuration probably will not be changed for a
longer time. You should do a backup in the following cases:
If you changed the configuration of the NMS setup.
If something with the Linux configuration, e.g. the networking parameters have been modified.
It is also a good idea, to back up the configuration before you start to change the NMS configuration. If the NMS does not
work as expected after the change, you have the chance to restore the state before the change.
If you do manual backups, you should use at least two disks. Use the disks on a rotating basis, you will be able to restore an older
state if you backed up the system with some data already corrupted.
Automatic backup
If you must rely on the event log data collected by the NMS, e.g. if you derive some billing data from the times with a carrier on air,
a daily backup is essential. You may configure the NMS to backup your data every day. To enable this feature, perform the
following steps:
1. Open an XTerm window.
2. Enter 'su' and give the root password ('root') when requested.
3. Open the file /etc/crontab in the editor by typing 'vi /etc/crontab'.
(C) 2013, SatService GmbH
www.satnms.com
NMS-IM-1307 Page 11/21
SatService
Gesellschaft für Kommunikationssysteme mbH
About 15 lines below the top of the file you find an entry looking like this:
# backup all configuration files
#
#30 4
* * *
root
/usr/local/bin/backup-to-floppy
Remove the dash ('#') in front of the '30', this activates the background job. The backup will be done every morning at 4:30 am
(UTC, if the computer's clock is running at UTC). Save the file and leave the editor ( :x ).
Now, at every evening, insert a ZIP disk to the drive. The NMS server automatically will do the backup in the following morning.
By using 7 disks in a rotating way, you get a one week backup.
Data restore
Restoring the data stored with the backup facility is as simple as doing the manual backup. Perform the following steps:
1. Stop the NMS server process. Select System Administration --> Stop NMS service from the start menu for this.
2. Insert the ZIP disk with the backup data to restore.
3. Select System Administration --> Restore from ZIP from the start menu to read the data from the ZIP disk. The
computer ejects the ZIP disk after it has read the data.
4. Re-boot the NMS server by selecting System Administration --> Reboot computer.
The NMS server shuts down and re-boots.
Clock synchronization
The NMS server provides a master clock for all VLCs managed by it. Every time the NMS connects to a VLC, the VLC receives
the actual time from the NMS and tunes the local clock a little bit faster or lower in order to get the clocks of NMS and VLC in
sync. The clock synchronization mechanism used by the NMS never sets the time at the VLC system time with a leap. This would
be fatal for the VLC software which depends on the system time in many aspects.
While the NMS - VLC time synchronization works mostly by itself, the NMS system administrator must take care that the NMS
server's clock always is accurate. As PC clocks tend to be not very accurate, the NMS clock should be checked at least once a
week. Principally there are two methods to correct the clock:
1. Set the clock manually.
2. Read the clock from another computer.
Without doubt, the second method is the more comfortable one. It however requires a NTP (Network Time Protocol) server
providing the accurate time visible for the NMS in the network.
Manually setting the clock
The NMS server runs a daemon called 'clktrimd' which keeps the Linux system clock in tune with the hardware clock chip built in
the computer. Setting the clock means setting time and date of the clock chip. 'clktrimd' then will tune the system clock accordingly.
Depending of the amount of time, the clock chip was set, it takes a few hours or severals days until the system clock is in sync with
the clock chip.
To set the NMS server's clock, you need root privileges. The procedure is as follows:
1. Open an XTerm window
2. Become 'root', type in 'su
' and the root password.
3. Type: 'hwclock --set --date "YYYY-MM-DD HH:MM:SS"
'
4. Close the window.
It is recommended to set the NMS clock to UTC rather than to local time. Specially NMS systems with nodes located in different
time require this as as common standard.
(C) 2013, SatService GmbH
www.satnms.com
NMS-IM-1307 Page 12/21
SatService
Gesellschaft für Kommunikationssysteme mbH
Syncing the clock with a NTP server
The NMS server has been prepared to sync it's clock automatically once a week to a NTP reference in the network. To activate
this option, perform the following steps:
1. Open an XTerm window
2. Become 'root', type in 'su
' and the root password.
3. Type 'vi /usr/local/bin/set-clock-from-ntp-server
One of the first lines of the file shows :
'
NTP_SERVER=""
4. Insert the IP address of the NTP server to poll between the double quotes.
5. Save the file and close the window.
The NMS now will set it's clock chip every Monday at 12:00 from this NTP server. If this fails, a mail is sent to the NMS
operator. If you want to sync the clock at another time or in other intervals, modify the file /etc/crontab to your needs.
Crash Recovery
The NMS comes with a system recovery CD which enables you to re-install the NMS software as well as the underlying Linux
operating system on the NMS computer.
Before you start with the recovery procedure below, ensure that the hardware fault which has broken the NMS system is fixed.
Then the following steps have to be done:
A. Boot the recovery CD
1.
2.
3.
4.
Switch on the NMS computer.
Before the computer tries to boot, insert the recovery CD
When the screen shows 'LILO boot:', hit
.
The Linux rescue system booting now automatically logs you on as 'root'. If you are using a non-American keyboard, you
might use the 'kmap' command to load the appropriate keyboard driver (example kmap de').
B. Partition the hard disk
The next step is to partition the hard disk. Use the 'fdisk' command to delete all existing partitions on the hard disk, then create the
new partitions.
1. Type 'fdisk/dev/hda
' to start 'fdisk'.
2. Type 'p
' to show the partition table of the disk. If there are already any partitions of the disk, delete them by typing 'd
' followed by the partition number. You should start with the higher numbers, if there is more than one partition.
3. Create the first partition. Follow transcript below. Operator entries are printed bold.
Command (m for help): n
Command action
e extended
p primary partition (1-4)
p
Partition number (1-4): 1
First cylinder (1-1245, default 1):
Using default value 1
Last cylinder or +size or +sizeM or +sizeK (1-1245, default 1245):
+2048M
4. Using the same procedure, create the second partition.
Command (m for help):
(C) 2013, SatService GmbH
n
www.satnms.com
NMS-IM-1307 Page 13/21
SatService
Gesellschaft für Kommunikationssysteme mbH
Command action
e extended
p primary partition (1-4)
p
Partition number (1-4): 2
First cylinder (263-1245, default 263):
Using default value 263
Last cylinder or +size or +sizeM or +sizeK (264-1245, default 1245):
+128M
5. Make the second partition a 'swap' partition.
Command (m for help): t
Partition number (1-4):
Type: 82
2
6. Make the first partition bootable.
Command (m for help): a
Partition number (1-4):
1
7. Now check the partition table typing 'p
on the geometry of you hard disk).
'. This should look like this (Start and end cylinders may be different, depending
Disk /dev/hda: 255 heads, 63 sectors, 1245 cylinders
Units = cylinders of 16065 * 512 bytes
Device Boot
/dev/hda1
*
/dev/hda2
Start
1
263
End
262
279
8. Now exit and save the partition table. Type w
Blocks
2104483+
136552+
Id
83
82
System
Linux
Linux swap
.
C. Format the partitions
Now you have to create the Linux file systems on the disk partitions. Type the following:
mke2fs /dev/hda1
mkswap /dev/hda2
D. Copy the Linux system from the CD-ROM to the disk
Now install the Linux system on the NMS computer. The sequence of commands is:
umask 000
mount /dev/hdc /cdrom
mount /dev/hda1 /mnt
cd /mnt
tar xzvpf /cdrom/linux.tgz
cd /
umount /mnt
Installing this may take some minutes, depending on the speed of the computer. By using the 'v' flag with 'tar', you see the name of
each file which is going to be installed, you see that the computer is working, not frozen.
E. Boot the installed Linux the first time
Now you have to boot the installed Linux system the very first time. It is till not yet able to boot by itself, so leave the CD in the
drive.
1. Type ' reboot
'.
2. After the computer booted again, when it prompts 'LILO boot:', enter 'linux root=/dev/hda1
'. Be aware, that the
computer at this early stage expects an American keyboard. To type the '/' use the key next to the right shift key. '=' you will
find left beside the backspace key in the top row of the main keyboard block.
3. Log on as 'root' (password 'root).
4. Type 'lilo
'.
(C) 2013, SatService GmbH
www.satnms.com
NMS-IM-1307 Page 14/21
SatService
Gesellschaft für Kommunikationssysteme mbH
The new Linux installation is now bootable, but the M&C application is not able to run as up to now there are no files installed
which configure the software for your application.
F. Restore the customer specific data
Finally, remove the rescue CD from the drive and type ' reboot
Windows graphical login screen.
'. The NMS server now shuts down and re-boots with the X-
Login as user 'mnc' (password 'mnc') and restore the application data from the recent backup ZIP disk. Use the procedure
described at the last paragraph of the chapter 'Data Backup & Restore'.
Near Hot Backup configuration
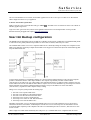
The sat-nms network management system is available in a redundant 'near hot backup' configuration. The redundant NMS permits
to switch between the primary and the backup NMS server in less than two minutes, without any loss of data.
The redundant NMS consists of two server computers which both are continuously running. The actually active computer runs the
NMS server application, the backup computer has the NMS service stopped. An external NAS (Network Attached Storage) disk
keeps all NMS relevant data.
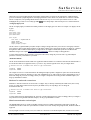
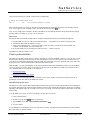
As shown in the example above, both NMS computers are connected with two Ethernet interfaces to the LAN. Each computer
provides a 'maintenance interface' with a unique IP address. The computer is permanently reachable at this IP address
(192.168.10.110, 192.168.10.111 resp. in this example). The other Ethernet interface is configured at both computers to have the
same IP address and even the same Ethernet MAC address. Only the active server has this interface up, the backup server has this
interface disabled. Client computers running the NMS user interface always see the NMS server at the same address
(192.168.10.107), regardless of which computer actually is running.
During a server swap the system performs the following steps:
1.
2.
3.
4.
5.
6.
The active server stops the NMS service.
The active server disables it's 'eth1' Ethernet interface.
The active server disconnects from the NAS device.
The backup server connects to the NAS device.
The backup server enables it's 'eth1' Ethernet interface.
The backup server starts the NMS service.
Depending on the number of VLCs controlled by the NMS this takes 30 to 120 seconds. During the swap an operator has to
switch the connections to the modems / terminal adapters from the active server to the backup one. The serial interface boards
used with the NMS computers provide a dispatch cable with one common multi-pin connector at the PC, hence this can be done
in some seconds.
Unlike a single server NMS which automatically starts with power on, a redundant NMS server configuration must be started
(C) 2013, SatService GmbH
www.satnms.com
NMS-IM-1307 Page 15/21
SatService
Gesellschaft für Kommunikationssysteme mbH
explicitly by an operator after the computers are up. The procedure is the same as swapping the servers.
Maintaining a redundant NMS
Handling the server swap for the operator is as simple as it could be: Simply start the NMS service on that computer where it shall
run. The NMS computer have been configured to do the swapping sequence as described in the previous chapter automatically.
Swapping the servers (local operation)
When operating the NMS server locally, use the start menu entry of the computer which shall run the NMS service to start it there.
This automatically stops the service on the other computer.
Remember to change the cable to the telephone modems when you do a server swap. You will not be able to connect to any VLC
if the modems are connected to the non-active NMS computer.
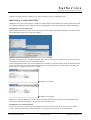
Another small shell script enables you to test if the NMS service is running on a particular computer. Select the 'Monitor the NMS
service' start menu entry to get a small window which tells about the state of the NMS service on this computer. The display gets
updates every two seconds. Below you see two examples:
The NMS server is running.
The NMS server is stopped.
Finally, there is a 'Stop the NMS service on this computer' entry in the start menu. Normally you don't need this function. It has
been foreseen for maintenance purposes, e.g. if you want to detach the NAS device.
Swapping the servers (telnet operation)
You also can do the server swap from any other computer in the network via telnet. Some person, however, must be with the
servers to change the serial interface cable to the modems. To swap the servers from remote, do the following steps
(C) 2013, SatService GmbH
www.satnms.com
NMS-IM-1307 Page 16/21
SatService
Gesellschaft für Kommunikationssysteme mbH
1. Open a telnet session to the computer which shall take over the NMS service. Use the maintenance IP address of this
computer.
2. Login as 'nms', password 'nms'.
3. Type in: nms-start
4. Close the telnet session.
Beside the 'nms-start' command there also are the commands 'nms-state' and 'nms-stop' available, resembling the start menu
entries discussed above. 'nms-state' called from a telnet client reports the NMS state once rather than providing an auto-update
display.
Redundant NMS Data Backup
A redundant NMS system mirrors it's data using several methods. This renders backups to removable media unnecessary in many
cases. Data mirroring is implemented in this way:
The NAS device implements a RAID 1 redundant hard disk. Data is mirrored by two hard disks. If one disk fails, no data is
lost.
Once a day, the active computer saves it's Linux configuration data (mainly the '/etc' directory and some other files) to a file
on the NAS device. These files are required to reconstruct the computer's settings after a crash recovery procedure.
Once a day, the active computer backs up the complete contents of the NAS device to a file at it's local disk. This is an
additional assurance in case of a complete damage of the NAS device (e.g. due to surge).
Due to the fact that only the active NMS computer is able to exchange backup data between the NAS device and it's local hard
disk, it is recommended to swap the NMS computer on a weekly basis.
Configuring a redundant NMS
A redundant NMS system demands some additional configuration steps during installation. While you usually will receive the near
hot backup system ready configured from SatService GmbH, the configuration steps below will be required if you need to replace
a component of the near hot backup NMS due to a hardware failure.
Setting up the NAS device
If for some reason the NAS device has to be replaced, the unit must be initialized and configured before it can be used with the
NMS. The following steps are to do:
1. The NAS device initially listens to the (invalid) IP address 10.10.10.10. To do the first configuration of the NAS device,
configure a computer to be able talking to this address. With one of the NMS computers you can do this (while the NMS
service is stopped) bay entering the following commands at an XTerm window:
su
(password is 'root')
ifconfig eth0 down
ifconfig eth0 10.10.10.1 netmask 255.255.255.0 up
2. Now start the web browser and connect to 10.10.10.10
3. Using the web based configuration menu, set the following parameters:
The IP address for the NAS device,
Configure the disks to RAID 1 (mirroring) mode.
Make the NAS device installing one 'Unix / NFS' type volume called 'Public'.
4. Reboot the NAS device and the NMS computer.
Rebooting the NAS takes a couple of minutes. After this time, the NMS computer should be able to connect to the NAS device.
Now the backed up data must be restored on the NAS device:
Enter the following commands at an XTerm window (the IP address is an example, replace it by the address of the NAS
device):
(C) 2013, SatService GmbH
www.satnms.com
NMS-IM-1307 Page 17/21
SatService
Gesellschaft für Kommunikationssysteme mbH
mount 192.168.10.112:/Public /home/nas
cd /home/nas
tar xpf /home/backup/nas.tar
cd
umount /home/nas
Restoring the data takes a few minutes. After you have unmounted the NAS device again you can start the NMS service using the
'nms-start' command or the analogous start menu entry.
Network configuration
For a redundant NMS computer, the network configuration is slightly different. The computer's first Ethernet interface is used as
the maintenance interface and configured as described in chapter 'Setting the IP address of the NMS server'. The second -- the
operational -- interface is controlled by the server swap scripts and activated only while the NMS service is running.
The configuration parameters for this interface are defined in the file '/etc/nhb.conf'. You need root privileges to change this file.
Below an example for a 'nhb.conf' file. The comments in the file should explain the definition sufficiently.
#
#
#
#
#
#
/etc/nhb.conf
configuration file for the sat-nms near hot backup facility.
# IP address of the NAS device containing the NMS application data
#
NMS_NAS_IP=192.168.10.112
# The common IP address used by clients to access the currently active
# NMS server. The active NMS server provides this address at eth1, the
# backup server has eth1 switched off
#
NMS_COMMON_IP=192.168.10.107
# Address for the unused interface. The non active NMS computer configures
# it's eth1 interface to this IP address.
#
NMS_DUMMY_IP=192.168.10.109
#
# MAC address used for the switched Ethernet interface eth1. Bets choice is to
# use the address of one of the eth1 Ethernet cards.
#
NMS_COMMON_MAC=00:02:B3:B1:AF:E1
# IP address used by this NMS server at the maintenance interface eth0
#
NMS_THIS_IP=192.168.10.110
# IP address used by the other NMS server
#
NMS_OTHER_IP=192.168.10.111
# used in scripts to identify who originated the messages
#
NMS_THIS_NAME=SERVER-A
Appendix
A short introduction to 'vi'
A short introduction to 'vi'
vi is the standard text editor used on Unix systems. The M&C system being based on the Linux operating system uses an
enhanced version of vi, called vim (vi improved). The paragraphs below give a short introduction how to use this text editor.
(C) 2013, SatService GmbH
www.satnms.com
NMS-IM-1307 Page 18/21
SatService
Gesellschaft für Kommunikationssysteme mbH
First of all, why to use vi? vi is known to be difficult to learn as it's concept is different as you might expect. There are other text
editors available for Linux which are easier to handle. The answer is: vi turned out to be the only text editor program which works
in a satisfying way when used in the Microsoft Windows telnet client. If you are going to maintain and configure a sat-nms network
management system, you will find it comfortable even to do configuration jobs from your desk.
The most important difference between text editors like the 'notepad' known from the MS Windows operating system and vi is the
modal behavior of vi. This means, vi treats keystrokes in a different way, depending on it's current mode. The two most important
modes of vi are the COMMAND mode and the INSERT mode
In COMMAND mode, each keystroke tells the editor to do something. Even plain characters are commands rather than they are
inserted into the text. The advantage of this COMMAND mode is that you can operate the editor without any special keys arrows
or function keys.
In contrast, the INSERT mode lets you enter text but no commands. You have to switch between these modes while you are
editing a text. Early versions of vi really didn't provide any commands while in INSERT mode. vim is much more flexible with this,
e.g. you may move around the text using the cursor keys, even if you are in INSERT mode.
The vi editor contains a extensive online help manual which you can view from within the editor. Type the
key, followed by :h
and
. The editor splits the window and shows the online help in the upper part. Type :q to remove the help again.
The following chapter lists the most frequently used commands for the vi editor as a reference.
Common commands
The table below lists some frequently used commands for the vi editor. Pleas note that all the commands except
must be typed
in COMMAND mode. This means if the editor is in another mode than the COMMAND mode, you have to press the
key
first.
Commands starting with a colon are so called 'ex commands' which are entered in the command / status line at the bottom of the
terminal window. As soon as you press the colon character in COMMAND mode, the cursor jumps to the bottom line and lets
you edit the command. Press
to complete the command or
to return to COMMAND mode without changing anything.
Mode changes
Leave the INSERT mode, revert to COMMAND mode.
i
Go to INSERT mode
Cursor movements
k
Up
j
Down
h
Left
(C) 2013, SatService GmbH
www.satnms.com
NMS-IM-1307 Page 19/21
SatService
Gesellschaft für Kommunikationssysteme mbH
l
Right
0
Start of line
$
End of line
gg
First line of the text
G
Last line of the text
Block / range commands
v
Start visual mode, this marks the block start
y
Yank the marked block into the paste buffer.
x
Yank the marked block and delete it from the text.
P
Paste the contents of the buffer before the cursor position. te
File / buffer commands
:qa!
Quit, abandon all changes.
:xa
Exit, save changes.
:e file-name
Edit a file in a separate buffer.
:bn
Step through buffers.
Find / replace commands
/ pattern
Goto the next occurrence of 'pattern'.
N
Repeat the last search.
:%s/pattern/text/gc Replace each occurrence of 'pattern' in the document with 'text'. Ask for confirmation before executing
each replace.
You normally will use the cursor keys at your keyboard for moving in the text rather than typing the commands shown in the table
above. If however the cursor keys do not work for some reason, knowing the command characters may be very helpful.
'vi' in the MS Windows telnet client
To make the MS Windows telnet client work well with the vi editor, you should configure the telnet client as shown below.
it is important to have the following parameters set:
(C) 2013, SatService GmbH
www.satnms.com
NMS-IM-1307 Page 20/21
SatService
Gesellschaft für Kommunikationssysteme mbH
No local echo selected.
The VT100/ANSI emulation chosen.
The buffer size set to 24 lines.
VT100 cursor keys enabled.
With these settings you get most comfortable control about the vi editor in the telnet window. Text scrolling works as you expect
with a buffer size of 24 lines, with the VT100 cursor keys enabled you can move in the text even in INSERT mode.
The keys 'Ins', 'Del', Pos1', 'End', 'Pg Up' and 'Pg Dn' do not work. You should not try to use them as they might insert strange
characters in the text instead of doing the function you expect.
(C) 2013, SatService GmbH
www.satnms.com
NMS-IM-1307 Page 21/21