1
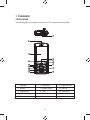
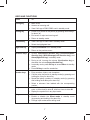
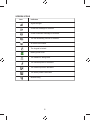
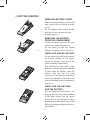
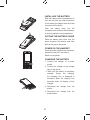
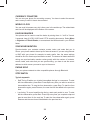
User Manual
- V1705
1
Table of Contents
1 OVERVIEW ........................................................................................................ 6
Your Phone ................................................................................................. 6
Keys and Functions .................................................................................... 7
Screen Icons ............................................................................................... 8
2 GETTING STARTED .......................................................................................... 9
Removing the Battery cover ....................................................................... 9
Installing a micro SD Card .......................................................................... 9
Installing the SIM Card the Battery ............................................................. 9
Installing the battery.................................................................................... 9
Putting the battery over............................................................................... 9
Power on the handset ................................................................................. 9
Charging the Battery ................................................................................... 9
Using the Function Menu .......................................................................... 10
Phone Lock ............................................................................................... 11
PIN and PUK ............................................................................................ 11
Locking the Keypad .................................................................................. 11
3 VOICE SERVICES ........................................................................................... 12
Making a Call ............................................................................................ 12
Answering a Call ....................................................................................... 12
4 TEXT ENTRY ................................................................................................... 13
Changing the Text Input Modes ................................................................ 13
Multi-tap Text Input ................................................................................... 13
Smart Input Mode ..................................................................................... 13
Entering Digits .......................................................................................... 13
Entering Symbols...................................................................................... 13
5 CALL TORY ..................................................................................................... 14
SIM1 Call history/ SIM2 Call history ......................................................... 14
6 PHONEBOOK .................................................................................................. 15
Creating a Contact .................................................................................... 15
Searching for a Contact ............................................................................ 15
Phonebook option ..................................................................................... 15
2
7 USER PROFILES............................................................................................. 26
Generals ................................................................................................... 16
Meetings ................................................................................................... 16
Outdoors ................................................................................................... 16
indoors ...................................................................................................... 16
Headset .................................................................................................... 16
Bluetooth................................................................................................... 16
8 WAP
............................................................................................................ 17
Network Settings....................................................................................... 17
Connecting to the Network ....................................................................... 17
9 MESSAGING.................................................................................................... 18
Writing and Sending a Text Message ....................................................... 18
Writing and Sending a Multimedia Message ............................................ 18
Emails ....................................................................................................... 18
Broadcast messages ............................................................................... .18
10 MULTIMEDIA ................................................................................................. 20
Taking a Photo .......................................................................................... 20
Recording a Video Clip ............................................................................. 20
Playing a Video Clip.................................................................................. 20
Listen to the FM Radio.............................................................................. 21
Playing Music............................................................................................ 21
Recording an Audio Clip ........................................................................... 21
Melody composer ..................................................................................... 22
11 ORGANIZER .................................................................................................. 23
File Manager ............................................................................................. 23
Calendar ................................................................................................... 23
Tasks......................................................................................................... 23
Alarm ........................................................................................................ 23
Calculator...............................................................................................…23
Currency Conveter.................................................................................... 24
World Clock .............................................................................................. 24
3
E-book rearder .......................................................................................... 24
Synchchronization .................................................................................... 24
Phone sync ............................................................................................... 24
Stop watch ................................................................................................ 24
12 FUN & GAMES………………………………………………………………………26
MSN ......................................................................................................... 26
Skype ........................................................................................................ 26
Yahoo messenger ..................................................................................... 26
Games ...................................................................................................... 26
13 SETTINGS...................................................................................................... 27
Phone setting ............................................................................................ 27
Time and date ........................................................................................... 27
Schedule power on /off ............................................................................. 27
Display ...................................................................................................... 27
Call Setting ............................................................................................... 27
Smart Divert settings ................................................................................ 27
SIM1/SIM2 Call setting ............................................................................. 27
Voice Changer .......................................................................................... 27
Blacklist..................................................................................................... 27
Background sound .................................................................................... 27
Call time display........................................................................................ 27
Call time reminder..................................................................................... 27
Auto quick end .......................................................................................... 27
Reject by SMS .......................................................................................... 27
SecuritySetting.......................................................................................... 27
Phone lock ................................................................................................ 28
Auto keypad lock ...................................................................................... 28
Secure –info protection ............................................................................. 28
Change password ..................................................................................... 28
Bluetooth................................................................................................... 28
4
Synchronizing Data................................................................................... 28
Using a Bluetooth Headset ....................................................................... 29
Transferring Data ...................................................................................... 29
Web cam................................................................................................... 29
14 WARNINGS AND PRECAUTIONS ................................................................ 30
15 DISCLAIMER ................................................................................................. 35
5
1 OVERVIEW
YOUR PHONE
The following figure is a sketch of the phone. The actual product may differ.
15
1
2
9
10
3
11
12
4
5
6
13
7
14
8
1 Earpiece
6 Calling key
11 Right soft key
2 Screen
7 Number keys
12 FM key
3 Left soft key
8 * key
13 Ending key
4 MP3 key
5 Connection jack
9 Direction keys
10 Ok key
14 # key
15 Headset jack
6
KEYS AND FUNCTIONS
Press
To
Calling key
• Make a call.
• Answer an incoming call.
• View Call Logs of SIM1/ SIM2 card in standby mode.
Ending key
• Power on or power off the phone (by pressing and holding it
for about 3s).
• End a call, or reject an incoming call.
• Return to standby mode.
Left soft key
• View Call Logs of SIM2 card in standby mode.
• Select the highlighted item.
Right soft key
• Display Phonebook list in standby mode.
• Return to the previous menu.
Direction keys
• Access: Calendar(Up direction key), Phonebook(Down
direction key), Write Message(Left direction key), and
Alarm(Right soft key) in standby mode.
• During a call, increase the volume (Up direction key) or
decrease the volume(Down direction key).
• In standby mode, press OK key to access Menu in standby
mode.
• Press OK key to confirm a selection.
Number keys
• Enter numbers, letters, and characters.
• Call the voice mail center in standby mode (by pressing and
holding the 1 key for about 3s).
• Speed-dial phone numbers in standby mode (by pressing
and holding the 2–9 keys for about 3s).
• Select a submenu item labeled with the corresponding
number.
* key
• In standby mode, press the key once to enter *, twice to
# key
• Display the symbol list in any input mode.
• Enter #.
• Enable or disable the Silent mode in standby mode
enter +, three times to enter P, and four times to enter W.
(by pressing and holding it for about 3s).
• Change input modes when editing texts.
7
SCREEN ICONS
Icon
Indicates
Signal strength.
A new text message is received.
A new multimedia message is received.
The call forwarding function is enabled.
An alarm is activated.
The keypad is locked.
Battery power level.
The headset is being used.
The General profile is activated.
The Outdoor profile is activated.
The Silent profile is activated.
Missed call(s).
8
2 GETTING STARTED
REMOVING BATTERY COVER
Before removing the battery and the SIM
card, ensure that your phone is power
on/ off.
Lift the Battery Cover toward upward
direction from the top edge of phone
as mention below.
REMOVING THE BATTERY
FROM THE COMPARTMENT
Locate the battery groove at the side
bottom of the battery compartment,
Lift the battery up with your fingers
Remove the battery out from the phone
INSTALLING A MICRO SD CARD
You can insert a micro SD card to expand
the memory capacity of your phone.
Locate the Memory Card slot at the
bottom of battery compartment.
Push the Memory Card cover in right
direction to unlock and pull it upwards
to open Place the Memory Card into
Memory Card slot with the metal
connectors of the Memory Card facing
down Close the Memory Card cover and
push it in left direction to lock the Memory
Card cover
INSTALLING THE SIM CARD
AND THE BATTERY
You can install two SIM cards on the
phone at the same time. When installing
a SIM card, ensure that the golden
contact area on the SIM card is facing
downward, and the beveled edge of the
SIM card is properly aligned with that of
the card slot.
9
INSTALLING THE BATTERY
Slide the battery into the compartment in
such an way that the metal connectors
of the battery are aligned with the metal
connectors of the phone
Push the battery down into the
compartment and ensure that the battery
is securely placed in the compartment.
PUTTING THE BATTERY COVER
Place the battery back cover over the
phone squarely with bottom side dent
fitted to the groove the phone.
POWER ON THE HANDSET
Press the power key/End key and keep it
pressed for about 3-5 seconds to
Switch on the phone.
CHARGING THE BATTERY
1. Connect the charger to a power
socket.
2. Connect the charger to the charger
jack on the phone.
3. Wait until the battery is completely
charged. During the charging,
the charging icon is displayed in
animation. When the charging icon
becomes static, the battery is fully
charged.
4. Disconnect the charger from the
phone.
5. Disconnect the charger from the
power socket.
10
USING THE FUNCTION MENU
1. In standby mode, press LSK(Calls).
2. Press Direction keys to select the desired function menu.
3. Press LSK(OK) or OK key to display the selected menu.
4. Press Up/Down direction keys to select a submenu.
5. Press LSK(OK) or OK key to display the submenu.
6. Press RSK(Back) to return to the previous menu or exit the function menu.
To return to standby mode, press Ending key.
PHONE LOCK
The phone lock protects your phone from unauthorized use. By default, the phone
lock function is disabled. You can change the default phone lock code (0000) into
any numeric string in the range of four to eight digits.
Do remember your phone lock code. If you forget it, contact the service center.
PIN AND PUK
The personal identification number (PIN) protects your SIM card from unauthorized
use. The PIN unblocking key (PUK) can unlock the blocked PIN. Both PIN and
PUK are delivered with the SIM card. For details, consult your service provider.
If you enter wrong PINs for a specified number of times consecutively, the phone
asks you to enter the PUK.
LOCKING THE KEYPAD
In standby mode, press the LSK and then * key to lock the keypad, and press the
LSK then * key again to unlock the keypad.
If the Auto Keypad Lock function is enabled and the phone is idle for a preset
period in standby mode, the keypad is locked automatically.
Note:
When the keypad is locked, you can press the Calling key to
answer an incoming call or make emergency calls.
11
3 VOICE SERVICES
MAKING A CALL
1. In standby mode, enter the phone number.
• To make an international call, press * key twice consecutively to enter the
plus sign (+). Then enter the international long distance code, country code or
region code, area code, and phone number in sequence.
• To call an extension, enter the phone number, press * key three times
consecutively to insert P, and then enter the extension number.
2. Press Calling key to dial the number.
3. Press Ending key to end the call.
Note:
• You can also make a call through Call History, Phone Book,
and Message.
• During a call, press Up/Down direction keys to adjust the
volume.
ANSWERING A CALL
When there is an incoming call, you can do as follows:
• Press Calling key to answer it.
• Press Ending key to reject it.
• Press RSK(Silent) to mute the speaker, and then press RSK(Reject) again to
reject it.
• Press LSK(Options) and then select Answer to answer it.
If the Any Key answer function is enabled, you can press any key except LSK
and Ending key to answer an incoming call.
12
4 TEXT ENTRY
CHANGING THE TEXT INPUT MODES
Your phone support the following text input modes. The indicator of the current
text input mode is displayed on the screen. You can press # key to change the
text input mode.
Note:
Icon
Text Input Mode
ABC, abc
Multi-tap
eZi ABC, eZi abc
Smart
123
Number
• In editing mode, press RSK(Clear) once to delete the
character to the left of the cursor; press and hold RSK(Clear)
to clear all characters at a time.
• In multi-tap text input mode, press 1 key consecutively to
enter a commonly used punctuation.
• In smart text input mode, press 1 key and then press Direction
keys to enter a commonly used punctuation.
• In multi-tap text input mode, press 0 key to enter a space and
twice to enter 0. In smart text input mode, press 0 key to enter
a space.
• In smart text input mode, press Direction keys to scroll
through the predicted words.
MULTI-TAP TEXT INPUT
In multi-tap text input mode, you can press a key labeled with the desired letter
once to enter the first letter on the key, twice to enter the second letter on the key,
and so on.
SMART INPUT MODE
In Smart text input mode, do as follows to enter an English word:
1. Press each key only once according to the spelling sequence of the desired
word. The phone displays the commonly used words according to the numeric
sequence of key presses.
2. Press Direction keys to scroll to the desired word.
3. Press OK key to enter the word.
13
ENTERING DIGITS
• In “123” input mode, you can directly press number keys labeled with desired
digits.
• In multi-tap text input mode, press the number key consecutively until the
desired digit appears on the screen.
• In smart text input mode, press the number key labeled with the desired
number and then press Direction keys until the number appears.
ENTERING SYMBOLS
1. Press * key to display the symbol list.
2. Press Direction keys to scroll to the desired symbol.
3. Press OK key to enter the symbol.
5.CALL HISTORY
SIM1/ SIM2 Call history
You can view SIM 1’s/SIM 2’s information related to call records, including
Missed Calls, Dialed Calls, Received Calls, Delete Call Log, Call Time,
Call Cost, SMS Counter and GPRS Counter. If you have inserted only one
SIM card, you can see only one of the SIM card’s phone records.
14
6 PHONEBOOK
You can store information such as names, phone numbers, and e-mail addresses
in the phonebook. Phone numbers can be stored in your mobile phone or SIM
card. The mobile phone can store up to 1200 records, the amount of phone
numbers that SIM card can store vary with its capacity. In standby state, you can
access this interface with the help of right soft key.
CREATING A CONTACT
1.
2.
3.
4.
Select Menu > Phonebook > Add new contact.
Press OK key to edit the contact.
Press OK key to save the contact.
Press LSK(Yes) to save the contact; press RSK(No) to exit.
SEARCHING FOR A CONTACT
1. Select Menu > Phonebook.
2. Enter the first character of the contact.
3. Press Up/Down direction keys to search the required contact.
PHONEBOOK OPTION
Very useful function is present in phone book option in Phonebook-> option menu
as mention below.
Delete: You can delete entries from the SIM card and Phone.
Copy: you to copy entries both from the SIM card to Phone / Other SIM and vice
versa.
Send contact: Send contacts
Move: You can Move entries from the SIM card and Phone.
Send Contacts: you can send contacts As text messages, As multimedia
messages, As Email,Via Bluetooth.
Add to Black list: You can add contact to Blacklist.
Caller Groups: You Can group you contact to different group.ie Friends, Family
VIP, Business, Others
Phonebook Setting: you can use different setting of your Phonebook.
15
7 USER PROFILES
You can select your own user profile for the phone.
Select Menu > Settings > User Profiles, to access different profiles.
• General
• Meeting
• Outdoor
• Indoor
• Headset
• Bluetooth
You can activate and customize them as per your need. Activate enables to select
a particular profile le and activate it. Customize enables to set Tone setup, Volume,
Alert type, Ring type, Extra tone and Answer mode.
16
8 WAP
You can access WAP sites and use WAP-based services on your phone. To access
the WAP sites through your phone, you need to subscribe the corresponding
service from the service provider and set the relevant parameters on your phone
first.
For details about the service and the charges, contact your service provider.
NETWORK SETTINGS
To access the WAP sites through your phone, you need to set the data account
and WAP parameters on your phone first.
SETTING THE DATA ACCOUNt
1.
2.
3.
4.
5.
Select Menu > Services > Data Account > GPRS/GSM data.
Select your service provider, and then press LSK(Options) and then Edit.
Set the account information.
Press LSK(Options) and then select Done.
Press RSK(Done) to save the settings.
SETTING THE WAP
1. Select Menu > Services > Internet services > Settings > Profiles.
2. Select your service provider, and then press LSK(Options) and then select
Edit profile.
3. To set the relevant parameters.
4. Press LSK(Done) to save the settings.
Connecting to the Network
You can browse WAP pages on your phone after setting the connection profile
and WAP parameters.
1. Select Menu > Services > Internet services > Input address.
2. Input a WAP site address.
3. Press LSK(Options) and then select Done.
The browser will display the corresponding WAP page.
17
9 MESSAGING
• Functions related to the MMS and emails are network
dependent. For provision of and subscription to a service,
contact your service provider.
Note:
• Open multimedia messages and emails with caution. Objects
in multimedia messages or emails may contain hazards that
can damage your phone, such as malicious software.
WRITING AND SENDING A TEXT MESSAGE
1.
2.
3.
4.
5.
Select Menu > Messaging > Write message.
Edit the text message.
Press LSK(Options) and then select Send to.
Input the recipients manually or select from the phonebook.
Press OK key and then select “From SIM1/SIM2” to send the message.
WRITING AND SENDING A MULTIMEDIA MESSAGE
1.
2.
3.
4.
Select Menu > Messaging > Write message.
Press LSK(Options) and then select Switch to MMS.
Press LSK(Options) and then select Add subject to edit the subject..
Edit the content of the message. You can add text content, images, sounds,
videos, attachments, slides, and bookmarks to the multimedia message.
5. Press OK key to navigate to “Send MMS” screen, select a recipient and
changes input method to abc to insert the Email address.
6. In “Send MMS” screen, press OK key to send the MMS.
EMAILS
Before sending or receiving emails, you need to create and activate an email
account.
CREATING AN EMAIL ACCOUNT
1. Select Menu > Messaging > Email > Email accounts.
2. Press LSK(Options) and then select New account.
3. Set the related parameters in sequence.
After setting an item, press LSK(Options) and then select Next to proceed to
set other items.
4. Press LSK(Options) and then select Done to save the email account.
18
ACTIVATING AN EMAIL ACCOUNT
1. Select Menu > Messaging > Email > Email accounts.
2. Select an email account.
3. Press LSK(Options) and then select Activate.
WRITING AND SENDING AN EMAIL
1.
2.
3.
4.
5.
6.
7.
8.
•
•
Select Menu > Messaging > Email > Write Email.
Select To, Cc, or Bcc to add the email address of a recipient.
Select Subject to edit the email subject.
Select Attachment to add an attachment. A maximum of three attachments
can be added to an email.
Set the email priority.
Select Content to edit the text contents of the email.
After editing, press LSK(Done).
Press LSK(OK) to select from the following options:
Send: to send the email.
Send and save: to send and save the email.
BROADCAST MESSAGE
Broadcast message enable You to receive messages related to your cell location
information or the messages broadcast from your service provider (network
service). Contact your service provider for more details.
Receive Mode: Enables to make receiving mode ON/OFF.
Read Message: Enables to read the messages received.
Langages: Enables to set out the preferred language.
Channel Settings: Enables to set out the preferred Channel.
19
10 MULTIMEDIA
TAKING A PHOTO
In standby mode, select Menu > Multimedia > Camera to launch the camera.
In picture mode, you can do as follows:
• Press LSK to view photos, or perform relevant settings.
• Photos :This option enables you to view the images from photo album.
• Camera Setting: you can set below option in camera setting
Camera LED: flash highlight on /off for flash light.
Shutter sound: you can set /customize sound produce during the photo click.
EV: set Exposure value for image quality for adjusting light condition.
Delay timer: Different delay timer are 5sec, 10 sec,15sec,off.
Cont shot: different cont shot are 5,3,1,off.
Image Setting:
you can set different image size(2048*1536,1600*1200,1280*1024,
640*480,240*320).
White balance: you can set your photo cooler or warmer by adjusting the white
balance.
Scene mode: You can set scene mode of own choice.
Storage : you can set Phone memory or memory card to store capture photo.
• Press OK key to take a photo.
• After capturing photo form the option menu you can send the photo as
Multimedia messages, As Email, Via Bluetooth to different Bluetooth device,
edit in photo editor or delete it.
RECORDING A VIDEO CLIP
You can access the video mode by using the following methods:
In standby mode, select Menu > Multimedia > Video recorder.
Long press of Camera is Video recording mode activated directly.
In video mode, you can do as follows:
• Press LSK to view video clips, or perform relevant settings.
• Press OK key to start or stop recording.
PLAYING A VIDEO CLIP
1. Select Menu > Multimedia > Video player.
2. Select a video clip and press OK key to open it.
3. Press OK key to start playing the video clip.
20
•
•
•
4.
During playing of the video clip, you can do as follows:
Press Up/Down direction key to increase/decrease the volume.
Press Left/Right direction key to fast forward or rewind the video clip.
Press OK key to pause or resume.
Press RSK(Stop) to stop playing the video clip.
LISTEN TO THE FM RADIO
Besides being used for listening to the radio, the headset cable functions as an
antenna. To ensure normal listening of radio programs, do not plug out the headset
or bind the headset cable.
• Connect a compatible headset to the phone.
• In standby mode press the FM key or select Menu > Multimedia > FM radio.
• Press OK key to stop or resume playing a radio program.
• Press Up/Down direction key to adjust the volume.
• Press Left/Right direction key to adjust the frequency with a precision of 0.1
MHz.
• Press and hold Left/Right direction key to adjust the frequency quickly.
• Switch to a channel by pressing the number key corresponding to the
channel.
• Press LSK(Options) to view the channel list, manually input a frequency,
automatically search for and set a channel, and perform relevant settings.
PLAYING MUSIC
1. In standby mode, press the MP3 key or select Menu > Multimedia > Audio
player to launch the music player.
2. Press OK key to start playing music.
During music playing, you can do as follows:
• Press Up/Down direction key to adjust the volume.
• Press Left/Right direction key to switch music.
• Press LSK(Options) to view the music list or perform relevant settings.
RECORDING AN AUDIO CLIP
1.
2.
3.
4.
Select Menu > Multimedia > Sound recorder.
Press LSK(Options) and then select New record to start recording.
During audio recording, press LSK to pause or resume.
Press RSK(Stop) to stop recording.
21
MELODY COMPOSER (COMPOSING A RINGTONE)
1. Select Menu > Multimedia > Melody compose.
2. Press LSK(Add) to access the Stave screen.
3. Press number keys to enter note and compose a ringtone.
Press RSK(Clear) to delete the note to the left of the cursor. Press and hold
RSK (Clear) for about 3s to delete all notes.
4. Press RSK(Options) to select from the following options:
• Play: to play the composed ringtone.
• Play speed: to set the speed for playing the ringtone.
• Select instrument: to select your favorite instrument for playing the ringtone.
5. After composing the ringtone, press RSK (Options) and then select Save.
6. Enter a name for the ringtone.
7. Press RSK (Options) and then select Done.
22
11 ORGANIZER
FILE MANAGER
You can use File Manager to organize your files in folders, in the phone and
memory card. If a memory card is inserted, the files stored on it are organized
separately. Select Phone or Memory card and then select Options to browse, copy,
delete, and move files in folders. Depending on the size and type of memory card
the read time will differ.
CALENDAR
You can use the phone’s calendar to keep track of reminders, calls you need to
make, meetings and birthdays. You can set the calendar to sound an alarm for
your task.
Pressing the left soft key for “Option” which enables you to View Tasks, Add task,
Jump To Date and Go to weekly view.
View : Enables you to view task’s list and add tasks.
Add Event: Use Navigation keys for moving to the day you want and press Options
to Add events. You can select task type such as: Reminder / Meeting / Course.
Jump to Date: Enables you to input a date to jump to a particular date.
Go to Weekly View: Enables you to access monthly view and weekly view.
TASKS
Task: you want Add Task. You can select task type such as: Date / Call /
Anniversary
ALARM
You can set the device to sound an alarm at a desired time. The mobile Phone can
set up to five alarms, and supports shutdown alarm.
Select Menu > Organizer> Alarm, to access the alarm.
To set the Alarm, select the time and set the Options: On /Off, Time, Repeat
Type, Snooze time and Alert type. You can repeat the alarm Once, Everyday or
as User Defined.
CALCULATOR
You can use your phone’s calculator to add, subtract, multiply and divide.
Press the # key to enter decimal point.
Press the up, down, left and right key and OK key to select +, -, x, /, +
and = respectively.
Press Clear to delete the figures.
23
CURRENCY CONVETER
You can use your phone for converting currency. You have to select the amount
and currency to which it has to be converted
WORLD CLOCK
You can scroll to browse every city’s time zone in the world map. The related date
and time will be displayed at the bottom of the screen.
E-BOOK REARDER
Your phone can be used to read the books by storing them in *.txt fi le* format.
It supports view of UCS-2, ASCII and UTF-8 encoding documents. Select Menu
> Organizer > E-Book Reader, to access/read the books stored in your E-Book
folder.
SYNCHCHRONIZATION
Synchronization your contacts contacts, events, tasks, and notes that you to
Server. your phone needs to be set up for Internet access. If you are using Internet
or WAP with your phone for example to read e-mails, then the same settings
should be fine for remote synchronization as well. The amount of data transferred
during one synchronization session varies greatly with the number of contacts,
events, tasks, and notes that you are synchronizing. you have to set the server
address to which server you want to sync to the server.
PHONE SYNC
Sync your phone contacts to other compatible phones through Bluetooth.
STOP WATCH
Typical stopwatch
• Split Timing: Enables you to take intermediate timings in a sequence. To start
the time observation, press Start. Press Split every time you want to record an
intermediate time. To stop the time observation, press Stop. To start the time
observation again, press Resume, the new time will be added to the previous
time.
• Lap timing: To record repetitive lap timing, reset each period to zero. To start
the time observation, press Start. Press Lap every time you complete a lap and
want to reset time for the next lap. To start the time observation again, press
Resume and the new time will be added to the previous time.
24
•
View Record: Enables you to View, Add, Edit, Delete and Delete all the list of
records.
nWay stopwatch
It offers to take the intermediate time for all the directions by pressing up/ down/
left/right key. The total time is displayed on the top of the screen.
25
12 FUN & GAMES
MSN
MSN Internet instant messenger for consumers using your mobiles phones. The
software can track whether users are online and allow them to swap text messages
between phones or between a cell phone and a PC. For this service, you require
GPRS/EDGE service in your SIM.
Note: Only online contacts can be added.
SKYPE
Skype offers you the opportunity to send an instant message over GPRS/EDGE.
With Skype, you can send your written message to anyone with a cell phone or
Skype account. Sign in to your Skype account to send instant messages.
YAHOO MESSENGER
Yahoo messenger offer to send instant message over GPRS/EDGE. Sign in to
your yahoo account to send instant messages to your buddies.
GAMES
Game interface offers option to select a game, the user can select the following
games from the interface .refer help option games how to play.
Puzzle
Brick
Tetris
26
13 SETTINGS
PHONE SETTING
Select Menu > Settings > Phone Settings, to get access to these options:
Time and Date: Enables to set time and date by setting home city, time, date
and format.
Schedule Power on /off : Enables to set the time for automatic power on/off.
Display : Enable to set display characters such as Wallpaper, Screen saver,
Themes, Clock type.
CALL SETTING
Smart Divert settings: When user in call on the first numbers, on Incoming call of
second number it will divert to first number if user activate the smart divert function.
using smart divert setting you have to activate the Call waiting service in your both
SIM1 and SIM2 card.
You have to enter the SIM1 and SIM2 mobile number is below menu.
Menu->setting -> Call setting -> Smart Divert settings->Numbers setting
and Activate the services Menu->setting -> Call setting -> Smart Divert settings>SIM1 setting/SIM2 setting -> Activate.
* This function is based on service provider and diverting function might not work
on inter service provider if they have not this services.
SIM1/SIM2 Call setting: This option enables you to set your caller ID by network,
Call waiting, Call barring, line switching.
Voice Changer: Voice changer is the unique feature of the phone, which let you to
change the voice. You can set the voice changer On/Off and select different kinds
of voices.
Blacklist: This function enables you to add the number in the blacklist and
activating. it enables you to block calls from that number
Background sound: This option enables you to play a background sound during
an active call. You can also add your own sound.
Call time display: It enables you to power on/off the call time display.
Call time reminder: This function enables you to set the call time reminder as
Single time or Periodic.
Auto quick end: It enables you to disconnect the current call automatically after
certain duration of time. You can on/off this option and set the time between 1 and
9999 seconds
Reject by SMS: You can set the Reject by SMS option activating the features from
27
the menu->Setting ->call setting -> Reject by SMS.
Send an SMS to the caller, you can manually reject an incoming call from the
option (LSK) of the call. Something like the SMS reply function, but just for manual
rejects.
Security Setting
Phone lock:You can lock or unlock the phone. Enter the password to activate or
deactivate the phone lock. When the phone is locked, you will be required
to enter the phone password
Auto keypad lock: You can lock or unlock the phone keyboard and set the key
lock time
Secure –info protection: Secure your personal data thorough the password
Your default password for these features is “0000”.
Change password: This option lets you change the password of your phone.
Default password “0000”.
Bluetooth
Through Bluetooth, you can synchronize data between a PC and your phone,
exchange data with other Bluetooth devices, or use a Bluetooth headset.
Bluetooth:
For activate Bluetooth select Menu->Setting -> Bluetooth->power on.
Following option are available in Bluetooth menu.
Power on /off
Enquiry Audio device: search for devices
My device: display all the connected device
Setting: Configure setting of Bluetooth devices.
SYNCHRONIZING DATA
Before synchronizing data between a PC and your phone, ensure that the PC
supports the Bluetooth function.
1. Select Menu > Settings > Bluetooth > Power. Then select On to enable the
Bluetooth function.
2. Start the Bluetooth driver on the PC.
3. Pair the PC with the phone.
After pairing, you can synchronize data between the PC and the phone.
28
USING A BLUETOOTH HEADSET
No Bluetooth headset is delivered in the product package. If a Bluetooth headset
is required, you can buy one yourself.
1. Select Menu > Settings > Bluetooth > Enable. Then select On to enable the
Bluetooth function.
2. Select Inquiry audio device to search for available Bluetooth headsets.
3. After searching, press LSK(Pair).
4. Enter the password for pairing the Bluetooth headset.
5. After the phone sets up a connection with the headset, the headset icon is
displayed on the standby screen and you can use the headset in this case.
TRANSFERRING DATA
1. Select Menu > Settings > Bluetooth > Enable. Then select On to enable the
Bluetooth function.
2. Select My device > Inquiry new device to search for available Bluetooth
devices and then pair the phone with the desired device.
When a Bluetooth device sets up a connection with the phone for the first time,
a pairing password needs to be entered for verification.
3. After pairing, you can transfer data between the phone and the Bluetooth
device.
WEB CAM
Your phone can function as a webcam When the phone and the PC are powered
on, after you connect the phone to the PC, you can have a video chat through the
phone camera.
1. Connect the phone to the PC through the USB cable.
2. Set the USB mode to Webcam.
3. Start the browser on the PC to log in to a Web site.
Start the video tool installed on the PC to have a video chat
29
14 WARNINGS AND PRECAUTIONS
This section contains important information pertaining to the operating instructions
of your device. It also contains information about how to use the mobile safely.
Read this information carefully before using your device.
ELECTRONIC DEVICE
Power off your device if using the device is prohibited. Do not use the device when
it causes danger or interference with electronic devices.
MEDICAL DEVICE
•
•
•
Power off your device and follow the rules and regulations set forth by the
hospitals and health care facilities.
Pacemaker manufacturers recommend that a minimum distance of 15
cm be maintained between a device and a pacemaker to prevent potential
interference with the pacemaker. If you are using a pacemaker, use the device
on the opposite side of the pacemaker and do not carry the device in your front
pocket.
Some wireless devices may affect the performance of the hearing aids. For any
such problems, consult your service provider.
POTENTIALLY EXPLOSIVE ATMOSPHERES
Switch off your device in any area with a potentially explosive atmosphere, and
comply with all signs and instructions. Areas that may have potentially explosive
atmospheres include the areas where you would normally be advised to turn off
your vehicle engine. Triggering of sparks in such areas could cause an explosion
or fire, resulting in bodily injuries or even deaths. Do not switch on the device
at refueling points such as service stations. Comply with restrictions on the use
of radio equipment in fuel depots, storage, and distribution areas, and chemical
plants. Also, adhere to restrictions in areas where blasting operations are in
progress. Before using the device, watch out for areas that have potentially
explosive atmosphere that are often, but not always, clearly marked. Such locations
include areas below the deck on boats, chemical transfer or storage facilities and
areas where the air contains chemicals or particles such as grain, dust, or metal
powders. Ask the manufacturers of vehicles using liquefied petroleum gas (such
as propane or butane) if this device can be safely used in their vicinity.
30
TRAFFIC SECURITY
Observe local laws and regulations while using the device. Also, if using the device
while driving a vehicle, please comply with the following guidelines:
• Concentrate on driving. Your first responsibility is to drive safely.
• Do not talk on the device while driving. Use hands-free accessories.
• When you have to make or answer a call, park the vehicle at the road side
before using your device.
• RF signals may affect electronic systems of motor vehicles. For more
information, consult the vehicle manufacturer.
• In a motor vehicle, do not place the device over the air bag or in the air bag
deployment area. Otherwise, the device may hurt you owing to the strong force
when the air bag inflates.
• Do not use your device while flying in an aircraft. Switch off your device before
boarding an aircraft. Using wireless devices in an aircraft may be dangerous to
the operation of the aircraft, disrupt the wireless telephone network, and may
be considered illegal.
OPERATING ENVIRONMENT
•
•
•
•
•
•
•
Do not use or charge the device in dusty, damp or dirty places or places with
magnetic fields. Otherwise, the circuit may not function properly.
The device complies with the RF specifications when the device is used near
your ear or at a distance of 1.5 cm from your body. Ensure that the device
accessories such as a device case and a device holster are not composed of
metal components. Keep your device 1.5 cm away from your body to meet the
requirement earlier mentioned.
On a thunder and stormy day, do not use your device when it is being charged,
to prevent any danger caused by lightning.
When you are on a call, do not touch the antenna. Touching the antenna affects
the call quality and results in increase in power consumption. As a result, the
talk time and standby time are reduced.
While using the device, observe the local laws and regulations, and respect
others’ privacy and legal rights.
Use accessories authorized by manufacturers. Using unauthorized accessories
will render the warranty null and void.
Keep the ambient temperature between 0 and 45 degree centigrade while the
device is being charged. Keep the ambient temperature between -10 to 55
degree cengtigrade for using the device powered by battery.
31
PREVENTING HEARING DAMAGE
Using the receiver, ear buds, headphones, speakerphone, or earpieces at high
volume can result in permanent hearing loss. Be extremely careful when listening
at high decibel levels. Set the volume to a safe level. If you experience strange
sounds in your ears like ringing or if you hear muffled speech, get your hearing
checked. If you continue to use high volume, your hearing will soon get affected.
Hearing experts offer the following suggestions to protect your hearing:
• Reduce the time you use the receiver, earbuds, headphones, speakerphone,
or earpieces at high volume.
• Do not increase the volume to block noisy surroundings.
• Reduce the volume if you cannot hear people speaking near you.
SAFETY OF CHILDREN
Please comply with all precautions with regard to children’s safety. Letting the
child play with your device or its accessories, which may include parts that
can be detached from the device, may prove dangerous, as it may present a
choking hazard. Make sure that small children are kept away from the device and
accessories.
ENVIRONMENT PROTECTION
Follow all the local regulations regarding the disposal of your devices or electrical
accessories (such as chargers, headsets, or batteries). Recycle them. Do not
dispose of an exhausted battery or a used device in a garbage can.
ACCESSORIES
Use only the accessories, such as the charger, battery, and headset, delivered
by manufacturer. Using accessories of other manufacturers or vendors with this
device model might invalidate any approval or warranty applicable to the device,
might result in the non-operation of the device, and might be dangerous.
BATTERY AND CHARGER
•
•
The battery can be charged and discharged hundreds of times before it
eventually wears out. When the standby time and talk time are shorter than
normal, replace the battery.
Use the AC power supply defined in the specifications of the charger. An
improper power voltage may cause fire or the charger may not function
properly.
32
•
•
•
•
•
•
•
If the ambient temperature is considerably low or high, the capacity and life of
the battery is reduced. When the temperature is lower than 0°C, performance
of the battery is affected.
Do not connect two poles of the battery with conductors such as metal
materials, keys or jewelries. Otherwise, the battery may be short-circuiting and
may cause injuries and burns on your body.
Do not disassemble the battery or solder the battery poles. Otherwise, it may
lead to electrolyte leakage, overheating, fire, or explosion.
If battery electrolyte leaks out, make sure that the electrolyte does not touch
your skin and eyes. When the electrolyte touches your skin or splashes into
your eyes, wash your eyes with clean water immediately and consult a doctor.
If the battery is damaged, or the color changes or gets abnormally heated while
you charge or store the battery, remove the battery immediately and stop using
it. Otherwise, it may lead to battery leakage, overheating, explosion, or fire.
If the power cable is damaged (for example, the lead is exposed or broken),
or the plug loosens, stop using the cable at once. Otherwise, it may lead to
electric shock, short-circuit of the charger, or a fire.
Do not dispose of batteries in fire as they may explode. Batteries may also
explode if damaged.
CLEARING AND MAINTENANCE
•
•
•
•
•
The device, battery, and charger are not water-resistant Keep them dry.
Protect the device, battery and charger from water or vapor. Do not touch the
device and charger with a wet hand. Otherwise, it may lead to short-circuit or
malfunction of the device and electric shock to the user.
Do not place your device, battery, or charger in places where it can get
damaged because of collision. Otherwise, it may lead to battery leakage,
device malfunction, overheating, fire, or explosion.
Do not place magnetic storage media such as magnetic cards and floppy disks
near the device. Radiation from the device may erase the information stored on
them.
Do not leave your device, battery, or charger in a very hot or cold place.
Otherwise, they may not function properly and may lead to a fire or an
explosion.
If the ambient temperature is considerably low or high, the capacity and life of
the battery is reduced. When the temperature is lower than 0°C, performance
of the battery is affected.
33
•
•
•
•
Do not place sharp metal objects such as pins near the earpiece. The earpiece
may attract these objects and hurt you when you are using the device.
Before you clean or maintain the device, power off the device and disconnect it
from the charger.
Do not use any chemical detergent, powder, or other chemical agents (such as
alcohol and benzene) to clean the device and the charger. Otherwise, parts of
the device may get damaged or a fire can be caused. You can clean the device
and the charger with a piece of damp and soft antistatic cloth.
Do not dismantle the device or accessories. Otherwise, manufacturer is not
liable to pay for damages as the device and accessories are not covered by
warranty.
EMERGENCY CALL
You can use your device for emergency calls in the service area. The connection,
however, cannot be guaranteed in all conditions. You should not rely solely on the
device for essential communications.
34
15 DISCLAIMERS
Features and specification specified in this manual are subject to Change without
prior notice. Certain mobile phone features may not be Activated by your service
provider, and/or their network settings may limit the feature’s functionality. Services
and some features such as GPRS, E-mail may be dependent on the network, SIM
card, as well as on the Compatibility of the devices used and the content formats
supported, and may require network/service subscription/solutions. Data transfer
Speeds are network dependent. You must use the same Bluetooth Profile to enable
the Bluetooth devices to communicate with one another. To determine the profiles
supported by other Videocon products, visit http://www.videoconmobiles.com For
other devices, contact their respective manufacturers. Certain Bluetooth features
including those listed may not be supported by all compatible Bluetooth enabled
devices, and/ or the functionality of such features may be limited in certain devices,
or certain wireless carriers. Always demand for original Videocon mobile phones
to protect yourself from buying tinkered and/or used or tampered phones. Buy
Videocon tested and Videocon certified compatible accessories and add-ons. The
warranty is applicable only for Videocon phones, the company is not responsible
for any loss or theft. Always use Videocon original Enhancements (including
batteries) for safety. The use of any other type may invalidate warranty applicable
to the mobile phone and can also be dangerous. The phone is designed to operate
using Lithium ion batteries approved by the Videocon phone manufacturers.
Using non approved batteries with the phone may result in poor performance
and can cause damage to the phone or its enhancements or attachments. The
display and products visualization here are for illustrative purposes only. All
features, functionality and other product specifications are based on the latest
available information and are correct at the time of printing, however such product
specifications are subject to change without notice based on newer versions and
enhancements. The unauthorized copying of copyrighted material is not legal and
is inimical to the provisions of the Copyright Laws of India and other countries.
Kindly refer to http://www.videoconmobiles.com website for knowing newer
versions of information provided in this manual, which might be of further use.
35