1
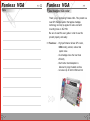
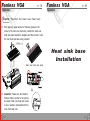
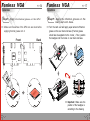
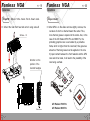
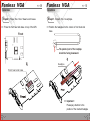
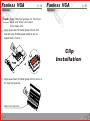
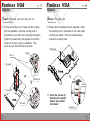
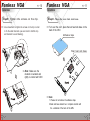
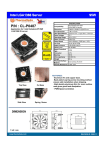
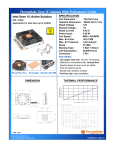
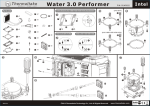
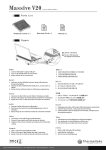
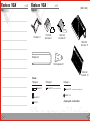
Fanless VGA
Note
>> 20
Fanless VGA
>> 01
( Unit : mm )
Component
Clip sets X 2
Front heat
sink base X1
Rear heat
sink base X1
Main front
heat sink X1
Thermal
Grease
Heatpipe X 2
Thermal grease X 1
Main rear
heat sink X1
Screws :
Package A
Screw-A X 3
Screw-B X 3
Nut-C X 3
Package B
Screw-D X 6
Package C
( for rear heat sink base )
Screw-E X 10
Washer
( for main front and rear heat sink )
X4
* Spare parts are included.
Fanless VGA
Fanless VGA
>> 02
>> 19
Screw - E
Main rear heat sink
Nut - C
Screw - D
Adhesive tape
Rear heat sink base
Screw-B
Front heat
sink base
Screw-A
Clip set
Heatpipe
Check Point
Main front
heat sink
Screw - E
Exploded Drawing
1. After completing the Fanless VGA installation, turn on the
computer to check if both of the main heat sink are at
similar temperature range (Leave the computer running
for a few minutes to confirm the temperature and you can
tell the difference by turning the computer off and touch
both of the heatsinks with your hand).
If temperature for both main heat sink seems to differ
greatly, please check the following:
A. Is the thermal grease properly spread onto the following
six areas:
a. On the surface of front heat sink base
b. Inside the tunnel of front heat sink base
c. On the surface of rear heat sink base
d. Inside the tunnel of rear heat sink base
e. Inside the tunnel of main front heat sink
f. Inside the tunnel of main rear heat sink
B. Is the GPU and the front heat sink base tightly in contact?
C. Is the heatpipe properly in contact with the heat sinks?
2. We do not recommend overclocking the video card. We
are not responsible for any damages caused by
overclocking.
3. If the heatpipe is tampered with or scratched by a sharp
object, it may not function properly. Please handle with
care.
4. After successfully installing the video card, do not shake
or exert excessive force on any part of the heat sinks.
The screws and nuts that hold the heat sinks may
become loose.
FANLESS VGA
User's Manual
Taiwan : Thermaltake Technology Co.,Ltd.
Address: 8F, No.27, Lane 155, Sec.3, Pei Shen Road, Saen
Keng Hsiang, Taipei Hsiang, Taiwan
TEL:(886) 2-2662-6501 FAX:(886) 2-2662-6510
E-mail: [email protected]
Overseas Branch
USA: Thermaltake Technology Inc.
Address: 525Parritott Place,
City of Industry, CA 91746
TEL: (626)968-9189 FAX: (626)968-7659
E-mail: [email protected]
France: Thermaltake France
Address: 73, Bld de Courcerin Parc du Courcerin 77185 Lognes
TEL: + 33 - (0)160 1763 15 FAX: + 33 - (0)1 60 17 63 16
E-mail : [email protected]
China: Thermaltake Beijing Co.Ltd
Address: #907,HaiTai Plaza, No.229, North 4th
Ring Road, Haidian District,Beijing 100083 PRChina
TEL:+86-10-82883159/3189 FAX:+86-10-82376577
E-mail: [email protected]
Australia: Thermaltake Australia and
New Zealand Pty Ltd
Address: Unit 1, 49 Henderson Road Rowville
Victoria 3178 Australia
TEL: +61- (03) 9763 1622 FAX: +61- (03) 9763 1677
E-mail: [email protected]
URL: www.thermaltake.com.au
Japan: Thermaltake Japan Inc.
Address: No.5-A, Hei-An Bldg 2-6-16 Okubo,
Shinjuku-ku, Tokyo, 169-0072, Japan
TEL: +81- 3-3203-3371 FAX: +81- 3-3203-3372
E-mail: [email protected]
www.thermaltake.com
O1693
Fanless VGA
Note
>> 22
Fanless VGA
>> >
>> Dual heatpipe VGA cooler
Thank you for purchasing Fanless VGA. This product is a
new GPU thermal solution that applies heatpipe
technology and can be applied to video card with
mounting holes on the PCB.
Be sure to read this user guide in order to use this
product properly and safely.
>> Features : - High performance fanless GPU cooler,
0dBA cooling solution, reduce total
system noise
- Dual heatpipe move the heat more
efficiently
- Much better heat dissipation is
delivered by larger heatsink surface
- Universal clip for both nVIDIA and Ati
Fanless VGA
>> > >
Component
1
Heat Sink Base Installation
3
Clip Installation
7
Heatpipe Installation
NOTICE: Thermaltake is not responsible for
any damaged caused by the incorrect
installation or usage of this product.
Fanless VGA
Note
Contents
13
>> 21
Fanless VGA
>> 18
Installation
Fanless VGA
>> 03
Installation
Step12: Position the main rear heat sink.
>> After applying equal amount of thermal grease on the
tunnel of the main rear heat sink, position the main rear
heat sink plate toward the heatpipe and then mount it onto
the rear heat sink base using screw-E.
Screw - E
Heat sink base
Installation
Main rear heat sink plate
>> Important : Make sure the finished
Fanless VGA is similar to the picture
as shown. Main rear heat sink needs
to be in position underneath with the
main front heat sink.
Fanless VGA
>> 04
Fanless VGA
>> 17
Installation
Installation
Step1: Apply the thermal grease on the GPU.
Step11: Apply the thermal grease on the
rear heat sink base.
>> Make sure the surface of the GPU core are clean before
applying thermal grease onto it.
Front
Back
>> Turn the card over and apply equal amount of thermal
grease on the rear heat sink base (Thermal grease
should also be applied into the tunnel ). Then, position
the heatpipe into the tunnel on rear heat sink base.
Th
G erm
re
as al
e
Front
Back
>> Important : Make sure the
position of the heatpipe is
according to the drawing.
Fanless VGA
>> 16
Fanless VGA
Installation
Installation
Step10: Mount the main front heat sink.
Important :
>> Mount the main front heat sink onto it using screw-E.
Screw - E
Attention on the
position of the
inserted heatpipe
Front View
Side View
>> 05
>> Most GPU`s on the video card are slightly concave, the
curvature of which is directed toward the center. Thus,
more thermal grease is required at the center. Also, in the
case of the ATI Radeon 9700 Pro and 9800 Pro, the
protruding graphics core is surrounded by a protective
frame, which is higher than the core itself, thus generous
amounts of thermal grease must be applied on the core.
If proper contact between the front heatsink and the GPU
core cannot be made, it will lead to the possibility of the
core being overheat.
ATI Radeon 9700 Pro
ATI Radeon 9800 Pro
Fanless VGA
>> 06
Fanless VGA
Installation
Installation
Step2: Place the front heat sink base.
Step9: Install the heatpipe.
>> Place the front heat sink base on top of the GPU.
>> 15
>> Position the heatpipe into the tunnel on front heat sink
base.
Front
The pointed part of the heatpipe
should be facing downward.
Heatpipe
Front heat sink base
>> Important :
Please pay attention to the
position of the inserted heatpipe.
Fanless VGA
>> 14
Installation
Fanless VGA
Installation
Step8: Apply thermal grease on the front
heat sink base and main
front heat sink.
>> Apply equal amount of thermal grease onto the front
heat sink base (Thermal grease should be also be
applied into the "tunnel" ).
Clip
Installation
>> Apply equal amount of thermal grease into the tunnel on
the main front heat sink.
Main front heat sink
>> 07
Fanless VGA
>> 08
Installation
Fanless VGA
Installation
Step3: Place clip set on to front
heat sink base.
>> Place clip set onto the front heat sink base (both clip
sets are identical, use either one of them).
Clip set
Heatpipe
Installation
>> 13
Fanless VGA
>> 12
Fanless VGA
Installation
Installation
Step7: Put the second clip set on.
Step4: Fix the clip.
>> Put the second clip set on. Please note the mounting
arms are adjustable. Adjust the mounting arms in
accordance to your video card s mounting hole pattern
Tighten the screw-B using the supplied nut-C and the
screws on the clip by using a screwdriver. Then,
secure the rear heat sink base by screw-D.
>> 09
>> Please note the mounting arms are adjustable. Adjust
the mounting arm`s in accordance to your video card's
mounting hole pattern. Place the included screw-A
through the mounting holes.
Screw-A
Nut-C
Nut-C
Screw-D
Screw-B
Washer
Screw-B
Screw-D
>> Secure the screw-A by
tightening the supplied
washers and screw-B
from behind.
Screw-B
Fanless VGA
>> 10
Fanless VGA
>> 11
Installation
Installation
Step5: Tighten the screws on the clip.
Step6: Place the rear heat sink base.
>> Use screwdriver to tighten the screws on the clip in order
to fix the small heat sink (use one hand to hold the clip
and heatsink to avoid shaking).
>> Turn over the card , place the rear heat sink base on the
back of the GPU.
Adhesive tape
Rear heat sink base
>> Note : Make sure the
heatsink is centered and
tightly in contact with GPU.
>> Note:
1. Please do not remove the adhesive tape.
2.Heat sink base should be in complete contact with
the underside of the back of the GPU.