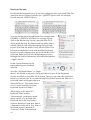
1
KeyStrokes 4.1
®
for Mac OS X
On-screen keyboard
User Manual
by
AssistiveWare®
AssistiveWare
Van Speijkstraat 73-D
1057 GN Amsterdam
The Netherlands
Europe
fax: +31-20-6128266
http://www.assistiveware.com
KeyStrokes contact:
[email protected]
KeyStrokes, the KeyStrokes application icons, and the KeyStrokes
documentation are copyright David Niemeijer © 1996-2008. All rights reserved.
The KeyStrokes application icon (which also features on the cover of this
manual) was designed by Giesbert Nijhuis using KeyStrokes®, a HeadMouse®
and Photoshop®.
AssistiveWare is a trade name and registered trademark of Niemeijer Consult.
KeyStrokes, SmartTransparency, PolyPredix, Proloquo, SwitchXS, Dwellix and
the “salamander” logo are trademarks or registered trademarks of Niemeijer
Consult. Macintosh, Power Macintosh, Mac, and Mac OS are trademarks of
Apple Computer, Inc., registered in the U.S. and other countries. HeadMouse is
a registered trademark of Origin Instruments Corporation. Photoshop is a
registered trademark of Adobe Systems Incorporated.
Use of KeyStrokes is subject to the license agreement located towards the end of
this manual.
Manual version 4.1
Introduction
A Visual QuickStart
4
Main features
5
System requirements
6
Installation
7
Activating download copies
7
Activating CD-ROM copies
7
Registration
8
Using the on-screen keyboard
Keyboard models and sizes
9
9
Keyboard layouts
10
The keyboard toolbar
11
The typing field and prediction area
11
Using the prediction window
14
Using prediction with a hardware keyboard
15
Using prediction with SwitchXS
16
Using prediction, shortcuts and auto-type
17
The basics of prediction
17
Shortcuts
19
Auto-type
20
Statistics
21
Advanced prediction and dictionary topics
4
23
How learning works
23
Using the dictionary editor
24
Using dwelling and the Dwellix™ window
28
Designing your own keyboards
30
Using Simple Mode
31
1
Using Invade Fullscreen Mode, Game Mode and the
KeyStrokes Widget
32
Using SmartTransparency™
34
Preference settings
35
Accessing the preferences
35
General
35
Keyboard
36
Dwellix™
38
SmartTransparency™
39
Audio & Visual Feedback
40
Prediction
41
Shortcuts
42
Auto-type
42
Hot keys
43
Tips and Tricks
Typing in Dashboard
45
45
Working with the command, control, option and shift keys 45
Working with the Dwellix™ buttons
45
Using SmartTransparency™
45
Key label readability
46
Resetting everything to default
46
Iconize, collapse or hide the KeyStrokes windows
46
Known issues
2
47
Unicode keyboard layouts
47
Compatibility with TypeIt4Me
47
Compatibility with full-screen applications
47
Login window and secure screen savers
47
Mac OS X built-in accessibility features
48
Support
49
Support steps
49
Local distributors
49
Software License Agreement
50
Prediction dictionaries disclaimer
52
3
Introduction
KeyStrokes® provides a fully-functional on-screen keyboard for Mac OS X that
works by drawing a keyboard image on the display and using a mouse,
trackball, head pointer or other mouse emulator to type characters into any
normal application. It works seamlessly with all standard Mac OS X
applications as well as applications running in the Classic environment
allowing a person with a disability to type virtually anywhere a hardware
keyboard can be used. KeyStrokes requires Mac OS X 10.4 or later. Users
running Mac OS 9 or older versions of Mac OS X can use KeyStrokes 3.1, 3.6 or
4.0.
KeyStrokes provides advanced multilingual word prediction. Thanks to its
revolutionary PolyPredix™ word prediction engine it can do word completion,
next word prediction and even multi-word prediction in any Roman language
as well as many other languages. The PolyPredix™ prediction engine offers
many unique, time and effort saving features allowing significantly easier and
faster typing. Word prediction can also be used with the hardware keyboard or
with SwitchXS version 2.1 and later.
KeyStrokes offers shortcut expansion, is able to speak what you type and
automatically adjusts to US and international keyboard layouts and has
multiple resizable keyboard models. It handles command-key combinations,
dead-keys, and modifier key - click combinations. It offers a quick access
toolbar and has many customizable settings. The integrated Dwellix™ utility
provides advanced system-wide dwelling allowing people with disabilities to
click, double click, drag, right-click, and type by simply holding the cursor
motionless for a programmable period of time. The included
SmartTransparency™ technology allows optimum use of screen real estate by
showing the keyboard only when needed.
A Visual QuickStart
Using KeyStrokes is actually quite simple. You install it by dragging KeyStrokes
from the disk image or CD to your hard disk. You double click the KeyStrokes
application icon to load KeyStrokes. A configuration wizard will appear
allowing you to choose between typing with the on-screen keyboard, the
hardware keyboard or SwitchXS. It also allows you to choose which prediction
dictionary you would like to initially use. Now, you are ready to type.
KeyStrokes is configured to work out-of-the-box while most special features can
be learned by doing. However, if you are curious to learn more or want to make
best use of some of the more advanced features this manual is there to help you.
4
Dwellix window for
auto-clicking
KeyStrokes menubar
Prediction window
Keyboard window and toolbar
The figure shows the KeyStrokes menus and main windows.
Main features
• Fully functional on-screen keyboard
• Works seamlessly with all standard applications
• Includes PolyPredix™, an advanced word prediction engine that can do
word completion, next word prediction and even multi-word prediction in
any Roman language as well as many other languages. PolyPredix™ can
reduce typing efforts by 50 to 70%.
• Includes LayoutKitchen, a poweful keyboard editor permitting KeyStrokes
users to design their own keyboards with buttons to type, to speak, to
launch applications and much more. LayoutKitchen requires a KeyStrokes
4, SwitchXS or LayoutKitchen activation code. Users with a KeyStrokes 3
activation code can use keyboards others designed with LayoutKitchen but
cannot design their own keyboards.
• Provides prediction for the on-screen keyboard, the hardware keyboard and
for SwitchXS 2.1 or later.
• Learns your vocabulary as you type or through text files and learned text
can even be spell-checked automatically to prevent learning typos
• Includes a powerful dictionary editor to edit user dictionaries or even
design dictionaries for additional languages or dialects
5
• Provides various visual and audio-feedback features including speaking
what you type (the latter option is built-in for English and can be extended
to other languages and higher quality voices by using Proloquo)
• Has configurable auto-spacing and auto-capitalization features for a
number of languages
• Provides powerful shortcut expansion features
• Includes Dwellix™, which offers an advanced, customizable dwelling
solution to click, double click, drag, right-click and type without pushing a
mouse button
• Includes SmartTransparency™ technology, which makes the keyboard and
Dwellix™ windows become transparent when not used and makes them
automatically reappear when needed
• Handles command-key combinations, dead-keys, and modifier key - click
combinations
• Works with US and international keyboard layouts
• Offers multiple interactively resizable keyboard models with key labels in
any font the user desires
• Offers many options including: auto key-repeat, different key designs, and
customizable key spacing.
• Provides a collapsible toolbar to access the most important features right
from the on-screen keyboard
• Offers an iconizable and collapsible keyboard window floating above other
applications
• Includes special “invade fullscreen” and game modes for increased
compatibility with fullscreen applications and games. Also provides a
Dashboard widget that facilitates typing with KeyStrokes into Dashboard
widgets.
• Provides a customizable simple mode to control what users can and cannot
do with the on-screen keyboard
• Is AppleScriptable.
System requirements
KeyStrokes 4.1 runs on Mac OS X 10.4 and higher. KeyStrokes requires a
minimal screen resolution of 800 x 600 pixels. For optimum performance and
access to all features Mac OS X 10.5 or higher is recommended. KeyStrokes can
be used with any mouse, trackball, head pointer or other mouse emulator that
is compatible with Mac OS X. For Mac OS 9 and older Mac OS X versions
KeyStrokes 3.1, 3.6 or 4.0 can be used.
6
Installation
KeyStrokes is distributed on a Disk Image (a file with the extension .img
or .dmg) or CD-ROM. KeyStrokes can be installed by mounting the disk image
or CD-ROM and dragging the KeyStrokes Application to your hard disk.
Among other places, KeyStrokes may be installed in your home folder or in the
Applications folder (recommended).
Activating download copies
In case you have downloaded KeyStrokes from the Internet the software will
run in a full trial mode. Full trial
mode expires after 15 days of use
(these need not be consecutive). At
that time KeyStrokes will revert to
restricted trial mode in which one
(random) key will be disabled,
preferences settings will no longer be
saved and the software will refuse to
run for more than 30 minutes at a
time. You will need to activate
KeyStrokes to lift these restrictions.
If, after your 15-day full trial has
expired, you still feel that you require
more time to evaluate KeyStrokes,
you can send an e-mail to [email protected] to get an
activation code that will allow you to extend your trial period for at least 7
consecutive days (counted from the moment your extended trial request is
received). To lift all restrictions you should purchase a license of KeyStrokes to
obtain a permanent activation code.
You should enter the activation code as well as your name, company name (if
applicable) and e-mail address (if applicable) in the Activation window (select
“Activation...” from the “KeyStrokes” menu) and press the Add license button.
Activating CD-ROM copies
In case you obtained KeyStrokes on a CD-ROM the application may have been
pre-registered for you. In this case, when you first launch KeyStrokes, an
Activation window will appear with your permanent activation code already
pre-entered. Now you will only have to enter your name, company name (if
applicable) and e-mail address (if applicable) in the Activation window and
press the Add license button. Note that if the Activation window does not
appear automatically or a permanent activation code does not appear in the
designated field, your copy may not have been pre-registered and you will have
to enter the code you obtained from your reseller manually (it may have been
7
written on the disk, the sleeve, a separate piece of paper or may have been sent
to you by e-mail). In this case, follow the instructions for activating download
copies.
If you do not activate your copy, KeyStrokes will run in full trial mode for 15
non-consecutive days and after that revert to restricted trial mode. To remove
all limitations you should activate your copy by going to the Activation
window (select “Activation...” from the “KeyStrokes” menu) and then follow
the above instructions.
Please store your permanent activation code and user information in a safe
place in case you need to re-install the software at some point.
Registration
After activating your copy you are kindly requested to register KeyStrokes
online at http://www.assistiveware.com/register.php so that we can keep you
informed of updates and bug fixes. There are also a number of optional
questions on this online form that help us to further improve KeyStrokes. The
information supplied will be kept confidential.
8
Using the on-screen keyboard
Keyboard models and sizes
KeyStrokes includes multiple, fully resizable, keyboard models, including
standard and extended keyboards, alphabetic keyboards and frequency-base
layout keyboards. (Note that the block model is optimized for use with the
standard US QWERTY keyboard layout and is not recommended for AZERTY,
DVORAK and other keyboard layouts.) Additionally, if you have a KeyStrokes
4 activation code you can use LayoutKitchen 2.0 and later to create your own
keyboards (see section “Designing your own keyboard”).
You can change the keyboard model through the
KeyStrokes “Keyboard” menu. This menu is accessible
through the KeyStrokes menubar when KeyStrokes is
the front application (click the KeyStrokes application
icon in the Dock) to bring KeyStrokes and its menus to
the front). You can also access the “Keyboard” menu at
any time from the keyboard icon button on the
keyboard window toolbar (see section “The keyboard
toolbar”).
The keyboard menu also allows you to select one of the
standard keyboard sizes, show or hide the keyboard,
show or hide the keyboard window toolbar and toggle
between the small and the large toolbar.
The keyboards are fully resizable by dragging the
lower right corner. This allows you to give them any
size and proportion you desire.
9
Keyboard layouts
By default the keyboard layout is used as configured when you install Mac OS.
American users will thus typically see a QWERTY layout and, for example,
French users an AZERTY layout.
You can change the keyboard layout (for example from
QWERTY to AZERTY, DVORAK or a foreign layout,
such as the Russian key layout) using the Mac OS X
input menu that may be found on the menubar and is
usually labeled with a flag identifying the keyboard
layout. Note that this menu is only shown if Mac OS X
has been configured to work with multiple keyboard
layouts. If your computer does not show the Mac OS X
keyboard menu you can also change the key layout
through the System Preferences (accessible through the
“Apple” menu).
In the System Preferences the
International panel should be
selected.
Next the “Keyboard Menu” or “Input
Menu” tab should be selected, which provides access to all the keyboard
layouts installed on your Mac OS X system. Here you can select the keyboard
layout you want to use. If you select multiple keyboard layouts the Mac OS X
keyboard menu will appear that was
discussed above. This menu allows
you to switch instantly from one
keyboard layout to another.
The settings in the Mac OS X
keyboard menu and the
“International” preferences panel
apply equally to your hardware
keyboard and to the KeyStrokes
software keyboard. Note that, due to
a limitation in Mac OS X 10.4, when a
keyboard layout is marked as
“Unicode” in the “International”
10
preferences you need to select this layout (from the Input Menu) both when
KeyStrokes is the front application and when the document or window you
want to type into is up front (so you effectively need to choose the keyboard
layout twice). Only in this way will you be able to see on the on-screen
keyboard the letters you will be typing into your document. On Mac OS X 10.5
this is not necessary.
When you change to a non-Roman keyboard layout the font used to display the
labels of the on-screen keyboard keys is automatically adjust when necessary. If
this does not happen or if you do not like the default font you can change the
font using the KeyStrokes preferences (see the section “Preference settings”).
The keyboard toolbar
With the toolbar of the keyboard window you can perform a number of
common actions. The figure explains what each of the buttons are for.
Show prediction
Double click
window
Keyboard menu
Dwell on/off
Show menus
Collapse toolbar
Iconize keyboard
Show preferences
Show/hide
Dwellix™ window
Single click
Right click
Drag click
Quit
With the Keyboard menu (accessible through the KeyStrokes menubar and
through the toolbar button with the keyboard icon) you can choose to hide or
show the toolbar. You can also use this menu to choose between a large and a
small toolbar. Finally, when the toolbar is shown you can temporarily collapse it
by clicking on the small triangle found all the way on the left side of the toolbar.
You can also use the small semi-transparent “toolbar” button at the right-hand
side of the window titlebar to hide or show the toolbar.
The typing field and prediction area
Both the typing field and prediction area are optional parts of the KeyStrokes
keyboard that can be turned on and off through the Keyboard menu (accessible
through the KeyStrokes menubar and through the toolbar button with the
keyboard icon). The typing field shows the letters and words as you are typing.
This allows you to focus on the keyboard and reduces the need to look at your
document while typing, which reduces eye movements and increases typing
speed.
11
Select learning dictionary
Select prediction dictionary
Typing field
Prediction area
Learning on/off
Automation on/off
If you click outside the KeyStrokes windows to move the caret (the blinking
typing cursor) or undertake some other action that could result in typing taking
place in another location, the typing field is reset to make sure it always
consistently reflects what you are typing. So when you type “hi David” this will
show in the typing field, but if you subsequently click in your text to edit the
word “hi” in order to replace the ‘h’ with a capital the typing field will be reset
and display “H” rather than showing “hi DavidH”.
Occasionally, the typing field may loose synchronization with the text in your
document. This may, for instance, happen when you hold down the backspace
key to erase some text because some applications erase faster than the regular
key repeat rate and KeyStrokes has no way of knowing whether this is
happening. A single click in your document will reset the typing field so that
subsequently typed text will be in-synch again.
The prediction area shows the words and phrases the KeyStrokes prediction
engine thinks you might want to type. As you type, the prediction engine
adjusts its suggestions with each key you type. You can configure how many
items will be suggested, how much space is reserved between items, the text
size used, and so forth, through the KeyStrokes preferences (see the
“Preferences” section for details). To type one of the suggestions simply click on
it.
The typing field and prediction area share four special buttons. On the far left
you will find a button with a menu listing all the available prediction
dictionaries. Currently open dictionaries are marked with a check mark.
KeyStrokes can predict from multiple dictionaries at once. To open or close
dictionaries simply select them from this menu. The second button on the left
has a menu that lists the available user dictionaries. If you want KeyStrokes to
learn new words and phrases as you type you need to select one of these
dictionaries for learning. The active learning dictionary will be marked with a
check mark. Only one dictionary can be used for learning at a time.
On the right side there is a button with a pencil icon. This button is used to turn
learning on/off. If the button is highlighted learning is on. You may want to
turn this button off if you are typing things you do not want KeyStrokes to
learn (passwords for instance) or things that make little sense for it to learn (like
when you are doing your accounting and are mainly typing numbers and
12
formulas). On the far right there is a button with a cogwheel icon. This is the
automation on/off button. When automation is on the auto-type features
(affecting spacing and capitalization) are active. You can temporarily turn
automation off if you want to type something for which you know the autotype rules are counterproductive. For example, if you want to type
“elaboration” and after typing “elab” notice that the dictionary knows only
about “elaborate” you can turn automation off (so that auto-spacing will not
automatically append a space after a word has been selected), click on
“elaborate” to select that word, type backspace to delete the last “e” and type
“ion” to make it read “elaboration”. Afterwards, you can turn automation back
on again and continue typing your sentence.
13
Using the prediction window
The prediction window shares the buttons discussed in the section “The typing
field and prediction area”. It has one additional button labeled with a ‘+’. Using
this button you can, depending on whether the Text or Shortcuts tab is active,
add respectively words and shortcuts to the current learning dictionary. Below
the buttons, the list of text suggestions or shortcut suggestions is displayed
depending on which tab you select. The prediction window, which provides a
vertical prediction list that can be placed anywhere on the screen and be resized
as needed, complements the horizontal prediction list of the keyboard. If you
have selected to view more suggestions than fit the window (using the
Prediction section of the Preferences) the list will be scrollable when KeyStrokes
has a lot of suggestions to share with you. The list may actually be blank in case
KeyStrokes has no suggestions for you, for example, because you are typing an
unknown word. To type one of the suggestions simply click on it. Predictions
can also be triggered with hot keys, which is useful if you use the word
prediction with a hardware keyboard (see the
section “Using prediction with a hardware
keyboard”). Using either the Hide Toolbar item
of the Prediction menu or the toolbar toggle
button in the window title bar you can show or
hide the toolbar of the prediction window.
The prediction and keyboard windows can
snap together if you move them near to each
other. When that happens you can move both
windows at the same time by dragging just the
keyboard window. If you want to separate them
again you should drag the prediction window
instead.
Note that during certain lengthy operations
such as during learning from file or importing
or exporting a dictionary KeyStrokes may
temporarily transform the prediction window
into a progress window.
14
Using prediction with a hardware keyboard
KeyStrokes can also provide prediction when typing with a normal keyboard.
You can use the configuration wizard to configure KeyStrokes for use with a
hardware keyboard (either the first time you run KeyStrokes or later by
accessing the configuration wizard from the KeyStrokes menu). When
configured for hardware keyboard use, KeyStrokes will automatically adjust its
suggestions as you type with the hardware keyboard. You can select a
suggestion by clicking on it with the mouse or through a hot key. You can define
the hot keys to use in the Hot keys section of the KeyStrokes Preferences. In that
preferences panel you can also determine whether KeyStrokes should show the
hot key in parentheses behind each suggestion displayed in the Prediction
window. When selecting hot keys make sure you select keys not used for other
purposes in the applications you are normally working with. Aside from this
additional way of selecting the suggestions to type the prediction works the
same for use with the on-screen keyboard and with the hardware keyboard. The
only function not available for use with the hardware keyboard is the automatic
capitalization after punctuation. It should also be noted that the hot keys apply
to the items displayed in the Prediction window, not those displayed in the
prediction area of the on-screen keyboard (which may be in a different order).
Sometimes you will want to use a key that is defined as hot key for its normal
function. The Hot keys section of the KeyStrokes Preferences also allows you to
define a key combination that will serve as a toggle switch to activate or
deactivate the hot keys. For example, if number keys 1 though 0 have been
defined as hot keys to trigger suggestions 1 to 10 and you want to type a
number you first deactive the hot keys using the defined key combination, then
type your number and finally, using the same key combination you activate the
hot keys again. When you use the key combination to activate or deactive the
hot keys a small semi-transparent message window will appear on your screen
to signal that hot keys are being activated or deactivated.
15
Using prediction with SwitchXS
KeyStrokes can also provide prediction when typing with SwitchXS 2.1 or
higher. You can use the configuration wizard to configure KeyStrokes for use
with SwitchXS (either the first time you run KeyStrokes or later by accessing the
configuration wizard from the KeyStrokes menu). KeyStrokes will
automatically adjust its suggestions as you type with SwitchXS. You can select a
suggestion from within SwitchXS by using one of the panels that has a name
ending with “-KS”. Those panels include a row of buttons labeled s1, s2, etc.
and are used to select suggestion 1, 2 and so forth as displayed in the Prediction
window (not those displayed in the prediction area of the on-screen keyboard,
which may be in a different order). In the Hot keys section of the KeyStrokes
Preferences you can determine whether KeyStrokes should show the suggestion
number in front of each suggestion displayed in the Prediction window. The
prediction process itself works the same if you type with the KeyStrokes onscreen keyboard or with SwitchXS.
16
Using prediction, shortcuts and auto-type
This section discusses the basics of prediction, shortcut expansion, auto-type
and the statistics. The more advanced features, such as the dictionary editor are
discussed in the section “Advanced prediction and dictionary topics”.
KeyStrokes relies on the revolutionary PolyPredix™ prediction engine
developed by AssistiveWare. The key features of this prediction engine are that
it is language independent (it handles all Roman languages as well as many
other languages), that it is able to predict from multiple language or topical
dictionaries at once and offers multiple prediction levels. The prediction engine
is paired with smart auto-type features that take care of correct spacing and
capitalization in many situations. PolyPredix™ can reduce typing efforts by 50
to 70%.
The basics of prediction
The standard KeyStrokes dictionaries (available for a number of common
languages) contain frequently used words and phrase elements (composed of
up to 5 words). As you type with the on-screen keyboard or click on the
suggested items KeyStrokes adjusts the frequencies to your vocabulary and also
records when you have last typed a particular piece of text. This information is
used to optimize the prediction for your vocabulary and the topics you write
about. You can configure many aspects of prediction (see the “Preferences”
section for more information), but in most cases the default settings should
work fine.
By default KeyStrokes does word completion, next word prediction and multiword prediction. Word completion provides suggestions of how a word might
be completed based on the letters you have already typed, so if you type “d”
KeyStrokes might suggest “development”, “do”, “devoted”, “did”, and so
forth, as ways you might want to complete your word. Next word prediction
ensures that if you type “do” followed by a space, KeyStrokes will suggest
likely next words such as “as”, “it”, “so”, “you”. Multi-word prediction looks
further back and ahead and suggests likely phrase elements that start with the
words or letters you already typed or are likely sequels to the word you just
typed. For “do” these might be: “do you”, “do you know”, “do you mean”,
“down to the”.
Word completion is the lowest prediction level, then comes next word
prediction and the highest prediction level is multi-word prediction. Each
higher level of prediction includes the former levels, so multi-word prediction
handles all levels of prediction. The standard prediction dictionaries are able to
handle all prediction levels. User dictionaries can be set to the level you want,
with the higher levels leading to larger, but more flexible dictionaries. Using the
Prediction section of the KeyStrokes Preferences you can set the prediction level
17
that KeyStrokes uses for its suggestions. Obviously, it makes no sense to set this
to multi-word prediction if you are working with dictionaries that have been set
to the next-word prediction level. Generally speaking, the higher the prediction
level the more KeyStrokes can help you speed up typing and reduce efforts.
However, in some cases multi-word prediction may lead to an information
overload so, for instance, for children next-word prediction may be a more
appropriate prediction level to use so that they will only get words suggested
and not multi-word phrase elements.
There are many settings that allow you to influence how many items are
suggested at once, what priority recently typed text gets, whether suggested
items are listed alphabetically or by likelihood, and so forth (see the
“Preferences” section for more information).
When KeyStrokes is launched it searches for standard and user prediction
dictionaries. The standard dictionaries are automatically installed in current
user’s “Library/Application Support/AssistiveWare Support/Main Prediction
Dictionaries” folder. The user dictionaries are automatically created in the User
Prediction Dictionaries folder, which can be found in current user’s “Library/
Application Support/AssistiveWare Support” folder. You may move these
dictionaries to another location as long as you make an alias of each dictionary
(or a folder containing multiple dictionaries) and put that alias into the above
mentioned location(s). If you want to use KeyStrokes on both Mac OS 9 and
Mac OS X and share the same dictionaries you can do that following this
procedure. Note that you can make aliases in the Finder by selecting the file you
want to make an alias of and then choosing Make Alias from the Finder’s File
menu. You can also command-option drag a file to another location to create an
alias there.
KeyStrokes makes an automatic backup of a user dictionary each time it is used.
These backups are located in the same location as the regular user dictionaries
but have the extension .bk.udic instead of
just .udic. If ever a user dictionary gets
damaged, KeyStrokes will automatically
attempt to revert to the last backup of the
dictionary. This automatic backup and restore
process minimizes chances of loosing the
contents of the user dictionaries without any
efforts on your part. However, it cannot
protect against general hard disk failures so it
is recommended that regular backups are
made of the user dictionaries to CD or an
external hard disk in the same way as you
make backups of other valuable files and
documents.
18
KeyStrokes will list the available dictionaries in a menu attached to the button
with the dictionary icon (available from the prediction window and next to the
prediction area or typing field in the keyboard). Another menu, attached to the
button with the dictionary plus pencil icon, lists the dictionaries that can be
used for learning. See the section “The typing field and prediction area” for
more information on how to use these menus.
When you type words and phrase elements not available in the currently open
standard prediction dictionaries KeyStrokes will learn these if learning is turned
on (the little button with the pencil is highlighted) and you have an active
learning dictionary (one that is marked in the menu attached to the button with
the dictionary plus pencil icon). When first used, KeyStrokes automatically
creates a “Default User Dictionary” and makes it the active learning dictionary.
You can create your own learning dictionaries by choosing Create Dictionary
from the Prediction menu. After supplying a name for your dictionary and
clicking OK a dialog will appear allowing you to set the Dictionary Settings
(you can change them at a later time by choosing the Dictionary Settings item
from the Prediction menu). You should set the text language for the dictionary
and the language to use for spelling. Normally, you will want to set the
prediction level to multi-word prediction unless you are sure you will never use
this dictionary for multi-word prediction in which case you can choose a lower
prediction level to make your dictionary take up less space on disk and in
memory. The next two options control how KeyStrokes handles misspelled
words and unlikely items. In most cases, the default settings are recommended.
Unlikely items are low frequency items that are extremely unlikely to ever be
suggested because they start with the same letters as other higher frequency
items. The last option in this dialog controls how KeyStrokes will deal with
items the dictionary learns but you rarely use. To prevent user dictionaries to
grow unnecessarily large KeyStrokes is able to clean them up on a regular basis,
removing seldom typed text that has not been used recently. If you use a
dictionary daily it is best to set the removal period to a few weeks, but if you
use a dictionary only a few times per year it is best to set the removal period to
a higher number of weeks.
There are several more items in the Prediction menu, such as Learn From File,
Import, Export, and Edit Dictionary that will be discussed in the “Advanced
prediction and dictionary topics” section. Note that several items in the
Prediction menu are only available if a user dictionary has been selected for
learning.
Shortcuts
KeyStrokes has powerful shortcut features. It allows you to couple a short
abbreviation to a longer piece of frequently used text. For example, you could
have an abbreviation “homea” expand to your full home address. You can
19
define shortcuts in two ways. One is using the dictionary editor discussed in the
section “Advanced prediction and dictionary topics”. The other is by clicking
on the ‘+’ button in the prediction window while the shortcuts tab is active.
This will bring up a small window that allows you to enter the text for the
abbreviation and for the expansion. The abbreviation should consist of a single
word (no spaces!), while the expansion text may consist of multiple lines of text
(up to some 16,000 characters) containing words, numbers, spaces, and tabs.
You can expand shortcuts in several ways. You can click on a shortcut item
displayed in the shortcut list of the prediction window or you can type the
abbreviation followed by an expansion key, which can be a space, tab, return or
any user defined key. If you type the abbreviation starting with a capital
KeyStrokes will also give the expanded text an initial capital. That way you do
not need to define the same shortcut twice, once with a capital and once
without. Whether all shortcuts get shown in the prediction window or just
those starting with the letters just typed and what key is used for shortcut
expansion while typing is set in the shortcuts section of the Preferences (see the
“Preferences” section for more information). Note that if you only expand
shortcuts by clicking on them in the list in the prediction window you do not
even need to define an abbreviation for each of your shortcuts. An abbreviation
is only required for shortcuts that you want to be able to expand while typing
using the expansion key. If you want to temporarily turn off this kind of
shortcut expansion, for instance because you want to type something as a plain
word that you normally use as an abbreviation to expand, you should just
temporarily turn off automation using the earlier mentioned button with the
cogwheel icon (see section “The typing field and prediction area”).
Auto-type
Auto-type groups together a number of features that conveniently add or
remove spaces and control automatic capitalization as you type. Rules are
available for several languages, but if your language is not listed you are
probably ok using the English rules. For a detailed description of the various
options see the “Preferences” section. Here only the basic principles will be
discussed.
Auto-spacing adds or removes spaces where punctuation requires this. For
instance, if you type a period, auto-spacing can automatically remove any space
before the period and add one after the period. It is quite intelligent and will
not add a space if the last character was a number, because in that case it is very
likely that you wanted to type a decimal number and do not want a space after
the period. It can also add or remove spaces as necessary before and after
brackets, parentheses, quotation marks, and so forth. If the standard rules do
not apply in a specific context you can temporarily turn off the automatic
behavior using the automation button (the one with the cogwheel icon
discussed in section “The typing field and prediction area”). There are also
20
auto-spacing settings that determine whether a space will be appended after
you click on a predicted item or expand a shortcut.
Auto-capitalization helps you by only suggesting words that start with a capital
in certain grammatical contexts or, for instance, by automatically switching to
capitals after you terminate a sentence. This later option has two varieties about
which you can read more in the “Preferences” section. It should be off when
using prediction with the hardware keyboard.
Statistics
The statistics can be accessed by choosing Show Statistics from the Prediction
menu. When you choose Show Statistics the statistics are calculated and shown
in a window. If you have been typing with the Statistics window open and want
to see how the statistics have been affected by this recent typing you should
click the Refresh button.
From the popup menu you can choose which statistics you want to view. The
General statistics contains four lines of information: The first line shows how
much efficiency you have gained, through prediction, auto-typing and shortcut
expansion. It takes into account the number of characters you typed in relation
to the number of clicks you made. This is expressed in terms of a percentage,
whereby 200% indicates that you were able to type twice as many characters as
you made clicks. The next line shows your average and maximum typing speed
in characters per minute (for comparison, a fast 10-finger typists reach about
180 to 200 characters per minute). The third line shows the total number of
characters you typed versus those completed and auto-typed. The last line
gives an overview of your efforts in terms of the number of click (or keys typed
when using the hardware keyboard or SwitchXS) and the total pixel movements
(calculated as the minimum distance between each key and suggestion you
clicked). More detailed statistics
can be obtained by choosing
the Copy command from the
Edit menu while the Statistics
window is in front. Tabdelimited text will be put on
the clipboard ready to be
pasted into a spreadsheet for
further calculations. To reset
the general statistics back to
zero click the Reset button.
You can also choose to view the statistics of any of the open dictionaries by
choosing that dictionary from the popup menu. Again there are three lines of
information. The first two lines tell you how many items and shortcuts there are
in the dictionary. The last line tells you your typing efficiency gain on predicted
21
text from that particular dictionary (expressed as a percentage). Say that the
dictionary contains the word “wealth” and you type “we” after which you click
on “wealth”, which appears as one of the suggestions. You have clicked three
times and KeyStrokes has typed “wealth “ (an extra space thanks to auto-type)
which totals 7 characters, so KeyStrokes typed 2.3 times as many characters as
you have made clicks, which shows as a gain of 233.33%. To reset the statistics
for the selected dictionary back to 0 click the Reset button.
Viewing the statistics can be just to satisfy your curiosity, but can also be a very
powerful tool to compare different prediction settings (see the “Preferences”
section for more information) and find out what works best for you. You can
either optimize for typing speed by looking at the General statistics’ average
typing speed or optimize for minimal effort by looking at the efficiency gain in
the General and dictionary specific statistics.
22
Advanced prediction and dictionary topics
This section explains how learning works, how importing and exporting works
and how you can make your own dictionaries for specific languages or topics
using the dictionary editor. You do not need to know all this in order to use
KeyStrokes, but it provides useful background information and, if you are a
power user or want to become one, it can help you to get the most out of
KeyStrokes.
How learning works
KeyStrokes has three ways of learning new vocabulary. The first and simplest
way is learning as you type. If learning is turned on (the button with the pencil
icon is highlighted) and there is an active learning dictionary (one of the
dictionaries listed in the learning dictionary menu has a check mark)
KeyStrokes learns from what you are typing using the on-screen keyboard. It
adjusts the frequency and last usage time of text that is already in one of the
open dictionaries. In addition, unknown words or phrase elements (sequences
of words) are stored in the active learning dictionary. They may be spell
checked and, depending on the setting you chose when creating the dictionary
(see section “The basics of prediction”), be either discarded if incorrectly spelled
or marked as misspelled (so that you can later review them in the dictionary
editor). Text that is used only a few times is automatically deleted from the
dictionary after it has not been used for the number of weeks indicated in the
Dictionary settings dialog (see section “The basics of prediction”).
With learning as you type KeyStrokes will never learn the first word you type
because it cannot be sure that it is not a partial word (you may have started
typing in the middle of an existing word to correct an error or to rephrase
something). KeyStrokes learns the last piece of text you typed after you use a
punctuation mark other than a space. So if you want to type “Delilah and
Delilah” KeyStrokes won’t be able to suggest Delilah the second time, but it will
be able to suggest Delilah for the next sentence (i.e., after you typed a period or,
for example, a question mark). One of the benefits of this approach is that you
can easily correct typos by backspacing up to a few words, without being
worried that your misspelled word has already been learned by KeyStrokes.
Learning as you type is automatically disabled if both the prediction window
and the prediction area in the keyboard are hidden. If you want to temporarily
disable learning as you type, for example because you want to type a password,
simply click on the button with the pencil icon to turn it off.
The second learning method is by learning from a file containing a piece of text
in the language and topic you want to teach KeyStrokes about. Choose Learn
From File from the Prediction menu to do this (note that you must first have an
active learning dictionary). KeyStrokes can only read plain text files (typically
23
with the extension .txt). You can export text in this format from most word
processors but also from Simple Text or TextEdit. Just make sure it is plain
unformatted text and not Unicode. Learning from file can take a long time and
requires a lot of memory. You should be able to handle text files of up to several
megabytes without problems, though say a 4 megabyte file may take a few
hours to process. Luckily, you can continue to type as learning is taking place.
Once learning is done you will probably want to clean up your dictionary using
the dictionary editor (discussed in section “Using the dictionary editor”).
The third learning method is by importing a file that you earlier exported from
KeyStrokes. KeyStrokes imports and exports dictionary files in a text format
that you can also open in for example Excel. KeyStrokes 3 and later are able to
import files that were exported from KeyStrokes 2.
When you want KeyStrokes to learn from file or import a dictionary that was
exported in KeyStrokes 2 it is generally advisable to ensure that the standard
dictionary for your language is open so that the active learning dictionary will
only be learning text that is not already known in the standard dictionary. This
reduces the size of your user dictionary.
Because KeyStrokes’ PolyPredix™ prediction engine is able to predict from
multiple dictionaries at once you can create dictionaries for specific topics and
open these for prediction as needed. Say that you have created a legal
dictionary with legal terms and phrases for your work and another dictionary
containing words and phrase about cars for your hobby and now your boss ask
you to write a legal piece about cars you simply open up the standard
dictionary for your language, the legal dictionary and the cars dictionary and
you are ready to go!
Using the dictionary editor
You can use the dictionary editor to simply add words or short phrases to the
active learning dictionary or add shortcuts to that dictionary. But, there is much
more to the editor then that. It is also a powerful tool if you want to create your
own language or topical dictionaries or make corrections after having “learned
as you type” for some time.
To add words or shortcuts you simply choose the Edit Dictionary from the
Prediction menu (available when KeyStrokes is the front application). Next you
click on either the Text or the Shortcuts tab to add respectively words or
shortcuts. Next to the Add button you enter the new word. For shortcuts you
enter the abbreviation here and the expansion text in the box below (which will
only appear if you have selected the Shortcuts tab). Next you click the Add
button and the word or shortcut is added to the dictionary. Note that adding
words is not really necessary because KeyStrokes can learn words as you type.
24
To change an existing
text or shortcut item
you need to click on
the item in the text or
shortcuts list so that
it is highlighted and
you will see that the
text appears in the
field(s) below the list.
You can now make
your changes and
press the Change button to save the changes. For text items you can also choose
Power Change which will apply the change to all text items in the dictionary
that contain this word or phrase. For example, if your dictionary contains the
misspelled word “lifestock” and you want to make sure that not just that word
gets changed to “livestock” but all phrase elements containing “lifestock” (e.g.,
“lifestock farm”, “his lifestock”) get updated you click on Power Change
instead of Change after you replaced the ‘f’ with a ‘v’ (resulting in “livestock”,
“livestock farm”, “his livestock”).
You can also use the dictionary editor to remove items that have not been used
for a long time (look at the Age column), with a low frequency (look at the
Frequency column) or with a certain number of word (look at the # words
column). To make such tasks easier you can click on the column heading to
have the list be sorted according to a particular column. Clicking a second time
reverses the sort order.
If you want to delete specific categories of items or want to do some specific
processing you can use the two popup menus and the input field at the top of
the Dictionary Editor window, for instance, to look up All Items Containing a
specific piece of text or with a specific number of words. If you change the text
in the field next to the popup menus you need to press the Go button to let
KeyStrokes recompile the list based on the new query. KeyStrokes predefines a
number of important categories (listed in the left-most popup menu) that can
help you to find the items you are looking for. These categories and their utility
are discussed below. One thing to note is that as you change your query by
making a selection from one of the popup menus above the list or by pressing
the Go button this may result in a smaller or larger number of items to be
shown after the new query.
To optimize prediction KeyStrokes distinguishes the following categories
regarding capitalization: Items that may need an initial capital, items that
sometimes need an initial capital, items that require an initial capital, and items
that are all caps. During learning as you type and learning from a text file
KeyStrokes will categorize each item that contains a capital in one of these
categories depending on whether the text always occurs with a capital, whether
25
it only has a capital when located at the beginning of a sentence, etc. You choose
any of these categories from the left most popup menu to view just those items.
The flag column in the list also indicates the capitalization status. Items that
may need an initial capital, but KeyStrokes is not sure of this, have a lowercase
‘m’ in the flags column. Items that sometimes need an initial capital show a
lowercase ‘c’. Items that always require an initial capital show an uppercase ‘C’.
Finally, items that are all caps show an uppercase ‘A’ in the flags column.
As KeyStrokes has no specific knowledge about the language you are using, it
can only do an educated guess at the right capitalization category. You can use
the dictionary editor to make corrections. You do so by marking the items of
which you want to change the capitalization status and then click on the No
Capital, Some Capital (short for sometimes a capital), and Capital buttons. In
the flags column in the list you will see items changing status. If you just want
to switch an item from no initial capital to a required initial capital or the other
way around you can also check or uncheck the box in the column labeled Cap.
Making sure that your dictionary has the right capitalization set for each text
item enhances KeyStrokes capacity to do the right thing with its autocapitalization features (discussed in the “auto-type” section).
The left most popup menu has a number of other useful categories. Items that
contain a number can be used to just list those items that contain a decimal
number. Often these are items you want to eliminate from your dictionary
because they were part of a specific code you had to type once only. To
eliminate items you do not want just mark them and click on the Delete button.
The Marked Items category allows you to list only items that you marked
earlier. This can be convenient after you have made use of another feature. For
example, say that you run into a word that you want to eliminate from your
dictionary. You could simply mark it and delete it, but the word may also occur
elsewhere in your dictionary as part of a phrase element. If you want to
eliminate it everywhere you can mark the word, click the Mark Other button to
mark all items containing this text and then list all those items by choosing
Marked Items form the left most popup. You can then review that list
(unmarking items as necessary) before deleting all the marked items.
The Misspelled Items category allows you to view just those items containing a
misspelled word (based on the spelling language you choose when creating the
dictionary). Note that KeyStrokes makes use of the build in spell-checker and
the languages available within that spell checker may vary from one Mac OS X
version to another. Misspelled words are marked with an uppercase ‘S’ in the
flags column of the list of items. You can decide to either delete misspelled
words or correct them. If you decide to correct them you might want to use the
earlier discussed Power Change button to have your change affect all
occurrences of the word you are changing. Use the Power Change feature with
care as some words may be spelled differently depending on whether they are
26
used alone or used as part of a longer word. Sometimes, KeyStrokes may
indicate that an item is misspelled whereas you know it is correct. In those cases
you can simply check the item in the Mark column and click the Accept button
to accept the item as is.
The New Items category is also important. When KeyStrokes first learns a word
through learning as you type or from file it will be marked as new and show
with an uppercase ‘N’ in the Flags column. This makes it easy for you to review
all new items without having to go through all the items you reviewed before.
Items loose their “new” status if you mark them and then click the Accept
button. So, during the reviewing process it is best to mark items that are OK
and then click the Accept button. That way, next time you are reviewing the
dictionary you can concentrate on reviewing the new items and ignore the ones
you already reviewed last time.
The final category is Unlikely Items. These are items that due to their low
frequency are unlikely to ever be suggested because there are other items with
higher frequencies starting with the same characters. It is often best to delete
these items.
As you may have noticed you often need to mark the items on which you want
to perform a certain action. Just below the Go button there is a button labeled
Mark Specific Items with a popup menu that allows you to mark or unmark all
items in the current list, toggle the marks (i.e., what was marked is unmarked
and the other way around), and mark only items with a specific low frequency.
That last option helps you remove items that are hardly ever used and in that
way keep your dictionary lean and mean.
27
Using dwelling and the Dwellix™ window
Dwellix™ provides advanced system-wide dwelling. Dwelling allows you to
click, double click, right-click, drag, and type simply
by holding the cursor motionless for a programmable
Progress to
period of time. When the dwell time has elapsed a
dwell point
click, double click, or right-click will be issued or a
drag will be initiated depending on the selected
Show menus
dwell function. For all dwell functions, except the
drag function, the dwell system will now wait until
the cursor is moved before issuing any further clicks.
Show
This is to prevent repeated clicks while you are
preferences
considering what to do next. To issue more dwell
clicks the cursor must first be moved a small
distance. How much it needs to be moved depends
Show/hide
keyboard
on the tolerance diameter (discussed below). So if
you are, for example, using dwelling to type you
should typically move the cursor off the key you just
Turn dwell
typed before trying to type the next key. This means
on/off
that if you want to type the same key twice you need
to position the cursor above the key you want to
type, wait until a click occurs, move the cursor of the
Single click
key (to restart the dwell system) and then move it
back onto the key and wait until the dwell click
occurs again. At first this may seem inconvenient, but
our testing has shown that it works far better then if
Double click
clicking would automatically continue as long as the
cursor is in the same spot.
Most of the dwelling features are readily accessible
from the keyboard toolbar, but there is also a separate
Dwellix™ window, which conveniently groups the
most common dwell features in a vertical window.
Drag click
Right click
By default Dwelling is turned off. You can turn it on
through the Dwellix™ menu or by clicking (or
holding the cursor motionless above) the Dwell
button of the keyboard toolbar.
Left & right
mouse button
state indicators
The Dwellix™ window can be configured through the KeyStrokes preferences
(see section “Preferences Settings”) to display only those buttons that you need
so as to occupy the minimum amount of screen space. For that same reason the
window is resizable by pulling the lower right corner. The figure shows the
Dwellix™ window with all the default buttons.
28
Dwelling behavior is determined by two key parameters: (1) dwell timing and
(2) dwell tolerance diameter. Both can be set it the KeyStrokes Preferences (see
the section “Preference settings” for details on how to access the preferences). If
you increase dwell timing you need to keep the cursor motionless for a longer
period of time before a click is issued. If you increase the dwell tolerance
diameter the dwell function becomes less sensitive to small movements and
will thus be more
tolerant when
considering
whether the mouse
is still held on the
same spot and
should therefore result in a click when the timing limit has been reached. In
general, the better control you have over your cursor the more sense it makes to
use low values for timing and tolerance.
Dwellix™ offers advanced dwelling for all keys and buttons of the keyboard
and Dwellix™ windows. In this case the tolerance diameter is ignored and you
only need to move from one key or button to another for the dwell timer to be
restarted again. This considerably speeds up dwell-based typing.
If you want to use Dwellix™ only for typing and manipulating KeyStrokes and
not for clicking in the document you are working on you can set “Only dwell
on KeyStrokes’ floating windows” in the KeyStrokes preferences.
29
Designing your own keyboards
KeyStrokes 4 and later have the ability to work with user designed keyboards.
Such keyboards can be designed using LayoutKitchen or may be obtained from
other users who designed them with LayoutKitchen. LayoutKitchen requires a
KeyStrokes 4 activation code or a SwitchXS or LayoutKitchen activation code.
Users of older versions of KeyStrokes can upgrade to a KeyStrokes 4 activation
code.
User designed keyboards can be freely shared among users as long as no
copyrighted material is employed of course. If you have a great keyboard that
you think others might also be able to put to good use, please contact us and we
will make it available as a free download to others.
Keyboards designed with LayoutKitchen can contain many different types of
buttons, including key buttons, text buttons that type multiple words at once,
buttons that speak, buttons that launch applications, buttons that run
AppleScripts, buttons that open other keyboards and more. You can set the
color of buttons and labels, you can use symbols or images, change the font, the
button size and placement and more. This allows you to design keyboards
exactly the way you like them.
When a new KeyStrokes keyboard is created with LayoutKitchen it will by
default be saved in ~/Library/Application Support/AssistiveWare Support/
Keyboards/ where ~ represents the user’s home folder. KeyStrokes will in that
case automatically add the new keyboard to it’s keyboard list and if the current
keyboard is the one being modified KeyStrokes will refresh it automatically.
If you want to give your self-made keyboard to someone else you can either
open it in LayoutKitchen and then save it to, for example, a USB memory stick
or the desktop and then give it to someone else, or you can copy it from the
Keyboards folder mentioned in the previous paragraph.
When you receive a keyboard from someone else, just drag and drop it on the
KeyStrokes application icon in the Finder or in the Dock. KeyStrokes will then
automatically load and install the new panel in the right location.
For more information on designing your own keyboards see the LayoutKitchen
manual.
30
Using Simple Mode
Simple Mode allows you to control keyboard and dwelling access. It allows you
to fix several keyboard properties such as keyboard size and keyboard location.
Simple Mode can also block certain keys (e.g., the Command key) or certain key
combinations used to switch between applications (Command+Tab) or to
invoke Force Quit (Command+Option+Escape). Keys that are blocked will
show as a circle with a diagonal line through them (ø) and emit a beep if
clicked. Simple Mode is typically used for when you want to set up a touch
screen kiosk and do not want users to drag around the keyboard or use the
keyboard toolbar. Another application is where you use KeyStrokes for a
student and want to make sure the student only works with the standard
keyboard and does not accidentally push any of the toolbar buttons.
You enter and exit Simple Mode
through the “Mode” menu. When
entering Simple Mode you need
to specify a password and repeat
that same password once more to
make sure you did not make any
typos. Once this is done, you can
determine which features should
be blocked and which features
should be left in operation. To exit
Simple Mode, return to Mode
menu and choose “Exit Simple
Mode...”. This will present a
dialog requesting you to type the
password you typed on entry.
Without this password you will not be able to exit Simple Mode.
Simple Mode is only active on a per launch basis. If you quit KeyStrokes it will
be launched in full mode again.
Warning about Simple Mode security: Simple Mode is not a general purpose
security solution to lock (parts) of your computer. Simple Mode cannot block a
Force Quit through the Apple Menu or a Quit through the KeyStrokes Dock
icon. You will need other software to limit access to these standard system
resources. What Simple Mode does offer, is an effective way to control use of
the on-screen keyboard.
31
Using Invade Fullscreen Mode, Game Mode and the KeyStrokes Widget
KeyStrokes offers an Invade Fullscreen Mode and a Game Mode from the Mode
menu. If the KeyStrokes windows get hidden behind a fullscreen window you
can try to use the Invade Fullscreen Modemode to force KeyStrokes’ floating
windows to show above the full screen window that is obscuring them in the
regular mode. This works for some Apple and third party applications
including certain games. Also use this mode if you want to use KeyStrokes to
configure Snapz Pro X 2.0.2 and later for taking screen shots and screen movies.
Other applications (especially games) may actual take over the screen in such a
way that neither KeyStrokes nor the Mac OS is able to display any window on
top. Note that in this mode regular menus start appearing behind rather than in
front of the KeyStrokes windows. KeyStrokes offers the option of supplying a
fake cursor during Invade Fullscreen Mode. You can use this feature if the game
or other full screen application hides the normal cursor making it impossible to
see where the cursor is when you want to type with KeyStrokes. The fake
cursor can sometimes solve this problem and you can choose between a fake
cursor that only shows above the KeyStrokes windows and one that is active all
the time.
For playing games you can use the Game Mode, which offers a super set of
features of the Invade Fullscreen Mode. Game Mode is available in 10.3 and
later and in addition to bringing the keyboard window to the highest possible
window level and providing the optional fake cursor it offers the additional
feature of unfreezing the system cursor. Some games freeze and hide the system
cursor making it impossible to use the cursor to click on the keys of KeyStrokes
to control the game. The unfreeze system cursor option can overcome this
problem (typically used in combination with the fake cursor). When needed
you can also tell KeyStrokes to accelerate the cursor if the fake cursor is not
responsive enough. Do note that if a game freezes the cursor you will not be
able to move the keyboard window, even when using unfreeze cursor. Also note
that while game mode enhances compatibility with many games, there are still
games that remain unplayable with KeyStrokes.
On Mac OS X 10.4 (Tiger) and later KeyStrokes also automatically installs a
Dashboard widget called KeyStrokes Widget that you can access from the
widget bar at the bottom of the screen when Dashboard is running. This widget
makes it easy to type into Dashboard widgets using KeyStrokes. The
KeyStrokes Widget allows you to either manually or automatically bring the onscreen keyboard above the Dashboard layer (basically it shifts KeyStrokes in
and out of Invade Fullscreen Mode). The widgets has two buttons that allow
you to manually show or hide the on-screen keyboard above Dashboard. If you
move the cursors above the KeyStrokes Widget a small ‘i’ will appear in the
lower right corner of the KeyStrokes Widget. If you click this ‘i’ you can
configure the Widget to automatically bring KeyStrokes forward or do it
manually (only when you click the Show and Hide buttons on the front of the
32
widget). Note that the KeyStrokes Widget must be on-screen in order for it to be
able to automatically bring the keyboard window above the Dashboard layer.
33
Using SmartTransparency™
SmartTransparency™ is a technology developed by Niemeijer Consult that
makes the keyboard, prediction and Dwellix™ window visible when you need
them and automatically makes them disappear when they are not needed.
By default SmartTransparency™ is turned off. You can turn it on at any time
through the KeyStrokes preferences (see section “Preferences Settings”).
With SmartTransparency™ the keyboard windows or the Dwellix™ window
become transparent when not used. As soon as you move your cursor over the
window the transparency is removed and the window is ready for use. To
prevent flashing of the window there is a customizable gradual transition
between transparent and non-transparent states. Furthermore, the window only
looses its transparency when you slow down the mouse above the area where
the window is located, not when you accidentally move the mouse across this
area. This saves you screen real-estate and saves unnecessary clicks to iconize or
collapse the keyboard window or Dwellix™ window to be able to see under
them. Note that the transparency state of the keyboard and prediction windows
are synchronized for maximum convenience.
If you have lost track of the location of the keyboard window and/or Dwellix™
window because they have been set to become fully transparent when not used,
clicking on the KeyStrokes icon in the dock while briefly show the windows
fully opaque so that you can easily locate them again on your screen.
You can customize SmartTransparency™ in the KeyStrokes Preferences (see
section “Preferences Settings”).
34
Preference settings
Accessing the preferences
There are two ways to get to the KeyStrokes Preferences:
(1) When the KeyStrokes application is in front you can select the Preferences
command from the “KeyStrokes” menu. Note: You can click on the KeyStrokes
icon in the Dock to bring it to the front or use the “Show menus” toolbar button
(see section “The keyboard toolbar”).
(2) Alternatively, you can click on the “Preferences” button of the toolbar of the
KeyStrokes on-screen keyboard window (see section “The keyboard toolbar”).
This will bring KeyStrokes to the front and display the Preferences dialog. The
same button is also located on the Dwellix™ window (unless you have turned
this off in the Preferences).
KeyStrokes has nine sets of preferences: General, Keyboard, Dwellix™, and
SmartTransparency™, Audio & Visual Feedback, Prediction, Shortcuts, Autotype and Hot keys.
In most cases the default preference settings will be fine but once you gain more
experience with KeyStrokes you will appreciate the ability to fine-tune
KeyStrokes’ powerful features to your specific needs or preferences.
General
Automatically launch KeyStrokes after login is used to have KeyStrokes
automatically launch after you have logged in to your computer. This does not
currently allow you to use KeyStrokes to type your login name and password in
the login window, which means you will have to setup Mac OS X to
automatically login for you in case you cannot use a hardware keyboard. To do
this you need to go to the System
Preferences by choosing “System
Preferences...” from the Apple
menu. Next, you need to choose
Accounts. click on “Login
Options” and check the
“Automatically log in” check box.
Adjust window dimensions when
toolbar size changes is used if you
would like the keyboard or
prediction windows to expand or
shrink whenever a change is made
to the size of the toolbar (i.e., when
the toolbar is shown/hidden,
35
collapsed/expanded, or the button size is changed).
Ignore typing on hardware keyboard is used to prevent KeyStrokes to respond
to or interfere with typing on the hardware keyboard. It is a good idea to turn
this on if you use the on-screen keyboard and occasionally share your computer
with someone who does not use KeyStrokes. In that case, if KeyStrokes is
running and someone types with the hardware keyboard they won’t be
confronted with KeyStrokes doing auto-spacing and auto capitalization stuff
that they might not expect.
Preferred text size allows you to set the text size used for the keyboard typing
field, the keyboard prediction area, the prediction and shortcut lists of the
prediction window and the dictionary editor.
Preferred font allows you to select the font used for the keyboard typing field,
the keyboard prediction area, the prediction and shortcut lists of the prediction
window and the dictionary editor. This font is also used for the keyboard keys
unless you select a different font in the Keyboard preferences.
Type engine speed is used to set the speed with which KeyStrokes types into
the front application if you click on a suggested item or expand a shortcut. You
can adjust this if you notice that the front application is unable to keep up with
the speed at which KeyStrokes types into the application’s windows and is
loosing characters.
Keyboard
The keyboard settings options are discussed in some detail below.
Keyboard toolbar: Show Dwellix™ buttons is used if you want to have access to
the Dwellix™ buttons on the keyboard toolbar.
Key behavior: Allow auto key
repeat is used to control key
repeat. When key repeat is
turned on, holding down the
mouse over one of the keys on
the KeyStrokes keyboard will
result in repeated typing of that
key until the mouse is released.
There is one exception: For
technical reasons key repeat
does not work when typing into
one of the fields in a dialog of
the KeyStrokes application
itself.
36
When key repeat is turned off, holding down the mouse over one of the keys on
the KeyStrokes keyboard will not result in repeated typing. Only a single key
will be typed as soon as the mouse is released.
If you want to control the initial delay before key repeating occurs or the
interval between repeating keys you can do this through the Repeat Rate
section of the Keyboard panel of the regular Mac OS X System Preferences.
Choose “System Preferences...” from the Apple menu and click on “Keyboard”.
The settings in this preferences panel apply equally to your hardware keyboard
and to the KeyStrokes software keyboard.
Allow auto key repeat: Also for function keys should be turned off if you want
to use the Exposé feature of Mac OS X 10.3 and higher. If you use auto key
repeat make sure to uncheck this box to be able to make optimum use of Exposé
and assign the Exposé functions to the function keys (which is actually the
default on Mac OS X 10.3).
Keyboard window dimensions: Adjust to keyboard model is used to determine
what happens with the keyboard dimensions if you change keyboard models. If
this option is turned off the keyboard window will stay the same size if you
switch between keyboard models and the proportions of the keys are changed
to fit the new model within the same window dimensions. If this option is
turned on the window dimensions are adjusted for the larger or smaller size of
the selected keyboard model and the keys maintain their proportions.
Key labels: Do not modify when the command key is down is used to
determine whether you would like the key labels to remain unmodified if the
command key is down. Turning this option on is convenient if you want to type
for instance a command-option-key combination and want to continue to see
the “normal” key labels rather than the key labels that will be typed when the
option key is down.
Key labels: Do not modify when the control key is down is used to determine
whether you would like the key labels to remain unmodified if the control key
is down. Turning this option on is convenient if you want to type for instance a
control-option-key combination and want to continue to see the “normal” key
labels rather than the key labels that will be typed when both the option and
control keys are down (this would be mostly blank key labels).
Key labels: Mark dead keys by underlining is used to determine how so called
dead keys* are displayed. If this option is turned on dead keys are marked by
an underlined label.
Key labels: Use bold text for labels is used to make the text of the key labels
bold. For some fonts this increases the contrast and readability significantly.
37
Key labels: Font is used to select the font used for the key labels. This will
override the default fonts of the keyboard model. If you want to change the font
on individual keys use LayoutKitchen to design your own keyboard.
Keyboard appearance: Background is used to select the background color used
for the keyboard window. This will override the default background color of
the keyboard that was set in LayoutKitchen. In LayoutKitchen you can set any
background color you want.
Keyboard appearance: Key design is used to choose the button design used for
the keys. This will override the default key design of the keyboard model. If
you want to change the key design on individual keys use LayoutKitchen to
design your own keyboard.
Keyboard appearance: Key spacing is used to set the space between keys on the
on-screen keyboard. Note that “Aqua rounded bevel” always uses some space
between the keys to prevent drop shadows from drawing on top of other keys.
Dwellix™
The Dwellix™ settings options are discussed in some detail below.
Interaction: Always dwell on Dwellix™ buttons is used if, also when dwelling
is off, you want to be able to dwell on any of the Dwellix™ buttons (i.e., activate
them without actually clicking yourself but just by holding the mouse over the
button).
Interaction: Automatically switch back to single click mode is used if you want
Dwellix™ to switch back to single click mode after a double click, drag, or
right-click. Note that you can click twice on a Dwellix™ button to overrule the
switch back from occuring. In this case a third click on the same Dwellix™
button unlocks the button again.
Interaction: Only dwell on
KeyStrokes’ floating windows is
used when you do not want
dwell clicks to occur in the
document you are working on
but like to dwell type or use
Dwellix™ to activate suggested
items in the prediction window
or keyboard prediction area.
This option reduces typing
efforts while helping to prevent
unwanted clicks in the
document you are working on.
38
Interaction: Keep Dwellix™ window active when obscured allows you to use
the dwell buttons for dwell clicking even when the Dwellix™ window has been
obscured by, for instance, the windows of a game. Of course you do need to
memorize in this case where the Dwellix™ window was located before it got
obscured.
Display in Dwellix™ window is used to determine whether the buttons in the
Dwellix™ window should have a text label and to determine which buttons
you would like to have access to from the Dwellix™ window.
Dwell timing slider is used to set the amount of time the mouse needs to be
held over the same spot in order to reach dwell point and cause a click (when
dwelling is on).
Dwell tolerance diameter slider is used to set the spatial tolerance for dwelling
in terms of how much the mouse may still be moved around for it still to be
considered in the same spot. Note that this slider is to scale allowing you to
visually judge the tolerance setting.
SmartTransparency™
The SmartTransparency™ settings options are discussed in some detail below.
SmartTransparency™ is used to turn SmartTransparency™ on or off. This
option controls transparency behaviour of the keyboard, prediction and
Dwellix™ windows.
Sensitivity when cursor moves over window is used to control how sensitive
SmartTransparency™ is for cursor movements above the keyboard or Dwellix™
window area. With low sensitivity the transparency is removed only when the
cursor really comes to a stand still above the window. With high sensitivity a
slight movement above the
window are already removes
transparency.
Delay after cursor leaves the
window is used to determine
how many seconds after leaving
the window the transparency
should change. Longer delays
prevent flicker if you accidentally
move the cursor off the window.
Transition speed is used to
determine how long the
transition between two
transparency states should take.
39
Note that to increase productivity the transition to high visibility is always a
few times faster than to high transparency.
Keyboard & Prediction windows: Transparency when cursor above is used to
set the transparency of the keyboard and prediction windows when the cursor
is above the window (because you are using it to type). The maximum
transparency you can set is 90%, because at higher transparency the window
becomes unusable.
Keyboard & Prediction windows: Transparency when cursor not above is used
to set the transparency of the keyboard and prediction windows when the
cursor is not above the window (you are not typing).
Dwellix™ window: Transparency when cursor above is used to set the
transparency of the Dwellix™ window when the cursor is above the window.
The maximum transparency you can set is 90%, because at higher transparency
the window becomes unusable.
Dwellix™ window: Transparency when cursor not above is used to set the
transparency of the Dwellix™ window when the cursor is not above the
window.
Audio & Visual Feedback
Audio feedback: Make click sound for dwell clicks is used if you want to hear
each click (mouse down and mouse up) made using dwelling.
Audio feedback: Make typewriter sound when typing is used if you want to
hear a typing sound each time you click on a key.
Audio feedback: Make typewriter sound when clicking on a predicted item is
used if you want to hear a typing sound each time you click on a predicted item
or expand a shortcut.
Speech feedback: Speak the key
or suggestion below the cursor is
used if you want KeyStrokes to
speak the letter or suggestion
below the cursor. If you need
high quality voices or voices for
other languages, use KeyStrokes
in combination with Proloquo.
Speech feedback: Speak the keys
as you type is used if you want
KeyStrokes to pronounce each
key as you type. Note that not all
40
keys are pronounceable by the Mac OS build-in English speech synthesis. If you
need high quality voices or voices for other languages, use KeyStrokes in
combination with Proloquo.
Speech feedback: Speak completed text is used if you want KeyStrokes to speak
each suggested item click or shortcut you expand. If you need high quality
voices or voices for other languages, use KeyStrokes in combination with
Proloquo.
Audio volume is used to set the volume used for audio and speech feedback
without affecting the overall sound output level of your computer.
Visual feedback: Highlight the key below the cursor does what it says.
Prediction
Basic prediction setting: Prediction level is used to choose between word
completion, next word prediction and multi-word prediction, the most
advanced form of word prediction. Next word prediction also does word
completion and multi-word prediction combines all three prediction methods.
The actual prediction level used also depends on the prediction level that was
used to build your dictionaries. A dictionary build for multi-word prediction
can be used for just word completion, but not the other way around. For more
information see the “Prediction” section.
Basic prediction setting: Maximum number of suggestions to show determines
how many suggestions KeyStrokes will show at most in the suggestion list of
the prediction window and in the keyboard prediction area.
Basic prediction setting: Sort suggestions determines whether KeyStrokes
presents suggestions in
alphabetical order or in order of
likelihood.
Advanced prediction setting:
Give suggestions with at least X
characters is used to force
KeyStrokes to only suggest
longer words and phrases.
Advanced prediction setting:
Give suggestions saving at least
X clicks is used to force
KeyStrokes to only suggest
words and phrases for which a
large number of KeyStrokes can
be saved.
41
Advanced prediction setting: Prioritize recently used text is used to control the
weight the PolyPredix™ type engine gives to text you recently typed. If you like
KeyStrokes to rapidly adapt to your current topic you should prioritize recent
text strongly. Generally, a setting between medium and strongly will work best.
Advanced prediction setting: reset prediction after command-key combination
should normally be turned on except if you frequently apply command-key
combinations that do not affect what you are typing or the position of the caret
(the little blinking bar that shows the position where you are typing).
Prediction in keyboard options: Auto-fit allows KeyStrokes to adjust the
number of suggestions it will display in the keyboard prediction area to the
length of the suggested items (long words less items, short words more items).
Turn auto-fit off if you always want to get the exact same number of
suggestions (however, these may need to be cut-off occasionally if they are too
long to fit).
Prediction in keyboard options: Show few or many items allows you to control
the number of items displayed as well as the spacing between items. How
many items are actually displayed is also a function of the keyboard window
size and the preferred text size and font.
Shortcuts
Show shortcuts allows you to choose between getting all shortcuts listed or just
those whose abbreviations begin
with the characters you start
typing.
Automatically expand shortcuts
allows you to set a key to trigger
automatic shortcut expansion
after you type the abbreviation of
the shortcut you want. By typing
the trigger key immediately after
typing the shortcut expansion
will take place. You can either
select one of the standard keys or
define your own key to be used to
expand shortcuts.
Auto-type
Auto-type rules is used to set the rules used for auto-spacing and autocapitalization. If your language is not listed here there is a good chance that the
English rules will work fine for you.
42
Auto-space settings: Auto spacing before/after punctuation should be turned
on if you want KeyStrokes to automatically add or remove spaces as required
by the punctuation rules of the language you selected for the auto-typing rules.
Auto-space settings: Append space following predicted items should be turned
on if you want KeyStrokes to automatically add a space when you click on a
suggested item.
Auto-space settings: Append space following expanded shortcuts should be
turned on if you want KeyStrokes to automatically add a space when you
expand a shortcut.
Auto-capitalization settings: Take capitalization into account for prediction will
lead KeyStrokes to suggest only items that always or sometimes require an
initial capital or are always in allcaps in those places where you
type a capital letter and normal
grammatical rules do not require
such a capital. For instance, if you
want to write “With David’s help”
the word “David” is in a location
that does not require an initial
capital on grammatical grounds,
so if you type the capital “D”
KeyStrokes will only suggest
words that sometimes or always
require an initial capital such as
“David” and “Dave” and not
“do” or “door” if this option is
turned on.
Auto-capitalization settings: Auto-capitalize items requiring a capital will lead
KeyStrokes to automatically type an initial capital if you click on a suggested
item that requires a starting capital even if you already started out typing
without using a capital. This allows you to type “Hi dav”, then click on
“David” as it appears in the suggestion list and actually get “Hi David”.
Auto-capitalization settings: Auto-capitalize after punctuation will lead
KeyStrokes to automatically capitalize the next character you type after a
period, question mark, etc. or, if you prefer, just turn on the shift key for you so
that the keyboard is ready to type a capital. Keep this option off when using the
hardware keyboard for typing.
Hot keys
Activate hot keys is used to turn on the selection of suggestions shown in the
Prediction window through hot keys. The hot leys are listed in the table below.
43
Hot keys can be added or
removed using, respectively, the
plus and minus buttons below
the table. To change a hot key
select the table row and then
click once on the hot key you
want to change. An edit field
will appear and you can now
type the key combination you
would like to use for that
suggestion. Be careful not to type
a key combination that is likely
to be used for commands in the
software you normally use. You
can type single keys or keys
combined with one or modifiers (such as shift, control, etc.).
User defined key combination to toggle this setting allows you to define a key
combination to temporarily turn on or off the hot keys that trigger suggestions.
Use this to temporarily deactivate the hot keys if you type with the hardware
keyboard and want to use the normal function of a key setup as hot key.
Show hot keys in parentheses should be turned on to see the defined hot keys
listed behind the suggestions in the Prediction window. This can help if you
find it hard to memorize which hot key to use for which suggestion.
Number the suggestions is useful for SwitchXS users making use of the
KeyStrokes prediction facilities and will put a number in front of each
suggestion.
44
Tips and Tricks
This section describes a few tips and tricks when using KeyStrokes.
Typing in Dashboard
Mac OS X 10.4 and higher provides Dashboard for many quick access functions.
KeyStrokes is fully compatible with Dashboard, but in order to be able to us it
for typing in Dashboard you need to use the Invade Fullscreen Mode of
KeyStrokes accessible from KeyStrokes’ Mode menu. To make this easier,
KeyStrokes automatically installs a KeyStrokes Widget on 10.4 and later. The
KeyStrokes Widget can automatically shift KeyStrokes in Invade Fullscreen
Mode when Dashboard is activated. For more information see the section
“Using Invade Fullscreen Mode, Game Mode and the KeyStrokes Widget”.
Working with the command, control, option and shift keys
The command, control, option and shift keys are called modifier keys because
they modify the behavior of normal character keys as well as mouse clicks. If
you like to type using one of these keys or need to issue for instance optionclicks it is good to know that after you click these keys once they will lock until
you either type a character or click the key again to unlock it. However, if you
want these keys to remain depressed while typing multiple characters you can
simply double click the appropriate modifier key(s) and the key(s) will remain
locked until clicked again.
Working with the Dwellix™ buttons
The Dwellix™ buttons on the keyboard toolbar and the Dwellix™ window can
be used to click using dwelling. You can use the KeyStrokes Preferences (see
section “Dwellix™”) to determine what should happen after a click has been
issued. It is possible to continue issuing the same clicks or to switch back
automatically to single click mode. If you like the latter as default behavior you
can still stay in, for instance, double click mode for a series of clicks by clicking
the double click button twice in a row. This locks the double click function until
you click the button again or click on one of the other Dwellix™ buttons.
Using SmartTransparency™
If you have lost track of the location of the keyboard window and/or Dwellix™
window because they have been set to become fully transparent when not used,
clicking on the KeyStrokes icon in the dock will briefly show the windows fully
opaque so that you can easily locate them again on your screen.
45
Key label readability
For many fonts the key labels look better if they are displayed using the bold
text style, for others, such as Charcoal, plain text looks better. You can control
the use of bold text with the “Use bold text for labels” option in the keyboard
preferences (see section “The Keyboard Settings”).
Resetting everything to default
If you would like to reset all preference settings as well as the window positions
and states back to default go to the “KeyStrokes” menu and choose the “Reset
KeyStrokes Preferences and Quit” item.
Iconize, collapse or hide the KeyStrokes windows
The keyboard, prediction and Dwellix™ windows can be collapsed or hidden.
In addition, the keyboard window can also be iconized. Alternatively, you can
turn on SmartTransparency™, which makes the windows become transparent
when not used and automatically makes them reappear when needed.
To iconize the keyboard window you click on the iconize button of the
keyboard window toolbar. This shrinks the keyboard window to icon size. The
iconized window can be placed anywhere you want and you can even make it a
little smaller or bigger depending on your needs. Clicking the KeyStrokes icon
in the iconized window will bring back the full keyboard window again in its
old position.
To collapse the keyboard, prediction or Dwellix™ window you click on the
collapse icon of the window title bar (in Mac OS X 10.3 and later this shrinks the
window into the dock) or you just double click the window title bar (this
collapses the window into its title bar). In the same manner you can expand a
collapsed keyboard, prediction or Dwellix™ window again.
Finally, you can just hide the keyboard, prediction or Dwellix™ window
altogether by clicking in the close box of the window’s title bar (the little round
button all the way to the left). If KeyStrokes is the front application you can also
hide or show the window using the appropriate command from the Keyboard,
Prediction or Dwellix™ menu. If KeyStrokes is not the front application you can
also click on the KeyStrokes dock icon to show the keyboard, prediction, or
Dwellix™ window again. In all cases you can use the dock icon menu (hold the
mouse down over the KeyStrokes icon in the dock and a menu will pop up) to
toggle keyboard window display.
46
Known issues
Unicode keyboard layouts
On Mac OS X 10.4 and earlier: If you want to type with a Unicode keyboard
layout you need to take the following steps: (1) Bring keystrokes to the front by
clicking its icon in the dock or by clicking on the “menu” icon button in the
keyboard toolbar; (2) Select the Unicode keyboard layout from the Input menu
(see the section “Keyboard layouts” for details); (3) Activate the application you
want to type into by click in the document and select the Unicode keyboard
layout from the Input menu. This should activate the same keyboard layout in
KeyStrokes as in the active typing document and allow you to see on the
keyboard the characters you will be typing. This applies to Arabic, Hebrew,
Turkish and many other keyboard layouts.
Compatibility with TypeIt4Me
If you want to use KeyStrokes in combination with the Mac OS X version of
TypeIt4Me you should turn Key Repeat off in the Preferences of KeyStrokes.
Compatibility with full-screen applications
Some applications allow you to run in either full-screen or windowed mode (for
example Virtual PC, Timbuktu and certain games). KeyStrokes works well with
many full-screen applications, but in those cases where it does not, it is advised
to use these applications in windowed mode only. With full-screen mode two
kinds of problems can occur: (1) the keyboard, prediction and Dwellix™
windows appear to be hidden and (2) the cursor appears to float behind the
KeyStrokes windows. KeyStrokes has a special Invade Fullscreen Mode that
may overcome these problems for certain (but definitely not all) full-screen
applications. For details see the section “Using Invade Fullscreen Mode, Game
Mode and the KeyStrokes Widget”.
Login window and secure screen savers
Because of technical restrictions KeyStrokes cannot currently be used to type
the login password to login to Mac OS X. For this reason, you should configure
your Mac to automatically login using the Accounts panel of the System
Preferences.
KeyStrokes can be used with a secure screen saver. If you run KeyStrokes in
Invade Fullscreen Mode, KeyStrokes will remain above the screen saver and
will allow you to type your password into the secure screen saver dialog. For
more information on the Invade Fullscreen Mode see the section “Using Invade
Fullscreen Mode, Game Mode and the KeyStrokes Widget”.
47
Mac OS X built-in accessibility features
KeyStrokes is not designed to be used in combination with the following Mac
OS accessibility features: Sticky Keys, Full Keyboard Access and Mouse Keys.
KeyStrokes already offers sticky keys on the on-screen keyboard and therefore
does not require Mac OS’ Sticky Keys. Both Full Keyboard Access and Mouse
Keys are designed for people who can use a hardware keyboard but have
problems using a mouse or other cursor device (or do not want to use a mouse).
KeyStrokes instead is designed for those people who cannot use a hardware
keyboard and want to control their computer with a mouse or other cursor
device only. Using Mouse Keys with an on-screen keyboard therefore makes no
sense and would confuse the operating system. To a lesser degree this is also
true for Full Keyboard Access, which therefore only partially works with
KeyStrokes.
48
Support
Support steps
Step 1.
Check this manual and/or consult the KeyStrokes help function.
This help function can be accessed through the “Help” menu
when KeyStrokes is the active (front-most) application.
Step 2.
Consult the dealer where you purchased KeyStrokes.
Step 3.
Contact your local distributor (see below for details).
Step 4.
If none of the above help or if you purchased directly with
AssistiveWare, send an email to [email protected]
Local distributors
Please find below a list of the current local distributors. Note that this may
change over time and that the latest information on local distributors is always
available at http://www.assistiveware.com/resellers.php
Territory
Distributor / Dealer
Purchase online
North
America
(USA,
Canada,
Mexico &
Caribbean)
Origin Instruments Corporation
(full support)
854 Greenview Drive
Grand Prairie
Texas 75050-2438
USA
Phone: 972-606-8740
FAX: 972-606-8741
Email: [email protected]
Web: http://orin.com/access/keystrokes/
Origin Instruments
Corporation
(full support)
http://orin.com/ec/
keystrokes/
Everywhere
else
AssistiveWare
(email only support in English, French or Dutch)
Van Speijkstraat 73-D
1057 GN Amsterdam
The Netherlands
Europe
FAX: +31-20-6128266
Email: [email protected]
Web: http://www.assistiveware.com
AssistiveWare
(email only support in
English, French or Dutch)
http://
www.assistiveware.com
/purchase.php
49
Software License Agreement
Niemeijer Consult / AssistiveWare
Software License Agreement
Single Use License
PLEASE READ THIS SOFTWARE LICENSE AGREEMENT (“LICENSE”) CAREFULLY BEFORE USING
THE SOFTWARE. BY USING THE SOFTWARE YOU ARE AGREEING TO BE BOUND BY THE TERMS
OF THIS LICENSE. IF YOU DO NOT AGREE TO THE TERMS OF THIS LICENSE (IF APPLICABLE)
RETURN THE NIEMEIJER CONSULT SOFTWARE TO THE DEALER WHERE YOU OBTAINED IT.
DEPENDING ON THE TERMS OF DELIVERY OF YOUR DEALER YOU ARE ELIGIBLE FOR A
(PARTIAL) REFUND.
1. General. The Software and documentation accompanying this License whether on disk, in read only
memory, on any other media or in any other form (henceforth referred to collectively as the “Software”)
are licensed, not sold, to you by Niemeijer Consult for use only under the terms of this License, and
Niemeijer Consult reserves all rights not expressly granted to you. The rights granted herein are limited to
the use rights of the Software and do not include any other rights. You own the media on which the
Software is recorded but Niemeijer Consult and/or Niemeijer Consult’s licensor(s) retain ownership of the
Software itself.
2. Evaluation copies. This license also applies in full for so-called demo or evaluation copies of the
Software for which use is solely permitted for a period of a few days up to (in case explicitly stated) a
maximum of 3 weeks before purchase. If the Software is not purchased within the stated period the
Software should be removed permanently and completely from the computer(s) on which it has been
installed.
3. Permitted License Uses and Restrictions. This License allows you to install and use one copy of the
Software on a single computer at a time. This License does not allow the Software to exist on more than
one computer at a time except for home use by a single individual. It is not permitted to use the Software
on more than one computer at a time or make the Software available over a network where it could be
used by multiple computers at the same time. You may make one copy of the Software in machinereadable form for backup purposes only; provided that the backup copy must include all copyright or
other proprietary notices contained on the original. Except as and only to the extent expressly permitted in
this License or by applicable law, you may not copy, decompile, reverse engineer, disassemble, modify, or
create derivative works of the Software or any part thereof. THE SOFTWARE IS NOT INTENDED FOR
USE IN THE OPERATION OF NUCLEAR FACILITIES, AIRCRAFT NAVIGATION OR
COMMUNICATION SYSTEMS, AIR TRAFFIC CONTROL SYSTEMS, LIFE SUPPORT MACHINES OR
OTHER EQUIPMENT IN (OR, MORE IN GENERAL, CIRCUMSTANCES UNDER) WHICH THE
FAILURE OF THE SOFTWARE COULD LEAD TO DEATH, PERSONAL INJURY, OR SEVERE
PHYSICAL OR ENVIRONMENTAL DAMAGE.
4. Transfer. You may not rent, lease, lend or sublicense the Software. You may, however, make a one-time
permanent transfer of all of your license rights to the Software to another party, provided that: (a) the
transfer must include all of the Software, including all its component parts, original media, printed
materials and this License; (b) you do not retain any copies of the Software, full or partial, including copies
stored on a computer or other storage device; and (c) the party receiving the Software reads and agrees to
accept the terms and conditions of this License.
5. Termination. This License is effective until terminated. Your rights under this License will terminate
automatically without notice from Niemeijer Consult or a Niemeijer Consult authorized representative if
you fail to comply with any term(s) of this License. Upon the termination of this License, you shall cease
all use of the Software and destroy all copies, full or partial, of the Software.
6. Limited Warranty on Media. Niemeijer Consult warrants the media on which the Software is recorded
and delivered by Niemeijer Consult to be free from defects in materials and workmanship under normal
use for a period of thirty (30) days from the date of original retail purchase. Your exclusive remedy under
this Section shall be, at Niemeijer Consult’s option, a refund of the purchase price of the Software or
replacement of the Software, which is returned to Niemeijer Consult or a Niemeijer Consult authorized
representative with a copy of the receipt. This limited warranty and any implied warranties on the media
including, but not limited to, the implied warranties of merchantability, of satisfactory quality, and of
fitness for a particular purpose, are limited in duration to thirty (30) days from the date of original retail
purchase. Some jurisdictions do not allow limitations on how long an implied warranty lasts, so the above
limitation may not apply to you. The limited warranty set forth herein is the only warranty made to you
and is provided in lieu of any other warranties (if any) created by any documentation or packaging. This
50
limited warranty gives you specific legal rights, and you may also have other rights, which vary by
jurisdiction.
7. Disclaimer of Warranties. YOU EXPRESSLY ACKNOWLEDGE AND AGREE THAT USE OF THE
SOFTWARE IS AT YOUR SOLE RISK AND THAT THE ENTIRE RISK AS TO SATISFACTORY QUALITY,
PERFORMANCE, ACCURACY AND EFFORT IS WITH YOU. Except for the limited warranty on media
set forth above and to the maximum extent permitted by applicable law, the Software is provided “as is”,
with all faults and without warranty of any kind, and Niemeijer Consult and Niemeijer Consult’s licensors
(collectively referred to as “Niemeijer Consult” for the purposes of sections 7 and 8) hereby disclaim all
warranties and conditions with respect to the Software, either express, implied or statutory, including, but
not limited to, the implied warranties and/or conditions of merchantability, of satisfactory quality, of
fitness for a particular purpose, of accuracy, of quiet enjoyment, and non-infringement of third party
rights. Niemeijer Consult does not warrant against interference with your enjoyment of the Software, that
the functions contained in the Software will meet your requirements, that the operation of the Software
will be uninterrupted or error-free, or that defects in the Software will be corrected. No oral or written
information or advice given by Niemeijer Consult or a Niemeijer Consult authorized representative shall
create a warranty. Should the Software prove defective, you assume the entire cost of all necessary
servicing, repair or correction. Some jurisdictions do not allow the exclusion of implied warranties or
limitations on applicable statutory rights of a consumer, so the above exclusion and limitations may not
apply to you.
8. Limitation of Liability. TO THE EXTENT NOT PROHIBITED BY LAW, IN NO EVENT SHALL
NIEMEIJER CONSULT BE LIABLE FOR PERSONAL INJURY, OR ANY INCIDENTAL, SPECIAL,
INDIRECT OR CONSEQUENTIAL DAMAGES WHATSOEVER, INCLUDING, WITHOUT LIMITATION,
DAMAGES FOR LOSS OF PROFITS, LOSS OF DATA, BUSINESS INTERRUPTION OR ANY OTHER
COMMERCIAL DAMAGES OR LOSSES, ARISING OUT OF OR RELATED TO YOUR USE OR
INABILITY TO USE THE SOFTWARE, HOWEVER CAUSED, REGARDLESS OF THE THEORY OF
LIABILITY (CONTRACT, TORT OR OTHERWISE) AND EVEN IF NIEMEIJER CONSULT HAS BEEN
ADVISED OF THE POSSIBILITY OF SUCH DAMAGES. Some jurisdictions do not allow the limitation of
liability for personal injury, or of incidental or consequential damages, so this limitation may not apply to
you. In no event shall Niemeijer Consult’s total liability to you for all damages (other than as may be
required by applicable law in cases involving personal injury) exceed the amount of fifty euro (euro 50.00).
The foregoing limitations will apply even if the above stated remedy fails of its essential purpose.
9. Controlling Law and Severability. This License is established in the Dutch language, which will be
regarded as the authentic language for this License. Any translation of this License is done for local
requirements. In the event of a dispute between the Dutch and any non-Dutch versions, the Dutch version
of this License shall govern. The agreement that will be entered in will be governed exclusively by Dutch
law and disputes shall be exclusively brought in front of Dutch judges and courts in the Netherlands,
unless prevailing International Treaties enforce a different regulation. In those cases where the choice of
forum (court or judge) is not up to Niemeijer Consult but to the user of the Software the user obliges
himself/herself to select a Dutch judge in The Netherlands. If for any reason a court of competent
jurisdiction finds any provision, or portion thereof, to be unenforceable, the remainder of this License shall
continue in full force and effect.
10. Complete Agreement. This License constitutes the entire agreement between the parties with respect to
the use of the Software licensed hereunder and supersedes all prior or contemporaneous understandings
regarding such subject matter. No amendment to or modification of this License will be binding unless in
writing and signed by Niemeijer Consult or Niemeijer Consult’s authorized representatives.
51
Prediction dictionaries disclaimer
The prediction dictionaries supplied with this product are provided free of
charge and AssistiveWare can in no way guarantee, or be held responsible
for, the correctness of the dictionaries.
The prediction dictionaries have been compiled mainly using publicly available
electronic texts and AssistiveWare can take no responsibility for the correct
spelling, word usage and phrasing of the source texts.
Some prediction dictionaries were compiled in collaboration with the user
community of AssistiveWare’s software, also these users cannot be held
responsible for the correctness of the dictionaries.
If you want to collaborate on creating a dictionary for your language or for a
particular topic feel free to contact us at [email protected].
52
Your Dealer
Your Distributor
53