1
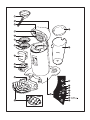
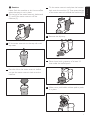
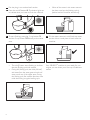
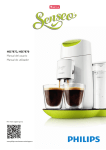
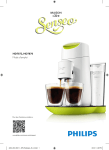
HD7872, HD7870
User manual
For more support go to:
www.philips.com/senseo-twist/support
1
Introduction 5
2
General description 5
3
Important
4
Flushing the machine before
first use 6
5
Brewing SENSEO® coffee 9
6
Cleaning 13
7
Descaling 14
8
Frost-free storage 17
9
Ordering accessories 17
6
10 Environment 17
11 Guarantee and service 17
12 Troubleshooting 18
1Introduction
Congratulations on your purchase and welcome
to Philips! To fully benefit from the support
that Philips offers, register your product at
www.philips.com/welcome.
1.1SENSEO® coffee system
Make your coffee moments truly special with
SENSEO®. This unique system combines the
easy-to-use Philips SENSEO® coffee machine
with the specially developed Douwe Egberts
SENSEO® coffee pods, giving you a full, smooth
coffee with a delicious foam layer. Douwe Egberts
coffee in convenient SENSEO® coffee pods and
Philips’ unique new SENSEO® brewing system
are perfectly matched to ensure that the best
taste and aroma are extracted from the coffee.
Discover all SENSEO® coffee blends at
www.senseo.com.
To ensure a smooth and full coffee taste, you
should keep the following things in mind:
Fresh coffee pods
Use the SENSEO® coffee pods that have been
specially developed by Douwe Egberts for your
SENSEO® coffee machine for a full, round taste.
Douwe Egberts SENSEO® coffee pods stay fresh
longer if you store them in an airtight storage
container.
Fresh water
Use fresh water every day. If you have not used
the coffee machine for one day, you have to
flush it with fresh water before you use it again
(see chapter ‘Brewing SENSEO® coffee, section
‘Flushing the machine after a day of non-use’).
E nglish
Table of contents
2 General description
(Fig. 1)
1 Coffee collector
2 Lid lever
3 Lid with brewing chamber
4 Sealing ring
5 Water distribution disc
6 2-cup pod holder qq
7 1-cup pod holder q
8 Coffee spout cover
9 Coffee spout
10 Spout release buttons
11 Removable drip tray
12 Cup tray
13 Touch panel
14 On/off button
15 Personal coffee memory symbol (HD7872 only)
16 Regular coffee symbol
17 Selection button
18 Strong coffee symbol
19 CALC light
20 1-cup button q
21 2-cup button qq
22 Water reservoir
23 Water reservoir lid
5
3Important
Read this user manual carefully before you use the
machine and save it for future reference.
Danger
•• Never immerse the machine in water or any
other liquid.
Warning
•• Check if the voltage indicated on the bottom
of the machine corresponds to the local mains
voltage before you connect the machine.
•• This machine is not intended for use by
persons (including children) with reduced
physical, sensory or mental capabilities, or lack
of experience and knowledge, unless they
have been given supervision or instruction
concerning use of the machine by a person
responsible for their safety.
•• Children should be supervised to ensure that
they do not play with the machine.
•• Do not use the machine if the plug, the mains
cord or the machine itself is damaged.
•• If the mains cord is damaged, you must have it
replaced by Philips, a service centre authorised
by Philips or similarly qualified persons in
order to avoid a hazard.
Caution
•• After unpacking the machine, never put your
SENSEO® machine on its side. Always keep it
in upright position, also during transport.
•• Always return the machine to a service centre
authorised by Philips for examination or repair.
Do not attempt to repair the machine yourself,
otherwise your guarantee becomes invalid.
•• Do not use the machine in combination with
a transformer, as this could cause hazardous
situations.
•• Always put the machine on a flat and stable
surface.
•• Do not use the machine at altitudes higher
than 2200 metres above sea level.
•• Never pour milk, coffee, hot water or
carbonated water into the water reservoir.
•• Never flush the machine or let it brew coffee
when the spout is not in place.
6
•• This machine is intended for normal
household use only. It is not intended for
use in environments such as staff kitchens
of shops, offices, farms or other work
environments. Nor is it intended to be used
by clients in hotels, motels, bed and breakfasts
and other residential environments.
3.1 Compliance with standards
This machine complies with all standards regarding
electromagnetic fields (EMF). If handled properly
and according to the instructions in this user
manual, the machine is safe to use based on
scientific evidence available today.
The energy consumption of this machine in
off mode is less than 1 watt. This means that
this machine complies with European Directive
2009/125/EC, which sets the ecological design
requirements for energy-using products.
4 Flushing the machine
before first use
It is important that you flush your SENSEO®
coffee machine before first use. After the flushing
cycle (which only takes approx. 2 minutes), the
machine is ready for brewing SENSEO® coffee.
C Caution:
Never interrupt the flushing cycle halfway. If you
do, the boiler does not fill itself properly.
1 Attach the spout to the machine. Grab the
two ridges of the inner part of the spout and
squeeze them lightly (1). Place the spout on
the machine and release the two ridges (2).
3
4
5
Tilt the water reservoir and place the bottom
back onto the machine (1). Then press the top
of the water reservoir towards the machine (2).
6
Remove the drip tray.
7
Place a bowl with a capacity of at least 1.5
litres under the coffee spout.
Fill the water reservoir to the top with cold
tap water.
Place the lid on the water reservoir before
you put the water reservoir back onto the
machine.
1.5L
8
Make sure a pod holder, without pod or pods,
is in place.
7
E nglish
C Caution:
Never flush the machine or let it brew coffee
when the spout is not in place.
2 Tilt the top of the water reservoir backwards
(1) and lift the water reservoir off the
machine (2).
•• When all the water in the water reservoir
has been used up, the flushing cycle is
finished and the machine switches off.
9
Put the plug in an earthed wall socket.
Press the on/off button 3. The button lights up
to indicate that you have to flush the machine.
11
To start flushing, press the 1-cup button q
and the 2-cup button qq briefly at the same
time.
12
•• The on/off button starts flashing to indicate
that the flushing cycle has started.
•• During the flushing cycle, the boiler fills itself
with water from the water reservoir and cold
water comes out of the coffee spout. During
the flushing cycle, the machine produces more
noise than during a regular brewing cycle.
Your SENSEO® machine is now ready for use
so that you can brew your first cup of delicious
coffee.
10
8
Fill the water reservoir with fresh tap water,
put the lid on it and place it back onto the
machine.
Pull the lid lever upwards to open the lid.
The lid opens automatically.
While the SENSEO® coffee machine is heating
up, you can select the coffee strength you prefer
and the number of cups you want to brew. The
machine then brews the cup or cups immediately
after it has heated up.
1 Make sure that the water reservoir is filled
with fresh cold tap water beyond the MIN
level and that the lid is on the water reservoir.
5
If you want to make one cup of SENSEO®
coffee, place the 1-cup pod holder q in the
machine (1). If you want to make two cups,
put the 2-cup pod holder qq in the machine
(2). Make sure the pod holder is clean.
E Tip:
Use fresh water every day.
2 Put the plug in an earthed wall socket.
3 Press the on/off button 3. The on/off button
flashes slowly while the water heats up.
6
Place 1 coffee pod in the 1-cup pod holder
q (1) or place 2 coffee pods in the 2-cup
pod holder qq (2). Place the pod or pods
properly in the centre of the pod holder, with
the convex side pointing downwards. Press
the pod or pods lightly into the pod holder.
E nglish
4
5 Brewing SENSEO®
coffee
D Note:
If the on/off button flashes rapidly, the water
reservoir does not contain enough water for
brewing one cup of coffee.
9
D Note:
Make sure the coffee in the pod or pods is
evenly distributed.
9
Press the selection button to select the
desired coffee strength. Select the cup symbol
with three bars for a regular cup of coffee
(125ml) (1). Select the cup symbol with one
bar for a strong cup of coffee (60ml) (2).
10
When you have selected the desired coffee
strength, press the 1-cup button q for one
cup (1) or press the 2-cup button qq for
two cups (2).
11
When the water has heated up and the on/
off button lights up continuously, the machine
starts brewing coffee.
C Caution:
Never put normal ground coffee or use torn
pods in the SENSEO® machine, as this causes
it to become blocked.
7 Close the lid (1) and lock the lever (2).
B Warning:
Make sure the lid is closed properly and
the lid lever is locked before you start
brewing coffee.
8 Place one cup or two cups under the
spout openings. You can adjust the height
of the coffee spout by sliding it upwards or
downwards. You can also remove the drip tray
to be able to place higher cups.
D Note
The cups you use should have a capacity of at
least 150ml when you brew regular coffee or
100ml when you brew strong coffee. Do not
use cups that are too large, as they cause the
coffee to get cold more quickly.
10
E Tip:
You can interrupt the brewing cycle at any
time. To do this, press the same cup button (1cup button or 2-cup button) that you pressed
to start brewing coffee. However, if you do
this, the machine does not complete the
interrupted brewing cycle if you switch it on
again or press the same cup button again.
D Note:
Do not remove the water reservoir during a
brewing cycle.
When the coffee is ready, remove the used
coffee pod or pods. Simply lift the pod holder
out of the machine and empty it.
2
To enter the programming mode, first select
the personal coffee memory symbol (star
symbol) with the selection button (1). Keep
the selection button pressed for 2 seconds
until the star symbol starts flashing (2) and
you hear a beep. Then release the selection
button.
3
Press the 1-cup button to make the coffee
flow into the cup (1). When the cup contains
the amount of coffee you prefer, press the
1-cup button again (2). Your preferred amount
of coffee has been set.
C Caution:
There may still be some hot water/coffee on
the coffee pod or pods.
13 After use, press the on/off button 3 to switch
off the machine.
D Note:
If you do not use the machine, it switches off
automatically after 15 minutes to save energy.
E nglish
12
5.1 Personal coffee memory
(HD7872 only)
You can program the machine to brew the
amount of coffee you prefer (up to 145ml). Simply
experiment and find out what you like best. We
advise you to brew at least 60ml for optimal taste
and temperature.
While programming, you can only use the
1-cup button. When you have completed the
programming process, you will be able to brew
one or two cups with the programmed amount
of coffee.
D Note:
It is not possible to program your personal coffee
memory while the machine is heating up. Wait
until the on/off button lights up continuously.
1 Place 1 coffee pod in the 1-cup pod holder
and place 1 cup under the spout openings.
From now on, your SENSEO® machine brews one
or two cups with this amount of coffee when you
select the personal coffee memory symbol with
the selection button.
D Note:
If you want to change the set amount of coffee,
simply perform steps 1-3 again.
11
5.2 Flushing the machine after
a day of non-use
5
If you have not used the coffee machine for one
day, flush it to make sure that the boiler is filled
with fresh water.
To flush the machine, brew two cups of hot
water in the following way:
1 Fill the water reservoir with cold tap water
beyond the MIN level (1). Put the lid on it (2)
and put it the water reservoir back onto the
machine.
Press the on/off button 3. The on/off button
flashes slowly while the water heats up.
6
Make sure that the coffee strength you have
selected is regular coffee (cup symbol with
three bars).
7 Press the 2-cup button qq to brew two cups
of hot water.
2
Put the 1-cup pod holder q or the 2-cup pod
holder qq in the machine without pods.
8
When the water has heated up, the on/off
button lights up continuously and the coffee
machine starts operating.
9 Throw away the water in the cups. Now the
machine is ready for use again.
3
4
12
Close the lid and lock the lever.
Put two cups or a large mug under the coffee
spout to collect the water.
5
To disassemble the coffee spout, grab the
two ridges of the inner part of the spout and
squeeze them lightly (1). Move the inner part
downwards to remove it from the outer part
of the spout (2).
6
Clean the water reservoir and its lid, the
coffee spout, the coffee collector, the drip tray,
the cup tray and the pod holders in hot water
or in the dishwasher.
Regular cleaning of your SENSEO® is important
to ensure that the SENSEO® coffee always tastes
optimally and to optimise the lifetime of the
coffee machine.
B Warning:
Never immerse the SENSEO® coffee machine in
water.
1 Always unplug the machine before you clean
it.
2 Clean the outside of the machine with a moist
cloth.
3 Remove the coffee collector.
4
To remove the coffee spout, press the release
buttons (1) and pull the coffee spout off the
machine (2).
C Caution:
Be careful not to damage the valve in the
bottom of the water reservoir if you use a
washing-up brush to clean the water reservoir.
D Note:
Check if the sieve in the centre of the pod holder
is clogged. If this is the case, unclog the sieve by
rinsing the pod holder under the tap. If necessary,
use a washing-up brush to clean the sieve
13
E nglish
6Cleaning
7
Clean the water distribution disc and the
rubber sealing ring with a moist cloth.
C Caution:
Do not remove the rubber sealing ring and be
careful not to damage the tab on the water
distribution disc.
8 Clean the water inlet on the machine with a
moist cloth.
7Descaling
Scale builds up inside the machine during use. It is
essential to descale the SENSEO® coffee machine
when the CALC light goes on. Use SENSEO®
Descaler (HD7012, HD7011, HD7006) only.
When to descale
•• Descale the SENSEO® coffee machine as
described below when the CALC light goes
on (after you have brewed approx. 400 cups
of SENSEO® coffee).
Why to descale
Your reasons to descale:
•• It prolongs the life of your SENSEO® coffee
machine
•• It ensures maximum cup volume
•• It ensures maximum coffee temperature
•• The machine produces less sound during
brewing
•• It prevents malfunctioning
If the descaling procedure is not performed
correctly, scale residue remains behind in the
machine. This causes scale to build up more
quickly and may cause permanent and irreparable
damage to the machine.
Use the correct descaling agent
Use SENSEO® Descaler (HD7012, HD7011,
HD7006) only. It has been developed to ensure
better machine performance and operation.
Each descaling mixture can be used only once.
For more information about this descaler,
visit our website www.philips.com.
B Warning:
Never use a descaling agent based on mineral
acids such as sulphuric acid, hydrochloric acid,
sulphamic acid and acetic acid (e.g. vinegar). These
descaling agents may damage your SENSEO®
coffee machine.
7.1 Descaling procedure
14
The descaling procedure consists of a descaling
cycle and two flushing cycles. Do not interrupt the
descaling cycle and do not switch off the machine
before you have performed the two flushing cycles.
Mix 50 grams of citric acid with 1 litre of
water in a measuring jug. Stir until the powder
has dissolved. Fill the water reservoir with the
descaling mixture.
2
Tilt the water reservoir and place the bottom
back onto the machine (1). Then press the top
of the water reservoir towards the machine (2).
4
Place the 1-cup pod holder q with a used
coffee pod in it in the coffee machine. Close
the lid and make sure it is properly locked.
E nglish
1
D Note:
Always put a used coffee pod in the pod
holder when you descale the machine. This
pod serves as a ‘filter’ to prevent the sieve or
hole in the pod holder from getting clogged
with scale residue.
B Warning:
Make sure the lid is closed properly and
the lid lever is locked before you start
descaling.
5 Remove the drip tray.
3
Press the on/off button 3. The on/off button
flashes slowly while the water heats up. The
machine is ready for descaling when the on/
off button lights up continuously.
6
Put a bowl with a capacity of at least 1.5
litres under the spout to collect the descaling
mixture.
1.5L
15
7
When the on/off button lights up continuously,
press the 1-cup button q and the 2-cup
button qq at the same time for 3 seconds
until you hear a beep. Release the buttons
as soon as their lights as well as the selected
strength go out. This means that the descaling
procedure has been activated correctly.
•• The CALC light and the on/off button start
flashing to indicate that the descaling cycle
is in progress.
•• During the descaling cycle, the water comes
out of the machine in intervals.
•• When all the water in the water reservoir
has been used up, the descaling cycle is
finished. The on/off button starts to flash
rapidly.
D Note:
If you press the 1-cup and 2-cup button
longer than 3 seconds, the machine does not
start the descaling cycle. If this happens, press
the 1-cup button and the 2-cup button at the
same time for 3 seconds again.
D Notes:
Do not refill the water reservoir with used
hot water or the used descaling mixture.
2 Tilt the water reservoir and place the bottom
back onto the machine (1). Then press the top
of the water reservoir towards the machine (2).
3
Place the 1-cup pod holder q with a used
coffee pod in it in the coffee machine. Close
the lid and make sure it is properly locked.
4
Put a bowl with a capacity of at least 1.5 litres
under the spout to collect the water.
7.2 Flushing after descaling
1
Rinse the water reservoir under the tap and
then fill it to the top with fresh tap water.
1.5L
16
Press the 1-cup button q and the 2-cup
button qq at the same time for 3 seconds
until you hear a beep to start the flushing
cycle.
Remove the used pod and clean the pod
holder after the flushing cycle to prevent the
sieve in the centre from getting clogged.
7 Repeat steps 1 to 6 once more to ensure a
clean machine.
8 After the descaling cycle and the flushing
cycles, the CALC light goes out and the
machine switches off automatically.
10Environment
•• Do not throw away the machine with the
normal household waste at the end of its life,
but hand it in at an official collection point for
recycling. By doing this, you help to preserve
the environment.
6
8 Frost-free storage
After you have flushed the machine for the first
time (see chapter ‘Flushing the machine before
first use’), it may only be used and stored in a
frost-free place to prevent damage.
9 Ordering accessories
To purchase accessories for this machine,
please visit our online shop at
www.shop.philips.com/service.
If the online shop is not available in your country,
go to your Philips dealer or a Philips service
centre. If you have any difficulties obtaining
accessories for your machine, please contact the
Philips Consumer Care Centre in your country.
You find its contact details in the worldwide
guarantee leaflet.
11Guarantee and
service
If you need service or information or if you
have a problem, please visit the Philips website at
www.philips.com/support or contact the Philips
Consumer Care Centre in your country.You find its
phone number in the worldwide guarantee leaflet. If
there is no Consumer Care Centre in your country,
go to your local Philips dealer.
The purchase of the Philips SENSEO® coffee
machine does not exhaust any of the rights of
Sara Lee/Douwe Egberts or Philips under any
of their patents nor does it confer upon the
purchaser a licence under these patents.
Always return the machine to a service centre
authorised by Philips for examination or repair.
Do not attempt to repair the machine yourself,
otherwise your guarantee becomes invalid.
17
E nglish
5
12Troubleshooting
12.1SENSEO® coffee machine
This chapter summarises the most common problems you could encounter with the machine.
If you are unable to solve the problem with the information below, visit www.philips.com/support
for a list of frequently asked questions or contact the Consumer Care Centre in your country.
Problem
Solution
My cup overflowed
when I used the
machine for the first
time.
You probably tried to brew a cup of coffee without flushing the machine
first. Before you start brewing coffee, you have to flush the machine.
When you switch on the machine again, the on/off button either lights up
continuously or flashes slowly or rapidly.
If the on/off button lights up continuously, you have to carry out the flushing
procedure (see chapter ‘Flushing the machine before first use’).
If the on/off button flashes slowly or rapidly, you do NOT have to carry
out the flushing procedure. If the on/off button flashes slowly, the water
is heating up. If it flashes rapidly, there is not enough water in the water
reservoir or the water reservoir is not placed on the machine properly.
If water continued to flow from the spout until the water reservoir was
empty, the machine was performing the flushing cycle. Before you start
brewing coffee, you have to flush the machine. When you switch on the
machine again, the on/off button either lights up continuously or flashes
slowly or rapidly.
If the on/off button lights up continuously, you have to carry out the flushing
procedure (see chapter ‘Flushing the machine before first use’).
If the on/off button flashes slowly or rapidly, you do NOT have to carry
out the flushing procedure. If the on/off button flashes slowly, the water
is heating up. If it flashes rapidly, there is not enough water in the water
reservoir or the water reservoir is not placed on the machine properly.
You have used the SENSEO® coffee machine at an altitude higher than 2200
metres above sea level. This has caused the water in the machine to start
boiling before it has reached the required temperature, which prevents the
machine from functioning properly. Switch off the machine and no longer
use it at altitudes higher than 2200 metres above sea level.
You have pressed the 1-cup button and the 2-cup button at the same time.
This started the descaling cycle. If you did not intend to start the descaling
cycle, simply press the on/off button to switch off the machine. If you did
intend to start the descaling cycle, do not interrupt this cycle but let the
appliance operate until the water reservoir is empty.
Water continued to
flow from the spout
when I used the
machine for the first
time.
The on/off button
flashes slowly.
The CALC light
flashes.
18
Solution
The CALC light does
not go out after
descaling.
The CALC light does not go out if the descaling procedure has not been
performed correctly. To perform the descaling procedure correctly:
The on/off button
continues to flash
rapidly.
Water leaks from the
coffee machine.
E nglish
Problem
1. Make sure that you do not interrupt the descaling cycle or switch off or
unplug the machine during the descaling cycle. During the descaling cycle,
hot water comes out of the coffee spout at intervals and the machine stops
descaling 3 to 4 times to let the descaling mixture act and to heat up again.
2. Make sure that you start the descaling cycle by pressing the 1-cup
button and the 2-cup button at the same time. See chapter ‘Descaling’ for a
complete description of the descaling procedure.
3. Make sure that you use three full water reservoirs to complete the
descaling procedure: one reservoir filled with descaling mixture and two
reservoirs filled with fresh water.
Make sure that there is enough water in the water reservoir and that the
water reservoir is placed properly.
Make sure that the ambient temperature is not lower than 5°C. If it is, the
machine does not function properly.
If you notice coffee or water leaking from your SENSEO® machine, try to
establish where the leakage occurs. This is important, as the location of the
leakage determines the solution.
1. If the leakage occurs near the lid or the spout, make sure that:
1a. The sieve in the centre of the pod holder is not clogged. If it is, unclog
the sieve by holding the pod holder under a running tap.
1b. The coffee pod has been put properly in the centre of the pod holder.
1c. The sealing ring has not got stuck under the edge of the water
distribution disc (see figure 1 at the beginning of this user manual).
1d. The spout and the coffee collector have been placed correctly.
2. If the leakage occurs near the bottom of the water reservoir or under the
machine, make sure that:
2a. There is not too much water in the water reservoir.
2b. You do not place the water reservoir onto the machine too roughly.
If you place the water reservoir too roughly, water may splash out of the
water reservoir.
2c. The water reservoir is not damaged or broken. Normally, water should
not start to drip from the water outlet in the bottom of the water reservoir
within 30 seconds after filling.
19
Problem
Solution
I cannot open the lid.
A vacuum may have temporarily formed under the lid. Switch off the
machine. Pull up the lever and wait 24 hours before you open the lid.You
may need to use quite some force.
Make sure that you do not move the SENSEO® machine. Moving the
machine, placing it outdoors or in a cool or cold environment does not
accelerate the unlocking of the lid.
For this not to happen again, always make sure that the pod holders are
clean and that the sieve in the centre of the pod holders is not clogged.
Perhaps the sieve in the centre of the pod holder is clogged. If this is the
case, unclog the sieve by rinsing the pod holder under a running tap. Use a
washing-up brush to clean the sieve, if necessary.
Descale the machine (see chapter ‘Descaling’).
Check if a used coffee pod is sticking to the water distribution disc. If this is
the case, remove the used pod.
Check if you used the correct pod holder. Use 2 pods in combination with
the deeper 2-cup pod holder qq.
Make sure that you have selected the coffee strength that you prefer. You
can choose between regular and strong coffee. You can also increase or
decrease the coffee strength by setting your preferred amount of coffee
with the personal coffee memory function (HD7872 only).
Make sure that you have used the correct number of pods and have
pressed the right button. Use 2 pods in combination with the 2-cup pod
holder qq and the 2-cup button qq.
Make sure that you have placed the coffee pod or pods properly in the
centre of the pod holder, to prevent water from escaping along the edge
of the pod or pods. When you use two coffee pods on top of each other,
make sure that the convex sides of both pods point downwards and press
the pods lightly into the pod holder.
Make sure that you have not used the same coffee pod twice by accident.
Make sure that the coffee in the pod is evenly distributed.
If you prefer a more robust flavour, SENSEO® coffee pods with a stronger
blend are available.
The coffee machine
produces less coffee
than before.
I cannot close the lid
properly.
The SENSEO® coffee
is not strong enough.
20
Solution
The coffee is not hot
enough.
If you have used the machine for quite some time and the temperature of
the coffee decreases, we advise you to descale the machine. See chapter
‘Descaling’. Descale your SENSEO® coffee machine regularly.
Do not use cups that are too large, as they cause the coffee to get cold
more quickly. Make sure that the cups have a capacity of at least 150ml.
Use thin-walled cups. Thin-walled cups absorb less heat from the coffee than
thick-walled cups.
Make sure the size of the cup matches the amount of coffee. Do not brew
a small amount of coffee in a large cup.
If you drink coffee with fresh milk, preheat the milk in the cup in a
microwave.
You can preheat the coffee machine by first brewing a cup of coffee without
placing a coffee pod in the pod holder. In this way you also heat up your
coffee cup.
If there is water on the touch panel, the buttons do not work. Make sure
that the touch panel is dry and also make sure your hands are dry when
you use the touch panel.
Make sure that you press the selection button and not the symbols to the
left of the selection button.
This happens because the touch panel is very sensitive and the buttons
only require a light touch to be activated. There is no problem when this
happens, the machine will not start brewing coffee.
Unplug the machine before you clean it.
Please read section ‘Personal coffee memory’ in chapter ‘Brewing SENSEO®
coffee’ and try to set the amount of coffee you prefer again.
The touch panel does
not work.
I accidentally activate
the touch panel when
I clean it.
HD7872 only: The
personal coffee
memory button does
not produce the
amount of coffee I
prefer.
21
E nglish
Problem
© 2012 Koninklijke Philips Electronics N.V.
All rights reserved.
4222.200.0566.3