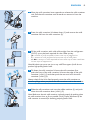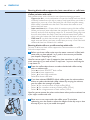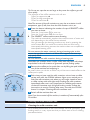
1
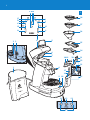
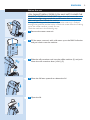
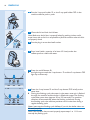
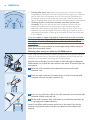
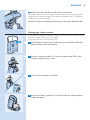
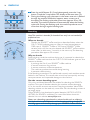
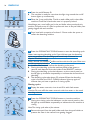
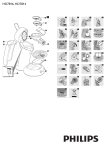
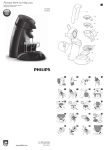
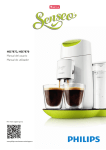
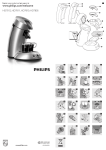
HD7850
2
3
FGH
2 3
1
E
D
C
I
J
B
K
A
L
28
27
4
26
5
25
24
6
7
18 19
20
21
22
23
1
8
17
16
9 10
11
15
12
14
13
4
HD7850
English 6
6
English
Introduction
Congratulations on your purchase and welcome to Philips! To fully benefit
from the support that Philips offers, register your product at
www.philips.com/welcome.
Make your coffee moments truly special with SENSEO®. This unique
system combines the easy-to-use Philips SENSEO® coffee machine with
the specially developed Douwe Egberts SENSEO® coffee pods, giving you a
full, smooth coffee with a delicious foam layer.
The SENSEO® Latte Select coffee machine offers you delicious coffee
specialties made with fresh frothed milk. Choose from cappuccino, latte
macchiato, caffè latte and regular SENSEO® black coffee - all at the touch
of a button.
To ensure a smooth and full coffee taste, you should keep the following
things in mind:
Fresh water
Use fresh water every day.
Fresh coffee pods
Use the SENSEO® coffee pods that have been specially developed by
Douwe Egberts for your SENSEO® coffee machine for a full, round taste.
The Douwe Egberts SENSEO® coffee pods stay fresh longer if you store
them in an airtight storage container.
A clean machine
Clean your coffee machine regularly as described in chapters ‘Cleaning the
milk container unit’ and ‘Cleaning the machine’. Remove used coffee pods
after brewing. If you have not used the machine for some time, flush the
machine before you use it again (see section ‘Flushing the coffee machine’
in chapter ‘Cleaning the machine’).
For a reliable performance of the milk container unit and consistently
good frothing results, it is very important that you follow the 2 cleaning
procedures below:
1 Flush the milk container unit after you have brewed a cappuccino, latte
macchiato or caffè latte (see section ‘Flushing after every use with the
CLEAN button’ in chapter ‘Cleaning the milk container unit’).
2 Clean the milk container and the lid thoroughly if you are not going
to use the milk container again that day (see section ‘Cleaning all parts
after the last use of the day’ in chapter ‘Cleaning the milk container
unit’).
For the best long-term results make sure you descale the machine regularly
according to the instructions in chapter ‘Descaling’. The CALC CLEAN
indicator tells you when descaling is required. Always use a descaler based
on citric acid, for instance the descaler specifically developed for SENSEO®
coffee machines. Do not use white vinegar to descale your SENSEO®
machine!
General description (Fig. 1)
1 Water reservoir (your water reservoir may differ from the one shown
in the figure)
2 Height adjustment knob for drip tray
3 Calc-Clean tool
English
7
4 Control panel (your control panel may differ from the one shown in
the figure)
A Coffee select button
B SENSEO® black coffee indicator
C Cappuccino indicator
D Latte macchiato indicator
E Caffè latte indicator
F CLEAN/CALC CLEAN button
G CALC CLEAN indicator
H CLEAN indicator
I Large black coffee volume indicator
J Medium black coffee volume indicator
K Small black coffee volume indicator
L Volume select button
5 Lid lever
6 Sealing ring
7 Water distribution disc
8 Milk container lever
9 Cup tray
10 Drip tray
11 1-cup button q
12 On/off button with light ring
13 2-cup button qq
14 Light rings
15 Milk container unit
16 Milk container
17 Milk tube
18 Milk container lid release lever
19 Steam inlet
20 Milk container lid, including frothing unit
21 tab of milk container lid cover
22 Milk container lid cover
23 Rubber seal
24 Coffee spout
25 Coffee spout cover
26 Coffee collector
27 2-cup pod holder qq
28 1-cup pod holder q
Important
Read this user manual carefully before you use the machine and save it for
future reference.
Danger
-- Never immerse the machine in water or any other liquid.
Warning
-- Check if the voltage indicated on the bottom of the machine
corresponds to the local mains voltage before you connect the
machine.
-- This machine is not intended for use by persons (including children)
with reduced physical, sensory or mental capabilities, or lack of
experience and knowledge, unless they have been given supervision or
8
English
instruction concerning use of the machine by a person responsible for
their safety.
-- Children should be supervised to ensure that they do not play with the
machine.
-- Do not use the machine if the plug, the mains cord or the machine
itself is damaged.
-- If the mains cord is damaged, you must have it replaced by Philips, a
service centre authorised by Philips or similarly qualified persons in
order to avoid a hazard.
Caution
-- Correct cleaning of the milk container is very important for reliable
performance of the milk container unit and good frothing results. See
chapter ‘Cleaning’.
-- Always return the machine to a service centre authorised by Philips for
examination or repair. Do not attempt to repair the machine yourself,
otherwise your guarantee becomes invalid.
-- Never put normal ground coffee or use torn pods in the SENSEO®
machine, as this causes it to become blocked.
-- Do not use the machine in combination with a transformer, as this
could cause hazardous situations.
-- Always put the machine on a flat and stable surface.
-- Never let the machine operate unattended.
-- Do not use the machine at altitudes higher than 2200 metres above
sea level.
-- The machine does not work at temperatures below 10°C.
-- Flush the coffee machine with fresh water before you use it for the first
time (see chapter ‘Before first use’). This causes the boiler to fill with
water, which is essential for the machine to work properly.
-- Do not use the SENSEO® machine in combination with water
softeners based on sodium exchange.
-- Philips strongly advises you to descale this SENSEO® machine
when the CALC CLEAN indicator tells you that descaling is required.
If the machine is not descaled in time and according to the procedure
described in chapter ‘Descaling’, this may lead to technical failures.
-- Never use a descaling agent based on mineral acids such as sulphuric
acid, hydrochloric acid, sulphamic acid and acetic acid (e.g. vinegar).
These descaling agents may damage your SENSEO® coffee machine.
-- Never turn your SENSEO® machine on its side, as water may leak from
the boiler. Always keep it in upright position, also during transport.
-- This machine is intended for household use only and not for
professional use.
Electromagnetic fields (EMF)
This machine complies with all standards regarding electromagnetic fields
(EMF). If handled properly and according to the instructions in this user
manual, the machine is safe to use based on scientific evidence available
today.
English
Before first use
YOU CANNOT BREW COFFEE IF YOU HAVE NOT FLUSHED THE
SENSEO® COFFEE MACHINE FIRST! Note that the buttons do not
work and the light ring around the on/off button does not start to
flash until you have flushed the machine.
During the flushing cycle, the water in the water reservoir is flushed
through the machine and the boiler is filled with water. After the flushing
cycle, the coffee machine is ready for use.
Flush the machine in the following way:
1 Remove the water reservoir.
2 Fill the water reservoir with cold water up to the MAX indication
and put it back onto the machine.
2
3 Slide the milk container unit into the coffee machine (1) and push
down the milk container lever (‘click’) (2).
1
4 Move the lid lever upwards to release the lid.
5 Open the lid.
9
10
English
6 Put the 1-cup pod holder q or the 2-cup pod holder qq in the
machine without pod or pods.
7 Close the lid and lock the lid lever.
Note: Make sure the lid lever is properly locked by pushing it down until it
snaps home with a click. It is not possible to flush the machine when the lid is
not properly closed.
8 Put the plug in an earthed wall socket.
9 Put a bowl (with a capacity of at least 1.5 litres) under the
coffee spout to collect the water.
10Press the on/off button 3.
,, the light rings around the 1-cup button  q and the 2-cup button qq
light up continuously.
11Press the 1-cup button q and the 2-cup button qq briefly at the
same time.
,, During the flushing cycle, the water in the water reservoir is flushed
through the machine and the boiler is filled with water. The flushing
cycle takes some time (approx. 90 to 150 seconds). The machine
switches off automatically when the flushing cycle ends. During
the flushing cycle, the machine produces more noise than during a
regular brewing cycle.
Never interrupt the flushing cycle halfway. If you do, the boiler does not
fill itself properly.
Note: If the machine does not work properly, repeat steps 1 to 11. Do not
interrupt the flushing cycle.
English
11
12Clean the coffee spout, the coffee collector, the pod holders, the
milk container and the milk container lid with hot water and some
washing-up liquid or in the dishwasher. Clean the water reservoir
thoroughly in hot water, if necessary with some washing-up liquid.
Now your Philips SENSEO® coffee machine is ready for use.
Using the machine
Preparing for use
1 Fill the water reservoir with cold water up to the MAX indication
and put it back onto the machine.
The water reservoir has a volume of 8 medium-sized cups of coffee.
Never pour milk, coffee, hot water or carbonated water into the water
reservoir.
The MIN indication on the water reservoir indicates the minimum
amount of water required for brewing coffee. Always fill the water
reservoir beyond the MIN level.
2 Press the on/off button 3.

,, The light ring light flashes slowly while the water is heating up.
Heating up takes approx. 90 seconds.
,, The coffee machine is ready for use when the light ring around the
on/off button lights up continuously.
,, If the light ring around the on/off button flashes rapidly, the water
reservoir does not contain enough water for brewing coffee.
3 Move the lid lever upwards to release the lid.
4 Open the lid.
5 Place the appropriate pod holder in the machine.
Note: Make sure the pod holder is clean and the sieve in the centre is not
clogged, e.g. with loose coffee grounds.
-- Use 1 coffee pod in combination with the 1-cup pod holder and the
1-cup button q if you want to make one cup of SENSEO® black
coffee, cappuccino, latte macchiato or caffè latte.
12
English
-- Use 2 coffee pods in combination with the deeper 2-cup pod holder
and the 2-cup button qq if you want to make two cups of SENSEO®
black coffee.
6 Place the SENSEO® coffee pod or pods properly in the centre of the
pod holder, with the convex side pointing downwards.
Note: Use SENSEO® coffee pods from Douwe Egberts, which have been
specially designed for your SENSEO® coffee machine and give a full and round
taste.
Note: Make sure the coffee in the pod or pods is evenly distributed and press
the pod or pods lightly into the pod holder.
Note: Never put normal ground coffee or use torn pods in the SENSEO®
machine, as this causes it to become blocked.
-- Place 1 SENSEO® coffee pod in the 1-cup pod holder q.
-- Place 2 SENSEO® coffee pods in the 2-cup pod holder qq.
7 Close the lid and lock the lid lever.
Make sure you push down the lid lever until it snaps home with a click.
Note: It is not possible to brew coffee when the lid is not properly closed and
the lid lever is not locked.
Filling the milk container
Always use milk at refrigerator temperature (5-8°C) to obtain hot
frothed milk of high quality for your cappuccino, latte macchiato or caffè
latte.
Note: If you want to brew SENSEO® black coffee, it is not necessary to fill the
milk container.
English
13
1 Move the milk container lever upwards to release the milk container
unit. Pull the milk container unit forwards to remove it from the
machine.
2 Press the milk container lid release lever (1) and remove the milk
container lid from the milk container (2).
2
1
3 Fill the milk container with cold milk straight from the refrigerator
(5-8°C) up to the level required for the coffee variety.
-- ¶= amount of milk required to brew one cup of cappuccino.
-- % = amount of milk required to brew one cup of caffè latte.
-- õ/ ¶¶= amount of milk required to brew one cup of latte macchiato
or two cups of cappuccino.
Note:We advise you not to use rice or soy milk.These types of milk do not
produce high-quality frothed milk.
1
2
4 To fasten the milk container lid onto the milk container, first
push the front of the milk container lid onto the edge of the milk
container (‘click’) (1) and then push the rear end onto the milk
container (‘click’) (2).
Always check if the lid is fixed properly onto the milk container to
prevent spillage when you place the milk container unit in the machine.
2
1
5 Slide the milk container unit into the coffee machine (1) and push
down the milk container lever (‘click’) (2).
Note: Make sure that the milk container is placed properly by pushing down
the milk container lever as far as possible (‘click’). Proper placement of the
milk container is essential for obtaining properly frothed milk.
14
English
Brewing black coffee, cappuccino, latte macchiato or caffè latte
Coffee varieties with milk
Each coffee variety with milk has its own distinctive brewing process:
-- Cappuccino ¶ is a rich combination of one-third coffee and two-thirds
of freshly frothed hot milk with a creamy froth layer. When you brew a
cappuccino, your cup is first filled with hot milk froth and then strong
black coffee is brewed onto the froth. This causes the coffee to sink
below the froth layer.
-- Latte macchiato õ is a 3-layer drink. It contains more milk than coffee.
When you brew a latte macchiato, the machine first fills your cup with
hot milk and milk froth and then stops for 15 seconds. During this time
the milk sinks below the froth. Then the machine brews black coffee,
which also sinks below the froth and settles above the layer of hot milk.
-- Caffè latte % is a drink that contains milk and coffee in more or less
equal amounts. When you brew a caffè latte, your cup is first filled with
coffee and then hot frothed milk is added.
Brewing black coffee or a coffee variety with milk
To brew a delicious black coffee, cappuccino, latte macchiato or caffè latte,
follow the steps below.
1 Before you brew coffee, make sure the water reservoir is filled with
water and you have placed 1 or 2 pods in the correct pod holder
(see chapter ‘Preparing for use’).
Note:You cannot make 2 cups of cappuccino, latte macchiato or caffè latte
at the same time. If you want to brew 2 cups, brew 1 cup at a time using the
1-cup button q.
2 Press the coffee select button to select the desired coffee variety
with or without milk.
-- Select À to brew SENSEO® black coffee.
-- Select ¶ to brew cappuccino.
-- Select  õ to brew latte macchiato.
-- Select % to brew caffè latte.
3 If you have selected SENSEO® black coffee, press the volume select
button to select the desired coffee volume. By varying the volume,
you also affect the strength of coffee.
-- Select  f for a small amount of black coffee (80ml).
-- Select  g for a medium amount of black coffee (125ml).
-- Select  h for a large amount of black coffee (145ml).
Note:You cannot operate the volume select button when you have selected one
of the coffee varieties with milk.
4 Place one or two cups under the coffee spout. To minimise
splattering, turn the knob to adjust the height of the drip tray so that
the top of your cup is just under the spout.
English
15
Tip: Do not use cups that are too large as they cause the coffee to get cold
more quickly.
The amounts of the coffee varieties with milk are:
-- 160ml for cappuccino ¶.
-- 220ml for latte macchiato õ.
-- 190ml for caffè latte %.
Note:The amount of the milk varieties may vary due to variations in milk
temperature, type of milk, how clean the milk container unit is, etc.
5 Press the button indicating the number of cups of SENSEO® coffee
you want to brew.
-- Press the 1-cup button q for one cup.
-- Press the 2-cup button qq for two cups.
,, The SENSEO® coffee machine starts brewing.
-- The machine automatically supplies the correct amount of water and
milk, depending on the coffee variety selected.
-- You can interrupt the brewing process at any time by pressing the
on/off button 3. If you switch the machine back on after having
interrupted the brewing process, the machine does not complete the
interrupted brewing cycle.
Do not remove the water reservoir during a brewing cycle, as this
causes the machine to draw in air. When this happens, the next cup is
only partly filled.
Do not remove the milk container during a brewing cycle.
Note:When the machine brews a coffee variety with milk, some milk always
stays behind in the milk container to guarantee optimal frothing quality.
6 Remove the coffee pod or pods after use by lifting the pod holder
out of the machine and emptying it.
Be careful when you do this, as there may still be some water/coffee on the
coffee pod or pods.
7 Each time you have used the milk container unit to brew a coffee
variety with milk, the CLEAN indicator lights up to remind you to
flush the milk container unit when you no longer intend to brew
a coffee variety with milk right away. Flushing the milk container
immediately after use is very important for reliable performance
of the milk container unit and good frothing results. Follow the
instructions in section ‘Flushing after every use with the CLEAN
button’ in chapter ‘Cleaning the milk container unit’.
8 Switch off the machine after use.
Note: If you do not switch off the machine, it switches off automatically after
30 minutes.
Cleaning the milk container unit
Cleaning the milk container unit
For a reliable performance of the milk container unit and consistently good
frothing results, it is very important that you follow each of the 2 cleaning
procedures below:
English
16
1 Flushing after every use (when you do not plan to froth milk again
straightaway). After each use, the CLEAN indicator lights up to remind
you to flush the milk container unit. To flush the milk container unit,
fill the milk reservoir with water and press the CLEAN button. See
section ‘Flushing after every use with the CLEAN button’ in this chapter.
2 Cleaning all parts of the milk container unit after the last use
of the day. To do this, remove the milk container lid from the milk
container. Open/remove the blue parts (milk container lid cover
and steam inlet) and the milk tube. Then clean all parts of the milk
container unit with hot water and some washing-up liquid or in the
dishwasher. See section ‘Cleaning all parts after the last use of the day’
in this chapter.
If you are unable to obtain high-quality frothed milk, the milk container
unit is probably dirty. Clean the milk container unit by following the
instructions in section ‘Cleaning all parts after the last use of the day’ in
this chapter.
Note:The machine only continues to produce high-quality frothed milk if you
follow these instructions closely.
Flushing after every use with the CLEAN button
Every time you have used the machine to froth milk, the CLEAN indicator
lights up to remind you to flush the milk container unit by filling the milk
container unit with water and using the CLEAN button.
Note:You have to do this if you do not plan to froth milk again straightaway.
Philips advises you to flush the milk container unit within 30 minutes after you
have used it.
1 Move the milk container lever upwards and remove the milk
container unit.
2
2 Press the milk container lid release lever (1) and remove the milk
container lid from the milk container (2).
1
3 Pour out any milk that is left in the milk container and rinse the milk
container briefly under the tap.
4 Fill the milk container with cold water up to the latte macchiato õ/
2-cup cappuccino ¶¶ indication.
Note: Do not fill the milk container with warm or hot water. If you do, the
machine only produces steam and does not clean the milk container unit
properly.
English
1
2
2
5 To fasten the milk container lid onto the milk container, first
push the front of the milk container lid onto the edge of the milk
container (‘click’) (1) and then push the rear end onto the milk
container (‘click’) (2).
6 Slide the milk container unit into the coffee machine (1) and push
down the milk container lever (‘click’) (2).
1
7 Place an empty cup under the coffee spout.
8 Press the CLEAN button.
,, The milk container unit is flushed.
Cleaning all parts after the last use of the day
2
1 Press the milk container lid release lever (1) and remove the milk
container lid from the milk container (2).
2 Pull at the blue parts:
1
17
English
18
-- Pull at the tab on top of the milk container lid cover to open the cover.
-- Pull out the steam inlet (this part stays attached to the lid by means of
a plastic strip)
Note:You can only pull the steam inlet out of the milk container lid when
the milk container lid cover is open.
3 Pull the milk tube off the milk container lid.
4 Clean the milk container, the milk container lid and the milk tube in
the dishwasher or with a washing-up brush in hot water with some
washing-up liquid. Rinse the parts with fresh water after cleaning.
Note: Cleaning in the dishwasher is recommended, especially when the milk
container is very dirty. In the dishwasher, all parts should be open or removed
as well.
1
3
5 Push back the steam inlet (1), connect the milk tube (2) and
close the milk container lid cover (3).
Note: Push back the steam inlet before you close the lid, otherwise the steam
inlet does not fit anymore.
Note: Make sure you push the milk tube far enough onto the connector so that
the holes in the connector are covered.
2
English
1
2
19
6 To fasten the milk container lid onto the milk container, first
push the front of the milk container lid onto the edge of the milk
container (‘click’) (1) and then push the rear end onto the milk
container (‘click’) (2).
Note: Make sure all parts of the milk container lid are dry before you
reassemble the lid.
Note: Always check if the lid is fixed properly onto the milk container to
prevent spillage when you place the milk container unit in the machine.
2
7 Slide the milk container unit into the coffee machine (1) and push
down the milk container lever (‘click’) (2).
1
Cleaning the machine
Danger: Never immerse the machine in water or any other liquid.
Cleaning the coffee machine
1 Always unplug the machine before you clean it.
2 Clean the outside of the machine with a damp cloth.
3 Remove the coffee collector.
4 Remove the coffee spout cover and take the coffee spout out of the
machine.
20
English
5 Clean the coffee spout cover, the coffee spout, the
coffee collector and the drip tray in hot water, if necessary with
some washing-up liquid, or in the dishwasher.
6 Hold the cup tray in your hand while you clean it with hot water. If
necessary, use some washing-up liquid.
The cup tray can also be cleaned in the dishwasher.
To clean the cup tray, always remove it from the machine, as it might
prove sharp when handled incorrectly. Always handle it carefully.
7 Clean the pod holders in hot water, if necessary with some washingup liquid, or in the dishwasher.
If the sieve in the centre of the pod holder is clogged, rinse the pod holder
under a running tap. If necessary, use a washing-up brush.
8 Clean the water reservoir in hot water, if necessary with some
washing-up liquid.
Note: If you use a washing-up brush, be careful not to damage the valve and
float in the bottom of the water reservoir.
Note:The water reservoir can also be cleaned in the dishwasher.
9 Clean the water inlet on the machine with a moist cloth.
Do not use an object with sharp edges to clean the water inlet.
10Rinse the parts with fresh water after cleaning and put them back
into the machine.
English
21
11Clean the water distribution disc with a moist cloth.
Be careful when you do this; make sure that the rubber sealing ring does
not get stuck under the edge of the water distribution disc. If it does, the
coffee machine starts leaking.
Note: Be careful not to damage the metal tab on the water distribution disc.
Flushing the coffee machine
If you have not used the coffee machine for three days, you have to flush it
with fresh water before you use it again.
Flush the machine in the following way:
1 Fill the water reservoir with cold water up to the MAX indication
and put it back onto the machine.
2 Put the 1-cup pod holder q or the 2-cup pod holder qq in the
machine without pod or pods.
3 Close the lid and lock the lid lever.
4 Put a bowl (with a capacity of 1.5 litres) under the coffee spout to
collect the water.
English
22
1
2
5 Press the on/off button 3 (1) and subsequently press the 1-cup
button q and the 2-cup button qq briefly at the same time (2).
,, During the flushing cycle, the water in the water reservoir is flushed
through the machine. While this happens, water comes out of
the spout. The flushing cycle takes some time (approx. 90 to 150
seconds). The machine switches off automatically when the flushing
cycle ends. During the flushing cycle, the machine produces more
noise than during a regular brewing cycle.
Descaling
Note:This machine is intended for household use only. It is not intended for
professional use.
When to descale
-- Descale the SENSEO® coffee machine as described below when the
CALC CLEAN indicator goes on (after you have brewed approx.
1000 cups of  SENSEO® coffee or 250 cups of SENSEO® coffee
varieties with milk). You can also descale the SENSEO® coffee machine
more often (at least every 3 months) in the same way. The descaling
procedure takes approx. 40 minutes.
Why to descale
Scale builds up inside the machine during use. It is essential to descale the
SENSEO® coffee machine when the CALC CLEAN indicator goes on. Your
reasons to descale:
-- It prolongs the life of your SENSEO® coffee machine
-- It ensures maximum cup volume
-- It ensures maximum coffee temperature
-- The machine produces less sound during brewing
-- It prevents malfunctioning
If the descaling procedure is not performed correctly, scale residues remain
behind in the machine. This causes scale to build up more quickly and may
cause permanent and irreparable damage to the machine.
Use the correct descaling agent
Only citric acid-based descalers are suitable for descaling the SENSEO®
machine. This type of descaler descales the machine without damaging
it. For the correct amount, see section ‘Descaling procedure’ below. Each
descaling mixture can be used only once. After use, the descaling mixture is
no longer active.
Philips SENSEO® has developed a special descaler (HD7012, HD7011,
HD7006) for SENSEO® machines. For more information about this
descaler, visit our website www.philips.com.
Never use a descaling agent based on mineral acids such as sulphuric
acid, hydrochloric acid, sulphamic acid and acetic acid (e.g. vinegar). These
descaling agents will certainly damage your SENSEO® coffee machine.
English
23
Descaling procedure
The descaling procedure consists of three cycles:
-- Descaling cycle (approx. 35 minutes)
-- Rinsing cycle with used pod (approx. 3 minutes)
-- Rinsing cycle without used pod (approx 3 minutes)
Descaling cycle
1 Mix 50 grams of citric acid with 1 litre of water in a measuring jug.
Stir until the powder has completely dissolved.
2 Remove the water reservoir.
3 Take the Calc-Clean tool out of the recess in the back of the
machine.
4 Remove the milk container unit from the machine.
5 Insert the Calc-Clean tool into the coffee spout.
Note: Push the Calc-Clean tool into the machine until it locks into position with
a click.
6 Push down the milk container lever.
7 Fill the water reservoir up to the MAX indication with the descaler
mixture. Then put the water reservoir back onto the coffee machine.
24
English
8 Press the on/off button 3.
,, The machine is ready for use when the light ring around the on/off
button lights up continuously.
9 Place the 1-cup pod holder q with a used coffee pod in the coffee
machine. Close the lid and make sure it is properly locked.
Note: Always put a used coffee pod in the pod holder when you descale the
machine.This pod serves as a ‘filter’ to prevent the sieve in the pod holder from
getting clogged with scale residues.
10Put a bowl with a capacity of at least 1.5 litres under the spout to
collect the descaling mixture.
11Press the CLEAN/CALC CLEAN button to start the descaling cycle.
Never interrupt the descaling cycle. If you did interrupt the descaling
cycle, see problem ‘The descaling cycle lasted only 5 minutes’ in
chapter ‘Troubleshooting’.
Never descale the SENSEO® coffee machine with the lid open. Make sure
the lid is properly locked.
,, It takes a few seconds before the descaling cycle starts.
,, During the descaling cycle, the machine pauses a few times to
remove scale deposits from the inside of the SENSEO® machine.
,, During the descaling cycle, the indicators on the control panel on
the lid light up clockwise sequentially to indicate that the machine is
descaling.
,, The descaling cycle takes about 35 minutes. When the descaling
cycle is finished, the CALC CLEAN indicator lights up again to
indicate that you have to perform 2 rinsing cycles.
Rinsing cycles
1 Empty the water reservoir, rinse it and fill it with fresh water.
Caution: Do not refill the water reservoir with hot water or the used
descaling mixture.
2 Press the CLEAN/CALC CLEAN button to rinse the machine.
,, During the rinsing cycle, the indicators on the control panel on the
lid light up anticlockwise sequentially to indicate that the machine is
rinsing.
Note:The rinsing cycle takes a few minutes.
3 Remove the pod from the pod holder and clean the pod holder to
prevent the sieve in the centre from getting clogged.
English
25
4 Rinse the machine a second time by repeating steps 1 and 2 above.
5 Remove the Calc-Clean tool from the coffee spout. Reinsert the
Calc-Clean tool into the recess in the back of the machine.
The descaling procedure is now finished and the machine is ready to brew
coffee again.
Frost-free storage
If the coffee machine has already been used and therefore has been
flushed with water, it may only be used and stored in a frost-free place to
prevent it from becoming damaged.
Replacement
You can order all removable parts from your Philips dealer or a Philips
service centre.
Environment
-- Do not throw away the machine with the normal household waste
at the end of its life, but hand it in at an official collection point for
recycling. By doing this, you help to preserve the environment.
Guarantee and service
If you need service or information or if you have a problem, please visit
the Philips website at www.philips.com or contact the Philips Consumer
Care Centre in your country (you find its phone number in the worldwide
guarantee leaflet). If there is no Consumer Care Centre in your country, go
to your local Philips dealer.
The purchase of the Philips SENSEO® coffee machine does not exhaust
any of the rights of Sara Lee/Douwe Egberts or Philips under any of their
patents nor does it confer upon the purchaser a licence under these
patents.
26
English
Troubleshooting
This chapter summarises the most common problems you could encounter
with the machine. If you cannot find the solution to your problem, you can
find more solutions at www.philips.com/support. If you still cannot solve
the problem, contact the Consumer Care Centre in your country (see
chapter ‘Guarantee and service).
Problem
Solution
The SENSEO machine
does not produce good
or enough frothed milk.
®
1.The milk container unit may be dirty. Clean the milk container unit by
following the instructions in chapter ‘Cleaning the milk container unit’, section
‘Cleaning all parts after the last use of the day’. We advise you to clean the
milk container unit in the dishwasher.
2.You may have used milk that is not cold enough. If the milk temperature
is above the 8°C, the machine uses less milk. Make sure you use cold milk
straight from the refrigerator (5-8°C).
3. You have used another type of milk than cow’s milk (e.g. rice or soy milk.
These kinds of milk do not produce high-quality frothed milk. To get the best
frothed milk, we advise you to use semi-skimmed cow’s milk.
Steam escapes from
the SENSEO® machine
during the brewing or
cleaning cycle.
1. When you brew a coffee variety with milk, some steam may escape from
the machine. To ensure a perfect cup of coffee and to minimise steaming, fill
the milk container up to the required level for the coffee variety.
2. You may have forgotten to fill the milk container before brewing a coffee
variety with milk. Fill the milk container up to the required level for the coffee
variety.
3. Perhaps the milk tube is not connected to the milk container lid. Connect
the milk tube to the milk container lid. Make sure you push the milk tube far
enough onto the connector so that the holes in the connector are covered.
4. Perhaps the milk container unit is dirty. Clean the milk container
unit thoroughly as described in chapter ‘Cleaning the milk container unit’. We
advise you to clean the milk container unit in the dishwasher.
5. Perhaps you did not push the milk container far enough into the machine.
Make sure that the milk container is placed properly by pushing down the
milk container lever as far as possible (‘click’). This is necessary to ensure
proper frothing results.
6. You may have pressed the CLEAN/CALC CLEAN button to flush the milk
container unit without putting water in the milk container first. Make sure
you always fill the milk container with water for flushing. During the flushing
process, some steam always escapes from the machine for thorough cleaning
of the milk container unit.
7. You may have filled the milk container with warm water for flushing. Fill the
milk reservoir with cold water.
There is some milk left
in the milk container
after brewing a coffee
variety with milk.
1. It is normal that there is some milk left in the milk container after you have
brewed a coffee variety with milk. This extra milk is required to ensure highquality frothed milk.
English
Problem
27
Solution
2. Perhaps you filled the milk container beyond the level required for the
coffee variety you wanted to brew.
3. You may have used milk that is not cold enough. If the milk temperature
is above the 8°C, the machine uses less milk. Make sure you use cold milk
straight from the refrigerator (5-8°C).
The coffee varieties
with milk are not hot
enough.
1. It is normal that a coffee variety with milk is less hot than a cup of normal
black coffee, as the milk is heated to a lower temperature to ensure highquality frothed milk.
2. You can preheat the cups with hot water to keep the coffee hot longer. The
best way to do this is by pressing the 1-cup button qwithout using a coffee
pod.
3. You may have used cups that are too large, which cause the coffee to get
cold more quickly. We advise you to use a 180ml cup for cappuccino, a 260ml
cup for latte macchiato and a 220ml cup for caffè latte.
The SENSEO® machine
splatters when it brews
a coffee variety with
milk.
You may have used milk that is too warm. Make sure you use cold milk
straight from the refrigerator (5-8°C).
The CALC CLEAN
indicator lights up
continuously.
The CALC CLEAN indicator goes on when you need to descale the
machine. This happens after 1000 cups of SENSEO® black coffee or 250 cups
of cappuccino, latte macchiato or caffè latte have been brewed. To descale
your SENSEO® machine, follow the instructions in chapter ‘Descaling’. The
CALC CLEAN indicator goes out after the descaling procedure has been
performed correctly and the Calc-Clean tool has been removed.
I pressed the CLEAN/
CALC CLEAN button,
but the machine does
not work.
1. If you want to flush the milk container unit, make sure you have filled
the milk container with cold water and you have inserted the milk container
unit properly into the machine.
2. If you want to descale the machine, make sure the Calc-Clean tool is
placed correctly. See chapter ‘Descaling’ for more details.
3. Perhaps the machine is still heating up (the light ring around the on/off
button flashes slowly). The machine needs some time to heat up before
descaling is possible.
The descaling cycle
lasted only 5 minutes.
The descaling cycle was probably interrupted. This can have several causes: 1)
You pressed the on/off button during the descaling cycle 2) You removed the
water reservoir during the descaling cycle 3) You did not place the Calc-Clean
tool correctly or removed it from the machine during the descaling cycle.
To restart the descaling procedure: 1) Remove the Calc-Clean tool 2) Flush
the machine by pressing the 1-cup button qand the 2-cup button qq briefly
at the same time 3) Reinsert the Calc-Clean tool and press the CLEAN/
CALC CLEAN button to start the descaling procedure.
28
English
Problem
Solution
The light ring around
the on/off button
continues to flash
rapidly.
1. When the light ring around the on/off button flashes, there is not enough
water in the water reservoir to brew coffee. To brew coffee, the water in the
water reservoir must be above the MIN level.
2. You may have selected a coffee variety with milk (cappuccino, caffè latte
or latte macchiato) and you did not place the milk container in the machine
or did not place it correctly. Place the milk container filled with milk in the
machine if you want to brew a coffee variety with milk.
3. The water reservoir has not been placed properly. Remove the water
reservoir and put it back onto the machine in the correct position.
4. Perhaps the lid is not locked. Check if the lid lever is locked properly.
5. You may be using the SENSEO® machine in a room with a temperature
below 10°C. The SENSEO® machine does not work below 10°C. Check if
the SENSEO® machine functions normally when you use it in a room with a
temperature above 10°C.
The SENSEO® machine
produces loud sounds.
1. When the machine froths milk, it is perfectly normal that it produces louder
sounds.
2. Perhaps the rubber seal in the bottom of the milk container lid is not
placed correctly. See Fig. 1 for how the rubber seal should be placed. If you
lost the rubber seal, please contact the Philips Consumer Care Centre in your
country.
3. Perhaps the cover of the milk container lid is not closed properly. Always
close the cover properly (‘click’) before you slide the milk container back into
the machine.
I do not know what
types of milk to use.
To get the best frothed milk, we advise you to use semi-skimmed cow’s milk.
Other types of milk (e.g rice milk or soy milk) do not produce high-quality
frothed milk.
I do not know how
to use the SENSEO®
machine to produce
frothed milk only.
It is not possible to make frothed milk only. The machine has been designed
to produce coffee varieties with fresh frothed milk.
4222.200.0445.1