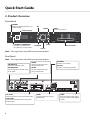
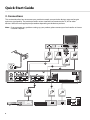
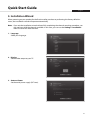
1
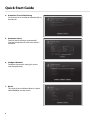
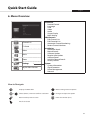
HD Digital Receiver User’s Manual HD-5500T The default password is 0000. Quick Start Guide English 1. Checking Accessories Quick Start Guide User’s Manual Remote Control & Batteries Manual & Quick Start Guide SCART Cable Note: The accessories may vary according to area. Customer information concerning the „Application of the Directive 2008/103/CE regarding batteries, accumulators and the related waste disposal“. Your remote control needs 2 batteries AAA type, 1,5VDC. The batteries included don’t contain mercury (Hg), cadmium (Cd) or lead (Pb). Do not mix different types of batteries or new and old batteries. Do not use rechargeable batteries. In order to avoid any risk of explosion, observe polarities indicated inside the battery compartment. Replace only with the type of batteries specified above. Do not throw them into fire, do not recharge them. If you are not using the remote control for a long period of time, remove the batteries. Please respect the environment and prevalling regulations! Batteries must be collected separately from other refuse! 1 Quick Start Guide 2. Product Overview Front Panel STANDBY Switches between operation and standby modes. OK MENU Status Display STANDBY/TV/RADIO LED The light is emitted when the product is in each mode. TV/RADIO RESET Restart the receiver. Guide Smartcard Slot Arrows Note: The image shown may differ from the actual product. Rear Panel Note: The image shown may differ from the actual product. ANTENNA IN Connect a network cable. ANTENNA OUT Connect to the TV or VCR using an RF cable. VIDEO Connect to the TV or VCR using an RCA cable. AUDIO Connect to the TV or VCR using an RCA cable. TV SCART Connect to the TV using a TV SCART cable. VCR SCART Connect to the VCR or DVD using a VCR SCART cable. 2 HDMI Connect to the TV using an HDMI cable. ETHERNET Connect a LAN cable. USB Port Connect a USB storage device. SPDIF Connect to the audio system using an S/PDIF cable. (digital audio) Quick Start Guide English Remote Control MUTE Mutes audio. STANDBY Switches between operation and standby modes. SOURCE Controls the output of TV SCART. mhp Displays MHP application information. V-FORMAT Sets the resolution of video. WIDE Sets the display format. NUMERIC Buttons Enters a TV/radio channel number. TEXT Enters the digital text service. MENU Displays the main menu. COLOUR Buttons Colour keys for interactive applications LIST Displays the channel list. GUIDE Displays the programme guide. ARROW Buttons Moves the cursor up, down, left or right. OK Selects a menu or confirms. EXIT Exits all On-Screen Display (OSD) screens. BACK Returns to the previous screen. VOLUME Adjusts the audio volume. i(Information) Displays the channel and programme information. OPT+ Displays the channel attributes. P+/P- Changes the channel or page. MyEPG Displays the MyEPG screen. AUDIO Displays the audio list. SUBTITLE Displays the subtitle language list. TV/RADIO Switches between TV and radio modes. Note: The image shown may differ from the actual product. Inserting Batteries Battery 1. Press the hook upward and lift the battery cover off. 2. Insert the batteries (supplied) matching the plus(+) and minus(-) at each end. 3. Close the cover. 3 Quick Start Guide 3. Connections This section describes how to connect your product to match your particular devices setup and to gain optimum signal quality. The product provides various interfaces to connect to the TV, VCR or other devices. Select the most appropriate procedure depending on the device you have. Note: If you encounter any problems setting up your product, please contact your local retailer or Humax Customer Helpline. HDMI TV SCART DVI Connecter RCA Cable SCART Cable 3 HDMI Cable HDMI Cable 2 1 4 Ethernet Cable SCART Cable LAN VCR SCART Router 4 5 S/PDIF Cable Quick Start Guide English Connecting the Antenna Connect the aerial to the ANTENNA IN. Connecting the TV and VCR You can select one of the following connections depending on the device you have. ❶ TV with the HDMI connector; For the best picture quality, connect the product and TV using an HDMI cable. ❷ TV with the DVI connector; For very good picture quality, connect the product and TV using an HDMI cable and an HDMI-to-DVI converter for video and an RCA cable(Audio L/R) for audio. ❸ TV with the SCART connector; For good picture quality, connect the product and TV using a SCART cable (TV SCART). ❹ TV with the SCART connector; To output video and audio, connect the product and VCR using a SCART cable. (VCR SCART). To make the audio connection, you can either 1. Connect the product and TV using an RCA cable (Audio L/R). 2. When using the digital audio system, connect the product and the digital audio system using an S/PDIF cable. Note: • Connecting your TV directly to the audio/video output of the product will assure a more vivid picture and enhance your viewing enjoyment. • Programmes restricted by DRM (Digital Rights Management) may not be viewed via the HDMI cable. Connect using the SCART or RCA cable. Connecting the Network ❺ Connecting to the LAN; Connect one end of the Ethernet cable to the receiver and the other end to the LAN router. 5 Quick Start Guide 4. Powering On 1. Connect the power cord of the product to a wall outlet. 2. Power on by pressing the STANDBY button on the remote control or the STANDBY button at the front of the product. 6 Quick Start Guide English 5. Installation Wizard When powering on your product for the first time after purchase or performing the factory default in menu, the installation wizard will operate automatically. Note: If you exit the installation wizard without fully completing the channel searching procedure, you may not have all of the channels available. In this case, you can use the Settings > Installation menu to search for more channels. 1.Language Select your language. 2.Display Set the video output to your TV. 3. Antenna Power Set the aerial power supply (5V Tuner). 7 Quick Start Guide 4. Automatic Channel Numbering Set channels to be numbered automatically by broadcaster. 5. Automatic Search Channel search will begin automatically. Save the found channels when the search is complete. 6. Configure Network Configure the network setting for various internet applications. 7.Result The result of the Installation Wizard is shown. Select Finish to exit the wizard. 8 Quick Start Guide English 6. Menu Overview Preference • Parental Control • Language • Time • Video • Audio • Screen Display • MHP Settings Channel List TV Guide Video Music Photo Settings Pay Per View Services Edit Channels • Edit Channel List • Edit Favourite List • Automatic Channel Numbering • Renew Channel Numbers Installation • Automatic Search • Manual Search • Software Update • Regular Auto Update • Antenna Power • Invisible Channel Search • Factory Default System • System Information • Signal Detection • Power Management • Network How to Navigate Displays the Menu OSD GREEN or BLUE GREEN YELLOW BLUE YELLOW Moves among menus or options RED GREEN RED BLUE BLUE BLUE GREEN or adjusts RED Changes the option Returns to the previous screenYELLOW GREEN REDthe number (0~9) Enters RED GREEN GREEN YELLOW Selects (Enters) a menu or confirms a selection RED RED BLUE Exit all On-Screen GREEN RED 9 Basic Operation Changing Channels You can change the channels in several ways. Press the Pp/Pq button. Enter the channel number directly. (0-9) Go to the channel list or TV guide and select a channel. Note: Press the TV/RADIO button to switch between TV and radio channels. Volume / Mute / Audio To adjust the audio volume, press the +/- button. To mute the audio temporarily, press the MUTE button. Setting Audio Options Audio options are available only when the programme supports multiple audio languages. 1. 2. 3. 4. Press the AUDIO button. Select the audio language. Select the audio direction. Press the OK button. YELLOW BLUE GREEN RED Note: • The mute function remains set while you change channels. • You cannot set the audio direction when the programme is broadcast in Dolby Digital. Display Select YELLOW YELLOW 10 Confirm BLUE BLUE GREEN GREEN RED RED Basic Operation English Display Format / Resolution YELLOW BLUE GREEN RED Setting Display Format Press the WIDE button to set the display format according to the screen ratio. Each time you press this button, the value changes. Screen ratio 4:3: Auto - Letter Box - Centre Screen ratio 16:9: Auto – Pillar Box – Zoom Note: Refer to Display Format for details. Display YELLOW BLUE GREEN RED Setting Resolution Press the V-FORMAT button to set the resolution of the screen. Each time you press this button, the value changes. 576i - 576p - 720p - 1080i - Original Note: When connected with an HDMI cable, you can only change to resolutions the TV supports. Display 11 ELLOW Basic Operation Programme Information (i-plate) The i-plate is an information banner that is displayed for a certain period of time whenever you change channels. Press the i button while watching a progamme to display the i-plate. Press the EXIT button to hide. Playing time Programme name Channel number and name Icons Signal strength and quality Group name Current time and date Display Navigation mode YELLOW Viewing detailed programme information BLUE GREEN Press the i button again while the i-plate is displayed. Viewing programme information GREEN previous/next RED Press the t/u button while the i-plate is displayed. Press the OK button to set reminders for future programmes. Viewing programme information of other channels Press the p/q button while the i-plate is displayed. Press the OK button to change to the selected channel. BLUE Icons The icons represent the information and services provided. MHP application Teletext Locked programme Resolution Scrambled programme (CAS icons) HD programme Parental guidance programme Multiaudio Scheduled programme (Blue: Reminder) Dolby Digital audio Dolby Digital Plus audio Subtitle Note: Programme information is not displayed when there is no programme information. 12 RED Basic Operation English Subtitle You can select the subtitle language when subtitle information is provided. YELLOW BLUE GREEN RED 1. Press the SUBTITLE button. 2. Select the subtitle language. 3.Select Off to make the subtitle disappear. 4. Press the OK button. Note: You can choose to always display the subtitle when available. Display Select YELLOW Confirm BLUE GREEN RED Text and Interactive Services YELLOW BLUE GREEN RED If your chosen channel has digital teletext features, you can access them. Teletext services often load automatically shortly after the digital teletext window is displayed. In which case, simply follow the on screen instructions. (Press colour buttons) 1. Press the TEXT button to access digital teletext. 2. Press the TEXT button again to return to normal viewing. 3. Press the Pp/Pq button to exit this service.. Note: The channel and volume cannot be controlled using the arrow buttons in interactive mode. 13 Channel List The channel list will help you find the channel you want to watch quickly and easily. You can access the channel list in several ways. Press the LIST button. Press the MENU button and select Channel List. Changing Channels Select the channel you want to watch and press the OK button. The displayed channel will change. Note: • : Locked channel, : Scrambled channel (CAS icons) • Pressthei button to view the detailed channel information. • PresstheLIST or EXIT button to exit. Advanced Options Changing Group You can display the list of the selected channel group. TV, HDTV, Radio, Favourite 1~5, Recent 1. Press the u button. 2. Select a channel group. 3. Press the OK button. Note: Press the TV/RADIO button to switch between TV and Radio groups. Sorting Channels Press the RED button to sort the list in numerical or alphabetical order. YELLOW BLUE Display/Change GREEN RED YELLOW Select BLUE YELLOW 14 Confirm GREEN BLUE RED GREEN RED Channel List English Editing Channels in Channel List You can lock, delete or rename each channel in the channel list, as well as in menu. To edit the multiple channels, go to the Settings > Edit Channels menu. Locking / Deleting / Renaming Channels 1. Select a channel you want to edit and press the GREEN button. 2. Select an option. Lock: Select On or Off. Delete: Press the OK button. Rename: Press the OK button and enter the name in the keyboard. 3.Select OK to save and exit. Note: • Refer to Edit Channels for details. • The default password is 0000. If you have forgotten the password, please contact your YELLOW BLUE local distributor. Setting Favourite Channels GREEN RED Display Select YELLOW Confirm BLUE You can select your favourite channels and include them in the five favourite groups. YELLOW BLUE GREEN GREEN RED RED 1. Select a channel and press the GREEN button. 2.Select Favourite. 3. Select a favourite group you want to include the channel in and press the OK button. To remove a channel from a favourite group, select the group and press the OK button again. 4.Select OK to save and exit. 15 YELLOW BLUE Managing Channels Editing Channels The Edit Channel List menu will help you delete, move lock or rename multiple channels. MENU Settings Edit Channels Edit Channel List Group name Marked / Total channels Function buttons : Coloured or OPT+ button Select BLUE GREEN Mark/Confirm GREEN RED RED YELLOW BLUE Page up/down GREEN RED Note: • : Locked channel, : Scrambled channel (CAS icons) • Thechannelsfrom1to74and100to849willnotbelisted.Youcannoteditthosechannelsasthe YELLOW GREEN RED BLUE channel numbers are automatically assigned. • PresstheMENU or EXIT button to exit. Press the BACK button to return to the previous screen. Deleting Channels 1. Select the channels using the p/q and OK button. 2. Press the RED button. Moving Channels Channels can be moved only when Automatic Channel Numbering is set to Off. 1. Select the channels using the p/q and OK button. 2. Press the GREEN button. 3. Move the selected channels to the location you want using the p/q and OK button. Renumbering Channels Channels can be renumbered only when Automatic Channel Numbering is set to On. 1. Press the GREEN button. The channels will be renumbered. 16 Managing Channels English Locking / Unlocking Channels 1. Select the channels using the p/q and OK button. 2. Press the OPT+ button. 3.Select Lock. To unlock, select Unlock. Renaming Channels 1. Select a channel to rename. 2. Press the OPT+ button. 3.Select Rename. 4. Enter the name in the keyboard. Advanced Options Changing Group To list the channels of other groups, press the YELLOW button and select a group you want. Note: Press the TV/RADIO button to switch between TV and Radio groups. Changing Background You can change the channel displayed in the background while editing. 1. Select the channel you want to watch. 2. Press the BLUE button. The displayed channel will change. Selecting / Releasing All Channels 1. Press the OPT+ button. 2.Select Select All. 3. To release all, select Release All. 17 OW YELLOW Managing Channels Editing Favourite Channels The Edit Favourite List menu will help you add or remove channels from the favourite groups. MENU Settings Edit Channels Edit Favourite List Group name Marked / Total channels Favourite group name Function buttons : Coloured or OPT+ button Select BLUE BLUE GREEN GREEN Mark/Confirm Page up/down RED RED Note: Press the MENU or EXIT button to exit. Press the BACK button to return to the previous screen. YELLOW GREEN RED BLUE Adding / Removing Favourite Channels 1. Press the YELLOW button and select the favourite group you want to edit. 2. To add channels to the favourite list, select the channels you want to add using the p/q and OK button in the left column and then press the RED button. The added channels will appear in the right column. 3. To remove channels from the favourite list, select the channels you want to remove in the right column and then press the RED button. Moving Channels 1. Select the channels using the p/q and OK button. 2. Press the GREEN button. 3. Move the selected channels to the location you want using the p/q and OK button. Note: You can move the channels in the right column only. 18 Managing Channels English Automatic Channel Numbering MENU Settings Edit Channels Automatic Channel Numbering You can set the channels to be numbered automatically by broadcaster. Select On to set the channel numbers automatically by broadcaster. Note: Whenever changing the value, the terrestrial channels will be searched again. Renew Channel Numbers MENU Settings Edit Channels Renew Channel Numbers You can renew the channel numbers you edit. Select Yes and press the OK button to renew the channel numbers. Note: This function is available only when Automatic Channel Numbering is set to On. 19 TV Guide The TV Guide is an on-screen guide of grid type which displays the programme information of channels in time and date order. You can access the TV Guide in several ways. Press the GUIDE button. Press the MENU button and select TV Guide. Note: Press the GUIDE or EXIT button to exit. Press the BACK button to return to the previous screen. Preview Current time and date Information of the selected programme: channel number & name, programme name, simple information, favourite group, network type, and icons Time bar Function buttons : Coloured button Select YELLOW YELLOW BLUE BLUE Tune/Reserve GREENGREEN RED Page up/down RED Note: • Press the i button to view the detailed programme information. • YELLOW : Scheduled (Blue: GREEN RED Reminder) BLUE programme : Present time, : DRM(Digital Rights Management) icon Watching Programmes 1. Select a programme and press the OK button. The programme will be displayed in the preview. 2. Press the OK button again to exit the TV Guide and watch the programme. 20 TV Guide English Setting Reminders 1. Select a future programme and press the OK button. 2. Press the OK button again to cancel the reservation. The reserved programmes will be added automatically in Schedule. Note: • If the programme is overlapped with another programme, adjust the reservation appropriately. • If the channel is locked, you will be prompted to enter your password before watching. The default password is 0000. If you have forgotten your password, please contact your local distributor. • In standby mode the product will switch on to the channel when the programme starts. • You can reschedule reminders .(Refer to Scheduling Reminders.) Advanced Options Quick Navigation Press the t/u button to move to the previous/next programme. Changing Group To list the channels of other groups, press the BLUE button and select a group you want. Note: • Press the TV/RADIO button to switch between TV and Radio groups. • To search specific programmes, go to Find Programmes by pressing the GREEN button. (Refer to Finding Programmes.) 21 TV Guide Finding Programmes Find Programme will help you find the programmes more specifically using the keyword or genre. By Keyword 1. Press the GREEN button. 2.Select Keyword and press the u button. 3. Select a keyword and press the OK button. 4. Press the YELLOW button to confirm. Note: To enter a new keyword, select New Keyword. By Genre 1. Press the GREEN button. YELLOW BLUE 2.Select Genre and press the u button. 3. Select a genre and press the OK button. 4. Select the specific genre and press the OK button. (if provided) GREEN RED Display Confirm Page up/down GREEN RED BLUE Note: YELLOW YELLOW GREEN RED BLUE • Press the i button to view the detailed programme information. • Press the OK button to watch a found programme. (Refer to Changing Channels.) • You can set reminders for future programmes. (Refer to Setting Reminders.) 22 Select YELLOW BLUE GREEN TV Guide English Scheduling Reminders Schedule lists reminders and will help you manage them in more detail. 1. Press the YELLOW button. 2. You can add, edit or delete your reminders. To add, select New Reservation and press the OK button. To edit, select a reservation and press the OK button. To delete, select a reservation and press the BLUE button. 3. Reservation will pop up. You can change the options you want using the p/q/t/u, NUMERIC(0~9) and OK buttons. 4.Select OK to save and exit. YELLOW BLUE GREEN RED Display Confirm Select Note: • Press the i button to view the detailed Page YELLOW BLUE programme information. up/down • You can easily set reminders in TV guide, GREEN navigation RED BLUE or i-plate Find YELLOW Programmes mode. (Refer to Setting Reminders, Find Programmes or YELLOW GREEN RED BLUE Programme Information) GREEN 23 Media List You can playback video, music or photo files. Go to MENU Video/Music/Photo. Switching Storage 1. Press the BLUE button to display the type of storage. 2. Select the storage type and press the OK button. USB: Displays each partition of the USB. Network: The Home network server is searched. Select the type of the server. Note: • Only one USB icon will appear even when there are more than one USB. Switching Media 1. Press the YELLOW button to switch the media. 2. Select the media type and press the OK button. Video, Music, Photo 24 Menu On/Off Select YELLOW Confirm BLUE GREEN RED Enter 0~9 Media List English Using the Home Network Server You can have access to Home network servers such as the PC or NAS (Network attached storage) and play the video, music or photo files. To connect to a Home network server, the receiver must be connected to the local network. Modem PC NAS HD-5500T HD-5500T Playing Video Files in Network 1. 2. 3. 4. Go to MENU>Video Press the BLUE button and select Network. Select the Home network server from the list and select the folder the video file is located in. Select the video file and play the file. Note: • Playing music and photo files is similar as playing video files. • You can download Home network tools such as Media Server 11(http://www.microsoft.com/windows/ windowsmedia/it/player/11/default.aspx) and XBMC((http://www.xbmc.org). The software can be downloaded and updated in each website. Menu On/Off Select YELLOW Confirm BLUE GREEN RED Enter 0~9 25 Media List Using Video List MENU Video Path of folder Storage Function buttons : Coloured button Playing Files Select a file and press the OK button. To select multiple files, select the files and press the RED button. Note: • If a folder is selected, the file within the folder will not play unless it is selected. • You will be prompted to enter the password when playing locked files. • You can view video files only. Plays or pauses. Jump to the previous scene. GREEN BLUE GREEN BLUE BLUE RED GREEN RED Jump to the RED next scene. GREEN RED Stops the playback of the current file and displays the list. RED Fast Forward. Fast Rewind. 26 Menu On/Off Select YELLOW Confirm BLUE GREEN RED Enter 0~9 Media List English Using Music List MENU Music Path of folder Storage Title, artist, album Function buttons : Coloured button Playing Music Files To play all files in the folder, press the OK button. If you want to play the selected files only, select the files and press the OK button. Music Player The music player is displayed while playing back a music file. Plays or pauses Plays the previous file BLUE GREEN GREEN RED BLUE GREEN RED Stops the music player and displays the list. RED GREEN RED Plays the next file RED Changes the play mode (Once, Repeat, Repeat All, Shuffle) Menu On/Off Select YELLOW Confirm BLUE GREEN RED Enter 0~9 27 Media List Using Photo List MENU Photo Photo Slideshow To slideshow all photos in the folder, press the OK button. If you want to slideshow the selected photos only, select the photos and press the OK button. Path of folder Storage Thumbnail Function buttons : Coloured or OPT+ button Pauses slideshow. Shows the next photo. BLUE GREEN GREEN RED BLUE GREEN RED Shows the previous photo. RED Stops the slideshow and displays the list. RED Info Banner Press the OK button to pause the slideshow and display the information banner. 28 Menu On/Off Select YELLOW Confirm BLUE GREEN RED Enter 0~9 Media List English Slide Mode 1. Press the OPT+ button. 2.The Slide Mode is displayed. Display Time: The duration the photo is displayed. Music Play: Determines whether to play music file during slideshow or not. Folder: The folder the music file is located in. Press the OK button to display the list of music files and select a folder. Menu On/Off Select YELLOW Confirm BLUE GREEN RED Enter 0~9 29 Preferences In this chapter you can set options for parental control, language, time, video, audio, screen display and MHP settings. Note: Press the MENU or EXIT button to exit. Press the BACK button to return to the previous screen. Parental Control MENU Settings Preferences Parental Control You will be prompted to enter the password to access this menu. Note: The default password is 0000. If you have forgotten your password, please contact your local distributor. Maturity Rating 1.Select Maturity Rating. 2. Select an option. View All 7, 12, 14, 18 : Blocks the programmes for viewers under the age limit Lock All 2. Press the OK button. Note: You will be prompted to enter the password to view the blocked programmes. Changing Password You can change the current password. This password is prompted every time a password blocked menu is accessed. 1.Select Change Password. 2. Enter the new password. 3. Enter the new password for verification. 30 Menu On/Off Select YELLOW Confirm BLUE GREEN RED Enter 0~9 Preferences English Language Setting MENU Settings Preferences Language You can set the language for system, audio and subtitle. 1. Select the language type. System Language Audio Language Subtitle Language 2. Select the language. Note: • You can change the audio or subtitle language by pressing the AUDIO or SUB button while watching a programme. • If you select Off in subtitle language, the subtitle will not be displayed. Setting Power On/Off Timer MENU Settings Preferences Time 1. To turn on the product automatically, select Power On Timer and select Set Timer. 2. Enter the time. 3. Set the options for the power on timer. Channel: Select the channel to be displayed when powering on. Volume: Adjust the volume of the audio when powering on. Repeat: Select the repeat mode of the power on timer. 4. To turn off the product automatically, select Power Off Timer and select Set Timer. 5. Enter the time. Note: The power on time and power off time should be set different from each other. Menu On/Off Select YELLOW Confirm BLUE GREEN RED Enter 0~9 31 Preferences Video Setting MENU Settings Preferences Video Setting TV Screen Ratio You can select the screen ratio of your TV. 1.Select Screen Ratio. 2. Select an option. 16:9 - 4:3 Setting Display Format You can select the display format according to the screen ratio of your TV. 1.Select Display Format. 2. Select an option. Screen ratio 4:3: Auto - Letterbox - Centre Screen ratio 16:9: Auto - Pillarbox - Zoom Note: You can set the display format by pressing the WIDE button while watching a programme. Refer to Display Format / Resolution. Screen ratio Display Format 4:3 Auto Letterbox Centre Auto Pillarbox Zoom 16:9 Setting Letter and Pillar Box Colour You can set the colour for the margin space according to the display format. 1.Select Letter & Pillar Box Colour. 2. Select an option. Black - Grey Setting TV SCART / VCR SCART You can select the video signal output option for the TV SCART or VCR SCART. 1.Select TV SCART or VCR SCART. 2. Select an option. TV SCART: CVBS – S-Video – RGB VCR SCART: CVBS – S-Video 32 Menu On/Off Select YELLOW Confirm BLUE GREEN RED Enter 0~9 Preferences English Audio Setting MENU Settings Preferences Audio Setting Digital Audio Output You can select the digital audio signal output of your product. 1.Select Digital Audio Output. 2. Select an option. Stereo - Multi-channel Setting Lip-Sync You can adjust the sound difference of audio and video. 1.Select Lip-Sync. 2. Adjust the lip-sync using the t/u button. Pressing the right button increases the audio speed and pressing the left button decreases it. Menu On/Off Select YELLOW Confirm BLUE GREEN RED Enter 0~9 33 Preferences Screen Display MENU Settings Preferences Screen Display Setting Info Display Time You can set the duration the information box is displayed every time the channel is switched. 1.Select Info Display Time. 2. Select an option. Off - 1~20 sec Setting Transparency You can set the transparency of the On-Screen Display. 1.Select Transparency. 2. Select an option. Off - 25% - 50% - 75% Setting Subtitle Font You can adjust the subtitle font. 1.Select Subtitle Font. 2. Select an option. Variable - Fixed MHP Settings MENU Settings Preferences MHP Settings You can set MHP applications. Select MHP Settings Display by MHP App.: Display i-plate when changing channels. MHP Logo: Display MHP logo. Auto-Start MHP App.: Start interactive MHP application automatically. MyEPG: Use a TV guide supported by MHP application. 34 Menu On/Off Select YELLOW Confirm BLUE GREEN RED Enter 0~9 Installation English Installation menu allows you to search the available TV and radio channels. Software update, antenna power and factory default setting are also available in this section. MENU Settings Installation Note: • You will be prompted to enter the password to access this menu. The default password is 0000. If you have forgotten your password, please contact your local distributor. • Press the BACK button to save the changes and return to the previous screen. Press the MENU or EXIT button to exit. Automatic Search You can search channels automatically without entering any other information. 1.Select Automatic Search. Channel search starts. 2.Select Save and press the OK button to save the results. Note: Select Stop and press the OK button to stop the channel search. Menu On/Off Select YELLOW Confirm BLUE GREEN RED Enter 0~9 35 Installation Manual Search You can search channels manually by searching parameters. 1.Select Manual Search. 2. Configure the search options. Channel: Select the channel. Frequency: Enter the frequency. Bandwidth: Select the bandwidth. Network Search: Select On or Off. 3.Select Search and press the OK button. 4.Select Save and press the OK button to save the results. Note: Select Stop and press the OK button to stop the channel search. Software Update (OTA) In order to maintain proper performance of the product, it is essential to have the most up-to-date software. Please refer to http://www.humaxdigital.com/italy for software update. It is recommended that you periodically check for the availability of software update. OTA, an abbreviation of Over–the-Air, means that the software can be downloaded through your aerial. The manufacturer reserves the right to decide when and where to release software by this process. You can also search and download new software manually. MENU Settings Installation Software Update Automatic Update 1. Select Automatic Update and press the OK button to search for new software. 2. When new software is detected, select Yes to start the update process now. 36 Menu On/Off Select YELLOW Confirm BLUE GREEN RED Enter 0~9 Installation English Manual Update 1.Select Manual Update and press the OK button. 2. Enter the options manually. Channel: Select the channel. Frequency: Enter the frequency. The corresponding frequency value will be automatically displayed. 3.Select Search and press the OK button to search for new software. 4. When new software is detected, select Yes to start the update process now. Please wait until the update is complete. When completing the software update, the product is automatically powered off and on again. Note: • It may take 5~10 minutes to update software. • Other functions such as scheduling programmes will not activate while software update takes place. • Be sure to update software when the signal strength and quality is high. If the weather is not favorable and the signal strength and quality are not recommendable, perform the software update later. • The product will search new software automatically during standby. If new software is detected, you can choose either to download immediately or later when you switch into operation mode. If you select Later, the message will be displayed again when you power on. Caution: • Please be careful to keep the power on and the power cord plugged in during software update. If the power is off during software update, fatal damage may be caused to the product. • Please be careful not to pull out the signal line (RF cable) during software update. Update may be interrupted and the product may not operate. Menu On/Off Select YELLOW Confirm BLUE GREEN RED Enter 0~9 37 Installation Regular Auto Update MENU Settings Installation Regular Auto Update You can set to update the channel and software regularly 1.Select Regular Auto Update. 2. Set the options. 3.Select Manual Update if you want to update the software by entering the options manually. Update Target: Select All, Channel or Software. Auto Search in Standby: Select On or Off. Auto Search in Operate: Select On or Off. Search Time: Enter the search time. Frequency: Select Daily or Weekly Antenna Power MENU Settings Installation Antenna Power Active antenna is a portable or indoor antenna which needs power supply from the product because it does not have power cord for itself. Connect an active antenna to the ANTENNA IN on the rear of the product. 1.Select 5V Antenna Power. 2. Select an option. On: 5V power is supplied from the active antenna cable. Off: No power supplied 38 Menu On/Off Select YELLOW Confirm BLUE GREEN RED Enter 0~9 Installation English Invisible Channel Search MENU Settings Installation Invisible Channel Search You can set to search the invisible channels during channel search. 1.Select Invisible Channel Search. 2. Select an option. On - Off Factory Default MENU Settings Installation Factory Default 1.Select Factory Default. 2.Select Yes. 3. You will be prompted to enter the password. Enter the password. Menu On/Off Select YELLOW Confirm BLUE GREEN RED Enter 0~9 39 System In System, system information, signal detection, power management and network options are available. Note: Press the MENU or EXIT button to exit. Press the BACK button to return to the previous screen. System Information MENU Settings System System Information The system information is displayed. Signal Detection MENU Settings System Signal Detection You can check the signal strength and quality of the searched channels. 40 Menu On/Off Select YELLOW Confirm BLUE GREEN RED Enter 0~9 System English Power Management MENU Settings System Power Management Setting Power Saving in Standby You can minimise the standby power consumption to below 1W. 1.Select Power Saving in Standby. 2. Select On to deactivate the certain features and minimise the power consumption. Network MENU Settings System Network Configuring IP (LAN) 1. You can configure the Ethernet setting options. DHCP: Apply the options according to the DHCP. Manual: Enter the options manually, Select Apply and press the OK button. Note: When entering the IP address manually, enter 3 digits in a row. Menu On/Off Select YELLOW Confirm BLUE GREEN RED Enter 0~9 41 Pay Per View Services You can use Mediaset Premium and PANGEA service only when you tune to Mediaset Pay TV channels or PANGEA channels. MEDIASET PREMIUM MENU Pay Per View Services MEDIASET PREMIUM Card Information 1.Select CARD INFORMATION. 2. The card information is displayed. Purchase history 1.Select SELCTED PROGRAMS. 2. The list of purchased programs is displayed. Viewing recharge history 1.Select RECHARGE HISTORY. 2. The recharge history is displayed. Purchasing program package 1.Select PACKAGE PURCHASE. 2. Select the program package you want. 3. Press the GREEN button to view the description of the program. 4. Press the OK button to view the terms of service. 5. Press the OK button to confirm. 42 Menu On/Off Select YELLOW Confirm BLUE GREEN RED Enter 0~9 Pay Per View Services English PANGEA MENU Pay Per View Services PANGEA Purchasing the programs 1.Select PRODUCTS CATALOGUE. 2. Select the genre. 3. Select the program you want. 4. Press the GREEN button to view the description of the program. 5. Press the OK button to view the purchase conditions. 6. Press the OK button to confirm. Purchase history 1.Select PURCHASED PRODUCTS. 2. The list of purchased programs is displayed. Card Information 1.Select SMARTCARD INFORMATION. 2. The smartcard information is displayed. Recharge Information 1.Select RECHARGE INFORMATION. 2. The recharge information is displayed. Menu On/Off Select YELLOW Confirm BLUE GREEN RED Enter 0~9 43 Pay Per View Services Irdeto Conditional Access (Irdeto Smartcard User Only) MENU Pay Per View Services Irdeto Conditional Access Conditional Access You can check the information of the Irdeto Conditional Access. 1.Select Conditional Access. 2. Select the item you want. Smart Card Status Softcell Service Status Loader Status Components 3. The information of the selected item is displayed Mail Messages You can receive mails from the broadcasting company. 1.Select Mail Messages. 2. Select a mail to read then press the OK button. The message will be displayed. Note: • When a new mail arrives, the envelope icon will appear. • Old mails will be deleted automatically when your mail box is full Conax Conditional Access (Conax Smartcard User Only) MENU Pay Per View Services Conax Conditional Access Conditional Access You can check the information of the Conax Conditional Access. 1.Select Conditional Access. 2. The information of the conditional access is displayed. 44 Menu On/Off Select YELLOW Confirm BLUE GREEN RED Enter 0~9 Appendix English Service and Support Information concerning troubleshooting, software upgrade and product support is provided in the following website. Should your product require warranty service, please contact the customer service center of which telephone number is on the website. HUMAX Italia Website: E-mail: www.humaxdigital.com/italy [email protected] Note: For hardware repair, please visit our website. Humax Srl Via Brescia 28 20063 Cernusco S/N (MI) Fax. +39 02 99765669 45 Appendix Safety Warning This product has been manufactured to comply with international safety standards. Please read the following safety precautions carefully. Safety Instructions and Precautions 1. MAINS SUPPLY • Operate this product only from the type of power supply indicated on the marking label. If you are not sure of the type of power supplied to your home, consult your local power company. • Disconnect the product from the mains before you start any maintenance or installation procedures. 2.OVERLOADING • Do not overload a wall outlet, extension cord or adapter as this may result in electric fire or shock. 3.LIQUID • The product should not be exposed to liquid of any kind. In addition, no objects filled with liquid should be placed on the apparatus. 4.CLEANING • Disconnect the product from the wall outlet before cleaning. • Use a light damp cloth (no solvents) to dust the product. 5.VENTILATION • The slots on top of the product must be left uncovered to allow proper airflow into the unit. • Do not stand the product on soft furnishings or carpets. • Do not stack electronic equipments on top of the product. 6.ATTACHMENTS • Do not use any unsupported attachments as these may be hazardous or cause damage to the product. 7. LIGHTNING, STORM OR NOT IN USE • Unplug the product from the wall outlet and disconnect the antenna during a thunderstorm or when left unattended and unused for long periods of time. This will prevent damage to the unit due to lightning and power-surges. 8. EXTRANEOUS OBJECTS • Do not insert anything through the openings in the unit, where they can touch dangerous voltage points or damage parts. 9. REPLACEMENT OF PARTS • When replacement of parts is required, be sure the service technician uses replacement parts specified by the manufacturer or those that have the same characteristics as the original part. Unauthorized substitution may result in additional damage to the unit. 10. CONNECTION 46 [Satellite] CONNECTION TO THE SATELLITE DISH LNB • Disconnect the product from the mains before connecting or disconnecting the cable from the satellite dish. Failure to do so can damage the LNB. [Cable] CONNECTION TO THE CABLE TV SIGNAL • Connect all components before plugging any power cords into the wall outlet. Always turn off the product, TV and other components before you connect or disconnect any cables. [Terrestrial] CONNECTION TO THE AERIAL • Disconnect the product from the mains before connecting or disconnecting the cable from the aerial. Failure to do so can damage the aerial. Appendix English 11.CONNECTION TO THE TV • Disconnect the product from the mains before connecting or disconnecting the cable from the TV. Failure to do so can damage the TV. 12. EARTHING [Satellite] The LNB cable must be earthed to the system earth for the satellite dish. 13. LOCATION • Place the product indoors to avoid exposing it to lightning, rain or sun. Do not place it near a radiator or heat register. • We recommend that the product has 10 cm clearance from any other appliances susceptible to electromagnetic influences, such as a TV or a VCR. • Do not block the openings with any object, and do not place the product on a bed, sofa, rug, or other similar surface. • If you place the product on a rack or a bookcase, ensure that there is adequate ventilation and that you have followed the manufacturer’s instructions for mounting. • Do not place the product on an unstable cart, stand, tripod, bracket, or table where it can fall. A falling product can cause serious injury to a child or adult, and serious damage to the appliance. Warning 1. To avoid damage of the power cord or plug; • • • • • Do not modify or process the power cord or plug arbitrarily. Do not bend or twist the power cord. Make sure to disconnect the power cord holding the plug. Keep heating appliances as far as possible from the power cord in order to prevent the cover vinyl from melting. The mains plug, as a disconnection device, shall remain readily accessible by the user. 2. To avoid electrical shock; • • • • Do not open the main body. Do not insert metal or inflammable objects inside the product. Do not touch the power plug with wet hands. Disconnect the power cord in case of lightning. 3. To avoid damage of product; • Do not use the product when it is out of order. If you continue to use the product when defective, serious damage can be caused. Make sure to contact your local product distributor if the product is out of order. • Do not insert metal or alien substance into the slots for the modules or Smartcards. (where applicable) It may cause damage to the product and reduce its life span. 4. To avoid damage of the hard disk drive (PVR only) • Do not move the product or turn the power off suddenly while the hard disk drive is running. • The company shall not be liable for any corruption of data on the hard disk drive caused by carelessness or misuse. 47 Appendix Trouble Shooting Before contacting your local service centre, please read the tips below carefully. If the problem persists after completing the following procedure, please contact your local product distributor or service centre for further instructions. 1. No message displayed on the front display. (The product will not switch on.) • • • • Check the main power cable and make sure it is plugged into a suitable power outlet. Check that the mains supply is switched on. Connect the power cable to a different power outlet. Check that the power switch is on at the rear of the product. (where applicable) 2. No picture • • • • • • • • Make sure that the product is powered on and in operation mode. (Press the STANDBY button) Make sure that the AV cable is firmly connected to the TV. Make sure that the antenna cable is properly connected to the product. Be sure to activate channel search. Check the brightness level of the TV. Check if the channel is currently on air. Contact the broadcaster to ensure that the channel is running. Press the SOURCE button if the product is in external input mode. (where applicable) Satellite: Make sure that the antenna setting in the menu is correct. 3. Poor picture/sound quality • • • • Install the antenna in an obstacle-free place. Make sure there is no mobile phone or microwave oven near the product. Keep the power and the antenna cables apart from each other. Check the signal levels and adjust your antenna if the level is too low. The signal level may be affected by weather conditions. Note: If the antenna is covered with snow or the RF is weakened by heavy rain, the condition of the sound and picture may temporarily be poor. However, the poor sound and picture quality due to weather conditions cannot be accepted as a malfunction of product. • • • • • • [Satellite] Check that your dish alignment is correct. [Satellite] Change the satellite dish for a larger one as this will increase the signal levels received. [Satellite] Replace the LNB with a lower noise factor in cases where the noise factor is too high. [Satellite] Replace the LNB with a new one in case it is damaged or out of order. [Terrestrial] Adjust the antenna direction to get a better picture. [Terrestrial] Set the antenna power in menu to On, if you use the active antenna to improve the reception. (where applicable) 4. No or poor sound • • • • Check that your AV cable is connected correctly. Check the volume levels of your TV set and the product. Check if the product or TV is on mute. Check audio type or soundtrack option in the AV menu. (where applicable) 5. Remote control does not operate. • To control the product, the top end of the remote control should point directly towards the receiving part of the product. • Remove and reinsert the batteries in the remote control. • Replace the batteries in the remote control for a new set. • Set the remote control to STB or PVR mode, if you are using the universal remote control. (where applicable) 48 Appendix English 6. Cannot make reservations. • Check that no previous reservations are conflicting with the new reservation. 7. No password information is given. • The default password is always 0000. 8. Channel search does not work. • Satellite: Make sure that the antenna setting in the menu is correct. • Terrestrial: Make sure that the antenna is connected correctly. • Terrestrial: Use the appropriate antenna capable of receiving VHF or UHF channels for your area. 9. Cannot update new software. • You can get an update. If the product does not show a message requesting update, this means no software is available. 10.Cannot watch scrambled channels. • Check that you have the appropriate Smartcard or CI-Module. Reinsert the Smartcard or CI-Module and make sure it initialises correctly. • Check in the menu that the product is detecting the Smartcard or CI-Module. • Check in the menu that you have a valid and working subscription to the channels you wish to view. • Ensure that the Smartcard or CI-Module is not damaged. 11.Cannot watch pay channels. • Check in the menu that you have a valid and working subscription to the channels you wish to view. • Contact your network operator for more information. 12.The product makes a humming noise. • The noise is from the fan; the hard disk is operating normally. This kind of noise is inevitable but seldom noticeable. 13.Cannot record progammes. (PVR only) • The hard disk is full. Delete unnecessary programmes and make space for new recording. • Check if recording is overlapped with another channel. Stop the current recording or wait until the recording is finished. • Check that the product is switched on when recording starts. 14.Cannot operate TSR (Time Shifted Recording). (PVR only) • TSR may not be available during recording. Wait until recording is finished. • Delete unnecessary programmes and make space for new recording. 15.Cannot playback. (PVR only) • To playback the recorded file of a scrambled channel, use the Smartcard. In case it has been a long time since you last recorded, this may not work. Contact the product distributor. • The signal during recording may be weak or the hard disk too full. 16.Cannot change channels while recording. (PVR only) • Certain channels may not be changed due to restriction of the tuner or connection type. 49 Appendix Error Message Error message No or bad signal [Satellite] No or bad signal [Cable] No or bad signal [Terrestrial] The channel is scrambled or not available. The audio is not available. Possible causes The satellite dish is not pointing at the satellite. Adjust dish alignment. Signal is too weak. Increase the LNB voltage or connect a signal amplifier. Satellite dish is too small. Change to a larger dish. Problem with LNB. Change the LNB. Wrong antenna setting. Set the antenna correctly. The cable is not connected. Make sure the cable is connected correctly. The cable may be damaged or defective. Exchange the cable. The channel is not broadcasting. Exchange the cable. The aerial is not pointing properly. Adjust aerial. Check the cable from the aerial. If you cannot resolve the problem, you may need to have your aerial and installation tested by a professional. The channel has a signal, but no audio or video. Confirm if the channel is currently on air. The channel has been deleted by the broadcasting company. Check if the channel is currently on air The channel is for data broadcasting. Remove the channel from the channel list and check for new transponder details. The channel has a video signal, but no audio. Press the audio button to confirm that the channel has audio options. No access Make sure you are subscribed to the channel. No authorization. If the product has been turned off for a long time (standby or power off ), please wait for authorization. It may take up to 60 minutes. Smartcard is not inserted. Insert Smartcard. No access No card inserted. 50 What to do Appendix Error message Incorrect card CI-Module not installed. Invalid CI-Module Short LNB [Satellite] English Possible causes What to do Wrong Smartcard is inserted. Insert the correct Smartcard. Smartcard is not inserted correctly. Remove the Smartcard and reinsert it. Smartcard is damaged. Contact your Smartcard retailer or channel broadcaster for a Smartcard replacement. CI-Module is not inserted. Insert CI-Module. CI-Module is not inserted correctly. Remove the CI-Module and reinsert it. CI-Module is not recognized. Insert a different CI-Module to check if your existing module is working. Wrong CI-Module. Insert the correct CI-Module. CI-Module is damaged. Replace the CI-Module. LNB cable is short. Replace LNB cable. LNB is internally short. Replace LNB. Alien substance is inserted in the LNB IN port. The port may be damaged. Remove the alien substance and contact the local service centre in case damaged has occurred. 51 www.humaxdigital.com ROHS/MANUAL/HD5500T/200GBIT *20000-00311* 20000-00311