1
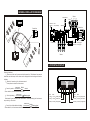
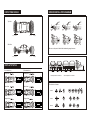
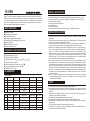
USER'S
MANUAL
GENERAL INSTALLATION DIAGRAM
Sensor
Control Switch
Horn
4
3
Black wire - Earth
Red wire + 12V ( ON//ACC)
Display
2
3
C
B
A
Yellow wire
Control box
Control box
1
D
4
1
Se
ns
or
2
Control box
Red wire + reversing light
Black wire - reversing light
B
C
D
Display
A
D
C
1
2
3
4
Sensor
B
A
Se
ns
or
Control box
LCD DIGITAL DISPLAY
Working Conditions
1 When reverse the car, 8 sensors work at the same time. The distance from nearest
obstruction and the bumper will be shown on the display with horn alarming and direction
indicator.
2 When drive forward, only the front sensors work.
Three options to control the front sensors
Yellow wire of Switch
ON/ACC
a Control by switch: front control box
When switch on, the front sensors start to work.
Yellow wire of
Braking signal
b Control by braking : front control box
When brake the car, the front sensors start to work ; when stop braking, the front sensors
stop working in 30 second.
Yellow wire of Switch
Braking signal
front control box
c Control by both the switch and braking :
When switch on, the front sensors start to work as above mentioned option b.
Back
Front
0.7-0.6m 1.5-1.1m Safety Area
0.5-0.4m 1.0-0.4m Alarm Area
Back
Front
0.7-0.6m 1.5-1.1m Safety Area
0.5-0.4m 1.0-0.4m Alarm Area
0.3-0.0m 0.3-0.0m Danger Area
0.3-0.0m 0.3-0.0m Danger Area
DETECTING RANGE
SENSOR INSTALLATION DIAGRAM
Top View
70(cm) 30
0
0
30
150(cm)
Side View
Be sure no other part of vehicle falls into detecting range of sensors.
70(cm) 30
0
0
30
150(cm)
( Front detection )
0.5-0.8m
DISPLAY STATUS
( Rear detection )
0.6-0.8m
Safety Area
0.3-0.4m
The best position for 2 sensors
The direction of sensors
Alarm Area
Alarm Area
Insert-in
Danger Area
0.6-0.8m
0.3-0.4m
Safety Area
Danger Area
Insert-in
Stick-on
The best position for 4 sensors
1. Advised position to install the sensors
The direction of sensors
A. 4 drilled holes (A,B,C,D)
should be under the same line.
A
Vertical installation position to the ground
B
C
D
Sloping installation position to the ground
B. 0.5-0.8m vertically high to the
ground, 0.55 is recommended.
Stick-on and insert-in sensors in various shapes for options
Smooth slope
Smooth round objects
Objects absorbing
wave, e.g. Cotton
C. Vertical, tidy surface without
metal components is preferred.
Objects hard to be detected
INSTALLATION TOOLS
2. Select drilling position for sensor A & D
D
A
A. Choose suitable drilling
position for A & D sensor with
relevant mark.
B. To perform the best detecting
angle, select the position for A &
D sensor with 8-13CM away
from the side, 11CM is
recommended, and 20 with the
side.
3. Select drilling position for sensor B & C
A
D
6. Others
A. Measure the distance
between sensor A and D, get the
result "L".
Bracket 1
Fix the display
on rear mirror
B
B. Mark sensor B & C for every
1/3 "L" interval.
A
Bracket 2
Display is adjustable
for different vision
angel
4. Drilling
Fix the display
on dash board
A. Drill with a small awl to
locate.
B. Drill with the original
driller.
5. Sensor Installation
Sensor
The display should
be installed where
easy to be seen.
7. Sensor Detecting
A.. Insert the sensors into the
holes one by one and tighten
them. The sensor with metal slice
must be installed following the
direction.
1.5m
B. Hide the wires in good order
according to various cars.
Locate the control box in the
boot, keep safe, cool, dry
and away from shake and
interference.
H-066
INSTALLATION STEPS
H-066 Parking Sensor System consists of ultrasonic sensors, digital control box and LCD
display. The system detects the distance between the car and front/rear obstruction by
ultrasonic sensors installed at the front/rear bumper of car. The distance will be displayed
in an innovative mode with the special designed LCD, numeric display and step-up sounds,
which will be changed according to the actual positions detected obstruction so that the
driver could judge the distance and avoid accident.
MAIN FEATURES
TECHNICAL SPECIFICATIONS
Rated Voltage: DC 12V
Operating Range: DC 10-16V
Operating Current: 30-360mA
Detecting Distance: Front 0.3 0.7m Rear 0.3 1.5m
Ultrasonic Frequency: 40KHz
Working Temperature of Control Box: -30-+70
Working Temperature of Display: -20-+70
Display Size: 70*32*14mm
ALARM MODE
Awareness
Alarm Sound
Digital Display
Alarm Color
0.6~0.7
White
1
>0.7m
Safety Area
2
0.6~0.7m
3
0.4~0.5m
Safety Area
Alarm Area
0.4~0.5
White
4
5
0.3m
Danger Area
Ding
0.3
White
<0.3m
Danger Area
Ding
0.0
White
Digital Display
Alarm Color
Silence
Dang
Dang
1.5~1.1
White
Dang
1.0~0.4
White
( Rear detection )
Distance
Stage
Awareness
1
>1.5m
Safety Area
Ding
Ding
Silence
Ding Ding
Ding
Ding
Alarm Sound
2
1.5~1.1m
3
1.0~0.4m
Safety Area
Alarm Area
4
5
0.3m
Danger Area
Dang
0.3
White
<0.3m
Danger Area
Dang
0.0
White
Dang
Choose right installation position for sensors
Select drilling position for sensor A & D Select drilling position for sensor 1 & 4
Select drilling position for sensor B & C Select drilling position for sensor 2 & 3
Locate the position and drill
Install the sensors and hide wires
Install the display
Install the control box
Connect the whole system according to the General Installation Diagram
INSTALLATION AND TEST
Digital LCD display
Three-stage simulation alarm
Front and back detection
Four-stage simulation distance display
"DingDingDing", "DangDangDang" alarm sound
Hidden installation
Switch, Braking delay control
Self-test function of sensor
( Front detection )
Distance
Stage
1.
2.
3.
4.
5.
6.
7.
8.
Dang
1. Adjust the directions of the sensors and axial orientation, neaten the wiring after installing
the sensors.
2. Connect the power supply of back control box to the reversing light. Connect the power
supply of front control box to auto ignition switch.
3. Connect the data wires between the front control box and display, and disposal the
control switch with front control box. Do not disposal the sensor at the moment.
4. When the car is started, the horn sounds "Dang,Dang" to enter into working status , 2s
later, it turns to standby status. Put the car into back gear, then the display shows "En"
(n=0,1,2
)to show the number of defective sensors, with the indication of exact
defective sensors. Insert one of the sensors into corresponding interface in front/back
control box. Human being could be detected normally, if he stands within 0.7m right
before the sensor; Pull out the sensor, and check other sensors in the same method.
Insert all the sensors in corresponding interfaces after testing.
Test: a. After connect a sensor with the control box, if the buzzer sounds"Bi
", please
check whether there is any obstacle around it, or the sensor is fixed too tight or close to
great interference sources(such as vent-pipe, wires) ;b. If the display shows any distance
figure with no obstacle around the sensor, the sensor may detect the ground or some
outshoots of the car(such as registration mark etc.), please check the directions of sensor
and axes; c. If the system still could not work properly after the above mentioned handling,
the sensor(s ) can be deemed defective, or unmatch with the control box. The system
should be replaced.
Note: a. The connection between sensor and the digital control box is unique. b. It performs
as: when detecting within 0.3m, it shows "0.0", instead of 0.1-0.2 to alert which requires
the driver to stop immediately.
NOTE
1. The car must be in power-off, when installing ultrasonic sensors
2. Its performance may be affected in following situation: heavy rain, gravel road, bumpy
road sloping road and bush, very cold, hot or moist weather, or the sensors is firned or
iced over.
3. Switches among ultrasonic, electric wave, DC and AC and those among 24V, 12V
voltages may also effects its performance.
4. The sensors should be installed appropriate loose or tight.
5. Its performance will be effected if the sensors are fixed on metallic bumper.
6. Avoid installing the digital control box in places of great interference, such as vent-pipe,
wiring nearby.
7. Test the system to make sure it works normally before using.
8. This system is a reversing aid and the manufacturer will take no responsibility for any
accidents caused after the kit is installed.