1
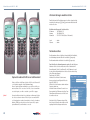
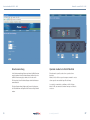
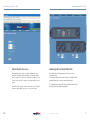
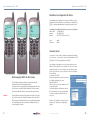
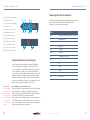
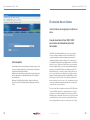
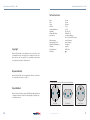
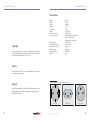
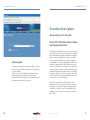
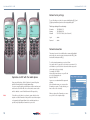
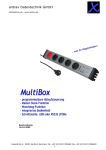
PM 211 – MIP Benutzerhandbuch User Manual Manual de usuario 1613_788_13916_82_7993986927 Infratec AG Werner-von-Siemens-Straße 7 D-64625 Bensheim, Germany +49 (0) 6251 8405-0 +49 (0) 6251 8405-99 [email protected] www.infratec-ag.de Benutzerhandbuch PM 211 – MIP Manual de usuario PM 211 – MIP Datos técnicos Urheberrecht Alle Rechte an diesem Benutzerhandbuch liegen bei der Infratec AG, Bensheim. Wiedergabe und Nachdruck auch von Teilen dieses Handbuches sind nur mit Quellenangabe gestattet. Ancho : Altura : Longitud: : Peso : Energía de entrada : Voltaje : Conexión a red : Tipo de conexión : Salida principal : Salida esclava por par : Corriente total máxima : Modo de interrupción : Funciones de interrupción : Aprobación : 55 mm 55 mm 600 mm 1.5 kg 1.5 VA 85-250 V AC 10 Mbit RJ 45 dependiendo de la versión enchufe con contacto a tierra 1.5 m max. 16 amperios max. 8 amperios 16 amperios un polo WEB, WAP Haftung Die Infratec AG Bensheim bietet auf alle mechanischen und elektrischen Komponenten eine Garantie von 24 Monaten. Entsorgung Tipo de conexión difiere según la versión: Die Infratec AG hat eine EAR-Nummer (Elektro-Altgeräte-Register) beantragt, diese wird in Kürze nachgereicht. PM 211-MIP 2 to control your world PM 211-MIP-1 PM 211-MIP-2 31 Manual de usuario PM 211 – MIP Benutzerhandbuch PM 211 – MIP Die Steckdosenleiste im Überblick »Remote Power für das Home Office« Infratec PM 211-MIP Steckdosenleiste zum Schalten kleiner Rechnerumgebungen Actualización de software Para transferir el software del nuevo sistema operativo primero se tiene que descargar en su ordenador desde el sitio Web de Infratec AG en Internet el archivo necesario para la actualización. Después se inicia la sesión en su conector con su navegador de Internet, del modo en que lo realiza normalmente, y en el menú se selecciona el área »Update« (actualización). Cuando ya se haya localizado el archivo de actualización, se inicia el proceso de actualización con el botón »Press« (pulsar). 30 Die PM211-MIP verfügt über eine Ethernet-Schnittstelle und kann deshalb mit jedem normalen Switch oder DSL-Router verbunden werden. Gesteuert wird sie über einen integrierten Webserver, der die intuitive Konfiguration aller Schaltfunktionen erlaubt und auch eine Verwaltung mehrerer Benutzer mit unterschiedlichen Zugriffsrechten gestattet. Die IP-Adresse für die Steckdosenleiste lässt sich fest konfigurieren oder dynamisch über einen DHCP-Server vergeben. Neben einem Masterausgang besitzt die PM 211-MIP zwei doppelt ausgeführte Slave-Anschlüsse. Diese Konfiguration erlaubt das Ein- und Ausschalten des Computers über das Internet, sie erleichtert aber auch das Schalten, wenn man zu Hause ist. Wird beispielsweise der Monitor angeschaltet, erkennt die Steckdosenleiste den eingeschalteten Verbraucher und schaltet automatisch die an den Slave-Dosen angeschlossenen Geräte ein. Im Fall eines Stromausfalls merkt sich die PM 211-MIP den letzten Schaltzustand der Anschlüsse und schaltet die Verbraucher entsprechend ein, sobald das Stromnetz wieder verfügbar ist. Pro Anschluss lassen sich Verbraucher mit einer Leistungsaufnahme von bis zu 5 Ampere schalten, die Steckdosenleiste selbst hat eine Leistungsaufnahme von weniger als 1,5 Watt. to control your world 3 Benutzerhandbuch PM 211 – MIP Manual de usuario PM 211 – MIP Operación desde la línea de comandos Anzeige für Betriebsbereitschaft Reset Taster 2 3 7 4 5 689 La línea de conectores se puede operar también mediante un programa desde la línea de comandos. Para esto se dispone de estos comandos (httpget.exe está disponible en Internet como una opción) Drehregler Masterfunktion Netzwerkanschluss Anzeige Netzwerkverbindung Anzeige Netzwerkverkehr Comando Anzeige Master Anzeige Slave 1 uso: http://ip/sw?u=user&p=passwd&o=n&f=func Anzeige Slave 2 o: http://ip/sw?s=0 ip: dirección IP user: nombre de usuario passwd: contraseña n: número de salida que se conmuta func: on Mastersteckdose Slavesteckdosenpaar 1 Slavesteckdosenpaar 2 Die Master/Slave-Funktion Die Master/Slave-Funktion ermöglicht alle an der Steckdosenleiste angeschlossenen Verbraucher gleichzeitig zu schalten, indem der an der Master-Steckdose angeschlossene Verbraucher geschaltet wird. Beispielsweise kann ein PC-System mit Peripherie komplett angeschaltet werden indem nur der Schalter des Monitors betätigt wird. Der Schaltpunkt kann mittels des Drehreglers eingestellt werden. Der Schaltpunkt sollte so gewählt werden, dass der Verbraucher an der Master-Steckdose diesen immer sicher überschreitet. Achtung! Alle Verbraucher an den SlaveSteckdosen vor der Einstellung entfernen oder ausschalten. 4 off pulse toggle ?s=0 read status Zum Einstellen gehen Sie wie folgt vor: Man schaltet den »Master« ein und verdreht nun den Regler langsam bis man den Schaltpunkt erreicht bei dem die Master-Anzeige erlischt. Nun wieder ein kleines Stück in die entgegengesetzte Richtung damit die Master-Anzeige wieder aufleuchtet. Die Funktion nun bitte mehrmals testen. Leuchtet die Master-Anzeige nun immer wenn auch der Verbraucher an der Master-Steckdose schaltet, so ist die Einstellung beendet. to control your world 29 Manual de usuario PM 211 – MIP Benutzerhandbuch PM 211 – MIP Werkseinstellungen wiederherstellen Zum Rücksetzen aller Einstellungen muss der Reset solange betätigt werden bis die Anzeigen , und gemeinsam aufleuchten und wieder erlöschen. Die Werkseinstellungen der Steckdosenleiste: IP Nummer : 192.168.000.211 Gateway : 192.168.000.254 Netzmaske : 255.255.255.000 (Klasse C Netzwerk) Login Passwort : : admin admin Netzwerkanschluss Der Netzwerkanschluss erfolgt über ein handelsübliches Patchkabel, der Verbindungsstatus wird über die Leuchtdiode angezeigt. Der Netzwerkverkehr wird über die Leuchtdiode angezeigt. Operación mediante WAP con un teléfono móvil Desde su teléfono móvil, llame a la dirección IP de su teléfono móvil con el siguiente agregado: http://Ip-Nummer/!wap Ahora se puede registrar normalmente con su teléfono móvil y conmutar cada uno de los conectores. Con »NC«, el conector mantiene su estado vigente, con »On« se enciende y con »Off« se apaga. ¡Nota! 28 Para poder utilizar esta función se tendrá que confirmar que la línea de conectores tiene un número IP oficial o que a su enrutador DSL se le ha asignado un nombre claro mediante el servicio de nombres dinámico (DNS) y que las peticiones sobre el puerto 80 (se puede ajustar libremente) se envían hacia su conector. Zum Einstellen der Netzwerkparameter gehen Sie wie folgt vor: Verbinden Sie die Steckdosenleiste mittels eines Patchkabels mit Ihrem Netzwerk. Stellen Sie auf Ihrem PC eine IP Nummer ein, welche im gleichen Netzwerkbereich wie die der Steckdosenleiste liegt (siehe Werkseinstellungen). Zum Beispiel: 192.168.0.1. Aktivieren Sie auf Ihrem PC den Internetbrowser, und gehen auf folgende Webseite: http://192.168.0.211. Melden Sie sich als Benutzer »admin« mit dem Passwort »admin« an. Im Menü »Network« können Sie nun die von Ihnen gewünschte IP Nummer einstellen. Zum Übernehmen der Daten müssen Sie die Steck dosenleiste rebooten. Nach dem Sie die IP Nummer eingestellt haben, können Sie Ihren Rechner wieder auf die ursprünglichen Einstellungen zurücksetzen. to control your world 5 Benutzerhandbuch PM 211 – MIP Benutzerverwaltung Operación mediante la World Wide Web In der Benutzerverwaltung können zwei unterschiedliche Benutzer angelegt werden. In den Werkseinstellungen sind bereits drei vor definierte Benutzer angelegt: »admin«, »user1« und »user2«. Die Passwörter in den Werkseinstellungen sind mit den Benutzer namen identisch. En la máscara de operación, cada esclavo se puede activar o desactivar. Además, el botón »Pulse« se puede usar para conmutar el conector esclavo respectivo una cantidad específica de tiempo. Für jeden Benutzer kann ein Name und Passwort festgelegt werden. Zusätzlich kann der Zugriff auf die Slavedosen eingeschränkt werden. 6 Manual de usuario PM 211 – MIP Los estados de conmutación se visualizan en el sitio Web mediante los LED, exactamente de la misma forma que en la línea de conectores. to control your world 27 Manual de usuario PM 211 – MIP Administración de usuario Bedienung über das World Wide Web En la administración de usuario se pueden configurar dos clases de usuarios. De fábrica vienen predefinidos tres usuarios: »admin«, »user1« y »user2«. El los valores de configuración de fábrica, las contraseñas de estos usuarios coinciden con el propio nombre de cada usuario. In der Maske für die Bedienung kann jeder Slave ein und aus geschaltet werden. Zusätzlich kann mit dem Button »Pulse« für eine einstellbare Zeit die jeweilige Slavesteckdose ein- bzw. ausgeschaltet werden. Para cada usuario se puede establecer un nombre y una contraseña. Además, se puede limitar el acceso a los conectores esclavos. 26 Benutzerhandbuch PM 211 – MIP Die Schaltzustände werden in der Webseite genau wie bei der Steckdosenleiste über die Leuchtdioden angezeigt. to control your world 7 Benutzerhandbuch PM 211 – MIP Manual de usuario PM 211 – MIP Restablecer la configuración de fábrica Para reasignar toda la configuración a sus valores de fábrica, se tiene que pulsar el botón Reset hasta que se visualice que los indicadores , y se encienden simultáneamente y después se apagan otra vez. La configuración de fábrica de la línea de conectores es la siguiente: Número de IP :192.168.000.211 Gateway : 192.168.000.254 Máscara : 255.255.255.000 (red clase C) Login Password : : admin admin Conexión de red La conexión de red se establece mediante un cable patch disponible en los comercios , el estado de la conexión se indica mediante el LED . El tráfico de la red se indica mediante el LED . Bedienung über WAP mit dem Handy Rufen Sie über Ihr Handy die IP Adresse Ihres Handys mit dem folgenden Zusatz auf: http://Ip-Nummer/!wap Sie können sich jetzt wie gewohnt auf Ihrem Handy anmelden, und jede Steckdose schalten. Mit »NC« verbleibt die Steckdose im aktuellen Zustand, Mit »On« wird sie ein- und mit »Off« ausgeschaltet. Hinweis! 8 Um diese Funktion nutzen zu können müssen Sie dafür sorgen, dass Ihre Steckdosenleiste eine offizielle IP Nummer erhält, oder dass Ihr DSL-Router mittels Dynamic Name Service einen eindeutigen Namen hat, und Anfragen auf dem Port 80 (frei einstellbar) an Ihre Steck dose weitergeleitet werden. Para configurar los parámetros de red se deben seguir estos pasos: Utilizar un cable patch para conectar la línea de conectores a su red. Configurar un número IP en su ordenador que sea del mismo rango de red como la línea de conectores (véanse los valores de configuración de fábrica). Por ejemplo: 192.168.0.1. Activar el navegador de Internet de su ordenador y diríjase al siguiente sitio web: http://192.168.0.211. Inicie la sesión con el usuario »admin« y con la contraseña »admin«. En el menú »Network« (red) ahora podrá establecer el número IP que requiera. Para utilizar estos datos tendrá que reiniciar la línea de conectores. Cuando se ha establecido el número IP, puede restablecer su ordenador a la configuración original. to control your world 25 Manual de usuario PM 211 – MIP Benutzerhandbuch PM 211 – MIP Bedienung über die Kommandozeile Visualizador de estado operativo Botón Reset (reinicio) 2 3 7 4 5 689 Die Steckdosenleiste kann auch über ein Kommandozeilenprogramm gesteuert werden. Hierzu sind folgende Befehle vorhanden. (httpget.exe ist optional im Internet erhältlich) Función maestra control giratorio Conexión de red Indicador de conexión de red Indicador de tráfico de red Befehl Indicador Master (maestro) usage: http://ip/sw?u=user&p=passwd&o=n&f=func Indicador Slave 1 (esclavo 1) or: http://ip/sw?s=0 ip: ipaddress user: username passwd: password n: outletnumber to switch func: on Indicador Slave 2 (esclavo 2) Conector Master (maestro) Conector Slave (esclavo) par 1 Conector Slave (esclavo) par 2 Función Master/Slave (maestro/esclavo) La función maestro/esclavo permite la conmutación simultánea de todos los dispositivos consumidores conectados a la línea de conectores mediante la conmutación del consumidor conectado al conector maestro. Por ejemplo, todo un sistema de ordenadores con periféricos se puede conmutar mediante la simple activación del interruptor del monitor. El punto de conmutación se puede ajustar mediante el control giratorio . El punto de conmutación debería seleccionarse de manera que el dispositivo consumidor del conector maestro siempre se pase de la raya de un modo seguro. ¡Precaución! Antes de realizar la configuración, quite o apague todos los dispositivos consumidores conectados a los conectores esclavos. 24 off pulse toggle ?s=0 read status Para configurarlo, seguir estas indicaciones: Encienda el “master” y después lentamente gire el controlador hasta que llega al punto de conmutación y el indicador maestro se extingue. Ahora gire lentamente en la dirección opuesta de manera que el indicador maestro se enciende nuevamente. Ahora, haga el favor que comprobar varias veces el funcionamiento. Si el indicador maestro se enciende cada vez que se conecta el dispositivo consumidor del conector maestro, entonces la configuración se puede considerar totalmente satisfactoria. to control your world 9 Benutzerhandbuch PM 211 – MIP Manual de usuario PM 211 – MIP El conector de un vistazo. »Control remoto de energía para su oficina en casa« Línea de conectores Infratec PM 211-MIP para entorno de ordenadores personales conmutables Softwareupdate Zum Aufspielen einer neuen Betriebssystem-Software müssen Sie zuerst die notwendige Update-Datei von der Internetseite der Infratec AG auf Ihren Computer herunterladen. Melden Sie sich danach wie gewohnt mit Ihrem Internetbrowser bei Ihrer Steckdosenleiste an und wählen dann den Bereich »Update« aus dem Menü aus. Nachdem Sie die Update Datei auf Ihrer Festplatte lokalisiert haben starten Sie den tatsächlichen Update Vorgang mit dem Knopf »Press«. PM 211-MIP tiene una interfaz Ethernet y, por lo tanto, se puede conectar a cualquier conmutador normal o enrutador DSL. Está controlado mediante un servidor web integrado que permite la configuración intuitiva de todas las funciones de conmutación, así como también la administración de múltiples usuarios con diferentes derechos de acceso. La dirección IP de la línea de conectores puede tener una configuración fija o se puede ejecutar dinámicamente por medio de un servidor DHCP. Además de la salida maestra, PM 211MIP también posee dos conexiones esclavas, cada una de ellas con dos conectores. Gracias a esta configuración, es posible encender y apagar el ordenador mediante Internet y también facilita la conmutación cuando se está en la oficina. Si, por ejemplo, encendemos el monitor la línea de conectores reconoce los consumidores que están conectados y suministra energía automáticamente a los dispositivos conectados a las conexiones esclavas. En el caso de un fallo en el suministro de energía, PM 211-MIP toma en cuenta el último estado de los conmutadores de las conexiones y tan pronto se restablezca el suministro de corriente encenderá los interruptores que correspondan. En cada conector esclavo se pueden conectar dispositivos con un consumo de energía de hasta 5 amperios VA. La propia línea de conectores consume menos de 1,5 vatios. 10 to control your world 23 Manual de usuario PM 211 – MIP Benutzerhandbuch PM 211 – MIP Technische Daten Copyright Breite : Höhe : Länge : Gewicht : Leistungsaufnahme : Spannung : Netzwerkanschluss : Anschlussart : Masterausgang : Slaveausgang je Paar : Maximaler Gesamtstrom : Schalttart : Schaltfunktionen : Zulassung : 55 mm 55 mm 600 mm 1,5 kg 1,5 VA 85-250 V AC 10 Mbit RJ 45 Je nach Ausführung inkl. 1,5 m Anschlussleitung max. 16 Ampere max. 8 Ampere 16 Ampere einpolig WEB, WAP Infratec AG, Bensheim es el propietario de todos los derechos sobre este manual de usuario. La reproducción o reimpresión de este manual, tanto sea total como parcial, sólo se permitirá con una referencia completa de la fuente de la información. Responsabilidad Infratec AG, Bensheim ofrece una garantía de 24 meses sobre todos los componentes mecánicos y eléctricos. Die Anschlussart unterscheidet sich je nach Ausführung: Disponibilidad Infratec AG ha solicitado un número EAR (Elektro-Altgeräte-Register – German foundation for Waste Electrical Appliances Register) que será emitido en breve. PM 211-MIP 22 to control your world PM 211-MIP-1 PM 211-MIP-2 11 User Manual PM 211 – MIP User Manual PM 211 – MIP Technical data Copyright Infratec AG, Bensheim owns all rights to this user manual. Reproduction and reprinting of this manual, either in full or in part, shall only be permitted with full reference to the source. Width : Height : Length : Weight : Power input : Voltage : Network connection : Type of connection : Master output : Slave output per pair : Maximum total current : Switching mode : Switching functions : Approval : 55 mm 55 mm 600 mm 1.5 kg 1.5 VA 85-250 V AC 10 Mbit RJ 45 version dependent (see below) connector cable with powerplug (1,5 m) included max. 16 amps max. 8 amps 16 amps single-pole WEB, WAP Liability Infratec AG, Bensheim offers a 24-month guarantee on all mechanical and electrical components. Disposal Type of connection differs according to version: Infratec AG has applied for an EAR (Elektro-Altgeräte-Register – German foundation for Waste Electrical Appliances Register) number, which will be issued soon. PM 211-MIP 12 to control your world PM 211-MIP-1 PM 211-MIP-2 21 User Manual PM 211 – MIP User Manual PM 211 – MIP The socket strip at a glance »Remote power for the home office« Infratec PM 211-MIP socket strip for switching small computer environments Software update To transfer new operating-system software, you first have to download the necessary update file from the Internet site of Infratec AG onto your computer. Then log onto your socket strip with your Internet browser in the usual manner and select the »Update« area from the menu. When you have localized the update file on your hard disk, start the actual update process with the »Press« button. The PM211-MIP has an Ethernet interface and can thus be connected to any normal switch or DSL router. It is controlled via an integrated web server that enables the intuitive configuration of all switching functions, as well as the administration of several users with different access rights. The IP address for the socket strip can have a fixed configuration or it can be used dynamically via a DHCP server. In addition to a master output, the PM 211-MIP also has two slave connections, each with two sockets. Thanks to this configuration, it is possible to switch the computer on and off via the Internet and it also facilitates switching when actually in the office. If, for example, the monitor is switched on, the socket strip recognises the consumers that are switched on and automatically supplies the devices connected to the slave connections with power. In the event of a power failure, the PM 211-MIP notes the last switching status of the connections and switches the consumers on accordingly as soon as the power supply is up and running again. For each slave, it is possible to connect consumers with a power consumption of up to 5 amps. The socket strip itself consumes less than 1.5 Watts. 20 to control your world 13 User Manual PM 211 – MIP User Manual PM 211 – MIP Operation via the command line Display for operational readiness Reset button 2 3 7 4 5 689 The socket strip can also be operated via a command-line program. The following commands are available for this. (httpget.exe is available on the Internet as an option) Rotary control master function Network connection Network connection indicator Network traffic indicator Command Master indicator usage: http://ip/sw?u=user&p=passwd&o=n&f=func Slave 1 indicator or: http://ip/sw?s=0 ip: ipaddress user: username passwd: password n: outletnumber to switch func: on Slave 2 indicator Master socket Slave socket pair 1 Slave socket pair 2 off The master/slave function The master/slave function enables the simultaneous switching of all consumers connected to the socket strip by switching the consumer connected to the master socket. For example, an entire PC system with peripherals can be switched by activating the monitor switch alone. The switching point can be adjusted via the rotary control . The switching point should be selected so that the consumer at the master socket always oversteps this safely. Caution! Before setting, remove or switch off all consumers on the slave sockets. 14 pulse toggle ?s=0 read status To set, proceed as follows: Switch the »master« on and now slowly turn the controller until it reaches the switching point and the master indicator is extinguished. Now turn slightly in the opposite direction so that the master indicator lights up again. Now please test the function several times. If the master indicator lights up whenever the consumer on the master socket is switched, the setting has been completed successfully. to control your world 19 User Manual PM 211 – MIP User Manual PM 211 – MIP Restore factory settings To reset all settings, reset has to be pressed until displays , and light up simultaneously and are then extinguished again. The factory settings of the socket strip: IP number : 192.168.000.211 Gateway : 192.168.000.254 Netmask : 255.255.255.000 (class C network) Login Password : : admin admin Network connection The network connection is established via a commercially-available patch cable, the connection status is indicated via the LED . Network traffic is indicated via LED . Operation via WAP with the mobile phone From your mobile phone, call the IP address of your mobile phone with the following addition: http://Ip-Nummer/!wap You can now register with your mobile phone in the normal way and switch each socket. With »NC«, the socket retains its current status and it is switched on and off with »On« and »Off« respectively. Note! 18 To be able to use this function, you have to ensure that the socket strip has on official IP number or that your DSL router has been given a clear name by the Dynamic Name Service and that enquiries on port 80 (freely adjustable) are forwarded to your socket. To set the network parameters, proceed as follows: Use a patch cable to connect the socket strip to your network. Set an IP number on your PC that is in the same network range as the socket strip (see factory settings). For example: 192.168.0.1. Activate the Internet browser on your PC and go to the following web site: http://192.168.0.211. Logon on as user »admin« with the password »admin«. In the »Network« menu, you can now set the IP number you require. To adopt the data, you have to reboot the socket strip. When you have set the IP number, you can restore your PC to the original settings. to control your world 15 User Manual PM 211 – MIP User administration Operation via the World Wide Web Two different users can be set up in the user administration. Three pre-defined users are already set up in the factory settings: »admin«, »user1« and »user2«. The passwords in the factory settings are identical to the user names. In the operating mask, each slave can be switched on and off. In addition, the »Pulse« button can be used to switch the respective slave socket on or off for a specific amount of time. A name and password can be set up for each user. In addition, access to the slave sockets can be restricted. 16 User Manual PM 211 – MIP The switching statuses are displayed on the web site via the LEDs in exactly the same way as on the socket strip. to control your world 17