1
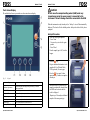
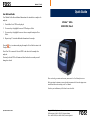
Infratec™ Sofia
Quick Guide
User Defined Fields
User Defined Fields allow additional information to be attached to a sample to be
analysed.
1.
If available a list of UDFs are displayed.
2.
Use arrow keys to highlight the correct UDF and press Select.
3.
Use arrow keys to highlight the correct value or sample description. Press
Select.
4.
Repeat steps 2-3 to attach additional information to the sample.
Infratec™ Sofia
6002 5351 / Rev. 3
Press the
- key to continue analyzing the sample or Press Back to return to the
''Analyze'' view.
Press Clear All to remove all selected UDF’s and values for the sample to be
analysed.
Previously selected UDFs will remain as default values for new analyses until
changed or cleared.
Please read safety precautions and warranty statement in the User Manual prior to use.
Before operating the instrument, ensure that the instrument and all external equipment are
installed and connected according to the User Manual.
Note that your installation may differ from the one described.
Quick Guide 6002 5351 / Rev. 3
Copyright 2008 / All rights reserved
FOSS Analytical AB, Box 70, SE-263 21 Höganäs, Sweden
Tel Int +46 42 361500, Fax +46 42 340349, E-mail [email protected]
Infratec™ Sofia
Touch Screen Display
The embedded software is presented on a colour touch screen display.
Infratec™ Sofia
Caution
Do not move the sample handling wheel (SHW) under any
circumstances when the power supply is connected to the
instrument. This will damage the motor connected to the SHW.
When the instrument is ready for analysis, the “Analyze” view will be automatically
displayed. The check cell is the default product. Analyse the check cell only when
prompted.
Analysis Procedure
1. Select the correct grain product:
- Press 'Grain'
- Use arrow keys to select the grain
product
- Press 'Select'.
2. Pour the sample (up to 0.4 l) into the
hopper.
3. Press the
- key.
4. Register additional information to the
sample with User Defined Fields,
UDFs (optional). See next page.
Fig. 1:1
5. Press the
- key again. It takes
approximately 3 minutes to complete
an analysis.
Keypad
Key
Function
1 Ambient light sensor
Automatically adjusts display settings according to ambient
lighting conditions.
2 On/Off LED
Indicates if power source connected to instrument.
3 Analysis LED
Indicates if analysis sequence has been initiated.
4 Analyse key
Initiates an analysis.
5 Cancel key
Cancels an analysis or function/action.
6 Arrow keys
Scroll up and down the contents of a list.
Soft keys F1, F2, F3 and F4
Function indicated on instrument screen.
Quick Guide 6002 5351 / Rev. 3
6. When the analysis is completed, the
sample is automatically emptied from
the SHW into the drawer and the
result is displayed.
7. Repeat steps 2-6 to analyse additional
samples of the same grain type.
Quick Guide 6002 5351 / Rev. 3