1
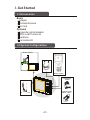
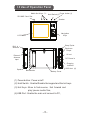
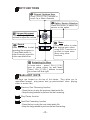
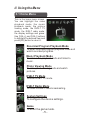
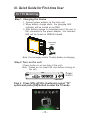
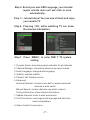
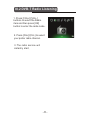
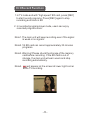
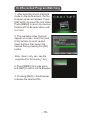
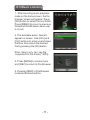
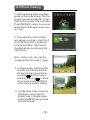
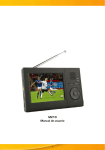
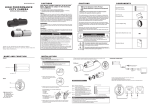
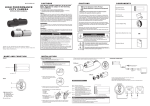
Digi-TV 390
User Manual
Table of Contents
Preface ............................................................. 1
I. Get Started
I. 1 Accessories ..................................................2
I. 2 System Configurations ..................................2
I. 3 Use of Operation Panel ................................3
II.Using the Main Menu
II. 1 Home Menu .................................................5
III.Quick Guide for First-time User
III.1 DVB-T TV Watching .................................... 6
III.2 DVB-T Radio Listening ................................. 8
III.3 Record Function ......................................... 9
III.4 Recorded Program Watching .......................10
III.5 Music Listening ..........................................11
III.6 Photo Viewing ............................................12
IV . Technical Settings
IV.1 System Settings .........................................14
V. Trouble Shooting Q&A ..................................... 15
VI. Specification ................................................... 17
Before Starting
Warning
Unauthorized duplication of copyrighted material may
infringe upon the right of third parties and may be
contrary to copyright laws.
Safety Notes
nDo not bend, drop, crush, puncture, incinerate, or open
this device.
nKeep this device within acceptable temperatures. Do
not submit it to extreme temperatures.
nDo not use this device in rain, or near washbasins or
other wet locations. Take care not to spill any food or
liquid into it. In case this device gets wet, unplug all
cables, turn it off and allow it to dry thoroughly before
turning it on again.
nNever attempt to repair this device by yourself. It does
not contain any user serviceable parts. The battery
should be replaced only by authorized service
providers.
nDo use headphones safely. Use of headphones while
operating a vehicle is not recommended and is illegal in
some areas. Be careful and attentive while driving. Stop
using this device if you find it disruptive or distracting
while driving or performing any other activity that
requires your full attention.
-1-
I. Get Started
I.1 Accessories
Basic
Adaptor
Portable Antenna
AV Cord
Optional
Cigarette Lighter Adaptor
MCX-to-IEC connector
Earphone
Car Holder Kit
I.2 System Configurations
Built-in antenna
Earphone
(Optio n)
AV Cord (optio n)
AC/DC Power
Adaptor
Cigarette Lighter
Adaptor (optio n)
External antenna
-2-
I.3 Use of Operation Panel
Power button (1)
Media Hot Keys (3)
Hold Switch (2)
SD/ MMC Card Slot
Speaker
Navigation
Keys
LCD Panel
Strap Eyelet
Built- in
Antenna
Earphone
Output
AV out
External
Antenna
Input
DC Power In
Charging
Indicator
Speaker
USB Host (4)
Back Holder
Battery Cover
(1) Power button : Power on/off.
(2) Hold Switch: Enable/Disable the keypad and the hot keys.
(3) Hot Keys : Allow to fast reverse, fast forward and
play/ pause media files.
(4)USB Port : Enable the main unit connect to PC .
-3-
KEY FUNCTIONS
Channel Up/down Keys
Press [ CH+ ]/ [ CH- ] buttons to
scroll up or down channels .
Option/ Service Selection
Press this button to select the
service or the option
Volume Adjustment
Press [VOL-] and [VOL+]
buttons to adjust the volume.
Menu
Press this button to enter
the service menu when
using DVB- T services or
go back to home menu
when using other
functions.
Record
Press this button to start
recording the programs in
TV and Radio mode. In
other file mode, press this
button can delete files.
Navigating the Menu
In home menu , press [ CH+ ]/ [ CH- ]
keys to move cursor up and down .
Press [ V OL+ ]/ [ VOL- ] buttons to move
the cursor left and right .
Media HOT KEYS
Hot keys are located on the top of the device. They allow you to
rewind/fast forward, play/pause and go previous/next when playing
video or music files.
Previous/ Fast Reversing function.
- Press the key to play the previous video/audio file.
- Keep the key pressed to perform the fast reversing.
Play/ Pause function.
Next/Fast Fowarding function.
- Press the key to play the next video/audio file.
- Keep the key pressed to perform the fast forwarding.
-4-
II. Us ing the Me nu
II.1 Home Menu
This is the home menu screen.
You can highlight the video
playback mode, the music
playback mode, the picture
viewing mode, the DVB-T TV
mode, the DVB-T radio mode,
the display settings and game.
Use [VOL+], and [VOL-] buttons
to highlight the desired item and
press [OK] button to select it.
Recorded Program Playback Mode
To enter recorded program playback mode and
watch recorded programs.
Music Playback Mode
To enter audio playback mode and listen to
music.
Photo Viewing Mode
To enter photo viewing mode and watch
pictures.
DVB-T TV Mode
To enter DVB-T TV mode.
DVB-T Radio Mode
To listen to DVB-T radio broadcasting.
System Settings
To configure the device settings.
Game
To enter the game mode.
-5-
III. Qu ick Gu ide for First-time Us er
Playback
III.1Video
TV Watching
Step 1: Charging the device
1. Connect power adaptor to the main unit.
2. When battery charge starts, the charging LED
indicator will be turned on as RED.
3.After battery charge is completed and if the unit is
Still connected to the power adaptor, this indicator
LED will be turned to GREEN instead.
AC/DC Power
Adaptor
Note: You can enjoy mobile TV while battery is charging.
Step 2:Turn on the unit
( Power button is on top side of the unit)
Note: Please do not insert SD card before turning on
the unit.
Power
button
Step 3: Press [VOL+]/[VOL-] buttons to select “TV”
option and press [OK] button to enter the TV mode.
- 6-
Step 4:Select your own OSD Language, your located
region and the main unit will start to scan
automatically.
Step 5: Job well-done! You can now sit back and enjoy
your mobile TV.
Step 6: Pressing [OK] while watching TV can show
the channel information.
Step 7: Press [MENU] to enter DVB-T TV system
setting.
1. Program Guide: show the program schedule for all channels.
2. Channel Manager: choose the channels you want to hide.
3. Audio Language: change audio language.
4. Subtitle: activate subtitle.
5. Teletext: call Teletext service.
6. Advanced:
Antenna Selection: choose to use built-in antenna external
antenna or auto switch.
Manual Search: choose channels you want to search.
Tuning Information: show channel information.
7. Update channels: enter to start auto search.
8. First Time Setup: reset region and language and start auto
search immediately.
9. Home: leave for home menu.
-7-
III.2 DVB-T Radio Listening
1. Press [VOL+]/[VOL-]
buttons to select the Radio
item and then press [OK]
button to enter the radio mode.
2. Press [CH+]/[CH-] to select
your prefer radio channel.
3-The radio service will
instantly start.
-8-
III.3 Record Function
1.In TV mode and with “high speed” SD card, press [REC]
to start record programs. Press [REC] again to stop
recording and store in SD
2. In recorded program player mode, users can enjoy
recorded programs here.
Note1. The main unit will keep recording even if the signal
is weak or no signals.
Note2. 1G SD card can record approximately 35 minutes
programs.
Note3. Warning! Please check the storage of the memory
card before recording. If the SD card is out of
storage, the main unit will warn users and stop
recording automatically.
Note4.
will appear on the screen at lower right corner
while TV recording.
-9-
III.4 Recorded Program Watching
1. After selecting music playback
mode on the home screen, the file
browser screen will appear. Press
[OK] button to select the root folder.
Press [MENU] to return to previous
folder/exit File Browser when user
is in root.
2. The available video files will
appear on screen. Use [CH+] and
[CH-] buttons to scroll up and
down the files, then select the
desired file by pressing the [OK]
button.
Note: Users only can see file
supported for this mode (*.avi).
3. Press [MENU] to invoke menu
and [REC] to return to File Browser.
4. Pressing [REC] in File Browser
to delete the selected file.
- 10 -
III.5 Music Listening
1. After selecting music playback
mode on the home screen, the file
browser screen will appear. Press
[OK] button to select the root folder.
Press [MENU] to return to previous
folder/exit File Browser when user
is in root.
2. The available audio files will
appear on screen. Use [CH+] and
[CH-] buttons to scroll up and down
the files, then select the desired
file by pressing the [OK] button.
Note: Users only can see file
supported for this mode (*.MP3).
3. Press [MENU] to invoke menu
and [REC] to return to File Browser.
4. Pressing [REC] in File Browser
to delete the selected file.
- 11 -
III.6 Photo Viewing
1. After selecting photo playback
mode on the home screen, the file
browser screen will appear. Press
[OK] button to select the root folder.
Press [MENU] to return to previous
folder/exit File Browser when user
is in root.
2. The available picture folders
will appear on screen. Use [CH+]/
[CH-]/[VOL+]/[VOL-] buttons to
browse the folder , then select
the desired one by pressing the
[OK] button.
Note: Users only can see file
supported for this mode (*.jpeg).
3. In single mode, pressing [OK]
to enter the slide show mode.
Go back to previous photo by
pressing
and go to next
photo by pressing
. In slide
show mode, press [MENU] to
enter internal system setting.
4. In slide show mode, pressing
[OK] again can go back to
single mode. In single mode,
pressing [MENU] can go back
to photo browser.
- 12 -
5.In slide show mode, press
for
reverse slide show mode, and
press
for forward slide show
mode.
6. Pressing [REC] in File Browser
to delete the selected file.
- 13 -
IV. Technical Settings
IV.1 System Settings
This is the system settings
menu screen. Users can adjust
the language setting, display
,and proceed to a software
upgrade. Use [VOL+], and
[VOL-] buttons to highlight the
desired item and press [OK]
button to select one.
IV.1.1 Language
Use [VOL+][VOL-] to choose menu language setting.
IV.1.2 Brightness
Use [VOL+][VOL-] to adjust the backlight level.
(level 0: the gloomiest to level 4: the brightest).
IV.1.3 System Information
Display boot and application code version.
IV.1.4 Software Upgrade
Upgrading application code through SD card.
- 14 -
V.Channel
TroubleDelete
Shooting Q&A
Most of the troubleshooting issues can be easily
solved. The common cases and their respective
solutions are listed in the table below. If the problem
persists, please contact the after sales service.
Problem
No picture, no
Possible Reason
Solution
The battery is totally
Connect the unit to an external
discharged.
power source to charge the battery.
The power line is not
Check the power lead connection.
properly inserted into
W hen using the in-car power
the unit.
connector, check if the power is
audio.
available at the socket.
The unit is not switched
Slide the “POW ER SW ITCH” to
on.
“ON” position.
The SD/MMC Card is
Check the SD/MMC Card is
wrongly inserted.
properly inserted.
The device does
The lock function has
Check the lock switch position and
not respond.
been switched on.
unlock.
The number of available
Perform “Auto Search” or “Manual
channels is limited due
Search” to rescan all the channels.
to the local broadcasting
system. The available
In DVB-T mode,
channels can vary
the number of
depending on the area.
DVB-T channels
The signal quality of
Use the external antenna to
is not as much
some TV channels is
increase the reception sensitivity.
as we expected.
too low.
For indoor use, place the antenna
close to a window and place it on
high point.
Some TV channels are
Only the locally broadcasted
not available.
channels can be viewed. They can
differ depending on the area.
- 15 -
Problem
Possible Reason
Solution
Som e TV channels
Use the external antenna to
signal quality is too low.
increase the reception sensitivity.
In DVB-T m ode,
For indoor use, place the antenna
all of the
close to a window and place it on
channels show
“no signal or
high point.
W rong antenna is used.
random m osaic
Use only the external antenna
provided with this unit.
tiles appear on
No DVB-T service is
Check your country DVB-T
the display.”
provided in the area.
coverage m ap. It is not possible to
watch digital TV/listen to digital
radio in non-covered areas.
The audio volum e is too
Click the “VOL+” button to raise the
low.
volum e.
The audio is m uted.
The video is fine
Click the “MU TE” button to disable
the m ute function.
but there is no
The earphones are not
Check if the earphone plug is clean
sound while
connected properly.
and well inserted.
watching TV.
The device is located
Move the device to another location
close to strong m agnetic
and use it again.
field.
There is no
The battery is totally
Connect the unit to an external
voice while
discharged.
power source to charge the battery.
playing video
The video file is
Please check the video files.
files.
corrupted.
- 16 -
VI. Specifications
Display
3.6” LTPS TFT-LCD
Resolution
320RGB (= 960 dots) (W) x 240 (H) Pixels
Brightness
220 nits
Contrast ratio
400:1
View Angle
120°(Horizontal) / 110°(Vertical)
Antenna
Bulit-in antenna with UHF and VHF band reception
Support external antenna input
Speaker
Built-in 0.5W / 8Ω stereo speakers
Media Support
SD/MMC Card
User Interface
7 keys: [CH+],[CH-],[VOL+],[VOL-],[OK],[MENU],[HOME],
Mini USB (USB1.1 supported)
Power button and hold switch,
3 Hot keys: FF/Next, Play/Pause, FR/Previous,
A/V output, Earphone.
OSD Languages
English, German, French, Portuguese, Spanish, Italian, Dutch,
Finnish, Traditional Chinese, Simplified Chinese.
Features
DVB-T TV/Radio, auto channel search, multi-language EPG,
channel preview, teletext, subtitle,
Multimedia playback: MP3, JPEG.
Power Supply
5V/1.2A DC
Built-in rechargeable Lithium Polymer battery, 3.7V/2000mA.
Operating Time
DVB-T TV operation: Max. 3 hrs.
Video playback: Max. 4 hrs.
Dimensions
120 x 78 x20 (mm)
Weight
200g (including battery)
Media Format
Audio Format: *.mp3.
Supported
Video Format: *.avi (recorded programs)
Photo Format: *.jpg.
- 17 -
Service Address in Germany
PST professional support technologies GmbH
Breitscheider Weg 117 D- 40885 Ratingen
Hotline: 01805 012204 (0.14 Euro/Minute from German fixed
network, mobile may be charged different)
e-Mail: [email protected]
© 2009 Alan Electronics GmbH