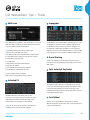
1
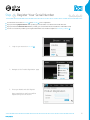
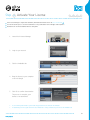
Software User Manual
Version 1.5
EN 141027 REV B
End User License Agreement (EULA)
Do not use this product until the following license agreement is understood and accepted.
By using this product, or allowing anyone else to do so, you are accepting this agreement.
UltraMini (henceforth ‘the Product’) is licensed to you as
3. Ownership
the end user. Please read this Agreement carefully.
As between you and UVI, ownership of, and title to, the
You cannot transfer ownership of these Sounds and Software
enclosed digitally recorded sounds (including any copies)
they contain. You cannot re-sell or copy the Product.
are held by UVI. Copies are provided to you only to enable
you to exercise your rights under the license.
LICENSE AND PROTECTION
4. Term
This agreement is effective from the date you open this package,
and will remain in full force until termination. This agreement
1. License Grant
will terminate if you break any of the terms or conditions of this
UVI grants to you, subject to the following terms and
agreement. Upon termination you agree to destroy and return to
conditions, a non-exclusive, non-transferable right
UVI all copies of this product and accompanying documentation.
to use each authorized copy of the Product.
5. Restrictions
The product is the property of UVI and is licensed to you only
Except as expressly authorized in this agreement, you may not rent,
for use as part of a musical performance, live or recorded. This
sell, lease, sub-license, distribute, transfer, copy, reproduce, display,
license expressly forbids resale or other distribution of the
modify or time share the enclosed product or documentation.
sounds and software included in the Product or their derivatives,
either as they exist on disc, reformatted for use in another
digital sampler, or mixed, combined, filtered, resynthesized or
otherwise edited, for use as sounds, multi-sounds, samples,
multi-samples, wavetables, programs or patches in a sampler,
microchip or any hardware or software sample playback device.
You cannot sell the Product content or give it away for use
by others in their sampling or sample playback devices.
In the event UVI terminates this agreement due to your
breach, you agree to return the original and all other
copies of the software and documentation to UVI.
UVI reserves all rights not expressly granted to herein.
2. Protection of Software
You agree to take all reasonable steps to protect the product and
any accompanying documentation from unauthorized copying
or use. You agree not to modify the product to circumvent any
method or means adopted or implemented by UVI to protect against
or discourage the unlicensed use of copying of the Product.
©2014 UVI, all rights reserved.
All trademarks are the property of their respective owners
Moog is not affiliated with UVI or any UVI products.
2
Table of Contents
Introduction................................................................................................................................................................................4
What’s New.................................................................................................................................................................................5
System Requirements...........................................................................................................................................................6
Installation
Step 1: Register Your Serial Number......................................................................................................................7
Step 2: Activate Your License....................................................................................................................................8
Step 3: Install Your Instrument..................................................................................................................................9
Step 4: Load Your Instrument....................................................................................................................................10
Signal Flow and Functionality Overview......................................................................................................................11
Classic and XL...........................................................................................................................................................................12
User Interface
Global and Oscillators.....................................................................................................................................................13
Pitch, Color, Filters and Amps....................................................................................................................................14
Stereo and Effects............................................................................................................................................................15
Phraser...................................................................................................................................................................................16
Arpeggiator..........................................................................................................................................................................17
Step Modulator..................................................................................................................................................................18
LFO Modulator and Modwheel Controls..............................................................................................................19
Low-CPU Mode (UltraMini LE)..................................................................................................................................20
Preset List
Preset List - Mono...........................................................................................................................................................21
Preset List - Poly..............................................................................................................................................................22
Preset List - Xtra 1.5........................................................................................................................................................23
UVI Workstation: Tips and Tricks.....................................................................................................................................24
Credits and Thanks.................................................................................................................................................................25
3
Introduction
The Beauty of Firsts
instrument a pure sound from the start. Then accurately modeled
There’s something evocative and mysterious about firsts. Normal
filters and effects are used on the back-end to shape and control the
people will recall their first pet, first crush or their first kiss. That’s
sound, spending precious CPU cycles only where they’re needed. For
not us. For us, that warm ethereal feeling comes from our first analog
this approach to work you need to build an amazing library of sounds
synth. There’s something timeless about it. Part of it is its place in
and marry them to a truly advanced DSP engine. This is exactly
history, being the first affordable and accessible analog synthesizer.
what we’ve done for UltraMINI thanks to hundreds of man hours
Part of it is a sonic fingerprint that resonates through over 40 years
of tedious multi-sampling and the award-winning UVI Engine™.
of live and recorded music. Regardless of the
criteria we can only summarize by saying
this instrument has made a permanent
Two Analog Souls
impression on us, and we’re not alone.
We started with a beautifully restored 1971 model,
sampling every waveform of every oscillator across
every key - and we did this for multiple overdrive
A Prolific Past
settings. UltraMini seeps with a thick and immediate
First made available to the public in 1971, this
analog sound produced with the same 3-oscillator
synth continued to be produced with very
configuration. But we didn’t stop there. In 2002
little change for over 10 years. Considered the
the king of mono synths had a second coming;
most popular synth ever by some there’s no
this version has its own wild character and we
doubt the instrument has led a prolific life,
figured, what better way to make a Mini ultra than
leaving a massive wake in its path; changing
to give you two of them. Taking the new 2011
perceptions and influencing synthesizer
model, we performed the same comprehensive
design to this day. With a striking balance of
session creating an identical sample footprint.
simplicity and sonic range it was one of the
first real novice-friendly systems, a factor
that surely contributed to its success and also
made it a superb tool for teaching the basics of subtractive synthesis.
Beyond Mini
Oscillators are only half the story—what about the filters? Don’t
worry, we’ve got you covered. We’ve included not one, but two of our
There’s No Quitting You
aggressive analog-modeled Xpander filters in UltraMINI, giving you
As firsts often do, this one taught us a great deal. It cultured in
unprecedented control and a sound so sweet you’ll swear it’s analog.
us a sensitivity to intuitive design and the importance of great
sound regardless of form. In fact we’ve been speaking about
Additional features include amplitude and filter key follow,
it from a project perspective since we began. We knew that if
unrestricted polyphony, mono retrigger, per-oscillator amplitude,
we were going to do it, it would not only have to sound great
stereo, color and drive control, a built in bit crusher, phaser, delay,
but it would need to elicit that same balance of immediate
limiter and our advanced algorithmic reverb—SparkVerb, built-in
simplicity and sonic reward - a deceptively complex task. As time
phraser and arpeggiator assignable per-oscillator, step and LFO
progressed our vision crystallized; the design was ambitious but
modulations and a huge library of expertly crafted presets to explore.
it was clear to all of us that this was a project we had to do.
UltraMINI has been designed to give you a rich, authentic
sound and an immediate experience. An elegant GUI presents
Heart of a Hybrid Monster
controls in an easy-to-understand layout, grouped for efficient
One of our specialties is making hybrid instruments. With a hybrid
and intuitive operation eliciting the feel of a real Minimoog.
instrument we get the best of both worlds. High fidelity sample-based
waveforms produced by real circuits, in real machines give the
Now lets get started!
4
What’s New in v1.5
- 200+ New Factory Presets
- Computer-based Authorization (iLok dongle no longer required)
- Low-CPU Mode (UltraMini LE)
5
System Requirements
Compatibility
Compatibility
Audio Units, VST, MAS, AAX, RTAS or standalone
VST, AAX, RTAS or standalone
UVI Workstation 2.5.7 or higher
UVI Workstation 2.5.7 or higher
Minimum System Requirements
Minimum System Requirements
Intel CPU
Core Duo or faster
4 GB of RAM (8 GB+ recommended)
4 GB of RAM (8 GB+ recommended)
2 GB of disk space
2 GB of disk space
Mac OS X 10.7 or higher
Windows 7 or higher
iLok account (free, dongle not required)
iLok account (free, dongle not required)
Authorize the Way You Want
Your license allows 3 concurrent authorizations on any combination of computers and iLok dongles.
License management is a simple drag-and-drop process done through iLok License Manager.
Visit ilok.com/
to download iLok License Manager and create your free account.
6
Step
1
Register Your Serial Number
1
2
3
4
You must have an account on uvi.net/ and ilok.com/ prior to registration
If you purchased a physical version of this product, your serial number is located on the inside of the box
If you purchased an electronic version of this product, your serial number will be included in a confirmation email
You can see a list of the products you’ve registered and their serial numbers anytime at uvi.net/my-products
1. Login to your account on uvi.net/
2. Navigate to the ‘Product Registration’ page
3. Enter your details and click ‘Register’
Upon completion a new license will be
deposited in your iLok account
7
Step
2
Activate Your License
1
2
3
4
iLok License Manager is required for activation, download the newest version at ilok.com/ilm.html
Your license allows up to 3 concurrent activations on any combination of iLok dongles and computers
Activations can be moved between devices at anytime
1. Launch iLok License Manager
2. Login to your account
3. Click the ‘Available’ tab
4. Drag the license to your computer
or an iLok dongle
5. Click ‘Ok’ to confirm the activation
The process is complete, your device is now authorized
»
»
To see how many authorizations you have left simply select the license and click ‘Show Details’
To deactivate your license, right-click it and select ‘Deactivate’ — doing so will return your license to the ‘Available’ tab
8
Step
3
Install Your Instrument
1
2
3
4
UVI Instruments can be stored anywhere on your system
Storing your instruments on a fast drive will improve performance
Your instruments can be downloaded at any time from uvi.net/my-products
1. Create a folder on your computer and place your UVI Instruments in it
Once this is done we need to tell UVI Workstation where to find your instruments.
We do this by creating a watch folder, follow the steps below to create your own:
2. Open UVI Workstation
3. Click the Settings page
4. Click the ‘Sound Banks’ tab
5. Click the ‘...’ button and select
the folder where you’ve placed
your instruments
6. Restart UVI Workstation and
open the Browser
Your instruments will be available under the ‘Soundbanks’ tab
9
Step
4
Load Your Instrument
1
2
3
4
UVI Workstation is required to run UVI Instruments
The newest version of UVI Workstation can be downloaded free at uvi.net/downloads
UVI Workstation can be run as a standalone program or as a virtual instrument from within your DAW of choice
1. Open UVI Workstation
2. Click the Browser icon
3. Open the Sound Banks tab
4. Select a product, in this example
we’ll choose Vector Pro, then select an instrument and patch
Double-click the patch to load it
5. The UI appears and you’re ready to jam!
10
Signal Flow and Functionality Overview
Step Mod
Pitch
Arp/Phraser
Oscillator 1
Arp/Phraser
Oscillator 2
+ Noise
Arp/Phraser
Oscillator 3
Color
Volume
LFO Mod
Drive
Filter 1
Pitch
Color
Volume
Color
Amp Env 1
Stereo 1
Filter 2
Amp Env 2
Stereo 2
Filter 2
Amp Env 3
Stereo 3
Drive
Filter 1
Pitch
Filter 2
Crusher
Phaser
Delay
Reverb
Limiter
Master
Drive
Volume
Filter 1
UltraMINI Signal Flow Diagram
Functionality Overview
UltraMINI is a 3+1 oscillator subtractive mono/poly switchable
spectrum. An [ALT] control is available, which when engaged
synthesizer built on the UVI Engine and a comprehensive library
will invert the stereo position with every key press. With [ALT]
of sample data from 2 hardware Minimoogs (1971 & 2011).
engaged the [Spread] control is enabled and sets the distance
™
from center (0 being center, 10 being fully panned).
Each oscillator includes an octave switch, 6 base waveforms and
has independent amplitude, drive, color, pan and overdrive controls.
A variety of sound shaping effects are available including the
Oscillators 2 and 3 have sweepable detune with a range of -7/+7
proprietary SparkVerb. Effects run in serial in the following
semitones. A noise oscillator offers pink or white tone. Its signal
order: bit crusher, phaser, delay, reverb, limiter.
travels alongside oscillator two, feeding through its amplitude filter.
An arpeggiator and a phraser are available, each containing
UltraMINI can run in mono portamento, mono portamento 2, mono
independent bypass per oscillator. The arpeggiator and
retrigger or polyphonic modes. A global pitch control allows for
phaser are exclusive, meaning only one can be engaged at
glide effect with independent time and pitch depth settings.
a time. Activating one will deactivate the other if it happens
to be engaged. Both offer editable resolution, groove, gate
3 amplitude filters provide standard ADSR envelope controls
and step length controls for a maximum of 16 steps. The
and can be edited individually or globally. A [NO VEL] switch
phraser offers live pattern input for fast programming.
overrides velocity data with a fixed 128 value. A [VEL > ATK] switch
overrides the attack parameter with the incoming note velocity.
Step and LFO modulators offer per oscillator parameter
modulation of volume, pan, pitch and drive as well as filter
Xpander filters run in parallel offering low pass, band pass and
cutoff for both Xpanders. In legato mode the Step modulator
high pass modes. Each filter is equipped with ADSR envelope
gains independent delay, rise and smooth controls and the
controls as well as depth and velocity. Filters can be edited
LFO modulator gains attack, decay and depth controls.
independently or globally and have independent bypass switches.
Linear Key Follow is available for both Filter and Amplitude envelopes.
Patches can be saved as multis through UVI
Workstation or as programs in MachFive3. Additionally
A unique stereo control is available per oscillator. By default
if you’re working in plug-in mode, patch settings will be
you can pan each oscillator signal to any position in the stereo
automatically saved in your project via. your DAW.
11
Classic and XL
Old and New: A Brief Explanation
Within UltraMINI are two wholly separate instruments, the
Classic and XL (pictured here). The Classic sports a natural
wood and black metal faceplate while the XL is dressed in
a clean white. Each instrument has the same control set;
your experience operating one will translate directly to
the other. The difference between them lies at the core.
UltraMINI is based on a quite massive sample footprint
taken from 2 vintage synths—one from 1971 and the
other from 2011. Extreme care was taken to ensure these
sets were as near as possible to allow for a consistent
and seamless experience. These sample sets serve as
the fundamental difference between the two versions of
UltraMINI - Classic (1971)
UltraMINI; quite literally they are different instruments.
There are both subtle and distinct sonic differences
between the two. To help illustrate this point we’ve
made a generous preset bank available for both
versions giving you a straight-forward way to AB a
huge range of configurations if you’re so inclined.
We hope very much that you enjoy exploring these two
synths and that you find ways to apply their particular
strengths in your work.
UltraMINI - XL (2011)
12
Global and Oscillators
4
9
Drive
Waveform
5
10
Noise Bypass
11
Noise Volume
12
Noise Type
13
Overload Switch
3
Page Buttons
Detune
6
Volume
7
Preset Navigator
2
Master Volume
1
Oscillator Controls
9
Master Volume
Set the master volume for the selected instance of UltraMINI (0-100)
4
Preset Navigator
Arrow buttons toggle through presets
Click preset name for a list view
3
Octave per-oscillator (-2/+2oct)
Waveform per-oscillator
11 Noise Volume
Detune per-oscillator (-7/+7 semitones)
12 Noise Type
Choose Pink or White noise
Volume
Gain per-oscillator (0-100%)
13 Overload Switch
8
Noise gain (0-100%)
Detune
7
Turn noise generator ON/OFF
Waveform
Page Buttons
Navigate between the UI pages
10 Noise Bypass
6
Drive
Amount of Drive per-oscillator
Range
5
2
Oscillator Bypass
Range
Global Controls
1
8
Oscillator Bypass
Select amount of overload per-oscillator
(none/soft/medium/hard)
Turn oscillators ON/OFF
13
Pitch, Color, Filters and Amps
1
Mode Switch
Filter
Glide
3
7
Filter Envelope
8
Filter Mode
11
Amp Key Follow
12
Amp Switch
13
Amp Envelope
9
10
Filter Controls
8
Mode Switch
Set global mode: (mono portamento, mono portamento 2, mono retrigger, polyphonic)
Pitch Controls
Glide
»Depth
Set glide pitch depth
(-24/+24 semitones)
»Time
Set glide time (0/10)
Timbre Control
3
Filter Switch
6
Polyphony
5
2
Vel > Atk
2
Filter Bypass
Color
No Vel
1
4
Color
4
Filter Bypass
5
Filter Switch
Edit filter parameters independently (1/2) or all at once (All)
6
Filter
»Cutoff
Set filter cutoff (20Hz/20kHz)
»Resonance
Set filter resonance (0-100%)
» EG Depth
Set filter depth (-1/+1)
»Velocity
Set filter velocity (0-100%)
» Key Follow
Set linear key follow (0-200%)
(key position » resonance)
Adjust timbre per-oscillator (-24/+24)
7
Filter Envelope
Attack/decay/sustain/release per filter
Mode
Set filter mode (LP/BP/HP)
Amplitude Controls
9
No Vel
Sets note velocity to a fixed value of 128
10 Vel > Atk
Overrides amp envelopes attack value with incoming note velocity
11 Key Follow
Set amp key follow amount (-1/+1)
(key position » volume)
12 Amp Switch
Edit amp parameters independently (1/2/3) or all at once (All)
13 Amp Envelope
Attack/decay/sustain/release
per-oscillator
14
Stereo and Effects
Phaser
5
Bit Crusher
4
Pan
1
Alt
2
Spread
3
Stereo Controls
1
Pan
Set pan per-oscillator (L/C/R)
5
Phaser
7
» Bypass Switch
»Sync
»Mix
»Speed
»Size
2
Set phaser rate (1/32 - 1/2)(0-10Hz)
Engage Alt mode —inverts stereo »Depth
»Decay
position with each key press
3
Spread
Used in Alt mode—sets pan distance
from center (0-100%)
Effects
4
Bit Crusher
» Bypass Switch
»Bits
Set bit depth (1-24bits)
»Frequency
Set sample rate (2-48kHz)
»Drive
Set drive amount (0-100%)
Set phaser depth (0-100%)
7
SparkVerb
Set decay time (.5s/50s)
»Feedback
» Lo Decay
Set phaser feedback amount (0-100%)
Limiter
Set reverb size (4m/0.4s - 50m/5s)
8
Set mix of dry/wet signal (0-100%)
Alt
Delay
SparkVerb
» Bypass Switch
Synchronize phaser to global tempo
6
Set low decay multiplier (x0.1/x10)
» Lo Crossover
6
Delay
Set low crossover ƒ (10Hz/1kHz)
» Bypass Switch
» Hi Decay
»Mix
» Hi Crossover
Set mix of dry/wet signal (0-100%)
»Time
Set hi decay multiplier (x0.1/x10)
Set hi crossover ƒ (12kHz/20kHz)
Set delay length (1/16tri - 1/2)
»Feedback
7
» Bypass Switch
Set delay feedback amount (0-100%)
Limiter
»Cutoff
»Mix
Set cutoff amount (LP/Off/HP)
Set limiter wet/dry mix (0-100%)
»Spread
Set spread amount (-100%/100%)
15
Phraser
Osc Bypass
2
4
Groove Amount
Power
1
7
Step Quantity
Step Length
3
6
Record Note
5
Gate
11
Step Indicator
12
Phraser /Arp Switch
Step Volume
8
Step Pitch
9
Step Tie
10
Phraser Controls
5
1
Gate Amount
Set the gate amount (0-100%)
ON/OFF switch for the phraser—
6
enabling the phraser while the »Record
arpeggiator is on will disengage
Enables phraser record mode—use to
the arpeggiator
quickly program pitch sequences
Record Note
» Skip Step
2
OSC Bypass
4
Step Pitch
Set pitch per-step (-48/+48 semitones)
Step Length
Groove Amount
Set the groove amount (0-100%)
Set tie per-step
11 Step Indicator
LED indicator displays current step
12 Phraser / Arp Switch
7
Set the step length (1/32 - 1/2)
10 Step Tie
Use in record mode to skip a step
Per-oscillator bypass switch
3
Power
9
Step Quantity
Set the number of steps to be played Switch between phraser and arpeggiator pages (does not change current mode)
(1-16)
8
Step Volume
Set volume per-step
16
Arpeggiator
Osc Bypass
2
4
Groove Amount
Power
1
8
Step Quantity
7
Octave Range
Step Length
3
6
Mode
Step Volume
9
5
Gate Amount
10
Step Indicator
11
Phraser /Arp Switch
Arpeggiator Controls
5
1
Gate Amount
Set the gate amount (0-100%)
Step Volume
Set volume per-step
Power
ON/OFF switch for the arpeggiator—
6
enabling the arpeggiator while the phraser is on will disengage
(Up/Down-Up/Down)
the phraser
7
2
OSC Bypass
Per-oscillator bypass switch
Mode
Set the playback mode
10 Step Indicator
LED indicator displays current step
11 Phraser / Arp Switch
9
Octave Range
Set the octave range to be played Switch between phraser and arpeggiator pages (does not change current mode)
(-6/+6oct)
3
Step Length
Set the step length (1/32 - 1/2)
8
Step Quantity
Set the number of steps to be played (1-16)
4
Groove Amount
Set the groove amount (0-100%)
17
Step Modulator
Step Level
1
Pan
10
Pitch
Mode
4
11
Drive
Legato Controls
5
7
Filter 2
5
Step Level
Set the parameter amount per-step Step Quantity
Set the number of steps to be played
Legato Controls
Enabled if mode is set to [Legato]
»Delay
Step Length
Set the step length (1/32 - 1/2)
8
Volume
» Step modulator » volume (0-100%)
» Bypass per-oscillator
Set the delay amount (0-10 sec)
»Rise
9
» Step modulator » pan (0-100%)
Set the rise amount (0-10 sec)
»Smooth
Pan
» Bypass per-oscillator
Set the step interpolation (0-100%)
10 Pitch
6
9
3
(1-16)
3
Volume
Step Length
(-1/+1)
2
8
2
Filter 1
Step Quantity
Step Modulator Controls
1
6
Filter 1
» Step modulator » filter 1 cutoff (-1/+1)
» Step modulator » pitch (-1/+1)
» Bypass per-oscillator
»Bypass
11 Drive
4
Mode
7
Filter 2
Set the playback mode
» Step modulator » filter 2 cutoff (-1/+1)
(Retrigger/No Retrigger/Legato)
»Bypass
» Step modulator » drive (0-100%)
» Bypass per-oscillator
18
LFO Modulator and Modwheel Controls
Waveshape
1
8
Volume
Speed
2
12
Filter
Sync
3
9
Pitch
10
Pan
Legato Controls
5
13
Vibrato
Mode
4
11
Drive
Filter 1
6
14
Tremolo
Filter 2
7
Step Modulator Controls
1
Waveshape
Set the LFO waveshape
(sine, triangle, square, s&h)
5
Legato Controls (cont.)
» LFO » drive (0-100%)
» Bypass per-oscillator
6
Set the smooth amount (-1/+1)
Filter 1
» LFO » filter 1 cutoff (-1/+1)
2
Speed
Set the LFO speed
(Sync: 4x - 1/32)(Free: .18Hz - 15Hz)
»Bypass
7
Filter 2
» LFO » filter 2 cutoff (-1/+1)
3
Sync
»Bypass
Sync the LFO to the global tempo
8
4
Mode
Set the playback mode
(Retrigger/No Retrigger/Legato)
Legato Controls
Enabled if mode is set to [Legato]
Volume
» LFO » volume (0-100%)
» Bypass per-oscillator
9
5
11 Drive
» ED Depth
Pitch
» LFO » pitch (-1/+1)
Step Modulator Controls
12 Filter
» Modwheel » filter 1+2 cutoff (-1/+1)
»Bypass
13 Vibrato
» Modwheel » vibrato amount (0-100%)
»Bypass
14 Tremolo
» Modwheel » tremolo amount (01-00%)
»Bypass
» Bypass per-oscillator
»Attack
Set the delay amount (0-10 sec)
10 Pan
»Decay
» LFO » pan (0-100%)
» Bypass per-oscillator
Set the rise amount (0-30 sec)
19
Low CPU Mode (UltraMini LE)
Filtering CPU Cycles
UltraMini’s oscillators are powered by large multi-sampled
libraries instead of realtime algorithms leaving the lions share
of processing duty for two high quality multi-mode physically
modeled filters. Under many circumstances, especially when
running in poly mode, UltraMini can be quite resource hungry
which is undesirable in larger sessions and on laptops.
In order to compensate for these environmental variables
we’ve included a separate version of UltraMini with an
optimized engine called UltraMini LE. The LE version functions
near identically, with the only UI difference being in the
filter section (see right-top). A significant amount of rework
went into streamlining efficiency of the filter section, among
others, allowing you to run more instances with less CPU
overhead and for the most part very little difference in sound.
In order to get the best balance of sound quality to CPU
efficiency the filters in UltraMini LE are single mode
lowpass instead of switchable multi-mode. As lowpass is
Top: the filter section of UltraMini (standard)
Bottom: the filter section of UltraMini LE, with single-mode lowpass filters
the most commonly used filter mode this should generally
be a transparent change. However, in cases where
presets have been designed with a bandpass or highpass
filter mode the setting will be conformed to lowpass for
UltraMini LE likely resulting in a noticeable sound change.
Please make special note of this and pay close attention
to the filter settings if moving between versions.
Additionally UltraMini LE utilizes a streamlined subset of
the main sample library to improve loading speeds.
You can find the LE version of UltraMini along with the
other modules in the UltraMini.ufs file (see right-bottom).
If the LE version does not appear in your UltraMini.ufs please
download the latest version of UltraMini from the UVI website
(log in and click ‘Downloads’ under your user name).
UltraMini LE can be found with the other modules in the UltraMini library
20
Preset List - Mono
Mono Presets
(Classic and XL)
00 - Init
Arpeggios
BS - Hive Mind
LD - Dragon Totem
PHR - Phrase Min7 MK
BS - Hollow Sus MK
LD - Endless Dawn
PHR - Phraser Crew
BS - I Am In Charge
LD - Evolead
PHR - Rubber Bandit
BS - Light Hollow MK
LD - Gryphic Solo
PHR - Substructure
BS - Mango Wheel
LD - HPF Lead CS
PHR - The Earth Quake
BS - Melodic MK
LD - Hybridation
PHR - WheeLocomotion
BS - Obee Boo
LD - Lead Hollow MK
BS - Phassty
LD - Leading To Heaven
ARP - 101 Clean Decay MK
BS - Saw Tri MK
LD - Little Cake
ARP - 101 Clean Short MK
BS - Shinra Generator
LD - Love Me Funk
ARP - Axial Tracer
BS - Short Bass CS
LD - Mini Saw Lead
ARP - Bass Reflector MK
BS - Soft Funk MK
LD - Multi Charger
ARP - Circuit Symp One
BS - This is D Mode
LD - Nasty Tremowheel
ARP - Count Down
BS - Tracer Wheel
LD - No Warning
ARP - Crystalizer
BS - Ultra Wet
LD - Phone Lead
ARP - Engine Starter
BS - Very Low
LD - Raw Funk
ARP - Inversions
BS - Video Game Sub
LD - Robotik
ARP - Melancolie
BS - Z Ball Dad
LD - Smooth Solo
ARP - Popped Stitch
ARP - Rail Jumper
ARP - Slow Elepants
ARP - Speak n Spell CS
ARP - Spiral
ARP - Tangerine One
ARP - Telephony
ARP - Three Storms
ARP - Vintage Pincer
ARP - Warm Panner
ARP - Z Banana Factory
Bass
FX / Sound Design
FX - Broken Lead
FX - Daisy Grain
FX - Major Feeling
FX - Mini Arcade
FX - Minor Glitch
FX - OSC Kick CS
FX - Sonar Scan
FX - Steam CS
FX - Subsonic Devastator
FX - Sweep my Wheel
BS - 3 Oct Sub Click MK
BS - Argentum
BS - Bloom Tender
BS - Broken Bass
BS - Droid Crooner Wheel MK
BS - Drone Step
BS - Hard Gristle
SEQ - Almost 8bit
SEQ - Cop Porn
SEQ - Little Mouse
SEQ - Short Soft
SEQ - VELectronica
SEQ - You Vee Hi
LD - So Funky
FX - Well Know One
BS - 3 Oct Sus MK
Short Sequence
Lead / Solo
LD - Solo Axis
LD - Synth Hero
LD - Talking Fat
LD - The Last Whaal
LD - Turbo Charged
Monophonic
Phraser
PHR - Bass Magnetic
PHR - DG Havana
PHR - Electric Pirate
PHR - Fine AL
PHR - Finish Him
PHR - Gullfire
PHR - Hell Fusion
LD - Big Short Lead
PHR - I Am Moustachu
LD - Cliffs
PHR - Lydian
LD - Cool Perfection CS
PHR - Noisy Bass Line
LD - Dark Choir
PHR - One Again
21
Preset List - Poly
Poly Presets
(Classic and XL)
00 - Init
Analog Strings
PL - Gryphic Poly
PD - Sweep Alien Zone
FX - Ghosted
PL - Old School Game
PD - Wheel Done
FX - Inside UFOs
PL - Raise to 7th MK
PD - Accumulator
FX - Quino Polygon
PL - Relax
PL - Rendez Vous
PL - SanzAnalog
PL - Sequensations
PL - Simple Funky
STR - Big Triple
PL - Soft Bright on Wheel
STR - Chunky Strings
PL - Sun Titan
STR - Pure Old Analog
STR - Slow JMJ
STR - Strings Plain MK
STR - Strings Slow MK
Bass
Keyboards Sounds
KB - Analog Dub
MSC - Guitar Jazzy MK
KB - Dream Analog Keys
MSC - Nate Bells
KB - Lead Chords
MSC - Space Marimba
KB - Medievaling
MSC - Step Timelapse
KB - Mini Wurli
MSC - The Voice and the
ARP - Alternator
KB - MKlavinet
Whistle
ARP - Jah Wheel
KB - Organ Chapel MK
MSC - Three Bells
ARP - Man On Tropo
KB - Organ Dirty 5th MK
MSC - Twelve Mellow
ARP - Nostalgia
KB - Organ Perc MK
ARP - Space Analog Piano
KB - Organ Soft 1 MK
Arpeggios
ARP - Space Dust MK
KB - Organ Soft 2 MK
ARP - Sparkle Steps MK
KB - Perc Keys MK
BS - Comp Attack MK
ARP - Zodiac
KB - Perfect Keys CS
BS - Fusion MK
BS - Warm Attack
Poly Synths
Miscellaneous
KB - Cat Keys MK
BS - Bass The Dog MK
BS - Jazz in the Box MK
FX - Stack em High
KB - Church Analog
STR - Full Phase Strings MK
STR - Mellow Strings
FX - Soft Film Emitter
KB - Pianolution
Pads
PD - 2nd ENV Trigger MK
PD - 7th Random MK
PD - 70s Haunting MK
KB - Porta Sine
KB - Pure Beauty Keys
KB - Sine Keys MK
KB - Stellar Paradise
KB - Stepped Keys
KB - Synth Harpsychord
PL - Analog Bells
PD - Air Tin Teeter
PL - Band Pass Stepper MK
PD - Arc Drops Move
PL - Brabrass
PD - Baked Phalanges
PL - Brass 7th MK
PD - Bell and Dawn
PL - Brass 12 db MK
PD - Dark Wheel Sweep
PL - Brass Oct MK
PD - Future Passed CS
PL - Chord BP Stab MK
PD - Lo Fox
FX - Chrome Throat
PL - Cosmic Forces
PD - Male Choir MK
FX - Crazy Melodic
PL - Dawn Ascension
PD - Rocking Chair
FX - Destroy Strum
PL - Four Midable
PD - Silver Ramper
FX - Fire Mares
PL - Future PPG CS
PD - Step eWHEELution
FX - Flutter
KB - Synth Keys
KB - The Lee Crew
FX / Sound Design
22
Preset List - Xtra 1.5
New Presets
Keyboard Sounds
(Classic and XL)
KB-Aggro Organ
00 - Init
KB-Bandit
KB-Cab Chord
Arpeggios
ARP-Abcess
KB-Ting Vibe
Lead/Solo
ARP-Autolog
PHR-Crunchy Chip
SEQ-Invert
PHR-Diver Glide
SEQ-Rez Fry
PHR-Diver
SEQ-Softbit
PHR-Drive Cycles
STR-Stringmach
PHR-Drive Max
PHR-Fastlane
PHR-Fri Mod
PHR-Gut Slide
PHR-Insecticide
PHR-Jam Slider
ARP-Bevel Key
LD-Bit Skit
PHR-Joom
ARP-Chaotic
LD-Biting Slider 1
PHR-Little Beasty
ARP-Chiff Grit
LD-Biting Slider 2
PHR-Lo Aircrisp
ARP-Chopper
LD-Crunch Keys
PHR-Power Chord
ARP-Circles
LD-Diver Glide
PHR-Push
ARP-Flicksyn
LD-Energy Waver
PHR-Ringer
ARP-LoBit
LD-Finglide
PHR-Scream Bubble
ARP-Lock In
LD-Fri Jam
PHR-Slide Pass LP
ARP-Meat Bass
LD-Glass Grinder
PHR-Slide Pass
ARP-One
LD-Mean Rise
PHR-Sub Crispy
ARP-Perk Chords
LD-Noisy Open
PHR-TriOctane
ARP-Pulse Wah
LD-Open Stack
PHR-Ups Bass
ARP-Square Glue
LD-Rez AM
PHR-Whalk
ARP-Two
LD-Ring Rez
PHR-Whip Squared
LD-Rogue
PHR-Wob Fly
Bass
BS-Alive
BS-Antic
LD-Stained
LD-Vibrofade
Pads
BS-Bodybass
Poly Synths
PL-Attacko
PL-Band Chord
BS-Dry Pass
PD-Dampen
PL-Bevel Key
BS-LoBit
PD-Softback
PL-Blue Pluck
BS-Mean Sus
PD-Twist Phase
PL-Chord Me
BS-Portabit
BS-Raw Bass
BS-Triform
BS-Velocitize
Effects
PL-Fast Ambi
Phraser
PHR-Agent Red
PHR-Blue Chordline 1
PL-Melodon
PL-Red Chord
Short Sequence
PHR-Blue Chordline 2
PHR-Blue Chordline 3
SEQ-Alive Auto
FX-Chordmod
PHR-Can Opener
SEQ-Attacko
FX-Launch
PHR-Chord Mover
SEQ-Bodybass
FX-Mezmor
PHR-Creep
SEQ-Gate Hollow
23
UVI Workstation: Tips + Tricks
MIDI Learn
Arpeggiator
Most UVI Workstation parameters can be automated via. a convenient
UVI Workstation comes equipped with a robust arpeggiator. To insert
MIDI Learn. MIDI Learn allows you to bind a physical MIDI controller
an arpeggiator in a part, you need to display the Single view in the
to specific parameters within UVI Workstation.
UVI Workstation, then click on the note icon. The arpeggiator can
be employed as a pattern gate, arpeggiator, or even an advanced
Any FX tab parameter, Macro Knob or Slider in UVI
instruments can use the MIDI Learn feature
rhythmic processor for your live MIDI performance or sequenced MIDI
tracks. Arpeggiators can be inserted in an unlimited number of parts.
The MIDI controller type and the MIDI Channel assignment will
be saved with the multi or with your song in the host sequencer
Automation is assigned per-part
To use MIDI Learn:
1. Right-click the parameter in UVI Workstation
that you want to automate
2. After the MIDI Learn dialog appears, Trigger the
desired MIDI input controller (knob, fader etc.)
Preset Stacking
Thanks to the simplicity of the UVI Workstation you can stack as
many preset as you want by simply assign multiple part on the same
MIDI channel.
Split, Velocity & Key Switch
To remove a MIDI controller assignment:
Right-click the desired parameter and press “Delete”
Unlimited FX
The Keyswitch settings allow you to load multiple presets into two
or more parts and dynamically play and mute them from your MIDI
controller using key switching, note range, velocity range or any
combination of the three parameters. This powerful feature gives you
a great deal of real-time control.
UVI Workstation offers a wide variety of FX, or effect
processors, to cover all your audio processing needs. The FX
Scroll Wheel
implementation is robust and includes the ability to insert
unlimited FX slots in several stages of the signal flow.
All knobs can be adjusted with the scroll wheel on your mouse.
When you double-click on any knob or slider, you can manually enter
Click the “FX” tab to open the FX page on the Single view
or type in the desired value.
In Multi view the FX section is always displayed
24
Credits and Thanks
Produced by UVI
Recording / Editing / Sound Design
Damien Vallet
Kevin Guilhaumou
Alain J Etchart
Michael Kastrup
Nathaniel Reeves
Oliver Davis
Scripting & Software
Olivier Tristan
Remy Muller
GUI
Nathaniel Reeves
Special Thanks
Michael Kastrup
Manu @ master-wave.com