1
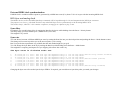
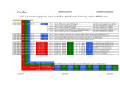
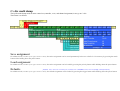
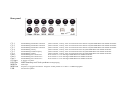
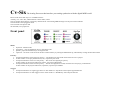
Cv-Six
The Analog Processor that interface your analog synthesizer with the digital MIDI world.
But it's much more than only a CV to MIDI interface!
Actually, it's a 4-in-1 Box, subdivided into 4 basic modes, where
The 1st mode is the keyboard-, respectively realtime mode. All incoming MIDI messages will be processed in realtime!
The 2nd mode is the arpeggiator mode.
The 3rd mode is the phraser and
the 4th mode, a step sequencer.
Front panel
Mode:
1.
2.
3.
4.
keyboard - realtime mode
arpeggiator – plays all 'hold down keys' in chromatic order.
phraser - plays all 'hold down keys' in assigned order.
sequencer - 128 notes can be stored in the Non-volatile memory by turning the Mod Wheel up, and loaded by turning the mod wheel down
Priority:
1. In keyboard mode this is the high-note-priority. – The highest note will sound if more than one note is played.
2. In other modes it’s the play back direction, UP-, respectively Forwards.
3. In keyboard mode this is the low-note-priority. – The lowest note played gets priority.
In other modes it's the play back direction, Down-, respectively Backwards.
4. In keyboard mode this is the last-note-priority. – The last note played will sound, no matter how many keys you hold down.
In other modes it's the play back direction, Up/Down, respectively Fwd/Bwd
Trigger:
1. In keyboard mode this is single trigger where in other modes it's Stop & Rec with sequence append function
2. In keyboard mode this is multi trigger where in other modes it's Hold & Play with transpose function
Rear panel
CV-1
CV-2
CV-3
CV-4
CV-5
CV-6
Gate-1
Gate-2
Gate-3
S-Trigger
DIN-Sync
MIDI-In
MIDI-Out
USB
By default assigned to NoteNumber and Pitch.
assignable to any Controller, Velocity, After-Touch and/or Notes & Pitch on any MIDI channel or OMNI.
By default assigned to NoteNumber and Pitch.
assignable to any Controller, Velocity, After-Touch and/or Notes & Pitch on any MIDI channel or OMNI.
By default assigned to NoteNumber and Pitch.
assignable to any Controller, Velocity, After-Touch and/or Notes & Pitch on any MIDI channel or OMNI.
By default assigned to Velocity by default.
assignable to any Controller, Velocity, After-Touch and/or Notes on any MIDI channel or OMNI.
By default assigned to CutOff Frequency
assignable to any Controller, Velocity, After-Touch and/or Notes on any MIDI channel or OMNI.
By default assigned to Volume
assignable to any Controller, Velocity, After-Touch and/or Notes on any MIDI channel or OMNI.
By default assigned to Note On/Off CV-1
assignable to Note On/Off CV-1 on any MIDI channel or OMNI
By default assigned to Note On/Off CV-2
assignable to Note On/Off CV-2 on any MIDI channel or OMNI
By default assigned to Note On/Off CV-3
assignable to Note On/Off CV-3 on any MIDI channel or OMNI
S-Trigger of Gate-1.
Analog clock and remote start/stop output. Synchronized by MIDI Clock, and MIDI Start/Stop
Main input.
Sequencer, arpeggiator and phraser goes out here parallel to CV/Gate 1
For firmware updates.
The 4 basic modes 1-4
You can step through these 4 modes by pressing the button below the right LED column.
Mode 1 [Keyboard/Realtime]
All the three LED's of the right column are dark.
This mode offers you all the features to control a monophonic analog synthesizer in realtime.
There are 6 CV outputs to provide analog synthesizers with individual MIDI assignments, which are:
CV / Gate 1 MIDI note number and / or pitch bend on any assignable MIDI channel.
CV / Gate 2 MIDI note number and / or pitch bend on any assignable MIDI channel.
CV / Gate 3 MIDI note number and / or pitch bend on any assignable MIDI channel.
CV 4-6 assignable to all MIDI channel messages, except pitch bend.
There are 3 Trigger/Gate outputs which are corresponding to note on/off messages on CV 1-3.
Last but not least, there is an S-Trigger output synchronously with Gate 1. (I'm sure, some old synthesizers will be glad)
Mode 2 [Arpeggiator]
The lower LED of the right column is on.
The arpeggiator can be played in realtime.
A chord hold down on your keyboard will be subdivided into single notes and played step by step in chromatic order,
upwards AND, OR downwards, depending on the selected Priority.
Pushing the Play button while holding a chord, will memorize and hold the keys for you.
So you can release your fingers from the keyboard and lean back.
Now you can transpose your arpeggio by playing a note on your keyboard at any time.
If MIDI-Clock is available at the CV6 MIDI input, then a MIDI Start command (FA) enables the arpeggiator to play in realtime MIDI-Sync.
Also in realtime MIDI-Sync a finger tip on the Play button, will memorize and hold the arpeggio keys for you.
A MIDI Stop command (FC) will disable the arpeggio MIDI-Sync and stops the arpeggiator.
Holding chords now will play the arpeggiator with it’s internal clock again.
Mode 3 [Phraser]
The centre LED of the right column lights.
The phraser can be played in realtime, but what's a phraser?
It's likely an arpeggiator which remembers the notes played in sequentially assigned order.
A chord hold down on your keyboard will be played in assigned order, forwards AND, OR backwards, depending on Priority.
Pushing the Play button while holding down a chord, will memorize and hold the keys for you, as the arpeggiator does, so lean back again.
Now you can transpose your phrase by playing a note on your keyboard at any time, as the arpeggiator does.
If MIDI-Clock is available at the CV6 MIDI input, then a MIDI Start command (FA) enables the phrase to play in realtime MIDI-Sync.
Also in realtime MIDI-Sync a finger tip on the Play button, will memorize and hold the phraser keys for you.
A MIDI Stop command (FC) will disable the phraser MIDI-Sync and stops the phraser.
Holding chords now will play the phraser with it’s internal clock again.
The arpeggiator, as well as the phraser, can be set to play 1, 2 or 3 octave cycles in a chain, by pressing the Pause button.
The octave changes immediately after the current cycle, no matter if the end of the octave chain has been reached or not.
This gives you many variation possibilities where the rhythm never fails.
To avoid arpeggio, or phrase double notes at the up/down/up or fwd/bwd/fwd intersection, we skip the 1st note of the next cycle reversal point.
This offers a lot of amazing rich and never boring musical varieties.
Mode 4 [Sequencer]
The upper LED of the right column smiles brightly.
In this mode, a sequence with up to 128 notes can be stored in the Non-volatile memory
by turning the Mod Wheel up, and can be loaded by turning the mod wheel down.
The last stored sequence loads automatically while power on CV-Six.
More details below!
Uuups! I forgot to mention - The Transpose function - Yes of course - It works also with the sequencer.
Priority 1-3
You can step through these 3 priorities by pressing the button below the centre LED column.
Priority 1 [High, Up, Fwd]
The lower LED of the centre column is on.
In keyboard mode this is high-note priority – the highest note will sound if more than one note is played.
In arpeggiator, phraser and sequencer mode this is the playing direction. Up, respectively Forwards.
Priority 2 [Low, Down, Bwd]
The centre LED of the centre column is on.
In keyboard mode this is low-note priority – the lowest note played gets priority.
In arpeggiator, phraser and sequencer mode this is the playing direction. Down-, respectively Backwards.
Priority 3 [Last, Up/Down, Fwd/Bwd]
The upper LED of the centre column is on.
In keyboard mode this is last-note priority – the last note played will sound, no matter how many keys you hold down. (modern synth like)
In arpeggiator, phraser and sequencer mode this is the playing direction. Up/Down, respectively Fwd/Bwd.
Trigger 1-2
You can toggle this state by pressing the button below the left LED column.
Trigger 1 [Single, Stop & Rec]
The lower left LED is on
In keyboard mode, this is the single trigger function, where
in arpeggiator, phraser or sequencer mode it’s the Stop & Rec. function.
Trigger 2 [Multi, Hold & Play]
The centre left LED is on
In keyboard mode, this is the multi trigger function, where
in arpeggiator, phraser or sequencer mode it's the Play function (with transpose).
Trigger and Gate what's the difference?
If you're in keyboard mode, and multi trigger is enabled, you can adjust the trigger time by turning the Rate-Pot. The range is [1...32 ms].
This is a typical sequencer sounding effect, now brought to you in realtime keyboard mode.
If a sequencer plays your analog synth via CV-Six, the trigger time is very important and the need to adjust depends on playback speed.
Some do like it, others don't, but, don't worry, turning the Rate-Pot fully clockwise will switch from trigger to gate.
It’s you choice to play with trigger or play with gate and have the complete envelope control.
The Sequencer
No, it's not another boring realtime sequencer.
No! It's a true Step Sequencer.
Record mode
The step sequencer in not running and waiting for food
Each note played on the keyboard, will be recorded, step by step, where a pause can be recorded by pushing the Pause button.
You can LOAD a sequence from the non volatile memory by holding down the Pause button and press PRIORITY.
You can SAVE a sequence to the non volatile memory by holding down the Pause button and press MODE.
Play mode
The step sequencer in running and plays a song
There are two ways to stop a sequence, arpeggio or phrase.
If you hold down the stop switch for longer than half a second, then the sequencer will stop immediately.
If you press the stop switch just a short time (< ½ sec.), then the sequencer will play the entire sequence and stops at the end.
In Play mode, the Rate-Pot has several different functions depending on MIDI Clock Synchronization or not.
Internal clock
If you run the sequencer by pressing the Start button, no matter if MIDI Clock is available or not, the sequencer plays with its own Clock and the Rate-Pot
controls the speed, as usual.
Undo, Redo, Delete
While playing a sequence, you can UNDO the last step by holding down the Pause + Trigger button.
While playing a sequence, you can REDO the last step by holding down the Pause + Priority button.
While playing a sequence, you can DELETE it by holding down the Pause + Mode button.
External MIDI clock synchronization
If MIDI clock is available and the sequencer got started by a MIDI Start event (FA), then CV-Six is in sync with the incoming MIDI clock.
DIN-Sync and analog clock
The MIDI Clock as well as the MIDI Start/Stop commands will be looped through Cv-Six and outputted to the DIN-Sync connector.
The purpose is to slave e.g. a Roland TR-606 or any other DIN-Sync device synchronously to the incoming MIDI Clock.
This works always, either if Cv-Six contains a sequence, an arpeggio or a phrase to play, or not.
Sync delay
If required, you can add a Sync delay by turning the Rate-Pot clockwise while holding down the Pause + Priority button.
The delay range goes from ZERO up to ½ MIDI Clock (1/192 note)
This might be very useful.
Sync rate
You can choose between 9 different MIDI Sync rates by turning the Rate-Pot into your desired position and pushing the Pause + Mode button to enter.
This change will execute in perfect sync at the next sequence cycle crossing.
But if you prefer the experimental way of thrill, then the 2nd method might be you goal.
You can change the Sync Rate on the fly by turning the Rate-Pot while holding down the Pause + Mode button.
This might have surprising and impressive sync skipping side effects but worth a try.
The Sync rates in clockwise order are:
1.
2.
3.
4.
5.
6.
7.
8.
9.
48
24
12
6
3
4
8
16
32
clocks
clocks
clocks
clocks
clocks
clocks
clocks
clocks
clocks
per
per
per
per
per
per
per
per
per
1/2
1/4
1/8
1/16
1/32
1/24
1/12
1/6
1/3
note
note
note
note
note
note
note
note
note
-
this
this
this
this
this
this
this
this
this
will
will
will
will
will
will
will
will
will
sync
sync
sync
sync
sync
sync
sync
sync
sync
the
the
the
the
the
the
the
the
the
sequencer
sequencer
sequencer
sequencer
sequencer
sequencer
sequencer
sequencer
sequencer
every
every
every
every
every
every
every
every
every
1/2
1/4
1/8
1/16
1/32
1/24
1/12
1/6
1/3
bar
bar
bar
bar
bar
bar
bar
bar
bar
one
one
one
one
one
one
one
one
one
step
step
step
step
step
step
step
step
step
ahead (Rate-Pot fully counter clockwise)
ahead
ahead
ahead (Rate-Pot Centre position)
ahead
ahead
ahead
ahead
ahead (Rate-Pot fully clockwise)
Changing the Sync rate will reset the Sync delay to ZERO! If required, you can add a new Sync delay after you made your changes.
Controller, AfterTouch and Voice assignment
In realtime mode, each CV Output can be assigned to be controlled by any MIDI Controller on any MIDI channel.
So you can control the Cut-Off-Frequency, either with After Touch or with any other controller e.g. Mod Wheel.
The assignment can be done easily by sending a simple System Exclusive Message to your Cv-Six.
There are only 3 numbers to change, who, are pp, cc and dd. Explained below.
SystemExclusiveMessage
[F0,7D,nn,pp,cc,dd,F7]
These are the HEX numbers from 0-F
And these are the matching decimal numbers from 0-15
0,1,2,3,4,5,6,7,8,9, A, B, C, D, E, F
0,1,2,3,4,5,6,7,8,9,10,11,12,13,14,15
SysEx
SysEx
SysEx
SysEx
SysEx
SysEx
SysEx
always F0
always 7D
mostly 07
Controller and voice assignment
MIDI channel
controller number 00-7F
always F7
Byte
Byte
Byte
Byte
Byte
Byte
Byte
[0]
[1]
[2]
[3]
[4]
[5]
[6]
F0
7D
nn
pp
cc
dd
F7
–
–
–
SystemExclusive
SysEx id
number of bytes incl. F0 & F7
parameter 00-7F
cannel 00-0F
data 00-7F
EndOfSystemExclusive
The Midi channel goes from 0-F, so 0 means, Midi channel 1
Voice A-F corresponds with CV-1…6 and follows the note numbers
Example:
F0,7D,nn,pp,cc,dd,F7
F0,7D,07,02,00,01,F7
F0,7D,07,03,07,4A,F7
F0,7D,07,0A,00,01,F7
F0,7D,07,0B,01,00,F7
F0,7D,07,0C,02,02,F7
More details below
=
=
=
=
=
=
parameter
channel
CV-2, MidiChannel-0(=1),
CV-3, MidiChannel-7(=8),
CV-1, MidiChannel-0(=1),
CV-2, MidiChannel-1(=2),
CV-3, MidiChannel-2(=3),
data
Controller-01 (ModWheel)
Controller-4A (74 decimal CutOff)
Voice-A = 1
(voice enabled)
Voice-B = 0
(voice disabled)
Voice-C = 2
(voice & Pitch enabled)
Cv-Six multi dump
The SysEx multi dump sends an entire control set (controller, voice, and channel assignment) in one go to Cv-Six.
The format is as follows.
Save assignment
In realtime mode (all LEDs of the right column are dark), the entire assignment can be stored permanently in the non volatile Cv-Six memory by pressing the mode
button while holding down the pause button.
Load assignment
In realtime mode (all LEDs of the right column are dark), the entire assignment can be loaded by pressing the priority button while holding down the pause button.
Defaults
[Default: CV-1 voice, CV-2 velocity, CV-3 volume, CV-4 ModWheel, CV-5 ctrl.74=CutOff, CV-6 AfterTouch]
In realtime mode (all LEDs of the right column are dark), the default assignment can be loaded by pressing the trigger button while holding down the pause button.
Summary of Pot, button & switch functions
Keyboard/Realtime Mode
TRIGGER
PRIORITY
PAUSE + TRIGGER
PAUSE + PRIORITY
PAUSE + MODE
Single-Trigger, Multi-Trigger
High note, Low note, Last note Priority
LOAD defaults
LOAD control map
SAVE control map
Sequencer Mode
TRIGGER
Record, Play
Record
PRIORITY
PAUSE
PAUSE + PRIORITY
PAUSE + MODE
Upwards, Downwards, Up/Down
PAUSE record
LOAD sequence
SAVE sequence
Internal Clock Play
POT
PAUSE + TRIGGER
PAUSE + PRIORITY
PAUSE + MODE
Clock Rate
UNDO
REDO
DELETE
speed
last step
last step
sequence
External MIDI Sync Play
PAUSE + PRIORITY + POT
PAUSE + MODE + POT
Sync-Delay
Sync-Rate
0 – 1/192 note
1/2, 1/4, 1/8, 1/16, 1/32, 1/24, 1/12, 1/6, 1/3
Arpeggiator, Phraser Mode
TRIGGER
PRIORITY
PAUSE
POT
Record, Play
Upwards, Downwards, Up/Down
Octaves (1-3)
as Sequencer
Cv-Six
Der Analog-Prozessor, der Deinen Analog-Synth mit der MIDI-Welt verbindet.
Viel mehr als nur eine CV zu MIDI Konverter!
Eigentlich ist es eine 4-in-1-Box, in 4 grundlegende Modi unterteilt, in denen
Der erste Modus der Keyboard-, bzw. Echtzeit-Modus ist. Alle eingehenden MIDI Befehle werden in Echtzeit verarbeitet!
Der zweite Modus ist der Arpeggiator.
Der dritte Modus ist der Phraser und
Der vierte Modus, ein Step-Sequenzer.
Front Panel
Mode:
1.
2.
3.
4.
keyboard - realtime mode
arpeggiator – spielt alle gehaltenen Töne in chromatischer Reihenfolge.
phraser – spielt alle gehaltenen Töne in der eingespielten Reihenfolge.
sequencer - 128 noten können im nicht flüchtigen Speicher gesichert werden.
Priority:
1. Im keyboard mode ertönt die höchste Note, wenn mehr als eine Note gespielt wird.
In anderen Modi bestimmt die Priority die Wiedergabe-Richtung, Aufwärts bzw. Vorwärts.
2. Im keyboard hat die tiefste gespielte Note hat Priorität
In anderen Modi bestimmt die Priority die Wiedergabe-Richtung, Abwärts bzw. Rückwärts.
3. Im keyboard klingen die zuletzt gespielt Note, egal wie viele Tasten, gedrückt werden.
In anderen Modi bestimmt die Priority die Wiedergabe-Richtung, Aufwärts/Abwärts bzw. Vorwärts/Rückwärts.
Trigger:
1. Im keyboard ist dies die Single-Trigger Funktion, in anderen Modi gelangen wir hier zur Aufnahme Funktion bzw. Stop.
2. Im keyboard ist dies die Multi-Trigger Funktion in anderen Modi wird hier die Widergabe gestartet Start.
Rear panel
CV-1
CV-2
CV-3
CV-4
CV-5
CV-6
Gate-1
Gate-2
Gate-3
S-Trigger
DIN-Sync
MIDI-In
MIDI-Out
USB
Standardmäßig NoteNumber und Pitch.
Standardmäßig NoteNumber und Pitch.
Standardmäßig NoteNumber und Pitch.
Standardmäßig Velocity.
Standardmäßig CutOff Frequency
Standardmäßig Volume
Standardmäßig Note On/Off CV-1
Standardmäßig Note On/Off CV-2
Standardmäßig Note On/Off CV-3
S-Trigger von Gate-1.
jedem Controller, Velocity, After-Touch und/oder Notes & Pitch auf jedem MIDI Kanal oder OMNI zuordenbar.
jedem Controller, Velocity, After-Touch und/oder Notes & Pitch auf jedem MIDI Kanal oder OMNI zuordenbar.
jedem Controller, Velocity, After-Touch und/oder Notes & Pitch auf jedem MIDI Kanal oder OMNI zuordenbar.
jedem Controller, Velocity, After-Touch und/oder Notes auf jedem MIDI Kanal oder OMNI zuordenbar.
jedem Controller, Velocity, After-Touch und/oder Notes auf jedem MIDI Kanal oder OMNI zuordenbar.
jedem Controller, Velocity, After-Touch und/oder Notes auf jedem MIDI Kanal oder OMNI zuordenbar.
Note On/Off CV-1 auf beliebigem MIDI Kanal oder OMNI zuordenbar.
Note On/Off CV-2 auf beliebigem MIDI Kanal oder OMNI zuordenbar.
Note On/Off CV-3 auf beliebigem MIDI Kanal oder OMNI zuordenbar.
MIDI Start/Stop und Clock synchroner Analogausgang.
Main input.
Sequencer, Arpeggiator und Phraser Ereignisse werden parallel zu CV/Gate 1 via MIDI ausgegeben.
Für firmware updates.
Die 4 grundlegenden Modi MODE 1-4
Durch Betätigung der Taste unter der rechten LED Spalte wird der gewünschte Modus gewählt.
Mode 1 [Keyboard / Realtime]
Alle drei LEDs der rechten Spalte sind dunkel.
Dieser Modus bietet alle Funktionen, um mehrere monophone Analog-Synthesizer in Echtzeit zu kontrollieren.
Es gibt 6 CV-Ausgänge denen individuelle MIDI-Funktionen zugewiesen werden können.
Den CV-Ausgängen 1…3 können Channel Messages wie z.B. MIDI-Noten, Pitch Bend und MIDI-Controller auf beliebigen MIDI-Kanälen zugewiesen werden.
Den CV-Ausgängen 4 – 6 können ebenfalls alles Channel Messages ausser Pitch Bend zugewiesen werden.
Es gibt 3 Trigger/Gate Ausgänge, welche den CV-Ausgängen 1 – 3 zugeordnet sind und entsprechenden Note- on/off Ereignissen auf beliebig festlegbaren MIDI
Kanälen zugeordnet werden können.
Zu guter Letzt gibt es noch einen S-Trigger-Ausgang synchron zu Gate 1. (Ich bin sicher, einige alte Synthesizer werden froh drüber sein)
Mode 2 [Arpeggiator]
Die untere LED der rechten Spalte ist jetzt an.
Der Arpeggiator kann in Echtzeit gespielt werden.
Ein auf der Tastatur gegriffener Akkord wird in einzelne Noten zerlegt und in chromatischer Reihenfolge abgespielt, aufwärts, abwärts und, oder beides,
abhängig von der gewählten Priorität.
Durch Drücken der Play-Taste während der Wiedergabe eines Arpeggios, wird der gegriffene Akkord gespeichert.
Die Tasten können nun losgelassen werden und die Arpeggio Wiedergabe kann durch spielen auf der Tastatur innerhalb einer Oktave transponiert werden.
Wenn MIDI-Clock am MIDI-Eingang des CV6 anliegt kann der Arpeggiator mit dem MIDI-Befehl Start (FA) in Echtzeit via MIDI Clock synchronisiert werden.
Auch im realtime MIDI-Sync-Modus wird mit einem Druck auf die Play-Taste während der Wiedergabe, der gegriffene Akkord gehalten.
Ein MIDI Stop Befehl (FC) schaltet den realtime MIDI-Sync wieder ab und der Arpeggiator hält an.
Wenn nun Akkorde gegriffen werden spielt der Arpeggiator diese wieder mit seiner internen Clock.
Mode 3 [Phraser]
Die mittlere LED rechts leuchtet.
Der Phraser kann ebenfalls in Echtzeit gespielt werden, aber was ist überhaupt ein Phraser?
Es ist eigentlich auch eine Art Arpeggiator mit dem Unterschied, dass die Noten nicht in chromatischer,
sondern in der gespielten Reihenfolge wiedergegeben werden.
Auch der Phraser kann den gehaltenen Akkord vorwärts, oder, und rückwärts wiedergeben, je nach Priorität.
Durch Drücken der Play-Taste bei gehaltenem Akkord, wird der Akkord hier ebenfalls gespeichert, also wieder Hände hoch.
Transponieren geht natürlich auch hier wieder genau so wie beim Arpeggiator.
Wenn MIDI-Clock am MIDI-Eingang des CV6 anliegt kann der Phraser mit dem MIDI-Befehl Start (FA) in Echtzeit via MIDI Clock synchronisiert werden.
Auch im realtime MIDI-Sync-Modus wird mit einem Druck auf die Play-Taste während der Wiedergabe, der gegriffene Akkord gehalten.
Ein MIDI Stop Befehl (FC) schaltet den realtime MIDI-Sync wieder ab und der Phraser hält an.
Wenn nun Akkorde gegriffen werden spielt der Phraser diese wieder mit seiner internen Clock.
Der Arpeggiator, sowie der Phraser, können auf 1, 2 oder 3 Oktave eingestellt werden indem die Pause-Taste kurz gedrückt wird.
Dann werden die Phrasen quasi aneinandergekettet und um jeweils eine Oktave transponiert nacheinander wiedergegeben,
bis die gewünschte Anzahl von Oktaven erreicht ist.
Bei Druck auf die Pause Taste ändert sich die Oktave unmittelbar zu Beginn des nächsten Zyklus,
egal ob das Ende der Oktav-Kette erreicht ist oder nicht.
Dies gibt Dir viele Variationsmöglichkeiten, wobei der Rhythmus nie aus dem Tritt kommt.
Um zu verhindern, dass bei der Umkehrung Up/Down oder vorwärts/rückwärts Noten doppelt gespielt werden, überspringen wir die erste Note des jeweils
nächsten Zyklus am Umkehrpunkt.
Dies bietet eine Menge erstaunlich kreative, und nie langweilig werdende, musikalische Möglichkeiten.
Mode 4 [Sequencer]
Die obere LED der rechten Spalte lacht dich an.
In diesem Modus kann eine Sequenz mit bis zu 128 Noten im nichtflüchtigen Speicher gesichert werden,
Die zuletzt gespeicherte Sequenz wird beim einschalten automatisch geladen.
Mehr Details über den Sequenzer gibt’s weiter unten!
Uuups! Ich vergaß die Transpose-Funktion zu erwähnen - - Ja, natürlich - Die funktioniert auch im Sequenzer.
PRIORITY 1-3
Durch drücken der Taste unterhalb der Mittleren LED Spalte wird die gewünschte Prioritäten gewählt.
Priority 1 [High, Up, Fwd]
Die unterste LED der mittleren Spalt leuchtet.
Im Keyboard-Modus ist nun High-Note Priority aktiv - der höchste Ton ertönt, wenn mehr als eine Note gespielt wird.
Im Arpeggiator, Phraser und Sequenzer-Modus geht’s nun nach vorne los, also die Musik spielt vorwärts.
Priority 2 [Low, Down, Bwd]
Die mittlere LED der mittleren Spalte leuchtet.
Im Keyboard-Modus ist nun Low-Note Priority aktiv - die tiefste gespielte Note hat Priorität.
Im Arpeggiator, Phraser und Sequenzer-Modus geht’s nun nach hinten los, also die Musik spielt rückwärts.
Priority 3 [Last, Up/Down, Fwd/Bwd]
Die oberste LED der mittleren Spalte leuchtet.
Im Keyboard-Modus ist nun Last-Note Priority gewählt - die zuletzt gespielt Note klingen, egal wie viele Tasten, gedrückt werden.
Im Arpeggiator, Phraser und Sequenzer-Modus geht’s jetzt drunter und drüber also die Musik spielt vorwärts und rückwärts.
TRIGGER 1-2
Durch drücken der Taste unter der linken Spalte kann zwischen diesen beiden Modi gewechselt werden.
Trigger 1 [Single, Stop & Rec]
Im Keyboard-Modus ist nun Single Trigger aktiv.
Im Arpeggiator, Phraser oder Sequenzer-Modus Stop & Rec.
Trigger 2 [Multi, Play]
Im Keyboard-Modus ist nun Multi Trigger aktiv.
Im Arpeggiator, Phraser oder Sequenzer-Modus ist nun Play & Transpose aktiv.
Trigger oder Gate, was ist der Unterschied?
Wenn Multi Trigger im Keyboard-Modus aktiviert ist, kann mit dem Rate-Pot die Triggerzeit zwischen [1 ... 32 ms] eingestellt werden.
Es ist sehr nützlich die Triggerzeit genau an die Faktoren, Attack, Decay, Sustain und Releas in Abhängikeit zur Spielgeschwindigkeit anpassen zu können.
In Rate-Pot Stellung Rechtsanschlag, ist der Trigger deaktiviert und wir haben eine ganz alltägliche Gate Steuerung.
Trigger oder Gate, es ist Dein Wahl den Sound in Abhängigkeit bereits erwähnter Parameter zu triggern, oder zu gaten, und somit die volle Kontrolle über die
Hüllkurven zu haben.
Der Sequenzer
Nein, es ist kein weiterer langweiliger Echtzeit-Sequenzer!
Es ist ein lupenreiner Step-Sequenzer!
Record-Mode
Im Record-Mode speichert der Sequenzer Ton für Ton, Schritt für Schritt
und wenn mal eine Pause her muss, OK, kein Problem, dafür gibt’s die Pause Taste.
Mit der Tastenkombination PAUSE + MODE wird die Sequenz im nichtflüchtigen Speicher gesichert.
Mit der Tastenkombination PAUSE + PRIORITY kann die Sequenz wieder geladen werden.
Play-Mode
Es gibt zwei Möglichkeiten eine laufende Sequenz, Arpeggio oder Phrase anzuhalten.
Wenn die Stop-Taste nur kurz gedrückt wird, (< ½ Sekunde) dann wird die Sequenz bis zum Ende gespielt und hält danach an.
Wird die Stop-Taste länger gehalten dann stoppt der Sequenzer sofort.
Im Play-Mode hat das Rate-Pot unterschiedliche Funktionen. Das hängt davon ab ob zur MIDI-Clock synchronisiert wird, oder nicht.
Interne Clock
Wenn der Sequenzer, mit seiner eigenen Clock läuft, (das erreicht man indem die Start Taste gedrückt wird),
egal ob am MIDI-Eingang MIDI-Clock zur Verfügung steht oder nicht, der Sequenzer kümmert sich dann nicht um die MIDI-Clock.
Dann, wie nicht anders zu erwarten, steuert das Rate-Pot die Geschwindigkeit.
Undo, Redo, Delete
Mit der Tastenkombination PAUSE + TRIGGER kann während der Wiedergabe der Letzte Schritt einer Sequenz ungeschehen gemacht werden.
Mit der Tastenkombination PAUSE + PRIORITY kann während der Wiedergabe dieser Schritt wieder rückgängig gemacht werden.
Mit der Tastenkombination PAUSE + MODE kann während der Wiedergabe die komplette Sequenz gelöscht werden.
Externe MIDI-Clock Synchronisation
Wenn MIDI-Clock am Eingang zur Verfügung steht und der Sequenzer durch ein MIDI Start Event gestartet wurde,
dann sind wir auch schon im MIDI-Sync und der Sequenzer läuft synchron zur MIDI-Clock.
DIN-Sync and analog Clock
Wenn Cv-Six im externen MIDI-Clock Sync läuft, werden sowohl MIDI Sart/Stop Befehle wie auch die MIDI-Clock
durch den Cv-Six zur DIN-Sync Buchse weitergeleitet.
Sinn und Zweck ist es z.B. eine Roland TR-606 oder ein anderes DIN-Sync fähiges Gerät zur eingehenden MIDI-Clock zu synchronisieren.
Das funktioniert immer, egal ob Cv-Six gerade eine Sequenz, ein Arpeggio oder eine Phrase spielt.
Sync-Delay
Bei Bedarf kann eine Sync-Delay durch drehen des Rate-Pot bei gehaltener PAUSE+PRIORITY-Taste im Uhrzeigersinn hinzugefügt werden.
Die Verzögerung lässt sich von NULL bis hin zu ½ MIDI-Clock (1/192 Note) einstellen.
Das Kann sehr nützlich sein!
Sync-Rate
WassenDasssss? Kurz und deftig erklärt. Wir hängen hier ab und machen HipHop alles 4/4, cool immer alles in Sync, keine Probleme.
Dann kommt Opa und will Walzer tanzen. Uuups, holper, stolper, nix geht mehr, OK, 3/4 Takt. Und nicht nur für Opa im 3/4 Takt, sondern auch für Half- oder Doubble-Beat ist das gut.
Hier kann zwischen 9 verschiedenen MIDI-Sync-Raten gewählt werden,
in dem das Rate-Pot in die gewünschte Position gestellt, und anschließend mit der Tastenkombination PAUSE + MODE bestätigt wird.
Diese Änderung wird erst beim nächsten Sequenz-Zyklus wirksam und die Synchronisation bleibt perfekt erhalten.
Wenn Du allerdings eher die experimentelle Art und den Nervenkitzel bevorzugst, ist die zweite Methode eher geeignet.
Die Sync-Rate kann dann im fliegenden Wechsel geändert werden, indem Du die PAUSE + MODE Taste gedrückt hältst und mit dem Rate-Pot
die unterschiedlichen Sync-Rates anwählst. Das kann beeindruckende und überraschende Nebenwirkungen haben, aber einen Versuch ist es allemal wert.
Die Sync-Raten im Uhrzeigersinn sind:
1. 48 Clocks pro 1/2 Takt – Der Sequenzer kriecht nun
2. 24 Clocks pro 1/4 Takt – Hier noch halb so langsam
3. 12 Clocks pro 1/8 Takt – Beinah schon normal speed
4. 6 Clocks pro 1/16 Takt – Und hier jetzt Normalzeit
5. 3 Clocks pro 1/32 Takt – Und jetzt richtig Vollgas
6. 4 Clocks pro 1/24 Takt – Für Opa im 3/4 Takt jetzt
7. 8 Clocks pro 1/12 Takt – Und es wird langsamer nun
8. 16 Clocks pro 6.1 Takt – Und hier wird’s gemütlich
9. 32 Clocks pro 1/3 Takt – Und zum einschlafen jetzt
mit
mit
mit
mit
mit
mit
mit
mit
mit
1
1
1
1
1
1
1
1
1
Step
Step
Step
Step
Step
Step
Step
Step
Step
pro
pro
pro
pro
pro
pro
pro
pro
pro
1/2
1/4
1/8
1/16
1/32
1/24
1/12
1/6
1/3
Takt (Rate-Pot voll gegen den Uhrzeigersinn)
Takt
Takt
Takt (Rate-Pot Center-Position)
Takt
Takt
Takt
Takt
Takt (Rate-Pot ganz nach rechts)
Änderungen der Sync Rate haben einen Reset des Sync Delays zur Folge! Falls gewünscht, kann anschließend ein neues Sync Delay hinzugefügt werden.
Controller, After-Touch und Voice Zuweisung:
Im Realtime-Mode kann jeder CV-Ausgang ein beliebiger MIDI Controller auf einem beliebigen Midi-Kanal zugeordnet werden.
Somit kann mit After-Touch oder einem anderen Controller z.B. die Cut-Off Frequenz, eines analog Synths gesteuert werden.
Die Controller können mit einer einfachen SystemExclusive Message beliebig zugeordnet werden.
Es müssen pro Controller-Zuweisung lediglich 3 Werte geändert werden, nämlich pp, cc und dd wie im folgenden Beispiel beschrieben.
SystemExclusiveMessage
[F0,7D,nn,pp,cc,dd,F7]
Dies sind die HEX Zahlen 0-F
Und dies die entsprechenden dezimal Zahlen 0-15
0,1,2,3,4,5,6,7,8,9, A, B, C, D, E, F
0,1,2,3,4,5,6,7,8,9,10,11,12,13,14,15
Hier die Daten wie sie in chronologischer Folge zum Cv-Six gesendet werden:
SysEx
SysEx
SysEx
SysEx
SysEx
SysEx
SysEx
Byte
Byte
Byte
Byte
Byte
Byte
Byte
[0]
[1]
[2]
[3]
[4]
[5]
[6]
F0
7D
nn
pp
cc
dd
F7
–
–
–
–
SystemExclusive
SysEx id
anzahl der bytes inkl. F0 & F7
parameter 00-7F
MIDI cannel 00-0F
data 00-7F
EndOfSystemExclusive
immer F0
immer 7D
meist 07
Controller und voice assignment
controller number 00-7F oder Voice off/on/pitch
immer F7
Die Midikanäle werden genau wie auch alle anderen Daten im HEX Format eingetragen dabei entspricht 0-F, den Kanälen 1-16
Die Oszillator-Stimmen Voice A-F korrespondieren mit den CV-Ausgängen 1-6 und folgen den gespielten Noten.
Example:
F0,7D,nn,pp,cc,dd,F7
F0,7D,07,02,00,01,F7
F0,7D,07,03,07,4A,F7
F0,7D,07,0A,00,01,F7
F0,7D,07,0B,01,00,F7
F0,7D,07,0C,02,02,F7
Weitere Details unten
=
=
=
=
=
=
parameter
channel
CV-2, MidiChannel-0(=1),
CV-3, MidiChannel-7(=8),
CV-1, MidiChannel-0(=1),
CV-2, MidiChannel-1(=2),
CV-3, MidiChannel-2(=3),
data
Controller-01 (ModWheel)
Controller-4A (74 decimal CutOff)
Voice-A = 1
(voice enabled)
Voice-B = 0
(voice disabled)
Voice-C = 2
(voice & Pitch enabled)
Cv-Six multi dump
Ein SysEx multi dump sendet eine komplette Map (controller-, voice-, und channel Zuordnung) in einem Rutsch zum Cv-Six.
Das SysEx Format ist in der folgenden Tabelle beschrieben.
Speichern der Controller-Zuweisungen
Im Realtime-Mode (alle LEDs der rechten Spalte sind aus) kann die Controller-Zuweisung mit der Tastenkombination Pause + Mode gespeichert werden.
Laden der Controller- Zuweisungen
Im Realtime-Mode (alle LEDs der rechten Spalte sind aus) kann die Controller-Zuweisung mit der Tastenkombination Pause + Priority wieder geladen werden.
Standard-Werte
[Default: CV-1 voice, CV-2 velocity, CV-3 volume, CV-4 ModWheel, CV-5 ctrl.74=CutOff, CV-6 AfterTouch]
Im Realtime-Mode (alle LEDs der rechten Spalte sind aus) werden mit der Tastenkombination Pause + Trigger die Standardwerte geladen.
Zusammenfassung der Pot-, Button- & Switch Funktionen
Keyboard/Realtime Mode
TRIGGER
PRIORITY
PAUSE + TRIGGER
PAUSE + PRIORITY
PAUSE + MODE
Single-Trigger, Multi-Trigger
High note, Low note, Last note Priority
LOAD defaults
LOAD control map
SAVE control map
Sequencer Mode
TRIGGER
Record, Play
Record
PRIORITY
PAUSE
PAUSE + PRIORITY
PAUSE + MODE
Upwards, Downwards, Up/Down
PAUSE record
LOAD sequence
SAVE sequence
Play Internal clock
POT
PAUSE + TRIGGER
PAUSE + PRIORITY
PAUSE + MODE
Clock Rate
UNDO
REDO
DELETE
Geschwindigkeit
letzter Schritt
letzter Schritt
sequenz
external MIDI sync
PAUSE + PRIORITY + POT
PAUSE + MODE + POT
Sync-Delay
Sync-Rate
0 – 1/192 note
1/2, 1/4, 1/8, 1/16, 1/32, 1/24, 1/12, 1/6, 1/3
Arpeggiator, Phraser Mode
TRIGGER
PRIORITY
PAUSE
POT
Record, Play
Upwards, Downwards, Up/Down
Octaves (1-3)
wie im Sequenzer