1
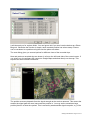
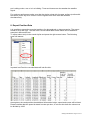
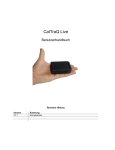
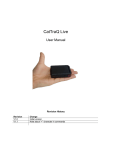
CatLog/CatTrack1 - User Manual CatTraQ™ Revision: March 6, 2014 Check for updates on: www.mr-lee.com Mr. Lee CatTrack, CatTraQ and CatLog are trademarks of Perthold Engineering. Index Index......................................................................................................................... 1 Change History ......................................................................................................... 2 1. Overview .............................................................................................................. 3 2. Software Setup ..................................................................................................... 4 3. Connect and Disconnect ...................................................................................... 4 4. Control Elements and Status Lights ..................................................................... 5 5. Device Setup using Control Center (@Trip Software) .......................................... 6 6. Place Device on Pet ............................................................................................. 9 7. Download Positions ............................................................................................ 11 8. Export Position Data ........................................................................................... 13 9. Support and Help ............................................................................................... 14 10. Important Safety Notes ..................................................................................... 14 CatLog User Manual - Page 1 of 14 Change History We try to keep this manual up-to-date. Therefore changes and additions are made. You may want to check from time to time for updates so that you have the most recent issue available. Revision Date 2. April 2008 Changes Initial revision 29. October 2008 22. May 2009 Change to @Trip 2.0 as software interface Note about destruction by reverse connection, removal of plastic plate protection (causes unwanted malfunction if the button is pressed continuously). Information about data export Safety notes, minor redesign of layout Rework Minor changes, adding notes about additional data extraction. 4. March 2011 10. June 2011 5. July 2011 6. March 2014 CatLog User Manual - Page 2 of 14 1. Overview The CatLog (former name CatTrack™) allows to automatically record your pets trips using satellite based position acquisition (GPS). Trace your pet’s ways and find out how far it walked, where it got food and where it spent the night. After returning home you can play back the positions. With a tiny size of only 1.8 x 1.2 x 0.5 inch (4.7 x 3 x 1.3cm) and a weight of only 0.75 oz (21g) it can easily attached to a cat without creating stress. The device is water resistant, has an internal rechargeable battery which allows extended usage of 30 hours and more. The interface for recharging and data transfer is USB. The position capture interval time can be adjusted by the user. Captured position data is displayed directly on Google Maps (Internet required). As an alternative usage the device can be used as a GPS receiver for almost any navigation software. Features: - Interface for data exchange and charging: USB 1.1 GPS chipset: Sirf 3 Antenna: Build-in patch antenna Battery capacity: 380mAh (runtime approx 30 hours with a 30s interval time) Position acquisition: cold start <60s, warm start <38s Position logging interval time: 1s - 60 minutes Operation temperature: -10 to +50 degrees Celsius Export data format: GPX, CSV (Excel) Recorded Data: Time, Position, Speed, Height, Direction CatLog User Manual - Page 3 of 14 2. Software Setup ! Note: run the setup program before you plug in the device to your computer. The latest version of the driver is always available from the Mr. Lee website (www.mr-lee.com CatLog Support Drivers). Setup will install the Device driver and Command center (@Trip) Software support for Windows only. 3. Connect and Disconnect After you installed the software, plug in the device to your computer using the USB interface. 1: Plug in the connector into the CatLog. The arrow on the connector must point upwards. ! Important: An unwanted destruction of the device can occur when the connector is attempted to get plugged in reverse. 2: To unplug, do not pull the connector, just bend it. ! Important: An unwanted destruction of the device can occur if the connector is pulled instead of bent over. 2 1 CatLog User Manual - Page 4 of 14 4. Control Elements and Status Lights The GPS logger has basically 3 elements to interact: one button (used for on/off and manual position logging) and two lights which show the device status. All functions are set up using the control center. Mode Charging Power on Power off Satellite tracking mode Data logged Memory low Memory full Battery low Data Transfer Battery damaged LED signal The red light stays on during charging and goes off when charging is completed. Button is pressed for 2 seconds. The blue light blinks once. Button is pressed for 2 seconds. The red light blinks once. The blue light blinks every 8 seconds Both lights blink simultaneously twice The blue lights blinks three times every 8 seconds The red light blinks twice every 3 seconds The red light blinks once every 5 seconds. The blue light blinks randomly. Red light blinks rapidly The table does not apply for the silent mode, no status LED is activated in that mode. CatLog User Manual - Page 5 of 14 5. Device Setup using Control Center (@Trip Software) The GPS logger is set up using the control center. There are 3 operation modes: - Automatic logging in an adjustable interval time with manual interaction (device has to be switched ON manually); recommended for beginners. Automatic logging in an adjustable interval time in silent mode (no LED status, no manual on/off switching; preferred option to track pets) Automatic logging according to a time schedule. Enables the device for a specified time during day/week. The following section will show you how to change between the modes. To setup the device follow these steps: 1. Select device setup: 2. Select Configuration. If the device is protected by a password then enter it. Click “Next”. CatLog User Manual - Page 6 of 14 3. To set the continuous recording mode (device records as long as turned on) select “Manual Control” and click “Next”. 4. In the next menu select the desired recording interval time. There are predefined profiles available. As a rule of thump the longer the interval time the longer the battery lasts. The displayed time is just a rough estimation. The operation time can be extended by enabling the power saving option. The position accuracy may decrease with that option enabled. Click on “Next” to configure the device. CatLog User Manual - Page 7 of 14 5. Other features of the device are silent mode (no status lights) and scheduled recording. For both features the Scheduled Control mode has to be selected (see bullet 3, select “Scheduled Control”). Make sure your GPS acquired a position and date before selecting this mode. To disable the lights remove the checkmark at “Enable LED”. Additionally you have to select all days in the time table and set the active time on all days from 0 to 24 o’clock. It is wise to select a start date that is in the past in case the time zone is not detected correctly. The Scheduled Control activates the device only at certain times of a day or at certain days a week. For each day 2 time windows can get set in which the device is activated. The time windows are set using the mouse pointer. Once the active time windows are defined you will get to the settings for the position recordings as shown in paragraph 4. Depending on the setup the device enables itself after you disconnect it from the computer. The On/Off button has no effect. Please consider that if you put the device in the silent mode it will start recording as soon as you unplug the device from USB or power down the computer. Additionally you can not switch it on or off any more. It will acquire positions and log them in the adjusted interval as long as the device is not connected to the computer or the battery runs out of power. CatLog User Manual - Page 8 of 14 6. Place Device on Pet It is recommended to use a pet harness instead of a pet collar. This has several advantages: - GPS device can be secured and its position is fixed Receiver antenna points toward the sky (where all the satellites are located) A harness has usually no safety release feature which on a collar prevents strangulation of the pet. This means the harness will not break loose. Your pet is not annoyed with something hanging on the collar. Place the rubber frame on the harness. This may require disassembling of the harness. Place the GPS Logger in the frame. For additional protection against dirt the device can be wrapped into a thin plastic foil prior to the placement in the rubber frame. An additional protection against loss of the GPS device is provided by a small chain. CatLog User Manual - Page 9 of 14 One end of the chain is linked onto the GPS device. Place the other end of the chain on the harness and close the hook. The device is now mounted properly with a good protection against damage and loss. To put the equipment on your pet, follow the instructions of the harness or collar. On a harness the neck strap “A” is usually put on first, then the chest strap “B”. Make sure that the device is activated (not visible in silent mode) and that the upper side points toward the sky. Make also sure that the harness / collar is not adjusted too tight or too loose. CatLog User Manual - Page 10 of 14 7. Download Positions To download the recorded positions simply start the Control Center and connect the GPS logger to the USB cable. It will ask you to download the data from the GPS logger. If not, select the following button: As a next step enter a name of the recorded trip, e.g. Cat001. Now the data is transferred from the device. Here it is possible to erase transferred data by setting the checkmark at “Clear existing track data”. In the following dialog all trips are displayed for selection. Select the trips you are interested in: CatLog User Manual - Page 11 of 14 It will also ask you for a photo folder. You can ignore this if you don’t use the device as a Photo Blog tool. Otherwise the function is simple: each recorded position has a time stamp. Photos can be correlated to a position using the time the photo was taken. The next dialog gives you several options for different views of the recorded trips. New and previous recorded trips are shown in a list on the left hand side of the control center. If you select one, the software will connect to Google Maps and show the trip on the map. This requires an active internet connection. The position accuracy depends from the signal strength at the receiver antenna. This means the weaker the signal gets the more inaccurate the position is. You may notice sometimes large position jitters in a short time period. This is caused by weak satellite signal reception, e.g. if the CatLog User Manual - Page 12 of 14 pet is sitting under a car or is in a building. Trees and leaves can also weaken the satellite signal. For optimum performance make sure that the device points with its upper surface (surface with the button) to the sky since it has to receive signals from more than two satellites simultaneously. 8. Export Position Data It is possible to export the recorded positions for data analysis or data processing. The export format is GPX and CSV. The later one is a text based table format which can be loaded for example in Microsoft Excel. To export select a trip in the saved trip list and press the right mouse button. The following menu will appear: Imported into Excel the recorded data will look like this: Among date, time and position the additional information height, speed and course will be listed. Please consider that the speed is stated in meter per hour, to convert into km/h the value must be divided by 1000. CatLog User Manual - Page 13 of 14 The column “Type” will provide information about the device state, e.g. if the button was pressed while the device was active to mark a certain waypoint. Column “Essential” shows which positions are considered as useful and which are filtered out by the control center @Trip for optimization. These are usually positions what do not change. For additional analysis purposes more data can get extracted from a device. This is only possible at the time you have the device connected to your computer. First, create a folder named GT_DATA_LOG on your C: drive. Next, open @Trip control center and connect your device. Select to download the recorded GPS data. In parallel a CSV file will be generated in the GT_DATA_LOG folder containing raw data from the device. Please understand that not all information for the raw data is disclosed. The most interesting part might be the number of satellites present for a certain position to estimate the accuracy of the position. 9. Support and Help You can get in contact with the technical support by sending a mail to [email protected] Perthold Engineering LLC P.O. Box 383 Anderson, SC 29622 USA 10. Important Safety Notes ! Warning: This device is not suitable for children. It is not a toy. Small parts may break loose and get swallowed. Danger of suffocation ! ! Warning: This device is not suitable for larger animals like dogs which tend to chew and swallow non-food things. The animal may get hurt. ! Warning: Do not expose device to temperatures above 60°C / 140°F. The rechargeable battery may explode and catch fire. CatLog User Manual - Page 14 of 14