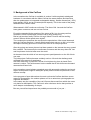
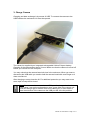
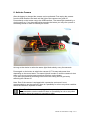
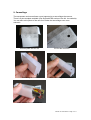
1
CatCam® v2 - User Manual Revision: May, 13 2011 Check for updates on: www.mr-lee.com Mr. Lee CatCam and CatCam are registered trademarks. Index Index .........................................................................................................1 Change History .........................................................................................2 1. Overview...............................................................................................3 2. Background of the CatCam...................................................................4 3. Charge Camera ....................................................................................5 4. Insert Memory Card ..............................................................................6 5. Picture Storage and Download .............................................................6 6. Activate Camera ...................................................................................7 7. Setting of Recording Interval.................................................................8 8. Change Time Stamp .............................................................................8 9. Camouflage ..........................................................................................9 10. Collar Attachment .............................................................................10 11. Support and Help ..............................................................................11 12. FAQ ..................................................................................................11 13. Important Safety Notes .....................................................................11 CatCam v2 User Manual - Page 1 of 11 Change History We try to keep this manual up-to-date. Therefore changes and additions are made. You may want to check from time to time for updates so that you have the most recent issue available. Revision Date March 11, 2011 Changes Initial revision of CatCam v2 April 4, 2011 May 13, 2011 Addition to Change Time Stamp Added FAQ CatCam v2 User Manual - Page 2 of 11 1. Overview The CatCam® takes pictures in an adjustable time sequence/interval. The device is designed to be worn on the collar of an animal (cat) but may find use for general surveillance tasks or time laps photography as well. The CatCam® offers a small size 64x41x18mm (2.5 x 1.6 x 0.7 inch) and a weight of approx. 30 grams (1.1 oz). Memory and rechargeable battery are integrated into the device. The camera takes photos in a resolution of 1280x1024 pixels. Memory media is a Micro SD card. The camera supports up to 16GB but is equipped with 2GB in standard version. With one battery charge around 500 photos can be recorded. The device is protected against dust, dirt and water (but is not dive proof). It is shock and scratch resistant. No noise is emitted at any time. CatCam v2 User Manual - Page 3 of 11 2. Background of the CatCam In the meantime the CatCam is available in version 2 with completely redesigned hardware. It now shares with the Video CatCam the same platform and has other than the predecessor an integrated rechargeable battery, smaller dimensions (-30%), lower weight (-50%) and an increased photo capacity. This is the result of the plenty feedback from CatCam users. What started in 2007 continues until today. The fans of Mr. Lee and the CatCam have gotten numerous and are not less curious. Everything started with the question of the owner of Mr. Lee, the stray cat from Anderson, South Carolina/USA, what the cat is doing all day long. Did he had an other family? Did he visit a girl friend? How far was he strolling around? Where did he spend some nights? The countless the questions the numerous the speculations. After some ideas and tests the CatCam was born. A small digital camera that was put on Mr. Lee’s collar did capture amazing pictures out of the cat’s world in its own perspective. After the project and some pictures had been posted on the Internet the story spread like a wildfire. The interest by the media was enormous and the story about Mr. Lee and his pictures circled at least once the world. At the same time the whish of cat owners grew to participate also on the life of their own cats. The joke project CatCam became suddenly serious. We took the challenge and collected a big amount of experience. Also after more than 3 years the CatCam is build piece by piece by hand. Each camera is unique. This achievement is also notable that in this time some thousand cameras have been built. In the meantime some imitators struggled even with automatic production and much higher development budget to satisfy the quality and functional requirements of this camera concept. In the progress of open discussions it turned out that the CatCam had born a new aspect of photography. Are random photos art? Is an animal as a photographer an originator and artist? In the same way the versatility of the cat’s life was discovered from which the owner only had a far anticipation. The CatCam is often cited as a device that provides a much deeper understanding of the pet. But see yourself and experience the probably secret world of you pet … CatCam v2 User Manual - Page 4 of 11 3. Charge Camera Charging and data exchange is by means of USB. To connect the camera to the USB interface the enclosure’s lid must be opened. The camera is supplied by an integrated rechargeable Lithium-Polymer battery. Charging of the camera takes about 2 hours. Make sure that the camera is turned off before you connect it to the computer. You may notice that the camera board sits lose in the enclosure. When you want to disconnect the USB cable you need to hold the camera board with some finger so it does not slide out. After charging or setup close the lid. For additional protection you may want to use some tape to keep the lid closed. ! Note: If the camera is connected to an USB port for a longer duration in some cases it can not be activated any more (green light of the control unit works but orange light of camera core is not coming on). In such cases a short reconnection of the camera to the USB port will solve the problem. CatCam v2 User Manual - Page 5 of 11 4. Insert Memory Card If the camera is bought without a memory card or the memory should get changed then proceed as described: Ensure that the camera is turned OFF and not connected to the USB interface. Open the enclosure and pull out the whole camera board. The circle marks the slot for the memory card (Micro SD). Here, put in the memory card with label facing up until it locks in. To eject, first press the card into the slot until it releases then pull it out. 5. Picture Storage and Download Pictures are stored in JPEG format and can be viewed with a wide range of picture viewing/editing software. To download the pictures open the camera as described before and connect the cable to the USB interface. The computer should recognize the camera as an additional drive. If this not the case check if the camera is switched off before connecting it to the computer. Now you can copy and erase files like on a regular hard disk. ! Note: Prior to disconnecting the camera from the computer make sure you stopped it with the device manager. Otherwise the file system of the camera may become corrupt. CatCam v2 User Manual - Page 6 of 11 6. Activate Camera After the battery is charged the camera can be activated. First unplug the camera from the USB interface and wait until the light of the camera core goes off. Press shortly on the button next to the USB interface. The status light (marked by a circle) comes on. If you have difficulties pressing the button you may use a pencil or something similar in order to extend your reach. As long as the device is active the status light blinks shortly every few seconds. Press again on the button to switch the camera off. This may take some time depending on the record state. The status light will remain on until the camera is shut down, you do not need to press more than one time on the button. If you have programmed recording interval time the setting will not get lost by switching the camera off. Note: Even if the camera is equipped with a protective enclosure it is not recommended to use the camera if there is a possibility for rain or any other condition where the camera is exposed to water. ! Note: Even if the camera is equipped with a protective enclosure it is not recommended to use the camera if there is a possibility for rain or any other condition where the camera is exposed to water. CatCam v2 User Manual - Page 7 of 11 7. Setting of Recording Interval The time between the photos can be adjusted in steps of 10 seconds. The maximum time is about 40 minutes. Setting the time is done using the On/Off button. While a quick push on the button switches the camera ON. Holding the button down enables time setup. The procedure is as follows: • • • • • In the default state the camera is Off Hold the button down until the status light blinks. Each blinking increases the interval time by 10 seconds. When the desired time is reached release the button. The settings will be stored and the camera switches into the recording mode. 8. Change Time Stamp The photos are overlaid with a time stamp. This time can be adjusted. Procedure: 1. Open notepad or any other text only editor 2. write: [date] 2011/04/21 20:35:00 this is setting the date to April 21, 2011 and the time to 8pm 35 minutes. Make sure that each line, also the last line, is finished by pressing the ENTER key. File size must be 30 Bytes. 3. 4. 5. 6. save as text file with the name tag.txt (lower case). copy this file in the cameras root directory. disconnect camera switch camera ON, the camera will read the file, set the date and erase the file. Older cameras require a different format of the file: Write: [date] 2009/12/29 16:58:00 this is setting the date to Dec. 29, 2009 and the time to 4pm 58 minutes. Make sure that the last character after the time is a space ! CatCam v2 User Manual - Page 8 of 11 9. Camouflage The transparent enclosure allows a good opportunity to camouflage the camera. There is a print template available (see Support&FAQ section of the Mr. Lee website). You can also add a photo of the cats fur to make the camouflage even more authentic. Print template and cut out Cut out the lens hole Fold along the lines Insert camouflage into enclosure. Insert camera core into enclosure. CatCam v2 User Manual - Page 9 of 11 10. Collar Attachment The collar is fed through both loops and then attached around the neck of the animal. ! Safety note: Please consider that a collar on a neck of a cat is a potential safety risk. Because a cat wanders and crawls more or less in any place and can catch or trap itself with the collar on an object such as fence rods or tree branches. This may lead to death of your pet. It is recommended to use a safety release collar. Such a collar will open if a certain amount of force is applied. Everything mounted to the collar will be lost in such a case. Please decide what is more important: The life of your pet or the device on the collar. CatCam v2 User Manual - Page 10 of 11 11. Support and Help You can get in contact with the technical support by sending a mail to [email protected] Perthold Engineering LLC, P.O. Box 383, Anderson, SC 29622, USA 12. FAQ Q: The file system got screwed up, is there a way to fix it ? A: Yes, you can format the memory card. Either with your computer or with an other digital camera. With the computer it depends on the operation system. Windows XP: Start -> Run… , then enter CMD command line will appear, enter Format f: (f is the drive letter mapped to the CatCam and will be different on your computer). Q: What is the orange light for ? A: The CatCam consists out of the controller (green light) and camera module (orange light). The orange light shows the operation state of the camera module. Q: Can the memory card get exchanged ? A: Yes, if you take the camera core out of the enclosure you will find the Micro SD memory card. Press on it to eject it. The camera will accept up to 16GB cards. Q: Camera does not take pictures, what is the problem ? A: This can have several reasons: charge level not sufficient, memory card not inserted correctly, camera turned on before disconnection was finished, camera in hibernate state after long charge time. Please check sections “Charge Camera” and “Activate Camera”. 13. Important Safety Notes ! Warning: This camera is not suitable for children. It is not a toy. If the camera is pulled apart small parts may break loose and get swallowed. Danger of suffocation ! ! Warning: This camera is not suitable for larger animals like dogs which tend to chew and swallow non-food things. The animal may get hurt. ! Warning: Do not expose camera to temperatures above 50°C / 125°F. The rechargeable battery may explode and catch fire. CatCam v2 User Manual - Page 11 of 11