1
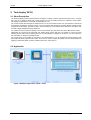
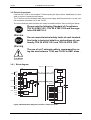
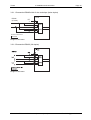
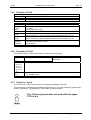
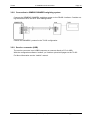
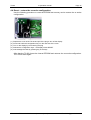
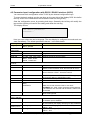
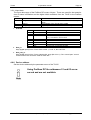
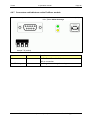
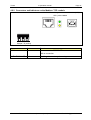
User’s manual
Message display
TA 125
manual_ta125_v3.0.0.doc, Rev. 0
and
Text interface
TI 125
TA125
Gönnheimer Elektronic GmbH
Operation instructions
phone +49 (6321) 49919-0
Page 2
Email: [email protected]
TA125
Operation instructions
Page 3
Contents
1
2
Operation instruction for Explosion protected device............................................................................ 5
Message display TA125 ........................................................................................................................ 6
2.1
Short Description............................................................................................................................ 6
2.2
Application...................................................................................................................................... 6
3 Installation and Connection ................................................................................................................... 7
3.1
Mounting ........................................................................................................................................ 7
3.2
Electrical terminals ......................................................................................................................... 8
3.2.1
Block diagram ......................................................................................................................... 8
3.2.2
Connection schema for device types: TI125.x.0.x.................................................................. 9
3.2.3
Connection schema for types TI125.x.2.0 (Profibus) ........................................................... 11
3.2.4
Connection schema types TI125.x.3.0 (Ethernet) ................................................................ 11
3.2.5
Terminals of TI125 ................................................................................................................ 12
3.2.6
Terminals of TA125 .............................................................................................................. 12
3.2.7
Twelve binary inputs ............................................................................................................. 12
3.2.8
Connection to SIMENS SIWAREX weighting system .......................................................... 13
3.2.9
Service- connector (USB) ..................................................................................................... 13
4 Operation manual................................................................................................................................ 14
4.1
Display ......................................................................................................................................... 14
4.2
Internal (hidden) Configuration keys ............................................................................................ 14
4.3
Starting......................................................................................................................................... 14
4.4
Reset – restore the ex works configuration ................................................................................. 15
4.5
Parameter input /configuration with RS232 / RS485- interface (ASCII) ...................................... 16
4.5.1
Protocol................................................................................................................................. 17
4.5.2
User protocol......................................................................................................................... 17
4.5.3
SIWAREX- Protokoll ............................................................................................................. 18
4.5.4
Data format ........................................................................................................................... 18
4.5.5
Device address ..................................................................................................................... 18
4.5.6
Twelve binary inputs ............................................................................................................. 18
4.6
Parameter input and Configuration with PROFIBUS DP ............................................................. 19
4.6.1
GSD- file ............................................................................................................................... 19
4.6.2
Configuration......................................................................................................................... 19
4.6.3
Display modes ...................................................................................................................... 19
4.6.4
Data format ........................................................................................................................... 20
4.6.5
Compact display mode (page mode).................................................................................... 20
4.6.6
Device address ..................................................................................................................... 21
4.6.7
Connectors and indicators on the Profibus- module............................................................. 22
4.7
Parameter input and configuration with MODBUS RTU- interface.............................................. 23
4.7.1
Display modes ...................................................................................................................... 24
4.7.2
Data format ........................................................................................................................... 24
4.7.3
Compact mode (Page- mode) .............................................................................................. 24
4.8
Parameter input and configuration with MODBUS TCP- interface .............................................. 26
4.8.1
Display modes ...................................................................................................................... 26
4.8.2
Connectors and indicators on the Modbus- TCP- module.................................................... 27
5 Appendix ............................................................................................................................................. 28
5.1
Technical Details.......................................................................................................................... 28
5.2
Dimensions .................................................................................................................................. 29
5.3
Type code .................................................................................................................................... 30
5.4
ASCII- Control characters ............................................................................................................ 31
5.4.1
Format text (Function 8) ....................................................................................................... 32
5.4.2
Working with variables (function 11, 12)............................................................................... 32
5.4.3
Storing text pages (Function 13,14) ..................................................................................... 32
5.4.4
Binary output (function 15).................................................................................................... 32
5.5
ASCII- character set of TA125 ..................................................................................................... 33
Gönnheimer Elektronic GmbH
phone +49 (6321) 49919-0
Email: [email protected]
TA125
Operation instructions
Page 4
The symbols WARNING, CAUTION, NOTE
This symbol warns of a serious hazard. Failure to observe
this warning may result in death or the destruction of property.
This symbol warns of a possible failure. Failure to observe
this caution may result in the total failure of the device or the
system or plant to which it is connected.
This symbol highlights important information.
Gönnheimer Elektronic GmbH
phone +49 (6321) 49919-0
Email: [email protected]
TA125
Operation instructions
Page 5
1 Operation instruction for Explosion protected device
Application and Standards
This instruction manual applies to explosion-protected control panels of type of protection types
below. This apparatus is only to be used as defined and meets requirements of EN 60 079 particularly EN60 079-14 "electrical apparatus for potentiality explosive atmospheres".
Use this manual in hazardous locations, which are hazardous due to gases and vapors according
to the explosion group and temperature class as stipulated on the type label. When installing and
operating the explosion protected distribution and control panels you should observe the respective nationally valid regulations and requirements.
General Instructions
The device has to have a back-up fuse as stipulated. The mains connection must have a sufficient short circuit current to ensure safe breaking of the fuse. To achieve an impeccable and
safety device operation, please take care for adept transportation, storage and mounting, as well
as accurate service and maintenance. Operation of this device should only be implemented by
authorized persons and in strict accordance with local safety standards.
The electrical data on the type label and if applicable, the "special conditions" of the test certificate TÜV 00 ATEX 1551 und 1552 are to be observed.
For outdoor installation it is recommended to protect the explosion protected distribution and control panel against direct climatic influence, e.g. with a protective roof. The maximum ambient temperature is 40°C, if not stipulated otherwise.
Intrinsically Safe Circuits
Erection instructions in the testing certificates of intrinsically safe apparatus are to be observed.
The electrical safety values stipulated on the type label must not be exceeded in the intrinsically
safe circuit. When interconnecting intrinsically safe circuits it is to be tested, whether a voltage
and/or current addition occurs. The intrinsic safety of interconnected circuits is to be ensured. (EN
60079-14, section 12)
Safety Measures: to read and to comply
Work on electrical installations and apparatus in operation is generally forbidden in
hazardous locations, with the exception of intrinsically safe circuits. In special cases
work can be done on non-intrinsically safe circuits, on the condition that during the
duration of such work no explosive atmosphere exists. Only explosion protected
certified measuring instruments may be used to ensure that the apparatus is voltage-free. Grounding and short-circuiting may only be carried out, if there is no explosion hazard at the grounding or short circuit connection.
Gönnheimer Elektronic GmbH
phone +49 (6321) 49919-0
Email: [email protected]
TA125
2 Text display TA125
Page 6
2 Text display TA125
2.1 Short Description
The field text display TA125 indicates arbitrary messages, warnings or hints in the hazardous area zone 1. It’s large
(58 x 244 mm2), reflective display with a figure height of 15 mm can easily be read up to a distance of five meters.
The display is organised into 4 rows with 40 characters per row.
The TA125 receives the messages for instance from a PC or DCS located in safe area. The interface TI125 serves
as intrinsically safe barrier and power supply. It can be equipped with several bus modules (RS232, RS485, RS422,
Profibus DP and Modbus). The distance to the TA125 could be up to 300 meters with a data rate of 38,4 kbit/s. Use
wire with a bigger diameter for longer distances.
It is possible to connect many text display to one bus (theoretical up to 255). Each one with a different text content.
Additionally the TA125 has an intrinsically safe passive alarm output. With this it is possible to connect a further
alarming device. With the three digital inputs you can acknowledge a message or an alarm or you can request further information on the spot in hazardous area.
The TA125 stores up to 32 kByte of messages in an internal EEprom. You can program the stored messages with
the bundled windows software “TEXT LINK”. There are two ways to display the stored texts: the serial interface or
applying a defined bit pattern to binary address inputs of the TI125 (option).
2.2 Application
Figure 1 Example: Application TA125 / TI125
Gönnheimer Elektronic GmbH
phone +49 (6321) 49919-0
Email: [email protected]
TA125
3 Installation and connection
Page 7
3 Installation and Connection
3.1 Mounting
The TA125 is predicated for mounting and use in hazardous area zone 1. Fix the TA125
with the drillings on the rear side of the housing. Choose a solid place to install the display
in the field area.
The interface TI125 must be mounted in safe area! We recommend a 35 mm rail acc. EN
50022 for mounting.
Observe local safety guidelines and the regulatives
EN 60079 ff, especially the regulative EN 60079-14.
Regard the distances of mounting drillings on the figure below:
Figure 2 dimensions, mounting schematics
Figure 3 dimensions TI125, with terminal numbers
Gönnheimer Elektronic GmbH
phone +49 (6321) 49919-0
Email: [email protected]
TA125
3 Installation and connection
Page 8
3.2 Electrical terminals
Connect the TA125 to the Interface TI125 according the figure below. Additionally it is possible to connect 3 passive push-buttons.
The TI125 has on its intrinsically safe side a power supply terminal (terminals 1,2) and a serial connection (terminals 3,4) to the TA125.
The non intrinsically safe terminals are mains and data interface. See on the figure below:
Please note the following Standard of Compliance:
TÜV 00 ATEX 1551, TÜV 00 ATEX 1552 and the regulative EN 60079-14.
Do not exceed terminal safety limits of each terminal.
See limits in technical details or declarations of conformity TÜV 00 ATEX 1551 and TÜV 00 ATEX 1552.
The use of cat 7 network cable is recommend by using the wire between TI125 and TA125 in EMC areas .
3.2.1 Block diagram
Safe area
Hazardous area
TI125
L, (+)
Mains N, (-)
PE
shield
PE
Y
RS485
Z
A
B
RS232
RXD
TXD
GND
binary adress
inputs
GND
7
8
9
10
11
12
13
14
15
16
17
18
19
TA125
U,I
1 (+)
2 (-)
LCD
(+) 1
(-) 2
CPU
TXD
RXD
RXD
TXD
20
...
27
19
3
4
5
6
3
4
PE
PE
EEx i 5V+
“backspace”
5
“0”
“1”
“2”
“3”
“4”
“5”
“6”
“7”
“8”
“9”
6
7
8
11
12
13
14
15
16
17
18
19
EEx i 5V+
20
“Enter”
Interface
+
9
-
10
DO
DIinterface
Figure 4 Detailed Block diagram connection TA125 and TI125
Gönnheimer Elektronic GmbH
phone +49 (6321) 49919-0
Email: [email protected]
TA125
3 Installation and connection
Page 9
Figure 5 Block diagram connection TA125 and KB125
3.2.2 Connection schema for device types: TI125.x.0.x
Clamps 10-19
LED: green = active
Service (USB)
terminals 7-9 (mains)
Gönnheimer Elektronic GmbH
phone +49 (6321) 49919-0
Email: [email protected]
TA125
3 Installation and connection
Page 10
3.2.1.1 Connection RS485 within 2 wire technique (halve duplex)
TI125
RS485
(2 Draht)
PE
Y
Z
A
B
10
11
12
13
14
15
16
TXD
RXD
Brücke für Abschluss
widerstand
Bridge for terminator
3.2.1.2 Connection RS422 (full duplex)
Bridge for terminator
Gönnheimer Elektronic GmbH
phone +49 (6321) 49919-0
Email: [email protected]
TA125
3 Installation and connection
Page 11
3.2.3 Connection schema for types TI125.x.2.0 (Profibus)
9 pol. Sub D connector for Profibus
LED: green = DATA-Exchange
LED: yellow = Init
Service (USB)
terminals 7-9 (mains)
Figure 6 Terminals and switches on the Profibus module
3.2.4 Connection schema types TI125.x.3.0 (Ethernet)
ETHERNET
LED: green = LINK
LED: yellow = Active
Service (USB)
terminals 7-9 (mains)
Figure 7 Terminals on the ETHERNET module
Gönnheimer Elektronic GmbH
phone +49 (6321) 49919-0
Email: [email protected]
TA125
3 Installation and connection
Page 12
3.2.5 Terminals of TI125
Intrinsically safe outputs (blue terminal plug)
Terminal
Comment
1 (+), 2 (-)
Intrinsically safe power supply for TA125
3,4
Intrinsically safe serial interface to TA125
Non- intrinsically safe inputs
Terminal
Comment
7 (L) (+)
Mains power supply, type depending Attention! The voltage of the DC- version
8 (N) (-)
is 24 V DC !!
9 PE
Protective ground (CCITT)
10 PE
Shield connector
11 (Y)
RS485 Transceiver
13 (Z)
Connect Terminal 11 and 12 to activate internal terminal resistor (120 Ω)
14 (A)
RS485 Receiver
16 (B)
Connect Terminal 14 and 15 to activate internal terminal resistor (120 Ω)
17 (TxD)
RS232 Data output (Transmit Data)
18 (RxD)
RS232 Data input (Receive Data)
19 (GND)
Ground RS232
20-27
Absent
3.2.6 Terminals of TA125
The PCB contains 2 coded connectors to avoid wrong connecting.
Terminal
1 (+)
2 (-)
3, 4
5-6, 5-7, 5-8
5-11, 5-12,
5-13, 5-14,
5-15, 5-16,
5-17, 5-18,
5-19
9 (+)
10 (-)
20 (+)
Comment
Power supply for TA125
A 2 x 2 x 0,25 mm² twisted pair- cable is
recommend.
Serial interface, Twisted pair
Active binary inputs, only to connect passive switches
Passive Open –Collector- Binary output, galvanic separated to any current circuit
up to a voltage of 60V.
+ 5 V Ex i- Voltage
3.2.7 Twelve Ex i- inputs
The TA125 has 12 Ex i- binary inputs, for sending messages to the host.
The user press a pushbutton connected to binary input x. the host computer get this information (Character x ) by polling the TA125 table of pressed inputs.
The 12 binary inputs does not work with the types
TI125.x.0.x.
Gönnheimer Elektronic GmbH
phone +49 (6321) 49919-0
Email: [email protected]
TA125
3 Installation and connection
Page 13
3.2.8 Connection to SIMENS SIWAREX weighting system
Connect the SIEMENS SIWAREX weighting system to the RS485- interface. Consider using the shorts to RTa and RTb. See drawing below:
Choose the SIWAREX- protocol in the TA125 configuration.
3.2.9 Service- connector (USB)
The service connector is an USB-B connector zu connect directly a PC via USB.
With the configuration software “textlink” you’ll edit an upload text pages on the TA125.
For More information see the “textlink” manual.
Gönnheimer Elektronic GmbH
phone +49 (6321) 49919-0
Email: [email protected]
TA125
4 Operation manual
Page 14
4 Operation manual
To change the configuration of the TA125 uses the internal keys. To set characters to the
display use the software “Textlink”, which is included the TA125, or your favourite terminal
program.
4.1 Display
The display of the TA125 has 4 rows with 40 characters per row. The TA125 can be
switched to a bigger font by an ESC- sequence. The large text has a character height of 65
mm. Texts with more than 6 characters scroll through the display.
4.2 Internal (hidden) Configuration keys
The configuration keys are located inside of the TA125- housing. To get them remove the
four screws on the top of the housing and open the TA125. The keys are located on the
small PCB with the blue terminal socket on the rear side of the cover.
Right and left key
Figure 8 Rear side of the cover with the internal configuration keys
4.3 Starting
After a correct connecting of the TA125 to the TI125 and power on the TA125 shows the
figure below:
TA125
Gönnheimer Elektronic GmbH
„Version number“
Checking EEPROM data!
after that the display shows
TA125
Gönnheimer Elektronic GmbH
„Version number“
Connecting to interface!
The TA125 now tries to build up a communication to the TI125.
Next the display will be cleared and the transmitted text will be shown.
Gönnheimer Elektronic GmbH
phone +49 (6321) 49919-0
Email: [email protected]
TA125
4 Operation manual
Page 15
4.4 Reset – restore the ex works configuration
Use the following procedure to reset the EPROM text memory and to restore the ex works
configuration:
(1)
(2)
(3)
(4)
(5)
Replace the cover of the TA125 and pull of the plug to turn off the display
Press and hold both configuration keys on the rear side of the cover
Turn on the display by reconnecting the plug
Release the configuration keys – the display shows RESET
Acknowledge the reset by pressing any of the keys
After that the TA125 format the internal EPROM and restores the ex works configuration.
The TA125 starts again.
Gönnheimer Elektronic GmbH
phone +49 (6321) 49919-0
Email: [email protected]
TA125
4 Operation manual
Page 16
4.5 Parameter input /configuration with RS232 / RS485- interface (ASCII)
You can enter basic configuration of the TA125 by the internal configuration keys.
To enter the basic settings use the two keys on the rear side of the display PCB. We define
the key closer to the terminals as the left and the other as the right key.
Start the configuration menu by pressing both keys. Generally the left key will modify the
tag and the right key will confirm the setting and show the next tag.
The display shows:
Set device parameters
Language =
Here you can select the user’s language. The text display is configured ex works and can
start immediately. The default parameters has an * in the table below:
Menu tag
Language
Data format:
Bit
Parity
Stop bits
Baud rate
Protocol:
Protocol
Possible contents
Comment
Deutsch*, English, French,
Dutch, Spanish
n = 7, 8*
no*, even, odd
n = 1*, 2
n = 600, 1200, 2400, 4800,
9600*, 19200, 38400,
57600, 115200 bit/s
Number of data bits for the serial communication
Parity of the serial communication
Number of stop bits
Speed of the serial communication
None
STX/ETX
none
STX/ETX: Each received character sequence must start
with the control character “STX” and end with an “ETX”.
CR/LF: Each received character sequence ends with the
control character “CR/LF”. See also Protocol
CR/LF*
SIWAREX
USER
Protocol answer no*,
Echo,
ACK/NACK
Skip
n = 0* ...9
Device address:
Address length n = 0* ...3
Device address
0* up to 255
Only with
“USER protocol”
Starting signal
End signal
Gönnheimer Elektronic GmbH
SIWAREX: protocol of SIEMENS SIWAREX weight system for direct talking to SIWAREX module
User defined see chapter
If you use one of the above protocol, then the answer is:
Echo: the revived characters will be sent back
ACK/NACK: An “ACK” control character will be returned,
if all characters are received well otherwise a “NACK” will
be returned
Number of the first n characters of a data sequence
which will be ignored.
n is the number of the digits of the device address. If n=0
the address input is disabled.
If you use more than one text display on the same bus,
you must identify the display device by its device address
Defines the Starting signal (STARTDELIMITER);
default = “#02”
Defines the End signal (ENDDELIMITER);
default = “#03”
phone +49 (6321) 49919-0
Email: [email protected]
TA125
4 Operation manual
Data end signal
Defines the data end signal (STRINGTERMINATOR);
default = “#09”
Defines the reference data length;
default = “#06”
Defines the skip length #02;
default = “#02”
Reference data length
Skip #2
Watchdog time
0* up to 999
Settings ok
Yes / No
Page 17
The watchdog timer determinates a broken data wire. If
the TA125 gets no data in watchdog time, the TA125 will
show “ No connection to host !”. After receiving data
again the message disappears.
If “Yes” is entered all settings will be confirmed and the
configuration menu will be left. Otherwise the menu starts
from the beginning.
After leaving the menu the TA125 sends the data to the TI125. Both devices
shutdown and restart automatically.
4.5.1 Protocol
The serial interface can manage several receive protocols, see the table below:
DATA
(1) No protocol
HEADER
DATA
(2) no protocol + address
DATA
CR/LF
(3) CR/LF
HEADER DATA
CR/LF
(4) CR/LF + address
STX
DATA
ETX
(5) STX/ETX
HEADER STX
DATA
ETX
(6) STX/ETX + address
CR = Carriage Return (0Dh), LF = Line Feed (0Ah), STX = Start of Text (02h), ETX = End of Text (03h)
The data contains text data and format characters for instance Text page recall, show variable etc. The header contains the display device address.
4.5.2 User protocol
The user- protocol is a wide and tolerate non-specific protocol to match many common protocol with the text display TA125 / TI125.
User- protocol definitions:
Character
Example
Description
Starting signal
#02
The Starting signal of the protocol
Skipped symbols
#33, #55, #03
3 variable symbol were skipped
Device address
#09
The TA125 with device address “9” is called
Skipped symbols
#13, #55, #33,
#44
All arbitrary symbols are be skipped until the
data end signal is received
Data end signal
#09
Data end signal of the protocol
Gönnheimer Elektronic GmbH
phone +49 (6321) 49919-0
Email: [email protected]
TA125
4 Operation manual
Page 18
Skipped symbols #2
#33, #55, #03,
#29
Skipping four arbitrary symbols
„ Reference data “
#30, #31, #32
Displayed characters on the TA125 display
End signal
#03
End signal of the protocol
4.5.3 SIWAREX- Protocol
The “Siwarex” is a special protocol for use in combination with a SIEMENS SIWAREX
weighting system.
4.5.4 Data format
The default data format of the serial interface is 8 bit. That can be changed to 7 data bits.
The user may change the parity, stop bit and serial speed settings too.
4.5.5 Device address
It is possible to connect several display devices to one bus. In that case every device get its
individual device address (0* ... 255) in menu tag (10). This address must be sent in the
head of each data transmission to select the right device.
The display devices TA125 understand the address “0” as Broadcast. That means that
every display device on the bus receives and displays the message.
Enter the address length at menu tag (9). If you use the transmission protocol (1), (3) or (5)
choose “0” as address length.
4.5.6 Twelve binary inputs
The TA125 has three binary inputs, to acknowledge an alarm for instance. If a signal on input x occurs the TA125 sends immediately the ASCII character x to the host. If the user releases the button the TA125 sends the ASCII “0” 30(hex).
With serial RS232 / RS485- interface it is not possible to use this inputs, if more than one
unit is connected to the network.
Gönnheimer Elektronic GmbH
phone +49 (6321) 49919-0
Email: [email protected]
TA125
4 Operation manual
Page 19
4.6 Parameter input and Configuration with PROFIBUS DP
Enter basic configuration of the TA125 by the internal configuration keys. Later on you can
modify the configuration by software.
4.6.1 GSD- file
Obtain the concerning GSD file on our website: www.goennheimer.de.
4.6.2 Configuration
Start the configuration menu by pressing both keys. Generally the left key will modify the
tag and the right key will confirm the setting and show the next tag.
The display shows:
Set device parameters
Language =
You can select here the user’s language. The text display is configured ex works and can
start immediately. The default parameters have an * in the table below:
Menu tag
Language
Device address
Digital inputs
Settings ok
Possible contents
Comment
Deutsch*, English, French,
Dutch
0* up to 255
If you use more than one text display on the same bus,
you must identify the display device by its device address
DI12
DI0
“0” means normal open mode
000000000000
“1” means normal closed mode
Yes / No
If “Yes” is entered all settings will be confirmed and the
configuration menu will be left. Otherwise the menu starts
from the beginning.
After leaving the menu the TA125 sends the data to the TI125. Both devices
shutdown and restart automatically.
The bit rate of the bus master is set automatically and could not be configured
manually. The TI125 drives a bit rate up to 12 MBit.
4.6.3 Display modes
Since software version 2.0.0 the TA125 has two different display modes. The general
mode the TA125 works according to ISO/IEC 6429. With this general mode all text functions of the TA125 can be used.
Additionally works the TA125 in a smart compact mode (page mode). With this page mode
the TA125 gets in a short form the page number to recall out in the internal memory and the
actual valve of all eight variables usable on one page.
The data exchange format is equal in each mode.
Gönnheimer Elektronic GmbH
phone +49 (6321) 49919-0
Email: [email protected]
TA125
4 Operation manual
Page 20
4.6.4 Data format
The TA125 works in combination with the TI125 as Profibus- Slave.
The device has a transfer interface with Data_Out of 34 Byte and Data_In of 4 Byte.
4.6.5 Compact display mode (page mode)
The TA125/TI125 contains a new indicator mode as well as the introduction of binary variable to the announcement in the TA125.
With this compact mode (PV- mode) it is possible to recall most efficient pages from the internal memory and set the variables of 1-8 to new values.
In this new indicator mode the profibus memory is divided as follows:
3.2.1.3 Output data
The output-area of the Profibus DP covers 34 bytes. These are used for the selection of
the page which can be indicated and for filling variables with values. The variables are
coded according to DIN 19245 part 2.
Adress
0
Name
Trans_hs
1
2-5
6–9
10 – 13
14 – 17
18 – 21
22 - 25
26 – 29
30 - 33
Page_No
Var1
Var2
Var3
Var4
Var5
Var6
Var7
Var8
1. CTRL:
Bit Name
0
New
1
Mode
2
3
Clear_restart
DA
4
5
6
7
Ack
Function
Contains different Bits to control the TA125, see details
below:
No. of the recalled page
Value of variable 1
Value of variable 2
Value of variable 3
Value of variable 4
Value of variable 5
Value of variable 6
Value of variable 7
Value of variable 8
Function
There is new data for the TA125
Defines the display mode
0 = common general mode (only string variables)
1 = PV- Mode (binary variables)
Reset of the restart_flag
Set the digital Output (DO) on TA125
0 = DO open
1 = DO is closed
Reserved
Reserved
Reserved
DP Master has recognized data
2. Page_No:
The page of No will be displayed.
3. Var1 …Var2:
Values of the variable 1 to 8. The values must be coded according to DIN 19245 Teil2. The data
types are visible string (max 4 characters), Boolean, Integer8, Integer16, Integer32, Unsigned8, Unsigned16, Unsigned32, Floating-point, time of day (without date) and
Bit_string. For every variable type are 4 bytes at the disposal. If the variable don’t need all 4
bytes only the bytes with the lower addresses (e.g. Integer8 in Var1 it only the byte at address 2
used) are used.
Gönnheimer Elektronic GmbH
phone +49 (6321) 49919-0
Email: [email protected]
TA125
4 Operation manual
Page 21
3.2.1.4 Input data
The input data range of the Profibus DP covers 4 bytes. These are used for the transmission of status information and the digital initial conditions from the TA125 to the Profibus
master.
Address
0
Name
Rec_hs
1
2–3
Data_in
Data_raw_in
Function
Contains different bits to control the TA125 see description
below:
Digital inputs of the TA125 ASCII coded
Digital inputs of the TA125 coded as Bit- array
1. STATUS:
Bit
0
1
2
Name
New
Restart-Flag
Live bit
3
4
5
6
7
Ack
Function
New data for DP Master available
The TA125 has made a restart
=1 if connection TI/TA ok
=0 , if connection TI/TA not ok
Reserved
Reserved
Reserved
Reserved
TA125 has recognized last data
2. Data_in:
Keys (digital inputs) of the TA125 ASCII coded: „0“ until “9”, BS und Enter.
3. Data_raw_in:
Keys (digital inputs) of the TA125 coded as Bit- array (Bit 0 bis 11). The “normal open” normal
closed” mask in the TA125 are used for these bits.
4.6.6 Device address
Set the device address by the parameter menu of the TA125.
Using Profibus DP the addresses 01 and 02 are reserved and are not available.
Gönnheimer Elektronic GmbH
phone +49 (6321) 49919-0
Email: [email protected]
TA125
4 Operation manual
Page 22
4.6.7 Connectors and indicators on the Profibus- module
9 pol. Sub D connector
LED- green: Init
Service (USB)
LED- yellow: DATA- Exchange
clamps 7-9 (mains)
Name
Color
Function
Init
green
On: Profibus- Slave is initialized
Off: no connection
Data Exchange
yellow
Gönnheimer Elektronic GmbH
Flashing: data exchange is running
phone +49 (6321) 49919-0
Email: [email protected]
TA125
4 Operation manual
Page 23
4.7 Parameter input and configuration with MODBUS RTU- interface
You can enter basic configuration of the TA125 by the internal configuration keys.
To enter the basic settings use the two keys on the rear side of the display PCB. We define
the key closer to the terminals as the left and the other as the right key.
Start the configuration menu by pressing both keys. Generally the left key will modify the
tag and the right key will confirm the setting and show the next tag.
The display shows:
Set device parameters
Language =
Here you can select the user’s language. The text display is configured ex works and can
start immediately. The default parameters has an * in the table below:
Menu tag
Language
Data format:
Bit
Parity
Stop bits
Baud rate
Possible contents
German*, English,
French, Dutch
Comment
n = 7, 8*
no*, even, odd
n = 1*, 2
n = 600, 1200, 2400,
4800, 9600*, 19200,
38400 bit/s
Number of data bits for the serial communication
Parity of the serial communication
Number of stop bits
Speed of the serial communication
Device address:
Device ad1* up to 247
dress
Watchdog time 0* up to 999
If you use more than one text display on the same
bus, you must identify the display device by its device address
The watchdog timer determinates a broken data
wire. If the TA125 gets no data in watchdog time,
the TA125 will show “ No connection to host !”. After
receiving data again the message disappears.
Digital inputs
DI12
DI0
000000000000
“0” means normal open mode
“1” means normal closed mode
Settings ok
Yes / No
If “Yes” is entered all settings will be confirmed and
the configuration menu will be left. Otherwise the
menu starts from the beginning.
After leaving the menu the TA125 sends the data to the TI125. Both devices
shutdown and restart automatically.
Gönnheimer Elektronic GmbH
phone +49 (6321) 49919-0
Email: [email protected]
TA125
4 Operation manual
Page 24
4.7.1 Display modes
From the software version 2.0 the TA125 has two different display modes. The general
mode the TA125 works according to ISO/IEC 6429. With this general mode all text functions of the TA125 can be used.
Additionally works the TA125 smart compact mode (page mode). In this page mode the
TA125 gets in a short form the page number to recall out in the internal memory and the actual valve of all eight variables usable on one page.
4.7.2 Data format
The TA125 in combination with TI125 works as MODBUS slave only. It has 100 HOLDING
Registers output range.
4.7.3
Compact mode (Page- mode)
The software-Version 2.0.0 of the TA125/TI125 contains a new indicator mode as well as
the introduction of binary variable to the announcement in the TA125. With this compact
mode (Page- mode) it is possible to recall most efficient pages from the internal memory
and set the variables of 1-8 to new values. The TA125 uses only “Holding registers” to receive and characters and commands.
In this new indicator mode the modbus registers is divided as follows:
3.2.1.5 Registers in page mode
The output-area covers 18 registers. These are used for the selection of the page which
can be indicated and for filling variables with values. The variables are coded according to
DIN 19245 part 2.
Gönnheimer Elektronic GmbH
phone +49 (6321) 49919-0
Email: [email protected]
TA125
4 Operation manual
Page 25
Register
(Hex)
40001
Access
Data format
Function
R
Bit
Bit
40002
R
R/W
R/W
R/W
R/W
R/W
4 byte field
Ctrl- Flags:
Bit 0: Key 1 (terminal 6)
Bit 1: Key 2 (terminal 7)
Bit 2: Key 3 (terminal 8)
Bit 3: Key 4 (terminal 11)
Bit 4: Key 5 (terminal 12)
….
Bit 11: Key 12 (terminal 19)
Bit 12: Restart- Flag
Bit 13: Clear Restart- Flag
Bit 14: Set Digital Output ( 1 = close)
Bit 15: Mode ( 1 = PV- mode)
Page x: Recall of page x from internal memory
(page no. set in low byte, high byte is reserved)
Variable #01
R/W
4 byte field
Variable #08
40003
40004
.
.
40011
40012
1. Mode Register (40001):
Bit
Function
0 ..11
Status of DI 1 ..12
12
Restart Flag
13
Reset of the restart_flag
14
Set the digital Output (DO) on TA125
0 = DO is open
1 = DO is closed
15
Defines the display mode
0 = common general mode (only string variables)
1 = Page- Mode (binary variables)
2. Page_No. x: (40002)
The page x should be displayed out of the internal menory
3. Var1 …Var8: (40003) – (40012)
Values of the variable 1 to 8. The values must be coded according to DIN 19245 Teil2. The data
types are: visible string (max 4 characters), Boolean, Integer8, Integer16, Integer32, Unsigned8, Unsigned16, Unsigned32, Floating-point, time of day (without date) and
Bit_string. For every variable type are 4 bytes at the disposal. If the variable don’t need all 4
bytes only the bytes with the lower addresses (e.g. Integer8 in Var1 it only the byte at address 2
used) are used.
Gönnheimer Elektronic GmbH
phone +49 (6321) 49919-0
Email: [email protected]
TA125
4 Operation manual
Page 26
4.8 Parameter input and configuration with MODBUS TCP- interface
You can enter basic configuration of the TA125 by the internal configuration keys.
To enter the basic settings use the two keys on the rear side of the display PCB. We define
the key closer to the terminals as the left and the other as the right key.
Start the configuration menu by pressing both keys. Generally the left key will modify the
tag and the right key will confirm the setting and show the next tag.
The display shows:
Set device parameters
Language =
Here you can select the user’s language. The text display is configured ex works and can
start immediately. The default parameters have an * in the table below:
Menu tag
Language
Possible contents
German*, English,
French, Dutch,
Spanish
Comment
Device address: ETHERNET interface parameters
DHCP
Yes / No
Meaning:
Yes: TI125 get automatic an address from DHCP server
No: direct configuration of a fixed IP address
IP
xxx.xxx.xxx.xxx
Direct configuration of the device IP address
Gateway
000.000.000.000
Direct configuration of the gateway
Netmask
255.255.255.255
Direct configuration of the netmask
Port
1 up to 65535
Direct configuration of the port on the TI125
Digital inputs
DI12
DI0
“0” means normal open mode
000000000000
“1” means normal closed mode
Settings ok
Yes / No
If “Yes” is entered all settings will be confirmed and the
configuration menu will be left. Otherwise the menu
starts from the beginning.
After leaving the menu the TA125 sends the data to the TI125. Both devices
shutdown and restart automatically.
4.8.1 Display modes
The display modes are equal to chapter 4.7.1 ff.
Gönnheimer Elektronic GmbH
phone +49 (6321) 49919-0
Email: [email protected]
TA125
4 Operation manual
Page 27
4.8.2 Connectors and indicators on the Modbus- TCP- module
ETHERNET
LED- green: Link
Service (USB)
LED- yellow: Active
clamps 7-9 (mains)
Name
Colour
Function
LINK
green
On: connected to ETHERNET
Off: no connection
DATA EXCHANGE
yellow
Gönnheimer Elektronic GmbH
Flashing: data exchange is running
phone +49 (6321) 49919-0
Email: [email protected]
TA125
5 Appendix
Page 28
5 Appendix
5.1 Technical Details
TA125
General
Ex- protection
Certificate
Display
Montage
Ambient temperature
Housing
Electrical
Specifications
Zone
Dimensions H x B x T
Material
Protection
Power supply
(Kl 1,2)
Serial interface (Kl.3,4)
Further conditions
Intrinsically safe output
Binary Inputs
Text display TA125
II 2 G, Ex ib IIC T6 resp. II 2 D, T 70°C IP65
TÜV 00 ATEX 1551
Text: 4 x 40 Characters
View area 68 x 244 mm2
-20°C ...+45°C T6
-20°C ...+65°C T4
Hazardous area, Zone1
TA125.0:
120mm x 360mm x 80mm
Aluminium, RAL 7035
IP65
Ui = 14V, Ii = 75 mA, Ci = 100 nF
Ui = 6V, Ii = 75 mA, Ci = 1,65 µF
Sum of the currents of terminal 1 and 3 = 75 mA
Ui = 30V, Ii = 160mA, Pi = 850 mW, Li = 20µH,
Ci ist negligible
U0 = 6V, I0 = 1mA, P0 = 1,5 mW
C0 = 60 µF, L0 = 1000 mH
TI125
General
Housing
Electrical
Specifications
Ex i terminals
Mounting
Ex- protection
Certificate
Ambient temperature
Dimensions
HxBxT
Protection
Material
Fixing
Mains
(Kl. 7-9)
Power consumption
Power supply te. 1,2
Serial interface
Further conditions
Interface modu- Non Ex i terminals
le
Text interface TI125
Safe area
[E Ex ib]
TÜV 00 ATEX 1552
-20°C ...+60°C
101 x 100 x 66 mm3
IP65
Aluminium
35mm rail acc. EN50022
230VAC, 120 VAC, 24 VDC
ca. 9W
U0 = 14V, I0 = 75mA, rectangular characteristic
C0 = 467 nF, L0 = 0,13 mH
U0 = 6V, I0 = 75mA, rectangular characteristic
C0 = 1,867 µF, L0 = 0,48 mH
Sum of the currents of terminal 1 and 3 = 75 mA
RS232, RS485, Profibus DP, Interbus, Modbus
See also certificates TÜV 00 ATEX 1552 and TÜV 00 ATEX 1552
Gönnheimer Elektronic GmbH
phone +49 (6321) 49919-0
Email: [email protected]
TA125
5 Appendix
Page 29
5.2 Dimensions
Dimensions TA125.0
Dimensions TA125.0 for control panel mounting
Dimensions TI125.x.x
Gönnheimer Elektronic GmbH
phone +49 (6321) 49919-0
Email: [email protected]
TA125
5 Appendix
Page 30
5.3 Type code
Interface
TI125 .x .x
Mains:
230 VAC...............................
.0
110 VAC ............................... .3
24 VDC .................................. .6
Interface module:
RS485 / RS232 / RS422 ............... .0
Modbus RTU ................................ .1
Profibus DP ................................... .2
Modbus TCP ……………………… .3
Option binary address inputs:
Without ................................................
.x
.0
More field bus types on request
Text display
IP 65 housing
More housing types on request
Gönnheimer Elektronic GmbH
TA125
TA125.0
phone +49 (6321) 49919-0
Email: [email protected]
TA125
5 Appendix
Page 31
5.4 ASCII- Control characters
The TA125 works with control characters according ISO/IEC 642. These are listed in the table below:
No. Function
*
Data „ESC [“
prefix
(1)
CURSOR
NEXT LINE
CURSOR
PREV. LINE
CURSOR
LEFT
CURSOR
DOWN
CURSOR
RIGHT
CURSOR
UP
CURSOR
ABSOLUT
SET GR.
RENDITION
1
Pn E
1
Pn F
1
Pn D
1
Pn B
1
Pn C
1
Pn A
1;
2
0
Pn1; Pn2 H
Pn m
ERASE IN
PAGE
0
Pn J
(10) ERASE IN
LINE
0
Pn K
(11) VAR Pn1
mit Pn2
CHR.
(12) VAR Pn
SET
(13) TEXT Pn
STORE
(14) TEXT Pn
RECALL
1;4 Pn1 ; Pn2 V
(2)
(3)
(4)
(5)
(6)
(7)
(8)
(9)
(15) SET OUTPUT 0/1
1
1
1
0
Pn v STX var
ETX
Pn t STX text
ETX
Pn T
Pn X
Example : ASCII
HEX
ESC [ 1 E
1B 5B 32 45
ESC [ 1 F
1B 5B 31 46
ESC [ 2 5 D
1B 5B 32 35 44
ESC [ 3 B
1B 5B 33 42
ESC [ 2 0 C
1B 5B 32 30 43
ESC [ 2 A
1B 5B 32 41
ESC [ 2 ; 1 2 H
1B 5B 32 3B 31 32 48
ESC [ 0 m
1B 5B 30 6D
ESC [ 1 m
1B 5B 31 6D
ESC [ 5 m
1B 5B 35 6D
ESC [ 6 m
1B 5B 36 6D
ESC [ 2 2 m
1B 5B 32 32 6D
ESC [ 0 5 m
1B 5B 32 35 6D
ESC [ 0 J
1B 5B 30 4A
ESC [ 1 J
1B 5B 31 4A
ESC [ 2 J
1B 5B 32 4A
ESC [ 0 K
1B 5B 30 4B
ESC [ 1 K
1B 5B 31 4B
ESC [ 2 K
1B 5B 32 4B
ESC [ 7 ; 6 ; 2 ; 8 V
1B 5B 37 3B 36 3B 32
3B 38 56
ESC [ 7 v STX 13 ETX
1B 5B 37 76 02 31 33 03
ESC [ 9 t STX S1 ETX
1B 5B 37 74 02 53 31 03
ESC [ 9 T
1B 5B 39 54
ESC [ 2 1 9 T
1B 5B 32 31 39 54
ESC [ 0 X
1B 5B 30 58
ESC [ 1 X
1B 5B 31 58
Comment:
The Cursor jumps to the very left
position of the next line
The Cursor jumps to the very left
position of the previous line
The Cursor jumps 25 positions left
The Cursor jumps 2 line down
The Cursor jumps 20 positions right
The Cursor jumps 2 line up
The cursor position is now 2nd row,
12th column
The following characters will be displayed normal
Toggle to large text display 1 line 6
columns
The following characters are flashing
slowly (1 Hz)
The following characters are flashing
fast (2 Hz)
Toggle to normal display (4 x 40
Characters)
The following characters are static
(no flashing)
The characters between Cursors
and page end will be deleted
The characters between Cursors
and page start will be deleted
Erase the hole page
The characters between Cursors
and line end will be deleted
The characters between Cursors
and line start will be deleted
Erase the hole line
Initialisation of The variable “7” as
float with 6 figures length and 2
figures right of the comma
Set contents of variable „7“ to „13“
„S1“ is saved into the page No. 9
Recall the page No. 9
Recall the page No. 219
The open collector output is open
The open collector output is closed
Pn = Parameter ; * = Default Parameter
Gönnheimer Elektronic GmbH
phone +49 (6321) 49919-0
Email: [email protected]
TA125
5 Appendix
Page 32
5.4.1 Format text (Function 8)
The function „SET GR. RENDITION“ sets format for the actual page respectively the following characters. Normally the text has 4 rows with 40 columns. After the Sequence „ESC [ 1
m“ the display has only one line with a figure height of 65 mm. The sequence „ESC [ 2 2 m“
toggles back to normal display.
It is possible to let flash some words to increase their recognition. The sequence „ESC [ 5
m“ enables flashing with 1 Hz; the sequence „ESC [ 6 m“ with 2 Hz. The sequence „ESC [
2 5 m“ stops flashing mode and shows the following characters normally.
5.4.2 Working with variables (function 11, 12)
The TA125 offers the ability to define fields in the text area as variables. Later the variables
can to be replaced by different contents, without uploading the whole page. The master has
to send only the variable number and content and the TA125 replaces the variable on the
defined place. This can be useful for process indications for instance.
The TA125 can manage 127 variables with a length of up to 10 characters. The sequence
„ESC [ 7 ; 9 V“ defines for instance a variable No. 7 with a length of 9 characters on the actual cursor position. This place will be reserved on the display immediately.
Later the variable get its contents with the sequence „ESC [ 7 v STX CONTENTS ETX“ as
often as the master will send this sequence.
5.4.3 Storing text pages (Function 13,14)
The TA125 stores up to 255 pages (max 32kByte) in its internal EPROM. The sequence
„ESC [ Pn t STX CONTENT ETX“ stores CONTENT in the page Pn.
This page can be recalled by the sequence „ESC [ Pn T“.
The pages are kept in memory even after power down. To erase the pages overwrite it with
a new content or use the hardware reset of the TA125, in this case all pages will be erased
5.4.4 Binary output (function 15)
The TA125 has a Open-Collector transistor out. This can be used for an acoustical actor for
instance. The sequence „ESC [ 1 X“ closes the transistor and the sequence „ESC [ 0 X“
opens it.
Gönnheimer Elektronic GmbH
phone +49 (6321) 49919-0
Email: [email protected]
TA125
5 Appendix
Page 33
5.5 ASCII- character set of TA125
Gönnheimer Elektronic GmbH
phone +49 (6321) 49919-0
Email: [email protected]
EG-Konformitätserklärung
Declaration of conformity / Déclaration de conformité
Communauté Européenne
Anbieter:
Supplier:
Fournisseur
Gönnheimer Elektronic GmbH
Anschrift:
Address:
Adresse:
Gewerbegebiet Nachtweide
Dr.-Julius-Leber-Straße 2
67433 Neustadt/Weinstraße
Produkt:
Product:
Produit:
TA125,
Textanzeige
Das oben beschriebene Produkt erfüllt die Schutzanforderungen der folgenden EG-Richtlinien
/ the product described above complies with the following EG- rules / le produit décrit cidessus accomplit CU- réglementations
2004/108/EG, 93/68/EWG, 94/9/EG
und ist konform mit / and is in conformity with / et est conforme á:
EN 60079-0: 2006, Allgemeine Bestimmungen
EN 60079-11: 2007, Eigensicherheit „i“
EN 61241-1: 2004, Schutz durch Gehäuse "tD"
EN 1127-1: 2008, ATEX- Grundnorm
EN 61000-6-4: 2007, Fachgrundnorm Störaussendung: Industriebereich
EN 61000-6-2: 2006, Fachgrundnorm Störfestigkeit: Industriebereich
EN 60947-1: 2008, Niederspannungs-Schaltgeräte
zusätzliche Angaben / additional information / informations supplémentaires:
Qualitätsmanagement- System nach ISO EN DIN 9001:2008
Anerkanntes Qualitätssicherungssystem nach Richtlinie 94/9/EG
EG- Baumusterprüfbescheinigung / EC- Type certification / Attestation d’examen ce de type
TÜV 00 ATEX 1551
Neustadt, den 22.09.2010
Gönnheimer Elektronic GmbH
EG-Konformitätserklärung; Rev.1
EG-Konformitätserklärung
Declaration of conformity / Déclaration de conformité
Communauté Européenne
Anbieter:
Supplier:
Fournisseur
Gönnheimer Elektronic GmbH
Anschrift:
Address:
Adresse:
Gewerbegebiet Nachtweide
Dr.-Julius-Leber-Straße 2
67433 Neustadt/Weinstraße
Produkt:
Product:
Produit:
TI 125,
Textanzeige-Interface
Das oben beschriebene Produkt erfüllt die Schutzanforderungen der folgenden EG-Richtlinien
/ the product described above complies with the following EG- rules / le produit décrit cidessus accomplit CU- réglementations
2004/108/EG, 93/68/EWG, 94/9/EG
und ist konform mit / and is in conformity with / et est conforme á:
EN 60079-0: 2009, Allgemeine Bestimmungen
EN 60079-11: 2007, Eigensicherheit „i“
EN 1127-1: 2008, ATEX- Grundnorm
EN 61000-6-4: Fachgrundnorm Störaussendung; Teil 6-4: Industriebereich
EN 61000-6-2: Fachgrundnorm Störfestigkeit; Teil 6-2: Industriebereich
EN 60947-1: 2008, Niederspannungs-Schaltgeräte
zusätzliche Angaben / additional information / informations supplémentaires:
Qualitätsmanagement- System nach ISO EN DIN 9001:2008
Anerkanntes Qualitätssicherungssystem nach Richtlinie 94/9/EG
EG- Baumusterprüfbescheinigung / EC- Type certification / Attestation d’examen ce de type
TÜV 00 ATEX 1552
Neustadt, den 23.04.2010
Gönnheimer Elektronic GmbH
EG-Konformitätserklärung; Rev.1