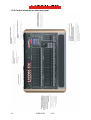
1
User manual Version 1.1 -2- 12.02.2010 V1.0 12.02.2010 V1.0 -3- Foreword Congratulations on your purchase of the Licon FX lighting console. The company JB-Lighting would like to thank you for your confidence in our products. We came up with this lighting control console thanks to increased inquiries of our Licon 1/1X users for a fader extension to the Licon 1/1X designed for the use with conventional light. In the planning phase we soon decided to further extend the hardware of the fader extension, so that you may also use it as stand-alone PAR console. We integrated several additional functions, which we have particularly programmed to facilitate the control of conventional light during live performances. Now enjoy working with your Licon FX console. If you have any suggestions or criticism with regard to the lighting control console and the user’s manual, please do not hesitate to contact us under the e-mail address [email protected]. -4- 12.02.2010 V1.0 Table of contents 1 First steps ................................................................................................................ 7 1.1 The user’s manual............................................................................................. 7 1.2 Overview of the console .................................................................................... 7 1.2.1 Scope of delivery ........................................................................................ 7 1.2.2 Control elements on the front panel............................................................ 8 1.2.3 Control elements on the rear panel ............................................................ 9 1.2.4 Technical specification ............................................................................. 10 1.3 LCD display and menu navigation .................................................................. 10 1.3.1 Overview .................................................................................................. 10 1.3.2 Screen display in the main menu.............................................................. 11 1.4 Power supply voltage and frequency .............................................................. 11 1.5 Turning the console on.................................................................................... 11 1.6 Turning the console off.................................................................................... 11 2 Resetting the console ............................................................................................ 11 3 Configuring the lighting control console ................................................................. 12 3.1 Remote control ................................................................................................ 12 3.1.1 Switching from stand-alone to extension mode ........................................ 13 3.1.1.1 Stand-alone mode of the Licon FX..................................................... 13 3.1.1.2 Fader extension mode to Licon 1 ....................................................... 13 3.1.1.3 Fader extension mode to Licon 1X .................................................... 14 3.1.2 Remote control via DMX In ....................................................................... 15 3.1.3 Remote control via external trigger input .................................................. 16 3.1.4 Remote control via MIDI ........................................................................... 16 3.2 DMX patch for stand-alone mode of the console ............................................ 17 3.3 Option ............................................................................................................. 18 3.3.1 Manual fade .............................................................................................. 19 3.3.2 Flash......................................................................................................... 20 3.4 Access ............................................................................................................ 20 4 Basic control elements........................................................................................... 22 4.1 Storage elements ............................................................................................ 22 4.2 A/B fader sections ........................................................................................... 22 4.3 Swap function ................................................................................................. 23 4.4 Cues and chases ............................................................................................ 23 4.5 Control section ................................................................................................ 24 4.5.1 Assigning the control section to a cue or chase fader .............................. 24 4.5.2 Changing links between faders and internal storage ................................ 24 4.5.3 Changing chase parameters with elements of the control section ............ 25 5 Cues ...................................................................................................................... 25 5.1 Screen display in the STORE and EDIT mode ............................................... 25 5.2 Storing cues .................................................................................................... 25 5.3 Changing cue parameters ............................................................................... 26 5.3.1 Changing the name .................................................................................. 26 6 Chases .................................................................................................................. 26 6.1 Screen display in the STORE and EDIT mode ............................................... 26 6.2 Storing chases ................................................................................................ 27 6.3 Editing chases ................................................................................................. 27 6.3.1 Deleting the entire chase .......................................................................... 27 6.3.2 Modifying steps......................................................................................... 28 12.02.2010 V1.0 -5- 6.3.2.1 Deleting steps .................................................................................... 28 6.3.2.2 Duplicating steps................................................................................ 28 6.3.2.3 Block operations ................................................................................ 28 6.3.2.3.1 Deleting a block ........................................................................... 28 6.3.2.3.2 Copying a block ........................................................................... 28 6.3.2.3.3 Moving a block ............................................................................ 28 6.4 Modifying chase parameters ........................................................................... 28 6.4.1 Using speed groups.................................................................................. 29 6.4.2 Changing the name .................................................................................. 29 6.4.3 Changing flow control ............................................................................... 30 6.4.3.1 Automatic sequencing with adjustable speed .................................... 30 6.4.3.2 Manual sequencing via Go keys ........................................................ 31 6.4.3.3 Manual sequencing by sound trigger ................................................. 31 6.4.3.4 Manual sequencing by fader of the control section ............................ 32 6.4.3.5 Manual sequencing by chase faders.................................................. 32 6.4.3.5.1 Combined fader for brightness and fading................................... 33 6.4.3.5.2 Separate faders for brightness and fading, automatic fade ......... 33 6.4.3.5.3 Separate faders for brightness and fading, manual change with key.............................................................................................................. 34 6.4.4 Changing the fade time ............................................................................ 34 6.4.5 Changing direction.................................................................................... 35 7 Tools ...................................................................................................................... 35 7.1 Locking the console ........................................................................................ 35 7.2 Setting a gate time for the sound input............................................................ 35 7.3 Performing a backup in the stand-alone mode ................................................ 35 7.3.1 File formats and file name extensions ...................................................... 36 7.3.2 Storing console data ................................................................................. 37 7.3.3 Loading console data ............................................................................... 37 7.4 Adjusting the brightness of the desk lamps ..................................................... 38 7.5 Adjusting the display brightness ...................................................................... 38 7.6 Adjusting the display contrast ......................................................................... 38 7.7 Setting the real-time clock ............................................................................... 38 7.7.1 Setting the date ........................................................................................ 38 7.7.2 Setting the time......................................................................................... 38 7.8 Displaying serial number and software version ............................................... 39 7.9 Testing keys, LEDs, faders as well as DMX inputs and outputs ..................... 39 7.9.1 Testing keys and LEDs ............................................................................. 39 7.9.2 Testing faders ........................................................................................... 39 7.9.3 Testing DMX In and DMX Out .................................................................. 40 8 Performing a software update................................................................................ 40 9 Index of keys and softkeys .................................................................................... 43 -6- 12.02.2010 V1.0 1 First steps 1.1 The user’s manual The user’s manual comes with an integrated quick start guide that will allow you fast access to the mode of operation of this console. The user’s manual will explain the basic functions of the lighting control console (quick start guide) at the beginning of each chapter (menu item). Then it will specify where to continue with the quick start guide and will finally give you detailed information on the extended use of the console. We have highlighted the Licon FX console buttons and menu elements / softkeys so that you can quickly identify them within the text. They are also listed under chapter 9 Index of keys and softkeys for selective and quick location in the user’s manual during your work with the console. 1.2 Overview of the console 1.2.1 Scope of delivery Included in the delivery of the Licon FX console are: Licon FX Power cord USB connecting cable (length 2m) 2 MIDI connecting cables (length 3m) User’s manual Included in the delivery of the Licon FX tour pack are: Licon FX Power cord USB connecting cable (length 2m) 2 MIDI connecting cables (length 3m) User’s manual Flight case (professional design) 2 desk lamps USB memory stick Dustcover 12.02.2010 V1.0 -7- 1.2.2 Control elements on the front panel -8- 12.02.2010 V1.0 1.2.3 Control elements on the rear panel 12.02.2010 V1.0 -9- 1.2.4 Technical specification Design: 512 DMX channels in total 96 dimmers 16 chases may be active simultaneously Control elements: Graphic LCD-display with softkeys and encoder 3 AUX controllers 2 sections with 24 faders each: all faders can be used as single-channel or preset faders. 16 of the 48 faders can be used as chase faders. All chase faders allow configuration both as trigger function via the chase flash button or as faders for manual fades. 1 main master fader 2 subgroup master faders 96 chases for internal storage 200 cues for internal storage Control section for fast access to chase parameters Signal connections: DMX - Out: 5-pin, 2 connectors DMX - In: 5-pin, 1 connector MIDI In/Out/Thru + Link Licon 1 USB - In/USB - Out for software update and data backup + Link Licon 1X 6.3 mm / ¼″ stereo jack connector for Sound In 6.3 mm / ¼″ stereo jack connector for External Trigger In Mains connection: 115V or 230V 50Hz / 60Hz factory default setting Models available for delivery: Licon FX: Dimensions: 706 mm W x 120.6 mm H x 456 mm D (27.8″ W x 4.75″ H x 17.6″ D) Weight: 10.2 kg (22.5 lbs.) Licon FX tour pack: Consists of: Licon FX, flight case, USB memory stick, 2 desk lamps, dustcover Dimensions: 775 mm W x 220 mm H x 610 mm D (30.5″ W x 8.66″ H x 24.0″ D) Weight: 24 kg (52.8 lbs.) 1.3 LCD display and menu navigation 1.3.1 Overview On the upper right side of the console you will find a graphic LCD display with softkeys for the selection of submenus and console functions. -10- 12.02.2010 V1.0 Press the ESC key to select submenus further down in the menu structure. Softkeys in the menu bar of the display, which are marked >>> or <<<, are used to toggle between menu pages in multi-page menus. With the encoder of the control section you can change or modify chase parameters as well as select and change data on the LCD display. Rough adjustment of a value is carried out with the shuttle section (outer ring) of the encoder and fine adjustment with the jog section (inner ring) of the encoder. 1.3.2 Screen display in the main menu The following elements are shown in the main menu: The left side of the display shows the current values of the AUX controllers. In the middle you will find remote control information and the right side of the display shows the currently selected elements of the control section as well as the system clock. These elements will be explained in more detail elsewhere in the user’s manual, where appropriate. 1.4 Power supply voltage and frequency The Licon FX comes with a factory default setting of 230V or 115V and can be operated at 50 Hz and 60 Hz. For voltage settings of your lighting control console see type plate on the rear panel of the console. If the voltage of your power supply system does not comply with the preset voltage of the console, please contact our technical support under the e-mail address [email protected]. 1.5 Turning the console on Switch the MAIN POWER SWITCH located on the rear panel of your console to the on-position. The console is now in the standby mode. Press the ON/OFF key on the upper right of the front panel to activate the lighting control console. 1.6 Turning the console off If you wish to turn the console off, press and hold the ON/OFF key and confirm with the softkey YES. This confirmation helps to avoid unintentional turning off of the console. Switch the MAIN POWER SWITCH on the rear panel of the console to the off-position. 2 Resetting the console Press the ON/OFF key to turn the console off. Press and hold the softkeys F1 to F4 simultaneously while the console is in the off state and then turn the console on with the ON/OFF key. Press and hold the softkeys F1 to F4 until the following clear menu is shown on the display: 12.02.2010 V1.0 -11- A reset of the user profiles must be carried out separately by pressing the softkey ACCES. This process will also reset a password protection, where present. You will be prompted to acknowledge the reset of elements by pressing the softkey YES. Press the softkey MORE and the following submenu is shown: We have designed the clear submenus in such a way that the softkey ALL will reset all elements displayed on the particular menu page. This means that all console data of the current submenu, except the user profiles, will be reset to factory default settings. -> For quick start guide continue with 3 Configuring the lighting control console CONF is used for resetting the configuration data (details after MEMO submenu). MEMO is used for resetting memories (cue and chase data). Press the softkey MEMO and the following submenu is shown: CUES is used for resetting the cue memory. CHASE is used for resetting the chase memory. FADER is used for resetting fader assignments. Press the softkey CONF in the previous menu and the following submenu is displayed: PATCH is used for resetting the DMX patch. OPTIO is used for resetting the parameters of the CONFIG Option menu. REMOT is used for resetting the remote configuration. Press the softkey REMOT and the following submenu is shown: MIDI is used for resetting the MIDI remote settings. EXTTR is used for resetting the external trigger remote mode settings. DMX is used for resetting the DMX remote settings. 3 Configuring the lighting control console For basic configuration of the console enter the main menu and press CONF. The following menu bar is shown: 3.1 Remote control In the REMOT menu, the basic configuration for remote-controlled working with the console is carried out. Activate this menu by pressing the softkey REMOT. The following submenu is displayed: -12- 12.02.2010 V1.0 In this submenu you can toggle between the stand-alone mode of the Licon FX as fader console and the extension mode to the Licon 1/1X. Here, you can also configure the remote control via DMX In, External Trigger and MIDI In. 3.1.1 Switching from stand-alone to extension mode Press the softkey LICON and the following submenu is displayed: The following three different modes of operation are available: 3.1.1.1 Stand-alone mode of the Licon FX Activate this mode paying attention as to how the menu items are displayed in the menu bar below: The illustration shows that the menu items are not displayed inverted. If a menu item is displayed inverted, deactivate the inversion by pressing the corresponding softkey. In the stand-alone mode of the lighting control console for conventional light, the DMX signal output takes place through the DMX connectors on the rear panel of the console. All data necessary for the operation of the console are exclusively processed by the processor card of the Licon FX. 3.1.1.2 Fader extension mode to Licon 1 Note: Ensure that you have the correct version of the Licon 1 operational software. Take the software version of your Licon 1 from the TOOLS INFO menu of the Licon 1 console. For the use of the Licon 1 with the Licon FX as fader extension, this version number must be equal to or higher than that displayed during the welcome routine. If required, load down the necessary software for your Licon 1 from the service section of our website www.jb-lighting.de . The ZIP file made available to you will also contain update instructions. If you wish to use the Licon FX as fader extension to Licon 1, connect the consoles with the two MIDI connecting cables supplied (max. length: 3m) according to the illustration below. Activate this mode paying attention as to how the menu items are displayed in the menu bar below: The illustration shows that for this mode the menu item LIC 1 is displayed inverted. If this is not the case, press the softkey LIC 1 to activate the inversion. 12.02.2010 V1.0 -13- Enter the TOOLS-REMOT menu of the Licon 1 and press the softkey L-FX to activate the remote mode of the Licon FX (menu item L-FX must be displayed inverted). The message “SYNCHRONIZING... PLEASE WAIT“ will appear on the LCD display of the Licon FX and will disappear again after a few seconds. The two consoles are now synchronised. If the above message does not disappear, please check the wiring on the basis of the above wiring plan. In the fader extension mode, almost all data are processed in the Licon 1. So all Licon FX console data and the Licon FX configuration are saved by the Licon 1 backup. After loading of backup data, the consoles are automatically resynchronised, if necessary. The Licon FX will automatically carry out a reset of the connecting parameters when it is separated from the Licon 1. 3.1.1.3 Fader extension mode to Licon 1X Note: Ensure that you have the correct version of the Licon 1X operational software. Take the software version of your Licon 1X from the TOOLS INFO menu of the Licon 1X console. For the use of the Licon 1X with the Licon FX as fader extension, the version number must be equal to or higher than that displayed during the welcome routine. If required, load down the necessary software for your Licon 1X from the service section of our website www.jb-lighting.de . The ZIP file made available to you will also contain update instructions. If you wish to use the Licon FX as fader extension to the Licon 1X, connect the consoles with the USB connecting cable supplied (max. length: 3m) according to the illustration below. It is very important that you observe the correct connection direction as is illustrated below. Activate this mode paying attention as to how the menu items are displayed in the menu bar below: The illustration shows that for this mode the menu item LIC 1X is displayed inverted. If not, press the softkey LIC 1X to activate the inversion. Enter the TOOLS-REMOT menu of the Licon 1X and press the softkey L-FX to activate the remote mode of the Licon FX (menu item L-FX must be displayed inverted). The message “SYNCHRONIZING... PLEASE WAIT“ will appear on the LCD display of the Licon FX and will disappear again after a few seconds The two consoles are now synchronised. If the above message does not disappear, please check the wiring on the basis of the above wiring plan. In the fader extension mode, almost all data are processed in the Licon 1X. So all Licon FX console data and the Licon FX configuration are saved by the Licon 1X backup. -14- 12.02.2010 V1.0 After loading of backup data, the consoles are automatically resynchronised, if necessary. The Licon FX will automatically carry out a reset of the connecting parameters when it is separated from the Licon 1X. -> For quick start guide to Licon FX as stand-alone console continue with 3.2 DMX patch -> For quick start guide to Licon FX as fader extension continue with 3.3 Option 3.1.2 Remote control via DMX In Press the softkey DMX. The following submenu is shown: The Licon FX comes with a DMX input on the rear panel of the console, which is used to perform the following two functions: Firstly, it provides a DMX merger which links the DMX channels of the DMX input to the internal DMX channels according to the HTP principle (Highest Takes Precedence) and displays the resulting value via the DMX Out connectors. This function is only available in the stand-alone mode of the console. The status of this merger is shown as MERGE on the display and can be changed by pressing the softkey MERGE . Secondly, it is possible that keystrokes on the console are assigned to DMX channels of the DMX input. This assignment allows remote control of certain console functions. A DMX value of more than 26 corresponds to pressing and a value of less than 24 to releasing the assigned key. The status of this function is shown as REMOTE on the display and can be changed by pressing the softkey REMOT . If you wish to change the assignment of the keys to the channels, press the softkey SET. The following submenu is shown: With the Licon FX, a maximum of 24 console keys can be remote-controlled by assignment to DMX channels. Only one assignment at a time is shown on the display, with the corresponding assignment number (1…24) shown in the field “NR :“ Use the encoder if you wish to change the shown assignment number. The menu item DMXCH must not be displayed inverted here. If inversion is present, press the softkey DMXCH for deactivation. The DMX channel to which you want to make the assignment is also selected with the encoder. For this purpose, the menu item DMXCH must be displayed inverted. If this is not the case, press the softkey DMXCH for activation. When the selection of the DMX channels for the assignments is completed, the DMX REMOTE mode is activated and the required values are being loaded on the corresponding channels via the DMX input, the selection of the corresponding assignment is shown on the display as a control. 12.02.2010 V1.0 -15- In order to assign a key to a channel, press the corresponding key on the console. To assign one of the display keys of this menu or the ESC key, press the softkey S-KEY (repeat if necessary). Delete the assignment by pressing the softkey K-OFF . The key selected for the assignment is shown on the display in the third line in the field “KEY :“. Note: The assignments made can be performed only outside this menu. 3.1.3 Remote control via external trigger input Press the softkey EXTTR. The following submenu is shown: The Licon FX comes with an external trigger input on the rear panel of the console to which, for example, a footswitch with two switching functions can be connected. The footswitch must simply connect the Go- or Go+ contact with the GND contact of the connector. It is possible to assign keystrokes on the console to these two switching functions. This assignment allows remote control of certain console functions. The status of this function is shown as REMOTE on the display and can be changed by pressing the softkey REMOT . If you wish to change the assignment of the keys to the switching functions of the footswitch, press the softkey SET. The following submenu is shown: The display shows the assignment for one external switching function at a time. The switching contact selected is shown on the display in the second line in the field “EXTTRG “. Select the other switching function of the footswitch with the encoder or by actuating one of the two external switching contacts while the external trigger remote mode is activated. To assign a key to a switching function, press the corresponding key on the console. To assign one of the display keys of this menu or the ESC key, press the softkey SKEY (repeat if necessary). Delete the assignment by pressing the softkey K-OFF . In the factory default setting, the Go+ and Go- keys of the control section are assigned to the external switching contacts. The key selected for the assignment is shown on the display in the third line in the field “KEY :“. Note: The assignments made can be performed only outside this menu. 3.1.4 Remote control via MIDI This function is not available in the fader extension mode of the Licon FX to Licon 1, since the MIDI interface is used here for data exchange with the Licon 1. Press the softkey MIDI. The following submenu is shown: -16- 12.02.2010 V1.0 The Licon FX comes with a MIDI input on the rear panel of the console, to which you may connect a MIDI keyboard or a MIDI sequencer. It is possible to assign keystrokes on the console to MIDI-note commands. This assignment allows remote control of certain console functions. The status of this function is shown as REMOTE on the display and can be changed by pressing the softkey REMOT . If you wish to change the assignment of the keys to MIDI-note commands, press the softkey SET. The following submenu is shown: The display shows the assignment for one MIDI note at a time. The MIDI note selected is shown on the display in the second line in the field “NOTE:“. To change the current selection you have two possibilities: If you wish to use the encoder to select another assignment, the menu item MIDCH must not be displayed inverted. If inversion is present, press the softkey MIDCH for deactivation. If you wish to change the assignment with a keystroke on a connected MIDI keyboard, ensure that you have chosen the correct MIDI channel and that the MIDI remote mode is activated. The desired MIDI channel is also selected with the encoder. For this purpose, the menu item MIDCH must be displayed inverted. If this is not the case, press the softkey MIDCH for activation. To assign a key to a MIDI-note command, press the corresponding key on the console. To assign one of the display keys of this menu or the ESC key, press the softkey S-KEY (repeat if necessary). Delete the assignment by pressing the softkey K-OFF . In the factory default setting, the flash keys starting from A1 in ascending order are assigned to the MIDI notes starting from C0. The key selected for the assignment is shown on the display in the third line in the field “KEY :“. Note: The assignments made can be performed only outside this menu. 3.2 DMX patch for stand-alone mode of the console This function is not available in the active extension mode of the Licon FX to the Licon 1/1X. In order to carry out the DMX patch for the stand-alone mode of the console, press the softkey PATCH. The available functions are shown on the following two menu pages: 12.02.2010 V1.0 -17- On the upper left of the patch display in the field “SEL:...“ you will see the currently selected console channel or AUX channel that is to be patched. On the upper right of the display in the field “DMX:...“ you will find the DMX channel selected for the patch. If the console channel currently selected is already patched, this field will be displayed as “DMX:---“. In the second line of the patch display you will find four fields determined for the four patches (PAT1 ... PAT4) that are possible for each console channel or AUX channel. The four fields in the third line show the DMX addresses of already performed patches as well as the channel characteristics. To select the console channel to be patched enter either the first menu page. The menu item DMXCH must not be displayed inverted here. Or enter the second menu page. If the menu item DMXCH on the first menu page is displayed inverted, press the softkey DMXCH to deactivate the inversion. Use the encoder to select the console channel for the patch. The console channels 1...96 are selected first and the channels AUX1....AUX3 afterwards. The softkey PATCH will only be displayed, when the channel is not already patched. Otherwise, the softkey OPEN is shown on the display. With this softkey, you can cancel an already existing patch performed for the channel of your choice. Each console channel or AUX channel can be patched to a maximum of four DMX channels. Enter the second menu page and press the softkey PATNR (number of patch) to select one of these four possible patches. Enter the first menu page to select the DMX channel for the patch. The menu item DMXCH must be displayed inverted. If this is not the case, press the softkey DMXCH to activate the inversion. Now select the DMX channel to be patched with the encoder. Press the softkey PATCH to patch the currently selected console channel or AUX channel to the currently selected DMX channel. The menu item 1 : 1 will patch all console channels to DMX channels in ascending order, beginning with the channels currently selected for the patch. Press the softkey 1 : 1, confirm the security check and select the number of channels to be patched from the values 24, 48, 72 and 96. Note: this function will delete an already existing patch. The softkey CLEAR deletes a complete patch. The menu item CURVE allows you to choose between the following three channel properties, which are indicated by the corresponding symbols: -> Linear function: Linear conversion between channel value and DMX value -> Logarithmic function: Logarithmic conversion between channel value and DMX value -> Switching function: A channel value < 128 displays a DMX value of 0; a channel value ≥ 128 displays a DMX value of 255 3.3 Option In the option menu you can configure additional functions for live performance. Press the softkey OPTIO to enter this menu. The following menu bar is shown: -18- 12.02.2010 V1.0 3.3.1 Manual fade The Licon FX allows you to use the chase faders in order to perform manual fades. -> For quick start guide continue with 3.3.2 Flash To configure this function press the softkey MFADE. The following display is shown: For a more elaborate usage of this function see 6.4.3.5 Manual sequencing by chase faders. The display shows two consecutive chases that you can configure in this setting. The designation of the currently selected faders you wish to configure is shown on the left side of the display. Select the faders either with the encoder or with the flash key that belongs to the fader of your choice. You can choose between the following three modes of configuration, the current setting being shown in the menu bar and in the middle of the display: -> Combined fader for brightness and fading: Activate this mode paying attention as to how the menu items are displayed in the menu bar below: As you can see in the illustration above, the menu item COMB 1 is not displayed inverted. In case of inversion, press the softkey COMB 1 for deactivation. Since this mode requires only one fader for the manual fade of a chase, the other fader can be used to control a separate chase. -> Separate faders for brightness and fading, automatic switching Activate this mode paying attention as to how the menu items are displayed in the menu bar below: As illustrated above, the menu items COMB 1 and AUTO 1 must be displayed inverted. If this is not the case, press the softkey COMB 1 and/or AUTO 1 for activation. The menu item AUTO 1 will only be displayed, when the COMBImode is activated (COMB 1 is inverted). Since this mode requires two faders for the manual fade of a chase, the second fader can no longer be used to control a separate chase. -> Separate faders for brightness and fading, manual switching with keys Activate this mode paying attention as to how the menu items are displayed in the menu bar below: 12.02.2010 V1.0 -19- As illustrated above, the menu item COMB 1 must be displayed inverted and AUTO 1 must not be displayed inverted. If this is not the case, press the softkeys COMB 1 and AUTO 1 for activation or deactivation. The menu item AUTO 1 will only be displayed, when the COMBI-mode is activated (COMB 1 is inverted). Since this mode requires two faders for the manual fade of a chase, the second fader can no longer be used to control a separate chase. 3.3.2 Flash The Licon FX provides the possibility of optionally configuring flash keys of the chase fader as trigger keys (or Go+) for the respective chase. -> For quick start guide continue with 3.4 Access Configure this function by pressing the softkey FLASH. The following display is shown: For a more elaborate usage of this function see 6.4.3.2 Manual sequencing via Go keys. The display shows two consecutive chase flash keys that you can configure in one setting. The designation of the currently selected keys you wish to configure is shown on the left side of the display. Select the flash keys either with the encoder or by pressing the relevant flash key. Press the softkeys GO1 and GO2 to toggle between the flash and trigger (Go+) mode of the keys. You can see the current mode of the flash keys in the menu bar and in the central part of the display. If the menu item GO1 or GO2 is displayed inverted, then the corresponding flash key is used in the trigger mode. Otherwise (no inversion), it is used as flash key. 3.4 Access You can create up to five different user profiles for the Licon FX. Thus, different users may be granted different user rights and unauthorised access to the console is blocked. -> For quick start guide continue with 4 Basic control elements To configure the access function press the softkey ACCES. The following display is shown: Activate the password protection by pressing the softkey CHECK. However, you must enter a master password for the master user profile before this Softkey will be -20- 12.02.2010 V1.0 shown. Now press the softkey SET to configure the user profiles. The following submenu is shown: The heading names the currently selected user profile. The line „USER PW :“ shows the selected password. The line below “CONFIG ACC:“ designates the user rights for access to the CONFIG menu and the last line “STORE ACC :“specifies the user rights for access to memories and fader assignments. The master profile always has full access to all functions. Enter master password first and then select the user profiles with the encoder. A password consists either of one digit or of a sequence of up to 10 digits selected from the numbers 0 to 9. The password is entered with the flash keys 1 to 8 of bank A and the flash keys 9 to 10 of bank B. The key 10 corresponds to digit 0. Digits are deleted by pressing the softkey DELCH. After you have selected one of the profiles from USER 1 to USER 4 with the encoder, the softkeys required for selection of the user rights are now shown on the display in addition. Press the softkey CONF to choose between full access (FULL) and no access authorisation (DENIED) to the CONFIG menu. Press the softkey STORE to choose between full access (FULL), limited access (LIMITED) and no access (DENIED) authorisation to memories and fader assignments. The LIMITED access mode allows only storage access to cues and chases of page 3 (see also 4.4 Cues and chases) and change of the storage assignments for the faders of bank D (see also 4.5.2 Changing the assignment between faders and internal memory). With this access hierarchy you may, for example, program the Licon FX in such a way that only cues and chases of page 1 and 2 as well as faders of bank A to bank C can be used when the console is run in a discotheque or a club. This limited user profile allows a light jockey, who is not so familiar with the functions of the console, to acquire a good knowledge of these functions and to create programs without being able to change the basic configuration of the console. If you wish to activate one of the user profiles from USER 1 to USER 4, you are required to enter a password first. The softkey STAT is used to activate or deactivate the user profiles and toggle between the status ACTIVE and INACTIVE of a profile. Note: The password protection is activated in the ACCESS main menu, as described above. You can lock the console during operation with the softkey LOCK in the TOOLS menu (see 7.1 Locking the console). 12.02.2010 V1.0 -21- 4 Basic control elements 4.1 Storage elements The Licon FX comes with two elements for the management of self-programmed lighting states: Cues are used to store single lighting states. Chases are used to store a sequence of lighting states. The mode of operation of these elements corresponds to that of the respective elements of the Licon 1/1X. The following two modes of operation are distinguished: The STORE Mode stores currently programmed lighting states in a cue or a chase. The EDIT Mode allows subsequent modification of parameters. The menu items STORE and EDIT in the main menu are used for activation of these two modes of operation. 4.2 A/B fader sections The following principle of operation applies for both the extension mode and the stand-alone mode of the Licon FX: The console has a brightness master fader and a BLACKOUT key belonging to this fader. The activation of this key corresponds to a fader value of 0%. Furthermore, the Licon FX is equipped with two fader sections A and B. Each of these sections has a brightness submaster fader. Unlike the fader sections of many other PAR consoles, the fader sections of the Licon FX can be configured to allow single channel access (channel blocks of 24 channels) as well as access to cues and chases. A great advantage of this configuration is that 48 faders are available both during the programming phase for access to a single channel and during a show for access to cues and chases. The configuration data are modified separately for the sections A and B by pressing the keys MODE A and MODE B. Both keys have two integrated LEDS, which signalise the current mode of the corresponding section: no LED active section is used for access to cues and chases red LED is lit single channel access to channels 1...24 green LED is lit single channel access to channels 25...48 red LED flashes single channel access to channels 49...72 green LED flashes single channel access to channels 73...96 If a fader section is switched to another channel section during the single channel access mode, a fader only becomes active for a channel when it is moved past the value active so far for this channel. The fader sections used for access to cues and chases are further subdivided into: 2 fader banks per fader section, where bank A and B are assigned to section A, and bank C and D to section B 8 faders per fader bank for storage of single cues and 4 faders per fader bank for storage of chases or single cues. This subdivision was chosen for reasons of compatibility with the PAR section of the Licon 1/1X console. -22- 12.02.2010 V1.0 Take into consideration the following aspects while you are programming cues or chases: The submaster faders of the sections A/B principally influence the brightness values to be stored. The master faders and the BLACKOUT key only have an influence on the displayed DMX output values, but not on the values relevant for programming, a fact that allows a kind of “blind“ programming. -> For quick start guide continue with 4.5 Control section 4.3 Swap function The swap function is used to set lighting highlights. For this purpose, flash keys of the fader sections A and B are pressed while the swap function is activated. The fader values of those faders with activated flash keys are then set to 100%, while the other fader values of the sections A and B are set to 0%. Press the SWAP key to activate (corresponding LED is active) or deactivate (corresponding LED is inactive) the swap function. In the fader extension mode of the Licon FX to the Licon 1/1X you can define in the CONFIG OPTION menu of Licon 1/1X, to which extent the swap functions for intelligent light and conventional light may influence each other. 4.4 Cues and chases For reasons of compatibility, we have designed the internal storage management of the Licon FX in analogy to the PAR section of the Licon 1/1X console. As already mentioned under 4.2 A/B fader sections, a maximum of 48 faders is available for access to cues and chases. Since the Licon FX is equipped with the same internal storage management as the Licon 1/1X, the console is capable of storing a far larger number of cues and chases. The following storage management for cues will arise: - 3 pages - 4 banks / page - 16 cues / bank - 8 cues that cannot be switched by page/bank keys This results in a maximum storage capacity of 3 x 4 x 16 + 8 = 200 cues. The following storage management for chases will arise: - 3 pages - 4 banks / page - 8 chases / bank This results in a maximum storage capacity of 3 x 4 x 8 = 96 chases. The 48 faders of the sections A and B are linked to these internal storage locations. The following links will result with default settings or after a reset: Fader internal storage location Section A bank A fader 1 page 1 bank A cue 1 Section A Bank A fader 2 page 1 bank A cue 2 ... Section A bank A fader C1 page 1 bank A chase 1 Section A bank A fader C2 page 1 bank A chase 2 … Section A bank B fader 1 page 1 bank B cue 1 ... 12.02.2010 V1.0 -23- Section B bank C fader 1 page 1 bank C cue 1 ... Section B bank D fader 1 page 1 bank D cue 1 It is possible to change the above links (see 4.5.2 Changing links between faders and internal storage). 4.5 Control section As already described previously, the encoder of the control section is used in order to change chase parameters as well as data on the LCD display. The elements of the control section are as a rule also used to change the links between faders and internal storage, as described under 4.4 Cues and chases, and to change chase parameters. You can assign the control section to any cue or chase fader. 4.5.1 Assigning the control section to a cue or chase fader The control section is assigned to cue or chase faders either automatically by activation in the STORE or EDIT menu (see: 5 Cues or 6 Chases) or manually in the main menu. For manual selection in the main menu press and hold the SELECT key of the control section. Then select the fader to which you want to assign the control section by pressing the corresponding flash key of the fader (BANK A 1...C4, BANK B 1...C4, BANK C 1...C4, BANK D 1...C4). Now release both keys. Thus the selected fader is defined master of the control section and is displayed in the field “SEL” as follows: e.g.: SEL: A 1 control section is assigned to cue fader bank A fader 1 SEL: DC2 control section is assigned to chase fader bank D fader C2 -> For quick start guide continue with 4.5.3 Changing chase parameters with elements of the control section 4.5.2 Changing links between faders and internal storage To change the link between a fader and the internal storage location, the corresponding fader section must not be in single channel access mode (see 4.2 A/B fader sections). After selection press SELECT key again and the following display is shown: The field ACTIVE SELECTION shows the link that is currently active. The field NEXT SELECTION shows the link that is activated, when the fader value 0% is reached. Use the encoder if you wish to carry out changes in the field NEXT SELECTION. -24- 12.02.2010 V1.0 4.5.3 Changing chase parameters with elements of the control section How chase parameters are changed with elements of the control section is described in detail in 6.4 Modifying chase parameters. By use of the control section, chase parameters, once selected in the control section, can also be changed outside the EDIT or STORE menu. 5 Cues 5.1 Screen display in the STORE and EDIT mode The cue main menu has the following structure: In the upper left of the display, the current mode is shown: „PROG MEMO“ for the STORE mode and „EDIT MEMO“ for the EDIT mode. In the line below on the left you will find the field for the internal storage location used. In this example, „1A01“ stands for page 1, bank A, cue 1. In the same line on the right you will find the field for the cue name. A cue name may have a maximum of 13 characters. Finally, the storage matrix is shown on the central left of the display. In this matrix, one pixel is set for each console channel from 1...96 of the stored cue with a brightness value of non-zero. The 96 console channels are subdivided into three lines with 32 channels each: Line 1: channels 1...32 Line 2: channels 33...64 Line 3: channels 65...96 5.2 Storing cues If you wish to store cues, you must first of all set the lighting state to be stored with the faders of the sections A and B. This lighting state may consist of single channels or of already programmed lighting states. It is therefore of importance that the faders of the A/B fader section have the desired configuration. Take into account that the position of the submaster faders will influence the dimmer values to be stored (see: 4.2 A/B fader sections). Enter the main menu and press the softkey STORE. The corresponding STORE LED will be activated. Then select the storage destination for the cue by pressing the flash key of the desired cue fader (BANK A 1...8, BANK B 1...8, BANK C 1...8, BANK D 1...8). The STORE LED is now flashing and the display as described under 5.1 Screen display in the STORE and EDIT mode is shown. Cancelling of the storage process is only possible by pressing the ESC key. For completion of the storage process, press softkey STORE again and the cue will be stored. This cue is now on request on the corresponding cue fader, unless the fader section of this fader is currently in the single channel access mode (see 4.2 A/B fader sections). If the storage destination is already occupied by a cue, this cue will be overwritten by the storage process. You can also delete this cue by pressing the softkey CLEAR. 12.02.2010 V1.0 -25- -> For quick start guide continue with 6 Chases 5.3 Changing cue parameters 5.3.1 Changing the name -> You can change this parameter in the STORE or EDIT menu To change the name of a cue press the softkey NAME. The following menu bar is shown: Delete the entire name by pressing the softkey CLEAR. Use the encoder to change the last character of the name. Delete the last character of the name by pressing the softkey DELCH (delete character). Add a character to the name by pressing the softkey INSCH (insert character). 6 Chases 6.1 Screen display in the STORE and EDIT mode The chase main menu is structured as follows: The upper left of the display shows the current mode: “PROG CHASE“ for the store mode and “EDIT CHASE“ for the edit mode. To the right of this field, the current length of the chase is displayed. In the right upper corner of the display, after the note sign, you will find the beat count value. In the line below on the left, you will find the field for the internal storage location used. In this example “1A01“ indicates page 1, bank A, chase 1. In the same line on the right, you will find the field for the chase name. The chase name may have a maximum of 13 characters. In the next line on the left, the chase step currently selected is shown (here: 1). To the right of this field there is a little white rectangle which will be marked, if the currently selected step is part of a block. The next element in this line is the field for the indication of the chase direction (here: - - >) and after that a field, in which the current flow control mode is displayed. On the central left of the display, the storage matrix is shown. In this matrix, one pixel is set for each console channel from 1...96 of the stored step with a brightness value of non-zero. The 96 console channels are subdivided into three lines with 32 channels each: Line 1 : channels 1...32 Line 2 : channels 33...64 Line 3 : channels 65...96 To the right of the matrix field in the field “FT …”, the fade time between two subsequent steps is displayed either in seconds or as percent value. -26- 12.02.2010 V1.0 Finally, the line below shows the speed of the chase in the AUTO mode expressed either in seconds or hertz. The speed time is also used as a basis for scaling of the fade time, if the fade time is a percentage value. 6.2 Storing chases In order to store chases, you must first of all - in analogy to the storage of cues - set the lighting state to be stored with the faders of the A/B section. This lighting state may consist of single channels or of already programmed lighting states. It is therefore of importance that the faders of the A/B fader sections have the desired configuration. Take also in account that the position of the submaster faders will influence the dimmer values to be stored (see 4.2 A/B fader sections). Enter the main menu and press the softkey STORE. The corresponding STORE LED is activated. Now select the storage destination for the chase by pressing the flash key of the desired chase fader (BANK A C1...C4, BANK B C1...C4, BANK C C1...C4, BANK D C1...C4). The STORE LED is now flashing and the display as described under 6.1 Screen display in the STORE and EDIT mode is shown. If the storage destination is already occupied by a chase (length L: non zero), you can delete this chase by pressing the softkey CLEAR. Cancelling of the storage process is only possible by pressing the ESC key. For completion of the storage process, press the softkey STORE again and the lighting state will be stored on the chase position currently selected. The free position after the last chase step is the standard destination for storage of a new chase step. You can change the storage position of steps within the chase using the encoder. This change is only possible, however, if the chase contains at least one step. If you select an already existing step, this step will be overwritten by the lighting state to be stored by pressing the softkey STORE With the softkey INS (insert) it is possible to insert the lighting state to be stored in the currently selected position. Within the chase, all subsequent steps plus the step currently selected will then be shifted backward by one position. This chase is now on request on the corresponding chase fader, unless the fader section of this fader is currently in the single channel access mode (see 4.2 A/B fader sections). 6.3 Editing chases The EDIT mode will modify stored chase steps and chase parameters. -> For quick start guide continue with 6.4 Modifying chase parameters Enter main menu and, in analogy to editing cues, press the softkey EDIT to edit chases. The corresponding LED is activated. Select the chase to be edited by pressing the flash key of the desired chase fader (BANK A C1...C4, BANK B C1...C4, BANK C C1...C4, BANK D C1...C4). The display as described under 6.1 Screen display in the STORE and EDIT mode is shown with the following menu bar: 6.3.1 Deleting the entire chase Press the softkey CLEAR to delete the entire chase. 12.02.2010 V1.0 -27- -> For quick start guide continue with 6.4 Modifying chase parameters 6.3.2 Modifying steps Press the softkey MODIF (modify) to modify steps. The following menu bar is shown: 6.3.2.1 Deleting steps To delete a single step select the step to be deleted with the encoder first and then press the softkey DELST (delete step) to execute the deleting process. 6.3.2.2 Duplicating steps To duplicate a single step select the step to be duplicated with the encoder first and then press the softkey DUPST (duplicate step) to execute the duplicating operation. The new step will be inserted after the step from which the duplicate is made. 6.3.2.3 Block operations Block operations will delete, copy or shift single steps or a group of steps. Carry out block operations as follows: First select the beginning of the block with the encoder. Then press and hold the softkey BLOCK. Highlight the end of the block with the encoder (only if the block consists of more than one step). Now release the softkey BLOCK again. The block is now highlighted and the following menu bar is shown: You can verify the highlighting of the block by moving the encoder. Steps are part of this block, when the field to the right of the current step number will be highlighted. The menu item B-MOV will only be displayed when the step currently selected allows moving. 6.3.2.3.1 Deleting a block Press the softkey B-DEL (block deletion) to delete the highlighted block. 6.3.2.3.2 Copying a block Select the step to which you want to add the copy. Press the softkey B-CPY (block copy) to execute the copying process. 6.3.2.3.3 Moving a block Select the step to which you want to move the block. Press the softkey B-MOV (block move) to execute the moving process. 6.4 Modifying chase parameters In order to modify chase parameters, enter the chase STORE or EDIT menu and press the softkey PARAM (parameter). The following menu bar is displayed: -28- 12.02.2010 V1.0 The following two parameters are distinguished here: Parameters that can only be modified when the STORE or EDIT menu is activated and parameters that can also be modified by elements of the control section, when a chase is directly selected (see 4.5.1 Assigning the control section to a cue or chase fader). In the more detailed description of the parameters below, we have pointed out the modes that are possible for modification of each of these parameters (->). 6.4.1 Using speed groups -> The parameter speed group can only be modified in the STORE or EDIT menu A distinction is made between two further categories of chase parameters: Firstly, the parameters name and speed group that are only applicable to a single chase. Secondly, all other parameters that are applicable either to a single chase or to a group of chases. These groups of chases are referred to as speed groups. A maximum of 16 speed groups can be used. If you modify parameters of a chase that is a member of a speed group, then these parameters are automatically modified for all other chases belonging to this group. The current setting of the speed groups is shown on the display in the line for the chase speed (upper line in the illustration below). If “SP: ...“ is displayed in the left upper corner, no speed group is currently active for this chase. “G n: ...“ is shown in this position when a speed group is selected, n standing for the group numbers from 1…16. In addition, the softkey SPGRP in the menu bar is displayed inverted. If you wish to activate or modify a group, press and hold the softkey SPGRP. Then select the desired speed group from the imprint “Speed group“ on the front panel of the console and press the corresponding FLASH key of section A. Now release both keys. To deactivate an active speed group press and release the softkey SPGRP. 6.4.2 Changing the name -> The parameter name can only be changed in the STORE or EDIT menu Press the softkey NAME to change the name of the speed group. The following menu bar is displayed: Delete the entire name by pressing the softkey CLEAR. The encoder is used in order to change the last character of the name. Delete the last character of the name by pressing the softkey DELCH (delete character). Add a character to the name by pressing the softkey INSCH (insert character). 12.02.2010 V1.0 -29- 6.4.3 Changing flow control -> The parameter flow control can be changed both in the STORE or EDIT mode and by direct selection via the control section Flow control determines the way in which you can switch from one step to another. The current setting is displayed in the activated STORE or EDIT mode (see 6.1 Screen display in the STORE and EDIT mode ). The current setting is also signalised by the two LEDs of the SOUND and the GO key as well as by the right (green) LED of the TIME/MAN-FADE key of the control section. These keys are used to change the flow control and are described in more detail below. 6.4.3.1 Automatic sequencing with adjustable speed This mode is displayed in the STORE or EDIT mode as follows: Activate this mode paying attention to the three LEDs of the control section mentioned above. As illustrated, the three LEDs must not be activated for this mode. If activated, deactivate the relevant LEDs by pressing the corresponding keys (repeatedly, if necessary). In the automatic flow mode, steps are switched forward automatically after a defined period of time. This time interval between the steps (also called chase frequency) is shown on the display in the line for chase speed (see 6.1 Screen display in the STORE and EDIT mode ) and can be changed with the encoder or the LEARN key of the control section. If you wish to change the chase frequency with the encoder while the STORE or EDIT mode is activated, ensure that you are in the PARAM menu and that the menu item FADET (fade time) is not displayed inverted. If activated, press the softkey FADET for deactivation. A change of the chase frequency with the LEARN key is reasonable, if you wish to adjust the frequency to the beat of a running piece of music. Press the LEARN key twice to carry out this operation. The first keystroke will start the measurement of the desired frequency (LED of this key begins flashing). The second keystroke will finish -30- 12.02.2010 V1.0 the measurement of the desired frequency (LED stops flashing) and the new chase frequency will be adopted. 6.4.3.2 Manual sequencing via Go keys This mode is displayed in the STORE or EDIT mode as follows: Activate this mode paying attention to the LEDs of the control section mentioned above. As can be seen from the illustration, only the LED for the Go key may be activated for this mode. If this is not the case, activate or deactivate the relevant LEDs by pressing the corresponding keys (repeatedly, if necessary). In the manual flow mode, you can switch from one step to the next or previous step by pressing the GO+ or GO- keys. The use of the manual instead of the automatic flow mode may be indicated, for example, if you have to react to breaks in the music. This mode is appropriate for temporary manual triggering of chases, since chases can only be switched forward via the control section when they are directly selected or when they belong to a speed group, an element of which is currently selected. If you wish to always trigger a chase manually, we recommend that you configure the corresponding flash key as trigger key (see 3.3.2 Flash). -> For quick start guide continue with 6.4.4 Changing the fade time 6.4.3.3 Manual sequencing by sound trigger This mode is displayed as follows in the STORE or EDIT mode: Activate this mode paying attention to the LEDs of the control section mentioned above. As can be seen from the illustration, only the LED for the sound key may be activated in this mode. If this is not the case, activate or deactivate the relevant LEDs by pressing the corresponding keys (repeatedly, if necessary). In this mode, the switch to the next step is triggered by the low-frequency part of an audio signal (e.g. bass drum). For this purpose, you can induct a line audio signal via the Sound In input. In the stand-alone mode of the console, use the Sound In input on the rear panel of the Licon FX (see 1.2.3 Control elements on the rear panel ). In 12.02.2010 V1.0 -31- the fader extension mode to the Licon 1/1X, use the Sound In input on the rear panel of the Licon 1/1X. The frequency will be filtered within the corresponding console. To avoid uncontrolled switching forward caused by multi pulses, a gate time can be set. This means that after a bass impulse the sound input is inactivated for this defined period of time. A gate time of about 0.4 seconds has proved to be a practicable value. In the stand-alone mode of the console, the gate time is set in the TOOLS-SOUND menu of the Licon FX (see 7.2 Setting a gate time for the sound input ). In the fader extension mode to the Licon 1/1X, the gate time is set in the TOOLS-SOUND menu of the Licon 1/1X. Furthermore, you can define the number of beats that should occur, before a switch to the next step is triggered. This defined number of beats is called the beat count. The current setting is shown on the display in the STORE or EDIT mode. You can choose a beat count between 1...16 beats. For this purpose, press and hold the SOUND key of the control section. Then select the desired beat count from the imprint Beat Count on the front panel of the console by pressing the corresponding FLASH key of section A. Now release both keys. 6.4.3.4 Manual sequencing by fader of the control section This mode is displayed in the STORE or EDIT menu (MFTM Manual Fade Time/Man-Fade Fader) as follows: Activate this mode paying attention to the LEDs of the control section mentioned above. As you will see in the illustration, only the green LED for the Time/Man Fade key may be lit. If this is not the case, activate or deactivate the LEDs by pressing the corresponding keys (repeatedly, if necessary). In the manual flow mode with fading by faders of the control section, fading to the next step is carried out by alternately moving up and down the Time/Man Fade fader. As soon as the fader has reached its minimum or maximum position, the console changes to the next step fade. This mode is appropriate for temporary manual fades, since chases can only be faded with the fader of the control section when they are directly selected or when they belong to a speed group, an element of which is currently selected. For permanent manual fading of a chase we recommend that you configure the chase fader for fading (see 6.4.3.5 Manual sequencing by chase faders). 6.4.3.5 Manual sequencing by chase faders This mode is displayed in the STORE or EDIT mode (MFC Manual Fade Chase fader) as follows: -32- 12.02.2010 V1.0 Activate this mode paying attention to the LEDs of the control section mentioned above. As can be seen in the illustration, only the green LED for the Time/Man Fade key may be flashing. If this is not the case, activate or deactivate the LEDs by pressing the corresponding keys (repeatedly, if necessary). In the manual flow mode with fading by chase faders, fading to the next step is carried out by alternately moving the chase fader up and down. When the fader has reached its minimum or maximum position, the console changes to the next step fade. This mode is appropriate for permanent manual fade of chases. There are three modes of operation, which will be described in the chapters below. These modes are configured in the CONFIG-OPTION-MFADE menu (see 3.3.1 Manual fade). A basic distinction is made between a) one mode of operation where a chase fader is employed for combined use for brightness control and fading and b) two modes of operation where the actual brightness fader of the chase remains as such and the subsequent chase fader is used for the fading operation. The later allow configuration of the chase fader combinations C1/C2 and C3/C4 on each bank. 6.4.3.5.1 Combined fader for brightness and fading Activate the desired chase fader by pressing the Time/Man-Fade key and adjust the desired brightness for the fade first. Then press the corresponding flash key in order to use the fader for fading between the chase steps. Move the fader to its minimum or maximum position and the console will change to the next step fade. To complete the fade, press the corresponding flash key again and then move the fader to the 100% position. If you are now moving the fader towards the 0% position, the fader will assume the function of a brightness controller as soon as it has reached the brightness value selected at the beginning of the fade. If you have accidentally activated a fade with a brightness of 0%, you can switch directly to the brightness adjustment mode by selecting the chase in the control section (see 4.5.1 Assigning the control section to a cue or chase fader) and then pressing the RESTART key. 6.4.3.5.2 Separate faders for brightness and fading, automatic fade This mode needs two faders for control of the manual fade. The left fader is used as brightness fader. The chase you want to use for the fade is stored on this fader and the flash key of this fader is used for selection of the chase in the control section. The right fader is used exclusively for fading between the chase steps. When the fader is moved to the minimum or maximum position, fading to the next step is carried out automatically. The flash key of the second fader has no function in this mode. 12.02.2010 V1.0 -33- If you wish to reset the chase to the first step, select the chase in the control section (see 4.5.1 Assigning the control section to a cue or chase fader) and press the RESTART key. 6.4.3.5.3 Separate faders for brightness and fading, manual change with key This mode also needs two faders for control of the manual fade. The left fader is used as brightness fader. The chase you want to use for the fade is stored on this fader and the flash key of this fader is used for selection of the chase in the control section. The right fader is used exclusively for fading between the chase steps. In this mode, you can change to the next step fade by pressing the flash key of the right fader. If you wish to reset the chase to the first step, select the chase in the control section (see 4.5.1 Assigning the control section to a cue or chase fader) and press the RESTART key. 6.4.4 Changing the fade time -> The parameter fade time can be changed both in the STORE or EDIT mode and by direct selection in the control section The parameter fade time determines the fade time between two chase steps. This applies to the modes automatic sequencing, manual sequencing by Go keys and manual sequencing by sound trigger. This parameter is displayed in the STORE or EDIT menu in the following line: On principle, the following two modes are distinguished: In the absolute mode, the fade time is a fixed time factor expressed in seconds. This mode is active, when the softkey LINKF in the PARAM menu is not displayed inverted. In the relative mode, the fade time is expressed as a percentage value. Here, the fade time is calculated as a percentage of the speed parameter. The advantage of this method is that if the speed is changed in the automatic mode, the fade time will be changed correspondingly. This mode is active, when the softkey LINKF is displayed inverted. You may toggle between the two modes with the softkey LINKF. Two possibilities are available to change the fade time: If you wish to change the fade time with the encoder in the active STORE or EDIT mode, ensure that you are in the PARAM menu and that the menu item FADET (fade time) is displayed inverted. If not, press the softkey FADET (fade time) for activation. You may also use the Time/Man-Fade fader of the control section to change the fade time. For this purpose, the left (red) LED of the TIME/MAN-FADE key must be activated. If this is not the case, press the said key for activation (repeatedly, if necessary). As soon as the Time/Man-Fade fader is moved, the fade time is set between 0 to 10 seconds. If the fade time is expressed in seconds, you can adjust the fade time directly by changing this parameter. If the fade time is expressed as a percentage value, the fade time is changed in that the chase speed is adjusted correspondingly. This is only possible, however, if the fade time parameter is not set to 0%. -34- 12.02.2010 V1.0 6.4.5 Changing direction -> This parameter can be changed both in the STORE or EDIT mode and by direct selection in the control section The parameter direction determines in what order chase steps are called. The current setting of this parameter is shown on the display in the active STORE or EDIT menu (see 6.1 Screen display in the STORE and EDIT mode). It is also signalled by the status of the LEDs of the DIRECTION key in the control section. There are the following three possibilities to change this parameter: -> Direction forward, symbol ““, no LED of the DIRECTION key is active -> Direction backward, symbol ““, left (red) LED of the DIRECTION key is active -> Direction changes after each completed run, symbol ““, right (green) LED of the DIRECTION key is active You may toggle between directions with the DIRECTION key of the control section. 7 Tools Enter the main menu and select the menu item TOOLS for performance of auxiliary functions. The tools available are shown on the following three menu pages: -> For quick start guide continue with 7.3 Performing a backup in the stand-alone mode 7.1 Locking the console With the menu item LOCK you can block the console against unauthorised access. This menu item is only shown on the display, when at least one user profile has been configured in the CONF-ACCES menu and the password check is activated (see 3.4 Access) 7.2 Setting a gate time for the sound input This function is not available when the Licon FX is in the active extension mode to Licon 1/1X. Here, the gate time is set in the TOOLS-SOUND menu of the Licon 1/1X. In the Licon FX, the gate time for the sound input located on the rear panel of the console is set with the menu item SOUND. This means that after a bass impulse the sound input is inactivated for this defined period of time. A gate time of about 0.4 seconds has proved to be a practicable value. When a line sound signal comes up at the sound input, the evaluation of the bass impulse is shown as a small bar graph on the upper right of the display. 7.3 Performing a backup in the stand-alone mode This function is not available in the activated extension mode of the console to the Licon 1/1X. Here, the backup of all Licon 1/1X and Licon FX data is performed in the BACKUP menu of the Licon 1/1X. 12.02.2010 V1.0 -35- Use a customary USB memory stick formatted with the FAT 32 file system for backup of the Licon FX console data. As a rule, all customary USB memory sticks should be compatible with the Licon FX. If your memory stick will not be recognised by the Licon FX, please contact our technical support under the email address [email protected] .The memory sticks available from JB-Lighting were tested especially with respect to the use with our lighting control consoles. Press the softkey BACKU to start the backup process. The following display is shown, when your USB memory stick is not yet connected to a USB Out of the Licon FX: Plug in the memory stick and the following (or similar) display is shown: The name of the memory stick is displayed and the softkey USB is visible in the menu bar. Press this softkey to get to the following submenu: In the centre of the display you can see an entry of the currently selected directory with indication of the name, file name extension, date and time of the storage operation. Select the respective entries with the encoder. The softkey DIR is used to load the directory when you have changed the memory stick. The position of the softkey DIR in the backup menu is replaced by CHDIR, if the currently selected entry is a subdirectory “<directory name>“ or a superior directory “<.. >“. Use this softkey to switch to the corresponding directory. Delete the currently selected entry by using the softkey DEL. 7.3.1 File formats and file name extensions The Licon FX supports three different file formats with their corresponding file name extension for data backup. Use the following softkeys to select one of these file formats during the storage or loading process: The softkey ALL is used for backup of all console data except user profiles. The corresponding backup files have the file name extension “.LFA“. -36- 12.02.2010 V1.0 The softkey MEMO is used for backup of all cue and chase data as well as the fader assignments. The corresponding backup files have the file name extension “.LFM“. The softkey CONF is used for backup of all CONFIG data except user profiles. The corresponding backup files have the file name extension “.LFC“. 7.3.2 Storing console data The softkey SAVE is used for the storage of console data. Press this softkey and the following submenu is shown: Select the desired file format and the following is shown on the display: This submenu exclusively shows files of the selected file format with their corresponding extension as well as directory entries. If you wish to store data to another directory, select this desired directory as described above. For this purpose, the menu item FNAME must not be displayed inverted. Deactivate an inversion by pressing the softkey FNAME. In order that data can be stored create and enter a file name with no more than 8 characters. The following two possibilities are available for this: Firstly, you can enter the file name using the encoder, the softkey INSCH (insert character) and the softkey DELCH (delete character). The menu item FNAME must be displayed inverted. If this is not the case, activate the inversion by pressing the softkey FNAME. Secondly, you can select an already existing file name from the directory with the encoder for storage of your data. The menu item FNAME is not displayed inverted here. If inverted, deactivate the inversion by pressing the softkey FNAME. To execute the storage process, press the softkey EXEC. The menu item EXEC will only be displayed, when you have defined a file name under which you want to store the console data. If a file of the selected format and with identical file name already exists in the current directory, you are prompted to acknowledge that the file will be overwritten. 7.3.3 Loading console data The softkey LOAD is used to load previously saved console data. Press this softkey and the following submenu is displayed: 12.02.2010 V1.0 -37- Select the desired file format and the following display is shown: This submenu exclusively displays files with their corresponding extension as well as directory entries. Use the encoder to select the desired file or to switch to another directory as described above. If you have selected a file, the softkey EXEC is displayed. Press this softkey to load the file. 7.4 Adjusting the brightness of the desk lamps Activate the menu item DLAMP and adjust the brightness of the desk lamps with the encoder. 7.5 Adjusting the display brightness Activate the menu item DISPB and adjust the display brightness with the encoder. 7.6 Adjusting the display contrast Activate the menu item DISPC and adjust the display contrast with the encoder. 7.7 Setting the real-time clock With the menu item CLOCK you can set the internal real-time clock. Activate this menu item and the following menu bar is shown: 7.7.1 Setting the date Activate the menu item DATE to set the date. The following submenu is shown: Select the parameter to be changed by pressing the corresponding softkeys (DAY, MONTH, YEAR) and change the parameters with the encoder. Confirm the new date by pressing the softkey SET. 7.7.2 Setting the time Activate the menu item TIME to set the time. The following submenu is displayed: Select the parameter to be changed by pressing the corresponding softkeys (HOUR, MIN, SEC) and change the parameters with the encoder. Confirm the new time by pressing the softkey SET. -38- 12.02.2010 V1.0 7.8 Displaying serial number and software version Press the softkey INFO to call up the serial number of the console as well as the current version number of the operating software. -> The quick start guide ends with this chapter. If you wish to look more deeply into the functions of the console, work through the menu items you left out so far starting at the beginning of this user’s manual. 7.9 Testing keys, LEDs, faders as well as DMX inputs and outputs The TEST menu performs a test of keys, LEDs, faders/potentiometers as well as DMX inputs and ouputs. Activate this menu by pressing the softkey TEST. The following menu bar is shown: 7.9.1 Testing keys and LEDs Press the softkey KEYS to perform a key/LED test. The following test display is shown: The test display shows that the key “BANK A1“ (left flash key of the fader bank A) will be tested first. Press this key, and the key “BANK A2“ to be tested next is shown on the display. If such key has integrated LEDs, these will light or flash when the key is pressed. Continue in this way testing all keys and LEDs consecutively. When a key has two LEDs, the left LED is activated first. Press this key once and the right LED is activated, press again and the next key to be tested is shown on the display. If the error message KEY ERROR appears on the display, if the test does not continue with the next element (key or LED) when a key is pressed or if it is not possible to activate an LED, then a malfunction of the console may be present. In that case it is necessary that you contact our technical support under [email protected] . 7.9.2 Testing faders Press the softkey FADER to start the test of the faders/potentiometers. 56 numerical values in the range 0...255 will be shown on the display. These correspond to the current values of the individual faders/potentiometers. The values assigned to the faders are arranged in lines on the display in analogy to the sequence of the faders/potentiometers listed below. The left upper value will be tested first. Section A Bank A Fader 1 … Section A Bank B Fader C4 Section B Bank C Fader 1 … Section B Bank D Fader C4 Time/Man-Fade Fader Sec A Sub Master Fader Sec B Sub Master Fader Main Master Fader Aux 1 Potentiometer Aux 2 Potentiometer Aux 3 Potentiometer Before starting the test, move all controllers to the zero position. 12.02.2010 V1.0 -39- Then perform the test according to the sequence of the above list by moving the respective controllers first to the maximum position and then to the minimum position. The corresponding value on the display should move linearly between the values 0 and 255. It is important that only one value is changed on the display when a controller is moved. The other values should remain less than 3. If no value or more than one value is changed on the display when a controller is moved, a malfunction of the console may be present. In that case it is necessary that you contact our technical support under [email protected] . 7.9.3 Testing DMX In and DMX Out Press the softkey DMXIN to perform a test of the DMX inputs and outputs. The following submenu is displayed: The DMX IN TEST menu displays the values received by the DMX input, whether or not the DMX remote function is activated. On the display you will see both the number of channels received (here: 512) and a list of the received channels in groups of four at a time. Use the encoder to select the channels displayed. The DMX start byte is the first channel on the display you may select. To test the DMX inputs and outputs you may, for example, patch two AUX potentiometers with the DMX channels 1 and 512. Then subsequently connect the two DMX outputs with the DMX input. Check, whether the number displayed for the channels transmitted is 512 and whether the values on the display received for the channels 1 and 512 will change in analogy to the movement of the two AUX potentiometers. If that is not the case, a malfunction of the console may be present. It is necessary then that you contact our technical support under [email protected] . You may, of course, use the DMX input of the Licon FX to test the DMX outputs of other DMX control consoles. 8 Performing a software update The following components are required for an update of the Licon FX operational software: PC or laptop equipped with the operational system Windows 2000/XP and a USB 2.0 port (Attention!!!: At present, a software update is not possible with certain PC chip sets of the company SIS!!! If we can rule out that this problem is caused by a bug in these chip sets, a possibility for an update with these chips will be made available soon.) USB connecting cable with a maximum length of 2m (included in the delivery of the Licon FX) Software “JB LICONX UPDATER 1.1“ for updates of the operational software for Licon 1X, Licon CX and Licon FX (available for download in the SERVICE section of the Licon FX on our website http://www.jb-lighting.de ) The current update file for Licon FX with the extension “.dat“ (available for download in the SERVICE section of the Licon FX on our website http://www.jb-lighting.de ). This file is made available as WIN-ZIP file and contains among other things the README file “Readme_english.txt“, which will also provide information on the update process and the software version. -40- 12.02.2010 V1.0 We will e-mail these updates to the Licon FX customers that are included in our mailing list. If you wish to be included in our mailing list, please notify us under [email protected] sending along your Licon FX serial number. Below, you will find a brief introduction to the installation/configuration of the JB LICONX UPDATER 1.1 for Windows 2000/Windows XP. Start the installation by unpacking the ZIP file. Move the updater files to a directory of your choice. Enter this directory and execute the setup program Setup.exe. Follow the instructions of the installation software. The JB LICONX UPDATER 1.1 is now installed. Attention: Data in the Licon FX will be lost once the update process is performed. It is therefore absolutely necessary that you save the console data on a USB memory stick before you start the update process. Performing a software update might involve problems. Therefore, NEVER perform an update immediately before or during an event, thus allowing our technical support to remedy problems that may arise from this procedure. Perform the update of your Licon FX on the basis of the following schedule: 1. Ensure that your Licon FX is in the standby mode (red LED of the ON/OFF key is lit). 2. Open the updater software in the Start menu programs JB LICONX UPDATER. 3. Use the USB cable to connect the Licon FX with a free USB 2.0 Port of the PC or laptop. 4. Press and hold the SWAP key of the Licon FX while you start the Licon FX with the ON/OFF key. Hold the SWAP key until the LICONX UPDATER opens a dialog window for file selection or until Windows starts the installation of the necessary USB drivers. Follow the instructions of your Windows system. If the window for file selection does not open immediately after the installation of the drivers, close the LICONX UPDATER, set the console to the standby mode with the power switch located on the rear panel of the console and start the update process again. 5. Select the desired update file "LiconFXUpdate_***.dat" (or similar) in the dialog window of the LICONX UPDATER and confirm with OK. 6. The progress of the update process is shown exclusively in the LICONX UPDATER (and not on the console, as is the case with the Licon 1). 7. The update process is completed, when the message “UPDATE COMPLETED“ is shown in the transfer status window of the LICONX UPDATER software. The Licon FX console should now switch on automatically and display the start screen. If the console does not start automatically, switch off the console with the power switch located on the rear panel of the console and start the console as usual. 12.02.2010 V1.0 -41- The transfer of the update file to the Licon FX will take approximately one minute. -42- 12.02.2010 V1.0 9 Index of keys and softkeys < <<< ................................................... 10 > >>> ................................................... 10 DISPB .............................................. 37 DISPC .............................................. 37 DLAMP ............................................ 37 DMX ............................................11, 14 DMXCH ......................................14, 17 DMXIN ............................................. 39 E 1 : 1 .................................................. 17 EDIT ...........................................21, 26 ESC ......................................10, 24, 26 EXEC ..........................................36, 37 EXTTR ........................................11, 15 A F ACCES ................................. 11, 19, 34 ALL ............................................. 11, 35 AUTO 1....................................... 18, 19 FADER .......................................11, 38 FADET ........................................29, 33 FLASH ..................................19, 28, 31 FNAME ............................................ 36 1 B BACKU ............................................. 35 B-CPY............................................... 27 B-DEL ............................................... 27 BLACKOUT ................................ 21, 22 BLOCK ............................................. 27 B-MOV .............................................. 27 G C H CHASE ............................................. 11 CHDIR .............................................. 35 CHECK ............................................. 19 CLEAR...................... 17, 24, 25, 26, 28 CLOCK ............................................. 37 COMB 1 ...................................... 18, 19 CONF ................................... 11, 20, 36 CUES ............................................... 11 CURVE ............................................. 17 HOUR .............................................. 37 GO ................................................... 29 GO- .................................................. 30 GO+ ................................................. 30 GO1 ................................................. 19 GO2 ................................................. 19 I INFO ................................................ 38 INS ................................................... 26 INSCH ..................................25, 28, 36 K D DAY .................................................. 37 DEL .................................................. 35 DELCH ........................... 20, 25, 28, 36 DIR ................................................... 35 DIRECTION ...................................... 34 12.02.2010 KEYS ............................................... 38 K-OFF .........................................15, 16 L LEARN ............................................. 29 V1.0 -43- LIC 1 ................................................. 12 LIC 1X............................................... 13 LICON............................................... 12 LINKF ............................................... 33 LOAD ................................................ 36 LOCK .......................................... 20, 34 PATNR ............................................ 17 M S MAIN POWER SWITCH ................... 10 MEMO ........................................ 11, 36 MERGE ............................................ 14 MFADE ....................................... 18, 32 MIDCH .............................................. 16 MIDI ............................................ 11, 15 MIN ................................................... 37 MODE A ........................................... 21 MODE B ........................................... 21 MODIF .............................................. 27 MONTH ............................................ 37 MORE ............................................... 11 SAVE ............................................... 36 SEC ................................................. 37 SELECT ........................................... 23 SET ........................... 14, 15, 16, 20, 37 S-KEY .........................................15, 16 SOUND .................................29, 31, 34 SPGRP ............................................ 28 STAT ............................................... 20 STORE ........................... 20, 21, 24, 26 SWAP .........................................22, 40 N TEST ............................................... 38 TIME ................................................ 37 TIME/MAN-FADE .......................29, 33 TOOLS .................................13, 31, 34 NAME ......................................... 25, 28 R REMOT ..................... 11, 13, 14, 15, 16 RESTART ...................................32, 33 T O ON/OFF ...................................... 10, 40 OPEN ............................................... 17 OPTIO ........................................ 11, 17 USB ................................................. 35 Y P PARAM ................................. 27, 29, 33 PATCH ................................. 11, 16, 17 -44- U 12.02.2010 YEAR ............................................... 37 V1.0