1
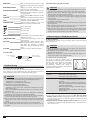
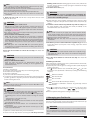
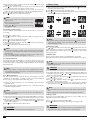
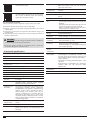
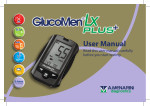
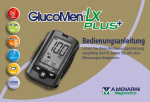
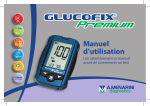
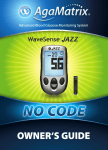
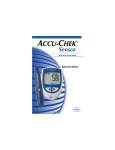
MASTER
2. System overview
2.1 Meter
FRONT
TEST STRIP PORT
ENTER (
) BUTTON
UP/DOWN (
BUTTONS
● Blood glucose
monitoring system
/
)
TEST STRIP PORT
Test strip should be inserted here.
ENTER ( ) BUTTON
Press and hold for 2 seconds to access meter memory (§5.1) or longer
(4 seconds) to enter setup mode while not testing (§6).
UP/DOWN ( / ) BUTTONS
Press or to scroll through different options and/or values.
BACK
RELEASE BUTTON
NFC ANTENNA
User manual
Thank you for choosing the GlucoMen® areo meter.
We have designed this compact blood glucose meter for faster and
easier testing of your blood glucose and we hope it will be of great
help in the management of your diabetes. This manual explains how to
use your new meter. Before testing, carefully read through this manual
and the package inserts that come with it: GlucoMen® areo Sensor and
GlucoMen® areo Control. Pay particular attention to listed warnings and
cautions. Please keep this manual handy for future reference. If you have
any questions, please contact A. Menarini Diagnostics for assistance
(references at the end of this manual).
BATTERY HOLDER
DATA TRANSFER PORT
RELEASE BUTTON
Press this button to remove used test strip.
BATTERY HOLDER
Houses two CR2032 3V lithium coin cell batteries.
DATA TRANSFER PORT
Connection port for PC data cable and Bluetooth device from A. Menarini
Diagnostics.
METER SCREEN
1. Intended use
Your GlucoMen® areo meter and GlucoMen® areo Sensor are in vitro
diagnostic medical devices to quantitatively measure the glucose level in
fresh capillary whole blood. They are intended for self testing to monitor
and control blood glucose levels by people with diabetes mellitus; they
can also be used in a clinical setting by healthcare professionals. They
are not intended for diagnosis or screening of diabetes or for neonatal
use. Do not alter your treatment on the basis of test results of this meter
without previously consulting your doctor or healthcare professional.
CLOCK/ALARM ICON
HYPO/HYPER ICONS
DROP ICON
MEMORY ICON
MAIN DISPLAY AREA
CTL ICON
UNIT OF MEASUREMENT
TIME
AVERAGE
NFC ICON
LOW BATTERY ICON
WRONG TEMPERATURE ICON MARKERS
ICONS
MEMORY ICON: CLOCK/ALARM ICON: HYPO/HYPER ICONS: DATE
indicates that you are using the memory
(§5).
“clock” appears while setting the time
(§6.1); “alarm” appears while setting
the acoustic reminder(s), and will be
displayed if any alarm is on (§6.2).
appear while setting the hypoglycaemic
and hyperglycaemic thresholds and if
your test results are below or above these
values (§6.4).
1
DROP ICON: MAIN DISPLAY AREA: UNIT OF MEASUREMENT: TIME: AVERAGE: DATE: MARKERS ICONS: blinks to indicate that the meter is ready
for blood or control solution testing (§4.2,
4.3).
displays test results, stored test values,
result averages and messages.
shows the unit of measurement of your
blood glucose meter (mg/dL or mmol/L,
not changeable).
shows time (HH:MM 12H am/pm or 24H
format)
shows the period related to the displayed
average (1, 7, 14, 30, 60 or 90 days – §5.2)
shows the date (DD-MM format)
displayed while marking a test result
(§4.4) or reviewing a marked result.
Before meal marker
After meal marker
Exercise marker
CAUTION
● For testing with GlucoMen® areo meter use GlucoMen® areo Sensor
only. Do not use other test strips, it causes inaccurate test results.
●Do not use test strips after their expiry date. The expiry date is
written on the test strip vial next to symbol.
For accurate test results, allow the test strips to adjust to the their
surroundings for at least 30 minutes before testing your blood
glucose levels:
- temperature: 5 to 45°C (41 to 113°F);
- humidity: 20 to 90% RH.
● Do not use the test strips if 3 months or more have passed since first
opening the vial.
●The test strips are for single-use only. Do not use test strips that
have already absorbed blood or control solution.
●Keep all unused test strips in the original vial and after having
removed one, immediately close the cap tightly to preserve their
quality. Do not transfer them into any other container.
Check marker
WRONG TEMPERATURE ICON: appears while testing outside the allowed
temperature range.
LOW BATTERY ICON: appears when the battery needs to be
replaced (§7.3).
NFC ICON: displayed while setting the NFC (Near
Field Communication) function (§6.5)
and when this function is enabled;
blinks while data are transmitted via NFC
(§5.3.1)
CTL ICON: indicates a control solution test (§4.3).
2.2 TEST STRIP
INSERT THIS END INTO
THE METER
APPLY BLOOD/CTRL
SOLUTION DROP HERE
CHECK WINDOW
3. Before Testing
3.1 Caution when using the Meter
Time and date are pre-set in the meter. Please make sure that time and
date settings are correct before first use, and adjust them if needed.
Always check the settings after changing the battery (§7.3).
CAUTION
● For accurate test results, allow the meter to adjust to its surroundings
for 15 to 20 minutes before testing your blood glucose levels:
- temperature: 5 to 45°C (41 to 113°F);
- humidity: 20 to 90% RH (Relative Humidity).
● Do not store or use the meter where:
- there are sharp temperature fluctuations;
- humidity is high and causes condensation (bathrooms, drying
rooms, kitchen, etc.);
- there is a strong electromagnetic field (close to a microwave oven,
cell phone, etc.).
●Do not use the meter after if it has been dropped in a liquid or
liquids have entered inside, even if dried afterwards.
●Avoid hand contact with test strip port on the meter. A thermo
sensor is housed inside the meter to minimize any errors.
●Do not connect the data cable to the data transfer port during
testing. The meter may be damaged, leading to inaccurate test
results.
● Do not apply blood directly to the test strip port on the meter.
●Do not share your meter with anyone else to avoid the risk of
infection.
2
3.2 Caution when using the Test Strips
4. Measuring your blood glucose levels
4.1 Blood sampling
For information on how to use the lancing device, read the relevant
instructions for use.
CAUTION
●Wash the puncture site with soap and water and dry the site
thoroughly before sampling blood.
● Do not share the same lancet or lancing device with anyone else to
avoid the risk of infection.
●Always use a new lancet. Lancets are for single-use only. Do not
reuse a lancet that has already been used.
4.1.1 Alternative site testing (AST)
This meter can test the glucose levels of
blood from your fingertip, palm and forearm.
However, test results from sites other than
the fingertip may differ from fingertip
measurements. Consult your doctor or
healthcare professional before testing blood
from the palm or forearm.
Use blood from:
If you are going to test:
Fingertip, palm,
forearm
• Before meals
• Two hours or more after meals
• Two hours or more after exercise
Fingertip
• When there is the possibility of your blood glucose levels changing rapidly (e.g. after meals or
exercise)
•When experiencing symptoms of hypoglycaemia such as perspiration, cold sweats, a floating
sensation or trembling
• When immediate testing is needed for suspected hypoglycaemia
• When in poor physical condition, such as with a
head cold, etc.
4.2 Testing your Blood Glucose
1.Insert a new test strip into the test strip port. The drop icon starts
blinking on the screen. If nothing appears on the screen, remove the
test strip, insert it into the test strip port again and wait for the drop
icon to start blinking.
2.Apply the blood of drop to the tip of the test strip until the check
window is full. A beeper sounds (if enabled) and a countdown timer
starts on the screen.
NOTE
●For accurate test results, apply the drop of blood to the tip of the
test strip within 20 seconds after puncturing.
● Do not test blood that runs or spreads out from the puncture site.
● Do not smear blood onto the test strip.
● Do not forcefully press the test strip into your puncture site.
●Do not touch the test strip once the meter has started the
countdown.
3. Read your test result. You will hear a beep when the test result
appears on the screen.
CAUTION
● If “LO” or “HI” appears on the screen:
Repeat the test. If “LO” or “HI” still appears, contact your doctor or
healthcare professional. “LO” appears if your test result is less than
20 mg/dL (1.1 mmol/L). “HI” appears if your test result is more than
600 mg/dL (33.3 mmol/L).
● The “hypo” or “hyper” icons may appear depending on the threshold
limit you have set (§6.4).
● If test results do not match how you feel:
Make sure you have performed the test correctly as explained
in §4.2. Then, conduct a control test to check that the system is
working properly (§4.3). Repeat the test using a blood sample taken
from a fingertip (do not use an alternative site). If the test result still
does not match how you feel, contact your doctor or healthcare
professional.
● Do not ignore test results. Do not alter your blood glucose
management or treatment without first consulting your doctor or
healthcare professional.
4.Press the release button to remove the test strip. The meter will
switch off.
CAUTION
● When ejecting the used test strip, point your meter downwards and
away from others.
● Disposal of Biohazardous Waste
Used test strips and lancets are biohazardous waste. They
must therefore be disposed according to local regulations on
biohazardous waste.
4.3 Control Test
Conduct a control test if:
● you suspect the meter or test strips are not working properly;
● the meter has been dropped;
● the meter is damaged;
● your test results do not match how you feel;
● you want to check the performance of the meter and test strips when
you first get them or any time you want to check their performance
before a blood glucose test.
NOTE
To test your meter and test strips only ever use the GlucoMen® areo
Control (provided separately).
CAUTION
● Do not use control solutions after their expiry date. The expiry date
is indicated on the control solution vial next to symbol.
●For accurate test results, allow the control solution to adjust to its
surroundings for at least 30 minutes before running the control
test:
- temperature: 5 to 45°C (41 to 113°F);
- humidity: 20 to 90% RH.
●Do not use the control solutions if 3 months or more have passed
since first opening the vial.
● Do not drink the control solution. It is not intended for human
consumption.
●Avoid contact of the solution with the skin and the eyes as this
could cause inflammation.
To perform a control solution test, proceed as follows:
1.Insert a new test strip into the test strip port. The drop icon starts
blinking on the screen. If nothing appears on the screen, remove the
test strip, insert it into the test strip port again and wait for the drop
icon to start blinking.
2.Select the ctl test icon (§2.1).
WARNING
● If the ctl icon has not been selected before performing the
control solution test, the result will be stored as a blood test
and used for calculating averages.
3.Gently shake the control solution vial before testing. Discard a drop
before use. Squeeze a drop of control solution onto a clean, hard, dry
surface.
4.Touch the control solution drop with the tip of the test strip until
the check window is full. A beeper will sound (if enabled) as the
countdown timer starts on the screen.
NOTE
●The test will not start if you apply your control solution directly
to the check window. The test starts when the meter detects the
control solution. During the test the meter counts down from 5 to 1.
● Tightly close the control solution vial.
● Do not touch the test strip once the meter has started the
countdown.
5.Check that your test result is within the acceptable range indicated
on the label of the test strip vial. If out of range, repeat the control
solution test.
CAUTION
●If you still have test results that fall outside the acceptable range,
stop using the system, and contact the A. Menarini Diagnostics
customer service.
6.Press the release button to remove the test strip. The meter will
switch off.
4.4 Marking Test Results
After a blood (not control) glucose test is performed with a valid result,
you can mark the result as follows:
1.Start from point 3 of the glucose testing procedure (result displayed
on the screen, §4.2)
Press until the markers icons start blinking. Press or to scroll
through the icons (backwards or forwards) according to the following
sequence:
Before meal marker
After meal marker
Exercise marker
Check marker (General Purpose marker).
Void (Once confirmed it deselects any previously selected
marker).
2.Press
to confirm the marker you selected. You can select more
markers (but only one when setting
or
) by repeating steps
1 & 2.
3.Return to point 4 of the glucose testing procedure (§4.2).
5. Managing your Test Results
5.1. Reviewing past results
You can review past results stored in the memory. Your meter stores up
to 730 test results with dates, times and markers.
WARNING
Please make sure that the time and date are correct before the first
use, and adjust them if needed (§6.1). If the time and date settings
are not correct the meter will memorize the test results in the wrong
order.
3
1.Make sure the meter is off (to turn the meter off hold for 3 seconds
until the screen switches off ).
2.Press
for 2 seconds to turn the meter on and enter the memory
recall mode (the “mem” icon appears on the screen).
3.The most recent test result appears on the screen. The screen also
shows the date and time of the test and the corresponding markers.
4.Press or to scroll through all the stored data.
5.Press for 3 seconds to switch the meter off.
6. Meter Setup
i. Make sure the meter is off (to turn the meter off press for 3 seconds
until the screen switches off ).
ii.Press for 4 seconds to enter the setup menu.
iii.Press or to scroll through the setting menus (see pictures below)
and press to enter each single menu
NOTE
●If there are no results in the memory, the screen
displays “ooo“.
● At the end of reviewing the individual test results,
the screen displays “ooo“.
●Keep or pressed to speed up the browsing
through the results.
5.2. Viewing results averages
You can view the result averages over the set intervals (1, 7, 14, 30, 60
or 90 days).
1.Follow steps 1 and 2 in §5.1.
2.Press
to enter the average mode (the “AVG” icon appears on the
screen).
3.The 1-day average appears on the screen.
4.Press to scroll through the averages.
5.After reviewing the 90-das average, press to return to the memory
recall mode (step 3 of § 5.1).
6.Hold for 3 seconds to switch the meter off.
NOTE
●If there are less than 2 results in the memory for the averaged
period, the screen displays “ooo“. If there are no results, the screen
displays “ooo“.
●The averaging function equalises HI results to 600 mg/dL (33.3
mmol/L) and LO results to 20 mg/dL (1.1 mmol/L).
5.3. Data transmission
Test results stored in the GlucoMen® areo meter’s memory can be also
downloaded to GlucoLog® software or apps by means of either NFC,
a dedicated cable, or a Bluetooth dongle distributed by A. Menarini
Diagnostics only.
NOTE
●GlucoLog® software and apps, data cable, and Bluetooth dongles
are supplied separately. See relevant user manuals for instructions
on how to download data.
5.3.1. NFC Transmission
For data transmission by means of NFC the NFC function must be
enabled on the GlucoMen® areo meter (§6.5) and an NFC equipped
device (such as a Smartphone) with GlucoLog® apps.
1.Activate the NFC transmission on the GlucoLog® app of the NFC
equipped device.
2.Bring the GlucoMen® areo NFC antenna close (< 1 cm) to the antenna
in the NFC-equipped device.
NOTE
●Data will be transmitted even when the meter is switched off or in
memory recall mode.
3.Data transmission will start automatically (the GlucoMen® areo meter
will turn on and the
blinking icon will be displayed on the screen).
4.When the data transmission is completed, “End” will be displayed on
the GlucoMen® areo meter screen (together with the
icon), and a
beeper will sound once.
5.Press for 3 seconds to switch off the meter.
WARNING
● Data transmission via NFC may decrease battery life.
4
NOTE
●At anytime during set up, you may either press to exit, or insert
a test strip to perform a test. The changes made so far will be
memorized by the meter.
6.1 Date/Time setup
Use or to select the correct value. Press to confirm and move on
to the next step: year, month, day, time format (12H, 24H), hour, minutes.
After confirming the minutes (by pressing ) return to the setting
menus (step iii §6).
6.2 Alarm setup
You can set up to three alarms on your GlucoMen® areo meter.
When the alarm reaches the set time, the meter sounds for 30 seconds.
NOTE
●Press or insert a test strip to stop the acoustic meter alarm (the
alarm will remain set).
CAUTION
● Before setting the alarms please check that the time is properly set.
1.The display will show alarm 1 status (the default setting is OFF). You
can turn it on by pressing or . Press to confirm the selection and
move on to the next step.
2.Press or to select the hour. Press to confirm the selection and
move on to the next step.
3.Press or to select the minutes. Press to confirm the selection
and move on to the alarm 2 setting.
4.Set alarm 2 and 3 by following steps 2 to 3. After you have finished
setting all alarms, press to return to the setting menus (step iii §6).
NOTE
●The alarm will have the same format (12H, 24H) as when the time
set.
● Alarm settings will not be erased when changing the batteries.
6.3 Beeper setup
The beeper on your GlucoMen® areo meter is preset to ON. You can
adjust the beeper feature as follows.
1.Press
2.Press
or to turn the beeper ON or OFF.
to confirm and return to the setting menus (step iii §6).
WARNING
● Turning off the beeper could mean you miss many important cues
from your meter, such as confirmation or error messages.
6.4 hypo/hyper alarms setup
Your GlucoMen® areo blood glucose meter has an alarm feature that
allows you to set your high (hyperglycemia) and low (hypoglycemia)
blood glucose thresholds. Based on the values set, the screen will show
“hypo” or “hyper”, depending on whether your blood glucose test result
is below your low glucose or above your high glucose threshold values.
WARNING
● Consult your doctor or healthcare provider when setting the Hypo
and Hyper values.
● Do not alter or stop your medication based on this feature, always
consult your doctor or healthcare provider before altering or
stopping medication.
The hypo/hyper alarms on your GlucoMen® areo meter are preset to OFF.
You can set up the hypo and hyper threshold values as follows:
1.Press or to turn the hypo alarm ON/OFF.
2.Press to set the hypo alarm value (if ON).
3.Press or to select the desired value. Press and hold either or
to accelerate the numbering.
4.Press
to confirm the selection and move on to the hyper alarm
setup.
5.Press or to turn the hyper alarm ON/OFF.
6.Press to set the hyper alarm value (if ON).
7.Press or to select the desired value. Press and hold either or
to accelerate the numbering.
8.Press to confirm the selection.
4.Fit the new batteries into the battery holder with the “+” pole facing
upwards.
5. Close the battery holder.
WARNING
●If the batteries are inserted upside down, the meter
will not operate.
●The meter clock may stop if you touch the metal
parts inside the meter with your hands or metal.
●If you replace batteries after 2 minutes and do not
set the time, all subsequent test results will be stored
with the incorrect date and time.
Dispose of old batteries according to local environmental regulations.
8. Troubleshooting
8.1. HI and LO messages
If the test result is over 600 mg/dL (33.3 mmol/L)
the HI icon will appear on the display.
If the test result is less than 20 mg/dL (1.1 mmol/L)
the LO icon will appear on the display.
6.5 NFC setup
The NFC function on your GlucoMen® areo meter is preset to OFF and
can be enabled as follows:
1.Press the or buttons to select ON or OFF.
2.Press to confirm and exit.
7. Meter care
7.1 Storing your meter
After use, tightly close the caps of the test strip vial and control solution
bottle to maintain their quality.
Pack your meter, test strips, control solutions and manuals into your
carry case and store in a dry place. The correct storage temperature is
-20 to 50 °C (-4 to 122 °F) for the meter and 4 to 30 °C (39.2 to 86 °F) for
the test strips and control solutions. Do not freeze. Avoid heat, humidity
and direct sunlight.
CAUTION
To obtain accurate test results:
● Do not use test strips or control solutions if their bottles are broken
or have been left open.
●Do not use the test strips or control solutions after their expiry
dates.
7.2 Cleaning your meter
Your meter does not need special cleaning. If your meter gets dirty, wipe
it with a soft cloth moistened with mild detergent. To disinfect your
meter after cleaning, wipe with a soft cloth moistened with either 75%
ethanol alcohol or diluted household bleach (10% sodium hypochlorite
solution).
7.3 Changing the batteries
When the low battery icon appears on the screen, the batteries are
getting low. Before using your meter, change the batteries.
Past results remain in the memory even when the batteries are changed.
Your meter uses two CR2032 3V lithium batteries. This type of battery is
available in many stores. Keep spare batteries handy at all times.
You do not need to set the date and time if you insert new batteries
within 2 minutes after removing the old ones.
WARNING
● If the HI or LO message has appeared, please consult your doctor or
a healthcare professional before altering your treatment.
●If the HI or LO icons are displayed repeatedly, even though your
blood glucose levels should not be high or low according to your
doctor, please contact the A. Menarini Diagnostics customer
service.
8.2. Error messages
System Hardware Error. Remove and reinsert the
batteries to restart the meter, and repeat the test
with a new strip. If the problem persists, please
contact the A. Menarini Diagnostics customer
service.
The test strip is damaged or has already been
used or the blood sample was applied before
the “apply sample” icon started to blink on the
display. Remove the old test strip and repeat
the test with a new one. Wait until the drop icon
starts to blink before you begin.
Blood sample error. The blood sample did
not fill the sample area of the strip during the
measurement because the sample was not
applied correctly or the volume was insufficient.
Repeat the test with a new strip after correctly
puncturing your finger (§4.1).
The strip was removed or disturbed during the
countdown. Repeat the test with a new test strip.
NFC disconnection during transmission. Repeat
the NFC transmission. If the problem persists,
please contact the customer service.
Replace the batteries as follows:
1.Make sure the meter is switched off.
2.Remove the battery cover at the rear of the meter.
3.Remove the batteries.
5
Low battery. Change the batteries according to
the instructions (§7.3).
The temperature was not within the
recommended range. Repeat the measurement
after at least 30 minutes, when the operating
temperature has been restored.
8.3. Unexpected test results
If the test result is unusual compared to your previous test results:
1.Repeat the measurement using a new test strip (§4.2).
2.Perform a control measurement using the GlucoMen® areo Control
solution (§4.3).
3.Change the test strip vial and repeat the measurement using a new
test strip (§4.2).
4.If you are still uncertain about the test results, contact your doctor or
healthcare professional.
WARNING
● In case of an unexpected reading, consult your doctor or healthcare
professional before altering your treatment.
Memory:
730 test results with markers, dates and times.
When the memory is full, the new results will
replace the oldest ones.
Data
management:
Before/after meals, exercise, check markers
available.
Alarms:
Up to three settable acoustic alarms.
Data transfer:
Via dedicated data cable, NFC, or a Bluetooth
device.
Averages:
Over 1, 7, 14, 30, 60, 90 days.
Automatic turn
off:
-After 50 seconds of inactivity before the test
(sensor strip inserted into the meter, drop icon
flashing).
-After 45 seconds of inactivity after the test and
Error messages Err2, Err3, Err4, HI and LO.
-After 5 seconds for Error messages Err1, Err5,
Temperature icon and Battery icon.
Dimensions:
85.5 mm (L) x 56 mm (W) x 18.2 mm (H)
Weight:
46 g (without batteries)
Meter Operating
Conditions:
- Temperature: 5 - 45 °C (41 - 113 °F).
- Relative Humidity: 20 - 90% (no dew condensation).
Meter Storage
Conditions:
- Temperature: -20 – 50°C (-4 – 122 °F).
- Relative Humidity: 20 - 90%.
Test strip Storage
Conditions:
-Temperature: 4 - 30°C (39.2 - 86 °F) (both for
unopened vial and after opening).
- Relative Humidity: 20 - 90% (both for unopened
vial and after opening).
Control Solution
Storage
Temperature:
4 - 30 °C (39.2 - 86 °F)
Operating
environment:
The GlucoMen® areo meter complies with
electromagnetic compatibility standards and
has been tested for electrostatic discharge and
electromagnetic fields according to EN 60601-12:2007 +AC:2010.
Classification according to IEC/EN 60601-1: 2006
+AC:2010.
Electromagnetic compatibility: the equipment
complies with the EN 60601-1-2 EMC
requirements.
EU directive/
classification:
98/79/EC / Annex II, List B
Device Standard:
ISO 15197:2003
●If the test results continue to be unusual, please, contact the
A. Menarini Diagnostics customer service.
9. Technical specifications
Product:
GlucoMen® areo
Manufacturer:
A. Menarini Diagnostics srl
Tested item:
Blood Glucose level
Unit of
measurement:
mg/dL (mmol/L)
Test Range:
20 – 600 mg/dL (1.1 – 33.3 mmol/L)
Hematocrit range: 10 – 70 % (haematocrit compensated)
Test strip:
GlucoMen® areo Sensor
Test strip coding:
No coding required
Sample:
Fresh capillary whole blood
Sample size:
Minimum 0.5 µL
Test time:
5 seconds
Assay Method:
Electrochemical, Glucose Oxidase (GOD,
Aspergillus Niger sourced) based method.
Mediator: Hexacyanoferrate (III) ion.
Calibration and
traceability:
The results are equivalent to the plasma glucose
concentration (capillary plasma referenced).
The GlucoMen® areo system is calibrated using
capillary plasma values determined with a
Yellow Springs 2300 analyser (YSI). The YSI
analyser is calibrated (as a secondary reference
measurement procedure) using a series of YSI
standards (primary calibrators) which are taken
from the NIST (National Institute of Standards
and Technology, USA).
Temperature
compensation:
Automatic compensation using a built-in thermo
sensor.
Batteries:
Two 3.0 V lithium batteries (CR2032).
Battery life:
A minimum of 1000 tests or about 1 year
(about 1000 runs for 1 transmission/day & 3
tests/day).
6
10. Warranty
Your GlucoMen® areo meter is guaranteed to be free of material and
workmanship defects for 2 years from the date of purchase (except as
noted below). If at any time during the first 2 years after purchase, your
GlucoMen® areo meter does not work for any reason (other than as
described below), it will be replaced with a new meter, or a substantial
equivalent, free of charge. Should you wish to extend the warranty
period for your meter, please refer to the warranty card.
This warranty is subject to the following exceptions and limitations:
●this warranty is only applicable to the original purchaser;
●this warranty does not apply to units which malfunction or are
damaged due to obvious tampering, misuse, alteration, neglect,
unauthorized maintenance or failure to operate meter in accordance
with the Instructions;
●there is no other express warranty for this product. The option of
replacement, described above, is the warrantor’s only obligation under
this warranty.
The original purchaser must contact A. Menarini Diagnostics: Telephone
Number XXXXXXXX.
A. Menarini Diagnostics is committed to using your personal information
responsibly and in compliance with the law. You have our pledge that
we will not disclose or sell your personal information with third-parties.
The information you voluntarily provide will be used to help us serve
you better in the future.
11. Symbols & abbreviations
Consult instructions for use
Caution, consult instructions for use
Temperature limitation
Use by
Manufacturer
Batch code
In vitro diagnostic medical device
In vitro device for self-testing
Serial number
Recyclable package
This product fulfills the requirements of Directive
98/79/EC on in vitro diagnostic medical devices
Contamination risk due to the use of blood samples
Blood glucose meter
Significant additions or changes from previous user
manual revision
Direct current (voltage)
Catalogue number
7
46313 - 02/14
A. Menarini Diagnostics S.r.l.
Via Sette Santi, 3
50131 Firenze
Italy
XX
Distribuited by:
XXXXXXXXXXXXXXXXXXXX
XXXXXXXXXXXXXXX
XXXXXXXXXXXXXXX
XXXXXXXXXXXXXXX
XXXXXXXXXXXXXXX
XXXXXXXXXXXXXXX
Date of Issue: February 2014
8
GlucoMen® areo - User Manual - MASTER
46313
02/14
210 (w) x 300 (h)
I - BLACK C