1
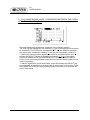
C2
USER MANUAL
C2
USER MANUAL
DIGITAL and ANALOGUE CATV (QAM A & B – J83-B)
COFDM and ANALOGUE TV
FM & FM Radio
Analyzer 4 – 880 MHz
ROVER LABORATORIES S.p.A.
Via Parini 2
25019 Sirmione (BS) – ITALY
www.roverinstruments.com
C2
USER MANUAL
PART NUMBER
REVISION DATE
UG-C2-1.19-1.0-EN-1.0
OCT. 2007
We all wish to sincerely thank you for choosing our measurement instrument, which is
currently approved and everyday used by the major Service Providers, Broadcasters
and by really many users all over in the world.
Like to them all, this measurement instrument will provide you with easiness of use and a full
range of measurement capabilities.
Our everyday efforts are targeted to continuously develop state of the art instruments,
capable to fulfil and possibly to exceed your expectations and all of your needs.
We are able to research and develop further improvements day after day
also thanks to your valuable suggestions and contributions.
Please let us know about your opinion, suggestions, and special requests
through our dedicated email address:
[email protected]
as well as by calling our Technical Support:
ROVER Hotline: +39 030 9198299
We are positive your expectations and your needs will be fully satisfied.
We are positive you will be happy with us.
Thank-you again.
Edoardo Romano
Chairman
2
C2
USER MANUAL
INDEX
OVERVIEW .......................................................................................... 6
1
2
__ FRONT PANEL & KEYBOARD .................................................................................................. 6
__ SIDE BODYPANELS .................................................................................................................. 7
USER MANUAL ................................................................................... 8
3
4
5
6
__
__
__
__
TURNING THE METER ON ....................................................................................................... 8
TURNING THE METER OFF...................................................................................................... 8
CHECK THE BATTERY CHARGE STATUS .............................................................................. 8
METER CONFIGURATION: MPEG SERVICE LIST .................................................................. 9
6.1
METER LOUDSPEAKER VOLUME SETUP.................................................................... 9
6.2
METER SETUP ................................................................................................................ 9
~ ___ BATTERY SAVING - SELF POWER OFF (TIMER OFF) ............................................. 9
~ ___ FIELD AND CHANNEL POWER MEASUREMENT UNIT (UNIT) .............................. 10
~ ___ LANGUAGE................................................................................................................. 10
~ ___ KEYS BEEP ................................................................................................................ 10
~ ___ DISPLAY BACKLIGHT (DISP.LIGHT) ........................................................................ 10
6.3
MAIN RECEPTION PARAMETERS SETUP.................................................................. 10
~ ___ COUNTRY CHANNEL PLAN ...................................................................................... 10
~ ___ CABLE TV STANDARD .............................................................................................. 11
{
7
DOCSIS (DOWNSTREAM)....................................................................................................... 11
~ ___ C/N TYPE .................................................................................................................... 11
__ SIGNAL TUNING : PLAN.......................................................................................................... 12
7.1
~
7.2
NAVIGATE INTO THE SELECTED COUNTRY CHANNEL PLAN ................................ 12
___ SURFING THE CHANNELS ....................................................................................... 12
NAVIGATE INTO A CUSTOM CHANNEL PLAN (USER DEFINED CHANNEL PLAN):
MANUMEMORY ............................................................................................................. 13
~ ___ MODIFY AND FINE-TUNE THE RECEPTION FREQUENCY ................................... 13
{
WHO’S THERE? AUTODISCOVERY ® ................................................................................... 13
~ ___ SELECT A DIFFERENT CUSTOM CHANNEL PLAN ................................................ 14
7.3
NAVIGATE INTO AN AUTOMEMORY CHANNEL PLAN.............................................. 15
8 __ PERFORMING MEASURES: MEAS ........................................................................................ 16
8.1
THE SELECTED CHANNEL CARRIES ON A DIGITAL CATV SIGNAL (QAM)............ 16
~ ___ NOISE MARGIN, QUALITY TEST, MER E BLOCK ERROR MEASUREMENT ........ 16
~ ___ BER MEASUREMENT BEFORE AND AFTER VITERBI............................................ 17
~ ___ CARRIERS CONSTELLATION AND QAM PARAMETERS DISPLAY....................... 17
{
~
~
~
~
8.2
~
~
ZOOMING THE CONSTELLATION IN/OUT............................................................................. 17
___
___
___
___
BOUQUET ID DATA.................................................................................................... 17
CHANNEL POWER MEASUREMENT........................................................................ 18
DISPLAYING THE SERVICE LIST OF THE CURRENT BOUQUET ......................... 18
SPECTRUM ANALYSIS OF THE TUNED CHANNEL................................................ 19
THE SELECTED CHANNEL CARRIES ON AN ANALOGUE TV/CATV SIGNAL ......... 19
___ VIDEO SIGNAL PEAK LEVEL MEASUREMENT ....................................................... 19
___ VIDEO Vs. AUDIO PEAK LEVEL RATIO AND SIGNAL TO NOISE RATIO .............. 19
3
C2
USER MANUAL
~
~
8.3
___ AUDIO PEAK LEVEL MEASUREMENT ..................................................................... 20
___ SPECTRUM ANALYSIS OF THE TUNED CHANNEL................................................ 20
THE SELECTED CHANNEL CARRIES ON A DIGITAL TERRESTRIAL SIGNAL
(COFDM) ........................................................................................................................ 20
~ ___ CHANNEL POWER MEASUREMENT........................................................................ 21
~ ___ SPECTRUM ANALYSIS OF THE TUNED CHANNEL................................................ 21
8.4
FM AUDIO MEASUREMENT (included FM RADIO 87,5 – 108,00 MHz) ...................... 21
~ ___ AUDIO LEVEL MEASUREMENT................................................................................ 22
~ ___ SPECTRUM ANALYSIS OF THE TUNED CHANNEL................................................ 22
9 __ SPECTRUM ANALYZER MODE.............................................................................................. 23
9.1
SURFING THE CHANNELS........................................................................................... 23
9.2
MOVING THE MARKER (FREQUENCY VALUE) ......................................................... 24
9.3
EDITING THE SIGNAL LEVEL END OF SCALE ........................................................... 24
9.4
EDITING THE SPAN VALUE ......................................................................................... 24
9.5
ACTIVATE THE MAX HOLD FUNCTION ...................................................................... 24
9.6
MATCHING THE SIGNAL LEVEL AT TWO USER-DEFINED FREQUENCY VALUES 24
~ ___ MODIFYING THE CURRENT FREQUENCY VALUE................................................. 25
~ ___ EDITING THE SIGNAL LEVEL END OF SCALE........................................................ 25
9.7
FULL BAND MAPPING .................................................................................................. 25
~ ___ FULL BAND MAPPING DISPLAY CONFIGURATION ............................................... 25
{
{
{
~
SIGNAL LEVEL DETECTED INTO EACH CHANNEL .............................................................. 26
AUDIO AND VIDEO PEAK LEVEL DETECTED INTO EACH CHANNEL ................................ 26
SIGNAL LEVEL COMPARISON (TILT) BETWEEN TWO USER-DEFINED CHANNELS ........ 26
___ ACTIVATE THE FULL BAND MAPPING (BARSCAN) ............................................... 26
{
FULL BAND SIGNAL LEVEL ANALYSYS IN EACH CHANNEL (LEVEL) ................................ 26
{
FULL BAND AUDIO AND VIDEO PEAK LEVEL ANALYSYS INTO EACH CHANNEL
(AUD/LEV).......................................................................................................................................... 27
{
FULL BAND SIGNAL LEVEL COMPARISON BETWEEN TWO USER-DEFINED CHANNELS
(TILT).................................................................................................................................................. 28
10
_ CABLE SYSTEM MEASUREMENTS....................................................................................... 29
10.1
VOLTMETER MODE (AC MEASURE AT RF TEST POINT)......................................... 29
10.2
CABLE LEAKAGE MEASUREMENTS........................................................................... 29
~ ___ CABLE LEAKAGE SETUP.......................................................................................... 29
{
{
{
{
{
AREA AND MEASUREMENT UNIT STANDARD SETUP ........................................................ 29
ANTENNA TYPE SETUP (USA ONLY) .................................................................................... 30
ANTENNA FACTOR SETUP .................................................................................................... 30
DISTANCE SETUP................................................................................................................... 30
THRESHOLD SETUP ............................................................................................................... 30
~ ___ CABLE LEAKAGE MEASUREMENT.......................................................................... 30
10.3
INGRESS MODE (MEASUREMENTS ON THE FREQUENCY RANGE 4 ÷ 66 MHz) .. 31
~ ___ MOVING THE MARKER (FREQUENCY VALUE) ...................................................... 31
~ ___ EDITING THE SWEEP TIME ...................................................................................... 31
~ ___ EDITING THE SIGNAL LEVEL END OF SCALE........................................................ 31
11 _ CREATING MEMORY PLANS ................................................................................................. 32
11.1
CREATING A MEMORY PLAN BY AUTO SEEK & STORE OF ANY RECEIVABLE
CHANNEL: AUTOSCAN................................................................................................. 32
~ ___ AUTOSCAN: FREQUENCY RANGE SELECTION .................................................... 32
~ ___ AUTOSCAN SEEK&STORE: CREATE A NEW AUTOMEMORY CHANNEL PLAN . 33
4
C2
USER MANUAL
{
{
{
{
SELECT A TARGET AUTOMEMORY CHANNEL PLAN.......................................................... 33
ANALOGUE SIGNALS: VIDEO SIGNAL LEVEL THRESHOLD SETUP .................................. 33
DIGITAL SIGNALS: CHANNEL POWER LEVEL THRESHOLD SETUP.................................. 34
SEEK&STORE START ............................................................................................................. 34
11.2
~
~
~
MANUALLY CREATING A MEMORY PLAN: MEMORY ............................................... 34
___ CREATE A BRAND NEW MEMORY PLAN................................................................ 34
___ ADDING A FURTHER CHANNEL TO AN EXISTING CUSTOM MEMORY PLAN .... 35
___ DIRECT STORING A NEW CHANNEL INTO AN EXISTING CUSTOM MEMORY
PLAN ........................................................................................................................... 35
11.3
DELETING A MEMORY PLAN....................................................................................... 36
~ ___ DELETING AN AUTOMEMORY CHANNEL PLAN .................................................... 36
~ ___ DELETING A CUSTOM MEMORY CHANNEL PLAN ................................................ 36
~ ___ DELETING A LOGGER FILE (LOGGER MEMORY PLAN) ....................................... 37
12 _ AUTO MEAS&STORE ON THE CHANNELS INCLUDED IN A CUSTOM MEMORY PLAN
(DATA LOGGER) ..................................................................................................................... 38
12.1
AUTO MEAS&STORE.................................................................................................... 38
12.2
RECALL A PREVIOUSLY STORED LOGGER MEMORY PLAN .................................. 39
13 _ TECHNICAL SPECIFICATIONS .............................................................................................. 40
SERVICE NOTES AND GUARANTEE REGULATIONS (CEE AND
EXTRA CEE) ...................................................................................... 42
FAULT IDENTIFICATION FORM ....................................................... 44
MANTAINING THE METER ............................................................... 45
DISPOSAL OF ELECTRONIC EQUIPMENT..................................... 46
5
C2
USER MANUAL
OVERVIEW
1
FRONT PANEL & KEYBOARD
Main Function
A
Main switch (ON/OFF)
B
C
D
E
F
G
H
I
L
M
N
P
Q
R
MPEG SERVICE LIST
LCD (dot matrix)
PLAN
SCAN - TILT
SPECT
MEAS
UP (also used as “ENTER”)
Built-in battery in-charge LED indicator
DOWN
SELECT
MEMORY
INGRESS
DATA LOGGER
External Power adaptor LED indicator
6
Secondary Function
(press and hold for 2”)
Level/Ch. Power meas. (press once)
RESET (press and hold for 10”)
Open Configuration Menu
AUTOMEMORY
MODIFY
LEAKAGE
STORE
HELP
Voltmeter
C2
USER MANUAL
2
SIDE BODYPANELS
S – External Power inlet ~ 12 Vac
T – USB 2.0 socket
U - RF inlet (75 Ω, F-type connector)
7
C2
USER MANUAL
USER MANUAL
3
TURNING THE METER ON
Press and release the HOME
4
[A] key.
TURNING THE METER OFF
Press and hold for 2” the HOME
5
[A] key
CHECK THE BATTERY CHARGE STATUS
When the meter is on, in the lower left corner of the LCD display [C] an icon is showing
the current power source of the meter: built-in battery or mains/12V DC external feed.
When the built-in battery icon is displayed, same icon represents the charging status of
the built-in battery (Full, ¾, ½, ¼, poor).
↑
Power from built-in battery
↑
External power adaptor
Connect the supplied AC adaptor or the supplied cigarette lighter adaptor to the [S]
inlet (located on the left side of the meter) to recharge the built-in battery. When the
meter is connected to an external power supply, the LED indicator [R] (located on the
meter front panel) is on.
8
C2
USER MANUAL
6
METER CONFIGURATION: MPEG SERVICE LIST
Press and hold for 2” the MPEG SERVICE LIST
6.1
[B] key
METER LOUDSPEAKER VOLUME SETUP
Press and release the SELECT [M] key repeatedly to highlight the item VOLUME.
Press and release the UP [H] key or DOWN [L] key to adjust the volume level of the
built-in loudspeaker: you can highlight one level among: 0% (loudspeaker off), 20%,
40%, 60%, 80%, 100% (max. volume).
6.2
METER SETUP
Press and release the SELECT [M] key repeatedly to highlight the item METER
SETUP.
Press the UP [H] key to enter the meter setup menu.
~
BATTERY SAVING - SELF POWER OFF (TIMER OFF)
If no key of the meter is pressed within the self power off time herein sat, the meter
automatically turns itself off in order to save battery life. To set up the auto power
off time, press and release the SELECT [M] key repeatedly to highlight the item
TIMER OFF.
Press and release the UP [H] key or DOWN [L] key to select: OFF (meter always
on), 5 min (meter turns off in 5 minutes), 10 min (meter turns off in 10 minutes)
9
C2
USER MANUAL
~
FIELD AND CHANNEL POWER MEASUREMENT UNIT (UNIT)
Press and release the SELECT [M] key repeatedly to highlight the item UNIT
Press and release the UP [H] key or DOWN [L] key to select the requested
measurement unit: dBm, dBmV (dBmillivolt) dBuV (dBmicrovolt)
~
LANGUAGE
Press and release the SELECT [M] key repeatedly to highlight the item
LANGUAGE
Press and release the UP [H] key or DOWN [L] key to select the language of your
choice. In some versions of the meter, English language only is available.
~
KEYS BEEP
Press and release the SELECT [M] key repeatedly to highlight the item KEYS
BEEP
Press and release the UP [H] key or DOWN [L] key to select the desired keys
beep volume: OFF, LOW, MEDIUM, HIGH (max.).
~
DISPLAY BACKLIGHT (DISP.LIGHT)
If no key of the meter is pressed within the backlight power off time herein sat, the
display backlight automatically turns itself off in order to save battery life. To set up
the auto backlight power off time, press and release the SELECT [M] key
repeatedly to highlight the item DISP.LIGHT
Press and release the UP [H] key or DOWN [L] key to select FullON (backlight
always on) or 30 sec (backlight turns off within 30 sec).
6.3
MAIN RECEPTION PARAMETERS SETUP
Press and release the SELECT [M] key repeatedly to highlight the item TV
CONFIG.& COUNTRY
Press the UP [H] key to enter the reception parameters setup menu.
~
COUNTRY CHANNEL PLAN
Press and release the SELECT [M] key repeatedly to highlight the item
COUNTRY.
Press and release the UP [H] or DOWN [L] key to select the relevant Country
Channel Plan. In some countries more than one Channel Plan is available (e.g.
10
C2
USER MANUAL
the USA). If you are going to select a Country Channel Plan of one of these
Countries, please carefully navigate within the selection list in order to setup the
appropriate Country Channel Plan.
~
CABLE TV STANDARD
Press and release the SELECT [M] key repeatedly to highlight the item
DISCOVERY.
Press and release the UP [H] key or DOWN [L] key to setup the required cable TV
standard (DVB-C [Annex A & B], J83-B, DVB-C & J83-B). Your meter is capable to
AUTO DISCOVERY® the current Cable TV standard. In case of any doubt about
the cable TV standard select DVB-C & J38-B. In case you already know the
standard in use, select a specific standard (DVB-C or J38-C) to speed-up the
lockup process of the signals.
{
DOCSIS (DOWNSTREAM)
DOCSIS downstream signalisations are commonly streamed in J83-B standard.
Thus setting the DVB-C & J38-B mode on the meter will allow you to correctly
lock and decode both payload signals (whichever the relevant standard) and the
downstream DOCSIS information
~
C/N TYPE
Press and release the SELECT [M] key repeatedly to highlight the item C/N TYPE.
Press and release the UP [H] or DOWN [L] key to select the desired C/N type (IN
BAND or OUT BAND).
11
C2
USER MANUAL
7
SIGNAL TUNING : PLAN
Connect the signal cable to the RF inlet [U] of the meter.
Press and release the PLAN
7.1
[D] key.
NAVIGATE INTO THE SELECTED COUNTRY CHANNEL PLAN
Press and release the SELECT [M] key repeatedly to highlight the item MASTER
PLAN.
Check the highlighted Country Channel Plan is the desired one. If not, proceed as
described in Chapter COUNTRY CHANNEL PLANCOUNTRY CHANNEL PLAN, at
page 10 to select the desired Country Channel Plan.
Press the MEAS
[G] key.
On the LCD [C] top row it will be displayed (from left to right): the selected Country
Channel Plan, the channel currently tuned, and the corresponding frequency (in
MHz).
~
SURFING THE CHANNELS
Press and release the SELECT [M] key repeatedly to highlight the current channel ID.
Press and release the UP [H] key and DOWN [L] key. Each pulse moves the channel
ID one step upward or (resp.) downwards. To rapidly move the channel ID up- or
downwards, press and hold the UP [H] or (resp.) DOWN [L] key.
12
C2
USER MANUAL
7.2
NAVIGATE INTO A CUSTOM CHANNEL PLAN (USER DEFINED
CHANNEL PLAN): MANUMEMORY
To create a Custom Channel Plan, proceed as described in Chapter 11.2MANUALLY CREATING A MEMORY PLAN: MEMORY, at page 34
Press and release the SELECT [M] key repeatedly to highlight the item CUSTOM
PLAN.
Press and release the UP [H] or DOWN [L] key to set the required Custom Channel
Plan
Press the MEAS
[G] key.
On the LCD [C] top row it will be displayed (from left to right): the selected Custom
Channel Plan, the channel ID currently tuned, and the corresponding frequency (in
MHz).
Press and release the UP [H] key and DOWN [L] key to navigate into the selected
Custom Channel Plan. Each pulse moves the channel ID one step upward or (resp.)
downwards. To rapidly move the channel ID up- or downwards, press and hold the
UP [H] or (resp.) DOWN [L] key.
THE METER WILL TUNE ONLY THE CHANNELS INCLUDED INTO THE
SELECTED CUSTOM CHANNEL PLAN
~
MODIFY AND FINE-TUNE THE RECEPTION FREQUENCY
Should you need to manually modify or to fine-tune the reception frequency, press
and release the SELECT [M] key repeatedly to highlight the value of the current
frequency. Press and release UP [H] key and DOWN [L] key to modify the frequency
value. To rapidly move the frequency value up- or downwards, press and hold the UP
[H] or (resp.) DOWN [L] key.
{ WHO’S THERE? AUTODISCOVERY ®
Once selected or fine-tuned the desired frequency value, the meter can provide
the user with the Autodiscovery ® function to self detect and tune the received
signal, both analogue and digital, and to set the appropriate signal bandwidth.
Suppose you are starting from the frequency value 699,95 MHz, which has no
correspondence with any significant frequency value in any country channel
plan:
13
C2
USER MANUAL
Press and hold for 2” the INGRESS
[G] key. The meter will start the
Autodiscovery ® process, and will display a rotating bar as an “in progress”
indicator.
When terminated, the meter displays the Autodiscovery ® results. In this case
the received signal was detected as analogue TV type at 695,35 MHz as video
carrier frequency.
In this case the meter was receiving an on-air broadcasted analogue TV signal
on EU channel 49, thus corresponding to a 695,25 video carrier frequency. From
the practical point of view, as well as from the end user one, the meter has
correctly detected the received signal even if the start frequency (699,95) was
4,6 MHz far from the correct one.
~
SELECT A DIFFERENT CUSTOM CHANNEL PLAN
Press and release the SELECT [M] key repeatedly to highlight the current Custom
Channel Plan. Press and release the UP [H] key and DOWN [L] key to navigate into
the complete Custom Channel Plan list.
14
C2
USER MANUAL
7.3
NAVIGATE INTO AN AUTOMEMORY CHANNEL PLAN
To create a Custom Channel Plan, proceed as described in Chapter 11.1 CREATING A MEMORY PLAN BY AUTO SEEK & STORE OF ANY RECEIVABLE
CHANNEL: AUTOSCAN, page 32.
Press and release the SELECT [M] key repeatedly to highlight the item AUTOtv
MEMORY.
Press and release the UP [H] key and DOWN [L] key and highlight the desired
Automemory Channel Plan.
[G] key
Press and release the MEAS
Proceed as described in Chapter 7.2 - NAVIGATE INTO A CUSTOM CHANNEL
PLAN (USER DEFINED CHANNEL PLAN), page 13.
15
C2
USER MANUAL
8
PERFORMING MEASURES: MEAS
Tune the desired Channel ID or the desired frequency value. Proceed as per Chapter 7
SIGNAL TUNING : PLAN, page 12.
8.1
THE SELECTED CHANNEL CARRIES ON A DIGITAL CATV
SIGNAL (QAM)
In the second row (from the top) the meter LCD will display, “TV QAM” and the
relevant standard (e.g.: DVB-C). In the LCD bottom row a “C” (= cable) appears just
above the CATV marker on the display frame.
~
NOISE MARGIN, QUALITY TEST, MER E BLOCK ERROR
MEASUREMENT
When the tuned channel carries on a signal the meter can successfully lock, the
meter will as first display the Noise Margin (N.MAR), the Quality test (QLTY:
possible values FAIL, MARGIN, PASS)), the MER measurement and the BLOCK
ERROR measurement. The NOISE MARGIN and MER real time values are also
displayed on level bars with peak level memory.
Further, in the LCD bottom row the qualifying bouquet information will be
displayed:
• bouquet ID (network name), in a few seconds and only in case the tuned
signal has a suitable quality
• CA system (encrypt) if at least one program in the bouquet is encrypted in
a few seconds and only in case the tuned signal has a suitable quality
• A “C” (= cable) marker appears just above the CATV marker on the display
frame.
16
C2
USER MANUAL
~
BER MEASUREMENT BEFORE AND AFTER VITERBI
From the previous measurement screen press and release once the MEAS [G]
key. The meter will display the BER measurement before Viterbi error (bBER or
PreBER) and after Viterbi (aBER or PosBER).
Please confirm the deletion of the highlighted sentences.
The bBER and aBER real time values are also displayed on level bars with peak
level memory.
~
CARRIERS CONSTELLATION AND QAM PARAMETERS DISPLAY
From the previous measurement screen press and release the MEAS [G] key. The
current carriers constellation will be displayed, together with the QAM major
parameters of the locked signal:
•
•
•
Transmission standard (and the relevant Annex as well)
QAM modulation (MODE)
Signal Symbol Rate (SR)
{
ZOOMING THE CONSTELLATION IN/OUT
To zoom-in/out the carrier constellation displayed press and release the
SELECT [M] key repeatedly to highlight the item ZOOM. Press and release the
UP [H] key or DOWN [L] key zoom-in and (resp.) zoom out the constellation
displayed. A square icon on the right of the ZOOM item will graphically display
the current zoom value. Only the constellation part where both I and Q are
positive can be zoomed in.
~
BOUQUET ID DATA
From the previous measurement screen press and release the MEAS [G] key.
The:
• Network name (NETW. NAME)
17
C2
USER MANUAL
• Bouquet name (BOUQ. NAME)
• Actual calendar date
will be displayed in the current measurement screen, provided that said
information are included into the broadcasted bouquet:. Should one or more of
said information be missing from the bouquet, the relevant value field will be blank.
~
CHANNEL POWER MEASUREMENT
From the previous measurement screen press and release the MEAS [G] key. On
the display bottom row the current channel power (together with the relevant
measurement unit) will be displayed. The channel power real time value is also
displayed on a level bar with peak level memory.
By pressing and releasing more times the MEAS
[G] key the user can surf
the various available measurement screens up to display the requested one.
~
DISPLAYING THE SERVICE LIST OF THE CURRENT BOUQUET
Press and release the MPEG SERVICE LIST
[B] key. The service list of
the currently tuned bouquet will be displayed. The video (Vpid) and audio (aPID)
PID associated to each service will be displayed; the current encryption status of
each service will be displayed as well (Y = encrypted, N = free).
It could take some time to complete the service and PID list..
18
C2
USER MANUAL
Press and release the UP [H] and DOWN [L] key to navigate the service list.
Press and release the MEAS [G] key to exit the service list display.
~
SPECTRUM ANALYSIS OF THE TUNED CHANNEL
Proceed as describer in Chapter 9 SPECTRUM ANALYZER MODE at page 23.
8.2
THE SELECTED CHANNEL CARRIES ON AN ANALOGUE
TV/CATV SIGNAL
In the second row (from the top) the meter LCD will display “TV ANALOG” and the
relevant standard (e.g.: PAL). In the LCD bottom row a black filled quadrangle
appears just above the AN (= analogue) marker on the display frame.
~
VIDEO SIGNAL PEAK LEVEL MEASUREMENT
On the display bottom row the current video signal peak level (together with the
relevant measurement unit) will be displayed. The video signal peak level real time
value is also displayed on a level bar with peak level memory.
~
VIDEO Vs. AUDIO PEAK LEVEL RATIO AND SIGNAL TO NOISE
RATIO
From the previous measurement screen press and release the MEAS [G] key.
19
C2
USER MANUAL
The meter will display the Video peak level Vs. Audio peak level Ratio (V/A, in dB)
and the Signal to Noise Ratio (S/N, in dB). Both real time Ratios are also displayed
on level bars with peak level memory.
~
AUDIO PEAK LEVEL MEASUREMENT
From the previous measurement screen press and release the MEAS [G] key.
The meter will display the Audio peak level measurement, together with the
relevant measurement unit. The real time Audio Level is also displayed on a level
bar with peak level memory.
The received audio signal will be played by the meter built-in loudspeaker. To setup the built-in loudspeaker volume, proceed as described in Chapter 6.1 METER
LOUDSPEAKER VOLUME SETUP, at page 9
[G] key the user can surf
By pressing and releasing more times the MEAS
the various available measurement screens up to display the requested one.
~
SPECTRUM ANALYSIS OF THE TUNED CHANNEL
Proceed as describer in Chapter 9 SPECTRUM ANALYZER MODE at page 23.
8.3
THE SELECTED CHANNEL CARRIES ON A DIGITAL
TERRESTRIAL SIGNAL (COFDM)
In the second row (from the top) the meter LCD will display “TV COFDM EMUL”. In
the LCD bottom row a locker appears just above the DIG (= digital) marker on the
display frame.
PLEASE NOTE: This meter does not include a COFDM de-modulator. Therefore
COFDM signals are managed in a COFDM emulation mode
20
C2
USER MANUAL
In the third row (from the top) the meter LCD will display the frequency bandwidth
(BW) of the tuned signal.
~
CHANNEL POWER MEASUREMENT
On the display bottom row the current channel power (together with the relevant
measurement unit) will be displayed. The channel power real time value is also
displayed on a level bar with peak level memory.
NO OTHER MEASUREMENT AVAILABLE IN COFDM EMULATION MODE.
~
SPECTRUM ANALYSIS OF THE TUNED CHANNEL
Proceed as described in Chapter 9 SPECTRUM ANALYZER MODE at page 23.
8.4
FM AUDIO MEASUREMENT (included FM RADIO 87,5 – 108,00
MHz)
Connect an antenna system capable to receive the desired frequency range to the
meter. Set up your meter as described in Chapter 7.2 NAVIGATE INTO A CUSTOM
CHANNEL PLAN (USER DEFINED CHANNEL PLAN), at page13.
[G] key repeatedly, up to display the Audio
Press and release the MEAS
peak level measurement screen (proceed as described in Chapter AUDIO PEAK
LEVEL MEASUREMENT, at page 20).
Press and release the SELECT [M] key repeatedly to highlight the frequency value.
Press and release the UP [H] and DOWN [L] key to set-up the desired frequency
21
C2
USER MANUAL
value. The LCD goes on displaying TV ANALOG and the relevant standard even if a
FM Radio signal, as well as a generic FM signal, has been tuned.
~
AUDIO LEVEL MEASUREMENT
The meter will display the Audio level measurement, together with the relevant
measurement unit. The real time Audio level is also displayed on a level bar with
peak level memory.
The received audio signal will be played by the meter built-in loudspeaker. To setup the built-in loudspeaker volume, proceed as described in Chapter 6.1 METER
LOUDSPEAKER VOLUME SETUP, at page 9
~
SPECTRUM ANALYSIS OF THE TUNED CHANNEL
Proceed as described in Chapter 9 SPECTRUM ANALYZER MODE, page 22.
22
C2
USER MANUAL
9
SPECTRUM ANALYZER MODE
Press the SPECT
[F] key.
The meter LCD will display the spectrum content of the tuned channel.
In case the tuned signal is analogue, the marker will be positioned by default on the
frequency value corresponding to the analogue Video signal peak level. The relevant
level is displayed in the LCD bottom row (MRK), together with the relevant
measurement unit.
In case the tuned signal is digital, the marker will be positioned by default on the
centre-band frequency of the tuned signal. The relevant level is displayed in the LCD
bottom row (MRK), together with the relevant measurement unit.
9.1
SURFING THE CHANNELS
Press the SELECT [M] key repeatedly to highlight the currently tuned channel. Press
and release the UP [H] and DOWN [L] key to seethe desired channel.
PLEASE NOTE: the meter will allow you to select ONLY a channel included into
the channel plan currently in use. To select a different channel plan, proceed as
described in Chapter 7 , at page12
23
C2
USER MANUAL
9.2
MOVING THE MARKER (FREQUENCY VALUE)
Press the SELECT [M] key repeatedly to highlight the current frequency value. Press
and release the UP [H] and DOWN [L] key to modify the marker position (current
frequency value). To rapidly move the frequency value up- or downwards, press and
hold the UP [H] or (resp.) DOWN [L] key. The meter LCD will at any time display the
current frequency value (first row, top right) and the relevant signal level
measurement (bottom row, MRK).
9.3
EDITING THE SIGNAL LEVEL END OF SCALE
Press the SELECT [M] key repeatedly to highlight the top level (end of scale) value
on the y-axis. Press and release the UP [H] or (resp.) DOWN [L] key to increase or to
decrease the end of scale value.
9.4
EDITING THE SPAN VALUE
Press the SELECT [M] key repeatedly to highlight the item span (SP…). Press and
release the UP [H] or (resp.) DOWN [L] key to increase or to decrease the span
value. Only pre-defined span values (from 2 MHz to FULL) can be set. No fine
adjustment is possible.
9.5
ACTIVATE THE MAX HOLD FUNCTION
Press and release a second time the SPECT [F] key. The LCD bottom row will
display MaxH on the right side of the real time level measurement.
Press and release twice the SPECT [F] key to exit the MaxHold function.
9.6
MATCHING THE SIGNAL LEVEL AT TWO USER-DEFINED
FREQUENCY VALUES
While in spectrum analyzer mode, set the marker on the frequency value whose
signal level is to be set as reference level. Said frequency value is herein referred to
as “reference frequency value”. Press and release twice the SPECT [F] key.
On its top row left edge, the LCD will display the reference frequency value (MKF, the
frequency value whose signal level was set as reference level); at the right edge the
LCD will display the real time signal level (L) measured in correspondence of the
24
C2
USER MANUAL
current marker position (current frequency value). An horizontal dotted line shows the
real time signal level value at the current marker position (current frequency value).
On its bottom row left edge, the LCD will display the ΔMF (current frequency value
less the reference frequency value [MKF]) and ΔL (signal level at current frequency
value less reference signal level) values.
~
MODIFYING THE CURRENT FREQUENCY VALUE
The current frequency value is the frequency value whose signal level will be
compared to the signal level at the reference frequency value (MKF).
Press the SELECT [M] key repeatedly to highlight the item ΔMF. Press and
release the UP [H] and DOWN [L] key to set the current frequency value. The ΔMF
item displays the real time spacing (in MHz) between the current frequency value
and the reference frequency value. On the LCD screen, two dotted vertical
markers indicate the reference frequency value (fixed marker) and the current
frequency value (this marker sweeps by pressing the UP [H] and DOWN [L] keys.
The ΔL item displays the real time variation between the signal level at current
frequency value and the reference signal level (at reference frequency value
MKF). On the LCD screen, two dotted horizontal markers indicate the reference
signal level (fixed marker) and the signal level at the current frequency value (this
marker rises or lowers itself according to the current signal level when adjusting
the current frequency value).
~
EDITING THE SIGNAL LEVEL END OF SCALE
Press the SELECT [M] key repeatedly to highlight the top level (end of scale)
value on the y-axis. Press and release the UP [H] or (resp.) DOWN [L] key to
increase or to decrease the end of scale value.
9.7
FULL BAND MAPPING
The meter can display a bar diagram in which each bar displays the signal level
detected on a specific channel into the full selected frequency band. The bar diagram,
the marker, and the display bottom row can display several parameters, depending
from the meter configuration.
~
FULL BAND MAPPING DISPLAY CONFIGURATION
Press and hold for at least 2” the SCAN-TILT [D] key. Press and release the UP
[H] or DOWN [L] keys to select the desired display mode.
25
C2
USER MANUAL
{ SIGNAL LEVEL DETECTED INTO EACH CHANNEL
Press and release the UP [H] or DOWN [L] keys to select LEVEL.
In this mode each bar will display the signal level real time measured in the
corresponding channel.
{ AUDIO AND VIDEO PEAK LEVEL DETECTED INTO EACH CHANNEL
Press and release the UP [H] or DOWN [L] keys to select AUD/LEV.
In this mode each bar will display at the same time the audio peak level and the
video peak level real time measured in the corresponding channel. The white dot
on each black represents the audio peak level. The whole black bar represents
the video peak level.
This display mode is consistent only when performed on analogue signals.
{ SIGNAL LEVEL COMPARISON (TILT) BETWEEN TWO USERDEFINED CHANNELS
Press and release the UP [H] or DOWN [L] keys to select TILT.
In this mode the meter will display the signal level difference between two userdefined channels. These two channels can be directly set while this
measurement function is running
~
ACTIVATE THE FULL BAND MAPPING (BARSCAN)
Press and release the SCAN-TILT [D] key. Depending on the selected
configuration (see Chapter FULL BAND MAPPING DISPLAY CONFIGURATION,
page 25) a specific bar diagram will be displayed.
{ FULL BAND SIGNAL LEVEL ANALYSYS IN EACH CHANNEL (LEVEL)
Each bar displays the signal level measured in the relevant channel. The marker
(the vertical dotted line) is positioned on the channel which is currently displayed
in the centre field of the LCD top line and whose frequency is displayed in the
LCD top right edge. The LCD bottom row displays the signal level measured in
the currently selected channel (MRK) together with the measurement unit
currently set for the meter. An horizontal dotted line shows the real time signal
level value measured in the currently selected channel.
26
C2
USER MANUAL
To move the marker on the desired channel, press and release the SELECT [M]
key repeatedly to highlight the centre field of the LCD top row. Press and release
the UP [H] and DOWN [L] key to set the desired channel.
To edit the signal level end-of-scale value, press and release the SELECT [M]
key repeatedly to highlight the top level (end of scale) value on the y-axis. Press
and release the UP [H] or (resp.) DOWN [L] key to increase or to decrease the
end of scale value.
{ FULL BAND AUDIO AND VIDEO PEAK LEVEL ANALYSYS INTO
EACH CHANNEL (AUD/LEV)
To be replaced with an updated screenshot.
Each black bar will contain a white pixel in it.
The overall height of each bar displays the video peak level measured in the
relevant channel.
The height of the bar segment between the x-axis and the above white pixel
displays the audio peak level measured in the relevant channel.
The marker (the vertical dotted line) is positioned on the channel which is
currently displayed in the centre field of the LCD top line and whose frequency is
displayed in the LCD top right edge. The LCD bottom row displays the video
peak level measured in the currently selected channel (MRK) together with the
measurement unit currently set for the meter. An horizontal dotted line shows the
real time video peak level measured in the currently selected channel.
This measure makes sense when performed on analogue signals only
To move the marker on the desired channel, press and release the SELECT [M]
key repeatedly to highlight the centre field of the LCD top row. Press and release
the UP [H] and DOWN [L] key to set the desired channel.
To edit the signal level end-of-scale value, press and release the SELECT [M]
key repeatedly to highlight the top level (end of scale) value on the y-axis. Press
and release the UP [H] or (resp.) DOWN [L] key to increase or to decrease the
end of scale value.
27
C2
USER MANUAL
{ FULL BAND SIGNAL LEVEL COMPARISON BETWEEN TWO USERDEFINED CHANNELS (TILT)
Each bar displays the signal level measured in the relevant channel.
The LCD top row displays the two channels (1: and 2:) whose signal level has to
be compared. The LCD bottom row displays (TLT, tilt) the difference between
the signal value measured in channel 1: and the one measured in channel 2:.
To select the channels whose signal level has to be compared, press and
release the SELECT [M] key to highlight the channel (1: or 2:) to be edited.
Press and release the UP [H] and DOWN [L] key to set the desired channel.
On the x-axis, two triangle shapes locate the two channels whose signal level is
under comparison.
To edit the signal level end-of-scale value, press and release the SELECT [M]
key repeatedly to highlight the top level (end of scale) value on the y-axis. Press
and release the UP [H] or (resp.) DOWN [L] key to increase or to decrease the
end of scale value.
28
C2
USER MANUAL
10 CABLE SYSTEM MEASUREMENTS
10.1 VOLTMETER MODE (AC MEASURE AT RF TEST POINT)
The meter automatically senses line frequency AC that may be present at the test
point. Connect the meter to the selected test point in question, then press and hold
for at least 2” the DATA LOGGER
[Q] key to activate the voltmeter mode.
The LCD displays the relevant measured voltage.
10.2 CABLE LEAKAGE MEASUREMENTS
~
CABLE LEAKAGE SETUP
Press and hold for at least 2” the MPEG SERVICE LIST
[B] key. Press
and release the SELECT [M] key repeatedly to highlight the field LEAKAGE
SETUP. Press and release the UP [H] to enter the setup menu.
{
AREA AND MEASUREMENT UNIT STANDARD SETUP
Press and release the SELECT [M] key repeatedly to highlight the field AREA.
Press and release the UP [H] or DOWN [L] key to select the appropriate area.
29
C2
USER MANUAL
The meter will accordingly set the standard measurement units and the antenna
sets.
{
ANTENNA TYPE SETUP (USA ONLY)
Press and release the SELECT [M] key repeatedly to highlight the field
ANT.TYPE. Press and release the UP [H] or DOWN [L] key to select the
appropriate antenna type.
{
ANTENNA FACTOR SETUP
Press and release the SELECT [M] key repeatedly to highlight the field
ANT.FACT. Press and release the UP [H] or DOWN [L] key to select the
appropriate antenna factor.
{
DISTANCE SETUP
Press and release the SELECT [M] key repeatedly to highlight the field
DISTANCE. Press and release the UP [H] or DOWN [L] key to select the
appropriate distance.
{
THRESHOLD SETUP
Press and release the SELECT [M] key repeatedly to highlight the field
THRESH. Press and release the UP [H] or DOWN [L] key to select the
appropriate threshold value in the measurement unit displayed on the LCD.
Press and release the MEAS [G] to exit the Cable Leakage Setup menu.
~
CABLE LEAKAGE MEASUREMENT
Press and hold for at least 2” the SPECT
[F] key to activate a cable
leakage measurement session using the parameters set up as per Chapter
CABLE LEAKAGE SETUP, page 29.
Press and release the UP [H] or DOWN [L] key to edit the test frequency. The
meter will display both the real time cable leakage factor (LIVE VAL) and the
maximum leakage factor detected during the same measurement session (PEAK
VAL). A measurement session does get stopped when editing the test frequency,
therefore the PEAK VAL displays the maximum value of the cable leakage factor
30
C2
USER MANUAL
detected by the meter on all the test frequencies set on the meter by the user
while performing the same measurement session.
Press and release the MEAS [G] to stop the current measurement session; this
will also quit the Cable Leakage measurement.
10.3 INGRESS MODE (MEASUREMENTS ON THE FREQUENCY
RANGE 4 ÷ 66 MHz)
Press and release the INGRESS
[P] key to enter the Ingress Mode. The LCD
will display the real time spectrum monitoring in the frequency band 4 ÷ 66 MHz.
A dotted vertical line (marker) displays the frequency value whose signal level is
currently displayed in the LCD bottom row (MRK) together with the relevant
measurement unit. In the top right edge the LCD displays frequency value
corresponding to the current marker position (F, highlighted in the above screenshot,
in MHz) An horizontal dotted line shows the real time signal level value at the current
marker position (current frequency value).
~
MOVING THE MARKER (FREQUENCY VALUE)
Press the SELECT [M] key repeatedly to highlight the current frequency value.
Press and release the UP [H] and DOWN [L] key to modify the marker position
(current frequency value). To rapidly move the frequency value up- or downwards,
press and hold the UP [H] or (resp.) DOWN [L] key. The meter LCD will at any
time display the current frequency value (first row, top right) and the relevant
signal level measurement (bottom row, MRK).
~
EDITING THE SWEEP TIME
Press the SELECT [M] key repeatedly to highlight the sweep time in the LCD top
left edge Press and release the UP [H] and DOWN [L] key to select the
appropriate sweep time. Only pre-defined sweep times (from 50 ms to 50 s) can
be set.
~
EDITING THE SIGNAL LEVEL END OF SCALE
Press the SELECT [M] key repeatedly to highlight the top level (end of scale)
value on the y-axis. Press and release the UP [H] or (resp.) DOWN [L] key to
increase or to decrease the end of scale value.
31
C2
USER MANUAL
11 CREATING MEMORY PLANS
11.1 CREATING A MEMORY PLAN BY AUTO SEEK & STORE OF
ANY RECEIVABLE CHANNEL: AUTOSCAN
Your meter is capable to automatically detect all the channels whose signal level
(analogue channels) or channel power (digital channels) is above a user defined
threshold value, and to store them into a dedicated (AUTOMEMORY) channel plan.
The threshold levels for analogue channels and for digital channels can be from time
to time individually set by the user. This auto seek&store is performed on the sole
channels of the CUSTOM CHANNEL PLAN or (resp.) of the COUNTRY CHANNEL
PLAN currently set. To select a custom channel plan proceed as described in
Chapter 7.2 NAVIGATE INTO A CUSTOM CHANNEL PLAN (USER DEFINED
CHANNEL PLAN), at page 13. To select a country channel plan proceed as
described in Chapter 7.1 NAVIGATE INTO THE SELECTED COUNTRY CHANNEL
PLAN, at page 12.
Your meter can store up to 30 AUTOMEMORY channel plans. Each Automemory
channel plan can contain both analogue and digital channels, but all of them have to
match the above threshold criteria. This feature can be useful to automatically store
all the channels configured in various buildings. This will allow the user to promptly
keep at hand a complete list of the channel configuration in each of the buildings
serviced by the user itself, thus saving time during future checks.
~
AUTOSCAN: FREQUENCY RANGE SELECTION
Before performing an auto seek&store, select the appropriate frequency range
(CATV / TV ONLY) to be scanned. Press and hold for 2” the MPEG SERVICE
LIST
[B] key. The meter LCD will display:
Press and release the SELECT [M] key repeatedly to highlight the item TV
CONFIG.&COUNTRY.
Press the UP [H] key to enter the configuration menu:
32
C2
USER MANUAL
Press and release the SELECT [M] key repeatedly to highlight the item
AUTOMEMORY. Press the UP [H] or DOWN [I] key to select the appropriate
frequency range (TV ONLY or CATV). Then press the MEAS [G] key per leave this
menu
~
AUTOSCAN SEEK&STORE: CREATE A NEW AUTOMEMORY
CHANNEL PLAN
Press and hold for 2” the PLAN
{
[D] key.
SELECT A TARGET AUTOMEMORY CHANNEL PLAN
The target destination plan is the channel plan where the result of the
seek&store operation will be stored. Press and release the SELECT [M] key
repeatedly to highlight the item DESTINAT. Right to the DESTINAT. item, the
name of the current target automemory plan is displayed.
If the current target plan is void, the LCD bottom row will display START?. In
case the current target plan already exists and contains data, the LCD bottom
row will display OVERWRITE?. Press and release the UP [H] and DOWN [L] key
to select the desired target Automemory channel plan (AUTO 1, AUTO 2, …).
{
SETUP
ANALOGUE SIGNALS: VIDEO SIGNAL LEVEL THRESHOLD
Press and release the SELECT [M] key repeatedly to highlight the item LEVEL.
Press and release the UP [H] key and DOWN [L] key to set the video level
threshold. Only the channels whose video signal level is above this threshold will
be saved to the target Automemory plan.
33
C2
USER MANUAL
{
SETUP
DIGITAL SIGNALS: CHANNEL POWER LEVEL THRESHOLD
Press and release the SELECT [M] key repeatedly to highlight the item POWER.
Press and release the UP [H] key and DOWN [L] key to set the channel power
threshold. Only the channels whose channel power is above this threshold will
be saved to the target Automemory plan.
{
SEEK&STORE START
Press the SELECT [M] key repeatedly to highlight the display bottom row. If
START? appears a brand new memory plan will be stored. Should
OVERWRITE? appear, the selected target Automemory plan already contains
data, and will be overwritten without further notice.
Press and release the UP [H] key. The auto seek & store will start. When
finished, the total number of both analogue and digital found and stored
channels will be displayed.
11.2 MANUALLY CREATING A MEMORY PLAN: MEMORY
Press and release the PLAN
~
[D] key.
CREATE A BRAND NEW MEMORY PLAN
Press and release the SELECT [M] key repeatedly to highlight the item CUSTOM
PLAN. Press the MEMORY
[N] key. Press the SELECT [M] key
repeatedly to highlight the item on the LCD top left edge (MANU1, MANU2,…).
Press and release the UP [H] or DOWN [L] key to select a void target memory
plan. When the current target plan is void, the LCD row under the dotted line
bottom row displays MEM P1: ---. Press the SELECT [M] key repeatedly to
highlight the current channel in the centre of the LCD top row.
• Press and release the UP [H] or DOWN [L] key to select the channel to be
stored in the current target memory plan.
• Press the SELECT [M] key repeatedly to highlight the item STORE?.
• Press the UP [H] key. The selected channel has now been stored.
34
C2
USER MANUAL
To add further channels to the current memory plan, press the SELECT [M] key
repeatedly to highlight the current channel in the centre of the LCD top row, then
repeat the above steps.
Press and release the MEAS [G] key to quit this menu.
~
ADDING A FURTHER CHANNEL TO AN EXISTING CUSTOM
MEMORY PLAN
Press and release the SELECT repeatedly to highlight the item CUSTOM PLAN,
then:
• Press and release the UP [H] and DOWN [L] key to select the desired
target Custom Memory plan.
• Press the MEMORY [N] key.
• Press and release the UP [H] or DOWN [L] key to select the channel to be
stored in the current target memory plan.
• Press the SELECT [M] key repeatedly to highlight the item MEM.:
• Press and release the UP [H] or DOWN [L] key repeatedly up to locate an
unused memory position (e.g.: P 6: ---).
• Press and release the SELECT [M] key repeatedly to highlight the item
STORE?. Press and release the UP [H] key. The selected channel is now
stored into the selected memory position of the current target Custom
Memory plan.
Further channels may be added by repeating the above steps.
Press and release the MEAS [G] key to quit this menu.
~
DIRECT STORING A NEW CHANNEL INTO AN EXISTING CUSTOM
MEMORY PLAN
While performing any measurement or spectrum analysys, it is always possible to
directly store the current channel into the currently selected Custom Memory plan.
Just press and hold for 2” the MEMORY [N] key, then:
• Press the SELECT [M] key repeatedly to highlight the item MEM.
• Press and release the UP [H] or DOWN [L] key repeatedly up to locate an
unused memory position (e.g.: P 6: ---).
• Press and release the SELECT [M] key repeatedly to highlight the item
STORE?. Press and release the UP [H] key The current channel is now
stored into the selected memory position of the current target Custom
Memory plan.
To store the current channel into the currently selected Custom Memory plan by
replacing a channel already included into the current Custom Memory plan, press
and hold for 2” the MEMORY [N] key, then:
• Press the SELECT [M] key repeatedly to highlight the item MEM.
• Press and release the UP [H] or DOWN [L] key repeatedly up to locate the
memory position where the channel to be replaced is presently stored
(e.g.: P 6: E4).
• Press and release the SELECT [M] key repeatedly to highlight the item
OVERWRITE?. Press and release the UP [H] key. The current channel is
now stored into the same memory position where was once located the
channel to be superseded.
35
C2
USER MANUAL
11.3 DELETING A MEMORY PLAN
Press and hold for 2” the MPEG SERVICE LIST
[B] key. Press the
SELECT [M] key repeatedly to highlight the item FILE MANAGER. Press the UP [H]
key.
THE MEMORY PLAN CURRENTLY IN USE CANNOT BE DELETED.
To switch the memory plan currently in use, proceed as described in Chapter 7
SIGNAL TUNING : PLAN at page 12.
~
DELETING AN AUTOMEMORY CHANNEL PLAN
Press the SELECT [M] key repeatedly to highlight the item SELECT TYPE. Press
and release the UP [H] key or DOWN [L] key repeatedly to select AUTOSCAN.
Press the SELECT [M] key repeatedly to highlight the item SELECT FILE.
• Press and release the UP [H] or DOWN [L] key repeatedly to select the
memory plan to be deleted (AUTO 1, AUTO 2, …).
• Press the SELECT [M] key repeatedly to highlight the item DELETE FILE.
• Press and release the UP [H] key to permanently delete the above
selected memory plan.
The meter will confirm the selected plan has been deleted (DELETED!). The
warning message VOIDED! means you have tried to delete a permanent and not
erasable memory plan (e.g.: ITALY).
~
DELETING A CUSTOM MEMORY CHANNEL PLAN
Press the SELECT [M] key repeatedly to highlight the item SELECT TYPE. Press
and release the UP [H] or DOWN [L] key repeatedly to select PLAN. Press the
SELECT [M] key repeatedly to highlight the item SELECT FILE.
• Press and release the UP [H] or DOWN [L] key repeatedly to select the
memory plan to be deleted (MANU 1, MANU 2, …).
•
36
Press the SELECT [M] key repeatedly to highlight the item DELETE FILE.
C2
USER MANUAL
•
Press and release the UP [H] key to permanently delete the above
selected memory plan.
The meter will confirm the selected plan has been deleted (DELETED!). The
warning message VOIDED! means you have tried to delete a permanent and not
erasable memory plan (e.g.: ITALY).
~
DELETING A LOGGER FILE (LOGGER MEMORY PLAN)
When an auto Meas&Store procedure has been completed (see paragraph 12
AUTO MEAS&STORE ON THE CHANNELS INCLUDED IN A CUSTOM
MEMORY PLAN (DATA LOGGER) at page 38), the relevant data are stored into a
user defined target Logger Memory Plan.
To delete a Logger memory plan, press the SELECT [M] key repeatedly to
highlight the item SELECT TYPE. Press and release the UP [H] or DOWN [L] key
repeatedly to display LOGGER. Press the SELECT [M] key repeatedly to highlight
the item SELECT FILE.
• Press and release the UP [H] or DOWN [L] key to display the Logger file to
be deleted (LOG.01, LOG.02,…).
•
•
Press the SELECT [M] key repeatedly to highlight the item DELETE FILE.
Press and release the UP [H] key to delete the selected Logger memory
Plan.
The LCD will confirm the delete action (DELETED!).
37
C2
USER MANUAL
12 AUTO MEAS&STORE ON THE CHANNELS INCLUDED IN
A CUSTOM MEMORY PLAN (DATA LOGGER)
This meter can automatically tune all of the channels included in any custom memory
plan (whichever the type) and to automatically perform all the available measurements
on each of the tuned channels. The measurements results are stored into a user
selected target file (LOGGER files).
Any LOGGER file can be downloaded to a PC in MS Excel ® format using the
connection software ROVER SMART ®.
The meter is capable to store up to 99 different LOGGER files, thus allowing the user
to perform a complete auto Meas&Store at almost every end-user socket in a building,
and to archive the results only when back home, without any need to stop the field
activity to free memory space for allowing further measurements.
12.1 AUTO MEAS&STORE
Press and release the DATA LOGGER
[Q] key.
In the second row from the top, the LCD will display [PLAN] the Memory Plan whose
channels will be automatically tuned to perform the auto Meas&Store. Press and
release the SELECT [M] key repeatedly to highlight the item PLAN to edit the
Memory Plan under investigation. Press and release the UP [H] or DOWN [L] key to
set the required Memory Plan. Only user defined memory plans can be selected.
Country Memory Plans (e.g.: ITALY) cannot be selected to auto Meas&Store.
Into the LCD third row from the top the current target LOGGER file [DataFile] is
displayed. Into this LOGGER file the measurements data will be stored. To edit the
target LOGGER file press and release the SELECT [M] key repeatedly to highlight
the item DataFile. Press and release the UP [H] or DOWN [L] key to select the
appropriate target file. Target LOGGER file names can be selected from LOG. 1 to
LOG.99.
In case the current target Logger file is void, the LCD bottom row will display
STORE? In case the current target Logger file already contains data from a previous
auto Meas&Store, the LCD bottom row will display OVERWRITE? In this case,
38
C2
USER MANUAL
should you proceed to a new Meas&Store, the former data will be deleted without
further notice.
To start the auto Meas&Store, press the SELECT [M] key repeatedly to highlight the
item STORE? or, resp., OVERWRITE? e press the UP [H] key. In the lowest part of
the LCD a progress bar will display the status of the running Meas&Store and the
message WAIT!. When the auto Meas&Store is completed the LCD will display
STORED!
12.2 RECALL A PREVIOUSLY STORED LOGGER MEMORY PLAN
Press and release the DATA LOGGER
[Q] key.
Press and release the SELECT [M] key repeatedly to highlight the item DataFile.
Press and release the UP [H] or DOWN [L] key to select the desired LOGGER file to
be recalled. Only previously created logger files can be recalled.
Press and release the SELECT [M] key repeatedly to highlight the item RECALL?.
Press the UP [H] key to recall the selected file.
The LCD will display a resume screen showing the stored measurement data for
each channel: NAME, TYPE, L/PWR, QLTY.
Press and release the UP [H] or DOWN [L] key to scroll the channel list upward or
(resp.) downward.
39
C2
USER MANUAL
13 TECHNICAL SPECIFICATIONS
Analogue TV & CATV, Digital TV & CATV (QAM + COFDM), FM audio, FM Radio
Signal Analyzer
Useful Frequency Range:
4 ÷ 870 MHz (FM Radio included)
Digital Modulation types:
QAM (Annex A & B – J38-C
COFDM (emulated)
Measurement capabilities:
Analogue TV & CATV
In-Channel field level
Video peak level
Audio peak level
Video/Audio level ratio
QAM CATV
Channel power
Pre-Viterbi and After-Viterbi BER
MER
Block Error Counter
Noise margin
Reception Quality Auto Testing
QAM parameters
Symbol Rate
Constellation (32 – 64 – 128 – 256 QAM)
COFDM digital TV (COFDM emulation)
Channel power
Complementary measurements
Audio and video peak level full band
analysys
RF Spectrum analysis
Ingress Mode Spectrum Analysis
(4 – 65 MHz)
Cable leakage measurements
40
MPEG-2 Special Functions:
Bouquet and Network ID identification
Encryption/CA system detection
Bouquet Service List with Audio and
Video associated PID table
Service encryption status indicator
Audio Special Functions:
Analogue TV, CATV, FM and FM Radio
Audio playback
TV Special Functions:
TV and CATV Auto Seek&Store
TV and CATV Auto Meas&Store
TV and CATV channel surfing
Main Specifications:
Meas. dynamic range: 5 ÷ 123 dBμV
Measurement accuracy: 1,0 dB
C2
USER MANUAL
Signal Tuning/Surfing: By frequency value
(measurement and spectrum analysis)
By Service ID
By channel (pre-stored Country channel
Plans, firmware upgradable)
Memory plans:
99 total with 199 channels per Plan
99 Logger-type Plans
Other Features:
Graphic, DOT-matrix LCD (64 x 128)
Power saving LCD backlight
User upgradable Firmware (also via web)
USB 2.0 data connection
Built-in battery operation: 2,5 h
Weight: 1,1 kg
Dimensions: 80 x 225 x 215 mm
Standard package includes:
Shock-proof ABS carrying case
AC adaptor & Battery charger
12V lighter adaptor & Battery charger
USB 2.0 cable
ROVER’s everyday efforts constantly aim at developing better and better instruments, more
reliable and easier to use. Thus, we know you will be on our side when we update the core
software powering our instruments before being able to update our user manuals too.
This way, you will always be entitled to rely on having in your hands the best available
version of the instrument you have chosen. Thank-you for choosing us.
ROVER: (ALWAYS) A STEP AHEAD.
41
C2
USER MANUAL
SERVICE NOTES AND GUARANTEE REGULATIONS
(CEE AND EXTRA CEE)
Rover Laboratories. S.p.A. guarantees the equipment you purchased for a period of 12
months, and in any case, according to the laws and/or possible regulations applied in
the Country where the equipment was purchased.
GUARANTEE REGULATIONS
1. IMPORTANT: the guarantee is valid only upon the presentation of invoice or receipt
to Rover Laboratories S.p.A.. The date of purchase must be clearly indicated on the
invoice/receipt
2. The guarantee covers the free of charge replacement of the only parts, which
malfunctioning is solely due to manufacturing faults. The faults must be individuated
and defined by Rover personnel only.
3. The guarantee is void if:
a. the equipment is tampered with or repaired by non-authorized personnel
b. damage is found, caused by the incorrect use of the equipment, without
following the advice explained in the User’s Guide accompanying the
equipment.
c. damage is found caused by the use of the equipment in unsuitable working
environments.
4. The following parts are not covered by the guarantee:
a. Parts subject to wear, such as aesthetic ones, keyboard, plastic chassis,...
b. Batteries.
c. Bags and carrying cases, included shoulder straps.
5. The equipment can not be replaced and the guarantee extended after the repair of a
fault.
SERVICE NOTES AND PROCEDURES
6. The equipment can only be repaired by the manufacturer or by an authorized Rover
Laboratories service center:
a. Before returning the meter for repair, always contact the distributor where you
purchased the unit or an authorized service center if present in your area to
obtain the return procedure for your analyzer. If no authorised ROVER service
centers are available in your area, please contact Rover Laboratories S.p.A.
directly at the following telephone / fax numbers and/or e-mail address:
+39.030.9198299
+39.030.9906894
Telephone number
Fax number
[email protected]
b. Important : please take note that not authorised returns for repair to Rover
Laboratoris S.p.A. will be rejected.
c. When returning the meter, always send it with the following documentation
attached:
i. the fully-compiled FAULT IDENTIFICATION FORM
42
C2
USER MANUAL
ii. transport document
iii. the eventual request for an estimate of repair costs
d. Please note that the request for an estimate of repair costs must be submitted
upon return of the analyzer with a written note. If the repair cost estimate is
not accepted, Rover Laboratories reserves the right to charge the customer
for the estimate analysis costs.
7. Risks and costs for transport to Rover Laboratories S.p.A. must be sustained by the
buyer. After repair, if the equipment is under guarantee, Rover Laboratories S.p.A.
will pay for the transport returning the goods to the customer. If the instrument is not
under guarantee, after repair, the equipment will be returned by courier service with
the amount to be paid by the customer shown in the invoice.
8. The guarantee does not cover compensation for direct or indirect damages of any
kind to people or goods caused by the use of the equipment and/or compensation
caused by the suspension of use due to eventual repairs.
9. Rover Laboratories. S.p.A. is not responsible for eventual tampering and/or modifi
cations that may cause the goods to no longer adhere to the European “CE”
regulations, especially regarding EMC and safety.
10. Rover Laboratories instruments are recognised and are fully compliant with DVB
regulations and specifi cations (ETS 300 421 – 12 / 94) and are consequently marked
with the DVB logo and registered with id. N. 3088.
43
C2
USER MANUAL
FAULT IDENTIFICATION FORM
CUSTOMER INFORMATION
CUSTOMER:
REFERENCE:
METER INFORMATION
METER MODEL:
SERIAL NUMBER:
TEL. / MOBILE.:
FAX:
HARDWARE (HW on startup display)
FIRMWARE (FW on startup display)
FAULT INFORMATION – check the appropriate box with an XAFFECTED ITEM
POWER SOURCE
the meter, if connected to external power supply, does not turn on
the meter, powered by internal batteries, does not turn on
the meter suddendly turn off (not respecting the stand-by time)
the led “MAINS” is on when the meter is connected to the external power supply
the led “MAINS” is off when the meter is connected to the external power supply
KEYS
each key is not working
one or more key (please specify) is not working
ENCODER (IF AVAILABLE)
does not work if pressed
does not work if turned
DISPLAYS
on LCD display pictures and/or labels are either totally lacking or incomplete
on TFT display pictures are either totally lacking or not complete
on TFT display pictures are distorted or in any way disturbed
EXTERNAL SOCKET / PORT
The meter is not connecting to the computer via the USB/RS232 port.
FAULT OCCURREDAT FIRST TIME WHEN:
the meter was first turned on
after ……… days of proper and normal use
after any fall or crash
FAULT OCCURS IN THE FOLLOWING CONDITIONS:
always
sometimes
each time the meter is turned on
immediately after turning on
only after several minutes of use
only tapping on the chassis
IS THE METER DAMAGED?
Front panel (display/keys/encoder)
Side panels (plugs/port/socket)
FAULT OCCURS WHILE MEASURING… ?
Please specify.
44
Chassis
Rear panel
C2
USER MANUAL
MANTAINING THE METER
CLEANING THE METER
Cleaning the meter from dust and dirt is easy and helps mantaining it in optimal work
conditions through the years. The cleaning procedure is simple and quick and requires
only minor attention.
Never use chemical aggressive products (diluent) and/or abrasive or rough clothes
which may damage plastics and displays.
Always use a soft cloth, damped with a simple water and alcohol solution or a degreasing not abrasive liquid soap.
Keyboard and display should be gently cleaned. Rubbing the keyboard and/or the
display(s) may seriously damage their functions.
MANTEINANCE AND CARE OF THE METER
This meter has been designed to withstand severe conditions of use. Even so, its life
may be prolonged by respecting some simple and effective rules:
• The meter has not been designed to withstand high temperatures (over 60°C or
140° F). Those temperatures can be easily reached when the meter is left in a
car, especially behind the windshield, or in the trunk. The LCD display and/or
other details may easily be damaged by the extreme temperature.
• The internal battery may rapidly loose its efficiency if exposed to high or low
temperatures. This will result in reduced autonomy of the meter when powered
by internal battery.
• When recharging the internal battery, do allow a good air circulation around the
meter and the adapter: do not cover it with clothes and do not recharge the
battery when the meter is contained in its transport case
• The meter is not waterproof, even if it is protected against incidental water
drops. In case of contact with water, when electronic circuits may be damaged,
allow the meter to dry thoroughly before trying to turn it on. Do not use hairdryer
or other strong heating sources, but just leave the meter in quiet air. Contact as
soon as possible Rover Laboratories S.p.A. Technical Assistance.
• The graphic display is protected by a special glass screen. If hit, this protective
screen may adhere to the actual display, causing a “stain” effect. The result will
be a reduced visibility and blind spots on the screen. It is possible to solve this
inconvenient by applying a strip of mild paper-masking tape to the display and
gently pulling it out. Do not use any kind of strong adhesive tape (electrical
tape, duct tape or even scotch tape) which may leave glue stains on the
display. In case of doubt, please contact Rover Laboratories S.p.A. Technical
Assistance.
45
C2
USER MANUAL
DISPOSAL OF ELECTRONIC EQUIPMENT
Disposal of electric / electronic equipment (applicable
in all CEE countries and whereever separate waste
collection system is applied).
This symbol on the packaging indicates that the product should not be considered as
domestic waste. The product, at the moment of disposal, should be brought to a waste
collection point with the proper facilities to manage electrical/electronic appliances.
Electric/electronical appliances, if not disposed of correctly, may have negative
consequences on your health and enivironment.
Furthermore, a proper recycling procedure helps mantaining natural resources.
To have more information about proper disposal of this product, please refer to your
local waste management offices or the shop where this product was bought.
46
C2
USER MANUAL
NOTES
_____________________________________________
_____________________________________________
_____________________________________________
_____________________________________________
_____________________________________________
_____________________________________________
_____________________________________________
_____________________________________________
_____________________________________________
_____________________________________________
_____________________________________________
_____________________________________________
_____________________________________________
_____________________________________________
47
Caring about you.
ROVER LABORATORIES S.p.A.
Via Parini 2 - 25019 Sirmione (BS) ITALY
Tel. ++39.030.91981 • Fax ++39.030.9906894
[email protected] • www.roverinstruments.com