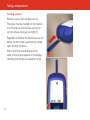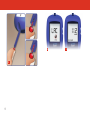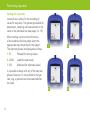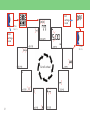
1
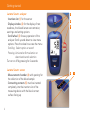
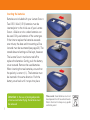
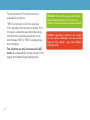
Sales and Service:
EKF-diagnostic GmbH
Ebendorfer Chaussee 3
39179 Barleben
Phone: +49 (0) 39203-785-0
Fax: +49 (0) 39203-785-24
www.ekfdiagnostics.com
[email protected]
Manufacturer:
SensLab GmbH
An EKF Diagnostics Company
Bautzner Str. 67
04347 Leipzig
Phone: +49 (0) 341-234-18-41
Fax: +49 (0) 341-234-18-40
www.senslab.de
[email protected]
User Manual
Part number 7023-9012-2350
Rev. 2.0–11/2013
Copyright© 2013 SensLab GmbH
No part of this publication may be
reproduced, transmitted, transcribed,
stored in any retrieval system or
translated into any human or computer
language by any means or in any form,
without the prior written permission of
Senslab GmbH.
Part Number: 7023-9012-2350
Rev. 2.0 –11/2013
Lactate Scout+ User Manual
Valid from serial no. XXXXX02135
Manufacturer
SensLab GmbH
Bautzner Str. 67
04347 Leipzig
Germany
Phone: (+49) 0341 - 234 18 41
Fax: (+49) 0341 - 234 18 40
www.senslab.de
Sales and Support:
This product has been tested to the requirements
of CAN/CSA-C22.2 No. 61010-1, second edition,
including Amendment 1, or a later version of the
same standard incorporating the same level of
testing requirements.
2
EKF-diagnostic GmbH
Ebendorfer Chaussee 3
D-39179 Barleben
Germany
Service: +49 (0) 39 203 78514
Email: [email protected]
www.ekfdiagnostics.com
Intended use and safety guidelines
• The Lactate Scout+ may only be used
with the Lactate Scout sensors to
determine the lactate concentration in
capillary whole blood. The Lactate Scout
sensors are only for single use.
• O
nly for external application outside the
body. (In-vitro diagnostic application)
• L actate Scout+ is suitable for self-testing.
It can also be used by qualified staff in
various medical faculties. Test results
should only be used as guidance in making
decisions for further treatment of patients
following a suitable period of evaluation.
• K
eep Lactate Scout+ and accessories out of
the reach of children (choking hazard due to
small parts).
• T
he principal risk of infection is in the
handling of blood samples when measuring
lactate concentrations.
3
• Only undamaged and unused lancets
and sensors may be used. Used sensors,
lancets and cellulose cloths pose a risk of
infection. These must be safely disposed of
as household waste following use.
• P
rotective gloves must be worn when
performing tests on third parties.
• T
he sterile single use lancets may only
be used to draw capillary blood on the
fingertips or earlobes.
Unpacking
Unpack the system and check that the
following components are present and
undamaged in the pack. If there is anything
missing contact customer support.
Lactate Scout+ Analyzer / 1,5V AAA/LR03 batteries (2x)
User manual
READ INSTRUCTIONS PRIOR TO USE
Only use the device for the purpose described in this manual.
Do not use any other accessories than those supplied by the manufacturer.
Do not use the device in case of malfunction or damage.
In case of non-intended use the safety measures for the device may become ineffective.
KEEP INSTRUCTIONS FOR USE
Not conforming to cautions may lead to serious health damage.
Not conforming to information marked with “attention” may cause faulty measurements or damage of the device.
Contents
1. Getting started
Lactate Scout+ analyzer and sensors
6
Inserting the batteries
7
Code setting.8
Temperature sensor
9
Care and cleaning, Disposal
10
4
2. Taking a measurement
Inserting a sensor
Blood sampling
12
14 3. Performing step tests
Settings for step tests
16
Afterload timer
18
Timing functions for step tests 18
Test results .19
Turning the device off
19
Deactivate the step test mode
19
4. Settings
Selecting and modifying settings
20
5. Data storage
Transferring data to the PC
23
6. Troubleshooting
Functionality check in dSC mode Error description, potential causes and solutions 26
28
7. Technical specifications
Parameters .32
Explanation of symbols 33
8. Accessories
5
Purchasing accessories
34 Getting started
Lactate Scout+ analyzer
· Insertion slot (1) for the sensor
· Display window (2) for the display of test
readiness, the blood lactate concentration,
warnings and setting options
· Scroll wheel (3) for easy operation of the
analyser. Scroll up and down to view menu
options. Press the wheel to access the menu
Scrolling: Select option or search
1
2
3
Pressing: Activate/confirm selection or
deactivate/cancel selection
Turn on or off by pressing for 2 seconds
Lactate Scout+ sensor
· Measurement chamber (4) with opening for
the collection of the blood sample
· Connecting contacts (5) must be inserted
completely into the insertion slot of the
measuring device with the black contact
surface facing up
6
4
5
Inserting the batteries
Batteries are included with your Lactate Scout+.
Two LR03 / AAA (1.5 V) batteries must be
inserted prior to the initial use of your Lactate
Scout+. Alkaline or zinc carbon batteries can
be used. Only use batteries of the same type.
If the time to replace the batteries exceeds
one minute, the date and time setting will be
lost and must be re-entered (see page 20). The
stored data and settings will be kept, however.
The Lactate Scout+ must be turned off to
replace the batteries. Gently, push the battery
cover outward. Remove the used batteries.
When inserting the new batteries, ensure that
the polarity is correct (+/-). The batteries must
be inserted in the same direction. Push the
battery cover back until it snaps into place.
Attention: In the case of prolonged periods
of non-use and when flying, the batteries must
be removed.
7
Please note: Used batteries must not
be disposed of with household waste.
Return them to the shop or any public
collection point.
Getting started
Code setting
The first time the Lactate Scout+ is used,
a two-digit code must be set. This code is
printed on the label of the sensor vial.
· Turn on the Lactate Scout+ device by
pressing the scroll wheel for two seconds.
The request to set the code appears on the
display (blinking) “set CODE” (1).
· After pressing the scroll wheel again briefly,
the code setting menu is activated and the
left code number will blink (2). Next, set the
left digit listed under “code” on the sensor
container by scrolling up or down and finally
confirm by briefly pressing the scroll wheel.
· To enter the right code digit, which will now
be blinking (3), repeat this process. The
device is now coded (4).
The finalisation of coding is confirmed by a
signal tone. To complete the process, insert
a sensor or turn off the device.
8
Attention: Prior to using a new or other sensor
container, it is necessary to always check whether the
code on the label corresponds to the current code in
the device. If necessary, the latter must be reset.
1
2
3
4
Temperature sensor
In order to be able to achieve equally reliable
test values under different climatic conditions,
the Lactate Scout+ is equipped with a
temperature sensor. It is located underneath
the insertion slot for the sensors.
The functionality of the temperature sensor
impacts the establishment of test readiness
as well as the achieved test values. Therefore,
contamination must be avoided. To ascertain
the ambient temperature, ensure that the
temperature sensor is not touched by hand
or covered.
The ambient temperature of the device can
be displayed for 2 seconds by pressing the
scroll wheel briefly in test mode.
9
Attention: Ensure that the measuring device
and sensors do not vary considerably from
each other in temperature prior to a test (e.g.
for winter sports or after storing the sensors in
the refrigerator). If necessary, allow sufficient
time for the temperature of the sensors and the
measuring device to adjust.
Getting started
Care and cleaning
The Lactate Scout+ measuring device is an
electronic precision measuring device and must
be handled and stored with care. It must be
protected from liquids, moisture, prolonged
solar radiation and excessive effects of cold and
heat (below 0°C and above +50°C).
Heavy mechanical loads, improper handling
and contamination can partially or completely
restrict functionality. Ensure that no liquid or
dirt enters the inside of the device through the
openings (insertion slot for sensor, scroll wheel
and battery housing).
If blood, test solution, dust or other
contaminants are present on the housing, it
must be cleaned using a soft, lint-free towel
or cellulose cloth (e.g. paper towel), which
has been pre-soaked in a mild cleaning agent
(e.g. water with a minimal amount of washingup liquid), and then wiped dry. Medical
staff should adhere to the regulations of the
medical facility in this case.
10
Never insert foreign objects or sensors
other than Lactate Scout sensors into the
insertion slot.
Disposal
In the case of blood lactate measurements it
is impossible to exclude the possibility that
the device will come into contact with blood.
As a result, there is a risk of infection. Dispose
of the device with household waste after
removing the batteries.
(The device does not fall under the application
of the European Directive 2002/96/EC
regarding electrical and electronic equipment).
Attention: If the device housing is opened
by the user, this will invalidate all warranty and
liability claims. Disinfecting agents containing
isopropanol will result in the permanent
tarnishing of the display window.
11
Taking a measurement
Inserting a sensor
Remove a sensor from the dessicant vial.
The sensor must be inserted into the insertion
slot of the device with the black connection
contact surfaces facing up (see right) (1).
Regardless of whether the device was on or off
before, the test mode is automatically started
upon inserting the sensor.
After a brief (one second) display of the
code, a blinking drop appears on the display
indicating that the device is ready to test (2).
1
2
12
Attention: Store the sensors only in the original
container and within the specified temperature
range of -18°C to +8°C. Only remove the sensors
for the purpose of testing. Close the container
again immediately. Never leave open! Protect
against solar radiation, prolonged temperatures
above 25°C and moisture. Temperatures outside
the specified range during transportation and
storage may influence the function of the sensors
and lead to faulty results.
13
Sensors, once removed from the container, must
be used immediately. The sensors must be kept at
room temperature with the measuring device at
least 20 minutes (at least two hours when stored
in the freezer) in the closed container prior to
testing. The expiration date of the sensors on the
label of the sensor container must be observed.
Following the initial opening of the container, the
sensors must be used within 90 days.
Taking a measurement
Blood sampling and analysis
Produce a drop of blood with a sterile single
use lancet approved for capillary blood
sampling. Follow the instructions for use of
the lancet. The site where blood is drawn
must be clean and free of sweat. Lactate
accumulates on the skin from perspiration
and leads to falsely elevated results. Hands
(or earlobes) must be disinfected and washed
with fresh, hygenically-safe water. Dry hands
thoroughly prior to testing. Avoid pressing on
the puncture site too extensively as there is a
risk that sweat and/or tissue fluid can merge
with the blood droplet and falsify the test
result. The drop of blood must not run.
Bring the fingertip with the droplet of blood
close to the tip of the sensor that has been
inserted in the device so that the blood can
be absorbed (3).
Once the measurement chamber of the
sensor is completely filled, an acoustic
confirmation signal sounds and the test
procedure will be activated. “LAC” and a
14
circular symbol with a progress bar appear
on the display as well as the assigned memory
space number (4).
After ten seconds, a second acoustic signal
sounds and the test result is displayed in
the measurement unit “mmol/L” (5).
This is stored automatically along with
the date and time of the test.
Attention: There is a risk of erroneous
(segmented or insuffiecient) filling of the
measurment chamber of the sensor. This may
occur if the subject or user is moving when a
sample is taken. To avoid this, ensure that the tip
of the sensor remains in contact with the drop of
blood whilst the measuring chamber is filling.
Caution: The safety lancet is intended for
single use and must be disposed together with
the used sensor (household waste).
4
3
15
5
Performing step tests
Settings for step tests
Lactate Scout+ allows for the recording of
values for step tests. The general procedure for
preparation, sampling and measurement is the
same as the individual test (see pages 12 - 15).
After inserting a sensor and confirmation
of test readiness (blinking drop) select the
appropriate step test phase for the subject.
The step test phases are displayed as follows:
1. PL:
Preload (for resting values)
2. LOAD:
Load (for load values)
3. AFL:
Afterload (for afterload values)
1
2
3
4
It is possible to begin with any of the step test
phases, however it is not possible to change
later. (e.g. a preload cannot be selected after
the load).
16
The number of the lactate concentrations
recorded per step test phase correlates to
the number of conducted tests. The count of
tested values occurs separately for every step
test phase and is automatically displayed on
the screen to the right of the respective step
test phase symbol (4). One test is intended
for every load step of the step test phase
(“LOAD”).
5
6
7
8
Upon inserting a new sensor, the last selected
step test phase is preset and is displayed
together with the next digit for the continued
test. Now you can perform this test or change
by scrolling up to the following phases or exit
the step test mode.
To exit the step test mode, turn the scroll
wheel directly following the test while the
sensor (5) is still inserted until “End” (6)
appears on the display. Confirm by pressing
the scroll wheel. Exiting is also possible prior
to a new test. In this case, after achieving test
readiness (7), scroll to “End” (8) and briefly press
the wheel. The Lactate Scout+ is now in the
17 individual test mode once again (blinking drop).
Attention: One hour after the last step test
measurement, the measuring device automatically
returns to the individual test mode.
Performing step tests
Afterload timer
If you select the test mode “AFL” for an
afterload test, the time in minutes and seconds
elapsed from the last measurement in the step
test phase “LOAD” will appear below on the
display instead of the time. In addition, a brief
signal tone sounds after every minute that
passes. After no more than twenty minutes, the
timer on the display will remain at “20:00” and
will only be reset upon restarting a step test.
The afterload timer will only be activated if one
or more load tests were performed.
Timing functions for step tests
Using the Countdown function “COUNT
DOWN” preceded by the step duration “DUR”,
it is possible to set times of up to 10 minutes
and to set a signal as they elapse (page 20).
2:56
To be able to control and adjust the load
intensity and step length for field tests
more efficiently, the Lactate Scout+ offers
supplemental application possibilities in the
setting mode (see chapter 4).
With the stop clock “CLOCK”, you can monitor
your lap time (maximum of ten minutes per
load step), see page 20.
18
Display of the expired time following
the last load measurement via the afterload timer
Detailed information on how to perform step
tests can be found in the Lactate Scout+
Compendium on the Lactate Scout Info CD or on
the website www.lactatescout.com
Test results
Test results that are in “idle mode” i.e. measured
prior to exercise, should be between 0.5 mmol/L
and approx. 2.5 mmol/L. The resting values
depend considerably on the physiological
condition of the subject as well as the previous
nutritional intake. In some cases, the value can
be increased due to illness.
After exercise, the lactate value can be more
than 20 mmol/L, particularly in those engaged in
intensive professional sports depending on the
duration and intensity.
Turning the device off
The device is turned off in the test mode by
removing the sensor. Otherwise, the Lactate
Scout+ will turn off automatically after five
minutes.
19
Deactivate the step test mode
In order to prevent accidental switching
into the step test mode or if step test
measurements should always be recorded as
single measurements the step test function
can be deactivated using the Lactate Scout
Assistant Software Ver. 1.0.6. The setting can
be re-activated in the same way. For detailed
instructions see Lactate Scout Assistant
Software manual.
Settings
Selecting and modifying settings
Settings are made in the "Settings and storage
mode“. The settings are only accessible when
no sensor is inserted. Press scroll wheel for two
seconds until a signal sounds and the display
with all elements and symbols appears.
Upon release the first submenu “set CODE”
symbol is shown. Move between submenus by
scrolling the wheel. Accessibility of the submenu
is indicated by blinking.
Briefly press the scroll wheel to activate a
submenu. Scroll to perform the desired settings
in the submenu. Press scroll wheel briefly to
confirm the setting. Exit the settings menu by
pressing the scroll wheel for two seconds.
(set CODE): enter the correct Code for the
sensors in use, for detailed description see
page 8.
(set) (DUR): at selection of this submenu the
current step duration appears. Set desired step
duration using the scroll wheel as described
above. Maximal duration of one step is 10
20 minutes. Minimal setting is 10 seconds.
(COUNT DOWN): by activation of this submenu
the count down for the previously selected
step duration is started. A short signal tone will
sound after each minute and at every second
during the last 10 seconds of a step. An initially
filled black circle will empty quarterly after 25%,
50%, 70% and 100% of the step duration. The
elapse of the step duration is indicated by brief
consecutive signal tones and blinking “0:00”
(CLOCK): activation of this submenu starts
the stop clock immediately. Full minutes are
indicated by a brief signal tone. The displayed
circle fills consecutively with one black quarter
every 2,5 minutes. After 10 minutes the device
switches back to the “CLOCK” menu. The stop
clock can be stopped during the 10 min interval
by briefly pressing the scroll wheel. A signal will
sound and the time will be stored together with
the next lactate test result.
(set) (Time Date): set correct hour by turning the
scroll wheel, confirm by briefly pressing the scroll
wheel. Repeat consecutive for minute, day and
year. Format: hh:mm and dd/mm/yy
Exit
settings
mode
Press
for 2 s
Enter
settings
mode
Press
for 2 s
Scroll wheel
21
Settings
(set) : settings for data transfer, see instructions
page 23-25.
(set) : the speaker volume can be selected
using the scroll wheel as described above.
The signal intensity is indicated by the speaker
symbol being full with three hemispheres (loud),
full with one hemisphere (medium) or empty
(muted)
(set) (CTRL D+S): settings for performing a
functionality test, see instructions page 26-27
(mem): to view stored test results the memory
submenu must be activated. The last result is
displayed together with the storage position
number and if available with the step test data
achieved during the test. The storage position
number is showed intermittent with the date and
time of the test result. The memory can hold up
to 250 test results. If more values are recorded
the oldest value will be overwritten first.
22
Data storage
Transferring data to the PC
The Lactate Scout+ is capable of the wireless
transfer of data to a PC using “BluetoothTM”.
The data transfer menu is activated in the setting
and storage mode. Press the scroll wheel for two
seconds and scroll until “set” and a BluetoothTM
symbol “ ” appears blinking on the display (1).
The menu is activated by briefly pressing the
scroll wheel so that “OFF” and the continually
blinking BluetoothTM symbol below are displayed
on the main display (2).
23
1
Menu for activating the
Bluetooth™ connection
2
Bluetooth™ is inactive
Data
Datastorage
storage
By turning the scroll wheel by one position,
the BluetoothTM module is connected, “On”
appears on the main display and the BluetoothTM
symbol is surrounded by a black line (3). After
confirmation (briefly press the scroll wheel), the
BluetoothTM module in the device is activated.
The Lactate Scout+ bluetooth function, can be
used with Windows XP, Windows Vista,
Windows 7 and Windows 8.
For data transfer to a PC additional software must
be installed on the PC. A generic data export
tool Lactate Scout Data link is availabe as free
download from the website www.lactatescout.
com". Advanced software solutions like the
Lactate Scout Assistant software including
data management and chart functions for
performance analysis are available for purchase
from EKF Diagnostics.
The activated BluetoothTM module is permanently
displayed in the setting and storage mode as an
outlined BluetoothTM symbol (4).
24
3
4
Bluetooth™ is active
Display of Bluetooth™
symbol after activation
Attention: A detailled description for the
initial setup of the Bluetooth TM connection
is available on the website www.lactatescout.
com. Please use the Bluetooth™ dongle
recommended by us.
In addition to the possibility of transferring in
the setting and storage mode, a data transfer is
also possible in the test mode with an activated
BluetoothTM module. Following the test, the
BluetoothTM module is turned on while the test
values are displayed (5, 6) in order to enable a
transfer of data, e.g. the last tested values. (The
success of this option depends, however, on the
PC software used for presenting the tested data.)
The procedure for turning off the active
BluetoothTM function is consistent with the
procedure for turning it on as described on
page 24.
5
6
Display during a test with an
active Bluetooth™ module
Display after a test with an
active Bluetooth™ module
Attention: To decrease energy consumption,
the Bluetooth™ module should not be activated
permanently, but rather only for the purpose of
transferring data. The reach of the Bluetooth™
connection is no more than 10 metres without
spatial barriers. The functionality of the device
can be influenced by strong electromagnetic
fields (e.g. in the proximity of radio towers).
25
Troubleshooting
Functionality check in dSC mode
A functionality check should be performed if
there are any doubts regarding the accuracy
of the test result or the correct function of the
device or sensors.Test solutions are available in
following concentrations: 10 mmol/L, 5 mmol/L
and 2 mmol/L.
Activate the submenu Ctrl D+S as described
under settings. In the display the letters "dSC"
are shown blinking. Insert sensor. The code
display appears briefly and switches to the
blinking drop symbol indicating that the device
is ready to test. At the same time the target value
is displayed with the measurement unit (mmol/L).
All test solutions must be stored at 5°C to 25°C.
The expiry date for the test solution is stated on
the label of the test solution bottle. After initial
use the test solution bottle must be firmly closed
for further storage and must be used within 3
months.
Turn the scroll wheel to select the appropriate
target concentration of your test solution. Do
not confirm by pressing the scroll wheel! Touch
the drop of test solution with the sensor like
when performing a regular measurement, see
instructions page 14-15.
Preparing the functionality test: Allow the test
solution, the sensors and the device to adjust to
ambient temperature before performing the test.
The test starts and the round progress display
is shown together with "dSC". An acoustic
signal indicates that the test is completed. The
measured lactate concentration is displayed.
Open the test solution bottle and wipe off the
opening. Discharge the first droplet and press
out the next droplet onto a clean non-absorbent
surface.
26
For test solutions of 10 mmol/L the result is
evaluated by the device:
“OK”: the test result is within the specified
limits, see label of the test solution bottles. If the
test result is outside the specified range a plug
connector test is started automatically and an
error message “Er3” or “Er4” is displayed (see
error messages).
Test solutions can only be measured in dSC
mode. Any measurement of test solution in the
regular test mode will give wrong results.
27
Attention: Never hold the opening of the test
solution bottle directly up to the sensor as its
contents will become contaminated and unusable.
Caution: Ingesting or contact of test solution
with the mucous membranes must be avoided.
Keep the test solution away from childrenchoking hazard!
Troubleshooting
Error description, potential causes and solutions
28
Error
Description and potential cause
Solution
Er1
Sensor error
Faulty sensor due to damage, incorrect storage or
sample uptake prior to test readiness
Use a new sensor from a correctly stored
container
Er2
Error when filling the sensor
Blood droplet too small or ran, contact time
sensor to blood droplet too short, interrupted
sample absorption or sensor pressed against skin
Repeat the test with a new sensor. If
necessary promote circulation (gently
massage the puncture site)
Er3
Plug connector error
There is a problem with the contacts of the
lactate sensor
Repeat the functionality test with a new
sensor. If the error continues to appear
please contact Lactate Scout+ Service.
Er4
Functionality test not successful
Repeat the functionality test using new
materials and new coding, follow the
instructions for performing the test carefully,
ensure correct selection of test solution
level. If the error continues to appear please
contact Lactate Scout+ Service.
29
Er5 (+blinking
temperatur
symbol)
Temperature error
The temperature is outside the operating range.
Ensure that the ambient temperature is
within the specification of the device.
Er6
Electronic error inside the device
Turn the device off and restart. If the error
continues to appear please contact Lactate
Scout+ Service.
Error when
transferring
data
Too large distance between Bluetooth module
and PC or obstacles in the way, disturbance of
signal by strong elektromagnetic fields (e. g.
caused by electronic devices or transmitter masts),
software error
Limit the distance, avoid obstacles or
interfering transmitters, reinstall software
Troubleshooting
Date bar
Blinking date/time bar on the display
The date/time settings are lost.
Set date and time
Battery
symbol,
blinking
Battery error
The batteries are nearly empty.
Replace batteries
bat
Battery error
The batteries are empty or expired or low quality
batteries have led to corrosion of the battery contacts.
Replace batteries. Use only quality
batteries. Contact Lactate Scout+ Service
in case of corroded battery contacts.
Code control
The display “set CODE” blinks after inserting a sensor
The set code must be checked and and if
necessary corrected after 24 tests.
LO display
Test result too low
The test value is below the test range of the
Lactate Scout+
Repeat the test using new sensor and
new coding, follow the instructions for
performing the test carefully, dry hands
carefully prior to testing.
Perform functionality test. In case of Er4
message contact Lactate Scout+ Service.
HI display
Test result too high
The test value is above the test range of the
Lactate Scout+
Repeat the test using new sensor and
new coding, follow the instructions for
performing the test carefully, wash hands
carefully prior to testing.
Perform functionality test. In case of Er4
message contact Lactate Scout+ Service.
30
Turn on
Device fails to turn on
Replace batteries. Press scroll wheel
> 2 seconds. If the problem persists
please contact LactateScout+ Service.
No test
readiness
No drop symbol displayed
Sensor not inserted properly
Insert sensor until it is noticeable in
place with the black contact surface
facing up.
Signal tones
No acustic signal
Volume was muted in the volume setting menu
Select and activate the volume under
settings
Display
Display shut off
Happens automatically after 5 minutes of inactivity
Poor display contrast
Too low ambient temperature or empty batteries
Display elements missing
Defective electronics or mechanical damage
Restart the device
Values appear to high/too low
Repeat the test using new sensor and
new coding, follow the instructions for
performing the test carefully. Perform
functionality test. In case of Er4 message
contact Lactate Scout+ Service.
Test values
31
Ensure ambient temperature in operating
range, replace batteries
Please contact Lactate Scout+ Service
Technical specification
32
Parameter
Specification
Type of device
Lactate Scout+ handheld device for measuring blood lactate
(model from SN 0000101115)
Sample material
Fresh capillary whole blood
Sample volume
0.2 μl
Measurement range
0.5 mmol/L – 25.0 mmol/L
Precision
± 3 % (minimal standard deviation: ± 0.2 mmol/L)
for Hct range 35 – 50%
± 4 % (minimal standard deviation: ± 0.3 mmol/L)
for extended Hct range
Measurement principle
Enzymatic amperometric determination of lactate using
lactate oxidase
Test duration
10 seconds
Measurement temperature range
+5 °C - +45 °C
Humidity
10 - 85% relative humidity (up to 2 minutes for sensors)
Storage temperature
-18°C - +8°C (sensors in container) or -20°C - +50°C (device)
Hematocrit range (Hct)
20 – 70 %
Max. elevation for use
up to 4,000 metres
Data storage
250 test values with date, time and step test allocations
Data transfer
Integrated Bluetooth® module (Class II module BT 1.2.)
Power supply
2 x 1.5 V AAA / LR03 batteries
Battery life
At least 1000 tests
Device dimensions
91 mm (L) x 55 mm (B) x 22 mm (H)
Device weight
80 g (with batteries)
Explanation of symbols
Symbols on containers and device labels, on instructions included in the packaging and in the operating instructions
Symbol
Meaning
In-vitro diagnostic
Product meets the requirements of the Directive regarding in-vitro diagnostics 98/79/EC
Manufacturer
Follow the operating instructions, read the package information leaflet
Intended only for single use
Expiration date
Batch designation
Storage temperature range
Wireless data transfer with Bluetooth® module
Do not expose to direct solar radiation
Hazardous waste, do not dispose of in household waste
Direct current
33
Accessories
Purchasing accessories
The following accessories are available at EKF diagnostic GmbH or at specialist retailers,
as listed on the product website www.lactatescout.com.
Item
Item no.
BigPack 72+: 3 x 24 Lactate Scout+ sensors in sensor containers
7023-3405-0846
BigPack 48+: 2 x 24 Lactate Scout+ sensors in sensor containers
7023-3405-0727
BigPack 24+: 24 Lactate Scout+ sensors in sensor container
7023-3405-1008
Lactate Scout Test Solution 2 mmol/L: Set of 5 x 2.5 ml bottles with 1.8 – 2.2 mmol/L lactate,
7023-6151-0257
Lactate Scout Test Solution 5 mmol/L + 10 mmol/L: Combi-pack of 2.5 ml bottles (2 x 5 units)
with 4.5 – 5.6 mmol/L and 8.9 – 11.1 mmol/L lactate,
7023-6151-0235
Lactate Scout Test Solution 10 mmol/L: Set of 10 x 2.5 ml bottles with 8.9 – 11.1 mmol/L
7023-6141-0246
SurgiLance Safety Lancets grey, G23
7202-4306-0276
Additional product information, literature and references
can be found online at www.lactatescout.com
34