1
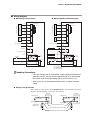
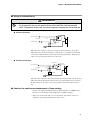
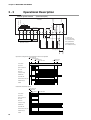
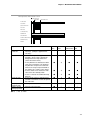
No. CP-SP-1142E
Advanced UV Relay
AUR300C
User's Manual
Thank you for purchasing the AUR300C.
This manual contains information for
ensuring correct use of the AUR300C. It
also provides necessary information for
installation, maintenance, and troubleshooting.
This manual should be read by those
who design and maintain devices that
use the AUR300C.
Be sure to keep this manual nearby for
handy reference.
RESTRICTIONS ON USE
This product has been designed, developed and manufactured for general-purpose
application in machinery and equipment.
Accordingly, when used in applications outlined below, special care should be taken to
implement a fail-safe and/or redundant design concept as well as a periodic
maintenance program.
• Safety devices for plant worker protection
• Start/stop control devices for transportation and material handling machines
• Aeronautical/aerospace machines
• Control devices for nuclear reactors
Never use this product in applications where human safety may be put at risk.
REQUEST
Ensure that this User's Manual is handed over to the user before the
product is used.
Copying or duplicating this User's Manual in part or in whole is forbidden. The information and specifications in this User's Manual are subject to change without notice.
Considerable effort has been made to ensure that this User's Manual is
free from inaccuracies and omissions.
If you should find any inaccuracies or omissions, please contact
Yamatake Corporation.
In no event is Yamatake Corporation liable to anyone for any indirect,
special or consequential damages as a result of using this product.
©2002 Yamatake Corporation ALL RIGHTS RESERVED
SAFETY PRECAUTIONS
■ About Icons
Safety precautions are for ensuring safe and correct use of this product, and for
preventing injury to the operator and other people or damage to property. You
must observe these safety precautions. The safety precautions described in this
manual are indicated by various icons.
As the following describes the icons and their meanings, be sure to read and
understand the descriptions before reading this manual:
WARNING
CAUTION
Warnings are indicated when mishandling this product might
result in death or serious injury to the user.
Cautions are indicated when mishandling this product might
result in minor injury to the user, or only physical damage to
this product.
■ Examples
Triangles warn the user of a possible danger that may be caused by
wrongful operation or misuse of this product.
These icons graphically represent the actual danger. (The example on
the left warns the user of the danger of electric shock.)
White circles with a diagonal bar notify the user that specific actions are
prohibited to prevent possible danger.
These icons graphically represent the actual prohibited action. (The
example on the left notifies the user that disassembly is prohibited.)
Black filled-in circles instruct the user to carry out a specific obligatory
action to prevent possible danger.
These icons graphically represent the actual action to be carried out.
(The example on the left instructs the user to remove the plug from the
outlet.)
i
WARNING
This unit is not equipped with the pre-purge timer and sequence functions
necessary for the burner ignition.
The overall equipment must be designed carefully by taking the timer and
sequence functions into consideration.
Never touch any terminal of this unit while the power is being supplied.
Doing so may cause an electric shock.
Before wiring the AUR300C, be sure to turn the power OFF. Failure to do so
might cause electric shock
Do not connect the solenoid valve to the high electric potential side.
If a ground fault occurs, the ground fault current may flow into the solenoid
valve. Regardless of this unit, the valve is opened, causing the fuel to flow out.
The pilot and main burner ignition time must not exceed the ignition time
specified by the burner or equipment manufacturer.
Failure to do so may cause the fuel to accumulate in the combustion
chamber to form explosive mixing, causing a serious explosion trouble.
Never touch any terminal of this unit during trial-run adjustment.
Doing so may cause an electric shock.
Before removing or mounting the AUR300C, be sure to turn the power OFF.
Failure to do so might cause electric shock.
Before starting the pilot turndown test or ignition spark response test, always
check that all manual fuel valves are closed.
Do not start the actual operation unless the trial-run adjustment tests and
tests specified by the equipment manufacturer are completed.
The terminal 11 (F) is electrically alive within 1 min. after the power to this
unit has been turned OFF.
Never touch the terminal 11 (F) immediately after the power has been turned
OFF. Doing so may cause an electric shock.
If the AUD300C detects a small pilot flame, which cannot ignite the main
burner, this unit does not recognize the flame failure even though the flame
failure occurs in the main burner. Therefore, the fuel flows out continuously,
causing a serious explosion trouble. To prevent such troubles, always
perform the pilot turndown test firmly.
When performing the pilot turndown test repeatedly, stop the equipment
completely every time the pilot turndown test is completed in order to
completely discharge the unburnt gas or oil accumulated in the combustion
chamber or flue.
If the unburnt gas or oil is not discharged completely, this may cause an
explosion accident.
ii
WARNING
After the pilot turndown test has been completed, turn OFF the POWER
switch to shut-down the power. Always restore all the test jumpers and
limit/regulator settings to their previous statuses.
If the operation is started without above restoration, this may cause damage
to the equipment, or gas leak or explosion.
Do not use the AUD300C for detection of ultraviolet rays other than those of
the burner.
If the AUD300C responds to other ultraviolet rays, the status that the flame
failure occurs in the burner is determined as flame presence. Thus, the fuel
flows out continuously, causing an explosion.
CAUTION
This unit is specially designed for intermittent burner operation (system is
started and stopped once or more within 24 hrs.) and 24-hour continuous
burner operation (system continues the combustion for 24 hrs. or longer).
The AUD300C having the self-check function must be used as a flame
detector to be combined with.
This unit is equipped with important functions necessary to safely operate the
equipment. Always operate this unit according to the user's manual.
Do not mount this unit in the following places:
• Place where special chemical or corrosive gas exists, such as ammonia,
sulfur, chlorine, ethylene compound, acid, or others.
• Place where it is exposed to water drops or damp atmosphere.
• Place where it is exposed to the high temperature.
• Place where vibration continues for an extended period of time.
Carefully perform the mounting and/or wiring work while referring to this
user's manual, as well as the instruction manuals published by the
equipment or set manufacturers.
Carry out the wiring work in conformity with the specified standards.
Always connect the power supply finally.
If any terminal is touched accidentally, this may cause an electric shock or
damage.
A load to be connected to each terminal must not exceed the rating shown in
the specifications.
Always supply the electric power having the same voltage and frequency as
those stated on the model label of this unit.
iii
CAUTION
If timers and auxiliary relays need to be used as additional functions, always
select those having high reliability to construct a correct circuit.
This unit must be grounded with the resistance less than 100Ω as described
in the electric facility technical standards. The grounding line must be
connected to the burner chassis.
The power cable and high-voltage cable of the ignition transformer must be
separated from the power cable of the AUD300C.
The high-voltage cable of the ignition transformer must be individual and kept
10 cm or more away from this unit.
Connect the high-voltage cable of the ignition transformer firmly so that no
faulty contacts exist.
If any faulty contact exists, high-frequency radio wave is produced, causing
noise to be produced in the radio or the radio to malfunction.
Additionally, mount the ignition transformer directly on the burner main unit or
metallic part electrically connected to the burner main unit.
After the wiring has been completed, always check that the wiring is correct.
Incorrect wiring may cause damage or malfunction.
Only authorized personnel who have the technical skill about the combustion
equipment and flame safeguard control must carry out the pilot turndown
test.
Only authorized personnel who have the technical skill about the combustion
equipment and flame safeguard control must carry out the mounting, wiring,
inspection, adjustment, and maintenance work.
If the safety shut-off is activated and the equipment is restarted, carry out all
the inspection items stated in Chapter 3, TRIAL-RUN ADJUSTMENT.
When performing the maintenance and inspection of the burner, always carry
out the pilot turndown test. Additionally, this inspection must be carried out
once a year or more frequently.
When cleaning the burner, clean also the AUD300C.
iv
The Role of This Manual
In all, two manuals have been prepared for the AUR300C and AUD300C. Read the manual according to your
specific requirements.
The following lists all the manuals that accompany the AUR300C and AUD300C and gives a brief outline of the
manual:
If you do not have the required manual, contact Yamatake Corporation or your dealer.
Advanced UV Sensor AUD300C
Manual No.CP-SP-1141E
The manual describes the mounting, wiring, maintenance and inspection,
and troubleshooting when the AUD300C is built-into the combustion
equipment.
Advanced UV Relay AUR300C
Manual No.CP-SP-1142E
This manual
The personnel in charge of design, mounting, operation, and maintenance
of the combustion equipment using the AUR300C must read this manual.
The manual describes the mounting, wiring, trial-run adjustment, and
maintenance and inspection of the AUR300C.
Conventions Used in This Manual
The following conventions are used in this manual:
Handling Precaution
: Handling Precautions indicate items that the user should pay attention to
when handling the AUR300C.
(1), (2), (3)
: The numbers with the parenthesis indicate steps in a sequence or
indicate corresponding parts in an explanation.
>>
: Indicates the result of operation or the state of the device after operation.
v
Contents
SAFETY PRECAUTIONS
The Role of This Manual
Conventions Used in This Manual
Chapter 1.
OVERVIEW
■
■
■
■
■
Chapter 2.
Overview • • • • • • • • • • • • • • • • • • • • • • • • • • • • • • • • • • • • • • • • • • • • • • • • • • • • • • • • • • • • • • • • • 1
Features • • • • • • • • • • • • • • • • • • • • • • • • • • • • • • • • • • • • • • • • • • • • • • • • • • • • • • • • • • • • • • • • • 1
Part names • • • • • • • • • • • • • • • • • • • • • • • • • • • • • • • • • • • • • • • • • • • • • • • • • • • • • • • • • • • • • • • 2
Model No. • • • • • • • • • • • • • • • • • • • • • • • • • • • • • • • • • • • • • • • • • • • • • • • • • • • • • • • • • • • • • • • • 3
Configuration • • • • • • • • • • • • • • • • • • • • • • • • • • • • • • • • • • • • • • • • • • • • • • • • • • • • • • • • • • • • 3
MOUNTING AND WIRING
2-1 Mounting • • • • • • • • • • • • • • • • • • • • • • • • • • • • • • • • • • • • • • • • • • • • • • • • • • • • • • • • • • • • • • • • • • • • 4
2-2 Wiring• • • • • • • • • • • • • • • • • • • • • • • • • • • • • • • • • • • • • • • • • • • • • • • • • • • • • • • • • • • • • • • • • • • • • • • • 6
■ Wiring diagram• • • • • • • • • • • • • • • • • • • • • • • • • • • • • • • • • • • • • • • • • • • • • • • • • • • • • • • • • • • 7
■ Wiring to AUD300C • • • • • • • • • • • • • • • • • • • • • • • • • • • • • • • • • • • • • • • • • • • • • • • • • • • • • • 8
■ Wiring to solenoid valve • • • • • • • • • • • • • • • • • • • • • • • • • • • • • • • • • • • • • • • • • • • • • • • • • 9
■ Cautions for continuous measurement of flame voltage • • • • • • • • • • • • • • • • • 9
2-3 Operational Description • • • • • • • • • • • • • • • • • • • • • • • • • • • • • • • • • • • • • • • • • • • • • • • • • • • • 10
Chapter 3.
TRIAL-RUN ADJUSTMENT
■
■
■
■
■
■
Chapter 4.
Outline of adjustment • • • • • • • • • • • • • • • • • • • • • • • • • • • • • • • • • • • • • • • • • • • • • • • • • • • 12
Pre-operational inspection• • • • • • • • • • • • • • • • • • • • • • • • • • • • • • • • • • • • • • • • • • • • • • 13
Measurement of flame signal (flame voltage) • • • • • • • • • • • • • • • • • • • • • • • • • • • 13
Pilot turndown test • • • • • • • • • • • • • • • • • • • • • • • • • • • • • • • • • • • • • • • • • • • • • • • • • • • • • 14
Ignition spark response test • • • • • • • • • • • • • • • • • • • • • • • • • • • • • • • • • • • • • • • • • • • • 16
Safety shut-off test • • • • • • • • • • • • • • • • • • • • • • • • • • • • • • • • • • • • • • • • • • • • • • • • • • • • • 17
MAINTENANCE AND INSPECTION
■ Frequency of maintenance and inspection
Chapter 5.
• • • • • • • • • • • • • • • • • • • • • • • • • • • • •
18
SPECIFICATION
■ Specification • • • • • • • • • • • • • • • • • • • • • • • • • • • • • • • • • • • • • • • • • • • • • • • • • • • • • • • • • • • • 20
■ Dimensions • • • • • • • • • • • • • • • • • • • • • • • • • • • • • • • • • • • • • • • • • • • • • • • • • • • • • • • • • • • • • 21
vi
Chapter 1.
OVERVIEW
■ Overview
This Advanced UV Relay AUR300C (hereafter referred to as AUR300C) is a
relay with a dynamic self-checking function and is used in combination with the
Advanced UV Sensor AUD300C (hereafter referred to as AUD300C).
As the shutter of the AUD300C is driven, the AUR300C drives the flame relay
while checking the AUD300C or AUR300C for faulty part.
If a fault occurs in the flame detection circuit of the AUD300C or AUR300C, the
AUR300C turns OFF the relay firmly to ensure the operational safety.
■ Features
● The AUR300C can monitor each burner.
● The dynamic self-checking function continuously performs the self-checking
of the flame detection circuits of the AUD300C and AUR300C to ensure the
operational safety.
• If a fault occurs in the circuit of the AUD300C or AUR300C before starting
the operation, the main valve is not opened to ensure the safety even though
the start operation is performed.
• If a fault occurs in the flame amplifier of the AUD300C or AUR300C
during combustion, the main valve and pilot valve are shut-off.
● If a fault is found during start-up operation, the check relay is not turned ON
and the output (flame output) to the main valve is not performed.
● The operation status can be checked using various LED indicators (POWER,
SHUTTER, START CHECK, and FLAME).
● A flame signal output (0 to 5Vdc) is provided as a standard function. This is
useful for burner adjustment and flame status control.
1
Chapter 1. OVERVIEW
■ Part names
Mounting hole:
4 locations
To be secured with M4 screws.
Details of indicators
Indicators
14
14
13
13
12
12
Name
POWER (Green)
SHUTTER (Green)
START CHECK (Green)
FLAME (Green)
Color
Green
Green
Green
Green
Description
Lights up when the power is turned ON.
Lights up when the shutter is closed.
Synchronized with the K1 relay (start check).
Synchronized with the K2 relay (flame detection).
SHUTTER
(G)
UV SENSOR
(F) 11
− 10
0-5V
+
9
K3
K1
K2
11
10
Terminal for connection of Advanced
UV Sensor AUD300C:
AUD300C is connected to this terminal.
M4 screw
9
8
8
7
7
6
6
5
5
4
4
3
3
2
2
1
1
Input/output terminal:
Power supply or output devices are connected.
M4 screw
Chassis ground connection part:
Chassis ground connection part commonly used as mounting hole.
The paint is peeled off to make the electric continuity active.
● Terminal pin assignments
Terminal No.
2
Description
14
Flame sensor Shutter (white)
13
Flame sensor Shutter (white)
12
Flame sensor G-terminal (yellow)
11
Flame sensor F-terminal (blue)
10
Flame voltage output (–)
9
Flame voltage output (+)
8
Combustion lamp output (K3)
7
Combustion lamp output (K3)
6
Flame output (K1, K2)
5
Contact output common
4
K2 relay NC (Flame relay NC)
3
Start input
2
Power supply (R) high voltage side
1
Power supply (S) ground side
Electrical rating
24Vdc 150mA
*3
*1: Functions in the same manner as the
—
0 to 5Vdc
*2
3A 250V (cos φ =1) *1
5A 250V (cos φ =1)
—
5A 250V (cos φ =1)
—
100/200Vac 50/60Hz
K2 relay.
(However, since the start check is not
performed, this is not used for the
combustion control, but used for the
combustion monitor.)
*2: Always use a measuring instrument
having an input impedance of 100 kΩ
or more.
Additionally, when connecting any
measuring instrument to this terminal,
use an IV lead wire with a cross
sectional area of 0.75 mm2 or more
and a length of 10 m or less.
*3: The shutter has no polarities.
Chapter 1. OVERVIEW
■ Model No.
Model No.
AUR300C13100
AUR300C13200
AUR300C131D0
AUR300C132D0
Description
Advanced UV relay, 100Vac 50/60Hz
Advanced UV relay, 200Vac 50/60Hz
Advanced UV relay, 100Vac 50/60Hz with inspection certificate
Advanced UV relay, 200Vac 50/60Hz with inspection certificate
■ Configuration
● Combined flame detector
Description
Advanced UV sensor
Model No.
AUD300C
Description
Flame simulator
Surge absorber
Model No.
123514B
83968019-001
● Optional parts
3
Chapter 2.
2-1
MOUNTING AND WIRING
Mounting
CAUTION
Do not mount this unit in the following places:
• Place where special chemical or corrosive gas exists, such as ammonia,
sulfur, chlorine, ethylene compound, acid, or others.
• Place where it is exposed to water drops or damp atmosphere.
• Place where it is exposed to the high temperature.
• Place where vibration continues for an extended period of time.
Only authorized personnel who have the technical skill about the combustion
equipment and flame safeguard control must carry out the pilot turn down
test.
● Mounting posture
Mount this unit on a wall.
When mounting this unit vertically, it is possible to tightly mount the unit.
● Mounting procedures
(1) To allow easy removal, heat radiation, wiring, and maintenance work, keep a
work space that is 20 mm or more in the vertical direction and 10 mm or more
in the horizontal direction as shown in the Fig. below.
Vertical mounting (It is possible to tightly mount the unit.)
20mm
14
14
13
13
12
12
SHUTTER
10mm
(G)
UV SENSOR
(F) 11
− 10
0-5V
+
9
K3
14
13
13
(G)
12
12
11
9
8
7
7
14
13
13
12
12
UV SENSOR
(F) 11
11
K3
(G)
11
− 10
0-5V
+
9
10
8
14
SHUTTER
UV SENSOR
(F) 11
K1
K2
14
SHUTTER
− 10
0-5V
+
9
10
9
8
8
7
7
K3
K1
6
6
5
5
4
10mm
10
9
8
8
7
7
6
6
5
5
K1
6
6
5
5
4
4
4
4
4
3
3
3
3
3
3
2
2
2
2
2
2
1
1
1
1
1
1
K2
K2
20mm
Horizontal mounting
1
2
3
4
5
6
7
8
9
11
10
12
13
14
10mm
20mm
10mm
4
1
2
3
4
6
5
K2
K1
7
8
K3
− 10
0-5V
+
9
12
(G)
UV SENSOR
(F) 11
13
SHUTTER
14
20mm
Chapter 2. MOUNTING AND WIRING
(2) According to the mounting dimension drawing, make mounting holes in the
panel.
Mounting hole
M4 (4 locations)
37±0.5
249±0.5
Mounting hole
M4 (4 locations)
249±0.5
37±0.5
Vertical mounting
Horizontal mounting
Mounting dimension drawing
(3) Secure this unit to the mounting holes (four locations) with M4 screws.
Handling Precautions
• The paint of the lower right mounting hole of this unit is peeled off to
make the electric continuity active, and then this part is used as the
chassis ground connection part.
Secure this part with the toothed lock washer to perform the electric
connection firmly.
• When mounting this unit horizontally, it is not possible to tightly mount
the unit.
5
Chapter 2. MOUNTING AND WIRING
2-2
Wiring
WARNING
Before wiring the AUR300C, be sure to turn the power OFF. Failure to do so
might cause electric shock.
CAUTION
Carefully perform the mounting and/or wiring work while referring to this
user's manual, as well as the instruction manuals published by the equipment
or set manufacturers.
Check the insulation of each wiring.
If any insulation is faulty, this may cause a ground fault or an electric shock.
Carry out the wiring work in conformity with the specified standards.
Always connect the power supply finally.
If any terminal is touched accidentally, this may cause an electric shock or
damage.
A load to be connected to each terminal must not exceed the rating shown in
the specifications.
Always supply the electric power having the same voltage and frequency as
those stated on the model label of this unit.
If timers and auxiliary relays need to be used as additional functions, always
select those having high reliability to construct a correct circuit.
This unit must be grounded with the resistance less than 100Ω as described
in the electric facility technical standards. The grounding line must be
connected to the burner chassis.
The power cable and high-voltage cable of the ignition transformer must be
separated from the power cable of the AUD300C.
The high-voltage cable of the ignition transformer must be individual and kept
10 cm or more away from this unit.
Connect the high-voltage cable of the ignition transformer firmly so that no
faulty contacts exist.
If any faulty contact exists, high-frequency radio wave is produced, causing
noise to be produced in the radio or the radio to malfunction.
Additionally, mount the ignition transformer directly on the burner main unit or
metallic part electrically connected to the burner main unit.
After the wiring has been completed, always check that the wiring is correct.
Incorrect wiring may cause damage or malfunction.
6
Chapter 2. MOUNTING AND WIRING
■ Wiring diagram
● Monitoring of burner flame
● Manual ignition (Intermittent pilot)
AUR300C
K2
11(F)
—
0 to 5Vdc
10
+
9
K3-1
K3-1
Combustion lamp output
FLAME LED
K2 driving circuit
12(G)
SHUTTER LED
8
Combustion lamp output
7
Flame voltage
output circuit
9
Yellow
Measuring
instrument
10
+
13
Blue
Flame voltage
output circuit
Measuring
instrument
0 to 5Vdc
14
White
Flame amplifying circuit
11(F)
—
K2
Shutter driving
circuit
Blue
FLAME LED
AUD300C
12(G)
White
Advanced UV sensor
Yellow
AUR300C
SHUTTER LED
K2 driving circuit
AUD300C
13
Flame amplifying circuit
Advanced UV sensor
14
White
Shutter driving
circuit
White
Start switch
8
7
K1-3
K1-3
Main valve
Flame output
6
6
K2-2
K2-2
Contact output common
5
5
K2 NC
Ignition transformer
Start check circuit
4
K1-2
K1
Start contact
Start check circuit
K1-2
4
START
CHECK LED
K1
START
CHECK LED
Pilot valve
3
K2-1
3
K1-1
Limit
POWER LED
2(R)
K1-1
POWER LED
2(R)
AC
1(S)
Power supply
circuit
Power supply
circuit
AC
K2-1
Stop switch
1(S)
* K1: Start check
K2: Flame detection
K3: Combustion lamp
Handling Precautions
• If the high voltagel side (H) of the power supply is distinguished from the
grounding side (G), the high electrical potential side (H) is connected to
the terminal 2 (R) and the grounding side (G) to the terminal 1 (S).
• When necessary, an overload prevention device is used for the power
supply.
● Wiring to surge absorber
When using the surge absorber model 83968019-001 (optional unit) as protective
measures against lightning, connect it as shown below.
AUR300C
Voltage side (H)
∼ Power supply
Grounding side (G)
Surge absorber
83968019-001
AUR300C
Voltage side (H)
2 (R)
1 (S)
∼ Power supply
Grounding side (G)
2 (R)
1 (S)
Surge absorber between lines
Flat terminal, FS4.8-series terminal side
Mounting bracket side (Grounding side)
7
Chapter 2. MOUNTING AND WIRING
Handling Precautions
• For wiring of the power supply, use an electric cable JIS C 3306 having
an cross sectional area of 0.75 mm2 or more (wire diameter: φ0.18,
number of strand wires: 30).
• Connect the flat connector FS4.8-series (AMP's 187-series receptacle or
equivalent) to one end of the electric cable and make the wiring as short
as possible.
• The grounding side of the metallic bracket for mounting of the surge
absorber is crimped internally to make the electric continuity active.
Mount this bracket on a metallic part, such as burner chassis to connect
the grounding line.
■ Wiring to AUD300C
Make the wiring to the AUD300C as shown below.
Advanced UV Sensor
AUD300C
Advanced UV Relay
AUR300C
White
White
Yellow
Blue
14
13
12
(G)
11
(F)
Handling Precautions
• The signal lines of the AUD300C (blue and yellow) have specific
polarities.
Connect the blue line to the terminal 11 (F) of the AUR300C and the
yellow line to the terminal 12 (G).
If the signal lines are connected reversely, this may cause the tube unit
to break or malfunction.
•
8
To extend the wiring, use a 600V-vinyl insulated IV cable having a cross
sectional area of 2 mm2 and a length of 200 m or less.
Chapter 2. MOUNTING AND WIRING
■ Wiring to solenoid valve
WARNING
Do not connect the solenoid valve to the high voltage side.
If a ground fault occurs, the ground fault current may flow into the solenoid
valve. Regardless of this unit, the valve is opened, causing the fuel to flow out.
● Correct connection
High voltage side (H)
100V
N
L
Burner
AUR300C
Grounding side (G)
(Ground fault)
Valve (Close)
Combustion equipment
Power supply
Fuel
When the valve wiring is connected correctly as shown in the Fig., the ground
fault current does not flow through the solenoid valve even though a ground fault
occurs due to faulty insulation of the high electrical potential side. Therefore, the
valve is not opened and the fuel does not flow out.
● Incorrect connection
(Ground fault)
High voltage side (H)
100V
N
L
Valve (Open)
Burner
AUR300C
Grounding side (G)
Combustion equipment
Power supply
Fuel
When the valve wiring is connected to the high electrical potential side, the ground
fault current flows through the solenoid valve if a ground fault occurs as shown in
the Fig. Therefore, the valve is opened regardless of this unit and the fuel flows
out.
■ Cautions for continuous measurement of flame voltage
• Connect a measuring instrument having an input impedance of 100kΩ or more
and a pen recorder having an input impedance of 1MΩ to this unit.
• Always use an IV cable with a cross sectional area of 0.75 mm2 or more for
signal lines. The wiring length must be 10 m or less.
9
Chapter 2. MOUNTING AND WIRING
Operational Description
(Intermittent pilot)
1(S)
2(R)
K2-1
3
4
5
K2-2
6
Start
switch
7
K3-1
8
9
Stop switch
* K1: Start check
K2: Flame detection
K3: Combustion lamp
K3 is operated with it
synchronized with K2.
(For combustion monitor)
Limit
Pilot valve
Ignition transformer
Main valve
Advanced UV sensor
Combustion lamp
+
0 to 5Vdc
10
11(F)
-
Measuring
instrument
AUD300C
K1-3
Flame voltage
output circuit
Blue
Yellow
13
12(G)
Flame amplifying circuit
White
14
Shutter driving
circuit
K1-2
K2 driving circuit
K1-1
K1
K2
FLAME LED
SHUTTER LED
AUR300C
White
POWER LED
Manual ignition method
START
CHECK LED
2-3
Power supply switch
(H)
• Operation is changed from normal operation to flame shut-off operation
Power switch ON
Start switch ON
Flame detection
Start switch OFF
Power switch
Start switch
Ignition transformer
Pilot valve
Main valve
Combustion lamp
POWER LED
SHUTTER LED
START CHECK LED (K1)
FLAME LED (K2)
FLAME
• False flame exists before ignition.
Power switch ON
False flame
Start switch
ON
Power switch
Start switch
Ignition transformer
Pilot valve
Main valve
Combustion lamp
POWER LED
SHUTTER LED
START CHECK LED (K1)
FLAME LED (K2)
FLAME
10
Start switch OFF
Flame failure
Flame response
(G)
Chapter 2. MOUNTING AND WIRING
• Flame signal exists when the shutter is closed.
Power switch ON
Start switch
ON
Start switch OFF
Power switch
Start switch
Ignition transformer
Pilot valve
Main valve
Combustion lamp
POWER LED
SHUTTER LED
START CHECK LED (K1)
FLAME LED (K2)
FLAME
Operation
Operation of this unit
Power ON
Limit ON
• Voltage is applied to the terminal 1 (S)
and 2 (R). (Voltage is applied to the
UV relay.)
• As the electric power is applied to the
terminal 3, the K1 relay is turned ON
through the flame relay contact K2-1
(close: false flame check)
• As the pilot flame is detected, the flame
relay (K2) is turned ON. The output of
the pilot valve is kept at the same time
when the K1 relay is kept turned ON as
the contacts K1-1 and K1-2 are closed.
• As K2-2 and K1-3 are closed, the main
valve enters the stand-by mode.
• As K3-1 is closed, the combustion lamp
lights up.
• As the electric power is applied from the
terminal 3 to terminals 5 and 6 to operate
the main valve.
• All relays are turned OFF.
Start SW ON
Start SW OFF
Stop operation
Stop SW OFF
Flame shut-off
during operation
• All relays are turned OFF.
POWER
LED
●
SHUTTER START
FLAME
LED
CHECK LED LED
○
○
○
●
○
●
○
●
◎
●
●
●
◎
●
●
●
◎
●
●
●
◎
●
●
○
○
○
○
●
○
○
○
●: Lit, ○: Off, ◎: Flash
11
Chapter 3.
TRIAL-RUN ADJUSTMENT
WARNING
The pilot and main burner ignition time must not exceed the ignition time
specified by the burner or equipment manufacturer.
Failure to do so may cause the fuel to accumulate in the combustion chamber
to form explosive mixing, causing a serious explosion trouble.
Never touch any terminal of this unit during trial-run adjustment.
Doing so may cause an electric shock.
Before removing or mounting the AUR300C, be sure to turn the power OFF.
Failure to do so might cause electric shock.
Before starting the pilot turndown test or ignition spark response test, always
check that all manual fuel valves are closed.
Do not start the actual operation unless the trial-run adjustment tests and
tests specified by the equipment manufacturer are completed.
The terminal 11 (F) is electrically alive within 1 min. after the power to this unit
has been turned OFF.
Never touch the terminal 11 (F) immediately after the power has been turned
OFF. Doing so may cause an electric shock.
■ Outline of adjustment
The following shows the test adjustment items described in this chapter:
• Measurement of flame voltage
• Pilot turndown test
• Ignition spark response test
• Safety shut-off test
Handling Precautions
After the above items have been adjusted, check again that each
adjustment item is satisfied.
It is absolutely necessary to satisfy all adjustment items at the final
mounting position of the flame detector.
● Tools and parts to be prepared
• Multi-meter
Input impedance 100kΩ or more
AC range 0 to 300V
DC range 0 to 10V
• Jumper cable with alligator clip, 2 cables
12
Chapter 3. TRIAL-RUN ADJUSTMENT
■ Pre-operational inspection
(1) Inspect all wiring parts.
(2) Check that the unit is mounted in a place where the ambient temperature is
within its allowable range.
(3) Check that the AUD300C is mounted correctly.
In particular, the blue lead wire (to terminal 11) and yellow lead wire (to
terminal 12) of the AUD300C are connected correctly.
For details, refer to the user's manual for AUD300C, CP-SP-1141E.
(4) Check that the valves and cocks of each fuel system are closed and that the
inside of the fuel chamber is exhausted sufficiently.
(5) After above items (1) to (4) have been checked, supply the power and start the
trial-run adjustment.
■ Measurement of flame signal (flame voltage)
Start the equipment and measure the voltage under several conditions, such as
start-up operation or normal operation.
(1) Set the multi-meter to the 0 to 5Vdc range.
(2) Connect the + (positive) probe of the multi-meter to terminal 9 and the (negative) probe to terminal 10.
(3) Check that the voltage is stable at a recommended flame voltage of 1.5V or
more.
(4) If the flame voltage fluctuates largely, check the mounting position of the
AUD300C and wiring status.
Handling Precautions
Even during normal operation, the flame voltage is synchronized with the
shutter operation of the AUD300C and fluctuates in a range of 0.1 to 0.3V.
13
Chapter 3. TRIAL-RUN ADJUSTMENT
■ Pilot turndown test
This test is intended to check that the flame is carried over to the main burner
correctly when the AUD300C detects the pilot flame if the gas pressure and air
pressure are changed to their worst conditions.
WARNING
If the AUD300C detects a small pilot flame, which cannot ignite the main
burner, this unit does not recognize the flame failure even though the flame
failure occurs in the main burner. Therefore, the fuel flows out continuously,
causing a serious explosion trouble. To prevent such troubles, always
perform the pilot turndown test firmly.
When performing the pilot turndown test repeatedly, stop the equipment
completely every time the pilot turndown test is completed in order to
completely discharge the unburnt gas or oil accumulated in the combustion
chamber or flue.
If the unburnt gas or oil is not discharged completely, this may cause an
explosion accident.
After the pilot turndown test has been completed, turn OFF the POWER
switch to shut-down the power. Always restore all the test jumpers and
limit/regulator settings to their previous statuses.
If the operation is started without above restoration, this may cause damage
to the equipment, or gas leak or explosion.
CAUTION
Only authorized personnel who have the technical skill about the combustion
equipment and flame safeguard control must carry out the pilot turndown test.
Handling Precautions
If the limit of the fuel pressure (if used) is opened, make it turned ON with a
jumper cable during this test.
To carry out the pilot turndown test, follow the steps below.
● Preparations before starting test
(1) Turn OFF the POWER switch.
(2) Close the manual valves of the pilot passage and main passage to stop the gas.
(3) Open the manual valve of the pilot passage.
● Check a gas pressure level, at which the AUD300C cannot detect the pilot flame.
(4) Turn ON the POWER switch and START switch.
>> The ignition operation is then started, the pilot valve is opened, and the
ignition transformer is operated.
The flame relay is turned ON and combustion lamp lights up.
14
Chapter 3. TRIAL-RUN ADJUSTMENT
(5) Slowly close the manual valve of the pilot passage.
The pilot flame becomes small gradually. Gradually throttle the valve until
the AUD300C cannot detect the flame.
(6) Record the gas pressure immediately before the flame relay is turned OFF and
the combustion lamp goes off.
● Check that the main burner can be ignited with the minimum pilot flame.
(7) Press the START switch again.
(8) Slowly open the manual valve of the pilot passage to adjust the pressure to a
level immediately before the combustion lamp goes off.
At this time, check that the flame relay is turned ON and the combustion lamp
lights up.
(9) Release the IGNITION switch.
(10) Check that the main burner is ignited smoothly within 1 sec. after the manual
valve of the main passage has been opened.
(11) Change the gas pressure level between the minimum and maximum levels and
ignite the main burner five or six times. At this time, check that the main
burner is ignited smoothly every time.
● Main burner is not ignited with the minimum pilot flame.
(12) Adjust the mounting position of the AUD300C and the incoming light amount
so that the AUD300C cannot detect the ignition of the main burner.
There are two kinds of adjustment procedures as shown below.
• Keep the monitoring wire of the monitoring pipe slightly away from the
pilot flame.
• Throttle the monitoring pipe to decrease the incoming light amount from
the pilot flame.
(13) Slowly open the manual valve of the pilot passage to make the pilot flame
larger than the previous flame.
● After the adjustment has been completed, check again that the main burner can be ignited
with the minimum flame.
(14) Perform the steps stated in "Check that the main burner can be ignited with the
minimum pilot flame" again.
● Measures to be taken after completion of the test
(15) After the test has been completed, return the manual valve of the main passage
to its fully opened position.
(16) Check that the flame voltage is proper.
(17) If any limit is connected with jumper cables, disconnect them to return the
limit to its previous state.
15
Chapter 3. TRIAL-RUN ADJUSTMENT
■ Ignition spark response test
WARNING
Do not use the AUD300C for detection of ultraviolet rays other than those of
the burner. If the AUD300C responds to other ultraviolet rays, the status that
the flame failure occurs in the burner is determined as flame presence. Thus,
the fuel flows out continuously, causing an explosion.
(1) Close the manual fuel valves of the pilot and main burners.
(2) Start the operation and measure the flame voltage in the pilot ignition
sequence to check whether or not the flame voltage is influenced.
(3) If the "FLAME" LED is lit, make the adjustment using the following
procedures while referring to the instruction manual for the equipment:
• Move the position of the AUD300C or ignition spark rod so that they do
not affect adversely.
• Put a shield plate in the optical path of the AUD300C so that the effect of
the spark is a flame signal value of 0.4Vdc or less.
Handling Precautions
Do not use this unit to detect ultraviolet rays other that those of the flame.
The following shows various ultraviolet ray sources other than flame that may
activate the AUD300C:
Examples:
Ultraviolet ray source
Gamma ray and
X ray source
16
Scorching furnace wall (within 50 cm of furnace wall)
Spark
Ignition transformer and welding arc
Gas laser
Sunlamp
Disinfecting lamp, ultraviolet radiation lamp, fluorescent
lamp
Strong flash light (toward UV sensor)
Regression analyzer
Electron microscope
X ray camera
High voltage vacuum switch
High voltage capacitor
Radioisotope
Other sources producing ultraviolet rays, gamma rays,
and X rays
Chapter 3. TRIAL-RUN ADJUSTMENT
■ Safety shut-off test
After all operational adjustments have been completed, carry out the safety shutoff test.
● Pilot ignition failure (Ignition failure)
(1) Close the pilot and main manual fuel valves.
(2) Press the START switch.
>> The operation is then started.
(3) Normally, as the pilot burner is ignited, the pilot valve is opened. Check that
the "FLAME" LED does not light up and the main valve is not opened if the
flame fails.
● Flame failure during normal combustion
(1) Open the pilot and main manual fuel valves.
(2) Press the START switch to start the operation.
(3) When the sequence advances correctly and it enters the normal combustion
(main valve is opened), close the pilot and main manual fuel valves to put off
the burner flame. At this time, check that the flame failure is detected and the
safety shut-off is activated correctly.
17
Chapter 4.
MAINTENANCE AND INSPECTION
WARNING
Before removing or mounting the AUR300C, be sure to turn the power OFF.
Failure to do so might cause electric shock.
CAUTION
Only authorized personnel who have the technical skill about the combustion
equipment and flame safeguard control must carry out the mounting, wiring,
inspection, adjustment, and maintenance work.
If the safety shut-off is activated and the equipment is restarted, carry out all
the inspection items stated in Chapter 3, TRIAL-RUN ADJUSTMENT.
When performing the maintenance and inspection of the burner, always carry
out the pilot turndown test. Additionally, this inspection must be carried out
once a year or more frequently.
When cleaning the burner, clean also the AUD300C.
■ Frequency of maintenance and inspection
Determine an appropriate frequency of the maintenance and inspection work by
considering the equipment type, ambient conditions (dust or ambient temperature)
of the mounting place, and damage or influence if the burner is shut-off for some
reason during operation of the equipment.
Inspection contents
Safety shut-off test (For details, refer to Chapter 3,
TRIAL-RUN ADJUSTMENT.)
Contamination of monitoring window and monitoring
pipe of AUD300C
Measurement of flame voltage
Pilot turndown test
Inspection frequency
Once a month or more
Once a month or more
Once a month or more
Once a year or more
Handling Precautions
• If the burner shut-off operation may cause a serious accident, perform
the inspection more frequently.
• If the burner manufacturer provides specific instructions about the
maintenance and inspection, always strictly observe them.
18
Chapter 4. MAINTENANCE AND INSPECTION
● Fault inspection flowchart
POWER switch ON
Is the power
voltage within the allowable range?
(Voltage between terminals
(1) and (2))
NO
• Set the power voltage within its allowable range.
• Check the limit switch and stop switch.
• Check the power supply and power supply wiring.
YES
Is "FLAME" LED off?
NO
• Check for light source that may cause the false
flame from the flame monitoring pipe.
• Check the flame voltage level.
• Check the AUR300C.
YES
Is "SHUTTER" LED off?
NO
• Check the AUD300C.
(Self-discharge of ultraviolet tube/warpage of
shutter blade)
• Check the flame voltage level.
• Check the AUR300C.
YES
START switch ON
Is the pilot burner ignited?
NO
YES
Are "COMBUSTION"
and "FLAME" LEDs lit?
YES
NO
Is the flame voltage correct?
YES
START switch OFF
• Check the AUR300C.
Is the main burner ignited?
YES
NO
• Check the burner carry over.
(Pilot turn down test)
• Check the wiring.
• Check the shut-off valve.
NO
Is the AC voltage
supplied to a point between terminals
(3)-(5) and (1) when the
operation is started?
• Check the ignition transformer,
pilot burner, and wiring.
• Check the flame monitoring position.
• Check the AUD300C.
NO
YES
Is the "START CHECK"
LED lit?
NO
YES
• Check the ignition transformer,
pilot burner, and wiring.
• Check the AUR300C.
• Check the wiring.
Correct operation
19
Chapter 5.
SPECIFICATION
■ Specification
Item
Flame detector
Flame response time
Flame voltage range
Recommended flame voltage
Rated power supply voltage
Allowable voltage range
Power consumption
Contact rating
Dielectric strength
Insulation resistance
Induced thunderbolt surge
Service life
Ambient temperature
Storage temperature
Ambient humidity
Vibration resistance
Terminal screw tightening
torque
Mounting posture
Color
Mass
20
Description
AUD300C1000
Nominal 3s, (Max. 4s) at 3V flame voltage
• When ignited: 1.2 to 4.0Vdc at room temperature, humidity and rated voltage
• When flame fails: 0.0 to 0.6Vdc at room temperature, humidity and rated voltage
1.5Vdc min. when ignited
100Vac or 200Vac at 50/60Hz
85 to 110% of rated power supply voltage
10W max. (with AUD300C)
Flame output (K1, K2)
: 5A 250V (cos φ = 1)
Flame output (K2)
: 5A 250V (cos φ = 1)
Combustion Lamp output (K3) : 3A 250V (cos φ = 1)
1500Vac 50/60Hz 1 min or 1800Vac 50/60Hz 1s
Application points: Between ground and primary terminals 1 to 8 units (except 9
to 14)
100MΩ min. by 500Vdc megger
Measurement points: Between ground and primary terminals 1 to 8 units (except
9 to 14)
10kV, 1.2/50µs (JEC-187: 75Ω min. surge impedance)
The surge absorber listed hereunder must be connected between the power
supply terminal (No.1 terminal) and the ground.
• Recommended surge absorber: Part No. 83968019-001
7 years or 100,000 cycles (operation cycles of each relay)
-20 to +60°C
-20 to +70°C
90% RH at 40°C max.
4.9m/s2 max., 10 to 55Hz for 2 h each in X, Y and Z directions
1.4N·m max.
Wall mounting (vertical or horizontal mounting)
White
Approx. 1.2kg
Chapter 5. SPECIFICATION
■ Dimensions
Unit: mm
60
37
94.1
5
4-R
14
14
13
13
12
12
UV SENSOR
(F) 11
11
SHUTTER
(G)
− 10
0-5V
+
9
K3
238
249
261
Free terminal screw M4
10
9
8
8
7
7
6
6
5
5
4
4
3
3
2
2
1
1
K1
K2
1.2
87.2
16.6
Chassis ground (commonly
used as mounting screw)
21
Revision History
Printed
Date
Manual Number
Edition
02-12
04-08
CP-SP-1142E 1st Edition
2nd Edition
Revised pages
7, 10
Description
RESTRICTIONS ON USE changed
“Duplicate pilot” changed to “Intermittent pilot”
Specifications are subject to change without notice.
Advanced Automation Company
Totate International Building
2-12-19 Shibuya Shibuya-ku
Tokyo 150-8316 Japan
URL: http://www.yamatake.com
This has been printed on recycled paper.
Printed in Japan.
1st Edition: Issued in Dec., 2002
2nd Edition: Issued in Aug., 2004(B)
(02)