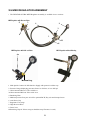
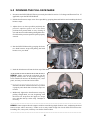
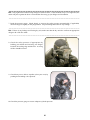
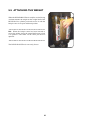
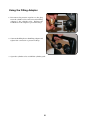
1
95239B01
USER MANUAL
DIVATOR MKII
© 2007 Interspiro AB, Sweden. This publication contains or refers to proprietary information which is protected
by copyright. All rights are reserved. Interspiro® and DIVATOR® are registered trademarks of Interspiro.
This publication may not be copied, photocopied, reproduced, translated, or converted to any electronic or machinereadable form in whole or in part without prior written approval from Interspiro.
Changes or updates to this publication may be made without prior notice.
Contents
1 APPRoVALs . .....................................................................5
2 sAFetY note . ..................................................................6
2.1 HAzARd IndICAtoRs . ........................................................................................... 6
2.2 oWneR's And UseR's ResPonsIbILItIes ......................................................... 6
3. teCHnICAL desCRIPtIon ..............................................8
3.1 sCoPe ..................................................................................................................... 8
3.2 DIVATOR MKII SYSTEM SCHEMATIC...................................................................... 9
3.3 dIVAtoR MKII sCUbA . ......................................................................................... 10
3.4 CYLINDER PACK.................................................................................................... 11
3.5 MKII ReGULAtoR AssembLY .............................................................................. 12
3.6 bReAtHInG VALVe . .............................................................................................. 16
3.7 FULL FACe mAsk ................................................................................................. 19
3.8 FULL FACe mAsk And bReAtHInG VALVe ........................................................ 21
3.9 DIVATOR Buoyancy compensating wing (BCW) . ....................................... 22
3.10 divator buoyancy compensating jacket (bcj)....................................... 23
3.11 DIVATOR HARness . ............................................................................................. 24
3.12 WeIGHts ............................................................................................................... 25
3.13 weight configurations, divator lite......................................................... 26
3.14 weight of steel cylinders............................................................................ 27
3.15 dIVAtoR dP1 sURFACe sUPPLY.......................................................................... 27
4 PRePARing FoR use . ...................................................28
4.1 Assembling the MKII ReGULAtoR UnIt and CYLIndeR PACk ................... 28
4.2 Assembling the single cylinder configuration .................................. 29
4.3 AttACHing the bCW oR HARness .................................................................. 31
4.4 AttACHing the ReGULAtoR to tHe bCW........................................................ 32
4.5 attaching the regulator to the harness or bcj................................. 32
4.6 AttACHing the oCtoPUs bReAtHInG VALVe WItH Hose ............................ 33
4.7 attaching the bcw and bcj inflation hose............................................. 34
4.8 AttACHing the FULL FACe mask ..................................................................... 34
4.9 CYLIndeR WeIGHt . ............................................................................................. 36
5 PRe-dIVe PRoCedURes ...............................................37
5.1 Leakage and function test........................................................................... 37
5.2 donnInG tHe APPARAtUs ................................................................................. 40
5.3 donnInG tHe FULL FACe mAsk ........................................................................ 41
5.4 CHeCking ReseRVe oR bail-out LeVeR PosItIon ...................................... 43
5.5 AttACHInG tHe WeIGHt ..................................................................................... 44
6 DIVING...............................................................................45
6.1 CHeCks dURInG dIVInG . ................................................................................... 45
6.2 dIVInG In CoLd WAteR ....................................................................................... 45
7 Post dIVe PRoCedURes .............................................48
7.1 DOFFING the DIVATOR After Use . .................................................................. 48
7.2 dIsmAntLInG ....................................................................................................... 48
8 FILLInG PRoCedURes ..................................................49
8.1 Filling the Interspiro Fully Composite Cylinders ............................. 49
8.2 Filling Adapter 99369-01................................................................................. 49
9 CHeCk LIst .....................................................................51
9.1 Pre-dive................................................................................................................ 51
9.2 During dive.......................................................................................................... 51
9.3 Post dive.............................................................................................................. 51
10 emeRGenCY PRoCedURes .........................................52
10.1 CLeARInG oF WAteR In tHe InteRsPIRo FULL FACe mAsk.......................... 52
10.2 Secondary breathing valve (Octopus) procedures............................ 52
10.3 FREE FLOW OF MASK BREATHING VALVE .......................................................... 53
10.4 FREE FLOW OF OCTOPUS BREATHING VALVE ................................................... 53
10.5 LOSS OF AIR ......................................................................................................... 53
10.6 Clearing The Breathing valve with mouthpiece.................................... 54
11 mAIntenAnCe And testInG sCHedULe . .................55
12 mAIntenAnCe ................................................................56
12.1 CLeAnInG ............................................................................................................. 56
12.2 Monthly Cleaning............................................................................................ 57
12.3 CHeCkInG And InsPeCtIon .............................................................................. 62
12.4 REPAIR.................................................................................................................... 65
13 tRAnsPoRt And stoRAGe .........................................69
13.1 stoRAGe............................................................................................................... 69
1 APPROVALS
The DIVATOR SCUBA is tested in accordance with EN 250. EC Type-examination (Directive 89/686/EEC)
by SGS ICS Ltd., Weston-super-Mare, BS22 OWA, UK (Notified Body No 0120).
The DIVATOR SCUBA is approved for a range of 0-50 meters (0-164 feet) depth and for cold water
temperatures down to 4 ± 2 °C (39,2 ± 3,6 °F) in accordance with EN 250.
The DIVATOR SCUBA has been successfully tested for cold water -1,7 °C (29 °F) use to a depth of 60 meters
(198 feet) of sea water by the United States Navy Experimental Diving Unit NEDU (Panama City, FL).
2 SAFETY Note
WARNING!
BEFORE USING THE DIVATOR SCUBA, THE USER MUST HAVE RECEIVED FULL TRAINING IN
ITS USE, HAVE READ AND UNDERSTOOD THESE OPERATING INSTRUCTIONS AND DEMONSTRATED PROFICIENCY TO A RESPONSIBLE TRAINER OR SUPERVISOR. FAILURE TO DO SO
MAY RESULT IN INJURY OR DEATH FOR THE USER AND CAN HAVE SERIOUS CONSEQUENCES
FOR PEOPLE TO BE RESCUED AND/OR ITEMS OF VALUE TO BE SAVED.
2.1 Hazard Indicators
This manual contains hazard warnings, identified as DANGER!, WARNING! and CAUTION!, that indicate
risks and dangers that you may face while using the DIVATOR System. These different types of hazard
indicators correspond to the degree of hazard you may encounter:
DANGER!
Indicates an imminently hazardous situation which, if not avoided, will result in death or serious injury.
WARNING!
Indicates a potentially hazardous situation which, if not avoided, could result in death or serious injury.
CAUTION!
Indicates a potentially hazardous situation which, if not avoided, could result in minor or moderate injury.
It may also be used as a warning against unsafe practices.
Failure to comply with the instructions highlighted by the hazard warnings may result in equipment malfunctioning, serious injury or death.
2.2 Owner's and User's Responsibilities
DANGER! All users of the DIVATOR SYSTEM must be certified by a nationally or internationally recognized SCUBA certification agency. Furthermore, all users of the DIVATOR SYSTEM must be adequately
trained in its use by a certified SCUBA instructor with knowledge and experience in the use of the DIVATOR diving system.
WARNING! High Pressure gas systems must be handled with care. Damage to high pressure gas system
components may result in injury or death. Interspiro is not liable for damages incurred as a consequence
of failure to follow the instructions in this manual.
WARNING! Before using the DIVATOR SYSTEM , the user must ensure that the system has been properly
inspected and maintained. (see Chapter 11 Maintenance and Testing Schedule, Chapter 12 Maintenance).
WARNING! All users of the DIVATOR SYSTEM must periodically undergo training in Emergency Procedures
in shallow water to maintain preparedness in the event of an actual emergency.
3 Technical Description
3.1 SCOPE
• The Interspiro DIVATOR SYSTEM consists of the DIVATOR SCUBA (Self Contained Underwater
Breathing Apparatus) and the DIVATOR DP1 SURFACE SUPPLY.
This User Manual applies to the following DIVATOR SCUBA sub-assemblies:
- DIVATOR Full Face Mask.
- DIVATOR MKII Regulator with Reserve Valve.
- DIVATOR MKII Regulator with Bail-out Valve.
- DIVATOR MKII REGULATOR.
- DIVATOR PED and DOT Approved Cylinders.
- DIVATOR BCW (Buoyancy Compensating Wing) (see DIVATOR BCW User Manual).
- DIVATOR Harness.
- DIVATOR MKII-J Buoyancy Compensating Jacket
- DIVATOR Breathing Valve with Safety Pressure.
- DIVATOR Breathing Valve without Safety Pressure.
- DIVATOR Octopus Breathing Valve.
- DIVATOR HATCH, Ambient Air Hatch (see DIVATOR HATCH User Manual).
- DIVATOR HUD, Heads Up Display Low Pressure Warning (see DIVATOR HUD User Manual).
- DIVATOR Spectacles. (See DIVATOR Spectacles Manual.)
- DIVATOR Mask Weights.
- DIVATOR DP1 SURFACE SUPPLY for One or Two Divers (see DIVATOR DP1 SURFACE SUPPLY User Manual).
Cylinder Pack
300 bar
4350 psi
DIVATOR SCUBA
Regulator,
1st stage
Pressure
Gauge
Drysuit
BCW
Reserve
or Bail
Out Valve
Breathing
Valve
Octopus
Mask
(optional) mounted
P+ Regulator
DIVATOR DP1
SURFACE SUPPLY
* Low Air Whistle
** Shuttle Valve
High Pressure
Lifeline Hose
Cylinder Pack
300 bar
4350 psi
2nd diver connector
*
**
Surface Unit
optional 2nd diver
*
**
Surface Unit
Cylinder Pack
300 bar
4350 psi
3.2 DIVATOR MKII System Schematic
3.3 DIVATOR MKII SCUBA
• The DIVATOR MKII SCUBA unit.
10
3.4 Cylinder Pack
1
2
4
7
6
3
5
1 Weight shaft
5 Handle with cross over tube
2 Cylinder boot
6 Tension straps
3 Cylinder valve
7 BCW quick attachment interface
4 Plug
• The DOT and CE approved DIVATOR LITE cylinder packs are available in two configurations. The
DIVATOR LITE 323.4 is a 3.4 liter 300 bar (75 cubic feet 4350 psi) twin cylinder pack and the DIVATOR
LITE 326.7 is a 6.7 liter 300 bar (140 cubic feet 4350 psi) twin cylinder pack.
The cylinder pack consists of two cylinders mounted together with two stainless steel straps. The cylinders
have one common valve mounted to one cylinder, the cylinders are interconnected with a cross over tube
that is protected by the carrying handle.
The DIVATOR Lite cylinders are fully composite cylinders with plastic liners wrapped with carbon and
glass fiber.
The cylinder handwheel must be pushed in and turned to close the cylinder valve. This prevents inadvertent
closing of the valve.
A handle used for carrying of the cylinder pack also protects the crossover tube from damage.
The safety disc on the cylinder pack is designed to rupture at a pressure of 450±50 bar (6525±725 psi).
Impacts to the cylinder pack may cause skewing and/or damage which may weaken the unit. Skewing or
damage must be checked and corrected. Carelessness when handling the cylinder pack with its weight fitted
may result in deformation of the spacing rod or weight shaft.
For charging of cylinders, see chapter 8 Filling Procedures.
11
3.5 MKII Regulator Assembly
• The DIVATOR SCUBA MKII Regulator Assembly is available in two versions:
MKII Regulator with Reserve Valve
9
5
2
4
3
7
6
1
10
8
MKII Regulator with Bail-out Valve
MK II Regulator without Warning
3a
"Bail-out" tag
1 Male Quick Connect for DP1 Surface Supply with protective rubber cap
2 Pressure Gauge displaying pressures from 0 to 300 bar, or 0 to 4350 psi
3 Chest-mounted Reserve Valve with lever
3aChest-mounted Bail-out Valve with lever
4 Breathing Hose
5 Medium pressure four port swivel for optional BCW, Dry suit and Octopus hoses.
6 Anti-freeze Cap
7 Regulator, First stage
8 High Pressure Hose
9 Dust Cover
10Retaining Clip for Velcro strap (or shoulder strap if harness is used)
12
3.5.1MKII Regulator, First Stage
• The pressure regulator is a downstream piston-type regulator with an extremely high flow capacity. The
regulator reduces the primary cylinder pressure of 300 bar (4350 psi) to a dynamic secondary pressure of
7.5 bar (109 psi). It is a pressure-balanced piston counter flow regulator. The effect of the balancing is that
the reduced secondary pressure is stable and is not affected by pressure variations in the air supply (primary
pressure).
The regulator includes a four port swivel that provides convenient air supply connections to the BCW, dry
suit and DIVATOR Octopus breathing valve. The high flow capacity ensures sufficient air to both the Primary and Octopus breathing valves down to 60 meters (198 feet) of sea water.
3.5.2DIVATOR MKII Regulator Options
• The DIVATOR MKII REGULATOR is available in three versions. The standard version is the DIVATOR
Regulator with Reserve Valve. This version provides an active breathing resistance warning when the
SCUBA cylinder pressure reaches the reserve pressure of 65 bar (942 psi). This warning is provided in
both the SCUBA and DP1 Surface Supply configurations.
The first optional version is the DIVATOR Regulator with Bail-out Valve. This version provides an active
breathing resistance warning only in the DP1 Surface Supply configuration when surface air supply pressure
is lost.
The second optional version is the DIVATOR MKII without Reserve Valve. This version can be seen as a
low cost alternative or the version to use if only active warning with HUD is requested.
The following is an overview of the available regulator options and their characteristics.
SCUBA
REGULATOR
TYPE
Active Warning
SURFACE SUPPLIED SCUBA
Passive
Warning
Active Warning
Passive
Warning
Pressure
Gauge
DIVATOR Regulator
with Reserve Valve
(standard)
65 bar / 942
psi SCUBA
cylinder
pressure
Pressure
Gauge
65 bar / 942
psi SCUBA
cylinder
pressure
DIVATOR Regulator
with Bail-out Valve**
(optional)
None *
Pressure
Gauge
Loss of Surface
Supply
Pressure
Gauge
Divator MKII without
Reserve Valve
None
Pressure
Gauge
None
Pressure
Gauge
* Visible active warning can be added by using the Interspiro DIVATOR HUD.
** The DIVATOR Regulator with Bail-out Valve is intended for applications where the diver needs completely
full SCUBA cylinders for his ascent, when he experiences a loss of surface supply air.
The Interspiro Bail-out regulator is not recommended for use in SCUBA (without surface supply) dives
because it does not provide an active warning when the diver’s SCUBA cylinders have reached the reserve
pressure level. The optional DIVATOR HUD provides a visible active warning that the SCUBA cylinders
have reached reserve pressure.
13
3.5.3DIVATOR MKII Regulator with Reserve Valve
• This is the standard regulator for use in both SCUBA and DP1 Surface Supply configurations.
The diver gets an active breathing resistance warning when approximately 20 % of the SCUBA cylinder air
supply remains 60-70 bar (870-1015 psi). The warning occurs on the high end of this pressure range when
the air consumption rate is high. The breathing resistance warning is created by reducing the air supply at
the end of each inhalation. The inhalation phase will be shorter and shorter and will be repeated a number
of times until the valve becomes completely closed or until the reserve valve lever is actuated (pushed down).
When actuated, the reserve valve lever will be locked in the open position (down) thereby shutting off the
breathing resistance warning and making the reserve air volume available to the diver.
It is not possible to inadvertently or prematurely activate (push down) the reserve valve lever; it will
automatically reset itself (up position) until the air supply pressure has dropped below approximately 80
bar (1160 psi).
When using the DIVATOR DP1 Surface Supply, all supply air will be taken from the DIVATOR DP1
Surface Supply as long as the supply pressure is greater than 20 bar (290 psi) at a dive depth of 50 meters
(150 feet) or less. Note: The DIVATOR DP1 Surface Supply has a low air warning whistle that is activated
at 55 bar (790 psi).
When using the DIVATOR DP1 Surface Supply and the surface air supply is interrupted, air will be taken
from the diver's SCUBA cylinders. The diver will receive an active breathing resistance warning when the
DIVATOR SCUBA cylinder pressure has dropped to approximately 65 bar (940 psi).
3.5.4DIVATOR MKII Regulator with Bail-Out Valve
• This regulator is identified with a yellow "Bail-Out" tag on the high pressure gauge hose. The DIVATOR
Regulator with Bail-Out Valve warns the diver when the air supply from the surface is interrupted. This is
a feature that can be required for decompressions that require more air than might be available when using
the standard Regulator with Reserve Valve.
While diving with the DIVATOR Regulator with Bail-Out Valve and connected to the DIVATOR DP1 Surface
Suppy, the bail-out valve lever should be in the upwards position. If the surface air supply is interrupted,
the diver will receive an active breathing resistance warning and must then actuate (push down) the lever
in order to switch to the SCUBA cylinder's air source. When actuated (pushed down), the bail-out valve
lever will be locked in the down position.
It is possible to push down the lever of the bail-out regulator prior to the active breathing resistance warning;
however, this action does not switch to the DIVATOR SCUBA cylinder air supply as long as there is pressure
from the DIVATOR DP1 Surface Supply. Note: the lever will not reset automatically like the Standard
Regulator with Reserve Valve version.
If the bail-out lever is pushed down prior to receiving the breathing resistance warning, and the surface
supply is then interrupted, the bail-out regulator will automatically switch from the surface supply to the
SCUBA cylinders without providing the diver with a warning.
DANGER! Always ensure that the regulator bail-out valve lever is in the up position prior to and during
surface supply diving.
14
3.5.5DIVATOR MKII Regulator without Reserve Valve
The DIVATOR MKII Regulator without Reserve Valve includes all the same features of the DIVATOR MKII
Regulator with Reserve valve (see above) with the exception of the reserve valve feature. The DIVATOR
MKII Regulator without Reserve valve is best combined with the DIVATOR Heads Up Display (HUD) if
the user prefers to have a visual warning rather than a tactile warning.
3.5.6DIVATOR Heads Up Display (HUD)
• The DIVATOR HUD is a warning light that activates when the DIVATOR SCUBA cylinders reach a
reserve pressure of 55 bar (800 psi).
The DIVATOR HUD can be mounted on any Interspiro DIVATOR Full Face Mask or breathing hose.
It is manually snapped onto the DIVATOR Full Face Mask frame without fasteners or tools.
The DIVATOR HUD is automatic and has no manual switches. When the SCUBA cylinders are either
empty or closed, the DIVATOR HUD is off. When the cylinder valve is turned on, the DIVATOR blinks
two or three times to verify that it is working properly. When the SCUBA cylinder air pressure drops to
55 bar (800 psi) the DIVATOR HUD begins to blink. The DIVATOR HUD blinks continuously until the
SCUBA cylinder air pressure drops to 10 bar (145 psi), at which point it automatically turns off.
The DIVATOR HUD is fail-safe against leakage. If inward leakage occurs, the light will blink continuously.
The DIVATOR HUD has an integral safety valve that safely vents in the event of over-pressure.
For additional information see DIVATOR HUD User Manual.
15
3.6 Breathing Valve
• The DIVATOR SCUBA Breathing Valve is available in three versions:
(1) Primary with safety pressure
(2) Primary without safety pressure
(3) Secondary (Octopus) with locking lever without safety pressure
The primary breathing valves are available in either black or gray. The octopus breathing valve is only
available in black with a yellow shield ring.
The primary breathing valves are mounted to the face mask with a bayonet coupling. All three of the
breathing valves are demand breathing valves, supplying air only during inhalation.
The DIVATOR Breathing Valve is balanced and maintains extremely low breathing resistance at all diving
depths even if variations occur in the secondary pressure.
The breathing valve is also designed as a safety valve for the first stage regulator. If the secondary pressure
from the first stage regulator increases to approximately 14 bar (203 psi), the relief valve in the breathing
valve will open. This prevents over-pressurization of the secondary system components.
As an additional safety feature, in the inhalation channel there is a one-way valve to prevent water from
penetrating into the valve mechanism where it could freeze and cause the valve to stick in the open
position.
16
3.6.1Primary Breathing Valve Parts (Safety Pressure)
7
6
5
9
10 1
8
4
3
2
1 Connection nipple
6 Locking ring
2 Non-return valve, inhalation channel 7 Shield ring
3 Bayonet coupling
8 Purge button
4 Diaphragm attachment
9 Safety pressure lever (Only on safety pressure version)
5 O-ring
10 Locking nut
• Interspiro recommends use of the DIVATOR Breathing Valve with Safety Pressure for diving in
contaminated water.
The DIVATOR Breathing Valve with Safety Pressure is designed to give a safety pressure of approximately
35 mm (1.5 inch) of water column in the mask in ambient air. The safety pressure is turned on automatically
when the user takes his first breath in the mask. The safety pressure reduces the risk of inward leakage of
water (or air at surface) which is very important when diving in contaminated water. The safety pressure
in the mask is maintained irrespective of the diver's air consumption rate.
In the event that water enters the mask, the mask is easily drained by pushing the purge button of the breathing
valve. When the mask is taken off, the safety pressure lever on the breathing valve must be pushed in (shut
off) against the valve housing.
DANGER! DIVATOR Breathing Valve with Safety Pressure must not be combined with the DIVATOR
mouthpiece, due to the risk of uncontrolled free flow.
17
3.6.2Primary Breathing Valve without Safety Pressure
• The DIVATOR Breathing Valve without Safety Pressure does not provide safety pressure during inhalation.
Otherwise, the performance is the same as the DIVATOR Breathing Valve with Safety Pressure.
A rubber sealing plug has replaced the safety pressure lever and other internal parts are different.
3.6.3Secondary Octopus Breathing Valve
1
2
1 Locking Lever
3
3 Shield Ring
2 Mounting Clip
• The DIVATOR Octopus Breathing Valve is identified by the yellow shield ring and yellow mounting
clip. The octopus breathing valve is a non-safety pressure type and is equipped with a locking lever. The
locking lever locks the valve from possible inadvertent free-flow of air and should always be in the locked
(closed) position when not in use.
18
3.7 FULL FACE MASK
• The DIVATOR Full Face Mask is available in four versions:
Natural Rubber
(1) Black
(shown with optional
DIVATOR Hatch)
(2) Gray
Silicone
(3) Black
(4) Yellow
All DIVATOR Full Face Masks are available with an optional DIVATOR Hatch.
For additional information see DIVATOR HATCH User Manual.
The DIVATOR Full Face Mask is available in either natural or silicone rubber. Natural rubber is more
resistant to chemicals and more tear resistant. Silicone is more resistant to ozone, thermal and UV light
radiation. The silicone mask is slightly smaller and may fit smaller faces better.
The rubber head harness has five straps that are tightened and locked by stainless steel buckles. The wide
and soft sealing edge of the mask is pressed lightly against the face and follows the contours of the face,
giving an effective seal. The mask is designed to be used with diving communications.
19
3.7.1 Visor
• The visor is designed to minimize the volume of air inside the face mask to reduce the positive buoyancy.
If it is necessary to adjust the mask to a neutral buoyancy, weights are available which can be attached to
each side of the visor. The visor is close to the wearer's eyes which gives the user a wider field of vision.
The sides of the visor have a matte finish to avoid optical distortions.
20
3.8 Full face Mask and Breathing Valve
The mask is provided with an inner mask and separate inhalation and exhalation channels that connect
with channels in the breathing valve. This ensures that inhalation and exhalation air will not be mixed.
During inhalation, air flows from the breathing valve up through the anti-fogging ports, over the inside of
the visor, and on through the non-return valves into the inner mask. During exhalation, the air is exhaled
to the ambient water through the exhalation valve.
1 Diaphragm assembly
2 Lever
3 Sealing spring
4 Sealing cone
5 Connection nipple
6 Non-return valve (two)
8 Exhalation valve
9 Cover
10 Sealing disc
11 Relief valve piston
12 Relief valve spring
13 Balancing diaphragm
7 Exhalation channel
The following describes the operation of the breathing valve. Refer to the picture above:
When the diver inhales, the diaphragm assembly (1) is drawn inward and pushes on the lever (2). The lever
lifts the sealing cone (4) from the valve seat on the connection nipple (5). Breathing air can now flow through
the inhalation channel and into the inner mask through the non-return valves (6). When the diver stops
inhaling, the diaphragm assembly (1), lever (2) and sealing cone (4) return to their initial positions, and the
inlet is closed by the sealing spring (3). When the diver exhales, air flows from the inner mask through the
exhalation channel (7) and the exhalation valve (8) and lifts the sealing disc (10). This allows air to flow out
to the ambient water through the slits in the cover (9). The relief valve mechanism serves as a safety valve
for the first stage regulator, since the sealing cone opens automatically if the secondary pressure increases
to between 14-20 bar (203-290 psi). This may happen, for instance, if the regulator leaks. In this case, the
relief valve spring (12) can no longer withstand the pressure on the central part of the balancing diaphragm
(13). The counter-pressure piston is then pressed inwards and actuated so that the valve mechanism lifts
and pulls the sealing cone away from the valve seat. Air is then released until the pressure falls to about 10
bar or 145 psi. The breathing valve has a non-return valve (not shown) in the inhalation channel to prevent
water entering and to minimize the risk of freezing.
Regulations state that breathing valves and face masks must be regularly cleaned and disinfected.
Furthermore, breathing valves and face masks that are used by more than one person must be cleaned and
disinfected after each use. Interspiro recommends personal breathing valves and personal face masks as
the most hygienic solution.
21
3.9 DIVATOR Buoyancy compensating wing (BCW)
BCW quick attachment interface
Back side view
The Interspiro DIVATOR BCW is a buoyancy compensator that combines high-quality, heavy-duty
construction, weight integration and rear wing-style buoyancy.
The DIVATOR BCW´s modular design allows the transition between rugged dry suit and thin wet suit diving.
Constructed of heavily reinforced 1050 denier ballistic nylon, the DIVATOR BCW is compatible with a
variety of options and accessories including bladders, pockets and custom gear attachment components.
The DIVATOR BCW is available in four sizes: Small, Medium, Large and Extra Large.
For additional information see the: DIVATOR BCW User Manual.
22
3.10 DIVATOR buoyancy compensating jacket (bcj)
The Interspiro BCJ stabilizing jacket design features flexible buoyancy control. The stabilizing jacket uses
unrestricted internal channels that allow air to constantly flow throughout the jacket, accumulating at the highest
point. The diver is surrounded by the bubble of air flow and can move easily and precisely. At the surface, the
stabilizing jacket provides the diver with a comfortable fit, floating ease, and the ability to be in the 'face up'
position.
The BCJ is CBRD certified as a Combined Buoyancy and Rescue Device because of its lift capacity and 'face up'
body positioning at the water's surface. The BCJ includes a 3-dump deflation system that enables divers to dump
air three different ways:
• From the right shoulder (equipped with a lanyard handle)
• From the left shoulder (integrated into the corrugated hose)
• From the waist (for divers in head-down position)
All BCJ jackets require a minimum internal volume to allow enough air to be injected in order to reach neutral
buoyancy as needed. This produces the necessary lift for the ascent to and flotation on the water's surface. European
Union norms require a minimum lift capacity in relation to the size of the tank used, as measured in kilograms.
In order to increase safety, the BCJ is equipped with an extra inflation air source cylinder of 0,47 l / 200 bar.
The BCJ contains a durable double-bladder design with a tough polyurethane inner bag that is protected by an 840
Denier polyester external cover. This construction ensures a high mechanical and abrasion resistance.
The BCJ jacket also contains an adjustable harness for perfect fit and ease of heavy tank load transfer on the stable
nylon strap system. The Divator BCJ is also equipped with strategically placed stainless steel D-rings.
The BCJ is tested and equipped with a quick connenction interface to fit all Divator cylinder packs available from
Interspiro.
23
3.11 DIVATOR HARness
The DIVATOR Harness is used in place of the DIVATOR BCW when diving with a front mounted life
preserver or with a dry suit when redundant buoyancy is not required, such as when working underwater
in a standing position while connected to surface supply.
Harness buckles
24
3.12WEIGHTS
• The DIVATOR Lite Cylinder pack must be compensated with weights in order to be neutral or negative
in water.
The advantage of this system is that the total weight of the DIVATOR Lite Cylinder Pack is divided into two
parts, where the heaviest part (brass cylinder weight) can stay at the dive site or boat while the DIVATOR
Lite Cylinder Pack is easily transported to be recharged. Only one weight is needed for each diver even if
multiple cylinders are transported. The Diver never carries the full weight of the DIVATOR SCUBA until
he enters the water. The Diver Attendant can add the cylinder weight just prior to the diver entering the
water and can remove the weight when the diver surfaces.
The cylinder weight consists of a top weight with handles and two lower weights. These can be combined
to create alternative weights; see below. The cylinder weight is mounted on a weight shaft on the cylinder
pack. The weight is secured in place by a hairpin cotter. The weight is easy to remove from the cylinder
pack so that the cylinder pack can be handled more ergonomically. The weights are made of brass. If a
lower weight is not used, it must be replaced with the plastic substitute weight.
The table on the next page describes the standard brass cylinder weights and cylinder weight configurations.
The table also provides the in-water weight of the standard brass cylinder weights and the weight of the
other possible configurations.
Additional weights are available and can be used to achieve the desired weight distribution. These weights
are:
Leg weight
Mask weight
Chest weight
Contains 5 weights
One on each side
Contains two weights
Each leg or chest weight weighs 0.45 kg (1 lbs) one mask weight, weighs 0.35 kg (0.78 lbs).
See also DIVATOR BCW User Manual for description of weight pockets that allow emergency weight
release.
25
97520-51
3,6
8,4
(7.9) (18.5)
97520-53
97521-51
97521-51
97522-51
97522-53
97522-51
Weight full Cyl. Package kg (lbs) in fresh water incl.
weight. Kg (lbs)
323.4
Weight empty Cyl. Package kg (lbs) in fresh water incl.
weight. Kg (lbs)
326.7
98853-02 DOT
98853-01 CE
Weight full Cyl. Package kg (lbs) in fresh water incl.
weight. Kg (lbs)
98857-02 DOT
98857-01 CE
Weight empty Cyl. Package kg (lbs) in fresh water incl.
weight. Kg (lbs)
Weight
Configurations, Divator Lite
3.13 Weight
Configurations, Divator Lite
4,7
7,1
(10.3) (15.6)
97522-53
STANDARD
STANDARD
2,6
7,4
(5.7) (16.3)
97521-51
3,7
6,1
(8.1) (13.4)
97521-51
97869-52
97522-52
97522-53
97522-51
0,8
4,9
(1.7) (46.6)
97521-51
2,8
5,3
(6.1) (16.6)
97521-51
97869-51
97869-52
97522-51
97869-52
Weight in fresh water kg (lbs)
97521-51
6,4 (14)
97522-51
2,9 (6.4)
97522-52
1,9 (4.2)
(incl. wires, hair pin cotter and screws)
97522-53
1 (2.2)
97869-51
0,1 (0.22)
(plastic)
97869-52
0,05 (0.11)
(plastic)
97520-51
12,2 (26.8)
97520-52
10,2 (22.4)
97520-53
8,3 (18.2)
26
3.14 Weight of Steel Cylinders
Part No
98445-01
98411-02
98412-02
Type
316
324
326
Water
Volume
[l]
Air
Volume
[Nl]
6
8
12
1630
2180
3260
Definitions
Media
Empty
Charged @ 290 K
Temperature
Compressibility Factor @ 300 bar, 290 K
Density @ 300 bar, 290 K
Tolerance
Weight in Air (kg)
Empty
9,35
13,16
21,2
Charged
11,3
15,8
25,1
Weight in Fresh
Water (kg)
Empty Charged
2,8
4,7
4,4
7
8
11,9
Air
2 bar
300 bar
290 K 16.85 C
1,103 (according Gas Encyclopaedia)
1,0893333 kg/m3
+/- 0.5 kg +/- 5 N
Weight of Harness, Regulator and Full face Mask approx. 4 kg or -19.5 N bouyancy in Water
3.15DIVATOR DP1 SURFACE SUPPLY
• For information about the DIVATOR DP1 surface supply, see the DIVATOR DP1 SURFACE SUPPLY
User Manual.
27
4 PrePAring for USE
CAUTION! It is extremely important that the procedures described in section "12.3 Checking and Inspection"
have been completed before the equipment is prepared for use.
4.1 Assembling the MKII Regulator Unit and
Cylinder pack
Assemble the equipment as follows:
1. Place the cylinder pack with the BCW quick attachment interface upwards.
2. Using a 23 mm open-ended wrench, unscrew the plug from
the cylinder valve .
3. To clear any moisture or dirt, open and then immediately close the cylinder valve.
4. Remove the yellow dust cover and check that the
connection and O-ring are clean and undamaged.
5. Check that the anti-freezing cover assembly is complete
and undamaged. When the cover is correctly fitted, it
sits in a groove on the regulator and should turn easily.
The rubber anti-freezing cap should not be squeezed.
28
7. Connect the regulator to the cylinder valve, with the anti-freezing cap pointing towards the handle.
8. Without using tools, tighten the handwheel
securely.
WARNING! To prevent the hose from whipping, the
mask and octopus must always be attached to the
system before opening the cylinder valve.
4.2 Assembling the Single Cylinder Configuration
1. Fit the parts of the single cylinder mounting kit according to the instructions enclosed with the kit.
2. Put the cylinder through the cylinder steel
strap.
3. Push the valve outlet into the holder with bushing
on the carrying handle.
29
4. Tighten the steel strap buckle.
5. Connect the regulator to the cylinder valve and
tighten by hand. Do not use tools.
The rest of the apparatus should be assembled in accordance with the instructions under "DIVATOR MK II
with Cylinder Pack".
The instructions above are also applicable for use with single cylinder on the BCW.
30
4.3 Attaching the BCW or Harness
1. Line up the quick attachment keyholes on the
BCW or harness rail with the quick attachment
lugs on the cylinder pack.
2. Attach the BCW or harness to the cylinder pack
with the quick attachment by guiding the rail with
the keyholes into place until it locks. Check that
it is connected properly and locked by pulling the
BCW or harness.
31
4.4 Attaching the regulator to the BCW
1. Place and secure the loop of the Velcro strap to
the reserve valve or bail-out valve manifold (if
harness is used, skip this step).
2. Wrap the Velcro strap around one of the D-rings
on the shoulder strap of the BCW (if harness is
used, skip this step).
4.5 Attaching the regulator to the harness or bcj
1. Attach the reserve valve manifold to the shoulder strap
(if harness is used) or mounting strap on the BCJ.
32
4.6 Attaching the Octopus Breathing valve
WITH Hose
1. Make a visual inspection of the octopus, ensuring that there is no damage.
Tighten the locking nut and the locking ring of the octopus breathing valve.
2. Connect the octopus breathing valve to the breathing hose. Hand-tighten the octopus breathing hose nut
securely.
3. Fold and attach the octopus hose with the bungee
cord.
4. Attach the octopus breathing valve to the yellow
mounting clip. Check that the octopus valve
locking lever is in the locked (closed) position
against the valve housing.
According to EN250, the manufacturer is obliged to warn the user of the following:
"If SCUBAs are configured and used by more than one diver at the same time, then the cold water and
breathing perfomance may not fulfill the requirements of EN250."
According to EN250, there is no test for use by more than one diver at the same time.
33
4.7 Attaching the bcw and bcj inflation Hose
1. Place the inflator hose in between the back of
the BCW/BCJ and the cylinder pack. Let the
inflator hose pass inside the BCW/BCJ inflator
connection.
2. Run the inflator hose through the Velcro strap.
3. Connect the inflator hose to the inflator.
4.8 Attaching the Full Face Mask
1. Perform a visual inspection of all plastic, rubber and metal parts for damage. Check rubber parts for
any sign of tears and cracking.
2. Check that the non-return valves in the inner
mask are flat and secured.
34
3. Make sure that the pressure equalizing pad is in place
and adjusted.
4. Check that the breathing valve connection on the
full face mask is free from dirt and that the O-ring
is in place on the breathing valve.
5. Connect the breathing valve to the mask by pushing
the valve into the connection piece and turn it
counter-clockwise so that it grips in the bayonet
coupling.
6. If applicable, install communication equipment.
Make sure O-ring is in place and undamaged.
7. Install the cover to lock the breathing valve in position, and hand-tighten the screws securely. Do not
over-tighten the screws or the threaded inserts in the
mask will be pulled out, damaging the mask.
Make sure O-ring is in place and undamaged.
8. Check that the locking nut on the breathing valve
is securely tightened.
35
9. Check that the locking ring on the breathing valve
is securely tightened.
10.Connect the full face mask with breathing valve
to the breathing hose. Hand-tighten the nut of the
breathing hose securely. Close the safety pressure
lever, if fitted.
4.9 Cylinder Weight
1. Check that the screws of the weight are tight.
2. When changing the lower weights to a different weight combination, use an 8 mm Allen key.
CAUTION! If you are removing one or both of the lower brass weights to reduce the overall weight, each
lower weight should be replaced with a plastic weight substitute to maintain the structural integrity of the
cylinder weight assembly.
36
5 Pre-Dive Procedures
5.1 Leakage and function test
5.1.1 Leakage and Function Test for MKII Regulator with Reserve Valve
For leakage and function testing of the regulator with bail-out valve, see section 5.1.2
1. If using the primary breathing valve with safety
pressure, push the breathing valve lever to the
closed position against the valve housing. If
using the primary breathing valve without safety
pressure, skip this step.
OPEN
2. Carefully open the cylinder valve to fully open.
Close the valve a quarter turn!
3. Check the pressure on the pressure gauge to make sure
that there is the required amount of air for the planned
dive. Interspiro recommends that the cylinders should
be full before every dive.
4.Push down the reserve valve lever. Check that the reserve
valve lever flips up automatically.
37
CLOSED
5. If using primary breathing valve with safety pressure, open
(pull away from breathing valve housing) the safety pressure lever. Check that a strong flow of air is heard. Reset
the safety pressure lever to the closed position.
If using primary breathing valve without safety pressure,
press the purge button on the breathing valve. Check that
a strong flow of air is heard. Release the purge button.
If using an octopus breathing valve, press the purge button
on the breathing valve. Check that a strong flow of air is
heard. Release the purge button. Reset the locking lever
against the valve housing.
6. Test the entire system for leaks with the following steps. Close the cylinder valve. Wait for one minute.
Open the cylinder valve while watching the pressure gauge. Check that the needle does not rise by more
than 10 bar (145 psi).
CAUTION! If leakage is greater than the specified value, the equipment must be repaired by an Interspiro
certified service technician.
7. Close the cylinder valve and slowly breathe down the pressure from the primary breathing valve until
the reserve valve activates (you will feel the increased breathing resistance on inhalation until the air
flow stops). Check that the air flow stops at a pressure well above zero pressure (around 60-70 bar or
870-1015 psi).
8. Push down (activate) the reserve valve lever and continue to slowly breathe from the primary valve. The
pointer on the pressure gauge must now fall to zero. This indicates that the reserve air valve is working.
5.1.2Leakage and Function Test for MKII Regulator with Bail-out Valve
For leakage and function testing of the regulator with reserve valve, see section 5.1.1
1. If using the primary breathing valve with safety
pressure, check that the breathing valve lever is in
the open position. If using the primary breathing
valve without safety pressure, skip this step.
OPEN
38
CLOSED
Bail-out Valve Lever
2. Check that the bailout lever is in the up position.
3. Carefully open the cylinder valve to fully open.
Close the valve a quarter turn!
4. Check the pressure on the pressure gauge to make sure that there is the required amount of air for the
planned dive. Interspiro recommends that the cylinders should be full before every dive.
5. If using primary breathing valve with safety pressure, check that no flow of air is heard. Reset the safety
pressure lever to the closed position.
If using the primary breathing valve without safety pressure, press the purge button on the breathing
valve. Check that no flow of air is heard. Release the purge button.
CAUTION! If leakage is heard, it indicates that there is a leak in the bail-out valve. The equipment must be
removed from service and repaired by an Interspiro certified service technician.
6. Push down the bail-out valve lever.
7. If using primary breathing valve with safety pressure, open
(pull away from breathing valve housing) the safety pressure
lever. Check that a strong flow of air is heard. Reset the safety
pressure lever to the closed position.
If using primary breathing valve without safety pressure, press
the purge button on the breathing valve. Check that a strong
flow of air is heard. Release the purge button.
If using an octopus breathing valve, press the purge button on
the breathing valve. Check that a strong flow of air is heard.
Release the purge button. Reset the locking lever against the
valve housing.
8. Test the entire system for leaks by follwing these steps: 1.) Close the cylinder valve.; 2.) Wait for one
minute; 3.) Open the cylinder valve while watching the pressure gauge; 4.) Check that the needle does
not rise by more than 10 bar (145 psi).
CAUTION! If leakage is greater than the specified value, the equipment must be repaired by an Interspiro
certified service technician.
39
5.1.4Leakage and Function Test for BCW
1. Inspect the BCW for any material degradation or tears.
2. If using primary breathing valve with safety pressure, make sure that the breathing valve lever is in the
closed position. If using primary breathing valve without safety pressure, skip this step.
2. Carefully open the cylinder valve to fully open if this is not already done. Close the valve a quarter
turn.
3. Inflate the bladder until the relief valve opens.
4. Wait for one minute and check that the bladder remains inflated and no leakage is heard.
CAUTION! If leakage is heard, the BCW must be removed from service and repaired by an Interspiro certified
service technician.
5. Close the cylinder valve if the DIVATOR SCUBA set is not going to be used directly.
For additional information, see the: DIVATOR BCW User Manual.
5.2 Donning the apparatus
5.2.1BCW
1. Extend the shoulder straps and waist buckles and put the apparatus on with the cylinder valve
downwards.
2. Adjust the shoulder straps by grasping the free ends of the straps and pulling on them until the apparatus
feels secure and comfortable.
3. Pull cummerbund tight and fasten securely. Fasten the waist buckle and pull on the loose ends to tighten
securely.
4. Check that the reserve air lever can be reached with both hands and is not obstructed by other
equipment.
5. If using a dry suit, connect the suit hose to the dry suit inlet valve.
5.2.2Harness
1. Pull out each waist buckle to the end of the waist straps. Open both harness buckles and pull out the
shoulder straps. Put the apparatus on with the cylinder valve downwards.
2. Adjust the shoulder straps by pulling on the waist straps until the apparatus feels secure and comfortable.
Lock the harness buckles.
3. Fasten the waist buckle and pull on loose ends to tighten securely.
4. Check that the reserve air lever can be reached by both hands and is not obstructed by other
equipment.
5. If using a dry suit, connect the suit hose to the dry suit inlet valve.
40
5.3 Donning THe FULL FACE mask
1. Pressurize the DIVATOR SCUBA as previously described in section 5.1 Leakage and Function Test. If
applicable, open the DIVATOR Hatch.
2. Pull the head harness straps out as far as possible by grasping the metal buckles and extending the head
harness straps.
3. Adjust (there are three possible positions) the
pressure equalizer pad to one of the three
positions that permits both an easy clearing of
ears and unrestricted breathing through the nose.
Check that the pressure equalizer pad is properly
secured.
4. Don the DIVATOR mask by grasping the lower
two head harness straps and pulling the head
harness over your head.
5. Push the chin down well into the chin cup of the mask.
WARNING! Make sure that the oral-nasal cup fits
properly. Failure to do so may result in high CO2
levels which will increase the breathing rate, cause
panic, and may even lead to fatal accident.
Pull down the back of the head harness to position
it properly and check that no harness straps are
twisted.
6. Moderately tighten the head harness straps by
pulling straight back, not out, beginning with
the lower two straps first, the upper two straps
next, and then the top center strap. Readjust if
necessary.
WARNING! Some neoprene hoods compress with increased diving depth. In those cases, readjusting the head
harness straps will be necessary. Failure to do so may result in high CO2 levels which will increase the
breathing rate, cause panic, and may even lead to fatal accident.
41
Note: Only tighten the forehead strap enough to eliminate slack. If the forehead strap is over-tightened, the
mask will press against the diver’s chin and the diver may get jaw fatigue and a headache.
7. Read the pressure gauge. Inhale deeply to turn on the safety pressure automatically (if applicable)
alternatively press lightly on the purge button. Stop breathing and listen for any leakage.
Note: If there is any leakage and if using dry suit, make sure that the dry suit face seal has an appropriate
design to fit a full face mask.
8. Check the safety pressure (if appropriate) by
holding your breath and inserting two fingers
between the sealing edge and the face. A strong
airflow should be heard.
9. Check that you are able to equalize (clear your ears) by
pushing the breathing valve upwards.
10.Check the pressure gauge to ensure adequate cylinder pressure.
42
5.4 Checking Reserve or Bail-out lever position
5.4.1Diving in SCUBA Mode
Reserve valve: Check that the lever for the reserve valve is automatically in the upright position when the
DIVATOR SCUBA is pressurized.
Bail-out valve: The Interspiro bail-out regulator is not recommended for use in autonomous SCUBA dives
because it does not provide an active warning for low air pressure in the SCUBA cylinders. The pressure
gauge is the only warning for low SCUBA cylinder air pressure. However, by adding the Interspiro DIVATOR HUD, an active warning for low SCUBA cylinder air pressure is provided.
Diving in SCUBA mode with the regulator with bail-out valve requires the bail-out valve to be down in
order to breath from the SCUBA cylinders.
5.4.2Diving in Surface Supply Mode
Reserve valve: Check that the lever for the reserve valve is automatically in the upright position when the
DIVATOR SCUBA is pressurized.
See DIVATOR DP1 Surface Supply User Manual for details.
Bail-out valve: Check that the lever for the bail-out valve is in the upright position.
Note: If diving in surface supply mode with the regulator with bail-out valve, if the bail-out valve is in the
down position (incorrect position) then the diver will get no active warning if the surface supply is interrupted. The diver’s only indication that he has switched from surface supply to the SCUBA cylinders is a
decrease in the diver’s pressure gauge.
See the DIVATOR DP1 SURFACE SUPPLY User Manual for details.
43
5.5 attaching the Weight
When the DIVATOR SCUBA is ready for use, the Diving
Assistant mounts the weight on the weight shaft of the
DIVATOR Lite cylinder pack and secures it with the
hairpin cotter in an open end down position.
Note: When the hairpin cotter has been inserted to
secure the weight, it must be rotated half a turn to lock
it in position. The tether on the cotter pin must be
upwards.
The DIVATOR SCUBA is now ready for use.
44
6 Diving
6.1 Checks during Diving
• Periodically check the pressure gauge.
• Periodically check the position of the reserve or bail-out valve lever.
• Make sure that other equipment does not interfere with the operation of or access to the necessary controls
and components.
• Check for leaks.
Important: When the diver activates the reserve valve, the dive must be aborted. The dive should be planned
with the intention of not using the reserve air volume.
6.2 diving in COLD water
Cold water diving is dangerous and requires special planning and preparation.
Below is a summary of some effects of cold water on the components of the DIVATOR system
6.2.1Regulator Unit
Internal freezing
The first stage regulator reduces the cylinder pressure to approximately 8 bar (116 psi). The air expands,
the pressure falls and the temperature will drop considerably. If the air contains moisture, ice crystals will
form that may obstruct the supply of air. "Internal freezing" of this kind can cause a total air stoppage. Dry,
clean air should therefore always be used. See the Cylinder Filling section for air quality requirements.
If the water and/or air temperature is low and the anti-freeze cover assembly of the regulator is damaged,
this, in combination with the cooling that will occur with the pressure reduction in the regulator, could
cause freezing. If that happens, water enters and solid ice will form in the spring housing of the regulator
and the regulator mechanism will stick in open position. The secondary pressure will then rise above
normal and open the safety valve in the breathing valve. The excess air will then flow through the face
mask (mouthpiece) and out into the water. In order to avoid this, the anti-freezing cover assembly should
always be checked before diving.
External freezing
Under extreme conditions; i.e. continuous surface supply diving in freezing water, the reserve or bail-out
valve may be difficult, or in the worst case impossible, to operate due to formation of ice on the exterior of
45
the reserve or bail-out valve lever. If this occurs, the octopus breathing valve could be used as an emergency
breathing air source.
The described external freezing is a rare possibility and only occurs in very cold water. The DIVATOR
SCUBA and DIVATOR DP1 Surface Supply are certified and tested for cold water use by the US Navy
Experimental Diving Unit (NEDU) in accordance with current European standards. The original CE
certificate goes back to 1996.
6.2.2Breathing Valve
All Interspiro breathing valves supply air during inhalation. When the diver inhales, air flows from the
breathing hose through the breathing valve and into the diver's lungs. The expansion of the supplied air
results in the air near the inlet valve being cooled to around -10°C (14°F) at a water temperature of 0°C (32°F).
Possible moisture in the inlet section of the breathing valve may then become ice which could increase the
friction between the moving parts of the valve mechanism to the extent that the return spring may not close
the valve at the end of each inhalation. In this case the breathing valve will free flow. To minimize this
possibility, the breathing valve has a non-return valve in the inlet section of the breathing valve. Moisture
may enter the inlet section of the breathing valve in the following ways:
a) During washing in water and if the breathing valve has not been properly dried.
b) The non-return valve of the breathing valve is not leak tight. See the Maintenance section for leak
test.
c) If the breathing valve is immersed in water and then the wet breathing valve has been exposed to freezing
air temperatures prior to the dive. To prevent this from happening, do not immerse the breathing
valve in water prior to use. If it has already been immersed, make sure to purge the breathing valve
thoroughly.
6.2.3Full Face Mask
The DIVATOR Full Face Mask protects the diver's face from cold water. The DIVATOR full face mask
separates the inhalation and exhalation air. The result is that moisture from the diver's exhalation cannot
reach the inlet section of the breathing valve, neither through the mask channels nor through the valve
mechanism. These features significantly reduce the risk of freezing.
6.2.4Octopus
The Octopus has separate inhalation and exhalation channels. The inhalation port of the breathing valve
is protected from water by the non-return valve, thereby minimizing the risk that the valve may freeze in
the open position.
46
6.2.5Procedures for Repeated Dives in Cold Water and/or Low Air Temperature
1. Prepare for the next dive by shaking water out of the full face mask and the breathing valves.
Dismantle equipment parts as quickly as possible before they freeze together.
2. Press the full face mask against your face and at the same time press the purge button on the breathing
valve for a few seconds. This removes any trapped water from the mask air channels as well as from
the breathing valve.
3. Press the purge button on the octopus breathing valve. This removes any trapped water from the breathing
valve.
4. Shake the reserve or bail-out valve manifold to remove any trapped water. This will help prevent
freezing.
5. Place the full face mask on a dry surface with the visor upwards, to prevent snow and water from entering
the mask.
6. If possible, store the DIVATOR SCUBA in a warm environment between dives.
7. If external ice has formed on the equipment or parts are frozen together; i.e., DIVATOR cylinder weight
cannot be removed from the cylinder pack, first stage regulator cannot be removed from the cylinder
valve, reserve or bail-out valve is frozen in position, use warm water to melt the ice.
8. For repeated dives, it is recommended that the used breathing valve be replaced with a dry breathing
valve.
47
7 Post Dive Procedures
7.1 DOFFING THE DIVATOR AFTER USE
1. The attendant should remove the hairpin cotter and pull off the weight.
2. Loosen the full face mask head harness. If using a primary breathing valve with safety pressure, turn
off the safety pressure by pressing the lever against the valve housing. Remove the mask.
3. Disconnect the quick coupling to the suit.
4. Open the waist buckle and cummerbund if using the BCW.
5. Undo the left shoulder buckle or loosen the shoulder strap. If using the harness, loosen left harness buckle
and the shoulder strap.
6. Remove the diving apparatus.
7.2 Dismantling
The apparatus should be cleaned as described in the section titled Cleaning, before carrying out the
following:
1. Close the cylinder valve by pressing in and turning the cylinder valve handle clockwise until it reaches
its end position.
2. Thoroughly vent the system by pressing the purge button on the breathing valve and simultaneously
activating the reserve valve lever.
Note: Venting may take as long as 30 seconds. The first stage regulator O-ring may be damaged if it is
removed when there is pressure remaining.
3. If using the DIVATOR SCUBA together with the DIVATOR DP1 Surface Supply see DIVATOR DP1
Surface Supply User Manual for disconnection and venting of the DIVATOR DP1.
3. Disconnect the octopus and the Velcro strap of the reserve or bail-out valve manifold.
4. Remove the DIVATOR BCW or harness from the cylinder package by pressing the locking mechanism
on the upper part of the DIVATOR BCW or harness. Then press and pull the harness down towards the
handle to remove it.
5. Remove the regulator from the air cylinder pack.
6. When the regulator is not connected, the cylinder valve must be fitted with a plug, which should be
hand-tightened. The connection nipple of the regulator must be protected with the yellow cap.
7. If the equipment is faulty or damaged, it must be repaired or returned to an Interspiro approved
maintenance workshop. Parts that can be repaired by the user are described in the repair section of this
manual.
8. Damp equipment should be thoroughly dried if it is to be stored in a bag for more than a few hours.
9.Fill the cylinders as described in Filling Procedures.
48
8 Filling Procedures
8.1 Filling the Interspiro Fully Composite Cylinders
The following procedures should apply when filling DIVATOR Lite cylinders with a starting pressure
of less than 30 bar (435 psi).
The filling rate must be limited to no more than 30 bar (435 psi) per minute. It is recommended that
the Interspiro Filling Adapter 99369-01 be used.
The cylinder pack must always be filled standing in an upright position with the valve facing
upwards.
When filling cylinders or cylinder packs that contain a starting air pressure of more than 30 bar (435
psi) a normal fill rate can be used.
The air used for charging the cylinders should, as a minimum, comply with the requirements of the
European Standard EN 120 21 or the purity standards of US FED SPEC BB-A-1034 Grade A.
8.2 Filling Adapter 99369-01
The Filling Adapter connects the cylinder valve and the filling hose.
The adapter is intended for filling the DIVATOR Lite cylinder packs 323.4 and 326.7.
The adapter has a built-in nozzle that limits the filling rate to approximately 30 bar (435 psi) per
minute.
49
Using the Filling Adapter
1. Disconnect the pressure regulator or the plug
from the cylinder valve and connect the filling
adapter to the cylinder valve. Tighten the
handwheel of the adapter to prevent leakage.
2. Connect the filling hose to the filling adapter and
tighten the connection to prevent leakage.
3. Open the cylinder valve and fill the cylinder pack.
50
9 CHECK LIST
9.1 PRE-DIVE
• Clear Cylinder Valve.
see 4.1
• Check Anti-freeze Cover assembly.
see 4.1
• Attach Regulator.
see 4.4 or 4.5
• Attach BCW or Harness.
see 4.3
• Attach Full Face Mask and Octopus.
see 4.8 and 4.6
• Check Full Face Mask, Non-return Valves and Pressure Equalizer.
see 4.8
• Check Cylinder Pressure.
see 5.1.1
• Check HUD (if used).
see 3.5.6
• Perform Leakage Tests including BCW.
see 5.1
9.2 DURING DIVE
• Check the reserve or bail-out lever and cylinder pressure gauge at regular intervals.
9.3 POST DIVE • Clean and rinse equipment.
• Close cylinder valve.
• Disassemble, dry and store equipment.
51
10Emergency ProcedureS
The following emergency procedures are examples of how to handle the equipment in some emergency situations. The organization conducting the diver training is responsible for development of adequate training
and emergency procedures.
10.1Clearing water FROM the Interspiro Full Face Mask DURING A DIVE
If water enters the full face mask during diving, either filled or partially filled, the most convenient way to
clear the mask is by using the purge button on the breathing valve.
If the mask has come off during the dive, find the mask. If a breathing valve with safety pressure is used,
push the safety pressure lever to the closed position to prevent free flow. Extend the head harness straps
and don the mask.
With your left hand, hold the mask against your face.
With the face in an upright (vertical) position press the
purge button until the water has cleared from the mask
sufficiently to start breathing.
After a few breaths of air, repeat purging procedure if
you find this necessary. A small amount of water will
always remain in the mask after this procedure.
Alternatively, if you have a full breath of air, hold the
mask against your face and exhale to clear the mask
of water.
When you are satisfied that the mask is clear of water,
tighten the head harness straps beginning with the lower
straps. Consider aborting the dive.
10.2Secondary breathing valve (Octopus) procedures
The DIVATOR Octopus is intended to be used in an emergency rescue situation to provide air to a victim
or diver that has no gas supply.
The DIVATOR Octopus is released by grasping and pulling the octopus away from the mounting clip.
The DIVATOR Octopus hose can be pulled out and extended up to 1.8 meters (6 feet). This will allow the
victim to swim freely ahead, behind or alongside the diver.
Under all circumstances, abort the dive and resolve the situation.
To clear the breathing valve of water, see the section titled "Clearing the Breathing Valve with Mouth
Piece."
52
10.3Free Flow of Mask Breathing Valve
In case of free flow of air into the mask, the following procedure is recommended:
1. Continue breathing.
2. Abort the dive and start ascending to the surface.
3. If loss of air occurs see section 10.5 Loss of Air.
Under all circumstances abort the dive and resolve the situation.
10.4 Free Flow of Octopus Breathing Valve
In case of free flow of octopus breathing valve, the following procedure is recommended:
1. Continue breathing.
2. Abort the dive and start ascending to the surface.
3. If loss of air occurs, see section 10.5 Loss of Air.
Under all circumstances, abort the dive and resolve the situation.
10.5 Loss of Air
In case of air loss, the following procedure is recommended:
1. Check the Pressure Gauge.
2. Actuate the Reserve Valve Lever or Bail-out Valve Lever.
3. Abort the dive and start ascending to the surface.
4. Check that the cylinder valve is fully open.
5. If there is still loss of air, use your dive partner’s octopus, if available.
6. If your dive partner’s octopus is not available, try to use your own octopus.
Under all circumstances, abort the dive and resolve the situation.
53
10.6 Clearing The Breathing valve with mouthpiece
1. Grasp the breathing valve and put it in the mouth.
2a.Clear the breathing valve by exhaling while turning the head so that the exhalation part of the breathing
valve is at the lowest position.
2b.Clear the breathing valve by pushing the purge button while turning the head so that the exhalation part
of the breathing valve is at the lowest position.
54
11 Maintenance and testing Schedule
Face piece
s
eVe
RY 6 TH
YeA
R
1
eVe
RY
YeA
R
AppARATUs/COMpOnenT
AFT
eR
Use
#
BeF
OR
Use e
This schedule is only valid for diving equipment. The schedule shows the minimum
requirements for service and testing as recommended by Interspiro. Local requirements may
differ due to environmental conditions and frequency of use. To ensure trouble free operation,
the following schedule should be followed:
D
1.1
Full Face Mask
V *
V
1.2
Mouth piece
V
V
1.3
Breathing Valve
F
2
Regulator unit
*
F
*
regulator
s
F
2.2
Warning Device
s
F
F
2.3
High pressure Hoses
V
V
2.4
Low pressure Hoses
V
V
3
Harness
s
C
V
4
Cylinder/Cylinder pack
s
C
V
Cylinder Valve
4.2
Cylinder
*
C
2.1
4.1
*
F
*
*
***
F **
periodic inspection to be
performed every 5th year
in accordance with DOT.
V
= Visual inspection (renew if necessary)
C
= Cleaning
D
= Cleaning and disinfection
s
= short user test
F
= Full inspection and performance tests
55
*
parts included in service kits
(or service parts) shall be replaced
during service.
V
** service is advised to be made in the
same periodic interval as cylinders,
however it must be done at least every
6 years.
*** Low pressure hoses must be replaced.
no service kit available.
12Maintenance
12.1Cleaning
12.1.1 After Each Dive
1. If the equipment is very dirty or in need of disinfection, see the section titled Monthly Cleaning.
2. Pressurize the DIVATOR SCUBA by opening the cylinder valve.
4. Rinse the full face mask and breathing valve with clean water. Use the purge button to blow air through
the valve in order to remove any water and dirt. Repeat a few times until the valve is clean.
5. Rinse off all the other parts of the DIVATOR SCUBA, including the BCW or harness, with clean water.
Allow the DIVATOR BCW to dry partly inflated.
6. Close the cylinder valve. Vent the regulator by pressing the purge button on the breathing valve and
simultaneously activating the reserve valve lever. Remove the regulator from the air cylinder pack.
Allow all regulator parts to dry.
7. Blow any moisture out of the cylinder valve by opening the valve and allowing air to escape for 1 to 2
seconds.
WARNING! Blow-off noise and pressure surges may cause hearing damage. Always use ear protectors when
filling and emptying air cylinder packs.
8. Close the valve and screw in the blanking plug by hand.
9. Remove the cylinder boot and allow the air cylinder pack to dry.
10.Fill air cylinder pack. Inform the filling station if the cylinder pack has been subjected to abnormal
treatment or if there is less than 30 bar (435 psi) in the cylinder.
Note: The air cylinder package should not be completely emptied. There must always be a residual pressure
of at least 10 bar (145 psi) in the cylinder to prevent moisture entering the cylinders through the valve.
56
12.2Monthly Cleaning 1. Assemble the air cylinder pack, regulator and full face mask/breathing valve.
2. Open the cylinder valve and check the pressure on the pressure gauge before cleaning begins. In order
to prevent water from entering the regulator and detect leaks, there must always be pressure in the air
cylinder pack. Change the air cylinder pack if the pressure gauge shows less than 270 bar (3915 psi).
3. If a full face mask is used, remove the cover by unscrewing the two screws. Grasp the lower part of the
full face mask (where the valve is located), with the visor upwards. Turn the breathing valve clockwise
to undo the bayonet coupling of the breathing valve.
4. Fill a container with clean water (preferably lukewarm, not above 40 °C (100 °F) ). Use a colorless, not
perfumed hand washing liquid soap.
5. Wash the full face mask and breathing valve, using a brush if necessary. Use the purge button to blow
air through the valve to remove water and dirt. Repeat until the valve is clean and dry.
6. Remove the cylinder boots and put in the air cylinder pack and regulator. Clean these, using a brush
if necessary. Note that the system must still be pressurized. If there are leaks in the regulator, these
must be located by tracing the air bubbles. The escaping air also prevents water from
getting in.
Note: Bubbles may come from cavities in the equipment. To clarify whether this is leakage, check by holding
the apparatus in several positions under the water. Try to clear all suspect air pockets manually.
7. Lift all parts out of the container. Then clean the harness in the container. Use a brush if necessary.
8. Fill the container with fresh, clean water and rinse the soap solution off all the parts. Begin with the full
face mask/breathing valve, then the air cylinder pack/regulator, and finally the harness.
WARNING!: If water accidentally gets into the inhalation side during cleaning of the full face mask and
breathing valve and is not removed, there is a risk of the valve freezing, resulting in constant air flow rate
(free-flowing valve). The reason for the freezing is that expanding air may reduce the temperature below
0 °C (32 °F) on the inhalation side of the valve when the equipment is used at low temperatures.
9. Vent the system by pressing the purge button on the breathing valve and simultaneously activating the
reserve valve lever.
Note: Venting may take as long as 30 seconds. The first stage regulator O-ring may be damaged if it is
removed when there is pressure remaining.
10. Blow any moisture out of the cylinder valve by opening the valve and allowing air to escape for 1 to 2
seconds.
Note: Blow-off noise and pressure surges may cause hearing damage. Always use ear protectors when
filling and emptying air cylinder units.
57
11. Close the valve and screw in the blanking plug by hand. An air cylinder pack to be filled should have
a blanking plug tightened by hand.
12. Let the air cylinder pack dry.
13. Shake the water off other parts and allow them to air-dry.
14. Fit a cover and breathing valve to the full face mask. Turn the breathing valve counter-clockwise to
fasten the bayonet coupling of the breathing valve.
15. Return the air cylinder pack for filling. Inform the filling station if the air cylinder pack has been subjected to abnormal treatment or if there is less than 30 bar (435 psi) pressure.
Note: The air cylinder pack should not be completely emptied. There should always be a residual pressure
of at least 10 bar (145 psi) in the cylinder to prevent moisture getting into the cylinders through the valve.
Checking the tightness of the non-return valve
The tightness of the non-return valve must be checked during monthly cleaning.
1. Connect the breathing valve to the medium pressure supply hose of the regulator.
2. Remove the breathing valve from the full face mask, or alternatively take the mouthpiece off of the
octopus breathing valve (see the section titled Replacing the Mouthpiece).
3. Open the cylinder valve.
4. Fill the free space of the non-return valve disc with water.
5. Check that no water leaks into the breathing valve. The water level over the non-return valve must not
drop. If there is any leakage, clean or replace the non-return valve.
6. Blow the valve dry by pressing the purge button. Check that the non-return valve disc lies flat after the
valve has been blown dry.
7. Close the cylinder valve and fit the breathing valve to the full face mask or refit mouthpiece.
Disinfecting the full face mask/breathing valve
The full face mask/breathing valve must be disinfected during monthly cleaning or when the need arises.
Interspiro recommends that face masks and breathing valves used by more than one person be cleaned and
disinfected after each use.
58
Dismantling
1. Clean the full face mask/breathing valve in accordance with the instructions for monthly cleaning.
2. Remove the breathing valve if a full face mask has
been used. If a mouthpiece was used, remove the
mouthpiece.
3. Remove the exhalation unit from the breathing
valve. Hold the exhalation unit and the valve
housing and undo the locking ring.
59
4. When the exhalation unit has been removed,
press on the threads of the exhalation unit to
remove the diaphragm pack from the exhalation
unit. Place a hand over the diaphragm pack to
prevent the spring from escaping.
5. Rinse spring, cover, diaphragm assembly and
mouthpiece in water. Carefully pull on the
diaphragm pack to stretch the diaphragm so that
surface dirt can be removed. Make sure not to
damage the diaphragm pack or to lose parts.
6. On the diaphragm assembly there is a white plastic
sealing disc. The sealing disc must be taken out and
cleaned. Rinse the internal part of the diaphragm
assembly. Also rinse the inside of the black sealing
lip of the diaphragm assembly, which makes contact
with the sealing disc. Inspect the diaphragm for any
holes or tears. Replacement of the diaphragm must
be made by a certified service technician.
7. To disinfect after the washing and rinsing, immerse parts in 0.1% solution of chlorhexidine in water for
one hour.
8. Rinse the parts thoroughly in fresh water and allow to air-dry.
60
Re-assembly
1. Put the sealing disc into the diaphragm assembly,
put guide disc with spring into the cover, then press
in the diaphragm assembly. Check that the spring
enters the guide in the sealing disc.
2. Put the exhalation unit into the breathing valve, screw
the valve housing together with the locking ring.
Note: Only the locking ring should be turned, otherwise the O-ring may be displaced, causing leakage.
3. If a full face mask is used, check that the O-ring in the bayonet coupling is not damaged and seated in
the O-ring groove. For replacement of the O-ring, see the section 12.4.4 Breathing Valve Replacement
of O-ring (full face mask only).
4. If a full face mask is used, connect the breathing
valve in the bayonet coupling by turning the breathing
valve counterclockwise. Mount the blanking cover on
the full face mask and secure with the two screws.
61
If a mouthpiece is used, Make sure that no O-ring is
in the groove, mount the mouthpiece on the breathing
valve, make sure that the rubber bulge on the inside
of the mouthpice enters the O-ring groove. Secure the
mouthpiece with the clamp.
12.3Checking and inspection
The checks described in this section must be done after a dive or before the next dive.
12.3.1 Checking the Reserve Air Valve
1. Assemble the DIVATOR SCUBA, following the instructions in the Operating procedures section.
2. Check that:
– the lever operates freely and stays in the open position.
– there are no deposits in and around the reserve air valve.
– no parts show signs of wear or damage.
3. Perform a function check; see Leakage and Function Check section.
If the equipment is found to be defective or damaged, it must be repaired by an Interspiro certified service
technician.
12.3.2 Checking the Movement of the Pressure Gauge Pointer
The first stage regulator has a restrictive orifice in the high-pressure port that limits the air flow to the pressure gauge hose and the pressure gauge. The restriction protects the user and the equipment if the hose or
the pressure gauge fails.
1. Assemble the diving apparatus, following the instructions in the Operating Procedures section.
2. Open the cylinder valve and observe the pressure gauge. Check that the pointer moves normally and
smoothly. If the pointer moves irregularly or not at all, the pressure gauge is faulty.
3. Close the cylinder valve, activate and hold the reserve valve lever, and press the purge button of the
breathing valve to vent the DIVATOR SCUBA.
If the equipment is found to be defective or damaged, it must be repaired by an Interspiro certified service
technician.
62
12.3.3 Checking Hoses
Check all hoses by pulling and bending them while inspecting for damage, cracks, discoloration and changes in hardness.
If the equipment is found to be defective or damaged, it must be repaired by an Interspiro certified service
technician.
WARNING!: The air loss caused by a break in the dry-suit hose is just as great as that caused by a break in
the breathing hose. Therefore, check thoroughly!
12.3.4 Checking O-rings
O-rings that are exposed to sunlight, salt water, chemicals (including mild detergents), and ozone suffer
ageing and may become defective.
1. Check all visible O-rings.
2. Cracked and damaged O-rings must be replaced.
3. All O-rings in this manual should be lubricated with Interspiro lubricant 331 190 269.
Only O-rings that are shown in section 12.4 Repair, of this manual are user-replaceable. Other parts found
to be defective or damaged, must be repaired by an Interspiro certified service technician.
12.3.5 Checking the Anti-freezing Cap
A leaking anti-freezing cap increases the risk of freezing and makes the regulator work less efficiently.
WARNING!: Oxides and salt deposits in the regulator may stop the flow of air. If the regulator has been exposed for a long time to water inside the regulator housing, the regulating piston may bind or stick. If a defect
of this kind is suspected, the regulator must be repaired by an Interspiro certified service technician.
Dismantling
1. Remove the clamp from the anti-freezing cover.
2. Open the anti-freezing cover. It is hinged at the top.
3. Remove the rubber anti-freezing cap from the regulator housing.
4. Check that no water has leaked in. If water has leaked in, the regulator must be blown dry. Blow
compressed air from a nozzle into one of the two holes in the bottom of the regulator.
5. Blow the regulator housing dry.
63
Mounting
1. Fit the rubber anti-freezing cap into the groove
in the regulator housing. Carefully stretch the
rubber at the opening to pass it over the flange.
The anti-freezing cap must sit in the upper groove
of the regulator housing, the groove with the
larger diameter.
2. Hold the two halves of the anti-freezing cover apart and fit one half into the groove in the regulator
housing. The anti-freezing cover must be fitted into the groove with the smaller diameter. Press the
halves together and check that the cap moves easily in the groove. The cover must not squeeze or damage
the anti-freezing cap.
3. Fit the clamp and tighten with a screw driver. The screw must lock the slits in the clamp. Do not overtighten and damage the anti-freezing cover. The cover should be easy to turn in the groove.
12.3.6 Checking the Visor
Inspect the visor of the full face mask and look for cracks in the plastic. If cracks are found, the mask should
be repaired by an Interspiro certified service technician.
12.3.7 Checking Rubber and Plastic Parts
Inspect the rubber parts of the full face mask by stretching and bending them.
Check the connection points around the buckles and metal band. Inspect the plastic parts (sealing surfaces,
bayonet coupling, cover and screws). If dry cracking or other damage is found, the part must be replaced.
12.3.8 Checking the Angle of the Cylinder Valve
The cylinder valve must not be angled in relation to the intersection between the halves of the handle. If
the angle of the cylinder valve on the air cylinder pack is wrong, the air cylinder pack must be returned to
an Interspiro certified service technician.
12.3.9 Checking the Air Cylinder Pack
If the air cylinder pack is full, it is fitted with a plug that is tightened with a wrench. Only a full air cylinder
pack may be fitted with a wrench-tightened plug. Check the air cylinder pack for mechanical damage or
other defects. If the equipment is found to be defective or damaged, it must be repaired by an Interspiro
certified service technician.
For more information regarding cylinder inspection, please see the DIVATOR Lite User Manual.
64
12.3.10 Checking the Weight
Oxidation changes the surface color of the weight. The oxide forms a hard surface which protects the
material beneath it. The only check to be done on the weight is to make sure that the handles, tether, and
hairpin cotter are not damaged or deformed.
12.4Repair
12.4.1 General
Maintenance that can be performed by the user will be covered in this section. Repair other than described
in this section must be carried out by an Interspiro certified service technician.
12.4.2 Regulator
Replacement of High Pressure Connection O-ring
This O-ring is located on the connection nipple on the high-pressure connection of the regulator. Normally
there is no need to replace or repair the O-ring between annual inspections, but it may get displaced
or destroyed if the regulator is removed from the air cylinder pack without venting of the DIVATOR
SCUBA.
1. Using a 5 mm Allen key, unscrew the nipple in the
high-pressure connection. The nipple also forms a
seal and serves as a holder for the regulator filter. The
nipple must therefore be kept pointing downwards
during the entire removal and assembly phase.
Otherwise, there is a risk of dirt trapped by the filter
entering into the regulator.
2. Using the 5 mm Allen key, unscrew the nipple a few turns to expose the flange for the O-ring so there
is space to fit a new O-ring.
3. If necessary, remove the old O-ring and fit a new O-ring. Do not use tools to remove and fit the O-ring,
as this may damage the sealing surfaces.
4. Using the 5 mm Allen key, screw in the nipple.
Note: Moderately tighten the nipple. However, the nipple must not be under-tightened so that it works
loose with normal handling.
5. Check that the O-ring is installed evenly in the O-ring groove.
65
12.4.3 Harness
Replacing the hip belt buckle
There is a left and right hip belt buckle. When the hip belts are correctly fitted, the free ends of the belts
will be on the outside of the hip belt, so that the belts can easily be pulled tight.
1. Check that the bent-outward part of the buckles are facing away from the user (“the outside”). From the
inside, thread the hip belt through the slot that is closest to the connecting buckle.
2. Thread the belt through the other slot from the outside of the buckle.
3. Check that the belts are not twisted.
12.4.4 Breathing Valve
Replacing the shield ring
1. Lift the shield ring over the lugs one at a time until the ring comes free. The shield ring can be lifted up
over a lug by squeezing together the shield ring and carefully pulling it over the lug.
2. Fitting a new shield ring: the chamfered edge on the shield ring must face away from the diaphragm attachment. Place the shield ring over two to three of the wing lugs, and press the ring over the remaining
lugs.
Replacement of O-ring (full face mask only)
The O-ring is located in the bayonet coupling on the breathing valve.
WARNING: This O-ring must not be fitted to a breathing valve with a mouthpiece, as it may cause the
mouthpiece to come off.
1. Remove the breathing valve from the full face mask.
2. If necessary, remove the old O-ring. Push out the O-ring with your thumb and index finger. Do not use
sharp objects as these may damage the groove.
3. Fit a newO-ring in the groove.
Check that the O-ring is lying evenly and not twisted.
Replacing the mouthpiece
1. Use a screwdriver to release the clamp that holds the mouthpiece in place. Loosen the clamp until it is
free of the mouthpiece groove.
2. Fit a new mouthpiece and clamp it to the breathing valve. Position the clamp screw in the space between
the diaphragm attachment and the mouthpiece.
3. Tighten the clamp with moderate torque. Check that the clamp is secured by holding the valve housing
and pulling on the mouthpiece.
4. Connect the breathing hose to the breathing valve and tighten the connection nipple by hand.
66
WARNING: The full face mask interface O-ring must not be used when the breathing valve is used with a
mouthpiece. This might cause the mouthpiece to become loose.
12.4.5 Full Face Mask
Replacing the head harness
Begin installing with the middle, uppermost strap in the head harness. Thread the strap through the buckle
from the inside of the mask. The IS logo at the midpoint of the head harness must be visible after installation. Thread head harness strap through the lower part of the buckle under the roller and then back over
the roller and through the top. Repeat the procedure for the four remaining straps.
Replacing the valve disc
The valve discs are located in the inner mask.
1. Using your fingers, grasp the valve disc and pull it upwards. Discard the old valve disc.
2. Fit a new sealing disc by first threading the sealing disc hole over one short side of the valve seat
pin. Carefully stretch the sealing disc so that the
hole can be threaded over the entire pin.
3. Check that the sealing disc rides freely on the
pin.
4. Check that the rubber of the inner mask is not
deformed and that it fits tightly around the valve seat.
Replacing the cover
Check that the O-ring is in place (replace O-ring if needed) on the blank cover and that the circlips are in
place around the screws.
Fit the cover. The round part must be facing towards the visor. Screw in the two screws.
Note: Carefully tighten the screws by hand.
67
Replacing the pressure equalizing pad
The pressure equalizer is held by a metal wire holder.
1. Check that the metal wire holder is not deformed.
2. The pressure equalizer has three grooves for connection to the wire holder. The wire holder must fit in
the same groove when installing the pressure equalizer. Check that the wire holder fits properly in the
groove so that the pressure equalizer does not come loose or become displaced.
68
13TRANSPORT AND STORAGE
13.1STORAGE
13.1.1Cylinder
• Before lengthy storage the cylinders, should be fully charged and fitted with tightened dust plugs. Make
sure that necessary warning signs have been put up at the storage room entrance in accordance with all
applicable regulations.
13.1.2 Harness or BCW
• The harness or BCW should be cleaned, dried and stored in a dry place.
13.1.3 Regulator Unit and Full Face Mask or Mouthpiece with Breathing Valve
• All rubber parts should be stored in dry conditions, well protected from direct sunlight and extremes of
temperature in a sealed plastic bag.
During transport, the equipment must be stored so that the equipment cannot be damaged and people cannot
be injured. The cylinder packs must be transported with tightened plugs and, if possible, in boxes.
The equipment must not be stored where the temperature may be expected to go above 70 ºC (158 °F). The
equipment must be completely dry before being put into storage.
Before the air cylinders are transported, the applicable rules for transport must be complied with.
For certain types of transport, the air cylinders must be depressurized. Use Interspiro 331 190 800 discharge
plug, which leaves a residual of about 2 bar (30 psi) in the cylinders. For a long period of storage, the storage
environment should be dark, dry, and cool, with minimal temperature changes. This is because the material
is sensitive to UV radiation and ozone.
Important: A draining plug must be used when releasing air from an cylinder pack. Uncontrolled air release
may cause moisture to form in the cylinders.
69
AUSTRIA
INTERSPIRO GesmbH www.interspiro.de
Feldbacher Str. 3 A-8200 GLEISDORF AUSTRIA
TEL +43 (0)311 236 133 FAX +43 (0)311 236 133 22 E-MAIL [email protected]
GERMANY
INTERSPIRO GmbH www.interspiro.de
Postfach 1220 D-76691 FORST/BADEN GERMANY
TEL +49 (0)7251 8030 FAX +49 (0)7251 2298 E-MAIL [email protected]
SWITZERLAND
NORTH & SOUTH AMERICA
INTERSPIRO Inc. www.interspiro-us.com
10225 82nd Avenue PLEASANT PRAIRIE WI 53158-5801 USA
TEL +1 262 947 9901 FAX +1 262 947 9902 E-MAIL [email protected]
UNITED KINGDOM & IRELAND
INTERSPIRO Ltd. www.interspiro.com
7 Hawksworth Road Central Park TELFORD Shropshire TF2 9TU UNITED KINGDOM
TEL +44 (0)1952 200 190 FAX +44 (0)1952 299 805 E-MAIL [email protected]
SCANDINAVIA, ASIA/PACIFIC & MIDDLE EAST
SWEDEN
INTERSPIRO AG www.interspiro.de
Güterstraße 47 CH-4133 PRATTELN SWITZERLAND
TEL +41 61 827 99 77 FAX +41 61 827 99 70 E-MAIL [email protected]
NORDIC & EXPORT SALES DIVISION www.interspiro.com
Box 10060 S-181 10 LIDINGÖ SWEDEN
TEL +46 8 636 51 00 FAX +46 8 765 48 53 E-MAIL [email protected]
THE NETHERLANDS & BELGIUM
MALAYSIA
INTERSPIRO BV www.interspiro.nl
Televisieweg 113 NL-1322 BD ALMERE NETHERLANDS
TEL +31 (0)36 5363103 FAX +31 (0)36 5384809 E-MAIL [email protected]
NORDIC & EXPORT SALES DIVISION www.interspiro.com
305 & 305A Lorong Perak Taman Melawati 53100 KUALA LUMPUR MALAYSIA
TEL +60 3 4105 8122 FAX +60 3 4105 3122 E-MAIL [email protected]
PART NO. 95239B01
CENTRAL EUROPE