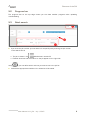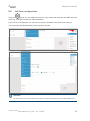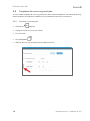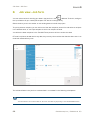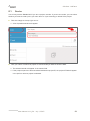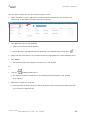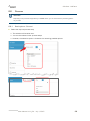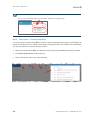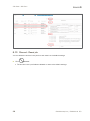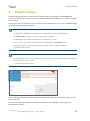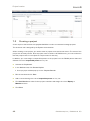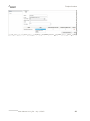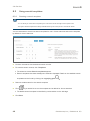
1
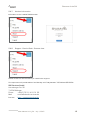
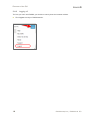
SWANenterprise - SWANcloud User Manual SSC-Services GmbH Herrenberger Straße 56 71034 Böblingen Germany 6.0 © SSC-Services GmbH 2015 All rights reserved. Reprinting, reproduction, and publication not permitted. SSC-Services GmbH Herrenberger Straße 56 71034 Böblingen Phone: +49 (0) 70 31/49 13 - 0 Fax: +49 (0) 70 31/49 13 55 Mail: [email protected] Internet: http://www.ssc-services.de Managing director: Domicile: Matthias Stroezel Böblingen Court of Registry: Stuttgart Commercial Register No.: 21439 SWANenterprise / SWANcloud Version 6.0 Title: User Manual SWAN 6.0 Version: V1.1_EN Status: July 1, 2015 Author: Technical Editing, SSC-Services GmbH Document History Document History Preceding documents SWAN Version SWAN 12.1 SWANenterprise 12.2 Dokument Stand User Manual SWAN 22.08.2012 SWANenterpriseSWANcloud User Manual 09.11.2012 SWANenterprise SWANenterprise5.0 SWANcloud User Manual 01.09.2013 Beschreibung SWANenterprise SWANenterprise5.4 SWANcloud User Manual 17.06.2014 SWANenterprise SWANenterprise6.0 SWANcloud User Manual 03.06.2015 Update screenshots New layout, new address neu: Hinweise zum Handbuch, Registerkarte Projekt Complete revision of the predecessor document Content identical with predecessor document New SSC colours and logo Complete revision of the predecessor documentnew GUI Current document User Manual SWAN 6.0 Doc version SWAN version Date Chapter V1.1 6.0 July 1, 2015 6.11 Description Author Additional info section SSCServices GmbH 6.13 Column ‚Download‘ 8.4 Content: Selecting files, viewing C. Chudoba content of tar container 8.7 Downloading many files User Manual V1.1_EN - July 1, 2015 I Table of contents Table of contents Document History................................................................................................................. I Table of contents ................................................................................................................. II Glossary.................................................................................................................................. V 1 Welcome to SWAN ..................................................................................................... 1 2 General information about this manual............................................................... 3 3 System requirements ................................................................................................ 4 4 Launching SWAN......................................................................................................... 5 5 Elements of the GUI .................................................................................................... 6 5.1 II Views - Overview ............................................................................................................................... 7 5.1.1 Job view ........................................................................................................................................................ 7 5.1.2 Job list view ................................................................................................................................................. 8 5.2 Progress bar ...................................................................................................................................... 9 5.3 Quick search....................................................................................................................................... 9 5.4 Extras .................................................................................................................................................10 5.4.1 Help and support for problems ........................................................................................................ 10 5.4.2 My profile - Overview ............................................................................................................................. 11 5.4.3 My profile - Configuration .................................................................................................................... 12 5.4.4 My profile - Delegation ......................................................................................................................... 13 5.4.5 My profile - System messages .......................................................................................................... 13 5.4.6 Previous user interface ....................................................................................................................... 14 5.4.7 Version information .............................................................................................................................. 15 5.4.8 Support - Service Desk - Contact data .......................................................................................... 15 5.4.9 Logging off ................................................................................................................................................ 16 5.5 Job form configuration................................................................................................................17 5.6 Templates for recurring send jobs ........................................................................................18 5.6.1 Creating a new template .................................................................................................................... 18 5.6.2 Managing and using templates ........................................................................................................ 19 SWANenterprise / SWANcloud 6.0 Table of contents 6 Job view - Job form ................................................................................................... 20 6.1 Sender ............................................................................................................................................... 21 6.2 Data recipient ................................................................................................................................. 22 6.2.1 Quick selection ........................................................................................................................................ 22 6.2.2 Quick search ............................................................................................................................................ 23 6.2.3 Entry in personal address book ........................................................................................................ 24 6.2.4 Selection via the search window ...................................................................................................... 24 6.2.5 Querying recipient details ................................................................................................................... 26 6.3 CC email recipient ......................................................................................................................... 27 6.4 Project ID .......................................................................................................................................... 27 6.5 Client (option) .................................................................................................................................. 28 6.6 Process ............................................................................................................................................. 29 6.7 6.6.1 Send options - General ........................................................................................................................ 29 6.6.2 Send option – Process step IPPro ................................................................................................. 30 Offline ................................................................................................................................................. 31 6.7.1 Generating an offline job ..................................................................................................................... 31 6.7.2 Decrypting content at the recipient ............................................................................................... 32 6.7.3 Reading from a storage medium ..................................................................................................... 32 6.8 Send time ......................................................................................................................................... 32 6.9 Additional text ................................................................................................................................. 32 6.10 Add file from file system ............................................................................................................. 33 6.11 Add file via drag & drop .............................................................................................................. 34 6.12 Send 35 6.13 Discard - Reset job ....................................................................................................................... 36 7 Project function ......................................................................................................... 37 7.1 Search project – Edit project................................................................................................... 38 7.2 Creating a project ......................................................................................................................... 40 User Manual V1.1_EN - July 1, 2015 III Table of contents 8 Job list view ................................................................................................................ 42 8.1 Configuring columns in the job list .........................................................................................43 8.2 Searching through the job list ..................................................................................................44 8.3 Using search templates .............................................................................................................46 8.4 IV 8.3.1 Creating a search template ............................................................................................................... 46 8.3.2 Managing search templates ............................................................................................................. 47 8.3.3 Using a search template for a search ........................................................................................... 47 8.3.4 Discarding search templates ............................................................................................................ 48 Retrieving functions and information about the jobs .....................................................49 8.4.1 Functions................................................................................................................................................... 50 8.4.2 Content ...................................................................................................................................................... 50 8.4.3 History ........................................................................................................................................................ 51 8.4.4 Contact data ............................................................................................................................................ 51 8.4.5 Additional Information .......................................................................................................................... 51 8.5 Recognizing the job status ........................................................................................................52 8.6 Exporting the job list .....................................................................................................................52 8.7 Downloading a job .........................................................................................................................53 SWANenterprise / SWANcloud 6.0 Welcome to SWAN Glossary Term Explanation CC email Information email about the dispatch of data in SWAN. A CC email recipient only receives information about the dispatch, not the data. GUI Graphical User Interface ISO image file Computer file containing a core image of the content of a CD or DVD that is structured in the format ISO 9660. ODETTE File Transfer Protocol (OFTP) is a protocol for the direct electronic transfer of files between two communication partners. It can be based on two different transport layers: OFTP Version 1 – ISDN (B- and D-channel), X.25, etc. Version 2 – TCP/IP (Internet) SWANcloud Product, distributed by SSC-Services GmbH for the worldwide exchange of engineering data. The subscription solution allows a cost-efficient data exchange as Internet service, which is available regardless of its location and without investments into IT infrastructure. SWANenterprise Product, distributed by SSC-Services GmbH for the worldwide exchange of engineering data. The purchase software allows the optional connection of third-party systems and the connection of external data exchange partners. TAR TAR is the abbreviation of "Tape ARchive". An archiving program in the UNIX environment that sequentially writes files into a single file without compressing them (archive) and then reads them back again. The file extension for files archived with the TAR system is ".tar". URL Internet address or web address ZIP Format for compressed files, which on the one hand reduces the space requirements in archiving and on the other hand acts as a container file in which multiple files that belong together or even entire directory trees can be combined together. The file extension for files archived with the ZIP system is ".zip". User Manual V1.1_EN - July 1, 2015 V Welcome to SWAN 1 Welcome to SWAN SWAN is a professional data management system that is used for automated OFTP/OFTP2 data exchange between development partners. In addition to functions for the safe receipt and sending of data, SWAN also offers a range of other advantages that, depending on the installed SWAN variant, can be implemented in the background by integrating numerous complex processes. This includes: » CAD data conversions » Data quality checks » Extraction of structure data from EDM systems » Data encryption and logging » Archiving of the exchange process Support for national and international standards such as OFTP, ENGDAT (electronic delivery note) and ENGPART (automated exchange of partner data) enables smooth and problem-free data exchange between development partners. The latest SWAN version comes with a fully new graphical user interface (GUI). We have developed a modern and functional interface that makes it easy for you to generate and download your orders thanks to an intuitive operating concept. You can use all of the functions via two individually configurable main views (job form and job list). Global elements in the GUI (quick search and the Extras menu) bring you directly to the desired job or give you access to the display, as well as to various setting options for your profile data, online data, and SWAN support. A Java installation is no longer necessary. Uploading and downloading is done via a function integrated in the browser. The SWAN user manual describes the elements of the new user interface and also provides you with information about fundamental aspects of its operation. Administrator functions and the associated controls are visible only to users with corresponding roles and authorisations. A description can be found in the SWAN admin manual. Project supervisors and their representatives will still have access to the project tab in the user interface for the previous version in order to manage their projects. User Manual V1.1_EN - July 1, 2015 1 Welcome to SWAN Information on using the old user interface (e.g. for users with administration rights) can be found in the SWANenterprise-SWANcloud User manual for SWAN-Version 5.4. Currently, the following languages can be selected for the SWAN user interface: » German » Chinese » English » French » Japanese » Portuguese » Russian » Spanish » Turkish Information You can select and save the language in the menu Extras > My profile > Settings. 2 SWANenterprise / SWANcloud 6.0 General information about this manual 2 General information about this manual This user manual describes the elements of the user interface for all SWAN variants and also provides you with information about fundamental aspects of their operation. This manual contains various types of information, which are marked accordingly. – Instructions are preceded by the symbol ■ . Example: Click …… – The outcome of an action is indicated by the symbol ». Example: » The XXX menu appears. – Controls in the SWAN user interface are shown in italics. Example: Job view. – Useful information and notes on the differences between the SWAN variants can be found in the sections identified with . Information You can ……. User Manual V1.1_EN - July 1, 2015 3 System requirements 3 System requirements In order to use SWAN, all you need is a windows computer (windows 7) with an Internet browser and a valid SWAN client certificate. The client certificate is issued by the SSC certification authority and will be sent to the new SWAN user via email. As the certificate is verified upon every SWAN login, you should store the certificate in a secure directory on your computer. You will receive the certificate key-password in a separate email. It has to be entered during the installation. Manuals for the installation of the SWAN client certificate are available in the support area of our homepage (http://www.ssc-services.de). The following browser versions are supported: – Internet Explorer 10/11. – Firefox, version 38 or higher The following components need to be activated or installed in the browser in order for the data transfer to work correctly: – Session cookies – Sufficient storage space in the download path (Default: C:\User\Username\Downloads) – Java script activated – Html5 – Internet Explorer: Sending of UTF-8 URLs activated (URL UTF-8 encoding activated) – Screen resolution of at least 1280x800 pixels. » Operation of SWAN with smartphones, netbooks or tablets is not possible or only possible to a limited extent. 4 SWANenterprise / SWANcloud 6.0 Launching SWAN 4 Launching SWAN Start the Internet browser (Internet Explorer or Mozilla Firefox). Enter the SWAN address (URL) into the address line of the browser. » The SWAN login screen is displayed. Log in with your user name (user ID) and your password. User Manual V1.1_EN - July 1, 2015 5 Elements of the GUI 5 Elements of the GUI The following figure shows an overview of the elements of the GUI. You can find a description in the following subchapters. 1 Views – Create job – Use job list – Call up administrator functions (is only shown if the user has the correct role) ▸ Chapter 5.1 2 Progress bar Indicates progress for uploads and downloads ▸ Chapter 5.2 3 Quick search field Job search, e.g. using the job number ▸ Chapter 5.3 6 SWANenterprise / SWANcloud 6.0 Elements of the GUI 4 Extras – – – – – – Help (online help) My profile (personal data, system messages, settings, delegation) User interface for the previous version (for administrators) Via (version information) Support (contact information for the SWAN service desk) Logout ▸ Chapter 5.4 5 Job form configuration Show and hide fields in the job form (processes/send options, send time, project ID, etc.) ▸ Chapter 5.5 6 Templates for recurring send jobs Create, manage, and use templates. ▸ Chapter 5.6 7 Job form Create new send job, use and manage address books ▸ Chapter 6 5.1 Views - Overview Information You can select and save the start view via Start page after login in the Extras > My profile > Settings menu. 5.1.1 Job view After selecting the Job view, you can create a new job. You can select a data recipient and the data to be sent, can inform persons that you have sent data via a so-called CC email, can enter a client who requested you to send the data, as a project member select a project as the sender, can select processes or send options that should be applied to the data, define a send time, and use other functions. User Manual V1.1_EN - July 1, 2015 7 Elements of the GUI In addition, in this view you can edit the entries for your personal address books for data recipients and CC email recipients, select recipients from the address books, and define default recipients. The input area required for a job, e.g. to select certain processes, can be shown and hidden using the symbol . The settings remain until you deselect the appropriate input area again. Information The selection options are dependent on the SWAN variant you are using. A detailed description can be found in chapter 6 Job view - Job form. 5.1.2 Job list view If you select the Job list view, you will see a list of your jobs on the left side. To search for a specific job, you can filter this list according to various search criteria and can create and manage search templates. The current status of your job is identified by the coloured bar on the left edge of the status column, as well as by the brief status description. After selecting a specific job, you will see information on the job on the right side (contact data, job history, information on job contents such as file names, file type, size, etc.) and, depending on the type of job, be presented with possible functions. You can, for example, download the received data into your file system or resend the sent job. Information The job list is only for display purposes. Functions, such as downloading or visualizing data are only available after you select a specific job by clicking in the appropriate line in the job list. A detailed description can be found in chapter 8 Job list view 8 SWANenterprise / SWANcloud 6.0 Elements of the GUI 5.2 Progress bar The progress bar at the top edge shows you the data transfer progress when uploading or downloading. 5.3 Quick search If you know the job number you can search for a specific job by entering the job number in the search field 1. » The job is shown in the Job list view in section 2. » Possible functions and information on the job appear on the right side. Using 3, you can define which columns you want to see in the job list. Activate the appropriate checkbox. Your selection will be saved. User Manual V1.1_EN - July 1, 2015 9 Elements of the GUI 5.4 Click 5.4.1 Extras in the top right corner to go to the extra functions. Help and support for problems The online help provides you with initial information on operation. There you can also download a PDF of the user manual. Click Help to call up the online help. In the support area of our homepage http://www.ssc-services.de you find different documents and service tools, which can be used for trouble shooting on occurring difficulties. Please contact our Service Desk if you need further support. Contact data can be found under Extras > Support. (Chapter 5.4.8 Support - Service Desk - Contact data). 10 SWANenterprise / SWANcloud 6.0 Elements of the GUI 5.4.2 My profile - Overview Click My profile. Overview contains information on your personal data with which your SWAN account is registered in the system database, such as contact data and personal address code, and the authorisations and project assignments set up for your user account. You have an option to change your password here if the system has not been configured for single sign-on. Depending on your rights, you can make settings and manage delegation in the fold out Configuration and Delegation menus. User Manual V1.1_EN - July 1, 2015 11 Elements of the GUI 5.4.3 My profile - Configuration You can change your profile settings in the Configuration section. Open the Configuration section. Click the down arrow next to the desired setting and select the appropriate option. » The selection will be taken over directly. Option Description Language Interface language Email format Select the email format (text or html) Time zone Time zone for the server location. Example: location in Germany Europe/Berlin Start page after login Here you select which view is active after login: Job - Job list 12 SWANenterprise / SWANcloud 6.0 Elements of the GUI 5.4.4 My profile - Delegation With the delegation function, you can grant other users in your company access to your jobs. You can assign time-limited rights to read, collect and receive a CC email upon receipt of a job. Information SWAN sends an email every six months to all users who have set up one or more delegates. The email contains all of the delegations of the relevant user and a direct link for the administration of these delegations. Open the Delegation menu. Click Please select . Select a user using User search. Click the desired user in the search results. Click Apply to delegate to this user. Edit the access settings and save the selection. If you do not enter anything in the field Valid until, access will be granted without a time limit. 5.4.5 My profile - System messages System messages shows a list of messages on e.g. system malfunctions and waiting times. User Manual V1.1_EN - July 1, 2015 13 Elements of the GUI 5.4.6 Previous user interface Information Only the new user interface is available for users without special rights. Users with special roles e.g. project supervisors and their representatives see the link Switch to old Gui and can use it to manage their projects in the old GUI using the Projects and Settings tabs. You can switch back using the Switch to new Gui link. 14 SWANenterprise / SWANcloud 6.0 Elements of the GUI 5.4.7 Version information Information on the installed SWAN version. 5.4.8 Support - Service Desk - Contact data Please contact our Service Desk if you need further support. Our expert team will provide advice from Monday until Friday between 7:00 AM and 05:00 PM. SSC-Services GmbH Herrenberger Str. 56 71034 Böblingen Phone: +49 (0) 70 31/4 91 31 00 Mail: [email protected] Internet: http://www.ssc-services.de User Manual V1.1_EN - July 1, 2015 15 Elements of the GUI 5.4.9 Logging off To finish your work with SWAN, you should not merely close the browser window. 16 Click Logout to end your SWAN session. SWANenterprise / SWANcloud 6.0 Elements of the GUI 5.5 Job form configuration Using the symbol, you can adapt the job form to your needs and show and hide additional input areas, e.g. to select processes for data preparation. In the minimum configuration, you can enter a recipient, add data to the job and send the job. You will only see the Sender field if you are a project member. Information The administrator can set which fields can be shown. The fields vary depending on the installed SWAN version. User Manual V1.1_EN - July 1, 2015 17 Elements of the GUI 5.6 Templates for recurring send jobs You can create templates for recurring send jobs, select these templates for new send jobs and e.g. identify a specific template as the default, which will always be used for a new send job. 5.6.1 Creating a new template Job view. Activate the Configure the job form to fit your needs. Fill in the fields. Click Templates Select a name for the template and click Save to confirm. 18 . SWANenterprise / SWANcloud 6.0 Elements of the GUI 5.6.2 Managing and using templates Activate the Click Templates Job view. . Here you can – Search for templates – Select templates for a new send job , . – Delete templates – Select template as the default template for future send jobs . » The template is identified by a coloured bar on the left edge. User Manual V1.1_EN - July 1, 2015 19 Job view - Job form 6 Job view - Job form You can make entries for sending your data in the job form in the Job view. To do this, configure the input fields to fit your needs (see chapter 5.5 Job form configuration). Select whether you are the sender or are sending data on behalf of a project. To quickly select a recipient, you can click one of the last recipients, search for and select a recipient in the address book, or use a job template in which the recipient is listed. You define the data recipients in the To: field. These persons will then receive the data. CC email recipients do not receive any data, they are only informed that the data has been sent in an email with a data delivery note. The individual fields in the job form are described in more detail in the following subchapters. Information The administrator can set which fields can be shown. The fields vary depending on the installed SWAN version. 20 SWANenterprise / SWANcloud 6.0 Job view - Job form 6.1 Sender You will only see the Sender field if you are a project member. If you are a member, you can select whether you want to send a job in your own name or if you are acting on behalf of the project. Click the triangle in the top right corner. » A list of possible senders will appear. Click your name or select the project on whose behalf you want to send the data. » The selected sender will appear in the sender field. » If the project supervisor has entered and activated a project ID, the project ID field will appear in the job form when a project is selected. User Manual V1.1_EN - July 1, 2015 21 Job view - Job form 6.2 Data recipient Data recipients receive the data and are informed via email (option) with PDF data delivery note (option) that the data is ready for download. Information email notifications Data recipients within your own company or users within the portal solution receive the data and are notified via an email that the data is ready for collection. Recipients who received the data via a dedicated data exchange system (ODETTE recipients) do not receive an email. There are several ways to select data recipients. Add further recipients if required. 6.2.1 Quick selection Quick selection by clicking the recipient field To: which opens a list of the last recipients used. SWAN saves the last 15 recipients. 22 Click the desired recipient. SWANenterprise / SWANcloud 6.0 Job view - Job form 6.2.2 Quick search Information You can search using the first name, last name, company, or user name (user ID) of the desired recipient. Please use the selection via the search window to search for a project name. Enter a search string in the recipient field To: (at least 3 letters) to open a hit list. Click the desired recipient. User Manual V1.1_EN - July 1, 2015 23 Job view - Job form 6.2.3 Entry in personal address book Information Every recipient to whom you have ever sent data is automatically added to your personal address book. You can add recipients to your personal address book Click or delete them from it. . » A list of entries in your address book will appear. Click the desired recipient. You can select several recipients at once by holding down the CTRL key. Click Select or in the Address book column. » The selected recipient will appear in the job form in the To: field. Click 6.2.4 to delete an entry from the address book. Selection via the search window You can use the search function in the address book and save the result in the address book. Click . » A list of entries in your address book will appear. » Entries already in the address book are identified in the Address book column with . You can define the directory in which you want to search for the recipient. 24 Select the desired option in the ▼ folder list (default: local server). SWANenterprise / SWANcloud 6.0 Job view - Job form You can use the search function and combine search criteria. Select the search criterion in▼ (name, company, location, department, etc.) and fill in the search field. To add additional filters, click the plus symbol. Click Search or confirm with [ENTER]. » A list with the search results appears. » Entries already in the address book are identified in the Address book column with . Select the required recipient. The selected recipient is highlighted with a coloured background. Click Select. » The selected recipient will appear in the job form in the To: field. Or: Click the Address book column. » The selected recipient is taken over in the address book and appears in the To: field of the job form. Add further recipients if required. » Press and hold the CTRL key to simultaneously select several recipients and take them over in the To: field or address book. User Manual V1.1_EN - July 1, 2015 25 Job view - Job form 6.2.5 26 Querying recipient details In the recipient field, click the name of the recipient to receive detailed information on the recipient. SWANenterprise / SWANcloud 6.0 Job view - Job form 6.3 CC email recipient CC email recipients do not receive any data, they are simply notified about the data transmission via an email with a data delivery note. You can: – Create and delete CC email addresses, – Search for saved CC email addresses, – Add a CC email address as a CC email recipient to the send job. It is possible to do a quick search by entering a search string in the CC email field, just as when selecting a data recipient. Proceed as described in chapter 5.3 Quick search. Information If you create CC email addresses yourself, you can edit the first name, last name, email and additional information. The information in the other columns is shown if the recipient is included in the database and cannot be edited. In the CC email line click . » The selection window for managing the CC email addresses pops up. » You can add new entries and edit existing entries. 6.4 Project ID If you send data on behalf of a project, the saved project name will automatically be entered here. You can also enter any text you like when sending an email, similar to the process for the subject line. User Manual V1.1_EN - July 1, 2015 27 Job view - Job form 6.5 Client (option) You can optionally enter a client when creating a job if you are sending data on behalf of another person. By default, the name of the user who is logged in is entered here. Search for your client via the linked address book (Who-is-who) . The search function is similar to that for your personal address book or the CC email address book. 28 SWANenterprise / SWANcloud 6.0 Job view - Job form 6.6 Process Information Depending on the processes supported in your SWAN version, you can choose various processing options for your data. 6.6.1 Send options - General Select the required process step. » The selection will be taken over. » You can then select further process steps. » However, the selection option is limited to the remaining possible options. User Manual V1.1_EN - July 1, 2015 29 Job view - Job form Information You can search for possible options using the search field with the magnifying glass. 6.6.2 Send option – Process step IPPro You can select the process step IPPro in order to reduce the design and production knowledge that makes its way directly into the CAD models when using CAD systems like CATIA or NX. Afterwards, you can then select the required reduction profile. Select the process step IPPro, the desired converting and required data compression method. The IPPro Profile Selection window pops up. Place a checkmark next to the required profile. 30 SWANenterprise / SWANcloud 6.0 Job view - Job form 6.7 Offline With SWAN, you have an option to exchange data via an encrypted data carrier (CD/DVD). This can become necessary if the recipient does not have his/her own OFTP system or if the data volume is too large for transmission via Odette/ISDN. An offline administrator can both generate media as well as read received media and forward the data to a recipient in SWAN. 6.7.1 Generating an offline job The selection of the recipient and files is performed in the same way as for a normal job. Select the data recipient and files that are to be sent. Select the required medium and the offline administrator. Click Send Job. » An ISO image file is created and sent to the offline administrator. » The offline administrator creates the medium. If the data is encrypted, the client for the offline job will receive an email with a password and the recipient of the medium will receive a so-called private key. These two components form the key required to read the data. User Manual V1.1_EN - July 1, 2015 31 Job view - Job form 6.7.2 Decrypting content at the recipient With the aid of a client that is stored on every medium in addition to the user data, the recipient has access to a user-friendly interface for decrypting and – if required – automatically unzipping the data. To do this, the user needs to be sent the corresponding password by the client. Then he/she can access the data for further processing. 6.7.3 Reading from a storage medium The offline administrator can read data from a data carrier into SWAN and send the data to a recipient. Here, an Odette job with all features is generated, which can be searched for in SWAN. 6.8 Send time You can select a send time here. By default, jobs are sent immediately. 6.9 Additional text You can enter additional information for the recipient of the data here. 32 SWANenterprise / SWANcloud 6.0 Job view - Job form 6.10 Add file from file system Click Add file . » The selection window File to upload will appear. Select: – An individual file by double clicking it or by clicking it and then on Open. » The file is added to the selection window. – Multiple files by clicking CTRL/SHIFT and clicking Open. » The files are added to the selection window. Add further files if required. With the aid of Remove at the end of the line, you can individually delete files from the job list. User Manual V1.1_EN - July 1, 2015 33 Job view - Job form 6.11 Add file via drag & drop You can also add files from an open Explorer window by pulling them into the selection window to the drag & drop area. Open Windows Explorer and navigate to the desired files. Pull the individual file or several selected files to the hatched drag & drop area. » The files are added to the selection window. Information When you click on the drag&drop area the select file for upload dialog is opened. You can select and add files as described in chapter 6.10. 34 SWANenterprise / SWANcloud 6.0 Job view - Job form 6.12 Send Information Data is uploaded and downloaded in SWAN with the function integrated in the browser. When you have added all files to the job and selected the required preparation options, you can finish off job creation. Click Send job . » The job is processed and the files are sent out. » The job list view then appears. » The progress bar at the top edge shows you the data transfer progress when uploading or downloading. » Information on the job and possible functions will appear on the right after you have selected the job by clicking it. » The selected job is highlighted in colour. Information When you show the column Download in the job list the icon shows you that a job sent by you has been downloaded by the recipient. Move the mouse over the icon and receive details on the download date. User Manual V1.1_EN - July 1, 2015 35 Job view - Job form 6.13 Discard - Reset job You can delete the entries in the job form and reset it to the default settings. Click Discard. » The entries in the input fields are deleted or reset to the default settings. 36 SWANenterprise / SWANcloud 6.0 Project function 7 Project function Project supervisors and their deputies will still have access to the Project and Settings tabs in the user interface for the previous version (Extras > Switch to old Gui menu) in order to manage their projects. Here you can see the projects you are a member of and, depending on your rights, manage projects or, for example, add project members. Project function info The Project tab is displayed only for persons who are responsible for a project and their deputies. The project function enables you to send out data on behalf of a project. The Sender field in the Job view is only shown if you are assigned to a project. You can see if you are a project member under Extras > My profile in the Permissions section. Corresponding rights are required for creating and managing projects, and these are assigned by the System Administrator. Information On the Settings tab in the old user interface, you can set up the presets for the default project and for displaying the project ID when sending out jobs. Enter the required presets here. When creating a new job, all users assigned to a project can enter as the sender a project sender and a project ID. If the job has been fully worked through after transmission, it is displayed in the outgoing list of all project members. User Manual V1.1_EN - July 1, 2015 37 Project function If files are sent to a project, the job appears for all project members in the incoming list. Projects are logically linked to servers. A user requires the business role project definition in order to create and manage projects. The system administrator assigns this role in the user admin area. Depending on your role in the project, you can do the following for projects in which you are a member: View, search for projects, edit projects, create new projects and assign users as project members to a project. There are the following roles within a project: The system administrator has unrestricted administration rights for all projects. He/she assigns the business role project definition to the person responsible for the project. The person who is responsible for the project has unrestricted administration rights for his/her project (mandatory, 1 person). The person who is responsible for the project cannot be deleted from the project. The project representative can accept members into the project or remove members from it (optional, multiple persons possible). A project member has no administration rights (optional, multiple persons possible). 7.1 Search project – Edit project Information If you do not enter any search criteria for your search, you will receive all existing entries as a result. You can use the following as search criteria: Project name A project has a name and its own address code. Member’s last name/ A project is assigned to at least one user member’s first name (the person responsible for the project). Activate the Project tab. Enter your search criteria and start the search by clicking Search or click My Projects. » The search results appear. 38 SWANenterprise / SWANcloud 6.0 Project function Select the required entry. In the Actions column, click next to the required entry. » The data appears on the Project data tab. » You can add or delete project members and change the role in the project. » A project logbook appears in an area on the right-hand side. Here, you can receive information about the project management. » In the Actions area on the left-hand side, you can select from the actions available at this level. Edit the entries and click Save. User Manual V1.1_EN - July 1, 2015 39 Project function 7.2 Creating a project A user requires the business role project definition in order to create and manage projects. This business role is assigned by the System Administration. When creating a new project, you need to enter a project name and a cost centre. The name of the project can be freely chosen. Since a project name is visible to all SWAN users, you must make sure that the project name is not subject to a requirement for secrecy. In addition, you must assign a responsible person to the project from the SWAN partner data and allocate the role of responsible person to him/her. Activate the Project tab. In the Actions area, click Create Project. » An empty input window pops up on the Project Data tab. Edit the entries and click Save. Add a user and assign the role of responsible person to him/her. 40 Click Add Member to select further project members and assign the role of Deputy or Member to them. Click Save. SWANenterprise / SWANcloud 6.0 Project function User Manual V1.1_EN - July 1, 2015 41 Job list view 8 Job list view You can manage your incoming and outgoing jobs in the Job list view. Information The number of jobs shown on the screen is adapted to the size of the screen. You can navigate through the list using the navigation arrows at the bottom edge of the list. Activate the Job list tab. » A job overview will appear. 1 Search for jobs 2 View (filtered) job list 3 Export selected columns from the job list to Excel file 4 Create, manage, and use search templates 5 Information on the job and possible functions (job selected by clicking it) You can influence the job list view with the icon in the right top corner of the list (section 2). 42 SWANenterprise / SWANcloud 6.0 Job list view 8.1 Configuring columns in the job list Information Depending on the column type, you can sort the list by clicking the column header. The horizontal arrangement of the columns can be moved around with the mouse. You can define which columns in the job list should be shown or hidden. Activate the Job list view. Click the icon in the top right corner of the list. Activate the appropriate checkboxes. » The selection will be saved. User Manual V1.1_EN - July 1, 2015 43 Job list view 8.2 Searching through the job list You can search through the job list using various criteria and create a search template that can be selected in the future or used as the default for searches. You can select various search criteria in the selection list (1): – Job number – Job list type (outgoing, incoming, offline) – Sender – – – – – – – – 44 (first name, surname, user name, project name, department, site and company of the sender) Recipient (first name, surname, user name, project name, department, site and company of the recipient) Job time period Status Job type (SWAN, Smaragd, …) Project ID Additional text Files (file name) Archiving status SWANenterprise / SWANcloud 6.0 Job list view Activate the Job list view Select the search criterion (1), e.g. Job list type and select the option in the drop-down menu or enter e.g. the search string in the search field under Sender (2). » The search criterion with the entered value will be added to the search (4) and removed from the selection list. Click PLUS (3), to add an additional search criterion to your search. Proceed accordingly until you have selected all of the desired search criteria. Click X to delete the entered search string (to do this, the cursor must be in the entry field) or on the search criterion to remove it from the search. Click Search/Refresh. » The search will be done. » An appropriately filtered job list will appear. User Manual V1.1_EN - July 1, 2015 45 Job list view 8.3 Using search templates 8.3.1 Creating a search template Information You can identify an active search template by the coloured bar at the left edge of the template name. The system default template that is always available shows you all of the jobs from the last two weeks. You can save search criteria in a search template for use in future searches and use the template by default for future searches. Perform the search with the desired search criteria. To save the search criteria, click Templates. » The selection window Search templates appears. » Search templates that have already been saved are displayed. Details on the available search templates can be found by clicking the magnifying glass Select a suitable name for the search template. Click . , if you would like to use the template as the default for future searches. » The default search template is identified by a coloured bar on the left edge. 46 Click Save. SWANenterprise / SWANcloud 6.0 Job list view 8.3.2 Managing search templates You can select saved search templates from the list and make them the default search template or delete search templates by clicking the appropriate icon. Click Templates to manage the saved search templates. » The selection window Search templates appears. » Search templates that have already been saved are displayed. » The default search template is identified by a coloured bar on the left edge. Click the magnifying glass 8.3.3 to receive information on a search template. Using a search template for a search Saved search templates can be selected and used for a search. Click Templates to select a saved search template. » The selection window Search templates appears. » Search templates that have already been saved are displayed. » The default search template is identified by a coloured bar on the left edge. Click the magnifying glass Click to receive information on a search template. if you want to use the template for your search. » The search will be done. » An job list filtered according to the template will appear. » The filter criteria are shown and you can add or delete further search criteria to filter the list even further. User Manual V1.1_EN - July 1, 2015 47 Job list view 8.3.4 Discarding search templates You can delete the entered search criteria and reset the search to the default search template. Click Discard. » The entered search criteria will be deleted. » The search will be done using the search template identified as the default (indicated by a coloured bar). » The filter criteria are shown and you can select or deselect further search criteria to filter the list even further. 48 SWANenterprise / SWANcloud 6.0 Job list view 8.4 Retrieving functions and information about the jobs Information The job list is only for viewing purposes. Information on a job can only be viewed and possible functions only selected once you have selected the job. Functions and information are shown on the right side of the Job list view only for the job shown in colour. User Manual V1.1_EN - July 1, 2015 49 Job list view Click in the line of the desired job. » The selected job is shown in colour in the job list. » Possible functions and information on the job then appear on the right side. Adjust the order of the view to fit your needs by moving the three dots section designation up or down. 8.4.1 Functions 8.4.2 Content to the left of the Show the content of a tar container by clicking on ▸. » A list of the files included in the tar container is displayed with file type and size. Close the list by clicking on ▼. Information Files with a hook in front of the filename are selected for download. Remove the hook if you do not want to download a specific file. 50 SWANenterprise / SWANcloud 6.0 Job list view 8.4.3 History 8.4.4 Contact data 8.4.5 Additional Information User Manual V1.1_EN - July 1, 2015 51 Job list view 8.5 Recognizing the job status The status of your job is indicated in the status column by a coloured bar and a status word. Additional information on the job will appear on the right side after you have selected the job by clicking in the line and it is shown in colour. 8.6 Exporting the job list You can export the job list into an Excel file. Click Export. » The selection window for exporting to an Excel file appears. Select the number of jobs and add the columns desired for the export to the selection list. Click Export. » An Excel file will be generated with the selected columns. 52 SWANenterprise / SWANcloud 6.0 Job list view 8.7 Downloading a job Information Uploading and downloading files is done via a function integrated in the browser. When downloading, the files are downloaded to the download directory set in the browser and saved there. Adjust the download directory in your browser, if needed. Make sure that sufficient storage space is available. Data recipients are informed of incoming data via an email with a data delivery note and can access the received data after they select the job in the job list. Job list view. Activate the Use the suitable search window to filter extensive job lists by certain criteria. – Quick search, e.g. if you know the job number, ▸ chapter 5.3 – Search with a combination of search criteria, ▸ chapter 8.2 – Search templates, ▸ chapter 8.3 Select the desired job from the job list. If the job contains several files, you can select specific files in the content area. Remove the hook in front of the filename if you do not want to download a specific file. In the Functions section, click Download. » The original file will be individually collected from the browser in the set download directory and saved there. » Several/many files will be packed in a zip container and then collected and transferred to the set download directory as 1 package and saved there. Information You can download the content of several jobs at once. Select the desired jobs in the job list. Select the files for download in the content area (default: all selected). User Manual V1.1_EN - July 1, 2015 53