1
TEXnicle:
A User’s Manual
Martin Hewitson
Brian Cansler
Issue 1, Revision 1
Last revised March 17, 2013
Contents
1 Introducing TEXnicle
1.1 In This Manual . . . . . . . . . . . . . . . . . . . . . . . . . . . . . . . . . .
1.2 Development . . . . . . . . . . . . . . . . . . . . . . . . . . . . . . . . . . .
3
3
3
2 Installation, Setup, and Requirements
4
3 User Guide
3.1 Welcome Screen . . . . . . . . .
3.2 Quick Start . . . . . . . . . . .
3.2.1 The Toolbar . . . . . . .
3.2.2 Main Editing Window .
3.2.3 Navigators Pane . . . . .
3.2.4 Integrated PDF Viewer .
3.2.5 Console . . . . . . . . .
3.2.6 Creating a New File . .
3.2.7 Creating a New Project
.
.
.
.
.
.
.
.
.
.
.
.
.
.
.
.
.
.
.
.
.
.
.
.
.
.
.
.
.
.
.
.
.
.
.
.
.
.
.
.
.
.
.
.
.
.
.
.
.
.
.
.
.
.
.
.
.
.
.
.
.
.
.
.
.
.
.
.
.
.
.
.
.
.
.
.
.
.
.
.
.
.
.
.
.
.
.
.
.
.
.
.
.
.
.
.
.
.
.
.
.
.
.
.
.
.
.
.
.
.
.
.
.
.
.
.
.
.
.
.
.
.
.
.
.
.
.
.
.
.
.
.
.
.
.
.
.
.
.
.
.
.
.
.
.
.
.
.
.
.
.
.
.
.
.
.
.
.
.
.
.
.
.
.
.
.
.
.
.
.
.
.
.
.
.
.
.
.
.
.
.
.
.
.
.
.
.
.
.
.
.
.
.
.
.
.
.
.
.
.
.
.
.
.
.
.
.
.
.
.
.
.
.
.
.
.
.
.
.
.
.
.
.
.
.
5
5
6
6
7
8
13
14
14
14
4 Reference
4.1 Preferences . . . . . . . . .
4.1.1 General . . . . . . .
4.1.2 Typesetting . . . . .
4.1.3 Fonts & Colors . . .
4.1.4 Templates . . . . . .
4.1.5 Commands . . . . .
4.1.6 Palette & Library . .
4.1.7 File Types . . . . . .
4.2 Engines . . . . . . . . . . .
4.3 Spell Check . . . . . . . . .
4.4 Creating Project Templates
4.5 Project Management . . . .
4.6 Clippings Library . . . . . .
4.7 Jump Bar . . . . . . . . . .
.
.
.
.
.
.
.
.
.
.
.
.
.
.
.
.
.
.
.
.
.
.
.
.
.
.
.
.
.
.
.
.
.
.
.
.
.
.
.
.
.
.
.
.
.
.
.
.
.
.
.
.
.
.
.
.
.
.
.
.
.
.
.
.
.
.
.
.
.
.
.
.
.
.
.
.
.
.
.
.
.
.
.
.
.
.
.
.
.
.
.
.
.
.
.
.
.
.
.
.
.
.
.
.
.
.
.
.
.
.
.
.
.
.
.
.
.
.
.
.
.
.
.
.
.
.
.
.
.
.
.
.
.
.
.
.
.
.
.
.
.
.
.
.
.
.
.
.
.
.
.
.
.
.
.
.
.
.
.
.
.
.
.
.
.
.
.
.
.
.
.
.
.
.
.
.
.
.
.
.
.
.
.
.
.
.
.
.
.
.
.
.
.
.
.
.
.
.
.
.
.
.
.
.
.
.
.
.
.
.
.
.
.
.
.
.
.
.
.
.
.
.
.
.
.
.
.
.
.
.
.
.
.
.
.
.
.
.
.
.
.
.
.
.
.
.
.
.
.
.
.
.
.
.
.
.
.
.
.
.
.
.
.
.
.
.
.
.
.
.
.
.
.
.
.
.
.
.
.
.
.
.
.
.
.
.
.
.
.
.
.
.
.
.
.
.
.
.
.
.
.
.
.
.
.
.
.
.
.
.
.
.
.
.
.
.
.
.
.
.
.
.
.
.
.
.
.
.
.
.
.
.
.
.
.
.
.
.
.
.
.
.
.
.
.
.
.
.
.
.
16
16
16
17
17
18
18
19
19
19
19
20
20
21
23
.
.
.
.
.
.
.
.
.
.
.
.
.
.
.
.
.
.
.
.
.
.
.
.
.
.
.
.
1
TEXnicle: A User’s Manual
4.8
4.9
Bookmarks and Code Folding . . .
The Edit Menu . . . . . . . . . . .
4.9.1 Paste as Image . . . . . . .
4.9.2 Paste as Table . . . . . . . .
4.9.3 Other Edit Menu Functions
4.10 The Editor Menu . . . . . . . . . .
CONTENTS: CONTENTS
.
.
.
.
.
.
A Keyboard Shortucts
.
.
.
.
.
.
.
.
.
.
.
.
.
.
.
.
.
.
.
.
.
.
.
.
.
.
.
.
.
.
.
.
.
.
.
.
.
.
.
.
.
.
.
.
.
.
.
.
.
.
.
.
.
.
.
.
.
.
.
.
.
.
.
.
.
.
.
.
.
.
.
.
.
.
.
.
.
.
.
.
.
.
.
.
.
.
.
.
.
.
.
.
.
.
.
.
.
.
.
.
.
.
.
.
.
.
.
.
.
.
.
.
.
.
.
.
.
.
.
.
.
.
.
.
.
.
.
.
.
.
.
.
24
25
25
26
26
26
28
2
Chapter 1
Introducing TEXnicle
TEXnicle is an editor and project manager for producing documents using LATEX and similar
typesetting languages. TEXnicle has been under development since 2010 and is intended
to provide a fast, feature-rich environment for writing LATEX documents under Mac OS X.
Employing all the features of modern Mac OS X applications, TEXnicle fits right at home
on a Mac.
One of the main design drivers for TEXnicle was to produce an editing environment similar
to Xcode, the development environment Apple provides for building applications on Mac OS
X.
1.1
In This Manual
This manual is split into four chapters. The first two are just to get us started: This introduction, and a discussion of installation and requirements in Chapter 2. Chapter 3 is a User
Guide that covers typical usage scenarios and introduces the basic concepts used throughout
TEXnicle. Chapter 4 is an in-depth reference guide to TEXnicle s features.
1.2
Development
The developer, Martin Hewitson, is a British physicist who works on TeXnicle in his spare
time. For more information, please visit his website. To report bugs or request new features,
please send him an email.
The primary author of this manual is Brian L. Cansler: linguist by day, avid TEXnicle user
by night. For more information, please visit his website. To report inaccuracies or suggest
changes, please send him an email.
3
Chapter 2
Installation, Setup, and Requirements
TEXnicle is designed to run on 64-bit machines1 running Mac OS X 10.6.8 (Snow Leopard),
10.7 (Lion), or 10.8 (Mountain Lion). There are currently no plans to support previous versions of Mac OS X or to support Windows operating systems. TEXnicle is a free application
and will remain so.
TEXnicle expects you to have an installed LATEX typesetting system on your machine. By
default, TEXnicle is set up to work with installations of MacTeX located on the hard drive
of your computer. If you have an alternative LATEX installation, you may need to set up some
new paths. In particular, you may need to copy and edit one or more of the built-in engines
that TEXnicle uses to typeset documents; this is described in section 4.2.
Note: Computers that run LATEX from a central source on a network like those found in many
academic institutions may also require tweaking of certain paths. As each network is set up
differently, please contact your network administrator for instructions on how to do this.
In addition to the engines described above, TEXnicle uses some commands for typesetting
code snippet previews. These are set under Preferences Palette & Library and are discussed
further in section 4.1.6.
1
32-bit machines are no longer supported by TEXnicle. Beta versions of TEXnicle that did support
older machines can be downloaded here.
4
Chapter 3
User Guide
This chapter focuses on how to use TEXnicle for common tasks. It will start with the basics
and move through the most important features. A more comprehensive description of all the
bells and whistles can be found in chapter 4.
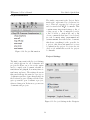
3.1
Welcome Screen
The welcome screen is shown in Figure 3.1.
Figure 3.1: TEXnicle’s welcome screen
5
TEXnicle: A User’s Manual
User Guide: Quick Start
When opening TEXnicle for the first time, or when opening the application without loading
an existing document, the welcome screen will be displayed. It has four major components:
1. Recent Files on the left displays a list of the files most recently opened with TEXnicle.
These files can be opened by selecting the file and clicking Open at the bottom or by
double-clicking the file name.
2. New Project. . . on the right will open a panel to walk the user through creating a
new project. This is described in section 3.2.7.
3. Open Existing. . . will open the familiar Mac OS X dialogue box that will allow you
to search your system for a file you wish to open.
4. New LATEX File will create a new TEX document. A menu will appear with template
options, or you may opt to open a blank document. See section 3.2.6.
3.2
Quick Start
Figure 3.2: A new window in TEXnicle
The TEXnicle window is divided into five major panes, which are described below. The
Navigators pane, the Integrated PDF Viewer, and the Console may all be hidden and shown
from the View menu ( Window menu for the Console) at the top of the screen.
3.2.1
The Toolbar
Figure 3.3 shows the standard toolbar in TEXnicle.
The toolbar includes quick access to functions that will allow you to typeset your project
and open them using the built-in PDF viewer. In the center, it has a console window with
status updates on the compilation of your document or project. Auxiliary files are trashed
6
TEXnicle: A User’s Manual
User Guide: Quick Start
Figure 3.3: TEXnicle’s toolbar
with the button on the right.1 If the current document is not included in a project, there
will also be a button in the toolbar to add that file to an existing project.
+ R ) will run your chosen engine on the selected document
The Typeset button (or
or project. This will update the Integrated PDF Viewer and (as expected) overwrite any
auxiliary and output files in the project folder. The Build & View button will typeset your
project using the chosen engine and then open the external PDF viewer. View will simply
open the external PDF viewer without typesetting.
3.2.2
Main Editing Window
The second part is the main editing window, located in the center. Fonts, colours, syntax
highlighting, line break length, and much more can be changed under Preferences. . . General
and Preferences. . . Font & Colors . This is where you will write your document. In project
windows, there is a bar of tabs above the main text window which shows all open documents
in the project. Below the tab bar (if applicable) is a Jump to section. . . bar, which will allow
you to jump to any section or bookmark in the open document quickly. This is called the
Jump Bar and its features are detailed in section 4.7. To the left of this bar is the syntax
indicator; green indicates that there are no syntax errors in the open document, while red
indicates there is at least one error. Clicking the indicator will display the line numbers,
descriptions, and samples of the offenses. To edit what offenses the chktex engine looks for,
look under Preferences. . . Typesetting Syntax Checking .
Synctex support
If you are typesetting with an engine which supports synctex (many of the built-in engines
do), then you can jump from the location in the text editor to the location in the PDF viewer
+ left mouse click in the editor. Similarly, you can jump from the current PDF
by doing
+ left mouse click in the PDF viewer.
location to the position in the editor by doing
7
TEXnicle: A User’s Manual
User Guide: Quick Start
Figure 3.4: Icons in the Navigators pane (projects on the left, stand-alone LATEX documents
on the right)
3.2.3
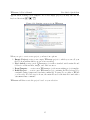
Navigators Pane
To the left of the window is the Navigators pane, which includes seven subcomponents (five
in non-project windows). These are shown in Figure 3.4.
Project Tree
The first icon, a folder, is the Project Tree. It
shows the tree view of your project, and so it
does not appear in non-project windows. All
of the project’s components (files, pictures,
bibliographies, folder organization, etc.) are
listed here. The main file of the project is
in bold, and it is this file that will be compiled when compiling your project. Component files are listed in unbolded black, and
files with unsaved changes are greyed out.
Group folders (groupings of files that appear
in TEXnicle but not on the disc) are grey,
as in Figure 3.5; disc folders (folders that do
exist on the disc) are in blue. Folders may
be collapsed and expanded as needed. To
move items into, out of, and between fold-click any file
ers, simply drag and drop.
to set it as the main file,2 remove it from the
project, rename it, or reveal it in the finder.
Figure 3.5: The Project Tree in the Navigator
-click a folder for the same options and a
few others, like adding existing files. Use the
+
+ 1 to access the Project Tree quickly.
shortcut
Symbol Palette
1
Setting defaults for files that should be trashed is done through Preferences. . . Typesetting Trash .
Note that a project may only have one main file at a time, so setting a new main file will set it as the
only main file.
2
8
TEXnicle: A User’s Manual
User Guide: Quick Start
The second icon is a delta symbol (∆), which
opens the Symbol Palette. The category of
symbols shown may be changed using the
drop-down menu at the top, and the symbol may be dragged into the open document,
double-clicked, or inserted using Insert at the
bottom. Categories include common foreign
symbols, accents, greek letters, arrows, and a
number of various mathematical subgroups.
The slider at the bottom changes the size
of the symbols. The Symbol Palette can be
+
+ 2 .
opened quickly using
Figure 3.6: TEXnicle’s Symbol Palette
9
TEXnicle: A User’s Manual
User Guide: Quick Start
Clippings Library
The third component of the Navigators pane is the Clippings Library (two superimposed rectangles), which includes code fragments that you can insert into your document just like symbols from the Symbol Palette. New
clippings and categories of snippets may be added from
this pane, as well.
The top section of the Clippings Library lists categories
of clippings. TEXnicle comes pre-installed with a number of useful categories, like sectioning commands, math
clips, formatting codes, and lists.
Below the categories panel is the clipping panel. Here,
TEXnicle will list the code clippings for a selected category (on the right) and render previews of the output
(on the left). To refresh a preview, click the round arrow.
The bottom panel allows you to edit codes, copy the
text of a clipping to the pasteboard, and insert clippings
into your document. You may also set shortcuts here.
To use a shortcut, type a # before the shortcut code in
the main editor window; the code will turn yellow and
expand by pressing
For more information on the Clippings Library, see 4.6.
To open this Navigator pane quickly, use the keyboard
+
+ 3 .
shortcut
Figure 3.7: The Clippings Library
10
TEXnicle: A User’s Manual
User Guide: Quick Start
Document Outline
The fourth component is the Document
Outline, which shows the outline of your
project or document based on sectioning
commands (Part, Chapter, Section, Paragraph, and so on). This pane makes it easy
to jump between sections of your entire document similarly to the Jump to section. . . bar
at the top of the main editing window. The
depth of the may be controlled using the
slider at the bottom. Colours used in the
outline may be edited under Preferences. . .
Font & Colors Outline Colors . To access the
Navigator’s Document Outline quickly, press
+
+ 4 .
Figure 3.8: The Navigator’s Document Outline
Project Search
The fifth component only appears in the
Navigators pane for projects and not
for stand-alone LATEX documents: Project
Search. This will allow you to search all files
in a project for a word or phrase. Options to
conduct case-sensitive searches and to search
only for whole words are available. To open
+
+ 5 .
Project Search quickly, press
Figure 3.9: Project Search in the Navigator
11
TEXnicle: A User’s Manual
User Guide: Quick Start
Project Information
The sixth component is the Project Information tab, represented by a lowercase letter i. This tab appears for both projects
and for stand-alone LATEX documents. This
contains many important features: a list of
coding errors, a list of misspelled words,
a list of labels, a citation list, and a list
of new commands that have been declared
in each document using \newcommand and
\renewcommand. In a stand-alone document,
this shows everything for the open file; for
a project, this shows information for every
document in the project. Projects also include a tab within this section for project
bookmarks
Figure 3.10: Project Information
Project Settings
The final component is the Project Settings
tab, which appears for all documents and
projects. It allows you to choose the engine
used to compile your document, whether to
run bibtex and ps2pdf, how many times to
run latex, and more. The settings chosen in
this panel will stay the same for a project or
document regardless of any changes made in
the Preferences pane. Changes in the Navigator govern the open document or project,
whereas changes in Preferences govern new
documents and projects.
Figure 3.11: Project Settings in the Navigator
12
TEXnicle: A User’s Manual
3.2.4
User Guide: Quick Start
Integrated PDF Viewer
The fourth important part of the
TeXnicle window is on the right: the Integrated PDF Viewer. This pane shows
a live update of the document (compiled
at an interval that can be set under
Preferences. . . Typesetting ) of your document. Live updating can be turned on
and off by toggling the Live Update button at the bottom of the viewer. To
update the viewer manually, click the
Typeset button on the toolbar or use the
+ R . To typeset and view
shortcut
in the stand-alone PDF viewer, press
+
+ R . The stand-alone viewer
has all of the same functions as the Integrated PDF Viewer with the sole exception of live updating: a page count
of the PDF output, a search function,
zoom capability, and an option to print
your document.
Figure 3.12: The Integrated PDF Viewer
13
TEXnicle: A User’s Manual
3.2.5
User Guide: Quick Start
Console
Figure 3.13: The Console in TEXnicle
The final pane is the Console pane, which appears at the bottom of the screen. When
typesetting your document, this pane will show the output of the compilation commands.
You can choose whether to show all messages from the console, errors only, or TEXnicle
messages only. Just as the Integrated PDF Viewer has a stand-alone version, you can set the
Console to appear in a separate window upon typesetting under the Project Settings tab of
the Navigator.
3.2.6
Creating a New LATEX File
Whether a new TEX file is created from the welcome screen, from File New Standalone LATEX File ,
+ N , a new window will appear with a template selection dialogue box.
or by pressing
Select one of the pre-existing templates from the list shown; if you choose, you may also edit
the code before opening the document using the preview window below the list. Alternatively, you may create a new template by clicking the + icon below the list (similarly, the
− icon deletes templates). The templates included are:
•
•
•
•
•
•
•
Empty: contains no code. It’s a blank slate.
Section: a document for a new section.
Custom: a blank template in which you may create a custom template.
Article: creates a document with a useful preamble for the Article class.
Book: creates a document formatted for the Book class.
Report: creates a new document in the Report class.
Beamer: creates a new Beamer presentation.
Once you have chosen a template, enter a name for the new document and click Select .
3.2.7
Creating a New TEXnicle Project
While TEXnicle can of course work with simple LATEX documents, its true power is in its
Project capabilities. A project creates a work environment with all of the files you need in
one place, displaying them in an integrated tree view. Figure 3.2.7 shows the window that
14
TEXnicle: A User’s Manual
User Guide: Quick Start
appears when creating a new template. For a new empty project, you may also use the
+
+ N .
keyboard shortcut
Figure 3.14: Starting a new projct in TEXnicle
When you opt to create a new project, you have four options:
1. Empty Project creates a new empty TEXnicle project to which you can add your
files (or from within which you can create new files).
2. New Article creates a new TEXnicle project with a standard article main file and
folders for additional files, images, and other resources.
3. From Tempate. . . creates a new TEXnicle project from an existing project template.
4. Build Project. . . creates a new TEXnicle project containing the files referenced by
a main file (using \input and \include commands). You may choose either a TEX file
or a directory. If a directory is chosen, the main file used is the first file found with a
\documentclass command.
TEXnicle will then create the project based on your selection.
15
Chapter 4
Reference
This chapter will take an in-depth look at most of the bells and whistles of TEXnicle.
4.1
Preferences
Access the preference pane just like in any other Mac application: TeXnicle Preferences. . . (or,
+ , will open the window). There are seven preference
if you prefer keyboard shortcuts,
categories: General, Typesetting, Fonts & Colors, Templates, Commands, Palette & Library,
and File Types.
4.1.1
General
Several important features are included under the General pane. You can set the number of
characters per line, at which point the line will wrap. Alternatively, you can turn wrapping
off. When pressing the Tab key, a tab is inserted into the document; this behaviour can be
changed from the General tab to insert any number of spaces instead.
TEXnicle can insert closing braces automatically when an opening brace is typed, if you
so choose. You can also opt to skip closing braces, which means that when the cursor is
set immediately before a closing brace and then the } key is pressed, the editor will simply
skip that brace rather than inserting a new one. You may also choose for TEXnicle to
+ ’ ) with two inverted apostrophes
automatically replace opening quotation marks (
( ‘ ). Line numbering and code folding (for \begin and \end environments) can be turned
on and off here. Line highlighting and the highlighting of matching words can also be edited.
TEXnicle is happy to save a project automatically when compiling the document, but if you
want to turn off this feature, it is located under the General tab. You can also toggle whether
16
TEXnicle: A User’s Manual
Reference: Preferences
TEXnicle restores project tabs when opening a project. Finally, the default file encoding
can be set to any one of a number of encoding options. The default is Unicode (UTF-8).
4.1.2
Typesetting
The second tab in the Preferences window is the Typesetting pane. This concerns the nuts
and bolts of TEXnicle with features like typesetting (obviously), syntax checking, engines,
and the discard of auxiliary files.
Typesetting options include the ability to clear the consoles upon typesetting a document,
the number of seconds between Live Updates, and a few other tweaks for the typesetting
process. Aside from clearing the console and the amount of time between Live Updates,
changes made under the Typesetting subcategory of this preference pane affect the default
values of new projects rather than the existing project. This means that changing the default
typesetting engine, for example, under this preference pane will not affect the engine used
for any existing projects; that option is changed in the Project Settings tab of the Navigator
on a by-project basis.
There are many options for syntax checking are possible. These are done with the chtex
binary from your LATEX installation. The path for this may need to be re-configured if you
do not have a stock installation of MacTeX on your machine. Syntax checking can be turned
on and off from this tab under the Typesetting preference pane.
Typesetting engines are edited and created under the Engines tab of the Typesetting pane.
Everything that has to do with engines is discussed in section 4.2.
The Trash tab in the Typesetting pane allows you to define which file types (aux, log, bbl,
out, dvi, ilg, ps, and so on) are deleted when using the Trash Aux Files feature.
4.1.3
Fonts & Colors
This section allows you to change the colours used to highlight LATEX syntax, the colours
used in the editor window, and the fonts used in the editor window and the console. Three
levels of differentiation in comments (using the % symbol) and three levels of markup text
(that should be edited later, marked with < and >) are possible.
Note: There is an option to colour multi-line arguments under this tab. While this function
may be desirable, please note that it is very taxing for TEXnicle and may slow down your
system.
17
TEXnicle: A User’s Manual
4.1.4
Reference: Preferences
Templates
The Templates preference pane allows you to create, edit, and delete two kinds of templates:
file templates and project templates. File templates are templates that can be used to start
new LATEX documents. TEXnicle comes with many default templates installed, but you may
also edit these as well as define your own. Project templates create new projects based on
a template. TEXnicle comes with one project template preinstalled: the article template.
After naming your template, this opens a new project window with a file based on the Article
Include for files you will include in your document
file template and creates two folders:
through the main file, and Images for image files you will insert into the document. These
can be edited at will. You may also define new project templates or create new templates
from existing projects.
4.1.5
Commands
The Commands pane is home to many of the powerful and most convenient features TEXnicle
has to offer. The categories within this pane will be discussed in detail.
The first tab is the Commands tab, which controls command completion. When you begin
typing a command, TEXnicle can be set to bring up a list of default commands that match
what you have typed. This function can be turned on or off from within this pane. When
the function is turned off, it will not automatically show the completion list; however, the
. The
completion list may still be viewed by clicking Edit Smart Complete or by pressing
Commands tab is also where you can define custom commands that will appear in this menu.
The second tab controls citation completion. When any citation command (either a default
command like \cite, \citet, etc. or a custom command like \cites) is typed, TEXnicle
will show a list of possible citations that match the key you have typed between the braces
based on the bibliography files referenced in your document. As with command completion,
this function can be turned on and off at will.
The third tab, References, does the same thing for \label and \ref commands. When typing
\ref (or a similar referencing command defined by the user and added to this list), a list
of labels within the document or project matching what you have typed will be displayed.
This can be turned off.
The File tab does the same thing for \input and \include commands, which can be turned
off. The .tex file extension is left off, as expected.
Finally, the Begin tab controls an autocomplete list for \begin{environment} commands.
Default environments are included, but you may add to or delete from this list as you wish.
You can also ask TEXnicle to auto-insert an \end{environment} command when you input
a carriage return after beginning an environment.
18
TEXnicle: A User’s Manual
4.1.6
Reference: Engines
Palette & Library
This section controls the paths to scripts use for creating preview images for the palette and
library code clippings. Default paths are set up based on a standard MacTeX installation,
but these may need to be rewritten if your system has a different installation.
4.1.7
File Types
This preference pane includes a list of files that TEXnicle will recognize as TEX files. You can
toggle which documents have syntax highlighting enabled and which files are spell-checked
(for more on spell-checking, see section 4.3). By default, the following file types are included:
tex, bib, sty, cls, bst.
4.2
Engines
TEXnicle has configurable engines. If you don’t need any specialized compiling capabilities,
you can simply use the engines supplied by TEXnicle by default. If you need more individualized engines, however, you can create your own. TEXnicle engines are simple scripts
which reside in Library Application Support TeXnicle engines.
A number of variables are passed to these script files from TEXnicle. If you create a new
engine, the template is preconfigured with the necessary variable set. To start making a new
template, click New under Preferences. . . Typesetting Engines .
Note: You can only edit engines that you have created yourself. Every time TEXnicle opens,
it rewrites the default engine files to their former, unchanged version.
To customize a built-in engine, use the Duplicate button under Preferences. . .
Engines . You can then edit the engine script and save it as a new engine.
Typesetting
Under Preferences. . . Typesetting , you can set the default engine that is used for new projects
and documents. You can also specify default values to some of the configuration variables
that are passed on to the engines. Not all engines support all configuration variables.
4.3
Spell Check
Spell-checking is a key feature of TEXnicle. Using http://cocoaspell.leuski.net/, a Mac OS
X implementation of Aspell, TEXnicle can check the spelling of TEX documents while
ignoring LATEX commands and their arguments. We suggest that you download and install
cocoAspell from the developer, turn on TEX/LATEX awareness for your chosen dictionaries,
19
TEXnicle: A User’s Manual
Reference: Creating Project Templates
and tell TEXnicle to use your chosen cocoAspell dictionary when checking your project.
This setting is found under the Project Settings tab in the Navigator pane. Spelling checks
are conducted every five seconds (in documents that have undergone changes since the last
check), and the results are populated under the Spelling tab of the Index part of the Navigator
pane.
Only files marked to check spelling under Preferences. . .
4.4
File Types
will be checked.
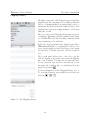
Creating a New TEXnicle Project Template
After you’ve laboured for weeks or months setting up your project so that it has everything
you need to work from entirely within TEXnicle, you may decide to save a version of your
project as a project template so you can base other projects on it in the future without
reinventing the wheel. This is done by clicking Project New Project Template. . . from within
the project you want to use as a basis for your template. The window in Figure 4.1 will
appear.
Figure 4.1: Creating a Project Template
From this window you can name the template, provide a description, and select which files
in the existing project are ported to the new template.
4.5
Project Management
To create a new folder in your project, click the folder icon in the bottom left corner of the
Navigators pane or click Project New Folder . You will be given the option to create a Group
20
TEXnicle: A User’s Manual
Reference: Clippings Library
Folder, which will appear in grey and exist only within the TeXnicle project space, or a
Folder on Disk, which will appear in blue and exist on your hard drive. Similarly, you can
add a new TEX document by clicking the document icon at the bottom of the Navigators
pane or by clicking Project New LATEX File . The Template Selection window will appear.
Note: Project New File will create a new file, but you must specify its extension. This function
will not create a TEX file unless you add the extension manually.
will allow you to search your computer for an existing file to add to your
project. You will be given the option to copy the file to the project folder or simply to
+
+
+ A will allow you to add an existing folder.
reference it from afar. Similarly,
These functions are also available in the Project menu or by clicking the gear in the bottom
right corner of the Navigators pane.
+
+ A
Changing the main document of your project can be done through the Project menu or by
-clicking the document in the Project Tree that you want to set. -clicking a file in the
Project Tree view will also allow you to rename, remove, or reveal the file.
4.6
The Clippings Library
The clippings library is one of TEXnicle’s most economical features. Becoming familiar with
clippings and customizing your library is a great way to save time and effort while preparing
your document. Recall the Clippings Library window in the Navigators pane:
To add a category of clippings, click the + button under “Categories.” (For example, the
category “Examples” in Figure 4.2 was a custom addition.) To add a clipping to an existing
category, click the + button under the list of clippings. To edit a clipping, double-click the
code.
Adding clippings is as easy as writing the code and then pasting it into a new clipping. After
clicking the + button, two options are given: “New clip” and “New from pasteboard.” The
former will open a new clipping in the list; double-click to edit. The latter will automatically
create a clipping based on copied text.
Once your clip has been created, it’s a good idea to set a command for the clip for easy
access. This is done in the third panel of the clipping library. To use a clipping by invoking
the command, type #(command-shortcut) into the editor window. For example, to insert a
table into your document quickly and easily, type #tbl in the editor window where you want
a new table to appear. If the shortcut command is valid, it will be highlighted in yellow as
in Figure 4.3.
Note: When you create your own commands, the # symbol should be excluded from the
“Command” input field. For example, to create a shortcut that will work by typing #shortcut,
you should input only “shortcut” in the “Command” field of the clipping editor.
21
TEXnicle: A User’s Manual
Reference: Clippings Library
Figure 4.2: The Clippings Library pane
Figure 4.3: A valid clip from the library will turn yellow.
Once the shortcut command turns yellow, press
to insert the clip. The #ben command
(shortcut for an enumerate environment) will yield the something like Figure ?? in the
editor:
Some clippings, like that in Figure 4.4 have placeholders that can be replaced by the user.
These look like the bubbles “item1” and “item2” in the figure. In clippings you define yourself,
include placeholder text by enclosing the text in symbols. For example, to create a shortcut
for text in small caps (the \smallcaps command), we will create a new clipping that contains
\textsc{@smallcaps@}. When the clipping is used (perhaps with a command we define such
as #sc), the word “smallcaps” will appear in a placeholder, as in Figure ?? below.
22
TEXnicle: A User’s Manual
Reference: Jump Bar
Figure 4.4: An expansion of the code for an enumerate environment.
Figure 4.5: After defining a placeholder, this is the output.
4.7
Jump Bar
The Jump Bar is located at the top of the editing window between the syntax indicator on
the left and two buttons ( %%+ and unfold all ). This bar allows you to jump to any labelled
section in the visible document, from part to subparagraph. Furthermore, the button to
the right ( %%+ ) allows you to instantly mark up text with commented notes that appear
in the Jump Bar.
Figure 4.6: The Jump Bar.
The following options are given to mark up text for the Jump Bar to find:
This is a powerful feature of TEXnicle that can save you valuable time and energy hunting
for particular lines.
23
TEXnicle: A User’s Manual
Reference: Bookmarks and Code Folding
Figure 4.7: Jump Bar markup.
4.8
Bookmarks and Code Folding
Two of TEXnicle’s features are found along the left side of the editor window. Bookmarks
are a useful feature of TEXnicle that allow you to jump between different parts of your
project quickly and easily. Click the line number of the line you want to bookmark, and a
blue arrow will appear. Click it again to delete the bookmark. (Alternatively, the keyboard
+ D will toggle the bookmark on a line.) Under the Information tab of the
shortcut
Navigators pane, the first sub-tab will display all bookmarks in the project grouped by file.
Double-click a bookmark to jump to that part of the document. At the top of the editor
window, the Jump to Section drop-down menu will show the bookmarks in the current
document in relation to labeled sectioning commands in the open document. Both locations
are shown in Figure 4.8.
Figure 4.8: Bookmarks in TEXnicle shown in the Navigator pane on the left and the Jump
to Section menu at the top of the editor window.
Note that this feature marks the line number, not the text. For example, if you add five lines
before a bookmark on line 20, the bookmark will remain at line 20 while the text that used
to be marked will now be located at line 25.
Bookmarks work better if line numbering is turned on; this is controlled under Preferences. . .
General .
Another useful feature of TEXnicle is code folding. Environments enclosed by \begin and
\end commands may be collapsed using the arrow buttons between line numbering (if it’s
turned on) and the editor window, as in Figure 4.9.
24
TEXnicle: A User’s Manual
Reference: The Edit Menu
Figure 4.9: Code folding: before and after
When an environment is folded, the fold icon turns red. Notice the jump in line numbering
following a fold, as well. The yellow ellipsis icon between \begin and \end is another indicator
that code has been folded. One advantage to having code folding activated is that \begin
commands without matching \end commands are marked with a red X over the code folding
arrow.
Figure 4.10: An unmatched \begin command
4.9
The Edit Menu
Beyond Undo , Select All , and Speech , the Edit menu has a few tricks up its sleeve that should
be highlighted, as they are some of TEXnicle’s most powerful features.
4.9.1
Edit
Paste as Image
After copying an image to the pasteboard, you can insert it into TEXnicle in a figure
environment quickly and easily under Edit Paste as Image or with the keyboard shortcut
+
+ V . You will be asked to name the image and save it on your hard drive; after that,
your image will be inserted in a stock Figure environment.
In a project, the image will automatically appear under the last folder in your project tree
that was selected. If you want the image to be loaded into a particular folder, click the folder
before pasting the image. If you forget to do this, drag the image within the project file list
to the desired folder.
25
TEXnicle: A User’s Manual
4.9.2
Edit
Reference: The Editor Menu
Paste as Table
Similarly to pasting as an image, TEXnicle can convert copied Microsoft Excel1 cells on
+
the pasteboard as a LATEX table by choosing Edit Paste as Table (keyboard shortcut
+ V ). You will be asked to select the delimiting character. It is important to remember
that while this feature correctly formats the table itself, it does not format the text. Any
text formatting, such as correcting Unicode accents, replacing special characters, and editing
punctuation, will need to be done by hand.
Note: Choosing the “tab” delimiter will correctly paste the table from Apple Numbers and
Microsoft Excel, but other programs and formats may require other delimiters. If your table
doesn’t paste correctly, try pasting with a different delimiter.
4.9.3
Other Edit Menu Functions
A few other goodies are included in under Edit that should be briefly mentioned. Edit
+ Q ) is useful when lines are set to hard wrap
Reformat Paragraph (keyboard shortcut
Preferences.
.
.
General . Reformat Paragraph deletes hard-wrap
rather than soft wrap under
editor line breaks to typeset the entire selection on a single editor line. Lines in the editor
still wrap as expected at the set number of characters.
will attempt to complete the word or command you have started typing.
.
It’s easily found by pressing
Edit
Smart Complete
+ Space , will pull up a list
also accessible with the keyboard shortcut
of words that TEXnicle thinks you may be typing based on the characters you have already typed. This is similar to Smart Complete above except that it does not suggest LATEX
commands.
Edit
Quick Spell ,
4.10
The Editor Menu
The Editor menu also holds a few less obvious TEXnicle features. This section will give a
quick overview of their functions.
will insert a blank a tabular environment (contained within a table
environment) with a desired number of columns and rows. Placeholders will be inserted in
each cell to facilitate editing. An example table with two columns and three rows is shown
in Figure 4.11.
Editor
Insert Table
1
Martin: Does this apply to Apple Numbers, too? Or other spreadsheet programs? What about Microsoft
Word/Apple Pages/other Word Processor table environments?
26
TEXnicle: A User’s Manual
Reference: The Editor Menu
Figure 4.11: A table inserted by TEXnicle
provides a quick shortcut to inserting math mode ($ $) with a place+
+
+ M .
holder in the middle. More useful is the keyboard shortcut:
Editor
Insert In-line Math
will allow you to jump within the open document to a particular line or
+ L .
character. The keyboard shortcut is
Editor
Go To Line. . .
Line indentation, comment level, and jumping between placeholders is all manageable from
this menu.
27
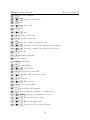
Appendix A
Keyboard Shortucts
This chapter lists all of the keyboard shortcuts available in TEXnicle. However, Mountain Lion has a useful feature that allows users to create custom shortcuts for individual
applications.
To access this feature, open the Keyboard panel in System Preferences. Navigate to Keyboard Shortcuts
and select Application Shortcuts . Click the + button and select TEXnicle from the list.
Figure A.1: Here, the Typesetting command has been remapped.
And now, a list of keyboard shortcuts in TEXnicle:
+
,
Open the Preferences panel.
+ Q
Quit TEXnicle.
+ N
Open a new LATEX document.
+
+ N
Create a new empty project.
+ O
Open an existing file.
+ W
Close the open window.
28
TEXnicle: A User’s Manual
+ S
+
Save the document.
+ S
+ P
+
+
Save the document as. . .
Print.
+ P
+ Z
Keyboard Shortucts:
Page setup.
Undo.
+ Z
Redo.
+ X
Cut the selected text.
+ C
Copy the selected text.
+ V
Paste the contents of the pasteboard.
+
+ V
Paste the contents of the pasteboard as an image.
+
+ V
Paste the contents of the pasteboard as a table.
+ A
Select all.
+ Q
Reformat paragraph.
Smart complete.
+ Space
+ F
+
Quick spell.
Document Find.
+ F
+ J
+
Find text selection in PDF.
+ J
+ G
+
Project Find.
Find PDF selection in source.
Find next.
+ G
Find previous.
+ E
Use selection for Find.
+
:
Show spelling and grammar.
+
;
Check spelling and grammar of document now.
Open the special characters panel.
+
+ Space
+
+ T
Hide and show the toolbar.
+
+ F
Enter or exit full screen.
+
+ 1
Show Project Tree in the Navigator.
29
TEXnicle: A User’s Manual
Keyboard Shortucts:
+
+ 2
Show Symbol Palette in the Navigator.
+
+ 3
Show Clippings Library in the Navigator.
+
+ 4
Show Document Outline in the Navigator.
+
+ 5
Show Project Search in the Navigator.
+
+ 6
Show Project Information in the Navigator.
+
+ 7
Show Project Settings in the Navigator.
+ +
Zoom in.
+ −
Zoom out.
+
+ N
Create a new project.
+
+ N
Create a new LATEX file.
+
+ B
Show bookmarks.
+ D
Toggle bookmark for the current line.
+
Delete selected bookmark.
+
+ B
Jump to selected bookmark.
+
+ P
Jump to previous bookmark.
+
+ N
Jump to next bookmark.
+
+ M
Jump to main file.
+
+ A
Add existing file.
+
+
+ A
Add existing folder.
+
+
+ M
Insert in-line math mode.
+ L
Go to line.
+ [
Increase indentation.
+ ]
Decrease indentation.
+ /
Toggle comment for the current line.
+
+ /
Increase comment level.
+
+ /
Decrease comment level.
+
+
Jump to next placeholder.
+
Jump to previous placeholder.
30
TEXnicle: A User’s Manual
+ R
Keyboard Shortucts:
Typeset project or document.
+
+ R
Typeset and view project or document in stand-alone PDF viewer.
+
+ K
Trash auxiliary files.
+ M
Minimize window.
+
+
Toggle Focus Editor/PDF.
+
+ W
Close tab.
+
+
+ W
Close all tabs.
+ }
Select next tab.
+ {
Select previous tab.
+ 1
Select first tab.
+ 2
Select second tab.
+ 3
Select third tab.
+ 4
Select fourth tab.
+ 5
Select fifth tab.
+
+ Q
+ C
Open the console.
Quit TEXnicle.
31


![[U4.PC.20] Macro commande MACR_ASPIC_CALC](http://vs1.manualzilla.com/store/data/006362194_1-ec063b984fd4fbf91bd9c6eaeb6f1b71-150x150.png)