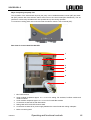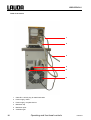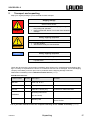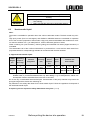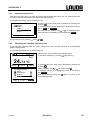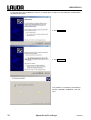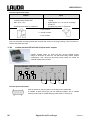
1
Operating instructions LAUDA VISCOCOOL 6 Viscothermostat with Peltier cooling and ECO SILVER control head LCD 0292 Original Operating Instructions VISCOCOOL 6 Viscothermostat with Peltier cooling and ECO SILVER control head English Version 01/2013 YAME0024 Valid from: Software of control system from version 1.36 Software of protection system from version 1.36 Software of cooling system from version 1.31 LAUDA DR. R. WOBSER GMBH & CO. KG Postbox 1251 97912 Lauda-Königshofen Germany Phone: +49 9343/ 503-0 Fax: +49 9343/ 503-222 e-mail [email protected] Internet http://www.lauda.de VISCOCOOL 6 Table of contents 1 SAFETY ......................................................................................................................................................... 6 1.1 SAFETY INFORMATION ............................................................................................................................... 6 1.2 GENERAL SAFETY...................................................................................................................................... 7 1.3 SPECIAL SAFETY INFORMATION .................................................................................................................. 8 2 GENERAL REMARKS................................................................................................................................... 9 2.1 DESCRIPTION OF THE DEVICE ..................................................................................................................... 9 2.2 INTENDED APPLICATION ............................................................................................................................. 9 2.3 USE OTHER THAN THAT INTENDED .............................................................................................................. 9 2.4 RESPONSIBILITY OF THE OPERATING BODY - SAFETY INFORMATION .............................................................. 9 2.5 EC CONFORMITY ....................................................................................................................................... 9 3 DEVICE DESCRIPTION.............................................................................................................................. 10 3.1 PUMP ..................................................................................................................................................... 11 3.2 PROGRAMMER ........................................................................................................................................ 11 3.3 INTERFACES............................................................................................................................................ 11 3.4 INTERFACE MODULES (ACCESSORIES) ...................................................................................................... 12 3.5 CHILLER ................................................................................................................................................. 12 4 OPERATING AND FUNCTIONAL CONTROLS ......................................................................................... 13 5 TRANSPORT AND UNPACKING ............................................................................................................... 17 6 BEFORE PUTTING THE DEVICE INTO OPERATION .............................................................................. 18 6.1 ASSEMBLY AND SITING............................................................................................................................. 18 6.2 FILLING AND EMPTYING ............................................................................................................................ 18 6.3 HEAT TRANSFER LIQUID ........................................................................................................................... 19 6.4 FIRST SWITCH-ON.................................................................................................................................... 20 6.5 INSTALLATION OF MODULES ..................................................................................................................... 20 7 OPERATION ............................................................................................................................................... 22 7.1 SWITCHING ON ........................................................................................................................................ 23 7.2 MENU STRUCTURE .................................................................................................................................. 24 7.3 DISPLAY REPRESENTATION ...................................................................................................................... 25 7.3.1 Basic window ................................................................................................................................ 25 7.3.2 Menu window ................................................................................................................................ 26 7.3.3 Entry window ................................................................................................................................. 27 7.4 BASIC SETUP .......................................................................................................................................... 27 7.4.1 Setting the overtemperature switch-off point Tmax ........................................................................ 27 7.4.2 Setting the temperature set-point value ........................................................................................ 28 7.4.3 Setting the pump level .................................................................................................................. 29 7.4.4 Activating the "Standby" operating state....................................................................................... 29 7.4.5 Defining temperature limits ........................................................................................................... 30 7.4.6 Selecting the menu language ....................................................................................................... 30 8 MAINTENANCE .......................................................................................................................................... 31 8.1 ALARMS, WARNINGS AND ERRORS ............................................................................................................ 31 8.1.1 Overtemperature protection: Alarm and checking ........................................................................ 31 8.1.2 Low level: Alarm and checking ..................................................................................................... 32 8.2 DEVICE STATUS....................................................................................................................................... 33 8.2.1 Memory for errors, alarms and warnings ...................................................................................... 33 8.2.2 Device data ................................................................................................................................... 33 8.2.3 Software version ........................................................................................................................... 34 8.2.4 Displaying and changing the device type ..................................................................................... 34 8.2.5 Displaying serial numbers ............................................................................................................. 34 8.3 SERVICING .............................................................................................................................................. 35 8.3.1 Cleaning ........................................................................................................................................ 35 8.3.2 Servicing intervals to VDI 3033 ..................................................................................................... 36 YAMD0024 Contents 3 VISCOCOOL 6 8.3.3 Inspecting the heat transfer liquid ................................................................................................. 36 8.4 FAULT FINDING ........................................................................................................................................ 37 8.5 DISPOSAL INFORMATION .......................................................................................................................... 38 8.5.1 Disposal of the packaging ............................................................................................................. 38 8.6 Decommissioning of the device ........................................................................................................ 38 8.7 ORDERING REPLACEMENT PARTS / LAUDA SERVICE ................................................................................ 39 9 ACCESSORIES ........................................................................................................................................... 39 10 TECHNICAL DATA AND GRAPHS............................................................................................................. 40 11 INDEX .......................................................................................................................................................... 43 12 OTHER SETTINGS ..................................................................................................................................... 46 12.1 RESETTING TO FACTORY SETTINGS .......................................................................................................... 46 12.2 SETTING THE VOLUME OF THE ACOUSTIC SIGNALS ..................................................................................... 46 12.3 SETTING THE CHILLER .............................................................................................................................47 12.4 SETTING THE DISPLAY BRIGHTNESS .......................................................................................................... 47 12.5 DEFINING THE STARTING MODE (AUTOSTART) ........................................................................................... 48 12.6 LIMITING THE MAINS CURRENT CONSUMPTION ........................................................................................... 48 12.7 ENTERING THE OFFSET OF THE DISPLAYED TEMPERATURE (CALIBRATION) .................................................. 49 12.8 RESTORING THE FACTORY SETTING OF THE INTERNAL TEMPERATURE SENSOR (FACTORY CALIBRATION) ...... 49 13 LIST OF "ALARM AND WARNING CODES" ............................................................................................. 50 14 EXTERNAL CONTROL ............................................................................................................................... 53 14.1 ACTIVATING EXTERNAL CONTROL (EXTERNAL PT100) ................................................................................ 53 14.2 SETPOINT OFFSET OPERATING MODE (DIFF. SET/ACTUAL) ......................................................................... 54 15 PROGRAMMER .......................................................................................................................................... 55 15.1 PROGRAMMING EXAMPLE......................................................................................................................... 55 15.2 CREATING AND EDITING A PROGRAM ......................................................................................................... 56 15.3 STARTING THE PROGRAM ......................................................................................................................... 58 15.4 INTERRUPTING, CONTINUING OR TERMINATING THE PROGRAM .................................................................... 59 15.5 DEFINING THE NUMBER OF PROGRAM LOOPS (LOOPS) ............................................................................... 59 16 CONTROL PARAMETERS ......................................................................................................................... 60 16.1 INTERNAL CONTROL VARIABLE (INTERNAL TEMPERATURE SENSOR) ............................................................ 60 16.2 EXTERNAL CONTROL VARIABLE ................................................................................................................ 61 16.2.1 Setting the correction limitation ..................................................................................................... 63 16.2.2 Procedure for setting the control parameters for external control ................................................ 63 17 INTERFACE MODULES ............................................................................................................................. 65 17.1 MENU STRUCTURE OF THE MODULES ........................................................................................................ 65 17.2 ANALOG MODULE .................................................................................................................................... 66 17.3 RS 232/485 INTERFACE MODULE ............................................................................................................. 67 17.3.1 Connecting lead and interface test RS 232 .................................................................................. 67 17.3.2 RS 232 protocol ............................................................................................................................ 68 17.3.3 RS 485 connecting lead ................................................................................................................ 68 17.3.4 RS 485 protocol ............................................................................................................................ 69 17.4 USB INTERFACE ..................................................................................................................................... 70 17.4.1 Description .................................................................................................................................... 70 17.4.2 Installation of the USB driver ........................................................................................................ 70 17.4.3 Connecting the thermostat to the PC ............................................................................................ 71 17.4.4 Where is the ECO Virtual COM Port? ...........................................................................................73 17.5 COMMANDS AND ERROR MESSAGES APPLICABLE TO THE RS 232/485 INTERFACE MODULE AND THE USB INTERFACE .............................................................................................................................................. 75 17.5.1.1 Interface write commands (data issued to the thermostat) ................................................... 75 17.5.2 Interface read commands (data request from the thermostat) ..................................................... 76 17.5.3 Interface error messages .............................................................................................................. 78 17.5.4 Driver software for LABVIEW® ...................................................................................................... 78 17.6 CONTACT MODULE .................................................................................................................................. 79 4 Contents YAMD0024 VISCOCOOL 6 17.6.1 Contact module LRZ 914 with 1 input and 1 output ..................................................................... 79 17.6.2 Contact module LRZ 915 with 3 inputs and 3 outputs .................................................................. 80 CONFIRMATION………...................……………………………………………………………………………..83 YAMD0024 Contents 5 VISCOCOOL 6 1 Safety 1.1 Safety information Type and source Consequences of non-compliance Action 1 Action ... Danger ! "DANGER" indicates an immediate dangerous situation which – if the safety requirements are ignored – may result in fatal or severe, irreversible injuries. Type and source Consequences of non-compliance Warning ! Action 1 Action ... "WARNING" indicates a possible dangerous situation which – if the safety requirements are ignored – may result in fatal or severe, irreversible injuries. Type and source Consequences of non-compliance Caution ! Action 1 Action ... "CAUTION" indicates a possible dangerous situation which – if the safety requirements are ignored – may result in slight, reversible injuries. Notice Type and source Consequences of non-compliance Action 1 Action ... "NOTICE" warns of possible property or environmental damage. 6 Reference Refers to further information in other sections. Safety YAMD0024 VISCOCOOL 6 1.2 General safety Read through the operating instructions carefully. They contain important information for working with this device. If you have any queries, please contact our Service Department ( 8.7). Follow all the directions in these operating instructions. Only in this way is the correct procedure ensured when working with the device. Make sure that the device is only operated by instructed specialist personnel. Never operate the device without heat transfer liquid (water). Never operate the device if ...if it is damaged, ...if it is leaking, ...if the mains cable is damaged. Switch off the device and withdraw the mains plug ...when carrying out service or repair work, ...when moving the device, ...when installing or removing modules or accessories, ...in case of danger. Do not make technical modifications to the device. Infringements in this respect invalidate the warranty. Have service and repair work carried out only by specialists. Follow the safety information in the following sections and read it through carefully. Classes in the EMC standard DIN EN 61326-1. Class A: Operation only on electrical supply networks without connected domestic areas. Class B: Equipment for operation on electrical supply networks with connected domestic areas. With unfavorable network conditions interfering voltage variations can occur. EMC standard DIN EN 61326-1 (corresponds to VDE 0843-20-1) Device for Europe Class B Device for Canada and the USA Class A Usage restriction For the EMC standard DIN EN 61326-1: Devices in Class A are only to be operated on electrical supply networks without connected domestic areas. YAMD0024 Safety 7 VISCOCOOL 6 1.3 Special safety information The use of the thermostat is only admissible under the following conditions: The siting surface must be impervious, flat, non-slip and non-combustible. Do not position the thermostat at the edge of the bench or table. Keep to the specified wall spacing ( 6.1). Protect the device from dripping or condensing water. Do not store any liquids or combustible objects above the device. Do not work with flammable liquids in the direct vicinity of the device. Only connect the device to an earthed mains socket which is freely accessible. At higher operating temperatures parts of the bath cover can take on surface temperatures of over 70 °C. There is a danger of burns. Make sure that ventilation openings are not covered nor closed. Set the overtemperature switch-off point according to the heat transfer liquid used. Have repairs carried out only by specialists. Keep to all the service and maintenance intervals according to VDI 3033 ( 8.3.2). Take note of all safety labels. 8 Safety YAMD0024 VISCOCOOL 6 2 General remarks 2.1 Description of the device This device is a Viscothermostat with Peltier cooling and transparent bath and is specially designed for applications of capillary viscometry close to room temperature. In this respect it involves a cooling, heating bath thermostat, also designated as a cooling thermostat in the following. It is used for cooling/ heating liquids. The device is constructed as a double-chamber system. A well-proven ECO SILVER control head is located on the basic device with integral Peltier unit. This arrangement ensures very good control constancy and very high homogeneity in the bath liquid with constant liquid level. 2.2 Intended application This LAUDA thermostat is manufactured exclusively for cooling/heating water in the viscosity measurement room. The devices must only be operated as intended and under the conditions stated in these operating instructions. Any other operating mode is not regarded as intended use. 2.3 The device may only be put into operation in suitable interior rooms. Operation up to a height of only 2000m above sea level is admissible. Operation is only allowed under the defined conditions ( 10). Use other than that intended The device must not be used: 2.4 for medical applications. in areas subject to explosion hazards. when sited outdoors. with non-aqueous liquids. for heating or cooling foodstuffs. Responsibility of the operating body - safety information The operating body is responsible for the qualifications of the operating personnel. The thermostat must only be configured, installed, maintained and repaired by specialist personnel. Persons operating the device must be instructed in their work by a specialist. Make sure that specialist personnel and operators have read and understood the operating instructions. The device must be used as intended ( 2.2). 2.5 EC conformity The device conforms to the relevant fundamental requirements for safety and health of the following listed directives: LAUDA DR. R. WOBSER GMBH & CO. KG Postbox 1251 97912 Lauda-Königshofen Low Voltage Directive 2006/95/EC. EMC Directive 2004/108/EC. Safety requirements for electrical equipment for measurement, control and laboratory use DIN EN 61010-1 Germany YAMD0024 General remarks 9 VISCOCOOL 6 3 Device description 1 2 3 4 5 6 7 10 1 ECO SILVER Control Head 2 Nozzle pipe 3 Grip 4 Cover plate 5 Connection points (poorly visible) 6 Lower section of device 7 Bath vessel Device description YAMD0024 VISCOCOOL 6 Openings in the cover plate 1 2 3 1 temperature probe 2 automatic measuring point (iVisc; Stand S5) 3 manual measuring point; temperature prestabilization point 3.1 Pump The device is equipped with a pressure pump. The pump provides a uniform flow through the bath vessel and also good transfer of the heat and cooling output to the bath medium. Using the operating menu, one of six flow-rate levels can be selected for the pump. Pump characteristics ( 10) 3.2 Programmer The devices are equipped with a programming function ( 15). 3.3 Interfaces In the basic version the devices are equipped with a mini-USB interface. This enables, for example, the connection of a PC and operation with the thermostat control software Wintherm Plus. In addition software updates are possible via the USB interface. The connecting lead is not included in the items supplied with the thermostat. When connecting up, make sure the correct plug is used. YAMD0024 Device description 11 VISCOCOOL 6 3.4 Interface modules (Accessories) The devices can be supplemented with further interface modules which are connected to the rear of the control head in two module slots ( 17) and are inserted. The following modules are currently available: 1. Analog Module (LAUDA order no. LRZ 912) with two inputs and two outputs on a six-pole DIN socket. The inputs and outputs can be set independently of one another as a 4...20 mA or 0...10 V interface. 20 V is brought out on the socket as a power supply for an external sensor with evaluation electronics. 2. RS 232/485 Interface Module (LAUDA order no. LRZ 913) with nine-pole SUB-D socket. Electrically isolated using optocouplers. The RS 232 interface can be connected directly to the PC using a 1:1 contacted cable (LAUDA order no. EKS 037). 3. Analog Module (LAUDA order no. LRZ 914) with connector to NAMUR NE28. Range of functions as for LRZ 915, but only one output and one input on each of two DIN sockets. Coupling socket 3-pole, (LAUDA order EQD 047) and coupling plug 3-pole, (LAUDA order no. EQS 048). 4. Analog Module (LAUDA order no. LRZ 915) with 15-pole SUB-D socket. With three relay contact outputs (changeover, max. 30V/0.2A) and three binary inputs for control via external voltage-free contacts. Socket 15-pole, (LAUDA order no. EQM 030) and connector shell (LAUDA order no. EQG 017). 5. Profibus Module (LAUDA order no. LRZ 917). You will find further information in the Operating Instructions YAAD0020 for the Profibus Module. 6. Pt100/LiBus Module (LAUDA Best. no. LRZ 918). External Pt100: LiBus: 3.5 For the connection of an external temperature sensor. For the connection of the Command remote control unit from the Proline equipment line and other accessories, such as a solenoid valve for cooling water control, a reverse-flow protection device or a throughflow cooler (DLK) with LiBus connection. Chiller The chiller mainly consists of thermoelectric modules. The heat dissipation takes place through an aluminum heat sink with flange-connected ventilator fan. To achieve this, fresh air is drawn in at the device sides and discharged at the back. To ensure proper air circulation the ventilation openings must not be covered up. The cold is discharged directly to the bath medium as it flows through a heat sink. The chiller is normally switched in automatically, but can also be switched in manually via the operating menu ( 17). Cooling times can be found in the cooling curves ( 10). 12 Device description YAMD0024 VISCOCOOL 6 4 Operating and functional controls The following pages illustrate the ECO SILVER control head and the control panel. ECO SILVER control head (modified for Viscocool) 1 2 3 4 5 6 7 8 9 1 2 3 4 5 6 7 8 9 YAMD0024 Light sensor for automatic control of display brightness Monochrome LCD display Control panel (refer to following page) Mains switch Selector switch for dividing up the external and internal pump flow Nozzle pipe Pressure nozzle Pt100 temperature sensor Heater Operating and functional controls 13 VISCOCOOL 6 Control panel and display ECO SILVER 25.00 °C Tset 1 Tint 2 Standby 3 24.73 °C Display Menu 1 4 4 5 7 6 Display 1 Status display 2 Display of the internal or external temperature value (Tint or Text) 3 Soft-key bar Control panel 4 Soft keys, left and right 5 Enter key 6 Arrow keys (cursor keys) for Up, Down, Left and Right. 7 Key Tmax display and setting of the overtemperature switch-off point 14 Operating and functional controls YAMD0024 VISCOCOOL 6 Ways of adjusting the pump flow The circulation of the heat transfer liquid by the pump can be divided between internal (INT) and external (EXT) with the aid of the selector switch at the front on the control head (flow distribution). The adjustment is continuously variable and is also possible at any time during operation. For maximum cooling power we recommend that the selector switch is set to internal (INT). Rear view of Control Head ECO SILVER 1 2 3 4 5 6 7 1 2 3 4 5 6 7 YAMD0024 Mini USB interface Upper module receptacle approx. 51 x 27 mm for analog, RS 232/485, Profibus module and contact modules Lower module receptacle approx. 51 x17 mm for Pt100/LiBus module Connection socket 75S for bath illumination Rating label of ECO SILVER Control Head Connection socket 51H for power supply between the control head and cooling underpart Mains connecting lead Operating and functional controls 15 VISCOCOOL 6 Back of the device 1 2 3 4 5 6 16 1 Cable RJ11 4P/4C plug for bath illumination 2 Power supply, chiller 3 Power supply, complete device 4 Bath drain tap 5 Bath drain point 6 Ventilation grill Operating and functional controls YAMD0024 VISCOCOOL 6 5 Transport and unpacking Keep your original packing of your thermostat for later transport. Shipping damage Electric shock hazard Danger ! Check the device carefully for shipping damage before putting into operation. Never operate the device if you have found shipping damage. Falling / toppling equipment Crushing of hands and feet, impacts Warning ! Notice Use the handles. Site the device only on a level surface. Falling / toppling equipment Property damage Do not tilt the device during transport and never turn it upside down. Check the device and the accessories immediately after shipment for completeness and shipping damage. If contrary to expectations the device or accessories are found to be damaged, inform the shipping company immediately so that a report can be produced and the shipping damage examined. Please also immediately inform LAUDA Instrument Service ( 8.7). Standard accessories: Order number Quantity Description Remarks HDQ 093 1 Cover cpl. D 15 V HDR 016 1 Cover cpl. D 15 KP/K EKS 087 1 Cable RJ11 4P/4C plug YAMD0024 1 Connector for bath illumination Operating Instructions (this document) Please return the completed warranty card to LAUDA. Warranty card It is in your own interest to return the completed warranty card to LAUDA immediately. ( 8.7) YAMD0024 Unpacking 17 VISCOCOOL 6 6 Before putting the device into operation Please note: The device can be operated up to an ambient temperature of 40 °C. 6.1 Assembly and siting Always comply with the following safety information: Falling / toppling equipment on sloping surfaces / table edge Crushing of hands and feet Warning ! Notice Only site the device on flat surfaces, not near the edge of the bench or table. Overheating of the device Property damage 6.2 Make sure there is sufficient wall spacing and avoid covering the ventilation grills so that adequate cooling and heat dissipation are ensured. Filling and emptying LAUDA accepts no liability for damage caused by the use of unsuitable or unapproved heat transfer liquids (approved heat transfer liquids ( 6.3)). Filling Withdraw the drain tap. Optimum operation is ensured with a filling level in the lower third of the connection points ( 3). If the filling level in the thermostatic chamber is too low, a low-level alarm follows! ( 8.1.2). Take into account the displacement volume of any objects to be introduced into the bath. Draining and changing the heat transfer liquid Switch off the thermostat and withdraw the mains plug. Allow the device and heat transfer liquid to cool down to or warm up to room temperature. Push a hose onto the bath drain point. Drain the heat transfer liquid by opening the drain tap at the back of the device. Empty the thermostatic bath with a suitable pump/device. Bath drain point and drain tap Completely drain the inner vessel, thermostatic bath and accessories and flush or clean them (e.g. with new heat transfer liquid). 18 Before putting the device into operation YAMD0024 VISCOCOOL 6 Contact with hot heat transfer liquid Scalding Caution ! 6.3 Bring heat transfer liquids to room temperature before draining. Make sure that the drain tap is closed after draining. Heat transfer liquid Note: Tap water is unsuitable for operation due to the calcium carbonate content. The bath vessel may calcify. High purity water (from ion exchangers) and distilled or bidistilled water are unsuitable for operation due to the corrosive properties of these media. High purity water and distillates are suitable as a medium after the addition of 0.1 g of soda (Na2CO3, sodium carbonate) per liter of water. Water containing iron (rust formation), chlorine (pitting) and untreated river water ("algae formation") is unsuitable. The thermostatic cell of the LAUDA VISCOCOOL is produced from 1.4301 and the bath vessel from polycarbonate and is correspondingly resistant to mechanical and chemical stresses. a) Approved heat transfer liquid LAUDA designation Operating temperature range Chemical designation °C Aqua 90 5...90 Decalcified water Viscosity (kin) Viscosity (kin) at temperature Flash point mm²/s at 20°C mm²/s °C 1 -- -- Container size Order number 5L 10 L 20 L LZB 120 LZB 220 LZB 320 At higher temperatures vaporization losses occur. In this case use the supplied bath cover. Use distilled water or pure demineralized water only after adding 0.1 g of soda (Na2CO3 sodium carbonate)/liter of water. Otherwise there is the risk of corrosion! Do not use any contaminated heat transfer liquid. Contamination of the pump chamber may lead to the pump jamming and the device then switching off. Pay attention to the safety data sheet for the heat transfer liquid. Follow the regulations for disposal of the used heat transfer liquid. If required, you can request the safety data sheets at any time. ( 8.7) YAMD0024 Before putting the device into operation 19 VISCOCOOL 6 6.4 First switch-on Make sure that the details on the name-plate match the mains voltage and frequency. Notice Use of inadmissible mains voltage or frequency Property damage Compare the rating label with the available mains voltage and frequency. Note: The device mains plug is used as a mains disconnection component. The mains plug must be easily recognizable and easily accessible. Only connect the device to a socket with a protective earth conductor (PE). No liability is accepted for incorrect mains connection. Make sure that the unit is filled according to section ( 6.2). Menu language When switching the device on for the first time, you can select your desired menu language with the cursor keys and . Confirm your choice with the enter key . English Deutsch Français Español Italiano ESC OK . Standby The menu language can be changed at any time ( 7.4.6). Note: The thermostatic head has a high precision Pt100 temperature probe which facilitates exact temperature control. Due to the method of construction as a double chamber system, with an unfavorable relationship between the bath temperature and ambient temperature an offset of the bath temperature to the thermostatic chamber temperature can occur. We always recommend that an offset adjustment (12.7) for the relevant temperature range is carried out or that our external temperature probe is used (6.5). 6.5 Installation of modules When installing modules, always follow this safety information: Live parts during module installation Electric shock hazard Warning ! 20 Disconnect the device from the mains before module installation. Have the installation carried out only by a specialist. Before putting the device into operation YAMD0024 VISCOCOOL 6 The ECO SILVER control head can be supplemented with interface modules which are inserted at the rear of the control head in two different module slots. Upper module receptacle (approx. 51 mm x 27 mm) for the RS 232/485 module /Analog module/ Contact module / Profibus module. Lower module receptacle (approx. 51 mm x17 mm) for the Pt100/LiBus module. Touch the bare earthed stainless steel back panel of the ECO thermostat to discharge any electrostatic charge. Remove the module from the packaging. Switch off the thermostat and withdraw the mains plug. The cover of the module receptacle has a recess on each side to lever it off. Insert a screwdriver first in the right and then in the left recess and lever it up carefully. Pull the bus connecting lead out of the cover. Plug in the bus connecting lead (red plug in the red socket). Introduce the module into the appropriate receptacle and fasten it using the two cross-head screws. Insert the mains plug again and switch on the thermostat. The connectors have reverse-polarity protection. The plug has a projection which slides into a notch on the socket. YAMD0024 Before putting the device into operation 21 VISCOCOOL 6 7 Operation Always follow this safety information: Contact with heat transfer liquid or hot surfaces Burns, scalds Caution ! Only operate the device with its housing. Avoid splashes and hand contact with hot heat transfer liquid. Do not touch the drainage point connection and nozzle pipe in the operating state. Use CE gloves, protective clothing and eye protection. Bath overflow due to thermal expansion or immersion of objects Burns, scalds Caution ! Take the volume of external loads into account. Take into account the increase in volume with a rise in temperature. Inadmissible operating temperatures Burns, scalds Caution ! Notice The bath vessel must not be heated above 95°C, because adhesion points might loosen, allowing bath medium to escape. Inadmissible operating temperatures Property damage 22 Note the various limitation options (Tih, Til, Tmax, correction limitation). Set the overtemperature switch-off point Tmax according to the heat transfer liquid (at least 25 K below the fire point). Operation YAMD0024 VISCOCOOL 6 7.1 Switching on Switch on the device with the mains switch at the front. An acoustic signal sounds. 1s Control Safety Cool Corresponding to the adjacent display the version numbers of the software appear for approx. five seconds. When making technical queries, please have the version numbers together with the device serial number ( 8.2.5) to hand. Further installed modules are displayed in Settings Device Status Software version. 1.29 1.29 1.25 1 25.00 °C Tset Tint 24.73 °C Display Menu 1 Standby 25.00 °C Tset Tint The current bath temperature (Tint), pump level as well as the pump symbol, the set-point temperature Tset and the soft-key bar at the bottom edge of the display are displayed. For the optimum use of the display representation, the soft-key bar disappears if no key has been pressed for at least ten seconds. The representation can be reactivated by pressing any key. The pump starts up (exception: "Standby" operating status). When standby is activated ( 7.4.4), the last operating values are taken over. 24.73 °C Tmax 85 °C 24.73 --- YAMD0024 Tmax Tint With the key you check or change the overtemperature switch-off point: On pressing the key Tmax the value in the upper line is displayed; (Setting the overtemperature switch-off point Tmax ( 7.4.1)) --- Operation 23 VISCOCOOL 6 7.2 Menu structure With the soft keys you can select the following menu points with the ECO SILVER control head: Stage 6 Stage 5 Stage 4 Stage 3 Stage 2 Stage 1 Pump level Control Cooling Temp. limits Basic setup Calibration Factory setting Device status Menu intern Pt100 extern Pt100 intern Pt100 extern Pt100 Contr. Variable Control parameters Control para. sets Setpoint offset Corr.limit. 1 Alarm Warn Error off on automatic off on Kpe Tne Xpf Tv manual/autom. Tve Tde Prop E no yes off extern Pt100 English Deutsch Français Español Italiano Loud Medium Low Off Brightness Lower limit (Til) Upper limit (Tih) Acoustic signal Display Autostart Curr.Consumpt. DLK 10/25 Language Set-point temp. Setup Programmer Module Standby Offset source Diff. set/actual value off Calibration Factory calibration Xp Tn Tv manual/autom. Tv Td Reset all Control no yes Status Edit Loops Info Error store Device data SW version Type Serial numbers no yes Section 8.2 Start Reset all Ctrl.param.int. Ctrl.param.ext. Internal Pt100 miscellaneous automatic Stage 5 Stage 4 Stage 3 Stage 2 Stage 1 off no yes Hold Stop Continue Stop 1 Correction limitation 24 Operation YAMD0024 VISCOCOOL 6 7.3 Display representation The ECO thermostats offer you intuitive user guidance. In the following the possible window views and the symbols used are explained. 7.3.1 Basic window Basic window in the normal display The following information is displayed depending on the operating status: Pump runs with displayed pump level; Heater is active; 1 Tint 24.73 °C Display Chiller is active; 25.00 °C Tset Menu Standby Tset Set-point temperature Tint Current bath temperature Text Temperature of the external temperature probe (if connected). Display, Menu, Standby Soft-key bar; function call via designated keys; Apart from the normal display of the basic window, there is another display. This includes in addition a further status display. With the soft-key bar activated changeover between the two display representations is obtained by pressing the left soft key. With both displays the soft-key bar disappears if no key has been pressed for at least ten seconds. The display of it can be reactivated by pressing any key. Basic window in the expanded display The following information is displayed depending on the operating status: Pump runs with displayed pump level; Heater is active; 1 23.85 Tint 24 73 °C Text . Display Menu Chiller is active; 25,00 Tset Standby Tint Current bath temperature; Tset Set-point temperature; Text Temperature of the external temperature probe (if connected); Display, Menu, Standby. Soft-key bar; function call via designated keys; With a connected external sensor and its selection as the control variable, the basic window with the expanded status display is always active. YAMD0024 Operation 25 VISCOCOOL 6 7.3.2 Menu window The menu of the ECO SILVER thermostats consists of several menu levels. With the cursor keys , you can call the menu points and select them with the enter key . , , Symbolizes the enter key or its assigned function. Displays the currently selected function. ► Indicates that further menu levels (submenus) are present. The padlock symbolizes a locked function. (Possible reasons: lack of access rights or function deactivated by parameter settings). Examples of display representation: Main menu In the main menu the selected menu point is shown inversely. The soft-key bar is shown in the lower region of the display. The following functions, for example, can be selected with the soft keys: ESC You return to the main menu level. Tset Setpoint Value Setup Programmer Modules Standby ESC OK OK Standby Standby You access the submenu (this can also occur by confirming ). Standby is activated. If Standby is inversely highlighted, standby is active. If not, the de vice is in operation. Submenu "Cooling" off on automatic ESC 26 OK . In window example the following information is displayed: The setting on is displayed inversely and can be selected by pressing the enter key . A tick behind the menu point indicates that this setting is active. In the example the cooling is set to "automatic". Standby Operation YAMD0024 VISCOCOOL 6 7.3.3 Entry window Values are input using the entry window. Tset Min: 10.00 Max: 102.00 85.00 --- 7.4 OK In the entry window the following information is displayed: In the first line the entry parameter is shown in short form (cf. example Tset). Min. and Max. state the limits for the value entry. The value to be entered is shown in large characters. The cursor flashes under the value. You can change the value with the cursor keys or . If you keep one of the two cursor keys pressed, input is sped up. By pressing or you can also select numbers individually and change them with or . By pressing (+/-) the arithmetic sign can be changed. The enter key accepts the set value. By pressing (ESC) you are returned to the menu level without changes. +/- Basic setup In this section the settings needed for proper use as prescribed are summarized. You are referred to the appendix ( Other settings) for further settings. 7.4.1 Setting the overtemperature switch-off point Tmax Overheating due to entering an incorrect Tmax and setpoint temperature Burns, scalds Warning ! Keep the key Set Tmax in each case according to the heat transfer liquid used. pressed during the whole set-up procedure: Tmax Min: 10.00 Max: 102.00 85.00 ESC YAMD0024 OK Press the enter key . The entry window appears. The cursor flashes under the Tmax value. The maximum and minimum adjustable temperature values are displayed. Change the value with or . Note: When pressed for longer, the figures run through faster. Single figures can be selected by pressing or . --- Operation 27 VISCOCOOL 6 Confirm your choice with the enter key Tmax 85 °C 24.73 °C --- . Tmax Tint --- On releasing the key you return to the menu level without changes. The following applies to Tmax: 5 Kelvin above the desired bath temperature. 7.4.2 Setting the temperature set-point value You activate the soft-key bar by pressing any key. Access to the main menu level is obtained by pressing the enter key . Tset Setpoint Value Setup Programmer Modules Standby ESC OK Tset Min: 10.00 Select the colored highlighted menu point Setpoint Value t using the enter key . Standby Max: 102.00 35.00 ESC By pressing 28 OK +/- The entry window appears. The cursor below the temperature value flashes and can be changed within the displayed limits. Change the value with or . Single figures can be selected by pressing or . With appropriate equipment, by pressing (+/-) the arithmetic sign can be changed. Confirm your choice with the enter key . (ESC) you are returned to the menu level without changes. Operation YAMD0024 VISCOCOOL 6 7.4.3 Setting the pump level With the ECO Vario pump you have six pump levels available with which you can optimize the bath circulation, flow rate and pressure and the mechanical heat input. You activate the soft-key bar by pressing any key. Stage 5 Stage 4 Stage 3 Stage 2 Stage 1 ESC Access to the main menu level is obtained by pressing the enter key . The adjacent menu window appears by selecting and confirming Setup Pump level. The level can be selected with or . The selected level becomes active immediately (in this example it is Stage 2). . OK Standby You quit the menu by pressing 7.4.4 (ESC), or . Activating the "Standby" operating state In the "Standby" operating state the pump, heating and cooling unit are switched off. The operating display remains active. You activate the soft-key bar by pressing any key. 1 25.00 °C Tset Tint 24.73 °C Display Menu Tset Setpoint Value Setup Programmer Modules Standby ESC YAMD0024 OK Standby There are two ways of selecting the standby mode: 1. Activating "Standby" by pressing (right soft key). 2. Access to the main menu level is obtained by pressing the enter key . Select "Standby" with or and confirm it with . If "Standby" is active, it is highlighted in color in the soft-key bar: Standby . . Note: By pressing the entry key active operating state. again you return to the Standby Operation 29 VISCOCOOL 6 7.4.5 Defining temperature limits The temperature limits Til and Tih are defined with this function. If, for example, you are using water as the heat transfer liquid, +5 °C would be practicable as the minimum temperature and +90 °C as the maximum temperature. You activate the soft-key bar by pressing any key. Lo. Limit (Til) Up. Limit (Tih) ESC OK Lo. Limit (Til) Min: 10.00 Access to the main menu level is obtained by pressing the enter key . Selection and confirmation of Setup Limits. The adjacent menu window appears. Select the lower (Til) or upper (Tih) limit with or and confirm it with . . Standby . Max: 102.00 15.00 ESC By pressing 7.4.6 OK In the entry window the cursor flashes below the value to be changed. The permissible adjustment range is indicated with Min and Max. Change the value with or . Single figures can be selected by pressing or . By pressing (+/-) the arithmetic sign can be changed. Confirm your choice with the enter key . +/- (ESC) you are returned to the menu level without changes. Selecting the menu language The ECO SILVER thermostats offer you the possibility of selecting the menu languages of English, German, French, Spanish and Italian. You activate the soft-key bar by pressing any key. English Deutsch Français Español Italiano ESC By pressing 30 Select the language with OK or Access to the main menu level is obtained by pressing the enter key . Selection and confirmation of Setup Basic setup. Language. The adjacent menu window appears. or and confirm it with . Standby (ESC) you are returned to the menu level without changes. Operation YAMD0024 VISCOCOOL 6 8 Maintenance 8.1 Alarms, warnings and errors Alarms: Warnings: Errors: Alarms are relevant to safety. Pump, heating and chiller switch off. Warnings are normally not relevant to safety. The device continues to run. If a malfunction occurs, switch off the unit at the mains switch. If the malfunction recurs after switching on the device, contact LAUDA Instrument Service ( 8.7) or your local service organization. All alarms, warnings or error messages triggered on the ECO thermostat are shown in the display as text. You will find the list with alarms and warnings in the appendix ( 13). Once the cause has been rectified, alarms and warnings can be cleared with Warnings can be ignored with 8.1.1 . without the message periodically appearing again. Overtemperature protection: Alarm and checking Overheating due to entering an incorrect Tmax and setpoint temperature Burns, scalds Warning ! Set Tmax in each case according to the heat transfer liquid used. Set the overtemperature switch-off point as described in ( 7.4.1). Recommended setting: 5 K above the desired maximum bath temperature (Remark: The overtemperature switch-off point Tmax is controlled by a system which operates independently of the bath control). The set overtemperature switch-off point is displayed on pressing in the display. Tmax 85 °C 24.73 °C Tint --- YAMD0024 Tmax --- Maintenance 31 VISCOCOOL 6 No. Alarm 3 Overtemperature Overtemperature Display OK Standby When the bath temperature lies above the overtemperature switch-off point, a two-tone alarm signal sounds. "Overtemperature" appears in the display, the heating switches off on all poles and the pump and chiller are switched off electronically. Rectify the cause of the malfunction. Wait until the bath temperature has cooled below the cut-off point or set the cut-off point higher than the bath temperature. If "Overtemperature" appears in the display: unlock the "Overtemperature" indication with . Before a longer period of unsupervised operation check the overtemperature protection: Slowly reduce Tmax as described in ( 7.4.5). The thermostat should switch off when the actual temperature is greater than Tmax. An alarm message (step 1-2, see above) should follow. Reset the switch-off point to be higher than the bath temperature. Unlock the "Overtemperature" indication with 8.1.2 . Low level: Alarm and checking No. Alarm When the liquid level falls so far that the heaters are no longer completely covered with liquid, a two-tone alarm sounds. "Low Level Pump" appears in the display, the heating switches off on all poles and the pump and chiller are switched off electronically. Rectify the cause of the malfunction. Top up the missing heat transfer liquid ( 6.2 and 6.3). Unlock the "Low Level Pump" indication with 1 Low Level Pump . Low Level Pump Display OK Standby Check the safety system at regular intervals ( 8.3.2) by lowering the bath level. Do not carry out this test at a bath temperature below 10°C or above 50°C in order to avoid hazards due to temperatures which are too cold or too hot. An alarm message (step 1-2, see above) should follow. Top up with heat transfer liquid. Unlock the "Low Level Pump" indication with . Switch the device off immediately and withdraw the mains plug if irregularities occur when checking the safety equipment. Contact LAUDA Instrument Service ( 8.7) or your local service. 32 Maintenance YAMD0024 VISCOCOOL 6 8.2 Device status Here you can recall error messages as well as device and software data. You activate the soft-key bar by pressing any key. Access to the main menu level is obtained by pressing the enter key . Errorstore Device data ► SW version ► Type RE 420 ► Serial numbers ► ESC 8.2.1 OK Standby Selection and confirmation of Device Status. The adjacent menu window appears. Here you can now: Errorstore read out the error store, Device data fetch device data, SW version fetch software version, Type fetch device type, Serial numbers fetch serial numbers. Setup Memory for errors, alarms and warnings For error analysis the ECO thermostats have an error memory in which up to 140 warning, error and alarm messages can be saved.Error store confirm with No. Source Code Type 11 Control 10 Safety 9 Control 1 Alarm 53 Error 53 Error Low Level Pump ESC 8.2.2 OK . The newest message is located in the first position. Navigate with or through the events which are sorted by date. The message text appears in the footer. The relevant module which is causing the message is displayed under "Source". "Code" is the coded alarm, warning or error description. "Type" specifies alarm, warning or error. You will find the list of alarms and warnings in the appendix ( 13). Standby Device data Device data T_int T_lp T_b_s T_a T max_s ESC YAMD0024 OK 24.73 °C 30.31 °C 22.64 °C 20.31 °C 60 °C confirm with . The device parameters are displayed under the menu point Device data. Standby Maintenance 33 VISCOCOOL 6 8.2.3 Software version SW version Control Safety Cool Ext Pt Analog ESC 8.2.4 OK 1.24.16 1.12 1.05 1.08 2.01 confirm with . Under the menu point SW version the appropriate software versions are displayed, depending on the device type and connected modules. Standby Displaying and changing the device type Type confirm with . The device type without the suffix "S" (SILVER) is shown in the menu. Note: When changing over, all parameters are reinitialized and the control parameters you have adapted are lost! Consequently, the type change has a 3 second key depression delay. The overtemperature switch-off point Tmax is automatically adjusted to the selected device type. Now you have to manually re-enter Tmax ( 7.4.1), because otherwise the device goes into the error status (error message in ECO SILVER: "Tmax diff. C to S"). 8.2.5 Displaying serial numbers Serial numbers Control LCD0292-13-0002 Ext Pt ESC 34 OK confirm with . The serial numbers of Control and Safety are displayed under the menu point Serial numbers. Provided they are available, the serial numbers of connected modules are also displayed. Standby Maintenance YAMD0024 VISCOCOOL 6 8.3 Servicing Follow all the safety instructions when cleaning or maintaining the device. Critical temperature of device parts, heat transfer liquid or accessories (hoses) Burns, scalds Caution ! 8.3.1 Bring the device parts, accessories and heat transfer liquid to room temperature before touching them. Have repairs carried out only by a specialist. Cleaning Live parts in contact with cleaning agents Electric shock hazard Warning ! Disconnect the device from the mains before cleaning. Cleaning can be carried out using water with a few drops of a surfactant (washing-up liquid) added and with the aid of a damp cloth. Notice Live parts in contact with cleaning agents Property damage Disconnect the device from the mains before cleaning. Water and other liquids must not enter the controller. Clean the control head only with the cleaning agents water (with washing-up liquid), benzine or spirit. Do not use acetone or aromatic hydrocarbons (thinners). This would result in permanent damage to the plastic surfaces. Before all maintenance or cleaning work it must be ensured that decontamination of the device is carried out if it has been in contact with hazardous materials. YAMD0024 Maintenance 35 VISCOCOOL 6 8.3.2 Servicing intervals to VDI 3033 Device part Mandatory with initial oper- Section ation and before longer unsupervised operation, recommended frequency thereafter Remarks Complete device External condition of device Monthly Heat transfer liquid Inspecting the heat transfer every six months liquid ( 8.3.3) Bath vessel with drain tap Sealing Daily External inspection Electronics Overtemperature protection Quarterly ( 8.1.1) Low-level protection Quarterly ( 8.1.2) Bring the device parts and accessories to room temperature before touching them. 8.3.3 Inspecting the heat transfer liquid If the heat transfer liquid becomes contaminated or degenerated, it must be renewed. If required, but at least every six months, the heat transfer liquid must be inspected for usability. Further use of the heat transfer liquid is only permissible if the inspection indicates this. The test of the heat transfer liquid takes place according to DIN 51529; ("Testing and assessment of used heat carrier media"). Source: VDI 3033; DIN 51529. Critical temperature of the heat transfer liquid Scalding Bring the heat transfer liquid to room temperature for the analysis. Caution ! 36 Maintenance YAMD0024 VISCOCOOL 6 8.4 Fault finding Before you contact the LAUDA Service ( 8.7), check whether you can rectify the faults yourself with the hints described further below. Comply with the following safety information: Live parts when fault finding Electric shock hazard Warning ! Disconnect the device from the mains before the repair (e.g. when changing components). Have the repair carried out only by a specialist. Rotating / live parts when removing the ventilator fan Cuts, crushing, electric shock hazard Warning ! Disconnect the device from the mains before the repair. Have the repair carried out only by a specialist. Uncontrolled start-up on release of jammed pump Crushing, electric shock hazard Warning ! Disconnect the device from the mains before the repair. Have the repair carried out only by a specialist. Critical temperature of device parts, heat transfer liquid or accessories (hoses) Burns, scalds Caution ! Bring the device parts, accessories and heat transfer liquid to room temperature before touching them. Have repairs carried out only by a specialist. Affix the symbol "Hot surface". Fault Possible remedy Device does not cool Temperature limit Til too high Reduce temperature limit Til 7.4.5. Device does not heat up Temperature limit Tih too low Increase temperature limit Tih ( 7.4.5). Device does not pump Check selector switch for dividing up the external and internal pump flow ( 6.1); pump blocked by foreign bodies. YAMD0024 Maintenance 37 VISCOCOOL 6 8.5 Disposal information The following applies to Europe: The disposal of this device must only be carried out by qualified specialist staff according to EC Directive 303/2008/EC in conjunction with 842/2006/EC. The disposal must be carried out according to the EC Directive 2002/96/EC. For Germany ChemKlimaschutzV applies. 8.5.1 Disposal of the packaging The following applies to Europe: The disposal of the packaging must be carried out according to the EC Directive 94/62/EC. For Germany the Packaging Act (VerpackV) applies. 8.6 Decommissioning of the device The device must be decommissioned by a specialist. Comply with the following safety information: Contact with hot heat transfer liquid Scalding Caution ! Bring the heat transfer liquid to room temperature before draining. Drain the device and any accessories before packing thoroughly. Contact with hot surfaces Burns Caution ! Bring the surfaces to room temperature before touching them. Falling / toppling equipment Crushing of hands and feet, impacts Use the handles. Caution ! 38 Maintenance YAMD0024 VISCOCOOL 6 8.7 Ordering replacement parts / LAUDA Service When ordering replacement parts state the serial number from the rating label; this helps to avoid queries and incorrect deliveries. The serial number is composed as follows, e.g. LCK1910-11-0001 LCK1910 = Order number 11 = Year of manufacture 2011 0001 = Incremental numeration Your contact for maintenance and expert service support. LAUDA Service Phone: +49 (0)9343/ 503-236 (English and German) Fax: +49 (0)9343/ 503-222 E-mail [email protected] We are available at any time for queries and ideas! LAUDA DR. R. WOBSER GMBH & CO. KG Postbox 1251 97912 Lauda-Königshofen Germany Phone: +49 (0)9343/ 503-0 Fax: +49 (0)9343/ 503-222 E-mail [email protected] Internet http://www.lauda.de/ 9 Accessories Please refer to the following table for order numbers for accessories. Accessories Order number Upper module receptacle approx. 57 x 27 mm Analog module LRZ 912 RS 232/485 interface module LRZ 913 Contact module with 1 input and 1 output LRZ 914 Contact module with 3 inputs and 3 outputs LRZ 915 Profibus module LRZ 917 Lower module receptacle approx. 57 x 17 mm External Pt100/LiBus module LRZ 918 Remote control unit Command* LRT 914 * functions only in conjunction with LRZ 918. YAMD0024 Maintenance 39 VISCOCOOL 6 10 Technical data and graphs The figures were determined according to DIN 12876. Ambient temperature range °C Relative humidity 5 ... 40 Maximum relative humidity 80% at 31°C and decreasing linearly to 50% up to 40°C. Contamination level 2 Setting resolution K ±0,01 Display resolution K ±0,01 Absolute accuracy K ±0.3 K and ±0.5 % of the relative measurement Temperature stability K ± 0.01 Temperature measurement Pump type/number of power levels Pressure pump/6 Discharge pressure, max. Discharge flow, max. bar 0.55 L/min 22 Display field LCD display 3.0"; 128 x 64 pixel Programmer One program with a total of 20 temperature/time segments ( 15) Standard interface Mini-USB Class of protection IP 21 Classification lII Overvoltages Overvoltage Category II and transient overvoltages according to Category II. Class of protection for electrical operating equipment DIN EN 61140 (VDE 0140-1) Class I ECO SILVER 230 V 220 V 115 V 100 V Working temperature range °C Heater rating / power consumption kW 1.3 / 1.4 1.2 / 1.3 1.3 / 1.4 1 / 1.1 W/cm² 6.8 6.2 6.8 5.1 Heater surface loading 15…90 Bath depth mm 330 Overall dimensions (W x D x H) mm 206 x 415 x 530 Weight kg 17.0 Mains connection 230 V; 50/60 Hz 17.0 17.0 17.0 Order number LCD 0292 --- --- --- 220 V; 60 Hz --- --- --- --- 115 V; 60 Hz --- --- LCD 4292 --- 100 V; 50/60 Hz --- --- --- LCD 6292 at Pump power level 1 40 Technical data YAMD0024 VISCOCOOL 6 Pump characteristic ECO SILVER 0,6 Pump characteristics Pumpenkennlinien measured with water gemessen mit Wasser 0,5 Stage 6 Discharge pressure in bar Förderdruck [bar] 0,4 Stage 5 Stage 4 0,3 Stage 3 0,2 Stage 2 0,1 Stage 1 0 0 5 10 15 20 25 30 Förderstrom [L/min] Flow rate in L/min Homogeneity of Viscocool at 20°C, Pump Level 6 20,020 20,015 20,010 20,005 20,000 19,995 19,990 19,985 10:15:08 10:16:48 10:18:28 10:20:08 10:21:48 10:23:28 10:25:08 10:26:48 10:28:28 10:30:08 10:31:48 10:33:28 10:35:08 10:36:48 10:38:28 10:40:08 10:41:48 10:43:28 10:45:08 10:46:48 10:48:28 10:50:08 10:51:48 10:53:28 10:55:08 10:56:48 10:58:28 11:00:08 19,980 YAMD0024 Technical data 41 10:40:15 10:52:35 11:04:55 11:17:15 11:29:35 11:41:55 11:54:15 12:06:35 12:18:55 12:31:15 12:43:35 12:55:55 13:08:15 13:20:35 13:32:55 13:45:15 13:57:35 11:30:42 11:33:02 11:35:22 11:37:42 11:40:02 11:42:22 11:44:42 11:47:02 11:49:22 11:51:42 11:54:02 11:56:22 11:58:42 12:01:02 VISCOCOOL 6 Viscocool heating curve 79,000 69,000 59,000 42 Heat transfer liquid: Water, bath closed. 49,000 39,000 29,000 19,000 Viscocool cooling curve 26,000 24,000 22,000 Heat transfer liquid: Water, bath closed. 20,000 18,000 16,000 14,000 Technical data YAMD0024 VISCOCOOL 6 11 Index A Heating curves ...................................................42 Acoustic signals ................................................... 46 Alarms ......................................................31, 32, 50 Ambient temperature ........................................... 40 Analog module ...............................................12, 66 Assembly ............................................................. 18 Autostart .............................................................. 48 I B L Basic window ....................................................... 25 Labview ................................................................78 Language .............................................................30 Loops ...................................................................59 Low level ..............................................................32 C Calibration ............................................................ 49 Chiller ................................................................... 47 Cleaning ............................................................... 35 Contact Module..............................................12, 80 Control panel...................................................... 14 Control parameters .............................................. 60 Cooling water ....................................................... 19 Correcting quantity limit ....................................... 61 Curr.Consumpt. ................................................... 48 Cursor keys .......................................................... 14 D Damping .............................................................. 60 Damping time....................................................... 61 Derivative time ...............................................60, 61 Device data .......................................................... 33 Device status ....................................................... 33 Device type .......................................................... 34 Display brightness ............................................... 47 Display representation ......................................... 25 Disposal .........................................................19, 38 Drain tap .............................................................. 18 E EMC requirement DIN EN 61326-1 ....................... 7 Emptying .............................................................. 18 Entry window ....................................................... 27 Error ..................................................................... 31 Error messages ................................................... 31 Error store ............................................................ 33 EXT ...................................................................... 15 External control ................................................. 53 External temperature sensor ............................... 12 F Factory calibration ............................................... 49 Factory settings ................................................... 46 Filling.................................................................... 18 Flow distribution (pump) ...................................... 15 G Gain ..................................................................... 61 H INT .......................................................................15 Interfaces ...................................................... 12, 65 K Kpe .......................................................................61 M Mains connection .................................................20 Maintenance ........................................................31 Menu structure .....................................................24 Menu window .......................................................26 O Offset, temperature sensor ..................................49 Operating controls................................................13 Operation .............................................................22 Ordering replacement parts .................................39 Overtemperature protection .................................31 Overtemperature switch-off point.........................27 P Profibus Module ...................................................12 Programmer .........................................................55 Prop_E .................................................................61 Proportional range .................................. 60, 61, 62 Pump ....................................................................11 Pump characteristic ..........................................41 Pump level ...........................................................29 R Repair ..................................................................35 Reset time ..................................................... 60, 61 RS 232/485 interface module ....................... 12, 67 S Safety .....................................................................6 Safety information ..................................................6 Serial number.......................................................39 Serial numbers .....................................................34 Servicing ..............................................................35 Servicing intervals ................................................36 Setpoint offset ......................................................54 Set-point, bath temperature .................................28 Soft key ................................................................14 Software version ..................................................34 Standby ................................................................29 Starting mode.......................................................48 Heat transfer liquids ............................................. 36 YAMD0024 Index 43 VISCOCOOL 6 T Td .........................................................................60 Tde .......................................................................61 Technical data .....................................................40 Temperature ambient temperature ........................................18 set-point value ..................................................28 Temperature control liquid changing .........................................................18 draining ............................................................18 Temperature limits ...............................................30 Tn .........................................................................60 Tne .......................................................................61 Tv .........................................................................60 44 Tve ...................................................................... 61 Type .................................................................... 34 U Unpacking ........................................................... 17 USB interface ................................................ 11, 70 W Warnings ....................................................... 31, 50 X Xp ........................................................................ 60 Xpf ....................................................................... 62 Technical data YAMD0024 VISCOCOOL 6 Appendix with settings The adjustments described in this appendix are intended for specially qualified personnel. YAMD0024 45 VISCOCOOL 6 12 Other settings 12.1 Resetting to factory settings You activate the soft-key bar by pressing any key. all default Control ESC OK Standby all default Ctrl.param.int. Ctrl.param.ext. Internal Pt100 miscellaneous ESC OK Standby no yes ESC OK By pressing 12.2 . or Access to the main menu level is obtained by pressing the enter key . Selection and confirmation of Setup Factory Setting. The adjacent menu window appears. If all default is selected, you can choose between "no" and "yes". With no you return to the "Factory Setting" menu level without changes being made. With yes all settings are reset. By selecting Control you can select the displayed parameters with or . The parameters can be reset individually. With "Miscellaneous" the following can be reset: set value, pump level, max. current consumption, control to "internal" and autostart to "auto". For all menu points under "Control", you can choose between "no" and "yes". With or select "yes" to reset the respective parameter. If "no" is selected, the parameters remain unchanged. Standby (ESC) you are returned to the menu level without changes. Setting the volume of the acoustic signals The ECO SILVER thermostats signal alarms and errors as a two-tone acoustic signal. Warnings are signaled as a continuous tone. You activate the soft-key bar by pressing any key. loud medium low off ESC By pressing 46 OK (ESC), Standby or Access to the main menu level is obtained by pressing the enter key . Selection and confirmation of Setup Basic setup. Acoustic signal. Choose Alarm, Warn or Error. The adjacent menu window appears. The volume is selected with or . The selected level is immediately active without confirmation. (In this example the volume is Medium. you are returned to the menu level without changes. Appendix with settings YAMD0024 VISCOCOOL 6 12.3 Setting the chiller The chiller of the cooling thermostats is normally operated in the "automatic" operating mode. Here, the chiller switches on or off automatically depending on the temperature and operating status. However, you can also switch the chiller on or off manually. You activate the soft-key bar by pressing any key. off on automatic ESC By pressing . OK or Standby Access to the main menu level is obtained by pressing the enter key . Selection and confirmation of Cooling. The adjacent menu window appears. Setup With or and you select and confirm the operating status "off", "on" or "automatic". In the menu the set operating status is displayed by a tick . (ESC) you are returned to the menu level without changes. Note: When the chiller is switched off, it can take up to two minutes before it switches on again. 12.4 Setting the display brightness The thermostats of the ECO equipment line have a sensor which automatically adapts the display brightness according to the ambient light level. However, the automatic adaptation can be deactivated and the brightness set manually. You activate the soft-key bar by pressing any key. automatic Stage 5 Stage 4 Stage 3 Stage 2 ESC By pressing YAMD0024 . OK (ESC), Access to the main menu level is obtained by pressing the enter key . Selection and confirmation of Setup Basic setup. Display Brightness. The adjacent menu window appears. Select "automatic", "Stage" or "off" with or . The selected stage is immediately active without confirmation. Standby or you are returned to the menu level without changes. Appendix with settings 47 VISCOCOOL 6 12.5 Defining the starting mode (Autostart) Generally it is required that the thermostat starts operating again after a power interruption. For e.g. safety considerations, you can insert a manual activation step. You activate the soft-key bar by pressing any key. Access to the main menu level is obtained by pressing the enter key . off on ESC By pressing 12.6 . OK or Standby Selection and confirmation of Setup Basic setup. Autostart. The adjacent menu window appears. Select the operating status "off" or "on" with or and confirm with . If "off" is selected, standby operation is activated after a mains interruption. With the setting "on" the device continues running straight after the mains interruption. (ESC) you are returned to the menu level without changes. Limiting the mains current consumption If your mains fusing is below 16 A, the current consumption can be reduced in steps from 16 A to 8 A. The maximum heating power is reduced correspondingly. Here, take into consideration whether other loads are connected to the same fused circuit or whether your ECO thermostat is the only load. You activate the soft-key bar by pressing any key. Curr.Cons. Min: 8.00 Max: 16.00 16.00 ESC By pressing 48 OK --- Access to the main menu level is obtained by pressing the enter key . Selection and confirmation of Setup Basic setup. Curr.Consumpt.. The entry window appears. Change the value with or . Single figures can be selected by pressing or . Confirm the entry with the enter key . (ESC) you are returned to the menu level without changes. Appendix with settings YAMD0024 VISCOCOOL 6 12.7 Entering the offset of the displayed temperature (calibration) Deviations to calibrated reference thermometers (e.g. LAUDA DigiCal) can be internally corrected with the "Offset" function. You activate the soft-key bar by pressing any key. Access to the main menu level is obtained by pressing the enter key . Selection and confirmation of Setup Calibration. The adjacent menu window appears. Calibration Factory calibration Select Calibration with ESC OK Standby Temp. ref. device Min: -22.0 2Max: 28.02 or and confirm with . The entry window appears. The value indicated on the reference thermometer must be entered as the value. Change the value with or . Single figures can be selected by pressing or . By pressing (+/-) the arithmetic sign can be changed. You confirm the set value by pressing . 25.02 ESC OK By pressing 12.8 +/- (ESC) you are returned to the menu level without changes. Restoring the factory setting of the internal temperature sensor (factory calibration) If the offset has been adjusted, the factory setting (factory calibration) can be restored again. You activate the soft-key bar by pressing any key. Access to the main menu level is obtained by pressing the enter key . Selection and confirmation of Setup Calibration. The adjacent menu window appears. Calibration Factory calibration Select and confirm "Factory Calibration" with ESC OK no yes ESC With "no", YAMD0024 Standby or and . The adjacent menu window appears. Select "yes" using factory settings. or and confirm with to restore the . OK (ESC), or Standby you are returned to the menu level without changes. Appendix with settings 49 VISCOCOOL 6 13 List of "Alarm and warning codes" Alarms Alarm code 1 2 3 4 5 9 10 11 12 13 15 Low Level Pump Low Level Pump Overtemperature Pump blocked Connection Command T ext Pt100 T ext analog T ext serial Input Analog 1 Input Analog 2 Digital Input Meaning Pump runs too fast (low level) Low level in the float Overtemperature (t> Tmax) Pump blocked standstill Remote control unit command triggered in running operation External Pt100 actual value is not present. External analog actual value is not present. External serial actual value is not present. Analog module: Current interface 1, interruption Analog module: Current interface 2, interruption Error on digital input Warnings Code 0XX Control system 1 CAN receive overf 2 Watchdog Reset 3 T_il limit active 4 T_ih limit active 5 6 7 8 9 10 11 12 50 13 14 15 16 17 18 19 20 21 26 corrupt parameter corrupt progr Invalid Parameter CAN system Unknown module SW control too old SW safety too old SW command too old SW cool too old SW analog too old SW serial too old SW contact old SW Valve 0 old SW Valve 1 old SW Valve 2 old SW Valve 3 old SW Valve 4 old SW HTC old 27 33 41 42 43 44 45 SW Ext Pt100 old RTC wrong data wrong net voltage no eco type no eco voltage chiller missing Diff.voltages Meaning Code 3XX SmartCool Overflow during CAN reception Watchdog reset til limit active tih limit active 1 2 3 4 inadmissible internal parameter inadmissible programmer data inadmissible parameter in memory Problem during internal data interchange Unknown module connected Software version of control panel too old Software version of protection too old Software version of command remote control unit too old Software version of cooling module too old Software version of analog too old Software version of RS232 too old Software version of contact module too old Software version of solenoid valve 0 too old Software version of solenoid valve 1 too old Software version of solenoid valve 2 too old Software version of solenoid valve 3 too old Software version of solenoid valve 4 too old Software version of high temperature cooler too old Software version of external Pt100 too old Internal clock defective Incorrect mains voltage setting Device type not configured Mains voltage not configured Chiller not running Different mains voltage configured (head and cooling underpart) 5 6 7 8 9 10 11 12 Meaning Overflow during CAN reception Watchdog reset No adaption run Pressure switch in cooling circuit triggered 13 14 15 16 17 18 19 20 21 26 CAN receive overf Watchdog Reset adaption missing Pressure switch activated Clean condenser TO1 range Klixon Invalid Parameter CAN system Unknown Module SW control too old SW safety too old SW command too old SW cool too old SW analog too old SW serial too old SW contact old SW Valve 0 old SW Valve 1 old SW Valve 2 old SW Valve 3 old SW Valve 4 old SW HTC old 27 33 34 35 36 37 38 SW Ext Pt100 old valve sm0 break valve sm1 break valve sm2 break valve sm3 break output sm0 output sm1 Clean condenser Injection temperature outside value range inadmissible parameter in memory Problem during internal data interchange Unknown module connected Software version of control panel too old Software version of protection too old Software version of command remote control unit too old Software version of cooling module too old Software version of analog too old Software version of RS232 too old Software version of contact module too old Software version of solenoid valve 0 too old Software version of solenoid valve 1 too old Software version of solenoid valve 2 too old Software version of solenoid valve 3 too old Software version of solenoid valve 4 too old Software version of high temperature cooler too old Software version of external Pt100 too old Cable of injection valve 0 defective Cable of injection valve 1 defective Cable of injection valve 2 defective Cable of injection valve 3 defective Triggering of injection valve 0 defective Triggering of injection valve 1 defective 39 40 41 42 43 44 output sm2 output sm3 sm0 min too small no eco type no eco voltage chiller missing Triggering of injection valve 2 defective Triggering of injection valve 3 defective Start value of injection valve too small Device type not configured Mains voltage not configured Chiller not running Appendix with settings YAMD0024 VISCOCOOL 6 Code 1XX Safety system 1 CAN receive overf 2 Watchdog Reset 5 Heat 1 failed 6 Heat 2 failed 7 Invalid Parameter 8 CAN system 9 Unknown Module Meaning Code 2XX Command Overflow during CAN reception Watchdog reset Heater 1 defective Heater 2 defective inadmissible parameter in memory Problem during internal data interchange Unknown module connected 1 2 3 9 10 11 12 13 14 15 16 17 18 19 SW control too old SW safety too old SW command too old SW cool too old SW analog too old SW serial too old SW contact old SW Valve 0 old SW Valve 1 old SW Valve 2 old Software version of control panel too old Software version of protection too old Software version of command remote control unit too old Software version of cooling module too old Software version of analog too old Software version of RS232 too old Software version of contact module too old Software version of solenoid valve 0 too old Software version of solenoid valve 1 too old Software version of solenoid valve 2 too old 20 21 26 SW Valve 3 old SW Valve 4 old SW HTC old 27 SW Ext Pt100 old Software version of solenoid valve 3 too old Software version of solenoid valve 4 too old Software version of high temperature cooler too old Software version of external Pt100 too old 10 11 12 Code 4XX Analog module 1 CAN receive overf 2 Watchdog Reset 9 Unknown Module 10 SW control too old 11 SW safety too old 12 SW command too old 13 SW cool too old 14 SW analog too old 15 SW serial too old 16 SW contact old 17 SW Valve 0 old 18 SW Valve 1 old 19 SW Valve 2 old 20 SW Valve 3 old 21 SW Valve 4 old 26 SW HTC old 27 YAMD0024 SW Ext Pt100 old Meaning Overflow during CAN reception Watchdog reset Unknown module connected Software version of control panel too old Software version of protection too old Software version of command remote control unit too old Software version of cooling module too old Software version of analog too old Software version of RS232 too old Software version of contact module too old Software version of solenoid valve 0 too old Software version of solenoid valve 1 too old Software version of solenoid valve 2 too old Software version of solenoid valve 3 too old Software version of solenoid valve 4 too old Software version of high temperature cooler too old Software version of external Pt100 too old Meaning 13 14 15 CAN receive overf Watchdog Reset Clock Error Unknown Module SW control too old SW safety too old SW command too old SW cool too old SW analog too old SW serial too old Overflow during CAN reception Watchdog reset Battery fault Unknown module connected Software version of control panel too old Software version of protection too old Software version of command remote control unit too old Software version of cooling module too old Software version of analog too old Software version of RS232 too old 16 17 18 19 20 21 26 SW contact old SW Valve 0 old SW Valve 1 old SW Valve 2 old SW Valve 3 old SW Valve 4 old SW HTC old Software version of contact module too old Software version of solenoid valve 0 too old Software version of solenoid valve 1 too old Software version of solenoid valve 2 too old Software version of solenoid valve 3 too old Software version of solenoid valve 4 too old Software version of high temperature cooler too old Code 5XX Serial (RS232/485) 1 CAN receive overf 2 Watchdog Reset 9 Unknown Module 10 SW Contr. too old 11 SW safety too old 12 SW command too old 13 SW cool too old 14 SW analog too old 15 SW serial too old 16 SW contact old 17 SW Valve 0 old 18 SW Valve 1 old 19 SW Valve 2 old 20 SW Valve 3 old 21 SW Valve 4 old 26 SW HTC old 27 SW Ext Pt100 old Appendix with settings Meaning Overflow during CAN reception Watchdog reset Unknown module connected Software version of control panel too old Software version of protection too old Software version of command remote control unit too old Software version of cooling module too old Software version of analog too old Software version of RS232 too old Software version of contact module too old Software version of solenoid valve 0 too old Software version of solenoid valve 1 too old Software version of solenoid valve 2 too old Software version of solenoid valve 3 too old Software version of solenoid valve 4 too old Software version of high temperature cooler too old Software version of external Pt100 too old 51 VISCOCOOL 6 Code 6XX Switching contacts 1 2 9 10 CAN receive overf Watchdog Reset Unknown Module SW Contr. too old Overflow during CAN reception Watchdog reset Unknown module connected Software version of control panel too old 11 12 13 14 SW safety too old SW command too old SW cool too old SW analog too old Software version of protection too old Software version of command remote control unit too old Software version of cooling module too old Software version of analog too old 15 16 17 18 19 20 21 26 SW serial too old SW contact old SW Valve 0 old SW Valve 1 old SW Valve 2 old SW Valve 3 old SW Valve 4 old SW HTC old 27 SW Ext Pt100 old Software version of RS232 too old Software version of contact module too old Software version of solenoid valve 0 too old Software version of solenoid valve 1 too old Software version of solenoid valve 2 too old Software version of solenoid valve 3 too old Software version of solenoid valve 4 too old Software version of high temperature cooler too old Software version of external Pt100 too old Code 1 2 3 7 8 9 10 11 12 13 14 15 16 17 18 19 20 21 26 27 52 Meaning 17XX Pt100/LiBus module CAN receive overf Watchdog Reset Ext_Pt_short Invalid Parameter CAN system Unknown Module SW Contr. too old SW safety too old SW command too old SW cool too old SW analog too old SW serial too old SW contact old SW Valve 0 old SW Valve 1 old SW Valve 2 old SW Valve 3 old SW Valve 4 old SW HTC old SW Ext Pt100 old Code 7, 8, 9, 10, 11, 16XX Solenoid valve 1 CAN receive overf 2 Watchdog Reset 3 No cooling liquid 6 no unfill liquid too hot 9 Unknown Module 10 SW Contr. too old Meaning Overflow during CAN reception Watchdog reset No cooling liquid present (HTC) No draining, because bath temperature is too hot (HTC) Unknown module connected Software version of control panel too old 13 14 15 16 17 18 19 20 SW safety too old SW command too old SW cool too old SW analog too old SW serial too old SW contact old SW Valve 0 old SW Valve 1 old SW Valve 2 old SW Valve 3 old Software version of protection too old Software version of command remote control unit too old Software version of cooling module too old Software version of analog too old Software version of RS232 too old Software version of contact module too old Software version of solenoid valve 0 too old Software version of solenoid valve 1 too old Software version of solenoid valve 2 too old Software version of solenoid valve 3 too old 21 26 SW Valve 4 old SW HTC old 27 SW Ext Pt100 old Software version of solenoid valve 4 too old Software version of high temperature cooler too old Software version of external Pt100 too old 11 12 Meaning Overflow during CAN reception Watchdog reset Line short on external Pt100 inadmissible parameter in memory Problem during internal data interchange Unknown module connected Software version of control panel too old Software version of protection too old Software version of command remote control unit too old Software version of cooling module too old Software version of analog too old Software version of RS232 too old Software version of contact module too old Software version of solenoid valve 0 too old Software version of solenoid valve 1 too old Software version of solenoid valve 2 too old Software version of solenoid valve 3 too old Software version of solenoid valve 4 too old Software version of high temperature cooler too old Software version of external Pt100 too old Appendix with settings YAMD0024 VISCOCOOL 6 14 External control The devices can also be controlled via an external Pt100 temperature sensor, which can be connected at the back of the control head. It is necessary to install an external Pt100/LiBus module ( 17) for external control. The module is available as an accessory ( 9). Furthermore, the signal coming from an analog or serial module can also be controlled. Analog module and contact modules are available as accessories ( 9). 14.1 Activating external control (external Pt100) You activate the soft-key bar by pressing any key. intern Pt100 extern Pt100 extern analog extern serial ESC By pressing OK or Access to the main menu level is obtained by pressing the enter key . Selection and confirmation of Setup Control Contr. Variable. The adjacent menu window appears. The menu item extern Pt100 only appears when the module for an external connection is available. A temperature sensor has to be connected to the module. Select and confirm extern Pt100 with Standby or and . (ESC) you are returned to the menu level without changes. Connection of the external Pt100 to Lemo socket 10 S Contact 1 2 3 4 + I + U - U - I Current path Voltage path Voltage path Current path Pt 100 DIN EN 60751 4-pole Lemosa plug for Pt100 connection (order no. EQS 022) Note: Only use screened connecting leads and connects the screen to the plug housing. YAMD0024 Appendix with settings 53 VISCOCOOL 6 14.2 Setpoint offset operating mode (Diff. set/actual) It is possible to apply an offset value to the temperature, which is provided by an external temperature sensor and to process it as the set value. The bath temperature can therefore be operated, for example, below the temperature of a reactor measured by the external temperature sensor. You activate the soft-key bar by pressing any key. Access to the main menu level is obtained by pressing the enter key . off extern Pt100 ESC OK Offset value Min: -500.0 Selection and confirmation of Control Setpoint offset. Offset source. The adjacent menu window appears. Standby Max: 500.0 -15.0 ESC By pressing 54 OK Setup Select and confirm the setpoint source with or and . The setpoint offset is deactivated with "off". The entry window appears on selecting the menu point Diff.set/actual. The minimum and maximum possible offset values and the current offset value are displayed. Change the value with or . Single figures can be selected by pressing or . By pressing (+/-) the arithmetic sign can be changed. Confirm your choice with the enter key . +/- (ESC) you are returned to the menu level without changes. Appendix with settings YAMD0024 VISCOCOOL 6 15 Programmer The programming function enables you to save a temperature/time program. The program consists of a number of temperature/time segments and details about their repetition (loops). The total number of freely programmable segments is 20. Temperature step changes (time is zero) or also temperature retention phases for the same start and end temperatures in the segment are possible. On starting the current set value is taken as the starting value of the first segment. Changes to the pump level are entered in the relevant line. If the pump level is to remain unchanged, "0" is entered (display shows "---") 15.1 Programming example The graph shows as an example the reprogramming of a set-point temperature trace. Cooling time dependent on device type, load, etc. Example seg. no. 2: "reach 50°C within 20 minutes" The original values ("before" table) are illustrated with a continuous line and the edited trace ("after" table) with a broken line. In the edited table a new segment has been entered, and the segment time , tolerance and pump level have been changed ( 15.2). before (____) 1 2 3 4 5 6 Tend 30.00 50.00 70.00 70.00 60.00 30.00 hh:mm ---0:20 0:40 0:10 0:30 0:00 Tol. 0.1 0.0 0.0 0.1 0.0 0.0 1 2 3 4 5 6 Pmp 2 2 3 4 2 2 S1 off off off off off off S2 off off off off off off S3 off off off off off off after (- - - -, edited) 1 2 3 4 5 6 7 YAMD0024 Tend 30.00 50.00 50.00 hh:mm ---0:20 0:20 Tol. 0.1 0.0 0.1 1 2 3 Pmp 2 2 3 S1 off off off S2 off off off S3 off off off 70.00 70.00 60.00 30.00 0:20 0:10 0:30 0:00 0.0 0.8 0.0 0.0 4 5 6 7 4 2 2 2 off off off off off off off off off off off off Appendix with settings 55 VISCOCOOL 6 The tolerance entry can have a large effect with external bath control. The adjacent graph of the edited trace shows the possible run-on of the actual temperature in the bath vessel (continuous line) for the set-point temperature of the programmer (highlighted in gray). Note: The tolerance field facilitates exact conformance to the dwell time at a specified temperature. The following segment is only processed when the actual temperature reaches the tolerance band , so that for example the ramp of segment 2 is only started delayed at . A tolerance range which is too tight can however also cause undesired delays. In particular with external control the range should not be chosen too tightly. In Segment 5 a larger tolerance has been entered, so that the desired time of ten minutes is maintained even with settling action . Only flat (slow) ramps should be programmed where necessary with a tolerance range. Steep ramps which lie close to the maximum possible heating or cooling rates of the thermostat may be severely delayed by a tolerance range that is too tight (here in Segment 2) . Note: No time specification is possible in the start segment (no.1). The temperature of the first segment is attained as quickly as possible in order to switch to segment 2 after reaching the set tolerance. 15.2 Creating and editing a program The following functions are explained below: Creating and editing a program. Insert or append a new segment. Delete a segment. Note: New segments can be inserted and existing ones changed, even when a program is currently being executed. Furthermore, except for the currently active segment, all segments can be deleted at any time. Changes to the currently running segment are possible. The segment is continued as though the change has been valid since the start of the segment. If the new segment time is shorter than the already expired segment time, then the program skips to the next segment. 56 If a segment time is required > 999h:59 min, then this time must be spread over several consecutive segments. Appendix with settings YAMD0024 VISCOCOOL 6 Creating and editing a program. 1 2 3 4 Tend hh:mm 35.00 40.00 50.00 70.00 --:-0:10 0:20 0:50 ESC new Pmp 1 2 3 4 1 1 2 2 ESC Compare programming example ( 15.1) Tol. 0.1 0.1 0.0 0.1 delete S1 S2 on on on on --------- OK S3 off off off off You access the editor view of the programmer by selecting and confirming Programmer Edit. To view the complete window information go to the right with . With the keys , , and you obtain access to the individual segment fields. If the cursor is located in the first column, the functions "new" and "delete" are visible in the soft-key bar. Program steps can be created or deleted in this way. With all other cursor positions the function "OK" is visible in the soft-key bar. Using (OK) you can select the appropriate parameters and change them with or . --- You can quit the edit window without changes using (ESC). When the cursor is located on a segment number, using you return to the menu level of the programmer without changes. Note: No time specification is possible in the start segment. The temperature of the first segment is attained as quickly as possible in order to switch to segment 2 after reaching the set tolerance. The programmer edit window contains the following parameters: The segment number of the program is located in the first column. Tend: Final temperature to be attained hh:mm: Time in hours (hh) and minutes (mm) in which the specified temperature is to be attained. If the value "0:00" is entered in the field "hh:mm", the set value is accepted immediately and the bath temperature approached as quickly as possible. Tol.: Tolerance defines how exactly the final temperature is to be attained before the next segment is processed. If the tolerance range is selected too small in the "Tol." field, the program might not continue, because the required tolerance is not achieved. Pmp: Pump level at which the segment is to be processed. S1, S2, S3: Switching contacts of the contact module (if present) can be programmed here. Contact modules are available as accessories ( 9). The setting "- -" stands for no change to the preceding segment, i.e. if "- -" is present in all fields, the contact setting of the start setup or that before the program start is retained. Inserting a new segment 1 2 3 4 ESC YAMD0024 Tend hh:mm 35.00 40.00 50.00 70.00 --:-0:10 0:20 0:50 new Tol. 0.1 0.1 0.0 0.1 With or go to the segment number under which the new segment is to be inserted. The new segment is inserted on pressing edit it as described above. (new). You can delete Appendix with settings 57 VISCOCOOL 6 Deleting a segment 1 2 3 4 ESC 15.3 Tend hh:mm 35.00 40.00 50.00 70.00 --:-0:10 0:20 0:50 new Tol. 0.1 0.1 0.0 0.1 Go to the segment to be deleted with or . The corresponding segment is deleted on pressing (delete). delete Starting the program You activate the soft-key bar by pressing any key. The submenu Status appears by selecting and confirming Programmer. With the menu Status you can execute the following commands Start Start program Status Edit Loops Info ESC OK Start ESC OK 1 24.85 Tint 24.73 °C Display 58 Menu Standby . Hold Hold program Continue Continue program Stop Terminate program by pressing the enter key . You can also pause the programmer with (Standby). When "Standby" is deactivated, the programmer continues running. Instructions which cannot be executed due to the situation are not displayed. Continue therefore only appears if Hold has been activated. Standby If the programmer is in operation, with an active soft-key bar this is indicated at the lower right. 25,00 Tset Text Prog. Appendix with settings YAMD0024 VISCOCOOL 6 15.4 Interrupting, continuing or terminating the program Hold Stop After the program start the menu points Hold and Stop are displayed. The options can be selected with or . Hold Interrupt program Stop Terminate program. . Confirm with the enter key ESC OK Continue Stop ESC OK . Standby To continue a program held by Hold Select the option Continue with or . . Confirm your choice with the enter key . Standby Also (Standby) holds the programmer. Pump, heating and chiller are here switched off. When (Standby) is pressed again, the programmer returns to the previously selected operating mode (Hold or active operation): 15.5 Defining the number of program loops (Loops) Status Edit Loops Info Programs can be processed many times. The submenu Loops appears by selecting and confirming Programmer. . Select and confirm Loops with Enter the desired number with or or and . Confirm your choice with the enter key ESC OK Loops (0, endlessly) Min: 0 By pressing YAMD0024 OK . Standby Max: 250 1 ESC . Note: To enter two or three-figure numbers move the cursor to the appropriate point and change the figures with or . If "0" is entered, the program is continuously repeated. --- (ESC) you are returned to the menu level without changes. Appendix with settings 59 VISCOCOOL 6 16 Control parameters The control parameters have been optimized at the factory for operation as a bath thermostat (with water as the heat transfer medium) with internal control. The standard parameters are already preset for thermostatic stabilization with external control. Depending on the application, the configuration can be adapted from case to case as required. Also the thermal capacity and the viscosity of the heat transfer medium affect the control behavior. Note: Only change the control parameters if you have sufficient knowledge of control techniques. 16.1 Internal control variable (internal temperature sensor) If you have not connected any temperature sensor, read further here. For activated external control read ( 16.2). The control compares the set-point temperature with the current bath temperature and calculates the set value for heating or cooling. These control parameters can be set: Description Short form Unit Proportional range Xp K Reset time Tn s Derivative time Tv s Damping Td s If " Tv manual/auto" is set to "a" (automatic), Tv and Td cannot be changed. They are in this case derived from Tn with fixed factors. Consider the effect of the temperature limits Tih and Til ( 7.4.5) on the control. You activate the soft-key bar by pressing any key. Xp 10.0 Tn 30 Tv man/auto a Tv 24 (a) Td 4.0 (a) ESC 60 OK Standby Access to the main menu level is obtained by pressing the enter key . Selection and confirmation of Setup Control Contr.parameter intern Pt100. The adjacent menu window appears. Apart from the control parameters the currently set values are displayed. Under the menu point "Tv man/auto" you can select between manual and automatic entry using . The selection is indicated in the menu line by a (automatic) or m (manual). If "automatic" is selected, the entry is blocked for the parameters Tv and Td. Appendix with settings YAMD0024 VISCOCOOL 6 Select and confirm parameters with Xp Min: 0.1 or Confirm your choice with the enter key By pressing 16.2 OK . The respective edit window appears with Min and Max figures for the parameter values Xp, Tn, Tv and Td. Change the value with or . Single figures can be selected by pressing or . Max: 50.0 12.0 ESC and . --- (ESC) you are returned to the menu level without changes. External control variable The setting options illustrated in this section are only possible with a connected external temperature sensor or with an existing module (as activated as control variable in Section 14) for reading in the actual temperature. The control system for external actual values is realized as a two-stage cascade controller to improve the response to setpoint changes. From the temperature setpoint and the external temperature, which is generally measured by the external Pt100, a "master controller" determines the "internal setpoint" which is passed to the slave controller. Its set value controls the heating and cooling. Correcting quantity limit If a step change in set-point temperature is specified, the optimum control might set an outflow temperature which is substantially higher than the temperature desired on the external vessel. With the correction limitation the maximum permissible deviation between the temperature on the external load and the outflow temperature can be limited. The limit can be set via a menu point. 0 These parameters can be set on the master controller (PIDT or external controller): Description Short form Unit Kpe - Prop_E K Reset time Tne s Derivative time Tve s Damping time Tde s Gain Proportional range YAMD0024 Appendix with settings 61 VISCOCOOL 6 These parameters can be set on the slave controller (P-controller): Description Proportional range Short form Unit Xpf K If "Tv manual/auto" is set to "automatic", Tve, Tde and Prop_E cannot be changed. Tve and Tde are in this case derived from Tne with fixed factors. You activate the soft-key bar by pressing any key. Kpe 0.5 Tne 100 Xpf 4.0 Tv man/auto a Tve 280 (a) ESC OK Standby Access to the main menu level is obtained by pressing the enter key . Selection and confirmation of Setup Control Contr.parameter extern Pt100. The adjacent menu window appears. Apart from the control parameters the currently set values are displayed. Under the menu point "Tv man/auto" you can select between manual and automatic entry using . The selection is indicated in the menu line by "a" (automatic) or "m" (manual). If "automatic" is selected, the entry is blocked for the parameters Tv and Td. Select and confirm parameters with Kpe Min: 0.01 Max: 30.0 2.0 ESC By pressing 62 OK or and . The respective edit window appears with Min and Max figures for the parameter values Kpe, Tne, Tve, Tde and Xpf. Change the value with or . Single figures can be selected by pressing or . Confirm your choice with the enter key . --- (ESC) you are returned to the menu level without changes. Appendix with settings YAMD0024 VISCOCOOL 6 16.2.1 Setting the correction limitation You activate the soft-key bar by pressing any key. Contr. Variable . Control parameter Contr.para.sets Setpoint offset Corr.limit. 50.0 ESC OK Corr.limit. Min: 0.0 Standby Max: 500.0 Access to the menu level is obtained by pressing . Selection and confirmation of Setup Control. The adjacent menu window appears. Select and confirm Corr.limit. with or and . The adjacent menu window appears. The minimum and maximum possible values and the current value are displayed. Change the value with or . Single figures can be selected by pressing or . Confirm your choice with the enter key . 20.0 ESC By pressing 16.2.2 OK --- (ESC) you are returned to the menu level without changes. Procedure for setting the control parameters for external control 1. Activating external control ( 14.1). 2. Set the slave controller: 2.1. Parameter to auto ; Xpf in dependence of: Check or adjust device type ( 8.2.4). Select heat transfer liquid with as low-viscosity and with as high a thermal capacity as possible. Ranking list: Water, water/glycol Set pump level as high as possible, Ensure adequate circulation, 2.2. Set Xpf: With a tendency to oscillate with a short period of oscillation (e.g. 30 s) Xpf smaller, otherwise larger, with poor thermal coupling and a large mass needing temperature stabilization large (e.g. 2...5, possibly even larger), with good thermal coupling and a small mass to be stabilized in temperature small (e.g. 0.2..., 0.7), 3. Setting the master controller (PID controller): First start with Auto, then possibly continue with manual. 3.1. Setting Kpe: With a tendency to oscillate (long period of oscillation, e.g. 10 min) Kpe larger, otherwise smaller, 3.2. Setting Tne/ Tve/ Tde: Generally quite high values (Tne = 70 s ... 200 s; Tve = 50 s ... 150 s), with smaller values faster transient responses, otherwise slower transient responses and therefore less oscillation, Tve: To reduce transients increase Tve, otherwise vice versa, YAMD0024 Appendix with settings 63 VISCOCOOL 6 Tde (damping for Tve): generally approx. 10% of Tve. 4. Correction limitation ( 016.2.1) and temperature limits (Til/Tih) ( 7.4.5). Set according to the physical boundary conditions. 64 Appendix with settings YAMD0024 VISCOCOOL 6 17 Interface modules 17.1 Menu structure of the modules All existing menu points are shown. Modules and menu points which cannot be realized are however masked out. More extensive information can be found in the following sections. off on no yes Calibration Factory calibration Menu Status Job function Interface type minimal value maximal value Calibration closed open automatic Analog Input 1 Analog Input 2 Analog Output 1 Analog Output 2 Module Status Job function Interface type minimal value maximal value Calibration RS232 RS485 extern Pt100 Cooling valve Analog Interface serial interface Switch.contacts Mode Baud rate RS 485 address Input 1 Input 2 Input 3 Output 1 Output 2 Output 3 2400 4800 9600 19200 Job function Contact open Contact closed Contact open Contact closed Job function Diagnostics Temperature range Set-point temperature external act. temperature Pump power Voltage 0-10V Current 0-20mA Current 4-20mA off on Set-point temperature Controlled temperature Internal temperature Temperature extern Pt100 Temperature extern analog Temperature extern serial Set value Pump power Pump speed Voltage 0-10V Current 0-20mA Current 4-20mA off Fault Standby Programmer Change mode Control mode intern Pt100 extern Pt100 extern analog extern serial off Error diagnosis Standby temperature range Programmer Control mode All Messages Low level Overtemperature Errors only YAMD0024 Appendix with settings 65 VISCOCOOL 6 17.2 Analog module Analog Module (LAUDA order no. LRZ 912) has two inputs and two outputs, which are brought out to a six-pole DIN socket to Namur Recommendation (NE28). The inputs and outputs can be set independently of one another as a 0...20 mA, 4...20 mA and 0...10 V interface. Various functions can be selected for the inputs and outputs. Accordingly, the signal on the input is interpreted differently and different information appears on the output. In addition the interfaces can be freely scaled according to the set function. 20 V DC is available for measurement transducers. The following values can be defined via the inputs: Setpoint Value Setpoint temperature Ext. Actual temperature External actual temperature Pump power Pump power The following values can be output via the outputs: Setpoint value Setpoint temperature Controlled temperature The temperature to which the system is being controlled Internal temp. Actual temperature (bath temperature) Temp.extern Pt100 External actual temperature of Pt100 Temp.extern analog External actual temperature of the analog input Temp.extern serial External actual temperature of the serial interface Set value Set value Pump power Pump power Pump speed Pump speed In addition the interfaces can be freely scaled according to the set function with minimal value and maximal value. For example: 4 mA corresponds to 0°C and 20 mA corresponds to 100°C. Accuracy of the inputs and outputs after calibration better than 0.1 % of full scale. Inputs, current Inputs, voltage Outputs, current Outputs, voltage 66 Input resistance < 100 Ohm Input resistance > 50 kOhm Burden < 400 Ohm Load > 10 kOhm Appendix with settings YAMD0024 VISCOCOOL 6 Connection of analog inputs and outputs A six-pole round connector with screw lock and contact assignment according to DIN EN 60130-9 or IEC 130-9 are required. A suitable coupling plug is obtainable under the order no. EQS 057. View of socket (front) or solder side of plug: Socket 74S Contact 1 Contact 2 Contact 3 Contact 4 Contact 5 Contact 6 Output 1 Output 2 0 V reference potential Input 1 +20 V (max. 0.1 A) Input 2 Note: Only use screened connecting leads and connect the screen to the plug housing. 17.3 RS 232/485 interface module RS 232/485 Interface Module (order no. LRZ 913) with ninepole SUB-D socket. Electrically isolated using optocouplers. With the LAUDA instruction set, extensively compatible to Ecoline, Proline and Integral series. The RS 232 interface can be connected directly to the PC using a 1:1 contacted cable (order no. EKS 037, 2 m cable and EKS 057, 5 m cable). 17.3.1 Connecting lead and interface test RS 232 Computer Signal RxD TxD DTR Signal Ground DSR RTS CTS 9-pole Sub-D socket 2 3 4 5 6 7 8 2 3 5 Thermostat 25-pole Sub-D socket 3 2 20 7 6 4 5 3 2 7 9-pole Sub-D socket 2 3 4 5 6 7 8 2 3 5 Signal TxD RxD DSR Signal Ground DTR CTS RTS with hardware handshake: On connecting a thermostat to the PC use a 1:1 and not a null-modem cable. without hardware handshake: The operating mode "Without hardware handshake" must be set on the computer/PC. Use screened connecting leads. Connect screen to the plug housing. The wires are electrically isolated from the rest of the electronics. Non-assigned pins should not be connected. The RS 232 interface can be checked in a simple way with a connected PC running Microsoft Windows operating system. With Windows® 95/98/NT/XP using the program "Hyper Terminal". YAMD0024 Appendix with settings 67 VISCOCOOL 6 17.3.2 RS 232 protocol Note the following aspects: The interface operates with one stop bit, no parity bit and with eight data bits. Transfer speed alternatively: 2400, 4800, 9600 (factory setting) or 19200 baud. The RS 232 interface can be operated with or without hardware-handshake (RTS/CTS). The command from the computer must be terminated with a CR, CRLF or LFCR. The response from the thermostat is always terminated with a CRLF. CR = Carriage Return (Hex: 0D); LF = Line Feed (Hex: 0A) Example: 17.3.3 Set-value transfer of 30.5°C to the thermostat Computer Thermostat „OUT_SP_00_30.5“CRLF „OK“CRLF RS 485 connecting lead Thermostat 9-pole Sub-D socket Contact Data 1 Data A (-) 5 SG (Signal Ground) optional 6 Data B (+) Use screened connecting leads. Connect screen to the plug housing. The wires are electrically isolated from the rest of the electronics. Non-assigned pins should not be connected. An RS 485 bus requires essentially a bus termination in the form of a terminating network, which provides a defined idle state in the high impedance phases of bus operation. The bus termination is as follows: Generally, this terminating network is integrated on the PC plug-in card (RS 485). 68 Appendix with settings YAMD0024 VISCOCOOL 6 17.3.4 RS 485 protocol Note the following aspects: The interface operates with one stop bit, no parity bit and with eight data bits. Transfer speed alternatively: 2400, 4800, 9600 (factory setting) or 19200 baud. The device address always precedes the RS 485 commands. Up to 127 addresses are possible. The address must always consist of three figures (A000_... to A127_...). The command from the computer must be terminated with a CR. The response from the thermostat is always terminated with a CR. CR = Carriage Return (Hex: 0D) Example: YAMD0024 Set-value transfer of 30.5°C to the thermostat with address 15. Computer Thermostat „A015_OUT_SP_00_30.5“CR „A015_OK“CR Appendix with settings 69 VISCOCOOL 6 17.4 USB interface Important: First install the driver and then connect the thermostat to the PC. 17.4.1 Description The ECO heating and cooling thermostats are equipped with a mini-USB interface at the back of the control head. This enables the connection of a PC and operation with the thermostat control software Wintherm Plus. In addition software updates are possible via the USB interface. The connecting lead is not included in the items supplied. When connecting up, make sure the correct plug is used. Mini-USB interface LAUDA makes the drivers specially produced for the USB interface available free of charge for download at http://www.lauda.de. 17.4.2 Installation of the USB driver The driver is installed once per PC. Supported operating systems: Windows ME, Windows XP, Windows 2000, Windows VISTA, Windows 7, Windows 8. Execute the file "LAUDA_ECO_USB_Driver.exe". The window below opens. 1. Select the language and confirm with OK . 70 Appendix with settings YAMD0024 VISCOCOOL 6 2. Key Continue . 3. Key Finish . Driver installation is installed 17.4.3 Connecting the thermostat to the PC If an ECO thermostat is connected via the USB interface, it is automatically assigned to a free COM port. The PC unambiguously identifies the thermostat via a serial number internal to the thermostat and always assigns the same COM port to this thermostat. If further ECO thermostats are connected via the USB interface, these thermostats are assigned other free COM ports. 1. Plug the mini-USB cable into the control head. 2. Switch on the thermostat at the mains switch. YAMD0024 Appendix with settings 71 VISCOCOOL 6 For the first time, after installation on the PC, a wizard opens to search for new hardware. Please follow the wizard instructions. 3. Key Continue 4. Key Continue This window is covered by the following window "Hardware installation" (see below). 72 Appendix with settings YAMD0024 VISCOCOOL 6 5. Click on Continue installation 6. Click on the key Finish 17.4.4 Where is the ECO Virtual COM Port? The thermostat can be operated via conventional communication programs (e.g. Hyperterminal) as a COM port. Further settings, such as baud rate, are not needed. YAMD0024 Appendix with settings 73 VISCOCOOL 6 Click on the tab with the mouse and then on the Device manager 74 Appendix with settings YAMD0024 VISCOCOOL 6 17.5 Commands and error messages applicable to the RS 232/485 interface module and the USB interface 17.5.1.1 Interface write commands (data issued to the thermostat) Command Meaning OUT_PV_05_XXX.XX Specify external temperature via interface OUT_SP_00_XXX.XX Set-value transfer with max. 3 places before the decimal point and max. 2 places after it. OUT_SP_01_XXX Pump power level 1 to 6 OUT_SP_02_XXX Cooling operating mode (0 = OFF / 1 = ON / 2 = AUTOMATIC). OUT_SP_04_XXX TiH outflow temperature limit, upper value OUT_SP_05_XXX TiL outflow temperature limit, lower value OUT_PAR_00_XXX.X Setting of the control parameter Xp. OUT_PAR_01_XXX Setting of the control parameter Tn (5...180 s; 181 = Off). OUT_PAR_02_XXX Setting of the control parameter Tv. OUT_PAR_03_XX.X Setting of the control parameter Td. OUT_PAR_04_XX.XX Setting of the control parameter KpE. OUT_PAR_05_XXXX Setting of the control parameter TnE (0...9000 s; 9001 = Off). OUT_PAR_06_XXXX Setting of the control parameter TvE (5 = OFF). OUT_PAR_07_XXXX.X Setting of the control parameter TdE OUT_PAR_09_XXX.X Setting of the max. correction limitation. OUT_PAR_10_XX.X Setting of the control parameter XpF. OUT_PAR_14_XXX.X Setting of the setpoint offset. OUT_PAR_15_XXX Setting of the control parameter PropE. OUT_MODE_00_X Keypad: 0 = released / 1 = locked (corresponds to: "KEY"). OUT_MODE_01_X Control: 0 = int. / 1 = ext. Pt100 / 2 = ext. Analog / 3 = ext. Serial. OUT_MODE_03_X Keypad remote control unit Command: 0 = released / 1 = locked. OUT_MODE_04_X Setpoint offset source: 0=normal / 1=ext. Pt / 2=ext. analog / 3=ext. serial. START Switches the device on (from Standby) STOP Switches the device in Standby (pump, heating, chiller off). RMP_SELECT_X Selection of program (1...5) to which further commands are to refer. When the RMP_START Start the programmer. RMP_PAUSE Stop the programmer. RMP_CONT Start the programmer again after a hold. RMP_STOP Terminate the program. RMP_RESET Delete program (all segments) RMP_OUT_00_XXX.XX_XXXXX_XXX.XX_ Sets programmer segment (temperature, time, tolerance, and pump level). A X segment is appended and assigned appropriate values. RMP_OUT_02_XXX Number of program loops: 0 = endless / 1...250. device is switched on Program 5 is selected. YAMD0024 For ”_“, ” ” (space character) is also admissible. Response from thermostat "OK" or with an error " ERR_X“ (RS 485 interface e.g. “A015_OK” or with an error ”A015_ERR_X”). Appendix with settings 75 VISCOCOOL 6 Admissible data formats: -XXXX.XX -XXXX.X -XXXX. -XXXX XXXX.XX XXXX.X XXXX. XXXX -XXX.XX -XXX.X -XXX. -XXX XXX.XX XXX.X XXX. XXX -XX.XX -XX.X -XX. -XX XX.XX XX.X XX. XX -X.XX -X.X -X. -X X.XX X.X X. X -.XX -.X .XX .X 17.5.2 Interface read commands (data request from the thermostat) Command IN_PV_00 Meaning Interrogation of bath temperature (outflow temperature) IN_PV_01 Interrogation of controlled temperature (int./ext., Pt/ext., Analog/ ext. serial). IN_PV_03 Interrogation of external temperature TE (Pt100). IN_PV_04 Interrogation of external temperature TE (Analog Input). IN_PV_10 Interrogation of bath temperature (outflow temperature) in 0.0001°C. IN_PV_13 Interrogation of external temperature TE (Pt100) in 0.0001°C. IN_SP_00 Interrogation of temperature set value. IN_SP_01 Interrogation of pump power level. IN_SP_02 Interrogation of cooling mode (0 = OFF / 1 = ON / 2 = AUTOMATIC). IN_SP_03 Interrogation of overtemperature switch-off point. IN_SP_04 Interrogation of outflow temperature limit TiH. IN_SP_05 Interrogation of outflow temperature limit TiL. IN_PAR_00 Interrogation of the control parameter Xp. IN_PAR_01 Interrogation of the control parameter Tn (181 = OFF). IN_PAR_02 Interrogation of the control parameter Tv. IN_PAR_03 Interrogation of the control parameter Td. IN_PAR_04 Interrogation of the control parameter KpE. IN_PAR_05 Interrogation of the control parameter TnE (response: XXXX; 9001 = OFF). IN_PAR_06 Interrogation of the control parameter TvE (response: XXXX; 5 = OFF). IN_PAR_07 Interrogation of the control parameter TdE (response: XXXX.X). IN_PAR_09 Interrogation of the max. correction limitation. IN_PAR_10 Interrogation of the control parameter XpF. IN_PAR_14 Interrogation of setpoint offset. IN_PAR_15 Interrogation of the control parameter PropE. IN_DI_01 Status of Contact Input 1: 0 = open/ 1 = closed. IN_DI_02 Status of Contact Input 2: 0 = open/ 1 = closed. IN_DI_03 Status of Contact Input 3: 0 = open/ 1 = closed. IN_DO_01 Status of Contact Output 1: 0 = NO contact open/ 1 = NO contact closed. IN_DO_02 Status of Contact Output 2: IN_DO_03 Status of Contact Output 3: 0 = NO contact open/ 1 = NO contact closed. 0 = NO contact open/ 1 = NO contact closed. 76 Appendix with settings YAMD0024 VISCOCOOL 6 Command Meaning IN_MODE_00 Keypad: 0 = released / 1 = locked. IN_MODE_01 Control: 0 = int. / 1 = ext. Pt100 / 2 = ext. Analog / 3 = ext. Serial. IN_MODE_02 Standby operation: 0 = Device ON / 1 = Device OFF. IN_MODE_03 Keypad remote control unit Command: 0 = released / 1 = locked. IN_MODE_04 Setpoint offset source: 0 = normal / 1 = ext. Pt / 2 = ext. Analog / 3 = ext. Serial. TYPE Interrogation of the device type (response = "ECO"). VERSION_R Interrogation of the software version number of the control system. VERSION_S Interrogation of the software version number of the protection system. VERSION_B Interrogation of the software version number of the Command remote control VERSION_T Interrogation of the software version number of the cooling system. VERSION_A Interrogation of the software version number of the analog module. VERSION_V Interrogation of the software version number of the RS232/485 module. VERSION_D Interrogation of the software version number of the digital module. VERSION_M_0 Interrogation of the software version number of the solenoid valve (cooling water). VERSION_M_3 Interrogation of the software version number of the solenoid valve (shut-off valve VERSION_M_4 Interrogation of the software version number of the solenoid valve (shut-off valve VERSION_M_5 Interrogation of the software version number of the high temperature cooler. VERSION_E Interrogation of the software version number of the external Pt100 module. 1). 2). STATUS Interrogation of the device status 0 = OK, -1 = Error. STAT Interrogation of the error diagnosis response: XXXXXXX X = 0 no error, X = 1 error 1st character = Error 2nd character = Alarm 3rd character = Warning 4th character = Overtemperature 5th character = Low Level 6th character = 0 7th character = External control value missing RMP_IN_00_XXX Interrogation of a program segment XXX response: (e.g. 030.00_00010.00_005.00_001.00 => Set-point temperature = 30.00 °C, Time = 10 min, Tolerance = 5,00 °C, Pump stage = 1). RMP_IN_01 Interrogation of the current segment number. RMP_IN_02 Interrogation of the set program loops. RMP_IN_03 Interrogation of the current program loops. RMP_IN_04 Interrogation of to which program further commands refer. RMP_IN_05 Interrogation of which program is currently running (0 = none). Note: For ”_“, ” ” (space character) is also admissible. Unless otherwise stated with the command, the response from the thermostat is always in the fixed-point format "XXX.XX" or "-XXX.XX" for negative values or "ERR_X". (RS 485 interface e.g. ”A015_ XXX.XX” or ”A015_-XXX.XX” or ”A015_ERR_X”). YAMD0024 Appendix with settings 77 VISCOCOOL 6 17.5.3 Interface error messages Error ERR_2 Meaning Incorrect entry (e.g. buffer overflow) ERR_3 Wrong command. ERR_5 Syntax error in the value. ERR_6 Impermissible value. ERR_8 Module or value not present. ERR_30 Programmer, all segments occupied. ERR_31 No setpoint input possible ERR_33 External probe missing. ERR_34 Analog value not present. 17.5.4 Driver software for LABVIEW® With the aid of the program development tool LABVIEW® from National Instruments (http://sine.ni.com/apps/we/nioc.vp?cid=1381&lang=US) an easy-to-use individual control or automation software program can be produced for operating ECO devices. In order to be able to address from the program the RS 232/485 interface that is used LAUDA makes the drivers specially produced for LABVIEW® available free of charge for download at http://www.lauda.de. 78 Appendix with settings YAMD0024 VISCOCOOL 6 17.6 Contact module 17.6.1 Contact module LRZ 914 with 1 input and 1 output Contact module (order no. LRZ 914) with connectors to NAMUR NE28, with 1 output and 1 input on each of 2 DIN sockets. The inputs provide the following functions: Error Set error Standby Set standby Control programmer Control programmer (Input 1 activates the programmer. The programmer is started on the first "closed" and is put into "hold" on "open". The next "closed" triggers "continue") with the function. Change mode Control change mode (the switching statuses of contact "open" or "closed" are assigned 2 different set-point temperatures). Control mode Control the Control mode (the switching statuses of input "open" or "closed" can have 2 different control temperature sources assigned to them, e.g. internal external control). The outputs provide the following functions: Error diagnosis Signal various error statuses. Standby Signal standby. Temperature range Give the status of the actual temperature within a certain range (within outside). Programmer Give programmer status. Contact Module LRZ 914; DIN sockets 1 output 1 input 5V 2 YAMD0024 1 3 1 Appendix with settings 2 79 VISCOCOOL 6 Contact outputs and inputs Output Input View of flanged plug coupling-socket solder side (front) View of of plug or Max. 30 V; 0.2 A socket (front) or solder side Signal approx. 5 V, 10 mA, do not assign Contact 3. Coupling plug order no. EQS 048 Coupling socket order no. EQD 047 1 = NO contact 2 = Center contact 3 = NC contact Note: Only use screened connecting leads and connects the screen to the plug housing. Cover unused connectors with protective caps. 17.6.2 Contact module LRZ 915 with 3 inputs and 3 outputs Contact module (order no. LRZ 915) with 15-pole SUB-D socket. Range of functions as LRZ 914, but with three relay contact outputs (changeover, max. 30V/0.2A) and three binary inputs for control via external voltage-free contacts. Contact Module LRZ 915; SUB-D Input Output 1 2 1 3 2 5V 12 4 5 6 13 14 15 7 8 1 3 5V 9 2 5V 10 3 11 Contact inputs and outputs View of sockets on the plug side or of sockets on the solder side. A suitable 15-pole Sub-D plug can be obtained together with a suitable housing under order no. EQM 030 (plug case order no. EQG 017). 80 Appendix with settings YAMD0024 BESTÄTIGUNG / CONFIRMATION / CONFIRMATION An / To / A: LAUDA Dr. R. Wobser • LAUDA Service Center • Fax: +49 (0) 9343 - 503-222 Von / From / De : Firma / Company / Entreprise: Straße / Street / Rue: Ort / City / Ville: Tel.: Fax: Betreiber / Responsible person / Personne responsable: Hiermit bestätigen wir, daß nachfolgend aufgeführtes LAUDA-Gerät (Daten vom Typenschild): We herewith confirm that the following LAUDA-equipment (see label): Par la présente nous confirmons que l’appareil LAUDA (voir plaque signalétique): Typ / Type / Type : Serien-Nr. / Serial no. / No. de série: mit folgendem Medium betrieben wurde was used with the below mentioned media a été utilisé avec le liquide suivant Darüber hinaus bestätigen wir, daß das oben aufgeführte Gerät sorgfältig gereinigt wurde, die Anschlüsse verschlossen sind, und sich weder giftige, aggressive, radioaktive noch andere gefährliche Medien in dem Gerät befinden. Additionally we confirm that the above mentioned equipment has been cleaned, that all connectors are closed and that there are no poisonous, aggressive, radioactive or other dangerous media inside the equipment. D’autre part, nous confirmons que l’appareil mentionné ci-dessus a été nettoyé correctement, que les tubulures sont fermées et qu’il n’y a aucun produit toxique, agressif, radioactif ou autre produit nocif ou dangeureux dans la cuve. Stempel Datum Betreiber Seal / Cachet. Date / Date Responsible person / Personne responsable Formblatt / Form / Formulaire: Erstellt / published / établi: Änd.-Stand / config-level / Version: Datum / date: UNBEDENK.DOC Unbedenk.doc LSC 0.1 30.10.1998 LAUDA DR. R. WOBSER GmbH & Co. KG Pfarrstraße 41/43 Tel: D - 97922 Lauda-Königshofen Fax: Internet: http://www.lauda.de E-mail: +49 (0)9343 / 503-0 +49 (0)9343 / 503-222 [email protected] LAUDA DR. R. WOBSER GMBH & CO. KG P.O. Box 12 51 · 97912 Lauda-Koenigshofen · Germany Phone: +49 9343 503-0 · Fax: +49 9343 503-222 E-mail: [email protected] · Internet: www.lauda.de