1
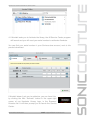
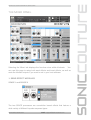
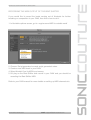
SONICCOUTURE KONKRETE USER GUIDE
www.soniccouture.com
email : [email protected]
SONICCOUTURE KONKRETE USER GUIDE
SONICCOUTURE
KONKRETE
CONTENTS :
INSTALLATION
ADD-ON PACKS INSTALLATION
INTRODUCTION
USING KONKRETE
THE INSTRUMENT PANEL
GLITCH MACHINE
THE MIXER PANEL
THE BEAT SHIFTER
SUPPORT
E.U.L.A
www.soniccouture.com
email : [email protected]
SONICCOUTURE KONKRETE USER GUIDE
INSTALLATION
This library requires Kontakt 5.1 or later.
If you do not own Kontakt 5, you will need to download and install the free
Kontakt player which you can do here ; Kontakt Player Download Link
TO ADD THE LIBRARY AND AUTHORIZE IN KONTAKT
1. In Kontakt or Kontakt Player open the Browser on the left (the folder Icon
at the top).
2. In the Libraries tab at the top of the Browser go to "Add Library"
3. Click and use the dialogue window to navigate to and point Kontakt to
the location of the ‘Soniccouture Konkrete > Library’ folder (see picture on
next page). This will add it to the Kontakt Library list AND to the Service
Center.
www.soniccouture.com
email : [email protected]
SONICCOUTURE KONKRETE USER GUIDE
4. If Kontakt asks you to Activate the library, the NI Service Center program
will launch and you will need your serial number to authorize Konkrete.
You can find your serial number in your Soniccouture account, next to the
product download.
If Kontakt doesn't ask you to authorize, you can force it to
by clicking the little "Activate" button in the upper right
corner of our Konkrete Library logo, in the Browser/
Libraries list. It will then prompt you to launch the Service
Center.
www.soniccouture.com
email : [email protected]
SONICCOUTURE KONKRETE USER GUIDE
After Authorization, you should restart Kontakt.
If you experience any problems, you will probably find the answer on our
FAQ page.
INSTALLING KONKRETE MASCHINE KITS
NOTE : YOU NEED TO HAVE THE KONTAKT / KONTAKT PLAYER
INSTALLED AND AUTHORISED FIRST FOR THE MASCHINE KITS TO
WORK.
1. Make sure Maschine and Kontakt are not currently open, and that
Konkrete has already been successfully authorised in Kontakt.
2. Navigate to folder: /Soniccouture Konkrete/Maschine Presets/Plugins/
3. Copy the relevant kit folders (named either K1 Kits, K2 Kits, or Konkrete
Kits) to the following location on your hard drive:
MAC: Documents/Native Instruments/Maschine/Modules/Instruments/
Plugins/
PC: My Documents/Native Instruments/Maschine/Modules/Instruments/
Plugins/
3. Launch Maschine and go to the Maschine Preferences, select the 'User
Paths' tab, and click 'rescan'.
The Konkrete kits should now be available in the browser under 'Plug-ins'. The kits can also be accessed by selecting BROWSE on the Maschine
hardware, selecting 'Instrument' with the FILTER knob, with BANK:
'Konkrete', and then selecting Konkrete 1, 2 or 3 kits from the TYPE sub
menu. All the Konkrete kits are visible on Maschine's right hand LCD screen,
and can be loaded by pressing the LOAD button on the top right hand side
of Maschine.
www.soniccouture.com
email : [email protected]
SONICCOUTURE KONKRETE USER GUIDE
www.soniccouture.com
email : [email protected]
SONICCOUTURE KONKRETE USER GUIDE
INTRODUCTION
Konkrete is the latest evolution of a product line that dates back to the early
days of Soniccouture. Conceived as a collection of drum kits which would
offer new drum and percussion sounds, Konkrete 1 (2006) was very
successful and its sounds went on to become well-loved by its users.
Konkrete 2 followed in 2007, and was equally popular.
Now a sophisticated new Kontakt instrument has been created, and 41 new
kits. A huge range of audio experimentation has gone into their creation :
Sledgehammers, Buchla synths, childrens playgrounds, broken soviet drum
machines, chinese zithers, circuit bent samplers and a 9ft grand piano, to
name a few.
www.soniccouture.com
email : [email protected]
SONICCOUTURE KONKRETE USER GUIDE
USING KONKRETE
Note that you can hover your mouse over any control in Konkrete to
get Info about its function if you have the Kontakt Info pane
activated.
THE INSTRUMENT PANEL
Selecting the ‘Instrument’ tab (above) gives access to the main editing
controls of Konkrete. This is where you can adjust the sound of each drum
within a kit.
There are a lot of controls available, so we’ll look at each section
independently, starting from the top left.
www.soniccouture.com
email : [email protected]
SONICCOUTURE KONKRETE USER GUIDE
THE SAMPLE SECTION
Here you’ll find the sample selection and display, and some editing options.
Beside the waveform display, the blue area shows you the current Edit mode,
and the MIDI Note and Name of the currently selected sample. The Note
and Name of the sample is a drop down menu, which you can use to change
the current selection.
Or if SELECT BY MIDI is turned on, the last note
played will be displayed and selected for editing.
On the right of this section, you have some other options:
SELECT BY MIDI can be turned on or off, as needed
EDIT ALL KEYS will change the edit mode so that when you make a change
on the panel it affects ALL the sounds in the drum kit. This is handy if you
want to say, set the velocity response to all the sounds identically, or else
route all sounds to a single bus output, etc.
It can also be slightly
dangerous, so be careful using EDIT ALL KEYS.
SOLO LAST NOTE puts the current selection into Solo mode, so you don’t
hear any other sounds while you’re editing that sound. You can use this to
better hear the edits you make to one element within a complex drum beat.
FOCUS MAP is a special mode in which the selected sample is stretched to
cover the entire keyboard.
You can use this to quickly make any drum
sound into a bass line, for example.
RESET will reset the currently selected sample to it’s default settings.
If
EDIT ALL KEYS is ON, then RESET will reset ALL keys to their default
setting, so this is quite a powerful tool to be used with caution.
www.soniccouture.com
email : [email protected]
SONICCOUTURE KONKRETE USER GUIDE
THE MAIN CONTROLS
On the right of the top row, we have the basic settings for each drum. These
include LEVEL, PAN, PITCH, START TIME, and SATURATION.
Note the small fader to the right of each of these knobs, this is the modulation
depth of either the Velocity or the LFO. When it’s in the middle, there is no
modulation applied to that parameter. When it’s at the top, there is maximum
positive modulation, and when it’s at the bottom there is maximum negative
modulation.
Note that you can reset a single knob or fader to it’s init value by CommandClicking on the control (CTRL-Click in Windows).
You’ll see some of the faders have a yellow “V” or purple “L” at the bottom,
this is a switch to allow you to view either the Velocity modulation depth or
the LFO depth, if both are available for that parameter.
The START time, for example, cannot be modulated by the LFO, so there is
only the Velocity modulation fader available for start time.
THE LOFI CONTROLS
On the left of the second row, the first block is for the LOFI effect.
The blue
switch at the top of the block turns this on or off for each drum sound. You
have control over the SAMPLE RATE and the BITS Depth for each sound,
and can modulate either of these with both Velocity and the LFO.
www.soniccouture.com
email : [email protected]
SONICCOUTURE KONKRETE USER GUIDE
THE FILTER CONTROLS
The next block contains the filter controls, which can also be turned on or off
with the blue switch at the top of the block. There is a knob for CUTOFF and
RESONANCE, both of which can be modulated by Velocity and the LFO.
You can change the filter type using the switches at the right of the filter
block, in which there is a choice of Low Pass Filter (LPF), Band Pass Filter
(BPF), and High Pass Filter (HPF).
THE ENVELOPE AND LFO CONTROLS
On the right of the second row is the ENVELOPE and LFO block.
This
section contains controls for three envelopes (AMPlitude, Filter (FEG), and
PITCH envelope), as well as the LFO controls.
You can choose which
controls you’re seeing with the switches at the far right.
In the AMP envelope you have controls for ATTACK, HOLD, DECAY,
SUSTAIN, and RELEASE.
The depth of the AMP envelope is always
maximum.
The FEG and PITCH EG has controls for ATTACK, DECAY,
SUSTAIN, RELEASE, and DEPTH.
The depth of these second two
envelopes can be either positive or negative.
Some of the Envelope parameters have Velocity modulation available.
www.soniccouture.com
email : [email protected]
SONICCOUTURE KONKRETE USER GUIDE
The LFO panel displays the controls for the amount of each waveform
making up the LFO signal.
You can mix some SINE and some SAW
together, for example. The last knob in this row controls the speed or RATE
of the LFO.
As with all controls on the Instrument panel, parameters can be set
individually for each drum sound.
www.soniccouture.com
email : [email protected]
SONICCOUTURE KONKRETE USER GUIDE
THE GLITCH MACHINE
The Glitch Machine is a generator for creating drills or “glitches” with any
drum sound.
The Glitch Machine is controlled by a GLOBAL TRIGGER, which can be
switched ON or OFF either by clicking on the title bar of the GLITCH block or
by using the MIDI key defined in the TRIGGER box at the bottom right of the
block (set to B0 by default).
When Glitch Machine is ACTIVE, the blue GLOBAL TRIGGER label lights up,
and any notes that have GLITCH turned on will respond to it. Not all notes
need to respond to the Glitch Machine at the same time, only notes that have
the blue switch turned on at the top left will in fact drill.
So to clarify, the small blue switch at the top left means the drum will respond
to glitch machine, the large blue GLOBAL TRIGGER shows whether glitch is
currently on or off.
The main controls for the glitch, or drill, are SPEED, DECAY, SLIDE, and
MODULATION. As you might guess, the SPEED sets the basic speed of the
drill, the DECAY controls whether it decays in volume, the SLIDE introduces
a pitch change, and the MODULATION lets you adjust all of those things in
real time using a controller set on the right as MOD CC (by default set to
CC1, the Mod Wheel).
If you click on MOD SETTINGS on the right, you can adjust how the MOD
CC affects the drill created by Glitch Machine, here you’ll find four depth
controls: SPEED, PITCH, START, and VELOCITY.
So as you bring the
MOD CC controller up, the SPEED, PITCH, START TIME, and VELOCITY of
the drill can be changed while in progress.
You can also set some randomization to the drill by selecting the
RANDOMISE button on the right.
www.soniccouture.com
email : [email protected]
SONICCOUTURE KONKRETE USER GUIDE
One important setting to understand is the LATCH controller, which is the
middle button on the right of the Glitch block. This affects how the Glitch
Machine Global Switch responds to the TRIGGER key it’s assigned to (B1).
If Latch is ON, you hit the TRIGGER once to make Glitch active, and again to
turn it off. If Latch is OFF, Glitch Machine is active while the TRIGGER key
is held down.
This is partly a matter of personal preference when
programming the Glitch Machine in a sequencer, but for use with the Beat
Machine later on in this guide we’ll see it’s best turned OFF.
GLITCH may take a bit of time to understand. Try to remember that there is
a global switch for the entire kit that activates the Glitch Machine, a switch for
each drum in the kit to tell it to respond to the global switch, and a Modulation
that can adjust the glitch in real time while it’s active.
THE EQ SECTION
The EQ section gives you access to a three band parametric EQ for each
drum sound.
You select the band on the right, and can adjust the
FREQuency, GAIN, and Q of each EQ band.
The entire block is turned on or off with the blue switch at the top left of the
block. You can modulate the HIGH band’s frequency and gain with velocity.
www.soniccouture.com
email : [email protected]
SONICCOUTURE KONKRETE USER GUIDE
THE COMPRESSOR SECTION
The Compressor can be turned on or off for any drum in the kit.
You have
control over the THRESHold, ATTACK, RELease, and GAIN of the
compressor with the knobs, and the ratio with the switches at the right of the
block. Keep in mind that this compressor works on a single drum only, if you
want to compress an entire beat, or a selection of drums (such as a high hat
pattern) you should route these to the same BUS and use a compressor on
the Mixer page, which we’ll talk about later.
THE EFFECTS SECTION
Here you can set the sends for each drum, there are two reverb sends
(SPACE 1 and SPACE 2), and two delay sends (DELAY 1 and DELAY 2).
The EFFECTS block must be turned ON for any drum to send to those
effects, using the blue switch at the top left. You can modulate the first three
sends with Velocity.
The EFFECTS themselves are set up on the Mixer page.
ROUTING
Finally, you can route each drum to any of the four busses. On
the Mixer page, each BUS has a selection of insert effects
available, and can then routed to any of Kontakt’s virtual
outputs.
www.soniccouture.com
email : [email protected]
SONICCOUTURE KONKRETE USER GUIDE
THE MIXER PANEL
Selecting the ‘Mixer’ tab displays the four-bus mixer within Konkrete. You
can use this page to setup both send effects and insert effects, as well as
route the Kontakt outputs if you want to mix in your host software.
1. SEND EFFECT MODULES
SPACE 1 and SPACE 2
The two SPACE processors are convolution based effects that feature a
wide variety of different impulse response types.
www.soniccouture.com
email : [email protected]
SONICCOUTURE KONKRETE USER GUIDE
SPACE 1 features effects that are mainly textural, designed to add a different
timbral edge to the drum sounds.
SPACE 2 features more conventional reverb effects and some longer special
fx type reverb tails.
By activating each of the 3 buttons in the side panel, you can control the
following SPACE parameters : SIZE, PREDELAY, HPF, LPF, OUTPUT
DELAY MODULES
There are two delay modules - these are fairly standard delay lines, as you
will have found in many other audio tools over your years of experience.
You have control over TIME, DAMPING, PANNING & the OUTPUT level.
You can switch SYNC on or off using the dropdown - when ‘on’ the delay
will sync to the tempo of your host DAW.
www.soniccouture.com
email : [email protected]
SONICCOUTURE KONKRETE USER GUIDE
THE MIXER MODULE
The MIXER is a fully-featured 4 channel stereo mixer with 4 inserts per
channel.
INSERTS
Each insert block can feature one from a choice of two different effects.
Each block has different effects available to it :
INSERT 1 : BUS COMPRESSOR or TRANSIENT MASTER
INSERT 2 : TAPE SATURATION or DISTORTION
INSERT 3 : G SERIES EQ or LOW PASS FILTER 24
INSERT 4 : LIMITER or CABINET EMULATION
www.soniccouture.com
email : [email protected]
SONICCOUTURE KONKRETE USER GUIDE
When activated, click in the insert block area to bring up the edit knobs in
the upper section above the mixer channels.
OUTPUT ROUTING
Below each fader there is a drop down where you can select which of
Kontakt’s VST outputs you want to route the audio too. The Output at the
bottom is set to “Default” by default, which means the output of the bus will
be the same output as that set in the instrument itself (ie. the output chosen
underneath the title of the kit on the main instrument bar).
All available
virtual outputs will show in this menu ; if you need more outputs, configure
this in Kontakt’s options menu.
CHANNEL CONTROLS
MUTE, SOLO AND PAN are available to each channel.
www.soniccouture.com
email : [email protected]
SONICCOUTURE KONKRETE USER GUIDE
THE BEAT SHIFTER
The Beat Shifter is selected with the leftmost tab. This is a generative drum
sequencer with some unique features. The Beat Shifter is turned ON with
the blue switch at the top left by it’s name, and PLAY is enabled with the
transport control at the bottom right.
There are six “tracks” that have identical controls. Firstly, using the drop
down menu on the left, you can choose which sound in the current kit you
want to trigger with that row, here set to C#1 KICK 2:
The table allows you to draw notes at varying velocities, which will be
triggered by the cursor as it moves across the screen. On the far right you
can adjust the TUNE and LEVEL of that sound. On the left you can also
SOLO or MUTE that track if you like.
So far, pretty straight step
sequencer.
Where things get interesting are with the four small sliders along the bottom
of the track, which are labelled TRAVEL, STEP SIZE, DIRECTION, and VEL.
These introduce changes to the pattern when it’s repeating.
www.soniccouture.com
email : [email protected]
SONICCOUTURE KONKRETE USER GUIDE
TRAVEL controls the “chance of travel” or likelihood of any hit in that pattern
moving. When it’s at zero, all the way left, the pattern hits stay exactly as
you drew it. The further right, or higher the chance of TRAVEL, the more
likely it is that each hit will shift when it repeats. When the pattern SHIFTS,
it moves your programmed beat to other positions on the grid, thus altering
and evolving the beat based on what you started with.
The STEP SIZE tells the generator how far to shift, if a shift is to happen. If
STEP is set to 1, then a note can only shift one grid position at a time. If it’s
set to 2, then if a note shifts, it will shift two grid positions, etc. Note that if
you set STEP SIZE to even numbers your beat will evolve in more naturally
rhythmic ways than if you set STEP SIZE to odd numbers.
The DIRECTION tells the generator in which direction to shift the beats, if a
beat is to be shifted. When it’s in the middle (default), the chance of a hit
moving to the left or to the right (ie. earlier or later in the bar) is equal, so
beats can move in either direction. If the DIRECTION is set all the way to
the right, then beats will ONLY move to the right (later), and if set all the way
to the left, beats will only move to the left. Note that hits will “wrap” from
the end of the bar to the beginning, or from the beginning to the end, if
moved beyond the beat LENGTH.
The last fader, VEL, introduces random alterations to the velocity of each hit.
This is in addition to the velocity set by the table.
The last menu, for pattern number 6, has one extra item available after all
the drum hits: GLITCH TRIGGER.
This row is then used to trigger Glitch Machine instead of triggering a key.
Only row 6 has this option. And note that if you use BEAT MACHINE to
trigger Glitch Machine, it’s best if Glitch Machine is NOT in LATCH mode.
You can use it in LATCH mode if you want to, of course, but the results are
far less predictable than when in LATCH.
www.soniccouture.com
email : [email protected]
SONICCOUTURE KONKRETE USER GUIDE
At the bottom of the BEAT SHIFTER there are some overall controls.
These switches are as follows:
ACTIVE duplicates the main ON/OFF control of BEAT SHIFTER
LATCH
if triggering BEAT SHIFTER with MIDI, this lets you choose
Latched or Unlatched behaviour
FREEZE
sets all TRAVEL to zero, ie. freezes the pattern as it is, stops it
evolving. This is nice if you suddenly hear a pattern you like.
The FREEZE Key, below FREEZE, allows you to assign a MIDI
note to activate FREEZE remotely
REVERT
sets the pattern to how it was the last time you hit STORE
STORE
stores the current state of the pattern
SAVE saves the pattern to disk, so you can share it with other kits
LOAD
loads a pattern from disk
There are two ways to load a pattern. If you LOAD with ALT
(Option) held down, the pattern will load WITHOUT changing
the notes assigned to each row. This is useful if you want to
try other patterns using the sounds you have already set up.
HOST
If HOST is selected, then the start and stop of BEAT SHIFTER
will chase the transport of a host sequencer. Also, if HOST is
active, you can play notes on the kit while BEAT SHIFTER is
on. You really only need HOST OFF if you want to program
the start and stop of BEAT SHIFTER with MIDI.
LENGTH
the length of the sequence in steps
SPEED
the duration of each step
www.soniccouture.com
email : [email protected]
SONICCOUTURE KONKRETE USER GUIDE
RECORDING THE MIDI OUTPUT OF THE BEAT SHIFTER
If you would like to record the beats coming out of Konkrete for further
tweaking or composition in your DAW, then this is how to do it:
1. In Kontakts options screen, go to : engine>send MIDI to outside world
2. Choose ‘Script generated ccs and script generated notes.
3. Create a new MIDI track in your DAW.
4. Select Kontakt 5 as its MIDI input source.
5. Hit play on the Beat Shifter and record in your DAW and you should be
recording the Beat Shifter MIDI.
Refer to your DAW manual for more details on setting up MIDI channels etc.
www.soniccouture.com
email : [email protected]
SONICCOUTURE KONKRETE USER GUIDE
SUPPORT
If you have any problems or questions relating to the use of this product,
please feel free to contact us. You can either email us at :
[email protected]
or we have a support forum within the KVR Audio community, which can be
found here :
Soniccouture Support Forum
We will always endeavour to reply to any enquiry within 12 hours, but do
bear in mind the differences in time zones, so please be patient!
www.soniccouture.com
email : [email protected]
SONICCOUTURE KONKRETE USER GUIDE
E.U.L.A.
END USER LICENSE AGREEMENT
PREFACE: This End-User License Agreement ("EULA") is a legal agreement
between you and Soniccouture LTD for the Soniccouture product
accompanying this EULA, which includes computer software and may
include associated media, printed materials, and online or electronic
documentation ("Software"). By installing, copying, or using the software,
you agree to be bound by the terms of this EULA. If you do not agree to the
terms of this EULA, you may not use the software.
The software is protected by copyright laws and international copyright
treaties, as well as other intellectual property laws and treaties. The software
is licensed, not sold.
Soniccouture Ltd grants the Owner of a Soniccouture product the right to
create finished musical works and performances using the sounds and
software that comprise the Soniccouture product.
The making of sample libraries in any form, commercial or otherwise,
using Soniccouture audio or software (be they single hits, loops, fully
mixed audio clips, or scripts) is STRICTLY FORBIDDEN without express
written agreement of Soniccouture Ltd, and violations will be prosecuted
to the full extent of international and local copyright law.
The ownership of all title and copyrights in and to the Software (including
but not limited to any images, photographs, animations, video, audio, music,
text, and "applets" incorporated into the Software ) is fully asserted by
Soniccouture Ltd.
The Owner may only install and use Soniccouture libraries and software
on multiple computers strictly under the following conditions: where
multiple computers comprise part of a single composition workstation for
a composer; or where the Owner has two non-concurrent sites of work,
for example a studio desktop and a laptop for live performance.
The Owner may not transfer, modify, rent, lease, loan, resell, distribute,
network, electronically transmit or merge the Software.
www.soniccouture.com
email : [email protected]
SONICCOUTURE KONKRETE USER GUIDE
DISCLAIMER OF WARRANTY: The software is provided "as is" and without
warranty of any kind. The entire risk arising out of the use or performance of
the software and documentation remains with user. To the maximum extent
permitted by applicable law, Soniccouture further disclaims all warranties,
either express or implied, including, but not limited to, implied warranties of
merchantability and fitness for a particular purpose, with regard to the
software, and any accompanying hardware. To the maximum extent
permitted by applicable law, in no event shall Soniccouture be liable for any
consequential, incidental, direct, indirect, special, punitive, or other damages
whatsoever (including, without limitation, damages for loss of business
profits, business interruption, loss of business information, or other
pecuniary loss) arising out of this EULA or the use of or inability to use the
software, even if Soniccouture has been advised of the possibility of such
damages.
www.soniccouture.com
email : [email protected]