1
RemotelyAnywhere User Guide
Contents
About RemotelyAnywhere..............................................................................................................6
RemotelyAnywhere System Requirements.................................................................................................................6
Installing RemotelyAnywhere.........................................................................................................7
RemotelyAnywhere Default Installation......................................................................................................................7
RemotelyAnywhere Custom Installation.....................................................................................................................7
Activating RemotelyAnywhere....................................................................................................................................7
Accessing RemotelyAnywhere........................................................................................................9
About Dynamic IP Addresses.....................................................................................................................................9
Accessing RemotelyAnywhere through a Firewall or Router......................................................................................9
Mapping a Firewall Port to the Computer.............................................................................................................10
Accessing RemotelyAnywhere through a Firewall.................................................................................................10
Logging In to RemotelyAnywhere..................................................................................................11
Advanced RemotelyAnywhere Login Options.............................................................................................................11
Bypassing the RemotelyAnywhere Login Screen........................................................................................................11
RemotelyAnywhere User Interface................................................................................................13
RemotelyAnywhere Dashboard.................................................................................................................................13
RemotelyAnywhere Dashboard Features..............................................................................................................14
RemotelyAnywhere Performance Data Viewer..........................................................................................................15
RemotelyAnywhere Quicklinks..................................................................................................................................15
Log Out and Timeout................................................................................................................................................15
RemotelyAnywhere System Tray Icon.......................................................................................................................15
Using Remote Control...................................................................................................................17
Starting Remote Control...........................................................................................................................................17
About HD Remote Control.........................................................................................................................................17
Changing How You View the Host.............................................................................................................................18
How to View the Host Computer in Full Screen Mode............................................................................................18
How to Magnify a Section of the Host Screen........................................................................................................18
How to Change Screen Size During Remote Control..............................................................................................18
How to Switch Between Multiple Host Monitors during Remote Control................................................................19
How to Change the Color Quality of the Host Screen.............................................................................................19
How to Optimize Remote Control Performance at Slower Connection Speeds........................................................19
Customizing the Remote Control Toolbar.............................................................................................................20
Security During Remote Control...............................................................................................................................20
How to Blank the Host Screen During Remote Control..........................................................................................20
How to Block Input During Remote Control..........................................................................................................20
Moving Data During Remote Control........................................................................................................................20
How to Copy and Paste Between Devices (Clipboard Synchronization)..................................................................20
How to Connect Drives During Remote Control.....................................................................................................20
Using Presentation Tools..........................................................................................................................................21
How to Draw on the Host Screen..........................................................................................................................21
How to Use the Laser Pointer................................................................................................................................21
Remote Sound ........................................................................................................................................................22
Remote Printing.......................................................................................................................................................22
System Management (Quitting Programs on the Host)..............................................................................................23
How to Open the Windows Task Manager on the Host Computer (Ctrl-Alt-Del).....................................................23
How to Force Quit Applications on a Mac Host (Command-Alt-Escape).................................................................23
Managing Files and Folders using the File Manager.....................................................................24
How to Navigate and Sort Files using File Manager..................................................................................................24
ii
RemotelyAnywhere User Guide
Contents
How to Transfer Files Between Computers using File Manager................................................................................24
How to Edit Files using File Manager.......................................................................................................................25
How to Select Files using File Manager....................................................................................................................25
How to Chat in RemotelyAnywhere...............................................................................................27
Sharing your Desktop with Another Person (Desktop Sharing)......................................................28
How to Send a Desktop Sharing Invitation................................................................................................................28
How to Disable/Enable or Delete a Desktop Sharing Invitation.................................................................................28
Customizing and Controlling your RemotelyAnywhere Experience................................................30
How to Optimize Remote Control Performance.........................................................................................................30
How to Set Keyboard and Mouse Priority for Remote Control...................................................................................30
How to Set Remote Control Permission Defaults (Host-side User's Consent)..............................................................31
How to Display/Remove the RemotelyAnywhere System Tray Icon............................................................................31
How to Prevent RemotelyAnywhere Notification Messages from Appearing .............................................................32
How to Set the Host to Lock after Remote Control.....................................................................................................32
How to Set Remote Control Time-out.......................................................................................................................32
How to Set Compression for Data Transferred from the Host....................................................................................33
How to Change Proxy Settings..................................................................................................................................33
How to View RemotelyAnywhere Log Files...............................................................................................................34
How to Record Remote Control Sessions..................................................................................................................35
How to Set RemotelyAnywhere to Report Software Errors........................................................................................36
Controlling Access to Host Computers...........................................................................................37
Using IP Filters to Protect your Computer from Intruders..........................................................................................37
How to Create an IP Filter Profile..........................................................................................................................37
IP Filtering Examples...........................................................................................................................................37
Detecting and Locking out Potential Intruders..........................................................................................................38
How to Set up a Denial of Service Attack Blocker..................................................................................................39
How to Set up an Authentication Attack Blocker ..................................................................................................39
Controlling Who can Access your Host Computers (User Access Control)..................................................................40
How to Specify User Access Rights in RemotelyAnywhere....................................................................................40
Troubleshooting...........................................................................................................................44
Troubleshooting Remote Printing............................................................................................................................44
Troubleshooting Display Issues................................................................................................................................44
Remote Management of RemotelyAnywhere Hosts.......................................................................45
Managing the Rights of Windows Users and Groups................................................................................................45
Monitoring Events in the Application, Security, and System Logs..............................................................................45
Working with Services.............................................................................................................................................46
Working with Processes...........................................................................................................................................46
Working with Drivers...............................................................................................................................................47
Editing the Registry..................................................................................................................................................47
Opening the Command Prompt................................................................................................................................48
Rebooting the Host..................................................................................................................................................48
Enabling Windows Automatic Logon (autologon).................................................................................................48
Viewing a Host Computer Desktop without Taking Control.......................................................................................49
Working with Environment Variables.......................................................................................................................49
Changing Virtual Memory Settings...........................................................................................................................49
Changing System Time on a Host.............................................................................................................................50
Managing Shared Resources...................................................................................................................................50
Setting Automatic Change Process Priorities............................................................................................................50
Managing RemotelyAnywhere Servers.........................................................................................52
How to Create an FTP Server....................................................................................................................................52
How to Create Users of an FTP Server......................................................................................................................53
How to Create User Groups for FTP Servers..............................................................................................................53
How to Start and Stop FTP Servers...........................................................................................................................54
iii
How to Manage Users of an FTP Server....................................................................................................................54
How to Change Group Membership of an FTP Server...........................................................................................54
How to Change User Permissions of an FTP Server...............................................................................................55
How to Set Upload/Download Ratio for an FTP User.............................................................................................55
How to Disable FTP Users....................................................................................................................................56
How to Set up Home Directories and Quotas for FTP Users...................................................................................56
How to Set Maximum Number of Connections to an FTP Server............................................................................57
How to Change the Welcome Message for an FTP User.........................................................................................57
How to View the Permissions of FTP Users...........................................................................................................58
How to View User and Server Statistics....................................................................................................................58
How to Secure an Externally Accessible FTP Server..............................................................................................58
How to View FTP Server Status................................................................................................................................59
About Port Forwarding............................................................................................................................................60
How to Configure Port Forwarding.......................................................................................................................61
How to View Port Forwarding Status....................................................................................................................62
How to View Active Directory Settings..................................................................................................................62
How to Create an Externally Accessible FTP Server...................................................................................................62
How to Set User Access to an Externally Accessible FTP Server.............................................................................63
How to Set a Welcome Message to an Externally Accessible FTP Server................................................................63
How to Set ODBC Access to an Externally Accessible FTP Server...........................................................................64
Managing Schedules and Alerts....................................................................................................66
How to Monitor Your System....................................................................................................................................66
How to Set Up Email Alerts......................................................................................................................................66
How to Set Up Scheduled Tasks...............................................................................................................................66
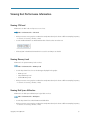
Viewing Host Performance Information........................................................................................67
Viewing CPU Load....................................................................................................................................................67
Viewing Memory Load.............................................................................................................................................67
Viewing Disk Space Utilization.................................................................................................................................67
Viewing Drive and Partition Information..................................................................................................................68
Viewing Open TCP/IP Ports......................................................................................................................................68
Viewing Network Traffic Information........................................................................................................................68
Viewing a List of Open Files.....................................................................................................................................68
Viewing a List of Registry Keys Open on a Host........................................................................................................69
Viewing a List of DLLs in Use....................................................................................................................................69
Viewing RemotelyAnywhere Connection Details.......................................................................................................69
Viewing Telnet and SSH Connections.......................................................................................................................69
Viewing Installed Applications.................................................................................................................................69
Viewing Loaded Device Drivers.................................................................................................................................70
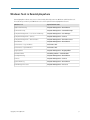
Windows Tools in RemotelyAnywhere..........................................................................................71
Working with RemotelyAnywhere from Command Line................................................................72
How to Install RemotelyAnywhere on the Client........................................................................................................72
How to Install RemotelyAnywhere on a Remote Computer........................................................................................72
How to Uninstall RemotelyAnywhere from the Client................................................................................................73
How to UnInstall RemotelyAnywhere from the Host..................................................................................................73
How to Start, Stop, and Restart a Service..................................................................................................................73
How to Export and Import RemotelyAnywhere Configuration Settings......................................................................74
How to Install RemotelyAnywhere without Generating a Certificate..........................................................................75
How to Install RemotelyAnywhere with the MD5 Hash Server Certificate..................................................................75
How to Install RemotelyAnywhere with a Self-Signed Server Certificate...................................................................75
How to Install RemotelyAnywhere with the Usescbyca Option...................................................................................76
How to List Available RemotelyAnywhere Server Certificates with MD5 Hash............................................................76
How to Select RemotelyAnywhere Certificates for Use..............................................................................................76
How to Create a Self-Signed Server Certificate for RemotelyAnywhere.....................................................................76
iv
RemotelyAnywhere User Guide
Contents
How to List Available RemotelyAnywhere CA Certificates..........................................................................................76
How to Select CA-signed RemotelyAnywhere Server Certificate.................................................................................77
How to Start and Stop FTP Servers in RemotelyAnywhere.........................................................................................77
Legal Notice.................................................................................................................................78
v
About RemotelyAnywhere
RemotelyAnywhere is a remote administration tool that lets you control and administer Microsoft® Windows®-based
computers over a local area network or the Internet. RemotelyAnywhere acts as the host software on the machine
that is to be controlled or accessed. The client requires no special software. RemotelyAnywhere provides such
useful capabilities as Java-based desktop remote control, file transfer protocol (FTP) for downloading and uploading
of files, configuration of the Host, remote-to-local printing, and advanced scripting.
The client software is any Java- or ActiveX-enabled web browser, such as Internet Explorer (IE). Many
RemotelyAnywhere features can also be accessed through your smartphone browser.
• Minimize Downtime RemotelyAnywhere helps system administrators keep IT systems up and computer users
happy by offering a versatile remote-support toolkit. Support staff can often detect, diagnose, and solve problems
faster than local support using built-in operating system functions. Background access means the user is not
interrupted during the implementation of solutions.
• Deliver the Solution, Not the Person All RemotelyAnywhere features can be accessed securely from any web
browser. Support and diagnostics can even be delivered via smartphone browser. This means you can offer
genuine global support from anywhere, anytime.
• Stop Fighting Fires RemotelyAnywhere brings predictability to system management. By giving you monitoring,
scripting, and alerts, RemotelyAnywhere allows you to detect potential problems on all your systems before they
bring a halt to business. This ensures that you are often the first to know about workstation issues, ranging from
attempted security breaches to unstable software installations.
• Fast, Simple, Secure Enterprise Deployment RemotelyAnywhere was designed for professionals responsible for
large installations of workstations. The product is simple to install and configure on systems of anywhere between
a handful and thousands of computers. Five levels of security and built-in event logging give you the confidence
that your systems are safe.
• Keep Your Company Productive Less downtime means more productivity. RemotelyAnywhere can also reduce IT
operating costs for a low price.
RemotelyAnywhere System Requirements
• Microsoft Windows Vista (including 64 bit version), XP (including 64 bit version), 2000, or NT4 both on the host
and client computers.
• ActiveX or Java-compatible web browser on the client computer.
6
RemotelyAnywhere User Guide
Installing RemotelyAnywhere
RemotelyAnywhere Default Installation
1. Download the remotelyanywhere.msi installer from http://www.RemotelyAnywhere.com/downloads.htm
and run it.
2. On the Welcome screen, click Next.
3. On the License Agreement screen, click I Agree if you agree to the terms and conditions.
4. The Software Options screen appears next. If the default listening port is acceptable, click Next. For more
information regarding customizing RemotelyAnywhere during installation, see RemotelyAnywhere Custom
Installation on page 7.
5. The setup will then ask for confirmation of the destination location for the files for RemotelyAnywhere.
6. To change the destination folder, click Browse. Click Next to confirm the destination folder.
7. To start copying the files to their destination folder, click Next.
8. Click Finish to complete the Setup.
RemotelyAnywhere Custom Installation
1. Download the remotelyanywhere.msi installer from http://www.RemotelyAnywhere.com/downloads.htm
and run it.
2. On the Welcome screen, click Next.
3. On the License Agreement screen, click I Agree if you agree to the terms and conditions.
The Software Options page is displayed.
4. Specify the listening port that RemotelyAnywhere will use.
If the default port used by RemotelyAnywhere (2000) conflicts with an existing application or service, you can
change it here. Consult your Network Administrator before a port is assigned.
5. Optionally, on the Software Options you can copy configuration settings from an existing RemotelyAnywhere
installation.
6. After all options have been configured, click Next.
7. To change the destination folder, click Browse. Click Next to confirm the destination folder.
8. To start copying the files to their destination folder, click Next.
9. Click Finish to complete the setup.
Activating RemotelyAnywhere
Once you have installed RemotelyAnywhere you must activate it. If you have already purchased a license, you can
paste it into the space provided and activate the software.
Copyright © 2012 LogMeIn, Inc.
7
If you have not purchased a license but would like to do so, you will be given the option to do this on the software
activation screen. If you purchase online, your license will be delivered immediately, so you can activate your
software without delay. Alternatively, you can contact our sales department.
8
RemotelyAnywhere User Guide
Accessing RemotelyAnywhere
When the installation is complete, the default Internet browser will open with the address of
http://MachineName:2000.
To access the host machine from a different machine, open an Internet browser and enter
http://111.111.11.1:2000 in the Location/Address line. 111.111.11.1 represents the IP address of
the host machine. 2000 represents the default port shown on the Software Options page during installation. If
you changed this port during installation, then use the specified port when accessing RemotelyAnywhere. On the
same network the machine name can also be used.
On the host itself you can access a machine by entering the loopback address http://127.0.0.1:2000 at
the Location/Address line. This address allows the user to communicate with the RemotelyAnywhere installation
only at the machine on which it is installed.
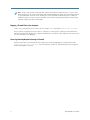
About Dynamic IP Addresses
Many DSL and cable Internet connections assign your machine a new IP address each time you connect to the
Internet. This is known as a Dynamic IP address. RemotelyAnywhere will work if you have a dynamic IP (DNS)
address, but RemotelyAnywhere needs to be able to track your IP address so that if it changes, the connection can
be maintained. There are dynamic DNS solutions available, often for free, which means that your machine can be
assigned a fully qualified and static domain name regardless of your IP address. Alternatively, under Preferences
> Network you can configure RemotelyAnywhere to send you an email message pointing to the IP address of your
remote host every time it detects a change. This way, you always know where to find your Host.
Accessing RemotelyAnywhere through a Firewall or Router
Most organizations today employ a range of security measures to protect their computer networks from hostile
intrusion. One of the common measures includes creating a firewall. A firewall is a system designed to prevent
unauthorized access to a private (internal) network. Firewalls can be implemented either as hardware or software,
or a combination of the two.
The most common use of a firewall is to prevent unauthorized intrusion from Internet users attempting to access
a private network or Intranet. A firewall examines all traffic entering or leaving the internal network/Intranet,
ensuring that traffic meets security criteria established by the Network Administrator.
RemotelyAnywhere can be configured to work with a firewall-protected computer. This requires mapping an
external, incoming port on the firewall to the internal IP and port on the computer running RemotelyAnywhere.
Routers, on the other hand, operate in much the same way as firewalls. They both offer the opportunity to open
and map ports to specific computers. For the rest of this document, the term "router" can be interchangeable with
"firewall."
From outside your LAN, you would gain access to the computer running RemotelyAnywhere by entering the firewall's
IP address and the port to which the desired machine is mapped. For example:
Router: External IP address: 111.111.111.111
RemotelyAnywhere computer: IP address: 192.168.0.10, Port: 2000 (port 2000 is the default but this can
also be changed).
Copyright © 2012 LogMeIn, Inc.
9
Note: No two router models are exactly alike, and this document lacks sufficient space or scope to offer
detailed support for all routers and firewalls and RemotelyAnywhere. However, the overarching principles
for port forwarding remain the same. Should your router or firewall documentation prove confusing or
insufficient, there are several resources available on the Internet that provide exhaustive instruction and
help with configuring routers and firewalls.
Mapping a Firewall Port to the Computer
In this case, you would pick a port on the router, for example 5200, and map it to 192.168.0.10:2000.
The procedure for mapping ports from routers to computers is router-specific. Usually your router will have a
web-based interface that allows you to configure and maintain it. Sometimes router companies refer to this action
as Port Forwarding or Port Mapping.
Accessing RemotelyAnywhere through a Firewall
Having done the above, you will now be able to fully access the RemotelyAnywhere computer with the URL
http://111.111.111.111:5200 - that is the firewall's external IP, followed by the port you mapped to
the RemotelyAnywhere machine.
10
RemotelyAnywhere User Guide
Logging In to RemotelyAnywhere
After entering the URL into your browser and pressing enter, you will see the RemotelyAnywhere Login screen.
RemotelyAnywhere will access the user database to authenticate the user. Initially, you will need to log on as
someone who is a member of the Administrators group. You can later change this default behavior by granting
NT users or NT groups access to RemotelyAnywhere under Security > Access Control.
By clicking NTLM you can use your current Windows login credentials to verify your identity on the Host. This option
is only available on local networks when accessing a Windows NT/2000 or XP computer. It will use your current
credentials (those you entered at the NT logon prompt on the computer running your browser) to identify you to
the Host.
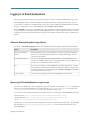
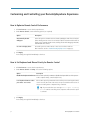
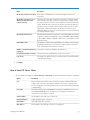
Advanced RemotelyAnywhere Login Options
By clicking on Show advanced options in the login window the following additional options become available:
Option
Description
Go directly to Remote
Control
Using these buttons you can select whether you want to go directly into Remote
Control, to File Transfer & Synchronization or to the Main Menu page - this last
option being the default.
Full and Light Interfaces
You can choose between the full and light interfaces. RemotelyAnywhere’s full
interface is for DHTML capable browsers. The light interface is more suitable for old
browsers or users with slow Internet connections.
SSL
If you set up SSL Support for RemotelyAnywhere all traffic between the client and
the host will be encrypted using industry-strength 128-bit ciphers, protecting your
passwords and data. You can do this by going to Security > SSL Setup, and following
the step-by-step instructions there.
Select language
You can select the language of your RemotelyAnywhere user interface.
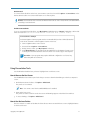
Bypassing the RemotelyAnywhere Login Screen
You can force an NTLM login - and thus bypass the login screen entirely - by appending /ntlm/ to the URL with
which you access RemotelyAnywhere. For example, the URL http://MAILSERVER:2000 would become
http://MAILSERVER:2000/ntlm/. Ensure you include the trailing slash.
You can also use this method to bypass the menu system and access certain parts of RemotelyAnywhere directly:
• Remote Control: http://your.machine.here:2000/ntlm/remctrl.html
• Command Prompt: http://your.machine.here:2000/ntlm/telnet.html
• Chat: http://your.machine.here:2000/ntlm/chat.html
Similarly, you can specify your username and password in the URL - thus forcing a normal login - by appending
the credentials in a /login:username:password:domain/ form to the URL with which you access
RemotelyAnywhere.
Copyright © 2012 LogMeIn, Inc.
11
For example, the URL http://MAILSERVER:2000 would become
http://MAILSERVER:2000/login:username:password:domain/. Ensure you include the trailing
slash.
The Windows NT domain you are logging into is optional. If omitted, RemotelyAnywhere will try to authenticate
you to the computer on which it is running, then in the domain to which it belongs. The following URLs are examples:
• Remote Control:
http://your.machine.here:2000/login?username=x&password=y&domain=z&go=r
• Command Prompt:
http://your.machine.here:2000/login:yourloginname:yourpassword/telnet.html
• Chat: http://your.machine.here:2000/login:yourloginname:yourpassword/chat.html
12
RemotelyAnywhere User Guide
RemotelyAnywhere User Interface
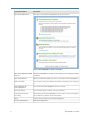
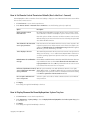
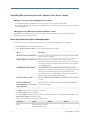
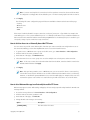
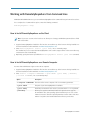
RemotelyAnywhere Dashboard
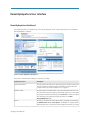
The Dashboard gives you a detailed, up-to-the-minute diagnostic view of system information for an individual
RemotelyAnywhere computer.
Figure 1: RemotelyAnywhere Dashboard
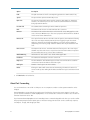
Each section of the Dashboard displays a summary of activity.
Dashboard Section
Description
System Information
Provides details about the Host's operating system; the CPU installed; the
amount of physical and virtual memory available and used; when the
computer was last booted; and which user is logged in.
Network Traffic
Provides details of network traffic on the selected network interface. The
area at the top shows the loading on the network interface: you can redraw
this graph to show the latest data by clicking Refresh. You may also adjust
the sensitivity of the graph by changing the values in the Max
Inbound/Outbound fields.
Events
Provides an instant view of information that is generally retrieved using
the Administrative Tools > Event Viewer in Windows. It displays the five
(default value) most recent events from the Application Event Log, Security
Copyright © 2012 LogMeIn, Inc.
13
Dashboard Section
Description
Event Log, and System Event Log. You can customize which events are
displayed by clicking Set Filter.
Disk Drives
Displays the size and amount of used/free space on each disk drive of the
Host.
Processes
Provides an instant view of information similar to what you can see in the
Processes tab of Windows Task Manager. It displays information about
the five (default value) processes using most CPU resources; the percentage
of CPU each process is using; and the amount of memory each process is
using.
Scheduled Tasks
Provides an instant view of information similar to what the Scheduled
Tasks feature in Windows retrieves. It lists the most recently executed
scheduled tasks.
Most Recent Accesses
Provides details of the most recent accesses to the Host using
RemotelyAnywhere.
Installed Hotfixes
Provides details of the Windows Hotfixes (updates, service packs, and so
on) installed on the Host.
Journal
Provides a list of the five (default value) most recent Journal entries. The
Journal allows you to add useful, time-stamped comments by typing in
the input field and clicking Add.
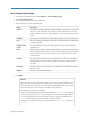
RemotelyAnywhere Dashboard Features
The Dashboard offers the following features:
Dashboard Feature
Description
Section-level details
To view detailed information, click a section heading.
Item-level details
Click any item to view detailed information about the event, process, disk
drive, and so on.
Tooltips
Hold your mouse over an item to see a tooltip containing a select set of
details about the event, process, disk drive, and so on.
Customizable layout
You can drag, drop, minimize, maximize or reposition the various sections.
Also, you can change the number of items to be displayed in certain
sections (Events, Processes, Scheduled Tasks, and Journal).
Journal
Use this feature to leave notes on the Host's desktop. For example, notes
on the current status of scheduled tasks, or the reason the computer was
remotely accessed.
Filtering
14
You can filter Event messages. For information, see Monitoring Events in
the Application, Security, and System Logs on page 45.
RemotelyAnywhere User Guide
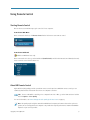
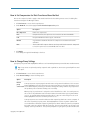
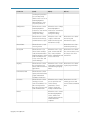
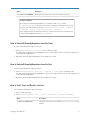
RemotelyAnywhere Performance Data Viewer
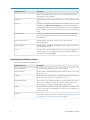
On every page of RemotelyAnywhere you can see a real-time Performance Data Viewer:
Figure 2: RemotelyAnywhere Performance Data Viewer
This java applet is to the right of the RemotelyAnywhere logo in the top frame. It shows CPU load (green) and
Memory load (red) and is updated every few seconds, so you can get instant feedback on the effects of performance
intensive processes. This graph can be disabled under Preferences > Appearance.
RemotelyAnywhere Quicklinks
QuickLinks are accessible from every page of RemotelyAnywhere. You can add your favorite pages to the QuickLinks
drop down menu wherever you see the star icon in the tool bar of the page you are viewing. You can also edit your
QuickLinks by clicking on Edit your QuickLinks in the QuickLinks drop-down menu.
The QuickLinks menu is situated in the top frame of the page so that your favorite pages are always only a click
away.
Log Out and Timeout
You can Log Out from RemotelyAnywhere by clicking Disconnect. If you are inactive for 10 minutes you will be
logged out automatically. You can set the session timeout interval under Preferences > Network.
RemotelyAnywhere System Tray Icon
RemotelyAnywhere includes a multi-purpose system tray icon that you can configure via Preferences > Appearance
> Systray Settings.
Systray menu options
Right-clicking the RemotelyAnywhere icon in the systray will bring up the following options:
Copyright © 2012 LogMeIn, Inc.
15
Systray Menu Option
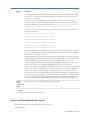
Description
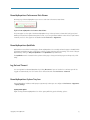
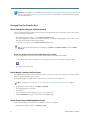
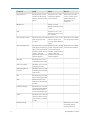
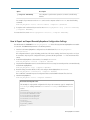
Open RemotelyAnywhere
This option opens the RemotelyAnywhere client user interface:
Figure 3: RemotelyAnywhere client user interface
16
Open RemotelyAnywhere Web
Interface
Starts RemotelyAnywhere on the local host and log you in using your network
credentials.
Open Status Window
Opens a window that updates you on the current status of RemotelyAnywhere.
Initiate chat with
You can start a chat session with the user whose computer you are connected
to.
Switch Off/Switch On
RemotelyAnywhere
You can turn the RemotelyAnywhere service on and off.
Share my Desktop
You can invite a guest to view or control your desktop.
Convert Remote Control
Recordings
This wizard converts RemotelyAnywhere remote control screen recording files
into an AVI file for playback in any media player.
About
Provides basic information about RemotelyAnywhere.
Exit RemotelyAnywhere
Quits RemotelyAnywhere.
RemotelyAnywhere User Guide
Using Remote Control
Starting Remote Control
Choose the most convenient way to gain control of a host computer.
From the Host Main Menu
Once connected to the host, click Remote Control on the left menu to start remote control.
From the Host Dashboard
Available on Windows hosts only.
Once connected to a Pro host, go to the Dashboard (Detailed mode) and click the Remote Control icon (not the text).
Select a remote control client from the list.
About HD Remote Control
High-definition (HD) quality provides a premium remote control experience. With HD remote control you can
seamlessly watch videos and stream music from one computer to another.
Path: To turn on HD while controlling a Pro computer from a PC or Mac, go to the Remote Control toolbar
and click Options > Color Quality.
For more information, see How to Change the Color Quality of the Host Screen on page 19.
Note: HD quality requires higher network bandwidth and computer performance than other options. In
general, most recently purchased computers can provide the required performance. Network bandwidth
depends on your service provider.
Copyright © 2012 LogMeIn, Inc.
17
Remember: HD quality is also available when connecting to a Pro computer from an iPhone, iPad, or iPod
touch. For details, visit https://secure.LogMeIn.com/products/ios/. HD quality is not available when connecting
from an Android device.
Changing How You View the Host
How to View the Host Computer in Full Screen Mode
In Full Screen Mode the host display covers the entire client display. Full Screen mode gives you the most realistic
"as if you were there" experience.
•
•
On the Remote Control toolbar, click the Full Screen Mode button.
The RemotelyAnywhere interface is minimized and the host computer's display appears on your entire screen.
Only the Remote Control toolbar remains visible.
To exit full screen mode, click the Full Screen Mode button again.
Tip: For best results during Full Screen viewing, go to Options > Resolution Settings and select Match
Resolution.
How to Keep the Remote Control Toolbar Visible During Full Screen Mode
In Full Screen Mode, the Remote Control toolbar will be hidden to allow maximum visibility.
•
To keep the toolbar visible, click the pin icon on the Full Screen version of the Remote Control toolbar.
The toolbar will remain open.
How to Magnify a Section of the Host Screen
The Magnifying Glass feature opens a box that you move on the host screen to view a small area in high resolution
without otherwise adjusting your resolution.
The Magnifying Glass is available when screen size is less than 100% of its original size.
Note: To adjust your screen size, see How to Change Screen Size During Remote Control on page 18.
1. On the Remote Control toolbar, click Options > Magnify.
The magnifying glass is activated.
2. Drag the box.
Any area within the box in displayed in 100% of its original size.
3. Click the Magnify button again to deactivate the magnifying glass.
How to Change Screen Size During Remote Control
View the host display on the client device in a way that you find comfortable.
1. On the Remote Control toolbar, click Options > View.
18
RemotelyAnywhere User Guide
2. Select the appropriate setting.
Your selection is applied immediately.
Tip: To change the actual screen resolution of the host display, edit the host Desktop Properties.
How to Switch Between Multiple Host Monitors during Remote Control
When connected to a host with two monitors, the Switch Monitors button will be available on the remote control
toolbar. Click this button to switch between monitors.
Also, there is a Monitors button in Options on the Remote Control toolbar. Click the Monitors button to switch
between monitors.
Tip: On a Windows PC, try this shortcut. Press Left CTRL key-Left Windows key-Right/Left
Arrow key to switch monitors. To see all monitors at once, keep moving through until you can see all
available monitors on the client display.
Note: The Java and HTML remote control clients do not offer multiple monitor support.
How to Change the Color Quality of the Host Screen
Select a lower setting to optimize the amount of information transferred during remote control, or select a higher
setting to improve the quality of the image.
1. On the Remote Control toolbar, click Options > Color Quality.
The Color Quality options are displayed.
2. Select the appropriate setting.
•
•
To improve performance, select Grayscale, Low quality, or Compressed.
For better image quality, select Medium quality or High quality.
Tip: Choose Automatically adjust color settings to allow RemotelyAnywhere to detect the optimal setting.
Your selection is applied immediately.
Remember: HD quality is also available when connecting to a Pro computer from an iPhone, iPad, or
iPod touch. For details, visit https://secure.LogMeIn.com/products/ios/. HD quality is not available when
connecting from an Android device.
How to Optimize Remote Control Performance at Slower Connection Speeds
Adjust your network connection speed to achieve optimal performance during remote control.
On the Remote Control toolbar, click Options > Network.
•
•
•
Select Slow to optimize your connection on lower speed connections
Select Fast to exploit a high bandwidth connection
Select Auto to allow to detect the optimal settings
Copyright © 2012 LogMeIn, Inc.
19
Customizing the Remote Control Toolbar
Add icons to the remote control toolbar for easy access to favorite remote control features. All features available
under the Options menu can be added.
Security During Remote Control
You can prevent others from viewing the host screen and from using the host mouse and keyboard.
How to Blank the Host Screen During Remote Control
Protect your data by blanking the host display during a remote control session.
•
•
On the Remote Control toolbar, click Options > Blank Screen.
You can turn this feature on or off at any time.
If this is the first time you are using the screen blanking feature on the host, you will be prompted to install a
DPMS (Display Power Management Services) driver.
Not all monitors, video cards, motherboards, or BIOS support DPMS. Check with your hardware vendor if you
experience problems with the DPMS driver. In case of incompatibility, you may not be able to use this feature
with some host computers.
Anyone at the host device will see a blank screen on the physical monitor while the remote session is active.
How to Block Input During Remote Control
Lock the host keyboard and mouse to prevent anyone sitting at the host machine from entering data during a
remote control session.
•
On the Remote Control toolbar, select Options > Lock Keyboard.
You can turn this feature on or off at any time.
Moving Data During Remote Control
You can copy and paste files and folders between the host and client.
How to Copy and Paste Between Devices (Clipboard Synchronization)
Use Clipboard Synchronization to save time and avoid errors by directly copying and pasting information between
devices during remote control.
This feature is not available during a view-only Monitor Host Screen session.
•
On the Remote Control toolbar, select Options > Sync Clipboard.
Anything copied on either device is available to be pasted to the other.
How to Connect Drives During Remote Control
Use the Connect Drives feature to make files on the client accessible to the host without copying or moving any
data.
20
RemotelyAnywhere User Guide
Get Connected
To connect client-side drives to the host, start a remote control session and click Options > Connect Drives on the
Remote Control toolbar. You can turn this feature on or off at any time.
Attention: Connect Drives does not function with the Flash remote control client, which is the default when
controlling a host via Chrome.
Find the Connected Drive
To access connected client-side drives, open My Computer in Windows XP or Computer in Windows 7. Client-side
drives are listed as Network Drives or Drives connected from [client name].
Connected Drives: Example
You have a Spyware cleaner program saved on a removable disk (such as a USB stick) attached
to the client. You want to run the Spyware cleaner on the host.
1.
2.
3.
4.
Start a LogMeIn remote control session.
Connect drives at Options > Connect Drives.
During remote control, open My Computer on the host.
Under Network Drives, locate and run the executable file for the Spyware cleaner to run
it directly from the drive attached to the client. There is no need to copy or move any files.
Remember: Some programs may require additional configuration or a license key
before they will run on the host.
Using Presentation Tools
Use the whiteboard and the laser pointer to highlight items on the host screen.
How to Draw on the Host Screen
Use the Whiteboard to activate a pencil tool that you can use to draw freehand images on the host computer's
screen.
1. On the Remote Control toolbar, click Options > Whiteboard.
The pencil tool is activated.
Note: You cannot control the host while Whiteboard is enabled.
2. Draw on the host screen.
The pencil tool leaves a red line on the host screen. All drawings appear on both the client and host.
3. To erase drawings, click Options > Whiteboard.
How to Use the Laser Pointer
The Laser Pointer is a small red dot that the client-side user moves around the host screen to highlight features
for the host-side user.
Copyright © 2012 LogMeIn, Inc.
21
1. On the Remote Control toolbar, click Options > Laser Pointer.
To the host-side user, the laser pointer appears as a simple red dot.
Note: You cannot control the host while Laser Pointer is enabled.
2. To exit, click Laser Pointer again.
Remote Sound
Use the Remote Sound feature to listen to sounds played on the host computer while you are at the client.
Mute
To mute remote sound during remote control, click the loudspeaker icon on the Remote Control toolbar.
Adjust the volume
To adjust the volume during remote control, drag your mouse across the volume bars on the Remote Control
toolbar.
Change sound quality
To change sound quality during remote control, click Options > Sound on the Remote Control toolbar and adjust
the Quality slide bar.
Remote Printing
You can print from the host computer to a printer connected to the client.
Make sure at least one printer is connected to the client.
Note: Remote printing does not function with the Flash remote control client.
1. On the Remote Control toolbar, click Options > Connect Printer to activate Remote Printing.
Tip: You will be able to connect one or more printers when multiple client-side printers are available.
The selected printer (or the client's default printer if there is only one printer available) will be ready to receive
print jobs from the host.
2. On the host, print as you normally would during regular use.
3. Make sure the client printer is selected in the Print dialog box: [Printer Name] via
RemotelyAnywhere.
22
RemotelyAnywhere User Guide
4. Click Print on the Print dialog box.
The file will print to the selected client-side printer.
Having trouble printing? See Troubleshooting Remote Printing.
System Management (Quitting Programs on the Host)
Remotely list and quit applications running on the host.
How to Open the Windows Task Manager on the Host Computer (Ctrl-Alt-Del)
During a remote session, the Ctrl-Alt-Del key combination entered on the client will only be registered by
the client.
This feature is not available during a view-only Monitor Host Screen session.
•
On the Remote Control toolbar, click Options > Ctrl-Alt-Del button.
The Windows Task Manager opens on the host computer.
Tip: You can also use a hotkey to send the Ctrl-Alt-Del command to the host. The default is
Ctrl-Alt-Insert. To change the hotkey, open the host preferences and go to General > Remote Control
> Interaction and select a key combination from the Ctrl-Alt-Del hotkey combination drop-down list.
How to Force Quit Applications on a Mac Host (Command-Alt-Escape)
This feature is not available during a view-only Monitor Host Screen session.
•
•
When controlling a Mac from a Windows PC, press Windows Key-Alt-Esc on the client keyboard.
The Force Quit Applications window opens on the host.
When controlling a Mac from a Mac, click Options > Cmd-Alt-Esc on the Remote Control toolbar.
The Force Quit Applications window opens on the host.
Copyright © 2012 LogMeIn, Inc.
23
Managing Files and Folders using the File Manager
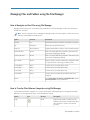
How to Navigate and Sort Files using File Manager
Navigate and Sort options are accessed via a drop-down menu on the File Manager toolbar. Shortcut keys are
available for each item.
Note: The host computer's files are displayed in the right frame, the client computer's in the left. Use the
Tab key to switch between the two frames.
Option
Shortcut
Description
Refresh
F5
Refreshes the folders on both the client and host computer.
Up
Backspace
Moves up to the parent directory.
Drive list
Ctrl+Backspace
Displays the available root drives on the selected computer.
Select left drive
Alt+F1
Click to select the disk drive you want to view in the left
pane of the File Manager window.
Select right drive
Alt+F2
Click to select the disk drive you want to view in the right
pane of the File Manager window.
Go to folder…
Ctrl+G
Click this item to open a box where you can type the name
of a specific folder or directory you want to view.
Sort by Name
Ctrl+1
Sort the directory contents by file name.
Sort by Type
Ctrl+2
Sort the directory contents by file type.
Sort by Size
Ctrl+3
Sort the directory contents by file size.
Sort by Date
Ctrl+4
Sort the directory contents by the date files were last
modified.
Show…
Select Show folders for all users, Show hidden files, and/or
Show system files in any combination.
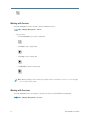
How to Transfer Files Between Computers using File Manager
Transferring files between computers is as easy as selecting files and dragging them to the appropriate folder.
Otherwise, use the appropriate options on the File Manager toolbar.
Option
Copy
24
Icon
Shortcut
Description
Ctrl+C
Copy the selected file or folder from the
existing location to the selected new location.
The copied file or folder is now in both
locations.
RemotelyAnywhere User Guide
Option
Icon
Shortcut
Description
Move
Ctrl+X
Cut a file or folder from the existing location
and move it to the new location. The moved
file or folder is now only in the new location.
Synchronize
Ctrl+S
Update the current folders to the client and
host so that their contents are the same. Files
and folders that exist only on one side are
copied normally. If both folders contain one
or more files that are different on the client
and host, the newer version will be copied.
The folders must be open, not simply
selected.
Replicate
Ctrl+R
Files and folders that do not exist in the
destination folder are copied normally. Files
that already exist in the destination folder
will be transferred from the source folder. If
a destination folder contains a file or a folder
that does not exist in the source it will be
deleted.
This is very useful if you update the Source
folder and want to push those changes to the
Destination.
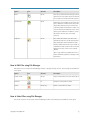
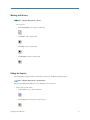
How to Edit Files using File Manager
Edit options are accessed on the File Manager toolbar or by right clicking on a file. Shortcut keys are available for
each option.
Option
Icon
Shortcut
Description
Create Folder
Ctrl+N
Create a new folder in the selected location
Rename
F2
Rename a selected file or folder
Delete
Delete key
Delete a selected file or folder
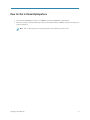
How to Select Files using File Manager
File selection options are accessed on the File Manager toolbar. Shortcut keys are available for each option.
Copyright © 2012 LogMeIn, Inc.
25
Option
Icon
Shortcut
Description
Select files
+ (on the numeric
keypad)
Opens a dialog box you can use to select
multiple files
Unselect files
- (on the numeric
keypad)
Opens a dialog box you can use to clear
selected files
Select all
Ctrl+A
Selects all files in the current location
Select none
Ctrl+- (on the
numeric keypad)
Clears all selections in the current location
Invert selection
* (on the numeric
keypad)
Change the current selection status to its
opposite (any selected item becomes cleared
and any unselected items becomes selected)
Example: How can I select or unselect files with the file selector?
The following list provides examples of using the file selector feature of the File Manager:
What to select
Syntax in the file selector
Select all files.
*
Select all files and folders.
\*
Select all .exe files in a directory.
*.exe
Select all files and folders, then unselect all
1. Click Selelct files and then enter \*
.jpg files.
2. Click Unselect files and then enter *.jpg
Important: You can only unselect
complete directories, not files within
directories.
26
RemotelyAnywhere User Guide
How to Chat in RemotelyAnywhere
1. From the RemotelyAnywhere interface, click Chat to open RemotelyAnywhere's Chat feature.
2. Enter your message in the text field at the bottom of the window and press Send to send your message to the
recipient at the Host.
Note: This is a two-way chat. No other participants can be invited to join the session.
Copyright © 2012 LogMeIn, Inc.
27
Sharing your Desktop with Another Person (Desktop Sharing)
Use the Desktop Sharing feature to invite anyone with an Internet connection to use or view your computer.
When should you use Desktop Sharing?
• When you are sitting at a computer that is running RemotelyAnywhere software
• When you want someone to see your desktop (for example, so you can show how to do something)
• When you want someone to be able to control your desktop (for example, to help you solve a problem with your
computer)
Note: You will be given the choice to allow full remote control or desktop viewing when your guest makes
a connection to your computer.
How to Send a Desktop Sharing Invitation
Remember: You can only invite someone to a Desktop Sharing session from a computer that is running the
RemotelyAnywhere host software.
1. Click the RemotelyAnywhere icon on the system tray and select Share my Desktop.
The Desktop Sharing dialog is displayed.
2. Select Invite a guest to work with you and click Next.
3. Enter Invitation Details:
a) Enter a Title for your invitation. This helps you track your invitations.
b) Specify how long the invitation will remain open. The invitation will expire if the invitee does not accept
within the given amount of time.
4. Click Next.
5. Send the invitation:
•
•
Click Email to send the invite to the recipient by email.
Click Copy to copy the invitation link to your Windows clipboard.
6. Click Finish to exit the sharing process.
The email recipient clicks the invitation link to activate the session. You are prompted to acknowledge your guest
and grant either remote control rights or desktop viewing rights.
How to Disable/Enable or Delete a Desktop Sharing Invitation
Desktop Sharing invitations can be cancelled or temporarily disabled.
1. Click the RemotelyAnywhere icon on the system tray and select Share my Desktop.
The Desktop Sharing dialog is displayed.
2. Click View pending invitations.
28
RemotelyAnywhere User Guide
3. Under Your Invitations, select the invitation you want to disable/enable or delete.
•
•
•
•
Click Disable or Activate to deactivate or activate the invitation
Click Delete to cancel the invitation and remove it from the list
Click Clear All to delete all active and expired invitations
Click New Invite to create a new invitation
Copyright © 2012 LogMeIn, Inc.
29
Customizing and Controlling your RemotelyAnywhere Experience
How to Optimize Remote Control Performance
1. Click Preferences to access the host preferences.
2. Under Remote Control, set the following options (as required):
Option
Description
Automatically disable
wallpaper
Select this option to disable the host's desktop wallpaper and all user interface
effects during remote control. User interface effects include transition effects
(fade, scroll), shadows under menus, trailing effects while dragging windows,
and Windows Aero effects.
Use mirror display driver
Select this option to make remote control sessions faster and less
CPU-intensive. See also Troubleshooting Display Issues on page 44 .
3. Click Apply.
Your settings are applied immediately to the host.
How to Set Keyboard and Mouse Priority for Remote Control
1. Click Preferences to access the host preferences.
2. Under Remote Control > Security, choose the following options:
Option
Description
Disable host keyboard and mouse Choose this option if you want to disable the input devices of the person
at the computer being controlled (the host).
Local keyboard & mouse takes
precedence over remote
Choose this option if you want the actions of the person running the remote
control session (the client-side user) to be processed before the actions of
the person sitting at the computer being controlled.
Tip: If you receive the error message Your input is being
blocked while controlling a host computer, make sure this option
is selected.
3. Click Apply.
Your settings are applied immediately to the host.
30
RemotelyAnywhere User Guide
How to Set Remote Control Permission Defaults (Host-side User's Consent)
RemotelyAnywhere offers a number of host-level settings to help you control when and how remote users will be
able to start a remote session.
1. Click Preferences to access the host preferences.
2. Under Remote Control > Interactive User's Permission , set the following options (as required).
Option
Description
Ask for permission from
interactive user
By default, RemotelyAnywhere prompts the host user to permit or deny
access whenever a client user attempts to open a remote control session.
Clear this option to allow a client user to initiate a remote control session
without asking for permission from the host user. Clearing the option will
also disable the Chat function.
Time allowed for the interactive Enter the amount of time within which the host user must respond to the
user to give permission
request for permission to initiate remote control. If this time expires, the
setting in the Default answer for confirmation message field will be applied.
Minimum 3 seconds, maximum 30 seconds.
Text to display to the user
This text will be presented to the host user in the remote control permission
dialog box. The string %USER% will be the Computer Name of the host as
set at the operating system level, plus the client user's operating system
account ID.
Default answer for confirmation Choose Yes to establish remote connection even if the host user does not
message
respond within the time set in the Time allowed for the interactive user
to give permission field. Choose No if you want the remote control session
to be refused if the host user does not respond.
Full Control (and Remote Control) With this option enabled, users with full Remote Control access rights
access rights bypass interactive (Read, Write, Delete, or “R+W+D”) will be able to access the Host without
user’s permission
first asking the user’s permission. If this is enabled it overrides the setting
in the Ask for permission from interactive user field.
Do not require authorization if
user is not present
Select this option to be able to initiate a Remote Control session without
user permission.
3. Click Apply.
Your settings are applied immediately to the host.
How to Display/Remove the RemotelyAnywhere System Tray Icon
1. Click Preferences to access the host preferences.
2. Under Appearance > Systray Settings, clear the Display the RemotelyAnywhere icon in the System Tray option
to remove the icon.
3. Click Apply.
Your settings are applied immediately to the host.
Copyright © 2012 LogMeIn, Inc.
31
How to Prevent RemotelyAnywhere Notification Messages from Appearing
You can choose to suppress all RemotelyAnywhere messages communicated from the system tray. This is useful
when messages could possibly disrupt the end-user experience, such as on a kiosk.
1. Click Preferences to access the host preferences.
2. Under Appearance > Systray Settings, select the Disable RemotelyAnywhere notification messages option to
suppress all RemotelyAnywhere messages communicated from the system tray.
3. Click Apply.
Your settings are applied immediately to the host.
How to Set the Host to Lock after Remote Control
Protect data on the host computer by setting the host to lock when remote control ends or is disconnected.
1. Click Preferences to access the host preferences.
2. Under Remote Control > Security, select the following options (as required):
Option
Description
Always lock console when remote control Select this option to always lock the host's operating system when
disconnects
a remote control ends.
Lock console when connection broken
Select this option to lock the host's operating system if the client
disconnects during remote control.
Lock console when connection times out Select this option to lock the host's operating system if the client
connection times out during remote control (see also How to Set
Remote Control Time-out on page 32).
3. Click Apply.
Your settings are applied immediately to the host.
How to Set Remote Control Time-out
Set the amount of time that can pass without activity in RemotelyAnywhere before a remote control session is
disconnected.
1. Click Preferences to access the host preferences.
2. Under Network, set the Idle time allowed.
3. Click Apply.
Your settings are applied immediately to the host.
32
RemotelyAnywhere User Guide
How to Set Compression for Data Transferred from the Host
Choose the compression level to apply to data transferred from the host during remote control, including files
transferred using the File Manager feature.
1. Click Preferences to access the host preferences.
2. Under Network, choose the appropriate File Transfer Compression option:
Option
Description
No compression
Data is not compressed.
Fast
Compared to Best, this option uses less host CPU, but more bandwidth.
Low
Keeps bandwidth and CPU usage at a minimum.
Normal
A good balance between effective file compression and balanced host CPU
utilization.
Best
The host CPU will compress data as much as possible before transfer. Compared
to Fast, this option uses less bandwidth, but more CPU.
3. Click Apply.
Your settings are applied immediately to the host.
How to Change Proxy Settings
Specify the proxy server RemotelyAnywhere will use as an intermediary between your web browser and the Internet.
Tip: Proxy servers are primarily used by companies and organizations. Home users generally will not need
this option.
1. Click Preferences to access the host preferences.
2. Under General Settings, set the following option:
Option
Description
Broken
Some proxy servers request pages from web servers using several IP addresses. This can cause
proxy
RemotelyAnywhere to bounce you back to the login page after you click the Login button. If you
server mask
are not affected by this problem, you should not change this setting. However, if you experience
this problem, please read the following section carefully.
When you log in, your browser is assigned a session identifier in a cookie. For security reasons,
this cookie is only valid when sent from the IP address from which the login originated. Were
it not so, an eavesdropping attacker would be able to copy your cookie and gain access to all
RemotelyAnywhere resources to which you have access.
Some proxy servers use several IP addresses when requesting data from a remote computer. If
this is the case with your proxy server, RemotelyAnywhere sees the original IP address and
session identifier as valid, but requests originating from other IP addresses (even if accompanied
by a valid cookie) are replied to with the login page. The login page breaks out of frames, and
displays itself in your browser - and you are prompted to log in again. A possible workaround
Copyright © 2012 LogMeIn, Inc.
33
Option
Description
is to keep logging in as many times as necessary - most proxy servers only use a few - maybe
half a dozen - IP addresses. Once all the IP addresses are logged in, you will no longer be
bounced to the login page.
Since version 3.2, RemotelyAnywhere has had a setting called Proxy Problem Fixer. This is
essentially a mask that can be applied to IP addresses. Suppose your proxy server uses the
following IP addresses to request pages from servers: 192.168.0.33, 192.168.0.34,
192.168.0.35, 192.168.0.36, 192.168.0.37, 192.168.0.38
In this scenario, if you look at the IP addresses in binary form, you can see that only the last
three bits are different:
11000000.10101000.00000000.00100001
11000000.10101000.00000000.00100010
11000000.10101000.00000000.00100011
11000000.10101000.00000000.00100100
11000000.10101000.00000000.00100101
11000000.10101000.00000000.00100110
This means that the largest number that can be represented on three bits (111 binary = 7 decimal)
has to be masked from the IP addresses when checking them against each other to verify the
validity of the session identifier cookie.
RemotelyAnywhere provides a subnet mask-like setting for this purpose. By default, it is set to
255.255.255.255 - this means that no bits are masked off. Given the above scenario, we need
to mask off the three least significant bits, thus we subtract 7 (binary form: 111) from
255.255.255.255, which leaves us with 255.255.255.248. By entering this value in the Proxy
Problem Fixer field, we are telling RemotelyAnywhere to ignore the last three bits.
This is a rather tedious way of getting around the problem, but short of reconfiguring the proxy
server to use only one IP address, there is no easier solution. The latter is the recommended
solution, since allowing several IP addresses to share the same session identifier can be a
security risk. It is not really significant when you only mask off a few (three or four) bits, but if
you need to decrease more and more significant bits of the IP addresses, you are putting yourself
in a risky situation. The risk is decreased significantly due to the fact that RemotelyAnywhere
now uses HTTPS rather than HTTP by default meaning that the cookie is protected by SSL.
Broken
Select this option if you use Internet Protocol Version 6 (IPv6).
proxy
server mask
(IPv6)
3. Click Apply.
Your settings are applied immediately to the host.
How to View RemotelyAnywhere Log Files
The host will always log the following events to the application log:
• Service Start/Stop
34
RemotelyAnywhere User Guide
• LogIn/Logout
• Remote Control Start/Stop
Follow this procedure to view log files:
1. Click Preferences to access the host preferences.
2. Go to Preferences > RemotelyAnywhere Logs.
A list of available log files is displayed.
3. On the list, double-click the file you want to view.
• The active log file is named RemotelyAnywhere.log
• Older logs are stored with the naming convention RAYYYYMMDD.log (example: the log file for January 20,
2011, would be RA20110120.log)
• Click Download all logs in one compressed file to access all available logs in a single compressed archive
4. You can also set the following options by clicking Preferences:
Option
Description
Directory for log files
Define the folder where the files are to be saved. Leave blank to use the
default location (the RemotelyAnywhere installation directory, typically
C:\Program Files\RemotelyAnywhere).
Keep log files for this many days
Enter the number of days for which you would like to store log files.
5. Click Apply.
Your settings are applied immediately to the host.
How to Record Remote Control Sessions
Set RemotelyAnywhere to record and save a video file of each remote control session with the host.
1. Click Preferences to access the host preferences.
2. Under Log Settings > Remote Control Session Recording, choose from the following options.
Option
Description
Enable Session Recording
Select this option to record all your sessions.
Important: You cannot choose not to record an individual
session. All sessions will be recorded without exception until
recording is disabled.
Location for Output Video Files
Specify the location where video files will be saved. Type a path to an
available directory or click Browse to define a location on the host.
Maximum Total Size of Output Video The maximum total size of your recordings in megabytes. The oldest
Files
recording is deleted if you exceed this limit.
Automatically convert to .AVI format Select this option to convert your RCREC recordings to AVI format.
3. Click Apply.
Your settings are applied immediately to the host.
Copyright © 2012 LogMeIn, Inc.
35
All remote control sessions will be recorded and saved in the chosen file format to the defined location.
To convert existing RCREC recordings to AVI format, click the RemotelyAnywhere icon on your system tray and
select Convert Remote Control Recordings. Follow all on-screen instructions of the AVI Conversion Wizard.
How to Set RemotelyAnywhere to Report Software Errors
The Guardian documents and records errors that occur in the host software and allows error details to be sent
directly to our development team for analysis.
The Guardian does not gather or report any personal information.
Follow this procedure to control how and when the Guardian will send error notifications to RemotelyAnywhere.
1. Click Preferences to access the host preferences.
2. Under Advanced Options > Software error reporting, choose one of the following options:
Option
Description
Always send an error report
An error report will always be sent (no user action required).
Never send an error report
An error report will never be sent.
Ask the user what to do
The user will be prompted to send an error report and can choose
to send the report or not.
3. Click Apply.
Your settings are applied immediately to the host.
36
RemotelyAnywhere User Guide
Controlling Access to Host Computers
Using IP Filters to Protect your Computer from Intruders
How to Create an IP Filter Profile
Create IP Filter Profiles to allow or deny connections to a host from specific IP addresses.
1. Click Preferences to access the host preferences.
2. Click Security > IP Filtering.
3. Type a Name for your filter and click Add to begin creating a filter profile.
The IP Filtering dialog box is displayed.
4. Choose a filter type:
•
•
Choose allow to make a filter that allows specified addresses to access this host
Choose deny to make a filter that prevents specified addresses from accessing this host
5. Enter the Address you want to allow or deny.
Accepted wildcards are an asterisk (*) that matches any number of characters, and a question mark (?) that
matches a single character only.
6. Enter a Subnet that you want to allow or deny.
7. Click Add filter.
The filter is added to the IP Filters In Profile box.
8. Repeat from step 2, above, to add additional filters to the Filter Profile.
9. Click Back when you are finished adding filters to the Profile.
Your Filter Profile is saved and you are returned to the IP Filtering page.
10. You must apply your Filter Profile before it can take effect. On the IP Filtering page, select a Filter Profile from
the Profiles list and click Use profile.
The Filter Profile is activated on the host.
When a connection is made to the host, the remote IP address will be checked against the filter or filters in the
applied Filter Profile. Access will be granted or denied accordingly.
Important: Filters are checked in the order they are listed in the IP Filters In Profile box. Ordering is crucial.
Use the up and down arrows next to the IP Filters In Profile box to set proper order.
The IP filters that you set up here apply to every connection except those aimed at the FTP or Port Forwarding
Server. To specify IP address restrictions specific to these modules you will need to use their specific IP filtering
options.
IP Filtering Examples
These examples will help you understand how to use the IP Filtering feature.
Copyright © 2012 LogMeIn, Inc.
37
IP Filtering Example 1
Allow connections from IP address 215.43.21.12 and the network 192.168.0.0, and deny all other connections.
ALLOW 215.43.21.12
ALLOW 192.168.0.0 (255.255.0.0)
-orALLOW 192.168.*
DENY:*
IP Filtering Example 2
Allow connections from IP address 215.43.21.12 and the network 192.168.0.0, but not from the address 192.168.0.12,
and deny everything else.
ALLOW 215.43.21.12
DENY 192.168.0.12
ALLOW 192.168.0.0 (255.255.0.0)
-orALLOW 192.168.*
DENY.*
Note: Denying the connection from 192.168.0.12 comes before allowing connections to the 192.168.0.0
network. If RemotelyAnywhere was to find the ALLOW item first, it would let IP address 192.168.0.12 through,
since it matches the condition. To prevent this, the address 192.168.0.12 is checked before the network to
which it belongs.
IP Filtering Example 3
Allow all connections, except those coming from 192.168.0.12
DENY:192.168.0.12
IP Filtering Example 4
Deny all connections from the network 192.168.0.0 except for the subnet 192.168.12.0; allow all other connections
ALLOW:192.168.12.0(255.255.255.0)
-orALLOW:192.168.12.*
DENY:192.168.0.0 (255.255.0.0)
-orDENY:192.168.*
Detecting and Locking out Potential Intruders
Set up a Denial of Service filter and an Authentication Attack filter to help detect and temporarily lock out potential
intruders.
Tip: You can view failed login attempts and lockouts in the log file if you have logging enabled.
38
RemotelyAnywhere User Guide
How to Set up a Denial of Service Attack Blocker
Use the Denial of Service attack blocker as a precaution against unwanted intruders who slow your host machine
by continuously requesting the same service.
1. Click Preferences to access the host preferences.
2. Under Security > IP Address Lockout, set the following Denial of Service filter options:
Option
Description
Active
Select this option to activate the attack blocker.
Number of invalid HTTP requests
allowed
Specify the number of HTTP requests to allow before the offending IP
address is locked out.
Reset invalid attempt counter after After the amount of time specified in this box has elapsed, the invalid
attempt count of the offending IP address will be reset to zero.
Lock out for
All attempted connections from an offending IP address will be rejected
for the amount of time specified in this field.
3. Click Apply.
Your settings are applied immediately to the host.
To allow access from blocked addresses, click Unblock all.
How to Set up an Authentication Attack Blocker
Use the Authentication Attack blocker to lock out those who try to get past your host logon screen without
authorization.
1. Click Preferences to access the host preferences.
2. Under Security > IP Address Lockout, set the following Authentication attack filter options:
Option
Description
Active
Select this option to activate the attack blocker.
Number of invalid attempts
allowed
Specify the number of invalid authentication attempts to allow before the
offending IP address is locked out.
Reset invalid attempt counter after After the amount of time specified in this box has elapsed, the invalid
attempt count of the offending IP address will be reset to zero.
Lock out for
All attempted connections from an offending IP address will be rejected
for the amount of time specified in this field.
3. Click Apply.
Your settings are applied immediately to the host.
To allow access from blocked addresses, click Unblock all.
Copyright © 2012 LogMeIn, Inc.
39
Controlling Who can Access your Host Computers (User Access Control)
What type of user can access RemotelyAnywhere host computers?
• Users with Administrator credentials on the host computer (at the operating system level)
• Non-administrator users who have been granted permission to access the host via the User Access Control feature
in RemotelyAnywhere.
What happens if a user without proper permission attempts to connect?
An attempt to log in without proper User Access Control permissions may result in error 4320 ("Operator or
Administrator has refused the request").
How to Specify User Access Rights in RemotelyAnywhere
Follow this procedure to make sure that users can access your RemotelyAnywhere host computers.
1. Click Preferences to access the host preferences.
2. Under Security > Access Control, select from the following general options:
Option
Description
Allow full control to administrators Select this option to grant full permissions to anyone with administrative
rights on the host computer.
Do Not List Domains on Logon Screen Select this option to clear the list of active domains in the host
authentication dialog box. This provides an extra layer of security by
forcing the remote user to type the exact name of the chosen domain
in the Log on to field.
NT LAN Manager Authentication
RemotelyAnywhere supports Windows Challenge/Response type
authentication. You must use Internet Explorer to take advantage of this
feature. You need not worry about exposing your password to
eavesdroppers if you are using HTTPS to secure all communications
between your browser and RemotelyAnywhere.
Save user name in a cookie
You can configure RemotelyAnywhere to remember your user name in
a cookie.
Display "Enable/Disable
RemotelyAnywhere" option on the
system tray menu
Select this option to be able to enable or disable RemotelyAnywhere
from the system tray.
3. Click Add to define the access rights of a new user.
The Access Control dialog is displayed.
4. In the User name field, type the name of the user for whom you want to set permissions. Alternatively, click
List users and groups to browse for a user.
5. Set the user's permissions using the following options:
40
Permission
R(ead)
Login
Allows the user to log into
RemotelyAnywhere. By
W(rite)
D(elete)
RemotelyAnywhere User Guide
Permission
R(ead)
W(rite)
D(elete)
revoking this permission
you can temporarily
disable a user’s access to
RemotelyAnywhere
without having to clear
any other permission.
Configuration
Allows the user to view
RemotelyAnywhere
Preferences. You must be
an Administrator to
change this setting.
Allows the user to change
RemotelyAnywhere
Preferences. You must be
an Administrator to
change this setting.
Scripts
Allows the user to view
and execute monitoring
and maintenance scripts
Allows the user to edit,
compile, enable and
disable monitoring and
maintenance scripts
Event Viewer
Allows the user to read
event log entries
File System
Allows the user to list
drives, folders and files;
read and download files;
view file attributes; shared
folder information and
access control lists; and
use File Manager
Allows the user to copy,
paste, rename and edit
files; create and share
folders; edit attributes and
access control lists
Registry
Allows the user to view
the registry keys and
values; and list installed
applications.
Allows the user to create Allows the user to delete
and rename registry keys; registry keys and values
add and change registry
values
Performance Data
Allows the user to view
system performance data,
graphs and detailed
hardware information
Processes
Allows the user to view
running processes,
services and drivers; list
DLLs and objects that
these processes use; and
view scheduled tasks
Reboot
Copyright © 2012 LogMeIn, Inc.
Allows the user to delete
monitoring and
maintenance scripts.
Allows the user to clear
and backup event logs.
Allows the user to change
process priorities and
service startup
parameters; control
services; create and
modify scheduled tasks
Allows the user to delete
files; remove shares; and
disconnect users from
shared files.
Allows the user to kill
running processes and
services; delete scheduled
tasks
Allows the user to restart
the RemotelyAnywhere
service; initiate and
schedule system reboots;
and hardreset the
computer.
41
Permission
R(ead)
Remote Control
Allows the user to view
Allows the user to view
and monitor the remote and interact with the
desktop; and use the chat remote desktop.
applet.
Whiteboard
Allows use of the
Whiteboard during remote
control
Chat
Allows the user to chat
with the person in front of
the computer
D(elete)
Allows the user to take
control over the remote
desktop without the
interactive user’s
permission.
User / Group Accounts
Allows the user to list and Allows the user to create Allows the user to delete
view user groups and
new user groups and
user groups and accounts.
accounts.
accounts; and modify their
details.
System Configuration
Allows the user to list and
view system configuration
data, such as environment
variables, virtual memory
settings, drive and
partition information and
network adapters.
SSH Shell
Allows the user to use a
command prompt via SSH.
SSH Port Forward
Allows the user to use port
forwarding via SSH.
SSH Privileged Port
Forward
Allows the user to use port
forwarding for ports below
1024 via SSH
SCP
Allows the user to use SFC
(Secure File Copy) via SSH.
SFTP
Allows the user to use
SFTP (Secure File Transfer)
via SSH.
Command Prompt
Allows the user to use the
secure RemotelyAnywhere
Telnet applet to open a
remote command prompt.
Telnet
Allows the user to use any
unsecured Telnet client to
open a remote command
prompt.
Desktop Sharing
42
W(rite)
Allows the user to modify Allows the user to delete
system configuration data, environmental variables.
such as environment
variables, virtual memory
settings, drive and
partition information and
network adapters.
Allows the user to create
and delete Desktop
Sharing invitations.
RemotelyAnywhere User Guide
Option
Description
Full Control
Give the user full control over all features of RemotelyAnywhere. It is the equivalent
of checking all other options (other than Compact View only).
Force Basic Interface Limit the host user to the Compact HTML view of the RemotelyAnywhere HTML interface
(the "Main Menu").
SSH Does Not
Set this flag to disable emulated stream mode for the SSH Server. The option is helpful
Emulate Stream Mode if you want SSH to execute non-interactive shell scripts which must not include terminal
emulation.
SSH uses an emulated stream mode when the command shell is cmd.exe. Emulation
is turned off by setting this flag, and this allows you to use an alternate shell (such as
bash.exe) in stream mode. (You can control the shell interpreter used by changing the
ComSpec environment variable for this user.) This flag, when set, overrides the
system-wide Console Mode parameter under Telnet Server and will enable Stream
Mode for this user.
By default, stream mode in RA SSH is emulated, meaning that it does not directly relay
I/O between the shell and the SSH client, but does some pre-processing in order to
properly display the original command-line shell of Windows (cmd.exe).
IP filter
Use this drop-down list to apply an existing IT filter profile to this user. This allows you
set the IP address (or range) from which the user can access the host.
6. Click Add.
The user is added to the User list.
7. Click OK to exit the User Access Control dialog box.
8. Click Apply.
Your settings are applied immediately to the host.
Copyright © 2012 LogMeIn, Inc.
43
Troubleshooting
For troubleshooting assistance, visit the Knowledge Base.
Troubleshooting Remote Printing
Follow these instructions if material printed using RemotelyAnywhere remote printing does not print properly (for
example, it is mirrored, has the wrong layout, or has meaningless characters and content).
1. Click Preferences to access the host preferences.
2. Under Preferences > Advanced Options Remote Control, select Force Bitmap Printing.
3. Click Apply.
Your settings are applied immediately to the host.
4. Print the file again.
When bitmap printing is activated, all material printed using remote printing will be 'printed' locally to a bitmap
which is then sent to the remote printer. Bitmap printing is slow, but reliable.
Troubleshooting Display Issues
Follow these instructions to help resolve problems experienced while viewing video or while using DOS-based or
graphic-intense applications during remote control. Typical problems include display black-out, host computer
restart when initiating remote control, or loss of Windows Aero functionality after remote control.
1. Click Preferences to access the host preferences.
2. Under Remote Control > General Settings, make sure that Use mirror display driver is not selected.
3. Click Apply.
Your settings are applied immediately to the host.
44
RemotelyAnywhere User Guide
Remote Management of RemotelyAnywhere Hosts
Managing the Rights of Windows Users and Groups
RemotelyAnywhere User Manager supports all features of Windows Computer Management for Local Users and
Groups, including full Active Directory support.
Path: Computer Management > User Manager
•
Click a user on the User tab:
•
•
•
•
•
•
•
•
Change the password and password settings
Rename the user
Disable the account
Delete the user
Assign a Home Directory
Assign a Logon Script
Assign a Profile Path
Click a group on the Groups tab:
•
•
•
•
Assign members to the group
Rename the group
Delete the group
Edit the Description
Monitoring Events in the Application, Security, and System Logs
RemotelyAnywhere Event Viewer supports features similar to the Windows Event Viewer, including the Application
Event Log and Security Event Log.
Path: Computer Management > Event Viewer
•
•
•
Click an entry to view event details
Clear the contents of a log file by clicking X (Clear Log) on the toolbar
Click the Email Alerts icon to send email alerts to specified email addresses when log entries matching a given
criteria are entered into any of the event logs
•
Click the Event Filter icon to filter a long list of events
Copyright © 2012 LogMeIn, Inc.
45
Working with Services
The RemotelyAnywhere Services feature is similar to Windows Services.
Path: Computer Management > Services
•
Select a service:
•
Click the Properties icon to view or edit details
•
Click Play to start a stopped item
•
Click Stop to stop a running item
•
Click Restart to restart a running item
Note: When specifying a user account to be used by a service, it must be in DOMAIN\USER form. Type
.\USER to use a local account.
Working with Processes
The RemotelyAnywhere Processes feature is similar to the Processes tab in Windows Task Manager.
Path: Computer Management > Processes
46
RemotelyAnywhere User Guide
Working with Drivers
Path: Computer Management > Drivers
•
Select a driver:
•
Click the Properties icon to view or edit details
•
Click Play to start a stopped item
•
Click Stop to stop a running item
•
Click Restart to restart a running item
Editing the Registry
RemotelyAnywhere Registry Editor functionality corresponds to the Windows Registry Editor.
Path: Computer Management > Registry Editor
Registry keys (HKCR, HKCU, HKLM, etc.) are displayed in a tree structure.
•
Click an item to view details
•
Click the Plus icon to create a new value
•
Click the Key icon to change access permissions
Copyright © 2012 LogMeIn, Inc.
47
•
Click the Delete icon to remove a key
Note: You can edit values that are either of text (REG_SZ, REG_EXPAND_SZ or REG_MULTI_SZ) or integer
(REG_DWORD) type; and REG_QWORD type values. Binary values are displayed, but cannot be edited.
Opening the Command Prompt
Open a fully functional command prompt on a host.
Path: Computer Management > Command Prompt
The Telnet client, written as an Active X applet, provides encryption and data compression for security and speed.
An HTML-based version is available as a fallback.
Rebooting the Host
Path: Computer Management > Reboot
Restart RemotelyAnywhere Restart the RemotelyAnywhere service. This does not reboot the host.
Normal Reboot
Close all processes and reboot the host in an orderly fashion.
Emergency Reboot
Available on Windows hosts only. Windows will shut down properly and flush all
outstanding file operations to disk. Applications and other processes may not
terminate gracefully, so you could lose unsaved data.
Hard Reboot
Reboot as quickly as possible. The operating system will not terminate gracefully,
so you could lose unsaved data. Reboot is immediate (like pressing your computer's
reset button). You will not receive feedback from the RemotelyAnywhere service.
Safe-mode Reboot
Available on Windows hosts only. Restart the computer in safe-mode with networking
(and RemotelyAnywhere) enabled. Safe-mode is a special way for Windows to load
when there is a system-critical problem that interferes with the normal operation
of Windows.
Scheduled Reboot
Schedule a date and time to automatically reboot the computer. This is useful if the
reboot is not urgent and can take place during off-peak hours.
Enabling Windows Automatic Logon (autologon)
Enable autologon to bypass the Windows logon screen. Upon system startup, the system will attempt to log on to
Windows with the specified autologon username and password.
Path: Computer Management > Reboot
48
RemotelyAnywhere User Guide
Caution: Read the autologon security warning from Microsoft before using this feature.
1. On the Reboot page, click Specify credentials to automatically login on the host after rebooting.
The Automatic Login page is displayed.
2. Enter a User Name, Password, and a Domain.
3. Select the Automatic logon enabled box.
4. Click Apply.
5. Restart the host.
Viewing a Host Computer Desktop without Taking Control
Use the Monitor Host Screen feature to gain view-only access to a host computer's screen.
Path: Computer Management > Monitor Host Screen
Working with Environment Variables
RemotelyAnywhere Environment Variable management corresponds to Environment Variable management under
System Properties in Windows.
Path: Computer Settings > Environment Variables
•
Select a variable:
•
Click the Properties icon to view or edit details
•
Click the Plus icon to create a new value
Changing Virtual Memory Settings
RemotelyAnywhere Virtual Memory management corresponds to Virtual Memory management under System
Properties in Windows.
Path: Computer Settings > Virtual Memory
1. Change Minimum (Initial) size and Maximum size.
Copyright © 2012 LogMeIn, Inc.
49
Tip: To remove the paging file from the drive, enter 0 in both fields.
2. Click Apply.
3. Restart the host.
Changing System Time on a Host
Path: Computer Settings > Time
•
Enter the desired values and click Apply.
Note: Time is displayed according to time settings on the host.
Managing Shared Resources
View and manage shared resources on the host, including shared folders, administrative shares, printers, scanners,
and similar.
Path: Computer Settings > Shared Resources
•
•
Click a folder's Path link to open the folder in RemotelyAnywhere File Manager
Click the Change Access Permissions button to open a dialog box where you can add new permissions or remove
existing permissions for the chosen object
•
Click the Delete button to remove sharing from an object
Setting Automatic Change Process Priorities
You can have automatically update the priority class a process runs under. This is useful for forcing lengthy,
CPU-intensive tasks into the background on a machine where responsiveness of other processes is critical.
Path: Computer Settings > Automatic Priorities
1. Click the Plus icon to create a new priority.
The Automatic Priorities dialog box is displayed.
50
RemotelyAnywhere User Guide
2. Enter the name of the executable in the Process Name field.
3. Choose the target priority class under Priority.
4. Select one or more Processor Affinity checkboxes to force a process to execute on a specific processor (or
processors).
5. Click Add.
Copyright © 2012 LogMeIn, Inc.
51
Managing RemotelyAnywhere Servers
RemotelyAnywhere provides powerful FTP and Port Forwarding capabilities. Server functions are available for
workstation and server editions, but only the server edition uses certain features.
RemotelyAnywhere Server Edition contains a versatile FTP server. You can set up an unlimited number of FTP
servers on one computer, each with its unique IP address and port combination. You can create users and groups
for your FTP servers, or you can use the built-in Windows accounts for user rights management.
If logging is enabled via Preferences > Log Settings, the FTP Server will log all user activity to the main
RemotelyAnywhere log file.
How to Create an FTP Server
1. Access the server preferences in Server Functions > FTP Configuration.
2. Click New FTP server.
The New FTP server page is displayed.
3. Specify the settings for your new FTP server.
52
Option
Description
Name
The name of the virtual FTP server that will be displayed on the FTP
configuration screens, the login message from the FTP server, and so on.
This is for reference purposes only.
TCP/IP port to listen on
The port in use by the virtual FTP server. The default is port 21.
TCP/IP address to listen on
The IP address to use. You can select one item from the list. If you select All
available interfaces, the virtual FTP server will listen on all assigned IP
addresses.
IP Filter
You can specify the IP addresses from which to accept connections. By default,
the clients can connect from any IP address. For information about IP filtering,
see How to Create an IP Filter Profile on page 37.
Port range for passive data
transfers (inclusive)
This feature is relevant to passive mode data connections (PMDCs), also
known as PASV mode in some clients. In such cases the data channels are
opened by the client and the server communicates a PASV reply stating
which address and port to connect to. However, servers behind firewalls or
routers may have problems with the use of the reported address or port.
IP address of the network
interface connecting to NAT
router and External IP address
of NAT router
By default the server examines the local IP address to which the client is
connected and accepts the PMDC on that address. In a NAT environment,
the server's local IP address is not externally visible for access from the
Internet. Therefore, you must specify the IP address of the network interface
connecting to the router. This will be the router's external IP address.
Subnet mask of network
interface connecting to NAT
router
If the router and the clients are on the same subnet of a LAN, you must define
a subnet mask for clients. In this way, they will not be redirected to an
external IP address before connecting to the router.
RemotelyAnywhere User Guide
4. Click Apply.
If your server is behind a firewall and clients experience problems with the connection, you can specify a range of
ports on which to accept PMDCs. If these ports are open on the firewall then the connection will be established.
How to Create Users of an FTP Server
1. Access the server preferences in Server Functions > FTP Configuration.
2. On the FTP Users tab, click New FTP user.
The New FTP user page is displayed.
3. Specify the settings for your new FTP user.
4. Click Apply to create the user.
You must assign permissions and a directory path to new FTP user so that they can use their accounts.
To allow anonymous access to an FTP server, you must create an FTP user called anonymous. You can assign
permissions to the anonymous user account but by default, the newly created anonymous user has no rights to
any virtual FTP server defined.
How to Create User Groups for FTP Servers
1. Access the server preferences in Server Functions > FTP Configuration.
2. On the FTP Groups tab, click New FTP group.
The New FTP group page is displayed.
3. Enter the name of the user group. Optionally, you can enter a welcome message from group members and
select additional groups for the users to be members of.
4. Click Apply to create the user group.
5. Click Permissions.
6. Set the permissions of the user group.
Option
Description
Directory path
The path you specify can be a full path, containing a drive letter, or a path relative to
the server's root directory. If you assign rights to a path that is not within the server's
root directory, the setting will have no effect at all.
L
Allows the user to list the contents of the directory.
R
Allows downloading files from the directory.
C
Allows the user to create new directories in the directory.
D
Allows the user to delete or rename a file or a directory. Also required to be able to
overwrite files.
W
Allows the user to create a new file and write data to it.
Full access
All of the above.
7. Click Apply.
Copyright © 2012 LogMeIn, Inc.
53
Important: User permissions always override user group permissions if they grant access to the same
directory.
How to Start and Stop FTP Servers
1. Access the server preferences in Server Functions > FTP Configuration.
2. On the FTP Servers tab, select a server you want to start or stop.
•
•
Click
to start the server.
Click
to stop the server.
Note: An FTP server stops automatically if you disable it, and starts if you enable it.
How to Manage Users of an FTP Server
You can modify the permissions, connection details, and limits of an FTP user.
1.
2.
3.
4.
Access the server preferences in Server Functions > FTP Configuration.
On the FTP Users tab, click the name of the user you want to modify.
Specify the settings for your new FTP user.
Click a button at the bottom of the page to change user settings.
Option
Description
Groups
Select which user groups have access to the FTP server.
Permissions
Set the user permissions for the individual FTP servers.
Ratio
Set the ratio between upload and download traffic. For example, an FTP server
may allow users to download twice as much data as they upload.
Disable
Select the servers on which you want to disable the user.
Home/Quota
Specify home directories for the user.
Max conn.
Specify the maximum number of simultaneous connections for a user account.
Welcome
Compose a custom welcome message for the user in this window.
Permissions report
Provide a list of permissions of an FTP user for all FTP servers he can access.
5. After changing the necessary settings and returning to the Settings for FTP user page, click Apply.
How to Change Group Membership of an FTP Server
Select which user groups have access to the FTP server.
1. Access the server preferences in Server Functions > FTP Configuration.
54
RemotelyAnywhere User Guide
2. On the FTP Users tab, click the name of the user you want to modify.
3. Click Groups.
4. Select groups on one pane and click Apply to change the membership of the user.
How to Change User Permissions of an FTP Server
1.
2.
3.
4.
Access the server preferences in Server Functions > FTP Configuration.
On the FTP Users tab, click the name of the user you want to modify.
Click Permissions.
Set the permissions of the user.
Option
Description
Directory path
The path you specify can be a full path, containing a drive letter, or a path relative to
the server's root directory. If you assign rights to a path that is not within the server's
root directory, the setting will have no effect at all.
L
Allows the user to list the contents of the directory.
R
Allows the user to download files from the directory.
C
Allows the user to create new directories in the directory.
D
Allows the user to delete or rename a file or a directory. Also required to be able to
overwrite files.
W
Allows the user to create a new file and write data to it.
Full access
All of the above.
5. Click Apply.
Example User Permissions
The above settings allow the user to access FTP Server 1 - he has full control over the contents
of the server. These permissions only apply to the root directory of the server and all directories
below that. The user also has list, read and write access to the c:\work directory on FTP
Server 2. However, the user has no permission at all to the c:\work\java directory on FTP
Server 2. The user has no permission at all on FTP Server 3, meaning he cannot even log on.
The rights you specify for a directory are automatically inherited by its subdirectories, unless
you specify different rights for them.
How to Set Upload/Download Ratio for an FTP User
You can edit the upload and download ratio settings for the user.
1.
2.
3.
4.
Access the server preferences in Server Functions > FTP Configuration.
On the FTP Users tab, click the name of the user you want to modify.
Click Ratio.
Set the upload and download ratio for the user.
Copyright © 2012 LogMeIn, Inc.
55
Option
Type
Description
None
The user is a normal user, and can download any file he has read
access to, without having to upload first.
Per session
When the user logs in, his counters are set to zero. Should he lose
connection while uploading or downloading, any remaining credits
he has will be lost.
Per user
The user's credits are remembered over sessions. This option is
not recommended if you want several users to share the same
account.
Per IP address
Even if the user loses connection, his credits are remembered, if
he logs in again from the same IP address. This does not cause a
problem, even if the user account is shared by hundreds of
concurrent users.
Upload / Download
The ratio of uploading and downloading data.
Starting credits
The user's starting download credits in KBytes.
Per IP ratio expiration The Per IP ratio expiration time setting allows you to have the per-IP credits expire
time
after a certain time. If the user logs back from the same IP address after not visiting
the server for the specified time, he will have to start building up credits again.
5. Click Apply.
How to Disable FTP Users
You can disable users on selected FTP servers.
1.
2.
3.
4.
Access the server preferences in Server Functions > FTP Configuration.
On the FTP Users tab, click the name of the user you want to modify.
Click Disable.
Select FTP servers on one pane and click Apply to change the status of the user on those servers.
How to Set up Home Directories and Quotas for FTP Users
You can specify home directories for FTP users. A home directory is the entry point for a user on an FTP server.
When the user logs in, the starting directory is the one you specify. If you do not specify a home directory, the user
will log in to the server's root directory. The user can move out from his home directory to a parent directory if he
has the necessary rights.
Quotas are only enforced on home directories, and apply to all files contained in the home directory and its
subdirectories. If a user has rights to upload files outside of his home directory, he will be able to do so without
restrictions. When a user starts to upload a file, the FTP server scans the contents of the directory to determine if
the user is below or above the quota. If the quota is not exceeded, the upload can be started; however, the FTP
server will interrupt the transfer as soon as the file being uploaded starts to exceed the specified quota.
1. Access the server preferences in Server Functions > FTP Configuration.
2. On the FTP Users tab, click the name of the user you want to modify.
3. Click Home/Quota.
56
RemotelyAnywhere User Guide
4. Edit the settings of the user.
Option
Description
Home directory path
You can use a full path, starting with a drive letter, or you can enter a relative path
to the server's root directory. Home directories specified above the server's root
directory are disregarded.
Note: Ensure that users have rights to their entry points on the server, otherwise
they will not be able to log in.
Quota
Set the home directory quota. This is an optional setting. By leaving the field empty
you do not limit the amount of data that the user can store on the server.
On server
Select the servers where you want to apply the directory and quota settings.
5. Click Apply.
How to Set Maximum Number of Connections to an FTP Server
You can specify the maximum number of simultaneous connections for a user account.
1.
2.
3.
4.
Access the server preferences in Server Functions > FTP Configuration.
On the FTP Users tab, click the name of the user you want to modify.
Click Max conn.
Edit the settings of the user.
Option
Description
Count
Limit the overall number of simultaneous connections.
Per IP
Limit the number of simultaneous connections for the user from a computer or IP
address. Leave this field blank to impose no limitations.
On server
Select the servers where you want to apply the connection limitations.
Note: An overall maximum connection limit ensures that the server cannot be overloaded by thousands
of Anonymous users, and a Per IP limitation makes sure that no single user can take up all available
connections.
5. Click Apply.
How to Change the Welcome Message for an FTP User
By changing the welcome message of a user, messages defined for groups that the user belongs to are disregarded.
1.
2.
3.
4.
5.
Access the server preferences in Server Functions > FTP Configuration.
On the FTP Users tab, click the name of the user you want to modify.
Specify the settings for your new FTP user.
Click Welcome to edit the welcome message for the user.
Click Apply.
Copyright © 2012 LogMeIn, Inc.
57
How to View the Permissions of FTP Users
You can modify the permissions, connection details, and limits of an FTP user.
1. Access the server preferences in Server Functions > FTP Configuration.
2. On the FTP Users tab, click the name of the user you want to modify.
3. Click Permissions report.
The user permissions for all FTP sites are listed.
4. Click Back to return to the settings of the FTP User.
How to View User and Server Statistics
You can list all current connections and their current activity for each server.
1. Access the server status information in Server Functions > FTP Statistics.
The FTP Statistics page is displayed.
2. Click Refresh to refresh the list.
How to Secure an Externally Accessible FTP Server
You can edit the security settings of an externally accessible FTP server.
1. Access the server preferences in Server Functions > FTP Configuration.
2. Click the name of the server you want to edit.
3. At the bottom of the page, click Security and change the settings.
Option
Description
Maximum number of simultaneous The maximum number of simultaneous connections to the FTP server.
connections
Setting it to zero means that there are no limits.
Maximum number of failed login
attempts
If a user fails to log in with the specified number of attempts the
connection will terminate.
Login timeout
The maximum time in seconds for the user to log in.
No transfer timeout
The connection will be considered idle and will terminate after the
specified number of seconds have elapsed on an open connection without
a file transfer or directory listing.
Stalled transfer timeout
This is the amount of time a file transfer can spend without sending or
receiving any data before it is considered stalled and thus terminated.
Allow keep-alives: FTP clients use When enabled, FTP commands such as CWD, PWD or the ubiquitous NOOP
various commands to keep the
will reset the No transfer timeout counter. If disabled, only an actual file
connection from being idle.
transfer or a directory listing will reset the counter.
Thread priority
58
You can select the priority of the threads servicing users for the FTP server.
If you are running an FTP server on an otherwise busy web server it might
be a good idea to set the priority to a lower value than the default Normal
setting.
RemotelyAnywhere User Guide
Option
Description
Allow unsecured FTP connections If this option is disabled the FTP client must support and use SSL
connection.
Allow data connections to go to
different IPs than that of the
control connection
The FTP protocol uses two connections: The control connection and the
data connection. The data connection is where all the raw data is sent,
the control connection is used to send commands to the server and receive
replies. Normally data connections are set up to the same IP address as
that of the control connection, but in order to facilitate server-to-server
file transfers it may be desirable to allow data connections to go to
different IP addresses. If you are not using server-to-server transfers you
can safely disable this option.
Quoted password changes
This determines whether the parameters of the SITE PSWD command are
in quotes or simply surrounded by a space. (SITE PSWD oldpwd newpwd
vs. SITE PSWD “oldpwd” “newpwd”). Which form is used depends on the
Hosted FTP client.
Anti-hammer filter
This feature is similar to RemotelyAnywhere’s IP address lockout settings.
By default if 4 bad logins occur from an IP address within one minute,
the IP address will be locked out for one hour.
Number of invalid attempts before The number of bad login attempts. The default is 4.
locking out
Reset invalid attempt count after
The time before the invalid attempt count is reset to zero.
Lock out for
The duration for which the user is locked out after the specified number
of invalid login attempts.
4. Click Apply.
How to View FTP Server Status
1. Access statistical information in Server Functions > FTP Status. The following status information is displayed:
Option
Description
Icon
Represents the current status of the connection. A green checkmark indicates a
ready, or idle connection. An hourglass indicates a connection currently in the
process of logging in or becoming ready. An up or down arrow indicates uploading
or downloading.
User name
The name of the user associated with the connection. For Windows users, it is in
an AUTHORITY\ACCOUNT form. For FTP users, it’s simply the username. For
connections not yet logged in, it’s N/A.
Control address
The IP address of the FTP control connection.
Downloaded Bytes
Downloaded during this connection.
Upload Bytes
Uploaded during this connection.
Data address
The IP address of the FTP data connection, if applicable.
Copyright © 2012 LogMeIn, Inc.
59
Option
Description
Path
The path and name of the file currently being uploaded or downloaded, if any.
Speed
The speed of the upload or download process.
Bytes left
The amount of data left from the transfer operation. Only applies to download
transfers, since the FTP protocol does not let the server know the size of the file
being uploaded in advance.
Est. time left
The estimated time remaining from the download operation.
Kick
This button kicks the user out and terminates the connection.
Ban user
This button kicks and then bans the user from the FTP server. Only applies to FTP
users, and not to Windows users. The user’s properties will show him as disabled
on the server he was banned from.
Ban user IP
This option first kicks the user from the server in question, then adds an IP filtering
rule to the user object that will prevent him from logging in again from the IP
address in question. He will have the ability to log in from other IP addresses
(depending on IP filtering setup) and the IP address will only be disabled for this
user.
Ban server IP
This button kicks the user, and then adds an IP filtering rule to the server object
that will cause the server not to accept connections from the IP address in question.
The user will be able to log in from other IP addresses.
Anti-hammering
Information for each server is also shown, where applicable.
IP address
The address the attempted connection came from.
Expires at
The time when the anti-hammering ban is lifted. Users will be able to establish
connections from the IP address at this time again.
Bad logins
Number of bad logins from the IP address.
Delete
Clicking this button will remove the anti-hammering information from the FTP
server’s memory, thus making the IP address available for logins, had it been locked
out.
2. Click Refresh to refresh the list.
About Port Forwarding
You can forward one or more TCP or UDP ports on one computer to another so that separate networks can be
bridged.
RemotelyAnywhere can provide SSL encryption even if neither the client nor the server supports it. In this case,
you can use two installations of RemotelyAnywhere: one to translate the connection from TCP to SSL, the other to
translate it back from SSL to TCP.
If you have two RemotelyAnywhere Port Forwarding Servers communicating with each other, you can also utilize
the proprietary Compressed SSL (CSSL) protocol instead of using plain SSL. CSSL can also seamlessly compress,
uncompress, encrypt, and decrypt your data.
60
RemotelyAnywhere User Guide
How to Configure Port Forwarding
1. Access the port forwarding rules in Server Functions > Port Forwarding Config.
2. Click Create forwarding rule.
The port forwarding properties page is displayed.
3. Enter the details of your port forwarding rule.
Option
Description
Protocol
Select the protocol type of your incoming and outgoing connection. You can specify
SSL, CSSL, or TCP. To translate SSL connections to TCP, and thus behave as an SSL
proxy for applications that are not SSL-enabled, set one end to SSL and the other end
to TCP.
IP Address
The IP address from which (In) or to which (Out) you want to forward communication.
Port
The port on which the computer is listening for communication (In) or to which it tries
to forward data (Out).
IP address filter
profile
Select a profile filter to restrict incoming connections to the corresponding port
forwarding rule.
Defer
Specify a timeout value for a special condition. When one end of the connection has
been closed, but the other is still open, the Port Forwarding Server (PFS) will wait this
much time for the open end of the connection to be closed. It will then close the
connection itself.
Timeout
This setting lets you specify how long the PFS will hold a connection open with no
data going through it in either direction. When the amount of time specified here is
reached and the connection is idle, both ends of the connection will be closed
gracefully.
Description
Specify a remark associated with the port forwarding item. This will be displayed on
the main screen.
Enabled
The status of the port forwarding rule.
4. Click Apply.
Example 1
Suppose that you are using a laptop with a dialup account, and your email software does not
support SSL. Also suppose that your corporate mail server does not support SSL either. If you
still want to keep your email secure, you can install RemotelyAnywhere both on your laptop
and on the email server, and set up port forwarding on both computers.
On your laptop, you must do the following:
• Create a port forwarding rule with the incoming IP address as 127.0.0.1 (the loopback
address), the incoming port as 3110, the incoming protocol is TCP. The outgoing IP address
or host name would be set to that of your email server, the outgoing port would be set to
3110, and the outgoing protocol would be SSL to enable encryption.
• Change your email client's preferences so that the POP3 server is 127.0.0.1 and the port
is 3110.
Copyright © 2012 LogMeIn, Inc.
61
On the mail server, you must create a port forwarding rule with the incoming IP address set
to your mail server's Internet IP address, the incoming port set to 3110, and the incoming
protocol set to SSL. The outgoing IP address would be the same (the mail server's Internet IP
address), the outgoing port would be 110 (the standard POP3 port), and the outgoing protocol
would be set to TCP to enable decryption on the mail server.
You must also have to create one additional port forwarding item on both computers for the
SMTP protocol that is used to send email as opposed to receiving it. This runs on port 25 by
default.
How to View Port Forwarding Status
1. Access the port forwarding rules in Server Functions > Port Forwarding Status.
2. Click Refresh to refresh the list.
How to View Active Directory Settings
RemotelyAnywhere provides an Active Directory browser. It lets the user connect to and browse through the various
elements in the Windows domain's active directory tree. It provides a useful system information tool.
1. Access the port forwarding rules in Server Functions > Active Directory.
2. Click the name of an Active Directory entry to view its details.
3. Select one of the following options:
•
•
•
•
Click Refresh to refresh the list
Click Parent to go back to the parent directory
Click Root to return to the root directory of your Active Directory
Click Back to return to the previous page
How to Create an Externally Accessible FTP Server
1. Access the server preferences in Server Functions > FTP Configuration.
2. Click New FTP server.
The New FTP server page is displayed.
3. Create an FTP server within RemotelyAnywhere with the default settings, listening on all available interfaces,
with the default FTP port of 21.
4. Set the IP address of the network interface connecting to the NAT router as 192.168.1.2, the subnet mask
to 255.255.0.0, and the external IP address to 123.45.67.89.
5. Set the port range for passive data transfers to 5200-5299.
6. Configure your router so that it forwards connections to 123.45.67.89:21 to 192.168.1.2:21 and
make sure port 21 is open on the firewall.
7. Configure the router to forward connections to 123.45.67.89:5200-5299 to
192.168.1.2:5200-5299 and make sure that you open the 5200-5299 port range on the firewall.
8. Finish configuring your remaining FTP settings (security, users, and so on).
9. Select the Use implicit SSL encryption option for your FTP server.
62
RemotelyAnywhere User Guide
Note: If a server uses implicit SSL connections, it will accept these connections alone and clients must
be configured accordingly. Most clients default to port 990 when creating implicit SSL FTP site entries.
10. Click Apply.
The following FTP server configuration pages will become available as buttons at the bottom of the page:
• Security
• Windows Users
• Welcome
• ODBC
If the server is behind a firewall it accepts connections on the port [server port - 1] by default. For example, the
server will try port 20 if it is on the default FTP port of 21. If multiple clients were to try to establish simultaneous
data connections this would fail and the server would query Windows for an arbitrary free port. To avoid this, you
can specify a range of ports on which to accept connections.
How to Set User Access to an Externally Accessible FTP Server
You can connect to your FTP server with any FTP client after you create a new FTP user and give them access to
the server. Alternatively, you can allow any Windows user to access the virtual FTP server.
1.
2.
3.
4.
To grant access to a Windows user or group on the FTP server, go to Server Functions > FTP Configuration.
Click the name of the server you want to edit.
At the bottom of the page, click Windows Users.
Select the name of a user or user group. You can select multiple users on both panes at the same time.
Note: To list user accounts from a domain rather than from the Client, enter the domain's name in the
Default domain field and click Apply.
5. Click Apply.
Note: After you have granted access to a Windows user, you can use an FTP client to connect and log
in to the FTP server. The user will have access to all files and directories below the server's root directory.
However, on an NTFS file system, Windows access restrictions will apply. For example, if the user does
not have the rights to read or write in a certain directory, he will not be able to do so via FTP either.
How to Set a Welcome Message to an Externally Accessible FTP Server
Welcome messages are server-wide settings and apply to all users and groups unless they have their own welcome
message defined.
1.
2.
3.
4.
Access the server preferences in Server Functions > FTP Configuration.
Click the name of the server you want to edit.
At the bottom of the page, click Welcome.
Change the welcome messages as necessary.
Option
Description
_!SERVER_NAME!_
The name of the FTP server.
Copyright © 2012 LogMeIn, Inc.
63
Option
Description
_!OS_VERSION!_
The operating system and its version.
_!SERVER_UPTIME!_
The amount of time the server has been up.
_!BYTES_UP!_ and _!BYTES_DOWN!_ The amount of data uploaded and downloaded. These variables behave
differently when used in the pre-login or post-login messages. In the
pre-login message, they represent a server-wide value, while in the
post-login message they represent the amount of data transferred by
the user.
_!TOTAL_LOGINS!_
The number of successful logins to the FTP server. Only valid in the
pre-login message.
_!GOOD_LOGINS!_ and
_!BAD_LOGINS!_
The number of logins and unsuccessful login attempts. Only valid in the
post-login message.
_!LAST_LOGIN!_
The last successful login by the user. Only valid in the post-login message.
5. Click Apply.
Clear the Show RemotelyAnywhere welcome banner option to disable this message.
How to Set ODBC Access to an Externally Accessible FTP Server
The ODBC option allows you to specify a database as a source of user information, which can be Oracle, SQL Server,
Microsoft Access, or even a plain text file. You must set up a link between the ODBC data source and the database
so that RemotelyAnywhere can access the database.
1. Access the server preferences in Server Functions > FTP Configuration.
2. Click the name of the server you want to edit.
3. At the bottom of the page, click ODBC and change the settings.
64
Option
Description
Data source name
The name of the database.
Login name
The user's login name. This is a mandatory field.
Password
The user's password. This is a mandatory field.
Connect timeout
The timeout after which the ODBC database connection terminates.
homedir
The user's home directory, which can be an absolute path (such as
z:\ftp\users\~john) or it can be relative to the server root (such as
/users/~john). Users have full access to their home directory, but have
neither read nor write permissions outside of it. This is a mandatory field.
quota
The quota field will not let the user store more data in his home directory and
its subdirectories than the number of bytes specified here. This is an optional
field.
downstream
Restricts download speed This is an optional field.
upstream
Restricts upload speed. This is an optional field.
disabled
When it is non-zero, the user is disabled and cannot log in. This is an optional
field.
RemotelyAnywhere User Guide
Option
Description
maxconns
Specifies the maximum simultaneous connections to this FTP server for a user.
This is an optional field.
maxconnsperip
Specifies the maximum simultaneous connections per unique IP address for a
user. This is an optional field.
welcome
Contains a custom welcome message for the user. This is an optional field.
4. Click Apply.
When you have your database and ODBC data source ready, we advise you to test it by querying it with a tool that
supports ODBC queries, such as a spreadsheet program.
Note: You must have all user information available in one database table.
Copyright © 2012 LogMeIn, Inc.
65
Managing Schedules and Alerts
How to Monitor Your System
You must have C or C++ programming experience, a basic understanding of HTML, and system administrator rights
to create system monitoring rules. These rules define the behavior of the system monitoring module.
1.
2.
3.
4.
Access the scheduled tasks in Scheduling & Alerts > System Monitoring.
Click Edit rules.
Click Compile to save your changes.
On the System Monitoring page, click the red X in the Active column to activate a rule.
How to Set Up Email Alerts
You must set up your SMTP server first in Preferences > Network > SMTP Settings.
1. Access the scheduled tasks in Scheduling & Alerts > Email Alerts.
2. Configure your email alerts according to the following criteria:
Option
Description
Event Log name
The event log to watch.
Type
Optional. The type of alert. Can be chosen from the drop-down list.
Event Source
Optional. Type in the source of the message you want to be alerted on. For
example, Security or Disk.
Event Category
Optional. Type in the category of the message as it will appear in the event log.
Event ID
Optional. Type in the event code as it will appear in the event log.
Email
The email address to which the notifications are sent. You can only specify a
single email address per entry. Specify a group alias if there are multiple
recipients.
How to Set Up Scheduled Tasks
1. Access the scheduled tasks in Scheduling & Alerts > Task Scheduler.
2. Click Create New Task.
The available options match those found in the Windows Scheduled Tasks System Tool.
66
RemotelyAnywhere User Guide
Viewing Host Performance Information
Viewing CPU Load
View metrics for CPU load on all processors on a host.
Path: Performance Info > CPU Load
•
•
Hold your mouse over a graph to see when the sample was taken (each shows a different sampling frequency
– 2 seconds, 10 seconds, 5 minutes, 1 hour)
Use the numbered buttons to switch between CPUs if the host has more than one
•
Click any item in the Most CPU-Intensive Processes list to view process details
Viewing Memory Load
View metrics for system memory load on a host.
Path: Performance Info > Memory Load
•
Use the drop-down list to choose the data type displayed in the graphs:
•
•
•
•
Memory Load
Physical Memory Load
Commit Memory Load
Hold your mouse over a graph to see when the sample was taken (each shows a different sampling frequency
– 2 seconds, 10 seconds, 5 minutes, 1 hour)
Viewing Disk Space Utilization
View metrics for disk space utilization per logical disk on a host.
Path: Performance Info > Disk Space
•
•
Use the drop-down list to switch between available disks
Hold your mouse over a graph to see when the sample was taken (each shows a different sampling frequency
– 2 seconds, 10 seconds, 5 minutes, 1 hour)
Copyright © 2012 LogMeIn, Inc.
67
Viewing Drive and Partition Information
View details regarding physical drives and partitions and logical drives on a host.
Path: Performance Info > Drive & Partition Info
•
To manage files on a drive, click a drive link
Viewing Open TCP/IP Ports
Path: Performance Info > Open TCP/IP Ports
1. Specify the type of port(s) you want to view
•
•
•
Listening ports (ports that are listening for connections)
Connected ports (ports that have been connected to another computer)
Everything else (ports in various stages of being connected and disconnected)
2. Select Resolve IP addresses to resolve IP addresses appearing in the list of Local names.
This can take a considerable amount of time to process.
3. Click Continue.
A list of ports is displayed.
Once you have generated the list, you can change the ports you are viewing using the boxes on the toolbar and
clicking Refresh.
Viewing Network Traffic Information
Path: Performance Info > Network Load
•
•
To view traffic for a network, click any listed network
To see total network traffic, click Inbound Network Traffic or Outbound Network Traffic
Viewing a List of Open Files
View a list of all files currently open on a host, along with the names of associated processes.
Path: Performance Info > Open Files
68
RemotelyAnywhere User Guide
Viewing a List of Registry Keys Open on a Host
Path: Performance Info > Registry Keys in Use
Viewing a List of DLLs in Use
View a list of all currently loaded dynamic link libraries and the processes that use them.
Path: Performance Info > DLLs in Use
Viewing RemotelyAnywhere Connection Details
Display all connections being served by RemotelyAnywhere, including the IP address and host name of any computer
making a remote connection, the type of connection, and the name of the Windows user associated with the
connection.
Path: Performance Info > RA Connections
Viewing Telnet and SSH Connections
You can list Telnet and SSH connections that are currently open.
Path: Performance Info > Telnet/SSH Connections
• Click a connection to view its details
• Click Refresh to refresh the list
Viewing Installed Applications
View a list of applications installed on a host. The list is populated from Add or Remove Programs on the host's
Control Panel.
Path: Performance Info > Installed Applications
•
•
Roll over a listed application to view available data, such as estimated size, installation source, registration
data, and time and date of last use
Click any Installation Directory link to work with files in the File Manager
Copyright © 2012 LogMeIn, Inc.
69
Viewing Loaded Device Drivers
The information is view only.
Path: Performance Info > Loaded Device Drivers
70
RemotelyAnywhere User Guide
Windows Tools in RemotelyAnywhere
RemotelyAnywhere allows easy access to functionality offered by numerous Windows administrative tools.
This table maps commonly used Windows tools to their equivalent RemotelyAnywhere feature.
Windows Tool
Equivalent RA Feature
Application Event Log
Computer Management > Event Viewer
Command Prompt
Computer Management > Command Prompt
Computer Management > Local Users and Groups
Computer Management > User Manager
Computer Management > Services
Computer Management > Services
Computer Management > Shared Folders
Computer Management > Shared Resources
Event Viewer
Computer Management > Event Viewer
Performance > Logs and Alerts
Performance Info
Performance > System Monitor
Performance Info
Registry Editor
Computer Management > Registry Editor
Scheduled Tasks
Scheduling & Alerts > Task Scheduler
Security Event Log
Computer Management > Event Viewer
Services
Computer Management > Services
System Event Log
Computer Management > Event Viewer
Task Manager/Processes
Computer Management > Processes
Copyright © 2012 LogMeIn, Inc.
71
Working with RemotelyAnywhere from Command Line
In Windows NT and Windows 2000, you can run RemotelyAnywhere from command line to perform various actions.
For a complete list of command line options, enter the following command:
RemotelyAnywhere -help
How to Install RemotelyAnywhere on the Client
Note: If your user account on the host does not allow you to change your Windows password, these fields
will not be visible.
1. Copy the RemotelyAnywhere installation files into the current directory, either from an existing installation or
from the installation archive available on www.RemotelyAnywhere.com.
2. Enter RemotelyAnywhere Install [-port PORT] into a command prompt.
The installation process creates the RemotelyAnywhere service and its support driver in the current directory,
and starts the service immediately.
3. Optionally, specify the listener port with the RemotelyAnywhere Install -port 2020 command.
How to Install RemotelyAnywhere on a Remote Computer
You must have administrator rights on the remote computer.
1. Copy the RemotelyAnywhere installation files into the current directory, either from an existing installation or
from the installation archive available on www.RemotelyAnywhere.com.
2. Enter Install <-computer COMPUTER> <-path PATH> [-port PORT] [-minimal]
[-license FILENAME] into a command prompt.
Option
Description
<-computer COMPUTER> The name of the remote computer. This is a mandatory parameter.
72
<-path PATH>
The path of your RemotelyAnywhere installation.
[-port PORT]
The HTTP port number for the remote connection which is 2000 by default.
[-minimal]
Allows you to perform a minimal install. This option does not copy the
documentation files, thus speeding up the installation process over a slow
network connection. The two required parameters are the name of the Host
and the local path to the intended destination directory on the Host.
RemotelyAnywhere User Guide
Option
Description
[-license FILENAME] Allows you to specify a license file to be installed on the Host.
Example Installation
If you want to install RemotelyAnywhere on a computer called KOSSUTH in the
C:\RemotelyAnywhere directory, and you do not want the documentation files copied,
you must enter the following command: RemotelyAnywhere Install -computer
\\KOSSUTH -path "C:\RemotelyAnywhere" -minimal
This command creates the destination directory, copies all necessary files, and creates and
starts the RemotelyAnywhere service on \\KOSSUTH.
How to Uninstall RemotelyAnywhere from the Client
You must have administrator rights on the client.
1. Enter RemotelyAnywhere Uninstall into a command prompt.
This will stop and remove the RemotelyAnywhere service and its support driver, as well as all registry entries
created by RemotelyAnywhere.
2. Optionally, delete the RemotelyAnywhere directory and all its content.
How to UnInstall RemotelyAnywhere from the Host
You must have administrator rights on the host.
1. Enter RemotelyAnywhere Uninstall -computer \\[name] into a command prompt.
This will stop and remove the RemotelyAnywhere service and its support driver, as well as all registry entries
created by RemotelyAnywhere.
2. Optionally, delete the RemotelyAnywhere directory and all its content.
How to Start, Stop, and Restart a Service
You must have administrator rights on the client.
1. Open a command prompt.
2. Enter RemotelyAnywhere start [-service SERVICE] [-computer MACHINE].
Option
Description
[-service SERVICE]
The name of the service to start, which is RemotelyAnywhere by
default.
Copyright © 2012 LogMeIn, Inc.
73
Option
Description
[-computer MACHINE]
The computer to perform the operation on, which is the Client by
default.
For example, if you want to run the W3SVC service on the computer called KOSSUTH, enter the following
command:
RemotelyAnywhere start -service W3SVC -computer \\KOSSUTH
3. To stop the service at the end of your session, enter RemotelyAnywhere stop [-service SERVICE]
[-computer MACHINE].
To restart the client, enter RemotelyAnywhere restart [-computer MACHINE].
How to Export and Import RemotelyAnywhere Configuration Settings
The default value for FILENAME is RemotelyAnywhere.ini in the directory the RemotelyAnywhere executable
is located in. The COMPUTER parameter is the Client by default.
1. Save the local RemotelyAnywhere configuration to the default text file: RemotelyAnywhere
CreateIniFile
All configuration data is copied, including permissions, FTP Server settings, the license key, and so on. If you
do not want to import specific configuration items, you must edit the generated .ini file and remove these
entries.
2. Install RemotelyAnywhere to the new host, for example on SERVER1.
RemotelyAnywhere install -computer SERVER1
3. Stop the RemotelyAnywhere service on the new host. This is necessary, because the previous command already
started RemotelyAnywhere.
RemotelyAnywhere stop -computer SERVER1
4. Read all settings from the default .ini file, and configure RemotelyAnywhere on SERVER1.
RemotelyAnywhere LoadIniFile -computer SERVER1
The LoadIniFile command imports all configuration data contained within the text file to the host.
5. Start RemotelyAnywhere.
RemotelyAnywhere start -computer SERVER1
A Generated Configuration File
This example is only a partial configuration file. If you do not want to copy, for example, the
VisitLength setting, remove the ValueXXXX=VisitLength line from the MetaData
section.
[MetaData]
Creator=RemotelyAnywhere
CreatorBuildNumber=268
SourceComputer=SERVER2
Value0000=UseGraphRed
Value0001=VisitLength
Values=2
[UseGraphRed]
Type=REG_DWORD
Data=0
74
RemotelyAnywhere User Guide
[VisitLength]
Type=REG_DWORD
How to Install RemotelyAnywhere without Generating a Certificate
Note: The default installation method includes automatically generating a self-signed CA Certificate and a
Server Certificate that is signed by the CA Certificate.
1. Copy the RemotelyAnywhere installation files into the current directory, either from an existing installation or
from the installation archive available on www.RemotelyAnywhere.com.
2. Enter RemotelyAnywhere install -noautocerts into a command prompt.
You can also install RemotelyAnywhere using the MSI Installer while also preventing RemotelyAnywhere from
generating any certificates.
msiexec /i RA.msi NOAUTOCERTS=1
How to Install RemotelyAnywhere with the MD5 Hash Server Certificate
RemotelyAnywhere selects the Server Certificate with the given MD5 hash and uses it to secure RemotelyAnywhere
sessions. Automatic certificate generation will be skipped.
1. Copy the RemotelyAnywhere installation files into the current directory, either from an existing installation or
from the installation archive available on www.RemotelyAnywhere.com.
2. Enter RemotelyAnywhere install -usesc <CERTMD5ID> into a command prompt.
You can also install RemotelyAnywhere using the MSI Installer with MD5 hash security.
msiexec /i RA.msi USESC=<CERTMD5ID>
How to Install RemotelyAnywhere with a Self-Signed Server Certificate
RemotelyAnywhere selects the Server Certificate with the given MD5 hash and uses it to secure RemotelyAnywhere
sessions. Automatic certificate generation will be skipped.
1. Copy the RemotelyAnywhere installation files into the current directory, either from an existing installation or
from the installation archive available on www.RemotelyAnywhere.com.
2. Enter RemotelyAnywhere install -createsssc <HOSTNAME> into a command prompt.
You can also install RemotelyAnywhere using the MSI Installer and instruct RemotelyAnywhere to create a Self-Signed
Server Certificate and use it to secure RemotelyAnywhere sessions. No CA Certificate is generated.
msiexec /i RA800735nh.msi CREATESSSC=1
If the CREATESSSCHOSTNAME MSI install option is not used then the hostname of the computer will be used for a
certificate common name.
Copyright © 2012 LogMeIn, Inc.
75
msiexec /i RA.msi CREATESSSC=1 CREATESSSCHOSTNAME=<HOSTNAME>
How to Install RemotelyAnywhere with the Usescbyca Option
You can install and instruct RemotelyAnywhere to select the first Server Certificate that was signed by the CA with
the given MD5 hash and use it to secure RemotelyAnywhere sessions.
1. Copy the RemotelyAnywhere installation files into the current directory, either from an existing installation or
from the installation archive available on www.RemotelyAnywhere.com.
2. Enter RemotelyAnywhere install -usescbyca <CERTMD5ID> into a command prompt.
You can also install RemotelyAnywhere using the MSI Installer and to instruct RemotelyAnywhere to use the first
Server Certificate that was signed by the CA with the given MD5 hash for RemotelyAnywhere sessions.
msiexec /i RA.msi USESCBYCA=<CERTMD5ID>
How to List Available RemotelyAnywhere Server Certificates with MD5 Hash
•
After RemotelyAnywhere has been installed, enter the following command to list the MD5 hash value of the
available Server Certificates: RemotelyAnywhere cert -listsc
How to Select RemotelyAnywhere Certificates for Use
•
After RemotelyAnywhere has been installed, enter the following command to select the Server Certificate with
the given MD5 hash and use it to secure RemotelyAnywhere sessions: RemotelyAnywhere cert -usesc
<CERTMD5ID>
How to Create a Self-Signed Server Certificate for RemotelyAnywhere
•
After RemotelyAnywhere has been installed, enter the following command to select the Server Certificate with
the given MD5 hash and use it to secure RemotelyAnywhere sessions: RemotelyAnywhere cert -usesc
<CERTMD5ID>
How to List Available RemotelyAnywhere CA Certificates
After RemotelyAnywhere has been installed, you can list the MD5 hash value of the available CA Certificates.
•
76
Enter RemotelyAnywhere cert -listca into a command prompt.
RemotelyAnywhere User Guide
How to Select CA-signed RemotelyAnywhere Server Certificate
After RemotelyAnywhere has been installed, enter the following command to select the first Server Certificate that
was signed by the CA with the given MD5 hash and use it to secure RemotelyAnywhere sessions.
•
Enter RemotelyAnywhere cert -usescbyca <CERTMD5ID> into a command prompt.
How to Start and Stop FTP Servers in RemotelyAnywhere
You can start or stop the built-in FTP server with the following commands. If you are running more than one FTP
server on the host, all of them will be started or stopped by the command.
• Remotelyanywhere.exe ftp start
• Remotelyanywhere.exe ftp stop
Copyright © 2012 LogMeIn, Inc.
77
Legal Notice
PUBLISHED BY
LogMeIn, Inc.
500 Unicorn Park Drive
Woburn, MA 01801
Copyright © 2012 by LogMeIn, Inc.
All rights reserved. No part of the contents of this document may be reproduced or transmitted in any form or by
any means without the written permission of the publisher.
LogMeIn®, the LogMeIn app, LogMeIn Backup®, LogMeIn® Central™, LogMeIn Free®, LogMeIn Pro®, LogMeIn®
Ignition™, LogMeIn Hamachi®, LogMeIn® Pachube™, LogMeIn Rescue®, LogMeIn® Rescue+Mobile™, join.me™
RemotelyAnywhere™ and any other related software or services are either registered trademarks or trademarks
of LogMeIn, Inc. in the United States and/or other countries.
This publication may contain the trademarks and service marks of third parties and such trademarks and service
marks that are the property of their respective owners. These marks may be registered and/or used in the U.S. and
countries around the world.
THE SPECIFICATIONS AND INFORMATION REGARDING THE PRODUCTS AND SERVICES IN THIS MANUAL ARE SUBJECT
TO CHANGE WITHOUT NOTICE. ALL STATEMENTS, INFORMATION, AND RECOMMENDATIONS IN THIS MANUAL ARE
BELIEVED TO BE ACCURATE BUT ARE PRESENTED WITHOUT WARRANTY OF ANY KIND, EXPRESS OR IMPLIED. USERS
MUST TAKE FULL RESPONSIBILITY FOR THEIR APPLICATION OF ANY PRODUCTS AND SERVICES. THE LICENSE AND
LIMITED WARRANTY FOR THE ACCOMPANYING PRODUCT AND SERVICES ARE SET FORTH IN THE LOGMEIN TERMS
AND CONDITIONS AND ARE INCORPORATED HEREIN BY THIS REFERENCE.
78
RemotelyAnywhere User Guide
Index
A
E
authentication attack filter 38, 39
autologon 48
effects
disable 30
email alerts 66
error
4320 40
printing 44
events 45
externally accessible servers
create 62
ODBC access 64
securing servers 58
welcome message 63
B
black out the host monitor 20
block input on host during remote control 20
blocked keyboard and mouse input 30
C
clipboard synchronization 20
color
quality during remote control 19
command prompt 48
command-alt-escape 23
command-option-escape 23
compression
file manager 33
connecting drives 20
control access to a host via IP filters 37
copy and paste 20
copy and paste between computers 20
copying files from one computer to another 24
CPU load 67
ctrl+alt+del 23
D
dashboard 13
features 14
denial of service 38, 39
Desktop Sharing
delete or disable an invitation 28
send an invitation 28
using 28
desktop viewing 49
device drivers 70
disconnection time
from remote control 32
disk space utilization 63, 67
display size during remote control 18
DLLs 69
DoS attacks 38, 39
DOS based applications, graphics problems 44
DPMS 20
draw during remote control 21
drive and partition information 68
drivers 47
dual monitors 19
Dynamic IP Addresses 9
F
File Manager 24
compression 33
open files for editing 25
select files 25
sort files 24
files
copying 24
moving 24
replicating 24
synchronizing 24
firewall
port mapping 10
Force Quit 23
FTP server
change group membership 54
change user permissions 55
create 52
create user 53
create user group 53
disable user 56
download ratio 55
externally accessible server welcome message 63
externally accessible servers 62
manage users 54
number of connections 57
ODBC access for externally accessible servers 64
port forwarding 60
port forwarding configuration 61
port forwarding status 62
quotas 56
securing externally accessible servers 58
set up home directories 56
statistics 58
status 59
view user permissions 58
welcome message 57
Index
full screen 18
O
G
open files 68
open ports 68
graphic intense programs during remote control 44
P
I
idle time 32
input blocked 30
input line
used for remote sound 22
installation
custom 7
default 7
installed applications 69
invite someone to use or view your computer 28
IP address filtering 37
K
keyboard and mouse priority 30
keys, See Registry Editor
kiosks 32
L
laser pointer 21
lock the host after remote control 32
log files
view 34
log out 15
login 11
advanced options 11
bypass login screen 11
M
magnify screen during remote control 18
manage
events 45
shared resources 50
Windows groups 45
Windows users 45
memory load 67, 69
monitor a host 49
monitors
switching between multiple host monitors 19
moving files from one computer to another 24
mute 22
N
network connection speed 19
network load data 68
notification messages
disable 32
80
pen drive
connect during remote control 20
performance data viewer 15
permission to remote control a host 31
permissions
user 72
port forwarding 60
configuration 61
view status 62
prevent input on host during remote control 20
prevent input on host when connection is lost 32
prevent others from seeing you work during remote control 20
printing
from the host to the client 22
priorities 50
profiles 72
proxy settings 33
Q
quicklinks 15
R
RCREC 35
reboot 48
record remote control sessions 35
Registry Editor 47
registry keys
view a list 69
remote control
customize the toolbar 20
move data 20
permission from a host user 31
presentation 21
record remote control sessions 35
security 20
system management 23
time out 32
remote printing 22
troubleshooting 44
remote sound 22
RemotelyAnywhere
about 6
accessing 9
accessing through a firewall 10
accessing through a firewall or router 9
activation 7
firewall 9
router 9
RemotleyAnywhere Guardian 36
resolution 18
RemotelyAnywhere User Guide
Index
restart host 48
U
S
USB stick
connect during remote control 20
user access control 40
users
invite 72
scheduled tasks 66
screen size 18
security 37, 40
authentication attack filter 39
denial of service 39
IP address filtering 37
remote control 20, 32
security during remote control 20
Services
starting, stopping, restarting 46
session recording 35
shared resources 50
sound 22
sound card
used for remote sound 22
SSL server 27
sync clipboard 20
system requirements 6, 45
system tray 15
display/remove system tray icon 31
T
Task Manager 23
taskbar, See system tray
TCP/IP ports 68
time
change system time 50
time out
from remote control 32
lock host 32
timeout 15
troubleshooting
remote printing 44
V
view
log files 34
view a host without taking control 49
W
wallpaper
disable 30
whiteboard 21
Windows
Application Event Log 45
autologon 48
Computer Management, Local Users and Groups 45
Event Viewer 45
Group Management 45
Processes 46
Registry Editor 47
Scheduling Priorities 50
Security Event Log 45
Services 46
System Properties, Environment Variables 49
System Properties, Virtual Memory 49
User Management 45
Windows Task Manager 23
Y
Your input is being blocked 30
81