1
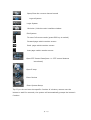
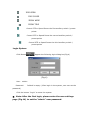
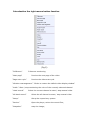
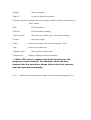
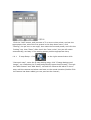
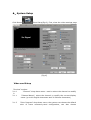
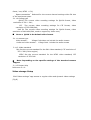
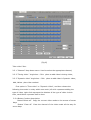
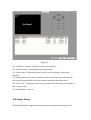
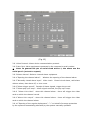
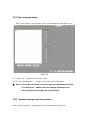
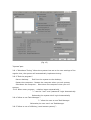
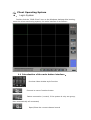
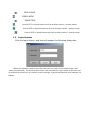
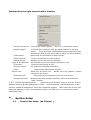
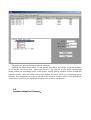
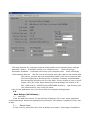
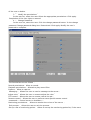
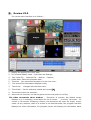
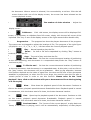
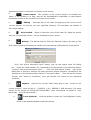
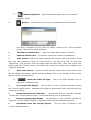
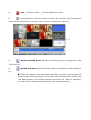
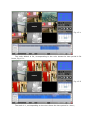
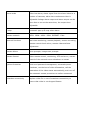
iDVR Digital Video Surveillance System User Guide Notices ★Please read the relevant prospectus before using the monitoring system; you could not use this goods until you know the function of everything part of it, it just ensured that there is a best function on it. Otherwise, everything is at your peril. ★ The host system power supply voltage of 220 volts +10%, if the voltage is instable or interference from other accidents, you choose high quality power (ie UPS) to ensure a good working system, ★On the system, host shall work at the room temperature (-10 +3 ℃ - 55 +2 ℃), a clean environment and keep it a good ventilation . ★ The system belongs to Our company’s proprietary software products, please do not copy without permission, otherwise we will not be responsible for the stability of the machine , meanwhile, we will pursue copyright piracy through the legal channels . 第 2 页 Hardware configuration requirements Server CPU:More than Celeron 2G (Recommended 1.8G dual-core or more) DDR:More than 256M(Recommended DDR1G) Graphic Card:32M Support Overlay (Recommended 256M) Network Card:10-100M Display Resolution:1024*768(32Bit) / 1280*1024(32Bit) / 1440*900(32Bit) Client CPU:More than P4 1.7G DDR:DDR 256M Graphic Card:64M Network Card:10-100M Display Resolution:1024*768(32Bit) / 1280*1024(32Bit) / 1440*900(32Bit) 第 3 页 Features (H.264 hardware compression) Operating Systems Windows XP/VISTA/WIN7,compress mode H.264 . Display Resolution 1024 x 768,1280 x 1024,1440 x 900 ; Record Resolution 352 x 288(PAL standard), 352 x 240(NTSC standard )Or 320 x 240,640 x 480(D1). The system Maximum support 32 channel. Support single-screen, 4 screen, 8 screen, 9 screen, 10 screen, 12 screen, 16 screen, 20 screen, 25 screen, 36 screen ,Support to display full-screen, support for auto-flip, can be multi-stage amplification. Real-time multi-screen display / Record / Playback function, support multiple PTZ control, supports a wide range of alarm box. Continuous video, timing video, dynamic video, event video, alarm video ,and so on. Each camera can set the display name. NTSC / PAL video display standard two options, 25 / s real-time preview, near real-time playback. Regulatory function of video attributes to make the image more clearly. Video multi-level image quality adjustable to change the storage file size, to facilitate the application of different occasions. Mobile alarm video recording, video alarm sensitivity, pre-video time, adjustable delay time video to support the voices of alarm output. Intelligent search, camera lens can play back all the time ( year / month / day / time period or long period of time for retrieval), automatic alarm video search can distinguish video events. With single / multi-screen playback at the same time. With local amplification , playback with frame-by-frame, fast playback, slow playback , the conventional player. Image playback can be carried out to capture function, files backup, document editing functions. 第 4 页 Remote monitoring, remote PTZ control, color, video manual, shield and unshield , restart your computer, such as control. Support the current maximum capacity of hard disk , also several large hard disk at the same time. Hard disk management can use the hard disk of the largest and the smallest hard disk space set aside to enable the hard disk can be fully justified to use. Automatically creates a log file (user logs, system logs, remote control log), easily search for record of the operation. System shutdown can be set from time to time, time to resume function, to ensure high stability of the system. Can be set to run automatically start monitoring software, power automatically shut down procedures, calls automatically restart, automatic restoration of the video. The System has been rigorously tested, stable and reliable. The System hardware configuration requires low, 32 channel video is displayed at the same time, CPU occupancy rate of below 50%. The System can effectively prevented the system to collapse from repeating operation of the user monitoring system. 第 5 页 Contents 1.1 Introduction of the main button interface........................................................................................ 3 1.2PTZ control button Introduction ......................................................................................................... 5 Login System.......................................................................................................................................... 6 Introduction the right mouse button function............................................................................................ 7 Video card Setup...................................................................................................................................... 10 Video storage Setup.................................................................................................................................. 12 2.3 Motion detection Setup..................................................................................................................... 14 2.4 Network Setup.................................................................................................................................. 15 2.5 PTZ Setup.......................................................................................................................................... 17 2.6 Alarm Setup...................................................................................................................................... 18 2.7 User manage Setup.............................................................................................................................. 20 2.8 System settings and information......................................................................................................... 20 1.2PTZ control button Introduction......................................................................................................... 26 Introduction the right mouse button function............................................................................................ 28 第 6 页 一、 Server Operating System Notices Please read instruction book carefully before operating Please do as instruction book strictly in the process of software, please refer to instruction book to set Settings in the software, and pay attention to setting the course of the attention. The first use of the software system known as the initial user "admin", no password .users log in, please set the "admin" user's password. settings for a particular set of channels are of immediate effect. The first time you set the "video store" page of video data, such as storage disk, it is suggest that users restart the software after the completion of monitoring software, and do not change the option of this setting page arbitrarily. This set of information related to the integrity of the video. Must be properly set up alarm decoder and the port number (default decoder using COM1, alarm using COM2), suggest that users do not change. When you add a user, please select the user's permissions carefully , add users to avoid undue authority. In order to ensure long-term and stable system operation, please restart the software operation after finishing setting. Important statement : If the operator does not read the instruction book carefully, there is no statement in accordance with the operation of the steps, leading to system instability, data loss, such as video anomalies by themselves , Our company does not undertake any responsibility . 第 1 页 ◆、Login System Monitoring system is installed, double-click on the Windows desktop "iDVR Server" icon, enter the monitoring system boot interface, as shown in Figure 1: (Fig.1) In the start screen, user can see the steps to initialize the system, This feature can be found where the problem lies in the video card there is a problem immediately , after the completion of a successful initialization into the user interface (Figure 2). 第 2 页 (Fig. 2) 1.1 Introduction of the main button interface Preview video window style function TV-out function keys to choose System log function keys Shield/Unshield function keys capture and browse the current channel selected images 第 3 页 Open/Close the current channel sound Logout System Login System Minimize / hide the main interface window Exit System To enter full-screen mode (press ESC key to switch) Forward page switch monitor screen Back page switch monitor screen Auto page switch monitor screen Open PTZ Control Panel(see 1.1: PTZ control buttons introduced) Open E-map Enter Review Enter System Setup Tip: If you do not know the specific function of a button, mouse over the button to wait five seconds, the system will automatically prompt the button's function. 第 4 页 1.2 PTZ control button Introduction (Fig.3) PTZ UP PTZ DOWN PTZ LEFT PTZ RIGHT PTZ AUTO FOCUS FAR FOCUS NEAR IRIS OPEN IRIS CLOSE ZOOM WIDE ZOOM TELE Control PTZ or Speed Dome the first auxiliary switch / preset points Control PTZ or Speed Dome the second auxiliary switch / preset points Control PTZ or Speed Dome the third auxiliary switch / preset points Login System Click Button Appear the following login dialog box(Fig.4) (Fig.4) User: admin Password: Default is empty (After login in the system ,user can set the password) Click the button "Login" to enter the system ※ Note: After the first login, please enter the user settings page (Fig.14) to set the "admin" user password. Introduction the right mouse button function (Fig.5) “FullScreen” Fullscreen monitoring “Next page” Preview the next page of the video “Page auto-cycle” Preview the video auto cycle “Window rearrangement” “Order to restore the default video display window” “Audio ” Start / stop monitoring the voice of the currently selected channel “Hand record” Select the current channel to start / stop manual video “All Hand record” Select the all channel to start / stop manual video “Setup” Setup the supervisory system “Review” Open the player, review the record files; “Snapshot” snap the image; “Shield” Start the shield; “Log off” Log on or log off the system; “Process minimize” Minimize the main window interface, which is equivalent to "hide" button “Exit” Exit the system; “PTZ Set” PTZ information Setting; “Dome preset” “E-map” Setup the ptz preset; (See 1.4.0:Preset setting) Open the e-map “Chat” Internet customers with the text Contact / chat “Log” Look at the system log; “Network Info” “Version Info” Show remote access news Display software version information ※ Note: PTZ control, capture and other functions for the purposes of each channel. For example: when the first channel into the operation, please click on the first channel, and then operate accordingly. 1.4.0 Preset point setting method: Open the preset settings page,(Fig5.1) (图5.1) Click the "Add" button, and increase of 2 or more cruise points, and set the appropriate time, select the first preset in the drop-down menu, click “Setting”, the ptz turn to an angle, then select the second preset, and click the “setting” too, then “Save”, after check the “auto cruise”, the ptz will rotate automatically, and stay in the setting preset position appropriate time; 1.4.1 E-map Setup :Click or the right mouse button click "electronic map", enter the E-map setting page, click “Change background image”, can customize the E-map background(support bmp format); Through the “Add Camera” and “Add Alarm”, can add the camera and alarm in the emap, add the camera and alarm can base on the actual situation;Double-Click the camera has been added,you can preview the channel; ◆、System Setup Click Button Enter Setup(Fig.6), First, show the video settings page (Fig.6) Video card Setup "Preview" section: 2.1.0 "Channel" drop-down menu: used to select the channel to modify it. 2.1.1 "Channel Name": select the channel to modify the current display name (up to 40 English characters and 20 Chinese characters) 2.1.2 "Color Program" drop-down menu: the system can choose the default color of some commonly-used configuration, can also choose "Custom" and through the following brightness, contrast, color, sharpness, etc. to adjust the slider to meet your needs. 2.1.3 "Opening of the Preview" The current channel is selected to show: playing : “”:Can monitor this channel screen, Otherwise, this channel can not monitor screen 2.1.4 OSD Setup "Show channel name": ”” Show the channel name Otherwise,don’t show the channel name; "Show time": “” Display system’s date and time Otherwise,don’t show the system’s date and time; "OSD Translucent": “” Show the channel name and the date and time for semi-transparent Otherwise, Show the name and date of access time for non-transparent Note: The channel name and the date of the location can drag the mouse to the right screen name and the date of the time 2.1.5 TV output Set the TV output circulartime by the slider; 2.1.6 Button function description: Button "default value" for the current channel selected for the system set up to restore the default state Button "Copy to all" for the current channel parameters of all the settings are copied to all other channels "Video" section: 2.1.7 "Channel" drop-down menu: used to select the channel to modify it 2.1.8 “No video signal when the voice alarm”: “” That the current channel sound without video signal 2.1.9 Video quality settings Rate Control Model : For the current channel rate control approach; Dynamic Stream: According to the actual video stream record Fixed Stream: Used arbitrarily set to the video stream Mixed Stream: When the stream is greater than the actual settings of the system stream into the set-up code enforcement to reduce the bit-stream Video Quality: Selected for the current channel set video video quality (divided into the best, better, in general, poor, worst, such as 5, the user can according to different environment, different set of needs) Frame rate: Selected for the current channel set video frames (PAL :1-25 frame / sec, NTSC :1-30) Space constraints: Selected for the current channel settings video file size of the maximum space 2.1.10 Coding type QVGA The current video encoding settings for QVGA format, video resolution of 320 * 240; CIF The current video encoding settings for CIF format, video resolution of 352*288/240; Half D1 The current video encoding settings for QVGA format, video resolution of 640*480/240, need to support by Video card; ※ Notes : QVGA is the default video format 2.1.11 stream type Video stream : Village Code does not include the audio stream Audio and video stream : Village Code include the audio stream 2.1.12 Video standard PAL Set the current standard for the PAL video standard, CIF resolution of 352 * 288 (China region) NTSC Set the current standard for the NTSC video standard, CIF resolution of 352*240 ※ Note: Depending on the specific settings of the standard camera support 2.1.13 Button Help Reference 2.1.6 Video storage Setup Click“Video settings” tags access to regular video and dynamic video settings (Fig.8) (Fig.8) “Plan video” Part: 2.2.1 "Channel" drop-down menu: Used to select the appropriate channel; 2.2.2 "Timing video " single-box:Click,plans to add video is timing video; 2.2.3 "Dynamic video" single-box:Click,plans to add video is Dynamic video; Add /delete plan video method: First option is "Time video" or "Dynamic Video", and then choose the following time scale in a day within one week ,left-click represent adding the type of video, right-click represent the deletion of the type of video. Article time, each lattice represent half an hour. 2.2.4 Button function description: Button“Select all” Copy the current video mode to the access of seven days Button “Clear all” Clear the channel of the video mode all the way for seven days Button “Copied to the daily” Copy the channel video mode on sunday to the other days Button“Copied to all” Copy the channel video mode every day to the other channels “Select the video disk” Part : 2.2.5 “Select the video disk” Check from the list of the disk used to store documents 2.2.6 “The length of the video file” Set the length of the video file packing , Default value is 60 minutes 2.2.7 "Disk space reservations " Settings for each video disk space reservations ,Default value is 500MB. 2.2.8 "Opening of the cycle of video" Check means that the opening, or not open. ※Note: If there no disk can be checked from the list, the system store the video recording documents to the default disk C; 2.3 Motion detection Setup Click“Motion detection Setup" tags access to Motion detection Setup (Fig.10) (Fig.10) 2.3.1 Channel: Used to select the channel to modify it 2.3.2 Motion detection sensitivity:The sensitivity of motion detection system (Range 1-9, 1 is the most sensitive,9 as the most insensitive, suggest that values is 2) 2.3.3 The length of pre-video: Motion is detected before time video (5-20s) 2.3.4 The length of time delay video:it will sustain video the time(5-20s)after the video system stop, 2.3.5 Motion triggered the voice:When motion is detected, it will sound. 2.3.6 Once trigger the sound, and never stop: when trigger the sound, Need to manually clear sound 2.3.7 Snap : Motion is detected , Click”snap setting”,enter the interval and number of snap setting; 2.3.8 Write “Alarm log”: Motion is detected,write the event into alarm log; 2.3.9 enlarge the screen:Motion is detected,enlarge the screen; 2.3.10 Motion triggered the alarm: When motion is detected, it will alarm. 2.3.11 Output to the alarm box: Check the “trigger the alarm”, click the "output to the alarm box", pop-up alarm output setting page, select one channel, then select the channel number of the alarm output, click "OK" to set effect; So set the other channel alarm output; 2.4 Network Setup Click “Network Setup" tags access to the Network parameters settings(Fig.13) (Fig.13) 2.4.1 Channel: Used to select the channel to modify it. ※ Note: in the video attribute settings, the selected channel if the current preview is not enabled, then the currently selected channel is also monitored through the network. 2.4.2 “IP address Verification”: After check, the IP address can be specified to allow the network to monitor, the IP has not been added and it will not be allowed to monitor; Click "Copy to all", the IP address can be allowed to monitor all channels ; 2.4.3 “User Password Authentication”: After check, they can enter a user name and password to check the network connection; Click "Copy to all", the username and password can be checked the network connection when connected all other channels; 2.4.4 “Network port” : Specify the corresponding port. Server: Client connects to the server port, default is 5060; Client receives alarm port: Client receive the alarm port, default is 5061; Remote playback port: Remote playback video files on the server port, default is 5062; Web Port: IE Client connects server port, default is 80, when Client connects the server through IE, you must select "Start Web server", Otherwise, you couldn’t connect the server; 2.4.5 “Server Domain Name”:Show the server domain name; We can connect to the server through the domain name; if the video card exception, the domain name will also display exception; 2.4.6 "external IP ": The server’s external IP address, users can connect to the server through the extern IP; In the "Web log" of the "Log Management", we can see the information of the external IP address; 2.4.7 “Local IP”: The server’s local IP address, LAN users can connect to the server through the IP address; 2.4.8 “Auto open port mapping”: Select the “Auto open port mapping”, the user may be using the domain name or external IP address to connect the server; if you need auto port mapping, please open UPnP on router; ※ Note: When client can not connect the server, check the Web service whether to start (IE client connect to the server must start the Web service), and check the enterable port whether is the same as the server; When the users can connect to the server through the local IP address, but can’t connect to the server through the domain name or external IP address, please check the router whether open the UPnP function, "Auto open port mapping " is whether checked; when the external IP address can connect to the server, and the domain name can’t connect to the server, please contact the seller to confirm whether the domain name is registered; 2.4.9 "When the network connection shows" Network Connection Information "dialog box": When a network connection, whether show the "network connection information" dialog box 2.4.10 "Alarm upload": Alarm signals received, whether upload the alarm signal. 2.4.11 "E-mail": After checking the system will send alarm information to the specified mailbox Server : Sender’s mail server address User : Login Sender’s mail User; : Password Login Sender’s mail Password; Sender Address: Email to send alarm information; Delivery Address :Email to receive alarm information; CC : CC E-mail address of alarm information; 2.5 PTZ Setup Click “PTZ Setup" tags access to the PTZ control settings(Fig.11) (Fig.11) 2.5.1 Channel:Used to select the channel to modify it 2.5.2 Protocol type: Decoder decoding agreement 2.5.3 Baud rate:Channel selected for the current settings of baud rate decoder 2.5.4 Start Address: Decoder address stream when setting the parameters, the value corresponding to the first channel decoder address stream. 2.5.5 Use Port: Selected for the current channel set-top boxes connected to the serial number 2.5.6 Button Help:see 1.1 2.6 Alarm Setup Click “Alarm Setup" tags access to the alarm parameters settings(Fig.12 ) (Fig.12) 2.6.1 Alert Protocol: Alarm device communication protocol 2.6.2 User Port: Alarm equipment connected to the computer's serial number ※ Note: In general the ptz of serial cloud mirror 1, the alarm use the serial port 2 (not set to repeat) 2.6.3 Alarm channel: Select a channel alarm equipment 2.6.4 “Opening the channel alarm": Whether the opening of the channel alarm 2.6.5 “Normally closed alarm input":After check,Closed circuit alarm, said alarm without alarm, that alarm off, or vice versa. 2.6.6 “Alarm trigger sound":Receipt of alarm signals, trigger the sound. 2.6.7 “Alarm pop-up E-map":Alarm signal received, the pop-up E-map. 2.6.8 “Alarm Link video" : when this channel alarm , there will trigger the video card on which the channel record. 2.6.9 “Alarm Link output" : when this channel alarm , there will trigger the video card on which the channel alarm. 2.6.10 “Opening of the regular deployment": “” on behalf of arrange protection by the system automatically,otherwise,by the system manually operated. 2.7 User manage Setup Click “User Setup" tags access to the user parameters settings(Fig.14) (Fig.14) 2.7.1 User List:In this list all system users. 2.7.2 “User Permissions”: Choose to add the user permissions. ※ Note: You must be careful to choose the user permissions when you add users , admin user can change password, but cannot delete and modify the permissions. 2.8 System settings and information Click “System settings " tags access to the system settings(Fig.15) (Fig.15) “System”part: 2.8.1 “Shutdown Timing” When the system time set to the user settings of the regular time, the system will automatically implement timing 2.8.2 “Exit the program”: Return desktop: Exit from the system to the desktop; Restart the computer:Restart the computer when you exit system; Shut down the computer: Shut down the computer when you exit system; 2.8.3 When enter program , whether logon automatically : “” use the "user" and "password" login Automatically Otherwise;the system don’t login Automatically 2.8.4 “Allow to use Task Manager”: “” allow the user to use Task Manager Otherwise,the user can’t use TaskManager 2.8.5 “Allow to use of WIN key (need restart system)”: “” allow to use WIN key; Otherwise,WIN keys are not allowed to use; 2.8.6 “Auto run when start windows” “” run the software when start windows Otherwise, the system don’t run when start windows; 2.8.7 “Disable panel(Standalone start the system, display panel; 2.8.8 “Minimize run after start”: mode)”: “” Doesn’t display the panel when the video fullscreen; Otherwise display the “ ” the minimize to the lower right when start the system; 2.8.9 “Check Shortcut on”: Desktop:“” will put a shortcut on the desktop,or vice versa; Start Menu:“” will put a shortcut on the start meun,or vice versa; “System information”part: This page shows the configuration of the computer and system uptime. “Language information” Part: “Auto select system language”: “” will match the system language; Otherwise the user may choose other language in the language list, and restart the DVR system to cause it to become effective; If it does not have the language of the user to need in the language list, then we can increase the language file, the method to be possible below to refer “increase the DVR system language file”; Increase the DVR system language file (For example: Increase French (0x040C)) Open the the ServerLanguages folder in the installs directory, we may see the existing language files of the DVR supervisory system, copy a optional language file to add to this directory, and rename the new file to French.ini; Then open the French.ini, and revises the Language value under the field of the General to French, revises the LanguageID to 0x040C, and change other string under the field to corresponding French; Save this file in the end; Restart the DVR supervisory system, we can found the French language in the language list of the “Language information” in the DVR “system Setup”; Chooses this language, click application, then restarts the DVR supervisory system to become effective; ※ Notice: Please don’t arbitrarily change the strings name of the language file under the ServerLanguages contents, otherwise the software will demonstrate unusually; See the operating system language ID:Examine the system language code through the operating system information of the “System Message” in the “System Setup”;(For example, simplified Chinese is 0x0804,English is 0x0409) 二、Client Operating System ◆、 Login System Double-click the "iDVR Client" icon on the Windows desktop after booting, enter the client monitoring system, the main interface is as follows: 1.1 Introduction of the main button interface : Preview video window style function Connect to server function button Packet connection / control, if the system is only one group, then automatically all connected; Open/Close the current channel record capture and browse the current channel selected images Open/Close the current channel sound Login System Logout System Minimize / hide the main interface window Exit System To enter full-screen mode (press ESC key to switch) Forward page switch monitor screen Back page switch monitor screen Auto page switch monitor screen Open PTZ Control Panel(see 1.1: PTZ control buttons introduced) Open E-map (Note: The current version of the client e- map function is unavailable) Enter Review Enter System Setup 1.2 PTZ control button Introduction (Fig.3) PTZ UP PTZ DOWN PTZ LEFT PTZ RIGHT PTZ AUTO FOCUS FAR FOCUS NEAR IRIS OPEN IRIS CLOSE ZOOM WIDE ZOOM TELE Control PTZ or Speed Dome the first auxiliary switch / preset points Control PTZ or Speed Dome the second auxiliary switch / preset points Control PTZ or Speed Dome the third auxiliary switch / preset points 1.3 Login System Click the login button, and that will appear the following dialog box : When the software used for the first time,you can only use the admin login user name(no password), the account with super user permissions, login below to access a list of monitoring points set up, monitor screen settings, system settings and user settings. as follows. Introduction the right mouse button function “Connect the server” Connect the server quickly ( see 1.4.1 connect the server ) “Connect again” Continue the connection with the same channel of the last server , if the last video transmission is interrupted by“Close Connection”,and we will not be able to carry out this operation “DisConnect” Disconnect the connection of this channel “Close Connect” Close the connection of this channel “Motion Detect” whether receive the motion detection “Copy to all channels” All channels receive the motion detection or not; “Fullscreen” Fullscreen monitoring or not “All hand record” All channels start/stop hand recor “Chat” contact/chat with network clients “Server List” Show the all server list , double click the channel number connect to the server ; “Disconnect all” “Process minimize” Disconnect all connections of the client to servers Minimize the main window interface, which is equivalent to "hide" function 1.4.1 Connect the specify server : Input the server domain name or ip in the “Server Domain name or IP”,the default port is 5060 , and correspond with network port in the server's "Network Parameters",select the connected channel , then enter the correct user name and password in the “user password check”,click“OK”,and we can connect to the specified server; ◆、 System Setup 1.1 Channel list Setup (As follows) : The page set up to monitor the server and control point (camera) : ( 1 ) Add Server : In server Settings information bar,respectively, fill in IP Address 、 server name (optional) and choose the service channel, click the add button. The list on the left add a server. Press the Apply button. add the server to complete. ( 2 )、 Update server : Select the server on the left list. In server Settings information bar , fill in IP Address、 server name, click the update button. Click Apply and then. Update server completely. ( 3 )、 Delete server : Select the server on the left list. click the delete button. Click Apply and then. Delete server completely. 1.2 Group Setup(As follows): The page can generate packet monitor settings : Settings,as follow these steps: In the packet drop-down list, select its packet number in the server list of the tree, select the server in the sub-list of the server monitoring points, select the monitoring point. Click on the "modify packet content" button to add the monitor screen; click the "Clear the group" button will clear all of the monitoring group settings. The completion of a group set up all the monitor screen, click on the application of the entry into force, to repeat the steps to set up other sub-groups. 1.3 System Setup(As follows) : The page displays the computer system configuration and completes policy settings : Automatic restart : Automatic restart your computer time , check effectively ; Automatic shutdown :Automatic shut down your computer time, check effectively ; Video storage disk set : Set the record documents and video capture documents and disk drives, the box will be automatically listed in the list of computer disk from the beginning of the hard drive C partition. Strongly recommended: Set the storage site after the E or the letter. If they choose to save in the E plates, while the video paper documents and drawings are located in E:\ REC_DATA and D:\ DVRCFG\V6\CLIENT\BMP directory, , this directory has two subdirectories, one is the file name . Click on the application entry into force after the complete settings page. 1.4 User Setup (As follows) : 1 )、 Add User : Click the Add User button. In the Add User dialog box fill in user name, password, confirm password. Select the appropriate permissions. Click Apply. Completion of the user to add. 2 )、 Delete User : In the user list, select the user. Click to delete user button. Click apply. Completion of the user to delete. 3 )、 Modify the permissions : In the user list, select the user. Select the appropriate permissions. Click apply. Completion of the user rights to amend. 4 )、Change Password: In the user list, select the user. Click the change password button. In the change password Change password dialog box. Determined. Click apply. Modify the user's password to complete. The Permissions are as follows : Record permissions : Allow to record ; Playback permissions : Allowed to play record files ; Capture: Allow to capture ; Messaging : Allows the user to send a message to the server ; Adjust color: Allows the user to remote adjust the color ; PTZ control : Allows the user to remote control the ptz ; Remote control : Allows the user to perform some special remote control commands ( Control server to shutdown ); Monitoring permissions : Allows to monitor the voices of the server ; Exit process : Allows the user to exit the process ; Set up a list of monitoring points : Allows to set up the monitoring points list, if the users log on without this Permissions, the setting page will not appear ; Monitor screen group setup : Allows to setup the monitor screen , if the users login in without this Permissions, the setting page will not appear; System setup: Allows to setup system , if the users login in without this Permissions, the setting page will not appear ; User management setup : Allow for user settings , if the users login in without this Permissions, the setting page will not appear. 三、 Review V3.0 The review main interface is as follows: : ①:Display the playing file in this area; ②:The window display mode、Fullscreen and Enlarge; ③: Play Local File 、 Network File 、 Backup 、 Capture; ④:Select date: Select the playback date ; ⑤: TimeLine , Can movement anywhere on the time ruler ; ⑥: The record files information displayer track; ⑦: Time Ruler , changes with the time scale ; ⑧: Time Scale ,Can be arbitrarily scaled and moved; ⑨: The area to select the channels ; ⑩: Select all the channels, the staring point and the end point to cut files; The video documents show window : Execution of process, the default screen displays is 4, if necessary, could adjust for the 4 screen 、 9 screen, 16 screen 、 25 screen or 36 screens. Enlarging a screen, the document will enter the single- screen mode. At any moment, there is a screen in the selected state, the program interface displays the video information, file playback screen will display the information about the document. When a screen is selected, it's surrounded by a red box. Click the left mouse button with one of the display screen, the screen has been selected as the current playback screen; The number of video window : Adjust the 1 、 display screen ; 2 、 FullScreen : Click this button, the display screen will be displayed full- screen, it is necessary to withdraw from full screen, simply click the top left corner of the keyboard "Esc" key or one of the display screen on the right mouse button double-click; Progress bar : The progress bar show the players document of the progress. The mouse can be dragged to adjust the location of file; The progress of the right figure 1/2/4/8/16 t or 1 / 2, 1 / 4, 1 / 8, 1 / 16 that reflect the current playback speed. 3 、 Play : Normal speed to play the file ; Pause : So that a file here suspended by clicking "Play" button to continue to play the file; 6 、 Stop : The end of play and close the file ; 7 、 To file the first : So that the current document location of positioning at the first beginning, and documents in a suspended state,Clicke the "Play" button to continue to play ; 4 、 5 、 To file the end : So that the current document location of positioning at the end document, And documents in a suspended state, At this point, such as click on the "play" button, the document will be re-broadcast 。 Need to pay attention: because this function depends on the index of open files. the time and file size of the documents establish is proportional, so when the file is too large, the need to open the file after a certain period of time in order to use this function. Please note: In the "local playback" time, click on this button will open a document and from the beginning of a file to play ; 8 、 9 、 Slow : Slow down the playback speed of the document. Continue to click on the button, playback speed document Sustainable down. Playback speed in normal circumstances, click the button total of 4 times, the button becomes inactive ; 10、 Fast : Speed up the playback speed of the document. Continue to click on the button, playback speed document Sustainable. Playback speed in normal circumstances, click the button total of 4 times, the button becomes inactive ; 11、 Previous frame: The "screen of the current players" to play back one frame, if the screen is playing, and it will be automatically suspended, so that players documents remain in the back one frame of the screen; 12、 Latter frames : The "window of the current players" to forward one frame, if the window is in play, and will be automatically suspended, so that players documents remain in the forward one frame of the screen; Editing : Intercept part of the video file playing in the” screen of the 13、 current players" to save as the user specified directory. The operation see details of "document editing. Voice switch : Open or close the voice of the video file. Open the sound, 14、 only the "Current Play screen " will be broadcast to play sound ; Backup :File backup feature, Click the “Backup” button, the pop-up “the 15、 DVR video recording document to transfer the code backup” dialog box as shown below : Click “the source document input” button, pop up the search input file dialog box , found the need transfer file, increased to the document in the following edition frame of “the source document input” ; click “the goal output” button , pop up the dialog box of choice to transfer the code document output contents, increased to the document in the following edition frame of “the goal output” ;Then choose the output format, click “starts to transform”, then will transfer the record to the appointed contents; Capture : Capture the current video frame play in the " screen of the 16、 current players", save as the D: \ DVRCFG \ V6 \ REVIEW \ BMP directory, file name similar to the format of "20090325-122341.BMP", were intercepted on behalf of "Year Month Day - Hour Minute Second"; 17、 Local playback : Click this button to enter the "local playback" mode, which is the default playback mode procedures ; 18、 Network playback : Open the network player,enter the “network playback” mode; Browse : Click this button, the pop-up dialog box as shown below : 19、 You want to playback the file, click the "Open" button in the "Current Playlist screen " play the document playback ; 20、 The date of selection box : Select the video date to play in this box ; 21、 Channel selection box :In this box, select the channel to broadcast it; Time Section: Search the video recording document in the time section; There have two time selections under the “Time Section”, the start time and the end time respectively, (the end time must be bigger than the start time), after user select time section, and click “Search” button, the record file in this time section will be added to the right side video list; 22、 Video data list box : Select the date and the camera after show them in this box all eligible Documents, double-click the playback file in the "window of the current players" to play this document; 23、 24、 Select the video file type : Box in the video showed a list of video files in different ways ; The current time display : By the time of "hour: minutes: seconds" to show the "Current Playlist screen " broadcast live images of documents, that is the picture of the real time recording; 25、 Documents show the total time : By the time of "hour: minutes: seconds" to show the "Current Playlist screen " is the total playing time of a document; 26、 Has been playing time display : By the time of "hour: minutes: seconds" to show the "Current Playlist window" is playing ,the file has been broadcasting time ; 27、 Documents show the current players : The file name of playing in the "current Playlist window" ; 28、 29、 Exit: Click this button , exit the playback process. 30、 Select/Deselect: Click this button to select all channels, and click again to cancel all the options(Figure A, part of the red box is checked all channels ); Fig A Marked starting point: Marked the starting point to intercept the video 31、 file(Figure B); 32、 Marked end point: Marked the end point to intercept the video file(Figure B); ● Select the channel to be intercepted video files, and then click the button of mark the start and end points to set the start point and end point, Finally, click the Backup button, (the specific operation see Article 16, "backup" operation) the video files be marked will be backup to the storage directory; Fig B File playback mode ◆、 Currently offers four ways to play : Local Play: This is the default mode of playing. After entering the procedure, we can see that in the upper right corner of the procedure, there is a marker of "date" drop-down box, a marker of "channel" of the drop-down box, the following box and a file list. Proceedings will automatically search all local hard disk video data. In the "Date" dropdown box can be seen that all the video files are added to the date of the drop-down box; In the "Channel" drop-down box, you can choose which one would like to broadcast channel; In the "Date" and " channel" are a good choice, if the designated channel in the specified date, there are video files in the document list, you can see video files the channel all day. Double-click the file list with the mouse any file name box, the document will be in the " screen of the current players" to play; also can click any of the file list file name box, if this " screen of the current players" did not play any document, Then click on "Play" button, then click the file previously will be broadcast; 1.1 1.2 Network Play : This is a broadcast network files on other machines to provide a function. Click the “network play” button, it will pop up a “network player”, click the “fast connection ” button or the “address ” button, it will connect the other server on the network, and the video files on the server will be added to the list on the right of the player; Double click the video files will be broadcast; 1.3 The local browser to play : Procedures for the upper-right corner click the "Browse" button, it will pop up a "Open File" dialog box, you can choose any one of the procedures to support the video file, click "OK", the document will be broadcast ; 1.4 The local multi-channel playback at the same time : First, select a time that it exists some video files in the player’s time list box, and then select the channel playback at the same time, finally, click the “play” button, and the video files at the time will be broadcast; 1.5 Playback by timeline: 4.1 Adjust the timeline 、 ruler and the timescale Open the player, you can see the scale at the top of the time list box, The scale default is 24, corresponding to the ruler shows the time period is 24 hours(Fig 1.5.1); Double-click the scale, it can zoom and stretch operation automatically, the shortest is 1,corresponding to the ruler shows an hour time period(Fig 1.5.2); Fig 1.5.1 The scale default is 24, corresponding to the ruler shows the time period is 24 hours ,Fig 1.5.1; Fig 1.5.2 The scale is 1, corresponding to the ruler shows the time period is 1 hour; If you want the ruler to display a period of the time, that the track show the video file information in the period of the time; you need to adjust the scale’s length; First, move the timeline to the hours that corresponding to the period of the time, and then double-click the scale,the ruler will be shown as the period time of the red lines in,move or extrude the scale, the ruler shows the start time and end time that corresponding to the required of the period time; For example: (1) 、 If you want to display the video file information between 17:00-18:00,First, move the timeline between 17:00-18:00(Fig 1.5.1), then double-click the time scale, and the ruler will show the time period between 17:00-18:00, corresponding the tracks will show the record files information (Fig 1.5.2); (2) 、 If you want to display the video file information between 17:1018:00,according to the operation above (1),move the timeline to right, and let the start time of the ruler is 17:10,and the tracks will show the record files information between 17:10-18:10(because the period time between 17:10-18:00 don’t have an hour, so the ruler default show an hour between 17:10-18:10); (3) 、 If you want to display the video file information between 17:3019:00,according to the operation above (1),move the timeline to right, and let the start time of the ruler if 17:30, and then move the mouse to the most right of the scale, click the mouse left button to stretch the scale, make the scale length into 2, and the ruler will show the time period between 17:30-19:30, corresponding the tracks will show the record files information between in this period time too (because the period time 17:30-19:00 over one hour and less then two hours, so the ruler will show two hours length); 4.2 Playback by timeline A, Continuous play: Choose the date, then select the playback channel, the video display window will be automatically adjusted the window display mode by the channel number, and then click the play button, then the video files of the selected channel in the date will be broadcast; B, Seek Play: Select the date and the playback channel, he video display window will be automatically adjusted the window display mode by the channel number, drag the red marking line, the window will quickly preview the video file information, drag to the requisite point time, and release the left mouse button, click the play button, then the selected channel will be broadcast from the point time; if we continue to drag the red marking line, the video will be shown by fastforward mode, stop dragging, the video display will be to normal state; ◆、 Cut Record File Player in the document, click the "edit" button, the following pop-up dialog box: In the "scope" the region, it can be seen in frames and in seconds the length of the document. From the above picture can be seen , a total of 8100 frame of the document, or there is a length of 328 seconds. In the "starting position" and "end position" of the right are two different input box ,for the left side of the Interception of user input to the start position and end position (end position must be greater than the initial position), the right is calculated after the procedure, the documents come to the interception of the end of the initial location and location. In practice, the user enters the start position and end position and the procedure to calculate the start position and end position may be about 1 ~ 2 seconds error. When the interception in the document in order to calculate the location of the procedure shall prevail. Click the" choose the directory" button on the right of "Save file name" , you can open a "Save As" dialog box for users to choose the path of files. In the "Save As" dialog box modify the file name of the storage operation is invalid, because the process will automatically be editing the document in accordance with the time and clip recording to calculate the starting point of the document after editing the file name, file name and file to ensure that starting Time line before. "Save the file name" the interception of the following documents is to show the path and file name. As a result of the above options, click on "View" button, the program automatically calculates the document on the interception of the initial position and end position, and calculate the interception of the file name. After completion of the operation, click the "Save the file", will be editing the document, the document will not be editing the paper clip to cause any damage, it is only from the paper clip to copy a clip of the document saved to the clip; 四、 technology parameter Platform WINDOWS XP/VISTA/WIN7 Operating system Video input Multi-channel PAL / NTSC composite video input Video output Support the secondary display device Audio input Multi-channel audio input Audio output Through the sound card, speakers in real-time playback, real-time sound monitor site Alarm input 8 / 16 (normally open, normally closed optional) alarm input, can be expanded to a 32-way Alarm output 8 / 16 (normally open, normally closed optional) alarm output, can be expanded to a 32-way Communication Interface Standard RJ-45 Network Interface Image Resolution 352*288dpi PAL standard、352*240dpi NTSC standard Display Mode Real-time display, single-screen /4 screen / 6 screen /8 screen / 9 screen / 10 screen / 12 screen / 16 screen / 20 screen / 25 screen / 36 screen / full-screen display, lock, security function, the screen before and after the switching function Screen information The camera name, date, time, video, and alarm status, confidential cover regional Time Show Displays the current time, location, X (0-180), Y (0-270) adjustable, stored in the video frame, time display adjustable brightness, adjustable transparency Lens Name Shows that the camera name, location, X (0-280), Y (0270) adjustable video frame stored in the camera name display brightness adjustable, adjustable transparency Shield function Screen located 128 *64 and 64 * 32 the size of the shielding region, the location X (0-220), Y (0-220) adjustable, stored in the video screen, the screen background color adjustable Record Mode Regular video、 manual video、 alarm video、 dynamic video、boot / auto-start video Record Quality The quality of each and every way the best, better, in general, poor, worst arbitrary adjustable Compression H.264 compression Video Media IDE / SATA hard drive capacity limitation Search Playback Retrieved by date time and list of files, multi-screen broadcast at the same time, single-frame playback, fast playback, slow playback, continuous playback on time, single-screen zoom, partial zoom and other functions, save a single picture, remote playback Backup Can backup to another hard disk or burn, print image data PTZ Control Terminal through the RS-232 to 485 communications, connect the camera to control PTZ decoder to achieve cloud mirror control Dynamic Perception Sensing region 99 can be set, 9 adjustable sensitivity, adjustable video duration, to support pre-video feature Alarm mode Video loss alarm, alarm signal from the alarm linked to a number of cameras, alarm time continuous video is adjustable linkage alarm output and alarm output can be more than a row at the same time, the output time adjustable E-map Automatic pop-up E-map when alarm Remote network PSTN、ISDN、ADSL、DDN、INTENET、Fiber Network functions Real-time monitoring, remote playback, remote recording, remote control cloud mirror, remote video attribute adjustment Remote Alarm Voice prompts, images text prompts Remote Control Video remote control, monitoring, PTZ and so on, remote control of the network server shutdown or restart System Protection Multi-level password management, automatic power shutdown, not the loss of video information, call the restoration of the video starts automatically, and turn off the automatic restart procedure to realize unmanned Seamless connectivity Replace video file to use of seamless connectivity to ensure that video is not dropped frames.