1
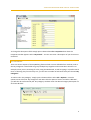
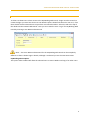
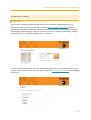
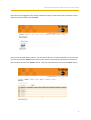
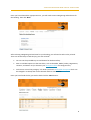
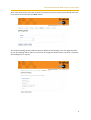
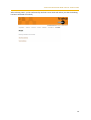
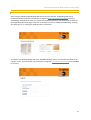
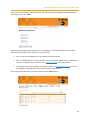
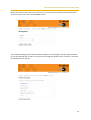
TRAKA KEY BOOKING WEB PORTAL USER GUIDE
1
TRAKA KEY BOOKING WEB PORTAL USER GUIDE
CONTENTS
Key Booking web portal ..........................................................................................................................3
Overview ..............................................................................................................................................3
Traka32 Configuration .........................................................................................................................3
Auto Comms & TAAS ........................................................................................................................3
firmware Options .............................................................................................................................3
Key Details ........................................................................................................................................3
Key Category ....................................................................................................................................4
Creating a User Login .......................................................................................................................5
Key booking process ............................................................................................................................6
Key Booking......................................................................................................................................6
Key Booking by Reference..............................................................................................................11
Booking List ....................................................................................................................................16
Booking Chart .................................................................................................................................16
Localisation ........................................................................................................................................17
Technical Support Information ..........................................................................................................17
2
TRAKA KEY BOOKING WEB PORTAL USER GUIDE
KEY BOOKING WEB PORTAL
OVERVIEW
The KeyBooking Web Portal application allows a user to create, edit and delete a booking from a
web browser as well as the Traka32 software. The KeyBooking Web application is designed to work
with an existing Traka32/SQL Server installation. Communications with cabinets is performed by
Traka32, either with Auto Comms enabled or preferably running as Traka as a Service (TaaS).
The Key Booking Web Portal connects to the existing Traka32 SQL Server database using the “Traka
Engineer” login account, which is created by default when the database is first initialised. (This
account is also used by TaaS).
TRAKA32 CONFIGURATION
AUTO COMMS & TAAS
For the Traka KeyBooking Web Portal to work effectively either Auto Comms or Traka as a Service
(TAAS) needs to be enabled. This will ensure that the bookings that are created on the Web Portal
are written to Traka32 and the cabinets a ‘user definable’ amount of time. You can see
communication status in the Web Portal by selecting the ‘Booking List’, you will notice there is a
status section next to each booking.
When a booking is waiting for Auto Comms or TAAS to communicate and update Traka32 and the
cabinet, the status will show ‘Waiting to Add’. It similar when waiting for a booking to be deleted,
the status will show ‘Waiting to Delete’. Once a booking has been synchronised with both the
cabinet and Traka32 the status will show OK.
For further information on ‘TAAS’ or ‘Auto Comms’ please consult the Traka32 User Guide.
FIRMWARE OPTIONS
The Traka cabinets you wish to create bookings for must have either the ‘KeyBooking’ or
‘KeyBooking by Reference’ option enabled in order to use the KeyBooking Web Portal.
KEY DETAILS
There are certain aspects of the KeyBooking feature which are user definable from Traka32, such as
the Key Description fields. These fields can be changed to any description you desire, for example if
they keys in your cabinet are specifically vehicle keys, your description fields may be as follows:-
3
TRAKA KEY BOOKING WEB PORTAL USER GUIDE
To change the description fields simply open Traka32 select File > Properties then when the
Properties window appears select ‘Key Details’. You can now enter a description of your choice into
each field.
KEY CATEGORY
There are certain aspects of the KeyBooking feature which are user definable from Traka32, such as
the Key Categories. These fields can group multiple keys together and narrow down searches. For
example, when you are searching for a key using the Web Portal, as well as typing in a specific search
term or selecting a key from the Key List, you can have a number of tick boxes with your desired ‘Key
Categories’.
To add or edit a ‘Key Category’ simply open Traka32 and then select File > Options. From the
options menu select the ‘Key Categories’ tab. Next click the ‘Options’ button and select ‘Add New’,
you will then be confronted by the ‘Key Category’ window. Enter the desired category description an
slick ‘Save & Close’.
4
TRAKA KEY BOOKING WEB PORTAL USER GUIDE
CREATING A USER LOGIN
To allow a Traka32 User to have access to the KeyBooking Web Portal, a login must be created. To
create the login you must have access to User Details. Open Traka32 and select the ‘User List’, from
there double click the desired user to open their User Details window. Select the tab at the top of
the details window named ‘Web Portal’. Here you can create the users ‘Log In’ for KeyBooking Web
Portal by entering a User Name and Password.
Note: - The Users Name and Password for the KeyBooking Web Portal can be completely
different to their Traka32 Login in details, although it is advised you use the same User Name.
KeyBooking Admin Option
This option when enabled will allow the selected user to create a Web Portal Log in for other users.
5
TRAKA KEY BOOKING WEB PORTAL USER GUIDE
KEY BOOKING PROCESS
KEY BOOKING
After having installed the KeyBooking Web Portal (see the seperate ‘KeyBooking Web Portal
Installation Guide’ for further information), navigate to http://localhost/keybooking (replacing
‘keyBooking’ with whatever Alias you used in the installation process). You will then be confronted
the KeyBooking Welcome page, from here you have the choice of ‘Adding a new Booking’, viewing
the ‘Booking List’ or viewing the ‘Booking Chart’ (see below).
To create a new booking simply select the ‘Add New Booking’ button. You will then be taken to the
‘Log On’ screen, from here enter your previously configured User Name and Password and click Next
to continue.
6
TRAKA KEY BOOKING WEB PORTAL USER GUIDE
Once the user has logged on they will be prompted to select a system they wish to book keys from.
Select the desired system and click Next.
Next you will be prompted to select a user to book the key for. To find the desired user, browse the
User List and click the ‘Select’ button next to their name, or alternatively type the users name into
the search bar and click the ‘Search’ button. Once you have selected a user click the ‘Next’ button.
7
TRAKA KEY BOOKING WEB PORTAL USER GUIDE
Once you have selected the appropriate user, you will need to enter a Beginning and End time for
the booking. Then click ‘Next’.
After selecting a Beginning and End time for your booking, you will need to select a key to book.
There are several ways to find they key you wish to book:•
You can use the provided Key List and browse for the desired key.
•
Enter a valid description into the search bar, such as the Make, Model, Colour, Registration,
Location, and Owner etc (or whatever your description fields are configured for).
•
Or there are several ‘Key Category’ tick boxes (each with a definable description which can
be changed in Traka32) that can be selected and then searched for.
Once you have found the key you wish to book click the ‘Next’ button.
8
TRAKA KEY BOOKING WEB PORTAL USER GUIDE
Next is the notes section, here you can enter any notes you want to relate to the booking. Once you
have written your notes click the ‘Next’ button.
The Confirm Booking section holds the summary details of you booking. If you are happy and want
to save the booking click on ‘Next’ or if you want to change the details click on ‘Previous’, to discard
the booking click on ‘Cancel’.
9
TRAKA KEY BOOKING WEB PORTAL USER GUIDE
After selecting ‘Next’, you be confronted by the final screen which will inform you that the booking
has been submitted successfully.
10
TRAKA KEY BOOKING WEB PORTAL USER GUIDE
KEY BOOKING BY REFERENCE
After having installed the KeyBooking Web Portal (see the separate ‘KeyBooking Web Portal
Installation Guide’ for further information), navigate to http://localhost/keybooking (replacing
‘keyBooking’ with whatever Alias you used in the installation process). You will then be confronted
the KeyBooking Welcome page, from here you have the choice of ‘Adding a new Booking’, viewing
the ‘Booking List’ or viewing the ‘Booking Chart’ (see below).
To create a new booking simply select the ‘Add New Booking’ button. You will then be taken to the
‘Log On’ screen, from here enter your previously configured User Name and Password and click Next
to continue.
11
TRAKA KEY BOOKING WEB PORTAL USER GUIDE
Once the user has logged on they will be prompted to select a system they wish to book keys from.
Select the desired system and click Next.
KeyBooking by Reference allow temporary users, who would not normally have access to the Traka
System, to have a key made available to them via a booking reference number.
You will then be confronted by the Booking Reference section. You will need to enter the name of
the user who will complete the booking and enter a Reference number.
Note: - the reference number must be numerical and can only consist of 12 digits.
12
TRAKA KEY BOOKING WEB PORTAL USER GUIDE
Once you have selected the appropriate user, you will need to enter a Beginning and End time for
the booking. Then click ‘Next’.
After selecting a Beginning and End time for your booking, you will need to select a key to book.
There are several ways to find they key you wish to book:•
You can use the provided Key List and browse for the desired key.
•
Enter a valid description into the search bar, such as the Make, Model, Colour, Registration,
Location, and Owner etc (or whatever your description fields are configured for).
•
Or there are several ‘Key Category’ tick boxes (each with a definable description which can
be changed in Traka32) that can be selected and then searched for.
Once you have found the key you wish to book click the ‘Next’ button.
13
TRAKA KEY BOOKING WEB PORTAL USER GUIDE
Next is the notes section, where you can enter any notes you want to relate to the booking. Once
you have written your notes click the ‘Next’ button.
The Confirm Booking section holds the summary details of you booking. If you are happy and want
to save the booking click on ‘Next’ or if you want to change the details click on ‘Previous’, to discard
the booking click on ‘Cancel’.
14
TRAKA KEY BOOKING WEB PORTAL USER GUIDE
After selecting ‘Next’, you be confronted by the final screen which will inform you that the booking
has been submitted successfully.
15
TRAKA KEY BOOKING WEB PORTAL USER GUIDE
BOOKING LIST
Once the booking is confirmed the Web Portal software will write the booking to the Traka System.
You can view the details of the booking by selecting the 'Bookings List' button from the ‘Welcome’
Screen and also on the ‘Finish’ page when you have completed a booking.
BOOKING CHART
The Key Bookings Chart provides a graphical representation of all current bookings. You can view the
details of the booking by selecting the 'Bookings List' button from the ‘Welcome’ Screen.
16
TRAKA KEY BOOKING WEB PORTAL USER GUIDE
LOCALISATION
The KeyBooking Web Portal application will automatically display in the language as set in your web
browser. This is usually automatically set to the language of your operating system.
To view or change these settings in Internet Explorer, Select Internet Options from the Tools menu
and click Languages. In Firefox 3, select Options from the Tools menu. Then in the Content tab,
click the Choose button in the Languages section at the bottom.
TECHNICAL SUPPORT INFORMATION
Should you have any problems or need further assistance with you Traka Products, please feel free
to contact our Technical Support Department by any of the means below.
Email:
[email protected]
Technical Support Helpline
Telephone: 0845 630 6300
17