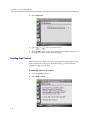
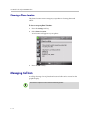
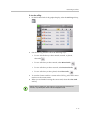
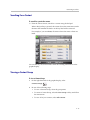
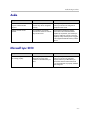
1
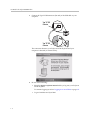
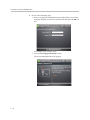
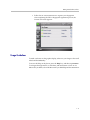
User Guide for the Polycom®
CX700 IP Phone
Microsoft® Lync™ 2010 Edition
| September 2011 | 1725-31402-001 Rev. C1
Trademark Information
POLYCOM®, the Polycom “Triangles” logo and the names and marks associated with Polycom’s products are
trademarks and/or service marks of Polycom, Inc. and are registered and/or common law marks in the United States
and various other countries. All other trademarks are property of their respective owners. No portion hereof may be
reproduced or transmitted in any form or by any means, for any purpose other than the recipient’s personal use, without
the express written permission of Polycom.
Microsoft, Lync, MS-DOS, Windows, WindowsServer, Windows Vista, and Windows XP are either registered
trademarks or trademarks of Microsoft Corporation in the United States and/or other countries.
Patent Information
The accompanying product is protected by one or more U.S. and foreign patents and/or pending patent applications
held by Polycom, Inc. and/or one or more of its licensors.
Copyright Notice
The software contained in this product may be copyrighted by Polycom and/or one or more of its licensors.
Copyright © 2011 Microsoft Corporation. All rights reserved.
Copyright © 2011 Polycom, Inc. All rights reserved.
© 2011 Polycom, Inc. All rights reserved.
Polycom, Inc.
4750 Willow Road
Pleasanton, CA 94588-2708
USA
No part of this document may be reproduced or transmitted in any form or by any means, electronic or mechanical, for
any purpose, without the express written permission of Polycom, Inc. Under the law, reproducing includes translating
into another language or format.
As between the parties, Polycom, Inc., retains title to and ownership of all proprietary rights with respect to the software
contained within its products. The software is protected by United States copyright laws and international treaty
provision. Therefore, you must treat the software like any other copyrighted material (e.g., a book or sound recording).
Every effort has been made to ensure that the information in this manual is accurate. Polycom, Inc., is not responsible
for printing or clerical errors. Information in this document is subject to change without notice.
ii
About This Guide
Thank you for choosing the Polycom® CX700 IP phone which enables a new
era in unified communications currently unavailable with traditional desktop
phones. Connecting a Polycom CX700 phone to Microsoft® Lync™ 2010 or to
a computer running Microsoft Lync 2010 allows you to place regular and
Voice over Internet Protocol (VoIP) calls, answer calls, forward calls, keep a
record of all calls, start a conference call, and click to call from a list of your
personal contacts through integration with Microsoft’s Active Directory and
Microsoft Exchange Server. Using your Polycom CX700 phone lets you take
advantage of Microsoft Lync 2010 without needing access to a computer. For
more information on what’s new in Microsoft Lync 2010, refer to
http://www.microsoft.com/en-us/lync/new-features.aspx
This User Guide provides everything you need to quickly use your new
phone. Verify with your system administrator that the network is prepared for
configuring your Polycom CX700 IP phone, you are provisioned in Microsoft
Lync 2010, and your network is correctly configured. As well, read the Parts
List and Safety Notices sections in this guide before you set up and use the
Polycom CX700 IP phone.
Changes to This Guide
The following section was removed for this edition:
•
Changing Your Password.
iii
User Guide for the Polycom CX 700 IP Phone
iv
Contents
About This Guide . . . . . . . . . . . . . . . . . . . . . . . . . . . . . . . . iii
Changes to This Guide . . . . . . . . . . . . . . . . . . . . . . . . . . . . . . . . . . . . . . . . iii
1 Getting Started with Your Phone . . . . . . . . . . . . . . . . . . . . 1–1
Parts List . . . . . . . . . . . . . . . . . . . . . . . . . . . . . . . . . . . . . . . . . . . . . . . . . . . . . . 1–2
Assembling Your Phone . . . . . . . . . . . . . . . . . . . . . . . . . . . . . . . . . . . . . . . . . 1–3
Connecting the Handset and Optional Headset . . . . . . . . . . . . . . . . . 1–3
Connecting the Phone to the Network . . . . . . . . . . . . . . . . . . . . . . . . . 1–4
Connecting to Your Computer Using a USB Cable . . . . . . . . . . . . . . . 1–5
Adjusting the Phone Base . . . . . . . . . . . . . . . . . . . . . . . . . . . . . . . . . . . . 1–7
Features of Your Phone . . . . . . . . . . . . . . . . . . . . . . . . . . . . . . . . . . . . . . . . . . 1–7
Before You Use Your Phone . . . . . . . . . . . . . . . . . . . . . . . . . . . . . . . . . . . . . . 1–8
Where to Position Your Phone . . . . . . . . . . . . . . . . . . . . . . . . . . . . . . . . 1–8
Logging in on Your Phone . . . . . . . . . . . . . . . . . . . . . . . . . . . . . . . . . . . 1–8
Usage Guidelines . . . . . . . . . . . . . . . . . . . . . . . . . . . . . . . . . . . . . . . . . . 1–11
2 Customizing Your Phone . . . . . . . . . . . . . . . . . . . . . . . . . . 2–1
Configuring Basic Settings . . . . . . . . . . . . . . . . . . . . . . . . . . . . . . . . . . . . . . . 2–1
Changing Date and Time Format . . . . . . . . . . . . . . . . . . . . . . . . . . . . . . 2–2
Changing Location and Time Zone . . . . . . . . . . . . . . . . . . . . . . . . . . . . 2–3
Changing Ring Tones . . . . . . . . . . . . . . . . . . . . . . . . . . . . . . . . . . . . . . . . 2–4
Changing Displayed Language . . . . . . . . . . . . . . . . . . . . . . . . . . . . . . . 2–4
Locking and Unlocking Your Phone . . . . . . . . . . . . . . . . . . . . . . . . . . . 2–5
Adjusting the Volume . . . . . . . . . . . . . . . . . . . . . . . . . . . . . . . . . . . . . . . 2–7
Adjusting Display Brightness . . . . . . . . . . . . . . . . . . . . . . . . . . . . . . . . . 2–7
Enabling High Contrast . . . . . . . . . . . . . . . . . . . . . . . . . . . . . . . . . . . . . . 2–8
Enabling Text Telephone . . . . . . . . . . . . . . . . . . . . . . . . . . . . . . . . . . . . . 2–9
Changing Your PIN . . . . . . . . . . . . . . . . . . . . . . . . . . . . . . . . . . . . . . . . . 2–9
Switching Users . . . . . . . . . . . . . . . . . . . . . . . . . . . . . . . . . . . . . . . . . . . 2–10
Calibration of Touch Screen . . . . . . . . . . . . . . . . . . . . . . . . . . . . . . . . . 2–10
Choosing a Phone Location . . . . . . . . . . . . . . . . . . . . . . . . . . . . . . . . . . 2–12
v
User Guide for the Polycom CX700 IP Phone
Managing Call Lists . . . . . . . . . . . . . . . . . . . . . . . . . . . . . . . . . . . . . . . . . . . . 2–12
Managing Contacts . . . . . . . . . . . . . . . . . . . . . . . . . . . . . . . . . . . . . . . . . . . . 2–14
Adding Contacts . . . . . . . . . . . . . . . . . . . . . . . . . . . . . . . . . . . . . . . . . . . 2–14
Deleting Contacts . . . . . . . . . . . . . . . . . . . . . . . . . . . . . . . . . . . . . . . . . . 2–14
Frequent Contacts . . . . . . . . . . . . . . . . . . . . . . . . . . . . . . . . . . . . . . . . . . 2–14
Placing a Call to a Contact . . . . . . . . . . . . . . . . . . . . . . . . . . . . . . . . . . . 2–14
Searching For a Contact . . . . . . . . . . . . . . . . . . . . . . . . . . . . . . . . . . . . . 2–15
Viewing a Contact Group . . . . . . . . . . . . . . . . . . . . . . . . . . . . . . . . . . . 2–15
3 Using the Basic Features of Your Phone . . . . . . . . . . . . . . . 3–1
Placing Calls . . . . . . . . . . . . . . . . . . . . . . . . . . . . . . . . . . . . . . . . . . . . . . . . . . . 3–2
Answering Calls . . . . . . . . . . . . . . . . . . . . . . . . . . . . . . . . . . . . . . . . . . . . . . . . 3–3
Ending Calls . . . . . . . . . . . . . . . . . . . . . . . . . . . . . . . . . . . . . . . . . . . . . . . . . . . 3–5
Redialing Numbers . . . . . . . . . . . . . . . . . . . . . . . . . . . . . . . . . . . . . . . . . . . . . 3–5
Muting the Microphone . . . . . . . . . . . . . . . . . . . . . . . . . . . . . . . . . . . . . . . . . 3–5
Adjusting the Call Volume . . . . . . . . . . . . . . . . . . . . . . . . . . . . . . . . . . . . . . . 3–5
Placing Calls on Hold . . . . . . . . . . . . . . . . . . . . . . . . . . . . . . . . . . . . . . . . . . . 3–6
Hosting Conference Calls . . . . . . . . . . . . . . . . . . . . . . . . . . . . . . . . . . . . . . . . 3–6
Joining Meetings . . . . . . . . . . . . . . . . . . . . . . . . . . . . . . . . . . . . . . . . . . . . . . . 3–7
Transferring Calls . . . . . . . . . . . . . . . . . . . . . . . . . . . . . . . . . . . . . . . . . . . . . . 3–8
Forwarding Calls . . . . . . . . . . . . . . . . . . . . . . . . . . . . . . . . . . . . . . . . . . . . . . 3–10
Using Voice Mail . . . . . . . . . . . . . . . . . . . . . . . . . . . . . . . . . . . . . . . . . . . . . . 3–11
Changing Your Presence Information . . . . . . . . . . . . . . . . . . . . . . . . . . . . 3–12
Restarting Your Phone . . . . . . . . . . . . . . . . . . . . . . . . . . . . . . . . . . . . . . . . . 3–14
4 Troubleshooting Your Phone . . . . . . . . . . . . . . . . . . . . . . . 4–1
Power and Startup . . . . . . . . . . . . . . . . . . . . . . . . . . . . . . . . . . . . . . . . . . . . . . 4–2
Controls . . . . . . . . . . . . . . . . . . . . . . . . . . . . . . . . . . . . . . . . . . . . . . . . . . . . . . . 4–3
Access to Screens and Systems . . . . . . . . . . . . . . . . . . . . . . . . . . . . . . . . . . . 4–4
Making and Receiving Calls . . . . . . . . . . . . . . . . . . . . . . . . . . . . . . . . . . . . . 4–6
Displays . . . . . . . . . . . . . . . . . . . . . . . . . . . . . . . . . . . . . . . . . . . . . . . . . . . . . . . 4–8
Audio . . . . . . . . . . . . . . . . . . . . . . . . . . . . . . . . . . . . . . . . . . . . . . . . . . . . . . . . . 4–9
Microsoft Lync 2010 . . . . . . . . . . . . . . . . . . . . . . . . . . . . . . . . . . . . . . . . . . . . 4–9
Safety Notices . . . . . . . . . . . . . . . . . . . . . . . . Safety Notices–1
vi
1
Getting Started with Your Phone
This chapter provides basic installation instructions and information for
obtaining the best performance with the Polycom® CX700 IP phone.
The Polycom CX700 IP phone provides a complete phone experience for
Microsoft® Lync™ 2010. The graphic display features flexible navigation
using its touch screen capabilities, the navigation wheel just below the screen,
or the traditional number keypad. The Polycom CX700 IP phone supports
advanced functionality including:
•
Presence and directory enabled telephony
•
5.7” color touch screen
•
Windows CE
•
Wideband audio
•
2 USB ports
•
Biometric fingerprint reader
•
2 10/100 switched Ethernet ports with POE
This chapter contains:
•
Parts List
•
Assembling Your Phone
•
Features of Your Phone
•
Before You Use Your Phone
To customize your phone, refer to Customizing Your Phone on page 2-1. To
read about the phone’s basic features, refer to Using the Basic Features of Your
Phone on page 3-1.
If you require additional information or assistance with your new phone,
contact your system administrator.
1-1
User Guide for the Polycom CX700 IP Phone
Parts List
The following components are included in your Polycom CX700 IP phone
package:
1-2
•
Polycom CX700 IP phone
•
handset & handset cord
•
Network Cable
•
USB cable
Getting Started with Your Phone
•
Quick Start Guide and registration card
Check this list before installation to ensure that you have received each item.
If you are missing any items, contact your system administrator.
Assembling Your Phone
This section describes how to assemble your Polycom CX700 IP phone:
•
Connect handset and headset (optional)
•
Connect to the network
•
Connect to your computer using USB cable (optional)
•
Adjust phone base
If your phone is already assembled, go directly to Features of Your Phone on
page 1-7.
Connecting the Handset and Optional Headset
To connect the handset and optional headset:
1
Connect one end of the phone cord to the handset and the other end of
the cord to the handset jack on the back of the phone.
2
Connect the headset (optional) to the headset jack on the back of the
phone (next to the handset jack).
1-3
User Guide for the Polycom CX700 IP Phone
A list of supported headsets is available in the Voice section of Polycom’s Support
web site at
http://www.polycom.com/global/documents/support/technical/products/voice/CX200
_700_Headset_Compatibility.pdf.
If headsets are deployed in high static environments where users frequently
disconnect and re-connect the headset to the phone, it is possible that the phone
can be damaged by electrostatic discharge (ESD).
Note
You should take precautions to avoid excessive static buildup in your environment.
This can include humidity control and removal of synthetic materials near the phone
location. Antistatic spray applied to carpets in the workplace can reduce the level of
static buildup.
Connecting the Phone to the Network
Use Power over Ethernet (PoE) for network and power source connections
unless otherwise directed by your system administrator.
To connect the network and AC power:
>> Plug the supplied network cable between the LAN jack on the back of the
phone and an available network RJ-45 data port.
Using the supplied network cable, the phone can be powered from a PoE
(IEEE 802.3af) enabled network port.
The phone will begin to power up.
Note
1-4
If there is no PoE enabled network data part available, contact your system
administrator for an AC/DC power adapter. Plug the AC/DC power adapter into the
Polycom CX700 IP phone’s power plug, then plug one end of in the country specific
power cord into the power adapter and the other end into an available AC outlet.
Getting Started with Your Phone
For more information on logging in, refer to Logging in on Your Phone on
page 1-8.
Connecting to Your Computer Using a USB Cable
You can connect your Polycom CX700 IP phone to your computer using a USB
cable. The advantages of this connection include:
•
Computer sign-in. If you are logged into Microsoft Lync 2010 on your
computer, you are automatically logged in on your phone.
•
Making a one-click audio call. Each contact in your contact list has a
default number that you can call by clicking the Contact card to the right
of the contact.
•
Phone Audio. When your your Polycom CX700 IP phone is connected to
your computer with a USB cable, you can receive audio through the
phone’s speaker for Microsoft Office Live Meeting 2007 and Microsoft
Lync 2010 calls.
The USB cable is not included in your Polycom CX700 IP phone package, but is
available as an optional accessory. Contact your system administrator if you want to
connect your phone to your computer.
Note
To connect your Polycom CX700 IP phone to your computer:
1
Log into Microsoft Lync 2010 on your computer.
2
Connect the Type A USB connector (square end) of the USB cable to the
Polycom CX700 IP phone.
1-5
User Guide for the Polycom CX700 IP Phone
3
Connect the Type B USB connector (flat end) of the USB cable to your
computer.
Type “A” USB
Connector
Type “B” USB
Connector
The connection between your Polycom CX700 IP phone and your
computer is detected (as shown below).
4
Do one of the following:
— Select the Sign in on phone instead soft key to log into your Polycom
CX700 IP phone.
To continue logging in, refer to Logging in on Your Phone on page 1-8.
— Log in from Microsoft Lync 2010.
1-6
Getting Started with Your Phone
Adjusting the Phone Base
To adjust the base:
1
Push the button on the back of the Polycom CX700 IP phone to adjust the
viewing angle.
2
Select an angle that best suits you by moving the base up or down.
Features of Your Phone
13
12
1
11
5
8
6
3
9
7
4
2
10
The features of the Polycom CX700 IP phone are:
1
Graphic Display—Shows information about calls, messages, time, date,
and other relevant data and allows you to enter commands and select
contacts through the touch screen.
1-7
User Guide for the Polycom CX700 IP Phone
Presence Status Indicator—Indicates your presence state.
2
For more information, refer to Changing Your Presence Information on
page 3-12.
3
Scroll wheel—Navigates up and down the contact list and other
elements of the user interface.
4
Select Key—Selects the highlighted information.
5
Help Key—Displays help for the currently displayed screen.
6
Microphone Mute Key—Mutes local audio during calls so that others
cannot hear you.
7
Volume Key—Use to adjust the volume of the handset, speakerphone,
and headset speaker, and ringer if not in a call.
8
Headset Key—Allows you to place and receive calls through an
optionally connected headset.
9
Speakerphone Key—Allows for hands-free communication during calls.
10 Speaker—For ringer and hands-free audio output.
11 Hookswitch and Handset Cradle
12 Dial Pad—These 12 keys provide the 10 digits, the 26 alphabetic
characters, and special characters available in context-sensitive
applications.
13 Fingerprint Reader—Allows you to log on to your Polycom CX 700 IP
phone with a swipe of your finger.
Before You Use Your Phone
Where to Position Your Phone
Use the following guidelines to select a position for your phone:
•
Place your Polycom CX700 IP phone in a well-ventilated, flat, level, clean,
and dry position near your computer.
•
Place the AC/DC power adapter in a well-ventilated, clean, and dry
position under the table and out of the typical walking path.
Logging in on Your Phone
You need to log in to place all outgoing calls or answer incoming calls. With regard
to the placement of emergency calls, consult your system administrator.
Note
1-8
Getting Started with Your Phone
To log in on the Polycom CX700:
1
After the initial Microsoft Unified Communications introduction screen
appears, the setup screen will appear.
Follow the instructions for setting up the touch screen.
The Sign In screen appears on the graphic display.
2
Using the graphic display’s soft keyboard, enter the following:
— Your Microsoft Lync 2010 sign-in name (for example,
[email protected])
— Your network domain and username (for example, polycom\user1)
— Your password
3
Select Sign In.
If you have connected your Polycom CX700 IP phone to your computer,
you can log in using Microsoft Lync 2010. Select Advanced, and then select
Sign in via PC.
1-9
User Guide for the Polycom CX700 IP Phone
4
Do one of the following steps:
— Enter a six digit personal identification number (PIN) of your choice
using the dial pad, re-enter the same PIN, and then press the OK soft
key.
For example, enter “123456” twice.
— Press the Use fingerprint instead soft key.
The Create Fingerprint ID screen appears.
1 - 10
Getting Started with Your Phone
— Follow the on-screen instructions to register your fingerprint.
After completing the PIN or fingerprint registration process, the
Contact List screen appears.
Usage Guidelines
To make a selection on the graphic display, either use your finger or the scroll
wheel and the Select key.
To access the Help on the phone, press the Help key, and then tap Contents.
To navigate through menus, to enter data, and instructions on how to use
Microsoft Lync 2010, refer to the Microsoft Lync 2010 help and documentation.
1 - 11
User Guide for the Polycom CX700 IP Phone
1 - 12
2
Customizing Your Phone
You can customize your Polycom® CX700 IP phone by adjusting the setting
for time and date, display contrast, and ring type, and other features. You can
add contacts to the phone’s directory manually or from call lists. You can
handle incoming calls from different contacts in different ways.
This chapter provides basic operating instructions for customizing your
Polycom CX700 IP phone. This chapter contains instructions on:
•
Configuring Basic Settings
•
Managing Call Lists
•
Managing Contacts
To read about the phone’s basic features, refer to Using the Basic Features of
Your Phone on page 3-1. To troubleshoot issues with the phone, refer to
Troubleshooting Your Phone on page 4-1.
If you require additional information or assistance with your new phone,
contact your system administrator.
Configuring Basic Settings
You can configure the basic settings by selecting the Settings soft key,
.
It appears on the left-hand side of the graphic display. You can change the
following settings:
•
Date and time format
•
Geographical location and time zone
•
The ring tone heard when there is an incoming call
•
Language support (localization)
•
Accessibility of your phone
•
Volume of the ringer, handset, and speaker
•
Display brightness
2-1
User Guide for the Polycom CX700 IP Phone
•
High contrast setting
•
Text telephone (TTY) setting
•
Your PIN or fingerprint ID
•
User who is currently logged into the phone
•
Touch screen’s calibration
You can also view the current phone network settings.
You must be logged in to configure the basic settings on your Polycom CX700
IP phone.
Changing Date and Time Format
The date and time appears on the graphic display of the Polycom CX700 IP
phone. The phone obtains the date and time automatically from a configured
SNTP server. If the phone cannot obtain the date and time, the display will
flash. Contact your system administrator if either the date or time is incorrect.
You have control over the format of the date and time display. The default date
and time format appears below.
To configure the time and date:
1
2-2
Press the Settings soft key.
Customizing Your Phone
2
Select Date/Time Format, then select your preferred format.
3
Press the OK soft key to save your changes.
Changing Location and Time Zone
You have control over the location and time zone.
To configure the location and time zone:
1
Press the Settings soft key.
2
Select Location/Time Zone, then select your preferred location and time
zone.
3
Press the OK soft key to save your changes.
2-3
User Guide for the Polycom CX700 IP Phone
Changing Ring Tones
You can select a ring tone for incoming calls.
To select a ring tone:
1
Press the Settings soft key.
2
Select Ring Tones, then select your preferred ring tone.
To hear the selected ring tone, press the Play soft key.
3
Press the OK soft key to save your changes.
Changing Displayed Language
Many languages are supported by the Polycom CX 700 IP phone.
To change the language:
1
2-4
Press the Settings soft key.
Customizing Your Phone
2
Select Change Language, then select your preferred language.
You can choose from Chinese (Simplified), Chinese (Traditional), Danish,
Dutch, English, Finnish, French, German, Italian, Japanese, Korean,
Norwegian, Portuguese (Brazilian), Russian, Spanish, and Swedish.
Your system administrator selects which of these languages are made available to
you. You will be able to select only those languages that your system administrator
has deployed.
Note
3
Press the OK soft key to save your changes.
The selected language is downloaded to your phone.
Locking and Unlocking Your Phone
After a period of inactivity, your Polycom CX700 phone will lock. You can also
lock your phone yourself, for example, if you are leaving your desk.
The inactivity timeout is configured by Microsoft Lync 2010. For more information,
contact your system administrator.
Note
To lock your phone:
1
Press the Settings soft key.
2-5
User Guide for the Polycom CX700 IP Phone
2
Select Lock.
Your phone is now locked.
To unlock your phone:
1
Press the Unlock soft key.
The PIN entry screen appears.
2
Enter your PIN, then press the OK soft key.
3
If you have forgotten your PIN:
a
Press the Forgot PIN soft key.
You are prompted to enter the password that you entered when you
first logged in (refer to Logging in on Your Phone on page 1-8).
If you press the Cancel soft key, the phone remains locked.
b
Enter your password (using the soft keyboard), then press the OK soft
key.
c
Enter a new six digit PIN twice (using the dial pad), then press the OK
soft key.
Use the fingerprint reader to unlock your phone if you initially identified yourself
using the fingerprint reader. For more information, refer to Logging in on Your
Phone on page 1-8.
Note
2-6
Customizing Your Phone
Adjusting the Volume
To adjust the volume on the ringer, handset, and speaker:
1
Press the Settings soft key.
2
Select Volume.
3
Using
or
, select your desired level for ringer, handset, and
speaker volume.
4
Press the OK soft key to save your changes or the Cancel soft key to exit
the Volume screen without making changes.
Adjusting Display Brightness
To adjust the brightness on the graphic display to a comfortable level:
1
Press the Settings soft key.
2-7
User Guide for the Polycom CX700 IP Phone
2
Select Brightness.
3
Using
4
Press the OK soft key to save your changes or the Cancel soft key to exit
the Brightness screen without making changes.
or
, select your desired level.
Enabling High Contrast
High contrast color schemes can increase readability by using higher contrast
color combinations on the screen. With this change, you can operate the
telephone in high-contrast mode.
To enable high contrast on your phone:
2-8
1
Press the Settings soft key.
2
Select High Contrast.
Customizing Your Phone
Press the Enable soft key or the Cancel soft key to exit the High Contrast
screen without making changes.
3
Enabling Text Telephone
The Text Telephony (TTY) setting enables those who are deaf or speech
impaired to use the telephone.
To enable TTY on your phone:
1
Press the Settings soft key.
2
Select Text Telephone (TTY).
3
Plug a telephone typewriter device into the headset port at the back of
your phone.
4
Press the Enable soft key or the Cancel soft key to exit the TTY screen
without making changes.
Changing Your PIN
PIN enforcement is configured by Microsoft Lync 2010. For more information,
contact your system administrator.
Note
To change your PIN:
1
Press the Settings soft key.
2
Select Change PIN.
2-9
User Guide for the Polycom CX700 IP Phone
3
Enter your old PIN, then enter your new PIN twice.
4
Press the OK soft key to save your changes or the Cancel soft key to exit
the Change PIN screen without making changes.
For more information on changing your the fingerprint and the fingerprint
reader, refer to Logging in on Your Phone on page 1-8.
Switching Users
To switch to another user:
1
Press the Settings soft key.
2
Select Switch User.
The Sign In screen appears on the graphic display.
3
Using the graphic display’s soft keyboard, enter the following:
— The new user’s Microsoft Office Communicator sign-in name
— The new user’s network domain and username
— The new user’s password
For more information, refer to Logging in on Your Phone on page 1-8.
4
Select Sign In.
The Confirm PIN screen appears.
5
Enter the new user’s six digit personal identification number (PIN) using
the dial pad, then re-enter the same PIN, and then press the OK soft key.
The new user’s contact list screen appears.
Calibration of Touch Screen
To calibrate the touch screen:
1
2 - 10
Press the Settings soft key.
Customizing Your Phone
2
Select Calibrate Touch Screen.
3
Follow the on-screen instructions to set the calibration.
4
Touch the graphic display a final time to finish the calibration.
2 - 11
User Guide for the Polycom CX700 IP Phone
Choosing a Phone Location
The phone location assists emergency responders in locating distressed
callers.
To view or set your phone’s location:
1
Press the Settings soft key.
2
Select Phone Location.
Your location will appear on your phone.
3
Press the OK soft key .
Managing Call Lists
A call log showing a list of placed and received calls can be viewed on the
graphic display.
This feature requires access to Microsoft Exchange 2007.
Note
2 - 12
Customizing Your Phone
To view the call log:
1
On the left-hand side of the graphic display, select the Call Log soft key,
.
2
Sort the Call Log screen in one of the following ways:
— To view all calls that you have missed, received, or placed,
select All,
.
— To view calls that you have missed, select Missed Calls,
.
— To view calls that you have received, select Received Calls,
— To view calls that you have placed, select Place Calls,
.
.
3
To view the Contact card for a contact in the Call Log, select the Contact
card next to the contact name.
4
When you are finished viewing the contact card, select the Close Card
soft key.
Missed calls are displayed in bold. After the call log has been closed for 10
seconds, only subsequent missed calls are displayed in bold.
2 - 13
User Guide for the Polycom CX700 IP Phone
Managing Contacts
You can view your list of contacts on the graphic display. You can view the
following information about each contact:
•
The contact’s presence icon
•
The contact’s name
•
The contact’s presence status
•
The Contact card, which contains detailed information about the contact
The following limitations (with respect to contacts) exist on the Polycom CX700 IP
phone:
•
The Microsoft Outlook contact list must contain less than 5000 contacts.
•
The Microsoft Lync 2010 contact list must contain less than 400 contacts.
•
Your company’s global address list must contain less than 200,000 entries.
Note
Adding Contacts
New entries to the contact list are added through Microsoft Lync 2010 on your
computer.
Deleting Contacts
Entries in the contact list are deleted through Microsoft Lync 2010 on your
computer.
Frequent Contacts
You can now view your Frequent Contacts on your phone. The Frequent
Contacts group was added to Contact Groups to let you easily find the people
who you contact the most.
Placing a Call to a Contact
To place a call to a contact:
>> Select the Contact card, and then select the number.
2 - 14
Customizing Your Phone
Searching For a Contact
To search for a particular contact:
>> From the contact screen, search for a contact using the dial pad.
When a dial pad key is pressed, the entries whose first name starts with a
character that matches the letters on the key label will be retrieved.
For example, if you enter Peter, all entries whose first name is Peter are
listed.
You can dial any successful matches from the resulting information on the
graphic display.
Viewing a Contact Group
To view a Contact Group:
1
On the right-hand side of the graphic display, select
Contact Groups,
2
.
Do one of the following steps:
— To view a Contact Group, select the group name.
— To create a Contact Group, select the New Group soft key and follow
the instructions.
— To view all of your contacts, select All Contacts.
2 - 15
User Guide for the Polycom CX700 IP Phone
2 - 16
3
Using the Basic Features of Your
Phone
Your Polycom® CX700 IP phone is designed to be used like a regular phone.
You place calls, transfer a call to someone else, or conduct a conference call.
At any time, only one active call may be in progress on your phone. The active
call is the one that has audio associated with it. There may be one other call on
hold or in an “Incoming call” or “Ringing” state. Use the Scroll Wheel or the
touch screen to switch between these calls.
This chapter provides basic operating instructions for the Polycom CX700 IP
phone. This chapter contains instructions on:
•
Placing Calls
•
Answering Calls
•
Ending Calls
•
Redialing Numbers
•
Muting the Microphone
•
Adjusting the Call Volume
•
Placing Calls on Hold
•
Hosting Conference Calls
•
Joining Meetings
•
Transferring Calls
•
Forwarding Calls
•
Using Voice Mail
•
Changing Your Presence Information
•
Restarting Your Phone
To customize your phone, refer to Customizing Your Phone on page 2-1. To
troubleshoot issues with the phone, refer to Troubleshooting Your Phone on
page 4-1.
3-1
User Guide for the Polycom CX700 IP Phone
If you require additional information or assistance with your new phone,
contact your system administrator.
Placing Calls
You can place a call in many ways using your Polycom CX700 IP phone:
•
Dial the number using the dial pad with the handset off-hook or on-hook.
•
Select a contact from the contacts list shown on the graphic display.
•
Select a contact from the contacts list using the Scroll Wheel, then press the
Select key (at the center of the Scroll Wheel).
During a call, you can alternate between Handset, Headset, or Speakerphone
modes by pressing the Speakerphone or Headset keys, or picking up the
handset.
Call duration on an active call is monitored through a local call timer. This is
visible within the active call window on the graphic display. In the figure
below, the call to Peter Krebs has just started.
You need to log in to place all outgoing calls or answer incoming calls. With regard
to the placement of emergency calls, consult your system administrator.
Only four simultaneous calls can be displayed on the graphic display at any time.
Note
To place a call using the handset:
>> Do the following steps in any order:
— Pick up the handset.
3-2
Using the Basic Features of Your Phone
— Dial the desired number using the dial pad.
The number appears in the phone number field.
The numbers will automatically dial once the complete number is entered.
You may need to press the Call soft key.
To place a call using the speakerphone:
>> Do one of the following steps:
a
With the handset on-hook, press the Speakerphone key.
When you hear a dial tone, enter the desired number.
b
Dial the desired number using the dial pad.
Press the Speakerphone key.
To place a call using the headset:
>> Do one of the following steps:
a
With the optional headset connected, dial the desired number using
the dial pad.
Press the Headset key.
b
Press the Headset key.
When you hear a dial tone, enter the desired number.
To place a call using the contact list:
Refer to Placing a Call to a Contact on page 2-14.
Answering Calls
You can answer a call in three basic ways using your Polycom CX700 IP phone:
•
using the handset
•
using the speakerphone
•
using the headset
Call duration on an active call is monitored through a local call timer. This is
visible on the graphic display.
You need to log in to answer incoming calls.
Only four simultaneous calls can be displayed on the graphic display at any time.
Note
3-3
User Guide for the Polycom CX700 IP Phone
Answering Incoming Calls
When the incoming call is for the user currently logged into the Polycom
CX700 IP phone, the caller name and information will be displayed.
To answer an incoming call when you are not already in a call:
>> Do one of the following steps:
a
Pick up the handset.
b
Press the Speakerphone key or the Answer soft key to answer the call
through the speakerphone.
c
Press the Headset key to answer the call through an optionally
connected headset.
To answer an incoming call when you are in another call:
>> Press the Answer soft key to access the new call.
The original call is put on hold.
3-4
Using the Basic Features of Your Phone
Ending Calls
To end a call:
>> Do one of the following steps:
— Press the EndCall soft key.
— Replace the handset.
— Press the Speakerphone key if you are using the speakerphone.
— Press the Headset key if you are using the optional headset.
Redialing Numbers
To redial the last placed call:
1
On the left-hand side of the graphic display, select the Contacts soft key,
.
2
Press the Redial soft key.
To redial any missed call:
>> Refer to Managing Call Lists on page 2-12.
Muting the Microphone
During a call, press the Microphone Mute key. Microphone Mute LED turns
on to indicate that the other party cannot hear you.
Microphone Mute applies to calls using the handset, headset, and
speakerphone. You can still hear all other parties while mute is enabled.
To turn off Microphone Mute, press the Microphone Mute key again.
Adjusting the Call Volume
During a call, if you are using the speakerphone, pressing the Volume key
adjusts the speaker volume.
3-5
User Guide for the Polycom CX700 IP Phone
During a call if you are using the handset, pressing the Volume key adjusts the
handset volume.
During a call, if you are using the headset, pressing the Volume key adjusts
the headset volume.
If you press the Volume key when not in call, the ringer volume is adjusted.
You can also adjust volume by selecting the Settings soft key and the Volume
screen. Refer to Adjusting the Volume on page 2-7.
Placing Calls on Hold
During a call, press the Hold soft key. This will be indicated on the graphic
display by the hold on the graphic display.
Press the Resume soft key again to resume the call.
As using the Hold feature typically generates music or a beeping tone, avoid putting
a conference call on hold.
Note
Hosting Conference Calls
You can initiate a conference call by selecting one or more contacts, by
selecting a contact group, or by selecting a distribution group. You start a
conference call as an initial phone call and then add more contacts. You can
join two calls into one conference through the Merge Calls selection.
3-6
Using the Basic Features of Your Phone
To set up a conference:
1
Call the first party.
You can either dial the phone number directly or search for the number in the
Contact Directory or Call Lists. For more information, refer to Placing Calls on page
3-2, Searching For a Contact on page 2-15, or Managing Call Lists on page 2-12.
Note
2
After the first party answers, press the Conference soft key, then press
the Add Someone soft key.
3
Call the second party.
To end a conference call:
>> Press the EndCall soft key or hang up.
Joining Meetings
You can only join a Communicator online meeting that was created by using the
latest version of Microsoft Lync 2010 Conferencing Add-in. IFor more information,
contact your system administrator.
You can view your meetings and join a meeting directly from your phone.
3-7
User Guide for the Polycom CX700 IP Phone
To view meetings on your phone:
On the left-hand side of the graphic display, press the Calendar soft key,
1
.
To join meetings on your phone:
On the left-hand side of the graphic display, press the Calendar soft key,
1
.
Select the meeting that you want to join, and then press the Join soft key.
2
Transferring Calls
A call can be transferred in two ways:
•
Consultative transfer—The party to whom you want to transfer the call
answers their phone before you transfer the call or hang up. You can
consult with them before completing the transfer.
•
Blind transfer—The call is automatically transferred after you dial the
number of the party to whom you want to transfer the call.
You can also park calls in the ‘parking lot’. Calls in the ‘parking lot’ will be
answered depending on the priority of the call.
The ‘parking lot’ service must be enabled for you tobe able to transfer calls there.
For more information, contact your system administrator.
3-8
Using the Basic Features of Your Phone
To perform a consultative transfer:
1
During a call, press Transfer soft key.
The active call is placed on hold.
2
Press the Consult then Transfer To... soft key.
3
Select the contact to which you want to transfer the call.
4
As soon as the ring-back sound is heard or after the party answers, press
the Complete Transfer soft key to complete the transfer.
You can talk privately to the party to which you are transferring the call
before the transfer is completed.
You can cancel the transfer before the call connects by pressing the Cancel
soft key.
To perform a blind transfer:
1
During a call, press Transfer soft key.
The active call is placed on hold.
2
Press the Transfer Directly To ... soft key.
Refer to the figure above.
3
Select the contact to which you want to transfer the call.
The call is transferred if the party answers, otherwise the call is sent to the
party’s voice mail.
You can cancel the transfer before the call connects by pressing the Cancel
soft key.
3-9
User Guide for the Polycom CX700 IP Phone
Forwarding Calls
You can configure your phone so that all incoming calls are forwarded to
another party (known as static forwarding). You can also forward calls while
the phone is ringing (known as dynamic forwarding).
You may also forward calls to your voice mail. This feature requires that you have
access to Microsoft Exchange 2007.
Note
Static Forwarding
To enable call forwarding:
1
At the top of the graphic display, select the Forwarding icon to the right
of your name.
2
On the Forwarding screen, do one of the following steps:
a
Select Forward to contact or phone number.
If you are forwarding to another contact or phone number, select the
contact name that you want to forward your calls.
b
Select Forward to voicemail or one of my numbers.
Select the number that you want to forward your calls.
c
Select Simultaneously ring any phone number.
Select the number that you want to ring simultaneously.
3
Press the OK soft key.
To disable call forwarding:
3 - 10
1
At the top of the graphic display, select the Forwarding icon to the right
of your name.
2
On the Forwarding screen, select Do not forward incoming calls.
3
Press the OK soft key.
Using the Basic Features of Your Phone
Dynamic Forwarding
To forward an incoming call:
>> With the phone ringing, do one of the following steps:
a
Press the Redirect soft key.
Enter a number to forward the incoming call to.
b
Select To Voice Mail.
Using Voice Mail
Your voice mail is saved in a centralized location and may be accessed from
your phone.
The presence of new voice mail messages is indicated by a Message Waiting
Indicator
on the graphic display. A list of voice mail messages is also
displayed in the Messages list, showing who left the message, their presence
status, and the date and time that the message was recorded.
This feature requires that you have access to a Microsoft Exchange 2007 server.
For more information, contact with your system administrator.
Note
To listen to voice messages:
1
Press the Messages soft key.
2
Press the Call Voice Mail soft key,
.
3 - 11
User Guide for the Polycom CX700 IP Phone
3
Follow voice or visual prompts on the graphic display to retrieve your
messages.
To delete voice messages:
1
Press the Messages soft key.
2
Select the meesage that you want to delete without listening to it, and
then press the Delete Voicemail soft key.
Changing Your Presence Information
Your presence information is constantly being updated by Microsoft Lync
2010 and Microsoft Communications Server “14” based on a variety of factors,
including your Outlook Calendar, whether you're in a call, an Instant
Messaging session, or a conference. However, there may be times when you
want to manually change your presence status. For example, if you've got a
deadline, you may want to change your status to Do Not Disturb to avoid
being interrupted.
To change your presence status information:
1
3 - 12
Click your presence icon in the upper-left hand area of the graphic
display.
Using the Basic Features of Your Phone
2
Choose a presence status from the following table:
Icon
Status Text
Description
Available
The contact is online and can participate
in conversations. This can also be set
manually by the user.
Busy
The contact is available but engaged in
another activity. Those activities
include:
•
In a Call—The contact is in a
phone, voice, or video
conversation.
•
In a Conference—The contact is in
a multiparty conversation using
phone, voice, video, or application
sharing.
•
In a Meeting—The Microsoft Office
Outlook calendar shows that the
contact has a scheduled meeting.
This can also be set manually by the
user.
Do Not Disturb
The contact is available but does not
want to be interrupted. This status is
displayed for the following reasons:
•
Appear Away
The contact has manually set their
presence status to Do Not Disturb.
The contact is probably not available.
This status is displayed for the following
reasons:
•
The contact's computer has been
idle for more than the idle time
period setting—15 minutes by
default.
•
The contact's Microsoft Office
Outlook calendar or Out of Office
Assistant indicates that the user is
out of the office.
•
The contact is temporarily
unavailable. As soon as activity is
detected on the contact's computer,
Microsoft Lync 2010 automatically
resets the presence status to the
appropriate state.
This can also be set manually by the
user.
3 - 13
User Guide for the Polycom CX700 IP Phone
Icon
Status Text
Description
Be Right Back
This contact is engaged in another
activity and will return shortly.
This can also be set manually by the
user.
Reset Status
3
Press the Reset Status soft key to reset
to the default, which is based on your
Microsoft Lync 2010 status.
Press the appropriate soft key.
.Press the Cancel soft key to exit the Change Presence screen without
making changes.
Restarting Your Phone
On rare occasions, you may need to restart your phone to address problems or
to force the sign out of a user who is not present to unlock the phone.
To restart the phone:
>> Insert a small tool, like a paper clip, into the small reset hole between the
headset jack and the USB port on the back of the phone.
The phone will restart, prompt the user to recalibrate the screen, and then
present either the Sign In screen or the Connect to Computer screen.
Restarting the phone will sign out any previously signed-in user and will wipe out
call logs and other data associated with that user.
Note
3 - 14
4
Troubleshooting Your Phone
This chapter presents problems, likely causes, and corrective actions.
Problems are grouped as follows:
•
Power and Startup
•
Controls
•
Access to Screens and Systems
•
Making and Receiving Calls
•
Displays
•
Audio
•
Microsoft Lync 2010
If you still need assistance, contact your system administrator.
You can reset your Polycom CX700 IP phone to factory defaults by using small pin
on back of device, between the headset and USB interfaces.
Note
Your system administrator may require information about your phone. Press
the Settings soft key, then select About. Information about your phone
appears, including the firmware version, MAC address, IP address, Subnet
mask, gateway address, DNS server address, VLAN ID, part number, and
serial number.
To assist your system administrator in the investigation of some problems,
you may be asked to upload your phone’s activity logs to the call server. Press
the Settings soft key, then select Logging and the Send Logs soft key. You may
be asked to change the log level.
4-1
User Guide for the Polycom CX700 IP Phone
Power and Startup
Symptom
Problem
Corrective Action
There are power issues.
The Polycom CX700 IP phone
has no power.
Do one of the following steps:
The Polycom CX 700 IP phone
appears to be fine, but there is
no interaction between the
handset and the Microsoft Lync
2010 client.
4-2
There may be problems with the
Microsoft Lync 2010 Server
software.
•
Verify that no lights appear on the unit
when it is powered up.
•
If using PoE, verify that PoE is present
on that port. Ask your system
administrator to check the appropriate
LED or readout or port at the hub.
•
If using PoE, verify that the network
cable is plugged into the correct port
on the Polycom CX700 IP phone.
•
If using AC power, check if the phone
is properly plugged into a functional
AC outlet.
•
If using AC power, make sure that the
phone isn't plugged into a plug
controlled by a light switch that is off.
•
If plugged into a power strip, try
plugging directly into a wall outlet
instead.
•
If using AC power, try the phone in
another room where the electricity is
known to be working on a particular
outlet.
Contact your system administrator to
ensure your account is configured
properly and that the Microsoft Lync 2010
Server software is properly installed and
configured.
Troubleshooting Your Phone
Controls
Symptom
Problem
Corrective Action
The dial pad does not work.
The dial pad on the
Polycom CX700 IP phone does
not respond.
Do one of the following steps:
•
Check for a response from other
feature keys or from the dial pad.
•
Place a call to the phone from a known
working telephone. Check for display
updates.
•
Check the termination at the switch or
hub end of the network LAN cable.
Ensure that the switch/hub port
connected to the telephone is
operational (if not accessible, contact
your system administrator).
•
Before restarting your phone, contact
your system administrator, since this
may allow more detailed
troubleshooting to occur before losing
any current status information.
4-3
User Guide for the Polycom CX700 IP Phone
Access to Screens and Systems
Symptom
Problem
Corrective Action
There is no response from key
presses.
The Polycom CX700 IP phone is
not in active state.
Do one of the following steps:
The display shows “Cannot
contact the server...” or “Cannot
acquire IP address”.
I cannot sign-in to the Polycom
CX700 IP phone. I see the
“Cannot connect to server or
server name is incorrect" error.
I cannot sign-in to the Polycom
CX700 IP phone. I see the
"Cannot validate server
certificate" error.
4-4
The LAN cable is not properly
connected.
The Polycom CX700 IP phone is
not recognized by the server.
The Polycom CX700 IP phone is
not recognized by the server’s
certificate.
•
Press the keys more slowly.
•
Check with the system administrator
to see whether or not the key has
been mapped to a different function or
disabled.
•
Make a call to the phone to check for
inbound call display and ringing as
normal. If successful, try to press
feature keys within the call to access
the Menu, for example.
•
Reboot the phone to attempt
re-registration to the call server (refer
to Updating Configuration on page
4-17).
Do one of the following steps:
•
Check termination at the switch or hub
(furthest end of the cable from the
phone).
•
Check that the switch or hub is
operational (flashing link/status lights)
or contact your system administrator.
•
Reboot the phone to attempt
re-registration to the call server (refer
to Updating Configuration on page
4-17).
Do one of the following steps:
•
Validate your domain name is correct.
•
Ensure DHCP is configured to provide
DNS address as part of DHCP
response.
•
Ensure DNS has SRV records for SIP
service.
•
Ensure SIP server is reachable from
the Polycom CX700 LAN.
Do one of the following steps:
•
Ensure either time.windows.com is
accessible or NTP is configured with
appropriate SRV records created in
DNS.
•
Ensure PKI enrollment objects have
been created on AD to point to CA or
CA delegate.
Troubleshooting Your Phone
Symptom
Problem
Corrective Action
I cannot sign-in to the Polycom
CX700 IP phone. I see the "User
name or password is invalid"
error.
The Polycom CX700 IP phone is
not recognized.
Do one of the following steps:
I cannot sign-in to the Polycom
CX700 IP phone. I continue to
see the "Device does not have a
valid IP address" error.
I am trying to log in first time on
Polycom CX700 IP phone and I
do not see PIN option.
The Polycom CX700 IP phone is
not connected to the network.
Make sure you user name and
password is correct.
•
If you change your password on the
phone before the server attempts to
reauthenticate, the phone will not be
able to sign in to the server and will be
left on the Sign In screen. Enter your
old password in the Password field
and press Sign in.
•
If your domain password has changed
and the server attempts to
reauthenticate, the phone will return to
the Sign In screen. Enter your new
password in the Password field and
press Sign in.
•
Make sure time on your phone is
correct if Kerberos is enabled in your
system.
•
Make sure WINS server is enabled if
Kerberos authentication is being used
on the server.
Do one of the following steps:
•
Check your phone is properly
connected to switch or router.
•
Make sure switch outlet has proper
connectivity to your network.
•
Make sure DHCP is enabled in your
system.
I mistyped my PIN during first
configuration.
Double tap on the edit text box for pin and
start typing new digits.
The Microsoft Communicator
“14” is not configured correctly.
Ensure PIN is enabled on Microsoft Lync
2010 (pool level->FrontEnd
Properties->VoIP tab).
I am trying to configure my
fingerprint, but the Polycom
CX700 IP phone does not seems
to recognize it.
I press the Help button or the
Setting button and get no
response.
•
Click "Use Pin Configuration" on menu bar
and click "Use Fingerprint Configuration"
on menu bar. Swipe your fingerprint again.
You are not logged in on your
Polycom CX700 IP phone.
Sign into Microsoft Lync 2010.
4-5
User Guide for the Polycom CX700 IP Phone
Making and Receiving Calls
Symptom
Problem
Corrective Action
There is no dial tone.
Power is not correctly applied to
the Polycom CX700 IP phone.
Do one of the following steps:
Dial tone is not present on one of
audio paths.
4-6
•
Check that the display is illuminated.
•
Make sure the LAN cable is inserted
properly at the rear of the phone (try
unplugging and re-inserting the
cable).
•
If using in-line powering, have your
system administrator check that the
switch is supplying power to the
phone.
Do one of the following steps:
•
Switch between handset, headset (if
present) or speakerphone to see if dial
tone is present on other paths.
•
If dial tone exists on another path,
connect a different handset or
headset to isolate the problem.
•
Verify that the phone is logged in and
registered with Microsoft Lync 2010
Server.
Troubleshooting Your Phone
Symptom
Problem
Corrective Action
The phone does not ring.
Ring setting or volume is low.
Do one of the following steps:
Outbound or inbound calling is
unsuccessful.
You turned off the ringer.
•
Adjust the ringing level from the front
panel using the volume up/down keys.
•
Check same status of handset,
headset (if connected) and through
the Speakerphone.
•
Verify that the phone is logged in and
registered with Microsoft Lync 2010
Server.
Do one of the following steps:
•
Place a call to the phone under
investigation. Check that the display
indicates incoming call information.
•
Lift the handset. Ensure dial tone is
present and place a call to another
extension or number. Check that the
display changes in response.
•
Verify that the phone is logged in and
registered with Microsoft Lync 2010
Server.
•
You may not have your dial plan set
correctly or you may not have
authorization to dial out. Contact your
system administrator.
Do one of the following steps:
•
I entered digits but I do not see
them on the display.
When there is an incoming call, lift the
handset, press Speakerphone key or
press Headset key and you will get a
dial tone.
Do one of the following steps:
•
If you are not in either call view or
contacts view, make sure you go back
to call view or contacts view.
•
Touch screen input once to make sure
text box is in focus.
4-7
User Guide for the Polycom CX700 IP Phone
Displays
Symptom
Problem
Corrective Action
There is no display.
Power is not correctly applied to
the Polycom CX700 IP phone.
Do one of the following steps:
The display is incorrect.
The display has bad contrast.
The contrast needs adjustment.
Outbound or inbound calling is
unsuccessful.
The display is flickering.
4-8
Certain types of older fluorescent
lighting may cause the display to
appear to flicker.
•
Check that the display is illuminated.
•
Make sure the LAN cable is inserted
properly at the side of the phone (try
unplugging and re-inserting the
cable).
•
If using PoE, have your system
administrator check that the switch is
supplying power to the phone.
Do one of the following steps:
•
Refer to Adjusting Display Brightness
on page 2-7.
•
Reboot the phone to obtain a default
level of contrast (refer to Updating
Configuration on page 4-17).
Do one of the following steps:
•
Place a call to the phone under
investigation. Check that the display
indicates incoming call information.
•
Lift the handset. Ensure dial tone is
present and place a call to another
extension or number. Check that the
display changes in response.
Do one of the following steps:
•
Move the Polycom CX700 IP phone
away from the lights.
•
Replace the lights.
Troubleshooting Your Phone
Audio
Symptom
Problem
Corrective Action
There is no audio on the
Polycom CX700 handset
earpiece.
Your Microsoft Lync 2010 Server
account may not be configured
correctly.
Contact your system administrator to
ensure your account is configured in
Enterprise Voice mode.
There is no audio on the
headset.
The headset is not properly
connected or turned on. Volume
may be set too low.
Ensure that the headset is properly
connected. Ensure that the headset
amplifier (if required for your headset) is
turned on and/or the volume is correctly
adjusted). Verify that the phone is logged
in and registered with Microsoft Lync 2010
Server.
Microsoft Lync 2010
Symptom
Problem
Corrective Action
The Microsoft Lync 2010 client is
not working properly.
There may be problems with the
Microsoft Lync 2010 client
software or with Microsoft Lync
2010.
Contact your system administrator to
ensure your account is configured
properly and that your Microsoft Lync
2010 client software and the Microsoft
Lync 2010 software are properly installed
and configured.
4-9
User Guide for the Polycom CX700 IP Phone
4 - 10
Safety Notices
Service Agreements
Please contact your Polycom Authorized Reseller for information about service agreements applicable to your
product.
Governing Law
This Limited Warranty and Limitation of Liability shall be governed by the laws of the State of California, U.S.A., and
by the laws of the United States, excluding their conflicts of laws principles. The United Nations Convention on
Contracts for the International Sale of Goods is hereby excluded in its entirety from application to this Limited
Warranty and Limitation of Liability.
All rights reserved under International and Pan-American Copyright Conventions. No part of the contents of this
manual may be copied, reproduced, or transmitted in any form or by any means, or translated into another language
or format, in whole or part, without written consent from Polycom, Inc. Do not remove (or allow anybody else to
remove) any product identification, copyright or other notices.
Limitations of Liability
LIMITATION OF LIABILITY. TO THE FULL EXTENT ALLOWED BY LAW, POLYCOM EXCLUDES FOR ITSELF
AND ITS SUPPLIERS ANY LIABILITY, WHETHER BASED IN CONTRACT OR TORT (INCLUDING
NEGLIGENCE), FOR INCIDENTAL, CONSEQUENTIAL, INDIRECT, SPECIAL, OR PUNITIVE DAMAGES OF
ANY KIND, OR FOR LOSS OF REVENUE OR PROFITS, LOSS OF BUSINESS, LOSS OF INFORMATION OR
DATA, OR OTHER FINANCIAL LOSS ARISING OUT OF OR IN CONNECTION WITH THE SALE,
INSTALLATION, MAINTENANCE, USE, PERFORMANCE, FAILURE, OR INTERRUPTION OF ITS PRODUCTS,
EVEN IF POLYCOM OR ITS AUTHORIZED RESELLER HAS BEEN ADVISED OF THE POSSIBILITY OF SUCH
DAMAGES, AND LIMITS ITS LIABILITY TO REPAIR, REPLACEMENT, OR REFUND OF THE PURCHASE
PRICE PAID, AT POLYCOM’S OPTION. THIS DISCLAIMER OF LIABILITY FOR DAMAGES WILL NOT BE
AFFECTED IF ANY REMEDY PROVIDED HEREIN SHALL FAIL OF ITS ESSENTIAL PURPOSE.
Safety Notices - 1
User Guide for the Polycom CX700 IP Phone
Polycom Limited Warranty and Limitation Liability
LIMITED WARRANTY. Polycom warrants to the end user (“Customer”) that this product is expected to be free from
defects in workmanship and materials, under normal use and service, for one year from the date of purchase from
Polycom or its authorized reseller.
Polycom’s sole obligation under this express warranty is at Polycom’s option and expense, to repair the defective
product or part, deliver to Customer an equivalent product or part to replace the defective item, or if neither of the
two foregoing options are reasonably available, Polycom may, on its sole discretion, refund to Customer the
purchase price paid for the defective product. All products that are replaced will become the property of Polycom.
Replacement products or parts may be new or reconditioned.
Polycom is expected to warrant any replaced or repaired product or part for ninety (90) days from shipment, or the
remainder of the initial warranty period, whichever is longer. Products returned to Polycom must be sent prepaid
and packaged appropriately for safe shipment, and it is recommended that they be insured or sent by a method that
provides for tracking of the package. Responsibility for loss or damage does not transfer to Polycom until the
returned item is received by Polycom. The repaired or replaced item will be shipped to Customer, at Polycom’s
expense, not later than thirty (30) days after Polycom receives the defective product, and Polycom will retain risk of
loss or damage until the item is delivered to Customer.
The product software comes with 90-day software warranty, providing for software updates (minor releases/bug
fixes). To continue to receive support, purchasing a maintenance contract is the most economical solution.
Exclusions
Polycom will not be liable under this limited warranty if its testing and examination disclose that the alleged defect or
malfunction in the product does not exist or results from:
• Failure to follow Polycom’s installation, operation, or maintenance instructions.
• Unauthorized product modification or alteration.
• Unauthorized use of common carrier communication services accessed through the product.
• Abuse, misuse, negligent acts or omissions of Customer and persons under Customer’s control; or
• Acts of third parties, acts of God, accident, fire, lightening, power surges or outages, or other hazards.
Warranty Exclusive
IF A POLYCOM PRODUCT DOES NOT OPERATE AS WARRANTED ABOVE, CUSTOMER’S SOLE REMEDY
FOR BREACH OF THAT WARRANTY SHALL BE REPAIR, REPLACEMENT, OR REFUND OF THE PURCHASE
PRICE PAID, AT POLYCOM’S OPTION. TO THE FULL EXTENT ALLOWED BY LAW, THE FOREGOING
WARRANTIES AND REMEDIES ARE EXCLUSIVE AND ARE IN LIEU OF ALL OTHER WARRANTIES, TERMS,
OR CONDITIONS, EXPRESS OR IMPLIED, EITHER IN FACT OR BY OPERATION OF LAW, STATUTORY OR
OTHERWISE, INCLUDING WARRANTIES, TERMS, OR CONDITIONS OF MERCHANTABILITY, FITNESS FOR
A PARTICULAR PURPOSE, SATISFACTORY QUALITY, CORRESPONDENCE WITH DESCRIPTION, AND
NON-INFRINGEMENT, ALL OF WHICH ARE EXPRESSLY DISCLAIMED. POLYCOM NEITHER ASSUMES NOR
AUTHORIZES ANY OTHER PERSON TO ASSUME FOR IT ANY OTHER LIABILITY IN CONNECTION WITH THE
SALE, INSTALLATION, MAINTENANCE OR USE OF ITS PRODUCTS.
Safety Notices - 2
Safety Notices
Safety and Compliance
Usage and Cleaning
•
Use in accordance with these instructions.
•
Do not use near any heat sources.
•
Only use attachments/accessories specified by Polycom.
•
Clean only with dry cloth.
Operating Environment
This device is rated as a commercial product for operation at +41ºF (+5ºC) to +95ºF(+35ºC).
WARNING Electrical Safety
Failure to properly set up, use, and care for the Polycom CX700 can increase the risk of damage to the Polycom
CX700, or possible serious injury. To ensure personal safety, this product must be used with NRTL Listed (UL, CSA,
ETL, etc.), and/or CE marked Information Technology equipment.
Warning: This equipment may become inoperable if electrical power fails or broadband internet access is
interrupted.
Any changes or modifications not expressly approved by Polycom could void the user's authority to operate this
device.
No serviceable parts included.
The product is intended to be supplied by a Listed Power Unit, marked with “LPS” on unit, and output rated 12V/1A,
if power unit is not supplied.
Disposal of Waste Electrical & Electronic Equipment in the European Union and Other
Countries with Separate Collection Systems
This symbol on the product or its packaging means that this product must not be disposed of
with your household waste. Instead, it is your responsibility to hand this over to an applicable
collection point for the recycling of electrical and electronic equipment. This separate collection
and recycling will help to conserve natural resources and prevent potential negative
consequences for human health and the environment due to the possible presence of
hazardous substances in electrical and electronic equipment, which could be caused by
inappropriate disposal. For more information about where to drop off your electrical and
electronic waste, please contact your local city or municipality office, your household waste disposal service, or the
shop where you purchased this product. Refer to http://ec.europa.eu/environment/waste/weee/index_en.htm for
additional information on WEEE.
FCC Part 15 Class B
This product was tested and complies with the limits for a Class B digital device under Part 15 of the U.S. Federal
Communications Commission (FCC) rules, and is subject to these conditions: It may not cause harmful interference
Canada ICES-003
and must accept any interference received, including any that causes undesired operation.
This Class B digital apparatus complies with Canadian ICES-003.
Cet appareil numérique de la classe B est conforme à la norme NMB-003 du Canada.
Not intended for use in machinery, medical or industrial applications.
CE
This Polycom CX700 has been marked with the CE mark. This mark indicates compliance with EEC Directives
2004/108/EEC and 2006/95/EEC. A full copy of the Declaration of Conformity can be obtained from Polycom Ltd,
270 Bath Road, Slough, Berkshire, SL1 4DX, UK.
Safety Notices - 3
User Guide for the Polycom CX700 IP Phone
Safety Notices - 4