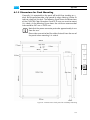
1
CLIPSTER Color Correction Panel LX User Guide (Version 1.0)
Accessory
CLIPSTER
Color Correction Panel LX
User Guide
CLIPSTER Color Correction
Panel LX User Guide
Introduction
1
Overview
2
Installation and Configuration
3
Operation
4
Appendix
A
Index
I
User Guide Version 1.0 for CLIPSTER Color Correction Panel LX Version 3.3
Copyright © 2006-2007 by DVS Digital Video Systems GmbH, Hanover. All rights reserved.
The manuals as well as the soft- and/or hardware described here and all their constituent parts are
protected by copyright. Without the express permission of DVS Digital Video Systems GmbH any
form of use which goes beyond the narrow bounds prescribed by copyright legislation is prohibited
and liable to prosecution.
This particularly applies to duplication, copying, translation, processing, evaluation, publishing, and
storing and/or processing in an electronic system.
Specifications and data may change without notice. We offer no guarantee that this documentation
is correct and/or complete. In no event shall DVS Digital Video Systems GmbH be liable for any
damages whatsoever (including without limitation any special, indirect, or consequential damages,
and damages resulting from loss of use, data, or profits, or business interruption) arising out of the
use of or inability to use the hardware, software and/or manual materials.
Those parts of this documentation that describe optional software or hardware features usually
contain a corresponding note. Anyway, a lack of this note does not mean any commitment from
DVS Digital Video Systems GmbH.
CLIPSTER is a registered trademark of DVS Digital Video Systems GmbH.
Any other product names mentioned in this documentation may be trademarks or registered trademarks of their respective owners and as such are subject to the usual statutory provisions.
Headquarters:
DVS Digital Video Systems GmbH
Krepenstr. 8
30165 Hannover
GERMANY
Phone:
+49-511-67807-0
Fax:
+49-511-630070
E-mail:
[email protected]
Internet:
http://www.dvs.de
Support:
Phone:
+49-511-67807-25
Fax:
+49-511-67807-31
E-mail:
[email protected]
For the Americas:
U.S. Headquarters:
DVS Digital Video, Inc.
300 East Magnolia Boulevard, Suite 102
Burbank, CA 91502
USA
Phone:
+1-818-846-3600
Fax:
+1-818-846-3648
E-mail:
[email protected]
Internet:
http://www.dvsus.com
Support:
E-mail:
[email protected]
Contents
1
Introduction ............................................................................... 1-1
1.1
1.2
1.3
1.4
1.5
1.6
2
C
Overview ............................................................................. 1-2
Target Group ........................................................................ 1-3
Conventions Used in this User Guide .................................... 1-3
Safety Instructions ................................................................ 1-4
Important Notes ................................................................... 1-5
Scope of Delivery ................................................................. 1-6
Overview .................................................................................... 2-1
2.1 Top Side ............................................................................... 2-2
2.2 Rear Side .............................................................................. 2-4
2.3 The Group ’ControlPanel’ (Configuration Tool) .................... 2-6
3
Installation and Configuration .............................................. 3-1
3.1 Hardware Installation and Setup ........................................... 3-2
3.1.1 How to Connect to CLIPSTER Directly ........................... 3-2
3.1.2 How to Connect to CLIPSTER via a Hub ........................ 3-3
3.2 Configuration in a DHCP Network ....................................... 3-5
3.3 Manual Configuration of the Networking ............................. 3-8
3.3.1 Setting Up the Ethernet Port of CLIPSTER ...................... 3-8
3.3.2 Activation of the Panel in the Software ........................ 3-10
i
CLIPSTER Color Correction Panel LX User Guide
4
Operation ................................................................................... 4-1
4.1 Basic Operations ................................................................... 4-2
4.1.1 Starting or Shutting Down the Panel .............................. 4-2
4.1.2 The Autoconnect Feature ............................................. 4-3
4.1.3 How to Connect to the Panel Manually ......................... 4-4
4.1.4 How to Disconnect the Panel Manually .......................... 4-4
4.2 Working with the Color Correction Panel LX ........................ 4-6
4.3 The Effects Keys ................................................................... 4-7
4.3.1 Effects Key 1 ............................................................... 4-7
4.3.2 Effects Key 2 ............................................................... 4-8
4.3.3 Effects Key 3 ............................................................... 4-8
4.3.4 Effects Key 4 ............................................................... 4-9
4.3.5 Effects Key 5 ............................................................. 4-10
4.3.6 Effects Key 6 ............................................................. 4-10
4.3.7 Effects Keys 7 to 9 ..................................................... 4-11
4.4 Resetting Values ................................................................. 4-12
A
Appendix ....................................................................................A-1
A.1 Technical Data ......................................................................A-2
A.1.1 General Technical Data ................................................A-2
A.1.2 Dimensions for Desk Mounting .....................................A-3
A.2 Troubleshooting and Self-Test ...............................................A-4
I
ii
Index ............................................................................................. I-1
Introduction
1
This documentation describes the installation and usage of the CLIPSTER Color Correction Panel LX. The CLIPSTER Color Correction
Panel LX is the DVS deluxe version of a tactile colorist control panel especially designed for a handy and efficient color correction when using
the CLIPSTER video system manufactured by DVS.
CLIPSTER together with its software and all accessories is a powerful
high-definition video workstation with enormous flexibility, especially
designed to meet the demands of modern post production houses.
With its multiple trackballs and control rings the CLIPSTER Color Correction Panel LX offers color correction operators of CLIPSTER a very
user-friendly environment. The additional and intuitive control of various effects of CLIPSTER as well as of its user interface via the Color Correction Panel LX supplement the usage of the panel.
The CLIPSTER Color Correction Panel LX is available as an accessory
and optional feature for CLIPSTER.
Other control panels that supplement the features of the Color Correction Panel LX are available as well in the deluxe panel range. Among
them you can find, for example, the CLIPSTER Transport Control Panel,
which provides besides other useful features transport and jog/shuttle
functionality for an even better and faster control of the CLIPSTER software. For further information about these panels please contact your
vendor.
1-1
1
2
3
4
A
I
CLIPSTER Color Correction Panel LX User Guide
1.1 Overview
This guide informs you about the installation and usage of the CLIPSTER Color Correction Panel LX.
The chapters in this user guide contain the following information:
1-2
Chapter 1
Begins with a short introduction to the CLIPSTER Color Correction Panel LX, followed by a
note regarding the audience this manual is
written for and an explanation of the conventions used in this manual. Furthermore, it provides safety instructions that you must adhere
to, some important notes that you have to read
and the scope of delivery.
Chapter 2
This chapter provides a top and a rear overview
of the Color Correction Panel LX detailing the
operation items and connection interfaces. Furthermore, it includes descriptions of the individual settings items of the CLIPSTER
Configuration Tool to configure and set up the
Color Correction Panel LX.
Chapter 3
Describes the installation and setup procedure
of the CLIPSTER Color Correction Panel LX.
Chapter 4
Details the operation of the CLIPSTER Color
Correction Panel LX and provides information
about how to use it together with the CLIPSTER video system and its software.
Appendix
Provides technical details and general information about the CLIPSTER Color Correction
Panel LX.
Index
This chapter facilitates the search for specific
terms.
Introduction
1.2 Target Group
To use this guide and the CLIPSTER Color Correction Panel LX you
should be familiar with the CLIPSTER video system and its software, especially with the CLIPSTER Edit Tool and the Configuration Tool. For
this please refer to the other user guides delivered with CLIPSTER.
Additionally, to use the Color Correction Panel LX to its full potential
you should have experience as a colorist, i.e. in the field of color correction in general.
Furthermore, to set up the CLIPSTER Color Correction Panel LX properly some basic knowledge in network administration and installation
would be helpful.
1.3 Conventions Used in this User Guide
1
The following typographical conventions will be used in this documentation:
y Texts preceded by this symbol describe activities that you must perform in the order indicated.
– Texts preceded by this symbol are parts of a list.
Texts preceded by this symbol are general notes intended to facilitate work and help avoid errors.
You must pay particular attention to text that follows this
symbol to avoid errors.
Group/Menu
Menu » Option
Item
Entry
[Key]
3
4
A
I
“ ” Texts enclosed by quotation marks are references to other manuals, guides, chapters, or sections.
BUTTON
2
Text in small caps and bold indicates push buttons
Text in italic and bold indicates either a group
name, menu name or options in a menu list
In the specified group or menu select the stated
item
Text in bold only stands for other labeled items
of a user interface
Parameters, selections or entries to be made either in a software program or at the panel
A key on the Color Correction Panel LX
1-3
CLIPSTER Color Correction Panel LX User Guide
1.4 Safety Instructions
To use the CLIPSTER Color Correction Panel LX correctly please heed
the following:
Please read the following safety instructions very carefully before attempting any installation and/or performing any work
on CLIPSTER or the CLIPSTER Color Correction Panel LX.
If the CLIPSTER Color Correction Panel LX is not used in compliance with the safety instructions, the warranty and all resulting liability claims will be void.
General
The CLIPSTER Color Correction Panel LX has been built according to
the applying safety regulations. To minimize the possibility of a faulty
operation of the device all manuals and guides must be available at all
times at the operation site. Before installing and/or using the CLIPSTER
Color Correction Panel LX the manuals and guides delivered with the
CLIPSTER Color Correction Panel LX must be read and observed.
– Use the CLIPSTER Color Correction Panel LX only in apparent good
technical order.
– Use the CLIPSTER Color Correction Panel LX only in compliance
with the technical data laid out in section “Technical Data” on
page A-2.
– The external power supply must be earthed using an appropriate
mains cord.
– Unplug the panel when it is not going to be used for long periods of
time.
– If fluids or solid objects get inside the casing, the CLIPSTER Color
Correction Panel LX must be disconnected from the power supply
immediately. Before using the CLIPSTER Color Correction Panel LX
again, it has to be checked by authorized service personnel.
– Only use a damp tissue without any cleaning agents to clean the
casing.
– The CLIPSTER Color Correction Panel LX may not be misused,
abused, physically damaged, neglected, exposed to fire, water or
excessive changes in the climate or temperature, or operated outside maximum rating.
– Do not perform any changes or extensions to the CLIPSTER Color
Correction Panel LX whatsoever.
Transportation
Please observe in case of transportation:
– Handle the CLIPSTER Color Correction Panel LX with great care.
1-4
Introduction
– Always use the original packing or a similar structured packing for
transportation.
– Avoid shocks or vibrations during transport.
– Keep CLIPSTER Color Correction Panel LX as a transportation good
dry.
Environmental Conditions
For error-free working and a long service life, the CLIPSTER Color Correction Panel LX needs some basic environmental conditions:
– Do not expose the CLIPSTER Color Correction Panel LX to sources
of heat, such as direct sunlight or a radiator.
– Avoid areas with high humidity or dust. Best operating conditions
are given in an air-conditioned site.
– Do not expose the CLIPSTER Color Correction Panel LX to strong
electric or magnetic fields.
– Avoid areas where the CLIPSTER Color Correction Panel LX will be
subject to vibrations or shocks.
– The panel can be fitted into a hole in a desk. However, then you
have to take care that the cables exiting from the rear of the panel
are not bent, squeezed or twisted in any way. Further information
about the desktop mounting can be found in section “Technical
Data” on page A-2.
1
2
3
4
1.5 Important Notes
A
The following provides information about the warranty of the CLIPSTER Color Correction Panel LX.
Warranty Information
This product is warranted to be free of defects in materials and workmanship for a period of one year from the date of purchase. DVS extends this Limited Warranty to the original purchaser.
You have to keep the original packing and use it in case of
transportation. Otherwise this warranty will be void.
In the event of a defect or failure to confirm to this Limited Warranty,
DVS will repair or replace the product without charge. In order to make
a claim under this Limited Warranty, the purchaser must notify DVS or
their representative in writing of the product failure. In this Limited
Warranty the customer must upon DVS’ request return the product to
the place of purchase or send the defective device to a given address
for the necessary repairs to be performed. In the warranty period the
customer must keep the original packing and pack the DVS product in
1-5
I
CLIPSTER Color Correction Panel LX User Guide
it in case of a product return. If the customer is not satisfied with the
repair, DVS will have the option to either attempt a further repair, exchange the product or refund the purchase price.
This warranty does not cover:
– Products not developed by DVS Digital Video Systems GmbH.
– Products not used in compliance with the safety instructions
detailed in section “Safety Instructions” on page 1-4
– Products on which warranty stickers or product serial numbers have
been removed, altered or rendered illegible.
– The costs of installations, removals, transportations, or reinstallations.
– Costs for transportation damages.
– Damages caused to any other item.
– Any special, indirect, or consequential damages, and damages
resulting from loss of use, data, or profits, or business interruption.
1.6 Scope of Delivery
The following lists the items that come with the CLIPSTER Color Correction Panel LX:
CLIPSTER Color Correction Panel LX
–
–
–
–
1 × Color Correction Panel LX
1 × external power supply
2 × network connection cables (one standard, one crossover)
1 × “CLIPSTER Color Correction Panel LX” user guide
A mains cord to connect the external power supply to your
mains supply may not be included in the delivery of the CLIPSTER Color Correction Panel LX. Then you have to use one of
your own cables. However, only use the external power supply
included in the delivery. Failure to do this will void your warranty and may be dangerous.
If any of the above mentioned items are missing or damaged,
contact your vendor immediately.
1-6
Overview
2
This chapter provides a detailed overview of the CLIPSTER Color Correction Panel LX. The panel will be shown in a top and a rear view and
all its operation items and interfaces will be listed.
Furthermore, this chapter includes a description of the individual settings items available in the group ControlPanel of the CLIPSTER Configuration Tool. They have to be used to configure and set up the
CLIPSTER Color Correction Panel LX.
1
2
3
4
A
I
2-1
CLIPSTER Color Correction Panel LX User Guide
2.1 Top Side
The following provides a detailed overview of the top side of the CLIPSTER Color Correction Panel LX:
1
2
3a
F1
F2
F3
F7
F8
F9
4a
3b
F4
F5
F6
4b
5a
5b
3c 4c
5c
Figure 2-1: Top view of the CLIPSTER Color Correction Panel LX
2-2
Overview
No.
Item
Description
1
Display
The display shows you the current state of
the panel. When working with the Color
Correction Panel LX, it provides information about your adjustments to various settings.
2
Knobs
The three knobs are used to make adjustments to certain effects or settings. Each
provides to its right a reset button that will
reset the respective value back to its default value.
3a, b, c Effects keys
4a, b, c Reset keys
5a, b, c Trackballs and
rings
With the effects keys you can access the
different effects provided by the Color Correction Panel LX, such as color correction,
zoom and pan, or cropping. They are consecutively labeled from ’F1’ to ’F9’.
With the reset keys you can reset the values changed with the trackball and ring below them. On some effects keys they can
provide another functionality than the resetting of values. To refer to them individually they are numbered in this user guide
from left to right (1, 2 and 3), e.g. reset key
trackball ( ) 1, reset key ring ( ) 1, reset
key trackball ( ) 2, etc.
The trackballs and their encircling rings allow you to make adjustments to parameters of certain effects. To refer to them
individually they are numbered in this user
guide from left to right (1, 2 and 3), e.g.
trackball 1, ring 1, trackball 2, etc.
More detailed information about the different functions of the
operation items and how to use them can be found in chapter
“Operation” on page 4-1.
2-3
1
2
3
4
A
I
CLIPSTER Color Correction Panel LX User Guide
2.2 Rear Side
The following provides a detailed overview of the rear of the CLIPSTER
Color Correction Panel LX:
LNK
System
ACT
Power
5V DC 4A
Ethernet
CP200
WARNING
Use only approved
power supply
Figure 2-2: Rear view of the CLIPSTER Color Correction Panel LX
Item
Description
System
The system LED will flash red about once a second if
the Color Correction Panel LX is running properly.
Power
The power LED will be on and green if power is connected to the panel.
5V DC 4A
This is the power supply input for the Color Correction
Panel LX.
Only use the external power supply delivered
with the CLIPSTER Color Correction
Panel LX.
Ethernet
2-4
The ethernet connector provides a standard network
connection (RJ45 connector using standard Cat 5 wiring). If you are using a hub/switch to connect to the
video system, you can use a straight-through patch
cable (pin-to-pin). In case you are connecting the panel directly to the video system, you have to use a crossover network cable.
Overview
Item
Description
The two LEDs at the top of the ethernet connector indicate the following:
LNK
Will be on and green if a valid ethernet connection is established.
ACT
Will flash orange when ethernet packets are
received by the panel.
1
2
3
4
A
I
2-5
CLIPSTER Color Correction Panel LX User Guide
2.3 The Group ’ControlPanel’ (Configuration Tool)
To connect the CLIPSTER Color Correction Panel LX to the CLIPSTER
workstation and successfully configure it, the CLIPSTER Configuration
Tool provides a settings group solely for this purpose. Once the Configuration Tool is started with the group ControlPanel activated on the
tab Defaults, the settings pane displays at its top a combo box where
you can select the connected type of panel.
With the entry ControlPanelLX selected from this combo box you
will see something like the following on the screen:
Figure 2-3: The settings items of the group ’ControlPanel’
Further information about the CLIPSTER Configuration Tool,
the various groups as well as about the group ControlPanel in
general can be found in the “CLIPSTER Configurations” user
guide.
The settings pane of this group with the entry ControlPanelLX selected from the topmost combo box provides several areas where you
can configure the CLIPSTER Color Correction Panel LX. They are explained in the following.
2-6
Overview
The Area ’Network’
With the area Network you configure the network settings of the CLIPSTER Color Correction Panel LX as well as of the other panels available
in the LX control panel range. The settings are used to connect the panels to the CLIPSTER video system:
The control panels in the panel range of the CLIPSTER Color
Correction Panel LX are optional available features of CLIPSTER that need a license to run with your video system. If they
are not licensed, the respective settings items mentioned below
to configure the individual panels may be hidden on your system.
Transport
Trackball
Poti Panel
PING
Same as Trackball but instead these items determine the network configuration of the CLIPSTER Transport Control Panel.
With this check box as well as the entry fields IP
Address and Panel ID to its right you enable
and set up the CLIPSTER Color Correction
Panel LX.
When the check box DHCP is enabled, the IP
address will be determined automatically by the
DHCP server in your network. Then the entry
field IP Address will be unavailable. In case the
panel is connected to another type of network
than a DHCP network, you have to configure
the IP address manually. For this the DHCP
check box must be disabled.
In the entry field Panel ID you have to set the
ID of the panel. It should be identical to the ID
visible in the display of the panel shortly after
starting it (see e.g. section “Manual Configuration of the Networking” on page 3-8).
The labeling Trackball indicates the state of the
respective panel. When it is displayed in red, the
panel is not connected to CLIPSTER. If in green,
the panel is currently connected to CLIPSTER
and can be used together with the CLIPSTER
software.
Same as Trackball but instead these items determine the network configuration of the CLIPSTER Potentiometer Panel.
Use the button PING to make sure that the panels are still connected to the CLIPSTER software.
It sends a ping request to all connected panels.
2-7
1
2
3
4
A
I
CLIPSTER Color Correction Panel LX User Guide
CONNECT
DISCONNECT
DHCP
Autoconnect
The ping request sent to the panel with
this button is a proprietary call and not
identical to a network ping request.
With this button the CLIPSTER software tries to
connect to all panels that are currently connected to the CLIPSTER video system. When successful, the respective labeling of the panel will
be shown in green instead of red.
This button severs the connection of the CLIPSTER software to the connected panels. Afterwards the font color of the panels’ labeling will
be displayed in red. Once the panels are disconnected with this button, no further reconnection
trials are performed by the CLIPSTER software
in this session. In case you want to connect to
the connected panels again, you have to do it
manually with the button CONNECT, or close the
CLIPSTER software with the autoconnect feature enabled and afterwards start it again.
The DHCP check box enables the automatic assignment of IP addresses, subnet masks and
other IP parameters via a DHCP server. For this
the panel(s) must be connected to a DHCP network via a hub to CLIPSTER. Once the check
box is activated, the IP Address entries will be
dimmed and unavailable because the parameters for the networking (except the panel ID)
will be determined by the server automatically
(see section “Configuration in a DHCP Network” on page 3-5). If the check box is disabled, you have to set the IP address manually
(see section “Manual Configuration of the Networking” on page 3-8).
This setting enables or disables the autoconnect
feature of the CLIPSTER software. Further information about this can be found in section “The
Autoconnect Feature” on page 4-3.
To bring a change of the autoconnection setting into effect, you have to restart the CLIPSTER software.
Further information about the manual connection/disconnection as well as about the autoconnect feature can be found in
section “Basic Operations” on page 4-2.
2-8
Overview
The Area ’Control Properties’
With the area Control Properties you set up and configure the behavior of the LX panels connected to CLIPSTER:
Increment
These radio buttons set the way an increment is
performed when using either the knobs or the
rings of the trackballs. You can set them to increment either when turned clockwise or when
turned counter-clockwise.
These settings configure the sensitivity of the
knobs of the CLIPSTER Color Correction
Panel LX as well as of the other panels. Either
use the slider to the left to set the sensitivity or
type in a value in the entry field to the right. A
value of less than one (1) sets a lower sensitivity,
while a value greater than one (1) increases it.
These settings configure the sensitivity of the
rings that encircle each trackball of the CLIPSTER Color Correction Panel LX. Either use the
slider to the left to set the sensitivity or type in a
value in the entry field to the right. A value of
less than one (1) sets a lower sensitivity, while a
value greater than one (1) increases it.
These settings configure the sensitivity of the
trackballs of the CLIPSTER Color Correction
Panel LX. Either use the slider to the left to set
the sensitivity or type in a value in the entry field
to the right. A value of less than one (1) sets a
lower sensitivity, while a value greater than one
(1) increases it.
Sensitivity Poti
Sensitivity Ring
Sensitivity Ball
The Area ’Generic’
The area Generic allows you to change the layout of the panel settings:
Style
This setting enables you to change the layout of the
Color Correction Panel LX settings. You can choose
between two different predefined layouts:
DVS
Standard panel layout of the
CLIPSTER Color Correction
Panel LX.
2-9
1
2
3
4
A
I
CLIPSTER Color Correction Panel LX User Guide
DVS Reverse
Alternative panel layout of the
CLIPSTER Color Correction
Panel LX, i.e. the settings for lift
and gain available on the panel
will be switched (trackballs and
rings).
Additional Settings
The additional settings of the settings pane to configure the connected
panels to CLIPSTER offer you, for example, the possibility to switch
back to default values:
2-10
DEFAULT
This button resets most configuration settings of
the group ControlPanel back to their default values. The settings of the area Network will not be
reset.
APPLY
This button confirms your alterations to the settings
of the group ControlPanel without closing the
CLIPSTER Configuration Tool. The new settings will
then be in effect for the connected panels.
Installation and Configuration
3
This chapter details all information necessary to install the CLIPSTER
Color Correction Panel LX to a CLIPSTER video system. For this the Color Correction Panel LX provides an ethernet connection to connect to
the CLIPSTER video system. It can either be connected to the LAN connection of CLIPSTER directly or via a hub.
First, the different hardware setups and connections of the panel to the
CLIPSTER video system are described. After that follows an explanation
about how to activate the connection when using DHCP. The chapter
will be concluded by a description of how to perform a manual configuration for the networking. It will include a detailed explanation about
how to configure the ethernet port of CLIPSTER properly.
When connecting the panel to CLIPSTER via a DHCP server,
the panel has to be connected via a hub to CLIPSTER. Furthermore, a configuration of the ethernet port of CLIPSTER
will not be necessary.
1
2
3
4
After all this the panel will be installed correctly and be ready to use
with the CLIPSTER software which is described in chapter “Operation”
on page 4-1.
3-1
A
I
CLIPSTER Color Correction Panel LX User Guide
3.1 Hardware Installation and Setup
The CLIPSTER Color Correction Panel LX must be installed properly before you can start working with it. It comes with an ethernet connection
(10 Mbps) to connect to the CLIPSTER video system and can be installed in two possible setups:
1.
2.
It can be connected to the LAN connection of CLIPSTER directly.
The connection can be routed over a network hub.
If you want to use the DHCP connection feature of the Color Correction Panel LX enabling the automatic assignment
of IP addresses and other parameters, the connection to
CLIPSTER has to be made via a hub that is part of the DHCP
network.
Both setups will be addressed in this section.
3.1.1 How to Connect to CLIPSTER Directly
The CLIPSTER Color Correction Panel LX can be connected directly to
CLIPSTER via a crossover network cable.
When connecting to CLIPSTER directly, the DHCP support
of the Color Correction Panel LX cannot be used.
To connect to CLIPSTER directly perform the following:
y Place the CLIPSTER Color Correction Panel LX on a firm, flat surface
near the CLIPSTER video system, for example, on a table next to its
keyboard.
y After this set up the external connection from the Color Correction
Panel LX to the CLIPSTER video system by connecting the ethernet
port of the panel with a free ethernet port (LAN connector) of the
CLIPSTER video system:
The cable for the external connection is a crossover network
cable. A standard network cable cannot be used for the direct connection. Please use an appropriate cable.
The CLIPSTER video system provides two ethernet ports. In
the operating system identify the port of CLIPSTER that you
want to use for the connection. Later, when configuring the
networking, you have to configure the properties of the correct port to enable the connection to the Color Correction
Panel LX.
3-2
Installation and Configuration
LNK
System
ACT
Power
5V DC 4A
Ethernet
CP200
WARNING
Use only approved
power supply
crossover network
cable
Adapter and power cable
CLIPSTER LAN connection
Figure 3-1: Direct connection of Color Correction Panel LX to CLIPSTER
1
y Connect the 5 V adapter and the power cable to the CLIPSTER
Color Correction Panel LX and plug it into a power outlet.
2
Once the above said is concluded, you have finished the direct hardware connection of the Color Correction Panel LX and it is set up properly. You can now continue the setup by manually configuring the
network ports and activating the panel in the software (see section
“Manual Configuration of the Networking” on page 3-8).
3
4
A
I
3.1.2 How to Connect to CLIPSTER via a Hub
The CLIPSTER Color Correction Panel LX can also be connected via a
hub to CLIPSTER. For this perform the following:
y Place the CLIPSTER Color Correction Panel LX on a firm, flat surface
near the CLIPSTER video system, for example, on a table next to its
keyboard.
y After this set up the external connection from the Color Correction
Panel LX to the CLIPSTER video system by connecting the ethernet
port of the panel with a free port at a hub/switch via a standard
network cable.
3-3
CLIPSTER Color Correction Panel LX User Guide
y Use a second standard network cable to connect the ethernet port
(LAN connector) of the CLIPSTER video system to the hub:
The CLIPSTER video system provides two ethernet ports. To
establish a connection you may either use an already provided network connection or set up a new one.
If your network does not provide the DHCP service to automatically determine the networking parameters, identify in
the operating system the port that CLIPSTER will use for the
connection. When configuring the networking, you have to
either determine or set the properties of the correct port to
enable the connection to the panel.
LNK
System
ACT
Power
5V DC 4A
Ethernet
CP200
WARNING
Use only approved
power supply
standard network
cable
standard network
cable
Adapter and power cable
CLIPSTER LAN connection
Figure 3-2: Connection of Color Correction Panel LX to CLIPSTER via a hub
y Connect the 5 V adapter and the power cable to the CLIPSTER
Color Correction Panel LX and plug it into a power outlet.
Once the above said is concluded, you have finished the hardware connection of the Color Correction Panel LX with the CLIPSTER video system and it is set up properly. You can now continue with the software
configuration of the panel either by using the DHCP feature (if provided in your network, see section “Configuration in a DHCP Network”
on page 3-5), or by configuring the networking manually (see section
“Manual Configuration of the Networking” on page 3-8).
3-4
Installation and Configuration
3.2 Configuration in a DHCP Network
Once a hub connection is set up properly as described in section “How
to Connect to CLIPSTER via a Hub” on page 3-3 and your network provides the DHCP service, you can use this feature. It will determine the
IP addresses as well as the other network parameters automatically,
meaning they will be assigned to the panel by the DHCP server that administers the network.
To configure the panel for a DHCP networking you simply have to activate the DHCP support in the software. For this perform the following:
y If appropriate, unplug the power supply and remove the network
cable from the panel.
y With the network cable removed turn the panel back on by plugging in the power supply.
During the initialization of the CLIPSTER Color Correction Panel LX you
will see in the display besides other information the panel’s unique ID:
1
2
Clipster Color Correction Panel LX
ID: 105
3
Figure 3-3: ID number displayed in the display
If you turn any of the knobs or trackballs, or press any of the
keys, the ID number will disappear from the display and be replaced by an indication of the control that has been changed.
y Memorize the ID number. It will be required during the activation of
the panel in the software.
y After this plug in the network cable again.
y Next start the CLIPSTER software.
y After finishing its loading open the CLIPSTER Configuration Tool
and activate the tab to set the default settings (for example, via the
menu bar with Options » Defaults…).
y Select from the group list of the CLIPSTER Configuration Tool the
entry ControlPanel.
y Afterwards with the settings of an optional control panel available
select from the topmost combo box in the settings pane to the right
the entry ControlPanelLX.
The settings pane will alter its appearance and the settings for an optional control panel will be displayed:
3-5
4
A
I
CLIPSTER Color Correction Panel LX User Guide
Figure 3-4: Setting and activating the panel
The individual settings items available when the entry
ControlPanelLX is selected, are explained in section “The
Group ’ControlPanel’ (Configuration Tool)” on page 2-6.
Now you have to set the necessary values to connect successfully to the
Color Correction Panel LX:
y Enable the check box Trackball to select the Color Correction
Panel LX for the connection.
y After this enable the check box DHCP.
This will make the fields under IP Address unavailable in the software
and they can no longer be set because they will be determined and assigned by the DHCP server automatically.
y Enter in the field Panel ID of the Trackball items the panel’s ID
number that you have memorized earlier.
Example:
Panel ID:
105
y After that click on the button CONNECT.
3-6
Installation and Configuration
The CLIPSTER software now sends the commands to connect to the
Color Correction Panel LX. When this is achieved, the labeling Trackball changes its color from red to green.
In case the panel should be activated automatically in the CLIPSTER software as soon as either the software or the panel is
started, you have to enable the check box Autoconnect (see
section “The Autoconnect Feature” on page 4-3 for further information).
y Once the connection is established, you may confirm your entries
with the button OK to close the CLIPSTER Configuration Tool.
The CLIPSTER Color Correction Panel LX is now successfully connected
to the CLIPSTER video system and activated in the CLIPSTER software.
It is ready to be used with the CLIPSTER software as described in chapter “Operation” on page 4-1.
1
2
3
4
A
I
3-7
CLIPSTER Color Correction Panel LX User Guide
3.3 Manual Configuration of the Networking
When the DHCP feature is not available in your network or when you
have connected the panel directly to the CLIPSTER video system, you
have to configure the networking manually. How to do this is described
in this section: First, it will be described how to determine or set up the
parameters of the ethernet port of the CLIPSTER video system, followed by an explanation how to activate the connection in the software.
A configuration of the panel’s ethernet port is not required. The
IP address will simply be handed over to the panel during its activation in the CLIPSTER software thus establishing the connection.
3.3.1 Setting Up the Ethernet Port of CLIPSTER
To determine or set up the parameters of the ethernet port of the CLIPSTER video system you have do the following:
y In the operating system of the CLIPSTER video system open the
TCP/IP properties window of the ethernet port that you have used
for the connection to the Color Correction Panel LX:
Figure 3-5: Selecting the properties of the ethernet port
This will open the following or a similar window:
3-8
Installation and Configuration
1
Figure 3-6: Properties of the ethernet port
2
y In this window choose from the list box the entry for TCP/IP and
click on the button PROPERTIES (as indicated in the figure above).
3
The following or a similar window will open:
4
A
I
Figure 3-7: Setting the properties of the ethernet port
3-9
CLIPSTER Color Correction Panel LX User Guide
When using an already provided network connection for the
connection of the panel, you only have to memorize or write
down the IP address as detailed in the window. After that
close all open windows of the operating system and continue the configuration with section “Activation of the Panel in
the Software” on page 3-10.
y Activate the radio button Use the following IP address to set the
necessary values for your network.
y Enter appropriate values for IP address and Subnet mask. Leave
all other fields empty.
Example:
IP Address:
196.154.028.102
Subnet Mask:255.255.255.0
When you have connected the Color Correction Panel LX to
CLIPSTER directly, you can select any number for the IP address as long as the first number stays between 1 and 223.
Standard subnet masks use numbers of either 0 or 255 as
values (as indicated in the example above).
In an already established network you should ask your network administrator for valid numbers of both parameters in
your network.
y After this confirm your settings with the OK button.
This will close the TCP/IP properties window and afterwards you may
close all previously opened windows. With the confirmation of the
TCP/IP settings the configuration of the ethernet port of CLIPSTER is
finished. As a last step you have to activate the Color Correction
Panel LX in the CLIPSTER software which is described next.
3.3.2 Activation of the Panel in the Software
As a last step to use the CLIPSTER Color Correction Panel LX in the
CLIPSTER software you have to activate the panel with the help of the
CLIPSTER Configuration Tool. For this perform the following:
y If appropriate, unplug the power supply and remove the network
cable from the panel.
y With the network cable removed turn the panel back on by plugging in the power supply.
During the initialization of the CLIPSTER Color Correction Panel LX you
will see in the display besides other information the panel’s unique ID:
3-10
Installation and Configuration
Clipster Color Correction Panel LX
ID: 105
Figure 3-8: ID number displayed in the display
If you turn any of the knobs or trackballs, or press any of the
keys, the ID number will disappear from the display and be replaced by an indication of the control that has been changed.
y Memorize the ID number. It will be required during the activation of
the panel in the software.
y After this plug in the network cable again.
y Next start the CLIPSTER software.
y After finishing its loading open the CLIPSTER Configuration Tool
and activate the tab to set the default settings (for example, via the
menu bar with Options » Defaults…).
y Select from the group list of the CLIPSTER Configuration Tool the
entry ControlPanel.
y Afterwards with the settings of an optional control panel available
select from the topmost combo box in the settings pane to the right
the entry ControlPanelLX.
The settings pane will alter its appearance and the settings for an optional control panel will be displayed:
1
2
3
4
A
I
3-11
CLIPSTER Color Correction Panel LX User Guide
Figure 3-9: Setting and activating the panel
The individual settings items available when the entry
ControlPanelLX is selected, are explained in section “The
Group ’ControlPanel’ (Configuration Tool)” on page 2-6.
Now you have to set the necessary values to connect successfully to the
Color Correction Panel LX:
y Enable the check box Trackball to select the Color Correction
Panel LX for the connection.
y If appropriate, deactivate the check box DHCP.
y Enter in the field IP Address of the Trackball items the IP address
that you have set or determined during your configuration of the
ethernet port (see section “Setting Up the Ethernet Port of CLIPSTER” on page 3-8).
Example:
IP Address:
196.154.028.101
The class C number of the IP address, i.e. the last three digits
of the address, must be different than the one configured or
determined at the ethernet port. All other values of the IP
address should be identical.
y Enter in the field Panel ID of the Trackball items the panel’s ID
number that you have memorized earlier.
Example:
3-12
Panel ID:
105
Installation and Configuration
y After that click on the button CONNECT.
The CLIPSTER software now sends the commands to connect to the
Color Correction Panel LX. When this is achieved, the labeling Trackball changes its color from red to green.
In case the panel should be activated automatically in the CLIPSTER software as soon as either the software or the panel is
started, you have to enable the check box Autoconnect (see
section “The Autoconnect Feature” on page 4-3 for further information).
y Once the connection is established, you may confirm your entries
with the button OK to close the CLIPSTER Configuration Tool.
The CLIPSTER Color Correction Panel LX is now successfully connected
to the CLIPSTER video system and activated in the CLIPSTER software.
It is ready to be used with the CLIPSTER software as described in chapter “Operation” on page 4-1.
1
2
3
4
A
I
3-13
CLIPSTER Color Correction Panel LX User Guide
3-14
Operation
4
This chapter describes how to operate the CLIPSTER Color Correction
Panel LX together with the CLIPSTER software.
First, the most basic operation is explained, i.e. what to observe during
the starting of the panel and the software, and how to turn it off after
you have finished your work. However, each time the CLIPSTER software is started and/or the Color Correction Panel LX is turned on they
have to connect to each other first to be able to work together. This can
be done either automatically (autoconnection) or manually. Both procedures will be explained in this chapter as well.
After that follows a description of how to use the CLIPSTER Color Correction Panel LX together with the CLIPSTER software. Furthermore,
this chapter contains a listing of the individual effects that can be adjusted via the Color Correction Panel LX and the operational items of
the panel that have to be used for the respective effect. The chapter will
be concluded with a description how to reset values to their default settings.
1
2
3
4
A
I
4-1
CLIPSTER Color Correction Panel LX User Guide
4.1 Basic Operations
This section explains the most basic operations of the CLIPSTER Color
Correction Panel LX. It is described how to start the panel and how to
turn it off after you have finished your work. However, each time the
CLIPSTER software is started and/or the Color Correction Panel LX is
turned on they have to connect to each other first to be able to work
together. This can be either done automatically (autoconnection) or
manually. Both procedures will be explained in this section as well.
4.1.1 Starting or Shutting Down the Panel
The CLIPSTER Color Correction Panel LX provides no extra power
switch and it can be turned on or off by simply plugging it in or unplugging it from a mains outlet. It has been built that way because most
desktop video workstations provide a main power switch which turns
on or off a complete workstation consisting of several individual devices. Nevertheless, after the CLIPSTER Color Correction Panel LX has
been supplied with power and the CLIPSTER software is started, they
have to connect to each other first to be able to work together.
In most cases the software connects itself automatically to the Color
Correction Panel LX as soon as both are running, meaning you can turn
on or off the panel and start or end the CLIPSTER software in any sequence you like and after a short period of time the panel will be registered and connected to the CLIPSTER software automatically. Then
the display of the Color Correction Panel LX will show you the settings
of the first effects key (see section “Effects Key 1” on page 4-7) indicating that it has connected to the CLIPSTER software successfully:
Contrast
1.000
Hue
1.000
Bright
1.000
Figure 4-1: Effects settings
However, for an automatic connection of the CLIPSTER software to the
Color Correction Panel LX you have to enable this feature first which
can be done with the check box Autoconnect of the group ControlPanel in the CLIPSTER Configuration Tool (see section “The Autoconnect Feature” on page 4-3).
When the autoconnect feature is disabled, no automatic connection of
the software will be performed. In such a case you can connect the software to the CLIPSTER Color Correction Panel LX at any time manually
(see section “How to Connect to the Panel Manually” on page 4-4).
4-2
Operation
After your work with the CLIPSTER Color Correction Panel LX is finished, you can turn off the CLIPSTER Color Correction Panel LX and the
CLIPSTER software in any sequence you want. As soon as one of them
is turned off/exited, the connection between them will be severed.
4.1.2 The Autoconnect Feature
The check box Autoconnect of the group ControlPanel in the CLIPSTER Configuration Tool (see figure 2-3 on page 2-6) enables an automatic connection of the CLIPSTER software to the CLIPSTER Color
Correction Panel LX. With this feature selected the CLIPSTER software
tries to connect to the panel during the starting of the software and, if
unsuccessful, afterwards again at certain intervals. Once a panel is
found, they are automatically connected to each other.
In essence with the autoconnect feature activated you can turn on or
off the CLIPSTER Color Correction Panel LX at any time and CLIPSTER
will always connect successfully to it again after a short period of time
when both are running.
To bring a change of the autoconnection setting into effect,
you have to restart the CLIPSTER software.
The user interface of the CLIPSTER software provides in its project information (bottom right of the user interface) an item that allows you
to monitor the connection state of the CLIPSTER Color Correction
Panel LX. Usually, this item (displaying the words ’ControlPanel’) is hidden in the user interface. Only when a change of the connection state
is detected by the software, will it be visible shortly, indicating its respective state. The following states are possible:
Item ’ControlPanel’
in grey
in red
hidden
Explanation
Connection to Color Correction Panel LX established successfully; this connection state will be
hidden from the user interface after a short period
of time
Connection to Color Correction Panel LX severed
Either no connection to the Color Correction
Panel LX at program start (e.g. due to a disabled
autoconnect feature), or no change in the connection state detected
If the Autoconnect check box is not enabled, no automatic connection
to the CLIPSTER Color Correction Panel LX will be performed. In such
a case you have to connect the CLIPSTER software to the panel manually (see section “How to Connect to the Panel Manually” on
page 4-4). Anyhow, after a manual connection of the Color Correction
Panel LX you may turn it off and afterwards on again and the software
4-3
1
2
3
4
A
I
CLIPSTER Color Correction Panel LX User Guide
will automatically reconnect the panel. This will work as long as this
particular CLIPSTER software session is not exited. After that no automatic reconnection will be performed anymore and, when starting the
software again, you have to connect to the panel manually once more
(due to a disabled autoconnect feature).
4.1.3 How to Connect to the Panel Manually
In case the CLIPSTER software is not able to find the CLIPSTER Color
Correction Panel LX or when the autoconnect feature is deactivated,
you may want to connect the CLIPSTER software to the CLIPSTER Color Correction Panel LX manually. For this you have to use the Configuration Tool of CLIPSTER:
y Open the CLIPSTER Configuration Tool and activate the tab to set
the default settings (for example, via the menu bar with Options »
Defaults…).
y With the default settings selected choose from the group list to the
left of the CLIPSTER Configuration Tool the entry ControlPanel.
Then the settings pane to the right will alter its appearance and the settings for the CLIPSTER Color Correction Panel LX will be displayed (see
figure 2-3 on page 2-6).
y Prior to connecting the panel manually confirm that the network
settings to connect to the CLIPSTER Color Correction Panel LX are
configured correctly (cf. section “Activation of the Panel in the Software” on page 3-10).
y After that click on the button CONNECT to connect to the panel
manually.
The CLIPSTER software now tries to connect to the Color Correction
Panel LX. When this is achieved, the labeling Trackball of the panel’s
items in the Configuration Tool changes its color from red to green.
y Once the connection is successfully established, you may close the
CLIPSTER Configuration Tool.
The CLIPSTER Color Correction Panel LX is now connected to the CLIPSTER software and it is ready to be used together with the software.
4.1.4 How to Disconnect the Panel Manually
Usually, the CLIPSTER Color Correction Panel LX is disconnected automatically as soon as it is turned off. However, in case you want to disconnect it and prevent further autoconnect trials of the CLIPSTER
software during this particular session, you may disconnect the panel
manually. For this perform the following:
4-4
Operation
y Open the CLIPSTER Configuration Tool and activate the tab to set
the default settings (for example, via the menu bar with Options »
Defaults…).
y With the defaults settings selected choose from the group list to the
left of the CLIPSTER Configuration Tool the entry ControlPanel.
Then the settings pane to the right will alter its appearance and the settings for the CLIPSTER Color Correction Panel LX will be displayed (see
figure 2-3 on page 2-6).
y In the settings pane click on the button DISCONNECT to sever the
connection to the panel manually.
The CLIPSTER software now disconnects the Color Correction
Panel LX. When this is achieved, the labeling Trackball of the panel’s
items in the Configuration Tool changes its color from green to red. Afterwards no further reconnection trials are performed by the CLIPSTER
software in this session. In case you want to connect to the panel again,
you have to do it manually as described in section “How to Connect to
the Panel Manually” on page 4-4, or close the CLIPSTER software with
the autoconnection feature enabled and afterwards start it again.
1
y Close the CLIPSTER Configuration Tool.
2
The CLIPSTER Color Correction Panel LX is now disconnected from the
CLIPSTER software and no further reconnection trials will be performed
in this session.
3
4
A
I
4-5
CLIPSTER Color Correction Panel LX User Guide
4.2 Working with the Color Correction Panel LX
After starting the CLIPSTER software and once a successful connection
to the CLIPSTER Color Correction Panel LX is established (see section
“Starting or Shutting Down the Panel” on page 4-2), you are able to
use the panel together with the CLIPSTER software, i.e. with the CLIPSTER Edit Tool. Then the display of the Color Correction Panel LX will
show you the following:
Contrast
1.000
Hue
1.000
Bright
1.000
Figure 4-2: Effects settings showing a successful connection
Usually, the effects settings of the first effects key will be displayed by
the panel, thereby indicating that the CLIPSTER software is successfully
connected to the CLIPSTER Color Correction Panel LX. These default
settings can then be used right away as soon as a clip is available in the
video track of the timeline area.
To begin to work with the panel perform the following:
y Add at least one clip to the video track of the timeline either by
loading a project that contains clips or by adding a clip to the bin
and then to the timeline. How to do either one of the procedures is
described in the “CLIPSTER Edit Tool” user guide.
y Place the timeline cursor on the clip that should undergo a change
of effect, for example, a color correction.
y Next select one of the effects from the effects keys of the CLIPSTER
Color Correction Panel LX in case the desired one is not already
selected (for a list of all effects keys and their associated functions
see section “The Effects Keys” on page 4-7).
y Then use the respective controls of the CLIPSTER Color Correction
Panel LX and the selected clip will be changed accordingly.
The effects operator selected via the effects keys of the panel will be
added to the clip automatically as soon as a value is altered at the Color
Correction Panel LX. You can see this in the properties of the respective
timeline clip: For example, if a primary color correction is applied to the
clip, the primary color correction operator will be added automatically
to the clip. Furthermore, when the primary color correction operator is
visible in the CLIPSTER software, you can see the alterations performed
at the panel immediately in the settings area of the operator.
4-6
Operation
4.3 The Effects Keys
The CLIPSTER Color Correction Panel LX offers various effects that can
be selected via the effects keys of the panel. The values that the effects
provide can be adjusted easily with the knobs and/or the trackballs and
rings of the Color Correction Panel LX. This section lists all available effects keys and their associated functions.
Further information about the individual effects operators and
their settings as well as any other item mentioned in the following can be found in the “CLIPSTER Edit Tool” user guide.
4.3.1 Effects Key 1
With the key [F1] of the CLIPSTER Color Correction Panel LX you can
perform a primary color correction of the luminance as well as adjust
other color related settings on the selected clip in the timeline (contrast,
hue, brightness). Additionally, you can adjust lift, gamma and gain.
When this effects key is selected, the necessary values can be adjusted
by using the knobs below the display as well as the trackballs and rings.
Key:
[F1]
Effect:
Master, luma and chroma settings of primary color
correction as well as lift, gamma and gain
Validity:
Selected clip
Controls:
Knobs, trackballs and rings
1
2
3
4
A
Knob 1:
Alters the contrast
Knob 2:
Alters the hue
Knob 3:
Alters the brightness
Trackball 1:
Adjusts the RGB values of lift
Ring 1:
Adjusts the master value of lift
Trackball 2:
Adjusts the RGB values of gamma
Ring 2:
Adjusts the master value of gamma
Trackball 3:
Adjusts the RGB values of gain
Ring 3:
Adjusts the master value of gain
I
Depending on the selected layout style of the panel, the settings for lift and gain may be switched (see section “The Area
’Generic’” on page 2-9).
4-7
CLIPSTER Color Correction Panel LX User Guide
4.3.2 Effects Key 2
With the key [F2] of the CLIPSTER Color Correction Panel LX you can
perform additional changes to the luminance and adjust other color related settings on the selected clip in the timeline (luma low, saturation,
luma high). Additionally, you can adjust lift, gamma and gain of the primary color correction, i.e. the trackballs and rings provide the same
functionality as under the key [F1]. With the key [F2] selected the values can be adjusted by using the knobs below the display as well as the
trackballs and rings.
Key:
[F2]
Effect:
Master, luma and chroma settings of primary color
correction as well as lift, gamma and gain
Validity:
Selected clip
Controls:
Knobs, trackballs and rings
Knob 1:
Alters the low-tones
Knob 2:
Adjusts the saturation
Knob 3:
Adjusts the high-tones
Trackball 1:
Adjusts the RGB values of lift
Ring 1:
Adjusts the master value of lift
Trackball 2:
Adjusts the RGB values of gamma
Ring 2:
Adjusts the master value of gamma
Trackball 3:
Adjusts the RGB values of gain
Ring 3:
Adjusts the master value of gain
Depending on the selected layout style of the panel, the settings for lift and gain may be switched (see section “The Area
’Generic’” on page 2-9).
4.3.3 Effects Key 3
The key [F3] allows you to adjust the global/master RGB values of the
primary color correction. Also provided on this effects key is the functionality of the key [F1], thus you can adjust lift, gamma and gain of the
primary color correction. When this effects key is selected, the values
can be adjusted by using the knobs below the display as well as the
trackballs and rings.
4-8
Key:
[F3]
Effect:
Global/master of primary color correction as well as
lift, gamma and gain
Validity:
Selected clip
Operation
Controls:
Knobs, trackballs and rings
Knob 1:
Alters red of global/master
Knob 2:
Alters green of global/master
Knob 3:
Alters blue of global/master
Trackball 1:
Adjusts the RGB values of lift
Ring 1:
Adjusts the master value of lift
Trackball 2:
Adjusts the RGB values of gamma
Ring 2:
Adjusts the master value of gamma
Trackball 3:
Adjusts the RGB values of gain
Ring 3:
Adjusts the master value of gain
Depending on the selected layout style of the panel, the settings for lift and gain may be switched (see section “The Area
’Generic’” on page 2-9).
1
2
4.3.4 Effects Key 4
Via the key [F4] you can alter the operator ’Zoom + Pan’ of the CLIPSTER Edit Tool. It enables you to zoom and pan the contents of the video clip in the timeline. Because this operator is by default available and
active for all clips in the timeline, it will not be automatically added to
the properties of the clip after having adjusted a value. When this effects key is selected, the values can be adjusted by using the knobs below the display as well as trackball 2 and the rings.
Key:
[F4]
Effect:
Zoom and pan
Validity:
Selected clip
Controls:
Knobs, trackball 2 and rings
3
4
A
I
Knob 1:
Pans the clip horizontally (x-axis)
Knob 2:
Zooms the clip with aspect ratio
locked
Knob 3:
Pans the clip vertically (y-axis)
Ring 1:
Zooms the width of the clip only
Trackball 2:
Pans the clip
Ring 2:
Zooms the clip with current aspect
ratio locked
Ring 3:
Zooms the height of the clip only
4-9
CLIPSTER Color Correction Panel LX User Guide
4.3.5 Effects Key 5
With the key [F5] you can crop the contents of your timeline, for example, if you need black bars in the video output.
Whereas most effects are valid for a single clip in the timeline
only, an alteration of the cropping will be performed for all clips
in the timeline, i.e. for the whole timeline.
Furthermore, with this effects key you can alter the operator ’Zoom +
Pan’ of the CLIPSTER Edit Tool. It enables you to sharpen or blur (setting Aperture) the contents of the video clip in the timeline. Because
this operator is by default available and active for all clips in the timeline, it will not be automatically added to the properties of the clip after
having adjusted a value.
When this effects key is selected, the values can be adjusted by using
the knobs below the display as well as trackball 2 and the rings.
Key:
[F5]
Effect:
Crop as well as sharpen/blur
Validity:
Whole timeline (crop)
Selected clip (sharpen/blur)
Controls:
Knobs, trackball 2 and rings
Knob 1:
Crops the contents horizontally, i.e.
adjusts the vertical borders of the
contents (left and right border)
Knob 2:
Adjusts the sharpness of the clip
Knob 3:
Crops the contents vertically, i.e. adjusts the horizontal borders of the
contents (top and bottom border)
Ring 1:
Moves the visible part of the
cropped contents horizontally
(x-axis)
Trackball 2:
Moves the visible part of the
cropped contents
Ring 2:
Crops the contents with the aspect
ratio locked
Ring 3:
Moves the visible part of the
cropped contents vertically (y-axis)
4.3.6 Effects Key 6
With the key [F6] you are able to control the CLIPSTER user interface.
It offers you the same features as a mouse as well as some control ele-
4-10
Operation
ments for a basic control of the CLIPSTER Edit Tool’s timeline. Furthermore, with this effects key selected you can adjust the timeline zoom as
well as switch through the various video scopes of the CLIPSTER software. When it is selected, you can control the user interface by using
the knobs 1 and 3, ring 1, trackball 3, and the reset buttons.
Key:
[F8]
Effect:
Control of user interface (mouse replacement) and
timeline, as well as timeline zoom and video scopes
Validity:
–
Controls:
Knob 1, knob 3, trackball 1, ring 1 and reset buttons
Knob 1:
Adjusts the zoom of the timeline
Knob 3:
Switches through the different video scopes of the control area
Ring 1:
Moves the timeline cursor one
frame backward or forward in the
timeline
1
Trackball 3:
Controls the mouse cursor movement
2
Reset
1:
Moves the timeline cursor one
frame backward in the timeline
3
Reset
1:
Moves the timeline cursor one
frame forward in the timeline
4
Reset
2:
Toggles between a reverse play-out
and stop of the timeline
A
Reset
2:
Toggles between a play-out and
stop of the timeline
I
Reset
3:
Left mouse click
Reset
3:
Right mouse click
To switch through the different video scopes you can also use
the reset key to the right of knob 3.
4.3.7 Effects Keys 7 to 9
The effects keys 7 to 9 (i.e. [F7], [F8] and [F9]) are reserved for future
use. Currently they provide no functionality.
4-11
CLIPSTER Color Correction Panel LX User Guide
4.4 Resetting Values
Each operation item of the CLIPSTER Color Correction Panel LX provides a reset key (see also section “Top Side” on page 2-2) that usually
resets the adjusted value back to its default setting. The reset keys of
the knobs are located to the right of the respective knob, whereas the
two keys right above the trackballs and rings reset either the respective
ring ( ) or the trackball ( ).
On some effects keys the reset buttons enable functions other
than a reset. If such is the case their functionality will be described in section “The Effects Keys” on page 4-7 as well.
4-12
Appendix
A
This chapter provides technical data and general information about the
CLIPSTER Color Correction Panel LX. Included are, for example, the dimensions for a desktop mounting as well as troubleshooting information.
1
2
3
4
A
I
A-1
CLIPSTER Color Correction Panel LX User Guide
A.1 Technical Data
This section provides technical data of the Color Correction Panel LX.
A.1.1 General Technical Data
The general technical data of the panel are as follows:
Dimensions
height:
width:
depth:
95 mm (max.)
332 mm
381 mm
Weight
approx. 4500 g
Environment
No exposure to heat
No exposure to strong electric or magnetic
fields
Operating tempera- Maximum:
ture
Optimum:
10 - 30 °C
15 - 25 °C
Storage temperature 0 - 50 °C
Humidity
10 - 80 %, non-condensing at all times
Air
Dust-free (recommended)
Surface
No vibrations/shocks allowed
Power
5V DC, 4A; center pin positive connection
Only use the power supply delivered together with the CLIPSTER Color Correction Panel LX. Using a different one may
damage the panel or even be dangerous. If you need a power
supply specific to your location, please contact your local vendor.
A-2
Appendix
A.1.2 Dimensions for Desk Mounting
Generally, it is expected that the panel will be left free standing on a
desk. But the panel provides a lip around its edge, allowing it to be fitted into a hole cut in a desk. The following figure shows the dimensions
of the CLIPSTER Color Correction Panel LX in case you want to mount
it in a desk. As the following figure shows the minimum recommended
hole would be 297 mm × 355.4 mm.
Note that the power connector protrudes approximately 4 mm
from the rear.
Please take care not to foul the cables that exit from the rear of
the panel when mounting it in a desk.
1
2
3
4
A
I
Figure A-1: Dimensions of the panel for a desktop mounting
A-3
CLIPSTER Color Correction Panel LX User Guide
A.2 Troubleshooting and Self-Test
If for some reason the CLIPSTER Color Correction Panel LX does not
give you the expected results, take a moment to do some investigation.
The most important concept is that you have your Color Correction
Panel LX connected and configured properly as outlined in chapter “Installation and Configuration” on page 3-1. In any case of troubleshooting take a moment to double-check your setup.
Troubleshooting Power
A common problem is that power is not properly supplied to the panel.
Make sure all power plugs are plugged in properly and that mains and
fuses are working. To isolate a problem further you may also check the
lights that indicate power at the external power supply and the rear of
the panel. If the panel still does not turn on, please contact the DVS service department.
Communication Problems
In case you have trouble to communicate with your panel, try a direct
connection to the CLIPSTER video system (see section “How to Connect to CLIPSTER Directly” on page 3-2). If the panel works under this
simple setup, it will be your network that is causing the problem. In this
case it is recommended either to stay with the direct connection or to
set up a new network using a hub/switch separated from your local
network (see section “Manual Configuration of the Networking” on
page 3-8).
Self-Test Mode
The CLIPSTER Color Correction Panel LX provides a self-test mode
which aids in troubleshooting the panel. The self-test mode will be automatically engaged when the panel is turned on and no network packages are received, i.e. the network cable should be unplugged during
the starting of the panel.
When in the self-test mode, the keys, knobs, trackballs and rings can
be tested by simply using them. The status of each operation item will
be indicated in the display of the panel: The first number displayed usually indicates the item that is used, while the second number shows the
amount of the change. If the latter number does not change when using the control, the item is faulty. In this case please contact the DVS
service department.
A-4
I
Index
A-C
accessory ....................................... 1-1
ACT .............................................. 2-5
activation .................................... 3-10
Aperture ..................................... 4-10
aspect ratio ...........................4-9, 4-10
autoconnect ........................... 4-2, 4-3
enable/disable .......................... 2-8
bin ............................................... 4-6
blue of global ................................ 4-9
blur ............................................ 4-10
brightness ..................................... 4-7
Cat 5 ............................................ 2-4
chapter overview ............................ 1-2
class C number ............................ 3-12
CLIPSTER ...................................... 1-1
Color Correction Panel LX .......... 2-7
Configuration Tool .. 2-6, 3-5, 3-11,
4-4, 4-5
control .................................. 4-10
Edit Tool ........................... 1-3, 4-6
optional features ....................... 1-1
Potentiometer Panel .................. 2-7
software .................................. 4-6
Transport Control Panel ...... 1-1, 2-7
color correction ....................... 1-1, 2-3
primary .............................4-7, 4-8
Color Correction Panel LX ........1-1, 2-7
activation ............................... 3-10
configuration .................... 3-5, 3-8
desk mounting ................. 1-5, A-3
installation ............................... 3-2
layout style .............................. 2-9
licensing .................................. 2-7
operation ................................. 4-1
overview .................................. 2-1
rear side .................................. 2-4
shutting down .......................... 4-3
starting .................................... 4-2
technical data ...........................A-2
top side overview ...................... 2-2
usage ...................................... 4-6
colorist ...................................1-1, 1-3
configuration ..........................3-1, 3-8
default ................................... 2-10
ethernet port ............................ 3-8
in a DHCP network ................... 3-5
of CLIPSTER software .......2-6, 3-10
of panel ................................... 2-6
Configuration Tool 2-6, 3-5, 3-11, 4-4,
4-5
connection ..................................... 2-8
automatic .................. 2-8, 4-2, 4-3
disconnect .........................2-8, 4-4
ethernet ............................3-2, 3-3
manual .................................... 4-4
severed .................................... 4-3
successful 2-8, 3-7, 3-13, 4-2, 4-3,
4-6
contrast ......................................... 4-7
control of GUI .............................. 4-10
control properties ........................... 2-9
conventions
of user guide ............................ 1-3
cropping ...............................2-3, 4-10
crossover network cable .................. 3-2
D-F
default settings ............................. 2-10
delivery of panel ............................. 1-6
desk mounting ............................... 1-5
dimensions ...............................A-3
DHCP ............................ 2-7, 2-8, 3-2
settings .................................... 3-5
disconnect connection ..............2-8, 4-4
display .......................................... 2-3
I-1
1
2
3
4
A
I
CLIPSTER Color Correction Panel LX User Guide
Edit Tool .................................1-3, 4-6
effects ........................................... 4-7
effects keys .............................2-3, 4-7
labeling ................................... 2-3
environmental conditions ........ 1-5, A-2
ethernet ........................................ 2-4
connection ........................3-2, 3-3
port ..................................3-2, 3-3
port (configuration) ................... 3-8
frame backward ........................... 4-11
frame forward .............................. 4-11
system .....................................2-4
left mouse button .........................4-11
licenses ..........................................2-7
lift .........................2-10, 4-7, 4-8, 4-9
LNK ..............................................2-5
low-tones ......................................4-8
luma high ......................................4-8
luma low .......................................4-8
luminance .............................. 4-7, 4-8
G-I
manual connection ................. 2-8, 4-4
master
see global
mouse .........................................4-10
left button ..............................4-11
right button ............................4-11
network administration ....................1-3
network cable
crossover ..................................3-2
standard ...................................3-3
network settings .............................2-7
notes (important) ............................1-5
operation .......................................4-1
operator ................................ 4-6, 4-7
overview
of chapters ...............................1-2
of Color Correction Panel LX ......2-1
rear side ...................................2-4
top side ....................................2-2
gain ...................... 2-10, 4-7, 4-8, 4-9
gamma .......................... 4-7, 4-8, 4-9
global ........................................... 4-8
blue ........................................ 4-9
green ...................................... 4-9
red .......................................... 4-9
green of global ............................... 4-9
group ’ControlPanel’ ....................... 2-6
guarantee ...................................... 1-5
high-tones ..................................... 4-8
hub .......................................3-2, 3-3
hue ............................................... 4-7
important notes ............................. 1-5
increment (rings) ............................ 2-9
installation ..............................3-1, 3-2
instructions
installation ............................... 3-2
safety ...................................... 1-4
shut down of panel ................... 4-3
starting of panel ....................... 4-2
usage ...................................... 4-6
IP address ................... 2-7, 3-10, 3-12
class C number ....................... 3-12
J-L
keys
effects keys .......................2-3, 4-7
reset keys ........................2-3, 4-12
test .........................................A-4
knobs ............................................ 2-3
sensitivity ................................. 2-9
test .........................................A-4
LAN .......................................3-2, 3-4
layout style of panel ....................... 2-9
LED
ethernet connector .................... 2-5
power ..................................... 2-4
I-2
M-O
P-R
pan ...............................................4-9
panel ID 2-7, 2-8, 3-5, 3-6, 3-10, 3-12
Ping ..............................................2-7
play-out (timeline) ........................4-11
reverse ...................................4-11
Potentiometer Panel ........................2-7
Poti Panel ......................................2-7
power ...........................................2-4
cable ............................... 3-3, 3-4
supply .......................1-4, 2-4, A-2
primary color correction ........... 4-7, 4-8
project ...........................................4-6
rear side ........................................2-4
red of global ..................................4-9
reset keys ......................................2-3
numbering ...............................2-3
usage .....................................4-12
reverse play-out ...........................4-11
right mouse button ....................... 4-11
rings ............................................. 2-3
increment ................................ 2-9
numbering ............................... 2-3
sensitivity ................................. 2-9
test ......................................... A-4
RJ45 ............................................. 2-4
S-T
safety instructions .......................... 1-4
saturation ...................................... 4-8
scope of delivery ............................ 1-6
self-test mode ................................ A-4
sensitivity
knobs ...................................... 2-9
rings ........................................ 2-9
trackballs ................................. 2-9
sharpen ....................................... 4-10
sharpness .................................... 4-10
shutting down of panel ................... 4-3
standard network cable ................... 3-3
starting of panel ............................. 4-2
stop (timeline) .............................. 4-11
subnet mask ................................ 3-10
system .......................................... 2-4
target group .................................. 1-3
TCP/IP .......................................... 3-9
technical data ................................ A-2
timeline ......................................... 4-6
frame backward ...................... 4-11
frame forward ........................ 4-11
play-out ................................. 4-11
reverse play-out ...................... 4-11
stop ....................................... 4-11
timeline cursor .............................. 4-11
timeline zoom .............................. 4-11
top side ......................................... 2-2
Trackball ........................................ 2-7
trackballs ....................................... 2-3
numbering ............................... 2-3
sensitivity ................................. 2-9
test ..........................................A-4
Transport ....................................... 2-7
Transport Control Panel ............1-1, 2-7
transportation ................................ 1-4
troubleshooting ..............................A-4
typographical conventions ............... 1-3
U-Z
usage of panel ............................... 4-6
video scopes ................................ 4-11
warranty ........................................ 1-5
zoom ............................................ 4-9
zoom and pan ................................ 2-3
zoom on timeline .......................... 4-11
1
2
3
4
A
I
I-3
CLIPSTER Color Correction Panel LX User Guide
I-4