1
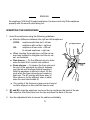
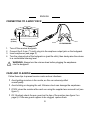
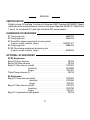
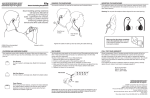
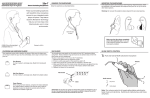
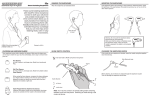
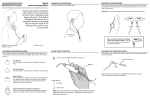
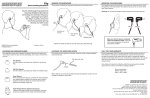
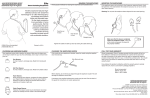
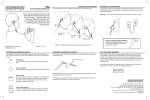
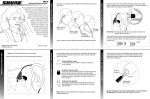
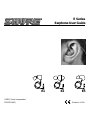
E Series Earphone User Guide E1 ©2002, Shure Incorporated 27A8791 (BG) E2 E5 Printed in U.S.A. ENGLISH WARNING! USING THIS SYSTEM AT EXCESSIVE VOLUMES CAN CAUSE PERMANENT HEARING DAMAGE. USE THE LOWEST VOLUME LEVEL AS POSSIBLE. To use this system safely, avoid prolonged listening at excessive sound pressure levels. Please use the following guidelines established by the U.S. Occupational Safety Health Administration (OSHA) on maximum time exposure to sound pressure levels before hearing damage occurs. 90 dB SPL at 8 hours 95 dB SPL at 4 hours 100 dB SPL at 2 hours 105 dB SPL at 1 hour 110 dB SPL at 1/2 hour 115 dB SPL at 15 minutes 120 dB SPL — avoid or hearing damage may occur It is difficult to measure the exact Sound Pressure Levels (SPL) present at the eardrum, since the SPL in the ear is affected by ambient sound from floor wedges or other devices in addition to the volume setting on the PSM. The isolation provided by the fit of quality earphones is also an important factor in determining the SPL in the ear. Here are some general tips to follow in the use of this product to protect your ears from damage: 1. Turn up the volume control only far enough to hear properly. 2. Ringing in the ears may indicate that the gain levels are too high. Try lowering the gain levels. 3. Have your ears checked by an audiologist on a regular basis. If you experience wax buildup in your ears, stop using the system until an audiologist has examined your ears. 4. Wipe the earphones with an antiseptic before and after use to avoid infections. Stop using the earphones if they are causing great discomfort or infection. 2002, Shure Incorporated 27A8791 (BG) 1 Printed in U.S.A. ENGLISH E-SERIES EARPHONES The Shure E1, E2 and E5 earphones are designed for use with Shure Personal Monitor Systems. They are also ideally suited for use with CD players, MP3 players, and any other device that has a 1/8-inch stereo output. E1/E5 E2 Low-mass, high-energy transducer n f Full–range dynamic transducer f n Universal fit n n Variety of isolating sleeves included n n Custom-molded sleeves optional n f Adjustment tube for securing cables n n Tool for removing wax buildup in earphone n f Wax guard to prevent wax buildup in earphone f n Features: n = Model has listed feature. f = Model does not have listed feature. 2 ENGLISH EARPHONE COMPONENTS The earphone components are illustrated below, using the E2 model as an example. Your earphone shape may vary, depending on the model. Ê Earphones. For models E1 and E5, the earphone with the BLUE marking fits in the left ear, while the earphone with the RED marking fits in the right ear. For model E2, the bi-colored earphone fits in the right ear, while the earphone that is all one color fits in the left ear. When properly inserted, the Shure logo will appear right-side up on the outside of the earphone with the cable exit pointing upwards. Ë Sleeves. The E1 and E5 earphones come with a pair of foam sleeves (installed), and a trial assortment of flex sleeves —small, medium, and large. The E2 earphones come with a pair of flex sleeves (installed) and a trial assortment of foam and flex sleeves in a variety of sizes. See Sleeve Varieties on the following page. Ì Adjustment Tube. For a secure fit, slide the adjustment tube back and forth to adjust the slack of the cables leading to the earphones. Í Input Connector. 3.5 mm (1/8-inch) plug connects to the earphone output of a PSM bodypack, or other any other device with a 3.5 mm stereo output. Î Wax Guard. (model E2 only) The earphones come with special wax guards (not installed) for keeping unwanted wax out of the nozzle. 3 ENGLISH SLEEVE VARIETIES Each of the following types of sleeves are available from Shure. The sleeves form a seal when inserted into the ear that isolates the ear from outside sound. If a tight seal isn’t achieved, the low end of the frequency response may be absent in the earphones. Foam Sleeves. These disposable foam sleeves compress to fit in the ear canal. Once in the ear, the foam expands to form a tight seal. Once tightly sealed, the sleeves hold the earphones firmly in place. The E1 and E5 come with yellow foam sleeves. The E2 earphones come with three sizes of orange foam sleeves to choose from —small, medium or large —for the best fit. Flex Sleeves. These reusable sleeves, made of a pliable plastic, fit comfortably in the ear and allow for ease of insertion. Choose from 3 sizes — small, medium or large —for the best fit. These should be cleaned regularly, using alcohol wipes or an antiseptic. Triple-Flange Sleeves (optional accessory for E1 and E5 only). These reusable sleeves form a tighter seal than flex sleeves while holding the earphones firmly in place. These should be cleaned regularly, using alcohol wipes or an antiseptic. CHANGING SLEEVES The sleeves at the end of the earphones can be replaced by sliding them off and on, as in the following illustration. A combination of twisting and pulling is recommended for sleeve removal. SMOOTH SIDE ROUGH SIDE NOTE: On each foam sleeve there is a rough side and a smooth side. For greater comfort, Shure recommends that you place the smooth side facing out, away from 4 ENGLISH the earphone. With the E2 model earphones, the sleeve will only fit the earphone properly with the smooth side facing out. INSERTING THE EARPHONES 1. Insert the earphones using the following guidelines: " Note the difference between the right and left earphones: E1/E5: earphone with blue dot = left ear earphone with red dot = right ear E2: earphone all one color = left ear bi-colored earphone = right ear " " " " When inserting the earphones, pull the ear upward and outward to straighten out the ear canal, as illustrated. Flex sleeves — Try the different sizes to determine the best fit for comfort and isolation. Foam sleeves — Compress the foam sleeve at the end of the earphone by rolling it between your thumb and forefinger before inserting it. Hold the earphone in place for about 30 seconds while the foam expands and creates a tight seal. The E2 comes with three sizes of foam sleeves: try the different sizes to determine the most comfortable fit. The quality of the frequency response and sound isolation depend on how well the sleeves seal. 2. E1 and E2: wrap the earphone cord over the top and down the back of the ear. E5: wrap the form-fitted wire over the top and down the back of the ear. 3. Use the adjustment tube to secure the cables comfortably. 5 ENGLISH CONNECTING TO A BODY PACK OUTPUT (3.5mm) LEFT RIGHT E5 EARPHONES 1. 2. 3. 4. Turn off the receiver bodypack. Connect the 3.5 mm (1/8-inch) plug into the earphone output jack on the bodypack. Insert earphones (see page 5). Turn the volume knob of the bodypack on (past the click), then slowly raise the volume to a comfortable listening level. WARNING: Always turn the volume down before plugging the earphones into the bodypack. CARE AND CLEANING Follow these tips to prevent service costs and ear infections: S S S S Avoid getting moisture in the nozzle, as this can adversely affect sound quality. Avoid striking or dropping the unit. Extreme shock can damage the earphones. E1/E5: clean the nozzles after each use using the supplied wax removal tool (see figure 1). E2: Routinely check the wax guard on the tips of the nozzles (see figure 2 on page 8). If the wax guards appear to be clogged, replace them. 6 ENGLISH EARPHONES WAX REMOVAL LOOP NOZZLE WAX BUILDUP AROUND EACH EARPHONE NOZZLE SHOULD BE REMOVED USING THE WAX REMOVAL LOOP FIGURE 1: E1/E5 Wax Removal S S S Foam sleeves should be disposed of and replaced when they get dirty. Flex and Triple-Flange Sleeves should be cleaned with an antiseptic after each use. Wipe down the case and cable with an antiseptic after each use. Stop using the earphones if they are causing great discomfort or infection. NOTE: Nozzles can collect cerumen (earwax), which can clog the earphone and lower the sound quality. If you experience sound loss, check the nozzles for clogging before sending the product in for service. There is a service charge for removing wax. WAX GUARD You should place wax guards on the nozzle of your E2 earphones before using them. To place a Wax Guard on one of your E2 earphones: 1. Remove the sleeve from the earphone nozzle. 2. If there is a dirty wax guard on the earphone, peel it off. 3. Clean the tip of the E2 nozzle with an antiseptic or alcohol wipe. 7 ENGLISH 4. Make sure that the tip of the nozzle is dry, then remove a wax guard from the supplied strip and place it on the tip of the nozzle, adhesive side down. 5. Place the sleeve on the earphone. FOAM SLEEVE WAX GUARD NOZZLE FIGURE 2: E2 Wax Guard Installation IMPORTANT: Do not place Wax Guards on sleeves! Wax guards are intended for use on the tip of the earphone only, otherwise they will not function properly. For service in the U.S., return earphones to: Shure Incorporated, Service Department, 222 Hartrey Avenue, Evanston IL 60202–3696, U.S.A. SPECIFICATIONS: E1 E2 E5 Low mass/ high energy Dynamic Dual low mass/ high energy Sensitivity (at 1kHz) 113.5 dB SPL/mW 105 dB SPL/mW 122 dB SPL/mW Impedance (at 1kHz) 29Ω 16Ω 110Ω Transducer Type Output Connector Cable Length Net Weight Gold-plated, stereo, 3.5 mm (1/8 in.), stereo plug 1.52 m (60 inches) 1.57m (62 inches) 1.55 m (61 inches) 17 g (0.6 oz) 30 g (1 oz) 31 g (1.1 oz) 8 ENGLISH CERTIFICATION Eligible to bear CE marking. Conforms to European EMC Directive 89/336/EEC. Meets applicable tests and performance criteria in European Standard EN 55103 (1996) Parts 1 and 2, for residential (E1) and light industrial (E2) environments. FURNISHED ACCESSORIES E1 Carrying pouch . . . . . . . . . . . . . . . . . . . . . . . . . . . . . . . . . . . . . . . . 95B2232 E2 Carrying pouch . . . . . . . . . . . . . . . . . . . . . . . . . . . . . . . . . . . . . . . . 95A2232 E2 Foam/Flex sleeve assortment w/ wax guards (2 each—small, medium, large) . . . . . . . . . . . . . . . . . . . . . . . 90WW1371 E5 Carrying pouch . . . . . . . . . . . . . . . . . . . . . . . . . . . . . . . . . . . . . . . . 80B8232 E1/E5 Flex sleeve assortment w/cleaning tool (2 each—small, medium, large) . . . . . . . . . . . . . . . . . . . . . . . . . . 80D8228 OPTIONAL ACCESSORIES E1/E5 Earphones: Bag of 20 foam sleeves . . . . . . . . . . . . . . . . . . . . . . . . . . . . . . . . . . . . . . PA750 Bag of 500 foam sleeves . . . . . . . . . . . . . . . . . . . . . . . . . . . . . . . . . . . . PA754 Bag of 10 flex sleeves (small) . . . . . . . . . . . . . . . . . . . . . . . . . . . . . . PA756S (medium) . . . . . . . . . . . . . . . . . . . . . . . . . . . . PA756M (large) . . . . . . . . . . . . . . . . . . . . . . . . . . . . . . . PA756L Triple-Flange sleeves (2) . . . . . . . . . . . . . . . . . . . . . . . . . . . . . . . . . . . . PA755 E2 Earphones: Bag of 10 foam sleeves (small) . . . . . . . . . . . . . . . . . . . . . . . . . . . . . PA752S (medium) . . . . . . . . . . . . . . . . . . . . . . . . . . . PA752M (large) . . . . . . . . . . . . . . . . . . . . . . . . . . . . . . PA752L Bag of 10 flex sleeves (small) . . . . . . . . . . . . . . . . . . . . . . . . . . . . . . PA757S (medium) . . . . . . . . . . . . . . . . . . . . . . . . . . . . PA757M (large) . . . . . . . . . . . . . . . . . . . . . . . . . . . . . . . PA757L Bag of 10 replacement wax guards . . . . . . . . . . . . . . . . . . . . . . . . . . . . PA759 9 ENGLISH CUSTOM EAR MOLDS A Hearing Health Care Professional can make custom-fit ear molds for the E1 and E5 from impressions of your ears. Custom-made ear molds can provide better comfort and ambient noise isolation for some users. The E1 fits in a custom ear mold as shown in the following illustration. For more information, contact: Sensaphonics, Hearing Conservation 660 N. Milwaukee Avenue Chicago, IL 60622 Toll Free: (877) 848-1714 In Chicago: (312) 432-1714 (ph) (312) 431-1738 (fax) e-mail: [email protected] www.sensaphonics.com 10 SHURE Incorporated Web Address: http://www.shure.com 222 Hartrey Avenue, Evanston, IL 60202-3696, U.S.A. Phone: 847-866-2200 Fax: 847-866-2279 In Europe, Phone: 49-7131-72140 Fax: 49-7131-721414 In Asia, Phone: 852-2893-4290 Fax: 852-2893-4055 Elsewhere, Phone: 847-866-2200 Fax: 847-866-2585