1
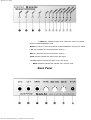
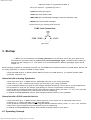
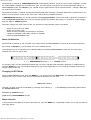
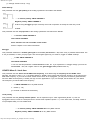
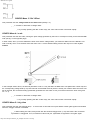
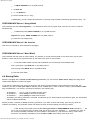
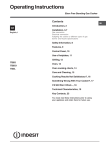
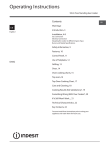
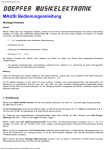
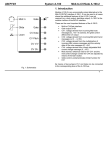
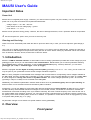
MAUSI User's guide MAUSI User's Guide Important Notes Power Unit MAUSI has no integrated power supply. Therefore, you need an external power unit (not included). You may use Doepfer PS1 power unit or any other that meets the requirements listed below: Voltage output: 7...12 V DC > 500 mA Outer sleeve of the low-voltage plug = ground Inner sleeve = +7...+12 V MAUSI will not operate at wrong polarity. However, this will not damage the device, since a protection diode is incorporated. A Use the Doepfer PS1 power unit if you want to avoid any risk. Cleaning and Servicing There are no user-serviceable parts inside the device. Open the device only in case you want to adjust the gate voltage (s. 4.7). Use a soft dry or slightly moistened cloth to clean the housing. If you want to remove obstinate dirt, moisten the cloth with a small amount of mild detergent and wipe the dirt away. Be sure to rub the device entirely dry afterwards. Never use solvents such as benzene, thinners, alcohol, and the like to clean the device. 1. Introduction MAUSI is a MIDI to CV/SYNC interface. It allows MIDI control of analog synthesizers provided with control voltage (CV) and gate/trigger inputs. Since you can select different CV characteristsics, MAUSI allows you to control synthesizers featuring either V/octave (Moog, Roland, Sequential, A-100) or Hz/V characteristics (Korg, Yamaha). Moreover, you can select gate/trigger (+5...+12V) or switched trigger control (S-Trigger). MAUSI is equipped with two digital-to-analog converters (DAC), generating a CV of 0 V...+5 V. Thus, you can control not only the pitch of your synthesizer but also another voltage-controlled component. DAC 1 is firmly assigned to received MIDI note messages and converts these to corresponding control voltages available at the CV 1 jack. The DAC operates with a resolution of 12 bits, providing a very accurate adjustment in steps of 1/4096th. DAC 2 can be assigned to velocity, after touch or any MIDI controller. The control voltages produced by this 7 bit converter (operating in steps of 1/128th) can be accessed at the CV 2 jack. Additionally, the software implemented in MAUSI offers functions such as portamento (glide), LFO and pitch bending. All these functions can be switched on/off and controlled by MIDI controllers. Furthermore, you can use MAUSI to synchronize older devices equipped with a SYNC interface to MIDI clock (e.g. Roland TR-808, TB-303). Received MIDI real-time messages such as CLOCK, START, and STOP are converted to CLOCK and START/STOP commands according to the sync standard. Normally, the SYNC CLOCK frequency is the same as the one of the received MIDI clock messages. However, you can lower the SYNC CLOCK frequency by selecting a divisor. Furthermore, the polarity of the SYNC CLOCK pulses can be set. In addition, it is possible to control devices such as arpeggiators by means of a special cable (SYNC plug à ¼" plug). All parameter changes can be stored to a special resident memory (EEPROM). 2. Overview Front panel http://www.doepfer.de/maus_m_e.htm[09.12.2013 13:05:45] MAUSI User's guide Œ MENU key switches to EDIT mode, selects the menu to be edited, switches to PERFORMANCE mode MODE key selects a menu set (CONFIG or PERFORMANCE menus) to be edited Ž INC key increases the current parameter value by 1 DEC key decreases the current parameter value by 1 GATE indicator indicates the status of the gate signal ‚ CLOCK indicator indicates the status of the clock signal ƒ ...ˆ MENU indicators indicates the selected menu in EDIT mode Back Panel http://www.doepfer.de/maus_m_e.htm[09.12.2013 13:05:45] MAUSI User's guide CV 2 jack sends CV 2 (generated by DAC 2) ‘ CV 1 jack sends CV 1 (generated by DAC 1) ’ GATE jack sends gate pulses “ SYNC jack sends SYNC pulses ” MIDI THRU jack forwards MIDI messages received at the MIDI In jack • MIDI IN jack receives MIDI messages A jack Connect your external power unit here SYNC Jack Connections (plan view) 3. Startup H Before you connect MAUSI to an analog synthesizer for the first time, refer to the user’s guide of the synthesizer for information about the nature of the required gate/trigger signal. The default factory setting of MAUSI is a gate voltage of +5 V. If the device to be connected requires a different gate/trigger signal, refer to chapter 4.7. Before powering up MAUSI by connecting the power unit, first establish all connections between your MIDI device, MAUSI, and the analog synthesizer or a device controlled by SYNC signals. Connect the MIDI IN jack • of MAUSI with the MIDI OUT jack of your MIDI device (e. g. keyboard controller, MIDI synthesizer, sequencer, etc.). Operation with an Analog Synthesizer Connect the GATE jack ’ of MAUSI with the gate/trigger input jack of your analog synthesizer. Connect the CV 1 jack ‘ of MAUSI with the pitch CV input jack of your analog synthesizer. If your synthesizer features input jacks for other voltage-controlled components, connect the CV 2 jack of MAUSI with the appropriate CV input jack (for example, jacks allowing to control the synthesizers cutoff frequency). Power up MAUSI. The flashing GATE indicator shows MAUSI's software version (one flash = v1, etc.). If not, check the power unit for proper functioning and correct polarity of the low-voltage plug. In CONFIG and PERFORMANCE menues, select suitable parameter values for your synthesizer. Operation with a SYNC-controlled device Connect the GATE jack ‘ of MAUSI with the SYNC input jack of your device. Use an appropriate cable for this connection (e. g. a stereo DIN cable). Do not use a MIDI cable! Power up MAUSI. The flashing GATE indicator suggests MAUSI's software version (1 flash = v1, etc.). If not, check the power unit for proper functioning and correct polarity of the low voltage plug. In CONFIG and PERFORMANCE menues, select suitable parameter values for your device. 4.1 Operating Concept http://www.doepfer.de/maus_m_e.htm[09.12.2013 13:05:45] MAUSI User's guide When MAUSI is powered up, PERFORMANCE mode is automatically selected. This is the normal mode of operation, in which the received MIDI messages are converted to CV, gate, and clock signals according to the interface parameter settings. In PERFORMANCE mode, the indicators ƒ to ˆ are off. Only the gate indicator and the CLOCK indicator ‚ will light if MIDI data are received and converted: Since MAUSI provides a multitude of parameters affecting MIDI data conversion, parameter adjustment is implemented on the basis of a menu structure. There are two menu sets, each containing six different menues. In PERFORMANCE menues, you can set frequently used playing parameters such as bend width or glide time, whereas the basic configuration parameters which are not changed regularly (for example gate polarity, CV proportion, or gate retrigger time) are edited in CONFIG menues. Parameter changes are made in EDIT mode. The procedure to edit parameter values is as follows: Select the menu set to be edited. Switch over to EDIT mode. Select the menu containing the parameter to be edited. Change the parameter value either manually or via MIDI. Return to PERFORMANCE mode. Menu Set Selection When MAUSI is powered up and you switch over to EDIT mode, the PERFORMANCE menues can be accessed right away. By pressing the MODE key, you can switch over to the CONFIG menues. The selected menu set is indicated by the indicators flashing successively(PERFORMANCE menu set: from left to right; CONFIG menu set: from right to left). ð ð ð : PERFORMANCE menues ï ï ï : CONFIG menues For example, when you have powered up MAUSI and now want to edit the GATE POLARITY parameter in CONFIG menu 1, press the MODE key once. The indicators flashing from right to left suggest that you can access the CONFIG menues if you change to EDIT mode now. Changing to EDIT Mode When in PERFORMANCE mode, press the MENU key Œ to change over to the EDIT mode. The flashing menu indicator ƒ suggests that you are in EDIT mode and can access the parameters of the first menu: EDIT mode - menu 1 Generally, the EDIT mode can be identified by a flashing menu indicator (ƒ ...ˆ ). The frequency of the flashing LED points to the activated menu set: slow flashing: CONFIG menues quick flashing: PERFORMANCE menues Menu selection If the parameter to be edited is not part of the first menu, press the MENU key Œ repeatedly to switch over to the next menues (see figure below). http://www.doepfer.de/maus_m_e.htm[09.12.2013 13:05:45] MAUSI User's guide Changing Parameters There are two ways of changing MAUSI's parameters: manually or by "learned" MIDI messages. Whenever possible, make your changes via MIDI. In chapters 4.2 and 4.3, the symbols M (MIDI) and m (manual change) indicate the possible ways of setting parameters. When changing the values manually, press the INC key Ž to increase the value by 1 and the DEC key to decrease the value by 1. Any change is confirmed by a short flash of all indicators. You can also change the values through a MIDI message transmitted to MAUSI. For instance, when you are in CONFIG menu 1 and transmit the MIDI message PROG Change 3, the parameter CV CHAR. is changed to V/octave proportion. Returning to PERFORMANCE Mode When you have made your change, you may change other parameters available in the same menu, or you may press the MENU key Œ to switch over to the next menu. Pressing the MENU key Œ repeatedly gets you back to PERFORMANCE mode after passing menu 6. All menu indicators (ƒ ...ˆ ) are off now (see fig. above). H If you have changed a parameter and now want to edit a parameter of the other menu set, you have to return to PERFORMANCE mode first. Then press the MODE key to switch over to the other menu set. 4.2 CONFIG Menues Config Menu 1 / CHANNEL / REF. NOTE The CHANNEL parameter sets the MIDI receive channel. The MIDI messages received on this channel in PERFORMANCE mode are converted to gate and CV signals and then transmitted to the analog synthesizer connected to MAUSI. The REF.NOTE parameter sets the basic note, which is the note on the MIDI keyboard corresponding to the lowest note which can be generated by the analog synthesizer (usually MIDI note number 36). M NOTE ON ch n vel ch: MIDI channel n: MIDI note number H Please note that the MIDI channel and the basic note are reset to the values of a received MIDI note. This way of setting the MIDI channel should be preferred to the setting made in PERFORMANCE mode (no confirmation!). http://www.doepfer.de/maus_m_e.htm[09.12.2013 13:05:45] MAUSI User's guide [m Change of basic note (0...127)] GATE Polarity This parameter sets the gate polarity of the analog synthesizer connected to the MAUSI. M Positive polarity: PROG CHANGE 1 Negative polarity: PROG CHANGE 2 H When using S-Trigger (jumper removed), the mode of operation is exactly the other way round. cv char. This parameter sets the CV proportion of the analog synthesizer connected to the MAUSI. M V/octave: PROG CHANGE 3 Hz/V: PROG CHANGE 4 Some functions are not accessible in Hz/V mode! Refer to chapter 4.8 for further information. Retrigger This parameter determines if another gate signal is transmitted (RETRIGGER = ON) when a key is pressed while another one is not yet released, or when you play legato. This second gate signal may, for instance, trigger an ADSR envelope. M OFF: PROG CHANGE 5 ON: PROG CHANGE 6 H You can set this parameter in PERFORMANCE mode, too. If you experience no retrigger though you have set RETRIGGER = ON, set a higher value for the gate retrigger time (CONFIG menu 5). CONFIG Menu 2 / clock time This parameter sets the divisor for the MIDI clock frequency, thus determining the frequency for the SYNC clock. Normally, the divisor is set to 1 (e. g. for Roland TB303 or TR808), which means that the SYNC frequency is the same as the MIDI clock frequency. If you want to control another device such as an arpeggiator, you may have to select a greatest divisor, since the MIDI clock frequency is usually too high for such applications. If you, for example, set the divisor to 2, the SYNC clock frequency is half the MIDI clock frequency. M PROG CHANGE n on any MIDI channel n = divisor (1...64) [m Increase or decrease of the devisor] clock polarity This parameter sets the polarity of SYNC pulses. This is important only for "slow" applications (divisor >1) such as arpeggiator control, but has no consequences for normal SYNC operation (divisor = 1). In the worst case, it actually causes a non-perceptible delay of a few milliseconds. M Positive polarity: PROG CHANGE 65 on any MIDI channel Negative polarity: PROG CHANGE 66 on any MIDI channel http://www.doepfer.de/maus_m_e.htm[09.12.2013 13:05:45] MAUSI User's guide CONFIG Menu 3 / Ref. Offset This parameter sets the voltage offset for the basic note (usually 0 V). m Increase or decrease of voltage offset. H If you keep pressing the INC or DEC keys, the value will increase or decrease rapidly. CONFIG Menu 4 / scale This parameter sets the fine scale, causing the pitch voltage generated by the DAC to correspond exactly to the received MIDI note (see fig. on the opposite page). In other words, when you have selected the basic note and the voltage offset, you transmit a MIDI note to the MAUSI. This note is usually one or more octaves above the basic note. A correct SCALE setting ensures the output of a note in pure octaves. In the example shown above, the SCALE parameter is set in a way that after the MIDI basic note (MIDI note number 36) and the corresponding voltage offset (0 V) have been set and the MIDI note 84 (which is exactly four octaves above the basic note 36) is received, the connected analog synthesizer generates the note which is four pure octaves above the basic note (pitch CV = 4 V). m Increase or decrease of voltage offset. H If you keep pressing the INC or DEC keys, the value will increase or decrease rapidly. CONFIG Menu 5 / rtrig. time This parameter sets the gate retrigger time, i. e. the amount of time that has to pass before another gate signal is transmitted when the retrigger function is activated. H When setting this value, always start with the shortest retrigger time (1 ms) and check if the connected synthesizer is retriggered. If not, increase this value until your synthesizer recognizes the new gate signal. http://www.doepfer.de/maus_m_e.htm[09.12.2013 13:05:45] MAUSI User's guide M PROG CHANGE n n = 0...127 RTRIG.TIME = n * 1 ms [m Value increase/decrease (0...255) in steps of 1 ms] CONFIG Menu 6 / assign cv2 This parameter sets the MIDI event assigned to DAC2. According to this assignment, received MIDI messages are converted to CV 2. M No. for manual setting MIDI event 0 Velocity (H in that case, a NOTE On/Off has to be transmitted) 1 Program change 2 Controller #n 3 Pitch bend 4 channel’s after-touch 5 polyphonic after-touch [m Assignment (0...5)] H Please note that MAUSI is able to learn any MIDI controller that you want to assign to DAC2. Just select CONFIG menu 6 and transmit the controller via MIDI to MAUSI. For example, if you move the Data Entry control (MIDI controller #6) at the connected MIDI keyboard, this control is assigned to DAC 2, meaning that whenever data produced by this controller are received they are converted to CV 2. This is also valid for Main Volume (MIDI Controller #7), Breath Controller, Foot Controller, etc. Performance Menues PERFORMANCE Menu 1 / Channel This parameter sets the MIDI receive channel. The data received on this channel in PERFORMANCE mode are converted to gate and CV signals and then transmitted to the analog synthesizer connected to MAUSI. [m Set the MIDI channel (1...16)] H We recommend to set the MIDI channel by means of a MIDI message received in CONFIG menu 1 (page 10), since you can immediately check if the procedure was successful. PERFORMANCE Menu 2 / LFO FREQ. This parameter sets the frequency of the LFO integrated in MAUSI. If you select a value <3, the LFO is switched off. Make an acoustic check of the set frequency. m Set the LFO frequency (~0.2 Hz...20 kHz) H If you keep pressing the INC or DEC keys, the value will increase or decrease rapidly. PERFORMANCE Menu 3 / Glide time This parameter sets the time of the GLIDE function (portamento) implemented in MAUSI. Set the value in steps of 20 ms. http://www.doepfer.de/maus_m_e.htm[09.12.2013 13:05:45] MAUSI User's guide M PROG CHANGE n on any MIDI channel n = 0 Glide Off n = 1...127 Glide On [m Set the GLIDE time (0...127)] H Additionally, you can change this parameter in real-time using the MIDI controller #5 (portamento; see p. 19). PERFORMANCE Menu 4 / Assign Mode This parameter sets the note assignment, i. e. it determines which note is played when more than one note is received simultaneously. M Last Note priority PROG CHANGE 1 on any MIDI channel Highest Note priority PROG CHANGE 2 on any MIDI channel [m Select the note assignment] PERFORMANCE Menu 5 / No function This menu is reserved for future extensions (arpeggio). PERFORMANCE Menu 6 / Bend Width This parameter sets the range for pitch bending. For example, if you set the bend width to one whole tone, use the pitch bender to "bend" the pitch of a pressed note up and down to the point of one semitone. M The bend width results from the interval between two successively received MIDI notes. Note 1 (reference note) NOTE On on any MIDI channel Note 2 (range note) NOTE On on any MIDI channel [m Sets the bend width] 4.4 Storing Edits MAUSI is equipped with a special resident memory (EEPROM). You can store the whole device setup; this setup will be recalled when MAUSI is powered up again. If you change a parameter, this change is temporary and will be lost when MAUSI is disconnected from the power unit. Therefore, you have to store your edits,so that they can be recalled later. In order to store the setup, press the INC and DEC keys simultaneously. Your action is confirmed by MAUSI in the following way: All indicators ( ...ˆ ) are on, until you release the keys again. All indicators ( ...ˆ ) flash slowly for about three seconds. All indicators ( ...ˆ ) flash quickly for about three seconds. Afterwards, the storing procedure is executed. All indicators go out. When MAUSI is powered up again, the stored setup will be recalled automatically. MAUSI provides a function to cancel the storing procedure. If you want to cancel the storing, press any key while the indicators are flashing. The parameter values will remain he same as before starting the storing procedure. H We strongly recommend to execute the storing procedure in PERFORMANCE mode (indicators ƒ ...ˆ are off). If you try to store the setup in EDIT mode (this is when one of the indicators ƒ ...ˆ is flashing), the value of the currently activated parameter may be increased or decreased by 1 just before the storing. This is likely because it is practically impossible to press the INC and DEC keys exactly at the same time. http://www.doepfer.de/maus_m_e.htm[09.12.2013 13:05:45] MAUSI User's guide If necessary, you can always recall the default factory settings (see chapter 4.6). 4.5 PERFORMANCE Mode When in PERFORMANCE mode, MAUSI converts received MIDI messages to corresponding gate and CV signals. Apart from the MIDI controllers mentioned before, MAUSI recognizes the MIDI controller messages described below and converts them accordingly. controller #01 (Modulation) This controller sets the modulation intensity, i. e. the LFO amplitude. M CONTROL ch 01 n n: 0...127 ch: MIDI channel controller #05 (Portamento Time) This controller sets the glide time (portamento time; see also PERFORMANCE menu 3). The settings made here will not be stored in MAUSI’s memory, which means that the default factory setting will be restored when MAUSI is powered up. M CONTROL ch 05 n n: 0...127 Portamento time ch: MIDI channel controller #64 (Sustain) This controller switches the sustain function on and off. M CONTROL ch 64 n n: 0...63 Sustain Off n: 64...127 Sustain On ch: MIDI channel controller #65 (Portamento) This controller switches the glide function on and off. M CONTROL ch 65 n n: 0...63 Glide Off n: 64...127 Glide On ch: MIDI channel controller #68 (Legato) This controller switches the retrigger function (see CONFIG menu 1) on and off. The settings made here will not be stored in MAUSI’s memory, which means that the default factory setting will be restored when MAUSI is powered up. M CONTROL ch 68 n n: 0...63 Retrigger Off n: 64...127 Retrigger On http://www.doepfer.de/maus_m_e.htm[09.12.2013 13:05:45] MAUSI User's guide ch: MIDI channel controller #92 (Tremolo) This controller sets the LFO frequency (see PERFORMANCE menu 2). The settings made here will not be stored in MAUSI’s memory, which means that the default factory setting will be restored when MAUSI is powered up. M CONTROL ch 92 n n: 0...127 LFO frequency ch: MIDI channel controller #121 (All Controllers Off) If you transmit this controller message to MAUSI, modulation intensity will be decreased down to 0 (however, the LFO runs on), and the Glide function will be switched off. M CONTROL ch 121 n n: 0...127 ch: MIDI channel controller #123 (All Notes Off) If you transmit this controller message to MAUSI, the gate signal will be switched off, and all notes left in MAUSI’s memory will be deleted. All control voltages remain on the voltage level currently selected. M CONTROL ch 123 n n: 0...127 ch: MIDI channel 4.6 Reset When MAUSI is powered up for the first time, its memory is initialized, meaning that all parameters are set to default values (see diagram below). Parameter Value Comment Channel 0 MIDI channel 1 ref. note 36 C3 clock time 1 1 MIDI clock message = 1 SYNC clock pulse clock polarity 0 Positive: [Abbildung] « retrigger 0 Legato (no retrigger lfo freq. glide time 0 No portamento bend width 12 1 octave assign cv2 0 Velocity assign mode 0 High note About 3 Hz http://www.doepfer.de/maus_m_e.htm[09.12.2013 13:05:45] MAUSI User's guide scale Semitone scale ref. offset 0V gate polarity 0 Positive: [Abbildung] rtrig. time 4 4 milliseconds cv char. 0 1 V/octave If necessary, you can always recall the default factory settings. Select one of the two options: a) Only the parameters marked with a "« " in the diagram above will be reset, or b) all parameters depicted in the diagram above will be reset. The procedure is as follows: a: Switch off MAUSI by disconnecting the power unit. Keep the MENU key Œ pressed and reconnect the power unit. The reset is confirmed by MAUSI's indicators ...ˆ , which will be flashing slowly for about five seconds. b: Switch off MAUSI by disconnecting the power unit. Keep all keys Œ to pressed simultaneously and reconnect the power unit. The reset is confirmed by MAUSI's indicators ...ˆ , which will be flashing slowly for about five seconds, then flashing quickly for another five seconds. 4.7 Adjustment of Gate Signals MAUSI's gate voltage default setting is +5 V. If your analog synthesizer requires a different sort of gate/trigger signal, select one of the two options described below: a gate voltage with a level equal to the supply voltage an S-Trigger (switched trigger), which is preferably required by Moog synthesizers. Refer to the manual of your synthesizer for information about the required trigger signal. You have to open the housing in order to adjust the gate signal. The procedure is as follows: Switch off MAUSI by disconnecting the power unit. Open the housing by removing the four cross-head screws in the front panel with an appropriate screwdriver. Remove the upper cover. A 3-pole pinboard is located behind the power jack. The sort of gate/trigger signal is determined by the position of the jumper attached to one of these pins (see also the print on the circuit board): +5: Control voltage +5 V +U: Gate voltage with level equal to the supply voltage S: S-Trigger (no jumper) H The marks indicating "+5" and "+U" were by mistake exchanged on the circuit board. Attach the jumper to the correct pin on the pinboard. If you select the S-Trigger (no jumper), attach the jumper to the dummy pinboard next to the print, so it cannot get lost. http://www.doepfer.de/maus_m_e.htm[09.12.2013 13:05:45] MAUSI User's guide Reassemble the housing. 4.8 Notes on the Hz/V mode If you select the Hz/V proportion (see chapter 4.2) to control, for instance, a KORG MS-10 or MS-20 synthesizer, the functions listed below are not available for technical reasons, meaning that the settings cannot be changed: REF. OFFSET SCALE PITCH BEND GLIDE LFO/MODULATION Therefore, you should operate MAUSI in V/octave proportion whenever possible. H The KORG MS-10 and MS-20 synthesizer allow V/octave operation. Use the "TOTAL" jack as CV input and select 1 V/octave with the "MG/T.EXT" control. http://www.doepfer.de/maus_m_e.htm[09.12.2013 13:05:45]