1
AMS REALTIME Resources
Version 5.1
User Guide
Software By
Paul Wohlers
Ernie Krausman
Dirck Blaskey
Documentation By
Deborah Davidson
Neil Smith
i
AMS REALTIME Resources User Guide
Advanced Management Solutions, Inc., Issue 1.1
Table of Contents
PROGRAM DESCRIPTION............................................................................................................................... 9
OVERVIEW .......................................................................................................................................................... 9
Multi-Platform Multi-Protocol Client/Server.................................................................................................. 9
LOGIN ACCESS CONTROL .................................................................................................................................. 10
GETTING STARTED ....................................................................................................................................... 13
AN INTRODUCTION TO AMS REALTIME.......................................................................................................... 13
THE DEFAULT DATABASE .................................................................................................................................. 16
The Activity Dataset ..................................................................................................................................... 18
The Employee Dataset.................................................................................................................................. 19
The Organization Dataset............................................................................................................................. 20
The Workplan and Actuals Datasets ............................................................................................................. 21
ENTERING DATA ............................................................................................................................................... 21
Adding Activities .......................................................................................................................................... 21
Adding Employees........................................................................................................................................ 22
Adding Organizations................................................................................................................................... 23
Modifying the Data Definitions .................................................................................................................... 25
SUMMING UP .................................................................................................................................................... 26
MAKING A WORK PLAN ..................................................................................................................................... 27
Assigning Work ............................................................................................................................................ 27
Swapping Plan Assignments ......................................................................................................................... 29
Activity Popup List Filtering ........................................................................................................................ 29
REPORTING TIME .............................................................................................................................................. 30
Posting Actual Hours Worked....................................................................................................................... 30
Navigating Through Time............................................................................................................................. 30
Entering Actual Time ................................................................................................................................... 31
Updating Estimates to Complete .................................................................................................................. 33
Entering Time for Another Employee ........................................................................................................... 35
ADDING AN UNPLANNED ACTIVITY .................................................................................................................... 35
GENERATING A REPORT ..................................................................................................................................... 36
EXITING AMS REALTIME RESOURCES ............................................................................................................ 40
PROGRAM MENUS ......................................................................................................................................... 41
PROGRAM LINE ................................................................................................................................................. 41
PULLDOWN MENUS ........................................................................................................................................... 41
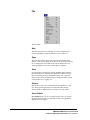
File .............................................................................................................................................................. 42
New .......................................................................................................................................................................... 42
Open ......................................................................................................................................................................... 42
Save .......................................................................................................................................................................... 42
Save as ...................................................................................................................................................................... 42
Save Globals ............................................................................................................................................................. 42
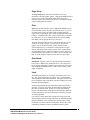
Page Setup................................................................................................................................................................. 43
ii
AMS REALTIME Resources User Guide
Advanced Management Solutions, Inc., Issue 1.1
Print .......................................................................................................................................................................... 43
Print Batch ................................................................................................................................................................ 43
Load.......................................................................................................................................................................... 43
Dump ........................................................................................................................................................................ 44
Exit ........................................................................................................................................................................... 44
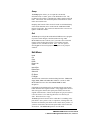
Edit Menu .................................................................................................................................................... 44
View Menu ................................................................................................................................................... 45
Options Menu............................................................................................................................................... 46
Login as..................................................................................................................................................................... 46
Change Password....................................................................................................................................................... 46
Recalculate................................................................................................................................................................ 48
Network Test............................................................................................................................................................. 48
Memory Check .......................................................................................................................................................... 48
Timecard Menu ............................................................................................................................................ 49
Submit....................................................................................................................................................................... 49
Approve..................................................................................................................................................................... 49
Reject........................................................................................................................................................................ 49
Close ......................................................................................................................................................................... 50
Help ............................................................................................................................................................. 50
FUNCTION TABS ................................................................................................................................................ 50
Time............................................................................................................................................................. 51
Posting Time ............................................................................................................................................................. 51
Unplanned Work ....................................................................................................................................................... 53
Plan ............................................................................................................................................................. 54
Resource Availability................................................................................................................................................. 54
Viewing Overall Assignments for a Resource............................................................................................................. 55
Using Skill Codes...................................................................................................................................................... 55
Report .......................................................................................................................................................... 56
Display...................................................................................................................................................................... 57
Headings ................................................................................................................................................................... 58
Groups ...................................................................................................................................................................... 59
Filters........................................................................................................................................................................ 60
Specifications ............................................................................................................................................................ 60
Batch List.................................................................................................................................................................. 60
Update ......................................................................................................................................................... 61
Key Fields ................................................................................................................................................................. 61
Define Mode................................................................................................................................................. 64
Renaming, Creating and Deleting Datasets ................................................................................................................ 65
Filter............................................................................................................................................................ 65
Access .......................................................................................................................................................... 65
OTHER HOTSPOTS ............................................................................................................................................. 66
Tool Tips ...................................................................................................................................................... 66
The Message Area ........................................................................................................................................ 66
Resizing the Window Layouts ....................................................................................................................... 66
Resizing the Calendar Timeline Window....................................................................................................... 67
Panning the Calendar Timeline Window....................................................................................................... 67
Calendar Control ......................................................................................................................................... 67
Editing Calendars ........................................................................................................................................ 68
Working Time - Shifts ............................................................................................................................................... 69
Moving Around in the Calendar................................................................................................................................. 69
Selecting Dates.......................................................................................................................................................... 69
Changing Working Days ............................................................................................................................................ 70
Work Cycles.............................................................................................................................................................. 70
Defining Overdays..................................................................................................................................................... 71
Specifying the Range of Dates Covered by a Cycle..................................................................................................... 71
Creating a New Calendar............................................................................................................................. 72
GENERAL SUMMARY ......................................................................................................................................... 72
iii
AMS REALTIME Resources User Guide
Advanced Management Solutions, Inc., Issue 1.1
DEFINING DATASETS .................................................................................................................................... 75
THE BASIC AMS REALTIME RESOURCES DATASETS ........................................................................................ 75
CREATING DATASET FIELD DEFINITIONS ............................................................................................................ 75
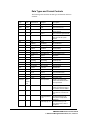
Data Types and Format Controls.................................................................................................................. 76
Defining the Activity Dataset........................................................................................................................ 77
Data Types ................................................................................................................................................................ 78
Attributes .................................................................................................................................................................. 81
A Sample Activity Dataset Definition ........................................................................................................................ 82
Defining the Employee Dataset .................................................................................................................... 82
Defining the Organization Dataset ............................................................................................................... 83
Renaming, Creating and Deleting Datasets .................................................................................................. 83
Timecard Notes and Annotations.................................................................................................................. 84
Decimal Calculations and Reference Fields ................................................................................................. 84
Adding Rate References to the Employee Table ......................................................................................................... 85
Adding Rate References to the Workplan Table ......................................................................................................... 85
Calculating Total Costs in the Activity Table ............................................................................................................. 87
Lookup Fields............................................................................................................................................... 87
Creating a Lookup Dataset......................................................................................................................................... 88
Entering Lookup Reference Data ............................................................................................................................... 90
Defining Fields that Use a Lookup Field .................................................................................................................... 90
UPDATING INFORMATION........................................................................................................................... 91
DATA ENTRY TABLES........................................................................................................................................ 91
Changing the Table Layout .......................................................................................................................... 91
Deleting Records.......................................................................................................................................... 92
Saving the Data............................................................................................................................................ 92
Hierarchical Organization Data Coding ...................................................................................................... 92
PLANNING WORK .......................................................................................................................................... 93
SELECTING A TASK FOR PLANNING ..................................................................................................................... 93
ASSIGNING EMPLOYEES TO THE TASK ................................................................................................................ 93
PLANNING THE WORKLOAD ............................................................................................................................... 94
Moving to Another Task ............................................................................................................................... 94
Filtering Activities ....................................................................................................................................... 94
Employee Availability Profile....................................................................................................................... 94
Viewing an Employee’s Task List.................................................................................................................. 95
Scaling the Calendar Timeline ..................................................................................................................... 95
Using Skill Codes ......................................................................................................................................... 96
Swapping Plan Assignments ......................................................................................................................... 97
POSTING TIME WORKED ............................................................................................................................. 99
TIMECARD SCREEN............................................................................................................................................ 99
Reporting Time............................................................................................................................................. 99
REPORTING WORK DONE ON A TASK ................................................................................................................ 100
Timecard Fields for a Task......................................................................................................................... 101
Entering Hours Worked.............................................................................................................................. 101
Changing the Timecard Layout .................................................................................................................. 101
CORRECTING AN ENTRY .................................................................................................................................. 102
How to Correct an Entry .......................................................................................................................................... 102
Audit Trail .............................................................................................................................................................. 103
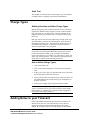
CHARGE TYPES ............................................................................................................................................... 103
Defining Overtime and Other Charge Types............................................................................................................. 103
How to Define Charge Types ................................................................................................................................... 103
ADDING NOTES TO YOUR TIMECARD ................................................................................................................ 103
iv
AMS REALTIME Resources User Guide
Advanced Management Solutions, Inc., Issue 1.1
How to Setup Notes on Timecards ........................................................................................................................... 104
Adding a Note to a Time Cell .................................................................................................................................. 104
COLOR CODING............................................................................................................................................... 105
‘Traffic Light’ Approval status:................................................................................................................................ 105
Charge Types........................................................................................................................................................... 105
Calendars and Days ................................................................................................................................................. 105
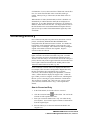
Adding New Activities ................................................................................................................................ 105
Non-Project Tasks ................................................................................................................................................... 107
Posting Time for Unplanned Work.............................................................................................................. 107
WORK BREAKDOWN STRUCTURES.................................................................................................................... 107
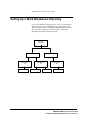
WBS Concept ............................................................................................................................................. 107
SETTING UP A WORK BREAKDOWN HIERARCHY................................................................................................ 110
DEFINING THE WBS TABLES ........................................................................................................................... 111
Defining the Activity WBS Fields................................................................................................................ 112
Entering Data in the WBS Source Tables.................................................................................................... 114
Defining the WBS Relationships ................................................................................................................. 116
WORKING WITH THE STRUCTURE .................................................................................................................... 119
Time Entry ................................................................................................................................................. 120
THE OUTCOME AND BENEFITS OF WBS CONFIGURATION .................................................................................. 120
Drilldown Filters........................................................................................................................................ 120
Find Existing........................................................................................................................................................... 120
Create New ............................................................................................................................................................. 121
FILTERS AND VIEWS ................................................................................................................................... 123
INTRODUCTION ............................................................................................................................................... 123
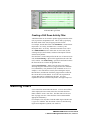
SORT FILTERS ................................................................................................................................................. 123
Creating a Drill Down Activity Filter ......................................................................................................... 124
MATCHING FILTERS ........................................................................................................................................ 124
The Current User Subset ............................................................................................................................ 125
VIEWS ............................................................................................................................................................ 126
GENERATING REPORTS ............................................................................................................................. 126
INTRODUCTION ............................................................................................................................................... 126
FUNCTION ICONS............................................................................................................................................. 127
REPORT BUTTON ............................................................................................................................................. 127
HEADINGS BUTTON.......................................................................................................................................... 127
GROUPS BUTTON ............................................................................................................................................. 128
FILTERS BUTTON ............................................................................................................................................. 129
REPORT PERIOD DATES .................................................................................................................................... 129
SUMMARIZED BY BUTTON................................................................................................................................ 130
SPECIFICATIONS .............................................................................................................................................. 130
BATCH LIST .................................................................................................................................................... 131
IMPORTING AND EXPORTING .................................................................................................................. 133
INTRODUCTION ............................................................................................................................................... 134
EXPORTING DATA ........................................................................................................................................... 135
IMPORTING DATA ............................................................................................................................................ 135
Creating Transaction Files......................................................................................................................... 136
AMS REALTIME INTERFACE PROJECTS AND RESOURCES .............................................................. 137
INTRODUCTION ............................................................................................................................................... 137
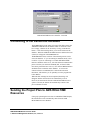
CONNECTING TO THE RESOURCES DATABASE ................................................................................................... 139
SENDING THE PROJECT PLAN TO AMS REALTIME RESOURCES....................................................................... 139
Operations ................................................................................................................................................. 140
v
AMS REALTIME Resources User Guide
Advanced Management Solutions, Inc., Issue 1.1
Options ...................................................................................................................................................... 140
Posting the Plan ......................................................................................................................................... 141
GETTING THE PROJECT PLAN FROM AMS REALTIME RESOURCES .................................................................. 141
Operations ................................................................................................................................................. 142
Options for Data Exchange ........................................................................................................................ 142
Activity Date Options ................................................................................................................................. 142
Getting the Plan ......................................................................................................................................... 143
GETTING ACTUALS FROM AMS REALTIME RESOURCES................................................................................. 143
Options for Data Exchange ........................................................................................................................ 144
Options for Time Now................................................................................................................................. 144
Loading Actuals ......................................................................................................................................... 145
GET ACTIVITY UPDATES FROM AMS REALTIME RESOURCES ......................................................................... 145
IDENTIFYING PROJECT OWNERSHIP OF TASKS ................................................................................................... 145
TIMECARD TRANSACTION DUMPS .................................................................................................................... 145
SYSTEM ADMINISTRATION....................................................................................................................... 147
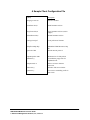
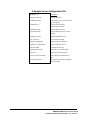
CONFIGURATION AND SETUP............................................................................................................................ 147
A Sample Client Configuration File............................................................................................................ 149
A Sample Server Configuration File ........................................................................................................... 150
Command Line Specifications .................................................................................................................... 151
LOGIN IDS ...................................................................................................................................................... 151
PASSWORDS .................................................................................................................................................... 152
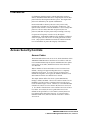
ACCESS SECURITY CONTROLS ......................................................................................................................... 152
Access Codes.............................................................................................................................................. 152
Access Hierarchy ....................................................................................................................................... 154
Attaching a Filter or View to an Access Code............................................................................................. 154
Creating a User Login Filter ...................................................................................................................... 155
NETWORK ENVIRONMENT ....................................................................................................................... 156
NETWORK OPTIONS ......................................................................................................................................... 156
Network Configuration Parameters ............................................................................................................ 157
Local or Remote Database Access.............................................................................................................. 157
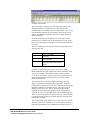
CLIENT/SERVER STATUS BAR .......................................................................................................................... 158
Event Log................................................................................................................................................................ 159
CONFIGURATION SWITCHES ............................................................................................................................. 161
AMS REALTIME Resources Switches ......................................................................................................... 161
Environment Switches ................................................................................................................................ 164
Communication Switches............................................................................................................................ 167
AMS REALTIME Projects Switches ............................................................................................................ 169
DDE SERVICE TOPICS ..................................................................................................................................... 171
OPEN DATABASE CONNECTIVITY (ODBC) ....................................................................................................... 175
INSTALLING THE ODBC DRIVERS .................................................................................................................... 176
Basic ODBC Drivers .................................................................................................................................. 176
Configuring the Data Sources .................................................................................................................... 176
MAKING AN ODBC CONNECTION TO RESOURCES ............................................................................................. 177
vi
AMS REALTIME Resources User Guide
Advanced Management Solutions, Inc., Issue 1.1
Copyright
This manual and the software described in it are copyrighted with
all rights reserved. Under the copyright laws, this manual and
software may not be copied, in whole or in part, without the written
consent of Advanced Management Solutions, Inc., except in the
normal use of the software or to make a backup copy. The same
proprietary and copyright notices must be affixed to any permitted
copy that are affixed to the original material. This exception does
not allow copies to be made for others, whether or not they are sold,
but all material purchased (along with backup copies) may be sold,
given, or loaned to another person. Under law, copying includes
translation into another language or format.
Information in this manual is subject to change without notice and
does not represent a commitment by the vendor. The software
described in this manual is furnished under a license agreement and
may only be used and copied in accordance with the terms of said
agreement.
AMS REALTIME is a trademark of Advanced Management
Solutions, Inc. The family of AMS REALTIME management
software contains modules for Projects, Resources, Solo, Vision,
Gateways and Costs. These modules have evolved from the
software formerly known as AMS Timekeeper and Schedule
Publisher. All other product names mentioned in this manual or
software are the respective trademarks of their owners.
Copyright 1997 Advanced Management
Solutions, Inc.
7231 Boulder Avenue, Suite 803, Highland, California 92346 USA
PHONE (909) 790 2026
FAX (909) 790 1892
vii
AMS REALTIME Resources User Guide
Advanced Management Solutions, Inc., Issue 1.1
Program Description
Overview
Multi-Platform Multi-Protocol
Client/Server
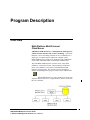
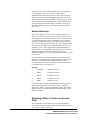
AMS REALTIME Resources is a multi-platform, multi-protocol
solution for time collection and resource scheduling. This means
that there is no need to change networks or force conformance to a
single type of computer system within your company! AMS
REALTIME Resources client/server architecture can communicate
across UNIX, Macintosh and PC workstations simultaneously.
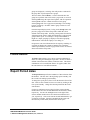
The AMS REALTIME Resources software can be run in either
standalone or client/server mode. When running in stand-alone
mode, a local database is accessed by each AMS REALTIME
Resources client program. This is mostly used for designing a
database and piloting before going live with a system. When AMS
Rtrx32.zip
REALTIME Resources is run in client/server mode, each
client has multi-user access to a single database, which is located on
the server machine.
9
AMS REALTIME Resources User Guide
Advanced Management Solutions, Inc., Issue 1.1
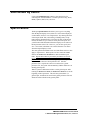
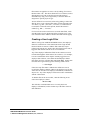
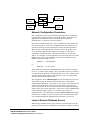
Client/Server mode: database transaction services for many clients.
The AMS REALTIME Resources program is available for
Windows, UNIX X Windows (Motif) and Macintosh environments.
A configuration file provides information regarding the local system
configuration, the communication protocols used and the location of
the database.
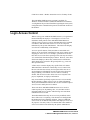
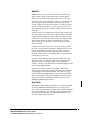
Login Access Control
When a user logs into AMS REALTIME Resources, a Login ID and
Password identify the employee. The employee’s Access Level
determines which portions of the AMS REALTIME Resources
software can be accessed, as well as what data that can be examined
or modified. Both Passwords and Access Levels are setup and
maintained by the System Administrator. This assures the integrity
as well as the confidentiality of the database.
Access to specific datasets, fields, and data records within each
dataset, can be specifically controlled for each user by setting up and
assigning an Access Level. For example, a particular level of user
must have access to the Time reporting section, but may also need to
view certain fields from the Employee dataset. However, some other
fields in the Employee dataset may contain sensitive information
which should not be released to the general public (e.g., rates and
other personnel data).
A filter can be created to display only specific fields of a dataset.
When that filter is attached to a Read-Only Access Control Code,
the users who have that security level assigned will be able to see
selected Employee information records, but will not be allowed to
change anything. This method of access control is extremely
flexible, and can also be used to allow users to see only their own
project, department, or employee information.
Only users with the specifically required Access Level can modify
the data structures, change Access Levels, or update information.
The System Administrator should be the only user with the required
Access Level to modify the Access dataset.
These tools allow AMS REALTIME Resources to be used as a
central repository for all planning, time, cost, and other related
information that may be sensitive without being concerned about
unauthorized access to data
The default database has only one access level predefined, which
allows full access to everything. This should not be changed until
the database has been completely designed. However, additional
access levels can be added to fully define each employee access level
for purposes of security. There is no internal limit to the number of
access levels which can be defined by the System Administrator.
10
AMS REALTIME Resources User Guide
Advanced Management Solutions, Inc., Issue 1.1
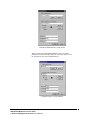
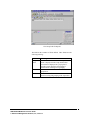
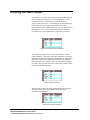
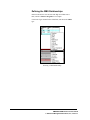
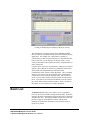
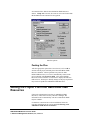
AMS REALTIME Resources Login Screen
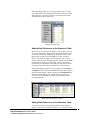
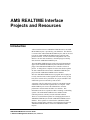
When you first enter AMS REALTIME Resources, you will be
prompted for a dataset and preference file. These file names can be
pre-specified in your client configuration file.
A Sample Login to a Local Database
11
AMS REALTIME Resources User Guide
Advanced Management Solutions, Inc., Issue 1.1
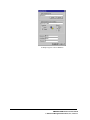
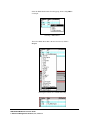
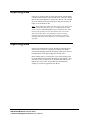
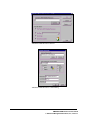
A Sample Login to a Server Database
12
AMS REALTIME Resources User Guide
Advanced Management Solutions, Inc., Issue 1.1
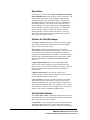
Getting Started
An Introduction to AMS REALTIME
AMS REALTIME Resources can be run as a single-user system
with a local database, or as a multi-user, client/server program with
a central database located on a server. In the multi-user mode, the
server is accessed through a client program on each workstation,
which communicates over a network. In most implementations,
AMS REALTIME Resources is used with the multi-user,
client/server mode.
Standalone or client/server access to a AMS REALTIME Resources
database mode is determined through preference and/or
configuration files, which are discussed later in this manual. The
system configuration and design should be customized by the system
administrator. For the purposes of this introduction, we will assume
that you have installed the software on your local machine exactly as
it comes from the box and have not made any configuration
changes. In this case, you will be operating the software in
standalone mode, which is the recommended way to learn about
AMS REALTIME Resources.
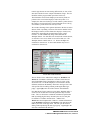
When AMS REALTIME Resources is first launched, the splash
screen will display the software version number and the AMS
copyright. Since the default configuration does not contain a
preference file setting, a dialog will allow you to Create a new
preferences file or Find an existing one.
The preferences file contains the location of the AMS REALTIME
Resources database, the last user that used AMS REALTIME
Resources, and user-defined views, filters and report layouts. If this
is the first time that AMS REALTIME Resources has been executed,
a preference file will not yet exist. Choose the Create button under
Select a Preference File.
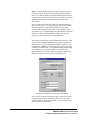
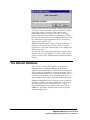
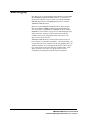
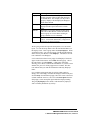
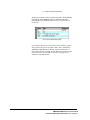
The Connection Info dialog is used to tell AMS REALTIME
Resources where to find the required preference and database files.
Use the Browse… button to seek an existing preference file or the
Create… button to specify a new one. You could select the
13
AMS REALTIME Resources User Guide
Advanced Management Solutions, Inc., Issue 1.1
Browse… option and then choose the sample.prf preference file to
examine the sample.dst database provided in the full installation.
However, for this introduction, choose the Create option so that we
can build an new preference file and create a new dataset. Choosing
Cancel will terminate the program and return to the Window
environment.
Next, you will be presented with a dialog for entering the name of
the new preference file. You might use your name or your initials.
The name must not be longer than eight characters and must
conform to the file naming conventions of your operating system.
An extension of .prf will automatically be appended to the end of the
filename you specify. Hit the Enter key when you are through
typing, or use the mouse and click on the OK button.
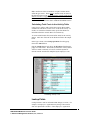
The Connection Info dialog accepts information about how you will
connect to the AMS REALTIME Resources dataset. Local access
indicates that you will be working with a database directly on your
local hard disk. Remote access indicates that you will be accessing
a database over the network. Click on Local. When first designing
a new database, it is recommended that you work with AMS
REALTIME Resources locally. When the design is complete, the
database and preference file can be moved onto the server.
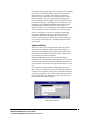
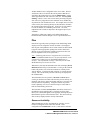
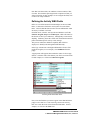
AMS REALTIME Resources Connection Info Dialog
Once you have created a new preference file you will need to either
point the preference file at an existing dataset, or use the second
Create… button to define a new database. For this example select
create and define a new database.
14
AMS REALTIME Resources User Guide
Advanced Management Solutions, Inc., Issue 1.1
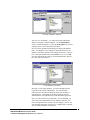
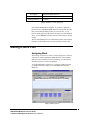
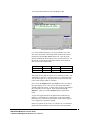
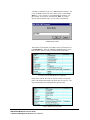
Choosing a Database Template
After you click on Create…, you will be presented with another
dialog for selecting a database template. Use the default.dbd to
create a customized database, or select the msproj.dbd if you will be
using Resources to store Microsoft Project data.
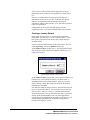
Next you will be prompted with a dialog for entering the database
name. You might use your company or department name for the
database, but it must conform to file naming conventions. After you
have entered the database name, hit the Enter key or click on OK.
An empty default database will be created with that name, and will
have .dst as the file extension.
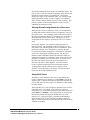
Create Database File Dialog
Since this is a new empty database, you will be prompted for the
Login ID for the System Administrator. Use your last name
followed by the first initial, limiting the entire login ID name to
eight characters. This length can be changed later on, but the
default database sets eight characters as the maximum login name.
Next, you will be asked for your full name. It is assumed that you
will be the System Administrator of this database; therefore, your
name and login ID will be entered as the first employee record. Use
your full name with upper and lower case. Middle name is optional.
You are initially limited to 30 characters.
15
AMS REALTIME Resources User Guide
Advanced Management Solutions, Inc., Issue 1.1
An empty database has now been created, complete with a user ID
entry for the system administrator. The system will now perform a
normal login sequence the same as it will each time AMS
REALTIME Resources is run again in the future. You will be
presented with the Connection Info dialog which has two fields at
the bottom for entering your user name and password. Use the Login
ID you built for the system administrator above, as it is the only
valid user in the database so far.
AMS REALTIME Resources will log you into the database and
present you with a timecard screen for the current week for the
logged on user. This completes the building of a new database and
an initial login process.
Now let’s look at the various parts of the system using this empty
database. Once you understand how to use the various parts of the
system, you will be able to modify the datasets and add information
to them.
The Default Database
Since you have created an empty database, it is important to
understand how the AMS REALTIME Resources database is
organized. The default database is comprised of five basic datasets:
Activity, Employee, Organization, Actuals and Workplan. First, we
will discuss the standard fields. You can modify the datasets and
create new ones to facilitate your organizational needs later on.
This information can be found in the chapter on Defining Datasets.
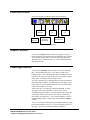
AMS REALTIME Resources has several basic modes of operation.
Each mode is entered by selecting one of the Tabs on the Function
line at the top of the screen, below the Menu line. To help
understand the database, select Update mode by clicking on the
Update Tab. The display will change and you will be presented
with the following screen.
16
AMS REALTIME Resources User Guide
Advanced Management Solutions, Inc., Issue 1.1
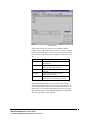
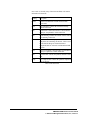
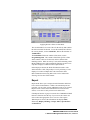
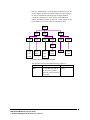
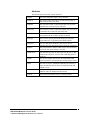
Update Screen
The left side of the screen contains a list of additional dataset
buttons. Once Update mode has been selected, clicking on a dataset
button will open that dataset. These are the five dataset components
that are automatically created when building a new database. They
are:
Dataset
Activity
Employee
Organization
Workplan
Actuals
Function
Dataset for defining the list of activities to
be worked on
Dataset for defining the list of employees
who can work on the activities
Dataset for defining an organizational
structure
Dataset where resource / activity
assignments are stored.
Dataset where actual hours reported by
each resource on an activity are stored.
We will examine these datasets one at a time to understand the
standard data fields and how they relate to the whole database. To
view a specific dataset, simply click on the button to the left of the
dataset name. The first three default datasets are text type, which
means that they hold records containing alphanumeric information.
We will begin with the Activity Dataset.
17
AMS REALTIME Resources User Guide
Advanced Management Solutions, Inc., Issue 1.1
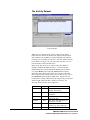
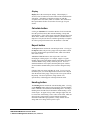
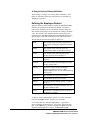
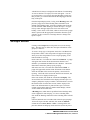
The Activity Dataset
Activity Dataset
When you are in Update mode, clicking on the Activity dataset
button will cause the activity dataset to be displayed in table mode.
Notice that there are a number of columns labeling each field and
one empty row for adding new activities. Since the database has just
been created, it is empty. We will create some activities so we can
post actual time in the Timecard screen.
Before we do that, however, let’s take a look at how fields are
defined in AMS REALTIME Resources. To look at the data
definitions that have been defined in the default Activity dataset,
click on the Define Tab, keeping the Activity dataset selected.
Depending on the physical size of the screen you have, the fields
may or may not all be visible on the screen. If they are not, click on
the Auto Resize option under the View menu. Auto Resize will
recalculate the column width based on the longest entry in each field
and the length of the field name, whichever is longest. The
following fields (columns) will be displayed:
Field
TaskID
Type
A15
Description
A30
Start
Date
Complete
Date
Level
Percent
Type
A2
Contents
Unique alphanumeric code to
identify each activity
Text Description of activity to be
performed
Date in the form DD-MON-YY
for activity Start
Date in the form DD-MON-YY
for activity Complete
Default Level of Effort for this
activity (e.g., 50%, 100% etc.)
Activity type P - Project NP -
18
AMS REALTIME Resources User Guide
Advanced Management Solutions, Inc., Issue 1.1
Color
A8
Filename
A40
Non-Project
Activity Color and Pattern (for
graphic representation)
Filename associated with this
activity for import/export
These fields represent the basic minimum number of fields that
AMS REALTIME Resources requires for activities in order to fully
perform its functions. You can add any number of fields to this
dataset or modify the default definitions. For this introduction, we
will simply review the default fields of the standard datasets.
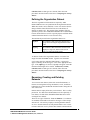
The Employee Dataset
With Define still selected, click on the Employee button to the right
of the activity table and the employee dataset will be displayed. The
default employee dataset contains the following fields:
19
AMS REALTIME Resources User Guide
Advanced Management Solutions, Inc., Issue 1.1
Field
ResID
Type
A15
Org Code
A15
Name
Login
Access
Level
A30
A8
A15
Password
Type
A8
Pick
Contents
Unique code to identify each
resource (employee)
Organization code for
employee. Refers to
Organization dataset
Employee (resource) name
Login ID for employee
Access level (specifies the
users access level for all
datasets and functions)
Login password
Resource Type: Person or
Generic
These fields represent the minimum default fields used for employee
records. Of course, additional fields can be added to contain
information such as a manager’s name, employee skill level code,
pay rate, etc.
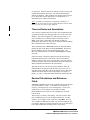
The Organization Dataset
The Organization dataset is used to control access to the data by
organization, as well as to define the hierarchical position of each
employee. Managers can look at both their own data and the data
for those who report to them, while employees can only look at their
own information. Department heads, on the others hand, might be
able to look at information across the entire department, while Vice
Presidents might have access to multiple departments, and so on.
More information on access control by organization structure can be
found in the section on Hierarchical Organization Data Coding,
which is located in the chapter on Updating Information.
The basic Organization dataset simply contains an identifying
organization code and an associated organization title.
Field
Code
Type
A15
Description
A30
Contents
Unique code to identify the
organization to which each
employee belongs
Description of title of the
Organization.
20
AMS REALTIME Resources User Guide
Advanced Management Solutions, Inc., Issue 1.1
The Workplan and Actuals Datasets
The Workplan dataset holds information about working
assignments: the planned amount of time an employee should need
to complete a task. A plan record exists for each employee
assignment to an activity.
The Actuals dataset contains the actual hours that an employee has
posted as worked on each task. This dataset contains many internal
fields, such as a flag that determines if the record has been
Submitted, Approved, Rejected, or Posted. If the system is
configured so that the time approval process is not being used,
records normally marked as Posted will be marked as Recorded after
they have been submitted.
Both of these datasets collect and maintain time-phased data, and
are referred to as Numeric type datasets. If a managers has an
Access Level which provides Write access to one or both of these
datasets, it is possible to create or edit work assignments or actual
hours directly. However, these datasets are not generally accessed
directly through Updating these tables, but indirectly through the
Timecard and Workplan screens. These screen modes are covered
later in this manual.
Entering Data
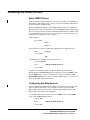
Adding Activities
The first step we will take in creating a new AMS REALTIME
Resources database will be to create some activities. We will assign
these tasks to employees and then let employees post actual hours
worked.
Return to the Activity table by clicking on the Activity button.
Then click on Update to allow editing of the data. To enter activity
data, simply click once in the empty cell within TaskID column to
set the text cursor and begin typing. Enter a TaskID, such as
AB121. Then hit the Tab key to move the text cursor into the
Description column. Enter a Description, Start, Complete, and
Level, as shown in the sample data below. Notice that a new empty
row is added to the bottom of the table for the addition of another
activity as soon as the current line has been used.
Simply add activities into the data table as you would in any other
spreadsheet program. Be sure that you enter a percent sign (%)
after the Level of Effort. Numbers entered without a percent sign
are assumed to be the number of hours per day and will be converted
to an equivalent Level of Effort.
21
AMS REALTIME Resources User Guide
Advanced Management Solutions, Inc., Issue 1.1
TaskID
Description
Start
Complete
Level
AB121
AB122
AB123
Design
Code
Test
01-JUL-98
01-AUG-98
15-AUG-98
30-JUL-98
15-AUG-98
31-AUG-98
50%
100%
30%
Entering Activity Data
Dates can be entered in any valid date format, but they will be
converted to the DD-MON-YY format. Try entering 8/15/98
instead of 15-AUG-98 for the start of AB123.
This information can also be added through the Dump and Load, or
Copy and Paste mechanisms if the data already exists in a text file
source. If you are using AMS REALTIME Projects to do your
planning, there is an automatic interface to load this information
into AMS REALTIME Resources from AMS REALTIME Projects
under the File Execute menu.
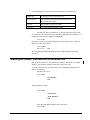
Adding Employees
Before an employee can login and report their time in AMS
REALTIME Resources, he must have an entry in the Employee
table. This record contains a unique employee identifier, name, and
login. When an employee logs in to AMS REALTIME Resources,
this record provides information about the employee’s access level.
This determines which modes and information can be accessed.
To add employee records to the table, click on the button to the left
of the Employee label. The employee table will already contain the
22
AMS REALTIME Resources User Guide
Advanced Management Solutions, Inc., Issue 1.1
entry you made for yourself when you first created the database.
This record will only contain the name and login fields, since that is
the only information that was provided during the database creation
step.
Enter a Resource ID, Organization Code, and if desired, a Password.
If you use a password for this sample, choose something that is easy
to remember, or you won’t be able to login to AMS REALTIME
Resources. If you don’t enter a password in the employee record,
the password prompt will not be displayed on login. Since we
haven’t created any Access Levels at this point, leave the Access
Level field blank.
Add a few other employee records to the dataset. This will provide
us with an employee pool to access from Plan mode in the next step
of this introduction. You can use the information from the table
below as a reference, or enter your own information.
ResID
Org Code
Name
Login
IS100
IS123
IS126
IS131
IS0
ISP
ISP
IST
Your Name
John Smith
Sherman Black
Mark Taylor
Your Login
SMITHJ
BLACKS
TAYLORM
Access
Level
Passwor
d
Entering Employee Data
Adding Organizations
Now that you have activities and the employees to perform these
activities, the next step is to update the organization table. This is
used to group employees by organization for selection and reporting.
Since the organization code is already a part of the employee data
23
AMS REALTIME Resources User Guide
Advanced Management Solutions, Inc., Issue 1.1
record, this information is optional, and you can skip over this
section, if desired.
The Organization Code can be used as a hierarchical code that
indicates a level within an overall organizational structure. This
coding structure can be used to provide certain employees with
access to other employee time records by organizational hierarchy.
The sample Org Codes in the table above use IS0 (IS plus zero) as
the code for Information Systems, while ISP is the Programming
arm of IS and IST is the Testing arm.
As far as access to data is concerned, anyone with the IS0
organizational code can access information relating to IS0, where
someone with an organization of ISP can only have access to ISP
data. If zeros are used at the end of the organization code, this
indicates a “wildcard” access to organizations in the levels below.
This might indicate that the individual is a manager and can have
access not only to that organization, but to any organizations
beneath it in the hierarchical structure. Since your organization
code is IS0 in this sample, you will have access to the other
organizations as well (ISP and IST).
Add the three organizational code used in the employee dataset and
their associated descriptions into the Organization table by clicking
on the Organization button and entering the data shown below:
24
AMS REALTIME Resources User Guide
Advanced Management Solutions, Inc., Issue 1.1
Org Code
IS0
ISP
IST
ISD
Description
Information Systems
Programming
Testing
Documentation
Entering Organization Data
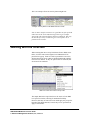
Modifying the Data Definitions
The Org Code defaults to an alphanumeric field of 15 characters.
Since this is really the same information that is contained in the
Organization dataset, we are going to redefine this as a Reference
field to the Code in the Organization dataset.
Note: This employee organizational scheme may not be detailed
enough to meet your company requirements, but it demonstrates the
potential for linking dataset information.
First, select the Define function and the Employee dataset. Click in
the Type column next to Org Code. From the popup list of field
types, select reference. Choose the Organization dataset from the
popup, and the select the Code field from the list of Organization
fields.
Now choose the Update function for the Employee dataset. Click in
one of the Org Code fields. A popup will appear that contains all
the possible Code selections from the current Organization dataset.
Pick the correct Org Code for each employee.
25
AMS REALTIME Resources User Guide
Advanced Management Solutions, Inc., Issue 1.1
Summing Up
Now that we have some information in the database, perform a File
Save and Exit in AMS REALTIME Resources. If you look at a
directory list of the files on your system, you will find the dataset
(file.dst) and preferences file (file.prf) that you have created in
AMS REALTIME Resources.
Before you restart AMS REALTIME Resources, make sure that
there are no dset or settings parameter in the configuration file.
You can open the configuration file (rtr16.ini for 16 bit software,
rtr32.ini for 32 bit software, rtp.cfg for Unix and Macintosh) in any
simple text editor. Placing a semi-colon character in the first
column in front of any configuration switch will cause it to be
ignored. Save the file and exit.
AMS REALTIME Resources will accept the preferences file you
have created as a command line parameter. On Unix platforms, you
can type the name of the preference file after the program name. On
Windows platforms, you can change the Properties of the icon and
type in the preference file name after the executable name. Then
when you double-click on the icon, the preference file will
automatically load the dataset and other stored information.
26
AMS REALTIME Resources User Guide
Advanced Management Solutions, Inc., Issue 1.1
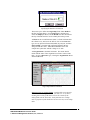
Description
Command Line
Working Directory
AMS REALTIME Resources
rtr16.exe bobjones.prf
c:\realtime
Sample Windows 3.1 Icon Properties
Now start the RESOURCES program. If you haven’t passed in a
preferences file, AMS REALTIME Resources will provide the same
Find, Create and Quit dialog so that you can select one. If you
haven’t already passed in a preference file using one of the methods
above, choose Find and select the preference file which you already
created.
The associated database will be automatically loaded, since internal
references to the database name are stored in the preferences file.
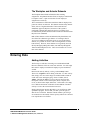
Making a Work Plan
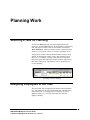
Assigning Work
The next step in our process will be to assign employees to work on
each activity. While AMS REALTIME Resources can assimilate
skill levels and availability to assist in planning, we will limit our
introduction to basic resource assignments.
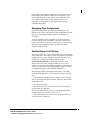
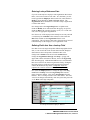
To assign individuals to activities, we will leave Update mode and
go into the Plan mode. Simply click on the Plan Tab below the
Menu bar.
Empty Planning Screen
27
AMS REALTIME Resources User Guide
Advanced Management Solutions, Inc., Issue 1.1
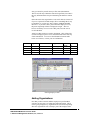
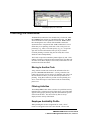
The Plan tab allows you to create or adjust work assignments for any
activity in the dataset. The button after Work Planned on shows
the current activity for which we are making work assignments.
The first activity in the database will appear by default.
If you click on the activity button, a popup will appear that allows
you to select another activity. Activity filters can be set to limit the
activities which appear in the popup for selection. Since our sample
dataset is small, we will use our entire list. The two buttons to the
right, labeled Previous and Next, are used to move on to the next or
previous activity in the database for further planning.
The table below is used to assign employees to work on the current
task. Since we have not made any assignments yet, it will be empty.
The bottom portion of the screen shows a list of employees and their
availability through time through the use of a color bar. The color
and shading of this bar indicates the availability of each employee.
Since no work assignments have been made, these bars are all solid
blue, which indicates that each employee is fully available.
To assign an employee to the Design activity, simply click in the
employee column on the first blank line. A popup menu of all the
available employees is displayed for selection. Clicking on a name
will automatically assign that employee to the task and add the
employee information to the blank line. A new line will then be
added to the table. This can be used to add more employee
assignments to the activity, one at a time.
By default, this work assignment for the selected activity spans the
entire task at the default level of effort, which is based on the Start,
Complete, and Level fields in the activity record. The actual work
assignment dates, as well as the level of effort or total number of
hours planned, can be changed for each employee.
Plan work assignments for the Design, Code and Test activities in
accordance with the table below. You can easily move to the next
activity by clicking on the Next button.
Activity
Design
Design
Code
Code
Test
Document
Employee
Your Name
John Smith
John Smith
Sherman Black
Sherman Black
Mary Taylor
28
AMS REALTIME Resources User Guide
Advanced Management Solutions, Inc., Issue 1.1
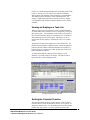
Notice that as you make the assignments, the availability bar at the
bottom updates the availability shading for each employee. The
color coding represents various degrees of the availability, where
blue is fully available, white is fully utilized, and red is overcommitted. Varying shades of blue and red indicate partial
availability and conflict.
Swapping Plan Assignments
Planned work assignments can be directly interchanged. This
method can be used to swap generic resource assignments to specific
employees, or to simply reassign work where an employee is
overloaded.
To swap a planned resource assignment, select the current plan
record by clicking on the row number. Then click on the desired
resource from the list of available resources below. The old resource
assignment will be marked as Deleted, and the new resource
assignment will be added.
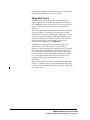
Activity Popup List Filtering
The Activity Popup list is can be controlled by Filters defined in the
activity filter table. This feature is used to cut down on the potential
number of activities that could appear in the list. This list is also
controlled by a setting in the configuration file called
GETPLANLISTOPTION=#. Depending on how this is set,
different types of activities will appear in the list. The types of
activities are described in the following definition. This definiation
can also be found in the Configuration Settings chapter and in the
Config.PDF file supplied on the AMS REALTIME CD.
The following number options apply to this setting. The setting
affects the items that will be viewed in the Task Popup list in Plan
view.
0 - List will display only My Activities. That is to say, a manager
will see the activities he and his team are planned on, based on the
Organization codes.
1 - Uses the Activity filter.
2 - This option means 0 & 1 are the factors for the list content, i.e.
activities must be in both lists.
NOTE: This options should only be set if all the Planning data is
created from Projects or another outside source.
3 - This option means 0 or 1 are the factors for the list content, i.e.
activities must be in either list.
29
AMS REALTIME Resources User Guide
Advanced Management Solutions, Inc., Issue 1.1
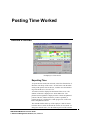
Reporting Time
Posting Actual Hours Worked
When the work assignments have been planned, the actual hours
worked against the plan can now be posted by each employee
throughout the period of performance. This is done through the
Time screen, which is the first screen presented to a newly logged in
user. After a database has been customized, the System
Administrator can define an Access Level for general user logins
that only provides access to this screen.
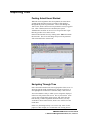
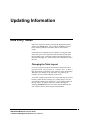
Return to the timecard screen by clicking on the Time tab beneath
the menu line. The screen will change and you will be presented
with a timecard for the current week.
Timecard Screen for the Current Week
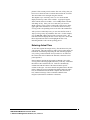
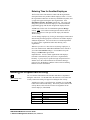
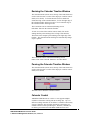
Navigating Through Time
Notice the small calendar in the lower right portion of the screen. It
shows the current month, with the days in the past crossed out. It
also highlights the weekends in red and has today’s date selected.
Also notice that the activity to which you are assigned is displayed
in the lower left portion of the screen. This is your task list. Since
you are only assigned to the design activity, that will be the only
task showing. If other assignments had been made to you, they
would all be shown in the task list, which is also referred to as the
Gantt chart.
In this case, the Design activity is to occur in July 1998. For the
purposes of this example, let’s assume that work is being done as
30
AMS REALTIME Resources User Guide
Advanced Management Solutions, Inc., Issue 1.1
planned. If the current period is not the first week of July, then you
have to move ahead or back to reach the timecard for the 01-Jul-98.
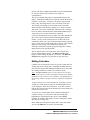
The current date can be changed using the calendar.
The simplest way to reach July 1998 is to click on the month
displayed in the top center of the calendar. A popup will appear
which contains all twelve months. Click on July and the calendar
will change to July. If the year is not 1998, then you can move
ahead or back a year by clicking on the right or left arrow to in the
upper right of the calendar box. You can move ahead or back by
clicking on the corresponding arrows to the left of the month name.
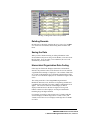
After you have reached July 1998, you can select the first week of
July by clicking on any day within the first week. For this example,
click on July 3rd, which is the first full work week in July. The
timecard screen will display the first week of July 1998. Notice that
the background in the task list will highlight the first week,
indicating that this is the current reporting period.
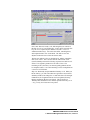
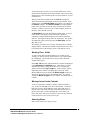
Entering Actual Time
To enter time against the Design activity, first add the activity into
your timecard. This can be done by either clicking on the empty cell
beneath the Task heading and picking the task from the popup list,
or by clicking on the task name from your task list. In either case,
the selected task will be added to the timecard so that time can be
posted against it.
Enter 8:00 hours against the design task on Monday, July 3rd by
clicking in that cell and typing 8, followed by a Tab key. Notice that
the number 8.00 is added to the cell. Totals are automatically
calculated at both the bottom of the timecard and in specific
columns to the right. Also notice that the assignment bar in the task
list has changed to represent the Baseline Planned dates (the white
bar), the Actual Start and calculated Complete date (the colored
bar), and the Percentage of the overall Plan which has been
Progressed (the black bar within the colored bar).
31
AMS REALTIME Resources User Guide
Advanced Management Solutions, Inc., Issue 1.1
Next, enter 75% in Tuesday’s cell, indicating that you worked on
this task for 75% of your working day. Notice when you hit the Tab
key, the 75% is replaced by the number 6.00 (6.00 = 75% of a
standard 8.00 hour day). Also notice that totals, remaining hours,
and completion dates were recalculated. The task bar was also
adjusted in the task list to reflect the current status.
The bar now indicates twice as much progress, and the completion
date is now earlier. This is because the two entries made so far
(6.00 for Monday and 6.00 for Tuesday) represent an actual level of
effort of 75% against a planned level of effort of 50%. The
remaining work is, therefore, less than originally planned and can
be completed earlier, even if the remaining work is accomplished on
a 50% level of effort basis.
Skip over Wednesday and put 2:30 into Thursday’s cell. When you
hit the Tab key, you will notice that once again the 2:30 (two hours
and thirty minutes) has changed to 2.5 and totals have also changed.
Furthermore, the assignment bar has also been updated, showing
that the completion date has now slipped. This is because by
Thursday there should have been 4 hours expended each day (4 x 4
= 16), yet only 14.5 hours have been posted.
32
AMS REALTIME Resources User Guide
Advanced Management Solutions, Inc., Issue 1.1
Timecard after Thursday’s Entry
To see another way of entering time, click in the column labeled as
Week and enter 20 hours. This indicates that 20 hours were
expended against that task for the entire week. Once the week total
has been entered, it will replace the daily totals with an average
hours per day (i.e., it will spread out the total over the working
days).
Updating Estimates to Complete
Before leaving the timecard, it should be pointed out that not only
can an employee enter actual hours worked, but can also change the
estimate for the completion of the work. This allows the estimated
completion date and other related information to be calculated.
Scroll the screen to the left using the right scroll arrow until Cum,
Base, Rem, ETC, LOE, Start, and Complete are visible, if they are
not already on the screen. These fields represent planning
information and have the following meaning:
Field
Cum
Base
Rem
ETC
LOE
Start
Complete
Description
Cumulative Hours Reported (to Date)
Baseline Hours (Original Plan)
Remaining Hours (Base - Cum)
Estimate to Complete (Set as Remaining
Hours by default)
Level of Effort (Set to the Planned LOE) by
default
Planned or Actual Start Date
Calculated Complete date (Current Date +
Rem * LOE)
33
AMS REALTIME Resources User Guide
Advanced Management Solutions, Inc., Issue 1.1
The planning information can be updated to reflect new anticipated
performance by the employee. For example, if the LOE in increased
in this case from 50% to 75%, then both the remaining time and the
complete date will shift to the left (earlier in time) accordingly.
If the Estimate to Complete (ETC) is increased to 100 Hours,
however, the complete date will shift to the right (later in time).
If the Complete date is moved to the 25th of July, the level of effort
will increase, recalculating the level of effort required to complete
the remaining 100 hours within the new time frame.
AMS REALTIME Resources is a powerful planning tool. Unlike
other tools, it allows the employee to communicate back to the
manager what he feels is left to do and how long it will take. If the
answer is unacceptable, the manager can take action to effect a new
plan based on this updated information.
34
AMS REALTIME Resources User Guide
Advanced Management Solutions, Inc., Issue 1.1
Entering Time for Another Employee
The first line of the timecard has a button with the organization
description followed by another with the employee name. Click on
the organization button (the one that says Information Systems) and
a popup will appear showing the other organizations. Pick
Information Systems - Programs from the list. The screen will
change and you will see the first employee’s timecard within the
programming group with his task assignments displayed below.
Add 30 hours for the week for John Smith against the Design
activity. Hint: Click on the word Design in the task list below to
add it to the timecard. Then put 30 in the empty cell under the
Week heading.
You can change employees by clicking on the employee name button
and selecting from the popup list to enter time for another employee
within the department. You can also move to another department
by clicking on the organization button and choosing a new
organization.
Whenever you move to a new time record, change employees, or
move into another mode. AMS REALTIME Resources will ask if
you wish to Save the Plan changes. Choose Save to keep the
changes, and Discard to ignore them.
Important Note: Access to other organizations and employee
timecards is determined by the current user’s organizational
hierarchy. A proxy may be specified to login and post time for a
another user in the same hierarchical level without entering a
password. See the ResProxy attribute in the section in Defining
Datasets for more information.
Adding an Unplanned Activity
New Activity Icon
Let’s assume that John Smith worked another task that was unplanned
during the same week. To add that task to the timecard, click on the New
Activity button and a dialog will appear for adding the new activity.
Add the new activity as specified below, and then click on the OK
button at the bottom of the dialog. The activity will be added to the
activity dataset, and it will also become an assignment for the
current employee (John Smith).
Field
Act ID
Description
Start
Complete
Level
Value
AB132
Specification Rework
03-JUL-98
07-JUL-98
20%
35
AMS REALTIME Resources User Guide
Advanced Management Solutions, Inc., Issue 1.1
Notice that the new activity is automatically added to the timecard
as well as the assignments list in the chart below. Report 10 hours
worked on this task to the week column.
Return to the Information Systems Organization and select yourself
as an employee.
Generating a Report
The last area we will cover in this introduction is generating
Reports. AMS REALTIME Resources has a powerful report
generating function that is accessed by clicking on the Report Tab.
When you click on the Report Tab, the screen will change and an
empty report screen will appear, as shown below:
Empty Report Screen
If this is the first time that you have gone into the report function,
there will be no report criteria defined. You will notice that all of
the Report buttons near the top of the screen (to the right of the
Calculate button) say Not Set. These buttons control report name
selected, report heading chosen, ordering and grouping of the data,
and report filter(s) to be applied to data records to determine
selection for inclusion in the report.
To keep the introduction to reports at a very basic level, we will start
by looking only at the Groups. Select the Edit Groups table button,
and the Group table will be displayed:
36
AMS REALTIME Resources User Guide
Advanced Management Solutions, Inc., Issue 1.1
The Group Table for Reports
The table has the a number of fields defined. These fields have the
following meaning:
Field
Group
Name
Dataset
Field
Meaning
Name to be associated with the Group. This
name is displayed in the Group button when
selected and it displayed in a pop-up list of
possible groups when the Group button is
clicked on for selecting a new grouping.
The dataset name that contains the field to be
grouped on.
The name of the field within the dataset to be
used for sorting and grouping of the report data
37
AMS REALTIME Resources User Guide
Advanced Management Solutions, Inc., Issue 1.1
Field
Display
Heading
Subtotal
Break
Meaning
(continued...)
The name of the field to be displayed as a label
for this grouping of data of other than the Field
as defined above. For example you may want to
group by Employee ID but display the Employee
name rather than ID.
A heading from the heading table that can be
displayed in the report if this field is a break
field.
Determines if you want subtotals for this group.
This can be either Before or After the break for
the new group or it can be None meaning no
group subtotals are to be calculated.
Specifies a control break on this grouping. This
can be A Line break (blank Line), a Page break
(new page) or None (no break).
We are going to add a Group to the Group table so we can create a
report. Click in the Group Name cell in the line labeled New to set
the display cursor. Enter a group name called By Employee. When
you hit the Tab key, you will get a popup of all the possible datasets
which exist in your database. Pick Employee. The dataset cell will
now contain the word Employee.
Click on the Field cell and a new popup of all Employee fields will
appear in the Field column. Select Name from the popup. Choose
the same field to go under Display. A font popup will follow,
allowing you to choose a font for this information. If you don’t want
another font, just click off the popup menu to continue. This line
now indicates that you want the information ordered by Employee
Name.
Let’s continue and group the data by activity within employee.
Simply click in the empty cell under the Employee dataset entry and
select Activity from the dataset popup. Move the cursor to the Field
column within the same row, and click on the Description from the
field popup. Select Description again under the Display heading.
The group By Employee now means “order the data by employee
with a secondary breakdown by activity.”
38
AMS REALTIME Resources User Guide
Advanced Management Solutions, Inc., Issue 1.1
Your Group table should now look something like this:
Group table with By Employee added
Let’s create another grouping so you can get another view of the
data. Move the mouse to the Group Name column in the last line
labeled New and enter By Activity in that cell. Then fill in the
Dataset and Field for this and the next line, as indicated below. For
the present, we will disregard the other columns. Select different
font for each of the group records.
Group Name
By Activity
Dataset
Activity
Employee
Field
Task ID
Login
Display
Description
Org Code
This group specifies that the report is to be ordered by Activity, and
within that, by Employee. Note that while we are searching on the
Task ID and Login, we are displaying the Description and the Org
Code; not the field on which we searched.
Now click on the Display button on the Edit line above to return to
the report display screen. Then click on the Group button that is
currently labeled as Not Set. A popup of the group you just added to
the Group table will now appear. Select the group name By
Employee. Then click on the Calculate button to generate the
report.
A report will appear that shows the planned and actual hours by
Employee. Each employee’s section of the report will be further
broken down by each activity that employee reported hours against
or was supposed to report hours against.
In the lower portion of the screen, you will also see a bar chart that
indicates the hours planned versus actual hours worked and hours
39
AMS REALTIME Resources User Guide
Advanced Management Solutions, Inc., Issue 1.1
remaining. These will be ordered and totaled in accordance with
the currently selected group.
Select the By Activity group by clicking on the Group button and
picking the By Activity group. Then Calculate the report again by
clicking on the Calculate button. The report will be redisplayed, but
this time it will be by activity and within that, by employee.
Exiting AMS REALTIME Resources
This concludes the Introduction to AMS REALTIME Resources.
Exit the AMS REALTIME Resources by selecting the Exit item
from the File menu. You will be asked if you want to save the new
database; select Save so that you can return to your sample later.
This brief introduction has helped you learn how to start AMS
REALTIME Resources, edit the database, plan work, post actual
hours, and generate simple reports. The remainder of this manual is
organized as a reference manual and goes through each function in
more detail.
40
AMS REALTIME Resources User Guide
Advanced Management Solutions, Inc., Issue 1.1
Program Menus
Program Line
The very top line of the AMS REALTIME Resources window
displays the name of the user which is currently logged on to the
AMS REALTIME Resources system.
The upper left corner contains the Close Box. When running AMS
REALTIME Resources on the Windows 3.1 platform, clicking on
the close box produces a menu with window sizing options, the
program Close option, the Switch To option (to leave AMS
REALTIME Resources running and switch to other active
applications), and the About option. Clicking on About provides
information about AMS REALTIME Resources.
Double-clicking on the Close Box will Exit the AMS REALTIME
Resources program. If you have made changes without saving,
AMS REALTIME Resources will ask you if you want to Save
Timecard Changes before Exiting the program. The available
response options are Save, Discard or Cancel.
Pulldown Menus
The next line of the window contains File, Edit, View, Options,
Timecard and Help pulldown menus. Many menu options have
menu accelerators which provide direct keyboard access to the menu
options. If an accelerator is available, it will be listed at the right
side of the menu option. The Ctrl key is indicated with a caret (^).
For example, the accelerator for Save is ^S, which means that
holding down the Ctrl key and pressing the S key will save the
current local dataset. There is no need to Save if you are a client
accessing a server dataset.
Each menu option also has a hotkey character, which is underlined.
To access the menus directly from the keyboard, hold down the Alt
key and press the hotkey character of the desired menu. For
example, to access the File menu, hold down the Alt key and press
the F key. Then press the S key to perform the save process.
41
AMS REALTIME Resources User Guide
Advanced Management Solutions, Inc., Issue 1.1
File
The File Menu
New
The New menu item is not currently used, but is maintained for
system conformance on some platforms as well as future use.
Open
The Open menu allows the user to select and open another local
dataset. A file selector dialog allows the user to browse the directory
list. If changes have been made to the current database, the user
will be prompted to save before opening the new database.
Save
If a local dataset is being used, selecting the Save option will force
the current data to be written back to the dataset. When accessing
the server dataset, the server determines when a save is required,
either because the record changed and a set time period has elapsed,
or because the user is logging out.
Save as
Save as allows you to save a local dataset to new dataset file. The
Save menu options apply only to local datasets, rather than to
datasets which are stored on the server and accessed by clients.
Save Globals
Save Globals allows you to save global reports, views, etc., back to
the global preference file (provided that you have been granted the
appropriate access rights).
42
AMS REALTIME Resources User Guide
Advanced Management Solutions, Inc., Issue 1.1
Page Setup
The Page Setup allows selection of a Printer Device, Page
Orientation, and other printer options. AMS REALTIME Resources
accesses your system to determine which printers have been
installed, and uses the system printer drivers. No additional printer
setup or configuration is required.
Print
Print takes the data from the current AMS REALTIME Resources
mode and sends it to the currently selected Print device. If you are
in a table format, such as in Update mode or Define mode, the
output will be a spreadsheet-style column formatted data table with
headings. Column and Row lines can be switched On or Off under
the View menu. If you are in Report mode, the current Heading
table fields will also print at the top of your report.
The Print dialog provides options to print all the data, the current
selection, or a range of pages. You can also set other printer
options, such as the DPI resolution, printer destination (the
connected print device or a filename), and the number of copies
desired, depending on the available options of the selected printer.
To print multiple copies, change the number in Copies: box from 1
to the number of copies desired. If Collate Copies is checked, each
table or report will print completely before the next copy begins.
Print Batch
Print Batch will print a series of report specifications which have
been setup in a Batch List in the Report screen. Once the process
has been setup and initiated, further user interaction is not required
from AMS REALTIME Resources. Make sure the printer’s paper
supply is adequate!
Load
The Load option allows you to load the current table from a text
file. The ASCII text file must be comma, space or tab delimited
with headings that match the field names. The table order does not
have to match the order of the fields, since the headings are used to
determine the data mapping.
All data is appended at the end of the dataset unless a key field is
specified. To specify a key field, select that field by following the
procedure to lock that field: double-click on the field heading.
Records with matching key field data will automatically update the
existing information. If no key field match is found, those records
are simply appended.
It is crucial to ensure that all data records have unique key fields
when multiple projects are being loaded into the AMS REALTIME
Resources database. This will ensure that new data that is being
loaded will not conflict with the existing data. Refer to the section
on Defining a Database for more information about key fields.
43
AMS REALTIME Resources User Guide
Advanced Management Solutions, Inc., Issue 1.1
Dump
The Dump option allows you to export the current table
information into a comma, space or tab delimited text file. The
resultant text file will have a heading line which contains each field
name. The text file will contain only those fields which are visible
in the current table order.
Dumping data from the Time mode will result in a delimited dump
of the actuals data that can be loaded into the AMS REALTIME
Projects Usage table. The current user must have the correct access
rights to enable this feature.
Exit
The Exit option will quit the AMS REALTIME Resources program.
If you have made changes to the data without saving, AMS
REALTIME Resources will ask you if you want to Save Timecard
Changes before Exiting the program. The available response
options are Save, Discard or Cancel. Note: The Exit option is
labeled Quit on Macintosh platforms to conform to the platform
standard.
Edit Menu
Undo
Cut
Copy
Paste
Paste Link
Clear
Insert Row
Delete Row
Select All
Fill Down
Fill Right
The Edit menu contains the standard editing functions: Undo, Cut,
Copy, Paste, Clear and Select All. Windows versions of AMS
REALTIME Resources also include Paste Link for DDE
integration.
Using Cut on selected data will copy the data into the system paste
buffer and delete the original selection. Using Copy on the selected
data will copy the data into the system paste buffer, but leave the
original selection intact. If these menu options are grayed out, there
is no text selected. Click and drag the mouse over the text you
want. Then select Cut or Copy.
The Paste option will become active when there is something in the
paste buffer. Once you have Cut or Copied text, selecting Paste will
insert the text from the paste buffer to the current cursor position. If
you have selected text, the text in the paste buffer will overwrite the
selected text. The Paste Link option is used for DDE.
44
AMS REALTIME Resources User Guide
Advanced Management Solutions, Inc., Issue 1.1
Clear will remove the contents of the selected fields, but will not
copy the contents into the paste buffer.
Delete Row and Insert Row act upon the row selection. If one or
more lines are selected, Delete Row will remove the lines, provided
that they are not referenced by other records in other tables. Insert
Row is not always available in certain tables, but new data can
always be sorted into the correct order.
Select All selects every field of every record in the current table.
The Fill Down and Fill Right commands take the topmost or
leftmost cell contents and copy it down or right (respectively) into
the remainder of the selected cells.
View Menu
Sort Up
Sort Down
Select Filter
Auto Resize
Select View…
Save View as…
Save View
Delete View…
Rename View…
Column Lines
Row Lines
LockLayout
The first item on the View Menu is Select Filter. Selecting this
option provides you with a popup of the filters which have been
defined form the current dataset. If filters have not been defined,
nothing will happen.
Once a filter has been selected, it will apply the stored sorting and
matching criteria to the current data table. To clear a filter, bring
up filter popup and click outside of the popup (without selecting a
new filter). This will remove the current filter and restore the
dataset to its natural order.
Auto Resize will reset the column widths to the maximum size of
their current field contents. The column width will be at least as
wide as the heading, even if the field contains no data records. For
example, if a 50 character alpha field called Customer contains
several records, and the longest of those is 20 characters long, the
column will resize to about 20 characters in width. If there are no
Customer records, the column will become just wide enough to
display Customer at the top of the column.
Select View allows you to chose a view name from a popup list of
stored views. A view “remembers” and resets the table field
45
AMS REALTIME Resources User Guide
Advanced Management Solutions, Inc., Issue 1.1
information: what fields are visible, the order of those fields, the
size of the columns and the fields that were locked, if any. The
Calendar area layout is not saved with the view information.
If no views have been saved for the current dataset or screen mode,
only the Save View as menu option will be available from the view
section. Once a view has been saved, the other View options will no
longer be grayed out. To save the current screen layout, click on
Save View as and enter the new view name at the prompt.
To save and update the current view, click on Save View. This will
automatically update the active view to the current screen layout.
To remove a view, click on Delete View. A popup will appear,
allowing you to select a view for deletion.
To rename a view, select Rename View from the menu. A popup
will appear, allowing you to select the view you wish to rename.
The old name appears in a dialog, allow you to edit it to a new
name. Click on OK when you have finished editing, or Cancel to
quit without making changes.
Column Lines and Row Lines will have a check next to the menu
item if they are turned on. These menu switches control the display
of lines between the rows and columns on the screen display and on
printed output.
Turning on Lock Layout will not allow the columns to be moved or
resized. Closed columns can not be opened. If the layout is locked,
a check will appear next to the menu item, and the cursor will not
change to the flat hand or the pointing finger when it is positioned
over the column headings.
Options Menu
Login as…
Change Password
Recalculate
Network Test…
Memory Check…
Login as
If employees are required to share a computer for AMS REALTIME
Resources access, this option can be used to Login to AMS
REALTIME Resources under another User ID without exiting and
restarting the program. Clicking on Login As will log out the
current user and produce the Login and Password prompts.
However, if another employee is not waiting to log time, users
should always exit the program to protect their time records.
Change Password
This menu option allows the currently logged in user to change their
password. A dialog will provide successive prompts for:
46
AMS REALTIME Resources User Guide
Advanced Management Solutions, Inc., Issue 1.1
Old Password
New Password
Confirm Password
47
AMS REALTIME Resources User Guide
Advanced Management Solutions, Inc., Issue 1.1
The actual password not displayed on the screen; each character is
replaced with an asterisk for the display to help ensure privacy.
Passwords should never be shared or given to other employees to
protect your timecard entries. If a password is forgotten, it can be
reset by the System Administrator.
Recalculate
All calculated fields (both system fields and user-defined fields) will
be recalculated when this is selected, ensuring that all data is
current, even if fields are calculated from data in other tables.
Network Test
The Network Test provides a method for the users with sufficient
access level privileges to verify that the network connection is up
and running. Clicking on Network Test will provide information to
verify that the connection exists and that the client can talk to the
server, and vice versa.
Memory Check
Memory information can be written to a report periodically with this
option to help trace memory usage. To create a text file report of
this data, add REPORT=MEMORY.TXT to the configuration file.
Each time Memory Check is selected, an about dialog will appear,
allowing you to type in a text identifier (such as the time or a step
number). The current memory usage will be appended to the text
report. This text identifier will appear after the keyword TAG and a
reference number for the memory check. The memory information
is displayed with the same reference number, but the keyword
CLASS, an internal program function , the number of bytes used
and number of objects.
48
AMS REALTIME Resources User Guide
Advanced Management Solutions, Inc., Issue 1.1
Timecard Menu
Submit
Approve
Reject
Close
Submit
Employees can select timecard entries (click and drag to select cells)
and choose Submit from the Timecard menu. The submitted time
entries will have a yellow background, which indicates that they
have been submitted.
All users have the ability to submit records. If the Approved
configuration switch is set to Y, only approved time records are
exported as actuals. If this switch is set to N, the approval process is
ignored, and all time records will be exported as actuals.
Approve
When a manager reviews the timecards for each of his employees,
he must make a determination as to whether the reported time is
acceptable. Groups of cells which are selected will receive a green
background when Approve is chosen from the Timecard menu.
This indicates to the timecard owner that those timecard entries
have been approved.
Access to both the Approve and Reject option is specified by the
Access level which is given to each user. If the Approved
configuration switch is set to Y, only the approved time records are
exported as actuals. If this switch is set to N, the approval process is
ignored, and all time records will be exported as actuals.
Reject
When a manager reviews the timecards for each of his employees,
he must make a determination as to whether the reported time is
acceptable. Groups of cells which are selected will receive a red
background when Reject is chosen from the Timecard menu. This
indicates to the timecard owner that the rejected timecard entries are
not acceptable, and must be changed and resubmitted.
Access to both the Approve and Reject option is specified by the
Access level which is given to each user. If the Approved
configuration switch is set to Y, rejected records will not be exported
as actuals. If this switch is set to N, the approval process is ignored,
and all time records will be exported as actuals.
To edit a rejected record, the rejected status must first be cleared by
selecting the rejected cell and changing the approval status. A
manager can simply toggle the Reject status by selecting the cell and
clicking on Reject. A user without access rights to Approve and
Reject can select a rejected cell, reset it to Submitted status, and then
49
AMS REALTIME Resources User Guide
Advanced Management Solutions, Inc., Issue 1.1
toggle the Submitted status off. Once the approval status has been
removed, the cell contents can be edited.
Close
Close allows a manager to disallow an employee to post further
timecard entries or make timecard changes on a completed task. To
close one or more tasks when reviewing an employee timecard,
select the task in the Time screen and select Close from the
Timecard menu.
The Open/Closed status for each Workplan record can also be set in
the Plan screen under the status column.
Access to the Close option is determined by the user’s Timecard
Access level.
Help
The Help menu provides access to the on-line Help program, which
contains documentation and samples. The Help menu also contains
an About option, which provides information about the software
version and its authors.
Function Tabs
The next screen line provides a list of AMS REALTIME Resources
functions. The screen layout and will change to reflect the specific
processing options for each function. For example, the Update,
Define, and Filter functions produce a list of dataset selection
buttons along the left side of the screen. When a dataset has been
selected, the screen will display the appropriate table fields for that
dataset.
If you are in Update mode, the data in the currently selected dataset
will be displayed in a spreadsheet-style table format. Update mode
allows you to enter or edit data in the currently selected dataset. A
user’s designated Access Level controls how he can access the data.
For example, Joe Smith might not even be able to look at the data,
while Rita Redstone can look at the data, but not make changes.
Jane Doe, however, might be able to edit the data, while Fred Jones
can also change the dataset definitions.
If you are in Define mode, the dataset definitions will be displayed
for each field. If you are in Filter mode, the current list of filter
criteria settings will be displayed. Again, a user’s designated
Access Level will control how the data is accessed.
The default mode is Time, which allows employees to post their
hours worked. The Time screen will be accessed by all users.
Available modes are defined by each user’s Access Level, which is
assigned by the System Administrator.
50
AMS REALTIME Resources User Guide
Advanced Management Solutions, Inc., Issue 1.1
Time
When an employee logs into AMS REALTIME Resources, the Time
entry screen will default to that specific user name. Unless the
employee has the privilege necessary to access the timesheet of
another user, only the currently logged in employee’s planned
activities will be available for time reporting.
Posting Time
To report time worked, click in the first column, which is labeled
Task. A popup list of assigned tasks will appear in the column.
Select a task that you worked on by clicking on the task with the
mouse. The task will then appear on the first unused line of the
timecard screen.
Note: The actual contents of the Task popup can be any Activity
field. Since an Activity field can be comprised of other fields or
portions of fields, the information displayed in the Task popup is
highly configurable. The Activity field which will be used for the
Task popup is determined by the TaskPick Attributes code in the
dataset definition.
51
AMS REALTIME Resources User Guide
Advanced Management Solutions, Inc., Issue 1.1
Once a task is selected, many of the timecard fields will contain
information for that task:
Heading
Description
Period
The Period contains the current Period-to-Date
actual totals.
Cum
The Cumulative contains the total hours already
worked on the task.
Base
The Baseline contains the number of hours that the
employee was planned to work on the task.
Rem
The Remaining contains the number of hours which
are remaining on the task.
ETC
The ETC contains the employee’s estimate of how
many hours are remaining on the task. This is used
to calculate the Progress and the Estimated
Completed Date for each task in AMS REALTIME
Projects.
LOE
The Level-of-Effort is the percentage of time that an
employee is planned to work on the task.
Start
The Start Date contains the planned start date of the
task.
Comp
The Complete Date contains the planned completion
date for the task.
Basic Timecard Fields
52
AMS REALTIME Resources User Guide
Advanced Management Solutions, Inc., Issue 1.1
Some fields, such as the date fields, ETC, and LOE, can be modified
by the user to communicate changes in the work which is being
done on the task. For example, if the 100 hours of work were
planned on a task, and 60 have been completed, 40 hours will be
show as remaining. However, perhaps unexpected progress has
been accomplished, and the employee now expects that the task can
be completed in 20 hours. By editing the ETC field from 40 to 20,
the employee can communicate that information directly into the
calculated progress field for that activity. If more than one
employee works on a task, each employee will contribute his portion
of the work and his own ETC toward the overall activity progress.
Likewise, an employee’s ETC may be extended, indicating that
unexpected complications have arisen and the task will not be
completed on the planned completion date. In this case, the
activity’s calculated progress would be decreased according to the
new percentage of that employee’s contribution toward the whole
task workload.
Unplanned Work
There may be times when an employee has worked on a task for
which he was not originally planned. Ideally, the manager (or
whoever does the planning) could go back to Plan mode and add
this employee to the planned work for the activity. However, this
may not always be possible or applicable.
AMS REALTIME Resources has several methods to handle
unplanned work. One method is to allow employees to use the New
Activity button to add a new task and automatically add themselves
to the work plan. Then the task will appear on the employee’s task
list.
Access to the New Activity button is configurable in the Access
table. Each user’s defined Access Level will determine whether or
not the New Activity button will be present. This button can also be
used when an employee wishes to track non-project time spent that
is not of general interest to management, such as activities used to
track personal time management goals.
Adding New Activities
53
AMS REALTIME Resources User Guide
Advanced Management Solutions, Inc., Issue 1.1
Another method is also configurable in the Access table. When a
“drill down” filter is created for the Activity dataset that filter is
specified in the Timecard access code, the Find Existing... option
will be appended to the end of the user’s task list. Selecting Find
Existing... allows a user to select a new task by choosing categories
from successive popups down to the detail task level, whether they
are planned to work on that task or not. For example, the user could
select a task by first selecting the Project, then the Phase, and then
the Task description from popup lists. Even if he was not planned
to work on that task, he could then post his time. Of course,
unplanned work can still be subjected to the Approval process for
validation.
Alternatively, WBS source tables can be defined which allow
hierarchical task selection through a series of pre-defined choices.
Plan
Plan mode is typically used by managers when determining which
employees will be assigned to work on each task. The employee
must be part of the planned work on a task in order for that Task ID
to appear in their popup when posting time worked. If the Plan
function is grayed out, then the currently logged in user does not
have the required access level to plan work.
Note: If Planning and Resource assignments have already been
created in AMS REALTIME Projects, this plan information can be
automatically loaded using the AMS REALTIME Resources
interface. This information exchange is launched from the AMS
REALTIME Projects File Execute menu.
When Plan is selected, the information line will now display Work
Planned on followed by a Task ID button. Clicking on the Task ID
button will produce a list of activities which are currently in the
Activity dataset. To change the task selection, click on the desired
activity. The current activity selection will always be displayed in
the TaskID button.
The information line also provides a Previous and Next button.
Clicking on the Previous button will select the previous activity for
planning, and clicking on the Next button will move you to the next
activity in the list for planning. Using these buttons to perform
resource planning on a series of activities helps to ensure that no
tasks are inadvertently passed over.
The last button is labeled Activity Filter, and allows selection of a
predefined Activity matching filter. Selecting an activity filter
allows you to limit what appears in the popup by showing only those
that match the specific criteria from the filter. The current activity
filter is always displayed in the Activity Filter button.
Resource Availability
When planning the resource assignments for activities, a list of
resources will appear below next to the calendar. If the
configuration switch Planavail is set to Y, each resource will have
54
AMS REALTIME Resources User Guide
Advanced Management Solutions, Inc., Issue 1.1
an associated shaded bar which displays its availability profile. The
bars are color coded: blue indicates availability, white indicates full
utilization, and red indicates overcommitment. The shading
indicates the degree of the availability status. For example, a light
shaded red indicates that the resource is slightly overcommitted,
while solid blue indicates that the resource is fully available. This
provides a planner with visual information to assist in resource
scheduling and workload leveling.
Viewing Overall Assignments for a Resource
When you have resources assigned to a task, you can immediately
see all the other tasks to which a resource is assigned by clicking on
the resource name. The availability profile in the lower portion of
the screen will instantly change to a Gantt chart view of all tasks to
which that employee has been assigned. This allows you to see
exactly what else the employee is planned to work on if a conflict
exists.
For example, Engineer A is assigned to engineering task by a
Resource Planner. The availability profile for Engineer A went
from white to red, indicating that he is now overcommitted. When
the Resource Planner clicks on Engineer A’s name in the plan
record, the task schedule for Engineer A will appear on the bottom
of the screen, replacing the availability profile. The Resource
Planner can then immediately identify the other tasks which are
competing for Engineer A to determine which of the tasks are more
important. The Planner can now either choose to reassign one of
the other tasks, change the percentage of time Engineer A is
allocated to the task, or delete Engineer A from the planned
resources for this task and replace him with another engineer.
To change back from the currently selected employee’s task
schedule, click on the employee to deselect. The task list will be
replaced by the overall availability profile.
Using Skill Codes
The database can be defined to allow activity requirements and
resource capabilities to be matched. If a field (Skills is used in the
samples below) is added to the Employee dataset that will hold one
or more skill codes for each resource, two methods for Skill filtering
become available.
The first method is to create an Employee filter that selects a subset
of the skill codes. For example, if you want to see only the C
Programmers, you could create an Employee filter where the criteria
under Skills was *CPROG*. Any resource filter can be selected in
Plan mode by double-clicking on the heading at the top of the
Resource list. A popup will appear, containing all the Employee
filters that have been created. Selecting an Employee filter will
apply it, so that only the resources that meet the filter criteria will be
available for planning.
55
AMS REALTIME Resources User Guide
Advanced Management Solutions, Inc., Issue 1.1
Applying Resource Filters in Plan Mode
The second method is to create a filter for the activity that contains
the skill set needed for the task. To use this method, add a field to
the Activity dataset, such as LaborFilter, that has the Attribute of
TaskResFilter.
The LaborFilter field must contain a Filter name, such as
ProgrammingTeam. The contents of this field specifies a filter
which contains a skill set for the task, which is defined with
matching criteria. When an activity is selected for Planning, AMS
REALTIME Resources will automatically filter the resource list to
only those employees which meet the required skill set.
In the Employee dataset, the Skills field should contain a code
which describes a skill, and possibly a level of proficiency as well.
Employees can have multiple skill codes listed in this field.
More information about using Skill Codes can be found in the
Planning Work section of this manual.
Report
Report mode allows you to output selected information which has
been collected in the database. While some standard reports are
provided, you can create as many additional reports as are required.
Reports can be selected from a standard list of saved selection
criteria, or can also be easily created on an ad-hoc basis.
If the Report function is grayed out on the list of AMS REALTIME
Resources functions near the top of your screen, the current user
does not have the appropriate Access Level to create reports.
When Report is selected, the information line displays Edit:,
followed by Display, Headings, Groups, Filters, Specifications
and Batch List.
56
AMS REALTIME Resources User Guide
Advanced Management Solutions, Inc., Issue 1.1
Display
Display shows the current report settings. When Display is
selected, a line of buttons across the bottom of the information line
will appear. All buttons are labeled across the top with the
exception of the first button, which is Calculate. The remainder of
the report buttons all allow for selection of some type of report
criteria.
Calculate button
Clicking on Calculate will search the database for all records that
meet the specified criteria (this includes Headings, Groups and
Specifications). If any of the report criteria has changed, the report
shown in the window will not update until the Calculate button is
depressed. This provides the user with the opportunity to complete
all of the report specifications before the database is searched.
Report button
The Report button contains the current Report name. Clicking on
the Report button will provide a popup of all report names which
have been defined in the Specifications table, which is described
later in this section.
AMS REALTIME Resources does not prevent a user from
modifying an existing report. For example, suppose a regular
monthly report called JON_REP collected actual hours sorted by a
Job Order Number using weekly collection periods. If a more
detailed breakdown was required, the JON_REP report could be
selected and the summarization period could be changed to daily
bins.
If desired, this new report could then be saved. To save a new or
modified report, click on the Report button and select Save Report
from the bottom of the popup. Then provide a new report name at
the prompt. The new report name, along with all of its
specifications, will then appear in the Specifications table.
Heading button
The Heading button contains the current Heading name. Clicking
on the Heading button will provide a popup list of all the Heading
names which have been defined in the Headings table. Selecting a
Heading name from the list will determine which heading is used
for the report. An upper left, top center and upper right value can
be selected for each heading. These values can be fields, which are
chosen from a popup and are replaced with the appropriate
information when the report generates, or they can also be text
strings that never change from report to report.
57
AMS REALTIME Resources User Guide
Advanced Management Solutions, Inc., Issue 1.1
Group button
The Group button contains the current Group name. Clicking on
the Group button will provide a popup list of all the Group names
which have been defined in the Groups table. Selecting a Group
name from the list will determine the order in which the
information is collected and grouped in the report. For example, a
Group called EMPACT might use a major grouping by employee
and a minor grouping underneath for each task the employee is
working on.
Group names can select information for the report by matching on
one field, but display the contents of another field. Headings,
subtotal specifications, and line or page breaks can also be selected
and stored with the Group name.
Filters button
The Filters button contains the current Filter Set name. Clicking on
the Filters button will provide a popup list of all the Filter Set
names which have been defined in the Filters table. The Filters
table is comprised of a series filters for selected datasets. Each filter
in the Filter Set will be applied to the report output.
Report Period
The Report Period specifies the boundaries of data collection from
the database. The first date is the beginning report boundary, and
the second is the ending report boundary.
To change the report period, first click on the button in front of the
date. Then use the Calendar to select a new date by clicking on the
new report boundary. Change the other Report Period date in the
same manner.
Use the Up and Down arrows to the left of the current calendar
month label to move the calendar Backward and Forward a month,
respectively. Use the Left and Right arrows to the right of the
current calendar month label to move Backward and Forward a
year, respectively. Click on the current calendar month label to get
a popup list of months. Selecting a month from the popup will
move directly to that month, but retain the current year.
Summarized by
Click on the Summarized by button to select the bin size for
collecting time from the database. The Bin options are Day, Week,
Month, Quarter, Half (Year), and Year.
Headings
Clicking on the Headings button provides access to the Headings
table. The Headings table allows you to define specific report
heading formats. Once a Heading name has been defined, only the
58
AMS REALTIME Resources User Guide
Advanced Management Solutions, Inc., Issue 1.1
name has to be selected in order for all of the components to appear
in the report. A Heading can have multiple lines.
To create a Heading, type a Heading name next to the word New in
the Heading Name column. This Heading name will appear in the
popup when you use the Heading button to select a report heading,
so the name shouldn’t be too long.
On the same line, click under the column labeled Left. A popup
will appear with several field names to choose from, such as
^Heading (the Heading name), ^Title (the Report name), ^Page (the
current page number or the report), ^From and ^To (the Report
Period dates), and many more. Click on any field name to select it
for that heading position. Do the same for the Center and Right
columns.
To enter a text string instead of picking a field name from the
popup, hold down the Ctrl key and click. A cursor will appear in
place of the popup. Type the text string for display.
A blank line will always be displayed at the bottom of each heading.
As soon as that line is occupied, a new line will appear. You can
use as many lines as you need for the report Heading, but take care
that you don’t go overboard and make the Heading bigger than the
body of the report.
Groups
Clicking on the Groups button will provide access to the Groups
table. This table lets you define how the report information will be
grouped, or ordered.
To create a Group, type a Group name next to the word New in the
Group Name column. This Group name will appear in the popup
when you use the Group button to select a report grouping, so the
name shouldn’t be too long (the actual limit will depend on the
defaultfont size specified in your configuration file).
On the same line, click under the column labeled Dataset. A popup
will appear that contains all the dataset names that have been
defined in your AMS REALTIME Resources database. Choose the
dataset that contains the primary report grouping.
Still on the same line, click under the column labeled Field. A
popup will appear that contains all the field names in the dataset.
Select the field that will be used as the primary search field for
reporting. This field will be used as the internal search criteria, but
does not have to be displayed in the report.
In the next column, click under the column labeled Display. The
selected field is the field which will be displayed in the report. For
example, perhaps the employee number is the field which is used for
the internal search for actual time records, but the employee last
name is the information that is printed in the report. The Field
column would contain employee number and the Display column
would contain the last name field.
59
AMS REALTIME Resources User Guide
Advanced Management Solutions, Inc., Issue 1.1
A Heading name (which must be predefined in the Headings table)
can be supplied for each Grouping. To select a Heading name,
click under the Heading column and select a Heading name from the
popup.
If desired, Subtotals can be included with selected report groupings.
To have the report calculate subtotals, click under the Subtotal
column and select None, Before or After. Selecting Before will
place the subtotal for that group on the same line (before any lower
groups are displayed). Selecting After will produce a subtotal for
the group after any subsequent lower groups.
The last column, labeled Break, is used to determine how the
groups are separated: with a line break, a page break, or not at all.
Selecting None keeps the report lines together, with no separation.
Selecting Line will force a blank line between each group.
Selecting Page will force a page break (including a new heading)
between each group. Each line within a group can have its own
Break selection.
Filters
The Filters table allows you to define a combination of one or more
filters which will be used to sort and filter the report data. If Each
set of filters should be given an identifying name under the Filter
Set column.
Select a dataset, and then select one of the filters which has been
defined for the dataset. As each line of the Filter Set is used, a new
line is added. This allows combinations of several different filters to
be applied, either from the same dataset or from different datasets.
Specifications
The Report Specifications table allows you to type in everything
from the Report Display screen (where it is accessed and displayed
on the buttons) and save it as a Report name.
By entering the name of the Report under Title, and entering a
Heading name, Group name, Binsize (Summarized by), From and
To date (of the Report Period), Activity Filter, Employee Filter and
Organization Filter, you get exactly the same report as if you had
entered the information from the Display screen and saved the
Report name as the Title. However, you can also specify and save a
View name, which has to be selected from the View menu when the
Report Display is used.
Batch List
The Batch List lets you create lists of report specification names to
be batch printed. To start a Batch Print process, select Print Batch
from the File menu. A popup will appear which contains all the
Batch Lists which have been defined. When the Batch List is
selected, the entire series of report specifications will be
automatically printed.
60
AMS REALTIME Resources User Guide
Advanced Management Solutions, Inc., Issue 1.1
Update
Update mode allows you to enter, edit and view the data in each
dataset. When Update is selected, the names of all the datasets
which have been defined will appear on the left side of the screen.
To access the data, select the name of a dataset. A spreadsheet-style
table will appear with the field names shown at the top of each
column. If there are too many data columns or records to fit in the
window, scroll bars will appear. Clicking on the scroll bars will
shift the table and allow you to shift the window and access the rest
of the data.
Double-clicking on a column heading will cause that column, (and
all columns to the left) to scroll lock. A darker border around those
columns indicates that they are locked. This means that when the
scroll bars are moved, the remaining columns to the right will shift
and scroll, but the locked columns will remain fixed. Use this
feature to keep a key field reference on the screen when viewing
long rows of data.
Columns can be moved and resized. To move a column, position
the cursor over the field name (heading). When the cursor is a flat
hand, click and drag the column to its new position. To resize a
column, position the cursor on the right edge of the field name
(heading). When the cursor is a pointing finger, click and drag the
column edge to its new size.
Re-sizing down to nothing will put away the column, so the data
will not be visible. Clicking in the white space to the right of the
displayed columns will produce a popup of all non-displayed
columns. Selecting a field from the list will add that field to the end
of the currently displayed table.
If the dataset is empty, a blank line will appear. When data is
entered, a new line will appear, so there will always be a blank line
for appending new data. Edit commands, such as the Cut, Copy,
Paste, Fill Down, Fill Right and Paste Link can be used to edit the
data. File commands, such as Load and Dump, can also be used to
transfer data stored in tab delimited text files in and out of each
AMS REALTIME Resources dataset.
Key Fields
Each dataset contains fields that hold key pieces of information that
are used by AMS REALTIME Resources for a specific purpose.
These fields can be identified by Attribute codes which are displayed
next to their definitions. It is important to ensure that these fields
are populated with valid data, since AMS REALTIME Resources
uses these fields to make calculations.
61
AMS REALTIME Resources User Guide
Advanced Management Solutions, Inc., Issue 1.1
Activity Dataset
The required key fields in the standard Activity dataset are:
Field Name
Description
Attributes
TaskID
a unique activity identifier
Task ID
Description
the task identifier that is
displayed in the popup
TaskPick
Start
starting date of the task
TaskStart
Complete
completion date of the task
TaskComp
Level
the default level-of-effort
TaskLevel
Type
the type of activity: project
or non-project
TaskType
Color
color number : pattern
number for the task bar
TaskColor
Filename
the filename used for
transaction file dumps
TaskFile
An optional key field in the standard Activity dataset is:
Field Name
Description
Attributes
Labor Filter
SkillCode used to filter
employee availability
profiles in Plan mode
TaskResFilter
Employee Dataset
The required key fields in the standard Employee dataset are:
Field Name
Description
Attributes
ResID
a unique employee ID
ResID
the organization code of
the employee* (this can be a
reference field from the
Organization dataset or an
Alpha text field)
ResOrg
Name
the employee identifier
which appears in the popup
ResPick,
ResLabel
Login
the employee’s Login ID
ResLogin
*If desired, the OrgCode field can hold a coded string which is used
to establish an organizational hierarchy. The coding works like a
fixed length OBS (Organizational Breakdown Structure) code,
which has no separating decimals and is padded to the right with
zeros when a higher organizational level applies. The zeros are
62
AMS REALTIME Resources User Guide
Advanced Management Solutions, Inc., Issue 1.1
treated as wildcard digits, so that an employee that had zeros in the
last two digits of his OrgCode number could access other employee
records provided that the remaining OrgCode digits matched.
Consider the sample below, where each box in the OBS chart
contains the number stored in the OrgCode. In this sample, the top
row would have access to all employee information below.
10000
11100
11000
12000
11200
12100
13000
12200
13100
13200
13152
13249
12210
11145
11234
12118
12217
11167
11297
12189
12266
11184
13273
12199
A Sample OrgCode Hierarchy Diagram
The optional key field in the standard Employee dataset is:
Field Name
Description
Attributes
Skills
a list of skill codes which
can be used to match the
skill code used in an activity
LaborFilter
(none)
63
AMS REALTIME Resources User Guide
Advanced Management Solutions, Inc., Issue 1.1
Organization Dataset
The required key fields in the standard Organization dataset are:
Field Name
Description
Attributes
Title
the organization title, which
will appear in the popup
DeptPick
Code
a list of all possible
OrgCodes
DeptOrg
Define Mode
Selecting Define also produces a list of the datasets on the left side
of the screen. When a dataset name is selected, its field definitions
are shown. This is where the field names and their data types are
defined.
Each dataset must be initially defined before data can be entered.
You can either start from scratch and create a new dataset, or you
can copy and modify the sample dataset provided.
To start a dataset from scratch, start AMS REALTIME Resources
with no dataset specified in the configuration file. You can do this
by opening the client configuration file (rtr32.ini or rtr.cfg) and
inserting a semicolon before the dset parameter so that it is ignored.
The dset parameter can later specify the default dataset to open
locally if a AMS REALTIME Resources Server address is not
specified (the preference file can also store this information).
If AMS REALTIME Resources doesn’t have a specified dataset, it
will prompt you to Find or Create a dataset, or Quit the program.
Find will let you select an existing dataset, and Create will allow
you to name a new dataset.
If you want to modify the sample dataset, you can either copy the
sample.dst file to a new dataset filename (maintain the .dst
extension), or you can open the sample dataset and use Save as to
copy it to a new dataset name.
The fields which are required by AMS REALTIME Resources are
included in the basic dataset. Each of those fields has an Attributes
keyword. These keywords are fixed and cannot be changed. Since
the keyword determines what each field represents to AMS
REALTIME Resources, the actual field names could be changed.
However, we do not recommended that these fields be altered
without a thorough and complete understanding of all related field
references from other datasets. Incomplete changes will produce
inconsistencies and unexpected results.
New fields, however, may be easily added to each existing template
dataset to create a customized database for your AMS REALTIME
Resources system.
64
AMS REALTIME Resources User Guide
Advanced Management Solutions, Inc., Issue 1.1
Defining an Activity Dataset
Renaming, Creating and Deleting Datasets
The three buttons to the right of the dataset allow you to rename,
create, or delete the currently selected dataset. These functions
allow you to create new datasets, delete old user-defined datasets, or
rename an existing dataset.
Datasets must be empty before they can be deleted. This is a safety
precaution. If a deleted user-defined dataset will be replace by a
new dataset, you should exit and restart AMS REALTIME
Resources before the new dataset is created to ensure that the old
dataset is fully cleared.
Note: If a field name or dataset is redefined or renamed, it is
important to ensure that all other virtual fields and reference fields
that will be affected by the change are also updated.
Filter
Selecting Filter will produce a table of matching and sort criteria
for the selected dataset. A Filter Name, which is entered in the
leftmost column, is used to select a filter from the popup when it is
applied to the dataset.
Filters allow you to create simple sorts and matching criteria, or
create combinations of filters that sort data on multiple fields, and
apply complex and/or logic to the data. Since each filter has a
name, each filter can be reapplied instantly by selecting the filter
name from a popup.
Match criteria uses the basic compare symbols, including greater
than, less than, equal (both case sensitive and insensitive) and not
equal. Wildcard symbols may be used. Matching specifications on
the same line represent and logic, and matching specifications on
subsequent lines represent or logic.
Access
The Access table defines each access level, which determines which
AMS REALTIME Resources functions are accessible to each user.
It is recommended that only the System Administrator have update
65
AMS REALTIME Resources User Guide
Advanced Management Solutions, Inc., Issue 1.1
access to the Access table, and that most users not be allowed to
view this table.
The Access table his comprised of a basic three-letter code for each
dataset and function. For dataset access codes, the first letter
determines the level of change allowed to dataset filters. The second
letter determines what the user can change in the contents of each
dataset. The third letter determines the level of change allowed to
dataset definitions.
Filter names can also be applied to an access code by adding
:filtername to the three-letter code. View names can be applied to
the access code by adding :optional filter | viewname to the code
(e.g., RR-: EmpFilter | PartialView) The combination allows
limited access to certain fields of a dataset, such as allowing the user
to look at only his own personal employee information, but only
those fields specified by a locked view.
Other Hotspots
Tool Tips
If the cursor is positioned on top of a button, a popup message will
appear, providing a brief description of the button’s function.
The Message Area
At the bottom line of the AMS REALTIME Resources screen, an
area exists where helpful messages are displayed. Whenever the
mouse is positioned over a hotspot area that is used to access a AMS
REALTIME Resources function, a message will display that tells
you what will happen when you click (or double-click) at that spot.
For example, position the mouse over the Clock, which is located at
the bottom of the Calendar. The message area says, “Click to Select
Clock Display Format.” Now click on the Clock display. A popup
appears with four time formats. Clicking on any one of those time
formats will reset the Clock display.
Resizing the Window Layouts
Dragging on the line that separates each window area will allow you
to resize the boundary and alter the screen layout. Changing the
screen to a full table display by dragging the boundary down into the
calendar area will allow more table information to be viewed
simultaneously. This can be easier than scrolling to view many
related pieces of information. When you need to see the graphic
employee information or the Calendar again, just drag on the
boundary line and pull out the area.
66
AMS REALTIME Resources User Guide
Advanced Management Solutions, Inc., Issue 1.1
Resizing the Calendar Timeline Window
The calendar timeline (shown across the top of the Gantt chart area)
can be rescaled to show a section of the employee’s task list in more
detail (or less detail). To look at the task list in less detail and
extend the range of the calendar timeline, click on the right edge of
the calendar timeline and drag inward, or click on the left edge of
the calendar timeline and drag inward.
The Vertical Bar Cursor with Inward Pointing Arrows
Pulls More Time into the Calendar Timeline
To look at a section of the task list in more detail, click on the
starting timeline point and drag to the left edge of the timeline.
Then click on the complete point and drag to the right edge of the
timeline. The calendar timeline labeling will automatically change
as space permits.
The Vertical Bar Cursor with Outward Pointing Arrows
Pushes Time off the Calendar Timeline to See More Detail
Panning the Calendar Timeline Window
The calendar timeline (shown across the top of the Gantt chart area)
can be rescaled to show a section of the employee’s task list in more
detail (or less detail).
The Hand Cursor Shifts the Calendar Timeline
Calendar Control
AMS REALTIME Resources version 1.3 now supports multiple
calendars to determine working and non-working days. Up to 16
different working calendars can be defined. Calendars control many
aspects of planning, time and date calculations, and changes to a
calendar can have a wide-spread impact. Therefore, calendars are
not directly passed between AMS REALTIME Resources and
67
AMS REALTIME Resources User Guide
Advanced Management Solutions, Inc., Issue 1.1
Projects, but must be dumped and loaded by a System Administrator
(or someone who has Full Calendar Access rights) for
synchronization.
The current calendar date (today) is slightly pushed down in the
display. AMS REALTIME Resources gets the current date from the
computer’s system date. A small box will always appear around
today’s date, and a diagonal line crosses out all days in the past.
The currently selected date is used in Time mode to determine
which timecard record should be displayed. To change to another
Time week, click on any calendar date within the week. If changes
have been made to the timecard data, AMS REALTIME Resources
will prompt you to save the record before continuing.
Clicking on the innermost arrows on either side of the calendar title
allows you to move backward and forward through the adjacent
months. Clicking on the outermost arrows on either side of the
calendar title allows you to move backward and forward by adjacent
years. Clicking on the current month name at the top of the calendar
display provides a popup of all months in the current year.
Selecting a month name from the popup will change the calendar
display directly to the specified month.
The two buttons in the lower right corner of the calendar area
provide calendar display options. The WDays On/Off button
toggles a Julian working day display on each day. The Markout
On/Off button toggles the cross-out lines for days in the past.
Editing Calendars
Calendars can be customized to allow for specific working and nonworking days and a working shift. If AMS REALTIME Resources
data will be exchanged with AMS REALTIME Projects, ensure that
the working calendars are identical for consistent results.
Note: AMS REALTIME Resources verifies that the user has Full
Access to all aspects of a Filter table before allowing any Calendar
modification to be saved to a server database. Any modifications to
the working calendar can impact activities, employees and planned
work.
To edit a calendar, click on the Calendar tab. Especially if you are
working on a small display monitor, the calendar definition areas
can be enlarged to show more information. To do this, click and
drag the line separator between the definition area and calendar area
to the bottom of the screen.
As you can see, Calendar Mode shows a familiar-looking desk
calendar covering a six-week period, with non-working days
highlighted by displaying their dates in red. In the default
Calendar, all Saturdays and Sundays are non-working days, and the
other days are working days.
Dates which have already been worked, that is, those dates which
are before the Now date, are shown crossed through.
68
AMS REALTIME Resources User Guide
Advanced Management Solutions, Inc., Issue 1.1
To the right of the screen are a series of tabs which can be used to
define specific information about each calendar. Above the calendar
and the tabs are some calendar-specific icon tools which are covered
in detail below.
When you first enter Calendar mode, the Info tab is displayed,
which shows the basic information for the current calendar. In the
example above, the Calendar Name shows that we are working on
the Default Calendar. The Select Calendar icon (the rightmost
button at the top of the screen) also shows the name of the current
calendar. Click the icon to see a list of other calendars, and select
the name of the calendar you want.
The Base Date is the point at which the calendar starts. You will
notice that the working days in the calendar are numbered
sequentially, and the number displayed at the bottom right of the
date box. (The figure at the top left is the actual date). This generic
day numbering starts from the day after the Base Date, since the
Base Date is zero.
Any changes you make can be saved by clicking the Save Calendar
Changes button. The Discard Calendar Changes button can be used
to ensure that none of the changes you have just made are saved.
Working Time - Shifts
As well as being able to define which days are working or nonworking, you can also specify which hours are to be worked within
the working day. These hours can be set up to mirror the shifts
worked on the project.
In the Info Tab, the basic shift information is entered and displayed
in the Shift Start and Shift End boxes. These times are used to
determine how many working hours there are in a working day,
which is entered in the Day Length box, in this example, 8 hours.
Depending on the number of working days in the week, AMS
REALTIME Projects will calculate the Week Length, in this case
40 working hours (this can use the format hh:mm). In a similar
fashion, the Month Length shows the number of working hours in
a month.
Moving Around in the Calendar
To move around in the calendar, to display a different month or
year, use the left and right arrows above the calendar. On the lefthand side, closest to the month label, click on the right arrow to
advance to the next month, and click on the left arrow to move to
the previous month. On the right-hand side, closest to the year
label, click on the right arrow to advance to the next year, and click
on the left arrow to move to the previous year.
Selecting Dates
Dates can be selected in a variety of ways:
69
AMS REALTIME Resources User Guide
Advanced Management Solutions, Inc., Issue 1.1
• Select an individual day by clicking on its date box. The date
selected is highlighted by showing the date box depressed as if a
switch has been pushed in.
• Select a range of dates by dragging across the date boxes. All
the dates selected are highlighted by showing the date boxes
depressed.
• Select a day of the week, for example all Saturdays, or all
Wednesdays, by clicking on the day name at the top of the
calendar. This highlights the day name, but does not show the
specific dates selected.
Changing Working Days
To change specific holidays from working days to non-working
days, or vice versa, choose the Holidays tab. Select the appropriate
date on the calendar and click the Holidays tab on the right of the
screen.
The screen changes to show the Holidays dialog. The date or date
range you have selected is shown in the From and To boxes. Click
Add Holiday to make these days non-working holidays.
Alternatively, click Delete Holiday to change the selected days
from holidays to working days.
Individual date changes only apply to the current year, so remember
to set annual holidays for each year in the project span… BEFORE
you schedule in that year!.
Work Cycles
In addition to changing the days when work will be done, you can
change the time during the day when work will be done. This is
important for determining the activity span and for many advanced
calculations. To change the shift, click on the Cycle tab. You are
presented with a dialog box which allows you to select a day of the
week and set up the From and To times for the shift.
You can select the day by clicking on the Shift For box and selecting
a day from the drop-down list. Alternatively, select a day on the
calendar.
Enter the times for the shift. To define the entire day as a shift,
enter 00:00 for the From time and 24:00 for the To time. Then
click Add Time to set these times as the shift for that day.
You can also create a split shift cycle by defining successive periods.
For example, a lunch break can be specified on the calendar by
defining a shift from 07:30 to 11:30 for Monday, and then adding a
second shift period from 12:30 to 4:30 for Monday. Just specify the
first period, click on Add Time, and repeat the process for the
second period.
To change the shifts for a day, select the day in the list at the bottom
of the dialog, and click Delete Time. Then add the new times as
discussed above.
70
AMS REALTIME Resources User Guide
Advanced Management Solutions, Inc., Issue 1.1
Any cycle of shifts that you define is specific to a defined time
period, which is called a range. For example, the range for this
cycle could be defined as being valid from June 1st to September.
30th. The date range is defined using the Range tab, and the default
range is Always.
The Range for this Cycle is selected by using the Range button to
select from a drop-down list. Combining Ranges and Cycles in this
way permits you to set up very sophisticated and complex patterns of
work.
Defining Overdays
AMS REALTIME Projects also allows you to define working day
exceptions, which are specific working days which would normally
be non-working. These extra hours or days are entered as overdays.
To define overdays, which are working days that are normally nonworking, but will be worked as an exception, click the Overdays
tab. Either select a date on the calendar and enter the dates in the
From and To boxes.
When you click Add Overdays, the exception working days will
be displayed at the bottom of the dialog.
To remove or change existing overday definitions, select the
appropriate date at the bottom of the dialog and click Delete
Overdays.
Specifying the Range of Dates Covered by a
Cycle
Your project may use standard shift patterns throughout its whole
duration. On the other hand, it could be that shift patterns, overdays
and holidays will change from time to time throughout the project.
For example, you could work one set of shift patterns during the
summer, and move to a different working pattern for the winter
months.
AMS REALTIME Projects allows you to specify a range of dates for
which the other information is applied.
Click the Ranges tab to access the Range dialog box.
Use the Range button to select an existing range or click Add
Range and name the new range. The Always Range is the default
range, which means that any cycle, holiday or overday information
is applied to all dates.
The date on which the Range is to start operating is entered in the
Start box.
The Synch date is the first date in the beginning of a cycle for the
new calendar range. For example, the summer calendar might start
on June 21, but if that is a Wednesday, and the cycle starts on a
Monday, we can set a Synch date for June 26, which is the next
Monday.
71
AMS REALTIME Resources User Guide
Advanced Management Solutions, Inc., Issue 1.1
Synch dates become clearer when they are applied to calendars with
odd cycles (instead of a weekly shift pattern). If a 10 day shift cycle
is defined, the system needs a way to determine which day is which,
since there will be more than one Monday in the pattern.
For example, let’s say we have defined a range that uses a 10 day
Cycle Length, enter a Start date of 01JUN97 and a Synch date of
11JUN97. When we look at the Cycle for this range, we will see
Day 1 of 10, Day 2 of 10, Day 3 of 10 and so on in the Shift For
popup, where we had previously seen the days of the week.
Specify the length of the cycle in the Cycle Length box. The default
is 7, which means that you can the shift times using the calendar
week specifically for this Range.
Creating a New Calendar
As well as making changes to existing Calendars, you can create
new calendars. Click on the Calendar tab to enter Calendar mode,
where the display will show the current calendar. Click the New
Calendar icon, at the left-hand side of the screen.
The Info tab change to display the Calendar Name as New
Calendar. Edit this field to enter the name you want to use.
From now on, the Select Calendar icon will include this new
calendar as part of the selection list. Any changes you make on any
other tab apply to the new calendar, so do take care that you have
selected the correct calendar before making any changes.
To leave the Calendar mode, click on OK and change to another tab.
If you are running in client/server mode, the calendar changes will
save with the next automatic database save, but to ensure that the
change is immediately stored, you can also force a File Save from
the AMS REALTIME Resources Server program.
General Summary
Schedule and resource data can be introduced into the database in
several different ways: by manual data entry, by importing text files
which contain the data for each dataset, from Microsoft Projects
files that have been saved to the Resources database using ODBC, or
from existing schedules using the direct AMS REALTIME Projects
interface. Once activity and employee information has been entered,
employee workload planning can be accomplished for each activity.
Employees can then post the hours they have worked on each
individual assigned task. If an employee works on an activity which
has not been assigned, they can add a new activity from the Time
screen. If an employee adds a new activity, that employee is
automatically assigned to the task. Once timecard hours have been
posted, the Report function will produce a wide variety of reports,
including saved reports that can be accessed by other programs
using ODBC. Timecard data can also be sorted and filtered.
72
AMS REALTIME Resources User Guide
Advanced Management Solutions, Inc., Issue 1.1
In a local client environment, information is stored in a local
database. In a client server environment, the dataset records are
stored in the server database, which is remotely accessed.
Processing is performed on both the client and server.
The AMS REALTIME Resources Server program handles all
client transactions, and has its own configuration file. The
configuration file contains the name of the server and the database,
network timing adjustment parameters, protocol parameters, and
other preference and file settings.
As with the client configuration file, this information is read by
AMS REALTIME Resources only upon initial program startup.
When the data has been modified and the user has not saved the
data file, the program will prompt the user to save before quitting
the program. The user can quit without saving, if desired. If a user
selects another reporting week, the program will prompt the user to
save.
Actual time worked can be reported in a variety of ways. Reports
can be created and stored for instant recall. Views and filters
combine to provide additional flexibility in presenting timekeeping
information. For instant and accurate status updates to AMS
REALTIME Projects, actual hours, progress, and plan changes can
be synchronized or exported to other external systems.
73
AMS REALTIME Resources User Guide
Advanced Management Solutions, Inc., Issue 1.1
Defining Datasets
The Basic AMS REALTIME Resources Datasets
The three basic text datasets are information sets containing
Activity, Employee and Organization information. The field names,
data typesThe Actuals and Workplan datasets are the standard
numeric type (i.e., containing time-phased data) datasets. These
contain the source data that appears in Plan mode and the Timecard
screen. As with the standard text datasets, the basic fields, data
types and attributes should not be redefined. There is some capacity
to add additional fields to these numeric datasets, but only within
the existing slot reference structure.
New datasets can also be created to hold information to support your
project and resource management systems, such as customer
information, billing and expense data, or document control
information. AMS REALTIME Resources can support up to 41
datasets in total (the 5 standard datasets plus up to 36 user-defined
datasets).
There is no implied order to dataset fields. Fields may be inserted
or deleted, but if a field is deleted, all corresponding data is lost.
Each field has a list of possible data types. Reference field types
allow selection of fields from other datasets. Virtual field types
automatically create the data from defined component fields or
subfields.
Creating Dataset Field Definitions
The first field in the dataset should be a unique record identifier. To
define the fields in a dataset, select the dataset name and choose
Define (note that only users with Full access to the dataset table
definition will be able make database definitions). Enter the field
name, and then tab over to choose a data type.
You can click in the Type field to get a menu popup that will
prompt you for the data type, size and format, or Ctrl-click to get
the cursor and edit or enter the type manually. The types are shown
in the definition using the following format:
TypeCode [Size] [ : FormatControl].
75
AMS REALTIME Resources User Guide
Advanced Management Solutions, Inc., Issue 1.1
Data Types and Format Controls
The following table describes the data types and formats which are
available:
Type
Size
Number
Alpha
Sample
Description
20
N
Up to 20 numeric characters
1-255
A35
Up to 35 chars of text
_ (underscore)
A25:_
Up to 25 chars of text with all
spaces removed
U
A12:U
Up to 12 chars of upper case text
A:_U
Default of up to 20 chars of
upper case text with spaces
removed
dd
D:dd
Day
ddMON
D:ddMON
Day MonthName3
ddMONyy
D:ddMONyy
Day MonthName3 Year
ddDAY
D:ddDAY
Day DayofWeek
dd-MON-yy
D:dd-MON-yy
Day-MonthName-Year2
dd-MON-yyyy
D:dd-MON-yyyy
Day-MonthName-Year4
DAY
D:DAY
DayofWeek
mm/dd
D:mm/dd
Month/Day
mm/dd/yy
D:mm/dd/yy
Month/Day/Year2
yymmdd
D:yymmdd
Year2 Month Day
yyyymmdd
D:yyyymmdd
Year4 Month Day
hh:mm
T:hh:mm
Hours:Minutes
hh.t
T:hh.t
Hours.Tenths
hh:th
T:hh:th
Hours.TenthsHundreds
hh
T:hh
Hours
ppp%
T:ppp%
Percentage of Day
R:Project.Name
Provide a popup of the field
contents of the Name field from
the Project dataset.
R25:Customer.ID
Provide a popup of the field
contents (25 characters long) of
the ID field of Customer dataset
V:Last + “, “ + First
Populate this field (up to 20
chars) with Last, a comma, and
First
V40:Project.Name
+ ID
Populate this field (up to 40
chars) with the Project Name
field plus ID
V30:Last[1:5] + ID
Populate this field (up to 30
chars) with the first 5 chars of
Last plus ID
Date
Time
Reference
20 is
FormatCtrl
default
max
Virtual
76
AMS REALTIME Resources User Guide
Advanced Management Solutions, Inc., Issue 1.1
Type
Sample
Description
Lookup
L:Org.Code
Lookup table field to establish
data contents by a date period
Calculate
C:BCWS-BCWP
Calculate fields using standard or
special operators. Special
operators are % (percentage)
and # (percent of total), standard
operators + - * /
Pick
P:Task MS NP
Provide a popup of Task, MS and
NP for data selection.
Group
Operation
C:Min(Workplan,
Drilldown
W40:Programs.
Name=WBS_IT
K:WBS_IT.
SubProject
Calculate the Min, Max, Sum, or
Count (record count) of a
numeric dataset field (Actuals or
Workplan).
An activity reference field to a
WBS source table.
A field that identifies a
datasource table as having a
WBS level beneath (a child
table).
A field that identifies a
datasource table as having a
WBS level above (a parent table).
This can also be used to create a
WBS subset branch.
A field that stores a working
calendar.
Future use - popup of defined
access levels.
Future use - enforce percentage
boundaries of 0 - 100%.
Future use - popup of defined
filter names.
Child
Size
FormatCtrl
Date)
Parent
O:WBS_IT.
Program
Calendar
Julian Calendar
Access
?
Progress
S
Filter
F:Activity
Note: Date and time formats are for display purposes. Dates can be
entered using any valid date format containing the month, year, and
day. Virtual and Reference fields default to 20 characters unless
specified otherwise. If a Virtual or Reference type string is longer
than the specified number, the remaining string is ignored.
Defining the Activity Dataset
The basic activity fields which are required by AMS REALTIME
Resources are already defined in the Activity dataset. While these
names can be modified, extreme care must be taken to change all
other related field references across all datasets if changes are made.
The contents of the Attribute field are used to differentiate special
purpose fields.
To add new fields to the Activity dataset, click in the first empty line
under the Name column. Type in the new field name.
77
AMS REALTIME Resources User Guide
Advanced Management Solutions, Inc., Issue 1.1
Data Types
Click on the same line under the Type column. A popup will
appear containing all of the data types available. Click on the
appropriate data type.
Alpha
If the Alpha type is selected, a prompt will appear so that the
maximum field length can be entered.
Reference
If the Reference type is selected, a popup will appear that allows
you to select the dataset you wish to reference. Click on a dataset
name. Once a dataset has been selected, a popup will appear
containing the fields in that dataset. Click on the field name you
wish to reference. When a user selects a Reference type field, a
popup will appear, allowing data selection from the contents of the
referenced field in the other dataset.
Reference Defaults
To set a default for a reference field, control click in the type
column. This will open the field for editing without producing the
data type popup menu. Add an exclamation point after the reference
field definition and then enter a reference link to a default value.
R:Organization.Code!Employee.Org Code
Virtual
If the Virtual type is selected, a popup will appear that contains all
the fields in the current dataset. Continue clicking on each field
until you have selected all you want. The contents of the new field
will be automatically created from all of the fields you have selected.
To override the popup and add text to the virtual field definition,
hold down the Ctrl key and click in the field definition. A cursor
will appear, allowing you to add text or edit the field.
Virtual Reference
A virtual reference field is a field that is automatically populated by
a reference link to another dataset. For example, each employee has
an Org Code. If the Org Code is defined as a reference field to a
Code field in the Organization dataset, the Employee’s Org Code
will establish a link to a particular Organization record. Other
fields in that record can be linked as a Virtual Reference field, such
as a Manager.
To define a Virtual reference field, enter a new field name. Chose
Virtual as the data type, and then select the field that contains the
reference link to another dataset. A popup will then appear that
78
AMS REALTIME Resources User Guide
Advanced Management Solutions, Inc., Issue 1.1
contains all the fields from the linked dataset. Choose a field from
the list to populate the virtual reference field.
Pick
If the Pick type is selected, a dialog will be provided so that you can
enter all the possible choices for the field. The pick list items can be
separated by a comma or a space. Items with embedded spaces must
be enclosed in quotes. This type provides a method for data
validation. Ctrl-click will override the popup and allow direct
editing, but the entry still must match one of the pick list items.
Lookup
If the Lookup type is selected, you must specify the name of a
lookup table. As the lookup table contents change by date range, the
resulting data will change as well.
Calculate
If the Calculate type is selected, a popup will appear that allows you
to select from the defined fields. Once a field has been selected, a
second popup will allow selection of an operator. Once an operator
has been selected, the field list will reappear to allow a second field
selection. from . The last popup will contain the fields from the
selected dataset.
Overriding Data Type Popups
To override the function popup and build a more complex calculated
formula, hold the Ctrl key and click in the type column to open the
field definition for editing. The formula must be preceded with C:
to indicate a calculated field type. Make sure that any field you use
in a calculated formula has been previously defined in the dataset.
The following operators can be selected:
Sample
Description
+
x+y
add x to y
-
x-y
subtract y from x
*
x*y
multiply x by y
/
x/y
divide x by y
%
x%y
find percent x is of y
#
x#y
find percent that x is of (x + y)
To modify the format specifier, hold down the Ctrl key and click on
the current type. A cursor will appear, allowing you to edit the
79
AMS REALTIME Resources User Guide
Advanced Management Solutions, Inc., Issue 1.1
format specifier. You can add substring specifiers to virtual fields
by adding the start column and stop column after the field name.
The columns must be enclosed in square brackets and separated by a
colon (e.g., name[3:6]). You can also edit in text constants by
enclosing the text string in quotes and using the plus sign to append
the string with the field components (e.g., last + “, “ + first).
Group Operations
If the Group Operation type is selected, a function popup will
appear. Select the Min, Max, Sum or Count function from the
popup. Then select a numeric dataset from the popup list. The last
popup will contain the fields from the selected dataset.
Drilldown, Child and Parent Types
The Drilldown, Child and Parent types are used for defining WBS
tables, where approved projects, phases, and other breakdown levels
can be stored. Users can then use a pre-defined drilldown
mechanism to select unplanned tasks by choosing each WBS level in
series, down to the work package. This process is covered in detail
in the section on Work Breakdown Structures.
Calendar
The Calendar data type should be used for a calendar name that
contains a Julian working calendar name.
Future Data Types
Access, Progress and Filter types are not yet incorporated in
Version 1.3, but will be implemented in the future. The Access and
Filter data types will be used to automatically produce a popup of
the existing Access levels and Filter names, respectively. The
Progress data type will be used to enforce percentage boundaries of
0% through 100%.
80
AMS REALTIME Resources User Guide
Advanced Management Solutions, Inc., Issue 1.1
Attributes
The Attribute keywords for the Activity dataset are:
TaskID
This field contains the unique activity identifier.
TaskPick
The contents of this field will be used for the task popup in
Plan mode and Time entry mode.
TaskStart
This field must contain a valid task start date, and is used to
determine the overall work span of the task.
TaskComp
This field must contain a valid task complete date, and is used
to determine the overall work span of the task.
TaskLevel
This field must contain a percentage level-of-effort, and is
used to determine the overall work span of the task.
TaskType
This is used to specify project and non-project tasks; nonproject tasks have a type that begins with the letter N.
TaskColor
The color and pattern numbers in this field are used to
determine the color and pattern of the activity bar on task lists.
TaskFile
This field can hold a filename which receives the actual hours
used on the task when a Dump is executed.
TaskResFilter
This skill filter specifies the skill required by the task, so that
in Plan mode, only those resources with a matching skill are
displayed.
TaskPC
The percent complete field used by the AMS REALTIME
Projects interface to correspond to the schedule Progress field.
ActID
The field used by the AMS REALTIME Projects interface to
link to the schedule Activity ID (if not found, the field with
TaskID is used).
TaskDrilldown
This is the starting field that will be used for a defined
drilldown order for unplanned work selection.
TaskCal
The field used to hold the activity’s working calendar.
81
AMS REALTIME Resources User Guide
Advanced Management Solutions, Inc., Issue 1.1
A Sample Activity Dataset Definition
The following is a sample of an Activity Dataset definition. Field
names are followed by field types and formats. Key fields have an
Attribute key specified.
Defining the Employee Dataset
The basic employee fields which are required by AMS REALTIME
Resources are predefined in the Employee dataset. While these
names can be modified, extreme care must be taken to change all
other related field references across the datasets if changes are made
at all. The contents of the Attributes field (by specific keyword)
determines how AMS REALTIME Resources differentiates between
special purpose fields and fields which contain other information.
The Attribute keywords for the Employee dataset are:
ResID
The contents of this field will be displayed in a
popup when selecting the Organization in Plan
mode.
ResOrg
The contents of this field will specify the
organization to which each employee belongs.
ResPick
The contents of this field will populate the
resource popup (a list of employees).
ResLogin
This field contains the Login ID for each
employee.
ResLabel
This field is used to label each employee’s task
list (the schedule bars).
ResProxy
This field is used to identify an alternate
employee login that can access a AMS
REALTIME Resources account without knowing
the password.
ResPassword
This identifies the Login password field.
ResAccess
This identifies the Access Level field.
ResType
This field is used to identify specific vs. generic
resources.
ResDrilldown
This identifies a field which holds the name of a
Resource drilldown filter.
ResCal
This identifies a field that contains the name of
the Resource Calendar.
To add new fields to the Employee dataset, click in the first empty
line under the Name column. Type the new field name.
Click on the same line under the Type column. A popup will
appear containing all the data types. Click on the appropriate data
type. If the Alpha type is selected, a prompt will appear so that the
maximum field length can be entered. If Reference, Virtual,
82
AMS REALTIME Resources User Guide
Advanced Management Solutions, Inc., Issue 1.1
Calculate, Pick or other types are selected, follow the same
procedures described in the section above on Defining the Activity
Dataset.
Defining the Organization Dataset
The basic organization fields which are required by AMS
REALTIME Resources are predefined in the Organization dataset.
While these names can be modified, extreme care must be taken to
change all other related field references across the datasets if
changes are made at all. The contents of the Attributes field (by
specific keyword) is how AMS REALTIME Resources differentiates
between fields which are used for a special purpose and fields which
contain information which is a user reference only.
The Attribute keywords for the Organization dataset are:
DeptPick
The contents of this field will be displayed in a
popup when selecting the Organization in Plan
mode.
DeptOrg
The contents of this field will be used for each
employee’s OrgCode, which can be used to
create an organizational hierarchy.
To add new fields to the Organization dataset, click in the first
empty line under the Name column. Type the new field name.
Click on the same line under the Type column. A popup will
appear containing all the data types. Click on the appropriate data
type. If the Alpha type is selected, a prompt will appear so that the
maximum field length can be entered. If Reference, Virtual,
Calculate, Pick or other types are selected, follow the same
procedures described in the section above on Defining the Activity
Dataset.
Renaming, Creating and Deleting
Datasets
You can create new datasets, delete old user-defined datasets, or
rename an existing dataset using the Rename, Create, and Delete
buttons that are located underneath the dataset names along the left
side of the screen.
Datasets must be empty before they can be deleted. This is a safety
precaution. If a deleted user-defined dataset will be replaced by a
new dataset, exit and restart AMS REALTIME Resources before
creating the new dataset.
There are two types of datasets: Text and Numeric. Text datasets
are standard, and should be selected for most types of data storage
and retrieval. The Activity, Employee and Organization datasets
are Text. Numeric datasets are time-phased and have one or more
reference links back to a key field in other datasets which make the
83
AMS REALTIME Resources User Guide
Advanced Management Solutions, Inc., Issue 1.1
record unique. Numeric datasets are limited to reference, date, pick,
calculated and numeric data types. The Actuals and Workplan
datasets are Numeric. Other examples of a Numeric dataset would
be a Lookup table for time-phased rates or organizations, or a
dataset that stores statistical information.
Note: If a dataset or field name is redefined or renamed, it is
important to ensure that all other virtual fields and reference fields
that access the new field are also updated.
Timecard Notes and Annotations
You can create a dataset that can be used to store information about
a particular timecard entry through a link. First, create a new text
database. The name will appear in a button in Time mode, so it
may be desirable to use a short descriptive field name, such as
Notes. Then create a field in the new database to hold text
information. More than one field can be created to hold information
that is annotated to the actual time entry.
The Actuals dataset has a Reserved field for the link information.
Change the Type of the Reserved field to Extension. Then choose
the new database you have just created from the popup. The
Reserved field should now be defined as X:Notes[6] (six being the
slot used).
In the Time mode, a button will appear next to the New Activity
button that contains Notes (or the name of the text annotations
database). When a time cell for a specific date is selected, clicking
on the Notes button will provide a dialog that allows an employee to
add in information annotations to the selected date.
This data can also be viewed in the Actuals database, where all
linked fields will be displayed with the time entry record. To see
only those fields which have a Note annotation, create a filter in the
Actuals Filter table where the Reserved field[6] is not equal to a
blank (e.g., enter <> under the field defined as the Extension field).
Decimal Calculations and Reference
Fields
AMS REALTIME Resources has the capability to hold and calculate
costs based on Rates * Hours. Cost values are calculated to an
accuracy, or float precision, of two decimal places. This section
outlines how to set up a simple cost calculation in AMS
REALTIME Resources based on a rate multiplied by the actual
hours worked.
The first step is to define a new dataset. This can be used to hold
rates for different types of work or different skill levels. For this
example, we are going to create a new table called Rate. We will
store a number of different rates which vary based on employee type.
For example, Engineers might be charged at a rate of say $20.50 per
hour, while Technicians are charged at $17.50 per hour.
84
AMS REALTIME Resources User Guide
Advanced Management Solutions, Inc., Issue 1.1
In the following example, we are going to explore how to set up a
very simple activity cost summary based on hours worked, by whom
and at what rate. The total cost of the work can be shown against
individual tasks in the Activity table.
A Sample Flat Rate Table
Adding Rate References to the Employee Table
Since these rates are based on an employee work category and level,
we will now add fields to the Employee dataset that reference which
rate will be used for each employee. By creating a reference field
that provides a popup of all of the Employee Codes in our Rate
table, we can select an category for each employee. We can also
define a virtual reference field that populates with the corresponding
rate based on the employee code selected. This rate field can be
used not only for calculations in the employee table, but can also be
used in the actuals table when an employee record is referenced.
In the sample Employee dataset, we have added two fields: ECode
and ERate. ECode is defined as a Reference field to the descriptive
field in the Rates dataset. ERate is defined as a Virtual Reference
field to the actual numeric rate. This means that as soon as an
ECode is selected, the ERate is automatically populated with the
corresponding value.
Rate Data in the Employee Table
Adding Rate References to the Workplan Table
You may have noticed that each field definition in the Workplan
datasets is followed by a number in brackets. All of the data in these
85
AMS REALTIME Resources User Guide
Advanced Management Solutions, Inc., Issue 1.1
numeric type datasets are stored using different bits, or slots, of the
same data variable for more compact information storage. The slot
identifiers tell the program which part of the field to use.
The information stored for the Employee and Activity fields are
pointers to the record in the Employee and Activity table. For
example, the data stored in the [0] slot will contain a pointer back to
the employee record used for the current Workplan record. The [1]
slot contains a pointer back to the activity record.
We can take advantage of this pointer link back to the base record to
add new fields. By adding a reference field back to another field in
the Employee dataset, such as ERate (the employee’s hourly rate),
and then also appending the element number of the pointer
reference, we can automatically bring related data into the
Workplan dataset. For data that’s not related in the Actuals dataset,
we will have to use slot 6, which is reserved for other uses. The
Workplan dataset contains slots 0 – 15. Slots 8 and higher are
available for customer use. In the Actuals dataset only slot 6 is
available for customer use.
Actuals Rate Field Definitions
The two fields we have added in this sample are WorkRate and
WorkCost. WorkRate is defined as a reference field to the rate
stored in the ERate field of the Employee table (by virtue of the
selected ECode). To add the Employee record reference into the
definition, hold down the Ctrl key and click in the Type field. This
will open the field for editing without producing the Data Type
popup. Append [8] to the end of the reference field definition.
Now that the rate for this employee exists in the Workplan table, it
can be used to calculate the cost of this particular entry of actual
hours. The Cost field is the calculation field that will perform the
math by multiplying the hourly amount by the rate for each plan
record that is recorded in the time sheet. Add the field
WorkCost.to the Workplan table. Make it a calculated field based
on the WorkRate multiplied by the Amount. Then hold down the
Ctrl key and click in the Type field. This will open the field for
editing without producing the Data Type popup. Append [9] to the
end of the calculated field definition.
86
AMS REALTIME Resources User Guide
Advanced Management Solutions, Inc., Issue 1.1
Make careful note of the slot numbers in square brackets which
suffix the type entries. These must be entered exactly as shown or
the function will not work. Each field in the Actuals and Workplan
datasets must have an appended slot number that is shared in order
to function correctly. The numbers in square brackets indicate
which slot is allocated for the data in AMS REALTIME Resources.
Calculating Total Costs in the Activity Table
It may also be useful to add a field to the Activity dataset which
calculates the total hours or total cost of work for the activity. To
do this, we will define a field that sums up all of the WorkCost
information from the Actuals dataset for each activity.
To create and define this field, enter Define mode for the Activity
dataset. Add a new field such as the WorkCost field in the sample
below.
In the Type column, select Group Operations from the popup.
Choose the Sum function.
Pick the Actuals dataset and choose the WorkCost field from the
popup of Actuals fields. The WorkCost field in the Activity dataset
will now contain a summary of costs for each activity that are
derived from the actual hours multiplied by the employee’s rate..
Calculating Activity Costs
Lookup Fields
Lookup fields are used for information that changes over time. For
example, an employee’s organization may change if he transfers
from one department to another. If the employee’s organization
87
AMS REALTIME Resources User Guide
Advanced Management Solutions, Inc., Issue 1.1
code is a text or reference field and the organization is simply
changed, the history of the previous organization’s actuals will be
lost.
However, if a lookup table is created to specify an employee’s
organization based on an “as of” date, actuals that were posted
under the old organization will still belong to the previous
organization, and the actuals after the “as of” date will be assigned
to the new organization.
Lookup tables can be used for rates that change over time,
organization codes, or any other information that varies with time.
Creating a Lookup Dataset
In the sample provided below, we will create an Organization
lookup table. The first step is to create a numeric dataset. It will
have one Key Field which will reference the a unique employee
identifier, ResID.
Use the Create New Dataset button to add a new dataset. We will
call it OrgLookup. Choose the Numeric dataset type.
At the Number of Keys prompt, enter 1. The Organization lookup
only needs one reference field for the employee’s ResID to have a
unique field reference.
Specifying the Number of Key Fields
At the Number of Slots prompt, enter 8. This will provide the room
to define up to 8 slots, which are references to other records or
independent fields, in the Lookup database. While we will only
start by defining 3 fields, this will provide room for the database
definition to be expanded.
Note that if the fields are unique references, the slot numbers do not
have to be specifically entered. The first field uses slot 0, the next
field uses slot 1, and so on. However, if another field is defined
where the slot reference will be shared, that slot must be specifically
entered. Hold down the Ctrl key and click in the Type field to
override the popup and append the slot number to the field (e.g., the
fields R:Employee.ResID[0] and R:Employee.Rate[0] share a
reference to an employee record).
88
AMS REALTIME Resources User Guide
Advanced Management Solutions, Inc., Issue 1.1
Specifying the Number of Field Slots
The next step is to define the OrgLookup fields. Enter ResID on
the first line under Name. Choose Reference as the data type.
Select the Employee dataset, and the ResID field. This first field is
the Key Field which will be used to identify the Lookup record.
Add Date as the second field name (Date is a fixed field name that
the software uses, and can not be altered). Set it to the Date data
type (use any preferred format with month, day and year, and then
Start of Shift). The Date field is defined to hold the date the
change should take effect. AMS REALTIME Resources will
compare the system date with the “change as of” date.
Add Organization as the third field name. This name should
match with the name of the Organization reference in the Actuals
table. Set it to a Reference type, selecting the Organization dataset
and the Code field.
OrgLookup Database Definition
Important Notes on Lookup Tables: Lookup table entries must be
maintained in ascending date order. The dates are "as of" dates,
meaning that each key field match will use the contents of the
lookup fields with the latest date. Each field that uses a lookup
table to populate a field should have at least one entry in the lookup
table.
89
AMS REALTIME Resources User Guide
Advanced Management Solutions, Inc., Issue 1.1
Entering Lookup Reference Data
If you do not already have employee and Organization data in those
tables, enter some test data to work with. At a minimum, you will
need to populate the Employee dataset with a few entries that have
ResID (a unique identifier), Name and Login defined. The
Organization dataset should have at least two unique Organization
Code and Title entries.
Now change back to the OrgLookup dataset in Update mode.
Under the ResID, select each ResID from the popup, one per line.
Under the Date field, enter the beginning of this year. Under each
code, select an appropriate Organization.
Now choose one of the employees that already has an entry and add
a second entry for that ResID. Enter tomorrow’s date under the
Date field, and then set the Organization field to a new
organization. This will allow actual entries from tomorrow forward
to automatically use the employee’s new organization Code.
Defining Fields that Use a Lookup Field
Now that we have the OrgLookup table defined and populated with
data, we can create fields in the Actuals dataset and the Employee
dataset that use the Lookup table to determine their value.
Change back to Define mode and select the Actuals dataset.
Change the Organization data type to Lookup. A popup will
appear that contains all Numeric datasets; choose the OrgLookup
table from the popup. AMS REALTIME Resources will determine
that correct value for the Actuals Organization field by finding the
latest date reference in the OrgLookup Organization field that
contains the ResID (the key field). Lookup data values are
populated in a Numeric table based on a matching field name.
Now select the Employee dataset. Change the Type of the Org
Code field to Lookup. Choose the OrgLookup table from the
popup of numeric datasets. Now choose Organization from the
field list. This is a lookup reference from a text dataset. This field
value will be changed automatically when the system date passes the
“as of” Date in the OrgLookup table.
A Lookup Field in the Employee Dataset
90
AMS REALTIME Resources User Guide
Advanced Management Solutions, Inc., Issue 1.1
Updating Information
Data Entry Tables
Data can be entered or edited by selecting the appropriate dataset
and choosing Update mode. All records are maintained in order
based on the key identifier field in the dataset, which must be
unique.
Fields which are not displayed can be added by clicking the mouse
in the white space to the right of the data table and selecting from
the field name popup. Only those fields not already displayed are
included in the popup list. Each selected field is added to the end of
the table.
Changing the Table Layout
If a View has been saved in the current dataset, table fields can be
moved or resized. Use View Save As... to name a View. To move a
table field column, position the cursor at the top of the field heading.
When the cursor changes to an open palm, click and drag the
column to its new position and let go of the mouse.
To size the columns, position the cursor at the right edge of the field
heading. When the cursor changes to a pointing finger, click and
drag until the column is the desired size. If you size the column all
the way down to its opposite edge, the column will disappear.
Selecting AutoResize from the View menu will automatically size
each column to the size allowed by the field definition.
91
AMS REALTIME Resources User Guide
Advanced Management Solutions, Inc., Issue 1.1
Entering / Editing Data in the Activity Dataset
Deleting Records
Records may be deleted by selecting the row or rows (click or Shiftclick on the row line number) and selecting Delete from the Edit
menu.
Saving the Data
When you have finished entering or editing information in the
selected dataset and you are using a local database, select Save from
the File menu. If you are using a server database, the server will
automatically save the record.
Hierarchical Organization Data Coding
If the OrgCode field in the Employee dataset has a hierarchical
structure, the positional values of the field will be used to establish
“organizational ownership” of employees. The contents of this field
are viewed in a hierarchical way to determine which employee data
a user can view and which employees are available for Login or Plan
access.
The coding works like a fixed length OBS (Organizational
Breakdown Structure) code, which has no separating decimals and
is padded to the right with zeros when a higher organizational level
applies. The zeros are treated as wildcard digits, so that an
employee that had zeros in the last two digits of his OrgCode
number could access other employee records provided that the
remaining OrgCode digits matched.
For example, an employee with an OrgCode of 373000 could plan
work for employees with the OrgCode of 373450, 373457, and
373680, but not have access to employee with OrgCodes of 380000
or 374123.
92
AMS REALTIME Resources User Guide
Advanced Management Solutions, Inc., Issue 1.1
Planning Work
Selecting a Task for Planning
To access the Plan mode and create task assignments for your
employees, select the Plan function. Work planning is performed by
task. The upper left corner of the screen contains a box labeled
Work Planned on. If the box contains Not Set, a task has not been
selected. To get a menu of tasks, click in the box with the mouse.
The popup list of tasks will be generated from the current Activity
dataset. To limit the list of tasks, select a filter from the Activity
Filter box. For example, selecting a filter that selects only those
tasks with a particular organization and project phase will list only
those tasks in the popup. This makes it easier to group tasks for
resource planning.
Selecting a Task for Planning
Assigning Employees to the Task
The current task will be displayed in the button on the information
line. Any employees already assigned to that task will then appear
in the table below. If no employees are assigned, or to assign
additional employees, click in the first empty line under the
Employee heading.
93
AMS REALTIME Resources User Guide
Advanced Management Solutions, Inc., Issue 1.1
Assigning Employees to the Task
Planning the Workload
The Start field contains the first scheduled day of each task, while
the Complete field contains it's scheduled ending date. The Base
shows the number of hours planned on each task. Rem contains
the remaining hours not worked, while the ETC contains the
estimated hours to complete the task. LOE contains the Level-ofEffort that you are planning for the task. This can be put in as a
percentage (e.g., 100%) or in hours per day (e.g., 8). If a percent
sign does not follow the number, hours per day is assumed.
Overtime planning is entered using the OT fields; these values
should be entered independently.
The Totals row provides cumulative planned figures by task. If the
number of employees allocated to the selected task is more than will
fit on the screen, those employees will scroll, but the totals row will
remain locked in at the bottom.
Moving to Another Task
Along with the current task selection, the information line also
provides a Previous and Next button. Clicking on the Previous
button will select the previous activity for planning, and clicking on
the Next button will move you to the next activity in the list for
planning. Using these buttons to perform resource planning on a
series of activities helps to ensure that no tasks are inadvertently
passed over.
Filtering Activities
The Activity Filter button allows selection of a predefined Activity
matching filter. Selecting an activity filter allows you to limit what
appears in the popup by showing only those that match the specific
criteria from the filter. The current activity filter is always
displayed in the Activity Filter button.
Employee Availability Profile
When planning the resource assignments for a task, a list of
resources will appear below next to the calendar. Next to each
94
AMS REALTIME Resources User Guide
Advanced Management Solutions, Inc., Issue 1.1
resource is a shaded bar which displays the availability profile of the
resource. The bars are color coded: blue indicates availability,
white indicates full utilization, and red indicates overcommitment.
The shading indicates the degree of the availability status. For
example, a light shaded red indicates that the resource is slightly
overcommitted, while solid blue indicates that the resource is fully
available.
Viewing an Employee’s Task List
When you have resources assigned to a task, you can immediately
see all the other tasks to which a resource is assigned by clicking on
the resource name. The availability profile in the lower portion of
the screen will instantly change to a Gantt chart view of all tasks to
which that employee has been assigned. This allows you to see
exactly what else the employee is planned to work on if a conflict
exists.
The duration of each task is displayed as a white shadow bar. The
planned work assignment is displayed as the colored and patterned
portion of the bar, and the actual time that has been expended, or
personal progress, is displayed as a dark progress bar on the lower
half of the planned work bar.
To change back from the currently selected employee’s task
schedule, click on the employee to deselect. The task list will be
replaced by the overall availability profile.
Viewing an Employee’s Task List
Scaling the Calendar Timeline
The calendar timeline at the top of the employee’s task list can be
resized to show a section of the task list in more (or less) detail. To
change the calendar scale, click the leftmost portion of the calendar
timeline and drag inward, or click the rightmost portion of the
95
AMS REALTIME Resources User Guide
Advanced Management Solutions, Inc., Issue 1.1
calendar timeline and drag inward toward the center. The calendar
timeline will automatically re-label as it is scaled.
Using Skill Codes
The dataset can be defined to allow activity requirements and
resource capabilities to be matched. The Employee dataset must
have a Skills field, which contains one or more skill codes for each
resource. This field name is fixed; the name Skills can not be
changed.
The Activity dataset must contain a field that contains a Filter name,
such as LaborFilter. The named Filter specifies the filter which
contains the skill set, which is defined with a match criteria. When
an activity is selected for Planning, AMS REALTIME Resources
will filter the resource list to only those employees which have the
have the required skill set. This fieldname is not fixed; it is
identified by the Attribute Key of TaskResFilter.
In the Employee dataset, the Skills field should contain a code
which describes a skill, and possibly a level of proficiency.
Employees can have multiple skills listed in this field. For example,
if a company sets up a standard skill coding system where a two
letter code indicates the skill and a :number from 0-4 indicates the
level of proficiency, Walter Jones might have a Skill code of EE:4
CP:1. This might mean that he has advanced experience as an
Electrical Engineer, and but only beginning skill as a C
Programmer.
Resource Filters should be created for each of the basic skills levels
required. Combination filters of mixed skill requirements can also
be created. The name of the filter should be consistent with the skill
set for easier usage.
96
AMS REALTIME Resources User Guide
Advanced Management Solutions, Inc., Issue 1.1
Filter Name
Skills
EE
=*EE*
CP
=*CP*
EE Level 4
=*EE:4*
EE and CP
=*EE* AND =*CP*
EE or SE
=*EE*
=*SE*
A Sample Resource Filter Table
After Resource Filters have been created, the activity skill
requirements field can be given the appropriate Filter name for the
skill set. When planning the workload for an activity, only those
employees that match the skill criteria will be available from the
resource list.
Swapping Plan Assignments
Planned work assignments can be directly interchanged. This
method can be used to swap generic resource assignments to specific
employees, or to simply reassign work where an employee is
overloaded.
To swap a planned resource assignment, select the current plan
record by clicking on the row number. Then click on the desired
resource from the list of available resources below. The old resource
assignment will be marked as Deleted, and the new resource
assignment will be added.
97
AMS REALTIME Resources User Guide
Advanced Management Solutions, Inc., Issue 1.1
Posting Time Worked
Timecard Screen
An Employee’s Time Screen
Reporting Time
To report the time worked on each task, select Time from the list of
functions near the top of the screen. Several factors can determine
exactly what options exist for the user, such the user’s hierarchical
OrgCode and the user’s Access Level.
Your task list will be displayed at the bottom of the screen. The
duration of the task is displayed as a white shadow bar. The
planned work assignment is displayed as the colored and patterned
portion of the bar, and the actual time you have expended, or
personal progress, is displayed as a dark progress bar on the lower
half of the planned work bar.
The calendar timeline at the top of the employee’s task list can be
resized to show a section of the task list in more (or less) detail. To
change the calendar scale, click the leftmost portion of the calendar
99
AMS REALTIME Resources User Guide
Advanced Management Solutions, Inc., Issue 1.1
timeline and drag inward, or click the rightmost portion of the
calendar timeline and drag inward toward the center. The calendar
timeline will automatically re-label as it is scaled.
Most users will already have their Organization and Name appear in
the buttons on the Time screen information line. Depending on the
organization hierarchy which is defined, clicking on them may or
may not provide popups which allow other users or organizations to
be selected.
Some users may be allowed other access to user records, depending
on their Access Level, the hierarchy code stored within their
OrgCode, or a combination of both.
The Calendar will indicate today's date by drawing a rectangle
around the date. The current date (which defaults to the system
date) is highlighted, as though that calendar day were pressed down.
The timecard defaults to the week in which the currently selected
day is located.
The current week can be altered by selecting a different day on the
calendar. To access a different month, click on the up and down
arrows to the left of the month name. To access a different year,
click on the left and right arrows to the right of the month name.
The current timecard period dates are displayed in the color black
when the timecard is in the current week (based on your system
date). If the timecard is in a past week, the period dates are
displayed in red. If a future week is selected, the period dates are
displayed in yellow.
If the employee has a long list of assigned tasks, the Calendar and
Task List can be put away by dragging down on the boundary line
between the two areas.
Click on the first timecard line entry to get a popup of all tasks
which have been assigned to the employee. Only those activities
with allocated time will appear in the popup. This information can
only be entered or changed by someone with the correct Access
Level.
Reporting Work Done on a Task
To report time worked on a task, click in the first empty line under
the task heading. A popup will appear that allows you to select from
the task list of your planned work. Choose a task from the list by
clicking on the task name. The task will now appear on the
timecard.
To access non-project tasks, hold down the Alt key and click under
the task heading. Non-project tasks are typically categorized as time
allocated for vacation, sick leave or a recurring overhead task.
100
AMS REALTIME Resources User Guide
Advanced Management Solutions, Inc., Issue 1.1
Timecard Fields for a Task
The Base field shows the total number of hours planned for you to
work on the task. The Cum shows how many hours you have
recorded to date. The Period show how many hours you have
recorded in current reporting period. The Rem calculates how much
of the original planned time is left (Base - Cum). The LOE shows
your assigned percentage level-of-effort. The ETC is your estimate
of how many hours it will take to complete the task.
If the task will take longer than originally planned, update the ETC
field to your new estimate. The progress of the activity will be
calculated using this estimate of completion.
Entering Hours Worked
Type in the time you worked on the selected task in the column
underneath that day. Time can be entered in hours (e.g., 8 or 4.5) or
as a percentage of effort (e.g., 50%).
You can also enter a total amount for the week (in hours or percent
effort), and AMS REALTIME Resources will spread the total out in
even increments from Monday to Friday. Even when the daily total
is calculated from the weekly total by AMS REALTIME Resources,
you can still go back and change a daily time entry, and the other
totals will update accordingly. Enter zero (0) to clear an entry.
You can enter overtime into the columns labeled with OT in front of
the day. AMS REALTIME Resources will differentiate these hours
in the database under a separate Cost Center.
Double-check your timecard entries before logging out of the
AMS REALTIME Resources or saving your changes!
To delete a task entry, click on the line number at the beginning of
the line to select the task entry. Then select Delete from the Edit
menu. The selected task line will be removed from the timecard.
A time window called a grace period is defined by the System
Administrator which specifies how far a user can go back into the
database to make a correction. If you know an error was made, but
can not move to that Timecard entry to make the change, contact
your Manager or System Administrator to make an adjustment.
Changing the Timecard Layout
Table columns can be resized or folded to modify the arrangement
of fields displayed on the timecard. To resize a column, position the
cursor at the right edge of the field heading. When the cursor
changes to a pointing finger, click and drag until the column is the
desired size. If you size the column all the way down to the left
edge, the column will disappear.
To move the remaining rightmost columns down to another line
(also called folding the table), click on the field where you want the
break to occur and drag it downward. The remaining fields will
then be underneath, and each task will now have two physical lines
101
AMS REALTIME Resources User Guide
Advanced Management Solutions, Inc., Issue 1.1
of information. To move the second line of fields back onto the first
line, click on the first field title in the second line and drag it
upward. When you let go of the mouse, the data fields will be in
one line.
When the table is folded, the horizontal scroll bar is disabled. It is
automatically re-enabled when the data fields are displayed on a
single line. To see other fields that are off the line, you will have to
fold those fields down to the next line. An empty field also exists in
the field list that can be used underneath the Description field as a
spacer to line up overtime fields underneath the regular day or the
week fields.
Correcting an Entry
Once a timecard entry has been posted or has moved into a closed
period ( as defined by PERIOD and GRACEPERIOD in the
configuration file) the timecard can not be edited. If a mistake has
been made it can be changed by making a correction entry. The
original value is not changed. The correction is made by adding the
original value and the correction value together. Negative
correction values are allowed.
Note: A Systems Administrator or any person with full access
rights, can make corrections to timecards at any time. For other
users, corrections can only be made when the following are true;
The date of the time entry to be corrected has moved out of the grace
period, the time entry must be approved and the user must have full
access rights to timecard as defined in the middle position of the
Timecard column in the access table, e.g. xFx.
On the Timecard, correction entries are displayed on three lines.
For example, if the correction is being made to Regular time only,
the first line displays the reconciliation value ( Original +
Correction ), the second line displays the adjustment ( Correction
Value ), and the third line displays the original value. Under the
type column you will see ‘Regular’ for the first row, indicating that
the time you are correcting is regular, rather than overtime hours.
The second row is labeled ‘Adj.’ This is the row you use to enter
your correction, and the third row ‘Orig.’ is the original hours
entered.
How to Correct an Entry
1.
In the Timecard tab, click in the cell to be corrected.
2.
Click the correction button
on the toolbar. The row for the
selected cell will expand to three rows.
3.
Enter your correction number in the ‘Adj.’ row under the day
to be adjusted. You can enter negative numbers to deduct hours
from the original figure.
4.
Press the Tab key to see the corrected total calculated in the
‘Regular’ row.
102
AMS REALTIME Resources User Guide
Advanced Management Solutions, Inc., Issue 1.1
Audit Trail
This method of correction has been developed to give an audit trail
of changes made to originally posted timecard information.
Charge Types
Defining Overtime and Other Charge Types
Multiple charge types can be defined, allowing users to enter hours
against many different charge categories such as overtime, Double
time, Triple time or even Travel time. The only limitation to the
number of charge types definable is the 128 character limit on the
pick field.
Each type may be selected on the Timecard by clicking on the Type
field and making a selection from the popup list. Type selection is
independent for each activity. Subtotals for all charge types in use
are automatically displayed. If more than one type is used on a
Timecard a grand total is also calculated.
Note: If you add additional charge types to the Timecard Tab and
do not place any actuals against them, those charge types will not
remain on the timecard when you go to another view and then
return to the timecard. If you do this, you will need to re-select your
charge type from the pick list. Once actuals are booked against any
charge type, it remains on the timecard permanently.
How to Define Charge Types
1.
Click on the define Tab.
2.
Click on the Actuals diamond to select the Actuals definition
table.
3.
In the ‘Type’ field’s Type cell, hold down the Ctrl key and click
the mouse pointer to place the edit cursor.
4.
Enter a comma at the end of the last entry in the Type field. (In
the default database the existing Charge Type descriptions are:
Regular, Overtime).
5.
Add your new Charge Type description after the comma.
Note: If you are adding a Charge Type description that has two
words, e.g. Double Time, be sure to enclose the two words within
double quotes, i.e. “Double Time”. Otherwise they will appear as
two separate entries in the popup list.
Adding Notes to your Timecard
Notes with additional information about the hours booked can be
attached to any non-zero cell on the timecard. This is done by
employing an extension dataset that is attached to the Actuals
dataset. By selecting a non-zero cell and clicking on the Push-Pin
103
AMS REALTIME Resources User Guide
Advanced Management Solutions, Inc., Issue 1.1
Notes button on the toolbar, a note can be attached to the cell. You
can identify a cell with a note attached by the turned down top left
corner of the cell.
How to Setup Notes on Timecards
First you need to create an extension dataset and attach it to the
Actuals dataset.
1.
Click on the Define Tab.
2.
Click the Create New Dataset
3.
In the New Dataset Name: dialog, enter a name for your notes
dataset and click OK.
4.
In the New Dataset Type dialog, Click on the Text button.
5.
Click on your new dataset’s diamond button to open it.
6.
In the Name column, create a name for your field, e.g.
“Details”.
7.
Click in the Type column and from the pick-list choose Alpha.
8.
In the Number of Characters dialog enter the number of
characters you need for your notes field and click OK. There is
a limit of 512 characters on Alpha fields.
button.
You have now created your notes dataset. Next this must be
attached to the Actuals dataset as an extension.
1.
Click on the Define Tab.
2.
Select the Actuals Dataset.
3.
Click in the Type column of the ‘Reserved’ field.
4.
Choose ‘Extension’ from the popup list.
5.
From the next popup list, choose the name of your newly
created extension dataset.
You have attached your new extension dataset to the Actuals
dataset. You will be able to see the extension fields by going to the
Update Tab and Clicking on the Actuals diamond button. The
extension dataset will appear at the end of the normal Actuals field
columns.
Note: Before the next step it will be necessary to shut down AMS
REALTIME Resources and restart the program. Some changes
such as the creation of new datasets require a restart of the program
before they will come into effect.
Adding a Note to a Time Cell
1.
Click on the Time cell you wish to attach the note.
2.
Click the Attach Note
3.
In the Dialog, enter your desired text in the text field.
button on the toolbar.
104
AMS REALTIME Resources User Guide
Advanced Management Solutions, Inc., Issue 1.1
4.
Click OK.
Once a note has been added to the Time Cell, you will see the top
left hand corner of the cell appears to be turned down. You can see
all of the attached notes in the Update Tab, Actuals dataset.
Color Coding
Color coding is used throughout the program to assist in its
readability and usability. Some of the color coding is insignificant
and is simply there to help your eye follow the rows across large
areas of data. Others are very specific to the state or type of data in
a particular cell. These specific colors are described below.
‘Traffic Light’ Approval status:
RED = The actuals in the cell have been rejected.
YELLOW = The actuals in the cell have been submitted.
GREEN = The actuals in the cell have been approved.
Charge Types
For each new charge type you create, a new color for its row is
created. For example, if you have three charge types and all three
are open on a record, the colors for each row would be as follows:
Regular (or first defined type) = Light Green
Overtime (or second defined type) = Light Yellow
Double Time ( or third defined type) = Light Blue
Triple Time (or fourth defined type) = Light Gray
Sub-totals for each of these would appear in there respective color
rows at the bottom of the Timecard display. Although you can
define more than eight Charge Types, new colors are only created
for the first eight, thereafter the rows are all white.
Calendars and Days
Non-working days are labeled in Red and days in a closed period are
labeled Dark Grey.
Adding New Activities
The New Activity button is located near the upper right-hand corner
of the Time screen. Clicking on this button allows a user to add a
new activity and also add himself to the Plan for that activity. This
allows the user to get the new activity on their task popup when
entering timesheet data.
When adding a new activity, the user must create a unique Task ID
and enter the basic task information, including the key fields.
105
AMS REALTIME Resources User Guide
Advanced Management Solutions, Inc., Issue 1.1
Field Name
Description
Task ID
a unique task identifier
(key field)
Description
task description
(key field)
Start
start date of the task
(key field)
Complete
complete date of the task
(key field)
Level
% of time planned for task
other
any other fields which are not
calculated or virtual fields
When the user enters this information and clicks on the New
Activity button, a new activity is created in the Activity dataset and
the currently logged in user will be added to the Plan record for that
task. An Activity ID naming system for user-added activities can
assist in differentiating between each type.
To clear the current New Activity screen and start over, click on the
Clear button. When you are finished adding new activities, click on
the Done button to return to the time sheet.
This button can also be used when an employee wishes to track time
spent on tasks that are not of general interest to management, such
as personal time management tasks. Set the contents of the Type
field to anything that begins with N to indicate a non-project task.
106
AMS REALTIME Resources User Guide
Advanced Management Solutions, Inc., Issue 1.1
Non-Project Tasks
Each Activity record has a Type field, which is used to categorize
tasks. Any Type that begins with the letter N is considered a nonproject task, and the actuals for that task will not be exported.
Non-project activities do not appear on the timesheet task list by
default. To get a popup of non-project tasks, hold down the Alt key
and click in the task area of the timesheet.
Posting Time for Unplanned Work
When a “drill down” filter is created for the Activity dataset that
filter is specified in the Timecard access code, the Find Existing...
option will be appended to the end of the user’s task list. If the item
Find Existing... does not appear at the bottom of your task list, then
your AMS REALTIME Resources database has not been configured
for drill down access to other unplanned tasks.
Selecting Find Existing... allows a user to select a new task by
choosing categories from successive popups down to the detail task
level, whether they were planned to work on that task or not. For
example, a user could choose a task by first selecting the Project,
then the Phase, and then the Task from popup lists that contain all
the current choices in the dataset. Even if he was not planned to
work on that task, he could then post his time. Of course,
unplanned work hours can still be subjected to the Approval process.
Find Existing... can also be used with predefined WBS tables for
unplanned work.
Work Breakdown Structures
WBS Concept
Many organizations which are embarking on a time tracking system
will need to book time against tasks which are part of an overall
Work Breakdown Structure. AMS REALTIME Resources has the
capability to model highly complex WBS Structures without the
necessity of having to create very large and complex databases.
AMS REALTIME Resources is designed to allow an individual task
at the detailed level to be associated with any other required
components in a hierarchical structure. This is achieved in the
following way:
One or more data tables can be defined by the user to contain all the
required elements in specific levels of the hierarchy. Parent Child
relationships can then be defined between these data tables. See the
following diagram for an example.
Level 1 ( Program dataset )
IT Program
107
AMS REALTIME Resources User Guide
Advanced Management Solutions, Inc., Issue 1.1
Level 2 ( Project dataset )
IT Project A
Level 3 ( Sub-Project dataset )
Sub-Project 1A
Level 4 ( Task dataset )
Task - 1
IT Project B
Sub-Project C1
Task - 2
Task - 3
At this point, it does not matter which branch of the structure a task
belongs to, provided a data table has been defined for each level and
each element has been specified in that table. In this case, IT
Program would be in the first data table, this table could be called
Program.
Below this would be another data table, perhaps called Project,
containing IT Project A, IT Project B, and so on, down to the task
level.
The real power of AMS REALTIME Resources is that you can then
associate any element in one table with another in a different level,
using parent and child relationships. You may choose not to set up
specific relationships, leaving a level open to selection from any
level above it. That means that a user could book time to Task 1,
under IT Project 1 in one week, and then book time to Task 1 under
Sub-project C1 the next week.
Your drilldown through the structure can be fixed or variable,
depending on the requirements of your organization. This means
that detailed task entries do not have to be repeated each time the
same type of task is carried out in different projects or locations.
This keeps the database small and simple, saves repetition and saves
maintenance overhead.
108
AMS REALTIME Resources User Guide
Advanced Management Solutions, Inc., Issue 1.1
Program Table
ID
Description
PG1
IT Program
Project Table
ID
ITA
ITB
ITC
Description
IT Project A
IT Project B
IT Project C
Sub_Project table
ID
Description
SA1
Sub-project A1
SC1
Sub-project C1
SC2
Sub-project C2
Task table - Task = PG1:ITB:SC2:Task 1
ID
Description
T1
Task 1
T2
Task 2
T3
Task 3
A Sample WBS Drilldown Source Table Hierarchy
Using the mouse, the user will be able to select from a popup list to
drill down and book time on Task1 in the following manor:-
Click on the Timecard task selection area - IT Program
- IT Project B
- Sub-project SC2
- Task 1
Booking time to PG1:ITB:SC2:Task 1 (ID’s or full names can be
viewed)
or
- IT Program
- IT Project C
- Sub-Project SC1
- Task 1
109
AMS REALTIME Resources User Guide
Advanced Management Solutions, Inc., Issue 1.1
Booking time to PG1:ITC:SC1:Task 1
Setting Up a Work Breakdown Hierarchy
First, create a database in the normal way. Once you are logged in
and have defined a system administrator, go to the ‘Define’ view.
We are going to model a very simple Work Breakdown Structure to
start with. When complete, users will be able to ‘Drill Down’
through this structure to book time to tasks.
Software
Program
Project A
Sub-Project
A1
Task A1.1
Project B
Sub-Project
A2
Task A2.1
Sub-Project
B1
Task A2.2
Task B1.1
110
AMS REALTIME Resources User Guide
Advanced Management Solutions, Inc., Issue 1.1
Defining the WBS Tables
In the Define view, firstly create a dataset for each WBS level using
the New button that appears below the existing datasets. In the
example provided, we will name them ‘Software Programs’,
‘Projects’ and ’Sub-Projects’. Task definitions (at the workpackage
level) will occur in the standard Activity dataset, as usual.
Having created our three WBS datasets, we will enter the basic field
definitions for each. For this example, the fields have been kept
very simple, but as much information as required may be stored.
Software Programs Dataset Definition
The Software Programs dataset contains an ID field (to contain a
unique identifier), a descriptive Title, and a Child field. The Child
field will contain the relationship to lower WBS levels. The Projects
dataset also contains these same fields, but also has an additional
Parent field that will eventually contain a relationship to the higher
level table. We will come back to these tables later to further define
these Parent Child relationships.
Projects Dataset Definition
The Sub-Projects table will contain similar ID and Title fields, but
will only contain a Parent field which will later define the
relationship to Parent tables.
Sub-Projects Dataset Definition
111
AMS REALTIME Resources User Guide
Advanced Management Solutions, Inc., Issue 1.1
Note that in all three tables, the Attributes column contains a filter,
User*ID. This should be placed against the component of data you
wish to link with. In these examples we are using the ID field, since
it will be our unique identifier.
Defining the Activity WBS Fields
Before we can define Parent Child relationships for the new WBS
tables, we must add a field in the Activity table for each of these
tables. This will hold the data selection from each WBS table when
an activity is defined or selected.
In Define mode, select the Activity table and add three new fields:
Software Program, Project and Sub-Project, which will related to
the datasets we have just constructed, , although they can be named
anything. Ultimately, these three fields will contain the hierarchical
path to which that specific activity or task belongs.
This process enables the drilldown capability that will allow
employees to identify tasks through the WBS hierarchy.
In the Type column next to the highest WBS table reference field
(Software Programs, in our example), select Drilldown from the
popup.
A popup menu will appears that contains the names of all text type
datasets. Select the name of the dataset your field is associated with.
For this example, we will choose Software Programs.
Selecting the Related WBS Table
Next, select the field that you want to appear in the WBS drilldown
popup to select this level. This field will go back to the Activity
table once a task has been selected from this WBS table. For this
example, we will select the Title field.
112
AMS REALTIME Resources User Guide
Advanced Management Solutions, Inc., Issue 1.1
A marker is a label that is given to a WBS drilldown structure. All
levels of a WBS will share the same marker name. Select Create
Marker… to give a name to your WBS drilldown structure. For
this example, we will name our marker IT_WBS. If you have
already created a marker name, you can select it from the list.
A WBS Marker Name
The Attribute for the highest level WBS reference field must be set
to TaskDrilldown. This tells AMS REALTIME Resources which
table to start in when selecting a task through the WBS tables.
The First Activity WBS Reference Completed
Do the same with the other activity reference fields, choosing the
name of the dataset that matches the fields name in each case. The
end result should look something like that picture below:
Activity WBS Reference Fields
113
AMS REALTIME Resources User Guide
Advanced Management Solutions, Inc., Issue 1.1
Entering Data in the WBS Source Tables
Now we will enter data into the WBS source tables. From Update
mode, enter names for all levels of WBS down to task details.
114
AMS REALTIME Resources User Guide
Advanced Management Solutions, Inc., Issue 1.1
Software Projects dataset
ID
TITLE
SP01
Technology Development
SP02
Program Maintenance
Projects Dataset
ID
TITLE
PR01
New Product Research
PR02
Laser Programming
PR03
Year 2000 Compliance
PR04
Database Reengineering
Sub-Projects Dataset
ID
TITLE
SP1A
Internet Search
SP1B
Information Integration
SP2A
Research
SP2B
Prototype
SP2C
Q&A Testing
SP3A
Identify Problem Areas
SP3B
Recode and Test
SP4A
Update Specifications & Design
SP4B
Coding & Testing
Activity Dataset
ID
Description
Start Date
Comp. Date
LOE
100
Requirements
01-JAN-98
01-FEB-98
100%
200
Coding
01-FEB-98
01-MAR-98
100%
300
Testing
04-MAR-98
15-APR-98
100%
400
Design
11-MAY-98
20-JUL-98
100%
The workpackage level activities should also be entered into the
Activity table, using the popup references to each source table. The
start and complete dates may be omitted if you wish, allowing the
workplan to be created as time is posted against each task.
115
AMS REALTIME Resources User Guide
Advanced Management Solutions, Inc., Issue 1.1
Defining the WBS Relationships
Return to the Define view and select the high level WBS source
table, which is Software Programs in our sample..
Click in the Type column for the Child field, and choose the Child
type.
Selecting a Child Relationship
116
AMS REALTIME Resources User Guide
Advanced Management Solutions, Inc., Issue 1.1
Select the WBS Marker name from the popup, which is IT_WBS in
our sample.
Choosing a WBS Marker
Then select WBS dataset that is the next level down, which is
Projects.
Selecting the Dataset for a Child Relationship
117
AMS REALTIME Resources User Guide
Advanced Management Solutions, Inc., Issue 1.1
A Completed Child Relationship
We have just created a child of Software Programs. When defining
relationships for the Projects dataset, both Parent and Child
relationships will be defined, as this has one level above and one
level below.
Parent and Child Relationships
It is worthy to note that you don’t always have to identify a parent,
and you don’t always have to define a child. This is what makes
AMS REALTIME Resources far more powerful and flexible. It
allows tasks which are common to more than one project to be open
to all levels above, or tasks that are specific to one project to be
confined to only that selection.
118
AMS REALTIME Resources User Guide
Advanced Management Solutions, Inc., Issue 1.1
This is an example of how the Activity dataset might look.
A Sample Activity Dataset with WBS Reference Fields
Note: In more complex scenarios it is a good idea to split up the ID
codes between the levels and then merge them to give a unique
Activity ID code when a drill down has been completed. That way,
the ID code of a newly created task gives a clear pointer to its
position in the structure.
Working With the Structure
When entering data into Activity fields that reference WBS source
tables, all of the entries in the highest level WBS table will be
presented in a popup. Each level will be presented in succession,
showing the subsets levels which are defined underneath, until the
lowest level is defined. If only one option exists for selection, that
selection will be automatic.
WBS Level Selection in the Activity Table
The sample that has been provided leaves all entries of each WBS
level open for selection, allowing for maximum flexibility.
However, there may be some sub-levels which apply only to specific
branches of the WBS structure, because they are too specialized to
apply to all branches.
119
AMS REALTIME Resources User Guide
Advanced Management Solutions, Inc., Issue 1.1
The Parent field of a WBS source table can be populated with an
entry from the higher level WBS. For example, go to the Projects
table and find the entry for PR02, Laser Programming. Click in the
Parent field and select Technology Development.
Now, if Technology Development is the selected path, Laser
Programming will appear in the next level for selection. But if
Program Maintenance is selected, it will not be one of the choices. It
is also important to note that tasks which do not have a parent
specified will appear as available to any branch of the structure at
that level. This is very powerful and gives AMS REALTIME
Resources a great deal of flexibility for the user.
Time Entry
When an employee clicks in the Task window to choose an item for
time entry, a list of his current tasks appears, including an entry at
the bottom for Find Existing and Create New.
Find Existing will produce a popup of the current WBS table
hierarchy until the lowest level selection determines the task.
Create New will allow the user to enter new tasks, picking the WBS
source table selections from the popups.
The Outcome and Benefits of WBS Configuration
Once all this configuration work has been carried out, the end user
for the product will be able to drill down through a specific
hierarchy to enter the information they need. This means that an
end user can be given the capability to create new booking scenarios
within the predefined constraints of the Work Breakdown Structure.
Common tasks which occur over a number of different projects do
not have to be re-created or repeated hundreds of times all over the
database. It also means that every booking scenario does not have to
be pre-planned or pre-empted, saving possibly hundreds of rows of
data and hundreds of hours of work.
Drilldown Filters
Find Existing
If you have a WBS defined, the Find Existing option will allow the
use of drilldown within that structure. However, if no WBS tables
are defined, Find Existing will look in the Time entry of the Access
dataset to see if a drilldown filter has been defined. If so, it will use
the drilldown filter to allow selection of tasks based on a particular
order, but not necessarily a hierarchy.
Note: In the client configuration file, the configuration switch
DRILLDOWN= N(default) must be set to ‘Y’. The default will apply
if the DRILLDOWN switch is omitted from the configuration file.
120
AMS REALTIME Resources User Guide
Advanced Management Solutions, Inc., Issue 1.1
Create New
This menu option will only appear if a complete WBS structure has
been defined.
121
AMS REALTIME Resources User Guide
Advanced Management Solutions, Inc., Issue 1.1
Filters and Views
Introduction
Filters are a way of applying matching criteria to look at only
certain portions of the data. This is extremely useful for generating
reports, since non-pertinent data can be removed from the display or
reported output without actually removing any data records. This
can also protect “need-to-know” information.
Any filter name that is preceded by an underscore (e.g.,
_Unfinished Work) is a global filter, which comes from the global
preference file. These filters can only be created by a System
Administrator, or someone with sufficient access privileges. If the
filter name does not begin with the underscore, it is a filter that was
created by a user and stored in their local preference file.
When filters are first created in a local dataset, the underscores
should not be entered with the filter name. Filter names that are
preceded by an underscore in local mode are ignored when
Resources updates information in the local preference file. This
occurs so that the globally defined filters do not write back to the
user's local preference file. Once the preference file is copied out to
the server and used as a global preference file, the system will
automatically add the underscores to identify global filters.
When a System Administrator wishes to add a global filter while
running in client/server mode, the underscore should be use at the
beginning of the filter name. This tells the system that it is a global
filter, and should be stored in the global preference file and should
be made available to the general public.
Sort Filters
Sorts can be stored by selecting the Filter function, choosing a
dataset, and naming the sort under the Filter name. Enter ^1 under
the primary sort field, ^2 under the secondary field, etc., on the
same line. The Up Arrow (or caret) signifies an ascending sort,
which is the only sort that has been implemented at this time.
When you are updating in that dataset, Filter Sort will produce a
popup with all the Sorts you have created for the current dataset.
123
AMS REALTIME Resources User Guide
Advanced Management Solutions, Inc., Issue 1.1
AND and OR Logic Filters
Creating a Drill Down Activity Filter
A drilldown filter can be created to produce popup menus that allow
users to post time on unplanned work. This is done by specifying
the fields which will be used for popup selection of tasks.
For example, assume that a filter called DrillDown is created where
Project has a ^1 sort key, and Phase has a ^2 sort key, and
Description has a ^3 sort key. When the Timecard access code is
set to RRR:DrillDown, users will be able to select a task by first
selecting a Project, then a Phase, and then a Description from the
current activity dataset.
Once the filter is created and specified in the user’s Timecard access
code, the Find Existing... option will be appended to the end of the
user’s task list. The Find Existing... option will not function unless
the Timecard access code has an appended filter.
Selecting Find Existing… allows a user to select a new task by
choosing categories from successive popups down to the detail task
level, whether they were planned to work on that task or not. For
example, a user could choose a task by first selecting the Project,
then the Phase, and then the Task from popup lists that contain all
the current choices in the dataset. Even if he was not planned to
work on that task, he could then post his time. Of course,
unplanned work time can still be subjected to the Approval process.
Matching Filters
Click on the Filter tab and then the dataset. A list of current filters
will be displayed. Enter a name at the New line under the Filter
Name column to create a new filter. The filter name will be used
later for popup selection. Enter the filter criteria underneath the
appropriate fieldname(s).
For example, to list only those Task IDs which begin with the letter
C, type = C* under the Task ID column. Filters use the following
logical and comparative symbols (case sensitive):
124
AMS REALTIME Resources User Guide
Advanced Management Solutions, Inc., Issue 1.1
>
greater than
<
less than
>=
greater than or equal to
<=
less than or equal to
=
case insensitive equal
==
case sensitive equal
*
wildcard
?
single character wildcard
AND
both conditions true
OR
either condition true
IN date1 ~ date2
within the given date range
Filter Operators
The Current User Subset
When a user logs into AMS REALTIME Resources, the employee
dataset is searched for an exact match between the Login ID and
Password which are entered. When it finds a match, it keeps a
pointer to the current user, which is how the software knows who is
logged in and what the current Access Level should be.
Any of the employee information fields for the current user can be
referenced through the ^User subset (case sensitive!). For example,
to create a match filter where only the currently logged in user’s
employee data will show, select Filter and the Employee dataset.
Next to the New line, enter the filter name User Only. On the same
line under the Login column, type the following match criteria:
= ^User.Login
If the User Only filter name is added to the default user Access
Level for the Employee dataset, whenever an employee logs in, they
will be able to view their own Employee information, but not that of
anyone else.
To add this filter to the Access table, the System Administrator
would select the Access function. On the Default row (blank) and
under the Employee column, the following access code should be
entered:
-R-:User Only
This would allow each user to view only their own Employee
information, but not examine any of the filter criteria or data
definitions. More information can be found on Access codes in the
Access Security Controls section of this manual.
125
AMS REALTIME Resources User Guide
Advanced Management Solutions, Inc., Issue 1.1
Views
Views are basically the program "remembering" how the screen is
setup. A view is stored internally and keeps track screen layout
information: which fields are displayed, their column position and
size, etc. Each View is saved with a name specified by the user.
Later, selecting that View name from the popup will cause the
screen to automatically reformat to the previous layout. This view
can also be renamed or deleted from the Format menu. There is no
limit to the number of views which can be stored in the dataset.
As with filters, when views are first created in a local dataset, the
underscores should not be entered with the view name. View
names that are preceded by an underscore in local mode are ignored
when Resources updates information in the local preference file.
This occurs so that the globally defined views do not write back to
the user's local preference file. Once the preference file is copied
out to the server and used as a global preference file, the system will
automatically add the underscores to identify global views.
When a System Administrator wishes to add a global view while
running in client/server mode, the underscore should be use at the
beginning of the view name. This tells the system that it is a global
view, and should be stored in the global preference file and should
be made available to the general public.
Generating Reports
Introduction
AMS REALTIME Resources report functions let you “slice and
dice” your stored information in an unlimited variety of ways. By
combining sort orders, time period selection, collection bin size,
headings, totals and subtotals, and selection filters, your report
output can present exactly the information that is required. These
reports can be saved under you own report names for instant recall.
Reports can be printed to any print device which is installed on the
host system.
126
AMS REALTIME Resources User Guide
Advanced Management Solutions, Inc., Issue 1.1
Function Icons
A set of icons has been added to represent basic functions.
Edit Report
Headings
Report
Browser
Edit Report
Grouping
Parameters
Edit Filter
Set
Edit Batch
List
Edit
Specifications
Report Icons
Report button
Clicking on the Report button will provide a popup of all report
names which have been defined in the Specifications table. Reports
set up from the Display mode can be saved under a Report name.
This name can be recalled for later use, or later modified from the
Specifications table.
Headings button
Clicking on the Headings button provides access to the Headings
table. The Headings table allows you to define specific report
heading formats. Once a Heading name has been defined, only the
name has to be selected in order for all of the components to appear
in the report. A Heading can have multiple lines.
To create a Heading, type a Heading name next to the word New in
the Heading Name column. This Heading name will appear in the
popup when you use the Heading button to select a report heading,
so the name shouldn’t be too long.
On the same line, click under the column labeled Left. A popup
will appear with several fieldnames to choose from, such as
^Heading (the Heading name), ^Title (the Report name), ^Page (the
current page number or the report), ^From and ^To (the Report
Period dates), and many more. Click on any fieldname to select it
for that heading position. Do the same for the Center and Right
columns.
To enter a text string instead of picking a fieldname from the popup,
hold down the Ctrl key and click. A cursor will appear in place of
the popup. Type the text string that should be displayed.
127
AMS REALTIME Resources User Guide
Advanced Management Solutions, Inc., Issue 1.1
A blank line will always be displayed at the bottom of each heading.
As soon as that line is occupied, a new line will appear. You can
use as many lines as you need for the report Heading, but take care
that you don’t go overboard and make the Heading bigger than the
body of the report.
From the Report Display mode, clicking on the Heading button will
provide a popup list of all the Heading names which have been
defined in the Headings table. Selecting a Heading name from the
list will determine which heading is used for the report. An upper
left, top center and upper right value can be selected for each
heading. These values can be fields, which are chosen from a popup
and are replaced with the appropriate information when the report
generates, or they can also be text strings that never change from
report to report.
Groups button
Clicking on the Groups button will provide access to the Groups
table. This table lets you define how the report information will be
grouped, or ordered.
To create a Group, type a Group name next to the word New in the
Group Name column. This Group name will appear in the popup
when you use the Group button to select a report grouping, so the
name shouldn’t be too long.
On the same line, click under the column labeled Dataset. A popup
will appear that contains all the dataset names that have been
defined in your AMS REALTIME Resources database. Choose the
dataset that contains the primary report grouping.
Still on the same line, click under the column labeled Field. A
popup will appear that contains all the field names in the dataset.
Select the field that will be used as the primary search field for
reporting. This field will be used as the internal search criteria, but
does not have to be displayed in the report.
In the next column, click under the column labeled Display. The
selected field is the field which will be displayed in the report. For
example, perhaps the employee number is the field which is used for
the internal search for actual time records, but the employee last
name is the information that is printed in the report. The Field
column would contain employee number and the Display column
would contain the last name field.
A Heading name (which must be predefined in the Headings table)
can be supplied for each Grouping. To select a Heading name,
click under the Heading column and select a Heading name from the
popup.
If desired, Subtotals can be included with selected report groupings.
To have the report calculate subtotals, click under the Subtotal
column and select None, Before or After. Selecting Before will
place the subtotal for that group on the same line (before any lower
128
AMS REALTIME Resources User Guide
Advanced Management Solutions, Inc., Issue 1.1
groups are displayed). Selecting After will produce a subtotal for
the group after any subsequent lower groups.
The last column, labeled Break, is used to determine how the
groups are separated: with a line break, a page break, or not at all.
Selecting None keeps the report lines together, with no separation.
Selecting Line will force a blank line between each group.
Selecting Page will force a page break (including a new heading)
between each group. Each line within a group can have its own
Break selection.
From the Report Display mode, clicking on the Group button will
provide a popup list of all the Group names which have been
defined in the Groups table. Selecting a Group name from the list
will determine the order in which the information is collected and
grouped in the report. For example, a Group called EMPACT
might use a major grouping by employee and a minor grouping
underneath for each task the employee is working on.
Group names can select information for the report by matching on
one field, but display the contents of another field. Headings,
subtotal specifications, and line or page breaks can also be selected
and stored with the Group name.
Filters button
The Filters button allows you to choose a named combination of
filters for sorting and filtering the report data. Each set of filters is
defined in the Filters table and has a Filter Set name. This allows
combinations of several different filters to be applied, either from
the same dataset or from different datasets.
Report Period dates
The Report Period specifies the boundaries of data collection from
the database. The first date is the beginning report boundary, and
the second is the ending report boundary.
To change the report period, first click on the button in front of the
date. Then use the Calendar to select a new date by clicking on the
new report boundary. Change the other Report Period date in the
same manner.
Use the Up and Down arrows to the left of the current calendar
month label to move the calendar Backward and Forward a month,
respectively. Use the Left and Right arrows to the right of the
current calendar month label to move Backward and Forward a
year, respectively. Click on the current calendar month label to get
a popup list of months. Selecting a month from the popup will
move directly to that month, but retain the current year.
129
AMS REALTIME Resources User Guide
Advanced Management Solutions, Inc., Issue 1.1
Summarized By button
Click on the Summarized by button to select the bin size for
collecting time from the database. The Bin options are Day, Week,
Month, Quarter, Half (Year), and Year.
Specifications
The Report Specifications table allows you to type in everything
from the Report Display screen (where it is accessed and displayed
on the buttons) and save it as a Report name. By entering the name
of the Report under Title, and entering a Heading name, Group
name, Binsize (Summarized by), From and To date (of the Report
Period) and Filter Set, you can store exactly the same report as if
you had entered the information from the Display screen and saved
the Report name as the Title. However, you can also specify and
save a View name, which has to be selected from the View menu
when the Report Display is used.
The same global nomenclature rules used with filters and views also
apply to report names. When reports are first created in a local
dataset, the underscores should not be entered with the report
name. Report names that are preceded by an underscore in local
mode are ignored when Resources updates information in the local
preference file. This occurs so that the globally defined reports do
not write back to the user's local preference file. Once the
preference file is copied out to the server and used as a global
preference file, the system will automatically add the underscores to
identify global reports.
When a System Administrator wishes to add a global report while
running in client/server mode, the underscore should be use at the
beginning of the report name. This tells the system that it is a
global report, and should be stored in the global preference file and
should be made available to the general public.
130
AMS REALTIME Resources User Guide
Advanced Management Solutions, Inc., Issue 1.1
Creating A Monthly Report of Employee Hours by Activity
This combination of reporting criteria allows AMS REALTIME
Resources data to be summarized and reported for extremely diverse
applications. For example, one could produce a summary of
overtime hours to date on a particular project, or determine the total
hours reported for a given employee for the past month. A wide
variety of information can be quickly and easily compiled with a few
clicks of the mouse.
Complex reports can be also be generated by setting up user-defined
datasets. These datasets can contain any combination of Reference
fields (fields from different datasets) and Virtual fields
(combinations and/or subsets of other data fields). Once a standard
dataset is been created, user-selected fields can be positioned and
sized on the screen to create the required report. This can then be
saved as a View name, and later selected by name from the Format
menu. Views that are selected will automatically reset the screen to
the correct format, which can then be printed. There is no limit to
the number of views which can be stored in the dataset.
Batch List
The Batch List table allows you to name a series of reports that
have been previously defined in the Specifications table. Each name
entered in the table will determine the reports that will be calculated
and printed in series. Selecting Print Batch from the File menu will
provide a popup list of the Batch List names from this table.
Selecting one of the names from this list will cause that series of
reports to be printed.
131
AMS REALTIME Resources User Guide
Advanced Management Solutions, Inc., Issue 1.1
Importing and Exporting
133
AMS REALTIME Resources User Guide
Advanced Management Solutions, Inc., Issue 1.1
Introduction
The Dump and Load options are located under the File menu.
Dump and Load allows the user to export or import the fields from
the current table to a text file. The user supplies the name of the
text file through a standard File Open/Save dialog.
134
AMS REALTIME Resources User Guide
Advanced Management Solutions, Inc., Issue 1.1
Exporting Data
If the user is exporting data, all of the data from the current dataset
is written to the file in the current column order. Only the columns
that are currently displayed are written out to the file. The resultant
file is tab delimited text with a heading line that provides the field
names for each column of data.
Note: Dump and Load produce text files similar to the table for all
datasets except the Time Entry Screen. Dumping from the Time
screen creates a AMS REALTIME Projects transaction file, which
has a specific format of Activity ID, Resource ID, Cost Center,
Date, and Actual Hours. The filename(s) used for creating
transaction files can be specified with each task record in the
Filename field of the activity dataset, or a new filename can be
specified.
Importing Data
If the user is loading from a text file, the data is read from the file
into the table. The user is responsible for making sure that the
selected table headings match the field names of the data, since the
headings determine the data loading (not the data order).
Before loading data over existing data, click on the heading of the
key field column which contains the unique record identifier. This
field will be used as a unique key to determine that each text line
updates the correct record. Record that don’t match with an
existing key record are appended to the dataset.
135
AMS REALTIME Resources User Guide
Advanced Management Solutions, Inc., Issue 1.1
Activity ID
Project
Phase
Description KeyID
EDU
1993
NPT
EDU
Education
NPT-EDU-EDU
01-JAN-199331-DEC-
HOL
1993
NPT
HOL
Holiday
NPT-HOL-HOL
01-JAN-199331-DEC-
ILL
NPT
ILL
Illness
NPT-ILL-ILL 01-JAN-199331-DEC-1993
MGT
1993
NPT
MGT
ManagementNPT-MGT-MGT
PDA
1993
NPT
PDA
31-DEC-1993
Paid Absence
QUA
1993
NPT
Quality
UPA
1993
NPT
UPA
31-DEC-1993
Unpaid Absence
VAC
1993
NPT
Vacation
QUA
VAC
Start
End
01-JAN-199331-DEC-
NPT-PDA-PDA
NPT-QUA-QUA
01-JAN-199331-DEC-
NPT-UPA-UPA
NPT-VAC-VAC
01-JAN-
01-JAN-
01-JAN-199331-DEC-
A Sample Tab-Delimited Textfile Created from File Dump
Creating Transaction Files
To create transaction files of AMS REALTIME Resources actuals
for AMS REALTIME Projects, first select the Time function. Then
choose Dump from the File menu. The TaskID, ResID, Cost Center
(Regular or Overtime), date, and actual hours for each record will be
exported into the Filename specified in the activity dataset.
Note: Do not attempt to load dataset definitions over existing data.
Dataset definitions must be loaded into an empty dataset.
136
AMS REALTIME Resources User Guide
Advanced Management Solutions, Inc., Issue 1.1
AMS REALTIME Interface
Projects and Resources
Introduction
A direct interface between AMS REALTIME Resources and AMS
REALTIME Projects is provided by your distributor. The interface
is executed from within AMS REALTIME Projects, and can be used
to create or update AMS REALTIME Resources datasets with
planned activities, resource information and planned work. The
interface can also load actual hours, calculated progress and slip
dates back into AMS REALTIME Projects.
The AMS REALTIME Resources menu option will automatically
appear on the AMS REALTIME Projects Schedule File Execute
popup if the AMS REALTIME Resources interface software is
present. A dialog allows complete selection of the desired options
for data communication between the AMS REALTIME Projects
project and the AMS REALTIME Resources database.
Since the AMS REALTIME Resources program allows employees
to easily enter the hours worked against each task on a day-by-day
basis, these actuals can be passed back to a project schedule as the
actual hours spent on each task by each resource.
A Progress value for each activity can also be calculated from the
actual hours worked and the expected hours to complete. AMS
REALTIME Projects can use this information to calculate
performance measurements and other cost variables. This
information can also be exported to other accounting or scheduling
systems. The AMS REALTIME Resources method of time
collection produces extremely accurate schedule feedback.
There are several different options for exchanging data between
AMS REALTIME Projects and the AMS REALTIME Resources
database. These options are selected in the AMS REALTIME
Resources options dialog, which is accessed from the File Execute
AMS REALTIME Resources selection in AMS REALTIME
Projects.
137
AMS REALTIME Resources User Guide
Advanced Management Solutions, Inc., Issue 1.1
AMS REALTIME Resources Interface
AMS REALTIME Resources Connect Dialog
138
AMS REALTIME Resources User Guide
Advanced Management Solutions, Inc., Issue 1.1
AMS REALTIME Resources Interface - Post Plan
Connecting to the Resources Database
The Connect to box in the upper left corner of the dialog shows the
AMS REALTIME Resources database which is connected. If the
box is empty, a dataset can be selected by clicking on the Browse
button. A file selector dialog allows you to locate and choose the
database. When the AMS REALTIME Resources database has been
selected, it will appear in the Connect to box.
The Protocol box allows selection of the network protocol used to
access the database. If you are running in standalone mode, select
Local file. If you are connecting to a central AMS REALTIME
Resources database on the server, select the network communication
protocol used on your network: NetBIOS, IPX, or UDP (TCPIP).
Once these parameters have been set, click on the Connect button to
establish a direct connection to the database. As soon as the
connection has been established, the Connect button becomes
Disconnect, which allows you to optionally sever the program link
to the database.
When the data exchange has been completed, the dialog will
disappear and the connection will be automatically severed.
However, the next time the Execute AMS REALTIME Resources
option is selected, the dataset will automatically connect to the
previous dataset selection.
Sending the Project Plan to AMS REALTIME
Resources
If the project planning has been done in AMS REALTIME Projects,
this information can be automatically entered into the AMS
REALTIME Resources database.
139
AMS REALTIME Resources User Guide
Advanced Management Solutions, Inc., Issue 1.1
AMS REALTIME Resources to Projects
Operations
Once the database connection has been established, the Operation
section of the dialog will be activated. To select the operation to
send the current project plan to AMS REALTIME Resources (which
includes Activities, Resources and Requirements from the AMS
REALTIME Projects project), click in the box to the left of Post
Plan to AMS REALTIME Resources.
By default, activities are identified by an exact match of the Activity
ID in AMS REALTIME Projects and the Task ID in AMS
REALTIME Resources (or the Activity field which has the Task ID
attribute). If another AMS REALTIME Projects field will be used
to keep an activity unique across all projects in the AMS
REALTIME Resources database, that field can be specified in the
Activity ID box. The field string %actid is the default, but it can
be edited to another fieldname, such as %WBSID. The preceding
percent sign is used by AMS REALTIME Projects to identify the
string as a field name rather than a string.
The Resource is identified by an exact match of the ResID in AMS
REALTIME Projects and the ResID in AMS REALTIME Resources
(or the Employee field which has the ResID attribute).
The ScheduleKey from the AMS REALTIME Projects Schedule
Extensions will be automatically copied into the Filename field in
the Activity dataset (the field with the TaskFile attribute). This
identifies the project schedule to which the task belongs, since the
AMS REALTIME Resources database holds a composite of all
activities across all projects.
Options
The Resource section of the dialog allows the user to determine
what should be done with Resources which are in the schedule, but
not in the AMS REALTIME Resources database. Only one of these
options may be selected. If Prompt is chosen, the user will be
prompted at each new resource to either Add or Skip over the
resource. If Add All is selected, every new resource that is
140
AMS REALTIME Resources User Guide
Advanced Management Solutions, Inc., Issue 1.1
encountered will be added to the AMS REALTIME Resources
dataset. If Skip All is selected, all resources not located in the AMS
REALTIME Resources dataset will be bypassed.
Interface Options
Posting the Plan
After the appropriate options have been selected, click on OK to
send the current project schedule plan to the AMS REALTIME
Resources database. When a plan has been posted to AMS
REALTIME Resources, a revision is automatically created in the
project schedule called Posted to RTR. Click on the Multiple
Revision icon and select the revision name to display the Posted to
RTR revision. This helps to identify changes to the project plan that
may need to be updated in AMS REALTIME Resources.
Getting the Project Plan from AMS REALTIME
Resources
If the project planning has been done in AMS REALTIME
Resources, or has been revised by a Resource Manager, this
information can be automatically sent into a AMS REALTIME
Projects schedule.
If a database connection has not been established, follow the
procedure established in the section entitled Connecting to the
AMS REALTIME Resources Database.
141
AMS REALTIME Resources User Guide
Advanced Management Solutions, Inc., Issue 1.1
Operations
Click on the box to the left of Get Plan [ScheduleKey] from AMS
REALTIME Resources in the Operation section of the dialog. The
contents of the ScheduleKey in the AMS REALTIME Projects
Schedule Extension Labels must match with the contents of the
AMS REALTIME Resources Filename field, (or the field that has
the TaskFile attribute). The contents of this field in the AMS
REALTIME Resources dataset determine the AMS REALTIME
Projects schedule to which the activity belongs. Clicking on the
arrow to the right of this box will provide a picklist of all the
different Filename contents in the Activity dataset. Selecting a
ScheduleKey match from the list is the method used to select the
data you will load into the schedule.
Options for Data Exchange
The Options section of the dialog controls several aspects of Plan
and Actuals communications between the two systems. Multiple
options can be concurrently selected.
Post Progress will bring calculated Progress from the AMS
REALTIME Resources dataset into the schedule. A Progress field
can be defined as the percentage of the actual hours completed
compared to the estimated hours to complete. A calculated Progress
field and other related field definitions are provided in the Sample
dataset (sample.dst) that is distributed with AMS REALTIME
Resources.
If Adjust Requirement Level is selected, AMS REALTIME
Resources will modify existing Level type requirements in the
project schedule. The resource increment will be used to spread out
the new requirement between the planned start and planned
complete dates.
If Replace Requirements is selected, the current project
requirements in the schedule will be completely replaced with the
current AMS REALTIME Resources plan.
If Level of Effort is selected, new plan requirements from AMS
REALTIME Resources will become Level type requirements in
AMS REALTIME Projects. Existing Effort-driven requirements
will be updated with the Planned Level-of-Effort, as well as Actual
and Total Hours. This allows the remaining work to recalculate the
duration of the activities in AMS REALTIME Projects.
Activity Date Options
The Activity Dates section of the dialog controls how activity start
and complete dates are stored in the project schedule when the dates
differ. Only one option can be selected.
If Calculated is selected, the planned start and complete dates from
AMS REALTIME Resources are used to update the activity start
and complete dates. Before the operation, a baseline revision called
142
AMS REALTIME Resources User Guide
Advanced Management Solutions, Inc., Issue 1.1
PreRTRUpdates is automatically created with the previous dates
from the project schedule. This allows tasks that have been shifted
by a resource manager to be easily identified by a project manager.
Of course, the project schedule can always be modified to meet the
original schedule targets. Some method of communication and
resolution of these differences within the project management
structure must occur to achieve a workable plan.
If Expected is selected, the planned start and complete dates from
AMS REALTIME Resources are sent to the project schedule in the
form of expected start and complete dates. These dates will show up
as “slipped” with the diamond indicator. (Check the Page Layout
dialog in AMS REALTIME Projects to determine if the diamond
marker is set to indicate the original Target dates or the expected
Actual dates.)
The expected dates (and the revised durations) will be used in any
network calculations. If network constraints are used in the
schedule, it may be beneficial to turn the Network off before loading
the revised plan. This will allow easier identification of task
slippage from AMS REALTIME Resources plan changes before the
network is allowed to recalculate and compound the issue.
Before the operation, a baseline revision called PreRTRUpdates is
automatically created with the previous dates from the project
schedule. This allows tasks that have been rescheduled by a
resource manager to be easily identified by a project manager.
If the RTRUpdate option is selected, the plan from AMS
REALTIME Resources will be loaded directly into a baseline
revision called RTRUpdates. This allows tasks that have been
rescheduled in AMS REALTIME Resources to be selectively
updated in AMS REALTIME Projects.
Select RTRUpdates from the Multiple Revision icon to make it the
current baseline revision. Tasks that have been rescheduled can be
identified with the AMS REALTIME Projects match criteria of Start
<> %BStart OR Complete <> %BComp. This can be stored in a
View for instant recall. Refer to the AMS REALTIME Projects User
Guide Addendum for complete documentation.
Select just those activities that will be updated and choose Baseline
-> Planned from the Activity menu to copy the AMS REALTIME
Resources revision dates into the current plan for the selected tasks.
Getting the Plan
After the appropriate options have been selected, click on OK to
load the current AMS REALTIME Resources plan into the project
schedule.
Getting Actuals from AMS REALTIME Resources
When actual resource hours are loaded into the project schedule
from the lowest, most accurate levels, ACWP and other project cost
143
AMS REALTIME Resources User Guide
Advanced Management Solutions, Inc., Issue 1.1
variables can be instantly calculated with no delay time. This allows
potential project slips to be identified in their early stages, while
there is still time to correct problems before they become major
impacts.
Options for Data Exchange
The Options section of the dialog controls several aspects of
Actuals communications between the two systems. Multiple options
can be concurrently selected.
Post Progress will bring calculated Progress from the AMS
REALTIME Resources dataset into the schedule. A Progress field
can be defined as the percentage of the actual hours completed
compared to the estimated hours to complete. A calculated Progress
field and other related field definitions are provided in the Sample
dataset (sample.dst) that is distributed with AMS REALTIME
Resources.
The option to get Only Approved Actuals will cause the Status
field of the Actual timesheet record to be checked before actual
hours are loaded into the project schedule. Only Approved hours
will be loaded, and their Status field will be updated to Posted after
the transaction is complete.
Options for Time Now
The options in the Time Now section of the dialog determine how
actuals are handled if they are ahead of the current costbin defined
by Time Now. Only one option can be selected.
The first option displays the project schedule Time Now in the box.
If the Set Time Now button is chosen, you can edit the Time Now
date, which will set Time Now in the project schedule.
If Ignore Future Actuals is selected, any actuals that have been
posted ahead of the Time Now date will be ignored. They will not
be loaded into the schedule, nor will they be marked as Posted.
If Move Time Now to Latest Actual is selected, the Time Now date
in the project schedule will be automatically updated to the latest
actual date encountered in the schedule. If Earned Value methods
are being used to track schedule and cost variances in the schedule,
this is not recommended.
If Force Future Actuals to Now is set, future actuals will be forced
into the current costbin regardless of their actual date. Again, if
Earned Value methods are being used to track schedule and cost
variances in the schedule, this is not recommended.
If Load all Actuals is selected, all the actuals are loaded and
statused as Posted. This will allow future actuals to be loaded, but
they will calculate into their correct bins. This method may
temporarily produce misleading cost variances until the earned
value amounts catch up with the actual costs.
144
AMS REALTIME Resources User Guide
Advanced Management Solutions, Inc., Issue 1.1
Loading Actuals
After the appropriate options have been selected, click on OK to
load the current AMS REALTIME Resources actuals into the
project schedule. If desired, the current plan and actuals can be
loaded concurrently by selecting both Operations.
This process should be initiated from each schedule at the end of
each costbin period. The actual hours will then feed the cost
calculations for earned value analysis.
Get Activity Updates from AMS REALTIME
Resources
Any basic activity information, including any extension fieldnames
that match, can be brought back into AMS REALTIME Projects
from the AMS REALTIME Resources database. This method can
be used when the Activity information should be updated, but not
the associated Plan.
Select Get Activity Updates from AMS REALTIME Resources
from the Operation section of the dialog, and click on OK. Any
activity fields linked by Attribute keys or field names that match
AMS REALTIME Projects Activity field names (including
extensions) will be loaded from AMS REALTIME Resources into
the project schedule.
Identifying Project Ownership of Tasks
Each AMS REALTIME Projects schedule that has activities in the
AMS REALTIME Resources dataset should have a schedule
extension label called ScheduleKey. The value of ScheduleKey
should be the same value as is contained in the field with the
filename attribute in the Activity dataset. For example, if a schedule
has a ScheduleKey of RX144, all those actuals associated with
activities that have a Filename of RX144 will be loaded into that
schedule. This allows activities from multiple schedules to be
maintained in a single AMS REALTIME Resources database.
Timecard Transaction Dumps
An alternate method of exporting actuals to AMS REALTIME
Projects (or another system) is to produce a text file containing
activity, resource, cost center, date, and actual hours. At the end of
each week (or time collection cycle), a File Dump from the
Timecard screen will cause all collected hours for the current week
to be output to the Filename specified in the activity dataset
(identified by the TaskFile attribute). This output is stored in the
145
AMS REALTIME Resources User Guide
Advanced Management Solutions, Inc., Issue 1.1
AMS REALTIME Projects transaction file format, and consists of
the following comma delimited ASCII text data:
Activity ID, Resource ID, Cost Center, Date, Hours
This hourly actuals data can be transacted into AMS REALTIME
Projects through the Usage table. Resources in corresponding AMS
REALTIME Projects files should have hourly units (since hours are
collected by the AMS REALTIME Resources program) and weekly
costbins to match the time collection cycle.
The Usage table transactions can be batch processed in AMS
REALTIME Projects for multiple schedules that can be designated
by a wildcard specifier (e.g., c:\spwin\xact\*.sch). If the Batch
Transaction process is used, each transaction file must have the
same base name as the schedule, but use a *.dat extension. For
example, the transaction file for design2.sch would be design2.dat.
If design2.dat is set in the ScheduleKey before the tasks are loaded
into the AMS REALTIME Resources database, then the Filename
field will be automatically populated with this string.
146
AMS REALTIME Resources User Guide
Advanced Management Solutions, Inc., Issue 1.1
System Administration
Configuration and Setup
The configuration file is an ASCII text file which allows the user to
set specific parameters. This text file is read on program startup,
and controls some aspects of AMS REALTIME Resources
functionality. This file should have the same base filename as the
executable, but with an .ini or .cfg extension, depending on the
platform. Refer to Appendix A for a full listing of configuration
switches for client and server applications.
The configuration file provides the program with information that is
user-definable, such as where the server database is located and
what protocols are in use on the client networks. Switches are case
insensitive.
Note: Specifications regarding the database server location and
network protocol are stored in the preferences file, and do not need
to be specified in the configuration file as well.
The language parameter holds the name of the resource file, which
provides the program with menu list, dialog messages, and other
resources. The string files can be translated and the program
recompiled so that AMS REALTIME Resources can be converted
into other languages as required. Different resource files would be
included with different language versions.
The smallfont, largefont and defaultfont parameters allow
specification of the fonts and font sizes which are used by the AMS
REALTIME Resources program. The fullscreen parameter controls
the default AMS REALTIME Resources window size.
The planavail parameter will produce the plan availability profile in
Plan mode if the switch is set to Y; otherwise, only the employee
schedule is displayed. If your database is extremely large, you may
wish to turn this off to bypass the calculation of employee
availability.
147
AMS REALTIME Resources User Guide
Advanced Management Solutions, Inc., Issue 1.1
The drilldown switch turns on the functionality that allows the
System Administrator to setup an activity filter name for an Access
level. The activity filter specifies the field order for popups so that
users can select tasks to post time on unplanned work.
The period allows you to set the time collection period, which is
used to calculate period totals on the timesheet screen. The period
can currently be defined in DAY units only. The starting base date
must be supplied. For example, PERIOD = 14 DAY 03JAN95 is a
valid configuration settings. One month is the default period. The
graceperiod defines the number of days that a user can go back to
make timesheet changes. Once the grace period has been exceeded,
the modifications to actual hours must be made by a user who can
access the Workplan directly. The grace period defaults to 365 day
(no limit on the grace period), and always uses a unit of DAY.
If a period setting is not recognized as a standard period, it is
assumed to be the name of an accounting period table. The
accounting period table is a text type dataset which contains a period
name, start date and end date for each collection period. This table
should match up with the company accounting periods which are
defined in the AMS REALTIME Projects costbins.arp file. The
period dates must be maintained in order, and should be defined
well beyond the current planning period.
The dset parameter specifies the location of the database file. The
settings parameter specifies the name of the preferences file, which
contains information about the last user that logged in, as well as
filter and view information. If you are using a server version of the
AMS REALTIME Resources, the RTRServer parameter will
contain the node address of the server. The server dataset name
defaults to TimeCard, but this can be modified by adding the
parameter dsetname=NewName.
When running in client/server mode, the dataset name is comprised
of the UDP service number (or port name) in combination with the
host name. The parameter TKServer provides the address where the
server dataset will be located, while the parameter dset provides the
database filename.
When running in stand-alone mode, the parameter dset can provide
the filename of the dataset. The RTRServer parameter must be
either removed from the configuration file or commented out by
placing a semicolon in the first column (e.g.,
;RTRServer=“AMSHPSVR”). Note: If the server can not find the
dataset name as specified, the AMS REALTIME Resources program
will produce an prompt and let you specify an existing dataset or
create a new dataset.
148
AMS REALTIME Resources User Guide
Advanced Management Solutions, Inc., Issue 1.1
A Sample Client Configuration File
[RTR]
Description
language=rtrrz.usa
Resource filename
smallfont=arial,6
Small fontname and size
largefont=arial,10
Large fontname and size (used in
popups)
defaultfont=arial,8
Default fontname and size
settings=local.prf
Local preferences filename
helpfile=rtrhelp.hlp"
AMS REALTIME Resources help
file
protocol=UDP
TCP/IP network protocol
udpmaxpacket=2048
Maximum size of UDP packets
drilldown=y
Use drilldown popup order for
unplanned work
minpassword=6
Enforce at least 6 character
passwords.
fullscreen=y
Default to full screen window
planavail=y
Use resource availability profile in
Plan screen
149
AMS REALTIME Resources User Guide
Advanced Management Solutions, Inc., Issue 1.1
A Sample Server Configuration File
[RTRServer]
Description
language=rtrsrz.usa
Resource filename
clienttimeout=200
Ticks (200/18 sec) to wait for initial
server response
clientshortto=5
Ticks to wait for further
communication packets
smallfont=arial,6
Small fontname and size
largefont=arial,10
Large fontname and size (used in
popups)
defaultfont=arial,8
Default fontname and size
dset="fy98.dst"
Server dataset filename
settings="fy98glbl.prf"
Global preferences filename
RTRServer="time@boris"
Network address of server
protocols=UDP
TCP/IP protocol in use
udpmaxpacket=2048
Maximum size of UDP packets
tnxlog=N
Don’t keep a transaction log
period=14 DAY 03JAN95
Time collection period and base
date
graceperiod=5 DAY
Days that timecard can be adjusted
after period end
150
AMS REALTIME Resources User Guide
Advanced Management Solutions, Inc., Issue 1.1
Command Line Specifications
If AMS REALTIME Resources is executed at the command line, the
executable name (rtr16.exe or rtr32.exe) can be followed by a path
and preferences file that will override a specified dataset in the
configuration file. The directory specified in the dataset path is
searched for a configuration file. This option can be used by
someone who may wish to access another dataset and preferences
file in a separate directory without modifying the configuration file.
For example, if
c:\time\rtr32.exe c:\west\contrct.prf
is entered at the Windows 3.1 File Run command line, AMS
REALTIME Resources will look for another configuration file in the
c:\west directory and open the contrct preferences and its associated
dataset.
Login IDs
The configuration parameter ResLogin provides the name of the
field in the employee dataset that holds the Login ID for each
employee. The fieldname provided (i.e., ResLogin =
LoginIDFieldName) must exactly match the name of the field.
AMS REALTIME Resources determines which employee is
accessing the database by matching the Login ID with the
corresponding employee information contained in the employee
dataset. If the configuration parameter CaseSensitive = Y, then
logins are case sensitive. By default, all Login IDs are forced to
upper case and matched accordingly. All Login IDs must be unique.
151
AMS REALTIME Resources User Guide
Advanced Management Solutions, Inc., Issue 1.1
Passwords
If a fieldname called Password is contains data in the employee
dataset, AMS REALTIME Resources will prompt the user for their
password before allowing them into the system. The length of the
password is definable by the System Administrator.
Passwords should be chosen by the user so they can be easily
remembered, but should never be divulged to another user. The
Options menu contains a selection that allows a user to change their
password. The user must enter their old password, the new
password, and then verify the password by reentering it correctly.
If a password is forgotten, it can be reset by the System
Administrator. AMS REALTIME Resources should be configured
so that everyday users can not view or modify passwords or access
levels. Only System Administrators should be entrusted with this
level of information to protect the integrity of the database.
Access Security Controls
Access Codes
The Access table defines each access level, which determines which
AMS REALTIME Resources functions are accessible to each user.
It is recommended that only the System Administrator have update
access to the Access table, and that most users not be allowed to
view this table.
When a database is first created and no Access levels have been
defined, a message will appear stating that access is completely
unrestricted for all users. As soon as Access levels have been
defined and assigned to user Logins, the database should be saved
and restarted to enable user-defined access controls.
The sample dataset defines four levels: system administrator,
manager, default, and blank. These levels and level names are not
mandatory, but can be used as a starting point to provide access
levels for different types of users. However, it is recommended that
a blank level with no access be stored in the first access level (row
1). If a match is found between a user’s defined Access level and a
level in the Access table, the user is granted the access levels
defined for the specified level. If no match is located, the access
level granted will be that of the first level. If you prefer not to
maintain a blank level, make sure that all Users have a defined
Access level.
152
AMS REALTIME Resources User Guide
Advanced Management Solutions, Inc., Issue 1.1
A Sample Access Table
The Access table is comprised of a basic three-letter code for each
dataset and function. For dataset access codes, the first letter
determines the level of change allowed to dataset filters. The second
letter determines what the user can change in the contents of each
dataset. The third letter determines the level of change allowed to
dataset definitions.
Filter and View names can be applied to an access code to allow
limited access to a dataset, such as allowing the user to look at only
his own personal employee information or to limit the fields that can
be viewed.
The Access dataset provides four basic character codes that are used
in each access code:
-
No View or Update
R
Read Only
W
Read and Write
F
Full (Read, Write, Define, Insert,
Delete)
To define a security access level, enter a Level name. AMS
REALTIME Resources will compare the contents of the field called
Access Level, which is stored in the employee dataset, with the
Levels in the Access table. Three access codes are defined for each
dataset and mode which determine the access to Filters, Update
Mode, and Definitions.
The Timecard access codes have different meanings, since they
apply to a complex timecard rather than a data table. In the first
position of the Timecard access code, the F character provides Insert
and delete capability for Timecard records. This can be given to
Manager type access levels. The W character provides Update
capability of the planned hours (the Base field). Setting the first
code to R lets users view their Base hours, but not edit them directly.
The ETC field can be updated for all Access levels. The R character
is generally used in position one for most employees who only need
to enter their own time.
The second position of the Timecard access code can be set to the F
character to allow users with this access level to Approve and Reject
timecard records that have been submitted for the approval process.
153
AMS REALTIME Resources User Guide
Advanced Management Solutions, Inc., Issue 1.1
Any other access code will allow Submit and Close functionality
(closing applies to the user’s part of the workplan only).
The third position of the Timecard access code can be set to the F
character to enable Load and Dump options from the Time screen,
which will dump out all the actuals data. Using an Access code of
W does not allow Load and Dump access, but will enable the New
Activity button in the Timecard mode. The dash (-) character in
this position disables the New Activity button for users with this
access level.
Access Hierarchy
The order in which Access Levels are created is important. For
example, an Access level defined on row number 1 of the Access
table is higher in the hierarchy than the access level defined on row
2. This means that when you are assigning these access rights to
individuals in the Employee table, you will notice that some of the
Access Levels may be grayed out in the list. This is telling you that
these items are of a higher access level than that to which you are
currently logged in. For example; If the system administrator is
defined on row 1, and a Manager is defined on row two, when the
manager is logged in he will not be able to assign system
administrator rights to any one in the database as this will be grayed
out in the list.
Also, if you define items with the first three characters the same,
Resources will treat these as having equal status in terms of Access
Hierarchy. For Example MNG1, MNG2 and MNG3 will be
considered equal by resources, regardless of their positions relative
to each other in the Access table rows.
Example:
1
SYSADM
Highest level access
2
MNG1
Second level access
3
MNG2
Second level access
4
MNG3
Second level access
5
EMP1
Third level access
So, using the above example; SYSADM can see and assign access
rights in the employee table to everyone. MNG1 - MNG3 can
assign access rights of each other and EMP1s but not SYSADMs,
EMP1 can not see or assign SYSADMs or MNGs but can see and
assign other EMPs.
Attaching a Filter or View to an Access
Code
An enforced filter for each dataset can be specified by putting a
colon followed by the user-defined filter name after the three letter
access code (e.g., RR- : filtername).
154
AMS REALTIME Resources User Guide
Advanced Management Solutions, Inc., Issue 1.1
Filter names are applied to an access code by adding :filtername to
the three-letter code. This allows limited access to a dataset, such as
allowing the user to look at only his own personal employee
information (by using a User Login filter), or activities which are
assigned to a specific project or type.
An user-defined View can also be enforced by putting a vertical bar
after the access code, colon and filter name (if used) followed by the
view name (e.g., RR- : filtername | viewname). If a filter name is
not used, the colon must still be present, but the filter name is
omitted (e.g., RR- : | viewname)..
If a view will be used to restrict access to certain data fields, make
sure that Lock Layout is checked on before saving the view, or the
user will still be able to add those fields to the table from the popup.
Creating a User Login Filter
When a user logs into AMS REALTIME Resources, the employee
dataset is searched for an exact match between the Login ID and
Password which are entered. When it finds a match, it keeps a
pointer to the current user, which is how the software knows who is
logged on and what the current Access Level should be.
Any of the employee information fields for the current user can be
referenced through the ^User subset (case sensitive!). For example,
to create a match filter where only the currently logged in user’s
employee data will show, select Filter and the Employee dataset.
Next to the New line, enter the filter name User Only. On the same
line under the Login column, type the following match criteria:
= ^User.Login
If the User Only filter name is added to the default user Access
Level for the Employee dataset, whenever an employee logs in, they
will be able to view their own Employee information, but not that of
anyone else. Any of the employee fields can be used in combination
with the ^User subset.
To add this filter to the Access table, enter the following access
code to the Employee column:
-R-:User Only
This will allow each individual user to view only their own
Employee information, but not examine any of the filter criteria or
data definitions.
155
AMS REALTIME Resources User Guide
Advanced Management Solutions, Inc., Issue 1.1
Network Environment
Network Options
The AMS REALTIME Resources program runs under Windows, X-Windows
(Motif), and Macintosh environments. Three network protocols are
recognized: IPX, NetBIOS and TCPIP. NetBIOS is the default protocol, and
requires no external .DLL files. UDP (TCPIP) requires the Windows Socket
Library (winsock.dll), and IPX requires Novell’s client API (nwipxspx.dll) to be
present. UNIX versions of AMS REALTIME Resources only recognize UDP.
AMS REALTIME Resources uses standard network communication protocols.
The network must be up and running, and the AMS REALTIME Resources
Server program should also be executing before clients attempt to execute and
send transactions to the server. The server displays a status table for each
protocol it is using.
Clients on multiple networks, even those that run under different protocols, can
simultaneously access the server application and database.
156
AMS REALTIME Resources User Guide
Advanced Management Solutions, Inc., Issue 1.1
Server
Database
Windows
Client
Macintosh
Client
RTRServer
Windows
Client
Unix
Client
Network Configuration Parameters
Each configuration file provides information regarding system configuration,
communication protocols and the location of the database. While the server
application can communicate with several different client protocols
simultaneously, it will still use one native protocol.
In the client configuration file, the protocol configuration switch specifies the
local network protocol. In the server configuration file, the switch protocols
specifies all network protocols which will be used by the client applications.
When running a client application in client/server mode, the pointer to the
server dataset is comprised of the UDP service number, or port name, in
combination with the host name. The parameter RTRServer provides this
address. For example, if a client application will be accessing the server on the
HP9000, and a service port of 8000 has been defined for that machine, the
RTRServer parameter might be set to
RTRServer = 8007@HP9000
or
RTRServer = 89.4.3.58:8007
where 8000 is the port number and HP9000 is the name of the host computer
(at 89.4.3.58, in the second example). The port number can also be referenced
as a symbolic name which has been defined in the services file. The host name
can be declared as the IP address, a domain name server or a symbolic name
which has been defined in the hosts file.
The configuration switch UDPMaxpacket specifies the datagram size in bytes.
This number refers to the largest size that the network can send without
fragmenting the data packet. The default is 8192, which is used if the switch is
not present. Some Windows TCP protocols can’t handle a value this large,
which is indicated by the no server response after four attempts when trying to
initiate a login from a client application. If this occurs, set the UDPMaxpacket
setting to another number, such as 512, in both the client and server
configuration file. The UDPMaxpacket number must be identical in both the
client and server settings. If you are using serial line communications (SLIP),
it is recommended that both UDPMaxpacket parameters are set to 256.
Local or Remote Database Access
When running a database locally, also referred to as in stand-alone mode, the
parameter dset provides the local filename of the dataset, and TKServer must be
157
AMS REALTIME Resources User Guide
Advanced Management Solutions, Inc., Issue 1.1
either removed from the configuration file or commented out by placing a
semicolon in column one.
A settings, or preferences file, can be specified with the configuration switch
Settings followed by the settings filename (e.g., settings = myviews.prf ). If no
dataset or settings file is specified, the program will provide a prompt so you
can specify Local or Remote access.
If you select Local access, the program will prompt you for the dataset name. If
you select Remote access, you will be prompted for the RTRServer address. If
multiple protocols are available for the platform you are using, you will also be
prompted for your communications protocol.
If you create an icon for your AMS REALTIME Resources client application
and pass in the preferences file as a command line parameter, the dataset will
be loaded automatically without specifying the dset parameter in your
configuration. This allows you to maintain multiple configurations on the same
system.
Client/Server Status Bar
Because it is often useful to know what’s happening between a Client and its
Server the application includes a status bar at the bottom of the program
window. This status bar gives information about transactions as they occur
between the Client and the Server and also stores a log of each event. The first
component on this status bar are two small status icons.
These icons give a graphical representation of a transmission, process receive
or idol state. The status icon on the left represents the Client. The one on the
right represents the Server. For each button the status is as follows:
Two Green Lights, Blue screen = Idol
Right Light is Red = Transmitting
Left Light is Red = Receiving
Two Green Lights, white screen = Processing.
Clicking on the Client Status Icon will give you a brief summation of all the
types of transactions that have happened since the program was logged on.
158
AMS REALTIME Resources User Guide
Advanced Management Solutions, Inc., Issue 1.1
Event Log
Click the Event Log button to see a list of the last 100 events that have occurred
on the client program. Each entry has a time stamp and a description of the
event. This log should be used by System Administrators to monitor
performance and to trouble shoot if problems occur with the network.
159
AMS REALTIME Resources User Guide
Advanced Management Solutions, Inc., Issue 1.1
Configuration
Configuration Switches
This Appendix provides a listing of AMS REALTIME Resources configuration
switches. Client configuration switches are stored in rtr16.ini if your are
running 16 bit software, rtr32.ini if you are running 32 bit software or rtr.cfg
for Unix and Macintosh environments. In all cases, the base name of the file
matches the base name of the executable. Server switches are stored in the
rtrs16 or rtrs32 .ini or .cfg file, following the same naming conventions as the
client configurations. These switches are indicated by the word Server after
the switch and default setting.
The information is provided in the following format:
Switch=Default
Client / Server
Description
AMS REALTIME Resources Switches
ALLOWLOGIN=LoginID List
Server
Only the specified list of User Login IDs can Login to AMS REALTIME
Resources. This can be set for maintenance, testing or downloading of actuals.
ENDSESSION=Y
Server (NT only)
When running as a Service (NT only) Allow the server to remain running when
the user logs off. Set this to Y if you wish the server to shut odwn when the
user logs off.PRINTMARGIN=inches
Client
Specify printer margin in inches.
GETPLANLISTOPTION=1
Plan View
0 - List will display only My Activities. That is to say, a manager will see the
activities he and his team are planned on, based on the Organization codes.
1 - Uses the Activity filter.
2 - This option means 0 & 1 are the factors for the list content, i.e. activities
must be in both lists.
NOTE: This options should only be set if all the Planning data is created from
Projects or another outside source.
161
AMS REALTIME Resources User Guide
Advanced Management Solutions, Inc., Issue 1.1
3 - This option means 0 or 1 are the factors for the list content, i.e. activities
must be in either list.
REPORT=filename
Client / Server
Generate memory usage report to file on About selection.
PLANHIDEOT=Y
Client
Hide Overtime fields in Plan mode.
PLANAVAIL=N
Client
Show resource availability in Plan mode.
NETWORKTEST=N
Client
Allow access to Network test from Options menu.
TARGETCOMPLETENOLATERTHAN=Y
SETTINGS=file.prf
Client
Client
Specify the default preference file.
TIMECARDPLANTIMES=Y
Client
Set this switch to Y (default) to display times with dates on the planning info.
To display dates only set this switch to N, time is still calculated and stored.
PERIOD=n DAY date
Client / Server
Set the time collection period. N is the number of days in each period, and the
date specified is the starting date of the first period. The default is one month.
For example,
PERIOD=14 DAY 02JAN95
sets a collection period of two weeks starting at January 2. Any string not
recognized as a standard period is assumed to be the name of a user-defined
Cost Periods dataset. The dataset must sequentially hold the Period Name,
Period Start Date, and Period Complete Date.
GRACEPERIOD=365
Client / Server
Set the grace period to post actuals. The grace period is the number of days
that users can still post actuals after the collection period ends before they are
locked out.
DRILLDOWN=N
Client
162
AMS REALTIME Resources User Guide
Advanced Management Solutions, Inc., Issue 1.1
Allow Drilldown access to non-planned work.
DSET=file.dst
Client / Server
Specify the database name.
LOGLEVEL=5
Server
Set the Server display level. Level 1 (Fatal) - Level 6 (All), as defined in the
Server menu.
IDLESAVE=n
Server
Save after n minutes of idle time.
FORCESAVE=n
Server
Save after n minutes always.
RTRSERVER=
Client / Server
Specify RTRServer address.
TXNLOG=N
Server
Log all transactions to a transaction log file.
BKUPDEPTH=5
Client / Server
Specify number of database backups (*.D0n).
PROTOCOL=
Client
Specify client network protocol.
PROTOCOLS=
Server
Specify a list of all server protocols used.
CASESENSITIVELOGIN=N
Client
This determines if LoginIDs are case sensitive.
MINPASSWORD=0
Client
Minimum number of characters in a password.
163
AMS REALTIME Resources User Guide
Advanced Management Solutions, Inc., Issue 1.1
TABLEBUFSIZE=15000
Client
Number of bytes allocated for table buffer size.
Environment Switches
The following switches are identical to the AMS REALTIME Projects switches
defined in Configs.Doc. If you are a AMS REALTIME Projects user, you may
wish to check how these switches are set in the AMS REALTIME Projects
configuration file to maintain consistency.
3DTABLES=Y
Client / Server
This provides 3D effect in the table face.
ICONFILE=RTR.ICL
Client
This setting tells Resources which ICL file to use for regular 16X16 toolbar
icons.
LARGEICONFILE=RTR24.ICL
Client
This setting tells Resources which ICL file to use for large 24X24 toolbar
buttons. You can customize the appearance of the toolbar buttons by editing
these .ICL files using tools such as Microangelo© or similar Icon editors. You
must however be careful not to rename or re-arrange any of the icons in the
ICL file. Also, make a backup of the .ICL file before you make any changes.
USELARGEICONS=
Client
The default for this switch is determined by the size of your screen resolution.
If the screen's resolution is less than or equal to 1024 X 768, then the default is
automatically set to N, and smaller toolbar buttons will be displayed. A screen
size of greater than 1024 X 768 will automatically set this switch to Y, giving
larger toolbar buttons. To over-ride the default setting, add this switch to the
RTRnn.INI (or RTR.CFG file for Mac and Unix) and enter Y or N depending
on what you require.
INTLMONEYSIGN=$
Client / Server
This is the character used as the monetary symbol for international
applications.
INTLMONEYRIGHT=N
Client / Server
This determines the placement of the monetary symbol for international
applications.
INTLDECIMAL = .
Client / Server
This is the character used as the decimal point for international applications.
INTLTHOUSAND = ,
Client / Server
164
AMS REALTIME Resources User Guide
Advanced Management Solutions, Inc., Issue 1.1
This is the character used as the thousands separator for international
applications.
INTLDATESEP = -
Client / Server
This is the character used as the date separator character for international
applications. For example, the slash (/) is used in the date format 08/08/96.
INTLLISTSEP = ,
Client / Server
This is the character used as the list item delimiter for international
applications.
165
AMS REALTIME Resources User Guide
Advanced Management Solutions, Inc., Issue 1.1
INTLNEGPAREN=N
Client / Server
This determines if parenthesis are used to display negative numbers.
INTLALTDATE=N
Client / Server
This determines the date ordering of Month, Day and Year. If this is Y,
DD/MM is used instead of MM/DD in the date format. If this is A, the Asian
date format YY/MM/DD is used.
GRAYS=33,25,17,34,26,18,10
Client / Server
Patterns used by plotters for "gray scale" patterns. If you have problems with
the default, try 31,30,15,14,13,12,11.
SMALLFONT=font,size
Client / Server
Font and size of Small font.
LARGEFONT=font,size
Client / Server
Font and size of Large font.
DEFAULTFONT=font,size
Client / Server
Font and size of Default font.
PRINTERFONT=Arial,8
Client
The default font used for printing dataset tables, timecards, etc. This does not
apply to Report specifications where a font is specified.
TABLEDUMPTHOUSEP=,
Client / Server
Thousands separator character for numbers.
DATEFMT=01-JAN-96
Client / Server
Date format sample.
BUSYWHEEL=Y
Client / Server
This switch displays a spinning “wait” cursor when the program is busy.
166
AMS REALTIME Resources User Guide
Advanced Management Solutions, Inc., Issue 1.1
LANGUAGE=RTRRZ16.USA
Client / Server
For Windows 3.1x
LANGUAGE=RTRRZ32.USA
Client / Server
For Windows 95/NT and 32 bit versions
This switch specifies a resource file, which is different for translated language
versions.
RIGHTDOUBLE=Y
Client / Server
The Windows right mouse button equals a double-click with the left mouse
button.
WINALTFILLRECT=N
Client / Server
Setting this to Y will force use of the alternate Windows FillRect function for
printers that don't fill in the background pattern in rectangles.
WINALTWIDELINE=N
Client / Server
Setting this to Y will change the way some Windows printer drivers print wide
lines, so they print lengthwise rather than sideways, which is less efficient.
WINMAXHMINUS=0
Client / Server
Number of screen pixels to subtract from the fully maximized screen height.
This makes the AMS REALTIME Resources window slightly shorter when
maximized.
PRINTCOMMAND=
UNIX Client
After a printer file is generated with the print command, provide an option to
execute the specified command. The command must be enclosed in quotes.
The %s is used for the print file name. For example, a command to queue a
print job on the RS6000 is:
PRINTCOMMAND="qprt -c -PQNAME %s >qprt.lst &"
PRINTFILE=default.ps
UNIX Client
Default output file name.
Communication Switches
The following switches are used to fine tune the network communications:
NBSENDBUFS=4
Client / Server
Number of NetBIOS send buffers. Maximum is 52.
167
AMS REALTIME Resources User Guide
Advanced Management Solutions, Inc., Issue 1.1
NBRECVBUFS=48
Client / Server
Number of NetBIOS receive buffers. Maximum is 52.
NBRECVPOST=2
Client / Server
Number of NetBIOS read ahead buffers.
IPXESRENABLES=Y
Client / Server
Enable IPX to allow interrupts while posting a message to a window handle.
IPXSENDBUFS=32
Client / Server
Number of IPX send buffers. Maximum is 52.
IPXRECVBUFS=32
Client / Server
Number of IPX receive buffers. Maximum is 52.
CLIENTTIMEOUT=25
Client
Number of ticks (1 / 18th of a second) to wait the first packet response.
CLIENTSHORTTO=5
Client / Server
Number of ticks (1 / 18th of a second) to wait for subsequent packets.
CLIENTTICKLEMIN=1
Client
How often (in minutes) the client should tickle the server.
CLIENTMAXTRIES=15
Client
Number of communication retries before a message prompt appears.
168
AMS REALTIME Resources User Guide
Advanced Management Solutions, Inc., Issue 1.1
UDPMAXPACKET=8192
Client /Server
Maximum UDP packet size. The correct value depends on the TCP/IP stack
size.
CLIENTPACKETGATE= n
Client
Number of packets that can be sent out from the client before a response back
from the server to eliminate buffer overflow. When using PC TCP, try setting
this to 4.
SERVERPACKETGATE= n
Server
Number of packets that can be sent out from the server before a response back
from the client to eliminate buffer overflow. When using PC TCP, try setting
this to 4.
SRVTIMEOUTMIN=15
Server
Number of minutes a server will wait until it logs a user off.
MAXSERVERS=3
Server
This can be set to the number of network protocols used to save memory. One
server application is generated to handle each protocol used. Set this switch to
the number of protocols used to use less memory. Maximum setting is 4.
SRVRELOGINOK=Y
Server
Let the Server allow a user to login from the same node without logging off
first.
AMS REALTIME Projects Switches
These switches can be added to the AMS REALTIME Projects configuration
file to specify defaults for the direct interface between AMS REALTIME
Projects and the AMS REALTIME Resources database.
RTRERRORLOG=filename
RTP <-> RTR
When executing the interface between AMS REALTIME Projects and AMS
REALTIME Resources, this file will contain any exception messages, such as
missing resources or activities.
RTRRZADJUSTLEVEL=N
RTP <-> RTR
If this switch is set to N, the requirement will be spread out over the duration of
the activity. If this is set to Y, the requirement will be front loaded at the
starting requirement date.
169
AMS REALTIME Resources User Guide
Advanced Management Solutions, Inc., Issue 1.1
RTRRZREPLACE=N
RTP <-> RTR
If this is set to N, requirements from AMS REALTIME Resources will be
added to existing project requirements. If this is set to Y, all project
requirements will be replace by the current AMS REALTIME Resources
requirements.
RTRRZAPPROVED=N
RTP <-> RTR
If this is set to N, all actuals are loaded into AMS REALTIME Projects from
AMS REALTIME Resources. If this is set to Y, only Approved actuals are
loaded, and the status of those actuals will become Posted.
RTRRZLOE=N
RTP <-> RTR
If this is set to N, new requirements that are loaded into AMS REALTIME
Projects from AMS REALTIME Resources will be created as Level type
requirements. If this is set to Y, new requirements will be created as Effortdriven types.
RTRSERVER=server address
RTP <-> RTR
Address of the Server where the AMS REALTIME Resources dataset resides.
RTRDSET=local dataset filename RTP <-> RTR
Default filename of the local AMS REALTIME Resources dataset.
PROTOCOL=Netbios
RTP <-> RTR
Network protocols currently supported are: NetBIOS, IPX and UDP. UDP is
used for TCP/IP.
RTRCONNECT=preference filename
RTP <-> RTR
RTRSERVER, RTRDSET and PROTOCOL can be replaced with this setting.
The preference file contains all the required information for making a
connection to the REALTIME Resources Server.
RTRACTID=%actid
RTP <-> RTR
Use the Activity ID as the key field to identify tasks when passing data between
AMS REALTIME Projects and AMS REALTIME Resources. Field names
must be preceded with a percent sign.
IGNORECOMPLETED=N
RTP <-> RTR
Set this switch to ‘Y’ to ingore 100% complete activities when bringing a plan
into REALTIME Projects from the Resources database.
170
AMS REALTIME Resources User Guide
Advanced Management Solutions, Inc., Issue 1.1
DDE
DDE Service Topics
Service Application Name
Services
Activity
Employee
Organization
Service Topics
FieldNames
FieldTypes
Filter
Formats
Record
TopicItemList
FieldNames
FieldTypes
Filter
Formats
Record
TopicItemList
FieldNames
FieldTypes
Filter
Formats
Record
TopicItemList
RTR
Description
Field Names in the Dataset
Field Data Types and Definitions
Current Data Filter Name
TEXT type
Current Record Number
List of Available Service Topics
Field Names in the Dataset
Field Data Types and Definitions
Current Data Filter Name
TEXT type
Current Record Number
List of Available Service Topics
Field Names in the Dataset
Field Data Types and Definitions
Current Data Filter Name
TEXT type
Current Record Number
List of Available Service Topics
171
AMS REALTIME Resources User Guide
Advanced Management Solutions, Inc., Issue 1.1
Services
other user-defined
datasets
Workplan
Actuals
Service Topics
FieldNames
Description
Field Names in the Dataset
FieldTypes
Filter
Formats
Record
TopicItemList
FieldNames
FieldTypes
Filter
Formats
Record
TopicItemList
FieldNames
FieldTypes
Filter
Formats
Record
TopicItemList
Field Data Types and Definitions
Current Data Filter Name
TEXT type
Current Record Number
List of Available Service Topics
Field Names in the Dataset
Field Data Types and Definitions
Current Data Filter Name
TEXT type
Current Record Number
List of Available Service Topics
Field Names in the Dataset
Field Data Types and Definitions
Current Data Filter Name
TEXT type
Current Record Number
List of Available Service Topics
172
AMS REALTIME Resources User Guide
Advanced Management Solutions, Inc., Issue 1.1
Services
Service Topics
Report
R - Read (DDERequest)
W - Write (DDEPoke)
Start
Complete
Binsize
Groups
Filters
Specification
Data
Labels
Rownames
[Calculate]
Description
String Representing the Report Start Date
(R/W)
String Representing the Report Complete
Date (R/W)
Current Report Bin Size (W), Available
Bin Sizes, Tab Separated (R)
Desired Group Name (W), Available
Group Names, Tab Separated (R)
Desired Filter Set (W), Available Filter
Sets, Tab Separated (R)
Report Specification Name (W),
Available Specifications, Tab Separated
(R)
Report Data, Tabs Between Columns, CR
Between Rows (R Only) [Valid After
Calculate]
Column Headings, Tab Separated (R
Only) [Valid After Calculate]
Data For Column 0 Only, Tab Separated
(R Only) [Valid After Calculate]
Command to Calculate Report. No
Arguments; Populates Data, Labels and
Rownames
NOTE - Square brackets are not part of
the command name, but are required to
conform to DDE command syntax.
173
AMS REALTIME Resources User Guide
Advanced Management Solutions, Inc., Issue 1.1
The following is a sample Microsoft Word Basic Macro to get Report data from
AMS REALTIME Resources:
Sub MAIN
rc = DDEInitiate("RTR", "Report")
DDEPoke rc, "Start", "1/1/96"
DDEPoke rc, "Complete", "3/31/96"
DDEPoke rc, "Groups", "Employee"
DDEPoke rc, "Filters", "Engineering Dept"
DDEExecute rc, "[Calculate]"
l$ = DDERequest$(rc, "Labels")
d$ = DDERequest$(rc, "Data")
Insert l$
Insert Chr$(13)
Insert d$
DDETerminate rc
End Sub
174
AMS REALTIME Resources User Guide
Advanced Management Solutions, Inc., Issue 1.1
ODBC
Open Database Connectivity (ODBC)
ODBC is a method used to link databases directly. ODBC must be supported by
your platform in order to be used. Also, ODBC drivers for other databases or
applications must have been installed and properly configured on your system in
order for the process to function.
This process allows direct data access between the AMS REALTIME Resources
datasets and other database programs. For example, an external database program
that maintains all of the basic employee information might be linked to the AMS
REALTIME Resources Employee dataset, so that information that is entered into
the external database will be automatically loaded into the Employee dataset.
This data exchange can go both ways. For example, Actuals data that has been
collected in AMS REALTIME Resources can be automatically linked to another
database so that it can be used by another system. Reports that are generated in
Resources can also be linked to another database program for historical storage or
enhanced reporting.
175
AMS REALTIME Resources User Guide
Advanced Management Solutions, Inc., Issue 1.1
Installing the ODBC Drivers
Basic ODBC Drivers
If you already have ODBC installed on your system, an ODBC icon will found in
the Windows Control Panel group. If this is not present, install the ODBC drivers
from the Windows installation disks.
Place the AMS REALTIME Resources ODBC Installation disk in a floppy drive.
Use the Windows File Run command to execute the Setup program from the floppy
disk. The setup program will load the AMS REALTIME Resources ODBC drivers
into your Windows System directory. (Note: choose the 16 bit or the 32 bit driver,
depending on the application you are running.)
From Windows:
click on File
Run ...
Browse ...
Select the drive (or directory) AMS REALTIME Resources ODBC directory.
Select
Setup.exe
click on OK
OK
The ODBC drivers installation program will execute.
click on Continue
Select
AMS REALTIME Resources
click on OK
The driver will install the ODBC files into the Windows System directory.
Run the Windows Control Panel program and double-click on the ODBC icon to
run the ODBC setup. If you click on the Drivers button, you should see AMS
REALTIME Resources in the list as an installed ODBC driver. Click on Close to
return to the ODBC Data Sources dialog.
Configuring the Data Sources
Once the AMS REALTIME Resources ODBC driver has been installed, the data
sources which use this driver can be configured. The data sources are AMS
REALTIME Resources preference files, which contain the Basic datasets and
Reports that can be linked to other programs.
To configure a Data Source, double-click on the ODBC icon to run the ODBC
setup. From the Data Sources dialog :
click on Add ...
Select
AMS REALTIME Resources
click on OK
176
AMS REALTIME Resources User Guide
Advanced Management Solutions, Inc., Issue 1.1
From the Setup dialog, enter the following information for the Data Source :
Data Source
A descriptive name for the data source.
Preference File
The preference file name (full path and filename) or
protocol and server name.
UserID
The UserID for login access rights.
Password
The Login Password for that UserID.
For both local and server databases, use the full path and file name of the
local preference file which points to the AMS REALTIME Resources database. For
example, the Preference File might be c:\rtr\wb.prf .
click on OK
Repeat this process for to add any additional Timekeeper data sources. When all
Data Sources have been entered,
click on Close
and click on
OK
This completes the AMS REALTIME Resources ODBC installation and setup
procedure.
Making an ODBC Connection to Resources
Each program will have it's own instructions to make an attachment to an ODBC
database. The following examples should give you the basic idea.
To create a Microsoft Access database that uses the AMS REALTIME Resources
data, do the following:
Run Microsoft Access
click on File
New Database
OK
When the database is open:
click on File
Attach Table ...
<SQL Database>
OK
Select the AMS REALTIME Resources data source
click on OK
AMS REALTIME Resources
• 177
Select a dataset or report for an open connection
click on OK
Repeat the last two steps until all Resources datasets and reports have been linked
into the current Access database.
Double-click on each table to open, view or edit the data. Saving the database will
save changes back to the Resources database. Extreme caution should be utilized
when directly accessing Resources data from an external source.
178
AMS REALTIME Resources User Guide
Advanced Management Solutions, Inc., Issue 1.1
AMS REALTIME Resources
• 179