1
AMS REALTIME
5.2 User Guide Addendum
Advanced Management Solutions, Inc.
This manual was written by Neil Smith, Advanced Management Solutions, Inc. © Copyright 2000.
All rights reserved.
Contents
Preface
v
About this Manual................................................................................................................ v
The Enterprise Solution
7
What is Enterprise Solution? ................................................................................................ 7
How does it work? ............................................................................................................... 7
Using AMS' Enterprise Solution for Microsoft Project
9
Enterprise............................................................................................................................. 9
Enterprise Menu ..................................................................................................... 9
Commit .................................................................................................................. 9
How to Commit a Workplan ................................................................................. 10
Status ................................................................................................................... 11
Options ................................................................................................................ 12
Map Files ............................................................................................................. 12
Status ................................................................................................................... 14
Workforce Browser .............................................................................................. 14
Logon................................................................................................................... 15
Disconnect ........................................................................................................... 15
REALTIME Resource 5.2
16
Introduction ....................................................................................................................... 16
About This Document........................................................................................... 16
Conventions ......................................................................................................... 16
Time Scale Functions ......................................................................................................... 17
Hot Spot Key Diagram ......................................................................................... 18
Selecting the time scale for manipulation .............................................................. 18
Manipulating the time scale .................................................................................. 19
Calendar Module................................................................................................................ 22
Manipulating the Calendar Object ......................................................................... 23
Wallpaper .......................................................................................................................... 26
Customized Wallpaper.......................................................................................... 26
Configuration Description..................................................................................... 26
Override Switches ................................................................................................ 26
Table Auto Resize .............................................................................................................. 27
Description........................................................................................................... 27
Usage ................................................................................................................... 27
Animate ............................................................................................................... 28
Zoom.................................................................................................................... 28
The Calendar Tab
29
Defining Working Time in the Calendar ............................................................................. 29
AMS REALTIME 5.2 Addendum
Contents • i
The Calendar Mode Display.................................................................................. 29
Working Time - Shifts .......................................................................................... 30
Moving Around the Calendar................................................................................ 31
Selecting Dates..................................................................................................... 31
Changing Working Days....................................................................................... 32
Changing Shifts .................................................................................................... 32
Defining Overdays................................................................................................ 34
Specifying the Range of Dates .............................................................................. 35
Creating a New Calendar.................................................................................................... 36
Worked Examples .............................................................................................................. 36
Sharing Calendar Info. Between Projects ............................................................................ 38
Assigning Calendars........................................................................................................... 39
Calendar Hierarchy............................................................................................................. 39
Database Tab
41
Formerly the Update and Define Tabs................................................................................. 41
Purpose .............................................................................................................................. 41
Database Tab Functions...................................................................................................... 41
Selecting a Dataset ............................................................................................................. 42
Defining a Key Field .......................................................................................................... 43
The Basic AMS REALTIME Resources Datasets ............................................................... 44
Creating Dataset Field Definitions ...................................................................................... 44
Data Types and Format Controls........................................................................... 44
Database Attributes ............................................................................................................ 47
What are database attributes? ................................................................................ 47
HOWTO: set a database attribute .......................................................................... 47
Project Dataset Attributes ................................................................................................... 48
Actuals Dataset Attributes .................................................................................................. 49
Defining the Activity Dataset ............................................................................................. 49
Data Types ........................................................................................................... 49
Overriding Data Type Popups............................................................................................. 51
Defining the Employee Dataset .......................................................................................... 54
Defining the Organization Dataset ...................................................................................... 55
Renaming, Creating and Deleting Datasets ......................................................................... 55
Timecard Notes and Annotations........................................................................................ 56
Lookup Fields....................................................................................................... 56
Configuration Dataset
60
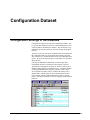
Configuration Settings in the Database ............................................................................... 60
User Attributes
61
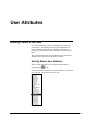
Adding Fields to the GUI ................................................................................................... 61
Activity Dataset User Attributes............................................................................ 61
Employee Dataset user Attributes.......................................................................... 62
Updating Information
67
Data Entry Tables............................................................................................................... 67
Changing the Table Layout ................................................................................... 67
Deleting Records .................................................................................................. 67
Saving the Data .................................................................................................... 67
Hierarchical Organization Data Coding .............................................................................. 68
Expenses............................................................................................................................ 68
Introduction.......................................................................................................... 68
ii • Contents
AMS REALTIME 5.2 Addendum
Entering Expenses.............................................................................................................. 68
Storing Files in the Database (BLOB)................................................................................. 70
Storing a File........................................................................................................ 71
Check Out and Check In ....................................................................................... 72
HOWTO: Set up for check out/in.......................................................................... 72
Check in/out Errors: File Error(229): Failed to lock............................................... 72
Portfolio Tab
73
What is Portfolio?............................................................................................................... 73
Overview.............................................................................................................. 73
Drilldown Controls............................................................................................... 74
Top Legend Area.................................................................................................. 74
Drilldown Table ................................................................................................... 74
Selecting Items ..................................................................................................... 75
Drilldown Chart.................................................................................................... 75
Graph Controls ..................................................................................................... 75
Using Portfolio View.......................................................................................................... 75
Performing a Drilldown ........................................................................................ 75
Portfolio Table ................................................................................................................... 76
Structure Diagram Chart..................................................................................................... 77
Gantt Chart ........................................................................................................................ 78
Baseline ............................................................................................................... 78
Clues.................................................................................................................... 78
Auto Range .......................................................................................................... 79
Report Displays.................................................................................................................. 79
Workplan Tab
81
Introduction ....................................................................................................................... 81
What is Workplan? ............................................................................................... 81
Workplan Dataset Attributes............................................................................................... 82
Navigating Workplan View ................................................................................................ 83
The Workplan View ............................................................................................. 83
Project/Activity tool bar........................................................................................ 83
Activity Table Area .............................................................................................. 84
Other Workplan Table Features ............................................................................ 85
Resource Tool Bar................................................................................................ 86
Usage Histogram .................................................................................................. 87
Interpreting the Usage Histogram.......................................................................... 87
The Usage Histogram ........................................................................................... 87
Average LOE ....................................................................................................... 88
Total LOE ............................................................................................................ 88
Average Available ................................................................................................ 88
Total Available..................................................................................................... 88
Using Workplan View........................................................................................................ 89
Making a new Work Assignment .......................................................................... 89
Changing a Work Assignment .............................................................................. 89
Deleting a Work Assignment ................................................................................ 90
Objects Tab
91
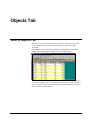
What is Objects Tab ........................................................................................................... 91
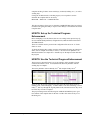
REALTIME Projects 5.2
93
Overview ........................................................................................................................... 93
AMS REALTIME 5.2 Addendum
Contents • iii
Technical Progress Enhancement........................................................................................ 93
Description of Enhancement ................................................................................. 93
HOWTO: Set up the Technical Progress Enhancement.......................................... 94
HOWTO: Use the Technical Progress Enhancement ............................................. 94
Field Calculator Enhancements........................................................................................... 96
Activity Extension Field Formatting ................................................................................... 96
Decimals .............................................................................................................. 96
Syntax Checking and Comments ........................................................................................ 97
Constants and project fields ................................................................................................ 98
Duration and Logical Functions ............................................................................ 98
Operators.............................................................................................................. 99
A Complex Calculation Broken Down into Steps .................................................. 99
String functions .................................................................................................... 99
Automatic Activity ID Formatting .................................................................................... 101
Resource Extension Field Enhancements .......................................................................... 101
G A VERY IMPORTANT NOTE! ...................................................................... 101
Resource LOE in ResList ................................................................................................. 102
Resource Extension Field Attributes ................................................................................. 102
Progress Enhancements .................................................................................................... 103
Other Configuration File Enhancements ........................................................................... 103
Python API
104
An Introduction to Python in AMS REALTIME ............................................................... 104
The Python API User Guide................................................................................ 105
Python in AMS REALTIME ............................................................................................ 105
Python Files ..................................................................................................................... 106
Glossary
iv • Contents
107
AMS REALTIME 5.2 Addendum
Preface
About this Manual
This manual covers new functionality or feature enhancements that have occurred to
the AMS REALTIME family of products. Version 5.2 introduces some major new
enhancements to AMS REALTIME Resources, Resources Server and the interface
with Microsoft™ Project ™.
Some inevitable conceptual changes to the Client/Server system for Resources has
prompted a change in reference to Enterprise. These tools now allow companies
with a large investment in Microsoft Project to centralize project and resource data
into a server managed database. From here, data can be summarized for reporting,
distributed to the project community for Timecard tracking of actuals, adjustment of
resource assignments and numerous other management tasks, all from a central
database and all in real time. Because of this broadening of scope with regards to
AMS REALTIME Server, the system is now being referred to as The Enterprise
Server, and is mentioned as such throughout more recent documentation and
publications.
Added to this the capability to update a timecard or perform other tasks from
anywhere in the world via the web, the scope of project and resource management is
now geared round a truly global solution.
This manual represents only some of the ground breaking work that is being done by
AMS to enhance the Enterprise Solution. This release is an interim release (not
maintenance) and will be followed by a more formal 'point' release in the near future.
At this time the contents of this manual will be absorbed into the main
documentation of the product set. However, for now it stands as an update to the
current documentation and should be used in conjunction with it.
AMS REALTIME 5.2 Addendum
Contents • v
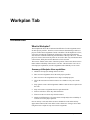
The Enterprise Solution
What is Enterprise Solution?
The Advanced Management Solutions' Microsoft Project Enterprise solution is an
easy way to allow project and resource managers to collaborate in the creation and
status of multiple projects across an organization. The main application controlling
this activity is called Workforce Browser. This tool is activated from within
Microsoft Project and allows the viewing and allocation of resources to and from
tasks located either in the Microsoft Project file or out on the Enterprise Server.
See the Workforce Browser User Guide for details about this product.
In simple terms, the enterprise solution allows a Microsoft Project user to login to a
central AMS Server, submit project plans and retrieve status updates. The AMS
Server manages the distribution of this project data to a community of project teams
who can provide feedback to the Microsoft Project schedules. This feedback is
typically timesheet information, giving detailed actual hours and progress on tasks,
assignment of individuals to tasks and estimates of expected time to complete tasks.
Organizations with a large commitment to Microsoft Project can collect and organize
the individual project schedules into an enterprise wide project and resource solution.
How does it work?
The AMS Enterprise Solution for Microsoft Project adds a special DLL to the
Microsoft Project user's system directory. It also provides an updated global.mpt
(template) file. With these two components added, the Microsoft Project user can
login to the AMS REALTIME Server from within Microsoft Project and submit a
project schedule. This is instantly available to a community of project teams and
team leaders through the AMS REALTIME Resources, Solo, WebSolo and Projects
applications. Team leaders can make resource assignments, team members can
record the hours they work and estimate time to the completion of activities via a
simple timesheet, and project managers can load these updates back into Microsoft
Project to progress their schedules.
AMS REALTIME 5.2 Addendum
The Enterprise Solution • 7
This system also offers a workforce management tool. This tool enables a central
pool of resources to be assigned to tasks in Microsoft Project. It also allows
resources that reside in a Microsoft Project file to be assigned to the central pool and
other tasks in other projects.
8 • The Enterprise Solution
AMS REALTIME 5.2 Addendum
Using AMS' Enterprise Solution
for Microsoft Project
Enterprise
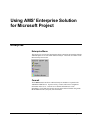
Enterprise Menu
This menu gives access to the functions that allow connection and operation with the
AMS Enterprise server from within Microsoft Project. This menu is available in the
Microsoft Project menu bar.
Commit
The Commit menu item allows a Microsoft Project schedule to be posted to the
AMS REALTIME Server. It passes activity, resource and resource assignment
information to the server. Once the server has this information, it can be
immediately viewed and acted upon by project teams and team leaders using AMS
REALTIME Resources, Projects, Solo or WebSolo.
AMS REALTIME 5.2 Addendum
Using AMS' Enterprise Solution for Microsoft Project • 9
How to Commit a Workplan
Click on the Enterprise menu in Microsoft Project. If you are not already logged in
to the server the logon dialog will appear. Logon as described in Logon.
1.
Choose the Commit option in the Enterprise menu.
2.
If the system has not yet been logged on to the server, the login dialog will
appear. Enter a valid user name and password to enter the system. Then click
the Login button to complete the login.
3.
Next the commit dialog will appear. In here, choose the Options… button.
4.
In the Options dialog, click on the Browse button to locate an appropriate map
file. A map file is a text file containing instructions telling the system how to
apply the fields of Microsoft Project to the fields in the enterprise server.
Note: The system is supplied with a sample Commit.map, Status.map and
MSPSample.dst dataset file. These files are designed to operate with each other and
can be used as a basis for customizing the Enterprise system
Once the appropriate map file has been specified, click the OK button. This will
return to the Commit dialog.
In the commit dialog, click on the Commit button to submit the Microsoft Project
schedule to the Enterprise system.
10 • Using AMS' Enterprise Solution for Microsoft Project
AMS REALTIME 5.2 Addendum
The project will be committed to the Enterprise Server and immediately be available
to the project community.
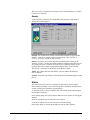
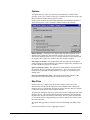
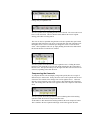
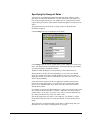
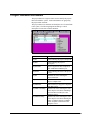
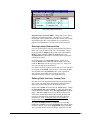
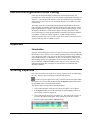
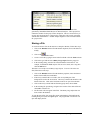
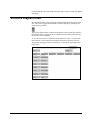
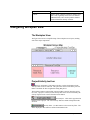
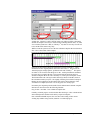
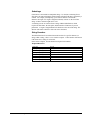
Results
As the schedule is committed, the commit dialog will populate a simple table of
fields to show what happened.
Scanned - this column shows what the commit function found to be present in the
schedule. In the above example it found 2 open projects, with 3 activities, 4
resources, 4 resource assignments and no actuals.
Deleted - Don't panic, this column does not refer to deleting the contents of the
schedule, it refers to a clearing mechanism within the commit function that clean out
any existing references to elements from a previously committed schedule, before
replacing them with an updated or appended element from the current schedule.
This process is marked by an OK message in the 'Deleted' column.
Added - this column shows the total number of objects added to the Enterprise
Server's database.
Updated - shows the total number of elements that where updated during the commit
process.
Status
This feature allows the status of a workplan to be pulled down into the original
Microsoft Project schedule. This will include progress calculations and actual hours
worked on tasks by the individuals assigned to them.
To obtain the status of a Project schedule click on the Status option in the Enterprise
menu in Microsoft Project.
In the resulting dialog box click the Options button to set the options for statusing the
schedule.
Select the appropriate map file using the browser button.
Click OK to complete the selection and return to the Status Dialog.
In the Status dialog, click on the Status button to start the status operation.
AMS REALTIME 5.2 Addendum
Using AMS' Enterprise Solution for Microsoft Project • 11
Options
The options dialog is used to select the map file used during a commit or status
operation. It also gives control over the types of data that are allowed to return to the
Microsoft Project schedule during a status operation.
During a status operation, the options dialog provides some additional check boxes.
These check boxes are used to control the data that returns to the schedule.
Replace Existing - Checking this box indicates that tasks and assignments in the
schedule will be updated by replacing them with more up-to-date versions of the
same objects that reside on the server. For example and activity called Act001 with
no progress will be replaced by Act001 on the server with 50% progress.
Only Approved Actuals - this switch indicates that only approved actuals (that is
actuals reported on a timecard that have been marked as approved by a manager) will
be used to update the progress of a schedule.
Ignore Actuals After [date] - this option allows actuals that have been posted after
the specified date to be ignored by the status process. This is useful if some of the
resources have posted time showing what they are going to do, not what they have
actually done.
Preserve Constraint Types / Date - this setting ensures that the integrity of the
links within the project and the dates are left in tact after the status.
Map Files
During a status or a commit, a map file is used to tell the system how to map
Microsoft Project fields with the Enterprise Server's database fields. Because the
Enterprise Server is customizable, map files are used to allow the map to be changed
to reflect the actual structure of the Enterprise database.
The path to the appropriate map file is usually stored in the Configuration table in the
Enterprise Server. The Commit and Status functions examine this table and display
the path in the map file field at the top of the dialog. However, if the map files have
not been defined in the configuration table, the Browser button can be used to locate
the required map file.
The options dialog provides two buttons concerned with finding and editing a map
file.
Use the Browse button to locate an appropriate map file.
12 • Using AMS' Enterprise Solution for Microsoft Project
AMS REALTIME 5.2 Addendum
Use the Edit Mapfile button to edit an existing map file.
Two sample map files are provided along with a database file. These can be used as
a starting point for a system. They are installed into the Enterprise menu, by default
this appears under the Program Files/AMS REALTIME directory. They are called
COMMIT.MAP, STATUS.MAP and MSPSample.DST.
Care must be taken when editing the map file not to change the order of events. For
example all the Workplan data must be processed before the Actuals are posted,
otherwise the system will protest.
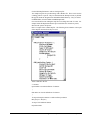
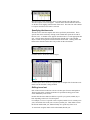
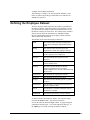
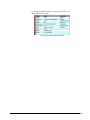
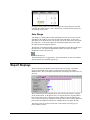
Here is a sample of the commit.map file. The following shows what the various part
of the map file mean and how they are used.
Add a comment to the file
// comment
Open marker to start the definition of a dataset.
{
End marker to close the definitions of a dataset
}
To map an Enterprise Dataset to a Microsoft Project dataset
RTR_Project = Projects {
To map a field within the dataset
ProjectID=Name
AMS REALTIME 5.2 Addendum
Using AMS' Enterprise Solution for Microsoft Project • 13
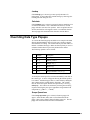
Map Field Types
D = date (Example Start:D=Start)
C = character (text)
F = Float
I = Integer
L = Logical
S = Span (duration)
Note: Instructions are given at the bottom of the sample map files to assist in the
modification and creation of new maps.
Status
This feature allows the status of a workplan to be pulled down into the original
Microsoft Project schedule. This will include progress calculations and actual hours
worked on tasks by the individuals assigned to them.
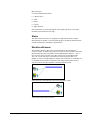
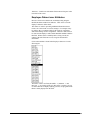
Workforce Browser
The Workforce Browser option runs an applet that allows the assignment of
resources to tasks. It does this by giving a view of the resources available in both the
Microsoft Project resource list and the central AMS Enterprise database. One or
more resources can be selected from either of these sources and added to tasks.
Also, one or more tasks can be selected and resources assigned to them. For
example, a resource from the Enterprise database can be selected, it's availability can
be examined and it can then be assigned to a task along with any other selected
activities from the Enterprise database or the Microsoft Project file.
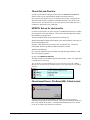
Selected resources from different sources being assigned to a task.
Selected task being assigned resources.
14 • Using AMS' Enterprise Solution for Microsoft Project
AMS REALTIME 5.2 Addendum
Multiple selected tasks being assigned to multiple selected resources.
The Workforce Browser makes centrally held resources in the Enterprise server
available to every Microsoft Project user. This means that when a new project is
being created, resources which need to work on the various tasks in that project can
be downloaded into the Microsoft Project resource list.
See the Workforce Browser section for details about how to use this product.
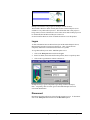
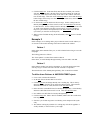
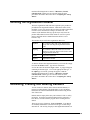
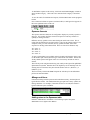
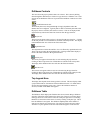
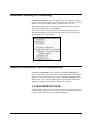
Logon
To share information between Microsoft Project and the AMS Enterprise Server,
Microsoft Project must be logged on to the Server. Once a logon has been
completed, information can be shared between the two systems.
To Log Microsoft Project on to the AMS Enterprise Server:
1.
Click on the Enterprise menu and choose Logon.
2.
Enter User Name, Password and from the pick-list, choose a repository name.
3.
Click on the Logon button to connect to the Server.
Example showing a typical completed Logon dialog in Microsoft Project.
Note: A repository name is a name given to the AMS Enterprise Server for
convenient identification.
Disconnect
Disconnects the Microsoft Project client from the enterprise server. To disconnect
click on the Enterprise menu and choose the Disconnect option.
AMS REALTIME 5.2 Addendum
Using AMS' Enterprise Solution for Microsoft Project • 15
REALTIME Resource 5.2
Introduction
About This Document
Many new modules and functions have been added to the AMS REALTIME
Enterprise Client (AMS REALTIME Resources). These modules and functions are
in most cases advances in the operational aspects of existing objects such as time
scales, calendars and table objects. These enhancements to the different class types
are far reaching and require detailed explanation.
This is an AMS addendum publication only and is intended to document all the new
functionality of the enterprise applications that appear in version 6.0.
These sections focus in high detail on individual classes in the Enterprise Client
software. They are intended to be removed from this document and placed in their
appropriate user guides for the 6.0 release. In the interim, this addendum will serve
as a User Guide for new and existing customers who need to find out what's new in
the release and how to use it to full effect.
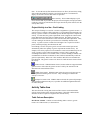
Conventions
Most objects in the system react to both mouse and keyboard input. When a mouse
and keyboard operation will affect the object the items are described separately using
two symbols.
16 •
AMS REALTIME 5.2 Addendum
Instructions based on the use of a mouse.
Instructions based on the use of a keyboard.
Time Scale Functions
The time scale object can be manipulated in a number of ways using either the
mouse or the keyboard. The time scale can be selected and then scrolled, stretched,
compressed, compressed to the left, compressed to the right and drilled in or out for
zooming.
The following text describes in detail how each of these operations can be achieved
using either the mouse or the keyboard.
AMS REALTIME 5.2 Addendum
REALTIME Resource 5.2 • 17
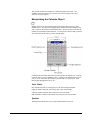
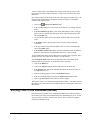
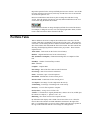
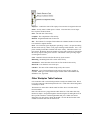
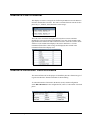
Hot Spot Key Diagram
Hot spots are areas of a program object that respond to mouse input. The time scale
has a number of hot spots that allow the view to be completely changed without the
need for filling in dates into dialog box fields. The diagram below illustrates the
location of hot spots on the time scale.
Note: Hot spots are mirrored at each end of the time scale.
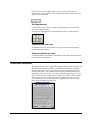
Selecting the time scale for manipulation
To select the time scale object using the mouse, click once anywhere on the time
scale object. The timescale will appear to indent, indicating that it is currently
selected.
Use the Tab key to change the selected object on the screen. Each press of the Tab
key moves the selection to the next object in the tab sequence. Press the Tab key
until the time scale object you wish to edit appears to indent.
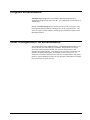
Example
Unselected time scale appears raised.
18 • REALTIME Resource 5.2
AMS REALTIME 5.2 Addendum
Selected time scale appears indented.
Manipulating the time scale
Scrolling/panning
To move the time scale to the left or right without altering the magnification of the
view, place the mouse cursor over the timescale. The mouse cursor will change to a
hand shape. Click the mouse button and drag in the direction required. The time
scale will scroll with the hand until the mouse stops and the button is released.
Autoscroll
To move the time scale to the left or right without dragging the mouse, autoscroll can
be used. Place the mouse cursor to the far left or far right of the time scale until the
cursor changes to a double arrow. Click the mouse button to activate the autoscroll.
The time scale will travel in the direction of the arrows until the mouse button is
released.
Autoscroll to the right, go back through time.
Autoscroll to the left, go forward through time.
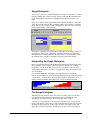
Expanding the time scale
The time scale can be expanded in the following ways. To manually expand the time
scale, place the mouse cursor over the vertical monthly separator bars; the cursor will
change into a left/right arrow pointer. Click the mouse button and drag to the left or
right to expand the time scale from that point. The cursor also places a vertical red
bar at the point the mouse was clicked. As the mouse is dragged left or right the
center part of the bar separates from the top and bottom of the bar and becomes the
cursor. The top and bottom bar fragments remain in the original position helping the
user see where the operation started from.
AMS REALTIME 5.2 Addendum
REALTIME Resource 5.2 • 19
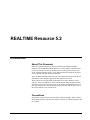
Getting ready to expand the view.
The above picture shows expanding the time scale to the left. The cursor can be seen
here as a red vertical bar. The two shorter red bars indicate the cursors original
starting point when a left drag started.
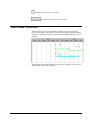
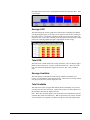
The view can also be expanded using the time scale auto expander hot spots located
in the upper half of the time scale, about 1/2 an inch from each end of the time scale.
Placing the mouse cursor over this hot spot changes the cursor to a dot and arrow
cursor. Then expand the time scale by simply holding down the mouse button until
the desired amount of zoom has been reached.
The above picture shows the time scale auto expander cursor. Clicking the mouse
button here will expand the view to the left, whilst retaining the date on the right of
the time scale. The equivalent hot spot on the right of the time scale does the reverse
of the left, expanding in the other direction.
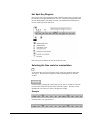
Compressing the timescale
To compress the time scale and display a longer time period, there are a couple of
different ways to achieve this. Firstly, the mouse cursor can be placed at the far end
of the time scale until the cursor changes into a left or right bar arrow. Click and
drag the cursor towards the center of the screen to drag additional time in from that
side. The starting date of the time scale opposite to the scale compressor will remain
fixed.
The above picture shows the right hand bar arrow indicating that a click and drag
operation in that direction will compress the time scale.
An alternative to this manual click and drag method is the Auto compressor feature.
This is similar to the auto expander and simply works in the opposite direction.
20 • REALTIME Resource 5.2
AMS REALTIME 5.2 Addendum
Place the mouse cursor mid height, about 1/4 inch from the end of the time scale.
The auto compress cursor will appear. Click the mouse button and hold it down to
see the time scale stepping in the direction if the arrow. The time scale will continue
to compress until the mouse button is released.
Specifying the time scale
The time scale's start and complete date can be specified by absolute date. These
specific dates can be entered by clicking on the calendar hot spot at the far ends of
the time scale. A calendar cursor appears when the mouse is over the appropriate hot
spot. Click the mouse button to invoke the little calendar object. The calendar
object can then be navigated to find and enter the desired date. Clicking on the date
button in the calendar sets the time scale position to that selected date.
Calendar cursor to invoke the calendar object.
Calendar object can be used to set a specific start or complete date for the time scale.
In this case the start date is being modified.
Drilling in and out
Each of the text items on the time scale are also hot spots for mouse manipulation.
These hot spots allow zooming operations to be performed to bring precise time
scales immediately to the screen.
Double click the mouse button to drill into a specific year, quarter, month, day or
hour depending on the level of zoom required.
For example, if a view of a specific week is required, and the view is currently set to
years, first double click on the year to zoom to just that year. Then double click on
the desired month in that year, and then finally on a specific day of the week.
To zoom back out again, double click on the month, then the year.
AMS REALTIME 5.2 Addendum
REALTIME Resource 5.2 • 21
Note: The cursor does not change when it passes over the text descriptor for a
calendar object. Ignore whatever cursor is displayed and double click to drill down
when over a date descriptor.
Scrolling/panning
To scroll the time scale to the left or right using the keyboard, first select the time
scale object using the Tab key.
To scroll to the left and right, use the left and right arrow keys on the keyboard.
Expanding the time scale
To expand the time scale, hold down the Ctrl key and use the left and right arrow
keys to activate the expansion.
Compressing the time scale
To compress the time scale, hold down the Shift key and use the left and right arrow
keys to activate the compression.
Calendar Module
The calendar module can be manipulated using either the mouse or the keyboard. It's
functionality and interactivity with the system makes this module very useful, not
just for changing the week view in a timesheet, but for altering dates on activities
and time scale objects. The calendar object affects the program in different ways
depending on where it is located. For example, when the calendar appears on a date
field, selections from the calendar will enter a date in the field cell. If the calendar is
selected on the time scale it will alter the start or end date of the time scale. The
same calendar object is also located in the lower right hand side of the screen and
affects the week displayed in a time scale.
22 • REALTIME Resource 5.2
AMS REALTIME 5.2 Addendum
The calendar module's functionality is available throughout the system. The
capabilities described in this next section are universal and apply in most cases
wherever this object appears.
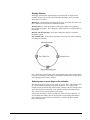
Manipulating the Calendar Object
Months and Years are navigated using the left and right pointers at the top of the
calendar object. The outer left and right pointers will increment the calendar by one
year at a time in the forward or backward direction. The inner pointers will alter the
calendar by one Month in either direction. To return to the current month, right click
once in the blue header at the top of the calendar dialog.
Clicking in the blue header bar at the top of the calendar will display a list. Clicking
to the left will give a list of Months to select. Clicking to the right will give a list of
years to select. This allow the calendar to jump directly to a selected year, rather
than stepping through them one by one.
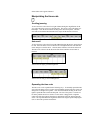
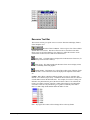
Color Codes
Days indicated in black are working days for the current displayed month.
Light red numbers represent non working days in the current month.
Light gray numbers indicate dates in the previous or next month.
Dark red numbers indicate non working days in the previous or next month.
Symbols
The diagonal (markout) lines across a date indicated that it has passed.
AMS REALTIME 5.2 Addendum
REALTIME Resource 5.2 • 23
Display Selector
The display selector button steps through four possible mode of display for the
calendar. Each successive click of the button takes the display to the next mode.
The modes are as follows.
Markout on - default display when the program opens. Shows the day of the week
plus a markout for any days that are behind current date.
Working Days on - shows the number of working days in the lower right hand
portion of the day buttons. The working days number starts at 0 on the Base Date of
the calendar.
Markout with Working Days - shows the working days and gives a markout
though days passed.
Day of Month Only - gives only the day number in each day box with no markouts
or working days showing.
Note: The display selector button shows the mode that will be selected if the button
is clicked. For example, if the display is showing the Working Days on mode, that is
what will happen if the button is clicked.
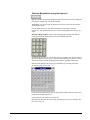
Selecting one or more days on the calendar.
The calendar day boxes can be used to select one or more dates. This feature is used
for various functions depending on where the calendar is. For example, if the
calendar is being used in the date field of a table, selecting a date box will apply that
date to the selected cell in the table. If the calendar is being used with the Project
Tab, it can be used to alter the duration of an activity.
In these cases the ability to select more than one consecutive date is desirable. To
select multiple dates simply place the mouse pointer on the starting date and then
click and drag the mouse across the calendar face. Each box the mouse pointer
passes will be selected.
24 • REALTIME Resource 5.2
AMS REALTIME 5.2 Addendum
Calendar Manipulation using the keyboard.
With the calendar object selected, input from the keyboard can be used to change the
selected days, months and years for the calendar.
Arrow keys - use the left, right, up and down arrow keys to move the selected day
on the calendar object.
Left and Right arrow keys move the selected date one day back or forward
respectively. The up and down keys move vertically changing the selection by one
week.
Selecting a Range of Dates - This is done using the plus and minus keys that are
usually present on the number pad area of most standard keyboards.
Clicking on the plus key will increase the selection by adding a day after the selected
day with each successive key press. Clicking on the minus key will remove one day
from the end of the selection, heading back towards the originally selected day.
Hold down the Shift key and use the plus and minus keys to add days from the
selected day going back in time.
Use the Page up and Page down keys to skip an entire month, moving to the previous
month or next month respectively.
Use the Home key to return to the current day.
Hold down the Shift key and use the Page Up and Page Down keys to change to the
previous or next year.
AMS REALTIME 5.2 Addendum
REALTIME Resource 5.2 • 25
Wallpaper
The blank areas that appear behind many of the tables in the product can be
populated with bitmap images that repeat to create a wallpaper or texture effect.
There are a number of standard themes that can be selected based on the number of
colors supported by the client computer's graphics driver and card. Themes range
from plain colors and 16 color designs to full 24 bit (millions of colors) images,
depending on the available graphics card.
Standard wallpaper themes can also be overridden by a set of configuration switches
that allow bitmaps in the programs directory to be selected and used. Therefore
customers can create their own themes to use as backgrounds for the product, giving
it the appropriate company identity and making the programs appearance unique.
Standard themes use images that have been incorporated into the programs dynamic
link libraries (DLLs) and are selected by right clicking on the table's background and
choosing a theme from the resulting list.
Customized Wallpaper
To override the standard themes and use company specific images or custom image
designs, activate the following switches in the configuration file by removing the
preceding semi-colon.
TCWALLPAPER=TC16.BMP
NOTEWALLPAPER=NOTES16.BMP
EXPWALLPAPER=EXP16.BMP
TLWALLPAPER=TSKLST16.BMP
AVWALLPAPER=PALLET11.BMP
PRJWALLPAPER=PALLET13.BMP
PRJFOLIOWALLPAPER=PORTF16.BMP
DBWALLPAPER=PALLET03.BMP
WPWALLPAPER=WORKP16.BMP
Configuration Description
If the desired bitmap file is stored in the program's executable directory, only the
name of the bitmap need be specified. If the bitmap image is stored elsewhere on the
computer, a full path must be used. For example if the bitmap files are stored in the
windows system directory, the configuration setting would appear as follows;
TCWALLPAPER=C:\WINDOWS\SYSTEM\TC16.BMP
Override Switches
The following gives a description of each available configuration switch and where
the image will appear in the program. These switches will override existing images
and themes in the program. To return to the standard themes, place a semicolon in
front of each of these switches.
TCWALLPAPER=name.BMP - Time card wallpaper.
NOTEWALLPAPER=name.BMP - Time card notes tables wallpaper.
EXPWALLPAPER=name.BMP - Time card expenses wallpaper.
TLWALLPAPER=name.BMP - Task List wallpaper.
AVWALLPAPER=name.BMP - Workplan tab, resource availability list wallpaper.
26 • REALTIME Resource 5.2
AMS REALTIME 5.2 Addendum
PRJWALLPAPER=name.BMP - Project tab, activity table wallpaper.
PRJFOLIOWALLPAPER=name.BMP - Portfolio tab, drilldown table wallpaper.
DBWALLPAPER=name.BMP - Database tab, data table wallpaper.
WPWALLPAPER=name.BMP - Workplan tab, allocation table wallpaper.
Table Auto Resize
Description
Auto Resize is a mode available in any selected table throughout the program. Auto
Resize monitors the length of text or numbers in each of the columns that are in the
visible display area. The column will automatically resize it's width to accommodate
the longest text string or number visible. As the table is scrolled up or down, column
widths are shortened or widened depending on content. This gives the advantage of
not having unnecessarily wide columns throughout the display, when only a small
number of cells contain very long text strings or numbers.
Usage
Auto Resize can be switched off in two ways. Firstly, any manual alteration of a
column width will switch off the mode, leaving the table columns at a fixed width
during any further scrolling. Secondly the function can be turned off and on using
the Auto Resize menu item under the View menu.
AMS REALTIME 5.2 Addendum
REALTIME Resource 5.2 • 27
Animate
The system offers two modes of operation for the way windows behave when being
moved, re-scaled or resized using the mouse. These modes are toggled on and off
using the Animate tool.
The Animate tool.
When Animate is on and an object is resized, it moves with the mouse pointer.
When animate is switched off and an object is resized, the mouse simply pulls a
dotted line out to represent the object's new size and shape. The object does not
assume that shape until the mouse is let go.
This feature has been made optional as it may be advantageous to switch off the
luxury of animation when manipulating tables that contain very large amounts of
data.
Zoom
The zoom tool is used to toggle the lower portion of the Resources window on and
off.
The Zoom tool.
If more real-estate is desired in the Resources window, click this button to toggle the
Report area off.
28 • REALTIME Resource 5.2
AMS REALTIME 5.2 Addendum
The Calendar Tab
Defining Working Time in the Calendar
Working time is defined in AMS REALTIME Resource using the Calendar Tab.
To access the Calendar click on the Calendar tab. Changing into this mode will
always display the Default Calendar. See the section on Creating New Calendars,
below.
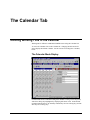
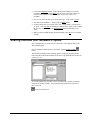
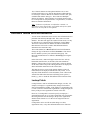
The Calendar Mode Display
Calendar Mode shows a familiar-looking desk calendar covering a six-week period,
with non-working days highlighted by displaying their dates in red. In the Default
Calendar illustrated above, all Saturdays and Sundays are non-working days, and the
other days are working days.
AMS REALTIME 5.2 Addendum
The Calendar Tab • 29
Dates that have already been worked, that is, those dates that are before the Now
date, are shown crossed through with a diagonal markout.
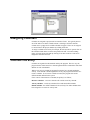
To the right of the screen are a series of tabs that can be used to define specific
information about each calendar. Above the calendar and the tabs are some
calendar-specific icon tools that are covered in detail below.
When the calendar tab is first entered, the Info tab is displayed. This shows the basic
information for the current calendar. In the example above, the Calendar Name
shows the current selected calendar is the Default Calendar. The Select Calendar
icon (the rightmost button at the top of the screen) also shows the name of the
current calendar. Clicking the icon will give a list of other calendars that can be
selected.
For information on creating a new calendar, see the section on Creating a New
Calendar, below.
Base Date
The Base Date is the point at which the calendar starts. The working days in the
calendar are numbered sequentially, and the number displayed at the bottom right of
each date box is the working day. This generic day numbering starts from the day
after the Base Date, since the Base Date is zero.
Any changes made can be saved by clicking the Save Calendar Changes button. The
Discard Calendar Changes button next to it (labeled Cancel) can be used to ensure
that none of the changes are saved.
See the section on Sharing Calendar Information Between Projects for information
on how calendars can be made available to other projects.
Working Time - Shifts
As well as being able to define which days are working or non-working, it is also
possible to specify which hours are to be worked within the working day. These
hours can be set up to reflect the shifts worked on the project.
In the Info Tab, the basic shift information is entered and displayed in the Day
Length, Week Length and Month Length fields. These times are used to determine
how many working hours there are in a working day, which is entered in the Day
Length box. In this example, 8 hours. Depending on the number of working days in
the week, the program will calculate the Week Length, in this case 40 working hours.
30 • The Calendar Tab
AMS REALTIME 5.2 Addendum
In a similar fashion, the Month Length shows the number of working hours in a
month.
Note : Data entered in the Info Tab does not influence the information held or
entered in the other tabs in the calendar dialog. These can usually be ignored as the
important settings are the once made in the cycle and range tabs.
See the section Cycle below for further information on establishing shift patterns.
Moving Around the Calendar
To move around the calendar, in order to display a different month or year, use the
left and right arrows above the calendar. The outer left and right arrow buttons will
step through one year intervals. The inner two arrow buttons step through the
months of the selected year.
Selecting Dates
Dates can be selected in a variety of ways:
• Select an individual day by clicking on its date box. The date selected is
highlighted by showing the date box as depressed.
• Select a range of dates by dragging across the date boxes. All the dates selected
are highlighted by showing the date boxes depressed.
• Select a day of the week, for example all Saturdays, or all Wednesdays, by
clicking on the day name at the top of the calendar. This highlights the day
name, but does not show the specific dates selected.
AMS REALTIME 5.2 Addendum
The Calendar Tab • 31
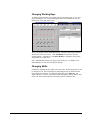
Changing Working Days
To change specific holidays from working days to non-working days, or vice versa,
choose the Holidays tab. Select the appropriate date on the calendar and click the
Holidays tab on the right of the screen.
The screen changes to show the Holidays dialog. The date or date range selected is
shown in the From and To boxes. Click Add Holiday to make these days nonworking holidays. Alternatively, click Delete Holiday to change the selected days
from holidays to working days.
Note: Individual date changes only apply to the current year, so remember to set
annual holidays for each year in the project duration.
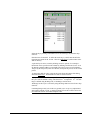
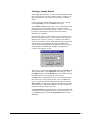
Changing Shifts
In addition to changing the days when work will be done, the time during the day can
be changed as well. This is important for determining the activity duration and for
many advanced calculations. To change the shift, click on the Cycle tab. The
display changes to a list box, From and To fields and a Range selection button. Days
of the week can be entered into the From and To fields for shift time entry.
32 • The Calendar Tab
AMS REALTIME 5.2 Addendum
Select the day by clicking on the Shift For box and selecting a day from the dropdown list.
Enter the times for the shift. To define the entire day as a shift, enter 00:00 for the
From time and 24:00 for the To time. Then click Add Time to set these times as the
shift for that day.
A split shift cycle can be created by defining successive periods. For example, a
lunch break can be specified on the calendar by defining a shift from 07:30 to 11:30
for Monday, and then adding a second shift period from 12:30 to 4:30 for Monday.
Just specify the first period, click on Add Time, and repeat the process for the second
period.
To change the shifts for a day, select the day in the list at the bottom of the dialog,
and click Delete Time. Then add the new times as discussed above.
Any cycle of shift that is defined is specific to a defined time period. For example,
the cycle could be defined as being valid from June 1st to September. 30th. The date
range is defined using the Range tab, see the Ranges section below.
The Range for this Cycle is selected by using the Range button to select from a dropdown list.
Combining Ranges and Cycles in this way permits you to set up very sophisticated
and complex patterns of work. A detailed example of how this could be achieved is
provided in the section on Worked Examples below.
AMS REALTIME 5.2 Addendum
The Calendar Tab • 33
Defining Overdays
The program also allows the definition of working day exceptions, which are specific
working days that would normally be non-working. These extra hours or days are
entered as overdays.
To define overdays (working days that are normally non-working, but will be
worked as an exception) click the Overtime tab. Either select a date on the calendar
and enter the dates in the From and To boxes.
Click on the Add Overdays button. The exception working days will be displayed
in the list at the bottom of the dialog.
To remove or change existing overday definitions, select the appropriate date at the
bottom of the dialog and click Delete Overdays.
34 • The Calendar Tab
AMS REALTIME 5.2 Addendum
Specifying the Range of Dates
A project may use standard shift patterns throughout its whole duration. On the
other hand, it could be that shift patterns, overdays and holidays will change from
time to time throughout the project. For example one set of shift patterns could be
required during the summer, and a different working shift pattern be required for the
winter.
The product allows the specification of a range of dates for which the other
information is applied.
Click the Ranges tab to access the Range control fields.
Use the Range button to select an existing range or click Add Range to create a new
range. The Always Range is the default range, which means that any cycle, holiday
or overday information is applied to all dates.
The date on which the Range is to start operating is entered in the Start box.
The Synch date is the first date in the beginning of a cycle for the new calendar
range. For example, the summer calendar might start on June 21, but if that is a
Wednesday, and the cycle starts on a Monday, the sync date can be set for June 26,
which is the next Monday.
Synch dates become clearer when they are applied to calendars with odd cycles
(instead of a weekly shift pattern). If a 10 day shift cycle is defined, the system
needs a way to determine which day is which, since there will be more than one
Monday in the pattern.
For example, a range has been defined that uses a 10 day Cycle Length. Enter a Start
date of 01JUN97 and a Synch date of 11JUN97. When the Cycle for this range is
examined, Day 1 of 10, Day 2 of 10, Day 3 of 10 will be seen in the Shift For popup, where previously the days of the week where visible.
Specify the length of the cycle in the Cycle Length box. The default is 7, which
means that the shift times can be set using the calendar week specifically for this
Range.
The section below on Worked Examples shows how to combine Range and Cycle
information to create complex working patterns for a project.
AMS REALTIME 5.2 Addendum
The Calendar Tab • 35
Creating a New Calendar
As well as making changes to existing Calendars, new calendar can be created in the
calendar tab.
Enter the calendar tab, where the display will show the Default calendar.
Click the New Calendar icon
at the left-hand side of the screen.
The Info tab changes to display the Calendar Name as NewCalendar. Edit this field
to enter the name required.
From now on, the Select Calendar icon will include this new calendar as part of the
selection list. Any changes made on any other tab apply to the new calendar.
Worked Examples
The examples below show how to combine the calendars different facilities to define
any type of working pattern.
The two examples below are used to show how each aspect of the calendar for two
different working patterns is defined. These might represent two different sites
where project work is carried out, each of which works a different shift pattern.
For the purposes of this guide the assumption has been made that it is the same
organization and site carrying out all the project work. The first example is based on
a vacation to France project, where we will be working at different times depending
on the phase of the project, i.e. Planning or Traveling. The second example shows
how the working patterns may vary depending on the time of year.
Example 1
While we are still planning, we shall have to work on this project during the
evenings and at weekends. Once we are Traveling, we shall be working on the
project all day.
Pattern 1
During the planning phase, we shall work from Monday through Friday from 7.00
PM to 9.00 PM., and on Saturday and Sunday from 12.00 midday to 4.00 PM.
Pattern 2
Once we are traveling, we expect to be ‘at work’ on the project from 9.00 am to 5.00
PM.
To define these Patterns in AMS REALTIME Projects
....
• Create a new calendar called Vacation.
• On the Info Tab set the Base Date as 01JAN97
• Click the Cycle tab and change Saturdays and Sundays into working days by
adding a shift for each day. This is done by selecting the day of the week from
the pop-up next to the Shift For label. Then enter From and To times (the
beginning and end of the shift in 24 hour time). Then click on the Add Time
button.
36 • The Calendar Tab
AMS REALTIME 5.2 Addendum
• Click the Ranges tab. In the Start field, enter the date on which your vacation
will start. The Synch date is the date of the first actual working day in the new
work cycle, which may not necessarily be the same as the “official” start of the
new calendar range. Then click on the Add Range button. Notice that the Range
button changes from Always to a date with an open-ended arrow, which indicates
the new calendar range.
• Go back to the Cycle tab and choose the new range. Set the working hours for
Monday through Friday as From 19:00 To 21:00. Click Add Time for each day
to enter the times. Set the working hours for Saturday and Sunday as From 12:00
To 16:00. (Note that shift cycle times can not overlap. If you are changing a
range for a period that is already defined, use the Delete Time button for that
cycle before you enter the new shift period.)
• When you have finished entering all the information, click OK to Save Calendar
Changes.
Example 2
In this example, we are dealing with a project where the work is based outdoors, so
we want to be able to take advantage of the better weather in the summer.
Pattern 1
In the colder, darker months of the year, we will be limited in how long we can work
in daylight.
The working pattern is as follows:
The ‘winter pattern’ is worked from October to March.
In the winter, we work Monday through Saturday, from 9.00 AM to 4.00 PM.
Pattern 2
In the summer months, from April to September, we can work much longer hours
each day, but give workers more time off at the weekend to compensate.
The normal hours will be Monday through Friday, from 8:00 AM to 6:00 PM.
To define these Patterns in AMS REALTIME Projects
• Create a new calendar called Outside.
• On the Info Tab set the Base Date as 01OCT97
• Click the Cycle tab and change Saturday into a working day. This is done by
choosing Saturday from the pop-up next to the Shift For label. Then enter the
shift time From 09:00 To 16:00, and click on the Add Time button.
• Delete all of the current Shift Times for Monday through Friday. Select Monday
and enter a Shift Time From 09:00 To 16:00. Click on Add Time button.
• Now add the new Shift Time for Tuesday through Friday.
• Click the Ranges tab. Enter a Start of 01APR98, which is the date on which our
new range starts.
• Since the cycle for this range starts on a Monday, enter 06Apr98 as the Synch
entry.
• The summer working day schedule of 5 working days will still be applied to a
weekly schedule, so enter 7 for the Cycle Length.
AMS REALTIME 5.2 Addendum
The Calendar Tab • 37
• Click on the Add Range button. Notice that the current Range is now From
01APR98 ->. If we click on the Range pop-up, we now have two entries: the
one previously mentioned and the first range, which is now called -> To
01APR98.
• Now we can define the Shift Cycle for the new range. Click on the Cycle tab.
• Select the From 01APR98 ->. Range using the Range button
• Set the working hours for each day of the week, except Sunday, as From 08:00
To 18:00. Click Add Time for each day to enter the times. After you have added
the first day, you can also use the Add Next Day button to make this process
faster.
• When you have finished entering all the information, click OK to Save Calendar
Changes.
Sharing Calendar Info. Between Projects
Once a calendar has been created it can be exported to a file and then shared with
other AMS programs.
Once all calendar modifications have been made, click the Dump Calendar
button.
The File Selector dialog for the operating system is displayed, prompting for the
name of the file in which the calendar will be stored. By default the file will have an
extension of .cal
To load the calendar into any other system, open that project, change to Calendar
mode and click Load Calendar. The program prompts for the name of the file to
load. Click OK.
The Load Calendar tool.
38 • The Calendar Tab
AMS REALTIME 5.2 Addendum
Assigning Calendars
Calendars are assigned to project tasks in a number of areas. It is typically done in
one of the table views in the calendar column. Selecting a cell in the calendar
column causes a popup list of available calendars to appear. These can be assigned
to various items in the project database by clicking on the list.
To assign a calendar to an activity for example, the activity table is opened. Click on
the calendar column in the row that corresponds to the task. From the resulting
popup, select the desired calendar by clicking on its name in the list. This action
assigns the calendar to the task.
Calendar Hierarchy
Calendars are regarded in a hierarchical order by the program. That is to say, the
program checks certain items for a calendar against which to calculate the items final
duration or work commitment.
When a new project is loaded, the program first checks for a calendar against the
activity. If no calendar is defined against the activity, the program next checks for a
resource calendar. If no resource calendar is located, the program will use the
default calendar defined for the system.
If one or more of the items has a calendar, the priority is as follows;
Resource calendars - a resource calendar will override an activity calendar.
Activity calendars - an activity calendar will override the default calendar.
Default calendar - the default calendar will be used only if no other calendars have
been assigned to a resource or activity item.
AMS REALTIME 5.2 Addendum
The Calendar Tab • 39
Database Tab
Formerly the Update and Define Tabs
In AMS REALTIME Resources 5.1.5 and earlier, the functionality of
the database tab was divided between the Update and Define tabs. In
version 5.2 and later, these two tabs have been merged into the
Database tab.
The following section illustrates how the new Database tab is used.
Purpose
The database tab is an important administrative tool used in the setup
of a database's tables and fields. Three main items can be addressed
using the database tab.
1.
Display and update data in the table.
2.
Create or modify filters for existing tables.
3.
Create and define datasets and table fields.
These break down into three modes within the database tab. These
are; Update, Filter and Define.
Careful planning is recommended before attempting to set up a
database schema for the enterprise system. The following text gives
details of how to create and modify tables using the Database tab.
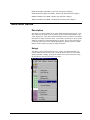
Database Tab Functions
Dataset select tool.
The dataset select tool allows the existing datasets to be selected for
display or modification. When the database tab is first entered there
is no table selected. Use this tool to select the required dataset.
Update command tool.
AMS REALTIME 5.2 Addendum
Database Tab • 41
To set the table for update, click on the update button shown above.
This will allow current database content to be modified. New
records can also be added when the database is in update mode.
Filter command tool.
Filters are used in the program to sort, select and order data into a
more manageable format for viewing and reporting. When in Filter
mode, changes can be made and new filters can be added to the
system to assist in the organization of large amounts of data.
Define command tool.
Define mode is used to specify the tables and dataset that will exist in
the system. The define tool is used to place the database tab in the
mode to enter database column and field definitions.
Rename dataset tool.
Use this tool to rename the currently selected dataset. Caution
should be employed using this tool as changing dataset names that
are referenced by other tables will cause the program to fail in some
circumstances.
Create dataset tool.
Use this tool to create and define a completely new dataset.
Delete dataset tool.
This tool allows the deletion of an existing dataset in the database.
This tool should be used with caution as deleting datasets referenced
by other datasets can cause the program to fail in certain
circumstances.
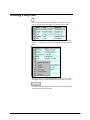
Selecting a Dataset
To select a dataset for display or modification;
1.
Click on the
Dataset selection tool.
2.
From the resulting list select the desired dataset to display.
The desired dataset will open into the Database tab. The data can
now be manipulated in the table, depending on the mode selection,
i.e. Update, Filter or Define.
42 • Database Tab
AMS REALTIME 5.2 Addendum
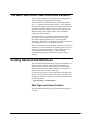
Defining a Key Field
Key fields are fields that contain a unique set of records and can be
used to cross-reference other datasets of identical unique fields.
Key fields can be identified by the key symbol in the row header of
the table. To define a key field, right-click in the row header for the
table.
From the resulting list, select the Make Key Field option. A key icon
will appear in the row header indicating that this is now a key field.
To define a key field using the keyboard and mouse, hold down the
Alt key and click in the field name.
AMS REALTIME 5.2 Addendum
Database Tab • 43
The Basic AMS REALTIME Resources Datasets
The four basic text datasets are information sets containing Project,
Activity, Employee and Organization information.
The fields named Actuals and Workplan are the standard numeric
type (i.e., containing time-phased data) datasets. These contain the
source data that appears in Workplan mode and the Timecard screen.
As with the standard text datasets, the basic fields, data types and
attributes should not be redefined. There is some capacity to add
additional fields to these numeric datasets, but only within the
existing slot reference structure.
New datasets can also be created to hold information to support
project and resource management systems, such as customer
information, billing and expense data, or document control
information. The product can support up to 41 datasets in total (the 5
standard datasets plus up to 36 user-defined datasets).
There is no implied order to dataset fields. Fields may be inserted or
deleted, but if a field is deleted, all corresponding data is lost. Each
field has a list of possible data types. Reference field types allow
selection of fields from other datasets. Virtual field types
automatically create the data from defined component fields or
subfields.
Creating Dataset Field Definitions
The first field in the dataset should be a unique record identifier. To
define the fields in a dataset, select the dataset name and choose
Define (note that only users with Full access to the dataset table
definition will be able make database definitions). Enter the field
name, and then tab over to choose a data type.
Click in the Type field to get a menu popup that will prompt for the
data type, size and format, or Ctrl-click to get the cursor and edit or
enter the type manually. The types are shown in the definition using
the following format:
TypeCode [Size] [ : FormatControl].
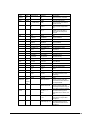
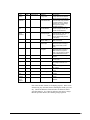
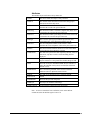
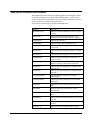
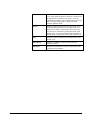
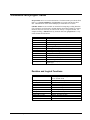
Data Types and Format Controls
The following table describes the data types and formats which are
available:
44 • Database Tab
AMS REALTIME 5.2 Addendum
Type
Size
Number
Alpha
Sample
Description
20
N
Up to 20 numeric characters
1-255
A255
Up to 255 chars of text
_ (underscore)
A25:_
Up to 25 chars of text with all
spaces removed
U
A12:U
Up to 12 chars of upper case
text
A:_U
Default of up to 20 chars of
upper case text with spaces
removed
dd
D:dd
Day
ddMON
D:ddMON
Day MonthName3
ddMONyy
D:ddMONyy
Day MonthName3 Year
ddDAY
D:ddDAY
Day DayofWeek
dd-MON-yy
D:dd-MON-yy
Day-MonthName-Year2
dd-MON-yyyy
D:dd-MON-yyyy
Day-MonthName-Year4
DAY
D:DAY
DayofWeek
mm/dd
D:mm/dd
Month/Day
mm/dd/yy
D:mm/dd/yy
Month/Day/Year2
yymmdd
D:yymmdd
Year2 Month Day
yyyymmdd
D:yyyymmdd
Year4 Month Day
hh:mm
T:hh:mm
Hours:Minutes
hh.t
T:hh.t
Hours.Tenths
hh:th
T:hh:th
Hours.TenthsHundreds
hh
T:hh
Hours
ppp%
T:ppp%
Percentage of Day
FTE
T:FTE
Full Time Equivalent (Unit of
availability)
Units
T:Units
XXXX
R:Project.Name
Provide a popup of the field
contents of the Name field from
the Project dataset.
R25:Customer.ID
Provide a popup of the field
contents (25 characters long) of
the ID field of Customer dataset
V:Last + “, “ +
First
Populate this field (up to 20
chars) with Last, a comma, and
First
V40:Project.Name
+ ID
Populate this field (up to 40
chars) with the Project Name
field plus ID
V30:Last[1:5] + ID
Populate this field (up to 30
chars) with the first 5 chars of
Last plus ID
Date
Time
Reference
20 is
FormatCtrl
default
max
Virtual
AMS REALTIME 5.2 Addendum
Database Tab • 45
Type
Sample
Description
Lookup
L:Org.Code
Lookup table field to establish
data contents by a date period
Calculate
C:BCWS-BCWP
Calculate fields using standard
or special operators. Special
operators are % (percentage)
and # (percent of total),
standard operators + - * /
Pick
P:Task MS NP
Provide a popup of Task, MS
and NP for data selection.
Group
Operation
C:Min(Workplan,
Drilldown
W40:Programs.
Name=WBS_IT
K:WBS_IT.
SubProject
Calculate the Min, Max, Sum, or
Count (record count) of a
numeric dataset field (Actuals
or Workplan).
An activity reference field to a
WBS source table.
A field that identifies a
datasource table as having a
WBS level beneath (a child
table).
A field that identifies a
datasource table as having a
WBS level above (a parent
table). This can also be used to
create a WBS subset branch.
A field that stores a working
calendar.
Future use - popup of defined
access levels.
Future use - enforce
percentage boundaries of 0 100%.
Future use - popup of defined
filter names.
Name of person who updated
record.
Date and time the record was
updated.
Populate field with record
number.
Store a binary file in the
database.
Child
Size
FormatCtrl
Date)
Parent
O:WBS_IT.
Program
Calendar
Julian Calendar
Access
?
Progress
S
Filter
F:Activity
Updated
by
Update
Time
Record
Number
Binary
Large
Objects
U:Employee.name
Z:ddMONyy
#
B:*.arp
Note: Date and time formats are for display purposes. Dates can be
entered using any valid date format containing the month, year, and
day. Virtual and Reference fields default to 20 characters unless
specified otherwise. If a Virtual or Reference type string is longer
than the specified number, the remaining string is ignored.
46 • Database Tab
AMS REALTIME 5.2 Addendum
Database Attributes
What are database attributes?
Database Attributes are used by the system to identify the role that
certain fields, in certain datasets play.
To express that in simple terms, the system needs to know if a field
exists as simply a general place to store data, or whether the field has
a special role within the system.
For example, the activity dataset has a TaskStart attribute associated
with one of the fields in the Activity dataset. This attribute tells the
system which of the fields in the dataset it should treat as the planned
start date for a task. After all, there could be other date fields in that
dataset. Having attributes gives the system much more flexibility for
the system administrator. If the system administrator wishes to use a
different field for TaskStart, the attribute can simply be moved to
that field.
Attributes are generally associated with the standard datasets that are
provided with the system. These are, Projects, Activities, Employee,
Organization, Workplan, Actuals and Expenses.
These tables must exist in the database for it to function correctly.
Also the attributes must also be appropriately set within these tables.
Customization of the system to meet with a company's business
practices can be achieved by either adding to these existing dataset,
or creating new datasets. AMS do not recommend removing any of
the existing standard tables, or any components therein without
consultation with an AMS representative.
HOWTO: set a database attribute
To set a database attribute, do the following,
1.
Click on the Database tab to open it.
2.
Select the dataset you wish to modify.
3.
Click on the
4.
Locate the field who's attribute is to be changed.
5.
Click in the field under the attribute column.
6.
From the resulting list, select the desired attribute.
define tool to enter define mode.
The attribute will now appear next to the selected field.
AMS REALTIME 5.2 Addendum
Database Tab • 47
Project Dataset Attributes
The project dataset is a high level table used to identify the projects
that exist within the system. Tasks in the database are grouped by
the projects that own them.
The project dataset uses attributes to identify the role of certain fields
to the system. The following diagram and table give a brief
description of each of the available attributes.
48 • Database Tab
Attribute
Description
ProjID
Field containing the project's unique ID
ProjDesc
Field containing the project's
description.
ProjFileName
Project original file name if imported
from AMS REALTIME Projects.
ProjOwner
Field containing the name of the project
owner.
ProjSD
Identifies the field containing the
Project Start Date
ProjCD
Identifies the field containing the
Project Complete Date
ProjMSPXFile
Microsoft Project .mpp file if imported
from that system.
ProjMSPCommitMap
Identifies the field containing the name
of the map file used when committing a
plan from Microsoft Project to the
Enterprise Server.
ProjMSPStatusMap
Identifies the field containing the name
of the map file used when obtaining the
status of a Microsoft Project schedule
based on updates extracted from the
enterprise server.
AMS REALTIME 5.2 Addendum
Actuals Dataset Attributes
The basic Actual fields required by the system are already defined in
the activity dataset. Here is a brief listing and description of the
currently available attributes.
Attribute
Description
ActualsResource
Name of ID of person performing
the work.
ActualsAuditWho
Name of person that changed any
actuals after submission.
ActualsTask
Task name
ActualsOrg
Organizational owner of task
ActualsCorrection
Identifies a corrected actual
ActualsType
Identifies the type of actual
ActualsDate
Identifies the original date the
actual was recorded
ActualsAuditWhen
Identifies the date the actual was
changed
ActualsAmount
Identifies the number of hours
submitted to the record
ActualsStatus
Actual's status, e.g. Recorded,
Submitted, Approved or Rejected
Custom
Assign a specific memory portion
for the field to use. This is mostly
reserved for user defined
additional fields.
Defining the Activity Dataset
The basic activity fields that are required by the product are already
defined in the Activity dataset. While these names can be modified,
extreme care must be taken to change all other related field
references across all datasets if changes are made. The contents of
the Attribute field are used to differentiate special purpose fields.
To add new fields to the Activity dataset, click in the first empty line
under the Name column. Type in the new field name.
Data Types
Click on the same line under the Type column. A popup will appear
containing all of the data types available. Click on the appropriate
data type.
AMS REALTIME 5.2 Addendum
Database Tab • 49
Alpha
If the Alpha type is selected, a prompt will appear so that the
maximum field length can be entered.
Reference
If the Reference type is selected, a popup will appear that allows the
selection of the desired dataset to reference. Click on a dataset name.
Once a dataset has been selected, a popup will appear containing the
fields in that dataset. Click on the field name to reference. When a
user selects a Reference type field, a popup will appear, allowing
data selection from the contents of the referenced field in the other
dataset.
Reference Defaults
To set a default for a reference field, control click in the type column.
This will open the field for editing without producing the data type
popup menu. Add an exclamation point after the reference field
definition and then enter a reference link to a default value.
R:Organization.Code!Employee.Org Code
Virtual
If the Virtual type is selected, a popup will appear that contains all
the fields in the current dataset. Click on each field until all the
desired items have been chosen. The contents of the new field will
be automatically created from all of the fields selected. To override
the popup and add text to the virtual field definition, hold down the
Ctrl key and click in the field definition. A cursor will appear
allowing the field to be modified.
Virtual Reference
A virtual reference field is a field that is automatically populated by a
reference link to another dataset. For example, each employee has an
Org Code. If the Org Code is defined as a reference field to a Code
field in the Organization dataset, the Employee’s Org Code will
establish a link to a particular Organization record. Other fields in
that record can be linked as a Virtual Reference field, such as a
Manager.
To define a Virtual reference field, enter a new field name. Chose
Virtual as the data type, and then select the field that contains the
reference link to another dataset. A popup will then appear that
contains all the fields from the linked dataset. Choose a field from
the list to populate the virtual reference field.
Pick
If the Pick type is selected, a dialog will be provided so that you can
enter all the possible choices for the field. The pick list items can be
separated by a comma or a space. Items with embedded spaces must
be enclosed in quotes. This type provides a method for data
validation. Ctrl-click will override the popup and allow direct
editing, but the entry still must match one of the pick list items.
50 • Database Tab
AMS REALTIME 5.2 Addendum
Lookup
If the Lookup type is selected, you must specify the name of a
lookup table. As the lookup table contents change by date range, the
resulting data will change as well.
Calculate
If the Calculate type is selected, a popup will appear containing a list
of all the defined fields. Once a field has been selected, a second
popup will allow selection of an operator. Once an operator has been
selected, the field list will reappear to allow a second field selection.
The last popup will contain the fields from the selected dataset.
Overriding Data Type Popups
To override the function popup and build a more complex calculated
formula, hold the Ctrl key and click in the type column to open the
field definition for editing. The formula must be preceded with C: to
indicate a calculated field type. Make sure that any field you use in a
calculated formula has been previously defined in the dataset.
The following operators can be selected:
Sample
Description
+
x+y
add x to y
-
x-y
subtract y from x
*
x*y
multiply x by y
/
x/y
divide x by y
%
x%y
find percent x is of y
#
x#y
find percent that x is of (x + y)
To modify the format specifier, hold down the Ctrl key and click on
the current type. A cursor will appear allowing the format specifier
to be edited. Add substring specifiers to virtual fields by adding the
start column and stop column after the field name. The columns
must be enclosed in square brackets and separated by a colon (e.g.,
name[3:6]). Also edit in text constants by enclosing the text string
in quotes and using the plus sign to append the string with the field
components (e.g., last + “, “ + first).
Group Operations
If the Group Operation type is selected, a function popup will
appear. Select the Min, Max, Sum or Count function from the
popup. Then select a numeric dataset from the popup list. The last
popup will contain the fields from the selected dataset.
AMS REALTIME 5.2 Addendum
Database Tab • 51
Drilldown, Child and Parent Types
The Drilldown, Child and Parent types are used for defining
hierarchy amoung tables, where approved projects, phases, and other
breakdown levels can be stored. Users can then use a pre-defined
drilldown mechanism to select unplanned tasks by choosing each
WBS level in series, down to the work package. This process is
covered in detail in the section on Work Breakdown Structures.
Calendar
The Calendar data type should be used for a calendar name that
contains a Julian working calendar name.
Future Data Types
Access, Progress and Filter types are not yet incorporated in the
current version, but will be implemented in the future. The Access
and Filter data types will be used to automatically produce a popup
of the existing Access levels and Filter names, respectively. The
Progress data type will be used to enforce percentage boundaries of
0% through 100%.
52 • Database Tab
AMS REALTIME 5.2 Addendum
Attributes
The Attribute keywords for the Activity dataset are:
TaskID
This field contains the unique activity identifier.
TaskPick
The contents of this field will be used for the task popup in
Plan mode and Time entry mode.
TaskStart
This field must contain a valid task start date, and is used to
determine the overall work span of the task.
TaskComp
This field must contain a valid task complete date, and is used
to determine the overall work span of the task.
TaskLevel
This field must contain a percentage level-of-effort, and is used
to determine the overall work span of the task.
TaskType
This is used to specify project and non-project tasks; nonproject tasks have a type that begins with the letter N.
TaskColor
The color and pattern numbers in this field are used to
determine the color and pattern of the activity bar on task lists.
TaskFile
This field can hold a filename which receives the actual hours
used on the task when a Dump is executed.
TaskResFilter
This skill filter specifies the skill required by the task, so that in
Plan mode, only those resources with a matching skill are
displayed.
TaskPC
The percent complete field used by the AMS REALTIME
Projects interface to correspond to the schedule Progress field.
ActID
The field used by the AMS REALTIME Projects interface to
link to the schedule Activity ID (if not found, the field with
TaskID is used).
TaskDrilldown
This is the starting field that will be used for a defined
drilldown order for unplanned work selection.
TaskCal
The field used to hold the activity’s working calendar.
TaskCloseon
XXXX
TaskMSPXID
Microsoft Project Task Unique ID
TaskProject
The Project to which the task belongs.
TaskDescription
For the field that contains the task's description.
Note: To remove an attribute from a definition, click on the attribute
column and select the attribute again to remove it.
AMS REALTIME 5.2 Addendum
Database Tab • 53
A Sample Activity Dataset Definition
The following is a sample of an Activity Dataset definition. Field
names are followed by field types and formats. Key fields have an
Attribute key specified.
Defining the Employee Dataset
The basic employee fields required by the product are predefined in
the Employee dataset. While these names can be modified, extreme
care must be taken to change all other related field references across
the datasets if changes are made at all. The contents of the Attributes
field (by specific keyword) determines how AMS REALTIME
Resources differentiates between special purpose fields and fields
which contain other information.
The Attribute keywords for the Employee dataset are:
ResID
The contents of this field will be displayed in a
popup when selecting the Organization in Plan
mode.
ResOrg
The contents of this field will specify the
organization to which each employee belongs.
ResPick
The contents of this field will populate the
resource popup (a list of employees).
ResLogin
This field contains the Login ID for each
employee.
ResLabel
This field is used to label each employee’s task
list (the schedule bars).
ResProxy
This field is used to identify an alternate
employee login that can access a AMS
REALTIME Resources account without knowing
the password.
ResPassword
This identifies the Login password field.
ResAccess
This identifies the Access Level field.
ResType
This field is used to identify specific vs. generic
resources.
ResDrilldown
This identifies a field which holds the name of a
Resource drilldown filter.
ResCal
This identifies a field that contains the name of
the Resource Calendar.
ResMSPXID
Microsoft Project Resource Unique identifier.
To add new fields to the Employee dataset, click in the first empty
line under the Name column. Type the new field name.
Click on the same line under the Type column. A popup will appear
containing all the data types. Click on the appropriate data type. If
the Alpha type is selected, a prompt will appear so that the
54 • Database Tab
AMS REALTIME 5.2 Addendum
maximum field length can be entered. If Reference, Virtual,
Calculate, Pick or other types are selected, follow the same
procedures described in the section above on Defining the Activity
Dataset.
Defining the Organization Dataset
The basic organization fields which are required by the product are
predefined in the Organization dataset. While these names can be
modified, extreme care must be taken to change all other related field
references across the datasets if changes are made at all. The
contents of the Attributes field (by specific keyword) is how the
product differentiates between fields which are used for a special
purpose and fields which contain information which is a user
reference only.
The Attribute keywords for the Organization dataset are:
DeptPick
The contents of this field will be displayed in a
popup when selecting the Organization in Plan
mode.
DeptOrg
The contents of this field will be used for each
employee’s OrgCode, which can be used to create
an organizational hierarchy.
DeptID
Department Indentifier
DeptCal
Department Calendar.
To add new fields to the Organization dataset, click in the first empty
line under the Name column. Type the new field name.
Click on the same line under the Type column. A popup will appear
containing all the data types. Click on the appropriate data type. If
the Alpha type is selected, a prompt will appear so that the
maximum field length can be entered. If Reference, Virtual,
Calculate, Pick or other types are selected, follow the same
procedures described in the section above on Defining the Activity
Dataset.
Renaming, Creating and Deleting Datasets
You can create new datasets, delete old user-defined datasets, or
rename an existing dataset using the Rename, Create, and Delete
buttons that are located underneath the dataset names along the left
side of the screen.
Datasets must be empty before they can be deleted. This is a safety
precaution. If a deleted user-defined dataset will be replaced by a
new dataset, exit and restart the program before creating the new
dataset.
There are two types of datasets: Text and Numeric. Text datasets
are standard, and should be selected for most types of data storage
and retrieval. The Activity, Employee and Organization datasets are
AMS REALTIME 5.2 Addendum
Database Tab • 55
Text. Numeric datasets are time-phased and have one or more
reference links back to a key field in other datasets which make the
record unique. Numeric datasets are limited to reference, date, pick,
calculated and numeric data types. The Actuals and Workplan
datasets are Numeric. Other examples of a Numeric dataset would
be a Lookup table for time-phased rates or organizations, or a dataset
that stores statistical information.
Note: If a dataset or field name is redefined or renamed, it is
important to ensure that all other virtual fields and reference fields
that access the new field are also updated.
Timecard Notes and Annotations
You can create a dataset that can be used to store information about a
particular timecard entry through a link. First, create a new text
database. The name will appear in a button in Time mode, so it may
be desirable to use a short descriptive field name, such as Notes.
Then create a field in the new database to hold text information.
More than one field can be created to hold information that is
annotated to the actual time entry.
The Actuals dataset has a Reserved field for the link information.
Change the Type of the Reserved field to Extension. Then choose
the new database you have just created from the popup. The
Reserved field should now be defined as X:Notes[6] (six being the
slot used).
In the Time mode, a button will appear next to the New Activity
button that contains Notes (or the name of the text annotations
database). When a time cell for a specific date is selected, clicking
on the Notes button will provide a dialog that allows an employee to
add in information annotations to the selected date.
This data can also be viewed in the Actuals database, where all
linked fields will be displayed with the time entry record. To see
only those fields which have a Note annotation, create a filter in the
Actuals Filter table where the Reserved field[6] is not equal to a
blank (e.g., enter <> under the field defined as the Extension field).
Lookup Fields
Lookup fields are used for information that changes over time. For
example, an employee’s organization may change if he transfers
from one department to another. If the employee’s organization code
is a text or reference field and the organization is simply changed, the
history of the previous organization’s actuals will be lost.
However, if a lookup table is created to specify an employee’s
organization based on an “as of” date, actuals that were posted under
the old organization will still belong to the previous organization,
and the actuals after the “as of” date will be assigned to the new
organization.
Lookup tables can be used for rates that change over time,
organization codes, or any other information that varies with time.
56 • Database Tab
AMS REALTIME 5.2 Addendum
Creating a Lookup Dataset
In the sample provided below, we will create an Organization lookup
table. The first step is to create a numeric dataset. It will have one
Key Field which will reference the a unique employee identifier,
ResID.
Use the Create New Dataset button to add a new dataset. We will
call it OrgLookup. Choose the Numeric dataset type.
At the Number of Slots prompt, enter 8. This will provide the room
to define up to 8 slots, which are references to other records or
independent fields, in the Lookup database. While we will only start
by defining 3 fields, this will provide room for the database
definition to be expanded.
Note that if the fields are unique references, the slot numbers do not
have to be specifically entered. The first field uses slot 0, the next
field uses slot 1, and so on. However, if another field is defined
where the slot reference will be shared, that slot must be specifically
entered. Hold down the Ctrl key and click in the Type field to
override the popup and append the slot number to the field (e.g., the
fields R:Employee.ResID[0] and R:Employee.Rate[0] share a
reference to an employee record).
Specifying the Number of Field Slots
The next step is to define the OrgLookup fields. Enter ResID on the
first line under Name. Choose Reference as the data type. Select
the Employee dataset, and the ResID field. This first field is the Key
Field which will be used to identify the Lookup record.
Add Date as the second field name (Date is a fixed field name that
the software uses, and can not be altered). Set it to the Date data
type (use any preferred format with month, day and year, and then
Start of Shift). The Date field is defined to hold the date the change
should take effect. AMS REALTIME Resources will compare the
system date with the “change as of” date.
Add Organization as the third field name. This name should match
with the name of the Organization reference in the Actuals table. Set
it to a Reference type, selecting the Organization dataset and the
Code field.
AMS REALTIME 5.2 Addendum
Database Tab • 57
OrgLookup Database Definition
Important Notes on Lookup Tables: Lookup table entries must be
maintained in ascending date order. The dates are "as of" dates,
meaning that each key field match will use the contents of the lookup
fields with the latest date. Each field that uses a lookup table to
populate a field should have at least one entry in the lookup table.
Entering Lookup Reference Data
If you do not already have employee and Organization data in those
tables, enter some test data to work with. At a minimum, you will
need to populate the Employee dataset with a few entries that have
ResID (a unique identifier), Name and Login defined. The
Organization dataset should have at least two unique Organization
Code and Title entries.
Now change back to the OrgLookup dataset in Update mode.
Under the ResID, select each ResID from the popup, one per line.
Under the Date field, enter the beginning of this year. Under each
code, select an appropriate Organization.
Now choose one of the employees that already has an entry and add a
second entry for that ResID. Enter tomorrow’s date under the Date
field, and then set the Organization field to a new organization.
This will allow actual entries from tomorrow forward to
automatically use the employee’s new organization Code.
Defining Fields that Use a Lookup Field
Now that we have the OrgLookup table defined and populated with
data, we can create fields in the Actuals dataset and the Employee
dataset that use the Lookup table to determine their value.
Change back to Define mode and select the Actuals dataset. Change
the Organization data type to Lookup. A popup will appear that
contains all Numeric datasets; choose the OrgLookup table from the
popup. AMS REALTIME Resources will determine that correct
value for the Actuals Organization field by finding the latest date
reference in the OrgLookup Organization field that contains the
ResID (the key field). Lookup data values are populated in a
Numeric table based on a matching field name.
Now select the Employee dataset. Change the Type of the Org
Code field to Lookup. Choose the OrgLookup table from the popup
of numeric datasets. Now choose Organization from the field list.
This is a lookup reference from a text dataset. This field value will
58 • Database Tab
AMS REALTIME 5.2 Addendum
be changed automatically when the system date passes the “as of”
Date in the OrgLookup table.
A Lookup Field in the Employee Dataset
AMS REALTIME 5.2 Addendum
Database Tab • 59
Configuration Dataset
Configuration Settings in the Database
Configuration settings are stored in the Configuration dataset. This
is a special table designed to allow the system administrator to store
certain switches in the Enterprise database. This ensures that every
client that logs in to the system gets the same settings and program
behavior.
At release 5.2.0-1354, the only two fields that have been migrated to
the configuration table are used to define the location of the .map
files needed to do a commit and status action from within Microsoft
Project. However the following gives a brief outline as to the tables
future function.
Currently the AMS REALTIME Suite of software ship with a
configuration file that is read whenever the program is opened.
Typically this configuration file (rtp32.ini, rtr32.ini or rtrs32.ini) is
installed in the programs executable directory. It contains a number
of setting that determine the program's operation. With a client
server application it makes sense to centralize the settings into a
database table, with the ability to specify global (affects all who
login) settings, and individual settings that only affect a specific
person. This may be necessary if users are logging in from different
platforms.
60 • Configuration Dataset
AMS REALTIME 5.2 Addendum
User Attributes
Adding Fields to the GUI
User defined fields can be added to certain planes in the Resources
user interface. This capability allows the system administrator to
present additional fields to the user community, without the user
needing to go into the database tab to enter data in customised field
types.
This is achieved through the use of attributes that are selected in the
Attributes field of the Activity and Employee datasets.
Activity Dataset User Attributes
The user fields in this dataset can be applied when the dataset is
opened in define
mode.
Click on the attribute field on the row of the field that is to be defined
as a User field. The following list can be seen:
AMS REALTIME 5.2 Addendum
User Attributes • 61
TaskUser1 - TaskUser10 will add the field to the tasl list pane in the
lower half of the screen.
Employee Dataset user Attributes
Resource fields can be added to the availability listing using the
ResSkill, ResRate and ResUser attributes. These can be set in the
Employee dataset in define mode.
This feature is useful in providing additional information about a
resource to a team leader or resource manager. For example it may
be useful to have a complete listing of the resources' specialized
skills when making resource assignments. Therefor a skill field can
be created in the Employee table and the ResSkill1 attribute added to
that field. Whenever the availability table is being viewed, the
content of the skill field can be seen, along side the standard
information.
Click on the Attribute column in the Employee dataset to view the
following list:
The names of these user fields; ResSkill1 - 3, ResRate1 - 3 and
ResUser1 - 5, are simply guides as to their usage. In reality you can
use these attributes to display anything you like, except against fields
that are already displayed on the table.
62 • User Attributes
AMS REALTIME 5.2 Addendum
AMS REALTIME 5.2 Addendum
User Attributes • 63
AMS REALTIME 5.2 Addendum
User Attributes • 65
Updating Information
Data Entry Tables
Data can be entered or edited by selecting the appropriate dataset and choosing
Update mode. All records are maintained in order based on the key identifier field
in the dataset, which must be unique.
Fields which are not displayed can be added by clicking the mouse in the
background space to the right of the data table and selecting from the field name
popup. Only those fields not already displayed are included in the popup list. Each
selected field is added to the end of the table.
Changing the Table Layout
If a View has been saved in the current dataset, table fields can be moved or resized.
Use View Save As... to name a View. To move a table field column, position the
cursor at the top of the field heading. When the cursor changes to an open palm,
click and drag the column to its new position and let go of the mouse.
To size the columns, position the cursor at the right edge of the field heading. When
the cursor changes to a pointing finger, click and drag until the column is the desired
size. If the column is sized all the way down to its opposite edge, (zero width) the
column will disappear. Selecting AutoResize from the View menu will
automatically size each column to the size allowed by the field definition.
Deleting Records
Records may be deleted by selecting the row or rows (click or Shift-click on the row
line number) and selecting Delete from the Edit menu. The Del key on the keyboard
can also be used.
Saving the Data
When the entering or editing of information is completed in the selected dataset and
it is a local database, select Save from the File menu. If the server version is being
used, the server will automatically save the record.
AMS REALTIME 5.2 Addendum
Updating Information • 67
Hierarchical Organization Data Coding
If the OrgCode field in the Employee dataset has a hierarchical structure, the
positional values of the field will be used to establish “organizational ownership” of
employees. The contents of this field are viewed in a hierarchical way to determine
which employee data a user can view and which employees are available for Login
or Plan access.
The coding works like a fixed length OBS (Organizational Breakdown Structure)
code, which has no separating decimals and is padded to the right with zeros when a
higher organizational level applies. The zeros are treated as wildcard digits, so that
an employee that had zeros in the last two digits of his OrgCode number could
access other employee records provided that the remaining OrgCode digits matched.
For example, an employee with an OrgCode of 373000 could plan work for
employees with the OrgCode of 373450, 373457, and 373680, but not have access to
employee with OrgCodes of 380000 or 374123.
Expenses
Introduction
Expenses incurred during the execution of a project task can be recorded along with
the timesheet. These expenses can be virtually anything that represents an additional
cost to the project or task. They can also be used to record personal expenses that
require reimbursement to an individual. In either case the expenses feature allows a
table detailing expenses to be populated in an area just below the time card. As is
the case with most AMS REALTIME features, expenses can be customized and
maintained during the like of the project to reflect business requirements and
functional capability.
Entering Expenses
Once actual hours have been booked to an activity, expenses can be recorded against
the entry. Expense entries are linked to individual timecard cells.
To enter an expense against a time entry, select the timecard cell against which
the expenses are to be recorded and then click on the Expenses button located in the
top right hand corner of the timecard tab window.
The expenses table will appear below the timecard table.
68 • Updating Information
1.
Click on the timecard to select the cell to which an expense is to be applied.
2.
In the Expenses table, click on the first blank cell in the Category column. A
list of expense categories will appear.
3.
Click on the desired category to activate the row. The name of the activity cell
selected in the timecard will appear, along with the day in the date column.
4.
Enter the expense amount in the Amount column.
AMS REALTIME 5.2 Addendum
To add further expenses to the activity, click in the next blank Category column an
choose another category. Then enter a new amount for the category as described
above.
To save the entries for both time and expense, click the Save button on the program's
toolbar.
Once a timecard cell has an expence associated with it, a small green box appears in
the lower right hand corner of the cell.
Expense Amounts
The expenses amount column can be configured to display any currency symbol or
unit type. For example, the figure entered can represent a currency amount or a
quantity for mileage or hours.
Different currency symbols can be entered using the ASCII code values. This is
useful if the keyboard being used does not have a key for the symbol required. The
examples below give some common currency symbols and their ASCII code
sequence for entering in the amount field. These are correct for Windows only.
Alt + 0163 = £
Alt + 0036 = $
Alt + 0128 = €
Alt + 0165 = ¥
To enter a symbol that is not available on the keyboard, hold down the Alt key and
use the number pad of the keyboard to type in the ASCII code number. Release the
Alt key and the symbol will appear in the cell. The currency amount can now be
entered.
This will only work using the number key pad, usually to the right of the 'QWERTY'
alpha numeric keyboard. Numbers above the Alpha keys do not normally work for
entering ASCII code because they have shared function such as 1 (Shift for !), 2
(Shift for @) etc.
The first currency listed in the Units field pick list will always be the default that
prefixes the amount number.
Mileage and Hours
If the amount being entered represents units other than currency, the description is
typed after the amount. The standard amount types apart from curreny symbols are
mileage and hours. For example, if 200 miles need to be recorded, the amount is
typed in followed by the word Miles.
Adding notes to the Expenses table
Database Administrative information. The following requires full system
administrator access rights to the database.
AMS REALTIME 5.2 Addendum
Updating Information • 69
A notes extension table can be added to the expenses table allowing users to enter
brief notes to the expense table in timecard. To add a notes extension, click on the
Define tab.
First a dataset must be created to store the notes made against an expense entry. The
Expenses table will then link to this dataset allowing it's fields to be available as
columns in the expenses table.
1.
Click on the
2.
In the resulting dialog box, enter a name for the dataset. For example 'Expense
Notes'.
3.
In the New Dataset Type dialog, click on the Text button to create a text type
dataset. The new dataset name will appear in the dataset dropdown list to the
left of the Define Tab.
4.
To open the new dataset click on the dataset dropdown and select it from the
menu..
5.
In the Name column, enter the name for the first notes field, for example
'Comments'.
6.
In the type column, click on the first blank cell to see a list of valid data types.
Choose the Alpha option.
7.
In the Number of Characters dialog, enter the maximum number of characters
that can be typed into the field (Maximum allowed 511); then click OK.
Create New Dataset button.
To enter further fields in the Expense Notes table, repeat the above operation. Once
finished, click the Save button on the toolbar to save the changes.
Once the Expense Notes fields have been entered the table can be linked to the
Expenses table as an extension. To do this follow these next steps.
1.
Click on the Define tab.
2.
Click on the Expenses table diamond on the far left of the define tab.
3.
In the Expense table look for the standard field called 'Extension' and click on
the Type field next to it.
4.
From the resulting popup list, click on the Extension option.
5.
In the next resulting popup list, choose the Expense Notes dataset option.
6.
Click on the Save button on the toolbar to save the changes.
The Expenses table is now linked to the Expense Notes dataset. The fields created in
the Expense Notes table will now be available to the user in the Expense table below
the timecard.
Storing Files in the Database (BLOB)
Files produced by programs such as AMS REALTIME Projects, Microsoft Word,
Excel and Projects can be stored within fields in the AMS Enterprise server. In fact
any type of binary, ASCII or text file can be stored. This is referred to as Binary
Large Object (BLOB) storage.
70 • Updating Information
AMS REALTIME 5.2 Addendum
For example, a field can be added to the Projects table to store schedule files
generated by AMS REALTIME Projects or Microsoft Project. These project files
contain the schedule for the project in the description. This is a convenient way to
securely store program files in a logical place, where they can be easily associated
with the data in the database. Another example might be to store Word documents
for a project brief.
Storing a File
To associate and store files in the Resource's enterprise database, follow these steps.
1.
Click on the Database tab and from the dataset dropdown, choose the dataset to
modify.
2.
Click on the
3.
Create a new field by typing its name in the first blank cell in the Name column.
4.
Click in the type field and select Binary Large Object from the popup list.
5.
In the resulting dialog, enter the file extension that the field will store. For
example, if AMS REALTIME Projects' files are to be stored, enter *.arp, then
click the OK button.
define button.
This table is now ready to store Binary Large Objects. To store a file in the new
field, follow these next steps.
1.
Click on the Database tab and from the database popdown, choose the dataset
that has been modified to stored Blobs.
2.
If the newly created field is not visible, click on any blank part of the
background to invoke the selection list. The newly created field should be at the
bottom of that list. Click on the field name in the list to open it into the table.
3.
Click on the newly created field and from the popup menu, choose Store.
4.
In the resulting file open dialog, navigate to the location of the desired file and
click OK to select the file.
5.
The file name will now appear in the field. The Binary Large Object has now
been stored in the database.
To open the stored file, click on the file's name in the database field and from the
resulting dialog box choose the Open option. The program that owns the file will
open and display the file.
AMS REALTIME 5.2 Addendum
Updating Information • 71
Check Out and Check In
In order to protect the data integrity of stored files, the Check out and Check in
features can be used to stop undesirable changes being made to the file.
Once a specific user checks out a file, no other person can open or change the file.
This protects the file from accidental or intentional alteration. Only the user who
checks out a file, can check it back in. Once the file has been checked back in, it is
available for others with access to that table.
HOWTO: Set up for check out/in
For check out and check in to work correctly two additional fields must be created in
the same dataset as the blob definition. These are the who and when fields, and the
blob definition to populate them.
The Who and When fields must be named in the following way:
BlobFieldNameWho & BlobFieldNameWhen, where BlobFieldName is the name of
the field containing the blob.
Example: a blob field has been created to store .arp schedule files. The field is
named ARP. Therefor, the Who and When fields must be named:
ARPWho and ARPWhen
Now a special statement needs to be added to the blob field type definition, so that
these two fields get populated.
B:*.arp;*.sch|ARPWho@ARPWhen
The item in bold has been added to the blob field definition. Below is a sample from
a working check out/in setup.
Tip: To edit the type field, hold down the Ctrl key and click in the field. Holding
down the Ctrl key prevents the standard popup list from appearing when clicking in
the field.
Check in/out Errors: File Error(229): Failed to lock
If you see this message when attempting a file check out or check in, there is
something wrong with the check in/out setup. Either the Who and When fields have
been set up with the wrong names, or the blob field definition needs to be verified.
Or one or all of these setup items has been missed.
72 • Updating Information
AMS REALTIME 5.2 Addendum
Portfolio Tab
What is Portfolio?
Overview
Portfolio view is a live executive project overview that displays the status of all
projects contained in the enterprise server. It offers the ability to view at the highest
level to see the overall status of a project, and also allows the viewer to drill down
into the detail of the project and examine progress, WBS, OBS and resource usage
across the organization's entire project portfolio.
The following diagram shows the basic layout of the Portfolio tab and is followed by
a description of each item and its capabilities. The first point to note, as with other
views in this product, is the horizontal split between the dynamic selection area and
charts in the top half, and the static display parts in the lower half of the screen. The
component in the top half allow the views and charts to be changed interactively on
the fly using the mouse. The lower half simply follows the selections and controls of
the upper half and displays whatever is selected, without the capability to change the
selected data.
AMS REALTIME 5.2 Addendum
Portfolio Tab • 73
Drilldown Controls
This area allows the project portfolio data to be selected. This is done by drilling
down through the different layers of data via a pop-down list. When the view is first
opened, the Set Drilldown Order tool is present in the Drilldown Controls area of the
screen.
Set Drilldown Order tool.
The hierarchy that can be navigated through is largely dependant on how the
database has been configured. Typically there would be a hierarchy that starts with
the project, down to activities, then down to resources. This can be displayed and
organized in any order desired based on selections from the pop-down list.
Project tool.
The project tool appears when a project is selected from the pop-down list. Clicking
on this tool presents a list of fields that are available in the Project table. The display
in the drilldown table area will show the field selected here.
Organization tool.
The Organization tool allow the Portfolio view to be filtered by organizational codes.
These code are present in the organization table. Clicking on this button displays a
menu of the fields available in the organization table.
Activity tool.
The activity tool appears when activities are selected using the pop-down list.
Clicking on this tool presents a list of fields that are available in the activity table.
The display in the drilldown table area will show the field selected here.
Resource tool.
The resource tool appears when resource are selected using the pop-down list.
Clicking on this tool presents a list of fields that are available in the employee table.
The display in the drilldown table area will show the field selected here.
Top Legend Area
The display here depends on the chart type that is selected. This area displays either
a project Gantt chart or a hierarchical work breakdown structure. If a Gantt chart is
selected, the legend displays a time scale. If the work breakdown structure is
selected, a toolbar for the WBS chart appears.
Drilldown Table
The Drilldown Table displays the fields that have been selected during a drilldown
operation. When first selected these items show a list of the top level items chosen
in the pop-down list. Each of these items has a little plus sign next to it, indicating
that there are items below it that can be viewed by clicking on the plus sign. This is
how the drilldown is navigated. The drilldown depth depends on the number of
items chosen from the pop-down menus. The lowest level item has been reached
when the is no plus sign next to the item and a diamond appears on the item line.
74 • Portfolio Tab
AMS REALTIME 5.2 Addendum
In this above example, DBConvert is the project level, Analysis is the Activity level
and the lowest level in this particular drilldown sequence is a resource. Resource
names not shown here to protect the innocent.
Selecting Items
Items can be selected in the list by clicking on the text of the item. The selection
feature is hierarchy sensitive. That is to say, that clicking on a parent item selects
both the parent and any child element below.
Drilldown Chart
The content of this area depends on the chart selection made with the Drilldown
control tools. By default a Gantt chart is displayed in this area. It can also display a
Work Breakdown Structure by clicking the 'Select Chart Type' tool.
Select Chart Type tool.
Graph Controls
The lower half of the Portfolio screen contains a set of graph controls that can be
used to alter the display in the report graph and report table area.
Using Portfolio View
Performing a Drilldown
When entering the Portfolio View, the first operation to perform is a drilldown. A
drilldown allows the data to be viewed in any chosen sort order. For example, the
data may need to be viewed first by project, then by activity and finally by resource.
Project |
--- Activity --|
--- Resource
To select the order use the 'Set Drilldown Order' tool.
Set Drilldown Order tool.
Click on the Set Drilldown Order button and choose Projects from the list. The list
will change to a list of fields in the projects table. The field selected here will be the
field displayed in the Portfolio table.
AMS REALTIME 5.2 Addendum
Portfolio Tab • 75
Repeat the operation for the Activity and finally the Resource selection. Once all the
necessary items have been selected, click away from the list to close it and enter the
selection in the portfolio view.
Return to Set Drilldown Order list at any time to change the order that is being
viewed. Once the desired view has been selected, further modifications to the view
can be made using the dataset filter buttons.
Click on the desired button to change the displayed fields from each of the datasets.
For example, to change the resource view from displaying ResID to Name, click the
resource button and choose Name from the fields list.
Portfolio Table
When a drilldown selection is complete, the Portfolio table is activated. The fist
column of this table is permanently locked to the left of the screen. This mean that
as the table is scrolled using the mouse and the horizontal slider below the table, the
other field columns slide underneath the first locked column. The table contains the
following fields displaying different elements of the project data. These fields are
explained below.
Total actuals - Total actuals to date for the selected item(s).
Baseline - Original Baseline hours for the selected item(s).
ETC (Estimate to Complete) - Estimated remaining hours to completion of the
task.
Staff Days - Number of total staff days worked.
Start - Start date.
Complete - Complete Date.
First Charge - Date of the first actual recorded for the item.
Last Charge - Date of last actual recorded hours.
Status - Task status; open or closed/completed.
Period Plan - Planned hours for the selected period.
Period Actuals - Actual hours for the selected period.
% Complete - Percentage of work completed on the activity.
% Remaining - Percentage of remaining work on the activity.
LOE (etc) - Level of effort required to complete.
LOE (to date) - Average level of effort so far.
Variance - Total amount of original planned hours, minus work so far (ACWP) plus
the estimate to complete, i.e. planned - total + etc.
Remaining - How much work is left to complete in hours.
By default the table displays with a width of about 20% of the screen. Therefore
most of these table columns are hidden behind the Gantt chart to the right of the
table. To expand the table to view more of the columns, place the mouse pointer on
the edge of the Gantt table until the cursor changes to a left/right arrow.
76 • Portfolio Tab
AMS REALTIME 5.2 Addendum
Click and drag the edge of the Gantt chart to the right to expose the table cells hidden
underneath.
Structure Diagram Chart
By default the Portfolio View displays the standard Gantt chart in the portfolio chart
area. This can be toggled with an alternative structure diagram by clicking on the
Select Chart Type button.
The structure diagram chart is linked to the drilldown selection in the first column of
the Portfolio Table. Changing the level of drilldown in the structure table alters the
layout of the structure diagram.
To view the lowest leaf of a structure's branch, either click on the + key next to the
item in the list or click on the structure diagram node itself to open the next level.
The structure will toggle between a horizontal or vertical layout, depending on the
toggle status.
AMS REALTIME 5.2 Addendum
Portfolio Tab • 77
Gantt Chart
The Gantt chart mode of Portfolio is the default view. The chart displays the activity
bars for the selected drilldown.
Drilling down into specific projects will open the chart to display the required details
in the Gantt chart. Further details can be revealed buy opening up the timeframe to
zoom in on a specific dates.
Projects, activities and resource can be selected by clicking the mouse on objects
available in the Gantt display area. Multiple selections can be made by clicking and
dragging the mouse pointer over a number of activity bars.
Unlike other Gantt charts throughout the AMS REALTIME suite of products, the
Portfolio chart will display multiple activity bars for a single activity if the drilldown
selection requires. For example, if the drilldown selection is Project, Activity and
Resource, then each resource assigned to the task will have a representative bar for
it's own commitment at the lowest level.
Baseline
If an activity displayed has moved from it's original baseline dates, a representation
of the original baseline dates can be seen behind the activity bar on the screen. It
appears as a shadow behind the activity bar.
In Portfolio view only the project activity bars will display the baseline marker.
Resource and organization bars will not show a baseline.
Clues
To help the user keep track of their position on the Gantt chart, a permanent tool tip
box is displayed near the mouse pointer. This gives a continually updated report on
the date at which the mouse pointer rests.
78 • Portfolio Tab
AMS REALTIME 5.2 Addendum
Placing the mouse pointer over an activity changes the tool tip flag to the start and
complete dates for the activity. This is useful if one or both ends of the activity bar
are currently off the screen.
Auto Range
Auto Range is a function that monitors and updates the time scale or level of zoom
depending on the width of activity bars present in the Gantt chart. As the view is
altered, the screen adjust the time scale in order to keep all of the activity bars inside
the visible area. As selections change, the Auto Range updates the screen to show
the entire activity bar lengths at all times.
This function is selectable manually using the Auto Range toggle button at the top of
the Portfolio tab. The function automatically disables as soon as any manual
adjustment is made to the time scale.
Auto Range tool.
The Auto Range tool is a toggle button. Each click alternate it's state from enabled
(appears depressed) to disabled (appears up).
Report Displays
The lower potion of the Portfolio screen offers an area for reports. Again these
reports are dependant on the contents of the current selection in the portfolio
drilldown table. The report updates automatically when changes are made to the list
selection.
The report shows the current baseline hours, actual hours and estimate to complete
for the selected items. In the picture above, the top bar shows the original planned
hours for the entire project. The upper portion of that bar represents baseline, the
lower left portion represents actual hours booked by the resources and the right hand
portion of the bar (light blue) indicates the estimated hours to complete the task.
The mouse cursor can be placed on the end of a bar and its tool tip flag gives a
precise number of hours.
AMS REALTIME 5.2 Addendum
Portfolio Tab • 79
Workplan Tab
Introduction
What is Workplan?
The Workplan tab allows the creation and modification of work assignments across
an entire project portfolio. Therefore, resources that are shared among activities or
projects can have their assignments created or modified. The Workplan tab or View,
accessed by selecting the workplan tab, displays the activity data in hierarchical
order based on selections made from pick-list buttons at the top of the view. First the
project is selected, next an activity filter can be used to show only activities that meet
certain criteria, finally the activities themselves can be selected.
The resource window in the center of the lower portion of the screen shows resource
names and the availability of the resource over time. This allows the viewer to see
critical project requirements, resource assignments and availability on one screen.
Summary of Workplan View capabilities:
•
Drilldown from projects through to their activities.
•
Show resource assignments across the entire project portfolio.
•
Show resource work assignments across single or multiple projects.
•
Allows the assessment of which resources are available to carry out a certain
task.
•
Swap generic resource skill assignments with the actual resources required to do
the work.
•
Swap out resource assignments based on equivalent skills.
•
Filter on activities to show only desired activities.
•
Filter on resources to show only desired resources.
•
Display six different types of resource charts to help analyze the availability of
resources across the project portfolio.
Once an activity is selected, all the resources scheduled to work on that activity
appear at the bottom of the screen in the resource chart area. Changes can be made
using the mouse to adjust or swap out resource assignments.
AMS REALTIME 5.2 Addendum
Workplan Tab • 81
Workplan Dataset Attributes
The Workplan tab is associated with an underlying table called Workplan. Changes
made in the workplan tab are recorded in the Workplan dataset. In order for the
system to interpret the workplan dataset correctly, a number of attributes are used to
tell the system how to regard certain specific fields.
These attributes and their purpose are listed in the table below:
82 • Workplan Tab
Attribute
Description
WorkPlanResource
Identifies the field containing the resource assigned
to a task.
WorkPlanWho
Identifies the field containing the name of the
person who last updated the workplan. Audit trail.
WorkPlanTask
Identifies the task field
WorkPlanWhen
Identifies when a task is scheduled to start
WorkPlanPlanned
Identifies the field containing the planned start date
for the work
WorkPlanETC
Identifies the field containing Estimate to Complete
data
WorkPlanLOE
Identifies the field containing Level of Effort data
WorkPlanStatus
Identifies the field containing the tasks status, i.e.
Open or Closed
WorkPlanType
Identifies the field containing work types, i.e.
Regular, Overtime or other custom work types.
WorkPlanCD
Identifies the field containing the workplan current
complete date
WorkPlanSD
Identifies the field containing the workplan current
start date
WorkPlanExtension
Identifies the field containing the workplan
extension data
WorkPlanCalendar
Identifies the field containing the named calendar
for the task
WorkPlanBS
Identifies the field containing the base hours start
date
WorkPlanBC
Identifies the field containing the base hours
complete date
WorkPlanBaseline
Identifies the field containing the original base
hours
WorkPlanPool
Identifies the field containing generic resource work
plan info
WorkPlanLast
Identifies the field containing the last date time was
booked
WorkPlanCum
Identifies the field containing number of hours
AMS REALTIME 5.2 Addendum
posted cumulative to date.
Custom
Used to assign a memory portion in which to store
data. This is generally reserved for user defined
additional fields, above and beyond the standard
fields and attributes already available.
Navigating Workplan View
The Workplan View
The figure below shows a simplified map of the workplan screen layout, marking
each of the major components:
Project/Activity tool bar
Remove Assignment. This button will allow a selected assignment in the
Activity's table area to be removed. This places the resource back in the pool and
makes it available for other assignments during that period.
The next three buttons on the toolbar operate together to narrow down the activity
list. First, a project is selected, next an activity filter can be chosen and finally, the
activity required can be selected from the last list button.
Select Project. Click on this pop-down list
button to select a project. The 'select activity' button's content will depend on this
selection.
Activity Filter. Use this button to select an activity filter. The
filters displayed in this button are defined in the database tab.
AMS REALTIME 5.2 Addendum
Workplan Tab • 83
Note: To clear the activity filter button and return to no filter (All Activities) setting,
click on the button without selecting a new item from the list. The button will
display 'All Activities' and no filter will be in operation.
Select Activity. This list button displays a pick
list of activities that are present in the project selected using the select project button.
It will also exclude any activities that do not pass the Activity Filter criteria set in the
activity filter button.
Project/Activity tool bar - Pool Linking
The concept of linking is to associate a resource assignment to a generic resource. A
generic resource is simply a skill requirement. To assign that skill requirement to an
activity, a generic resource is created that specifies the skill required to complete the
activity. At a later time, the generic requirement can be swapped out with an actual
person that has the necessary skill to complete the task. This allows persons not
responsible for resource allocation to create activities with skill requirements. Later,
a resource manager can allocate a person based on availability and skill to the
activity. A generic resource can therefore be thought of as a request for a skilled
person, without specifying who should do the task.
Pool Linking is used to swap out a generic resource with an actual person and
automatically reduce the quantity of generic requirements on that activity. For
example, if an activity requires four accountants to work on it simultaneously for two
weeks, a generic resource called Accountants is created. This is applied to the
accounting task at 400% Level of Effort (LOE). If Generic Linking is enabled, each
accountant that is allocated to that task at 100% LOE will automatically reduce the
generic requirement by 100% LOE. This continues until all four accountants have
been allocated. The generic resource now shows 0% LOE and can be removed from
the activity.
Link to Generic. With this button selected, resources that are swapped with the
generic resource will reduce the generic resource's LOE by the amount of LOE
allocated to the actual skilled resource.
Unlink From Generic. With this button selected, resources will not swap out
their requirement with the generic resource. They will simply be added to the
activity as a resource.
Prompt For Generic Link. With this button selected, the system will prompt to
either link the assignment to the pool, or perform an unlinked assignment that does
not reduce the pool.
Activity Table Area
This area allows the viewing and selection of the resources associated with the
activity selected in the 'Select Activity' button menu. This table contains details
about the resources required or assigned to the selected activity.
Table Column Description
Row Header Column - Contains an icon indicating either a resource, generic
resource or a linked resource, as shown below:
84 • Workplan Tab
AMS REALTIME 5.2 Addendum
Employee - contains the name of the employee/resource that is assigned to the task.
Status - Activity status is either Open or Closed. Closed activities can no longer
have any hours booked to them.
Start - The start date of the activity.
Complete - The complete date of the activity.
Planned - Original Planned hours for the task.
ETC - The Estimate To Complete field indicates the estimated number of hours still
to be worked to complete the task.
LOE - Level of Effort; figure displayed in percentage. 100% = one person working
full time on the activity. 400% = Four people working on task full time. 50% = one
person working for half their available time on the activity. When the resource is of
type Generic, the display shows the quantity of people still required to be allocated to
the activity in place of the generic resource. The number is not a percentage figure
as with regular resources.
Cum - Cumulative hours booked for this activity by the resource.
Remaining - Remaining hours left to work on the activity.
Actual Start - Actual start date when work was first booked to the activity.
Plan From - Last date hours were book up to.
Calendar - The name of the calendar being used by the resource.
Worktype - type of work performed on the activity by the resource, regular or
overtime. Other types can be added using the Actuals Table in the Database tab,
definitions view, Type field.
Other Workplan Table Features
Cells in the table with a colored background are usually non-editable fields. That is
to say, they cannot be edited in that particular view. Fields with a white background
can usually be edited.
The bottom row on the table contains totals for all the above rows that contain
relevant numbers.
Date cells will activate a popup calendar when clicked on. This makes date entry
much more simple. Navigate through the calendar using the left and right arrows at
the top of the calendar to scroll through months and years. While outer arrows
change the year, inner arrows change the months. Click on the desired date in the
calendar to enter the date into the selected cell.
AMS REALTIME 5.2 Addendum
Workplan Tab • 85
Resource Tool Bar
The resource tool bar gives quick access to resource allocation and display features
of the Workplan view.
Resource Filter List Button - This tool gives a list of the available
defined filters for resources. Resources often need to be viewed based on skills.
Filters can be set up in the Database view, Employee, define filter mode to create
custom filters to show resources that meet certain criteria.
Show Task - Click this button to display tasks in the Resource Chart Area, for
the currently selected resource name(s).
Show Usage - This button enables the Resource Chart Area to display various
resource availability charts and graphics.
Display Modes - This button gives a list of the possible types of display for the
resources chart. Click on the list to select the display mode required. These modes
are:
Conflict - Blue, White or Red bars indicate whether a resource is Available, fully
utilized or over utilized, respectively. Graduations between these states are shown as
colored shades between the different states. For example, if a resource is being over
utilized in one particular time period, the bar will show as Red. If it's solid red, the
resource is at 200% overload. If the bar is white with red dots it is less than 200%
overloaded. These are only intended to give a guide to availability and conflict.
Here is a chart to help understand the different shades of color.
Note: Any figure above 200% will not change the bar color any further.
86 • Workplan Tab
AMS REALTIME 5.2 Addendum
Usage Histogram
This view uses each bar as a miniature histogram of usage for each resource. Instead
of using a shaded color to represent usage, the bar scrolls from Blue, through white,
to red. The height of each of these is dependent on the amount of usage or overusage.
In this view, each row of the graph behaves like a miniature histogram. The height
of the bar represents 100% of either availability (Blue), Usage (White) or Overload
(Red). The gray area represents a non-working period. The Yellow area is the time
period for the currently selected activity.
The height of a particular color within the bar represents the percentage of usage or
overload, up to 200% usage. After 200% (completely Red), the system does not
distinguish more overload graphically. However it does record this number within
the workplan table, so higher overloads are represented in the LOE column.
Interpreting the Usage Histogram
Here is an expanded example of the multi-histogram showing 25% increments from
fully available to 200% overload. The histogram can be described as a 'rolling
histogram' in as much as the white rolls up to the top of the bar as the resource is
assigned and as the resource becomes over assigned past 100%, the red starts to roll
up over the white.
For convenient illustration, the diagram shows approximate 25% increments,
however the bars themselves are 10 pixels high and therefore represent to the nearest
1/10 increment. As stated before, these miniature graphs are designed to offer a
guide to resource availability rather than act as a precise reporting instrument.
The Usage Histogram
This third view represents the usage of a resource over time. In this case the blue
color represents usage and the red represents overload. The histogram scales
depending on the amount of usage and overload apply to the resource.
If the resource is only half used over the period, a blue bar will be occupy half the
resource bar's height. If the resource is fully committed, the blue bar will occupy the
full height of the resource bar. If the resource becomes overloaded a red bar will
appear above the blue bar and force the blue bar to occupy a smaller percentage of
AMS REALTIME 5.2 Addendum
Workplan Tab • 87
the height of the resource bar, even though the blue bar still represents 100%. Here
is an example:
Average LOE
This item changes the resource graph into a numeric table containing non-editable
cells displaying the figures for average level of effort for each resource working on
the selected activity. The display is dynamic and the results are based on the scope
of the time scale. If the scale is showing weeks, the figures reflect the daily average.
If the scale is showing months, the figures represent the weekly average.
Total LOE
This item shows a similar table to the average LOE table. The cells display figures
that show the total usage for a resource on the selected activity. The scope of the
time scale determines whether the figures are shown as days, weeks, months or
years.
Average Available
This item displays a table that shows the average amount of availability for a
resource over the duration of the selected activity. If the resources are fully utilized
over the period, the table will not display the cells.
Total Available
This item shows a table of figures that indicate the total availability for a resource
over the period of a selected activity. Again, if the resources are fully utilized over
this period the chart will not display any cells.
Note: The Yellow area that appears on all of the chart views indicates the start and
complete dates for the selected activity. With each selection of an activity, the time
scale of the chart view expands or contracts to fit the new start and complete dates.
88 • Workplan Tab
AMS REALTIME 5.2 Addendum
Using Workplan View
Making a new Work Assignment
To make a new work assignment follow the steps below:
1.
Click on the Workplan tab.
2.
Select the desired project using the Select Project button on the Activity tool bar
at the top of the Workplan tab.
3.
Select the desired activity using the Select Activity button.
4.
In the Resource Table area at the bottom left of the Workplan tab, select the
resource required to work on the activity.
5.
Click the
Assign Resource button on the resource tool bar to assign the
selected resource to the activity.
6.
The resource will appear in the resource table with a default assignment of
100% LOE to the activity. If the level of effort is to be changed, type in a new
percentage LOE in the LOE field, e.g. 75%. Numbers entered without the %
symbol will be interpreted as total hours in a day. For example, entering 4, will
convert to 50%, if the working day is 8 hours.
7.
Click the save button on the main toolbar to save the new assignment.
Changing a Work Assignment
To change or swap out a work assignment between one person and another, on an
activity, follow the steps below:
1.
Click on the Workplan tab.
2.
Select the desired project using the Select Project button on the Activity tool bar
at the top of the Workplan tab.
3.
Select the desired activity using the Select Activity button.
4.
In the Activity Table area below the Select Activity button, click on the
resource icon row header to select the entire row.
5.
In the resource table area at the lower left hand corner of the screen, select the
resource you wish to replace the existing assignment with, by clicking on that
resources rows header.
Note: If you need to swap out a resource with one who has the same skills, use
the Resource Filter button
appropriate skills for the task.
6.
AMS REALTIME 5.2 Addendum
to select resources that only have the
Swap Resource button. The software will replace the selected
Click on the
resource in the activity workplan table with the resource selected in the resource
table area. The previously assigned resource will be returned to the pool and
become available for other projects and tasks.
Workplan Tab • 89
Note: If the resource you are replacing has already booked hours to the activity, the
hours will not be lost. These hours are stored in the Actuals table and are protected.
However if the person/resource attempts to book further hours to the activity after
being re-assigned, the time card will not accept the new hours. To book further
hours, the person would have to be given non-project access to the task or have it
temporarily reassigned in order to book further hours to the task.
Deleting a Work Assignment
To remove or delete an existing work assignment, follow the instructions below:
1.
Click on the Workplan tab to enter the Workplan view.
2.
Click on the Select Project button on the tool bar at the top of the Workplan tab
and select the desired project from the list.
3.
Click on the Select Activity button and choose the desired activity from the list.
4.
Click the row header icon
5.
Click the
pool.
to select the desired resource to remove.
Remove Assignment button to return the resource back to the
Note: If the resource being removed has already booked actual hours to the activity,
the data will not be lost. Time card data is stored in the Actuals dataset and is
protected.
90 • Workplan Tab
AMS REALTIME 5.2 Addendum
Objects Tab
What is Objects Tab
This tab gives a view of the Resources Server statistics. This can be useful if the
server is physically inaccessible from the client or is too remote for regular
observation.
In the unlikely event of performance problems occurring with the system, these
statistics can be used to help track down the source of the problem.
The Five columns in the objects table represent different elements of the processes
involved in serving the client. The top most row in the table is a totals column that
gives a cumulative sum of all the data packet activity between the client and server.
These columns are explained below.
AMS REALTIME 5.2 Addendum
Objects Tab • 91
92 • Objects Tab
Class
Every computer program is made up of blocks of compiled
code. These blocks are known as functions. Functions can
be gathered into objects known as Classes. The Class
column shows the name of the Class that has been used by
the client, either during login, or during subsequent
activities within the client.
Objects
Objects is simply a general term for items, usually pieces
of data that pass between the server and the client. So a
single object could be a task record, a timecard record or
any other piece of data that is passing between the client
and the server. The objects column records the number of
objects that have passed between the client and the server.
Bytes
Number of data bytes that have passed between the client
and the server.
Delta Objects
Difference in quantity of objects since the last reset
statistics operation.
Delta Bytes
Difference in total number of bytes the objects have used
since the last reset statistics.
AMS REALTIME 5.2 Addendum
REALTIME Projects 5.2
Overview
The following chapter looks in detail at changes made to AMS REALTIME Projects
since the last major feature release and subsequent maintenance releases. These
enhancements include:
•
Technical Progress Enhancements
•
HOWTO's for using Technical Progress
•
Field Calculator Enhancements
•
Automatic Activity ID Formatting
•
Resource Level Of Effort
•
Resource Extention Field Attributes
•
Python overview.
Technical Progress Enhancement
Sometimes, the requirements for modeling progress go beyond the standard percent
complete, estimate to complete, actual complete date and so on. AMS REALTIME
Projects has additional capabilities that address some of the more complex and less
standard methods of progressing a project.
Technical Progress is used in order to separate 'percent complete' from the 'progress
to now date', as in reality these are often not the same thing. For example, a team
member may be half way though the allocated time given to complete a task, but has
delivered nearly the entire set of deliverables for the task's completion. Therefor, a
50% complete progress maker on the task, whilst being accurate in terms of how
long the work has been going on for, does not reflect the true actual progress of the
work itself. Some feature enhancements for technical progress have been added to
address a further issue with progress.
Description of Enhancement
As of version 5.2, some new flexibility has been added to the technical progress
feature. This enhancement allows project managers to enter actual start, actual
AMS REALTIME 5.2 Addendum
REALTIME Projects 5.2 • 93
complete and Prog To dates on non-work days (weekends, holidays, etc..), as well as
working days.
If using the Technical mode to calculate progress, a new equation is used to
determine the complete date for an activity:
REM DUR + PROG TO = COMPLETE Date.
This does two things, allows users to determine COMPLETE Date based on selected
Calendar while giving the ability to express non-workdays as Actual Start and Actual
Complete dates.
HOWTO: Set up the Technical Progress
Enhancement
Before attempting to use this feature, there are two settings in the rtp32.ini (rtp.cfg
on Unix and Macintosh platforms) configuration file, ABSOLUTEACTUALS and
TECHPROGSAVE.
These two switches must be present in the configuration file and set to =Y for the
feature to work.
To check and change these settings, open the configuration file using any simple text
editor, such as notepad on windows, or emacs, vi or xedit on Unix platforms. On
Macintosh machines use SimpleText. Alternatively use the Options editor built into
the program.
HOWTO: Use the Technical Progress Enhancement
The best way to show this feature is to use an example. In this example a simple
construction schedule is used. A task (Build Wall) has been planned to take ten
working days to complete.
The task is planned to start on Monday Jul 3rd and complete Friday Jul 14th.
However, Bob, the person assigned to the task, started the work ahead of time on
Sunday 2nd Jul, a non working day. To make matters even more interesting, it is now
Friday 7th, half way through the original planned work, but Bob knows he only needs
two more days of work to complete.
The project manager enters the following into AMS REALTIME Projects to get a
true estimate of the complete date for the task. Double click on the activity to see
this dialog box.
94 • REALTIME Projects 5.2
AMS REALTIME 5.2 Addendum
First the actual start is entered, Sunday 02JUL00. The work started on a non
working day. Next the To date is entered, in this case Friday 07JUL00. Then Bob's
estimate to complete of two days in entered in the remaining duration field. So, what
we've told the system here is that, as of Friday 7th Jul, there are two days of work left
to do; and the work started a day early.
What we want the system to tell us is the true estimated complete date based on these
facts. Here is the results of this example.
Note how the First activity shows the actual start occurred on Sunday 2nd, and a
diamond shows the original planned start for the task on the 3rd. Now look at the
Technical progress triangle pointer, positioned at the end of Friday 7th. This points
out where we are in terms of the Progress To date. At this point Bob has estimated
two more days to complete the task. The progress Bob has made puts the new
estimated complete date at the end of Tuesday 11th, with a percent complete of 80%.
The Fit Metal Gate task can begin a whole three days ahead of schedule, based on
the calculations made by Projects. The slightly confusing issue with this example is
that the percent complete bar at the bottom of the activity shows that 80% of the
work has been completed, based on a seven day span, not a ten day span.
In summary, the important point about this feature enhancement is that the complete
date has been moved based on the following formular:
Prog To date + Rem Dur = New estimated complete date.
Formally, technical progress would calculate either the Prog to value or the Rem Dur
and would adjust the end date based entirely on percent complete.
Note: AMS REATLIME Projects also now allows the booking of time on nonworking days whether using baseline, duration or technical progress.
AMS REALTIME 5.2 Addendum
REALTIME Projects 5.2 • 95
Field Calculator Enhancements
Calculated fields in the Projects module have been greatly enhanced to include
functions for duration, logical functions, element of cost specifications, project
variables, such as TimeNow and the Project Start and Complete dates, error checking
and test operators, and comments. Text functions, such as mid, find and substring
references, can now be used.
Element of Cost Formula Specifications
Calculated fields that refer to cost fields can now reference separate elements of cost
in the same calculation. For example:
Calc = BAC[LABOR] /BAC[TOTAL]
Calculated fields can also be entered using just the equal sign and expression:
= BAC[LABOR] /BAC[TOTAL]
Activity Extension Field Formatting
Decimals
The number of decimals displayed in a calculated field can be controlled by
preceding the equation with the decimals function. The function below specifies a
format of two decimal places. Use Ctrl click to get an edit cursor and enter the
decimal function.
Calc = decimals(2), BAC[LABOR] / BAC[TOTAL]
Numeric Summarization
Numeric type Activity extensions can be formatted to control whether they roll up
to a title summary or not. For example, the number of documents produced on an
activity should summarize into the title, but a numeric priority code should not. Use
the Control key to get and edit cursor in the Act. Ext Types column, and enter a :N if
the numeric field should not summarize to a title activity, or :Y if it should.
96 • REALTIME Projects 5.2
AMS REALTIME 5.2 Addendum
Syntax Checking and Comments
If a syntax error is encountered, AMS REALTIME will place an error position
marker before the problem in the field definition.
Calc = Amount * #^# UnknownField
Comments can be added to the end of a field definition. When the pound sign (#) is
encountered, everything else is ignored to the end of the line.
Calc = BAC[LABOR] /BAC[TOTAL]
Budgeted Cost
AMS REALTIME 5.2 Addendum
# Labor Percentage of Whole
REALTIME Projects 5.2 • 97
Constants and project fields
Project fields can be accessed in calculations. The dataset name precedes the field
name (e.g., project.schedulekey). Project.now accesses the current Time Now
date. The table below shows the standard project fields that are accessible.
Calendar names are also available as constants for interpreting working durations.
If no calendar is specified with a constant duration, the default calendar is assumed.
Duration values for an activity are based on the activity’s assigned calendar. For
example, defining a TimeNow activity extension field as C=project.now is a very
useful standard field definition.
Project Field
Start
End
Now
GenBaseDate
Fiscal
Heading
SubHeading
GenMPU
DurationFmt
WeekStarts
CostBin
IsMaster
user-defined fields
Description
Project Start Date
Project End Date
Project Now date
Base date for generic calendar display
Beginning of fiscal year
Heading (Title) for project
Sub-Heading (Sub title) for Project
Minutes per unit for generic timescale
Display format for durations
Week starts on day of week
Cost bins size for this project
Is this a merge-link Master?
Any user-defined project extensions (all fields are
Alpha type).
Duration and Logical Functions
useCalendar(calendarname)
check (0)
asComplete(1)
dhm(days, hours, minutes)
mpd()
mpw()
mpm()
days(span)
hours(span)
minutes(span)
number(date or span)
date(number)
span(number)
98 • REALTIME Projects 5.2
override activity calendar
disable type error checking to avoid calculation
errors on blank fields
result (if date) as complete date
span: from numbers
number: minutes per day (current cal)
number: minutes per week
number: minutes per month
number: days from span
number: hours from span
number: minutes from span
number: from date or span
date: from number
span: from number
AMS REALTIME 5.2 Addendum
Operators
#
test ? (truevalue, falsevalue)
|
Comment – rest of line is ignored
If test has a true (non-zero) result, true
value occurs, else falsevalue
Or list (Vertical bar) – use the first
populated value in the list
A Complex Calculation Broken Down into Steps
The user-defined activity field LateBy is calculated from this definition:
Calc=check(0), acomp ? (0:0, (project.now (progto|start|complete|project.now)))
1.
The check function turns off the error checking in case the AComp field is a
blank. This prevents type errors in the calculation.
2.
If the Acomp field has a non-zero (true) value, the activity is complete and it
doesn’t have late status. This returns a 0 days late value.
3.
If the Acomp field has a zero value, it isn’t finished yet, so the number of days
late is calculated as Time Now minus x, where x is determined by:
If there is a ProgTo date, x = ProgTo. Or, if there is a Start date, x = Start. Or, if
there is a Complete date (e.g., a Complete milestone) x = Complete. Or, if none of
those fields are populated (e.g., Title) x = Time Now. The activity is complete and it
is no longer late
String functions
Contatenation
When used with alpha fields, the plus sign is a concatenation operator, which can
append the contents of fields and/or literal strings. Literal string s should be
enclosed in single quotes. Again, you need to use Ctrl click in the Act. Ext. Type
column to get a cursor and enter the field definition.
Calc = ActID + ': ' + Description
If a syntax error is encountered (such as you typed a field name wrong), AMS
REALTIME will place an error position marker before the problem in the field
definition.
Calc = ActID + #^# “:” + Description
AMS REALTIME 5.2 Addendum
REALTIME Projects 5.2 • 99
Substrings
Functions have been added to manipulate strings. To calculate a substring from a
field, place the start and length in square brackets after the field name, separated by a
comma. For example, Description[5,7] will start at character 5 and return 7
characters in length. If a negative length is indicated, it means “to the end of the
string” so that a variable length can be used.
A substring can also be extracted from a string with the MID function, which
requires the field name, the start point, and the number of characters as passed
parameters. A negative length indicates all characters to the end of the string. The
function will return a blank if a result can not be calculated.
String Searches
The FIND function will search and return the location of a specific character (or
string) within a string. This is a case sensitive compare. If The function will return 0
if the character (or string) is not located.
In the follow examples, assume that the Description field contains
TheQuickBrownFox.
Function
Description[4,10]
Mid (description,4,10)
description[4,-1]
mid (description,4,-1)
Find(description, ‘B’)
Find(description, ‘b’)
Find(description, ‘B’, 10)
100 • REALTIME Projects 5.2
Result
QuickBrown
QuickBrown
QuickBrownFox
QuickBrownFox
6
0
0
AMS REALTIME 5.2 Addendum
Automatic Activity ID Formatting
Formatted Activity IDs that are created when the AutoID configuration setting is Y
can now be defined by a template string with the unique number inserted. A starting
number can be specified, and this number is updated each time it is used.
When the Project Extensions are defined as in the example shown to the right, the
next Activity ID that will be created is RTP-217.
After the activity has been created, the NextAutoID field will be updated to 218.
The FormatAutoID string can be any text format string, where the %d is replaced
with the current value of NextAutoID.
Resource Extension Field Enhancements
A resource extension field can also be defined to calculate the total usage for a
resource in the project. The Res.List field (a calculated field in the activity table that
lists the resources assigned to the activity) can be configured to show the average
LOE (Level-of-Effort) for each resource in the list. Resource attributes have been
added to allow resource extension fields to have non-specific names and locations.
Attributes are Summary, Element, ShowLOEFlag, and UsageTotal.
G A VERY IMPORTANT NOTE!
All projects that use Elements of Cost need to be updated to set the Element attribute
to the field used to relate a resource to an element of cost. This field no longer has to
be named Element, but needs to have the Element attribute set.
AMS REALTIME 5.2 Addendum
REALTIME Projects 5.2 • 101
Resource LOE in ResList
This displays a resource’s average level-of-effort in parenthesis next to the Resource
ID in the calculated Res.List field. The LOE is calculated form the current resource
plane only (i.e., Planned, Actual, Baseline resource usage).
The LOE will be calculated and displayed for only those resources which are
identified by a Resource Extension field that has a true value. In the example at the
right, the Resource Extension field ListAmount is used to select the resources which
will have a LOE calculated and displayed. Resources which have a Y in the
ListAmount field will have their average LOE displayed; those with N in the
ListAmount field will not display LOE.
Resource Extension Field Attributes
The extension field used for this purpose is identified by Resource Extension type of
Logical and a Resource Extension Attribute of ShowLOEFlag.
To control the number of decimals in the ResList (LOE), add the configuration
switch RzLoeDecimals=# to the configuration file, where # is the number of decimal
places.
102 • REALTIME Projects 5.2
AMS REALTIME 5.2 Addendum
Progress Enhancements
Automatic progress types have been added so that Remaining Duration is
automatically updated to the Time Now date: use AutoDuration, AutoTechnical, or
AutoBaseline.
Rollups of Technical progress type activities will give priority to Progress values
(rather than Remaining Duration) if RuPrgTech=Y in the configuration file. This
allows for a more accurate summary when Progress is maintained separately from
Remaining Duration.
Other Configuration File Enhancements
The configuration switches MERGEVIEWS=Y and MERGELINKVIEWS=Y will
load Views from each individual project schedule. Merge-linked views will be
stored only in the merge-link schedule, and will not be written back to each
individual component schedule. If the merged view references an field that is not
defined in the untitled.arp template, the matching criteria will not be set. If a
standard set of fields are defined and used, which is recommended, this will not be a
problem. System standards are critical for any enterprise solution that uses multiple
project techniques to operate correctly.
AMS REALTIME 5.2 Addendum
REALTIME Projects 5.2 • 103
Python API
An Introduction to Python in AMS REALTIME
Python is an easy to learn, powerful programming language that is interpretive and
interactive in an object-oriented framework. It is often compared to Tcl, Perl,
Scheme or Java. Python scripts can interact with many programs and operating
systems. It has efficient high-level data structures and a simple, but effective,
approach to object-oriented programming. Python's elegant syntax and dynamic
typing, together with its interpretive nature, make it an ideal language for scripting
and rapid application development in many areas.
The Python interpreter and the extensive standard library are freely available in
source or binary form for all major platforms from the Python web site,
http://www.python.org, and it can be freely distributed. The same site also contains
distributions of (and pointers to) many free or inexpensive third party Python
modules, programs and tools, and additional documentation.
The Python interpreter is easily extended with new functions and data types
implemented in C or C++ (or other languages callable from C). Python is also
suitable as an extension language for customizable applications. Python syntax is
similar to C, with modules, classes, exceptions, very high level dynamic data types,
and dynamic typing.
For a description of standard objects and modules, see the Python Library Reference
document. The Python Reference Manual gives a more formal definition of the
language. To write extensions in C or C++, read the Extending and Embedding and
Python/C API manuals. There are also several books covering Python in depth. For
a basic start in Python, try Learning Python, written by Mark Lutz and David Ascher,
published by O'Reilly and associates. There are also tutorials that can be found on
the web.
All AMS REALTIME products embed the Python language engine, and they export
modules that are usable from the embedded Python engine. This allows end-users
with programming ability to customize their off-the-shelf software by programming
Python scripts to help manage repetitive processes, or automate event drive
processes, such as business rule validation and automatic email messaging. Just like
AMS REALTIME, Python runs on Windows, Macintosh and Unix platforms.
A key advantage to customizing AMS REALTIME with Python is that when the
software is upgraded to a new version, user-defined scripts will not be overwritten,
and will still function with the new software.
104 • Python API
AMS REALTIME 5.2 Addendum
The Python API User Guide
Users interested in using Python to enhance and customize the capabilities of the
AMS REALTIME suite of application should obtain a copy of the Python API
Programmers Guide. This document focuses specifically on using Python with
AMS products and also gives details about the TDB (Text DataBase) API and how
Python interacts with it
Python in AMS REALTIME
All AMS Realtime products embed the Python language engine, and they export
modules that are usable from the embedded Python engine. Python is a simple and
powerful high-level object-oriented programming language created by Guido van
Rossum. Python can be freely distributed and available in source form on many
platforms, including Unix platforms, Windows and Macintosh. Visit the Python
Language website at www.python.org. The documentation that comes with Python
includes a tutorial. There is a Python newsgroup, comp.lang.python, an associated
mailing list, several Python Special Interest Groups and much more.
Python allows end-users with programming ability to customize their off-the-shelf
software and program in business rules and event-driven processes. For example,
when a Save occurs in a project, a Python script can check a calculated field that
contains slip, and if slip is more than a specified amount, an email notification can be
automatically sent. Python can also be used to automate repetitive processes, such as
copying the contents of one activity field into another after data import. One
advantage to user-defined Python scripts is that when the software is updated, the
user defined scripts will not be overwritten, and will still work with the new
software.
Python can add buttons and menus to any of the AMS REALTIME software
products. Some standard Python scripts will be included with version 5.2. They will
not be automatically turned on, because they are dependent on certain fields and
definitions. However, we will provide the specific requirements, a sample database
and project, and instructions for incorporating these Python scripts.
The standard 5.2 scripts include automatic email notification on project save if
activities are complete or have slipped more than 5 days, data validation options,
view that automatically update with Time Now, and a button that provides a popup
selection list of template activities. Buttons can also be added to Projects to connect
to the AMS REALTIME database, set exchange options, commit project plans, and
update projects with status and actuals.
An Enterprise Server Python script checks the total of each user's actuals for the
given period and compares it with the total number of actuals that the user should
report. If it is under the required amount, an automatic email notification is sent.
All of the AMS standard 5.2 release Python scripts come with a standard header
block that details what each script does, everything that is required to make each
script work (including required fields, configuration settings, etc), a basic
psuedocode description, and a history of changes that includes the programmer
name, date and change. In addition, all code has an extremely verbose English
comment line along the right side of the script that makes it is easy to tell exactly
what the script is doing and where potential custom changes should be made.
See Appendix A of this document for the standard Python scripts that will be
released with version 5.2.
AMS REALTIME 5.2 Addendum
Python API • 105
Python Files
By default the AMS Program's use the command path to locate the startup.py and
other python source files. For example, the startup.py file is placed in the program
executable directory and the program looks in there for the startup.py in order to load
any python scripts required.
However a configuration switch has been added to the AMS REALTIME programs
that allows the user to define where their python files are actually installed. This has
been done to allow python files to be stored away from the program directory, in a
directory of the user's own choosing. This reduces the risk of customized files being
stomped on during a future upgrade of the system.
The configuration switch PYROOT= has been added to the rtp32.ini configuration
file.
Example:
If the user has created some python scripts and placed them in a directory called
mypyfiles, the PYROOT setting would look like this;
PYROOT=C:\PROGRA~1\AMS REALTIME\PROJECTS\MYPYFILES
The startup.py that is to be used by the system should reside in the python root
directory.
Note: Always use an absolute path with this setting. Relative paths can not be
guaranteed to work.
106 • Python API
AMS REALTIME 5.2 Addendum
Glossary
AMS REALTIME 5.2 Addendum
Glossary • 107