1
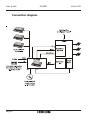
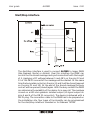
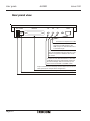
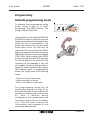
User guide
ALFRED
User guide
Issue 2.00
ALFRED
Courtesy annoucement device
with up to 60" recordable
message
Automated attendant feature
Start/Stop interface
(SW ALF63BV2 or better)
Page 1
User guide
Page 2
ALFRED
Issue 2.00
User guide
ALFRED
Issue 2.00
Contents
Description ................................................................................................ 4
Connection diagram ................................................................................. 6
Start/Stop interface .................................................................................. 7
Configuration examples ........................................................................... 8
Front panel view ..................................................................................... 11
Rear panel view ...................................................................................... 12
Features .................................................................................................. 13
Installation .............................................................................................. 13
Programming .......................................................................................... 15
Activate programming mode ................................................................. 15
Telephone number programming .......................................................... 16
Telephone number deleting .................................................................... 17
Answer delay programming ................................................................... 18
Flash signal time programming ............................................................. 19
Numbering plan digit number programming (automated attendant) . 20
Start/Stop operational mode programming .......................................... 21
Waiting time before call transfer programming .................................... 22
Default configuration data load ............................................................. 23
Message recording ................................................................................. 24
Message recording from CD, MC or mixer ............................................. 25
Play back ................................................................................................. 26
Technical data ......................................................................................... 27
Page 3
User guide
ALFRED
Issue 2.00
Description
ALFRED is a digital announcement device with the following features:
- Courtesy announcement
The device must be connected to a analouge PABX extension line. This port has to be
programmed on the PABX to receive, using features like call diversion or call rerouting,
all calls which can not be answered by the attendant or other extensions. Depending
on the required function the calls can be diverted to ALFRED only if the attendant or
the extension is busy, doesn't answer within a specific time or in any case. With small
PABX were call diversion or call rerouting features are not available the device should
be programmed to receive incoming calls at the same time as the attendant. You can
program then a call answer delay on ALFRED giving enough time to the attendant to
aswer the call if he/she is free. After answering the call the device can send an up to 60"
long message. The message can be recorded by the user itself using the build in
microphone or an external source like a CD or MC player. At the end of the message
the device will send a flash signal, followed by an up to 16 digit long telephone number.
This will connect the answered call back to the attendant, or other extension. Now the
external call will be placed in the waiting queue of the PABX. Using an optional MOH
device like the Phonphon, the waiting caller can now receive waiting messages with a
background music. The external music on hold source can be also connected to ALFRED and then forwarded to the PABX MOH input as well. In this case you will have a
courtesy announcement system with the same background music for all the duration
of the process.
- Automated attendant
This feature can be activated by programmation. With this feature activated the caller
party can be invited, during the greeting message, to dial a specific internal number
using his DTMF dial pad. If the caller will follow the instruction, the device wil stop the
outgoing message as soon as a valid DTMF digit is detected. At the end of the dial
ALFRED will transfer the call to the dialed number and not to the stored one. The
device will not survey the dialed number. Only the number lenght is programmed in
the device. This gives a high grade of flexibility in the possible applications of this
feature. To ensure that the external caller may not activate PABX features or external
calls, the extension line with the connected ALFRED should be restricted using the
class of service programmation of the PABX.
If the caller doesn't dial a number, or if the dialed number is shorter then the
programmed lenght, the device will forward the call the the programmed extension at
the end of the message or after a time out.
Also a flexible numbering plan scheme is programmable. In this case the dialled number
must be terminated by entering the digit # before the device will trasnfer the call.
- Digital announcement device
If no telephone number is programmed, the device will work as a digital annoucement
device. After the message the connection will be released.
Page 4
User guide
ALFRED
Issue 2.00
- Digital announcement device with start/stop interface
The device has a build in start/stop interface. This interface can be used to connect
ALFRED to larger PABX with this specific interface (like Siemens Hicom 300 or Nortel)
or ACD systems. With this interface the unit can be used also as digital announcement
device for other kind of installations (i.e. PA systems). The start/stop interface has a
start input (5 to 48 Vdc), a busy signal output and a isolated LF signal output. Both
start/stop and t/r interface can be used at the same time, as far as for both of it the
same message is used. Two tyoe of start/stop interfaces are programmable.
- Modular expandable
Up to four units can be configurated together as one device. One of the units is
automatically indentified as master unit. All the programmation and the recording of
the message is done on the master unit. This unit will then forward automatically the
information and messages to the connected devices. In this way you can configure a
multiline device with the same message for all channels. After the recording and
programmation all units will work stand alone for the normal business.
The following programmations can be done on the ALFRED:
- 1 to 16 digits long telephone number (0 bis 9, *,#)
- Delay on answer (0 to 99 calls)
- Delay on call transfer (0 to 99 seconds)
- Flash signal duration (0 to 999 ms)
- Internal numbering plan lenght (1 to 21 digits) or felxible with
max. 22 digits
The programmation is done using DTMF dial signals. For this procedure ALFRED has
do be called, after the programming mode has been activated. After the answer you
will receive a acknowledge tone and the programmation can be done using a DTMF
dial pad. Follow the instructions on the following pages.
The message is stored on a EEPROM memory using the DAST procedure. This memory
is protected against loss of data due to power failure for a period of ten years. The
message can be recorded using the build-in microphone or an external source.
The message volume can be regulated. The output inpedance is about 600 Ohm. The
power supply is provided by the attached plug PSU.
Page 5
User guide
Connection diagram
Page 6
ALFRED
Issue 2.00
User guide
ALFRED
Issue 2.00
Start/Stop interface
The start/stop interface is used to connect ALFRED to larger PABX
(like Siemens, Nortel or Alcatel). Over this interface the PABX can
control the the stored message and synchronise itself with the lenght
of it. Applying a DC voltage between 5 and 48 V on the pins 12 and
13 of the DB 25 connector the message will be started. At the same
time the busy relais contact on the pins 11 and 9 will be closed (opened
on the pins 11 and 10). At the end of the stored message the busy
contact will be opened (closed) again. With the busy contact the PABX
can determine the aviability of the device for a new call. The message
is send on a 600 ohm galvanic isolated output (LF signal output on
pins 4 and 4 of the DB 25 connector). The device is delivered with a
DB 25 plug. The connection cable to the PABX has to be prepared on
the installation site. Two types of functonality can be programmed
for the start/stop interface: standard or for Siemens TMOM.
Page 7
User guide
ALFRED
Issue 2.00
Configuration examples
Example 1. Courtesy announcement with busy attendant
- Call diversion on busy feature is activated for the attendant.
- If the attendand is busy the call is diverted immediatly to ALFRED.
Example 2. Courtesy announcement with no answer
- Call diversion after time is programmed for the attendand/extension.
- The call is forwarded to ALFRED only if the attendand/extension
doesn't answer.
Page 8
User guide
ALFRED
Issue 2.00
r
all
tra nsf e
Incoming call
C
Example 3. Courtesy announcement with no answer or busy
attendant
- Attendant and ALFRED are called at the same time.
- The call will be answered by ALFRED only after a programmed delay.
Example 4. Courtesy announcement with busy operator and
automated attendant
- Call diversion on busy feature is activated for the attendant.
- If the attendant is busy the call is diverted immediatly to ALFRED.
- The waiting caller can dial during the message an internal number
using the DTMF dialpad.
Page 9
User guide
ALFRED
Issue 2.00
Example 5. Automated attendant
- Alfred is programmed to receive all incoming calls.
- The caller can dial during the message an internal number using the
DTMF dialpad.
- If no number is dialed the caller will be connected to the attendant.
Example 6. DISA service
- Alfred is called by a DDI number
- After the aswer the caller can dial a public telephone number using
the DTMF pad. The number input is terminated by entering a #.
Page 10
User guide
ALFRED
Issue 2.00
Front panel view
PROG
Alfred
PROG key for the switch to programming/
recording mode. With multiple device configurations this key is enabled only on the master
device.
REC/STOP key for the recording of the message from microphone
or external source. The key is enabled only during the recording
mode (LED is flshing orange). The record will be started at the
release of the button. Pressing the button a second time will stop
the recording and store the message..
LED indicator:
- Green flashing: stand by
- Orange flashing: programming/recording function
- Red: recording
- Red flashing: 5 seconds to the end of recording time
- Green: answer mode
Volume control of the message send to the telephone line. The build in loudspeaker
doesn't have a volume control.
PLAY key for the play back of the recorded message. The message will be played automatically at the end of the record, and after power on.
Microphone for the registration of the message. Messages on CD or MC can also be
recorded using the connector JB on the back of the device. If this connector is used the
microphone will be disabled.
Page 11
User guide
ALFRED
Issue 2.00
Rear panel view
ON PWR
RS 232
JA
JB
JC
LINE
Connector for telephone line cable
Connector for MOH output to the
PABX. (Only if an external MOH source
is connected to JA)
Connector for the external source for the recording of the message (CD, MC, Mixer, etc.). The
build in microphone is disabled if this connector is used.
Connector for the external MOH source. The external MOH source will be automatically mixed with
the stored message. With the connector JC the
source can be forwarded to the PABX as well.
25 pin connector for the start/stop interface and/or interconnection
cable (optional) for multiple device configuration.
Plug in for external power supply unit
on/off switch
Page 12
User guide
ALFRED
Issue 2.00
Features
- On site recordable message
- Build in microphone for on site message recording
- Build in loudspeaker for the play back of the recorded message
- Input for external source (i.e. CD, MC or mixer) to record the message
- Courtesy annoucement service for quite any type of trunk and PABX
- Up to 16 digits long programmable telephone number
- DTMF dial
- Programmable flash signal time from 0 to 999 ms
- Programmable answer delay from 0 to 99 rings
- Programmable call transfer delay from 0 to 99 seconds
- Message output level control
- Up to 60 seconds recordable message lenght
- Programmation using DTMF dial
- Automated attendant feature (DTMF dial in during message)
- DISA service with flexible numbering plan lenght
- Multiple device configuration with one master and up to three slave units
- Build in start/stop interface with busy signal
- 230 Vac power supply with external unit
- Small case
- Nice shaped case
- Fast and easy installation and programmation
Installation
The installation place of the device should be:
- in a dry room;
- far from dirt, heat an direct sun light;
- far from device generating strong electromagnetical fields (like loudspeaker);
- far from liquids and chemical agressiv substances.
Before you start with the installation please note:
- The device can be powered only with voltage indicated on the identification
label.
- The device doesn't contain maintanable parts and should be opened only by
instructed technicians.
- If a liquid should get into the device disconnect immediatly the power supply.
The device should be opened only by instructed technicians.
- To polish the device use only a clean and soft cloth. To remove spots use a umid
cloth or a natural cleaning substance. Do not use chemical substances or petrol,
these might damage the plastic of the case.
- Do not drop or shock the device.
Page 13
User guide
ALFRED
Issue 2.00
- Static discharge may damage the device. Ensure that you discharge yourself
using a appropiate grounding before handling the unit.
Installation
- Connect the device to a telephone plug using the line cable. The PABX must be
programmed to work together with the device. This procedure is different from PABX
to PABX. For the normal use the extension line with the connected ALFRED should be
programmed to receive incoming calls at the same time as the attendant during day
service. Other type of programmations can use the call diversion features of the
PABX. For a best service the PABX should have the feature "call waiting on busy
extension", where an external call can be put on a waiting queue for a busy extension
by a call transfer.
- If a multiple device configuration has to be installed the units are to be connected
together. The connection cable has to be made using the schematics available on
Internet (www.music-on-hold.info) or directly from Rocom. The master unit is identified
automatically by pluging in the master connector. All other devices are identified as
slave units.
- If an external music source has to be connected (i.e. CD-Player, or Rocom Phonphon
MOH Player) the plug JA has be used. The external music can be forwarded to the
PABX using the plug JC and the provided cable. After the connection of an external
music source the volume of it may be regulated for a correct working together with
the ALFRED device.
- To use the start/stop interface a special cable has to made on site. Use the provided
DB 25 plug. Refer to the schematics shown in the chapter "Start/stop interface". For a
mutliple device configuration with start/stop interface, an optional interconnect cable
has to be made (for schematics read above).
- Connect the provided power plug to the device and into the mains plug. Switch the
unit on.
- After the play back of the stored message the device is ready to work. Herefore it has
to be programmed first. To program the unit press the button PROG. The orange LED
will flash fast. Call now the unit using a phone with DTMF dial pad. If you don't call
the unit within 30 seconds, it will automatically switch back to the stand by mode
(green LED slow flashing). In programming mode also the message can be recorded
using the build in microphone or an external source. For the programming of the
device and the recording of the message please read the following instructions.
Page 14
User guide
ALFRED
Issue 2.00
Programming
Activate programming mode
To activate the programming mode
press, using a pen or a small
screwdriver the PROG button. The
orange LED will flash fast.
PROG
Alfred
Using a phone with enabled DTMF dial
pad call the device using the internal
telephone number of the extension line
where the unit is connected to. The
device will answer the call the send
three short tones. The LED will be
switched off as soon as the frist DTMF
digit is recognized. After this the green
LED will go shortly on with any recieved
DTMF digit. After pressing the PROG
button you will have about 30 seconds
to call the device or to start with the
recording of the message. If this will
not happen the device will go back to
stand by mode automatically (green
LED flashing slow). In programming
mode you might hear the following
tones:
- Input is correct: three tones
- Input is wrong: six tones
- Error in the device: nine tones
The programming mode will be
terminated dialing the digit 3, or
automatically with no action within 30
seconds, or switching the unit off and
on. With a multiple device
configuration the programming and
recording is done only on the master
unit. This will then forward the
information and message to the
connected slave devices.
Page 15
User guide
ALFRED
Issue 2.00
Telephone number programming
The herewith programmed telephone number will be dialed at the end of the
message after sending a flash signal. At the end of the dial the device will release
the line. If no number is stored the unit will work as an answering maschine. At
the end of the message the line will be released without dial.
Activate the programming mode. See
also "Activate programming mode".
PROG
Alfred
Call the device using a telephone with
DTMF dial pad.
You here three short tones.
Dial now: * # 1
You here three short tones.
Dial now the desired telephone
number, max. 16 digits long. The DTMF
digits * and # can be used also as part
of the telephone number, as well a
pause and a flash signal.
Input:
- Digits 1 to 0to dial the digits 1 to 0
-##1, to dial the digit #
-##2, to dial the digit *
-##3, to insert a pause of 2 seconds
-##4, to send a flash signal
Dial at the end of the telephone
number: * *
You here three short tones.
The telephone number is stored.
You can now go ahead to program the
following steps or terminate the
programmation dial the digit 3.
Page 16
PLEASE NOTE!
Some PABX can detect
automatically
if
the
telephone has a rotary dial or
DTMF dial pad. The dial mode
can be detected only if the
dial is started without a flash
signal. To ensure that with an
Alfred connected to such a
PABX the dial mode can be
detected correctly the device
will send the stored number
without flash every time it
will be switched on. At the
first activation you should
program the number and
then switch the device off
and on. This will ensure that
the correct dial mode is setup
at the PABX and you can
check the correct stored
number.
User guide
ALFRED
Issue 2.00
Telephone number deleting
Without a programmed telephone number the device will work as an answer
machine. At the end of the message the line will be released. This is the default
configuration of the device.
Activate the programming mode. See
also "Activate programming mode".
PROG
Alfred
Call the device using a telephone with
DTMF dial pad.
You here three short tones.
Dial now: * # 6
You here three short tones.
The telephone number is deleted.
You can now go ahead to program the
following steps or terminate the
programmation dial the digit 3.
Page 17
User guide
ALFRED
Issue 2.00
Answer delay programming
The device will wait for the programmed number of calls before answering. The
default configuration is 00 calls: no delay.
Activate the programming mode. See
also "Activate programming mode".
PROG
Call the device using a telephone with
DTMF dial pad.
You here three short tones.
Dial now: * # 2
You here three short tones.
Dial now the number of rings 00 to 99
to be waited before answering the call.
Insert the value always with two digits!
You here three short tones.
The answer delay is programmed.
You can now go ahead to program the
following steps or terminate the
programmation dial the digit 3.
Page 18
Alfred
User guide
ALFRED
Issue 2.00
Flash signal time programming
Here you can program the flash signal (recall button) time for the connected
PABX. A recall activation with ground button is not possible. The default
configuration is 80 ms.
Activate the programming mode. See
also "Activate programming mode".
PROG
Alfred
Call the device using a telephone with
DTMF dial pad.
You here three short tones.
Dial now: * # 3
You here three short tones.
Dial now the flash signal time in
milliseconds 000 to 999. Insert the
value always with three digits!
You here three short tones.
The flash signal time is programmed.
You can now go ahead to program the
following steps or terminate the
programmation dial the digit 3.
Page 19
User guide
ALFRED
Issue 2.00
Numbering plan digit number programming
(automated attendant)
This programmation will activate the automated attendant feature. With this
feature the waiting party can be invited to dial a DTMF number during the waiting
message. If this will happen the device will wait until the here programmed
number of digits are dialed by the calling party. After this it will terminate the
message and forward the call to the dialed number. The device will NOT take any
control of the dialed number. If no number is dialed the unit will forward the call
to the programmed number. Also a felxible numbering paln is programmable. In
this case the dialed number has to be terminated by a #. The default
configuration is 00: no automated attendant feature.
Activate the programming mode. See
also "Activate programming mode".
Alfred
PROG
Call the device using a telephone with
DTMF dial pad.
You here three short tones.
Dial now: * # 4
You here three short tones.
Dial now the desired number of digits
required by the numbering plan of the
PABX from 00 to 22. Insert the value
always with two digits! With an input
value from 1 to 21 the device will wait
for the complete input of a number
with the programmed lenght. With a
value of 22 the number lenght is flexible and has to be terminated by a #.
You here three short tones.
The numbering plan digit number is
programmed.
You can now go ahead to program the
following steps or terminate the
programmation dial the digit 3.
Page 20
User guide
ALFRED
Issue 2.00
Start/Stop operational mode programming
This programmation will define the operational mode of the start/stop interface.
This interface can have two different operational modes: standard mode (to
connect to standard systems) or serial mode (to connect to Siemens TMOM
borads). The default oprational mode is standard.
Activate the programming mode. See
also "Activate programming mode".
PROG
Alfred
Call the device using a telephone with
DTMF dial pad.
You here three short tones.
Dial now: * # 5
You here three short tones.
Dial now the desired operational
mode:
1 for standard mode, or
2 for for serial mode with Siemens
TMOM boards
You here three short tones.
The start/stop interface operational
mode is programmed.
You can now go ahead to program the
following steps or terminate the
programmation dial the digit 3.
Page 21
User guide
ALFRED
Issue 2.00
Waiting time before call transfer programming
With this feature you can programm a waiting time bevore the device will hang
up after dialing a number (call transfer). This function is usefull if you like to
trasfer a call to an extrenal extension where you might have longer call setup
times. The default time is 00 (no delay on call transfer).
Activate the programming mode. See
also "Activate programming mode".
Call the device using a telephone with
DTMF dial pad.
You here three short tones.
Dial now: * # 7
You here three short tones.
Dial now the desired time delay in
seconds from 00 to 99. The time has
to be programmed with two digits all
time!
You here three short tones.
The delay time on call transfer is
programmed.
You can now go ahead to program the
following steps or terminate the
programmation dial the digit 3.
Page 22
PROG
Alfred
User guide
ALFRED
Issue 2.00
Default configuration data load
With this function you can reload the default configuration data as indicated.
Activate the programming mode. See
also "Activate programming mode".
PROG
Alfred
Call the device using a telephone with
DTMF dial pad.
You here three short tones.
Dial now: * # 999
You here three short tones.
The default configuration data are loaded. Only the programmed number
will be maintened.
You can now go ahead to program teh
following steps or terminate the
programmation dial the digit 3.
Page 23
User guide
ALFRED
Issue 2.00
Message recording
Activate the programming mode. See
also "Activate programming mode".
PROG
Press the REC/STOP button. The record
will start as soon you release the
button. The red LED will light.
Speak your message as close as
possible into the microphone. The
record lenght is about 60 seconds. As
the red LED will start flashing, you will
have 5 secondes of recording time left.
At the end of the recording time, or if
you press the START/REC button again,
the device will switch to play back
mode and you can hear the recorded
message on the internal loadspeaker.
The green LED will light during the play
back. At the end of the message the
unit will go in stand by mode. The
green LED will flash slowly.
You can hear to the recorded message
all time pressing the PLAY button.
During the play back the green LED will
light.
Page 24
PROG
PROG
PROG
PROG
Alfred
Alfred
Alfred
Alfred
Alfred
User guide
ALFRED
Issue 2.00
Message recording from CD, MC or mixer
Connect the external source to the JB
plug on the back of the device.
Activate the programming mode. See
also "Activate programming mode".
Press the REC/STOP button. The record
will start as soon you release the
button. The red LED will light.
ON PWR
RS 232
JA
PROG
PROG
JB
JC
LINE
Alfred
Alfred
Start the message paly back on the
external device. The record lenght is
about 60 seconds. As the red LED will
start flashing, you will have 5 secondes
of recording left.
At the end of the recording time, or if
you press the START/REC button again,
the device will switch to play back
mode and you can hear the recorded
message
on
the
internal
loadspeaker.The green LED will light
during the play back. At the end of the
message the unit will go in stand by
mode. The green LED will flash slowly.
You can hear to the recorded message
all time pressing the PLAY button.
During the play back the green LED will
light.
PROG
PROG
Alfred
Alfred
Page 25
User guide
ALFRED
Issue 2.00
Play back
You can hear to the recorded message
all time pressing the PLAY button.
During the play back the green LED will
light.
After recording the message to your
sadisfaction you can connect the device
to the PABX. For any question about
this matter refer to your technical
support for the PABX.
After
the
connection
and
programmation of the PABX test the
installation calling the PABX and
waiting until ALFRED will answer the
call.
With a small screwdriver you can now
regulate the volume of the message
level on the telephone line. If the
message will still be too low, you
should record the message again using
a higher output level on the external
device or getting closer to the
microphone
Page 26
Alfred
PROG
ON PWR
RS 232
JA
JB
JC
LINE
To the PABX
PROG
Alfred
User guide
ALFRED
Issue 2.00
Technical data
DESCRIPTION
Dimensions
Weight
Power supply
140 x 180 x 38 mm (D,L,H)
max. 400 g
12 Vdc; max. 400 mA
Power supply unit
230 Vac +6 /-10%; 50 Hz;
Signal output level
max. -10,5 dB, regulated
Output impedance
600 Ohm
Bandwith
Digitalisation
Memory
300 bis 3400 Hz
DAST, 8 kHz scanning frequency
EEPROM, 10 years data retain
Message lenght
60 seconds
No. of messages
1
Enviroment
Electical security
Class of protection
Electromagnetical immunity
O° to +45°C; max. 90% umidity
EN 60950
IP 30 DIN 40050
EN 60555-2, EN 55022, EN 50082-1
Page 27
© 2003 ROCOM GmbH. Product may change without notice. We do not respond for any errors or mistake in the present documentation.
Printed in Germany.
User guide
Page 28
ALFRED
Your dealer:
Manufactured by:
Energie- und Kommunikationssysteme GmbH
Lessing Str. 20, 63110 Rodgau, Germany
Tel. +49-6106-6600-0 Fax +49-6106-6600-66
E-Mail: [email protected]
http://www.rocom-gmbh.de
Issue 2.00