1
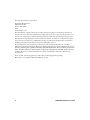
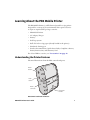
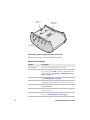
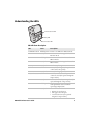
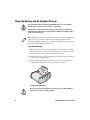
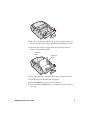
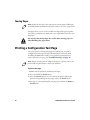
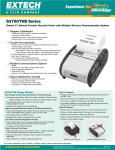
PB3
User’s
Guide
Mobile Printer
Intermec Technologies Corporation
Worldwide Headquarters
6001 36th Ave.W.
Everett, WA 98203
U.S.A.
www.intermec.com
The information contained herein is provided solely for the purpose of allowing customers to
operate and service Intermec-manufactured equipment and is not to be released, reproduced, or
used for any other purpose without written permission of Intermec Technologies Corporation.
Information and specifications contained in this document are subject to change without prior
notice and do not represent a commitment on the part of Intermec Technologies Corporation.
© 2008 by Intermec Technologies Corporation. All rights reserved.
The word Intermec, the Intermec logo, Norand, ArciTech, Beverage Routebook, CrossBar,
dcBrowser, Duratherm, EasyADC, EasyCoder, EasySet, Fingerprint, i-gistics, INCA (under license),
Intellitag, Intellitag Gen2, JANUS, LabelShop, MobileLAN, Picolink, Ready-to-Work, RoutePower,
Sabre, ScanPlus, ShopScan, Smart Mobile Computing, SmartSystems, TE 2000, Trakker Antares,
and Vista Powered are either trademarks or registered trademarks of Intermec Technologies
Corporation.
There are U.S. and foreign patents as well as U.S. and foreign patents pending.
Bluetooth is a trademark of Bluetooth SIG, Inc., U.S.A.
ii
PB3 Mobile Printer User’s Guide
Contents
Contents
Before You Begin. . . . . . . . . . . . . . . . . . . . . . . . . . . . . . . . . . . . . . . . . . . . . . . . . . . . . . . . . . . . . . . . . . v
Safety Information . . . . . . . . . . . . . . . . . . . . . . . . . . . . . . . . . . . . . . . . . . . . . . . . . . . . . . . . v
Global Services and Support . . . . . . . . . . . . . . . . . . . . . . . . . . . . . . . . . . . . . . . . . . . . . . . v
Warranty Information. . . . . . . . . . . . . . . . . . . . . . . . . . . . . . . . . . . . . . . . . . . . . v
Web Support . . . . . . . . . . . . . . . . . . . . . . . . . . . . . . . . . . . . . . . . . . . . . . . . . . . . vi
Telephone Support . . . . . . . . . . . . . . . . . . . . . . . . . . . . . . . . . . . . . . . . . . . . . . vi
Service Location Support . . . . . . . . . . . . . . . . . . . . . . . . . . . . . . . . . . . . . . . . . vi
Who Should Read This Manual . . . . . . . . . . . . . . . . . . . . . . . . . . . . . . . . . . . . . . . . . . . vii
Related Documents . . . . . . . . . . . . . . . . . . . . . . . . . . . . . . . . . . . . . . . . . . . . . . . . . . . . . . vii
Learning About the PB3 Mobile Printer . . . . . . . . . . . . . . . . . . . . . . . . . . . . . . . . . . . . . . . . . . . . . 1
Understanding the Printer Features . . . . . . . . . . . . . . . . . . . . . . . . . . . . . . . . . . . . . . . . 1
Understanding the LEDs . . . . . . . . . . . . . . . . . . . . . . . . . . . . . . . . . . . . . . . . . . . . . . . . . . 3
Using the Battery and AC Adapter/Charger . . . . . . . . . . . . . . . . . . . . . . . . . . . . . . . . . 4
Using the 2-Bay Battery Charger. . . . . . . . . . . . . . . . . . . . . . . . . . . . . . . . . . . . 6
Using the Belt Loop . . . . . . . . . . . . . . . . . . . . . . . . . . . . . . . . . . . . . . . . . . . . . . . . . . . . . . . 7
Loading Paper . . . . . . . . . . . . . . . . . . . . . . . . . . . . . . . . . . . . . . . . . . . . . . . . . . . . . . . . . . . . 8
Tearing Paper. . . . . . . . . . . . . . . . . . . . . . . . . . . . . . . . . . . . . . . . . . . . . . . . . . . . . . . . . . . . 10
Printing a Configuration Test Page . . . . . . . . . . . . . . . . . . . . . . . . . . . . . . . . . . . . . . . . . . . . . . . . 10
Communicating With a Host . . . . . . . . . . . . . . . . . . . . . . . . . . . . . . . . . . . . . . . . . . . . . . . . . . . . . 11
Setting Up Bluetooth or 802.11 Communications . . . . . . . . . . . . . . . . . . . . . . . . . . 12
Setting Up Serial Communications . . . . . . . . . . . . . . . . . . . . . . . . . . . . . . . . . . . . . . . . 12
Changing Printer Connection Settings. . . . . . . . . . . . . . . . . . . . . . . . . . . . . . . . . . . . . 13
Using the Magnetic Stripe Reader . . . . . . . . . . . . . . . . . . . . . . . . . . . . . . . . . . . . . . . . . . . . . . . . . 16
Maintaining the Printer . . . . . . . . . . . . . . . . . . . . . . . . . . . . . . . . . . . . . . . . . . . . . . . . . . . . . . . . . . 16
Troubleshooting . . . . . . . . . . . . . . . . . . . . . . . . . . . . . . . . . . . . . . . . . . . . . . . . . . . . . . . . . . . . . . . . . 18
Calling Product Support . . . . . . . . . . . . . . . . . . . . . . . . . . . . . . . . . . . . . . . . . . . . . . . . . 19
Software and Programming Information. . . . . . . . . . . . . . . . . . . . . . . . . . . . . . . . . . . . . . . . . . . 19
Installing Printer Firmware . . . . . . . . . . . . . . . . . . . . . . . . . . . . . . . . . . . . . . . . . . . . . . . 20
Specifications. . . . . . . . . . . . . . . . . . . . . . . . . . . . . . . . . . . . . . . . . . . . . . . . . . . . . . . . . . . . . . . . . . . . 20
Accessories . . . . . . . . . . . . . . . . . . . . . . . . . . . . . . . . . . . . . . . . . . . . . . . . . . . . . . . . . . . . . . . . . . . . . . 22
Pinout Diagram . . . . . . . . . . . . . . . . . . . . . . . . . . . . . . . . . . . . . . . . . . . . . . . . . . . . . . . . . . . . . . . . . 22
PB3 Mobile Printer User’s Guide
iii
Contents
iv
PB3 Mobile Printer User’s Guide
Before You Begin
Before You Begin
This section provides you with safety information, technical support
information, and sources for additional product information.
Safety Information
Your safety is extremely important. Read and follow all warnings and
cautions in this document before handling and operating Intermec
equipment. You can be seriously injured, and equipment and data can
be damaged if you do not follow the safety warnings and cautions.
This section explains how to identify and understand warnings,
cautions, and notes that are in this document.
A caution alerts you to an operating procedure, practice,
condition, or statement that must be strictly observed to prevent
equipment damage or destruction, or corruption or loss of data.
A warning alerts you of an operating procedure, practice,
condition, or statement that must be strictly observed to avoid
death or serious injury to the persons working on the equipment.
Note: Notes either provide extra information about a topic or contain
special instructions for handling a particular condition or set of
circumstances.
Global Services and Support
Warranty Information
To understand the warranty for your Intermec product, visit the
Intermec web site at www.intermec.com and click Support >
Returns and Repairs > Warranty.
PB3 Mobile Printer User’s Guide
v
Before You Begin
Disclaimer of warranties: The sample code included in this document
is presented for reference only. The code does not necessarily
represent complete, tested programs. The code is provided “as is with
all faults.” All warranties are expressly disclaimed, including the
implied warranties of merchantability and fitness for a particular
purpose.
Web Support
Visit the Intermec web site at www.intermec.com to download our
current manuals (in PDF). To order printed versions of the Intermec
manuals, contact your local Intermec representative or distributor.
Visit the Intermec technical knowledge base (Knowledge Central) at
www.intermec.com and click Support > Knowledge Central to
review technical information or to request technical support for your
Intermec product.
Telephone Support
In the U.S.A. and Canada, call 1-800-755-5505.
Outside the U.S.A. and Canada, contact your local Intermec
representative. To search for your local representative, from the
Intermec web site, click About Us > Contact Us.
Service Location Support
For the most current listing of service locations, go to
www.intermec.com and click Support >Returns and Repairs >
Repair Locations.
For technical support in South Korea, use the after service locations
listed below:
AWOO Systems
102-1304 SK Ventium
522 Dangjung-dong
Gunpo-si, Gyeonggi-do Korea, South 435-776
Contact: Mr. Sinbum Kang
Telephone: +82-31-436-1191
E-mail: [email protected]
vi
PB3 Mobile Printer User’s Guide
Before You Begin
IN Information System PTD LTD
6th Floor
Daegu Venture Center Bldg 95
Shinchun 3 Dong
Donggu, Daegu City, Korea
E-mail: [email protected] or [email protected]
Who Should Read This Manual
This document is for the person who is responsible for installing,
configuring, and maintaining the PB3 Mobile Printer.
This document provides you with information about the features of
the PB3, and how to install, configure, operate, maintain, and
troubleshoot it.
Before you work with the PB3, you should be familiar with your
network and general networking terms, such as IP address.
Related Documents
This table contains a list of related Intermec documents and their
part numbers.
Document Title
Part Number
PB3 Mobile Printer Quick Start Guide
930-217-xxx
PB2 and PB3 Compliance Insert
933-165-xxx
PB2 and PB3 Battery Instructions
943-217-xxx
XSim Programmer’s Reference Manual
937-014-xxx
ESC/P Programmer’s Reference Manual
937-010-xxx
Important cB-0907-01 Radio Information!
933-166-xxx
Important OWSPA311gi-06 Radio Information!
933-167-xxx
The Intermec web site at www.intermec.com contains our
documents (as PDF files) that you can download for free.
To download documents
1 Visit the Intermec web site at www.intermec.com.
2 Click Support > Manuals.
PB3 Mobile Printer User’s Guide
vii
Before You Begin
3 In the Select a Product field, choose the product whose
documentation you want to download.
To order printed versions of the Intermec manuals, contact your local
Intermec representative or distributor.
viii
PB3 Mobile Printer User’s Guide
Learning About the PB3 Mobile Printer
The PB3 Mobile Printer is a full-featured portable receipt printer
designed for a variety of job environments where point of service
receipts are required. The package contains:
•
PB3 Mobile Printer
•
AC adapter/charger
•
Battery
•
Belt loop system
•
Roll of 3-inch receipt paper (already loaded in the printer)
•
Printhead cleaning pen
•
Product documentation: Quick Start Guide, Compliance Inserts,
Battery Instructions, and Warranty Card
For a list of PB3 accessories, see “Accessories” on page 22.
Understanding the Printer Features
The next illustrations show the PB3 controls and ports.
Power
button
Feed
button
Power
connector
Paper door
handle
PB3 Controls and Power Connector
PB3 Mobile Printer User’s Guide
1
Belt loop
knob
Battery
door latch
Serial port
PB3 Serial Port, Belt Loop Knob, and Battery Door Latch
The printer features are described in the next table.
PB3 Feature Descriptions
Feature
2
Description
Power button
Press once to turn the printer on or off.
Feed button
Press to feed paper out of the printer.
You can also press Feed to print a configuration test
page. For help, see “Printing a Configuration Test
Page” on page 10.
Paper door handle
Pull to open the paper compartment door. For help,
see “Loading Paper” on page 8.
Power connector
Connects the printer to the AC adapter/battery
charger. For more information, see the next section.
Serial port
Connects the printer to a host computer. Use cable
P/N 5892RJD9-1.
Battery door latch
Slide to lock or unlock the battery door. For help, see
the next section.
Belt loop knob
Attaches the printer to the included belt loop. For
help, see “Using the Belt Loop” on page 7.
PB3 Mobile Printer User’s Guide
Understanding the LEDs
Communications LED
Battery LED
Data and Status LED
PB3 LED State Descriptions
LED
State
Description
Communications Flashing Green Power is on. PB3 is in RS-232 mode.
Battery
Data and Status
Steady Green
PB3 is communicating with host in
RS-232 mode.
Flashing Blue
Power is on. PB3 is in Bluetooth or
802.11 mode.
Steady Blue
PB3 is communicating via Bluetooth or
802.11 radio.
Steady Red
Low battery charge.
Off
Battery fully charged (when printer is
connected to AC power).
Steady Amber
Battery is charging.
Off
Card was read successfully, or card
cannot be read (for optional magnetic
stripe reader).
Steady Green
Card reader is ready to accept data (for
optional magnetic stripe reader).
Flashing Red
Printhead is too hot. Printing is paused
until printhead reaches normal
operating temperature.
Steady Red
One of three conditions:
• Printer is out of paper.
• The paper door is open.
• Card reader error (for optional
magnetic stripe reader).
PB3 Mobile Printer User’s Guide
3
Using the Battery and AC Adapter/Charger
Use Intermec battery model 318-040-001 only. Use of another
battery may present a risk of fire or explosion.
The battery used in this device may present a fire or chemical
burn hazard if mistreated. Do not disassemble, heat above 80°C
(176°F), or incinerate.
Note: The battery must be cycled several times to achieve maximum
capacity. To cycle a battery, fully charge it and then allow a full
discharge through normal use. To ensure a full charge, do not operate
the printer while charging the battery.
To install the battery
1 Slide the battery door latch toward the belt loop knob to unlock
the battery door, and open the battery door to an angle of about
90 degrees. Do not force the door all the way open.
2 Orient the battery so the arrow points toward the battery contacts
in the battery compartment.
3 Insert the end of the battery without contacts into the battery
compartment first. The contact end drops into place.
Installing the PB3 Battery
Be sure you insert the battery correctly, or you may damage
the battery contacts in the printer.
4
PB3 Mobile Printer User’s Guide
4 Close the battery door and slide the latch away from the belt loop
knob to lock the latch.
To remove the battery
•
Unlock and open the battery door and tip the printer to one side
to remove the battery.
To charge the battery with the AC adapter/charger
1 Plug the AC adapter into the power connector.
2 Install the appropriate AC plug on the adapter. The adapter comes
with four different plugs suitable for most regions worldwide.
3 Make sure the printer is off and connect the adapter to AC power.
The Battery LED turns on, indicating that the battery is fast
charging.
Note: If the other LEDs turn on, press the Power button to turn
the printer off.
After about three hours the Battery LED turns off. The battery is
fully charged.
10
9
8
11 12 1
2
3
7 6 5
4
Charging the PB3: The AC adapter/charger charges the battery in about
three hours.
Note: The wall mounted charger is Class II equipment. Multiple
plug configurations comply with most international standards.
The wall mounted charger is not supplied with plugs for use in
Korea.
PB3 Mobile Printer User’s Guide
5
Using the 2-Bay Battery Charger
Status LEDs
2-Bay Battery Charger Accessory
1 Plug the AC adapter into the 2-bay charger.
2 Connect the adapter to AC power. The Status LEDs turn green,
indicating that the charger is ready to use.
3 With the contacts on the bottom and the arrow pointing toward
the LEDs, place a battery into one of the bays.
4 Slide the battery towards the LEDs. The battery snaps into place.
Installing a Battery in the 2-Bay Charger
If the battery is not charged, the Status LED for that bay turns red.
The Status LED turns green when the battery is charged.
6
PB3 Mobile Printer User’s Guide
Battery Safety Information
Follow these tips for maintaining the PB3 battery:
•
Be sure to fully charge the battery before long printing sessions,
such as printing receipts with many bar codes and graphics.
•
For maximum battery life, Intermec recommends charging the
battery at 25°C (77°F).
•
Remove the battery from the printer before storing the printer for
long periods of time.
•
The battery storage temperature is -20°C to 40°C (-4°F to 104°F).
Do not store a fully charged battery at temperatures greater than
40°C (104°F) for long periods of time – the battery may
permanently lose charge capacity.
•
Dispose of battery according to local regulations. Do not throw in
trash.
•
Do not disassemble, short circuit, heat above 80°C (176°F), or
incinerate. The battery may explode.
For more information, see the PB2 and PB3 Battery Instructions
(P/N 943-217-xxx).
Using the Belt Loop
To attach the belt loop
1 Place the belt loop over your belt and snap it to secure it.
2 Insert the belt loop knob into the connector slot on the belt loop
and slide the printer down until the knob clicks into place.
PB3 Mobile Printer User’s Guide
7
3 To disconnect the printer from the belt loop, press both of the
connector latches and slide the belt loop knob out of the slot.
Note: Do not try to remove the printer from the belt loop without
pressing both latches.
Loading Paper
To prevent possible damage to the print mechanism, use only
receipt paper rolls that are not fastened to the inside core in any
way. Otherwise the core will be pulled into the mechanism
causing jamming and possible gear damage.
To load paper
1 Lift the paper door handle and pull it gently to open the door.
8
PB3 Mobile Printer User’s Guide
2 Place the 3-inch paper roll into the printer as shown in the next
illustration. The paper supply should unwind from the bottom.
3 Unroll about 3 inches of paper from the roll and position it
between the printhead guides.
Printhead
guide
Printhead
guide
4 Close the paper door. The door clicks when completely closed.
5 Fold the door handle flush with the printer.
6 Press the Power button to turn the printer on.
7 Press and hold the Feed button to verify that the paper advances
correctly.
PB3 Mobile Printer User’s Guide
9
Tearing Paper
Note: Using the tear bar is the only way to tear the paper. Pulling up
and pulling sideways without using the tear bar can cause a paper jam.
The paper door acts as a tear bar. Pull one edge of the paper against
the tear bar, and then tear down and across against the tear bar to tear
the paper.
The tear bar has sharp edges. Be careful when tearing paper or
when handling the paper door.
Printing a Configuration Test Page
Once the battery is charged and paper is loaded, you can print a
configuration test page. Use this information for reference when
installing the PB3 and to verify correct printer operation. If you
cannot print the test page, see “Troubleshooting” on page 18.
Note: If you are using the AC adapter/charger as a power source, the
printer will not print unless a battery is installed.
To print a test page
1 Make sure the printer is off before you begin.
2 Press and hold the Feed button.
3 Press the Power button once to turn on the printer. When the
printer starts printing the test page, release the Feed button.
4 To stop or cancel printing the test page, press either the Power or
Feed button.
10
PB3 Mobile Printer User’s Guide
INTERMEC PRINTER V1.ØØ (C) 2ØØ8
Power Timer: OFF, Manual Mode
Wireless Mode. 115.2K, 8, N, 1
Model Number:
PBXA021E
PBXA021E
Serial Number:
PBXA021E00
312R0800001
Device Address:
0012F305F6AA
0012F305F6AA
LIST OF INSTALLED FONTS:
=============================
KØ - COURIERØ - ROTATED 36 COLUMNS
A
b
C
d
0
1
2
3
K1
K2
K3
K4
K5
K6
K7
K8
K9
K1Ø
K11
K12
K13
K14
K15
COURIER1 - 36 COLUMNS A b C d Ø 1 2 3
COURIER2 - 48 COLUMNS AbCdØ123
COURIER3 - 57 COLUMNS AbCdØ123
COURIER4 - 64 COLUMNS AbCdØ123
COURIER5 - 72 COLUMNS AbCdØ123
MONOSPACE821BT_1ØCPI - 28 COLUMNS A b C d 0 1 2 3
AbCd0123
MONOSPACE821BT_2ØCPI - 57 COLUMNS
MONOSPACE821BT_2ØCPI_BOLD - 57 COLUMNS AbCd0123
MONOSPACE821BT_2ØCPI_BOLD - 57 COLUMNS AbCd0123
-
AbCd0
BOLD_FONT - 12 COLUMNS
VERIN_FONT Ø8x23 - 72 COLUMNS
VERIN_FONT Ø9x23 - 64 COLUMNS
VERIN_FONT 1Øx23 - 57 COLUMNS
VERIN_FONT 12x23 - 48 COLUMNS
VERIN_FONT 16x23 - 36 COLUMNS
AbCd0
AbCd0
AbCd0
AbCd0
AbCd0
LIST OF INSTALLED BARCODES:
============================
CODE-39
CODE-128
CODABAR
INTERLEAVED 2 OF 5
UPC_EAN_JAN
PDF417
---------------------------------INTERMEC PORTABLE THERMAL PRINTER
----------------------------------
*INTERMEC*
INTERMEC
Intermec
Sample Configuration Test Page
Communicating With a Host
Depending on the configuration you ordered, the PB3 supports either
a Bluetooth or 802.11g wireless network connection to a host
computer that will send data for the printer to print.
You can also configure the PB3 to use a serial connection instead. For
more information on configuring serial connections, see “Changing
Printer Connection Settings” on page 13.
PB3 Mobile Printer User’s Guide
11
Setting Up Bluetooth or 802.11 Communications
If your PB3 includes the optional Bluetooth module, the printer is
configured by default for Bluetooth connections at a baud rate of
115200. The PB3 cannot initiate a Bluetooth connection. You must
connect to the PB3 from a host, such as a handheld computer. See the
documentation for your computer for more information on
connecting to Bluetooth devices.
Note: When the printer is set for Bluetooth or 802.11
communications, the printer stays on all the time, unless you have
enabled the automatic power save feature. When power save is
enabled, the printer turns off if no communications are received from
the host for 99 seconds. To enable automatic power save, see
“Changing Printer Connection Settings” on page 13.
The unique Bluetooth Device Address (BDA) for the printer is printed
on the battery door certification label.
If your PB3 includes the optional 802.11g radio module, the printer is
configured by default for an 802.11g wireless network connection.
The unique MAC address for the printer is printed on the battery
door certification label.
Use the PB2 & PB3 Developer Tool utility application to configure
Bluetooth and 802.11 settings. For more information, see the utility
online help. To download the Developer Tool, see the next procedure.
To download the Developer Tool
1 Browse to www.intermec.com and choose Support >
Downloads.
2 In the Select a Product list, choose PB3. A list of downloadable
software appears.
3 Choose the Developer Tool and follow the prompts to download
the application.
Setting Up Serial Communications
For a serial connection to the host computer, you need to:
•
12
configure the PB3 for a serial connection. For help, see the next
section.
PB3 Mobile Printer User’s Guide
•
connect the PB3 to the host using the optional serial cable
(P/N 5892RJD9-1).
For pinouts, see “Accessories” on page 22.
To host
computer
Serial port
Serial cable
PB3 With Serial Cable
Changing Printer Connection Settings
Connection settings are changed by the DIP switches located inside
the battery compartment.
Follow the next procedure to change DIP switch settings.
Use caution when changing DIP switch settings. Carefully use a
pointer on the dip switch to toggle its position. Do not use a
screwdriver and do not apply excessive force.
To change printer settings with the DIP switches
1 Open the battery door and remove the battery. The DIP switches
are located inside the battery compartment.
PB3 Mobile Printer User’s Guide
13
DIP switches
PB3 DIP Switch Locations
The DIP switches are numbered 1 to 8 from left to right. By
default, all DIP switches are off (toggled away from the
configuration label inside the battery compartment) except for
switch 2.
N
O
FF
O
1
8
DIP Switch Default Positions: Only DIP switch 2 is on by default.
14
PB3 Mobile Printer User’s Guide
2 Change DIP switch settings by carefully pressing a pointer into the
switch and sliding it to the other side. For more information, see
the next table.
DIP Switch Settings
Turn These DIP Switches On
To Set This Parameter
1
2
3
4
5
6
7
8
Enable serial connection
Enable Bluetooth or 802.11 connection
Set baud rate:
X
115200
57600
X
38400
X
19200
X X
14400
9600
Parity Bit
X
X
X
2400
X
X
1200
X X
X
Enabled
X
Disabled
Odd/Even
Even
X
Odd
Auto Power Save
Enabled
X
Disabled
Note: If you are configuring the PB3 for a Bluetooth or 802.11
connection, make sure DIP switches 3, 4, and 5 are off.
3 Install the battery in the printer and close the battery door. The
printer is now configured for your connection.
PB3 Mobile Printer User’s Guide
15
Using the Magnetic Stripe Reader
If your PB3 includes the optional magnetic stripe reader, follow the
next procedure to read cards.
Note: You need an application running on the host computer to read
data from the card. For more information, see the XSim Programmer’s
Reference Manual (P/N 937-014-xxx).
PB3 Magnetic Stripe Reader Slot
To use the magnetic stripe reader
1 Position the card so the magnetic stripe faces the paper door.
2 Quickly swipe the card through the reader in either direction. The
Data and Status LED indicates card reading status as described in
“Understanding the LEDs” on page 3.
Cleaning cards for the magnetic stripe reader are available from
Intermec. For information, contact your local Intermec distributor.
Maintaining the Printer
To clean the exterior of the printer, use a soft cloth and mild cleaner.
Do not use abrasive cleaner, chemicals, or scouring pads, as these will
damage the finish.
16
PB3 Mobile Printer User’s Guide
When you load a new roll of paper or when voids in the printout are
apparent, clean the printhead and platen roller as described next.
Do not use sharp objects to clean the printhead. This may
damage the printer and require service or repair.
To clean the printhead and platen roller
1 Remove the paper from the printer. For help, see “Loading
Paper” on page 8.
Printhead
Black mark sensor
Platen roller
Tear bar
PB3 Paper Compartment: Paper has been removed.
2 Clean the printhead with the included cleaning pen or with a
cotton swab moistened with isopropyl alcohol.
3 Remove buildup from the black mark sensor and tear bar with a
cotton swab moistened with isopropyl alcohol.
4 Turn the platen roller with your finger and run a dry cloth, small
brush, or cotton swab moistened with isopropyl alcohol across the
roller. Ensure that the roller is clean all the way around.
Note: Dust build-up may occur depending on the environment
and the quality of the paper supply used. Use a can of compressed
air to blow dust and paper debris out of the printer.
PB3 Mobile Printer User’s Guide
17
Troubleshooting
Most printer operation, print quality, or printer communication
problems can be fixed easily. The next table includes some common
printer problems and possible solutions.
PB3 Problems and Solutions
Problem
Solution
Printer does not feed
paper correctly.
Remove jammed paper and reload paper supply.
Printer does not print.
Make sure the paper supply is loaded correctly.
Install a battery. The printer will not print
unless a battery is installed, even if you are using
the AC adapter/charger as a power source.
If you are unable to print from a host computer,
try printing a test page. Verify that the
communication settings from the test page are
correct for your connection. For help, see
“Printing a Configuration Test Page” on
page 10.
Print quality is too light.
Check the battery and recharge it if necessary.
Adjust print contrast through the print
application.
Voids appear in print.
Clean the printhead.
Data and Status LED is
steady red.
Check the paper supply and make sure the
paper door is closed properly.
Data and Status LED is
flashing red.
Read error. Try reading the card again.
Printhead may be too hot and printer has
automatically paused the current print job.
Battery LED does not turn Check the AC adapter output with a
multimeter. Output should be 10 VDC.
on when printer is
connected to AC adapter, • If AC output is OK, there is a problem with
but printer will not turn
the battery or battery charge circuit.
on.
• If AC output is not OK, replace the adapter.
Battery life is short after a Replace the battery.
full charge.
Move the printer closer to the host.
In Bluetooth mode,
printer does not print data Make sure the host has established a connection
from host.
with the printer.
18
PB3 Mobile Printer User’s Guide
Calling Product Support
If you cannot find the answer to your problem at Knowledge Central
or in the “PB3 Problems and Solutions” table, you may need to call
Intermec Product Support. To talk to a Product Support
representative in North America or Canada, call:
1-800-755-5505
Outside the U.S.A. and Canada, go to www.intermec.com and click
Contact to find your local Intermec representative.
Before you call Intermec Product Support, make sure you have the
following information ready:
•
Serial number
•
Firmware version
•
Bluetooth or serial communication settings, such as baud rate
Some printer settings are included on the configuration test page. For
help, see “Printing a Configuration Test Page” on page 10.
Visit the Intermec technical knowledge base (Knowledge Central) at
www.intermec.com and click Support > Knowledge Central to
review technical information or to request technical support for your
Intermec product.
Software and Programming Information
Intermec offers a variety of applications and utilities for your printer,
and may provide periodic firmware updates. Follow the next
procedure to download Intermec files for your PB3.
To download printer software
1 Browse to www.intermec.com and choose Support >
Downloads.
2 In the Select a Product list, choose PB3. A list of downloadable
software and firmware appears.
3 Click the file name and follow the prompts to download the file to
your PC.
The PB3 is compatible with the XSim printer language, as well as with
a subset of ESC/P commands. For more information, see:
PB3 Mobile Printer User’s Guide
19
•
the XSim Programmer’s Reference Manual (P/N 937-014-xxx).
•
the ESC/P Programmer’s Reference Manual (P/N 937-010-xxx).
Intermec’s Printing Resource Kit provides tools for developing mobile
printing solutions for the PB3. For more information, visit
www.intermec.com and choose Products > Applications & Software
> Developer Library > Developer Resource Kits.
Installing Printer Firmware
Use only firmware files provided by Intermec.
To install firmware
1 Configure the printer for a serial connection and connect it to the
host computer with a serial cable. For help, see “Setting Up Serial
Communications” on page 12.
2 Open a communications program such as HyperTerminal. The
printer turns on when the program connects to the printer.
3 As soon as you see the text bootloader v1.xx, press
Backspace. This message appears:
Erase user code?
4 Press Y. This message appears:
Erasing...
Erased Internal Bank 0.
Erased External Flash Chip.
Send a Hex File.
5 Send the firmware file to the printer. The printer loads the new
firmware, which takes 4 to 5 minutes. When the firmware is
loaded, the printer responds with Done.
20
PB3 Mobile Printer User’s Guide
Specifications
PB3 Mobile Printer Specifications
Specification
Description
Height
57 mm (2.25 in)
Width
120 mm (4.75 in)
Length
152 mm (6 in)
Weight (with battery and paper)
0.58 kg (1.3 lb)
Power
7.4 V Li-ion battery, 2200 mAH
Operating temperature
-10ºC to 50ºC (14ºF to 122ºF)
Storage temperature
-20ºC to 60ºC (-4ºF to 140ºF)
Operating humidity
20% to 85% non-condensing
Storage humidity
5% to 95% non-condensing
Printhead
80 mm (3 in) wide, 203 dpi (8 dots/mm)
Print method
Direct thermal
Print speed
Up to 5.6 cm/sec (2 in/sec)
Character sets
Standard: English/Latin
Optional: Arabic, Simplified Chinese,
Traditional Chinese, Cyrillic, Greek,
Hebrew, Polish
Supported bar codes
Codabar, Code 39, UCC/EAN-128,
EAN/UPC, Interleaved 2 of 5, Code 128,
PDF417
Memory
1 MB RAM, 4 MB program flash
Charge time
Approximately 180 min
Communications
Serial (RS-232), Bluetooth, 802.11g, IrDA
Print ratio
25% black max/sq in
PB3 Mobile Printer User’s Guide
21
Accessories
These accessories (sold and ordered separately) are available from
Intermec:
•
Battery (P/N 318-040-001)
•
AC Adapter/Charger (P/N 157261). Charges the battery and runs
the printer on AC power (battery must be installed or printer will
not print).
•
Shoulder Strap (P/N 757351)
•
Printhead Cleaning Pen (P/N 757150)
•
Magnetic Stripe Reader (MSR) Cleaning Cards (P/N 757160)
•
Serial Cable (P/N 5892RJD9-1)
•
3-inch Receipt Paper (P/N E24789)
•
Belt loop (P/N 756998-2)
•
2-Bay Battery Charger
•
Vehicle Battery Adapter (VBA)/cigarette lighter charger
Pinout Diagram
Pin 1
Serial Port Pin Assignments
22
Pin
Signal
Description
1, 5
COM
Logic common
2
TXD
RS-232 from printer (output)
3
RXD
RS-232 from host (input)
4
CTS
Clear to send from printer (output)
6
RTS
Request to send from host (input)
PB3 Mobile Printer User’s Guide
Worldwide Headquarters
6001 36th Avenue West
Everett, Washington 98203
U.S.A.
tel 425.348.2600
fax 425.355.9551
www.intermec.com
© 2008 Intermec Technologies
Corporation. All rights reserved.
PB3 Mobile Printer User’s Guide
*934-043-001*
P/N 934-043-001