1
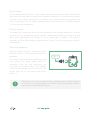
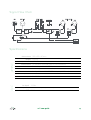
user guide
Introduction
sonible would like to thank you for your purchase of this innovative and highly versatile
audio device. We are confident you will enjoy the ml:1 as much as we do when using it in
live sound applications.
No matter how you are planning to use the ml:1, in a fixed installation setup or during
flexible live setups, we built the interface for durability, reliability and compatibility. So
please feel free to get in touch with us and forward us any questions, comments and
suggestions to [email protected].
We are looking forward to hear from you!
What it is
ml:1
ml:1
The sonible ml:1 is a no compromise
plug&play USB playback device combined
with a passive DI box and a test tone
generator. Automatic initialization of the
interface, direct analog volume control by the
USB host and other features are available
through the standard drivers of most
operating systems†.
Through its clear focus on professional interfacing, the ml:1 offers high flexibility in
different application scenarios. As there will always be some kind of coexistence of analog
and digital transmissions in the world of live sound, the analog and digital outputs of the
ml:1 provide a true missing link for a wide range of different audio setups.
†
Tested and supported: Microsoft Windows XP®, Vista®, Windows 7®, Windows 8®, Mac OS X 10.5® or
higher, Linux® with USB Audio Class compliant kernel module, Apple iOS6® or higher (except all kind of
iPhones®).
ml:1 user guide
2
Digital output
For the digital AES/EBU output, a high class digital signal transformer and a powerful line
driver allow for long cable runs and high impedance tolerances of connections and cables.
Therefore, even simple microphone XLR cables can be used without any problems for
short to mid cable runs. For longer distances cables conforming to the AES/EBU standard
(110 Ohm) are still mandatory.
Analog outputs
The analog XLR outputs are driven by two high quality audio signal transformers. They are
optimized for line signals and provide galvanic isolation and balancing. Please note that
these audio transformers will always be in the signal path, no matter if the signal is
supplied via USB (USB to analog configuration) or the two ¼" jack inputs (passive stereo DI
configuration).
Test tone generator
Last but certainly not least - one of the neatest
features of the ml:1 is its stand alone test tone
generator.
ml:1
This unique feature allows a simple line check
even before the actual signal source is
connected. From our own experience, we
know that such a feature can be very valuable
when sources change very often, or arrive last
minute (don't tell us you haven't been there
before…).
Although the ml:1 does not care whether phantom power (+48V) is applied
to it or not, our recommendation is to switch it off to avoid possible chatter
issues when connecting the outputs.
ml:1 user guide
3
Overview
Front panel
1
Switches
Transformer balanced XLR (analog) output
connectors (wired with pin-1 ground, pin-2
hot and pin-3 cold) provide a balanced 600 to
6
Test tone generator switch (momentary),
generates a multitone on the analog outputs
when toggled for longer than one second. The
initial delay prevents accidental activation of
the signal generator. The test tone will be
active on the outputs as long as you keep the
switch toggled.
7
Pad switch, attenuates analog output signals
(except test tone) by 18dB to ensure a
distortion-free signal with high gain inputs.
8
Ground lift switch, breaks the internal ground
connection of every pin 1 of the analog outputs
to isolate the analog signal ground of the ml:1
outputs from any input ground. This safely
eliminates ground loops and reduces ground
loop induced humming to a minimum.
800 Ohm high level analog signal.
1.1.1.1.1.1.1.1.1
2
3
Unbalanced ¼” jack inputs (switched, 600
Ohm), appropriate for line signals, ring and
sleeve are tied to ground internally.
Transformer balanced XLR digital AES/EBU
output connector.
4
Lockable Neutrik® USB (B-type) receptacle,
compatible with every B-type USB plug.
5
Status LED. Lights up in white if the
connection to the USB host is established.
ml:1 user guide
4
Quick Start Guide
Remove diecast cable carrier from USB cable
The lockable Neutrik® USB cable that comes with your ml:1 (USB type A to USB type B) is
equipped with two rugged diecast cable carriers. To use the USB type A end of the cable
with a conventional USB receptable (most likely, your host computer only offers this kind of
USB port), the cable carrier at this end of the cable has to be removed.
You do not need any tools to accomplish the following, very simple steps to remove the
cable carrier:
Step 1: Take the USB Type A end of your cable
and unscrew the PVC screw coupling counterclockwise from the cable carrier.
‡
Step 2: When the PVC coupling is fully
unscrewed, you can easily pull the diecast cable
carrier off the cable. You can now also simply
remove the PVC coupling from the cable.
Finished – take the conventional USB type A
connector and plug it into your host computer!
USB Audio Interface
The ml:1 can be used as a plug & play USB audio interface for playback applications. As the
interface is a bus powered device, all power needed in USB applications is provided
through the USB connector. The maximum current draw of the ml:1 is less than 40mA
offering a decent runtime even with battery powered solutions.
‡
®.
images copyright by NEUTRIK / the color of the cable carriers may differ (black, gray, silver)
ml:1 user guide
5
input
output
possible application scenarios
USB
digital output (AES/EBU)
connect laptop to digital mixing table
or system controller
USB
analog outputs (balanced)
connect laptop to active speakers
Note that the audio sent to the device through USB will always be routed
simultaneously to the analog and the digital XLR connectors.
Initialization of the ml:1 as USB device
Since the ml:1 is a USB audio class 1 compliant devices, the initialization of ml:1 on the
computer, laptop or mobile device should be done automatically by the operating system.
Depending on your operating system, the initial initialization of the device
will take between one (Mac OS, Linux) and 15 seconds (windows).
All subsequent initializations should only take a second on all operating
systems.
Selecting the ml:1 as USB playback device
On some devices, the ml:1 will be immediately selected as primary output device after
initialization, in some operating systems you have to manually set the ml:1 as output
device.
The method of selecting the systems primary audio device will differ from operating
system to operating system. The following exemplary step by step instructions give a short
reference for Mac and Windows computers.
ml:1 user guide
6
MAC OSX
To open the System Preferences
of your Mac, click the item in your
dock or type it in Spotlight (press
cmd + Shift Button) and confirm
your choice.
In the System Preferences menu
now select the menu item Sound
(see screenshot).
In the Sound menu, navigate to
the Output tab and select the
device called sonible ml:1 as
output device.
That’s all – your ml:1 is now
ready to use!
ml:1 user guide
7
WINDOWS 7 / 8
Right-Click on the loudspeaker
symbol in the windows toolbar to
open up the menu shown right.
Inside the menu
Playback devices.
click
on
The operating system now opens
a list of all available audio
playback devices.
Search for the device called
sonible ml:1 and select it as
current playback device. After
confirmation, the ml:1 is ready to
use.
(This screenshot shows the
Windows 7 Sound Tab. Under
Windows 8 the Tab looks slightly
different, but the steps are
identical.)
Some Windows operating systems will not show the name “sonible ml:1” for
the audio device and will only present a new Default Device. In this case, just
select this device to select the ml:1 as output device.
ml:1 user guide
8
Passive Stereo DI Box
The ml:1 can be also configured as a passive DI Box when the ¼” analog input jacks are
used as inputs. Please note, that signals send through the analog jacks have priority over
the audio signal sent through USB. No phantom power (+48V) is needed for this
functionality.
Inserting a ¼” plug overrides the USB audio signal on the ANALOG outputs and
exclusively passes the inserted signal to the output transformers.
As the digital AES output will always be connected to the USB interface
(regardless of the state of the analog ¼” input jacks), it is possible to use BOTH,
digital and analog XLR outputs, carrying two DIFFERENT galvanically isolated
stereo signals!
Test Tone Generator
The ml:1 test tone generator is a great tool for quick line checks. Using the test tone,
analog connections can be checked before a signal source is attached to the analog inputs
or the USB connector.
The test tone is routed only to the analog XLR outputs.
ml:1 user guide
9
The test signal is a multitone (a combination of harmonic sinusoidal components) and will
be routed to the analog outputs. To trigger the test tone you have to hold the switch for
more than 1 second. This delay prevents unwanted activation of the signal generator
during shock, heavy vibration or faulty operation.
test tone signal
waveform:
harmonic multitone f0=130Hz±10Hz
amplitude:
-22dBu (at full battery charge)
The following plot shows the approximate spectrum of the test tone signal.
130Hz
260Hz
520Hz
1040Hz
2080Hz
ml:1 user guide
8320Hz
log frequency
10
Common Caveats
Although we kept the use of the ml:1 as simple and intuitive as possible, there are a few
things we consider to be important enough to be mentioned in this manual.
Clock signal
In a digital transmission system, both sender and receiver have to agree on a common
clock. The digital AES output of the ml:1 is synced by its internal PLL that derives its clock
from the USB signal. So synchronizing the ml:1 digital AES output to a system with a digital
AES input requires one of the following configurations:
1. The system with the digital AES input is equipped with an ASRC (asynchronous sample
rate converter) option.
In this case, the ASRC takes care of any synchronization mismatch between sender and
receiver. This is the most common and preferred mode of operation. Disconnecting the
ml:1 will not induce any synchronization issues and allows for different sample rate
settings between the individual components.
2. The system with the digital AES input locks on to the inherent clock signal of the ml:1
AES output and the ml:1 becomes the global clock master.
This means the system with the digital AES input has to be configured as clock slave and
both sample rates have to match perfectly. While this offers bit perfect transmission,
synchronization issues may be induced if the ml:1 is not permanently installed.
ml:1 user guide
11
Test tone generator
The power for the test tone generator is supplied by a standard 3 Volt Lithium battery
(industrial standard type CR123A). These batteries are very reliable and long lasting, but
will eventually loose their capability to source power.
Keeping your ml:1 around room temperature will maximize the runtime of the
battery. Avoid storage or operating temperatures below 5°C/40°F and above
40°C/100°F, since this will decrease the battery life.
If you encounter a major change of the multitone in amplitude or frequency during use, the
battery might be low and needs to be replaced. In this case there are two possibilities to fix
the problem:
1. Send in your ml:1 for battery replacement.
sonible offers a easy and quick battery replacement service. This is the perfect option if
you do not want to do it by yourself and spend your time on more interesting things.
2. Replace the battery yourself.
If you’re an experienced service technician, changing the battery yourself is relatively easy.
sonible offers the original equipment manufacturers (OEM) material in replacement to keep
you up and running with a minimum of downtime.
Please check out the “ml:1 Battery Replacement Guide” in the service
area of our website (www.sonible.com) for further details on the two
replacement options given above.
ml:1 user guide
12
Signal Flow Chart
USB
S/PDIF out
analog in (line)
ch 1
ch 2
ground lift
ch 1
analog out (line)
ch 2
lift
pcm
dac
pad
-18dB
ch2
ch2
test tone generator
+
pad
test tone
DAC
general
Specifications
dimensions
weight
input current
connections
183 x 93 x 40 mm
1010 g
≤40mA
1x lockable Neutrik® type B USB connector
2x analog in Neutrik® ¼" jacks
2x analog Neutrik® XLR outputs
1x digital Neutrik® AES/EBU output (110Ohms)
output level 0dBFS equals -18dBu
pad 0/-18dB
ground lift yes
bit depth 16 Bits
sample rate 44.1/48 kHz (set by USB host)
SNR 96dB
ml:1 user guide
13
CE Declaration of Conformity
The sonible ml:1 has been tested by an independent test laboratory and found to comply
with the limits of the European Council Directive on the approximation of the laws of the
member states relating to the following standards:
EN 61000-6-3:2007/A1:2011 Radiated RF emission test
EN 61000-6-1:2007 Immunity against radiated RF disturbances
EN 61000-6-1:2007 Immunity against electrostatic discharges (ESD)
Access to the individual test report will be granted on request.
RoHS
This device has been soldered lead free and all of its internal components comply to the
european RoHS directive.
WEEE/Note on disposal
Following the European directive RL2002/96/EG (WEEE – Directive on Waste Electrical and
Electronic Equipment) this product has to be recycled at the end of its lifetime. Never
dispose this product in an inadequate manner, e.g. general trash, but use appropriate
collection stations for electronic waste.
In case where no appropriate disposal is possible, you may also return this device in a
prepaid shipment to sonible.
ml:1 user guide
14
Legal Disclaimer
Technical specifications and appearances are subject to change without notice and
accuracy is not guaranteed. sonible accepts no liability for any loss which may be suffered
by any person who relies either wholly or in part upon any description, photograph or
statement contained herein.
Colors and specifications may vary slightly from product to product. Distributors and
dealers are not agents of sonible and have absolutely no authority to bind sonible by any
express or implied undertaking or representation.
This manual is copyrighted. No part of this manual may be reproduced or transmitted in
any form or by means, electronic or mechanical, including photocopying and recording of
any kind, for any purpose, without the express written permission of sonible OG or a legal
representative. All rights reserved.
For further information please refer to our website www.sonible.com
or contact us under [email protected]
sonible OG
Plüddemanngasse 39/2
8010 Graz
AUSTRIA
ml:1 user guide
15