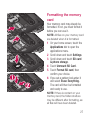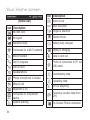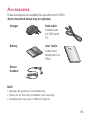
1
LG-P920 User Guide - English
Some parts of this manual may not
apply to your phone, depending
on its software or your service
provider.
• This handset is not recommended
for the visually-impaired because it
has a touch-screen keypad.
• Copyright ©2011 LG Electronics,
Inc. All rights reserved. LG and the
LG logo are registered trademarks
of LG Group and its related
entities. All other trademarks are
the property of their respective
owners.
• Google Search, Maps, Google
Mail, YouTube, Talk and Market are
trademarks of Google, Inc.
•
Disposal of your old appliance
1 When this crossed-out wheeled bin symbol is attached to a product it
means the product is covered by the European Directive 2002/96/EC.
2 All electrical and electronic products should be disposed of separately
from the municipal waste stream via designated collection facilities
appointed by the government or the local authorities.
3 The correct disposal of your old appliance will help prevent potential
negative consequences for the environment and human health.
4 For more detailed information about disposal of your old appliance,
please contact your city office, waste disposal service or the shop where
you purchased the product.
Disposal of waste batteries/accumulators
1 When this crossed-out wheeled bin symbol is attached to batteries/
accumulators of Your product it means they are covered by the European
Directive 2006/66/EC.
2 This symbol may be combined with chemical symbols for mercury(Hg),
cadmium(Cd) or lead(Pb) if the battery Contains more than 0.0005% of
mercury, 0.002% of cadmium or 0.004% of lead.
3 All batteries/accumulators should be disposed separately from the
municipal waste stream via designated collection facilities appointed by
the government or the local authorities.
4 The correct disposal of Your old batteries/accumulators will help to
prevent potential negative consequences for the environment, animal and
human health.
5 For more detailed information about disposal of Your old batteries/
accumulators, please contact Your city office, waste disposal service or
the shop where You purchased the product.
Contents
Guidelines for safe and eficient
use ............................................... 6
Important notice ........................ 14
Getting to know your phone...... 23
Installing the SIM card and
battery .......................................25
Charging your phone ..................26
Installing the memory card .........26
Formatting the memory card ......27
Your Home screen ..................... 29
Touch-screen tips ......................29
Lock your phone ........................1
Unlock screen ............................1
Home .......................................1
Adding widgets to your home
screen .......................................2
Getting back to a recently used
application .................................
On-screen keyboard...................5
Entering accented letters ............6
Google Account Set-up ............. 37
Creating your Google account .....7
Signing in to your Google
account .....................................7
Calls/Contacts ........................... 39
Making a voice call.....................9
Making a video call ....................9
In Video call Menu .....................40
Calling your contacts ..................40
Answering and rejecting a call ....40
Adjusting call volume .................40
Making a second call .................41
Viewing your call logs .................41
Call settings ...............................41
Contacts ....................................4
Searching for a contact ..............4
Adding a new contact.................4
Favourite contacts ......................4
Messaging/Email....................... 45
Messaging .................................45
Sending a message....................45
Changing your message settings 46
Setting up your email .................46
Microsoft Exchange email
account .....................................46
Other (POP, IMAP) email
account .....................................47
Composing and sending email ....48
Working with account folders......49
Adding and editing email
accounts....................................49
Social networking ..................... 50
Adding your account to your
phone ........................................50
Viewing and updating your
status .......................................50
Contents
Removing accounts from your
phone ........................................51
What’s New ...............................51
Photos and videos ..................... 52
Getting to know the viewinder
(Camera)....................................52
Taking a quick snap ..................5
Once you’ve taken the photo ......5
Using the advanced settings
(Camera)....................................54
Viewing your saved photos .........55
Getting to know the viewinder
(Video camera) ...........................56
Shooting a quick video ...............57
After shooting a video.................57
Using advanced settings (Video
camera) .....................................58
Watching your saved videos .......59
Adjusting the volume when
viewing a video ..........................59
D photos and videos.................59
3D Space ................................... 62
YouTube D ...............................62
D Gallery..................................62
D Camera ................................62
D Game & Apps .......................62
D Guide ...................................6
4
Multimedia ................................ 64
Gallery .......................................64
Music ........................................65
Playing a song ...........................65
Transferring iles using USB mass
storage devices ..........................65
How to save music/video iles to
your phone ................................66
How to move contacts from your
old phone to your current phone .67
How to send data from your phone
via Bluetooth ..............................67
HDMI .........................................68
Utilities ...................................... 70
Setting your alarm ......................70
Using your calculator ..................70
Adding an event to your calendar 70
Recording a sound or voice ........71
Sending the voice recording .......71
The Web..................................... 72
Browser .....................................72
Using options .............................72
Google applications................... 74
Maps .........................................74
Market.......................................74
Google Mail ...............................74
Talk ...........................................75
Google Search ...........................75
LG World .................................... 76
How to Get to LG World from Your
Phone........................................76
How to use LG World ..................76
Settings ..................................... 78
Wireless & Networks ..................78
Sound........................................79
Display .....................................80
Gesture .....................................80
Location & security ....................81
Applications ...............................82
Accounts & sync .......................8
Privacy ......................................8
SD card & phone storage ...........8
Language & keyboard ................84
Voice input & output ...................84
Accessibility ...............................85
Date & time ...............................85
About the phone ........................85
Wi-Fi .........................................86
Sharing your phone’s mobile data
connection .................................86
Portable Wi-Fi hotspot settings ...87
To share your phone’s data
connection as a portable Wi-Fi
hotspot ......................................87
To rename or secure your portable
hotspot ......................................88
Using SmartShare .....................89
How to use On-Screen Phone .....91
On-Screen Phone icons..............91
On-Screen Phone features .........91
How to install On-Screen Phone
on your PC.................................92
How to connect your mobile
phone to your PC .......................92
To check the phone-to-PC
connection ................................9
To disconnect your phone from
your PC .....................................9
Phone Software update ..............94
Sync your phone with your
computer ...................................95
Copyrights and trademarks ...... 97
Accessories ............................... 99
Technical data ......................... 100
Troubleshooting....................... 101
5
Guidelines for safe and efficient use
Please read these simple guidelines.
Not following these guidelines may
be dangerous or illegal.
Exposure to radio
frequency energy
Radio wave exposure and Specific
Absorption Rate (SAR) information.
This mobile phone model LG-P920
has been designed to comply with
applicable safety requirements for
exposure to radio waves. These
requirements are based on scientific
guidelines that include safety
margins designed to ensure the
safety of all persons, regardless of
age and health.
• The radio wave exposure
guidelines employ a unit of
measurement known as the
Specific Absorption Rate, or SAR.
Tests for SAR are conducted using
standardised methods with the
phone transmitting at its highest
certified power level in all used
frequency bands.
6
While there may be differences
between the SAR levels of various
LG phone models, they are all
designed to meet the relevant
guidelines for exposure to radio
waves.
• The SAR limit recommended by
the International Commission on
Non-Ionizing Radiation Protection
(ICNIRP) is 2W/kg averaged over
10g of tissue.
• The highest SAR value for this
model phone tested by DASY4 for
use at the ear is 0.90 W/kg (10
g) and when worn on the body is
0.642 W/kg(10 g).
• SAR data information for
residents in countries/regions
that have adopted the SAR limit
recommended by the Institute
of Electrical and Electronics
Engineers (IEEE), which is 1.6 W/
kg averaged over 1g of tissue.
•
Product care and
maintenance
•
WARNING
•
Only use batteries, chargers
and accessories approved
for use with this particular
phone model. The use of any
other types may invalidate any
approval or warranty applying
to the phone, and may be
dangerous.
Do not disassemble this unit. Take
it to a qualified service technician
when repair work is required.
• Repairs under warranty, at
LG’s discretion, may include
replacement parts or boards that
are either new or reconditioned,
provided they have functionality
equal to that of the parts being
replaced.
•
•
•
•
•
•
Keep away from electrical
appliances such as TVs, radios,
and personal computers.
The unit should be kept away from
heat sources such as radiators or
cookers.
Do not drop.
Do not subject this unit to
mechanical vibration or shock.
Switch off the phone in any area
where you are required to do so by
special regulations. For example,
do not use your phone in hospitals
as it may affect sensitive medical
equipment.
Do not handle the phone with wet
hands while it is being charged. It
may cause an electric shock and
can seriously damage your phone.
Do not charge a handset near
flammable material as the handset
can become hot and create a fire
hazard.
7
Guidelines for safe and efficient use
•
•
•
•
•
•
•
•
•
Use a dry cloth to clean the
exterior of the unit (do not use
solvents such as benzene, thinner
or alcohol).
Do not charge the phone when it
is on soft furnishings.
The phone should be charged in a
well ventilated area.
Do not subject this unit to
excessive smoke or dust.
Do not keep the phone next to
credit cards or transport tickets; it
can affect the information on the
magnetic strips.
Do not tap the screen with a
sharp object as it may damage
the phone.
Do not expose the phone to liquid
or moisture.
Use the accessories like
earphones cautiously. Do not touch
the antenna unnecessarily.
Do not use, touch or attempt to
remove or fix broken, chipped or
cracked glass. Damage to the
8
glass display due to abuse or
misuse is not covered under the
warranty.
Efficient phone operation
Electronics devices
All mobile phones may get
interference, which could affect
performance.
• Do not use your mobile phone
near medical equipment
without requesting permission.
Avoid placing the phone over
pacemakers, for example, in your
breast pocket.
• Some hearing aids might be
disturbed by mobile phones.
• Minor interference may affect TVs,
radios, PCs, etc.
Road safety
Check the laws and regulations on
the use of mobile phones in the area
when you drive.
• Do not use a hand-held phone
•
•
•
•
•
while driving.
Give full attention to driving.
Pull off the road and park before
making or answering a call if
driving conditions so require.
RF energy may affect some
electronic systems in your vehicle
such as car stereos and safety
equipment.
When your vehicle is equipped
with an air bag, do not obstruct
with installed or portable wireless
equipment. It can cause the air
bag to fail or cause serious injury
due to improper performance.
If you are listening to music whilst
out and about, please ensure that
the volume is at a reasonable
level so that you are aware of your
surroundings. This is particularly
imperative when near roads.
Avoid damage to your
hearing
Damage to your hearing can occur
if you are exposed to loud sound for
long periods of time. We therefore
recommend that you do not turn
the handset on or off when close to
your ear. We also recommend that
music and call volumes are set to a
reasonable level.
• When using headphones, turn the
volume down if you cannot hear
the people speaking near you, or if
the person sitting next to you can
hear what you are listening to.
NOTE: Excessive sound pressure
from earphones can cause
hearing loss.
Glass Parts
Some parts of your mobile device
are made of glass. This glass
could break if your mobile device
is dropped on a hard surface or
receives a substantial impact. If
the glass breaks, do not touch or
attempt to remove. Stop using your
mobile device until the glass is
replaced by an authorised service
provider.
9
Guidelines for safe and efficient use
Blasting area
Children
Do not use the phone where blasting
is in progress. Observe restrictions,
and follow any regulations or rules.
Keep the phone in a safe place
out of the reach of small children.
It contains small parts which may
cause a choking hazard if detached.
Potentially explosive
atmospheres
Do not use the phone at a
refuelling point.
• Do not use near fuel or chemicals.
• Do not transport or store
flammable gas, liquid, or
explosives in the same
compartment of your vehicle
as your mobile phone and
accessories.
•
In aircraft
Wireless devices can cause
interference in aircraft.
• Turn your mobile phone off before
boarding any aircraft.
• Do not use it on the ground
without permission from the crew.
10
Emergency calls
Emergency calls may not be
available under all mobile networks.
Therefore, you should never depend
solely on the phone for emergency
calls. Check with your local service
provider.
Battery information and
care
•
You do not need to completely
discharge the battery before
recharging. Unlike other battery
systems, there is no memory
effect that could compromise the
battery’s performance.
•
•
•
•
•
•
•
•
Use only LG batteries and
chargers. LG chargers are
designed to maximise the battery
life.
Do not disassemble or short-circuit
the battery pack.
Keep the metal contacts of the
battery pack clean.
Replace the battery when it
no longer provides acceptable
performance. The battery pack
may be recharged hundreds of
times until it needs replacing.
Recharge the battery if it has
not been used for a long time to
maximise usability.
Do not expose the battery charger
to direct sunlight or use it in high
humidity, such as in the bathroom.
Do not leave the battery in hot or
cold places as this may deteriorate
the battery performance.
There is risk of explosion if the
battery is replaced by an incorrect
type.
Dispose of used batteries
according to the manufacturer’s
instructions. Please recycle when
possible. Do not dispose as
household waste.
• If you need to replace the battery,
take it to the nearest authorised
LG Electronics service point or
dealer for assistance.
• Always unplug the charger from
the wall socket after the phone is
fully charged to save unnecessary
power consumption of the charger.
• Actual battery life will depend on
network configuration, product
settings, usage patterns, battery
and environmental conditions.
•
3D Content Viewing
Precautions
NOTES FOR VIEWING 3D
CONTENT: When viewing D
content, hold and adjust the device
to an appropriate viewing angle
and distance, to optimise the D
experience. If you exceed this
11
Guidelines for safe and efficient use
viewing angle or distance, you may
not be able to view the D content.
WARNINGS FOR VIEWING 3D
CONTENT:
• Viewing D content, including
videos and games, for a long
period of time can cause eyestrain,
drowsiness, headaches, nausea or
fatigue. Stop viewing immediately
and rest if you experience any of
these symptoms.
• If you watch D content too
closely or for too long, it may harm
your eyesight.
• Some D content may cause
you reactions such as ducking or
dodging the image displayed in
the video/game. Therefore, it is
best if not to view D content near
fragile objects or any sharp objects
that could cause injury.
• Do not view D content while
driving, walking or moving around.
This may result in injury from
bumping into objects, tripping or
falling.
12
Please check with a medical
specialist before allowing children
to view D content on the device,
as viewing D content may affect
sight development.
• Warning about photosensitisation
seizures:
• If you or anyone in your family
has a history of epilepsy or
seizures, please check with
a medical specialist before
viewing D content.
• If you or anyone in your
family experiences any of
the following symptoms,
immediately stop viewing
the D content and consult
a doctor: dizziness or lightheadedness, visual transition
or alterations, visual or facial
instability, such as eye or
muscle twitching, unconscious
actions, convulsions, loss of
consciousness, confusion
or disorientation, loss of
directional sense, cramps or
•
nausea. Parents should closely
monitor children, including
teenagers, for these symptoms
as they may be more sensitive
to the effects of watching D
content. Note: These symptoms
can occur in any situation
without any previous history.
• The risk of photosensitisation
seizure can be reduced by
taking the following actions:
• Take frequent breaks from
watching D content on
your phone.
• If your sight is different in
each eye, only view D
content after taking vision
correction measures.
• Some viewers may feel
disoriented after viewing
D content. Therefore, after
viewing D content on your
phone, take a moment to
regain awareness of your
surroundings before moving.
1
Important notice
Please check this section to see if
any problems you have had with your
phone are described, before taking
the phone in for servicing or calling a
service representative.
1. Phone memory
When the available space in your
phone memory is less than 10%,
your phone can't receive new
messages. You will need to delete
some data from your phone memory,
such as applications or messages, to
provide more memory space.
To manage the application:
1 On the home screen, touch the
Applications tab and select
Settings > Applications >
Manage applications.
2 When all applications appear,
scroll down to the application you
want to uninstall and select it.
3 Tap Uninstall and touch OK to
uninstall the selected application.
14
WARNING
If you delete your data stored
on the internal SD card of your
phone, you cannot restore it using
the Factory data reset option
(Settings > Privacy > Factory data
reset).
2. Optimising battery life
You can extend your battery's life by
turning off features that you don't
need that run in the background. You
can also monitor how applications
and system resources use battery
power.
To extend the life of your battery:
• Turn off radio communications
that aren't in use. Turn off Wi-Fi,
Bluetooth or GPS when not in use.
• Turn down screen brightness and
set a shorter screen timeout.
• Turn off automatic syncing for
Google Mail, Calendar, Contacts
and other applications.
Some applications you have
downloaded may reduce your
battery’s life.
To check the battery charge level:
1 On the home screen, touch the
Applications tab and select
Settings > About phone >
Status.
2 The battery status (charging,
discharging) and level (as a
percentage of a full charge) are
displayed at the top of the screen.
To monitor and control battery
use:
1 On the home screen, touch the
Applications tab and select
Settings > About phone >
Battery use.
2 The top of the screen displays
the battery usage time. This
is either how long since your
phone was last connected to a
power source or, if connected to
a power source, how long since
your phone last ran on battery
•
power. The body of the screen
lists the applications or services
using battery power, from highest
consumption to least.
3. Installing an open
source OS
If you install an open source OS on
your phone and do not use the OS
provided by the manufacturer, your
phone may malfunction.
WARNING
If you install and use an OS
other than the one provided by
the manufacturer, your phone
will not be covered by the
warranty.
15
Important notice
WARNING
To protect your phone and
personal data, only download
applications from trusted
sources such as Android
Market. If some applications
are incorrectly installed on your
phone, your phone may not
work properly, or serious errors
may occur. You will need to
remove these applications and
all their data and settings from
the phone.
Caution: Create a Google Mail
account first, before setting an
unlock pattern.
WARNING
Precautions to take when
using Pattern Lock
It is essential that you remember
the unlock pattern you set.
You have ive chances to enter
your unlock pattern, PIN or
password. Once you have used
all ive chances, you can try
again 30 seconds later.
4. Using unlock pattern
Set unlock pattern to secure your
phone. This opens a set of screens
that guide you through drawing a
screen unlock pattern.
You can draw your own unlock
pattern by connecting four or more
dots.
If you set a pattern, the phone
screen will lock. To unlock the phone,
enter the pattern you have set on the
screen.
16
If you can’t remember your unlock
pattern, PIN or password:
If you have tried to log on to your
Google account on the phone and
failed to enter the correct pattern five
times, tap the Forgot pattern button.
You will then be required to sign in
with your Google account to unlock
your phone.
If you haven’t created a Google
account on the phone or cannot
remember it, you will have to carry
out a factory reset.
5. Connecting to Wi-Fi
networks
To use Wi-Fi on your phone you need
to access a wireless access point or
“hotspot.” Some access points are
open, and you can simply connect
to them. Others are hidden or have
other security features, so you must
configure your phone to connect to
them.
Turn off Wi-Fi when you're not using
it to extend the life of your battery.
To turn Wi-Fi on and connect to a
Wi-Fi network:
1 On the home screen, touch the
Applications tab and select
Settings > Wireless & networks
> Wi-Fi settings.
2 Touch Wi-Fi to turn it on and
start scanning for available Wi-Fi
networks.
• A list of available Wi-Fi networks is
displayed. Secured networks are
indicated by a lock icon.
3 Touch a network to connect to it.
• If the network is open, you are
prompted to confirm you want
to connect to that network by
touching Connect.
• If the network is secured, you are
prompted to enter a password
or other credentials. (Ask your
network administrator for details.)
4 The status bar displays icons
indicating Wi-Fi status.
17
Important notice
6. Opening and switching
applications
Multi-tasking is easy with Android
because open applications keep
running even when you open a
further application. You do not
need to quit an application before
opening another one. Use and switch
between several open applications.
Android manages each application,
stopping and starting it as needed,
to ensure idle applications don’t
consume resources unnecessarily.
To stop using an application:
1 On the home screen, touch the
Applications tab and select
Settings> Applications>
Manage applications.
2 Scroll to the chosen application
and touch Force Stop to close it.
18
TIP!
Going back to a recent
Application
Touch and hold the Home key.
A screen will appear listing the
applications you have used recently.
7. Installing the LG PC
suite on your PC
To synchronise your phone with your
PC via a USB cable, you need to
install the LG PC suite programme
on your PC.
You can download this programme
from the LG website at www.lg.com.
Go to http://www.lg.com and select
your region, country and language.
Visit the LG website for more
information on installing and using
the programme.
LG PC SUITE
The LG PC Suite IV is a
programme that helps you
connect your mobile phone
to a PC using a USB data
communication cable, so you
can use your mobile phone's
functions on your PC.
Major LG PC Suite IV
functions
Create, edit and delete phone
data easily.
• Synchronise data from a PC
or phone (contacts, calendar,
messages (SMS), bookmarks,
call log).
• Transfer multimedia files
(photo, video and music) easily
with a simple drag & drop
between your PC and phone.
• Transfer messages from your
phone to your PC.
•
•
Software update without losing
your data
The LG-P920 does not
support:
- PC Connection via Bluetooth
- To-do in Calendar
- Java Applications
For more information, please
refer to the LG PC Suite
IV user guide. This can be
found in the Help menu after
installing LG PC Suite IV.
8. Connecting your
phone to a computer
via USB
To transfer files in your microSD
card using USB devices:
1 Install your microSD card on your
phone. (It may already be inserted
in your phone.)
2 Before connecting the USB data
cable, make sure the Mass
19
Important notice
storage mode is enabled on your
phone. (On the Applications tab,
choose Settings > SD card &
phone storage > Mass storage
only)
3 Use the USB cable with your
phone to connect it to a USB
port on your computer. Touch
Turn on USB storage. You will
get a notification that the USB is
connected.
When the phone is connected as
USB storage, you will receive a
notification. You phone’s microSD
card is installed as a drive on your
computer. You can now copy files to
and from the microSD card.
NOTE: When uninstalling PC Suite
IV, USB and Bluetooth Drivers
are not automatically removed.
They must therefore be removed
manually.
TIP! To use the microSD card on
your phone again, you need to
open the notiication drawer and
touch Turn off USB storage.
20
During this time, you can’t access
the microSD card from your phone,
so you can’t use applications that
rely on the microSD card such as
camera, gallery and music functions.
To disconnect your phone from
the computer, carefully follow the
computer’s instructions about how
to disconnecting USB devices, to
avoid losing information on the card.
1 Safely disconnect the USB device
from your computer.
2 Open the notification drawer and
touch Turn off USB storage.
3 Touch Turn off in the dialogue
box that opens.
WARNING
Do not insert or remove the
microSD card when the phone
is on. This might damage the
microSD card as well as your
phone, and the data stored
on the microSD card could
be corrupted. To remove the
microSD card safely, from the
Home screen press the Menu
key and touch Settings > SD
card & phone storage > Unmount
SD card.
9. Unlock screen
when using a data
connection
The LCD display will go dark if
untouched for a set time when using
a data connection. Touch it to turn it
on again.
10. Do not connect your
phone when you turn
your PC on and off
Make sure you disconnect your
phone and PC via a data cable to
avoid any harm to your PC.
11. Hold your phone
upright
Please hold your phone straight
and level, like a normal phone. The
LG-P920 has an internal antenna. Be
careful not to scratch or damage the
back of the phone, as this will impair
performance. While making/receiving
calls or sending/receiving data, try
to avoid holding the lower part of the
phone where the antenna is located.
This may affect call quality.
21
Important notice
12. If the screen freezes
If the phone does not respond to
user input, or the screen freezes:
Remove the battery, reinsert it and
switch on the phone. If it still does
not work, please contact the service
centre.
22
Getting to know your phone
To turn on the phone, hold down the Power key for seconds.
To turn off the phone, hold down the Power key for seconds, touch Power off
and touch OK.
Power/Lock key
Earpiece
- Switch your phone on/off
by holding this key down.
Proximity Sensor
- Lock and unlock the
screen.
Home key
- Return to home from
any screen.
Menu key
- Check available
options.
Inner camera lens
Back key
- Return to the previous
screen.
Search key
- Search the web and
contents in your phone.
WARNING: Placing a heavy object on the phone or sitting on it can
damage its LCD and touch screen functions.
Do not cover the protective ilm on the LCD’s proximity sensor.
This could cause the sensor to malfunction.
TIP! Touch the Menu key whenever you tap an application to see what
options are available.
TIP! If the LG-P920 displays an error message when you use it, or if you
cannot turn it on, remove the battery, put it back in, then turn it on again after
5 seconds.
2
Getting to know your phone
Stereo earphone
connector
Power/Lock key
Volume keys
- On the home screen: control ringer volume.
- During a call: control your earpiece volume.
- When playing music: control volume at any time.
Charger, micro USB cable connector
HDMI
3D key
- Access D Space directly by holding this key down.
Back cover
Battery
SIM card slot
microSD memory
card slot
24
Camera lens
Installing the SIM card
and battery
Before you can start using your new
phone, it has to be set up. To insert
the SIM card and battery:
1 To remove the back cover, hold
the phone firmly in one hand.
With the other hand, firmly press
down on the centre of the battery
cover, while pulling the top away
with your forefinger. Then lift off
the battery cover.
2 Slide the SIM card into the SIM
card holder. Make sure the gold
contact area on the card is facing
downwards.
3 Insert the battery in place by
aligning the gold contacts on the
phone and the battery.
25
Getting to know your phone
4 Replace the phone's back cover.
NOTE: The battery must be fully
charged on irst use to extend
battery lifetime.
Installing the memory
card
Charging your phone
The charger connector is on the top
of your LG-P920. Insert the charger
and plug it into an electrical socket.
Your LG-P920 must be charged until
you can see .
To store multimedia files, such as
photographs taken with the built-in
camera, you must insert a memory
card into your phone.
To insert a memory card:
1 Turn off your phone before
inserting or removing the memory
card. Remove the back cover.
2 Insert the memory card into the
slot. Make sure the gold contact
area is facing downwards.
26
Formatting the memory
card
Your memory card may already be
formatted. If not, you must format it
before you can use it.
NOTE: All iles on your memory card
are deleted when it is formatted.
1 On your home screen, touch the
Applications tab to open the
applications menu.
2 Scroll down and touch Settings.
3 Scroll down and touch SD card
& phone storage.
4 Touch Unmount SD Card.
5 Touch Format SD card, then
confirm your choice.
6 If you set a pattern lock,enter it
and select Erase Everything.
The card will then be formatted
and ready to use.
NOTE: If there is content on your
memory card, the folder structure
may be different after formatting, as
all iles will have been deleted.
27
Getting to know your phone
TIP! If your memory card is
already removed, you can use the
following steps to format it.
Touch Applications > Settings
> SD card & phone storage >
Format SD Card.
WARNING Do not insert or
remove the memory card while
the phone is on. Otherwise you
may damage the memory card
and your phone, and the data
stored on the memory card
may be corrupted. To remove
the memory card safely, select
Applications > Settings >
SD card&phone storage >
Unmount SD card.
28
Your Home screen
Touch-screen tips
Here are some tips on navigating around your phone.
Touch - To
Touch and hold
choose a menu/
- To open an
option or open
options menu or
an application,
grab an object
touch it.
you want to
move, touch and
hold it.
Drag - To scroll
through a list,
or move slowly,
drag across the
touch screen.
Flick - To scroll
through a list,
or move quickly,
flick across the
touch screen
(drag quickly and
release).
29
Your Home screen
Pinch and stretch
- To zoom in on
content while
centring the image
between the finger
tips, pinch on the
screen by pressing
two fingers down
and bringing
them together. For
stretching content,
move the fingers
away from each
other to zoom out
on an image.
0
NOTE:
To select an item, touch the centre
of the icon.
• Do not to press too hard: the
touch screen is sensitive enough
to pick up a light, steady touch.
• Use the tip of your finger to touch
the option you want. Be careful
not to touch any other keys.
•
Lock your phone
Home
When you are not using your LGP920, press the Power key to
lock it. This helps avoid accidental
touches on the screen and saves
battery power.
If you do not use the phone for a
while, whatever screen you are
viewing will be replaced by the lock
screen to conserve the battery.
Simply move your finger left or right
to view them.
You can also customise each panel
with widgets, shortcuts to your
favourite applications, folders and
wallpaper.
NOTE: Some screen images may
vary depending on your phone
provider.
On your home screen, you can view
quick keys on the bottom of the
screen. Quick keys provide easy,
one-touch access to the functions
you use most.
NOTE: If there are any programmes
running when you set the pattern,
they may keep running in lock
mode. We recommend you exit all
programmes before entering lock
mode to avoid unnecessary charges
(e.g. for phone calls, web access or
data communications).
Unlock screen
To wake up your phone, press the
Power key. The lock screen will
appear. Touch and slide up the
lock screen to unlock your home
screen. The last screen you viewed
will open.
Touch the Phone icon to bring
up the touch-dialling pad to make a
call.
Touch to open your contacts.
Touch the Messaging icon to
access the messaging menu.
You can create a new message here.
Touch the Applications tab
at the bottom of the screen. You
can then view all the installed
1
Your Home screen
applications. Just touch to scroll
through your applications.
To open any application, simply
touch the icon in the applications list.
NOTE: Pre-loaded applications may
vary depending on your phone’s
software or your service provider.
Adding widgets to your
home screen
You can customise your home
screen by adding shortcuts,
widgets or folders to it. For added
convenience when using your phone,
put your favourite widgets on the
home screen.
To add an icon to your home
screen:
1 On the home screen, touch the
Menu key
and select Add.
Alternatively, touch the empty
part of the home screen for an
extended period.
2 In the Edit Mode menu, touch
the type of item you want to add.
2
3 For example, select Folders
from the list and tap it. Select
Contacts with phone numbers
from the list and tap it.
4 A new folder’s icon will appear
on the home screen. Drag it to
the desired location on the right
panel and take your finger off
the screen.
TIP! To add an application icon
to the home screen from the
Applications menu, touch and
hold the application you want
to add.
To remove an application icon
from the home screen:
1 Touch and hold the icon you want
to remove. The rubbish bin icon
will appear.
2 Drag and drop the application
icon to the rubbish bin icon .
NOTE: You cannot delete preloaded applications. (You can only
remove their icons from the screen.)
Getting back to a
recently used application
1 Touch and hold the Home key
. The screen will give a pop
up with icons for applications you
have used recently.
2 Touch an icon to open its
application. Or touch the Back
key to go back to your current
application.
Notification drawer
The notification drawer runs across
the top of your screen.
Ring
Wi-Fi
Bluetooth GPS
Touch and slide the notification
drawer down with your finger.
3G
Alternatively, on the home screen
touch the Menu key
and
select Notifications. Here you can
check and manage Wi-Fi, Bluetooth
and GPS status, as well as other
notifications.
Viewing the status bar
The status bar uses different icons
to display phone information, such
as signal strength, new messages,
battery life and Bluetooth and data
connections.
The table below explains the
meaning of the icons you are likely
to see in the status bar.
Your Home screen
Icon Description
[Status bar]
Icon Description
New voicemail
No SIM card
Ringer is silenced
No signal
Vibrate mode
Airplane mode
Battery fully charged
Connected to a Wi-Fi network
Battery is charging
Wired headset
Data in and out
Call in progress
Call on hold
Phone is connected to PC via
USB cable
Speakerphone
Downloading data
Phone microphone is muted
Missed call
Bluetooth is on
4
Alarm is set
Uploading data
GPS is acquiring
Connected to a Bluetooth
device
Receiving location data from
GPS
System warning
On-Screen Phone connected
Icon Description
more notifications not
displayed
Data is synchronising
Download finished
New email
New Google Mail
New Google Talk message
New message
Song is playing
Upcoming event
Portable Wi-Fi hotspot is
active
Portable hotspot is active
SmartShare On
Icon Description
SmartShare Off or sharing
request
On-screen keyboard
You can enter text using the onscreen keyboard. The on-screen
keyboard appears automatically
on the screen when you need to
enter text. To manually display the
keyboard, simply touch a text field
where you want to enter text.
Using the keypad & entering
text
Tap once to capitalise the next
letter you type. Double-tap for all
capitals.
Tap to switch to the numbers
and symbols keyboard. You can
also hold this tab down to view the
settings menu.
Tap to view or change the
writing language.
5
Your Home screen
space
Tap to enter a space.
Tap to create a new line in the
message field.
Tap to delete the previous
character.
Tap to hide the on-screen
keyboard.
Entering accented letters
When you select French or Spanish
as the text entry language, you can
enter special French or Spanish
characters (e.g. á).
For example, to input "á", touch and
hold the "a" key until the special
characters are shown. Then select
the special character you want.
6
Google Account Set-up
The first time you open the Google
application on your phone, you will
be required to sign in with your
existing Google account. If you do
not have a Google account, you will
be prompted to create one.
Creating your Google
account
1 On the home screen, touch the
Applications tab
to open the
applications menu.
2 Tap Google Mail and tap Next >
Create to start the Google Mail
set up wizard.
3 Touch a text field to open the
touch keyboard, and enter your
name and username for your
Google account. When entering
text, you can move to the next
text field by touching Next on the
keyboard.
4 When you have entered your
name and username, tap Next.
Your phone will communicate
with Google servers and check
username availability.
5 Enter and re-enter your
password. Then follow the
instructions and enter the
required and optional information
about the account. Wait while the
server creates your account.
Signing in to your
Google account
1 Enter your email address and
password, then tap Sign in. Wait
to sign in.
2 After sign in, you can use Google
Mail and Google services on your
phone.
3 Once you have set up your
Google account on your phone, it
will automatically be synchronised
with your Google account on
the web. (This depends on your
synchronisation settings.)
After sign in, you can use Google
Mail, Google Calendar and Android
7
Google Account Set-up
Market, download applications
from Android Market, back up your
settings to Google servers and use
other Google services on your phone.
IMPORTANT!
•
Some applications, such as
Calendar, only work with the
first Google Account you add. If
you plan to use more than one
Google Account with your phone,
make sure you sign into the
one you want to use with these
applications first. When you sign
in, your contacts, Google Mail
messages, calendar events and
other information from these web
applications and services are
synchronised with your phone.
If you don’t sign into a Google
account during setup, you will
be prompted to sign in or create
one the first time you start an
application that requires an
account, such as Google Mail or
Android Market.
8
If you want to use the backup
feature to restore your settings to
this phone from another phone
running Android OS or later,
you must sign into your Google
account now, during setup. If you
wait until setup is complete, your
settings will not be restored.
• If you have an enterprise account
through your company or another
organisation, your IT department
may have special instructions on
how to sign into that account.
•
Calls/Contacts
Making a voice call
1 Touch
to open the keypad.
2 Enter the number on the keypad.
To delete a digit, touch the Clear
icon .
to make
3 Touch the Call icon
a call.
4 To end a call, touch the End
icon
.
TIP! To enter “+” to make
international calls, hold down
.
TIP! To bring up the keypad
during a call, touch Dialpad.
Making a video call
to open the keypad.
1 Touch
2 Enter the phone number as
before.
to
3 Touch the Video call icon
make a video call.
4 If you do not want to use the
speaker phone, touch Speaker
and make sure you have your
headset plugged in.
5 While the video call is connecting,
you will see your own image:
after the other party answers,
you will see their image on the
screen. Adjust the inner camera
position if necessary.
6 To end a video call, touch End.
Private: You can change the image
instead of showing the current
private one.
Dialpad: Type in a number.
Hold: Mute the microphone and
pause the video.
Mute: Mute the microphone.
Speaker: Speaker on or off.
9
Calls/Contacts
In Video call Menu
When screen is locked:
Capture - You can capture an image
of the other party or your own.
Use back/front camera - Switch
cameras.
When your phone rings, drag the
Decline icon
to the left to
Decline/Reject an incoming call.
Calling your contacts
1 Touch
to open your list of
contacts.
2 Scroll through the contact list
or enter the first letter(s) of the
contact you want to call by
touching Search.
3 In the list, touch the contact you
want to call.
Answering and rejecting
a call
TIP! Place your phone screen
down or press the volume (side)
key to mute the sound of an
incoming call. Gesture settings
must be set beforehand. Tap
Applications > Settings >
Gesture > Use motion gestures
> Incoming call > tick Mute.
40
When screen is unlocked:
When your phone rings, touch the
Accept icon . Touch the Decline
icon
to Decline/Reject an
incoming call.
TIP! Excuse messages
When you want to Decline/Reject
a call, you can send a message
quickly by dragging Excuse msg
on the screen. This is useful if you
need to reply to a message during
a meeting.
Adjusting call volume
To adjust the in-call volume during
a call, use the volume up & down
key on the left side of the phone.
Making a second call
1 During your first call, touch
Dialpad
and dial the number.
Also, you can search your
contacts by touching Contacts
and select the number you
want to call.
to
2 Touch the Call icon
connect the call.
3 Both calls will be displayed on the
call screen. Your initial call will be
locked and put on hold.
4 Touch the hold list to toggle
between calls.
NOTE: You can touch Merge
calls
to make a conference
call.
5 To end active calls, touch the End
icon
.
Viewing your call logs
On the home screen, touch
and
choose the Call log tab.
View a complete list of all dialled,
received and missed calls.
TIP! Touch any single call log
entry to view the date, time and
duration of the call.
TIP! Touch the Menu key, then
touch Delete All to delete all
recorded items.
Call settings
You can configure phone call
settings, such as call forwarding and
other special features offered by
your carrier.
1 On your home screen, touch the
Applications tab to open the
applications menu.
2 Scroll down and touch Settings.
3 Tap Call settings and choose the
options you want to adjust.
< Fixed Dialling Numbers >
Select Fixed Dialling Numbers
to turn on and compile a list of
numbers that can be called from
your phone. You’ll need your PIN 2
41
Calls/Contacts
code, available from your operator.
Only numbers on the fixed dial list
can be called from your phone.
< Voicemail >
Voicemail service – Allows you
to select your carrier’s voicemail
service.
Voicemail settings – If you are
using your carrier’s voicemail
service, this option allows you to
enter the phone number to use
for listening to and managing your
voicemail.
< Other call settings >
Call reject – Set to reject calls
on list or all calls. If you make a
Call reject list, touch Call reject list
> Menu key > New reject entry.
Then create New reject entry from
Contacts, Call logs or New number.
Call forwarding – You can configure
how your calls are forwarded if
you’re on the phone, if you don’t
answer, etc.
42
Additional settings – This lets you
change the following settings:
• Caller ID: Choose whether
to display your number on an
outgoing call.
• Call waiting: If call waiting is
activated, the handset will notify
you of an incoming call while you
are on another call. (This depends
on your network provider.)
• Select line: Allow selection of
different phone numbers in your
SIM.
Call barring – Select when you
would like calls to be barred. Enter
the call barring password. Please
check with your network operator
about this service.
Call costs – View the charges
applied to your calls. (This service is
network dependent: some operators
do not support this function.)
Call duration – View the duration of
all calls, dialled calls, received calls
and the last call.
Excuse messages – When you
reject a call, you can send a
message quickly using this function.
This is useful if you need to reply to
a message during a meeting.
Video call settings – Change your
video call settings.
Contacts
You can add contacts on your phone
and synchronise them your Google
account contacts or those in other
accounts that support contact
synchronisation.
Searching for a contact
1 On the home screen, touch
to open your contact list.
2 Touch Search and enter the
contact name using the keypad.
Adding a new contact
1 On the home screen, touch
, and enter the new contact’s
number, then touch the Menu
key
, and touch Add to
2
3
4
5
6
contacts. Then choose whether
to create new contact or Add
to the existing.
If you want to add a picture to the
new contact, touch .
Choose between Capture
picture or Pick from gallery.
Select the contact type by
.
touching
Touch a text field to open the
touch keyboard and enter a new
contact’s name.
Touch a contact information
category and enter your contact's
details.
Touch Save to save the contact.
Favourite contacts
You can assign frequently-called
contacts as favourites.
To add a contact to your
favourites:
1 On the home screen, touch
to open your contact list.
4
Calls/Contacts
2 Touch a contact to view their
details.
3 Touch the star to the right of the
contact’s name. The star will
turn gold.
To remove a contact from your
favourites list:
1 On the home screen, touch
to open your contact list.
2 Touch the Groups tab and select
Favourites. Touch a contact to
view their details.
3 Touch the gold star to the right of
the contact’s name. The star will
turn grey and the contact will be
removed from favourites.
44
Messaging/Email
Messaging
Your LG-P920 combines SMS and
MMS into one intuitive, easy-to-use
menu.
Sending a message
1 Touch the
icon on the home
screen to open a blank message.
2 Enter a contact name or call
number in the To field. As you
enter the contact name, matching
contacts will appear. You can
touch a suggested recipient. You
can add multiple contacts.
NOTE: You will be charged for
a text message for every person
you send the message to.
3 Touch Enter message below to
start entering your message.
4 Touch Send to send your
message.
TIP! You can touch the
icon
to attach the file you want to send
with your message.
5 The message screen opens, with
your message after your name.
Responses will appear on the
screen. As you view and send
additional messages, a message
thread will be created.
WARNING
The 160-character limit may
vary from country to country,
depending on language and
how the SMS is coded.
WARNING
If an image, video or audio ile is
added to an SMS message, it
will be automatically converted
into an MMS message and you
will be charged accordingly.
NOTE: If you get an SMS message
during a call, there will be a ring
notiication.
45
Messaging/Email
Changing your message
settings
Microsoft Exchange
email account
Your LG-P920 message settings
are pre-defined, so you can send
messages immediately. You can
change these settings based on your
preferences.
Touch the Messaging icon on the
home screen and touch the Menu
key, then tap Settings.
Email address – Enter the account
email address.
User name – Enter the account
username.
Password – Enter the account
password.
Domain – Enter the account domain
(optional)
Server address – Enter the server
address
Use SSL – Choose whether or not to
use SSL
SSL for Microsoft Exchange.
Touch the Next button to connect the
server.
Setup complete page will appear:
you will need to enter “name” for
account display and My name.
The account will now appear in the
list of accounts in your Email folder.
Setting up your email
Touch the Applications tab and
select Email. If the email account
is not set up, you need to start the
email set up wizard.
TIP! If an email account is
already set up, the wizard is not
activated automatically.
You can select mailbox type MS
Exchange or Others.
46
Other (POP3, IMAP)
email account
Email address – Enter the account
email address.
Password – Enter the account
password.
Setup complete page will appear and
you will need to enter “name”.
The account will now appear in the
list of accounts in your Email folder.
POP3 / IMAP4 – Select protocol
type, either POP or IMAP4.
Incoming server – Enter the
incoming email server address.
Secure type – TLS/SSL/Off.
Port number – Normally each
account’s default number will be
displayed.
Outgoing server – Enter the
outgoing email server address.
SMTP Secure type – TLS/SSL/Off.
Port number – Normally each
account’s default number will be
displayed.
The Accounts screen
The Accounts screen lists your
Combined Inbox and each of your
email accounts.
• Touch the Application tab and
select Email. The Account list
screen appears.
TIP! In account lists, touch an
email account more heavily to
move the account icon to the
home screen. Touch the icon to
go to straight to the inbox.
You can touch an account to view
its Combined Inbox. The default
account from which you send email
is indicated with a tick.
To open your Combined Inbox:
If you have configured email to
send and receive email from more
than one account, you can view all
messages sent to all accounts in
your Combined Inbox.
47
Messaging/Email
1 Touch Email.
2 Touch Combined Inbox (on the
Accounts screen). Messages in
the Combined Inbox are colourcoded on the left, by account,
using the same colours used for
your accounts in the Accounts
screen.
Composing and sending
email
To compose and send a message:
1 In the Email application, touch
the Menu key, then touch
Compose.
2 Enter an address for the
message’s intended recipient.
As you enter text, matching
addresses will be offered from
your contacts. Separate multiple
addresses with commas.
3 Touch the Menu key and then
touch Add Cc/Bcc to copy or
blind copy to other contacts/email
addresses.
48
4 Enter the text of the message.
5 Touch Attach
to attach the
file you want to send with your
message.
6 Touch Send.
If you’re not ready to send the
message, touch the Menu key
and the touch Save as draft to
save it in a Drafts folder. Touch
a message in a Drafts folder
to resume working on it. Your
message will also be saved as a
draft if you touch the Back key
before sending it. Touch
Discard to abandon and delete
a message, including any saved
drafts. If you aren’t connected
to a network, for example if you’
re working in airplane mode, the
messages you send are stored
in your Outbox folder until you’
re connected to a network. If it
contains any pending messages,
the Outbox will be displayed on
the Accounts screen.
Please note that messages sent
using an Exchange account will not
be stored on the phone: they will be
stored on the Exchange server itself.
If you want to see your sent
messages in the Sent folder (or with
the Sent label), you may need to
open the Sent folder/label and select
Refresh from the options menu.
TIP! When a new email arrives
in the inbox, there will be sound
and vibration notiication. Tap
the email notiication to end it.
Working with account
folders
Each account has Inbox, Outbox,
Sent, Drafts, Rubbish Bin and
Junk folders. Depending on the
features your account service
provider supports, you may have
additional folders.
Adding and editing email
accounts
To add an email account:
1 Touch the Applications tab and
select Email.
2 Select MS Exchange or Other.
If an email account is already set
up, the wizard is not activated
automatically. In this case, you
need to touch the Menu key then
tap Add account.
To change account settings:
1 Open the Accounts screen.
2 Touch the Menu key and select
Settings.
To delete an email account:
1 Open the Accounts screen.
2 Touch and hold the account you
want to delete.
3 Touch Remove account in the
menu that opens and touch OK in
the dialogue box to confirm.
49
Social networking
You can use your phone for social
networking and to manage your
micro-blog in on-line communities.
You can update your current status,
upload photos and view your friends’
status updates.
If you don’t have an account, you
can visit the website to set one up.
NOTE: Additional costs may be
incurred when connecting to and
using online services. Check data
charges with your network provider.
Adding your account to
your phone
1 Touch and hold the home screen.
When various Widgets appear,
choose Social+
and tap
the
Setting button. You
can also access a different way.
On the home screen, choose
Applications > Settings >
Accounts & sync > Social+
settings.
50
2 Choose the social networking
client application you want to
use from Facebook, Twitter and
MySpace.
3 Enter your community email
address and password, then tap
Log in.
4 Wait while your details are
confirmed with your community.
5 If you tap your community, you
can see the its current status.
Viewing and updating
your status
1 You can view and update social
community content using the
Social+
widget at any time.
2 On the Social+
widget,
choose the Social Networks
service you log in to. You will then
see your status and contents.
3 When you touch the input
box, the screen will switch to
update your current status with
comments or upload photos.
TIP! You can update your status
simultaneously by checking
the SNS services you want to
upload from Facebook, Twitter
and MySpace.
NOTE: This depends on network
services.
TIP! You can use information
about friends on the social
networking site only, or
synchronise all data to contacts.
What’s New
Show notifications for a Missed call,
an Unread message, Voice mail,
Email in priority order. Notifications
over a certain period of time are
shown.
1 Choose Applications > What’s
New.
2 By tapping the
button, you
can choose between list view or
category view.
Removing accounts from
your phone
1 Choose Applications > Settings
> Accounts & sync.
2 Choose the account you want
to delete, then touch Remove
account.
51
Photos and videos
Getting to know the viewfinder (Camera)
Zoom - Zoom in or out. Alternatively, you can use the side volume keys.
Switch camera - You can move to the internal camera from the external
one.
Transition between 2D - 3D
modes - Touch to switch photo
shoot mode between 2D and D.
Taking a photo
Video mode - Slide this icon to the
right to switch to video mode.
Gallery - Touch the last photo you
took to view. This enables you to
access your gallery and view saved
photos within camera mode.
Settings - Touch this icon to open
the settings menu. See Using the
advanced settings.
Flash - Allows you to turn on the flash when taking a photo in a dark place.
Brightness - This defines and controls the amount of sunlight entering the
image. Slide the brightness indicator along the bar towards “-” to lower the
image brightness or towards “+” to increase it.
TIP! You can close all shortcut options to give a clearer viewinder screen. Just
touch the centre of the viewinder once. To restore the options, touch the screen
again.
52
Taking a quick snap
1 Open the Camera application.
2 Holding the phone, point the lens
towards the subject you want to
photograph.
3 Touch the shutter icon .
4 The camera brings the image
into focus. When the image is
in focus, the focus indicators in
each corner turn green and the
camera takes a picture.
Notice: A shading issue
may occur when you take a
picture indoors, due to the
characteristics of the camera.
(Shading means a colour
difference between centre and
sides.)
Once you’ve taken the
photo
Your captured photo will appear on
the screen.
Touch to share it via
Bluetooth, Picasa,
Messaging, Facebook
for LG, MySpace for LG,
Twitter for LG, Google
Mail or Email.
NOTE: Additional charges may
apply when MMS messages are
downloaded while roaming.
TIP! If you have a social
networking site account and set it
up on your phone, you can share
your photos with your community.
Set as Touch to set the image
as Contact icon or
Wallpaper.
Rename Touch to edit the name of
the selected picture.
Edit Touch to edit the photo you
took.
Share
Touch to delete the image.
Touch to take another photo
immediately.
Touch to view the last photo
you took.
5
Photos and videos
Using the advanced
settings (Camera)
In the viewfinder, touch
to open
all the advanced options.
You can change the camera setting
by scrolling the wheel. After selecting
an option, touch the Back key.
Focus – Select the focus option
from Auto, Macro, Continuous AF
and Face tracking.
Image size – Touch to set the size
(in pixels) of the picture you are
taking.
Scene mode – Choose between
Auto, Portrait, Landscape, Sunset
and Night.
White balance – Choose between
Auto, Incandescent, Sunny,
Fluorescent and Cloudy.
Color effect – Choose a colour tone
for your new photo. Choose between
None, Sepia, Mono and Negative.
54
Timer – The self-timer allows you to
set a delay before a picture is taken
after pressing the shutter.
Shot mode – Select shooting mode
from Normal or Continuous shot.
Image quality – Choose between
Super Fine, Fine and Normal. The
finer the quality, the sharper the
photo. However, the file size will be
larger, meaning you’ll be able to
store fewer photos in the memory.
Auto review – If you set Auto
review to on, it will automatically
show you the picture you have just
taken.
Shutter sound – Select one of the
four shutter sounds.
Tag location – Activate to use your
phone’s location-based services.
Take pictures wherever you are and
tag them with the location. If you
upload tagged pictures to a blog that
supports geotagging, you can see
the pictures displayed on a map.
NOTE: This function is only
available when location service is
activated.
Storage – Select either Internal SD
card or External SD card to save
images.
Restore all camera default
settings.
Touch this if you want to know
how this function operates.
The following gives you a quick
guide.
TIP! When you exit the camera,
some settings will return to their
defaults. Check the camera
settings before you take your
next photo.
TIP! The settings menu
is superimposed over the
viewinder, so when you change
image colour or quality features
you will see the image preview
change behind the settings
menu.
Viewing your saved
photos
1 You can access your saved
photos from within camera mode.
Just touch
and your gallery
will appear on the screen. Touch
the photo on the screen. You will
then see Slideshow and Menu.
Touch to see slide show. Touch
Menu and select the options
you want.
Touch to share the contents.
Touch to delete a photo.
Touch More for more options,
as below.
Details - Find out more
information about the content.
Set as - Set as contact icon or
wallpaper.
Crop - Crop your photo. Move
your finger across the screen to
select an area.
Rotate - Rotate left or right.
Edit - Touch to edit the image
using various tools.
55
Photos and videos
Getting to know the viewfinder (Video camera)
Zoom - Zoom in or out. Alternatively, you can use the side volume keys.
Switch camera - You can move to the internal camera from the external
one.
Transition between 2D - 3D
modes - Touch to switch photo
shoot mode between 2D and D.
Start recording
Camera mode - Slide this icon to
the left to switch to camera mode.
Gallery - Touch to view the video
you recorded last. This enables you
to access your gallery and view
your saved videos from within the
video mode.
Settings - Touch this icon to open
the settings menu. See Using the
advanced settings.
Flash - Allows you to turn on the flash when taking a photo in a dark place.
Brightness - This defines and controls the amount of sunlight entering the
image. Slide the brightness indicator along the bar towards “-” to lower the
image brightness or towards “+” to increase it.
TIP! You can close all shortcut options to give a clearer viewinder screen. Just
touch the centre of the viewinder once. To restore the options, touch the screen
again.
56
Shooting a quick video
After shooting a video
1 Open the Camera application
and slide the camera mode
button down to the Video
position. The shutter icon
will
change to .
2 The video camera viewfinder will
appear on the screen.
3 Holding the phone, point the lens
towards the video subject.
4 Touch the start video icon .
5 REC will appear at the bottom of
the viewfinder, along with a timer
showing the length of the video.
6 Touch the stop video icon
to
stop recording.
A still image representing your video
will appear on the screen.
Play Touch to play the video.
Share Touch to share your video
via Bluetooth, Email,
Google Mail, Messaging
or YouTube.
NOTE: Additional charges may
apply when MMS messages are
downloaded while roaming.
Rename Touch to edit the name of
the selected video.
Touch to delete the video you
made and confirm by touching
Yes. The viewfinder will
reappear.
Touch to shoot another video
straight away.
Touch to view the last video
you recorded.
57
Photos and videos
Using advanced
settings (Video camera)
Using the viewfinder, touch
to
open all the advanced options.
Adjust the video camera settings by
scrolling the wheel. After selecting
an option, touch the Back key.
Video size – Touch to set the
size (in pixels) of the video you
will record. Set the video image
size as 1080P(1920x1080),
720P(1280x720), D1(720x480),
VGA(640x480), QVGA(20x240) or
QCIF(176x144).
White balance – The white balance
ensures white areas in your video
are realistic. To enable your camera
to adjust the white balance correctly,
you may need to determine the light
conditions. Choose between Auto,
Incandescent, Sunny, Fluorescent
and Cloudy.
58
Color effect – Choose a colour tone
to use for your new view. Choose
between None, Sepia, Mono and
Negative.
Video quality – Choose between
Super Fine, Fine and Normal.
Duration – Set a time limit for your
video. Choose between Normal and
MMS to limit the maximum size to
send as an MMS message.
Audio recording – Choose Mute to
record a video without sound.
Auto review – If you set this to On,
it will automatically show you the
video you have just recorded.
Storage – Select either Internal SD
card or External SD card to save
videos.
Reset all video camera settings.
Touch this if you want to know
how this function operates.
The following gives you a quick
guide.
Watching your saved
videos
1 In the viewfinder, touch
on
the lower right-hand corner.
2 Your gallery will appear on the
screen.
3 Touch a video once to bring it to
the front of the gallery. It will start
to play automatically.
a
b
c
Adjusting the volume
when viewing a video
d
To adjust the volume of a video while
it is playing, use the volume keys on
the left side of the phone.
e
3D photos and videos
Taking a 3D Photo
a
b
c
d
e
Switch camera - You can move to the
internal camera from the external one.
3D focus- You can manually fine-tune
D focus by adjusting the amount of
overlapping with a bar that appears at
the bottom. Before starting to take a D
picture, you can use this function.
Brightness - This defines and controls
the amount of sunlight entering the
video. Slide the brightness indicator
along the bar towards “-” to lower the
video brightness or “+” to increase it.
3D Photo size - Touch to set the size
of the D photo you will take. Set your
D photo image size as M, 2M or 1M.
Settings - Touch this icon to open the
settings menu. See Using the advanced
settings.
3D focus mode - Select the auto
D focus option from Border,
Center. Border uses a border
area for optimizing the amount of
overlapping. Center uses a center
area for it. You can also find-tune
manually with D focus function
of viewfinder.
59
Photos and videos
1 Open the Camera application.
2 Touch the D button
on the
viewfinder.
3 Holding the phone, point the lens
towards the subject you want to
photograph.
4 Touch the shutter icon .
5 The camera brings the image
into focus. When the image is
in focus, the focus indicators in
each corner turn green and the
camera takes a picture.
Recording a 3D Video
a
b
c
d
e
a
60
Switch camera - You can move to the
internal camera from the external one.
b
c
d
3D focus - You can manually fine-tune
D focus by adjusting the amount of
overlapping with a bar that appears
at the bottom. Before starting to take
a D video, you can use this function.
You can't adjust this function while
recording.
Brightness - This defines and controls
the amount of sunlight entering the
video. Slide the brightness indicator
along the bar towards “-” to lower the
video brightness or “+” to increase it.
3D Video size - Touch to set the size
(in pixels) of the D video you will
record. Set your D video image size as
HD (1280x720), D1 (720x480) or VGA
(640x480).
e
Settings - Touch this icon to open the
settings menu. See Using the advanced
settings.
3D focus mode - Select the auto
D focus option from Border,
Center. Border uses a border
area for optimizing the amount of
overlapping. Center uses a center
area for it. You can also find-tune
manually with D focus function
of viewfinder.
Stabilization - Set On to
compensate unsteady hand.
1 Open the Camera application and
slide the camera mode button
down to the Video position. The
will change
shutter icon
to .
2 The video camera viewfinder will
appear on the screen: touch the
D button
.
3 Holding the phone in landscape
view, point the lens towards the
video subject.
4 Touch the start video icon .
REC will appear at the bottom of
the viewfinder, along with a timer
showing the length of the video.
to
5 Touch the stop video icon
stop recording.
NOTE
D camera mode is only allowed
in landscape view.
• Keep the distance between the
camera and the object more than
0.5m.
• For the optimal D viewing
experience, hold the device
0~40cm away from your eyes.
•
61
3D Space
Press and hold the D key on the
right side of the phone to access
D Space. It will show you D
content such as YouTube D, D
Gallery, D Camera and D guide.
YouTube 3D
1 Touch YouTube D to launch. As
the screen switches to YouTube
D web, various D videos
appear.
2 Select a video you want to watch.
The video will be shown in side
by side format in portrait mode.
3 Rotate to landscape and D
mode will turn on automatically.
3D Gallery
D Gallery. The
1 Touch the
D images will then be listed.
2 Choose one you want to see.
NOTE
D content is best viewed with the
screen 0~40cm in front of you.
• To enjoy the D effect, the content
•
62
needs to be set in the right D
format. If the content is not shown
in D, change the format using the
D formatter.
3D Camera
1 Touch the
D Camera and
the screen will switch to D
camera mode. To create D
photos and D recordings, see
the D photos and videos on
previous pages.
3D Game & Apps
D Game & Apps and
1 Touch
any D Games and Applications
you have downloaded from
Market will be listed. Four
applications, such as Asphalt6,
Let's Golf2, Nova, Gulliver's
Travels, are provided as default
settings.
3D Guide
The D Guide contain instructions
that makes D content easier to use
with this phone. It will advise you
how to create D pictures, connect
to D TV via HDMI, view D content
and share them.
6
Multimedia
Gallery
You can also save your files to
an external memory card. The
advantage of using a memory card
is that you can free up memory
space on your phone.
Touch the Applications tab, then
select Gallery.
1 You can access your saved
photos from within camera mode.
and your gallery
Just touch
will appear on the screen. Touch
the photo on the screen. You will
then see Slideshow and Menu.
Touch to see slide show. Touch
Menu and select the options
you want.
Touch to share the content.
Touch to delete a photo.
Touch More for more options,
as below.
Details - Find out more
information about the content.
Set as - Set as contact icon or
wallpaper.
64
Crop - Crop your photo. Move
your finger across the screen to
select an area.
Rotate - Rotate left or right.
Edit - Touch to edit the image
using various tools.
NOTE: You can access D content
on Gallery.
To view MPO files,
1 Select the image you want to
watch.
2 Rotate to landscape and touch
the MPO viewer.
3 Tilt your phone.
To view 3D content,
1 Select the image you want to
watch.
2 Rotate to landscape and D
mode turns on.
3 For more information, refer to the
D Guide.
NOTE: A part of image files can be
converted 2D to D.
Music
Your LG-P920 has a built-in player
that lets you play all your favourite
music. To access the music player,
touch the Applications tab then
select Music.
Playing a song
1 On the home screen, touch the
Applications tab and select
Music.
2 Touch Songs.
3 Select the song you want to play.
to pause the song.
4 Touch
5 Touch
to skip to the next
song.
6 Touch
to go back to the start
of the song. Touch
twice to
go back to the previous song.
To adjust the volume while listening
to music, touch the up and down
volume keys on the left side of the
phone.
Touch and hold any song in the list.
It will display Play, Add to playlist,
Use as ringtone, Delete and Share
as options.
NOTE: Music ile copyright may
be protected by international
treaties and national copyright
laws.
You may therefore need to
obtain permission or a licence
to reproduce or copy music. In
some countries, laws prohibit
private copying of copyrighted
material. Before downloading
or copying a ile, please check
the laws of the relevant country
governing the use of such
material.
Transferring files using
USB mass storage
devices
To transfer files using USB
devices:
1 Connect the LG-P920 to a PC
using a USB cable.
2 If you haven't installed LG Android
65
Multimedia
Platform Driver on your PC, you
will need to change settings
manually. Choose Settings > SD
card & phone storage > Mass
storage only and connect your
phone to your PC using the USB
data cable.
3 Touch Turn on USB storage.
4 You can view the mass storage
content on your PC and transfer
files.
NOTE: You will need to install
your microSD card first. Without a
microSD card, you cannot use USB
mass storage.
How to save music/
video files to your phone
1 Connect your phone to the PC
using the USB cable.
• Touch and drag down the status
bar on the home screen. Select
USB connected > Turn on USB
storage > Open folder to view
files.
66
If you haven't installed LG Android
Platform Driver on your PC,
you will need to set it manually.
For more information, refer to
'Transferring files using mass
storage devices'.
2 Save music or video files
from your PC to the phone's
removable storage.
• You can copy or move files from
a PC to the phone's removable
storage using a card reader.
• If there is a video file with a
subtitle file (a .smi or .srt file with
the same name as the video file),
put them in the same folder to
display the subtitle automatically
when playing the video file.
• When downloading music or
video files, copyright must be
respected. Please note that a file
that is corrupted or has the wrong
extension may cause damage to
your phone.
•
How to move contacts
from your old phone to
your current phone
Export your contacts as a
CSV file from your old phone
to your PC, using a PC sync
programme.
1 Download Mobile Sync for
Android at www.lg.com and
install it on your PC. Run the
programme, and connect your
Android mobile phone to the PC
using a USB cable.
2 Select the Contacts icon. Go to
Menu > More > Import and
select the CSV file saved on
the PC.
3 If the fields in the imported CSV
file are different from the ones
in Mobile Sync for Android, you
need to map the fields. After
mapping the fields, click OK. The
contacts will then be added in
Mobile Sync for Android.
4 If the LG-P920 phone connection
using the USB cable is detected
by Mobile Sync for Android, click
"Sync" or "Sync contacts" to
synchronise the contacts saved
in the PC to your phone and
save them.
How to send data from
your phone via Bluetooth
You can send data via Bluetooth by
running a suitable application, rather
than from the Bluetooth menu as
with normal mobile phones.
• Sending pictures: Run the
Gallery application and select
Picture > Menu. Click Share
and select Bluetooth > Check
if Bluetooth is turned on and
select Scan for devices >
Choose the device you want to
send data from the list.
• Exporting contacts: Run the
Contacts application. Touch
the address you want to export
to. Touch the Menu and select
67
Multimedia
Share > Bluetooth > Check if
Bluetooth is turned on and select
Scan for devices > Choose the
device you want to send data from
on the list.
• Sending multiple contacts:
Run the Contacts application.
To select more than one contact
touch the Menu key and touch the
Menu key and touch Share. Select
the contacts you want to send
or touch Select all > Share >
Bluetooth > Check if Bluetooth
is turned on and select Scan for
devices > Choose the device you
want to send data from on the list.
• Connecting to FTP (Only FTP
servers are supported on this
handset): Settings > Wireless &
networks > Bluetooth settings.
Then select the Discoverable
tickbox and search for other
devices. Find the service you want
and connect to the FTP server.
68
TIP! Its is Bluetooth
version 2.1+EDR, certiied by
Bluetooth SIG. It is compatible
with other Bluetooth SIG
certiied devices.
NOTE: If you want to search for this
phone from other devices, go to
Settings > Wireless & Networks >
Bluetooth settings. Then select the
Discoverable tickbox. The tickbox
is cleared after 120 seconds.
NOTE: The following proiles are
supported: SDAP, HFP, HSP, OPP,
PBAP (server), FTP (server), A2DP
and AVRCP.
HDMI
HDMI (High Definition Multimedia
Interface) is a compact audio/
video interface for transmitting
uncompressed digital data. If you
connect your phone to a TV or
monitor using an HDMI cable, you
can transmit images or video files
with the video player/image viewer
of your phone and see them on the
TV or monitor. You can also play 3D
content on a 3D TV or monitor.
Note: It may take time to play
media files depending on the device
connected to your phone. Files
may not be played properly when
using a non-HDMI certified cable or
product. The image orientation you
set on your phone is also used on
the device.
3D content may not be transmitted
automatically if your phone and 3D
TV support different HDMI versions.
In this case, you can change the
3D settings of TV referring to the
TV user’s manual. When using a
HDMI cable, 3D video playback, 3D
camera preview, or 3D video camera
preview is displayed only on a TV
or monitor. HDMI OUT may not be
supported from some of files due to
request from copyright owner.
If your phone data is not displayed
properly on the device due to a
sync issue, you need to change the
resolution of your phone. (On the
Home screen, tap the Menu key,
and then tap Settings > HDMI >
Resolution.)
69
Utilities
Setting your alarm
1 On the home screen, touch the
Applications tab and select
Alarm Clock.
2 If you want to add a new alarm,
touch New alarm.
3 Set the alarm and touch Save to
turn it on.
NOTE: To delete the alarm on the
alarm list screen, touch the Menu
key and select Delete/Delete all.
Using your calculator
1 On the home screen, touch the
Applications tab and select
Calculator.
2 Touch the number keys to enter
numbers.
3 For simple calculations, touch the
function you want (+, –, x or ÷)
followed by =.
4 For more complex calculations,
touch Menu and Advanced
panel, then choose sin, cos, tan,
log, etc.
70
NOTE: As a standard unit of angle
measure, radian is only supported
by this calculator.
Adding an event to your
calendar
1 On the home screen, touch the
Applications tab and select
Calendar.
2 You must first create MS
Exchange or Google account to
use Calendar.
3 To check the event, touch the
date. Hold it down if you want
to add a new event. Then touch
New event.
4 Touch What, then enter the event
name. Check the date and enter
the time you want your event to
start and finish.
5 Then touch Where and enter the
location.
6 To add a note to your event,
touch Description and enter the
details.
7 If you want to repeat the
alarm, set Repetition and set
Reminders if necessary.
8 Touch Done to save the event in
the calendar. A coloured square
in the calendar will mark all days
that have saved events. An alarm
will sound at the event start time
to help you stay organised.
Recording a sound or
voice
Use the voice recorder to record
voice memos or other audio files.
1 On the home screen, touch the
Applications tab and select
Voice Recorder.
2 Touch to start recording.
3 Touch to stop recording.
4 Touch to listen to the
recording.
5 Touch to access your album.
You can listen to the saved
recording.
Notice: Available recording time
may differ from the real time.
Sending the voice
recording
1 Once you have finished recording,
you can send the audio clip by
touching Share.
2 Choose between Bluetooth,
Email, Google Mail and
Messaging. When you select
Email, Google Mail and
Messaging, the voice recording
will be added to the message
you write, and it will be sent as
normal.
71
The Web
Browser
Using options
Browser gives you a fast, full-colour
world of games, music, news, sports,
entertainment and much more, right
on your mobile phone - Wherever
you are and whatever you’re into.
Touch the Menu key to view options.
Read it later: Added in Read
it later.
Share page: Send the web
page via Bluetooth, Email, Facebook,
Google Mail, Messaging and so on.
Find on page: If you enter a
letter or word, it will mark all the
letters you entered from on the web
page.
Select text: Touch and select
the lines you want to copy. You
can paste it into any input box by
touching it for an extended period.
Add RSS Feed: Add your
favourite web page. When a new
item appears on the site, you will
automatically be notified by Google
reader.
NOTE: Additional charges apply
when connecting to these services
and downloading content. Check
data charges with your network
provider.
< Tool bar >
The icons bar on the screen below
makes it easier to use the browser.
Backward: Move to the
previous web page.
Forward: Move to the next
web page.
Windows: Show all your open
windows.
New windows: Open a new
window.
Settings: Move to Browser
settings.
72
NOTE: RSS (Really Simple
Syndication) is a family of web feed
formats used to publish frequently
updated content, such as blog
entries, news headlines or podcasts.
An RSS document, called a feed,
web feed or channel, contains
either a summary of content from
an associated website or its full
text. RSS makes it possible for
people to keep up-to-date with their
favourite websites in an automated
way that is easier than checking
manually. The user subscribes to
a feed by entering its link into the
reader or clicking an RSS icon in a
browser that starts the subscription
process. The reader checks the
user’s subscribed feeds regularly for
new content, and downloads any
updates it inds.
More
• Home page: Move to Home page.
• Set home page: Set the current
page as your home page
• Page info: Show the web page
information.
• Downloads: Show downloaded
history.
For unavailable RSS Feed
webpages, the 'Add RSS Feed'
icon menu will be disabled.
7
Google applications
1 First, set up a Google account.
Enter your user name and
password.
2 After signing in, the contacts,
email and calendar in your
Google account will automatically
synchronise with your LG-P920.
Maps
Check your current location and
traffic and receive directions to your
destination. Your phone must be
connected to Wi-Fi or G/GPRS.
NOTE: Google Maps does not
cover all cities and countries.
Market
Android Market lets you download
applications and games. If you
install applications and games from
Android Market, they will appear in
the LG-P920 menu.
You can check other peoples'
comments regarding an application,
or post your own comments.
74
Google Mail
Google Mail is configured when you
first set up your phone. Depending on
your synchronisation settings, Google
Mail on your phone is automatically
synchronised with your Google
account on the web. The inbox
conversations list will be your default
Google Mail view.
Touch the Menu key, then touch
Refresh to send or receive new
emails and to synchronise your
emails with your Google account
on the web. With the Menu key,
you can compose an email, add
accounts, go to labels, search, etc.
Talk
Google Talk is Google’s instant
messaging programme. It lets you
communicate with other people who
use Google Talk.
Touch the Menu key and select
the available options as below: All
friends, Add friend, Search, Sign
out, Settings, etc.
Google Search
Google Mobile Web Search allows
you to search for websites.
75
LG World
LG World offers an assortment
of exciting content - games,
applications, wallpaper and ringtones
- giving LG phone users the
chance to enjoy richer “Mobile Life”
experiences.
NOTE: What if there is no
icon?
1 Using a mobile Web browser,
access LG World (www.
lgworld.com) and select your
country.
2 Download LG World App.
3 Execute and install the
downloaded file.
4 Access LG World by tapping
the
icon.
How to Get to LG World
from Your Phone
1 Tap the
icon to access LG
World.
2 Tap Sign in and enter ID/PW for
LG World. If you have not yet
signed up, tap Register and get a
LG World membership.
3 Download the content you want.
76
How to use LG World
Participate in monthly LG World
promotions.
• Find and download exciting D
content from the ‘D zone’.
• Try the easy “Menu” buttons to
find what you’re looking for fast.
• Categories: Find contents
by category (e.g. Education,
Entertainment, Games, etc).
•
My Apps: List of downloaded/
to-be-updated contents.
• Apps for you: Recommended
content based on your previous
choices.
• Search: Search Content.
• Settings: Set Profile and
Display.
• Try other useful functions as well.
(Content Detail screen)
• Wish List: Save the content
you're interested in
• Share: Share content
information through E-mail,
Facebook, Twitter and SMS.
NOTE: LG World may not be
available in all carriers or countries.
•
77
Settings
On the home screen, touch the
Application tab then scroll and
touch Settings.
Wireless & Networks
Here, you can manage Wi-Fi,
SmartShare and Bluetooth. You
can also set mobile networks and
airplane mode.
Airplane mode – After setting
Airplane mode, all wireless
connections will be disabled.
Wi-Fi – Touch to select: This turns
on Wi-Fi to connect to available Wi-Fi
networks.
Wi-Fi settings – Allows you to set
up and manage wireless access
points. Set network notification or
add a Wi-Fi network. The advanced
Wi-Fi settings screen is accessed
from the Wi-Fi settings screen. Touch
the Menu key and touch Advanced.
SmartShare settings – Allows you
to change the device name and
select content type to be shared.
78
Bluetooth – Touch to select: Turns
on Bluetooth to connect to Bluetooth
devices.
Bluetooth settings – Set device
name & discoverable mode, scan
for other devices. Alternatively,
check a list of Bluetooth devices
you’ve previously configured plus
those detected when the phone last
scanned for Bluetooth devices.
Tethering & portable hotspot –
Tether your phone to your computer
with a USB cable to share your
phone's Internet connection with
your computer and turn your phone
into a Wi-Fi access point to share
your phone's Internet connection
with additional computers or devices.
VPN settings – Displays the list of
Virtual Private Networks (VPNs) that
you’ve previously configured. Allows
you to add different types of VPNs.
Mobile network settings – Set
options for data roaming, network
mode & operators, access point
names (APNs) etc.
On-Screen Phone settings –
Allows you to change the On-Screen
Phone password (the default
password is "0000"). On-Screen
Phone allows you to view your
mobile phone screen from a PC via
a USB or Bluetooth connection. You
can also control your mobile phone
from your PC, using the mouse or
keyboard.
Sound
< General >
Silent mode – Allows you to
silence all sounds (including call and
notification ringtones) except the
audio from music and videos, and
any alarms you have set. (Media and
alarms must be silenced from their
own applications.)
Notice: After setting silent mode it
is not available to use Settings >
Sound > Volume menu.
Vibrate – Allows you to set your
phone to vibrate when you receive
an incoming call.
Volume – Allows you to set the
volume for ringtones, media and
alarms. If you un-select the option
to use the same volume for calls
and notifications, you can set the
volumes for each separately.
< Incoming calls >
Phone ringtone – Allows you to set
your default incoming call ringtone.
< Notifications >
Notification ringtone – Allows
you to set your default notification
ringtone.
< Feedback >
Audible touch tones – Allows you
to set the phone to play tones when
dialling numbers using the dial
keypad.
79
Settings
Audible selection – Allows you to
set your phone to make a sound
when you touch buttons, icons and
other on-screen items that are
touch-sensitive.
Screen lock sounds – Allows you
to set your phone to make a sound
when locking and unlocking the
screen.
Haptic feedback – Allows you to set
your phone to vibrate briefly when
you touch the soft keys and carry out
other actions.
Display
Brightness – Adjust the brightness
of the screen.
Auto-rotate screen – Allows you
to set the orientation to switch to
landscape mode or portrait mode
automatically when you turn the
phone on its side or upright.
Animation – Allows you to set
animated transitions when navigating
from screen to screen.
80
Screen timeout – Allows you to
adjust the delay time before the
screen automatically turns off. For
best battery performance, use the
shortest convenient timeout.
Display font - Change the display
font.
Gesture
Use motion gestures – Adjust the
gesture settings for the incoming
calls and for use with the alarm.
Reset gesture sensor – Calibrate
the motion sensor with the phone
placed on a flat surface.
<Incoming call>
Mute – Allows you to mute the
sound by flipping the phone over
while the phone is ringing.
<Alarm>
Snooze (stop) – Allows you to
snooze(stop) the alarm by flipping
the phone over.
Location & security
< My Location >
Use wireless networks – If you
select Use wireless networks,
your phone will determine your
approximate location using Wi-Fi and
mobile networks.
Use GPS Satellites – If you select
Use GPS satellites, your phone will
determine your location with streetlevel accuracy.
< Screen unlock>
Set up screen lock – Set an unlock
pattern to secure your phone. This
opens a set of screens that guide
you through drawing a screen
unlock pattern. You can set a PIN or
Password instead of a Pattern, or
leave the option as None.
TIP! To lock your screen by
using the Pattern Lock
1 The first time you do this, a
short tutorial about creating
an unlock pattern appears.
2 You will be prompted to draw
and redraw your own pattern.
The next time you turn on
your phone or wake up the
screen, you will be prompted
to draw your unlock pattern to
unlock the screen.
< SIM card lock >
Set up SIM card lock – Set up SIM
card lock or change SIM PIN.
< Passwords >
Visible passwords – Select to show
passwords as you type them, or
deselect to hide them as you type
them.
< Device administration >
Select device administrators –
Add or remove device administrators.
81
Settings
< Credential storage >
Use secure credentials – Select
to allow applications to access your
phone’s encrypted store of secure
certificates, related passwords and
other credentials. Credential storage
is used to establish some kinds of
VPN and Wi-Fi connections. If you
have not set a credential storage
password, this setting is greyed out.
Install from SD card – Allows you
to install encrypted certificates from a
microSD card.
Set password – Allows you to set or
change the password for your secure
credential storage. Your password
must have at least eight characters.
Clear storage – Deletes all secure
certificates and related credentials
and erases the secure storage’s own
password.
82
Applications
Unknown sources – Permits
installation of applications you
get from websites, email or other
locations than Android Market.
WARNING
Depending on the applications
you install, the mobile phone
may not operate correctly
and could be illegally used to
establish your location and gain
access to personal information
via the Internet.
To protect your phone and
personal data, only download
applications from trusted sources
such as Android Market.
Manage applications – Manage
and remove installed applications.
Running services – Allows you
to view and control services and
applications that are currently
running. This option displays what
processes each running service
needs, and how much memory it is
using.
Development – Allows you to set
options for application development,
such as USB debugging, Stay
awake and Allow mock locations.
Accounts & sync
<General sync settings >
Background data – Permits
applications to synchronise data in
the background, whether or not you
are actively using them. Un-selecting
this setting can save battery power,
and will lower (but not eliminate)
data use.
Auto-sync – Permits applications to
synchronise, send and receive data
on their own schedule.
< Manage accounts >
List of all Google accounts and
other accounts you’ve added to your
phone.
If you touch an account in this
screen, its account screen will open.
Privacy
< Personal data >
Factory data reset – Erases all your
personal data from internal phone
storage, including information about
your Google account and any other
accounts, your system/application
data and settings, any downloaded
applications and your DRM licence.
Resetting the phone will not delete or
restore any system software updates
you have downloaded or any files
(e.g., photos and music files) on your
microSD card or internal SD card. If
you reset the phone this way, you will
be prompted to re-enter the same
information as when you first started
Android.
SD card & phone storage
< SD card >
Check total space and available
space. Touch Unmount External
SD card to remove it safely. Format
External SD card, if you want to
delete all data from the microSD
8
Settings
card. You must unmount a microSD
card before you can format it.
< Internal phone storage >
Check the Available space.
Language & keyboard
Use the Language & keyboard
settings to select the language and
region for the text on your phone
and for configuring the on-screen
keyboard, including words you’ve
added to its dictionary.
Voice input & output
< Voice input >
Voice recogniser settings –
Use the Voice recogniser settings
to configure the Android voice input
feature.
• Language: Opens a screen where
you can set the language you use
when entering text by speaking.
• SafeSearch: Opens a dialogue
box where you can set whether
you want Google SafeSearch filter
84
to block some results.
Block offensive words: When
un-selected, Google voice
recognition will recognise and
transcribe words many people
consider offensive, when you enter
text by speaking. When selected,
Google voice recognition replaces
those words in transcriptions with
a place holder comprised of hash
symbols (#).
< Voice output >
Text-to-speech settings –
Use the Text-to-speech settings to
configure the Android text-to-speech
synthesiser for applications that can
benefit from it.
•
NOTE: If you don’t have speech
synthesiser data installed, only the
Install voice data setting will be
available.
•
Listen to an example: Plays
a brief sample of the speech
synthesiser using your current
settings.
•
•
•
•
•
Always use my settings: Check
to use the settings on this screen
rather than the speech synthesiser
settings available in other
applications.
Default engine: Opens a dialogue
box where you can set the textto-speech application you want
to use, if you have more than one
installed.
Install voice data: If your
phone does not have speech
synthesiser data installed, this
connects to Android Market and
guides you through the process
of downloading and installing the
data. This setting is not available if
the data is already installed.
Speech rate: Opens a dialogue
box where you can select how
quickly you want the synthesiser to
speak.
Language: Opens a dialogue
box where you can select the
language of the text you want
the synthesiser to read. This is
particularly useful when combined
with Always use my settings
to ensure text is spoken correctly
across a variety of applications.
• Pico TTS: Configure the Pico TTS
settings.
Accessibility
Use the Accessibility settings to
configure any accessibility plug-ins
you have installed on your phone.
NOTE: Requires additional plug-ins
to become available.
Date & time
Use Date & time settings to set
how dates will be displayed. You can
also use these settings to set your
own time and time zone, rather than
getting the current time from the
mobile network.
About the phone
View legal information and check
phone status and software version.
85
Settings
Wi-Fi
With Wi-Fi, you can use high-speed
Internet access within the area of
wireless access point (AP) coverage.
You can enjoy wireless internet
with Wi-Fi, without incurring extra
charges.
Turn on Wi-Fi
From the home screen, open the
notification drawer and touch
on.
Or touch Application > Settings
> Wireless & networks, then turn
Wi-Fi on.
To connect to Wi-Fi
Choose the Wi-Fi network you want
to connect to. If you see
, you
need to enter a password to connect.
NOTE:
•
If you are out of a Wi-Fi area
and choose the G connection,
additional charges may be applied.
86
If your phone changes to sleep
mode when connected to Wi-Fi,
the Wi-Fi connection will be
disabled automatically. (In this
case, if your phone has access
to G data it may connect to
the G network automatically,
and additional charges may be
applied.)
• The LG-P920 supports WEP,
WPA/WPA2-PSK and 802.1x
EAP. Security. If your Wi-Fi service
provider or network administrator
sets encryption for network
security, enter the key in the popup window. If encryption is not
set, this pop-up window will not
be shown. You can obtain the key
from your Wi-Fi service provider or
network administrator.
•
Sharing your phone’s
mobile data connection
You can also share your phone’
s data connection with up to five
devices simultaneously, by turning
your phone into a portable Wi-Fi
hotspot.
When your phone is sharing its
data connection, an icon appears in
the status bar and as an on-going
notification in the notifications
drawer.
Icon Description
Portable Wi-Fi hotspot is
active
For the latest information about
portable hotspots, including operating
systems supported and other details,
go to http://www.android.com/tether.
NOTE: Additional costs may be
incurred when connecting to and
using online services. Check data
charges with your network provider.
Portable Wi-Fi hotspot
settings
On the home screen, touch the
Application tab and select Settings.
Touch Wireless & Networks and
select Portable hotspot.
Choose the options you want to
adjust.
Portable Wi-Fi hotspot – Select to
share your phone’s mobile network
data connection as a portable Wi-Fi
hotspot.
Help – Opens a dialogue box with
information about portable Wi-Fi
hotspots and advice about where to
learn more.
To share your phone’
s data connection as a
portable Wi-Fi hotspot
1 On the home screen, touch the
Applications tab and select
Settings.
2 Touch Wireless & Networks and
select Portable hotspot.
87
Settings
3 Check Portable Wi-Fi hotspot.
• After a moment the phone starts
broadcasting its Wi-Fi network
name (SSID), enabling you to
connect to it with up to five
additional computers or other
devices. An on-going notification
is added to the status bar
and notifications drawer.
• When Portable Wi-Fi hotspot
is selected, you can change its
network name or make it secure.
4 Un-select Portable Wi-Fi
hotspot to stop sharing your data
connection via Wi-Fi.
To rename or secure
your portable hotspot
You can change the name of your
phone’s Wi-Fi network name (SSID)
and secure its Wi-Fi network.
1 On the home screen, touch the
Applications tab and select
Settings.
2 Touch Wireless & Networks and
select Portable hotspot.
88
3 Ensure Portable Wi-Fi hotspot is
selected.
4 Touch Portable Wi-Fi hotspot
settings.
5 Touch Configure Wi-Fi hotspot.
• The Configure Wi-Fi hotspot
dialogue box will open.
• You can change the network SSID
(name) that other computers see
when scanning for Wi-Fi networks.
• You can also touch the Security
menu to configure the network
with Wi-Fi Protected Access 2
(WPA2) security using a preshared key (PSK).
• If you touch the WPA2 PSK
security option, a password field
is added to the Configure Wi-Fi
hotspot dialogue box. If you enter a
password, you will need to re-enter
it when you connect to the phone’
s hotspot with a computer or other
device. You can touch Open in the
Security menu to remove security
from your Wi-Fi network.
ATTENTION!
If you set the security option
as Open, you can not prevent
unauthorised usage of online
services by other people,
and additional charges
may be incurred. To avoid
unauthorised use, you are
advised to keep the security
option enabled.
6 Touch Save.
Using SmartShare
SmartShare uses DLNA (Digital
Living Network Alliance) technology
to share digital content through a
wireless network.
Both devices must be DLNA certified
to support this feature.
To turn SmartShare on and allow
sharing contents
1 Touch application tab and select
Settings.
2 Choose Wireless & networks
and SmartShare settings.
3 Touch SmartShare to checkmark
and turn the function on.
- Touch Always allow
requests if you would like to
automatically accept sharing
requests from other devices.
4 Under the Sharing contents
section, touch to checkmark the
types of content you would like
to share.
Choose from Pictures, Videos,
and Music.
5 SmartShare is now activated and
ready to share contents.
To share contents from remote
content library to other devices
Let your renderer device (e.g. TV)
play multimedia contents from your
remote content library (e.g. PC)
NOTE: Make sure that the DLNA
functionality of your devices is
properly configured (e.g. TV and PC)
1 Touch the top right button to or
select the device from renderer
lists.
89
Settings
2 Touch the top left button and
select the device of the remote
content library.
3 Touch SmartShare to checkmark
and turn the function on.
4 You can browse the content
library.
5 Touch and hold a content
thumbnail and flick them to the
top area with your flinger or touch
the play button.
To share contents from your
phone to your renderer device(e.
g. TV)
NOTE: Make sure that your renderer
device is properly configured
1 While browsing your pictures
or videos using the Gallery
application, touch and hold to
select files.
Then you will be able to select
multiple files to be shared.
2 Touch Share on the menu and
select the SmartShare.
90
3 SmartShare is automatically
launched with the selected files.
4 Touch the top right button to
select the device from renderer
lists.
5 Touch the play button to let your
renderer device play the files.
NOTE: Follow the same steps to
use the Music player to share music
files.
Notice: Check that your device is
connected with your home network
using Wi-Fi connection yo use this
application.
Some DLNA enabled device (e.g.
TV) support only the DMP feature
of DLNA and will not appear in the
renderer device list
Your device might not be able to play
some contents.
D images may not be displayed
properly on some of D TV sets
when using USB/DLNA with less
than 1280x720 (HD) resolution.
How to use On-Screen
Phone
On-Screen Phone
features
On-Screen Phone allows you to view
your mobile phone screen from a PC
via a USB or Bluetooth connection.
You can also control your mobile
phone from your PC, using the
mouse or keyboard.
•
•
On-Screen Phone icons
Connects your mobile phone to
your PC, or disconnects it.
Rotates the On-Screen Phone
window (only available with
applications that support
rotation).
Changes the On-Screen Phone
preferences.
Exits the On-Screen Phone
programme.
Minimises the On-Screen Phone
window.
•
•
•
Real-time transfer and control:
displays and controls your mobile
phone screen when connected to
your PC.
Mouse control: allows you to
control your mobile phone by using
the mouse to click and drag on
your PC screen.
Text input with keyboard: allows
you to compose a text message
or note using your computer
keyboard.
File transfer (mobile phone to
PC): sends files from your mobile
phone (e.g. photos, videos, music
and Polaris Office files) to your PC.
Simply right-click and drag to send
a file to your PC.
File transfer (PC to mobile phone):
sends files from your PC to your
mobile phone. Just select the files
you wish to transfer and drag and
drop them into the On-Screen
91
Settings
Phone window. The files sent are
stored on a microSD card.
• Real-time event notifications:
prompts a pop-up to inform you
of any incoming calls or text/
multimedia messages, as well as
alarm and event notifications.
Notice: The Camera preview, videos
and contents from D mode(D
Game & Apps, D Guide, YouTube
D, D Gallery) are not supported
in OSP, so they are not available on
the PC.
How to install On-Screen
Phone on your PC
Visit LG Home (http://www.lg.com)
and go to Support > Mobile Phone
Support > Download LG Mobile
Support Tool to PC. If you download
LG PC Suite IV, the On-Screen Phone
programme will also be downloaded
on your PC. You can then install the
On-Screen Phone on your PC.
92
NOTE: Go to Settings > SD card &
phone storage settings and make
sure that the “Mass storage only”
checkbox is deselected.
How to connect your
mobile phone to your PC
USB connection:
1 Open Connection Wizard, select
"USB Cable connection" and click
"Next".
2 Connect your mobile phone to the
PC using a USB cable and click
"Next".
3 Enter the On-Screen Phone
password and click "Next". The
default password is "0000".
You can change the password
in Settings > Wireless &
Networks > On-Screen Phone
Settings.
4 Click "OK" to exit the window.
NOTE: Go to Settings > SD card &
phone storage settings and make
sure that the “Mass storage only”
checkbox is deselected.
Wireless connection with
Bluetooth:
1 On your mobile phone, go
to Settings > Wireless &
Networks > Bluetooth settings.
Select Turn on Bluetooth and
then select Discoverable.
2 If you have previously connected
using a cable, run the New
Connection Wizard to create a
new connection.
3 Run the Connection Wizard on
the computer, select "Bluetooth
connection", then "Next".
4 The wizard will start searching
for Bluetooth-enabled mobile
phones. When the mobile phone
you want to connect to appears,
click "Stop" to stop searching.
5 Select "LG-P920" from the device
list and click "Next". You can
rename the device if you wish.
6 Enter the PIN code (e.g. "0000")
and click "Next".
7 On your mobile phone, accept the
request and enter the same PIN
code, then touch "OK".
8 Enter the On-Screen Phone
password and click "Next". (The
default password is "0000").
9 Touch "OK" to exit.
To check the phone-toPC connection
Once the devices have been
connected, drag down the notification
bar at the top of the home screen
to check the On-Screen Phone
connection status.
To disconnect your
phone from your PC
Click
in the top left of the
On-Screen Phone window.
Alternatively, drag down the
notification bar at the top of the
home screen and select "On-Screen
Phone". Touch "Yes" in the
Disconnect window.
9
Settings
NOTE: You must restart your phone
after shutting down the On-Screen
Phone service.
Phone Software update
LG Mobile Phone Software
update from internet
For more information on using this
function, please visit the http://
update.lgmobile.com or http://www.
lg.com/common/index.jsp select
country and language.
This feature allows you to update
the firmware of your phone to the
newer version conveniently from the
internet without the need to visit a
service centre. This feature is only
available if and when LG makes
the newer version of the firmware
available for your device.
As the mobile phone firmware update
requires the user’s full attention for
the duration of the update process,
please make sure to check all
instructions and notes that appear at
94
each step before proceeding. Please
note that removing the USB data
cable or battery during the upgrade
may seriously damage your mobile
phone.
NOTE: LG reserves the right to make
firmware updates available only for
selective models at its own discretion
and does not guarantee the
availability of the newer version of
the firmware for all handset models.
LG Mobile Phone Software
update via Over-the-Air (OTA)
This feature allows you to update the
firmware of your phone to the newer
version conveniently via OTA without
connecting the USB data cable. This
feature is only available if and when
LG makes the newer version of the
firmware available for your device.
First, you can check the software
version on your mobile phone:
Settings > About phone >
Software update > Software
update check.
You can also rearrange update
schedule in 1 hour, 4 hours, 8 hours
or 24 hours before updates.
In this case, the application will
notify you to update when the time is
up. Also you can rearrange or update
by manually.
NOTE: Your personal data from
internal phone storage—including
information about your Google
account and any other accounts,
your system/application data
and settings, any downloaded
applications and your DRM licence
—might be lost in the process of
updating your phone's software.
Therefore, LG recommends that you
back up your personal data before
updating your phone's software. LG
does not take responsibility for any
loss of personal data.
Sync your phone with
your computer
You can use the LG PC Suite to
sync Outlook contacts and calendar
between your computer and your
phone, and can use to update your
phone firmware with latest version.
Installing the LG PC Suite
Use the LG PC Suite installer preloaded in the phone memory.
1 Connect your phone to your
computer using the USB cable
that came with your phone.
2 When the ‘USB connected’
screen appears on your phone,
tap ‘Turn on USB storage’ and
select ‘OK’ to display the ‘USB
storage in use’ screen.
3 On your computer, the connected
phone is recognised as a
removable disk. Navigate to this
removable disk and open LGE
folder.
95
Settings
4 Copy the entire pc_suite folder
to your computer.
5 On your phone, press the home
key and go to Applications >
Settings > SD card & phone
storage and then disable ‘Mass
storage only’ setting.
6 Disconnect your phone from the
computer.
7 On your computer, go to
pc_suite folder, double-click
LGInstaller.exe and follow the
onscreen instructions to install LG
PC Suite.
96
Copyrights and trademarks
The rights to all technologies and
products that comprise this device
are the property of their respective
owners:
• Bluetooth® is a registered
trademark of Bluetooth SIG, Inc.
• microSD and the microSD logo
are Trademarks of the SD Card
Association.
• Google, Android, Google Search,
Google Calendar, Google Maps,
Google Latitude, Google Mail,
YouTube, Google Talk and Android
Market are trademarks of Google,
Inc.
• Wi-Fi is a registered trademark of
the Wireless Fidelity Alliance, Inc.
•
Contains Adobe® Flash® Player
technology by Adobe Systems
Incorporated.
•
DivX Mobile
ABOUT DIVX VIDEO: DivX® is a
digital video format created by
DivX, Inc. This is an official DivX
Certified® device that plays DivX
video. Visit www.divx.com for more
information and software tools to
convert your files into DivX video.
ABOUT DIVX VIDEO-ON-DEMAND:
This DivX Certified® device must
be registered in order to play
purchased DivX Video-on-Demand
(VOD) movies. To obtain your
registration code, locate the
DivX VOD section in your device
setup menu. Go to vod.divx.com
for more information on how to
complete your registration.
DivX Certified® to play DivX®
video up to HD 720p, including
premium content.
97
Copyrights and trademarks
DivX®, DivX Certified®
and associated logos are
trademarks of DivX, Inc. and are
used under licence. Covered by
one or more of the following
U.S. patents: 7,295,673;
7,460,668; 7,515,710;
7,519,274
Notice!
Open Source Software
To obtain the corresponding
source code under GPL, LGPL,
MPL and other open source
licences, please visit http://
opensource.lge.com/ All referred
licence terms, disclaimers
and notices are available for
download with the source code.
98
Wi-Fi® and Wi-Fi Protected Access
are registered trademarks of the
Wi-Fi Alliance.
• DTS 2.0 Channel
Manufactured under
license from DTS
Licensing Limited. DTS and the
Symbol are registered trademarks,
& DTS 2.0 Channel and the DTS
logos are trademarks of DTS, Inc.
Product includes software. © DTS,
Inc. All Rights Reserved.
• Dolby Digital Plus
Manufactured under
license from Dolby Laboratories.
Dolby and the double-D symbol
are trademarks of Dolby
Laboratories.
•
®
Accessories
These Accessories are available for use with the LG-P920.
(Items described below may be optional.)
Charger
Data cable
Connect your
LG-P920 and
PC.
Battery
User Guide
Learn more
about your LGP920.
Stereo
headset
NOTE:
• Always use genuine LG accessories.
• Failure to do this may invalidate your warranty.
• Accessories may vary in different regions.
99
Technical data
Ambient Temperatures
Max: +55°C (discharging), +45°C (charging)
Min: -10°C
Declaration of Conformity
Suppliers Details
Name
LG Electronics Inc
Address
LG Twin Tower 20,Yeouido-dong, Yeongdeungpo-gu Seoul, Korea 150-721
Product Details
Product Name
GSM 850 / E-GSM 900 / DCS 1800 / PCS 1900 Quad Band and WCDMA Terminal Equipment
Model Name
LG-P920
Trade Name
LG
Applicable Standards Details
R&TTE Directive 1999/5/EC
EN 301 489-01 v1.8.1 / EN 301 489-07 v1.3.1 / EN 301 489-17 v2.1.1
/ EN 301 489-19 v1.2.1 / EN 301 489-24 v1.5.1
EN 300 328 v1.7.1
EN 60950-1:2006+A11:2009
EN 50360:2001 / AC:2006 / EN 62209-1:2006 / EN 62209-2:2010
EN 301 511 v9.0.2
EN 301 908-1 v4.2.1 / EN 301 908-2 v4.2.1
Supplementary Information
The conformity to above standards is veriied by the following Notiied Body(BABT)
BABT, Forsyth House, Churchield Road, Walton-on-Thames, Surrey, KT12 2TD, United Kingdom
Notiied Body Identiication Number : 0168
Declaration
I hereby declare under our sole responsibility
that the product mentioned above to which this
declaration relates complies with the above mentioned
standards, regulation and directives
Name
Issued Date
Doo Haeng Lee/Director
3, May, 2011
LG Electronics Inc. – EU Representative
Veluwezoom 15, 1327 AE Almere, The Netherlands
Signature of representative
100
Troubleshooting
This chapter lists some problems you might encounter while using your phone. Some
problems require you to call your service provider, but most are easy to fix yourself.
Message
Possible causes
Possible Corrective Measures
SIM error
There is no SIM card in
the phone, or it is inserted
incorrectly.
Make sure the SIM card is correctly inserted.
No network
connection /
Losing network
Weak Signal outside GSM
network area.
Operator applied new
services
Move towards a window or into an open area.
Check the network operator coverage map.
Check whether the SIM card is more than
6~12 months old.
If so, change your SIM at your network
provider's nearest branch.
Codes do not
match
To change a security code,
you will need to confirm the
new code by re-entering it. The default code is [0000]. If you forget the
code, contact your service provider.
The two codes you have
entered do not match.
An application
cannot be set
Not supported by service
provider or registration
required
Contact your service provider.
Dialling error
New SIM card inserted
Calls not available Prepaid Charge limit
reached
New network not authorised.
Check for new restrictions.
Contact service provider or reset limit with
PIN 2.
On/Off key held down long
enough
Phone cannot be Battery is not charged
switched on
Battery contacts are dirty
Hold the On/Off key down for at least two
seconds.
Keep the charger attached for longer. Clean
the contacts.
Take out the battery and reinsert it.
101
Troubleshooting
Message
Possible causes
Possible Corrective Measures
Battery is not charged.
Outside temperature is too
hot or cold
Contact problem
Charge battery.
Make sure the phone is charging at normal
temperature.
Check the charger and connection to the
phone. Check the battery contacts, and clean
them if necessary.
Plug the charger into a different socket.
If the charger does not warm up, replace it.
Only use original LG accessories.
Replace battery.
Charging error
No voltage
Charger defective
Wrong charger.
Battery defective.
Number not
permitted
The Fixed Dial Number
function is on.
Check settings.
Impossible to
receive / send
SMS & Picture
Memory Full
Delete some messages from the phone.
Files not open
Unsupported file format
Check the file formats that can be supported
SD Card not
working
FAT16, FAT2 file system
supported
Check SD card file system via card reader, or
format SD card using phone
The screen does
not come on
when I receive
a call.
Proximity sensor problem
If you use a protective tape or case, check
whether it is covering the area around the
proximity sensor. Make sure the area around
the proximity sensor is clean.
No Sound
Vibration or manner mode
Check the settings status of the sound menu
to make sure you are not in vibrate or silent
mode.
102
Message
Possible causes
Possible Corrective Measures
Remove and re-insert battery.
Turn on the phone.
Hang up or freeze
Intermittent software
problem
If the phone is locked and does not work,
press and hold the Power/Lock key for
10 seconds to turn it off. Then, press the
Power/Lock key again for seconds to reboot
the phone.
Try to do a software update service via the
website.
10