1
Compliance Guardian 3
Installation and Administration
User Guide
Service Pack 3 Cumulative Update 2
Issued July 2015
Table of Contents
What's New in this Guide............................................................................................................................ 14
About Compliance Guardian ....................................................................................................................... 15
Complementary Products ........................................................................................................................... 16
Submitting Documentation Feedback to AvePoint .................................................................................... 17
Accessibility Information for Screen Reading Software.............................................................................. 18
Preparations Before the Installation........................................................................................................... 19
Ports Used by Compliance Guardian ...................................................................................................... 19
Compliance Guardian Manager System Requirements .......................................................................... 20
System Requirements for Control Service Installation ....................................................................... 20
Compliance Guardian Agent System Requirements ............................................................................... 23
Where to Install Compliance Guardian Agent ........................................................................................ 24
System Requirements for Agent Service Installation.......................................................................... 25
SQL Server Requirements for Compliance Guardian Databases ........................................................ 25
SharePoint Environment Requirements for Compliance Guardian Agents ........................................ 25
Required Permissions for Scanning Lync Content .................................................................................. 26
Required Permissions for Scanning Oracle Database ............................................................................. 26
Required Permissions for Scanning SQL Database ................................................................................. 27
Overview of Compliance Guardian Manager and Agent Services .......................................................... 28
Installing Compliance Guardian .................................................................................................................. 29
Compliance Guardian Manager .............................................................................................................. 29
Installing Compliance Guardian Manager........................................................................................... 29
Compliance Guardian Agent ................................................................................................................... 32
Installing Compliance Guardian Agent................................................................................................ 32
Accessing the Compliance Guardian GUI ................................................................................................ 36
Internet Explorer Setup........................................................................................................................... 36
Logging In to Compliance Guardian ........................................................................................................ 39
How to Use Your Keyboard in Compliance Guardian ............................................................................. 39
Compliance Guardian Manager and Agent Maintenance ...................................................................... 40
Update Compliance Guardian ..................................................................................................................... 41
2
Compliance Guardian Installation and Administration User Guide
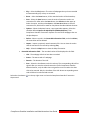
Compliance Guardian Report Database Upgrade Tool ........................................................................... 41
Using the Tool ......................................................................................................................................... 42
Uninstalling Compliance Guardian.............................................................................................................. 44
Uninstalling Compliance Guardian Manager .......................................................................................... 44
Uninstalling Compliance Guardian Agent ............................................................................................... 45
Resolve Issues Occurred During the Compliance Guardian Installation................................................. 45
Unattended Installation: Compliance Guardian Manager .......................................................................... 46
Generating the Installation Answer File for Compliance Guardian Manager......................................... 46
Import the UnattendedInstallation.dll File ............................................................................................. 49
Commands and Command Parameters for Compliance Guardian Manager Unattended Installation .. 49
Installation Command ......................................................................................................................... 49
Unattended Installation: Compliance Guardian Agent............................................................................... 53
Generating the Installation Answer File for Compliance Guardian Agent.............................................. 53
Import the UnattendedInstallation.dll File ............................................................................................. 54
Commands and Command Parameters for Compliance Guardian Agent Unattended Installation ....... 55
Installation Command ......................................................................................................................... 55
Installing Compliance Guardian App for Real-Time Classification .............................................................. 58
Uninstalling Compliance Guardian App for Real-Time Classification ......................................................... 61
Navigation Bar............................................................................................................................................. 62
Navigating Compliance Guardian................................................................................................................ 63
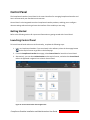
Control Panel............................................................................................................................................... 65
Getting Started........................................................................................................................................ 65
Launching Control Panel ......................................................................................................................... 65
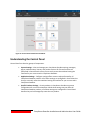
Understanding the Control Panel ........................................................................................................... 66
Accessing the Control Panel .................................................................................................................... 67
Monitor ................................................................................................................................................... 67
Using the Manager Monitor ............................................................................................................... 67
Using the Agent Monitor .................................................................................................................... 67
System Options ....................................................................................................................................... 70
Configuring General Settings .............................................................................................................. 70
Configuring Security Settings .............................................................................................................. 71
Viewing Security Information ............................................................................................................. 73
Compliance Guardian Installation and Administration User Guide
3
Authentication Manager ......................................................................................................................... 74
Configuring Windows Authentication................................................................................................. 74
Configuring AD Integration ................................................................................................................. 74
Configuring ADFS Integration ............................................................................................................. 76
Configuring Client Certificate Authentication ..................................................................................... 78
Account Manager.................................................................................................................................... 79
Managing Permission Levels ............................................................................................................... 79
Managing User Groups ....................................................................................................................... 80
Managing Users .................................................................................................................................. 83
My Settings ......................................................................................................................................... 87
License Manager ..................................................................................................................................... 88
Viewing License Information............................................................................................................... 88
Importing and Exporting the License File ........................................................................................... 90
Configuring License Renewal Notifications......................................................................................... 91
Configuring Server Usage .................................................................................................................... 92
Update Manager ..................................................................................................................................... 92
Configuring Update Settings ............................................................................................................... 93
Checking for Updates .......................................................................................................................... 94
Managing Updates .............................................................................................................................. 95
Reviewing the Installation History of Updates ................................................................................... 96
Agent Groups .......................................................................................................................................... 97
Managing Agent Groups ..................................................................................................................... 97
User Notification Settings ....................................................................................................................... 98
Configuring Send E-Mail Settings ........................................................................................................ 99
Configuring Receive E-Mail Settings ................................................................................................... 99
Configuring Receive E-Mail Notification ........................................................................................... 100
Managing Receive E-Mail Notification .............................................................................................. 101
Configuring E-mail Templates ........................................................................................................... 101
Job Pruning............................................................................................................................................ 102
Configuring Pruning Rules ................................................................................................................. 102
Configuring Settings .......................................................................................................................... 103
Configuring a Schedule ..................................................................................................................... 103
4
Compliance Guardian Installation and Administration User Guide
Log Manager ......................................................................................................................................... 105
Configuring Log Settings ................................................................................................................... 105
Collecting Logs .................................................................................................................................. 106
SharePoint Sites .................................................................................................................................... 106
Managing SharePoint Online Site Collection URLs ........................................................................... 106
Office 365 Account Profile Manager ................................................................................................. 110
Profile Manager .................................................................................................................................... 112
Security Profile .................................................................................................................................. 112
Auditor .................................................................................................................................................. 113
Configuring Pruning Settings............................................................................................................. 113
Exporting Auditor Data Report ......................................................................................................... 114
Self Checker........................................................................................................................................... 114
Managing Self Checker Profiles......................................................................................................... 115
Managing Rules in a Self Checker Profile .......................................................................................... 118
Exporting Self Checker Report .......................................................................................................... 119
Solution Manager.................................................................................................................................. 119
Managing Solutions........................................................................................................................... 119
Solution Description.......................................................................................................................... 121
Database Manager ................................................................................................................................ 122
Database ........................................................................................................................................... 122
Database Policy ................................................................................................................................. 123
Test Suite Manager ............................................................................................................................... 124
Background Information ................................................................................................................... 124
Managing Test Suites ........................................................................................................................ 125
Creating a New Check or Test Suite .................................................................................................. 125
Uploading Checks and Test Suites .................................................................................................... 127
Downloading a Test Suite ................................................................................................................. 128
Viewing Details about a Test Suite.................................................................................................... 128
Editing a Previously Configured Check or Test Suite ........................................................................ 128
Deleting a Test Suite ......................................................................................................................... 130
Risk Formula ...................................................................................................................................... 130
Viewing a Test Suite's or Check's Version History ............................................................................ 132
Compliance Guardian Installation and Administration User Guide
5
Report Configuration ............................................................................................................................ 133
Managing Report Settings................................................................................................................. 133
Configuring Report Settings .............................................................................................................. 133
Allowed Location................................................................................................................................... 134
Configuring Allowed Location ........................................................................................................... 134
Export Location ..................................................................................................................................... 135
Managing Export Locations............................................................................................................... 136
Configuring Export Locations ............................................................................................................ 136
Filter Policy ............................................................................................................................................ 136
Managing Filter Policies .................................................................................................................... 137
Configuring Filter Policies ................................................................................................................. 137
Editing Filter Policies ......................................................................................................................... 138
Website Scanner Settings ..................................................................................................................... 139
Configuring Authentication Profile ................................................................................................... 139
Configuring User Agent Profile ......................................................................................................... 140
Compliance Manager ................................................................................................................................ 142
Pre-Configurations ................................................................................................................................ 143
Configuring Scan Policies .................................................................................................................. 143
Configuring Filter Policies ................................................................................................................. 144
Configuring Database Policies ........................................................................................................... 144
Configuring the Account Manager .................................................................................................... 144
Configuring Connections for File System .......................................................................................... 145
Configuring Connections for Database ............................................................................................. 146
Compliance Scanner.............................................................................................................................. 148
Launching Compliance Scanner ............................................................................................................ 148
Home Page Overview ............................................................................................................................ 150
Selecting Mode ................................................................................................................................. 150
Managing Compliance Guardian Scanner Plans ............................................................................... 150
Compliance Guardian Scanner for SharePoint ..................................................................................... 151
Launching Compliance Guardian Scanner SharePoint Mode ........................................................... 152
Selecting the Scan Scope................................................................................................................... 152
Scanning User Profiles....................................................................................................................... 152
6
Compliance Guardian Installation and Administration User Guide
Using Plan Builder to Perform a Compliance Guardian Scanner Plan for SharePoint ...................... 153
Editing Template File for Filtering User Profiles ............................................................................... 158
Compliance Guardian Scanner for File System ..................................................................................... 158
Launching Compliance Guardian Scanner File System Mode ........................................................... 159
Selecting the Scan Scope................................................................................................................... 159
Using Plan Builder to Perform a Compliance Guardian Scanner Plan for File System...................... 159
Compliance Guardian Scanner for Website .......................................................................................... 162
Launching Compliance Guardian Scanner in Website Mode............................................................ 162
Using Plan Builder to Perform a Compliance Guardian Scanner Plan for Website .......................... 162
Scanning Gmail.................................................................................................................................. 165
Compliance Guardian Scanner for Lync ................................................................................................ 167
Launching Compliance Guardian Scanner Lync Mode ...................................................................... 167
Configuring Archiving Plans .............................................................................................................. 167
Searching Lync Content..................................................................................................................... 168
Selecting the Scan Scope................................................................................................................... 171
Using Plan Builder to Perform a Compliance Guardian Scanner Plan for Lync ................................ 172
Compliance Guardian Scanner for Database ........................................................................................ 174
Launching Compliance Guardian Scanner in Database Mode .......................................................... 174
Selecting the Scan Scope................................................................................................................... 174
Using Plan Builder to Perform a Compliance Guardian Scanner Plan for Database......................... 174
Compliance Reports .............................................................................................................................. 178
Getting Started.................................................................................................................................. 178
Launching Compliance Report .......................................................................................................... 178
User Interface Overview ................................................................................................................... 179
Classification Manager .............................................................................................................................. 180
Real-Time Classification Scanner .......................................................................................................... 181
Pre-Configurations ................................................................................................................................ 181
Configuring Scan Policies .................................................................................................................. 181
Configuring Filter Policies ................................................................................................................. 183
Configuring Action Policies ............................................................................................................... 183
Configuring Action Policies for Social Network................................................................................. 192
Getting Started...................................................................................................................................... 195
Compliance Guardian Installation and Administration User Guide
7
Launching Real-Time Classification Scanner ......................................................................................... 195
Home Page Overview ............................................................................................................................ 197
Configuring Actions on the Ribbon ................................................................................................... 197
Selecting Mode ................................................................................................................................. 197
Managing Nodes ............................................................................................................................... 198
Real-Time Classification Scanner for SharePoint .................................................................................. 198
Launching Real-Time Classification Scanner SharePoint Mode ........................................................ 198
Using Real-Time Classification Scanner Rules in SharePoint Mode .................................................. 198
Customizing SharePoint Page and Message ..................................................................................... 202
Real-Time Classification Scanner for Social Network ........................................................................... 204
Launching Real-Time Classification Scanner Social Network Mode ................................................. 204
Configuring Connections to Yammer ................................................................................................ 204
Using Real-Time Classification Scanner Rules in Social Network Mode ........................................... 205
Using AvePoint Yammer Connector Web Part to Post Messages to Yammer...................................... 208
Enable the AvePoint Yammer Connector Feature ............................................................................ 208
Adding the AvePoint Yammer Connector Web Part ......................................................................... 208
Posting Messages to Yammer through the AvePoint Yammer Connector Web Part ....................... 208
Scheduled Classification Scanner .......................................................................................................... 209
Pre-Configurations ................................................................................................................................ 209
Configuring Scan Policies .................................................................................................................. 209
Configuring Filter Policies ................................................................................................................. 210
Configuring Action Policies for SharePoint ....................................................................................... 210
Configuring Action Policies for File System ....................................................................................... 210
Configuring Action Policies for Social Network................................................................................. 215
Configuring Connections for File System .......................................................................................... 218
Getting Started...................................................................................................................................... 220
Launching Scheduled Classification Scanner ........................................................................................ 220
Home Page Overview ............................................................................................................................ 221
Selecting Mode ................................................................................................................................. 221
Managing Scheduled Classification Scanner Plans ........................................................................... 221
Scheduled Classification Scanner for SharePoint ................................................................................. 223
Launching Scheduled Classification Scanner SharePoint Mode ....................................................... 223
8
Compliance Guardian Installation and Administration User Guide
Scanning User Profiles....................................................................................................................... 223
Performing a Scheduled Classification Scanner Plan in Wizard Mode ............................................. 224
Performing a Scheduled Classification Scanner Plan in Form Mode ................................................ 228
Scheduled Classification Scanner for File System ................................................................................. 228
Launching Compliance Guardian Scanner File System Mode ........................................................... 229
Performing a Scheduled Classification Scanner Plan in Wizard Mode ............................................. 229
Performing a Scheduled Classification Scanner Plan in Form Mode ................................................ 231
Scheduled Classification Scanner for Social Network ........................................................................... 232
Launching Scheduled Classification Scanner Social Network Mode ................................................. 232
Configuring Connections to Yammer ................................................................................................ 232
Performing a Scheduled Classification Scanner Plan in Wizard Mode ............................................. 232
Performing a Scheduled Classification Scanner Plan in Form Mode ................................................ 236
Using Compliance Guardian Features in SharePoint ............................................................................ 236
Using Compliance Guardian Tag Assist Manager in SharePoint ....................................................... 236
Using Compliance Guardian Quarantine Manager in SharePoint .................................................... 239
Classification Report ................................................................................................................................. 248
Launching Classification Report ............................................................................................................ 248
Job Monitor ............................................................................................................................................... 249
Getting Started...................................................................................................................................... 249
Launching Job Monitor ......................................................................................................................... 249
Understanding Job Monitor .................................................................................................................. 250
Job Monitor Interface ....................................................................................................................... 250
Job Monitor vs. Scheduled Job Monitor ........................................................................................... 251
Configuring the Viewing Pane ............................................................................................................... 251
The View Toolbar .............................................................................................................................. 251
The Filter Toolbar .............................................................................................................................. 252
Searching Jobs ....................................................................................................................................... 252
Managing Jobs .......................................................................................................................................... 253
Operations in the Job Monitor Tab ....................................................................................................... 253
The Manage Toolbar ......................................................................................................................... 253
The Actions Toolbar .......................................................................................................................... 254
The Settings Toolbar ......................................................................................................................... 254
Compliance Guardian Installation and Administration User Guide
9
Operations in the Scheduled Job Monitor Tab ..................................................................................... 255
The Actions Toolbar .......................................................................................................................... 255
The Filter Toolbar .............................................................................................................................. 255
Using Check Validator Tool ....................................................................................................................... 256
Related Configuration File .................................................................................................................... 258
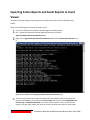
Using Detailed Risk Report Analysis Tool .................................................................................................. 259
Generating the Report .......................................................................................................................... 259
Information Included in the Exported Excel File ................................................................................... 260
Generate Detailed Risk Report of a File .................................................................................................... 261
Before You Begin................................................................................................................................... 261
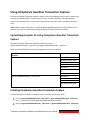
Using Compliance Guardian Transaction Capture .................................................................................... 263
System Requirements for Using Compliance Guardian Transaction Capture ...................................... 263
Installing Compliance Guardian Transaction Capture .......................................................................... 263
Using the Tool ....................................................................................................................................... 264
Exporting Action Reports and Social Reports to Event Viewer................................................................. 266
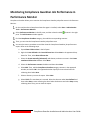
Monitoring Compliance Guardian Job Performance in Performance Monitor ........................................ 268
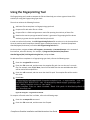
Using the Fingerprinting Tool ................................................................................................................... 269
Appendix A: Accessing Hot Key Mode ...................................................................................................... 272
Compliance Scanner Page ..................................................................................................................... 272
Compliance Scanner for Lync Page ................................................................................................... 279
Classification Scanner Page................................................................................................................... 281
Scheduled Classification Scanner Page ................................................................................................. 282
Scheduled Classification Scanner for Social Network Page .............................................................. 285
Real-Time Classification Scanner page.................................................................................................. 286
Job Monitor Page .................................................................................................................................. 289
Scheduled Job Monitor Page ................................................................................................................ 290
Control Panel Page ................................................................................................................................ 290
Appendix B: Configuring Checks and Test Suites ...................................................................................... 291
Configuring Check Type Attributes ....................................................................................................... 291
Element Type Check .......................................................................................................................... 292
EnhancedElement Type Check .......................................................................................................... 299
MatchedElement Type Check ........................................................................................................... 305
10
Compliance Guardian Installation and Administration User Guide
FindText Type Check ......................................................................................................................... 311
ComplexFindText Type Check ........................................................................................................... 313
RegularExpression Type Check ......................................................................................................... 316
ComplexRegEx Type Check ............................................................................................................... 319
Dictionary Type Check....................................................................................................................... 324
Cookie Type Check ............................................................................................................................ 328
SSL Type Check .................................................................................................................................. 330
WebBeacons Type Check .................................................................................................................. 331
FindFile Type Check........................................................................................................................... 334
LinkValidation Type Check ................................................................................................................ 335
FileProperty Type Check ................................................................................................................... 338
Redaction Type Check ....................................................................................................................... 341
CustomScan....................................................................................................................................... 345
Fingerprinting .................................................................................................................................... 345
Context .............................................................................................................................................. 346
Configuring Test Suite File Attributes ................................................................................................... 350
Test Suite for Compliance Reporting File Body Configuration.......................................................... 350
Test Suite for Classification and Tagging File Body Configuration .................................................... 355
Test Suite for Redaction .................................................................................................................... 359
Using CustomScan in Compliance Guardian ......................................................................................... 360
Method ............................................................................................................................................. 360
CustomCheck ........................................................................................................................................ 362
Using CustomCheck .......................................................................................................................... 362
Method ............................................................................................................................................. 362
Configuration .................................................................................................................................... 363
Example ............................................................................................................................................. 363
Related Configuration File ................................................................................................................ 364
Appendix C: Supported File Types in Compliance Guardian ..................................................................... 365
Appendix D: Compliance Guardian Configuration File ............................................................................. 366
Appendix E: Using the Scan Engine API .................................................................................................... 367
Initialize the ScanEngine Class .............................................................................................................. 367
Parameters of the ScanEngine.Scan Method ....................................................................................... 367
Compliance Guardian Installation and Administration User Guide
11
Usage Example ...................................................................................................................................... 368
Scan Files Using CCC .......................................................................................................................... 368
Scan Files Using MCC ........................................................................................................................ 372
Scan Metadata ...................................................................................................................................... 375
CCE.EngineWorker.exe Mode ............................................................................................................... 377
Appendix F: Using the ComplianceSetting.config file ............................................................................... 379
Configuring to Scan User Profiles...................................................................................................... 379
Configuring Restricted Attachment Types and Modifying the Allowed Maximum Size of Uploaded
Attachments in Incident Manager .................................................................................................... 379
Appendix G: Displaying Only Violations in the Error Highlight Report ..................................................... 381
Appendix H: Configuring for Supporting Load Balancing.......................................................................... 382
Configuring for Supporting Network Load Balancing ........................................................................... 382
Working Process ................................................................................................................................... 382
Installing Network Load Balancing Feature .......................................................................................... 382
Editing Network Load Balancing Cluster Properties ............................................................................. 383
Configuring File Share Locations ........................................................................................................... 383
Using CCE.EngineService.exe file to Encrypt Passwords and Do Operations on the <FS> Node ...... 384
Configuring Communication Settings ................................................................................................... 385
Control Service Load Balancing ............................................................................................................. 386
Installing Compliance Guardian Manager Control Service Load Balancing Environment .................... 386
Appendix I: Compliance Guardian Control Service Disaster Recovery ..................................................... 390
Preparations and Configuration............................................................................................................ 390
Prerequisite ....................................................................................................................................... 390
Compliance Guardian Installation ..................................................................................................... 390
Synchronizing Databases from PROD Environment to DR Environment .......................................... 391
Simulating the Disaster Recovery Process ............................................................................................ 391
Appendix J: Limitations of Scanning Oracle Database and SQL Server..................................................... 393
Prerequisite and Limitation of Scanning Oracle Database ................................................................... 393
Prerequisite ........................................................................................................................................... 393
Installing ODP.NET Provider .................................................................................................................. 393
Limitation of Scanning Oracle Database ............................................................................................... 395
Limitation of Scanning SQL Server ........................................................................................................ 396
12
Compliance Guardian Installation and Administration User Guide
Appendix K: Customizing the Interval of Retrieving Social Report Data .................................................. 397
Appendix L: Using the Discovery Function................................................................................................ 398
Using the EXE File .................................................................................................................................. 398
Using the BAT File ................................................................................................................................. 399
Configuring the CSV File .................................................................................................................... 399
Notices and Copyright Information .......................................................................................................... 400
Compliance Guardian Installation and Administration User Guide
13
What's New in this Guide
•
14
Updated Configuring Action Policies in Real-Time Classification Scanner.
Compliance Guardian Installation and Administration User Guide
About Compliance Guardian
Compliance Guardian is designed to ensure that information is available and accessible to the people
who should have it and protected from the people who should not. Compliance Guardian helps Chief
Privacy Officers, Chief Information Security Officers, Compliance Managers, Records Managers,
SharePoint Administrators, and Company Executives proactively protect their IT environments from
harmful information leaks, contamination, or misuse while simultaneously ensuring that all activities
and content residing in their environments are compliant, accessible, and manageable.
Compliance Guardian is designed to empower organizations to comply with regulatory, statutory, or
organization specific requirements to manage and oversee access to sensitive data.
Compliance Guardian works with AvePoint's extended Compliance Solutions to provide a "heat map"
that provides additional actionable context about the document including: how old is the document,
who authored it, how many times has it been accessed, who can access it, who has accessed it, and
what have they done with it. In this way, organizations can take specific steps to protect and mitigate
their risk.
By identifying, classifying, and taking action on compliance risks, and presenting this information in
easily digestible formats for various stakeholders, organizations can more effectively build and maintain
a compliant framework.
Compliance Guardian Installation and Administration User Guide
15
Complementary Products
Many products and product suites on the Compliance Guardian platform work in conjunction with one
another. The DocAve Auditor Reports are recommended for use with Compliance Guardian. Auditor
Reports are available in DocAve 6 Report Center under Compliance Reports.
16
Compliance Guardian Installation and Administration User Guide
Submitting Documentation Feedback to AvePoint
AvePoint encourages customers to provide feedback regarding our product documentation. You can
Submit Your Feedback on our website.
Compliance Guardian Installation and Administration User Guide
17
Accessibility Information for Screen Reading Software
Ensure that the following requirements are met before you use Job Access with Speech (JAWS) or
NonVisual Desktop Access (NVDA) to read Microsoft Silverlight:
1. JAWS does not read ActiveX controls. In order to enable JAWS to read Silverlight, the following
text must be added to the FsDomSrv.ini file, and JAWS must be restarted.
Add this text to the FsDomSrv.ini file:
[MS Silverlight Embedded in Internet Explorer using OBJECT Tag with type]
DLLName=SDomNodeMSAA
; TagNameMatch | ParamAndValueMatch
MappingFlags=96
Param=application/x-silverlight-2
TagName=OBJECT
StartString=Silverlight application start
EndString=Silverlight application end
ImplementationFlags=7
InteractionModeFlags=3
The user must disable the Virtual Cursor by pressing Ins + Z after the page containing the
Silverlight application (Compliance Guardian interface) has loaded.
2. For the NVDA screen reader, the following step must be performed in order to enable NVDA to
read Silverlight:
The user must enable NVDA Virtual Buffer Pass-through using Ins + Space after the page
containing the Silverlight application (Compliance Guardian interface) has loaded.
18
Compliance Guardian Installation and Administration User Guide
Preparations Before the Installation
Refer to the following sections for the prerequisites before installing Compliance Guardian.
Ports Used by Compliance Guardian
Before the installation, make sure the ports required for Compliance Guardian Manager and Agents can
be accessed through the firewall software installed on the corresponding machines. For example, if the
Windows Firewall is enabled on the servers which have installed Compliance Guardian, you must make
sure the 14100 and 14104 ports are allowed in the Inbound Rules on the corresponding servers.
*Note: If there are multiple Compliance Guardian services installed on the same server, make sure all of
the required ports are enabled on that server.
1. Remotely connect to the server where the Compliance Guardian Timer Service is installed.
2. Navigate to Start > Administrative Tools > Windows Firewall with Advanced Security.
3. Select Inbound Rules under Windows Firewall with Advanced Security on Local Computer and
select New Rule.
4. In the Rule Type step, select Port to configure the inbound rule for the ports used by
Compliance Guardian Timer Service, and select Next.
5. In the Protocol and Ports step, specify the rule to be applied to TCP, and then select Specific
local ports option. Enter 14100 in the textbox, and then select Next.
6. In the Action step, select the Allow the connection option to allow the connection to port
14100, and then select Next.
*Note: The port numbers may vary according to the settings configured when installing
Compliance Guardian in your environments.
7. In the Profile step, keep the default selection so that all three options are selected, and then
select Next.
8. In the Name step, enter the Name and an optional Description for this inbound rule.
9. Select Finish to complete the inbound rule creation.
10. Repeat the same steps on all of the other servers that have Compliance Guardian Agents
installed and have Windows Firewall enabled. The port used by the Compliance Guardian Agent
is 14104.
Compliance Guardian Installation and Administration User Guide
19
Compliance Guardian Manager System Requirements
Compliance Guardian Manager consists of one service called the Compliance Guardian Timer Service (a
control service). You can either run it on the same server as your Compliance Guardian Agent or on a
separate server. For more information on Compliance Guardian Manager, refer to Installing Compliance
Guardian Manager.
While it is possible to have the Compliance Guardian Manager and Agent on a single server, it is not
recommended. To maximize performance, AvePoint recommends you install the Manager Service on
one server, and install only the necessary agents on the agent servers.
Refer to System Requirements for Control Service Installation for the system requirements of the
Compliance Guardian Control Service.
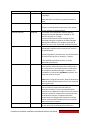
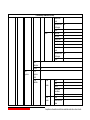
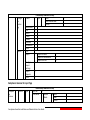
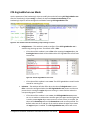
System Requirements for Control Service Installation
Rules
Total Physical Memory
Available Disk Space
.Net Framework Version
Operating System
Edition:
Windows Server 2008,
Windows Server 2008 R2,
Windows 7,
Windows Server 2012,
Windows Server 2012 R2
.Net Framework
Features
Net.Tcp Port Sharing
Service
Windows Process
Activation Service
World Wide Web
Publishing Service
20
Requirements
Required: 512MB or above
Recommended: 2GB
Required: 1GB or above
.NET Framework 3.5 SP1 or above
(excluding .NET Framework 4.0)
The Windows features, including WCF
Activation, HTTP Activation and Non-HTTP
Activation must be installed
Net.Tcp Port Sharing Service is started
•
Windows Process Activation Service is
started
•
Process Model, .NET Environment and
Configuration APIs are installed
World Wide Web Publishing Service is started
Compliance Guardian Installation and Administration User Guide
Rules
Web Server (IIS) Role
Total Physical Memory
Available Disk Space
.Net Framework Version
Operating System
Edition:
Windows Server 2003,
Windows Server 2003 R2
Net.Tcp Port Sharing
Service
World Wide Web
Publishing Service
ASP.NET
Application Server
Requirements
The following Windows features are installed:
• Web Server
•
Common HTTP Features (Static Content,
Default Document)
•
Application Development (ASP.NET,
.NET Extensibility, ISAPI Extensions and
ISAPI Filters)
•
Management Tools (IIS Management
Console, IIS 6 Management
Compatibility and IIS 6 Metabase
Compatibility)
Required: 512MB or above
Recommended: 2GB
Required: 1GB or above
.NET Framework 3.5 SP1 or above
(excluding .NET Framework 4.0)
Net.Tcp Port Sharing Service is started
World Wide Web Publishing Service is started
ASP .Net 2.0.50727 or above
• Network COM+ access is enabled.
•
IIS Service
HTTP SSL
Internet Information Services (IIS) is
started, including the following installed
features: Common Files, IIS Manager,
and World Wide Web Service
IIS Admin Service is started
IIS version must be 6.0 or above
HTTP SSL Service is started
Compliance Guardian Installation and Administration User Guide
21
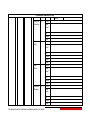
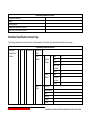
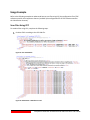
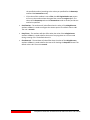
Required Application Pool Settings
The following application pool settings are required by Compliance Guardian Control Service Installation.
If you choose to create a new application pool, Compliance Guardian will automatically configure these
settings. If you choose to use an existing application pool, you must configure the application pool
according to the following table:
IIS
Version
IIS Setting
IIS7
Advanced Settings >
General > .NET Framework
Version
Advanced Settings >
General > Enable 32-bit
Applications
Advanced Settings >
General > Managed
Pipeline Mode
Process Model > Load User
Profile
Advanced Settings >
General > Start
Automatically
Value
Note
v2.0 / v4.0
No Managed Code is not supported.
False
False is required since Compliance
Guardian must load some third-party dlls
which are 64-bit ones.
It is not supported to use Classic together
with .NET Framework v4.0.
Integrated /
Classic
True
True / False
True is required by Compliance Guardian
SSO, and False is not supported.
True is strongly recommended because if
you set the value to False, the application
pool requires manual start up.
Required Application Pool Account Permissions
The application pool account must have the following local system permissions. The selected application
pool account will be granted Full Control permission to the following groups and folders automatically
during Compliance Guardian Manager installation:
•
IIS_WPG (for IIS 6.0) or IIS_IUSRS (for IIS 7.0)
•
Full Control to HKEY_LOCAL_MACHINE\SOFTWARE\AvePoint\ComplianceGuardian
•
Full Control to Compliance Guardian Manager folder
•
Member of the Performance Monitor Users group
•
Full Control to Compliance Guardian Certificate private keys
•
Full Control (or Read, Write, Modify, and Delete) to C:\WINDOWS\Temp (only for
Windows 2003 environment)
You can add the application pool account to the local Administrators group to meet the required
permissions.
The application pool account must have the following permissions to use the AvePoint Yammer
Connector Web Part:
22
Compliance Guardian Installation and Administration User Guide
•
Full Control to Compliance Guardian Agent folder
•
Full Control HKEY_LOCAL_MACHINE\SOFTWARE\AvePoint\ComplianceGuardian
Compliance Guardian Agent System Requirements
The Compliance Guardian Agent has one service called the Compliance Guardian Agent Service. A
Compliance Guardian Agent communicates with SharePoint based on the commands it receives from
the Compliance Guardian Manager’s Control Service. Multiple agent setups provide redundancy as well
as scalability for large environments by allowing you to use different accounts for different farms where
multiple farms exist. The Compliance Guardian Agent can be installed on different machines according
to the role of the machine, and the Compliance Guardian modules and functionalities you want to use.
For more information on where to install the Compliance Guardian Agents, refer to Where to Install
Compliance Guardian Agent.
*Note: Compliance Guardian supports scanning Microsoft Office files in a 2003 or earlier format using
iFilter. If you are using an earlier version of Compliance Guardian or if you updated to Compliance
Guardian 3 SP3 from an earlier version, you must download a compatibility pack and download an
update pack to scan the Microsoft Office files (can keep the file’s accessibility attributes). If you prefer to
scan these files through installing the compatibility pack but not through iFilter, you can install Microsoft
Office Compatibility Pack for Word, Excel, and PowerPoint File Formats, and install Microsoft Office
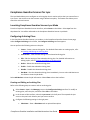
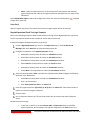
Compatibility Pack Service Pack 3 (SP3). Then, add the following node under the OfficeFileMapping
node in the configuration file ContentComplianceConfig.xml (you can find the file under the
path …\Compliance Guardian\Agent\Bin):
<NeedConvert>
<Extension>.xls</Extension>
</NeedConvert>
Compliance Guardian Installation and Administration User Guide
23
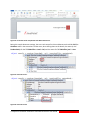
Figure 1: NeedConvert node.
The value in the Extension attribute is the extension of the file that you want to scan through the
compatibility pack.
Where to Install Compliance Guardian Agent
In order to install Compliance Guardian Agents, the following requirements must be met to make all of
the functions and configurations of the product available:
24
•
All of the installed Compliance Guardian Agents must be properly licensed in the
modules you want to use.
•
In order to use Compliance Scanner, Compliance Guardian Agent must be installed on at
least one of the front-end Web servers.
•
In order to use the Scheduled Classification Scanner, Compliance Guardian Agent must
be installed on at least one of the front-end Web servers.
•
In order to use the Real-Time Classification Scanner, Compliance Guardian Agents must
be installed on all of the front-end Web servers.
Compliance Guardian Installation and Administration User Guide
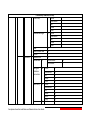
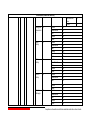
System Requirements for Agent Service Installation
Operating System
Edition:
Windows Server 2003,
Windows Server 2003 R2,
Windows Server 2008,
Windows Server 2008 R2,
Windows Server 2012,
Windows Server 2012 R2
Rules
Total Physical Memory
Available Disk Space
.NET Framework Version
.Net Framework Features
(only in Windows Server
2008,
Windows Server 2008 R2
and Windows Server 2012
environments)
Net.Tcp Port Sharing Service
SharePoint Version
Requirements
Required: 512MB or above
Recommended: 2GB
Required: 1GB or above
.NET Framework 3.5 SP1 or above
(excluding .NET Framework 4.0)
The Windows features, including HTTP
Activation and Non-HTTP Activation are
installed.
Net.Tcp Port Sharing Service has started.
SharePoint Server 2007, SharePoint
Server 2010, or SharePoint 2013 is
installed.
SQL Server Requirements for Compliance Guardian Databases
Databases
Control Database
Report Database
•
SQL Server Edition
Microsoft SQL Server 2005
•
Microsoft SQL Server 2008 R2
•
Microsoft SQL Server 2012 RTM
SharePoint Environment Requirements for Compliance Guardian Agents
Compliance Guardian Agents can be installed and used in the following SharePoint environments:
•
Microsoft Office SharePoint Server 2007 with SP2
•
Windows SharePoint Services 3.0 with SP2
•
Microsoft SharePoint Server 2010 with SP1
•
Microsoft SharePoint Foundation 2010 with SP1
•
Microsoft SharePoint Server 2010 RTM
•
Microsoft SharePoint Foundation 2010 RTM
•
Microsoft SharePoint Server 2013 with SP1
•
Microsoft SharePoint Foundation 2013 with SP1
•
Microsoft SharePoint Server 2013 RTM
•
Microsoft SharePoint Foundation 2013 RTM
Compliance Guardian Installation and Administration User Guide
25
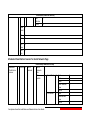
Required Permissions for Scanning Lync Content
In order to scan the Lync content, the agent account must meet the following permission requirements:
•
Local System Permissions
Compliance Guardian users must have Read permission to the Registry
HKEY_LOCAL_MACHINE\SOFTWARE\Microsoft\Real-Time
Communications\{A593FD00-64F1-4288-A6F4-E699ED9DCA35}.
•
PowerShell Permission
The agent account must be member of Domain Users and
RTCUniversalServerAdmins. The PowerShell cmdlet: Get-CsSite, Get-CsPool,
Get-CsManagementStoreReplicationStatus requires the permission of
RTCUniversalServerAdmins.
•
Database Permission
Database role of db_owner for all databases that are related with Lync,
including LcsLog and LcsCDR.
Compliance Guardian archiving database (db_owner for existing database and
db_creator for new database)
Compliance Guardian report database (db_owner for existing database and
db_creator for new database)
•
Lync File Share Folder Permission
At least Read permission to the Files Stores that are defined in the topology to
store attachments.
•
Domain Permission
Member of the Domain Users group under Default Group Policy.
Required Permissions for Scanning Oracle Database
In order to scan an Oracle database, the user who creates the connection with the database must meet
the following permission requirements:
26
•
The CREATE SESSION permission
•
The SELECT permission to the table that will be scanned.
•
The SELECT permission to the captured table.
•
The SELECT permission to the remote objects if using distribution CDC.
•
If the table that will be scanned has the BFILE column, the BFILE table will use one or
more directories. The user must have the READ permission to these directories.
•
The SELECT permission to the following objects:
Compliance Guardian Installation and Administration User Guide
ALL_CHANGE_TABLES
ALL_CHANGE_SETS
ALL_CHANGE_SOURCES
ALL_USERS
ALL_CONSTRAINTS
ALL_CONS_COLUMNS
ALL_DB_LINKS
ALL_TAB_COLUMNS
ALL_INDEXES
ALL_IND_COLUMNS
ALL_TABLES
ALL_TYPES
ALL_COLL_TYPES
ALL_TYPE_ATTRS
v$Instance
v$database
v$services
If you want to use Oracle network alias to connect to the database, make sure the agent account has the
READ permission to the following files:
•
%ORACLE_HOME%\network\admin\listener.ora
•
%ORACLE_HOME%\network\admin\tnsnames.ora
•
%ORACLE_HOME%\network\admin\sqlnet.ora
*Note: %ORACLE_HOME% means your ORACLE_HOME environment.
Required Permissions for Scanning SQL Database
If Windows Authentication or SQL Authentication was selected when creating the connection with the
database, the agent account or the user who creates the connection must meet the following
permission requirements:
•
The Database-Level role is db_datareader for the database that will be scanned; the
Server-Level Role is Public.
•
The SELECT permission to the table columns.
•
The SELECT permission to the captured table.
Compliance Guardian Installation and Administration User Guide
27
•
The EXECUTE permission to the following functions or procedures:
Procedure:sys.sp_cdc_help_change_data_capture
Procedure:sys.sp_cdc_get_captured_columns
Function:SERVERPROPERTY
Function:COLLATIONPROPERTY
Function:DATEDIFF
Function:DATEADD
Function:sys.fn_cdc_map_time_to_lsn
Function:SQL_VARIANT_PROPERTY
Function:GET_FILESTREAM_TRANSACTION_CONTEXT()
Function:[FileStreamColumn].PathName()
•
The SELECT permission to the following system views:
sys.databases
sys.columns
sys.identity_columns
sys.indexes
sys.index_columns
sys.foreign_key_columns
sys.foreign_keys
sys.schemas
sys.tables
sys.types
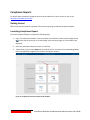
Overview of Compliance Guardian Manager and Agent Services
After properly installing all of the services, including Compliance Guardian Manager and Agent Services,
you are able to manage the compliance of your SharePoint data via the Compliance Guardian product.
Control Service receives the request from Compliance Guardian Manager, and then sends the request to
Agent Services which retrieves the data from SharePoint. Agent Services then send the data to the
Control Service for analyzing. If an action should be performed on the SharePoint contents that are
considered not compliant by Compliance Guardian, those actions will be performed by the Agent
Services. The Agent Services will also be used to export the compliance reports from the report
database.
28
Compliance Guardian Installation and Administration User Guide
Installing Compliance Guardian
The Compliance Guardian Installation Wizard will guide you through the installation process. In order to
complete the installation successfully, a local administrator account must be used to run the Installation
Wizard.
*Note: Install Compliance Guardian in the following order:
1. Install the Compliance Guardian Manager with the Manager Installation Wizard.
2. Install the Compliance Guardian Agents with the Agent Installation Wizard.
3. Log into Compliance Guardian to make sure the Manager and Agent are able to communicate
with each other properly.
Compliance Guardian Manager
Make sure the system requirements are met before starting installation for Compliance Guardian
Manager. For more information, refer to System Requirements for Control Service Installation.
*Note: When running the Manager Installation Wizard on the server running Windows Server
2003/Windows Server 2003 R2, make sure the Windows components are not being added or removed
during the rule scanning; otherwise, the scanning result will be affected.
*Note: When running the Manager Installation Wizard on the server running Windows Server
2008/Windows Server 2008 R2/Windows 7, make sure the Server Manager is not being used to add or
remove Windows features during the rule scanning; otherwise, the scanning result will be affected.
Installing Compliance Guardian Manager
To install Compliance Guardian Manager, complete the following steps:
1. Download the Manager ZIP file, either by requesting a demo version or by contacting an
AvePoint representative for links to this package.
2. Unzip the package, and then open the unpacked Compliance Guardian Manager directory. Run
the Setup.exe file.
3. After the welcome screen appears, select Next.
4. Enter your Name and Organization into the provided fields. Select Next.
5. Carefully review the Compliance Guardian License Agreement. After you have read the
agreement, check the I accept the terms in the license agreement checkbox, and select Next.
6. Select Browse, and then select the location for the Manager installation. By default, the
installation location is C:\Program Files\AvePoint. Select Next.
Compliance Guardian Installation and Administration User Guide
29
7. Select the Compliance Guardian Manager Service you want to install by checking the
corresponding checkbox. There is only one service to install.
Control Service – Manage all Compliance Guardian operations and achieve the Web-based
Compliance Guardian platform, allowing users to interact with the software. All agents can
communicate with the manager through the Control Service, so it is imperative that the
machine you install the control service on is accessible by all agent machines.
Select Next.
8. Compliance Guardian will perform a brief pre-scan of the environment to ensure that all rules
meet the requirements. The status for each rule will be listed in the Status column. Select the
hyperlink of the status, and the detailed information about the scan result will be listed in the
pop-up window. You may select Details to view the detailed information of all of the
requirements.
If any rules have failed the pre-scan, update your environment to meet the requirements, and
then select the Rescan button to check your environment again. Once all the rules pass, select
Next.
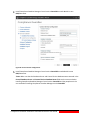
9. Set up the Control Service Configuration:
•
Control Service Address – Specify the current machine’s hostname or IP address. The
Control Service manages internal configuration data, user access control, scheduling,
and job monitoring.
•
IIS Website Settings – Configure the IIS website settings for the Control Service. You can
select to use an existing IIS website or create a new IIS website. The IIS website is used
to access Compliance Guardian Manager.
•
o
Use an existing IIS website – Select an existing IIS website from the drop-down
list, and if necessary, you can adjust the Website Port used to access the
Compliance Guardian Control Service.
o
Create a new IIS website – Enter the website name and create a new IIS website
for the Control Service. The default Website Port used to access Compliance
Guardian Control Service is 14100; you do not need to change it unless a known
port conflict exists.
o
Website Port – Control Service communication port. The default port is 14100.
Application Pool Settings – Configure the IIS application pool settings for the
corresponding website. You can select to use an existing application pool or create a
new application pool. The application pool is used to handle the requests sent to the
corresponding website. The following settings can be configured:
o
30
Use an existing application pool (not recommended) – Select an existing
application pool from the drop-down list. If you choose to use an existing
application pool, the Application Pool Account settings are greyed out and
cannot be changed.
Compliance Guardian Installation and Administration User Guide
o
Create a new application pool – Enter the application pool name and
application pool account settings to create a new IIS application pool for the
corresponding website. By default, the new application pool’s name is
ComplianceGuardian.
Select Next to continue to configure the database settings for Control Service.
10. In this page, MS SQL is selected in the Database Type drop-down menu. The following
information must be configured for the MS SQL database:
•
Database Server – The MS SQL server name.
•
Control Service Database Name – Enter a database name for the Control Service, if the
database does not exist, it will be created in the provided MS SQL server.
•
Database Credentials – Select the credentials for this Control Service database.
o
Windows Authentication (the default option) – Use this method when you want
the user identity to be confirmed by Windows. The specified account must have
permission to access the SQL Server machine where you want to create the
Control Service Database.
o
SQL Authentication – SQL server will confirm the user identity itself according
to the specified account and password. The specified account must have the
following permission: DB Owner of the existing Compliance Guardian Control
Database or DB Creator of the newly created Compliance Guardian Control
Database.
•
Passphrase Settings – Enter the passphrase you want to use for protecting Compliance
Guardian Manager data.
•
Advanced Database Settings – You can choose to associate the Compliance Guardian
Control database with a specific failover SQL server that is used in conjunction with SQL
Server database mirroring.
Select Next.
11. Set up the Advanced Configuration.
•
SSL Certification – Specify the method for encrypting information and providing
authentication for Compliance Guardian:
o
Built-in Certificate – Uses the certificate provided by Compliance Guardian. No
additional configuration is necessary.
o
User-defined Certificate – Enabling this option allows you to select a certificate
from your local machine. It will use the Certificate Authentication server of the
current machine to check whether the certificate is revoked. After the
certificates are filtered, only the certificates that are not revoked will be
displayed.
Select Next.
Compliance Guardian Installation and Administration User Guide
31
12. In the Ready to install Compliance Guardian Manager page, all of the information configured in
the previous steps is listed. Select Install to begin the installation. Select Back to change any of
the previous settings. Select Cancel to abandon all of the configurations and exit the installation
wizard.
13. When the Manager installation is completed, the Manager Passphrase you specified to protect
Compliance Guardian Manager data will be displayed on the Install Completed page. Save this
passphrase to enter it during the Agent installation.
After the installation is complete, select Finish to exit the installation wizard.
Compliance Guardian Agent
Make sure the system requirements are met before starting the Compliance Guardian Agent
installation. For more information, refer to System Requirements for Agent Service Installation.
Check that the Compliance Guardian Manager services have started before installing the Compliance
Guardian Agents.
Installing Compliance Guardian Agent
After the Manager’s services have started, complete the following steps to install the Compliance
Guardian Agent:
1. Download the Agent ZIP file, either by requesting a demo version or by contacting an AvePoint
representative for links to this package.
2. Unzip this package and navigate to the Compliance Guardian Agent directory. Run the Setup.exe
file.
3. From the welcome screen, select Next.
4. Enter your Name and Organization into the provided fields, and then select Next.
5. Carefully review the Compliance Guardian License Agreement.
After you have read the terms in the license agreement, check the I accept the terms in the
license agreement checkbox, and then select Next.
6. Select Browse, and then select the location for the Agent installation. By default, the installation
location is C:\Program Files\AvePoint. Select Next.
7. Compliance Guardian will perform a brief pre-scan of the environment to ensure that all rules
meet the requirements. The status for each rule will be listed in the Status column. Select the
hyperlink of the status, and the detailed information about the scan result will be listed in the
pop-up window.
8. Select Details to view the detailed information of all of the requirements. Update your
environment to meet the requirements if there are some checked rules that failed.
32
Compliance Guardian Installation and Administration User Guide
9. Select the Rescan button to check your environment again. Once all rules pass, select Next.
10. Set up the Communication Configuration.
•
Compliance Guardian Agent Host – Specify the current server’s hostname, IP address,
or fully qualified domain name (FQDN).
•
Compliance Guardian Agent Port – The port specified here is used by the Manager or
other Agents for communication. The default port number is 14104.
•
Control Service Host – The hostname or IP address of the machine where the Control
Service is installed.
*Note: If you want to configure the connection with Yammer for scanning posts, you
must enter the hostname of the machine where the Control Service is installed. For
more information on configuring the connection, refer to Configuring Connections to
Yammer.
•
Control Service Port – This is the port used for communication with Control Service and
should match the information provided during the Manager configuration. The default
port number is 14100.
•
SSL Certification – Specify the SSL Certification used for the specified Compliance
Guardian Manager.
Select Next.
11. Set up the Agent Configuration:
•
Agent Authentication – Enter the Manager Passphrase specified when configuring the
Compliance Guardian Manager installation. If you forget the passphrase, you can view it
by navigating to Compliance Guardian > Control Panel > System Options > Security
Settings. For more information, refer to Viewing Security Information.
•
Agent Account – Specify the Agent Account under which the agent activities are
performed. For more information on the permissions required for each Compliance
Guardian module, refer to the section of that module in this user guide. The ideal
account permissions for all Compliance Guardian products are listed below:
Local System Permissions
The specified Agent Account will be granted Full Control permission to the following
groups and folders during Compliance Guardian Agent installation:
*Note: The local administrator permission is required for the Agent Account when you
are installing the Compliance Guardian solutions using the Agent Account in Solution
Manager.
o
IIS_WPG (for IIS6.0) or IIS_IUSRS (for IIS7)
o
Performance Monitor Users
Compliance Guardian Installation and Administration User Guide
33
o
Compliance Guardian Users (the group is created by Compliance Guardian
automatically and it has the following permissions):
Full Control to the Registry of
HKEY_LOCAL_MACHINE\SOFTWARE\AvePoint\ComplianceGuardian.
Full Control to the Registry of
HKEY_LOCAL_MACHINE\SYSTEM\CurrentControlSet\services\eventlog.
Full Control to the Communication Certificate.
Permission of Log on as a batch job (it can be found within Control
Panel\Administrative Tools\Local Security Policy\Security Settings\Local
Policies\User Rights Assignment)
Full Control Permission of Compliance Guardian Agent installation
directory
SharePoint Permissions for SharePoint 2007
o
Member of the Farm Administrators group
o
Full Control permission to all zones of all Web applications via the User Policy
for Web Applications
o
Manage User Profiles of Shared Services Rights
SharePoint Permissions for SharePoint 2010
34
o
Member of the Farm Administrators group
o
Full Control permission to all zones of all Web applications via the User Policy
for Web Applications
o
User Profile Service Application permissions:
Permissions > Connection Permissions for User Profile Service: Full
Control
Administrators > Administrators for User Profile Service Application:
Manage Profiles
Administrators > Administrators for User Profile Service Application:
Manage Social Data
Use Personal Features
Create Personal Site
Use Social Features
o
Managed Metadata Service: Term Store Administrator
o
Business Data Connectivity Service: Full Control
o
Search Service: Full Control
Compliance Guardian Installation and Administration User Guide
SharePoint Permissions for SharePoint 2013
Member of the Farm Administrators group
Full Control permission to all zones of all Web applications via the User Policy
for Web Applications
User Profile Service Application permissions:
Permissions > Connection Permissions for User Profile Service: Full
Control
Administrators > Administrators for User Profile Service Application:
Manage Profiles
Administrators > Administrators for User Profile Service Application:
Manage Social Data
Use Personal Features
Create Personal Site
Use Social Features
Managed Metadata Service: Term Store Administrator
Business Data Connectivity Service: Full Control
Search Service: Full Control
SharePoint Online
o
For regular scan
o
Site collection administrator of the target site collections
In scan mode
Global administrator role, and the user must apply a valid SharePoint
Online license
SQL Server Permissions
o
Database role of db_owner for all of the databases related with SharePoint,
including content databases, SharePoint configuration database, and Central
Admin database, and for Compliance Report database and Classification Report
database
o
Database role of dbcreator and Security Admin to SQL Server, and database role
of dbcreator for creating new Compliance Report database and Classification
Report database
Select Next.
Compliance Guardian Installation and Administration User Guide
35
12. In the Ready to install Compliance Guardian Agent Page, review the customer information you
defined, and then select Install to begin the installation. Select Back to change any of the
previous settings. Select Cancel to abandon all configurations and exit the installation wizard.
13. After the installation is complete, select Finish to exit the installation wizard.
Congratulations! Compliance Guardian is now installed and configured. Once you have completed the
product installation, you can begin to configure the report database needed to store the report data.
Accessing the Compliance Guardian GUI
The following table displays the supported browsers and their requirements on the Silverlight version if
you want to access the Compliance Guardian GUI in a Windows Server 2008 R2 Enterprise SP1
environment.
Silverlight Version
Internet Explorer
Google Chrome
Mozilla Firefox
Rules
5.0 or above
IE 7 or above
19.0.1084.52
14.0.1
Requirement
Internet Explorer Setup
When first accessing Compliance Guardian using Microsoft Internet Explorer (IE), some initial security
settings must be configured. Run Compliance Guardian’s server application found in the Start menu on
the machine where the Compliance Guardian Control Service is installed, and complete the following
steps:
1. When you access Compliance Guardian by IE, the browser will display a security certificate
prompt. Select the Continue to this website option listed next to the shield.
Figure 2: Security certificate prompt.
36
Compliance Guardian Installation and Administration User Guide
2. Select the Certificate Error button next to the address bar.
Figure 3: Certificate Error button.
3. Select View certificates in the pop-up. The Certificate window appears.
Figure 4: View certificates link.
4. Select the Install Certificate… button to install the Compliance Guardian certificate. The name of
this certificate is the same as the hostname of the server that has Compliance Guardian Control
Service installed.
Figure 5: Install Certificate button.
Compliance Guardian Installation and Administration User Guide
37
5. Select Next to continue installing the certificate.
6. Select the Place all certificates in the following store option and select Browse to browse to the
Trusted Root Certification Authorities folder. Select OK to confirm the selection and select
Next.
Figure 6: Certificate Import Wizard.
7. Select Finish to complete the certificate import.
8. Select OK in the prompt window to acknowledge the successful import.
9. Choose to temporarily allow the Compliance Guardian GUI pop-up window or to always allow
the Compliance Guardian GUI in the prompt window.
Figure 7: Choose how to allow the pop-ups.
38
Compliance Guardian Installation and Administration User Guide
You can now log into Compliance Guardian from Internet Explorer.
Logging In to Compliance Guardian
The Compliance Guardian GUI can be launched from Web browsers within the same network as the
Compliance Guardian Manager. Refer to Accessing the Compliance Guardian GUI for the supported Web
browsers. Connect to the interface using the IP/hostname for the Compliance Guardian Manager
Control Service, as well as the Control Service Port if it was changed.
1. Open an Internet Explorer window and enter https://<machine>:14100 where <machine> is the
hostname or IP address of the machine running the Compliance Guardian Control Service. If the
default port number has been changed from 14100, enter the new port number.
*Note: If the hostname of the machine running the Compliance Guardian Control Service
contains the underline (_), use the IP address of the corresponding machine to access
Compliance Guardian.
2. The Compliance Guardian login screen pops up. Select Local System from the Log on to dropdown list and enter the default login account information:
•
Login ID: admin
•
Password: admin
3. Select Login.
*Note: When you log on to Compliance Guardian for the first time, it is strongly recommended
that you back up the Compliance Guardian security keys for protection. For more information,
refer to Viewing Security Information.
You can also log on Compliance Guardian using the integration with other authentication methods. For
more information, refer to Authentication Manager.
How to Use Your Keyboard in Compliance Guardian
Please refer to the following table for instructions on using the keyboard in Compliance Guardian.
Keyboard Key
Tab
Enter
Space
F2
↑↓←→
When to Use
Switch among all of the functions in one page.
Select one button.
Select one check box/radio button/button.
Gain focus in one cell of a table.
Switch among options in one list box, options in one combo
box, or among cells in one table.
Compliance Guardian Installation and Administration User Guide
39
Compliance Guardian Manager and Agent Maintenance
If you want to modify the configuration of Compliance Guardian Manager/Agent after the installation,
open the Start Menu in Windows on the Compliance Guardian Manager/Agent server, and navigate to
All Programs > AvePoint Compliance Guardian. Then, open the Compliance Guardian Manager Tools/
Compliance Guardian Agent Tools folder and select Manager Configuration Tool/Agent Configuration
Tool.
Select the items listed on the left part of the tool and you can modify the corresponding settings.
Refer to Installing Compliance Guardian Manager and Installing Compliance Guardian Agent for detailed
information about the settings.
40
Compliance Guardian Installation and Administration User Guide
Update Compliance Guardian
To update Compliance Guardian, complete the following steps:
1. Navigate to Compliance Guardian Manager > Control Panel > Update Manager. The Update
Manager interface appears.
2. Select Manage Updates on the ribbon. The Manage Updates interface appears.
3. Select Download to download the selected update from Compliance Guardian update server, or
select Browse on the ribbon to browse and load the update file into Compliance Guardian
Manager.
4. Select the update you want to install and select Install. The Server Selection pop-up window
shows all of the available Manager services on the Manager tab and all of the available Agents
on the Agent tab.
5. On the Manager tab, select the Install the update for all the managers below checkbox to
install the update on the Manager services.
6. On the Agent tab, select the farms whose Agent services you want to update by selecting the
corresponding checkboxes. The update will be installed on the selected Agents.
7. Select Install on the ribbon or on the lower-right corner. A message appears to prompt you
whether to automatically restart the IIS service immediately.
8. Select OK to automatically restart the IIS service, or select Cancel to manually restart the IIS
service later. The Update Installation page appears, displaying the progress. After installation, a
message appears to indicate that the installation is successful.
9. Select Finish.
After updating Compliance Guardian and the IIS service finishes restarting, you must update the
report databases if you still want to use the databases in the updated Compliance Guardian
version.
10. Navigate to Control Panel > Solution Manager.
11. If a message appears after a solution (The Current solution version is lower than the agent
version), then select the checkbox before the solution, and select Upgrade on the ribbon to
update the solution.
Compliance Guardian Report Database Upgrade Tool
Compliance Guardian Report Database Upgrade tool is used to update the report database or out of
quarantined files (only applies to files created in a version earlier than Compliance Guardian 3 SP3) if
you want use it in Compliance Guardian 3 SP3.
Compliance Guardian Installation and Administration User Guide
41
Using the Tool
To upgrade the Compliance Guardian report database or out of place quarantined files, complete the
following steps:
Navigate to the machines with Compliance Guardian Manager installed.
Open the …\Compliance Guardian\Manager\Shared\Tools\CGReportDBUpgrade directory to
find the CGReportDBUpgrade.exe file.
Select CGReportDBUpgrade.exe, and then select Run as administrator. The command line
interface appears.
Enter the Compliance Guardian Manager Server IP address, and press Enter.
Enter the Compliance Guardian Manager Server port, press Enter.
Enter the Compliance Guardian login username, and press Enter.
Enter the login password, and press Enter.
Figure 8: The CGReportDBUpgrade.exe file interface.
Enter the version to which you want to update.
42
•
If you want to update the report databases that store the Compliance Scanner from the
previous version (the version lower than Compliance Guardian 3 SP1) to Compliance
Guardian 3 SP1, enter 3.1.0, and then wait until the Press any key to exit message
appears after the databases finishes updating.
•
If you want to update the report databases that store the Compliance Scanner data and
the report databases that store the Classification Scanner data from the previous
Compliance Guardian version (the Compliance Guardian 3 SP1 version or the version
greater than Compliance Guardian 3 SP1 but lower than Compliance Guardian 3 SP2 or
Compliance Guardian 3 SP3) to Compliance Guardian 3 SP2 or 3 SP3. Enter 3.2.0 or
3.3.0. Then, wait until the Press any key to exit message appears. If you have entered n,
you must finish the following steps (step 4 and step 5) for completing the update of the
report databases.
Compliance Guardian Installation and Administration User Guide
*Note: You can only update the Compliance Guardian version in sequence. For example:
if you want to update Compliance Guardian 3 SP1 to Compliance Guardian 3 SP3, you
can only first update Compliance Guardian 3 SP1 to Compliance Guardian 3 SP2, and
then update Compliance Guardian 3 SP2 to Compliance Guardian 3 SP3.
Update the old report data in the Compliance Guardian Agent server.
Go to the machines with Compliance Guardian Agent installed and open the …\Compliance
Guardian\Agent\Bin directory to find the CCS.Toolkit.v2.exe or CCS.Toolkit.v4.exe file.
In the SharePoint 2007 or SharePoint 2010 environment, select CCS.Toolkit.v2.exe; in the
SharePoint 2013 environment, select CCS.Toolkit.v4.exe.
Select Run as administrator. The command line interface appears.
Enter 7 to update all of the old report data and press Enter. Wait until Press Enter to exit
appears after the report databases finishes updating.
Figure 9: The CCS.Toolkit.v2.exe file interface.
*Note: You are only required to run CCS.Toolkit.v2.exe or CCS.Toolkit.v4.exe and perform the
action in step 11 on one agent service per SharePoint farm.
Compliance Guardian Installation and Administration User Guide
43
Uninstalling Compliance Guardian
The Compliance Guardian Uninstallation Wizard is there to guide you through this uninstallation
process. By following the steps below, you will have Compliance Guardian removed from your
environment very quickly. In order to complete the uninstallation successfully, the Uninstallation Wizard
must be run by a local administrator.
Uninstalling Compliance Guardian Manager
In order to uninstall Compliance Guardian Manager, please ensure the Manager Service being removed
is not in use by another process. To uninstall Compliance Guardian Manager, complete the following
steps:
*Note: Once the uninstallation is in progress, it cannot be cancelled and the uninstallation interface
cannot be closed.
1. Open the Start Menu in Windows on the Compliance Guardian Manager Server, and navigate to
All Programs > AvePoint Compliance Guardian.
2. Open the Compliance Guardian Manager Tools folder, and then select Manager Uninstall.
3. Select the Remove option, and then select Next.
4. In the Ready to Remove Compliance Guardian Manager page, configure the Remove
configuration file option. Select this option if you want to remove all of the folders and
configuration files generated by the Compliance Guardian Manager installation.
*Note: The Logs folder will not be removed whether you select the Remove configuration file
option or not.
5. Select Remove to start the Manager uninstallation process.
If the application pool created by Compliance Guardian Manager installation is still useful, it will
not be deleted during the Manager uninstallation. If the application pool created by Compliance
Guardian Manager installation is not used by any other applications, it will be deleted during the
Manager uninstallation.
*Note: The Manager uninstallation will not delete the Manager databases.
6. Select Finish to complete the uninstallation.
44
Compliance Guardian Installation and Administration User Guide
Uninstalling Compliance Guardian Agent
In order to uninstall Compliance Guardian Agent, please ensure there are no current jobs running on the
agent. To uninstall Compliance Guardian Agent, complete the following steps:
*Note: Once the uninstallation is in progress, it cannot be cancelled and the uninstallation interface
cannot be closed.
1. Open the Start Menu in Windows on the Compliance Guardian Agent server, and navigate to All
Programs > AvePoint Compliance Guardian.
2. Open the Compliance Guardian Agent Tools folder, and then select Agent Uninstall.
3. Select the Remove option, and then select Next.
4. In ready to Remove Compliance Guardian Agent page, configure the Remove configuration file
option. Select this option if you want to remove all of the folders and configuration files
generated by the Compliance Guardian Agent installation.
*Note: The Logs folder will not be removed whether you select the Remove configuration file
option or not.
5. Select Remove and the Agent uninstallation process starts.
6. Select Finish to complete the uninstallation.
Resolve Issues Occurred During the Compliance Guardian
Installation
If you encounter other issues when installing the Compliance Guardian Manager or Agents, follow the
prompt messages to resolve the issue, and run the installation program again.
If the issue persists, refer to the site for additional help.
Compliance Guardian Installation and Administration User Guide
45
Unattended Installation: Compliance Guardian Manager
Make sure the system requirements are met before starting the Compliance Guardian Manager
unattended installation. For more information, refer to Compliance Guardian Manager System
Requirements.
Generating the Installation Answer File for Compliance Guardian
Manager
The Answer file is an XML file which provides configuration information required for the unattended
installation. Before performing the unattended installation, the Answer file must be generated using the
Compliance Guardian Setup Manager.
Navigate to the …\UnattendedInstall\SetupManager folder inside the unzipped Manager installation
package, and double select SetupManager.exe to run it. Complete the following steps:
On the welcome screen, select Next.
Select Create a new answer file for Compliance Guardian Manager.
•
Modify an existing answer file – If you want to reuse an existing Answer file, select
Modify an existing answer file. If this is selected, the path field will be enabled. Enter
the full path of the answer file is or select Browse to browse for an answer file. For
example, C:\AnswerFile.xml
*Note: We recommend you create a generic Answer file so that it can be reused later
with modification.
Select Next.
Carefully review the Compliance Guardian License Agreement.
After you have read the terms in the license agreement, check the I accept the terms in the
license agreement checkbox to agree to the terms. Select Next.
Enter your name and the organization into the provided field. Select Next to continue the
configuration, or select Back to return to the previous interface.
Set up the installation location using the following conditions:
46
•
Default directory – The Compliance Guardian Manager will be installed to the default
installation location on the specified destination server, which is …\Program
Files\AvePoint\Compliance Guardian\Manager.
•
Customized directory – If you select this option, enter a customized path in the
Installation Path field where you want to install the Compliance Guardian Manager on
the destination server.
Compliance Guardian Installation and Administration User Guide
o
Use the default directory if your customized directory is invalid – Enable this
option to install Compliance Guardian Manager to the default directory should
the path you defined for customized directory be invalid. For example, if the
drive indicated by the path you specified does not exist on the destination
server.
Select the Compliance Guardian Manager service you want to install. There are only one service
you can install.
•
Control Service – Manages all Compliance Guardian operations and communicates with
Compliance Guardian, allowing users to interact with the software. All agents
communicate with the Manager via the Control Service, so it is imperative that the
machine you install the Control Service on is accessible by all agent machines. This
service can be run on a Windows Network Load Balanced cluster to ensure load
balancing which leverages the Windows Network Load Balancer to automatically select
the proper Compliance Guardian Control Service for optimal performance.
Select Next.
Set up the Control Service Configuration:
•
•
IIS Website Settings – Configure the IIS website settings for the Control Service. The IIS
website is used to access Compliance Guardian Manager.
o
IIS website – Enter the website name and create a new IIS website for the
Control Service. The default Website Port used to access Compliance Guardian
Control Service is 14100, you do not need to change it unless a known port
conflict exists.
o
Website Port – Control Service communication port. The default port is 14100.
Application Pool Settings – Configure the IIS application pool settings for the
corresponding website. The application pool is used to handle the requests sent to the
corresponding website.
o
Application pool – Enter the application pool name for the corresponding
website.
o
Application Pool Account – Enter an application pool account to be the
administrator of the specified application pool, and the corresponding
password.
*Note: The application pool account for connecting an existing IIS website or
creating a new IIS website must have the following Local System Permissions:
Member of the following local group:
IIS_WPG (for IIS 6) or IIS_IUSRS (for IIS 7 and IIS 8)
Full Control to
HKEY_LOCAL_MACHINE\SOFTWARE\AvePoint\Compliance Guardian
Full Control to Compliance Guardian Manager folder
Compliance Guardian Installation and Administration User Guide
47
Member of the Performance Monitor Users group
Full Control to Compliance Guardian Certificate private keys
Full Control (or Read, Write, Modify and Delete) to C:\WINDOWS\Temp
(only for Windows 2003 environment)
You can add the application pool account to the local Administrators group to
meet the required permissions.
Select Next to continue to configure the database settings for the Control Service.
Configure a database for storing the relevant data of Control Service.
•
Database Type – Only MS SQL Server is supported to serve as the database server for
Control Service.
•
Database Server – Enter the MS SQL server name.
•
Control Database Name – Enter a database name for the Control Service. If the
database does not exist, it will be created in the provided MS SQL server.
•
Database Credentials – Select the credential for this Control Service database.
o
Windows Authentication (the default option) – Use this method when you want
the user identity to be confirmed by Windows. The specified account must have
the necessary permission to access the SQL Server machine where you want to
create the control service database.
o
SQL Authentication – SQL server will confirm the user identity itself according
to the specified account and password. The specified account must have the
following permission: DB Owner of the existing Compliance Guardian Control
Database or DB Creator of the newly created Compliance Guardian Control
Database.
•
Passphrase Settings – Enter the passphrase you want to use for protecting Compliance
Guardian Manager data.
•
Advanced Database Settings – You can choose to associate the Compliance Guardian
Control Database with a specific failover SQL server that is used in conjunction with SQL
Server database mirroring.
Select Next.
Once all of the required information has been configured, all of the information configured in
the previous steps is listed on the Installation Summary page. Select Save, and specify the path
you want to save the Answer file to. You can also modify the Answer file’s name in the pop-up
window.
48
Compliance Guardian Installation and Administration User Guide
Import the UnattendedInstallation.dll File
Before performing the Compliance Guardian Manager unattended installation, the
UnattendedInstallation.dll file must be imported into Windows PowerShell using either of the two
methods below.
*Note: If the UnattendedInstallation.dll file is not imported successfully, use the Set-ExecutionPolicy
command to set the execution policy to Unrestricted, RemoteSigned, or AllSigned in Windows
PowerShell and perform the import again using one of the following methods.
To manually import the UnattendedInstallation.dll file, complete the following steps:
Select Start on the server with the unzipped Manager installation package residing in, and find
Windows PowerShell. Right-click on it, and select Run as administrator to run it.
Enter the following command, and press Enter to import the UnattendedInstallation.dll file:
Import-Module
…\UnattendedInstall\PowerShellModules\UnattendedInstallation.dll
To automatically import the UnattendedInstallation.dll file, complete the following steps:
Navigate to the …\UnattendedInstall\PowerShellModules folder inside the unzipped Manager
installation package.
Right-click on the UnattendedInstallationLauncher.bat file, and select Run as administrator to
run it.
Now that you have imported the UnattendedInstallation.dll file, you can use the commands in the
following sections to check your environment, perform the manager installation, and configure settings.
Commands and Command Parameters for Compliance Guardian
Manager Unattended Installation
To perform the Compliance Guardian Manager unattended installation, refer to the following sections
for the commands.
Installation Command
The Compliance Guardian Manager Unattended Installation command for installing Compliance
Guardian Manager remotely is Install-CGManager. For example:
Install-CGManager -CustomTDFPath C:\Users\add\Desktop\custom checks.zip -TargetName
hostmachine -Username AvePoint\Compliance Guardian -Password “Ave” -PackageFilesFolder
"C:\Compliance Guardian Manager" -AnswerFilePath "C:\AnswerFile.xml" -RemoteTempPath
“C:\TempFolder”
Compliance Guardian Installation and Administration User Guide
49
This table contains detailed information for each of the parameters:
Parameter
-CustomTDFPath
Type
Optional
-TargetName
-Username
Required
Required
Description
The path of the ZIP file that contains the custom ZIP
checks. After Compliance Guardian is installed, the ZIP
file will locate in …Compliance
Guardian\Manager\Control\bin\Resources. The name
of the ZIP file will be changed to Custom XML AIO.zip.
Compliance Guardian’s built-in checks and the checks in
this ZIP file will be loaded in Test Suite Manager of
Compliance Guardian.
The name or IP address of the destination machine
where you want to install the Compliance Guardian
Manager.
*Note: If the hostname is used, ensure that the
specified computer name can be resolved through the
local Hosts file, by using Domain Name System (DNS)
queries, or through NetBIOS name resolution
techniques.
The username of the user used to access the
destination machine where you want to install the
Compliance Guardian Manager. The format of the
username is: domain\username.
The permissions of the user specified here are as
follows:
• If the specified user is the local
administrator of the destination
machine, it can be used directly. Enter
.\administrator for the Username
parameter.
•
-Password
Required
-PackageFilesFolder
Required
50
If the specified user is from the domain
which the destination machine belongs
to, the domain user must be added to
the Administrators group on the
destination machine.
The user specified here must have the Full Control
permission to the path specified in RemoteTempPath
parameter.
The password of the user specified above.
Quote the password if it contains any special character
or space.
The local path on the machine where you run the
command. The specified path stores the unzipped
Compliance Guardian Manager installation package
Compliance Guardian Installation and Administration User Guide
Parameter
-AnswerFilePath
Type
Required
-RemoteTempPath
Required
-Log
Optional
Description
(Manager ZIP file). The format of the path is:
C:\package.
Quote the path if it contains any special character or
space.
The local path where you saved the Answer file.
The path must be detailed to the name of the Answer
file. For example, C:\AnswerFile.xml.
A local path on the destination machine that the
Compliance Guardian Manager is installed to. The
format of the path is: C:\temp.
The path will be used to store the temporary files
generated during the Compliance Guardian Manager
unattended installation. The temporary files will be
deleted as soon as the unattended installation finishes.
This is an optional parameter. If used, the logs of the
unattended installation will be saved to the .txt file in
the specified path.
The path specified in this parameter must be detailed to
the name of the log file. For example, C:\Log.txt.
-UseIPv6forCommunication
Optional
-ReceiveInfoPort
Optional
-Timeout
Optional
If the specified log file does not exist, it will be
generated automatically.
This is an optional parameter used to specify the
communication method between the machine where
the command is run and the destination machine that
the Compliance Guardian Manager is installed. If an
IPv6 address is entered in TargetName parameter, this
parameter must be entered.
*Note: When using this parameter, both the destination
machine and the machine where you run this command
must support IPv6.
This is an optional parameter to specify a port for the
source machine to receive the data from the
destination machine. This port and the destination
machine’s IP are added to an inbound rule of the source
machine’s firewall so it allows all the connections from
the destination machine. Compliance Guardian
recommends you configure this parameter to ensure
smooth communication between the source machine
and the destination machine.
This is an optional parameter to specify a timeout value
for the connection to the destination machine. A
Compliance Guardian Installation and Administration User Guide
51
Parameter
52
Type
Description
timeout error will occur if there is no connection to the
destination machine in the specified period.
Compliance Guardian Installation and Administration User Guide
Unattended Installation: Compliance Guardian Agent
The Compliance Guardian Agent can be installed remotely using the unattended installation after the
Manager’s services have started. Ensure the system requirements are met before starting the
Compliance Guardian Agent unattended installation. For more information, refer to System
Requirements for Agent Service Installation.
Generating the Installation Answer File for Compliance Guardian
Agent
The Answer file is an XML file which provides configuration information required for the unattended
installation. Before performing the unattended installation, the Answer file must be generated using the
Compliance Guardian 6 Setup Manager.
Navigate to the …\UnattendedInstall\SetupManager folder inside the unzipped Manager installation
package, and double select SetupManager.exe to run it. You will be guided through the following steps.
On the welcome screen, select Next.
Select Create a new answer file for Compliance Guardian Agent.
•
Modify an existing answer file – If you want to reuse an existing Answer file, select
Modify an existing answer file. If this is selected, the path field will be enabled. Enter
the full path of the answer file or select Browse to browse for an answer file. For
example, C:\AnswerFile.xml
*Note: We recommend you create a generic Answer file so that it can be reused later with
modification.
Select Next.
Carefully review the Compliance Guardian License Agreement.
After you have read the terms in the license agreement, select on the check-box to select I
accept the terms in the license agreement. Select Next.
Enter your name and the organization into the provided field. Select Next to continue the
configuration. Select Back to go back to the previous interface.
Set up the installation location using the following conditions.
•
Default Directory – The Compliance Guardian Agent will be installed to the default
installation location on the specified destination server, which is … \Program
Files\AvePoint\Compliance Guardian\Agent.
•
Customized Directory – If select this option, the Installation Path field will be enabled,
enter a customized path and the Compliance Guardian Agent will be installed to the
specified path on the destination server.
Compliance Guardian Installation and Administration User Guide
53
o
Use the default directory if your customized directory is invalid – If this option is
selected, the Compliance Guardian Agent will be installed to the default
directory when the customized directory is invalid. For example, the path you
specified is on a drive which does not exist on the destination server.
Set up the Control Service configuration:
•
Compliance Guardian Control Service Host – The hostname or IP address of the
machine where installed Control Service.
•
Compliance Guardian Control Service Port – This is the port used for communication
with Control Service and should match the information provided during the Manager
configuration. The default port number is 14100.
Set up the Agent port:
•
Compliance Guardian Agent Port – The port specified here is used by the Manager or
other Agents for communication. The default port number is 14004.
o
Use a random port number if the specified one is being used – If select this
option, Compliance Guardian will use a random port number if the port you
specified has already been used. This option is selected by default.
Set up the Agent configuration:
•
Manager Passphrase – Enter the Manager Passphrase specified when configuring the
Compliance Guardian Manager installation answer file.
•
Compliance Guardian Agent Account – Specify the username and password of the
Agent account under which the Agent activities are performed.
Once all the required information has been configured, all of the information configured in the
previous steps is listed in the Installation Summary page. Select Save, and specify the path you
want to save the Answer file to. You can also modify the Answer file’s name in the pop-up
window.
Import the UnattendedInstallation.dll File
Before performing the Compliance Guardian Agent unattended installation, the
UnattendedInstallation.dll file must be imported into Windows PowerShell using either of the two
methods below.
*Note: If the UnattendedInstallation.dll file is not imported successfully, use the Set-ExecutionPolicy
command to set the execution policy to Unrestricted, RemoteSigned, or AllSigned in Windows
PowerShell and perform the import again using either of the two methods below.
To manually import the UnattendedInstallation.dll file, complete the following steps:
Select Start, and find Windows PowerShell.
Right-click on Windows PowerShell, and select Run as administrator to run it.
54
Compliance Guardian Installation and Administration User Guide
Enter the following command.
Import-Module
…\UnattendedInstall\PowerShellModules\UnattendedInstallation.dll
Press Enter to import the UnattendedInstallation.dll file.
To automatically import the UnattendedInstallation.dll file, complete the following steps:
Navigate to the …\UnattendedInstall\PowerShellModules folder inside the unzipped Manager
installation package.
Right click on the UnattendedInstallationLauncher.bat file, and select Run as administrator to
run it.
*Note: The value of the Set-ExecutionPolicy of the Powershell must be set as AllSigned.
Now that you have imported the UnattendedInstallation.dll file, you can use the commands in the
following sections to check your environment, perform the agent installation and configure settings.
Commands and Command Parameters for Compliance Guardian
Agent Unattended Installation
To perform the Compliance Guardian Agent unattended installation, run the commands in the following
sections.
Installation Command
The Compliance Guardian Agent Unattended Installation command for installing Compliance Guardian
Agent remotely is Install-CGAgent.
For example:
Install-CGAgent -TargetName hostmachine -Username AvePoint\Compliance Guardian -Password “Ave”
-PackageFilesFolder "C:\Compliance Guardian_Agent" -AnswerFilePath "C:\AnswerFile.xml" RemoteTempPath “C:\TempFolder”
Detailed information about the parameters is listed in the following table:
Parameter
-TargetName
Type
Required
Description
The name or IP address of the destination machine
where you want to install the Compliance Guardian
Agent.
*Note: If the hostname is used, ensure that the
specified computer name can be resolved through
the local Hosts file, by using Domain Name System
(DNS) queries, or through NetBIOS name resolution
techniques.
Compliance Guardian Installation and Administration User Guide
55
Parameter
-Username
Type
Required
-Password
Required
-PackageFilesFolder
Required
-AnswerFilePath
Required
-RemoteTempPath
Required
-Log
Optional
56
Description
The username of the user used to access the
destination machine where you want to install the
Compliance Guardian Agent. The format of the
username is: domain\username.
The permissions of the user specified here are as
follows:
• If the specified user is the local
administrator of the destination
machine, it can be used directly.
Enter .\administrator for the
Username parameter.
•
If the specified user is from the
domain which the destination
machine belongs to, the domain user
must be added to the Administrators
group on the destination machine.
•
The user specified here must have
the Full Control permission to the
path specified in RemoteTempPath
parameter.
The password of the user specified above. Quote the
password if it contains any special character or
space.
The local path on the machine where you run the
command. The specified path stores the unzipped
Compliance Guardian Agent installation package
(Agent ZIP file). The format of the path is:
C:\package.
Quote the path if it contains any special character or
space.
The local path where you saved the Answer file.
The path must be detailed to the name of the
Answer file. For example, C:\AnswerFile.xml.
A local path on the destination machine that the
Compliance Guardian Agent is installed to. The
format of the path is: C:\temp.
The path will be used to store the temporary files
generated during the Compliance Guardian Agent
unattended installation. The temporary files will be
deleted as soon as the unattended installation
finishes.
This is an optional parameter. If used, the logs of the
unattended installation will be saved to the .txt file in
the specified path. The path specified in this
Compliance Guardian Installation and Administration User Guide
Parameter
Type
Optional
UseIPv6forCommunication
-ReceiveInfoPort
Optional
-Timeout
Optional
Description
parameter must be detailed to the name of the log
file. For example, C:\Log.txt.
If the specified log file does not exist, it will be
generated automatically.
This is an optional parameter. It specifies the
communication method between the machine where
the command is run and the destination machine
that the Compliance Guardian Agent is installed to. If
an IPv6 address is entered in TargetName
parameter, this parameter must be entered.
*Note: When using this parameter, both the
destination machine and the machine where you run
this command must support IPv6.
This is an optional parameter to specify a port for the
source machine to receive the data from the
destination machine. This port and the destination
machine’s IP are added to an inbound rule of the
source machine’s firewall so it allows all the
connections from the destination machine.
Compliance Guardian recommends you configure
this parameter to ensure smooth communication
between the source machine and the destination
machine.
This is an optional parameter to specify a timeout
value for the connection to the destination machine.
A timeout error will occur if there is no connection to
the destination machine in the specified period.
Compliance Guardian Installation and Administration User Guide
57
Installing Compliance Guardian App for Real-Time
Classification
Compliance Guardian App for Real-Time Classification is used to support scanning SharePoint Online
sites in real time. To scan SharePoint Online sites, you must first install the app, and then activate the
app in Control Panel > SharePoint Sites. For more information on Real-Time Classification Scanner, refer
to Real-Time Classification Scanner.
*Note: Microsoft .NET Framework 4.5 or above version must be installed before installing this app.
The user who installs the app must have local system permissions. The user will be granted Full Control
permission to the following groups and folders automatically during the Compliance Guardian Manager
App installation:
•
IIS_IUSRS (for IIS 7.0)
•
Full Control to HKEY_LOCAL_MACHINE\SOFTWARE\AvePoint\ComplianceGuardian\App
•
Full Control to Compliance Guardian App folder
•
Member of the Performance Monitor Users group
•
Full Control to Compliance Guardian Certificate private keys
The application pool account needs to be added to the local Administrators group to meet the
required permissions.
Refer to the following steps to install the app:
Download the ComplianceGuardian_O365APP_Serial_Number.zip file to a machine by
contacting your AvePoint representative.
Unzip the package, and then open the extracted directory. Run the Setup.exe file.
The Compliance Guardian App for Real-Time Classification Installation Wizard interface appears.
Select Next.
Enter your Name and Organization into the provided fields. Select Next.
Carefully review the Compliance Guardian License Agreement. After you have read the
agreement, check the I accept the terms in the license agreement checkbox, and select Next.
Select Browse, and then select the location for the app installation. By default, the installation
location is C:\Program Files\AvePoint. Select Next.
Compliance Guardian will perform a brief pre-scan of the environment to ensure that all rules
meet the requirements. The status for each rule will be listed in the Status column. Select the
hyperlink of the status, and the detailed information about the scan result will be listed in the
pop-up window. You may select Details to view the detailed information of all of the
requirements.
58
Compliance Guardian Installation and Administration User Guide
If any rules have failed the pre-scan, update your environment to meet the requirements, and
then select the Rescan button to check your environment again. Once all the rules pass, select
Next.
Set up the Communication Configuration:
•
Compliance Guardian App Host – Specify the current server’s hostname, IP address, or
fully qualified domain name (FQDN).
•
Compliance Guardian App Port – The port entered here is used by the Manager or
other Agents for communication. The default port number is 14105.
•
Control Service Host – The hostname or IP address of the machine where the
Compliance Guardian Control Service is installed.
•
Control Service Port – This is the port used for communication with the Compliance
Guardian Control Service and should match the information provided during the
Manager configuration. The default port number is 14100.
•
Manager Passphrase – Manager Passphrase you entered to protect Compliance
Guardian Manager data.
•
SSL Certification – Select the method for encrypting information and providing
authentication for Compliance Guardian:
Built-in Certificate – Uses the certificate provided by Compliance Guardian. No
additional configuration is necessary.
User-defined Certificate – Enabling this option allows you to select a certificate
from your local machine. It will use the Certificate Authentication server of the
current machine to check whether the certificate is revoked. After the
certificates are filtered, only the certificates that are not revoked will be
displayed.
Select Next.
Set up the App Configuration:
•
Configure the App Account settings:
App Catalog Site – Enter the catalog site URL used to store the app in
SharePoint Online.
Username – Enter the username that is used to log into Office 365.
Password – Enter the password.
•
Configure the App Address settings: Log into the SharePoint Online site page:
SharePoint Online site URL/_layouts/15/AppRegnew.aspx, and then copy the Client ID,
Client Secret, App Title, App Domain, Redirect URL information and then paste to the
corresponding field of this App Settings information field to build trust.
Select Next.
Set up the website configuration:
Compliance Guardian Installation and Administration User Guide
59
•
•
IIS Website Settings – Configure the IIS website settings for the app. You can select to
use an existing IIS website or create a new IIS website. The IIS website is used to
communicate between Office 365 and Compliance Guardian.
o
Use an existing IIS website – Select an existing IIS website from the drop-down
list.
o
Create a new IIS website – Enter the website name and create a new IIS website
for the app.
Application Pool Settings – Configure the IIS application pool settings for the
corresponding website. You can select to use an existing application pool or create a
new application pool. The application pool is used to handle the requests sent to the
corresponding website. The following settings can be configured:
Use an existing application pool (not recommended) – Select an existing
application pool from the drop-down list. If you choose to use an existing
application pool, the Application Pool Account settings are greyed out and
cannot be changed.
Create a new application pool – Enter the application pool name and
application pool account settings to create a new IIS application pool for the
corresponding website.
•
IIS SSL Certification:
Not Use IIS SSL Certificate – Do not select an IIS SSL certificate. If you select this
radio button, you can still add a certificate in IIS for the website after you finish
installing the app.
Select SSL Certificate – Select an IIS SSL certificate.
Select Next.
In the Ready to install Compliance Guardian App page, all of the information configured in the
previous steps is listed. Select Install to begin the installation. Select Back to change any of the
previous settings. Select Cancel to abandon all of the configurations and exit the installation
wizard.
After the installation is complete, select Finish to exit the installation wizard.
60
Compliance Guardian Installation and Administration User Guide
Uninstalling Compliance Guardian App for Real-Time
Classification
To uninstall Compliance Guardian App for Real-Time Classification, complete the following steps:
*Note: Once you have initiated the uninstallation, it cannot be cancelled and the uninstallation interface
cannot be closed.
1. Open the Start Menu in Windows on the Compliance Guardian Manager Server, and navigate to
All Programs > AvePoint Compliance Guardian.
2. Open the Compliance Guardian Manager Tools folder, and then double-click Compliance
Guardian App for Real-Time Classification Uninstall.
3. In the appeared page, select the Remove configuration file option if you want to remove all of
the folders and configuration files generated by app installation.
4. Select Remove to start the uninstallation process.
5. Select Finish to complete the uninstallation.
Compliance Guardian Installation and Administration User Guide
61
Navigation Bar
After you login to Compliance Guardian, select Report or Administration on the top-left corner of the
home page. The navigation bar appears. You can navigate to your desired module by selecting the
corresponding tab in the navigation bar.
Figure 10: Navigation bar.
62
Compliance Guardian Installation and Administration User Guide
Navigating Compliance Guardian
Compliance Guardian mimics the look and feel of many Windows products, making for an intuitive and
familiar working environment. While there are many windows, pop-up displays, and messages within
Compliance Guardian, they share similar features and are navigated in the same ways.
Below is a sample window in Compliance Guardian. It features a familiar, dynamic ribbon, and a
searchable, content list view.
Figure 11: Navigating Compliance Guardian.
1. Ribbon Buttons – Allows users to access the functionality of the active Compliance Guardian
functions.
2. Manage columns ( ) – Allows users to manage which columns are displayed in the list. Select
the manage columns ( ) button, and then select the checkbox next to the column name in the
drop-down list.
3. Search – Filter the content displayed by the keyword you designate; the keyword must be
contained in a column value. At the top of the viewing pane, enter the keyword for the
permission level you want to display. You can select to Search all pages or Search current page.
Compliance Guardian Installation and Administration User Guide
63
*Note: The search function is not case sensitive.
4. Filter the column ( ) – Allows users to filter the information in the List View. Click the filter the
column ( ) button next to the column and then select the checkbox next to the column name.
5. Hide the column ( ) – Allows users to hide the selected column.
6. Change the number of items displayed per page, select the desired number from 5, 8, 10, 15, 20,
25, 50, 100 in the Show rows drop-down menu at the lower-right corner.
7. Enter the page number in the Go to … of text box at the lower-right corner and press Enter to go
to the specified page
8. Select the > button at the lower-right corner to go to the next page; select the < button at the
lower-right corner to return to the previous page.
64
Compliance Guardian Installation and Administration User Guide
Control Panel
The Compliance Guardian Control Panel is the central interface for managing Compliance Guardian and
how it interacts with your SharePoint environments.
Control Panel is also integrated into other Compliance Guardian products, enabling you to configure
relevant settings without having to leave the interface of the module you are using.
Getting Started
Refer to the following sections for important information on getting started with Control Panel.
Launching Control Panel
To launch Control Panel and access its functionality, complete the following steps:
1. Log in to Compliance Guardian. If you are already in the software, select the home page button
( ) on the top-left corner to go back to the home page.
2. From the Compliance Guardian home page, select Control Panel to launch the Control Panel.
3. Alternatively, you can select Administration on the top-left corner, and select the Control Panel
tab on the appeared navigation bar to launch Control Panel.
Figure 12: Control Panel tab on the navigation bar.
Compliance Guardian Installation and Administration User Guide
65
Figure 13: Control Panel module launch window.
Understanding the Control Panel
Control Panel has three key groups of components:
66
•
System Settings – View and manage your Compliance Guardian settings, managers,
agents, authentication, licenses, and product version. All of these functions are
performed in Control Panel so that you can easily access them without leaving the
interface for your current task in Compliance Guardian.
•
Application Settings – Configure settings affect common tasks performed by all
Compliance Guardian products. All of these settings are configured in Control Panel so
that you can easily access them without leaving the interface for your current task in
Compliance Guardian.
•
Specific Products Settings – Certain products in Compliance Guardian use preset
configurations for certain functionalities. While these settings may not affect all
Compliance Guardian products, all of these settings are configured in Control Panel
because they can be leveraged by more than one product.
Compliance Guardian Installation and Administration User Guide
Accessing the Control Panel
Since features in Control Panel overlap with so many products, it is important that it is easily accessible,
but not disruptive of your current task. For this reason, while there are many ways to access Control
Panel, the interface opens as a pop-up window so that you can remain on whichever page you are on,
and when you are finished configuring settings in Control Panel, closing it will return you to the page you
were on.
To access Control Panel, select the Compliance Guardian tab, and then select Control Panel. While in
the interface of a certain product, if the product utilizes a feature in Control Panel, selecting on that
feature on the ribbon of the product page will bring up the Control Panel pop-up window with the
appropriate tab open. Whenever you are finished configuring settings in Control Panel, close the
window to return to the previous screen you were on.
Monitor
The monitor features in the Control Panel of Compliance Guardian allow you to view and manage
Compliance Guardian Control Service and Compliance Guardian Agents:
•
Manager Monitor – Here you can view details about your Compliance Guardian Control
Service.
•
Agent Monitor – Here you can view and configure your Compliance Guardian Agents
currently installed on your SharePoint environment. This can be useful if there is a
change in personnel, and the SharePoint account that the Agent uses to communicate
with SharePoint needs to be changed. With Agent Monitor, you can also perform basic
maintenance operations on your agents if an agent ever becomes unresponsive or is
having issues, or temporarily disable the Compliance Guardian Agent Service to perform
server maintenance.
Using the Manager Monitor
To access Manager Monitor in the Control Panel interface, select Manager Monitor under the Monitor
heading. In Manager Monitor, you will see the Compliance Guardian Control Service.
You can select the Control Service by checking the checkbox next to the service name, then select View
Details on the ribbon to bring up the View Details page with information about the selected Manager
Service. When you are finished viewing the information about the Control Service, select Close on the
ribbon to close the Manager Monitor tab and return to the Control Panel main page.
Using the Agent Monitor
To access Agent Monitor, open the Control Panel interface, and then select Agent Monitor under the
Monitor heading. In Agent Monitor, you will see a list of Compliance Guardian Agents which have been
registered to the current Compliance Guardian Control Service.
Compliance Guardian Installation and Administration User Guide
67
Once your Compliance Guardian Agents are appropriately displayed, you can select an agent by checking
the checkbox next to the Agent Name, and then select:
•
Configure – Once you select an agent, this button will become available. Select
Configure on the ribbon to access the Agent Configuration interface. Here you can
configure the SharePoint Account for the agent as well as the agent type.
o
SharePoint Account – The SharePoint Account is used by the Compliance
Guardian Agent to provide Compliance Guardian with access and control to your
SharePoint environment. The account configured here must have the required
permissions for the Compliance Guardian products that are enabled. To
configure the SharePoint account, enter the Username and Password for the
desired account into the corresponding text box.
o
Agent Type Configuration – In order to use a certain product, the corresponding
agent type must first be configured. Before selecting the product, the necessary
agents for that product must already be installed.
To configure the agent type for the agent, check the checkbox next to the
corresponding product. You can navigate through the different product suites
that are enabled by selecting on the name of the suite. The configuration of the
agent type is on your local environment.
o
Job Restriction – Limit the maximum number of jobs that are allowed to run
simultaneously by this agent by enabling the Restrict the simultaneously
running job count option and enter a positive integer into the text box.
Once you are finished configuring the agent, select OK to save the configurations and
return to the Agent Monitor interface, or select Cancel to return to the Agent Monitor
interface without saving any changes.
•
Configuration File – Upload agent configuration files to the Manager Server and change
them for the specified agents. Select the desired Compliance Guardian Agents in Agent
Monitor and select Configuration File on the ribbon to change the configuration file for
them. In the pop-up window, select OK to confirm the modification action and you will
be redirected to the configuration page. Refer to the instructions below to change the
configuration file.
*Note: Since modifying the agent configuration files can be risky, it is not recommended
for end-users to do it.
68
o
Agent Information – In this field, you can view the agents you have selected
previously.
o
Browse Configuration File – Upload the configuration file to the Manager
Server. Select Browse to find the specified .config file and select Open to upload
it. You are able to upload multiple configuration files.
Compliance Guardian Installation and Administration User Guide
*Note: The name of the configuration file you upload must have the same name
as the existing one, and then you are able to apply the configuration file to
destination.
o
Destination Path – Enter the place where you want to upload the configuration
file. Compliance Guardian supports configuration file change in Agent\Bin and
Agent\data paths.
o
Conflict Resolution – Select a resolution when two configuration files have the
same name.
Merge ─ The content of the newly uploaded configuration file will be
merged into the old one.
Replace ─ The newly uploaded configuration file will replace the old
one.
Select OK to change the configuration files as you have configured or select Cancel to
exit the interface without saving the configuration. If you select OK, you will be asked to
restart the Agent Service. Select Auto to automatically restart the Agent Service
immediately or select Manual to manually restart the Agent Service later.
•
View Details – Select View Details on the ribbon to bring up the View Details page with
information about the selected Compliance Guardian Agent.
•
Restart – Select Restart on the ribbon to restart the selected Compliance Guardian
Agent. This is useful in situations where the agent is sluggish, or if a job it is running
hangs. You can restart the agent and try again.
*Note: Any jobs that are running when you restart the agent will fail.
•
Remove – Select Remove on the ribbon to remove the selected Compliance Guardian
Agent from the Agent Monitor. The removed agent will no longer be used by the Control
Service. You can only remove agents that have a down arrow ( ) in the Status column.
Removing an agent does not uninstall the agent.
*Note: When removing the last agent of one farm in Agent Monitor, the associated
farm and plans will also be deleted from the Compliance Guardian databases.
•
Deactivate – Select Deactivate on the ribbon to deactivate the selected Compliance
Guardian Agent. Once the agent is deactivated, it is marked as Inactive, and will not be
used by the current control service. However, the deactivated service will still run
normally. This is useful when you want to perform maintenance on a specified
Compliance Guardian Agent.
*Note: Any jobs that are running when you deactivate the agent will fail.
•
Activate – Select Activate on the ribbon to activate the selected Compliance Guardian
Agent. Once the agent is activated, it is marked as Active, and will be used by the
current control service.
Compliance Guardian Installation and Administration User Guide
69
When you are finished viewing and managing your Compliance Guardian Agents, select Close on the
ribbon to close the Agent Monitor tab and return to the Control Panel main page.
System Options
System Options allow you to customize the Compliance Guardian software interface itself. Within the
System Options tab, you can access Compliance Guardian General Settings, Security Settings, and
Advanced Settings:
•
General Settings – These settings affect Compliance Guardian’s interface, which
includes settings for Appearance and SharePoint Farm Settings. You can display
Compliance Guardian in the language of your preference, use date and time format that
you are comfortable with, insert a custom logo for your reports and e-mail templates,
and rename your SharePoint farms so that it is easier for you to recognize them.
•
Security Settings – These settings affect access to Compliance Guardian, which includes
settings for System Security Policy and System Password Policy. This way, you have
control over the users that are able to access Compliance Guardian.
Configuring General Settings
To access General Settings for Compliance Guardian, open the Control Panel interface, and then select
General Settings under the System Options heading.
The following settings can be configured in this page:
•
70
Language Preference – Specify a language for Compliance Guardian to be displayed in,
or allow users to utilize a translation engine to have Compliance Guardian displayed in
the language of the user’s browser.
o
Display … for all users – Select this option to display Compliance Guardian in the
language specified here. To change the display language, select the drop-down
menu, and select your desired language.
o
Change to the end user browser used language – Select this option to allow
Compliance Guardian to be displayed in the language used by the user’s
browser. Then select a language for Compliance Guardian to default to in the If
the language does not change successfully, please select to use a default
language drop-down menu. This way, if Compliance Guardian does not properly
display in the user’s browser language, Compliance Guardian will be displayed in
the language specified here.
•
Date and Time Format – Set the system location by selecting a location from the Locale
(Location) drop-down menu. Set the format for all date and time displayed in
Compliance Guardian by selecting a date format from the Date format drop-down
menu, and selecting a time format from the Time format drop-down menu.
•
Customize Logo – Customize the logo for Compliance Guardian system reports and email templates. Select Browse to find the desired logo file in the pop-up, then select the
Compliance Guardian Installation and Administration User Guide
logo, and select Open to open it. Select Preview to view the logo in the Show Preview
area. To hide the Show Preview area, select Hide Preview.
Select and drag the logo in the display field to change its placement. Select the zoom in
button ( ), the zoom out button ( ), or the reset button ( ) to reset the settings of
the new logo. Select Restore to Default button to roll back to the default logo.
•
Farm Name Mapping – Customize the display names for your farms in Compliance
Guardian. To find a specific farm, enter the farm name in the search text box, and select
the search button ( ). For each farm, enter the desired display name in the
corresponding Display Name in Compliance Guardian text field.
*Note: The search function is not case sensitive.
When you are finished configuring Compliance Guardian General Settings, select Save to save all
changes, then Close to exit the System Options interface. If you select Close without saving first, any
changes you have made will be lost.
Configuring Security Settings
To access Security Settings for Compliance Guardian, open the Control Panel interface, and then select
General Settings under the System Options heading. Select Security on the ribbon. There are two tabs
under Security Settings, System Security Policy, and System Password Policy.
System Security Policy
In the System Security Policy tab, the following options can be configured:
•
Maximum User Session – Configure the number of simultaneous logons allowed for
Compliance Guardian. For any new sessions that surpass the designated number, the
earliest session will be terminated.
•
Session Timeout – Configure how long a user can be inactive before being automatically
logged off. Enter an integer into the Logon will expire in: text box, and then select
either Minute(s) or Hour(s) in the drop-down menu.
Failed Logon Limitation – Specify the maximum number of failed logon attempts allowed in one day. If a
specific account fails to provide the correct login information in a single day, it will be locked. To unlock
the specified account, refer to Account Manager.
*Note: The default admin account cannot be locked.
•
Inactive Period – Configure how long a user can be inactive before the account is
automatically disabled. Enter an integer into the Deactivate the account when the
inactive period reaches: text box, then select either Day(s) or Month(s) in the dropdown menu. Once deactivated, a Compliance Guardian administrator must activate the
account before the user can log onto Compliance Guardian.
Compliance Guardian Installation and Administration User Guide
71
•
Network Security – Configure the IP addresses to have the desired level of access to
Compliance Guardian. To access these settings, check the Enable network security
checkbox, and then select either:
o
Trusted network – If selected, only the IP addresses added to this field can
access Compliance Guardian. To add an IP address as a trusted network, enter
the IP address in the Equals text box, and then select Add. Repeat these steps to
add additional IP addresses.
o
Restricted network – If selected, the IP addresses added to this field cannot
access Compliance Guardian. To add an IP address as a restricted network, enter
the IP address in the Equals text box, and then select Add. Repeat these steps to
add additional IP addresses.
System Password Policy
In the System Password Policy tab, the following options can be configured:
•
Default Password Settings – Specify the rules to be applied on the password after it has
been saved. Select Account is inactive if you would like to manually activate the account
before it can be used.
*Note: If no option is selected in this field, the password does not need to be modified
at first login, and it will never expire.
•
Maximum and Minimum Password Length – Enter an integer for the maximum and
minimum number of characters allowed in a password.
•
Password Rule – Configure the requirements for the password.
•
72
o
Minimum number of alpha – Enter a positive integer. There must be at least the
specified number of letters in the password.
o
Minimum number of numeric – Enter a positive integer. There must be at least
the specified number of numbers in the password.
o
Minimum number of special characters – Enter a positive integer, there must
be at least the specified number of special characters in the password. The
special characters include !, @, #, $, %, ^, &, and *.
o
Password cannot contain user ID – Select this option and the password cannot
contain the user’s name.
o
Password cannot contain space – Select this option and the password cannot
contain spaces.
Password Expiration Warning – Send out warnings if the password of a user will expire
in the specified time period. Set the period by entering a positive integer using the
Day(s) or Month(s) option. You can choose the forms of the warning by selecting the
Pop-up message or E-mail notification.
Compliance Guardian Installation and Administration User Guide
Viewing Security Information
Compliance Guardian uses a passphrase to protect the Compliance Guardian databases and secure the
communication. Before connecting to the Compliance Guardian Manager when installing the
Compliance Guardian Agents, the passphrase must be entered to verify the access.
The default passphrase is generated automatically at the end of the Manager’s Installation. To manage
the passphrase, open the System Options tab, and then select Security Information on the ribbon to
perform the following actions:
•
Back Up – Select this button to back up the passphrase to the following path:
…\AvePoint\Compliance Guardian\Manager\KeysBak. It is strongly recommended that
you back up the security keys and save the backup in a safe place.
•
Manage Passphrase – Select this button to view and modify the passphrase. The Modify
option will be displayed. By default, the password cannot be modified. You can select
this button to enable the modification of the default password. Enter a new passphrase
in the corresponding text box and select OK to save it.
*Note: Only the users of Administrators group have the permission to modify the
passphrase. For more information about adding users into Administrators group, refer
to Managing Users.
Compliance Guardian Installation and Administration User Guide
73
Authentication Manager
Authentication Manager allows you to view and manage integrated authentication methods usable by
Compliance Guardian. This means that Compliance Guardian can leverage your pre-existing
authentication methods, and customize it for access to Compliance Guardian. These authentication
methods include:
•
Windows Authentication – Allows the users to log onto Compliance Guardian using
their Windows Authentication credentials.
•
AD Integration – Allows the users to log onto Compliance Guardian using their Active
Directory authentication credentials.
•
ADFS Integration – Allows the users to access Compliance Guardian as long as they have
logged into the local machine using their ADFS credentials.
•
Client Certificate Authentication – Allows the users to access Compliance Guardian
using Client Certificate Mapping Services.
To access Authentication Manager for Compliance Guardian, open the Control Panel interface, select
Authentication Manager under the Authentication Manager heading. Select Close on the ribbon to
close the Authentication Manager interface.
Configuring Windows Authentication
To leverage Windows Authentication credentials to access Compliance Guardian, complete the following
steps:
1. In the Authentication Manager interface, select Windows Authentication on the ribbon.
2. Select the Authentication Type from the drop-down menu:
•
NTLM
•
Negotiate (Kerberos)
*Note: Kerberos authentication method must be previously configured in the operating
system before you select the Negotiate (Kerberos) option when enabling the
integration with Windows Authentication. Otherwise, the NTLM authentication method
will be enabled.
3. Select OK to save any changes made and close the Windows Authentication interface, or select
Cancel to close the Windows Authentication interface without saving any changes made.
Configuring AD Integration
To leverage Active Directory authentication credentials to access Compliance Guardian, configure your
Active Directories in the AD Integration interface.
74
Compliance Guardian Installation and Administration User Guide
To access your Active Directory integration configurations, open the Authentication Manager interface,
and then select AD Integration on the ribbon. In the AD Integration configuration interface, you will see
a list of previously configured Active Directories. You can customize how these Active Directories are
displayed in the following ways:
•
Search – Filter the Active Directories displayed by the keyword you designate; the
keyword must be contained in a column value. At the top of the viewing pane, enter the
keyword for the Active Directory you want to display. You can select to Search all
pages or Search current page.
•
Manage columns (( ) – Manage which columns are displayed in the list so that only the
information you want to see will be shown. Select the manage columns button ( ), and
then check the checkbox next to the column name to have that column shown in the
list.
•
Hide the column ( ) – Hover over a column name, and then select the hide the column
button ( ) in the column name to hide the column.
•
Filter the column ( ) – Filter which item in the list is displayed. Unlike Search, you can
filter whichever item you want, rather than search based on a keyword. Hover over a
column name, and then select the filter the column button ( ) of the column you want
to filter, and then check the checkbox next to the item name to have that item shown in
the list. To remove all of the filters, select Clear Filter.
To manage your integrated Active Directories, you can perform the following actions:
•
Add – To add a new Active Directory, select Add on the ribbon, then enter the Domain,
Username and Password in the corresponding text box. Select Validation Test to see if
the values you entered are valid, and then select OK to save the configurations for the
new Active Directory and return to the AD Integration interface, or select Cancel to
return to the AD Integration interface without saving the configurations.
•
Edit – To make changes to a previously configured integrated Active Directory, select
the Active Directory by checking the corresponding checkbox, then select Edit on the
ribbon. Make the necessary changes, and then select OK to save the changes and return
to the AD Integration interface, or select Cancel to return to the AD Integration interface
without saving any changes.
•
Delete – To delete a previously configured Active Directory, select the Active Directory
by checking the corresponding checkbox, then select Delete on the ribbon. You will be
presented with a pop-up window notifying you that “The user(s) associated with the
selected domain(s) will be disabled. The user(s) can be enabled only by adding the
selected domain(s) again. Are you sure you want to proceed?” There is also an option
to remove all of the users that are associated with the selected Active Directories from
Compliance Guardian; to do so, check the Remove all users associated with the
selected domain(s) checkbox. Select OK to confirm the deletion, or select Cancel to
return to the AD Integration interface without deleting the selected Active Directories.
•
Enable – Select Enable to allow the use of credentials from the corresponding Active
Directory to access Compliance Guardian.
Compliance Guardian Installation and Administration User Guide
75
•
Disable – Select Disable to not allow the use of credentials from the corresponding
Active Directory to access Compliance Guardian. This option is useful during the
maintenance of the Domain Controller machine. You can disable the integration with
the domain to be maintained and enable the integration again after the maintenance.
After one Active Directory has been integrated with Compliance Guardian, it will be shown in the
Domain text box after you select AD Integration in the Log on to drop-down list of the Compliance
Guardian login page. If a domain has father domain, sub domain or trust domain, when a user from
these domains has been added to Compliance Guardian, the corresponding domain will also be added
into Compliance Guardian and you will be able to view this domain in Compliance Guardian login page.
Configuring ADFS Integration
To leverage Active Directory Federation Services (ADFS) authentication credentials to access Compliance
Guardian, configure your ADFS integration in the ADFS Integration interface.
To access your ADFS integration configurations, in the Authentication Manager interface, select ADFS
Integration on the ribbon, then select ADFS Integration in the drop-down menu. You will be brought to
the ADFS Integration Configure Wizard. Complete the following steps in the wizard to set up ADFS
integration:
1. ADFS Information – Specify the following general information of the ADFS you want to
integrate:
•
•
ADFS Integration Method – Select Manually to configure the settings yourself, or select
Automatically to get the required information by using a federation metadata trust XML
file.
o
Manual configuration – Enter the URL of the security token service (STS) in the
ADFS Issuer text box in the following format:
https://full qualified domain name/adfs/ls
o
Automatic configuration – Enter the URL of the federation metadata trust XML
file in the Federation Metadata Trust text box in the following format:
https://full qualified domain name/FederationMetadata/200706/FederationMetadata.xml
Relying Party Identifier – Enter Compliance Guardian’s Relying Party Identifier, which
must first be configured in ADFS in the Relying Party Identifier text box.
When you are finished configuring the ADFS Information, select Next to configure the Security
Token Settings.
2. Security Token Settings – Configure the certificates used in the ADFS integration:
•
76
Token-signing – Choose Select. A new Select Certificate pop-up window will appear for
you to specify a token-signing certificate to communicate with ADFS. This certificate
must be the same as the one configured in ADFS. Alternatively, you may also select Find
Certificate to search for the desired certificate. Select a Find in: parameter from the
drop-down menu, enter the keywords in the Contains: text box, select a Look in field:
Compliance Guardian Installation and Administration User Guide
parameter from the drop-down menu, then select Find Now to start the search. Select
Stop to stop the search. Once you have selected your desired certificate, select OK to
save and exit the Select Certificate interface, or select Cancel to exit the Select
Certificate interface without saving specifying a certificate.
*Note: The certificate specified here must be the same as the one configured in ADFS.
•
Token-decrypting (optional) – Choose Select. A new Select Certificate pop-up window
will appear for you to specify a token-decrypting certificate to protect the
communication between Compliance Guardian and ADFS. This certificate must be the
same as the one configured in ADFS. Alternatively, you may also select Find Certificate
to search for the desired certificate. Select a Find in: parameter from the drop-down
menu, enter the keywords in the Contains: text box, select a Look in field: parameter
from the drop-down menu, then select Find Now to start the search. Select Stop to stop
the search. Once you have selected your desired certificate, select OK to save and exit
the Select Certificate interface, or select Cancel to exit the Select Certificate interface
without saving specifying a certificate.
When you are finished configuring the Security Token Settings, select Next to configure the
Claim Configuration.
3. Claim Configuration – Configure the mappings between the Claim Name displayed in
Compliance Guardian and the Claim Type displayed in ADFS. You can perform the following
actions to your claims:
•
You can change the order of the claims in the Order column of the table. If a user can be
identified using several claims, Compliance Guardian will use the Claim Name of the first
claim listed here as the display name for each respective user.
•
Select
•
Select Automatically to have the claim type be specified automatically after you select
the claim name from the Claim Name drop-down menu. Select Manu to add the claims
to delete the selected claim.
manually. Select Auto to switch back to the default option.
4. Overview – Review the settings you have configured in the previous steps. To make changes,
select Edit in the corresponding section, and you will be brought back to that step so you can
make changes.
5. Finish – Provides you with three options to import the relying party data for Compliance
Guardian in ADFS (using the Add Relying Party Trust Wizard).
•
Option 1 – Select the link to import relying party data that is published online from the
local network Federation metadata address.
•
Option 2 – Select the link to download the Federation metadata XML file, then upload
the downloaded file to the ADFS server. Follow the wizard to configure other settings.
•
Option 3 – Enter the relying party data and the relying party identifier manually in the
ADFS configuration wizard.
Compliance Guardian Installation and Administration User Guide
77
In this step, you can also choose to export the current ADFS configuration information to a
specified location by selecting Export on the ribbon, then explore to the location you want to
save the XML file to.
Select Finish to save your configurations, and return to the Authentication Manager interface, or
select Cancel to return to the Authentication Manager interface without saving any of the
configurations made.
Once you have configured an ADFS integration for Compliance Guardian, the Add Federation Trust
option will become available. Add Federation Trust allows you to integrate another trusted ADFS with
the ADFS you have already configured for Compliance Guardian.
To add integration with another trusted ADFS, open the Authentication Manager interface, select ADFS
Integration on the ribbon, and then select Add Federation Trust from the drop-down menu. In the Add
Federation Trust interface, enter the following information:
•
Name – The name entered here will be displayed in the Server drop-down menu on the
login page. You can select the corresponding name to log on Compliance Guardian using
the trusted ADFS.
•
URL – The identifier of the trusted ADFS.
Select Add to add the new record or select
to delete a selected ADFS trust.
Configuring Client Certificate Authentication
In the Authentication Manager interface, configure Client Certificate Authentication in any of the
following ways:
78
•
Select Enable in the Action column of the Client Certificate Authentication row to
enable the Client Certificate Authentication.
•
Select Disable to disable this authentication.
•
Select Set as default to set this authentication as the default.
Compliance Guardian Installation and Administration User Guide
Account Manager
Account Manager allows you to view and manage users and configure user groups with custom
permission levels for Compliance Guardian. This module allows you to give specific people, or groups of
people your desired level of access to Compliance Guardian.
In Account Manager you can give specified permissions to Compliance Guardian users to limit which
Compliance Guardian module a user is able to access and which farms specific Compliance Guardian
users can access. A user can belong to multiple groups.
*Note: If you would like to leverage authentication credentials from Windows Authentication, AD or
ADFS, you must first configure the relevant integration settings in the Authentication Manager.
To access Account Manager for Compliance Guardian, open the Control Panel interface, and then select
Account Manager under the Account Manager heading. Select Close on the ribbon to close the Account
Manager interface.
Managing Permission Levels
The Permission Level module allows you to create pre-configured permissions that can be applied to
user groups or users to quickly and easily apply the same permission configuration for multiple users.
To configure permission levels for Compliance Guardian, open the Account Manager interface, and then
select Permission Level on the ribbon. In the Permission Level interface, previously configured
Permission Levels will be displayed.
To manage your permission levels, you can perform the following actions:
•
Add – To create a new permission level, select Add on the ribbon. After selecting to add
the corresponding permission level, you will be redirected to the configuration page to
perform the following actions:
o
Name and Description – Enter a name for the new system permission level and
an optional Description for future reference.
o
Module – Select the modules you want to grant permission to for all groups and
users using this permission level.
Select Save to save the configuration. Select Cancel to return to the Permission Level
Interface without saving changes.
•
Edit – To edit a previously configured permission level, select the permission level you
want to edit by checking the corresponding checkbox, then select Edit on the ribbon. In
the Edit Permission Level interface, you can modify the Name and a Description of this
Permission Level. In the Module section, you can select the modules you want to allow
this permission level to access by checking the corresponding checkboxes. You can
select a product suite name to modify the access to its modules.
Compliance Guardian Installation and Administration User Guide
79
*Note: Unlicensed products have grayed out tabs and cannot be configured. Select OK
to save the modifications for the permission level and return to the Permission Level
interface, or select Cancel to return to the Permission Level interface without saving the
modifications.
•
Delete – To delete a previously configured permission level, select the permission level
you want to delete by checking the corresponding checkbox, and then select Delete on
the ribbon. A pop-up window will appear to confirm this action. Select OK to delete the
selected permission level and return to the Permission Level interface, or select Cancel
to return to the Permission Level interface without deleting the selected permission
level.
When you are finished managing your permission levels, select Cancel on the ribbon to return to the
Account Manager interface.
There following permission levels are configured in advance:
•
Real-Time Classification Scanner – Enables the Real-Time Classification Scanner module.
•
Scheduled Classification Scanner – Enables the Scheduled Classification Scanner
module.
•
Compliance Report – Enables the Compliance Report module.
•
Compliance Scanner – Enables the Compliance Scanner module.
•
Action Report – Enables the Action Report in Classification Report module.
•
Human Auditor – Enables the Human Auditor in Compliance Report module.
•
Encryption – Enables the Encryption in Classification Report > Incident Manager module.
•
Quarantine – Enables the Quarantine in Classification Report > Incident Manager
module.
•
Redaction – Enables the Redaction in Classification Report > Incident Manager module.
•
Yammer – Enables the Yammer Report in Classification Report module.
Managing User Groups
User groups allow you to apply the same permission levels to all users within the same user group. This
way, you can change the permission levels of multiple users by editing your user group rather than
individually configuring permission levels for each user. You can also change the permission levels of a
user by changing the group they belong to with pre-configured permission levels.
To access your user group configurations, go the Account Manager interface and then select Groups on
the ribbon. In the Groups configuration interface, you will see a list of previously configured user groups.
The Administrators group comes pre-configured and users of this group have Full Control permissions
for all modules.
80
Compliance Guardian Installation and Administration User Guide
To manage your user groups, you can perform the following actions:
•
Add Group – To add a new group, select Add Group on the ribbon. You will be directed
to the configuration page accordingly, and then you can perform the following actions:
o
Group Information – Enter a Group Name for the new group, then enter an
optional Description for future reference.
o
Group Permissions – In the Scope section, select Global permission to grant the
users of this group access to all farms with the permission levels configured here
or select Permission for different farms to grant users of this system group
access to specific farms with the configured system permission levels. If Global
permission is selected, choose which or all of the Permission Levels you want to
associate with this Group. If Permission for different farms is selected, for each
farm, choose which or all of the Permission Levels you want to associate with
this group.
*Note: At least one permission level must be assigned to the new group.
When you are finished configuring the settings for the new group, select OK to save and
return to the Account Manager interface, or select Cancel to return to the Account
Manager interface without saving the configurations.
•
Edit Group – To edit a group, select the group by checking the corresponding checkbox,
then select Edit Group on the ribbon, or select the name of the desired group. You will
be brought to the Edit Group interface. Here you can change the description for this
group, as well as the permission scope and permission levels.
*Note: If you have a group with Full Control permission configured in Compliance
Guardian, after upgrading to Compliance Guardian, this group will maintain the Full
Control permission but this will not show up on the interface by default. When you edit
this group and change the permission, it will pop up a warning message that the Full
Control permission of this group will be replaced by the newly granted permissions. You
can select OK to continue the action and save the change or select Cancel to cancel the
operation. In Compliance Guardian, only users of Administrators group have Full
Control permission.
When you have finished making changes to the configurations for this group, select OK
to save and return to the Account Manager interface, or select Cancel to return to the
Account Manager interface without saving any changes.
•
Show Users – To view and manage the users in a group, select the group by checking
the corresponding checkbox, then select Show Users on the ribbon. You will be brought
to the Show Users interface. Here you will see a list of all of the users that belong to this
group. You can customize how these users are displayed in the following ways:
o
Search – Filter the users displayed by the keyword you designate; the keyword
must be contained in a column value. At the top of the viewing pane, enter the
Compliance Guardian Installation and Administration User Guide
81
keyword for the user you want to display. You can select to Search all
pages or Search current page.
o
Manage columns ( ) – Manage which columns are displayed in the list so that
only the information you want to see is shown. Select the manage columns
button ( ), then check the checkbox next to the column name to have that
column shown in the list.
o
Hide the column ( ) – Hover over a column name, and then select the hide the
column button ( ) in the column name to hide the column.
o
Filter the column ( ) – Filter which item in the list is displayed. Unlike Search,
you can filter whichever item you want, rather than search based on a keyword.
Hover over a column name, and then select the filter the column button ( ) of
the column you want to filter, and then check the checkbox next to the item
name to have that item shown in the list. To remove all of the filters, select
Clear Filter.
You can perform the following actions on the users of this group:
o
Add User to Group – To add users to this group, select Add User to Group on
the ribbon. You will be brought to the Add User to Group interface. Enter the
username of the user you want to add, and then select the check names button
( ) to verify that the username you entered is valid. Alternatively, you can
select the browse button ( ) to search for the desired user. In the pop-up
window, enter the value to search for in the Find text box, and then select the
search button (
). Select the desired user, and then select Add. Select OK to
add the users, or select Cancel to close the window without adding the users.
o
Remove User from Group – To remove users from this group, select the desired
users by checking the corresponding checkbox, then select Remove User from
Group on the ribbon. A confirmation pop-up window will appear to confirm the
remove operation. Select OK to delete the selected users, or select Cancel to
return to the Show Users interface without deleting the users.
When you are finished, select Cancel to add the defined users to this group and return
to the Show Users interface.
There following groups are configured in advance:
82
•
Administrators – The permission scope is Global permission. The users in this group
have Full Control of all Compliance Guardian modules.
•
Real-Time_Classification_Scanner – The permission scope is Global permission. The
users in this group can only access the Real-Time Classification Scanner module.
•
Scheduled_Classification_Scanner – The permission scope is Global permission. The
users in this group can only access the Scheduled Classification Scanner module.
•
Compliance_Report – The permission scope is Global permission. The users in this
group can only access the Compliance Report module.
Compliance Guardian Installation and Administration User Guide
•
Compliance_Scan – The permission scope is Global permission. The users in this group
can only access the Compliance Scanner module.
•
Action Report – The permission scope is Global permission. The users in this group have
the permission to use Classification Report > Action Report.
•
Human Auditor – The permission scope is Global permission. The users in this group
have the permission to use Compliance Report > Human Auditor.
•
Encryption – The permission scope is Global permission. The users in this group have
the permission to use Classification Report > Incident Manager > Encryption.
•
Redaction – The permission scope is Global permission. The users in this group have the
permission to use Classification Report > Incident Manager > Redaction.
•
Quarantine – The permission scope is Global permission. The users in this group have
the permission to use Classification Report > Incident Manager > Quarantine.
•
Yammer – The permission scope is Global permission. The users in this group have the
permission to use Classification Report > Yammer Report.
Managing Users
*Note: If a domain is integrated with Compliance Guardian and a user from its parent domain,
subdomain or trust domain is added in Compliance Guardian Account Manager, the corresponding
parent domain, subdomain or trust domain will be integrated into Compliance Guardian and added to
the Log on to drop-down list in Compliance Guardian login page.
To view and manage users, go to the Account Manager interface, select Users on the ribbon. In the
Users interface, you will see a list of previously added users.
To manage users, you can perform the following actions:
•
Add User – To add a user for Compliance Guardian, select Add User on the ribbon. You
will be brought to the Add User interface. Select the User Type to configure the method
for authentication:
o
Local User – Select Local User to manually enter the authentication credentials
for this user. Configure the following settings to add a local user:
Enter the Username and E-mail of the user you are adding, as well as an
optional Description for future reference.
Enter the desired password into the Password and Confirm password
text boxes, and then configure the Password Settings. The password
entered here must meet the System Password Policy. For more
information, refer to System Password Policy.
You can select to use the Default password settings, or select
Customized to configure the password settings manually. Check the
corresponding checkbox next to the User must change password at
Compliance Guardian Installation and Administration User Guide
83
next logon, User cannot change password, Password never expires,
Account is inactive setting.
o
o
Set the permissions for this user by adding the user to a previously
configured Compliance Guardian user group or manually configure the
user’s permission levels. Select the Add user to group(s) drop-down
menu, and then select the desired user group from the drop-down
menu. The user will have all of the permissions of the specified group.
Active Directory User/Group – Select Active Directory User/Group to utilize the
user’s active directory authentication credentials for this new user. Configure
the following settings to add an active directory user:
Enter the name of the user/group you want to add into the AD
User/Group Name field, and then select the check names ( ) button
to verify that the username you entered is valid. Alternatively, you can
select the browse ( ) button to search for the desired user/group. In
the pop-up window, enter the value to search for in the Find text box,
then select the find names ( ) button. Select the desired user, then
select Add. Select OK to add the users, or select Cancel to close the
window without adding the users. Enter an optional description for
future reference.
Set the permissions for this user by adding the user to a previously
configured Compliance Guardian user group or, manually configure the
user’s permission levels. Select the Add user to group(s) option, and
then select the desired user group from the drop-down menu. The user
will have all of the permissions of the specified group.
Windows User/Group – Select Windows User/Group to utilize the user’s
Windows authentication credentials for this new user. Configure the following
settings to add a Windows user:
Enter the username of the user/group you want to add into the
Windows User/Group Name field, and then select the check names
( ) button to verify that the username you entered is valid. The
users/groups that are in the same domain as the Compliance Guardian
Control server can be added to Compliance Guardian. Alternatively, you
can select the browse ( ) button to search for the desired user/group;
In the pop-up window, enter the value to search for in the Find text box,
and then select the find name ( ) button. Select the desired user, and
then select Add. Select OK to add the users, or select Cancel to close the
window without adding the users.
Enter an optional description for future reference.
*Note: In order to log on Compliance Guardian using the added user,
the corresponding user must have the permission to access the machine
where the Compliance Guardian Control Service is installed.
84
Compliance Guardian Installation and Administration User Guide
o
o
Set the permissions for this user by adding the user to a previously
configured Compliance Guardian user group or, manually configure the
user’s permission levels. Select the Add user to group(s) option, and
then select the desired user group from the drop-down menu. The user
will have all of the permissions of the specified group.
ADFS Claim – Select ADFS Claim to utilize the user’s ADFS authentication
credentials for this new user. Configure the following settings to add an ADFS
user:
Select a Claim name from the drop-down menu. Claims are configured
in Authentication Manager. Enter the username in the Claim value text
box. The value entered in the Claim value text box will be displayed as
the logon name for the user in Compliance Guardian.
Set the permissions for this user by adding the user to a previously
configured Compliance Guardian user group or, manually configure the
user’s permission levels. Select the Add user to group(s) option, and
then select the desired user group from the drop-down menu. The user
then has all of the permissions of the specified group.
Client Certificate User – Before adding Client Certificate user to Compliance
Guardian Manager, make sure the Client Certificate Authentication has been
enabled in Authentication Manager. Select Client Certificate User in the User
Type section to utilize the user’s Client Certificate authentication credentials for
this new user. Configure the following settings to add a Windows user:
User Information – Enter the username of the user/group you want to
add into the Windows User/Group Name field, and then select the
check names ( ) button to verify that the username you entered is
valid. The users/groups in the same domain as the Compliance Guardian
Control server can be added to Compliance Guardian. Alternatively,
select the browse name ( ) button to search for the desired
user/group; in the pop-up window, enter the value to search for in the
Find text box, and then select the find name ( ) button. Select the
desired user, and then select Add. Select OK to add the users, or select
Cancel to close the window without adding the users. Enter an optional
Description for future reference.
*Note: In order to log into Compliance Guardian Manager using the
added user, the corresponding user must have the permission to access
the machine where the Compliance Guardian Control service is
installed.
Group – Set the permissions for this user by adding the user to a
previously configured Compliance Guardian user group, the user will
have all of the permissions of the specified group.
Compliance Guardian Installation and Administration User Guide
85
When you are finished, select Save to add the user and return to the Users interface, or
select Cancel to return to the Users interface without saving the configurations for this
new user.
•
Edit User ─ To edit a user for Compliance Guardian, select the user by checking the
corresponding checkbox, and then select Edit User on the ribbon, or select the
username. You will be brought to the Edit User interface where you can configure the
following settings for a user:
o
o
o
Edit Information – Edit the user information for the current user.
E-mail – Enter the e-mail address of the current logged-on user.
Description – Enter the optional description for future reference.
Password – Change the user password and configure the security settings for
the logged-on user. Check the Change my password checkbox, supply the New
password, and re-enter the new password in the Confirm new password field.
Select the desired security settings by checking the corresponding checkboxes. If
desired, select a deactivation method for the password:
Never – The password never expires.
After __ day(s) – Enter the number of days you wish the password to be
valid for before it expires.
On __ – Select the calendar button (
wish the password to expire.
) to choose the date when you
Group – Change the group the logged-on user belongs to. Select the desired
group from the drop-down menu. The user will have all of the permissions of
the specified group.
When you are finished, select Save to save your changes and return to the Users
interface, or select Cancel to return to the Users interface without saving any changes
made.
•
Delete User – To delete previously configured users, select the users by checking the
corresponding checkbox, then select Delete User on the ribbon. A confirmation window
will pop up for this deletion. Select OK to delete the selected users, or select Cancel to
return to the Account Manager interface without deleting the selected users.
•
Activate – To activate the Inactive user, select the user by checking the corresponding
checkbox, then select Activate on the ribbon.
*Note: If a user fails to provide the correct credentials when attempting to log into
Compliance Guardian, they will receive the following alert: Sorry, the login ID or
password is incorrect. If the user receives this alert more times than the number of
Failed Login Attempts, the user’s account will become Inactive.
•
86
Deactivate – To deactivate the Active user, select the user by checking the
corresponding checkbox, then select Deactivate on the ribbon.
Compliance Guardian Installation and Administration User Guide
My Settings
In Compliance Guardian, some users do not have the permission to navigate to the Account Manager.
My Settings allows the user to edit his/her own account information.
When you log into Compliance Guardian GUI, the currently logged-on user will be displayed at the top
right corner of the Compliance Guardian interface. Select the current username and a drop-down list
will appear. Select My Settings and enter the My Settings interface where you can view detailed
information of the current logged-on user and the Compliance Guardian groups it belongs to. Select Edit
on the ribbon and you can configure the settings. For more information about how to configure the
settings, refer to Managing Users. In addition, refer to the following steps:
1. In the Password field, if one user does not have the permission to change the password, the
password field will be grayed out. You must supply the Old password here.
2. In the Group field, refer to the following information:
•
Only users of Administrators group have the permission to change the Compliance
Guardian groups it belongs to. If a user both belongs to Administrators group and the
other groups, it also has the permission to change the Compliance Guardian groups it
belongs to. If the user moves itself out of Administrators group, the action will take
effect the next time that user logs in.
•
If the user is admin (Compliance Guardian default user), it can view that it belongs to
the Administrators group but is not able to edit the Group setting.
•
For users who do not belong to the Administrators group, they can only view the group
names they belong to and are not able to edit the Group setting.
After you have saved the modifications, select Cancel to exit the My Settings interface and return to the
previous Compliance Guardian interface you are in.
Compliance Guardian Installation and Administration User Guide
87
License Manager
License Manager provides you with information regarding your Compliance Guardian licenses. Here you
are also able to import and export license files, generate license reports, set up expiration notifications,
as well as monitor the number of servers you have used up in your license.
To access License Manager for Compliance Guardian, open the Control Panel interface and
select License Manager under the License Manager heading. Select Close on the ribbon to close the
License Manager interface.
Viewing License Information
In the License Manager interface, the License Details section displays the following information:
•
License Type – Whether you have a Trial license or an Enterprise license.
•
Server Host/IP – The host/IP of the server used to install Compliance Guardian Control
Service.
•
Maintenance Expiration Details – The start time and expiration date of the Compliance
Guardian maintenance service you have purchased.
•
License Details – The detailed license information for every SharePoint version in
SharePoint mode, File System mode, Website mode or social networks by selecting the
corresponding tab under License Details.
o
SharePoint – Select the SharePoint tab under License Details to see every
SharePoint version or remote farm (for SharePoint Online) license information
specific to:
Source – The SharePoint version.
License Type – The type of license purchased for the product.
Number of Servers – The number of servers you have bought.
Registered Servers – The number of servers you have used.
Expiration Time – The expiration time of the license for this SharePoint.
Status – The current status of the SharePoint which reflects proper
licensing.
Number of User Seats – The number of user seats for SharePoint Online
(displayed for the remote farm).
If the License Type is Trial, the following two columns appear:
88
Max Scanning Files – The maximum number of files that can be
scanned.
Remaining Scanning Files – The number of the files that can still be
scanned.
Compliance Guardian Installation and Administration User Guide
*Note: You are only able to view the SharePoint you are licensed for.
o
File System – Select the File System tab under License Details to see the file
system license information specific to:
License Type – The type of license purchased for the product.
Number of Agents – The number of agents you have bought.
Registered Agents – The number of agents you have used.
Expiration Time – The expiration time of the license for the file system.
Status – The current status of the file system which reflects proper
licensing.
If the License Type is Trial, the following two columns appear:
o
Max Scanning Files – The maximum number of files that can be
scanned.
Remaining Scanning Files – The number of the files that can still be
scanned.
Website – Select the Website tab under License Details to see Website license
information specific to:
License Type – The type of license purchased for the product.
Expiration Time – The expiration time of the license for the website.
Status – The current status of the website which reflects proper
licensing.
Test Suite Groups – Display the Check groups.
Used Host – The number of hosts you have used.
Remaining Host – The number of hosts you have not used.
Used Domain – The number of domains you have used.
Remaining Domain – The number of domains you have not used.
If the License Type is Trial, the following two columns appear:
Max Scanning Files – The maximum number of files that can be
scanned.
Remaining Scanning Files – The number of the files that can still be
scanned.
Select Details to the right of Test Suite Groups to view details about the used
hosts, remaining hosts, used domains, and remaining domains. Select Close to
return to the License Manager interface.
Compliance Guardian Installation and Administration User Guide
89
o
Social Network – Select the Social Network tab under License Details to see the
Yammer license information:
Source – Yammer is displayed.
License Type – The type of license purchased.
Number of Allowed Users – The number of users who can use Yammer
in one domain.
Expiration Time – The expiration time of the license for using Yammer.
Status – The current status of the Yammer license.
Instant Message/Communications – Select the Instant
Message/Communications tab under License Details to see the Lync license
information:
Source – Instant Message/Communications is displayed.
License Type – The type of license purchased.
Number of Allowed Users – The number of users who can use the Lync
function.
Expiration Time – The expiration time of the license for using the Lync
function.
Status – The current status of the Yammer license.
Database – Select the Database tab under License Details to see Database
license information:
License Type – The type of license purchased for the product.
Expiration Time – The expiration time of the license for using the
Database function.
Status – The current status of the Yammer license.
Importing and Exporting the License File
In License Manager, you can import a license file to apply that new license. Since all of Compliance
Guardian products are installed as a single platform, activating any product is as simple as applying the
new license file.
To import a license file, select Import on the ribbon. In the Import License interface, select Browse. Find
and choose the desired LIC file, then select Open. You will see a summary view of this license. Select
Apply to apply this license, or select Cancel to return to the previous page without applying this license.
To export a license file, complete the following steps:
Select Export on the ribbon.
Select to export the license file or license report.
90
Compliance Guardian Installation and Administration User Guide
Save the exported file or report.
*Note: Compliance Guardian will automatically log you off in order to use the new license upon logging
in again.
Configuring License Renewal Notifications
Compliance Guardian can be configured to notify you before licenses or maintenance expires. You can
set how many days prior to expiration and at what interval you want to be notified, as well as configure
the method of notification to use.
To configure License Renewal Notifications, select Settings on the ribbon. You will be brought to the
License Renewal Notification Settings interface. Here you can configure the following settings for
Notification Schedule:
•
•
•
By expiration date – Configure these settings for notifications of license expiration:
o
Enter a positive integer into the text box and select Day, Week or Month from
the Remind me starting from __ before license expires for any modules dropdown menu.
o
Check the Interval checkbox to have the reminder repeat at a set interval. Enter
a positive integer into the text box and select Day, Week or Month from the
drop-down menu.
By maintenance expiration date – Configure these settings for notifications of
maintenance expiration:
o
Enter a positive integer into the text box and select Day, Week or Month from
the Remind me starting from __ before license maintenance expires dropdown menu.
o
Check the Interval checkbox to have the reminder repeat at a set interval. Enter
a positive integer into the text box and select Day, Week or Month from the
drop-down menu.
By number of servers – Configure these settings for notifications of the number of
available servers left for any farm.
o
Enter a positive integer into the text box and Compliance Guardian will send you
a notification when the number of servers left of any farm is less than the
specified value.
o
Check the Interval checkbox to repeat the reminder at a set interval. Enter a
positive integer into the text box and select Day, Week, or Month from the
drop-down menu.
Configure the following settings for the Notification Method:
*Note: You must select at least one of the options in order for License Renewal Notifications to work.
Compliance Guardian Installation and Administration User Guide
91
•
Pop-up message box when you login – Select this option to have a message box pop up
with a reminder for expiring licenses or maintenance.
•
E-mail notification – Select this option to be notified of expiring licenses or maintenance
by e-mail based on the Notification Schedule you configured above. A drop-down menu
will appear where you can either select a previously configured Notification Profile or
you can choose New Notification Profile to set up a new e-mail notification profile. For
more information on how to configure the notification profile, refer to User Notification
Settings.
When you are finished configuring License Renewal Notification Settings, select OK to save and return to
the License Manager interface, or select Cancel to return to the License Manager interface without
saving the new configurations.
Configuring Server Usage
In Server Usage, you can register a new farm/agent or remove a previously registered farm/agent.
Select Server Usage on the ribbon or the server number/agent number in the Registered
Servers/Registered Agents column of the License Details area to enter the Server Usage interface.
Refer to the instructions below to configure the settings.
Select a SharePoint/File System tab, and then modify its registered farms or agents. You can perform the
following actions:
•
Register a farm/agent – Select the farm or agent you want to register in the
Unregistered Farms/Unregistered Agents list and select Add>>. The farm or agent will
be moved to the Registered Farms/Registered Agents list.
•
Unregister a farm – Select the farm or agent you want to unregister in the Registered
Farms/Registered Agents list and select <<Remove button. The farm or agent will be
moved to the Unregistered Farms/Unregistered Agents list.
*Note: If the number of servers in the Registered Farms/Registered Agents list reaches the number of
servers/agents for which the license you have purchased allows, Compliance Guardian will not allow you
to register more farms or agents and the exclamation point (
System name.
) will appear left of the SharePoint/File
Select OK to save the changes or select Cancel to cancel the operation. You will then be redirected to
the License Manager interface.
Update Manager
Compliance Guardian Update Manager provides you with information regarding Compliance Guardian
versions. You can check whether you are running the most up to date version of Compliance Guardian,
download updates, view download and installation history, and configure download and update
92
Compliance Guardian Installation and Administration User Guide
settings. Update Manager allows you to update the current version of Compliance Guardian within the
Compliance Guardian GUI to reduce the time and risk of a manual update.
Before performing an update, if multiple Compliance Guardian Control Services are installed in the
Windows Network Load Balance environment, the Download Location must be configured before you
can perform the update operation successfully.
To access Update Manager for Compliance Guardian, navigate to the Control Panel interface, and then
select Update Manager under the Update Manager heading. Select Close on the ribbon to close the
Update Manager interface.
Configuring Update Settings
In Update Manager, you can configure settings for custom locations to download updates, set Update
Manager to download or check for updates automatically, and configure a proxy server for downloading
Compliance Guardian updates. To configure these settings, select Update Settings on the ribbon. You
will be brought to the Update Settings interface where you can configure the following settings:
•
Download Location – Download Compliance Guardian updates to a net share path and
store them for future use. To utilize this capability, check the Use the Net Share path as
the update storage location checkbox, and then enter the UNC path, Username, and
Password into the corresponding text boxes.
*Note: The UNC path should be entered in the following format: \\admin-PC\c$\data
or \\admin-PC\c$\shared folder.
Select Validation Test to verify the access to the specified path.
If you are changing the download location to a new one, you can perform the following
two actions on the previously downloaded updates in the old path:
•
o
Move the uninstalled update(s) to the new location – All of the uninstalled
updates whose versions are higher than the current Compliance Guardian
version will be moved to the new location. The original update files in the old
location will be deleted.
o
Delete the installed update(s) – All of the downloaded files of the installed
updates will be deleted from the old path.
Automatic Update – Configuring Automatic Update can save time and effort for
Compliance Guardian administrators. Choose from the following options:
*Note: Automatic Update settings can only be configured if you have purchased
maintenance for Compliance Guardian.
o
Download the update for me, but let me choose when to install it –
Compliance Guardian will download the available updates for you, and save
them to the default installation path or the customized net share path. All of the
updates will be ready for installation at your own discretion.
Compliance Guardian Installation and Administration User Guide
93
o
Please notify me of the new updates, but do nothing to the updates –
Compliance Guardian will notify the configured users of available updates but
will not download the updates automatically.
*Note: The maintenance license must already have been applied in order to
select this option.
o
•
Select an e-mail notification profile you previously configured from the
drop-down list or select New E-mail Notification to set up a new e-mail
notification. For more information about how to configure the
notification, refer to User Notification Settings.
Turn off automatic updates – The automatic updates function will be turned off
and you will not be notified about the Compliance Guardian updates.
Proxy – Configure the settings of the proxy server you want to use to download
Compliance Guardian updates. Enter the proxy port to use when updating Compliance
Guardian Control Service in the Update Port text box. The default port is 14007. Select
the proxy protocol you want to use from the Proxy Type drop-down menu:
o
No Proxy (default) – No proxy server will be used.
o
HTTP Proxy – Select this to use the HTTP proxy, then configure the following
settings:
o
Proxy host – Host name or IP address of the proxy server.
Proxy port – Port used to access the proxy server.
Username – Username to log on the proxy server.
Password – Password to access the proxy server.
SOCKS5 Proxy – Select this to use the SOCKS5 proxy, then configure the
following settings:
Proxy host – Host name or IP address of the proxy server.
Proxy port – Port used to access the proxy server.
Username – Username to log on the proxy server.
Password – Password to access the proxy server.
Checking for Updates
To check for the latest updates, select Check for Updates. You can only check for updates after having
purchased maintenance for Compliance Guardian. If there are any new updates available, the following
information will be displayed in the area to the right:
94
•
Update Name – Name of the update.
•
Product Name – Compliance Guardian.
•
Type – Type of the update.
Compliance Guardian Installation and Administration User Guide
•
Size – Size of the update. The unit of the size is megabyte.
•
Status – Installation status of the update.
•
Version – Version of the update.
Managing Updates
To manage available updates, select Manage Updates on the ribbon. All available updates found by
using the Check for Updates function will be listed in this page. You can perform the following actions
on these updates:
•
View History – Select View History on the ribbon to view a list of previously installed
Compliance Guardian updates. You can customize how the list is displayed in the
following ways:
o
Search – Filter the updates displayed by the keyword you designate; the
keyword must be contained in a column value. At the top of the viewing pane,
enter the keyword for the update you want to display. You can select to Search
all pages or Search current page.
o
Manage columns ( ) – Manage which columns are displayed in the list so that
only the information you want to see is shown. Select manage columns button (
), then check the checkbox next to the column name to have that column
shown in the list.
o
Hide the column ( ) – Hover over a column name, and then select the hide the
column button ( ) in the column name to hide the column.
o
Filter the column ( ) – Filter which item in the list is displayed. Unlike Search,
you can filter whichever item you want, rather than search based on a keyword.
Hover over a column name, and then select the filter the column button ( ) of
the column you want to filter, then check the checkbox next to the item name
to have that item shown in the list. To remove all of the filters, select Clear
Filter.
To see more information about an update, select the update by checking the
corresponding checkbox, and then select View Details on the ribbon. In the pop-up
window, you can perform the following actions:
o
Uninstall – Select Uninstall to uninstall the selected update. The following
options can be configured in the pop-up window:
*Note: Only hotfixes and feature packs can be uninstalled. Service packs and
cumulative updates contain major important changes between different
versions, so they cannot be uninstalled.
In the Manager tab, all of the installed Manager services will be
displayed. Select Uninstall the update from all the managers below
when uninstalling updates from the Compliance Guardian Manager
Compliance Guardian Installation and Administration User Guide
95
services since all of the available manager services must be updated at
the same time.
In the Agent tab, select a farm to remove the update from all
Compliance Guardian Agents in that farm.
•
Browse – Select Browse on the ribbon to look for the updates on your local server.
Select the desired update, and then select Open to load the update file into Compliance
Guardian. The hotfix will be stored in the UNC path you specified in Update Settings. If
there is no UNC path configured, the hotfix will be stored under the default path:
…\AvePoint\Compliance Guardian\Manager\Work\patchFolder.
•
Download – Select Download to download the selected updates from Compliance
Guardian update server.
•
Stop – Select Stop to interrupt the selected downloading update.
*Note: The download progress will be reset to 0%.
•
•
Install – Select Install to install the selected updates. The following options can be
configured in the pop-up window:
o
In the Manager tab, all of the installed Manager services will be displayed.
Select Install the update for all the managers below when installing updates for
the Compliance Guardian Manager services since all of the available manager
services must be updated at the same time.
o
In the Agent tab, select a farm to update all Compliance Guardian Agents in that
farm.
Delete – Select Delete to delete the selected updates from Compliance Guardian. The
downloaded/browsed update files will be deleted at the same time.
Reviewing the Installation History of Updates
To review the installation history of your Compliance Guardian updates, select View History on the
ribbon. You will see a list of all of the previously installed Compliance Guardian updates. You can
customize how the list is displayed in the following ways:
96
•
Search – Filter the updates displayed by the keyword you designate; the keyword must
be contained in a column value. At the top of the viewing pane, enter the keyword for
the update you want to display. You can select to Search all pages or Search current
page.
•
Manage columns ( ) – Manage which columns are displayed in the list so that only the
information you want to see is shown. Select manage columns button ( ), then check
the checkbox next to the column name to have that column shown in the list.
•
Hide the column ( ) – Hover over a column name, and then select the hide the column
button ( ) in the column name to hide the column.
•
Filter the column ( ) – Filter which item in the list is displayed. Unlike Search, you can
filter whichever item you want, rather than search based on a keyword. Hover over a
Compliance Guardian Installation and Administration User Guide
column name, and then select the filter the column button ( ) of the column you want
to filter, then check the checkbox next to the item name to have that item shown in the
list. To remove all of the filters, select Clear Filter.
To see more information about an update, check the corresponding checkbox next to the update, and
then select View Details on the ribbon. In the pop-up window, you can select Uninstall if you want to
uninstall the selected update. The following options can be configured in the pop-up window:
*Note: Only hotfixes and feature packs can be uninstalled. Service packs (SP) and cumulated updates
(CU) contain major important changes between different versions and cannot be uninstalled.
•
In the Manager tab, all of the installed Manager services will be displayed. Select
Uninstall the update from all the managers below when uninstalling updates from the
Compliance Guardian Manager services since all of the available manager services must
be updated at the same time.
•
In the Agent tab, select a farm to remove the update from all Compliance Guardian
Agents in that farm.
•
When you are finished, select Close to close the pop-up window, and then select Cancel
to return to the Update Manager interface.
Agent Groups
Agent Groups allow you to assign specific agents for performing certain jobs. This way, you can maintain
balanced work load for different agents, and not have certain agents perform slower due to poor load
distribution.
To access Agent Groups for Compliance Guardian, open the Control Panel interface, and then select
Agent Groups under the Agent Groups heading. Select Close on the ribbon to close the Agent Group
interface. If you have several Agents enabled for an agent type, they will be displayed in different colors
in the Available Agents table.
Managing Agent Groups
In the Agent Groups interface, you will see a list of previously configured Agent Groups.
The following settings can be configured in the Agent Groups interface:
•
Create – Select Create on the ribbon to create a new Agent Group. In the Create
interface, you can configure the following settings:
o
Agent Group Name ─ Enter a name for the new Agent Group, and then enter an
optional description for future reference.
o
Agent Group Type – Select one of the three Agent Group Types: SharePoint Onpremises, File System, Website, and SharePoint Sites.
Compliance Guardian Installation and Administration User Guide
97
If SharePoint is selected, you must select a farm where you want to create this
new Agent Group.
o
Available Agents – Available agents will be displayed in the lower panel. Select
the desired agent by checking the corresponding checkbox, then select Add to
add the agent to the Agent Group. To remove an agent from the Agent Group,
select the desired agent in the Agents in Group column by checking the
corresponding checkbox, then select Remove.
When you are finished, select OK to save these configurations and return to the Agent
Groups interface, or select Cancel to return to the Agent Groups interface without
saving this new Agent Group.
•
View Details– Select an Agent Group by checking the corresponding checkbox, then
select View Details on the ribbon to view detailed information about the Agent Group.
In the View Details interface, select Edit on the ribbon to make changes to the
configurations of this Agent Group. Follow the instructions in the next bullet point to
edit Agent Groups.
•
Edit – Select an Agent Group by checking the corresponding checkbox, then select Edit
on the ribbon to make changes to the configurations. In the Edit Agent Group interface,
enter a new name for the Agent Group, and then enter a description for future
reference. Select the desired agent by checking the corresponding checkbox, and then
select Add to add the agent to the Agent Group. To remove an agent from the Agent
Group, select the desired agent in the Agents in Group column by checking the
corresponding checkbox, then select Remove.
When you are finished, select Save to save all changes made to the configurations of
this Agent Group, select Save As to save the new configurations as a new Agent Group,
or select Cancel to return to the Agent Groups interface without saving any changes.
•
Delete – Select an Agent Group by checking the corresponding checkbox, then select
Delete to delete the selected Agent Group. A confirmation window will pop up to ask if
you are sure you want to delete the selected Agent Groups. Select OK to delete the
selected Agent Groups, or select Cancel to return to the Agent Groups interface without
deleting the selected Agent Groups.
User Notification Settings
Certain Compliance Guardian products provide e-mail reports or notifications to provide you with
information when a certain triggering event occurs. Currently, Compliance Guardian notifications are
provided as a pop-up window within Compliance Guardian or as e-mails to designated recipients. We
are working on providing you with additional notification options which will be configurable in the
Integration Settings interface. Once the notification integration feature is activated, the Integration
Settings button on the ribbon will become available.
98
Compliance Guardian Installation and Administration User Guide
To access User Notification Settings for Compliance Guardian, navigate to the Control Panel interface,
and then select User Notification Settings under the User Notification Settings heading. Select Close on
the ribbon to close the User Notification Settings interface.
Configuring Send E-Mail Settings
The outgoing e-mail server must be configured before Compliance Guardian can send out e-mail
notifications. To configure the outgoing e-mail server, complete the following steps:
1. Check the Enable Sending E-Mail Servers Settings checkbox in order to activate e-mail server
settings.
2. Send e-mail server (SMTP) – Enter the address of the outgoing e-mail server.
3. Secure password authentication – Check this checkbox if you have this option enabled in your
E-mail account configuration.
4. Port – Enter the SMTP port. The default SMTP port is 25. For SSL authentication, the default port
is 587.
5. Sender – Enter the e-mail address for all Compliance Guardian e-mails to be sent from.
6. Username on SMTP – Enter the sender’s username on the SMTP server.
7. Password on SMTP – Enter the sender’s password to log onto the SMTP server.
8. SSL authentication – Configure this option according to your e-mail settings.
9. Select the Validation Test button to verify the information entered. If the information you
entered is verified successfully, a test e-mail will be sent to the sender you configured.
10. Select Save to save your configurations and select Close to exit the interface.
Configuring Receive E-Mail Settings
In the Receive E-Mail Settings interface, you will see a list of previously configured e-mail notification
profiles. You can customize how these notification profiles are displayed in the following ways:
•
Search – Filter the notification displayed by the keyword you designate; the keyword
must be contained in a column value. At the top of the viewing pane, enter the keyword
for the notification you want to display. You can select to Search all pages or Search
current page.
•
Manage columns ( ) – Manage which columns are displayed in the list so that only the
information you want to see is shown. Select manage columns button ( ), then check
the checkbox next to the column name to have that column shown in the list.
•
Hide the column ( ) – Hover over a column name, and then select the hide the column
button ( ) in the column name to hide the column.
•
Filter the column ( ) – Filter which item in the list is displayed. Unlike Search, you can
filter whichever item you want, rather than search based on a keyword. Hover over a
column name, and then select the filter the column button ( ) of the column you want
Compliance Guardian Installation and Administration User Guide
99
to filter, then check the checkbox next to the item name to have that item shown in the
list. To remove all of the filters, select Clear Filter.
Configuring Receive E-Mail Notification
The receive e-mail notification profile allows you to specify e-mail address to receive reports from
Compliance Guardian plans and services. To create a receive e-mail notification profile, select Create on
the ribbon, and complete the following settings:
•
Type – Select a type for the profile you are about to create:
o
Alert – An alert is sent to let you know that the file cannot be scanned, or
operation has been made according to the action policy.
o
Notification – A notification is sent to let you know the job report information
after the job finished.
If Alert is selected, configure the following settings:
•
Name and Description – Enter a Name for the Receive E-mail Notification profile and an
optional Description for future reference.
•
Notification Address – Configure the recipients for this alert.
o
E-mail Address – If the E-mail Address radio button is selected, select Add a
Notification Address, enter a recipient’s e-mail address in the Recipient column,
and then select a corresponding e-mail template. Select Add a Notification
Address again to add another recipient. Select the delete ( ) button to delete
a recipient.
o
SharePoint Group – If the SharePoint Group button is selected, select Add a
SharePoint Group, enter a SharePoint group name in the Recipient column, and
then select a corresponding e-mail template. Select Add a SharePoint Group
again to add another group. Select the delete ( ) button to delete a group.
If Notification is selected, configure the following settings:
•
Name and Description – Enter a Name for this Receive E-mail Notification profile and an
optional Description for future reference.
•
Notification Address – Configure the recipients for this notification. Select Add a
Notification Address and then configure the settings below to add a recipient:
•
100
o
(Only for Notification) Choose the detail level for the notification from the
drop-down menu in the Report column. Select either Summary Report
Recipient or Detailed Report Recipient.
o
Enter the notification recipient’s e-mail address in the Recipient column.
o
Repeat the settings above to add more recipients.
Report Setting (Only for Notification) – Select the type of information to include for the
report levels, the recipients of the corresponding report types must exist before you can
Compliance Guardian Installation and Administration User Guide
configure the report levels. If Notification was selected, you can configure the following
settings:
o
Summary report level(s) – Set when to send the summary report. By default,
Success, Failure, and Warning are all selected. After the job completed, failed, or
completed with exception, a summary report will be sent to the recipient.
o
Detailed report level(s) – Set when to send the detailed report. By default,
Success, Failure, and Warning are all selected. After the job completed, failed,
or completed with exception, a detailed report will be sent to the recipient.
o
Send all logs to recipient according to status – Select what kind of logs will be
sent to recipient. You can select Success, Failure, or Warning. By default, Failure
is selected.
o
Message format – Select the format which the message will be delivered in:
HTML or Plain text.
Select Save on the ribbon to save the settings or select Cancel to return to the Receive E-mail Settings
interface without saving the profile.
Managing Receive E-Mail Notification
To see the configurations of a notification profile, select a notification profile, and then select View
Details on the ribbon. You will see the configuration details of this notification profile.
To change the configurations for a notification profile, select the notification profile from the list of
previously configured notification profiles, and select Edit on the ribbon. For more information about
editing configurations for a notification, refer to Configuring Receive E-Mail Notification.
To set a notification profile as the default one, select the notification profile from the list of previously
configured notification profiles, and select Set as Default Profile on the ribbon. The default notification
profile will be selected by default when you build up plans or configure notification settings for the
Compliance Guardian Manager or Agent services.
To delete a notification profile which is no longer needed, select the notification profile from the list of
previously configured notification profiles, and select Delete on the ribbon. Select OK to confirm the
deletion or select Cancel to cancel the operation.
Configuring E-mail Templates
E-mail Template displays the e-mail templates that previously configured, and allows you to configure
an e-mail template to be used when sending alert emails. To create a new e-mail template, select Create
on the ribbon, and then complete the following steps:
•
E-mail Template Name – Enter a Name for this Notification profile and an optional
Description for future reference.
Compliance Guardian Installation and Administration User Guide
101
•
E-mail Template – Specify the Subject and Body of the e-mail template. There are three
columns that can be added to the e-mail subject: Item Name, Item URL and Scanned
Time. There are eight columns that can be added to the e-mail body: Job Name, Plan
Name, Job Type, Item Name, Item URL, Scanned Time, Reason and Quarantine Manager
(this will be the Quarantine Manager URL in SharePoint). The values of these columns
will be displayed in the e-mail is the columns are added in the e-mail template.
Alternatively, you can customize the subject and body of the e-mail template with the
desired content.
Select Save on the ribbon to save the settings, or select Cancel without saving the e-mail template
settings.
Job Pruning
Job pruning allows you to set up pruning rules for all job records across your farms. When a job record is
pruned, it will be deleted from the Job Monitor and the Compliance Guardian Control database.
*Note: It is highly recommended that you configure a Job Pruning policy if you are running scan jobs
frequently to ensure your databases are not overloaded with job data.
In Job Pruning, you can configure Job Pruning Rules for Compliance Guardian modules to retain the
desired number of jobs, or jobs within a desired time frame. Once you have configured the Job Pruning
Rule for a module, you may configure a schedule in the Settings tab to have Compliance Guardian prune
jobs according to the Job Pruning Rules at a specified time with a specified notification, or manually run
pruning jobs by selecting a module by checking the corresponding checkbox, and select Prune Now on
the ribbon to prune jobs for the selected module based on the Job Pruning Rules you have configured
for each module.
Job Pruning has Job Monitor integrated within the interface. To see the progress of your pruning jobs,
select Job Monitor on the ribbon. For more information about Job Monitor, refer to Job Monitor.
To access Job Pruning for Compliance Guardian in the Control Panel interface, select Job Pruning under
the Job Pruning heading. Select Save on the ribbon to save any changes made in Job Pruning. Select
Close on the ribbon to close the Job Pruning interface.
Configuring Pruning Rules
In the Rules tab, select a Compliance Guardian module by checking the corresponding checkbox, then
select Configure on the ribbon, or select the corresponding Job Pruning Rule for a module. The
Configure interface will open in a pop-up window. The following options can be configured:
•
No Pruning – Select this option to not prune the job records of this module. When
configuring pruning rules, you will be presented with the following options:
o
102
Keep the last__ job(s) – Select this option to keep only the desired number of
most recent jobs for this module. Set the number of jobs to keep by entering a
Compliance Guardian Installation and Administration User Guide
positive integer into the text box. For example, if you enter 5 in the text box,
only the 5 most recent jobs for this module will be kept. All other job records
for this module will be deleted.
o
Keep the last __ Day(s)/Week(s)/Month(s) of job(s) – Select this option to keep
only the jobs within the desired time frame for this module. Set the time frame
for the jobs you want to keep by entering a positive integer into the text box,
then select Day(s), Week(s), or Month(s) from the drop-down menu. For
example, if you enter 7 in the text box, and select Day(s), only jobs performed
within the last 7 days by this module will be kept. All of the previous job records
of this module will be deleted.
When you are finished, select OK to save your configurations and return to the Job Pruning interface, or
select Cancel to return to the Job Pruning interface without saving any changes.
Configuring Settings
Once you have configured Job Pruning Rules for Compliance Guardian modules, you can set up a
schedule for Compliance Guardian to run pruning jobs, and notify the designated users with reports
about the pruning jobs. In the Settings tab of the Job Pruning interface, configure the following settings:
1. Schedule Selection – Set up a schedule for Compliance Guardian to run pruning jobs, or select to
manually run pruning jobs.
•
No Schedule – Select this option if you want to manually run pruning jobs.
•
Configure the schedule myself – Select this option to have Compliance Guardian run
pruning jobs at a designated time. If this is selected, the Schedule Settings configuration
will appear. Here you will see a list of all of your previously configured schedules. To add
a new schedule, select Add Schedule. To edit a previously configured schedule, select
the text in the Summary column. To delete a schedule, select ( ). To preview the
added schedules in a calendar, select Calendar View. For more information about
adding or editing a schedule, refer to Configuring a Schedule.
2. Notification – Select an e-mail notification profile you have previously configured, or select New
Notification to set up a new e-mail notification profile. For more information about how to
configure the notification profile, refer to User Notification Settings.
Configuring a Schedule
To add or edit a schedule, complete the following steps:
1. Type – Select the time unit of the time interval for this schedule.
•
By hour – Configure the schedule by hour.
•
By day – Configure the schedule by day.
•
By week – Configure the schedule by week.
•
By month – Configure the schedule by month.
Compliance Guardian Installation and Administration User Guide
103
2. Schedule Settings – Configure the frequency for this schedule by entering a positive integer in
the text box. If you want to set up a more specific schedule, check the Advanced checkbox,
more options will appear depending on the Type you have selected in step 1:
•
If you selected By hour, select one of the following options and configure its settings:
o
Specify production time: From __ to __ – Specify the production time, it will run
the job pruning in the specified production time frame.
*Note: All pruning jobs that started within this time frame will finish even if the
end time is reached.
o
•
•
Select time below – Specify the time you want to run the job pruning. To add
several time points, select Add.
If you select By week, configure the following settings:
o
Run every __ week(s) – Enter the frequency in terms of weeks in the text box.
o
On __ – Specify the days of the week to run the job pruning on.
If you select By month, select one of the following options and configure its settings:
o
On day __ of __ – Select the day of the specific months to run the pruning jobs.
For example, if you select On day 3 of January and July, the pruning jobs will
run on the third of January and July.
o
Day __ of every __ month(s) – Select the day of the month and frequency to run
the pruning jobs on. For example, if you select Day 3 of every 3 month(s), the
pruning jobs will run every three months, on the third of the month.
o
The __ __of every __ month(s) – Specify on which occurrence of which days of
the month, and the frequency to run the pruning jobs. For example, if you select
The First Monday of every 3 month(s), the pruning jobs will run every three
months, on the first Monday of the month.
o
The __ __of __ – Specify on which occurrence of which days of which month to
run the pruning jobs. For example, if you select The First Monday of January
and July, the pruning jobs will run on the first Monday of January and July.
3. Range of Recurrence – Specify the Start time for pruning jobs. Select one of the following
options for the end time and configure its settings:
•
No end date – The pruning jobs will run on the configured schedule until you manually
end it.
•
End after __ occurrence(s) – The pruning jobs will stop running after the number of
times you specify here.
•
End by __ – The pruning jobs will end on the date and time you specify here.
4. When you are finished configuring the new schedule you want to add, select OK to save, or
select Cancel to close the Add Schedule interface without saving.
104
Compliance Guardian Installation and Administration User Guide
Log Manager
Log Manager allows you to manage the logs of all of the Compliance Guardian services. Logs provide the
Compliance Guardian support staff with important information for quicker troubleshooting.
Log Manager has Job Monitor integrated within the interface. To see the progress of your log collection
jobs, select Job Monitor on the ribbon. For more information about Job Monitor, refer to Job Monitor.
*Note: A Report Location must be configured in Job Monitor before you can use the Log Manager when
Compliance Guardian Control Service High Availability is used.
To access Log Manager for Compliance Guardian, go to the Control Panel interface, and then select Log
Manager under the Log Manager heading. Select Close on the ribbon to close the Log Manager
interface.
Configuring Log Settings
To configure the log settings, go to the Log Manager interface, and then select Log Settings on the
ribbon. You can configure the log settings for the following services by selecting either the Control
Service or Agent tab.
In each of the tabs, you will see the name of the service. For each service, the following options can be
configured:
•
Log Level – Logs could be configured to generate on each of the following levels.
o
Information (default) – Logs of this level record the basic information of
Compliance Guardian, such as the jobs that you have run, the operations you
have performed, and important processes of jobs. Information level logs also
contain all of the logs from warning and error levels.
o
Debug – Logs of this level record the detailed information related to the internal
operations such as the communication between Compliance Guardian Manager
and Compliance Guardian Agent, the operations in the database, the output
message of the data.
Logs of this level are used for finding out all of the details of the jobs, and it is
recommended that the level is set to Debug before troubleshooting. Debug
level logs also contain all of the logs from information, warning, and error levels.
•
o
Error – Logs of this level record the error messages for jobs. Not all of the errors
could lead to the failure of the jobs, some of the errors have already been dealt
with and the logs will record the detailed information.
o
Warning – Logs of this level record exceptions for jobs. Warning level logs also
contain all of the logs from error level.
Size of Each Log –The default size for a log is 5 MB. You can adjust the size according to
your requirements by entering a different number into the text box.
Compliance Guardian Installation and Administration User Guide
105
•
Total Log Count – The maximum number of all the log files in the Logs folder under the
installation folder of each Manager Service. For each Agent Server, the Total Log Count
is the maximum number of all of the log files which can be generated by each .exe file.
The Agent logs are stored in the Logs folder under the installation folder of each Agent.
When the number of log files exceeds the threshold, the oldest log files will be deleted.
When you are finished configuring Log Settings, select OK to save all changes and return to the Log
Manager interface, or select Cancel to return to the Log Manager interface without saving any changes.
Collecting Logs
In order to collect logs, you must first specify the Manager services or Agents that you want to collect
the logs from in the Log Collection section of the Log Manager interface. Select Collect on the ribbon to
begin collecting logs for the selected services or agents.
To receive e-mail notification containing the report, select a previously configured e-mail notification
profile in the drop-down list or select New Notification to set up a new e-mail notification profile. For
more information about how to configure the e-mail notification profile, refer to User Notification
Settings.
SharePoint Sites
Use SharePoint Sites to map out your SharePoint Online sites so that you can manage the site collections
within those objects with Compliance Guardian.
*Note: Compliance Guardian Manager requires internet access in order for you to configure SharePoint
Sites settings.
To access SharePoint Sites for Compliance Guardian, in the Control Panel interface, select SharePoint
Sites under the SharePoint Sites heading. Select Close on the ribbon to close the SharePoint Sites
interface.
Managing SharePoint Online Site Collection URLs
In Compliance Guardian’s SharePoint Sites interface, any SharePoint Site Groups that you have
previously configured will be displayed in the main display pane along with their associated Agent
groups, descriptions, and last modified time.
To create a new SharePoint Sites Group, select Create on the ribbon, and then configure the following
settings:
•
106
SharePoint Sites Group – Enter a name for this SharePoint Sites Group in the
SharePoint Sites group name text box, and then enter an optional description for future
reference. Keep in mind that while you are able to enter any name for this site group,
we recommend that you use names that provide some information about what type of
SharePoint sites should be associated with this group.
Compliance Guardian Installation and Administration User Guide
•
Agent Group – Specify an agent group to perform Compliance Guardian jobs on this
SharePoint site. For detailed information on configuring agent groups, refer to Agent
Groups.
Select OK to save these configurations and return to the SharePoint Sites interface, or select Cancel to
return to the SharePoint Sites interface without saving these configurations.
To view information about a previously configured SharePoint Sites Group, select the SharePoint Sites
Group, and then select View Details on the ribbon.
To modify the description for a previously configured SharePoint Sites Group, select the SharePoint Sites
Group, and then select Edit on the ribbon.
To delete a previously configured SharePoint Sites Group, select the SharePoint Sites Group, and then
select Delete on the ribbon.
Managing Site Collections
For each SharePoint Sites Group you add to Compliance Guardian, you must configure each site
collection in order to manage it with Compliance Guardian. In order to configure site collections for a
SharePoint Sites Group, select the SharePoint Sites Group, and then select Manage Site Collection on
the ribbon. In the Manage Site Collection interface for a SharePoint Sites Group, you will see a list of
previously configured site collections.
To view information about a previously configured site collection, select the site collection, and then
select View Details on the ribbon.
To modify to a previously configured site collection, select the site collection, and then select Edit on the
ribbon.
To delete a previously configured site collection, select the site collection, and then select Delete on the
ribbon.
Configuring Site Collections
To add a site collection, select Add on the ribbon of the Manage Site Collection interface. In the Add
Site Collection interface or Edit Site Collection interface, configure the following settings:
•
Site Collection URL – Enter the URL of an existing site collection within this SharePoint
Sites Group.
•
Site Collection User – Specify the user who has access to this site collection.
Username – Enter the username to use in order to manage this site collection.
Password – Enter the password for the specified account.
*Note: To register a site collection, the specified user must have the Design permission
at a minimum. However, the Design permission is not sufficient to use the registered
Compliance Guardian Installation and Administration User Guide
107
site collection to run jobs. Compliance Guardian recommends you use the site
administrator who can access the site collection you specified here so you can normally
use the registered SharePoint site to run jobs.
*Note: Compliance Guardian does not support to add subsites to the SharePoint sites
group. If you try to add a subsite to the SharePoint sites group, the following two
scenarios may occur:
o
If the user specified in the Site Collection User section does not have permission
to the site collection where the subsite you are about to add resides, a pop-up
window informs you the site failed to be added to the SharePoint sites group,
and the current user does not have sufficient permission to the specified site
collection.
o
If the user specified in the Site Collection User section has permission to the site
collection where the subsite you are about to add resides, Compliance Guardian
adds the site collection to the SharePoint sites group.
Select OK to save these configurations and return to the Manage Site Collection interface, or select
Cancel to return to the Manage Site Collection interface without saving these configurations.
After selecting OK, Compliance Guardian will verify the connection between all of the Agents and the
entered site collection. If any agent cannot connect to the entered site collection, a pop-up window
appears to inform the end users that the Agent cannot connect to the entered site collection. The
window also displays an error message and a suggestion on how to solve the error.
When configuring the site collection, the URL of the site collection will be tested by all of the agents in
the SharePoint Sites Group of the SharePoint Sites with this site collection. A green check (
of the agents connect to the site collection URL. A yellow check (
) means all
) means some of the agents connect
to the site collection URL. A red X ( ) means none of the agents connect to the site collection URL. By
default, the status of the connection between the agents and the site collection URL will be checked
every 10 minutes. The checking frequency can be configured through the configuration file.
Importing Site Collections
You can import the site collections in bulk using the provided template. Select Add Site Collections on
the ribbon in the Manage Site Collection interface to access the Add Site Collections interface. To add
the site collections, complete the following steps:
108
•
Download Template – Select Download Template on the ribbon or select the download
link to download the configuration file template. Modify the downloaded template to
add the site collections’ URLs you are about to add to the selected group into the
template. Save the modifications and close the modified template.
•
SharePoint Sites Group – Displays the name of the selected SharePoint sites group.
•
Upload Configuration File – Uploads the modified configuration file template. Select
Browse next to the File path text box to upload the modified template.
Compliance Guardian Installation and Administration User Guide
•
Site Collection User – Uses the user specified here to register all of the site collections
you are about to add. Enter the Username and the corresponding Password to access to
all of the site collections you are about to import.
*Note: To register SharePoint sites in bulk, the specified user must have the Design
permission at a minimum to all of the SharePoint sites you are about to add. But the
Design permission is not sufficient to use the registered site collections to run jobs.
Compliance Guardian recommends you use the site administrator who can access all of
the site collections you are about to add so that you can normally use the registered
SharePoint sites to run jobs.
*Note: If any site collections fail to connect, a pop-up window appears to let you choose
to add only the successfully connected site collections, or add all site collections.
Select OK to save the configurations and return to the Manage Site Collection interface, or select Cancel
to return to the Manage Site Collection interface without saving any changes.
Scanning Site Collections
Use Scan Mode to scan all of the SharePoint Online site collections on a specified SharePoint admin
center site. Add the scanned site collections to the specific SharePoint sites group in bulk. Select Scan
Mode on the ribbon in the Manage Site Collection interface to access the Scan Mode interface. To scan
the SharePoint Online site collections, complete the following steps:
Select Scan on the ribbon. A pop-up window appears.
Specify the Office 365 account information that will be used to scan all of the site collections in
SharePoint Online.
•
•
Use an existing Office 365 account profile – Select an Office 365 account profile from
the drop-down list. Once an Office 365 account profile is selected, the following fields
appear:
o
Office 365 User ID – The user that will be used to scan the SharePoint Online
site collections.
o
Password – Enter the corresponding password.
o
SharePoint Admin Center URL – The URL of the SharePoint admin center site.
Enter new Office 365 account information – Configure the Office 365 account that will
be used to scan the site collections.
o
Office 365 User ID – Enter the ID of the user that will be used to scan the
SharePoint Online site collections.
o
Password – Enter the corresponding password.
Compliance Guardian Installation and Administration User Guide
109
o
SharePoint Admin Center URL – The URL of the SharePoint admin center site.
Select the Save as a new Office 365 account profile checkbox to save the entered
information as a new Office 365 account profile. Once this checkbox is selected, you are
required to enter the profile name in the Profile Name text box.
Select Connect to start to scan the site collections in the specified SharePoint admin center. Or
select Cancel to close the pop-up window without saving any configurations.
All of the scanned site collections are displayed in the Site Collection column. Select the site
collections you are about to add to the specified SharePoint sites group. Select Add to add them
to the group. You can also select Remove to remove the selected site collections from the
SharePoint sites group.
Select Save to save your changes, or select Cancel to exit this page without saving any changes.
Retrieving Status of the Site Collections
On the Manage Site Collection page, select the site collections you want to retrieve the status. Then,
select Retrieve Status on the ribbon to retrieve the status of the selected site collections.
Activating App for Real-Time Classification
If you want to scan SharePoint Online site collections using the Real-Time Classification Scanner rule,
you must activate the app. For more information on installing the Compliance Guardian App for RealTime Classification, refer to Installing Compliance Guardian App for Real-Time Classification.
Select the site collections, and then select Activate App for Real-Time Classification on the ribbon. The
Activate App for Real-Time Classification interface appears.
•
Get SharePoint Online Token – Select Connect to the SharePoint Online site to get the
token used to obtain the trust of the Office 365. The Office 365 Login interface appears.
Enter the username and password. The Office 365 appears. Select the Trust it button.
The status displayed on the Activate App for Real-Time Classification interface is
Activated.
•
Alert – Select a notification profile to send an alert that the token will expire. Enter the
value to define when to send the e-mail before the token expires.
Select OK to save your changes, or select Cancel to exit this interface.
Then, the site collections are supported scanning using the Real-Time Classification Scanner rule. For
more information on configuring Real-Time Classification Scanner, refer to Real-Time Classification
Scanner.
Office 365 Account Profile Manager
Use Office 365 Account Profile Manager to manage all of the Office 365 accounts which will be used to
scan all of the site collections on the SharePoint admin center site.
110
Compliance Guardian Installation and Administration User Guide
To access Office 365 Account Profile Manager for Compliance Guardian, in the Control Panel interface,
select Office 365 Account Profile Manager under the SharePoint Sites heading. Select Close on the
ribbon to close the Office 365 Account Profile Manager interface.
Managing the Office 365 Account Profiles
In the Office 365 Account Profile Manager interface, you will see a list of previously configured Office
365 account profiles.
The following settings can be configured in the Office 365 Account Profile Manager interface:
•
Select Create on the ribbon to create a new Office 365 account profile. Configure the
following setting:
o
Profile Name – Enter a name for the Office 365 account profile you are about to
create.
o
Office 365 Credentials – Specify the Office 365 credentials for the Office 365
account profile you are about to create.
o
•
Office 365 User ID – Enter the user ID for the Office 365 account profile.
SharePoint admin center URL – Enter the corresponding password for
the Office 365 account profile.
Select Save on the ribbon to save your configurations and go back to the Office
365 Account Profile Manager interface, or select Cancel on the ribbon to go
back to the Office 365 Account Profile Manager interface without saving any
configurations.
Select Edit on the ribbon to edit the selected Office 365 account profile.
o
Profile Name – Enter a name for the Office 365 account profile you are about to
create.
o
Office 365 Credentials – Specify the Office 365 credentials for the Office 365
account profile you are about to create.
o
•
Office 365 User ID – Enter the user ID for the Office 365 account profile.
SharePoint admin center URL – Enter the corresponding password for
the Office 365 account profile.
Select Save on the ribbon to save your configurations and go back to the Office
365 Account Profile Manager interface, or select Cancel on the ribbon to go
back to the Office 365 Account Profile Manager interface without saving any
configurations.
Select Delete on the ribbon to delete the selected Office 365 account profiles. A prompt
message appears to inform you whether or not you want to delete the selected account
profiles, select OK to delete them or select Cancel to go back to the Office 365 Account
Profile Manager interface.
Compliance Guardian Installation and Administration User Guide
111
•
Select Close on the ribbon to exit the Office 365 Account Profile Manager interface and
go back to the Control Panel interface.
Profile Manager
Use Profile Manager to manage the Compliance Guardian related profile.
Security Profile
Security profile can protect your backup data using the security keys generated by the specified
encryption method. In the Security Profile pane, there is a default security profile named Default
Security Profile. The default profile is not able to be edited or deleted and only the users in the System
groups and Administrators group are able to view it.
Profile Setting
To create a new security profile, select Create on the ribbon, and then configure the following settings:
•
Name – Enter a profile name and an optional Description. When configuring encryption
options while creating plans for different Compliance Guardian modules, security profile
names are listed for you to select from.
•
Encryption Method – Select encryption method and encryption length to be used in the
encryption.
Specify an encryption method – Select an encryption method in the drop-down
list from AES, DES and Blowfish.
*Note: If you are using an FIPS policy in your environment, you can only use AES
as the encryption method.
Encryption Length (bit) – Specify the length of the encryption.
•
Encryption Key – Select the way to generate an encryption key.
o
Automatically generate an Encryption Key – Compliance Guardian will generate
a randomized key for you.
o
Generate Encryption Key from seed – Select this option to have Compliance
Guardian generate a key based on the seed you enter. If you choose this
method, enter a seed into the Seed text box and then enter the same seed into
the Confirm seed text box.
Select OK to save these configurations and return to the Security Profile Interface, or select Cancel to
return to the Security Profile interface without saving these configurations. The encryption method or
length of a security profile cannot be modified once the profile has been created.
In the Security Profile interface, to modify the description and configuration for a previously configured
security profile, select the profile you want to modify, and then select Edit on the ribbon. To delete a
112
Compliance Guardian Installation and Administration User Guide
previously configured security profile, select the profile you want to delete, and then select Delete on
the ribbon.
*Note: If the security profile you want to delete is already in use, it is not allowed to be deleted.
Importing and Exporting Security Profiles
You can create Security Profiles and export them to be used later. To export the Security Profile, select
the profiles you want to export, and select Export on the ribbon. You will be asked to create a password
for this security profile. Select OK after entering the desired password in both the Password and the
Confirm password text boxes. Then select OK on the ribbon to save the password and export the
profiles to the desired location.
To import the security profile, select Import on the ribbon. Enter the password that was created when
the profile was exported then select OK on the ribbon. The security profile will appear in the list of
Security Profiles in the Security Profile interface once it has been imported.
To exit the Profile Manager interface, select Close on the ribbon and return to Control Panel interface.
Auditor
Compliance Guardian Auditor monitors the activities in Compliance Guardian, such as creating,
modifying, or deleting a plan, exporting a report, or making changes on test suite, etc. It also allows you
to view and export the desired auditor data report by configuring the pruning settings.
To access Compliance Guardian Auditor for Compliance Guardian in the Control Panel interface, select
Compliance Guardian Auditor under the Auditor heading. Select Close on the ribbon to close the
Compliance Guardian Auditor interface.
In the Compliance Guardian Auditor interface, you will see all of the activities and the related
information including the users of the activities, the groups to which the users belong, the time of the
activities, the modules in which the activities are performed, and the statuses of the activities.
Configuring Pruning Settings
There may be quite a number of activities that the users performed in Compliance Guardian, for the
consideration of performance, you can configure the pruning settings and get your desired auditor data
displayed in Compliance Guardian Auditor.
To configure pruning settings, complete the following steps:
Select Pruning on the ribbon of the Compliance Guardian Auditor interface. The Configure
Pruning Settings interface appears.
Configure the following settings:
•
Pruning Rule – Configure the pruning rule.
Compliance Guardian Installation and Administration User Guide
113
•
o
No pruning – Select this checkbox, the auditor data will not be pruned.
o
Keep the last _ items – Enter a value to specify the number of items that will be
kept in the Compliance Guardian Auditor interface.
o
Keep the items of the last _ days/weeks/months – Enter a value and select a
unit (Days, Weeks or Months) to specify a time, the activities during the
specified time will be kept in the Compliance Guardian Auditor interface.
Schedule Selection – Set up a schedule for Compliance Guardian to run pruning jobs, or
select to manually run pruning jobs.
o
No Schedule – Select this option if you want to manually run pruning jobs.
o
Configure the schedule myself – Select this option to have Compliance
Guardian run pruning jobs at a designated time. If this is selected, the Schedule
Settings configuration will appear. Here you will see a list of all of your
previously configured schedules. To add a new schedule, select Add Schedule.
To edit a previously configured schedule, select the text in the Summary
column. To delete a schedule, select the delete ( ) button. To preview the
added schedules in a calendar, select Calendar View. For more information
about adding or editing a schedule, refer to Configuring a Schedule.
Select Prune Now at the lower-right corner or on the ribbon to prune the data according to the
settings immediately, after the pruning job finishes, the kept items will be displayed in the
Compliance Guardian Auditor interface.
Select Save to save the configured pruning settings, but the data will not be pruned. The next
time you navigate into this Configure Pruning Settings interface, the configured settings will be
loaded.
Select Cancel to return to the Compliance Guardian Auditor interface without saving any
changes.
Exporting Auditor Data Report
The auditor data displayed in Compliance Guardian Auditor is supported exporting to a datasheet for
your conveniently review. Select Export to Datasheet on the ribbon and then save the report to your
desired location, and then review it in the datasheet.
Self Checker
Self Checker scans the farm according to rules you select in the Self Checker profiles to check the health
of your environment.
*Note: Only the users in the Compliance Guardian Administrators group can use Self Checker.
Self Checker provides rules in four categories regarding the health of the Compliance Guardian modules.
•
114
Connection – Checks the connectivity among Compliance Guardian services.
Compliance Guardian Installation and Administration User Guide
•
Permission – Verifies appropriate permissions for the Agent account and the
Compliance Guardian application pool account.
•
Service – Checks the status of Compliance Guardian services.
•
Others – Verifies that all of the requirements for each module are met.
To use Self Checker to check the health of the Compliance Guardian modules, complete the following
procedures:
Create a Self Checker profile to include the rules you are about to scan for the Compliance
Guardian modules. For more information, refer to Creating a Self Checker Profile.
Run the newly created profile.
After the job is finished, check the status of the rules in the profile. If the status is Warning or
Error, click the rule to view the provided solution. For more information, refer to Managing
Rules in a Self Checker Profile.
Solve the issue according to the provided solution.
You can also re-scan the rules, after you have solved the issue, to ensure that the provided solution
solved the problem.
To access Self Checker in the Control Panel interface, click Self Checker under the Self Checker heading.
Click Close on the ribbon to close the Self Checker interface.
Managing Self Checker Profiles
Use the Self Checker profile to include the rules you are about to check for your Compliance Guardian
modules.
In the Self Checker interface, click Profile Manager on the ribbon. In the appeared interface, you can see
a list of previously configured profiles and perform the following actions to the profiles:
•
Create – Creates a profile. To do so, click Create on the ribbon.
•
View Details – Views the detailed information of the selected profile. To do so, select a
profile by selecting the corresponding checkbox, and then click View Details on the
ribbon.
•
Edit – Edits the selected profile. To do so, select a profile by selecting the corresponding
checkbox, and then click Edit on the ribbon.
•
Delete – Deletes the selected profiles. To do so, select one or more profiles by selecting
the corresponding checkboxes, and then click Delete on the ribbon.
•
Run Now – Run the selected profile immediately. To do so, select a profile by selecting
the corresponding checkbox, and then click Run Now on the ribbon.
•
Job Monitor – View and manage the profiles' jobs. To do so, click Job Monitor on the
ribbon.
Compliance Guardian Installation and Administration User Guide
115
A default profile is created automatically after the installation or upgrade. This profile will be run at
midnight (00:00:00) every Monday and includes all of the existing Agents, modules and rules.
Creating a Self Checker Profile
In the Profile Manager interface, click Create on the ribbon to create a new Self Checker profile.
Complete the following steps to create a new profile:
Profile Name – Enter a name for your profile, and then enter an optional description for future
reference. Click Next.
Scan Filter – Filters the modules and the Agents whose health you want to check.
•
Module Filter – Select one or more modules you are about to check by selecting the
corresponding checkboxes.
•
Agent Filter – Select one or more available Agents you are about to check by selecting
the corresponding checkboxes and select the Include New checkbox to include newly
registered or restarted Agent services when scanning all of the available rules.
Click Next to proceed.
Scan Rules – Select the rules you are about to include in your profile by selecting the
corresponding checkboxes. When running the newly created profile, Compliance Guardian
checks all of the rules included in the profile.
Click Next to proceed.
Scan Schedule – Configure the scan schedule and notification settings for your profile.
•
Schedule Selection – Select one of the following options:
No schedule – Scans the rules included in the profile only when you running the
profile.
Configure the schedule myself – Scans the rules included in the profile
according to the customized schedule settings. If you select this checkbox, the
Schedule Settings field will appear. For more information, refer to Configuring
Scan Schedule Settings for the Self Checker Profile.
•
Notification Settings – Select an existing notification profile from the drop-down list, or
click New Notification Profile to create a new one. After selecting the notification
profile, click View to view more details of this profile.
Select when to receive the notification e-mail by selecting the corresponding
checkboxes.
Passed – You will receive a notification e-mail with a report that includes all of
the rules that have a Passed status.
Warning – You will receive the report including all of the rules that are in
Warning status through the notification e-mail.
116
Compliance Guardian Installation and Administration User Guide
Error – You will receive a notification e-mail with a report that includes all of the
rules that have an Error status.
Skipped – You will receive a notification e-mail with a report that includes all of
the rules that have a Skipped status.
Stopped – You will receive a notification e-mail with a report that includes all of
the rules that have a Stopped status.
Click Next to proceed.
Overview – View the detailed information of your profile.
Click Finish to save the profile, or click Finish and Run Now to save and run the profile.
Configuring Scan Schedule Settings for the Self Checker Profile
In the appeared Schedule Settings field after selecting Configure the schedule myself, click the Add
Schedule link to add a new schedule for the profile. The Add Schedule interface appears. Complete the
following steps to configure the scan settings:
Type – Select a type of recurring schedule for the schedule you are about to add from the
following four options:
•
By hour
•
By day
•
By week
•
By month
Schedule Settings – Select how frequently the recurring schedule is used:
•
Every _ hours – Enter a positive integer in the text box. This option appeared when you
select By hour in the Type field. Select Advanced to configure more specific settings:
Specify production time – Select the start hour and the end hour in this field.
Select time below – Select when you will scan the rules. Click Add to add more
time point.
•
Every _ day(s) – Enter a positive integer in the text box. This option only appears when
you select By day in the Type field.
•
Every _ week(s) – Enter a positive integer in the text box. This option only appears when
you select By week in the Type field. Select Advanced to configure more specific
settings:
Run every _ week(s) – Enter a positive integer in the text box.
On _ – Select one or more options from the drop-down list, and then click OK.
•
Every _ month(s) – Enter a positive integer in the text box. This option appears when
you select By month in the Type field. Select Advanced to configure more specific
settings:
Compliance Guardian Installation and Administration User Guide
117
On day _ of _ – Enter a positive integer in the text box, and then select one or
more month from the drop-down list.
Day_ of every _ month(s) – Select a day from the drop-down list, and then
enter a positive integer in the text box.
The _ _ of every _ month(s) – Select an ordinal numeral from the first dropdown list, select one or more day from the second drop-down list, and then
enter a positive integer in the text box.
The _ _ of _– Select an ordinal numeral from the first drop-down list, select one
or more days from the second drop-down list, and then select one or more
months from the third drop-down list.
Range of Recurrence – Select when the recurring schedule will end:
•
Start time – Select a start time.
•
No end date – The schedule will not end.
•
End after _ occurrences – Enter a positive integer in the text box. The schedule will end
after the entered number of occurrences.
•
End by _ – Select the end date. The schedule will end on the selected end date.
Click OK to save your changes and return to Scan Schedule interface, or click Cancel to return to
Scan Schedule interface without saving any changes.
Click Add Schedule to add more schedules for your profile.
Click Calendar View to view the overall schedules.
Managing Rules in a Self Checker Profile
In the Self Checker interface, you can perform the following actions:
118
•
Profile Manager – Manages all of the Self Checker profiles. For more information, refer
to Managing Self Checker Profiles.
•
Export Report – Exports a report for all of the rules in the selected profile.
•
View Details – Views the detailed information of the selected rule. Select a rule and
then click View Details on the ribbon.
•
Stop Scanning – Stops scanning the selected rules. Select one or more rules and then
click Stop Scanning on the ribbon.
•
Rescan – Rescans the selected rules. Select one or more rules and then click Rescan on
the ribbon.
•
Job Monitor – Monitors all of the Self Checker jobs.
Compliance Guardian Installation and Administration User Guide
Exporting Self Checker Report
To export a Self Checker report, which will allow you to view detailed information about the rules
included in a specific profile, complete the following steps:
In the Self Checker interface, select a profile from the Profile Name drop-down list.
Select a collection time from the Collection Time drop-down list. By default, the latest collection
time of the selected profile is displayed.
To export all of the scan results, click Export Report. To export particular scan results, select the
checkboxes of the rules you want to export and click Export Report.
Click Export Report on the ribbon to export a Self Checker report. The Export Report interface
appears.
In the Scan Results Selection field, choose to export all of the scan results or only the selected
scan results.
Select a report format from the Select a report format drop-down list in the Report Format
field.
Click OK. The report will be exported to a location you specified.
Solution Manager
Solution Manager provides an interface for you to manage all of the Compliance Guardian solutions. To
access Solution Manager for Compliance Guardian, go to the Control Panel interface, and then select
Solution Manager under the Solution Manager heading. Select Close on the ribbon to close the Solution
Manager interface.
*Note: Be sure that you have Full Control of all zones of all Web applications via the User Policy for Web
Applications in your SharePoint permissions.
Managing Solutions
When you first access Solution Manager, you will see two Compliance Guardian solutions. In order to
see some of the information for these solutions, or to perform certain actions to these solutions, you
must first select a farm.
Farm Selection
Select a farm from the Farm drop-down menu, the following information of the farm will be displayed in
a table:
•
Number of Front-end Web Servers – Number of the servers which have enabled the
Microsoft SharePoint Foundation Web Application service.
Compliance Guardian Installation and Administration User Guide
119
•
Number of Available Agents – Number of the Compliance Guardian Agents with an up
( ) and Active status.
•
Deployment Method – Currently the solution can only be locally deployed. In other
words, solution files are deployed only to the Compliance Guardian Agent Server from
which the deployment operation was initiated.
Viewing the Solution's Information
You can view the following information of the solutions in the corresponding table:
•
Solution – Name of the Compliance Guardian solution.
•
Module – Name of the module this solution is intended for.
The following information is only available if you have a farm selected:
•
Version – Version of the solution.
•
Status – Deployment status of the solution file.
o
N/A – The solution is not installed.
o
Not Deployed – The solution is installed but not deployed.
o
Deployed – The solution is deployed to all of the Agent servers.
o
Partially Deployed – The solution is deployed to some of the Agent servers.
•
Last Refreshed Time – Last modified time of the corresponding solution.
•
Message – Detailed information about the solution deployment.
Operations on the Solutions
Select a solution from the table by checking the corresponding checkbox. You can perform the following
actions:
120
•
Install – Select Install on the ribbon to add a solution package to the farm's solution
store, which is in the farm's configuration database. Use this button when you only want
to add the solution to the specified farm and do not want to deploy it.
•
Deploy – Select Deploy on the ribbon to unpack the solution package, and copy its
elements to their appropriate places. This button can be used even when the solution
has not been installed to the specified farm. In that case, the solution will be installed to
the specified farm first and then be deployed.
•
Retract – Reverse the deployment of the farm solution's components. The solution
remains in the solution store and can be redeployed later.
•
Remove – Deletes the solution package from the solution store. This button can be used
even when the solution has not been retracted from the specified farm. In that case, the
solution will be retracted from the specified farm first and then removed.
Compliance Guardian Installation and Administration User Guide
After a solution is installed, to view information about it, select the solution by checking the
corresponding checkbox, and then select Solution Properties on the ribbon. You will be brought to the
Solution Properties page. By default, the Summary tab is open, which shows an overall view of the
specified solution. Select the Details tab to view the solution’s deployment status on each of the Web
applications and other detailed information. In the Details tab, you can also select Web applications by
checking the corresponding checkboxes, and then select to Deploy or Retract the solution from the
selected Web applications. When you are finished, select Cancel on the ribbon to return to the Solution
Manager interface.
Managing Solutions
To keep your Compliance Guardian solutions up to date, Solution Manager provides you tools to check
for solution version, upgrade existing solutions, and repair deployed solutions. To perform any of these
actions, select the solution by checking the corresponding checkbox, then select:
•
Retrieve Version on the ribbon to retrieve version information about the selected
solutions. The information displayed in the Version, Status, and Message columns will
be refreshed.
•
Upgrade on the ribbon to upgrade the selected solution to the latest version. A solution
can be upgraded if the solution version is lower than the current agent version.
•
Repair on the ribbon to repair the selected solution. You can repair a solution if it does
not have the same version as the current agent version.
Solution Description
Refer to the following descriptions to get an overall view of all of the Compliance Guardian solutions.
SP2007QuarantineManager.wsp/SP2010QuarantineManager.wsp/SP2013QuarantineManager.wsp –
This solution is used for the Real-Time Classification Scanner and Scheduled Classification Scanner. If you
deploy this solution, you are able to use the Compliance Guardian Quarantine Manager in SharePoint.
SP2007AssistManager.wsp/SP2010AssistManager.wsp/SP2013AssistManager.wsp – This solution is
only used for the Real-Time Classification Scanner module. After enabling this feature, you can manually
scan the document in the specified scope defined in Compliance Guardian, and view the scanned
results, or you can directly modify the tag values for the scanned document without modifying the
checks.
SP2007InstallEventReceiver.wsp/SP2010InstallEventReceiver.wsp – This solution is only used for the
Real-Time Classification Scanner module. If you deploy this solution, the Compliance Guardian Newly
Created Sites Real-Time Scan feature will be enabled on the Web application automatically. The newly
created site’s corresponding Compliance Guardian Real-Time Scan feature will also be enabled, and
then the newly created site will apply its parent's Real-Time Classification rule (if the parent has applied
a rule).
Compliance Guardian Installation and Administration User Guide
121
YammerConnector.wsp – This solution is used for the Real-Time Classification Scanner module. After
enabling this feature, and configuring related settings in Real-Time Classification Scanner, Compliance
Guardian will scan the content posted through the SharePoint Web part to Yammer.
Database Manager
Database Manager allows you to create and configure the databases for a Compliance Scan job and
Classification Scan job to use.
A database policy is configured for a Compliance Scan job, you can select a database, and set up a
retention policy for saving data in this database. In the Database Manager interface, you will see the
Report Database and Report Database Policy tabs.
Database
Database Manager allows you to store the scanned results of Compliance and Classification Scanners
and the archived Lync data. To access the Database settings for Compliance Guardian in the Control
Panel interface, select Database Manager under the Common Settings heading. Select Close on the
ribbon to close the Database interface.
Managing Database
In Database Manager, you can create a database, view details about a database, edit a previously
configured database, or delete a location. For more information about creating or editing a database,
refer to Configuring Database.
To view details about a report database, select it from the list of databases, select View Details on the
ribbon, then select Database in the drop-down menu. You will see the settings for this database.
Select Edit on the ribbon to change the configurations for this database. For more information about
editing configurations for a report database, refer to Configuring Database.
To delete a database from Compliance Guardian, select it from the list of databases, and select Delete
on the ribbon, and then select Database from the drop-down list. A confirmation window will appear
and ask if you are sure you want to proceed with the deletion. Select OK to delete the selected
databases, or select Cancel to return without deleting it.
Configuring Database
To create a new database, select Create on the ribbon, and then select Database in the drop-down
menu. To modify a database, select the database, and select Edit on the ribbon, and then select
122
Compliance Guardian Installation and Administration User Guide
Database in the drop-down list menu. In the Create Database or Edit Database interface, configure the
following settings:
•
Configure Database – Specify a report database. Enter a new Database Server and a
Database Name in the corresponding fields.
•
Authentication – Select the authentication mode for the report database.
If Windows Authentication is selected, the application pool account and the
Compliance Guardian Agent Account must have the db_owner permission for the report
database. If the report database does not exist and need to be created, the application
pool account and the Compliance Guardian Agent Account must have the dbcreator
permission for the report database. You can also validate the database account by
selecting Validation Test. The Validation Test only runs if the application pool account
has enough permissions to the report database.
If SQL Authentication is selected, the necessary information must be specified in the
Account and Password fields. You can also validate the database account by selecting
Validation Test.
•
Failover Database Server – Specify a failover database server. In the event that the
specified report database collapses, the data stored in the report database can be
transferred to this standby database.
Alternatively, you can configure the authentication in Advanced settings by entering a connection string
instead of configuring the settings. Select Advanced; the Connection String section appears. Check the
Edit Connection String directly checkbox to activate this feature, and then enter the connection string
according to the example listed in the left pane.
Select Save to finish and save the configuration, or select Cancel to return to the Database page without
saving any configurations.
Database Policy
Database Policy allows you to apply report retention rule to the specified database. A retention rule
defines how to prune the reports stored in the database.
To access Database Policy settings in the Control Panel interface, select Database Manager under the
Common Settings heading. The Database tab is the default one. Select the Database Policy tab to launch
the Database Policy page. Select Close on the ribbon to close the Database Policy interface.
Managing Database Policy
In Database Policy, you can create, view details, edit, or delete a database policy. For more information
about creating or editing a database policy, refer to Configuring Database Policy.
Compliance Guardian Installation and Administration User Guide
123
To view details about a database policy, select it from the list of database policies, select View Details
on the ribbon, then select Database Policy in the drop-down menu. You will see the settings for this
database policy.
Select Edit on the ribbon to change the configurations for this database policy. For more information
about editing configurations for a database policy, refer to Configuring Database Policy.
To delete a database policy from Compliance Guardian, select it from the list of database policies, and
select Delete on the ribbon, and then select Database Policy in the drop-down list. A confirmation
window will pop up and ask if you are sure you want to proceed with the deletion. Select OK to delete
the selected database policies, or select Cancel to return without deleting it.
Configuring Database Policy
To create a new database policy, select Create on the ribbon, and then select Database Policy in the
drop-down menu. To modify a database policy, select the policy, and select Edit on the ribbon, and then
select Database Policy in the drop-down list. In the Create Database Policy or Edit Database Policy
interface, configure the following settings:
•
Database Policy Name – Specify a name for the database policy. Enter a Report
Database Policy Name and a Description in the corresponding fields. The description is
optional.
•
Database – Select an existing database or create a new one.
•
Report Retention Rule – Check the Enable report retention checkbox to activate this
feature, and then enter an integer in the right pane to define how to prune the reports
in the specified database.
Select Save to finish and save the configuration, or select Cancel to return to the Database Policy page
without saving any configurations.
Test Suite Manager
Test Suite Manager allows you to manage test suites and create checks and test suites. To access the
Test Suite Manager in the Control Panel interface, select Test Suite Manager under the Common
Settings heading. Select Close on the ribbon to close the Test Suite Manager interface.
Background Information
In order to provide a flexible and customizable compliance solution, AvePoint developed the AvePoint
Testing Language (ATL) to provide organizations with the ability to rapidly respond to new compliance
threats and requirements. ATL is an XML structured language that is used to validate and classify
content related to compliance to standards or guidelines, including but not limited to security, privacy,
accessibility, and content classification. Because it is open and modifiable, ATL allows for coverage to
specifically match an organization’s needs. ATL uses test definition files (checks) to match your
124
Compliance Guardian Installation and Administration User Guide
environment and standards, test your framework and repair issues, validate that your content complies
with organizational standards, and identify all content that requires user review and distribute a list of
items to the appropriate parties.
A check is an XML file that defines the logic that Compliance Guardian uses to check files. Checks identify
the purpose for the check (the type of check to run, such as a pattern of characters), the condition for
the check (such as social security number pattern), and the possible result of the check (true or false).
Users can change the values in the checks to determine the check conditions, but the elements’ specific
format defined by Compliance Guardian in the checks must stay the same.
A test suite is a logical grouping of test definition files, or a set of checks, that define how to present the
scanned data. Test suites allow you to build scan plans for your specific regulations and requirements.
These collections are the basis of Compliance Guardian scans. A test suite contains one or more checks
and a configuration file that is used to define how to combine these checks and set risk levels for scan
results.
Managing Test Suites
In the Test Suite Manager interface, you will see a list of the configured test suites (including the built-in
test suites).
*Note: You can view the version of a test suite. When a test suite is uploaded to Compliance Guardian
or created through Compliance Guardian, Compliance Guardian will automatically assign a version for
this test suite. If a test suite is updated via Test Suite Manager, Compliance Guardian will also
automatically update its version when it is saved.
In the Test Suite Manager interface, you can create, upload, download, view details about, edit, or
delete checks and test suites. Review the following sections for information about each of these
available actions.
Creating a New Check or Test Suite
Review the following two procedures for information about creating either a new check or test suite.
Creating Checks
To create a new check, select Create on the ribbon of the Test Suite Manager interface. When the dropdown menu appears, select Check from the drop-down menu. To create a new check, complete the
following steps:
1. In the Check Template screen, select the desired check template in the check template list by
selecting the radio button before the check template.
2. Select Next on the ribbon or on the lower-right corner of the screen. The Report Text screen
appears.
Compliance Guardian Installation and Administration User Guide
125
3. Configure the following settings in the Report Text screen:
•
Name and Description – Enter a name for the check. The description is optional.
•
URL – Enter a hyperlink to provide additional information about this check, including
any official rules or articles of law that specify how the check will test files. This field is
optional.
•
True Result and Message – Select the returning status and message for this check when
the checking result is True. The checking logic determines whether a check result is false
or true.
•
False Result and Message – Select the returning status and message for this check when
the checking result is False. The checking logic determines whether a check result is
false or true.
4. Select Next on the ribbon or on the lower-right corner of the screen. The check attributes
configuration screen appears.
5. Configure the attributes for the check. The attributes that are required to be configured for each
type of check are different. For more information about configuring attributes for each type of
check, refer to Configuring Check Type Attributes in Appendix B.
6. Select Save on the ribbon or on the lower-right corner of the screen to save the check.
If you want to preview the check before saving it, select Preview on the ribbon or on the lowerright corner of the screen. A pop-up window appears. Enter the file name in the pop-up window,
and select Save. The check will be saved. You can view the configuration information on the
check, and then save the check in Compliance Guardian after you have previewed the check and
confirmed the check information.
Creating Test Suites
To create a new test suite, select Create on the ribbon of the Test Suite Manager interface. When the
drop-down menu appears, select Test Suite from the drop-down menu. To create a new test suite,
complete the following steps:
1. In the Test Suite Type screen, select the test suite type:
•
Test Suite for Compliance Reporting – Found in Compliance Manager. This type of test
suite is used to identify and report any instances of non-compliance to defined rules and
then identify the associated risks.
•
Test Suite for Classification and Tagging – Found in Classification Manager. This type of
test suite is used for content classification with a variety of related actions such as
embedding metadata, quarantining documents, and reacting content.
•
Test Suite for Redaction – Found in Classification Manager. This type of test suite is
used for redacting the specified content in a file.
2. After selecting the test suite type, select Next on the ribbon or on the lower-right corner of the
screen. The Test Suite for Compliance Reporting, Test Suite for Classification and Tagging, or
Test Suite for Redaction screen appears.
126
Compliance Guardian Installation and Administration User Guide
3. Configure the following settings:
•
Name and Description – Enter a name for the test suite. The description is optional.
•
Check Accessibility (only appears when Test Suite for Compliance Reporting type is
selected) – Select whether or not to check the file accessibility. If Yes is selected, the file
will be scanned keeping its formatting. If No is selected, the file will be scanned,
stripping out its formatting. If the file that will be scanned is the unsupported type in
Compliance Guardian, the function will not be used no matter the Yes option or the No
option is selected.
•
DepthScan (only appears when Test Suite for Compliance Reporting type or Test Suite
for Classification and Tagging type is selected) – Select an option for DepthScan.
o
Hybrid – Compliance Guardian scans the files with the supported file types. If
the files that will be scanned are the unsupported types in Compliance
Guardian, IFilter will be used for the scan.
o
True – Compliance Guardian scans the files. If the files that will be scanned are
the unsupported types in Compliance Guardian, the exception message will be
thrown and displayed in Compliance Guardian Report.
o
False – IFilter is used for the scan.
For more information on the supported file types in Compliance Guardian, refer to
Appendix C: Supported File Types in Compliance Guardian.
4. Select Next on the ribbon or on the lower-right corner of the screen. The File Body
Configuration screen appears.
5. Configure the attributes for the test suite. For more information about configuring the file
attributes, refer to Configuring Test Suite File Attributes in Appendix B.
6. Select Save on the ribbon or on the lower-right corner of the screen to save the test suite.
If you want to preview the Test Suite for Compliance Reporting, Test Suite for Classification
and Tagging, or Test Suite for Redaction file before saving it, select Preview on the ribbon or on
the lower-right corner of the screen, a pop-up window appears. Enter the file name in the popup window, and select Save to save the file. You can view configuration information on the file,
and then save the test suite in Compliance Guardian after you have previewed the file and
confirmed the file information.
Uploading Checks and Test Suites
Select Upload on the ribbon. A window will pop up, and then you can select the desired test suite or
check. The uploaded test suite will display in the test suite list in the Test Suite Manager interface; the
uploaded check will be loaded when you create a test suite. You can upload multiple test suites or
checks at one time. Before uploading the test suites or checks, you must zip the test suites to one file, or
zip the checks to one file first, and then select the ZIP file to upload them to Compliance Guardian.
Compliance Guardian Installation and Administration User Guide
127
Downloading a Test Suite
Select a test suite from the list of previously configured test suites, and then select Download on the
ribbon.
Viewing Details about a Test Suite
Select a test suite from the list of previously configured test suites, and then select View Details on the
ribbon.
Editing a Previously Configured Check or Test Suite
In the Test Suite Manager interface, select the test suite that you want to edit, and then select Edit on
the ribbon. A drop-down menu appears. Choose one of the following options:
•
Checks in Test Suite – Edit the test suite by enabling or disabling checks and removing
checks. You can also edit the checks in the test suite. For more information, refer to
Editing Checks in Test Suite.
•
Test Suite – Edit the selected test suites file. For more information, refer to Editing Test
Suite.
Editing Checks in Test Suite
If selecting Checks in Test Suite from the Edit drop-down menu, you will be brought to the Edit interface
where you can configure the following settings:
•
Name and Description – Edit the test suite’s name and description.
•
Check Selection – All the checks that are included in the selected test suite will be
loaded here. Refer to the description field for an overview of each check. Perform the
following actions as needed:
o
In the Status column, you can select the down arrow ( ), and then select
Enable or Disable to enable or disable a check. If you disable a check, the check
will not be used in the test suite.
*Note: The Status column only appears if you are editing a Test Suite for
Compliance Reporting.
o
To delete one or more checks from the test suite, select the checkboxes before
the checks, and select Delete on the ribbon.
o
To edit a single check, select the checkbox to the left of the check, and then
select Edit on the ribbon of this interface. Refer to Editing a Check.
You can also perform the following additional actions when selecting the checks in the
Check Selection section:
128
Compliance Guardian Installation and Administration User Guide
o
Sort – Select the header row of each column to sort all of the values in the
specified column according to the ascending/descending order.
o
To change the number of checks displayed per page, select the desired number
from 5, 8, 10, 15 (default value), 20, 25, 50, 100 in the Show rows drop-down
menu at the lower-right corner.
o
To go to the specified page, enter the page number in the Go to … of text box at
the lower-right corner and press Enter.
o
To go to the next page, select the > button at the lower-right corner; to return
to the previous page, select the < button at the lower-right corner.
Select Save to save the changes, or select Close to exit the interface without saving any changes.
Editing a Check
After selecting a check and selecting Edit on the ribbon, you will be brought to the check Edit interface.
Complete the following steps as needed:
1. Edit the following settings in the Report Text screen:
•
Name and Description – Enter a name for the check. The description is optional.
•
URL – Enter a hyperlink to provide additional information about this check, including
any official rules or articles of law that specify how the check will test files. This field is
optional.
•
True Result and Message – Select the returning status and message for this check when
the checking result is True. The checking logic determines whether a check result is false
or true.
•
False Result and Message – Select the returning status and message for this check when
the checking result is False. The checking logic determines whether a check result is
false or true.
2. Select Next on the ribbon or on the lower-right corner of the screen. The check attributes
configuration screen appears.
3. Configure the attributes for the check. The attributes that are required to be configured for each
type of check are different. For more information about configuring attributes for each type of
check, refer to Configuring Check Type Attributes in Appendix B.
4. Select Save on the ribbon or on the lower-right corner of the screen to save the check.
Alternatively, select Save As and enter a check name to save it as another check.
If you want to preview the check before saving it, select Preview on the ribbon or on the lowerright corner of the screen. A pop-up window appears. Enter the file name in the pop-up window,
and select Save. The check will be saved. You can view the configuration information on the
check, and then save the check in Compliance Guardian after you have previewed the check and
confirmed the check information.
Compliance Guardian Installation and Administration User Guide
129
Editing Test Suite
If selecting Test Suite from the Edit drop-down menu, you will be brought to the Test Suite Manager
Edit interface where you can edit the following settings:
1. Edit the Name and Description in the Test Suite for Compliance Reporting Test Suite for
Classification and Tagging or Test Suite for Redaction screen. The description is optional.
If you’re editing a test suite for Compliance Reporting, you need to configure the Check
Accessibility setting. Select whether or not to check the file accessibility.
2. Select Next on the ribbon or on the lower-right corner of the screen. The File Body
Configuration screen appears.
3. Configure the attributes for the test suite file. For more information about configuring the file
attributes, refer to Configuring Test Suite File Attributes in Appendix B.
4. Select Save on the ribbon or on the lower-right corner of the screen to save the test suite.
Alternatively, select Save As and enter a test suite name to save it as another test suite.
If you want to preview the Test Suite for Compliance Reporting Test Suite for Classification and
Tagging or Test Suite for Redaction file before saving it, select Preview on the ribbon or on the
lower-right corner of the screen. A pop-up window appears. Enter the file name in the pop-up
window, and select Save to save the file. You can view configuration information on the file, and
then save the test suite in Compliance Guardian after you have previewed the file and
confirmed the file information.
Deleting a Test Suite
Select a test suite from the list of previously configured checks or test suites, and then select Delete on
the ribbon. A confirmation window will pop up and ask if you are sure you want to proceed with the
deletion. Select OK to delete, or select Cancel to return without deleting it.
Risk Formula
Risk Formula provides the user with a method to measure level of risk in proportion to the risk type. It
allows users to grow risk at a specified factor, providing an accurate look at risk by occurrence.
Managing Risk Formulas
Select Risk Formula on the ribbon of the Test Suite Manager interface, you will be brought to the Risk
Formula interface. In the Risk Formula interface, you will see a list of the created Formula. There are
three default Formulas: Weighted, Stepped, and Raw.
In the Risk Formula interface, you can create, view details about, edit, or delete the created Formulas.
•
130
To view details about a Formula, select the Formula, and select View Details on the
ribbon.
Compliance Guardian Installation and Administration User Guide
•
To edit a previously created Formula, select the Formula, and select Edit on the ribbon.
•
To delete a previously created Formula, select the Formula, and select Delete on the
ribbon.
•
To create a new Formula, select Create on the ribbon, you will be brought to the Create
Risk Formula interface, configure the following settings:
o
Name and Description – Enter a name for the new formula. The description is
optional.
o
Formula – Define a new formula.
Detailed Information on the Formula
There are three default risk formulas: Weighted, Stepped, and Raw.
•
The formula for Weighted is: r1+r2*r3*(n-1).
•
The formula for Stepped is: r1+r2*(n-1).
•
The formula for Raw is: r1*n.
User can also create a new risk formula. Refer to the following section for the introduction about r1, r2
and r3:
•
r1 – Item Initial Risk value, this is the value assigned on the initial occurrence of the
compliance failure (related to the check being tested for) in the document or stream.
Allowed Values for r1 are 1-10.
•
r2 – Item Additional Risk Level factor (Step) that the risk level grows at for every
additional failure at the check level (for the same type) found in the document or
stream. This number is optional where the integer “-1” means ignore the value (allowing
to use the third value). If the value is -1 then the factor will be 1.
Allowed Values are -1 to 10.
•
r3 – Item risk in relation to other checks. This Item is optional. If this number is missing
then it is assumed that its value is “1”.
Allowed Values are 1-10.
In addition, the r3 value allows us to define importance of an item in a check against
other checks allowing us to look at a document with 100 images with missing alternative
text quite differently than a document that has 100 social security numbers. In addition,
if we considered alt text errors and SSN numbers as errors that should grow risk at the
same value for every new occurrence we could then define importance at a higher level
for a specified test suite. These two additional risk factors allow us to more accurately
show risk against checks or test suites and based on importance of repetitive failure in a
document.
Compliance Guardian Installation and Administration User Guide
131
Viewing a Test Suite's or Check's Version History
Compliance Guardian supports you viewing the version history of a check or a test suite. In the Test
Suite Manager interface, the latest version of a test suite is displayed in the Version column. To view
the detailed version history of a test suite as well as the version history of the checks in a test suite,
select the test suite, and then select Version History on the ribbon. The Version History interface
appears. Select Close on the ribbon to return to the Test Suite Manager interface.
Viewing a Test Suite's History Version
Select a test suite version that you want to view, and select the down arrow ( ) after the corresponding
test suite. A drop-down list appears. Select View Test Suite from the drop-down list. Then, save the test
suite version for your reference.
Alternatively, you can select the test suite version, and select View on the ribbon. A drop-down list
appears. Select Test Suite from the appeared drop-down list. Then, save the test suite version for your
reference.
Deleting a Test Suite's History Version
Select one or more test suite versions, and select Delete on the ribbon. The selected test suite versions
are deleted from the Version History interface.
Viewing a Check's History Version
Refer to the following steps to go to the View Checks interface which displays all of the checks of a
selected test suite:
Select a test suite version, and then select the down arrow ( ) after the test suite. A drop-down
list appears. Or you can select View on the ribbon. A drop-down list appears.
Select View Checks in Test Suite in the appeared drop-down list. The View Checks interface
appears. Or you can select Checks in Test Suite in the drop-down list appeared on the ribbon.
The View Checks interface also appears.
In the View Checks interface, select the radio button before a check, and then select All Versions. The
View Versions interface appears. You can also select the check in the View Checks interface to go to the
All Versions interface.
In the All Versions interface, all of the versions of a check are displayed. To review a check version,
select the down arrow ( ) after the check version, and then select View from the appeared drop-down
list. Then you can save the check version for your reference. Alternatively, you can select a check
version, select View on the ribbon, and then save the check version for your reference. To delete a
check version, select the down arrow ( ) after the check version, and then select Delete from the
appeared drop-down list. Alternatively, you can select a check version and then select Delete on the
ribbon.
132
Compliance Guardian Installation and Administration User Guide
*Note: The latest version of a check cannot be deleted.
Report Configuration
Report Configuration allows you to configure the report settings. To access Report Configuration
settings for Compliance Guardian in the Control Panel interface, select Report Configuration under the
Common Settings heading. Select Close on the ribbon to close the Report Configuration interface.
Managing Report Settings
In Report Configuration, you can specify a default report location, specify the maximum number of files
to display in the report interface, connect to DocAve Auditor Database, configure the authentication and
advanced settings. For more information about configuring the report settings, refer to Configuring
Report Settings.
Configuring Report Settings
In the Report Configuration interface, configure the following settings:
1. Default Report Location– Specify a Report Location as the default location for storing reports,
and then configure the pruning rule. The following options can be configured:
•
No Pruning – Select this option to choose not to prune the reports in the report
location.
•
Depending on the report location you are configuring pruning rule for, you will be
presented with different options:
o
Keep the last__ report(s) – Select this option to keep only the desired number
of most recent reports in this report location. Set the number of reports to keep
by entering a positive integer into the text box. For example, if you enter 5 in
the text box, only the 5 most recent reports in this report location will be kept.
All other reports will be deleted.
o
Keep the last __ Minute(s)/Hour(s)/Day(s)/Week(s)/Month(s) of report(s) –
Select this option to keep only the reports within the desired time frame in this
report location. Set the time frame for the reports you want to keep by entering
a positive integer into the text box, then select Minute(s), Hour(s), Day(s),
Week(s) or Month(s) from the drop-down menu. For example, if you enter 7 in
the text box, and select Day(s), only reports generated within the last 7 days in
this report location will be kept. All of the previous reports will be deleted.
2. Maximum Number of Files – Set the maximum number of files to display in the report interface
by entering a positive integer into the text box. For example, if you enter 500 in the text box,
only 500 reports will be stored in the report location.
3. Connect to DocAve Auditor Database – Specify a Database Server where the DocAve Auditor
database resides and a Database Name in the corresponding fields to connect to the specified
Compliance Guardian Installation and Administration User Guide
133
DocAve Auditor database. The DocAve Auditor information will be used with the risk analysis
from Compliance Guardian to generate the Risk Report export.
*Note: Since any changes to the database server or database name may lead to loss, it is
strongly recommended not to change them once configured.
4. Authentication – Select the authentication mode for the report database. The necessary
information must be specified in the Account and Password fields. You can also validate the
database account by selecting Validation Test.
Alternatively, you can configure the report settings in the Advanced settings by entering a
connection string instead of configuring the settings. Select Advanced, and the Connection
String section will appear. Check the Edit Connection String directly checkbox to activate this
feature, and then enter the connection string according to the example listed in the left pane.
5. Select OK to save the configurations and return to the Control Panel interface, or select Back to
return to the Control Panel interface without saving any changes.
Allowed Location
Allowed Location allows you to configure a destination location where the scanned file is moved. To
access Allowed Location settings for Compliance Guardian in the Control Panel interface, select Allowed
Location under the Common Settings heading. Select Close on the ribbon to close the Allowed Location
interface.
Configuring Allowed Location
In Allowed Location, you can create a new allowed location, edit a previously configured allowed
location, or view the information of the previously configured allowed locations.
To create a new allowed location, select a scope (you can configure an allowed location either in the site
level or the list level). Select Configure and the Configure window appears. Expand the farm tree or My
Registered Sites and then select a library or folder where the file is moved. Then, select OK to save the
settings.
You can configure to move a file between sites in the same farm, move a file from a SharePoint 2010
farm to a SharePoint 2010 farm, move a file from SharePoint 2013 farm to a SharePoint 2013 farm, or
move a file between SharePoint 2013 On-Premises and SharePoint Online.
Inheritance Status
For site level, there are two types of inheritance status: N/A and Not Inherit. For list level, there are
three types of inheritance status: N/A, Not Inherit, and Inherit.
When there is no allowed location configured for a site, the site inheritance status is N/A. The
inheritance statuses of the lists that inherit the site are N/A; the inheritance statuses of the lists
that do no inherit the site are Not Inherit.
134
Compliance Guardian Installation and Administration User Guide
When there is an allowed location that has been configured for the site, the site inheritance
status is Not Inherit. The inheritance statuses of the lists that inherit the site are Inherit; the
inheritance statuses of the lists that do not inherit the site are Not Inherit.
Inherit or Not Inherit
After configuring an allowed location in a site, the lists under this site automatically inherit the
destination folder that is configured for the site. If you configure an allowed location in the lists that are
under this site, these lists are regarded as stopping inheriting from the site. If files are moved after
scanning according to the action policy, the files in these lists will be moved to the list destination
folders; the files in this site except this list will be moved to the site destination folder.
If some lists have configured allowed locations, and the site does not configure one. The files in these
lists that are moved according to the action policy will be moved to the list destination folders; the files
in the site but not in these lists will not be moved even if they should be.
The files in sites or lists that do not configure allowed locations will not be moved.
Helpful Notes
Review the following helpful notes on configuring the Allowed location:
•
By default, the Allowed Location configured for the site level is inherited by the list
levels.
•
You can configure a new destination folder in list level to break the inheritance from the
site level.
•
Not Inherit logically separates the destination folder in list level from the site level.
•
When configuring destination folders for the first time, you can configure destination
folders directly at either the site level or the list level. After one destination folder has
been configured for a list level, you can still configure destination folders directly to the
site levels.
•
The inherited destination folder cannot be removed; it can only be edited.
•
The target library where the allowed location is must contain a content type that
matches with the source file’s content type, and the matched content type must contain
all the source’s files columns.
Export Location
Export Location allows you to export SharePoint data to a specified location. To access Export Location
settings for Compliance Guardian in the Control Panel interface, select Export Location under the Export
Location heading. Select Close on the ribbon to close the Export Location interface.
Compliance Guardian Installation and Administration User Guide
135
Managing Export Locations
In Export Location, you can create a new export location, view details about an export location, edit a
previously configured export location, or delete a previously configured export location. For more
information about creating or editing an export location, refer to Configuring Export Locations.
To view details about an export location, select it from the list of previously configured export locations,
then select View Details on the ribbon. You will see the previously configured settings for this export
location.
Select Edit on the ribbon to change the configurations for this export location. For more information
about editing configurations for an export location, refer to Configuring Export Locations.
To delete an export location from Compliance Guardian, select it from the list of previously configured
export locations, and then select Delete on the ribbon. A confirmation window will appear and ask if you
are sure you want to proceed with the deletion. Select OK to delete the selected export locations, or
select Cancel to return without deleting it.
Configuring Export Locations
To create a new export location, select Create on the ribbon. To modify a previously configured export
location, select the export location, and then select Edit on the ribbon. In the Create Export Location or
Edit Export Location interface, configure the following settings:
1. Name and Description – Enter a Name for this export location, and then enter an optional
Description for this export location for future reference.
2. Path – The export location can be a file share, storage area network (SAN), or network-attached
storage (NAS).
•
Enter the UNC Path in the following format: \\admin-PC\c$\data or \\admin-PC\shared
folder.
*Note: The path you specified must already exist.
•
Enter the Username and Password in the corresponding text boxes, and then select
Validation Test. Compliance Guardian will test the path and user information to make
sure they are valid.
3. Select OK to save the configurations and return to the Export Location interface, or select Back
to return to the Export Location interface without saving any changes.
Filter Policy
Filter Policy allows you to set up filter rules so you can control what objects and data appear so that you
can target content more precisely. By setting up and saving filter policies, you can apply the same filter
policies to different plans without having to recreate them each time.
136
Compliance Guardian Installation and Administration User Guide
To access Filter Policy for Compliance Guardian in the Control Panel interface, select Filter Policy under
the Filter Policy heading. Select Close on the ribbon to close the Filter Policy interface.
Managing Filter Policies
In Filter Policy, you can create a new filter policy, view details about a filter policy, edit a previously
configured filter policy, or delete a previously configured filter policy.
For more information about creating a filter policy, refer to Configuring Filter Policies.
For more information about editing configurations for filter policy, refer to Editing Filter Policies.
To view a filter policy for Compliance Guardian, select it from the list of previously configured filter
policies, and then select View Details on the ribbon. To delete a filter policy for Compliance Guardian,
select it from the list of previously configured filter policies, and then select Delete on the ribbon. A
confirmation window will pop up and ask if you are sure you want to proceed with the deletion. Select
OK to delete the selected filter policy, or select Cancel to return without deleting it.
*Note: There are three default filter policies (Common File Types and Items is used for Compliance
Guardian Scanner for SharePoint and Classification Scanner for SharePoint; File System Common File
Types is used for Compliance Guardian Scanner for File System and Classification Scanner for File
Systems; Common Website Content is used for Compliance Guardian Scanner for Website) configured in
advance. The default filter policies will be selected if no other filter policies are configured.
Configuring Filter Policies
To create a new filter policy, select Create on the ribbon. In the Create Filter Policy interface, configure
the following settings:
Name – Enter a Name for the filter policy.
Description – Enter an optional Description for future reference.
Type – Select a filter policy type. There are three kinds of filter policy types: SharePoint, File
System, Website, and Lync:
•
SharePoint – This type of filter policy is used in Compliance Guardian Scanner for
SharePoint and Classification Scanner for SharePoint. If this type is selected, then select
specific objects or data within each SharePoint level (from site collection down to
attachment). Each level has a unique set of rules that can be applied to enhance
configurations.
•
File System – This type of filter policy is used in Compliance Guardian Scanner for File
System and Classification Scanner for File System. If this type is selected, then select the
level. Each level has a unique set of rules that can be applied to enhance configurations.
•
Website – This type of filter policy is used in Compliance Guardian Scanner for Website.
•
Lync – This type of filter policy is used in Compliance Guardian Scanner for Lync.
Compliance Guardian Installation and Administration User Guide
137
After selecting the filter policy type, configure the following settings:
a. Select a criterion, and then select Add a Filter Level Group to add a new rule of the
specified level. Select the delete button (
) to delete the rule that is no longer needed.
o
Rule – Select the new rule you want to create from the drop-down list.
o
Condition – Select the condition for the rule.
o
Value – Enter a value you want the rule to use in the text box.
*Note: The File Content criterion for the SharePoint type filter policy and File System
type filter policy is only for the HTML file, you can specify which lines or columns are
excluded in this scan by using the filter policy.
b. To add more filters to the filter policy, repeat the previous step.
*Note: Depending on the filters you enter, you can change the logical relationships
between the filter rules. There are currently two logical relationships: And and Or. By
default, the logic is set to And. To change the logical relationship, select the logical
relationship link. The And logical relationship means that the content which meets all of
the rules will be filtered and included in the result. The Or logic means that the content
which meets any one of the rules will be filtered and included in the result.
You can view the logical relationship of the filter rules in the Basic Filter Condition area.
For example, if the logical relationship is ((1 And 2) Or 3) in the Basic Filter Condition area, the
contents that meet both the filter rule 1 and filter rule 2, or meet the filter rule 3, will be filtered
out.
Select Save to save the configurations and return to the Filter Policy interface, or select Cancel to return
to the Filter Policy interface without saving any changes.
Editing Filter Policies
To modify a previously configured filter policy, select the filter policy, and then select Edit on the ribbon.
In the Edit Filter Policy interface, edit the related settings according to your own requirement. For more
information about how to configure settings for filter policies, refer to Configuring Filter Policies.
After finishing editing settings of the selected filter policy, select Save to save the configurations and
return to the Filter Policy interface. Alternatively, select Save As and enter a filter policy name to save it
as a new filter policy. Select Cancel to return to the Filter Policy interface without saving any changes.
138
Compliance Guardian Installation and Administration User Guide
Website Scanner Settings
Configure the Authentication Profile and the User Agent Profile for using Compliance Guardian Scanner
for Website.
Configuring Authentication Profile
An authentication profile is used to connect to the website. To configure authentication profiles in the
Control Panel interface, select Authentication Profile under the Website Scanner Settings heading.
Select Close on the ribbon to close the Authentication Profile interface.
Managing Authentication Profile
In the Authentication Profile interface, you will see a list of previously configured Authentication
profiles.
In the Authentication Profile interface, you can create a new authentication profile, view details about
an authentication profile, edit a previously configured authentication profile, or delete a previously
configured authentication profile. For more information about creating or editing an authentication
profile, refer to Creating and Editing Authentication Profile.
Select Edit on the ribbon to change the configurations for the selected authentication profile. For more
information about editing configurations for the authentication profile, refer to Creating and Editing
Authentication Profile.
To view an Authentication profile, select it from the list of previously configured profiles, and then select
View Details on the ribbon. To delete an authentication profile, select it from the list of previously
configured profiles, and then select Delete on the ribbon. A confirmation window will pop up and ask if
you are sure you want to proceed with the deletion. Select OK to delete the selected authentication
profile, or select Cancel to return without deleting it.
Creating and Editing Authentication Profile
To create a new authentication profile, select Create in the Manage group of the Authentication Profile
page. To modify an authentication profile, select the authentication profile, and then select Edit on the
ribbon. In the Create Authentication Profile or Edit Authentication Profile interface, configure the
following settings:
•
Name and Description – Enter a name and an optional description for the profile.
•
Authentication Method – Select an authentication method: Username and Password
Only or Certificate.
Username and Password – If this method is selected, then enter the specified
username and password to access the website. Compliance Guardian supports
Basic, Digest, NTLM, Negotiation Authentications.
Compliance Guardian Installation and Administration User Guide
139
*Note: If you configure the authentication profile for scanning Gmail content,
you must select Username and Password Only. For details about creating a plan
to scan Gmail content, refer to Scanning Gmail.
Certificate – If this method is selected, upload a certificate, and then enter the
username and password to access the website.
Form-based Authentication – This method is used for scanning the website that
can be logged in after submitting the form. You are required to enter the
following information after selecting Form-Based Authentication:
Login URL – Enter the form URL.
Username Class or ID – Enter the login username class or ID.
Username – Enter the login username.
Password Class or ID – Enter the login password class or ID.
Password – Enter the login password.
Login Button Class or ID – Enter the login button class or ID.
Select Save to save the configurations and return to the Authentication Profile interface. At any time,
select Cancel to return to the Authentication Profile interface without saving any changes.
Configuring User Agent Profile
A user agent profile is used for the backend web server when scanning the website. To configure user
agent profiles in the Control Panel interface, select User Agent Profile under the Website Scanner
Settings heading. Select Close on the ribbon to close the User Agent Profile interface.
Managing User Agent Profile
In the User Agent Profile interface, you will see a list of previously configured User Agent profiles.
In the User Agent Profile interface, you can create a new user agent profile, view details about a user
agent profile, edit a previously configured user agent profile, or delete a previously configured user
agent profile. For more information about creating or editing a user agent profile, refer to Creating and
Editing User Agent Profile.
Select Edit on the ribbon to change the configurations for the selected user agent profile. For more
information about editing configurations for the user agent profile, refer to Creating and Editing User
Agent Profile.
To view a user agent profile, select it from the list of previously configured profiles, and then select View
Details on the ribbon. To delete a user agent profile, select it from the list of previously configured
profiles, and then select Delete on the ribbon. A confirmation window will pop up and ask if you are
sure you want to proceed with the deletion. Select OK to delete the selected user agent profile, or select
Cancel to return without deleting it.
140
Compliance Guardian Installation and Administration User Guide
Creating and Editing User Agent Profile
To create a new user agent profile, select Create in the Manage group of the User Agent Profile page. To
modify a previously configured user agent profile, select the user agent profile, and then select Edit on
the ribbon. In the Create User Agent Profile or Edit User Agent Profile interface, configure the following
settings:
•
Name and Description – Enter a name and an optional description for the profile.
•
User Agent String – Specify the user agent string.
Compliance Guardian Installation and Administration User Guide
141
Compliance Manager
Compliance Manager enables you to retrieve compliance information about all of the files in the
specified scope through performing Compliance Scanner jobs. It displays the scan results through
different kinds of Compliance Reports so users can easily view the compliance status of the files in the
specified scopes.
*Note: Compliance Guardian supports scanning Microsoft Office files that are in a 2003 or earlier format
using iFilter in this version. If you are using an earlier version of Compliance Guardian or if you updated
to Compliance Guardian 3 SP 3 from an earlier version, you must download a compatibility pack and
download an update pack to scan the Microsoft Office files (can keep the file’s accessibility attributes). If
you prefer to scan these files through installing the compatibility pack but not through iFilter, you can
install Microsoft Office Compatibility Pack for Word, Excel, and PowerPoint File Formats, and install
Microsoft Office Compatibility Pack Service Pack 3 (SP3). Then, add the following node under the
OfficeFileMapping node in the configuration file ContentComplianceConfig.xml (you can find the file
under the path …\Compliance Guardian\Agent\Bin):
<NeedConvert>
<Extension>.xls</Extension>
</NeedConvert>
Figure 14: NeedConvert node.
The value in the Extension attribute is the extension of the file that you want to scan through the
compatibility pack.
142
Compliance Guardian Installation and Administration User Guide
Pre-Configurations
Make sure the settings in the following sections have been configured prior to creating a Compliance
Scanner plan.
Configuring Scan Policies
A scan policy defines the compliance rules to be used when scanning the contents in the specified scope.
To configure the scan policies, select Scan Policy on the ribbon of the Compliance Scanner > Create >
SharePoint/File System/Website page to enter the Scan Policy interface.
Managing Scan Policies
In the Scan Policy interface, you will see a list of previously configured scan policies.
In the Scan Policy interface, you can create a new scan policy, view details about a scan policy, edit a
previously configured scan policy, delete a previously configured scan policy, or export the check
information for the test suites included in the selected scan policy. For more information about creating
or editing a scan policy, refer to Creating or Editing Scan Policies.
Select Edit on the ribbon to change the configurations for the selected scan policy. For more information
about editing configurations for the scan policy, refer to Creating or Editing Scan Policies.
Select Export on the ribbon to export the check information for the test suites in the selected scan
policy.
To view a scan policy, select it from the list of previously configured scan policies, and then select View
Details on the ribbon. To delete a scan policy, select it from the list of previously configured scan
policies, and then select Delete on the ribbon. A confirmation window will pop up and ask if you are
sure you want to proceed with the deletion. Select OK to delete the selected scan policy, or select
Cancel to return without deleting it.
Creating or Editing Scan Policies
To create a new scan policy, select Create in the Manage group of the Scan Policy page. To modify a
previously configured scan policy, select the scan policy, and then select Edit on the ribbon. In the
Create Scan Policy or Edit Scan Policy interface, configure the following settings:
•
Name and Description ─ Enter a name for this scan policy. You can also enter an
optional description to distinguish this scan policy from the others.
•
Select the Test Suites ─ Specify the test suites that you want to include in this scan
policy. There are some predefined test suites in this page, you can refer to the
description of each test suite for the introduction of its usage. To add more desired test
suites, select Test Suite Manager in the Settings group on the ribbon. For more
information on configuring test suites, refer to Test Suite Manager.
Compliance Guardian Installation and Administration User Guide
143
After selecting some test suites, if you want to clear the selection status, select the Clear
Selection link and then specify your desired test suites again.
You can also perform the following actions when selecting the test suites:
•
Sort ─ Select the header row of each column to sort all of the values in the specified
column according to the ascending/descending order.
•
Search – Filter the test suites and display them by the keyword you designate; the
keyword must be contained in a column value. At the top right corner of the test suite
viewing pane, enter the keyword for the test suites you want to display. You can select
to Search all pages or Search current page.
•
Manage columns ( ) – You can manage which columns are displayed in the list so that
only the information you want to see will be shown. Select the manage columns button
( ), then check the checkbox next to the column name to have that column shown in
the list.
•
Hide the column ( ) – Hover over a column name, and then select the hide column
button ( ) in the column name to hide the column.
•
To change the number of test suites displayed per page, select the desired number from
5, 8, 10, 15 (default value), 20, 25, 50, 100 in the Show rows drop-down menu at the
lower-right corner.
•
To go to the specified page, enter the page number in the Go to … of text box at the
lower-right corner and press Enter.
•
To go to the next page, select the > button at the lower-right corner; to return to the
previous page, select the < button at the lower-right corner.
After you are satisfied with the configuration of the scan policy, select OK to save this scan policy. If you
do not want to save the current configuration, select Cancel to cancel the configuration.
Configuring Filter Policies
For more information, refer to Filter Policy.
Configuring Database Policies
For more information, refer to Database Manager.
Configuring the Account Manager
For more information, refer to Account Manager.
144
Compliance Guardian Installation and Administration User Guide
Configuring Connections for File System
A connection is used in the Compliance Guardian Scanner File System Mode. Configure a connection
with the file system, then the files in the connected file system are supported to be scanned in
Compliance Guardian.
Navigate to Compliance Scanner > Create > File System, and select Configure Connection on the ribbon
to enter the Configure Connection interface.
Managing Connections
In the Configure Connection interface, you will see a list of previously configured connections.
In the Configure Connection interface, you can create a new connection, view details about a
connection, edit a previously configured connection, or delete a previously configured connection. For
information about creating or editing a connection, review Creating and Editing Connections.
Select Edit on the ribbon to change the configurations for the selected connection. For information
about editing configurations for the connection, review Creating and Editing Connections.
To view a connection, select it from the list of previously configured connections, and then select View
Details on the ribbon. To delete a connection, select it from the list of previously configured
connections, and then select Delete on the ribbon. A confirmation window will pop up and ask if you are
sure you want to proceed with the deletion. Select OK to delete the selected connection, or select
Cancel to return without deleting it.
Creating and Editing Connections
To create a new connection, select Create in the Manage group on the Configure Connection page. To
modify a previously configured connection, select the connection, and then select Edit on the ribbon. In
the Create Connection or Edit Connection interface, configure the following settings:
•
Name and Description – Enter a name for this connection. You can also enter an
optional description to distinguish this connection from the others.
•
Type – Select the file system type for the connection.
•
Connection – Configure the following settings:
o
Agent Group – Select the agent group that will perform the Compliance Scanner
File System job.
o
UNC Path – Specify a path in the format \\admin-PC\c$\data or \\adminPC\shared folder. The files in the specified location are supported to be
scanned.
o
Username – Specify a username that can access the specified location.
o
Password – Specify a password.
Compliance Guardian Installation and Administration User Guide
145
*Note: The specified user must have the following permissions:
If the path is specified in the format \\admin-PC\c$\data:
The specified user must have the local administrator permission to the
connected server.
If the path is specified in the format \\admin-PC\shared folder:
The specified user must have the Log on as a batch job permission to
the connected server, or the user must be the member of the Backup
Operators group of the connected server.
The specified user must have the Read and Change permissions to the
shared folder.
After you are satisfied with the configuration of the connection, select OK to save this connection. If you
do not want to save the current configuration, select Cancel to cancel the configuration.
Configuring Connections for Database
A database connection is used in the Compliance Guardian Scanner Database Mode. Configure a
connection with the database, then the content in the connected database is supported to be scanned
in Compliance Guardian.
Navigate to Compliance Scanner > Create > Database, and select Configure Database Connection on
the ribbon to enter the Configure Database Connection interface.
Managing Connections
In the Configure Database Connection interface, you will see a list of previously configured connections.
In the Configure Database Connection interface, you can create a new connection, view details about a
connection, edit a previously configured connection, or delete a previously configured connection. For
information about creating or editing a connection, review Creating and Editing Database Connections.
Select Edit on the ribbon to change the configurations for the selected connection. For information
about editing configurations for the connection, review Creating and Editing Database Connections.
To view a connection, select it from the list of previously configured connections, and then select View
Details on the ribbon. To delete a connection, select it from the list of previously configured
connections, and then select Delete on the ribbon. A confirmation window will pop up and ask if you are
sure you want to proceed with the deletion. Select OK to delete the selected connection, or select
Cancel to return without deleting it.
146
Compliance Guardian Installation and Administration User Guide
Creating and Editing Database Connections
To create a new connection, select Create in the Manage group on the Configure Database Connection
page. To modify a previously configured connection, select the connection, and then select Edit on the
ribbon. In the Create Connection or Edit Connection interface, configure the following settings:
•
Name and Description – Enter a name for this connection. You can also enter an
optional description to distinguish this connection from the others.
•
Type – Select the database type for the connection.
The followings are the Oracle database versions that are supported scanning in
Compliance Guardian:
Oracle Database 9i
Oracle Database 10g
Oracle Database 11g
Oracle Database 12c
The followings are the SQL Server versions that are supported scanning in Compliance
Guardian:
Microsoft SQL Server 2005
Microsoft SQL Server 2008
Microsoft SQL Server 2008 R2
Microsoft SQL Server 2012
Microsoft SQL Server 2012 R2
Microsoft SQL Server 2014
•
Scanned Database – Enter the IP or host name of the database server, or IP\Instance
name. Then, enter the database name in which the data will be scanned.
•
Authentication – Specify the authentication mode, database credentials and an optional
failover database server for connecting the database.
o
Select the Windows Authentication or SQL Authentication mode for the
database and specify the database credential for the selected authentication
mode. After this, you can validate the specified account by clicking Validation
Test.
Windows Authentication – Use this method if you want the user’s
identity to be confirmed by Windows.
SQL Authentication – SQL Server will confirm the user’s identity
according to the user’s account and password.
Compliance Guardian Installation and Administration User Guide
147
o
•
Failover database server – Optionally select this checkbox and specify a failover
database server. In the event that the specified database collapses, the data
stored in the database can be transferred to this standby database.
Agent Group – Select a production Agent group from the drop-down list to execute the
jobs. An Agent group can utilize multiple Agents for loading balancing and performance
improvement.
After you are satisfied with the configuration of the connection, select OK to save this connection. If you
do not want to save the current configuration, select Cancel to cancel the configuration.
Compliance Scanner
Compliance Scanner enables you to perform a scan job using the defined scan policy and generate the
compliance scan results of all of the scanned files. The users in the specified Report Group can then view
the compliance scan results in the Compliance Report module.
Refer to the following sections for important information on getting started with Compliance Scanner.
Launching Compliance Scanner
To launch Compliance Scanner, complete the following steps:
1. Log in to Compliance Guardian. If you are already in the software, select the home page button
( ) go to the home page. From the home page, all of the products are displayed.
2. Select Compliance Scanner to launch its interface.
3. Alternatively, you can select Administration on the top-left corner, and select the Compliance
Scanner tab on the appeared navigation bar to launch Compliance Scanner.
148
Compliance Guardian Installation and Administration User Guide
Figure 15: Compliance Guardian module launch window.
Compliance Guardian Installation and Administration User Guide
149
Home Page Overview
The Compliance Scanner home page displays a list of all of your previously created Compliance Guardian
Scanner plans. You can also select Create to select the Compliance Guardian Mode: SharePoint, File
System, Website, or Database and then create a plan.
Figure 16: Compliance Scanner home page.
Selecting Mode
Select Create on the ribbon. A drop-down list appears. Select the corresponding mode from the dropdown list: SharePoint, File System, Lync, Website, or Database. Then you can enter the corresponding
mode, and configure a plan to scan objects in SharePoint, a file system, or a website.
Managing Compliance Guardian Scanner Plans
The Compliance Scanner home page displays a list of all of your previously created Compliance Guardian
Scanner plans. Also it displays the scan policy that is selected in the plan. You can also see the plan type
in the Scope Type column.
You may perform any of the following actions on a selected plan:
150
Compliance Guardian Installation and Administration User Guide
•
View Details – Select View Details on the ribbon to see the details of the selected plan.
Here you can also select Edit on the ribbon to make changes to the plan’s settings. You
will be brought to the Edit page where you can change the settings for this plan. After
editing the settings, select Save on the ribbon to save the plan. To save a changed plan
as a new one, select Save As on the ribbon. At any time, select Cancel on the ribbon to
return to the Plan Manager without saving any of your changes.
•
Edit – Select Edit on the ribbon to make changes to the selected plan’s settings. You will
be brought to the Edit page where you can change the settings for this plan. Select Save
on the ribbon to save the plan. To save a changed plan as a new one, select Save As on
the ribbon. At any time, select Cancel on the ribbon to return to the Plan Manager
without saving any of your changes.
*Note: If you change the scan policy when editing a Compliance Scanner plan, or change
the database policy when editing a Compliance Scanner plan, after you save the
changes, the next time the plan will mandatorily run a full job although you select to run
an incremental job, thus to guarantee that the job can perform correctly, as well as
guarantee the job data is generated correctly.
•
Delete – Select Delete on the ribbon to delete the selected plan. A warning message will
appear to confirm the deletion. Select OK to delete the selected plan, or select Cancel to
return to Plan Manager without deleting the selected plan.
•
Run Now – Select Run Now on the ribbon to execute the plan immediately. After you
select Run Now, a pop-up window appears, you can select to run a full job or an
incremental job. If Incremental Scan is selected, the Reference Time option is enabled.
o
Reference Time – Choose whether to scan contents created or modified at a
specified interval. If you choose to use a reference time, specify the time to scan
contents created or modified. Enter an integer into the textbox and select
Month(s), Day(s), Hour(s), or Minute(s) from the drop-down list.
*Note: It is recommended that you specify a reference time when the
recurrence schedule configured in Range of Recurrence is End after 1
occurrence.
You can see the review details about the plan’s execution in Job Monitor.
Compliance Guardian Scanner for SharePoint
The SharePoint Mode allows you to define a SharePoint scope and then perform a scan job using the
defined scan policy to generate the compliance scan results of all of the files within that SharePoint
scope. The users in the specified Report Group can then view the compliance scan results in the
Compliance Report module.
*Note: The posts and replies in SharePoint 2013 Newsfeed and the notes in Note Board in SharePoint
are also supported to be scanned.
Compliance Guardian Installation and Administration User Guide
151
Launching Compliance Guardian Scanner SharePoint Mode
On the Compliance Guardian Scanner Home interface, select Create on the ribbon, a drop-down list
appears. Select SharePoint from the drop-down list, and you will be brought to the Compliance
Guardian Scanner SharePoint Mode.
Selecting the Scan Scope
After launching the Compliance Scanner SharePoint mode, the Scope panel on the left of the screen
displays the root node of the farm. To select the scan scope, complete the following steps:
1. Select the farm node to expand the tree. The tree can be loaded down to the list level.
2. Select the scope where you want to perform the scan job on the tree.
Scanning User Profiles
Compliance Guardian supports scanning user properties and social notes in user profiles. Compliance
Guardian accesses the user profiles through the personal site. Select the related personal site node in
the farm tree to scan user properties in the corresponding user profile. However, if the personal site is
not created, you cannot scan the corresponding user profile since there is no personal site node in the
tree. Compliance Guardian Compliance Scanner provides a method to scan the user profile when the
personal site is not created. The User Profile Services node is loaded on the farm tree by changing the
UserProfile Used="false" (change the value false to true) node in the ComplianceSetting.config file.
Refer to Configuring to Scan User Profiles for details, and then select the corresponding User Profile
Service node, and configure the related plan settings to scan the user properties and notes.
152
Compliance Guardian Installation and Administration User Guide
Figure 17: User Profile Service node in Compliance Scanner.
Using Plan Builder to Perform a Compliance Guardian Scanner Plan for
SharePoint
Use the Plan Builder to set up a Compliance Scanner plan. To use Plan Builder, complete the following
steps:
1. After selecting the scope for the compliance scan, select Plan Builder on the ribbon of
Compliance Scanner page.
2. From the drop-down menu, select Wizard Mode for step-by-step guidance during configuration,
or select Form Mode (recommended for advanced users only) to set up a plan quickly.
Refer to the following section that is applicable to your choice for information about performing a
Compliance Scanner plan.
Performing a Compliance Scanner Plan in Wizard Mode
Wizard Mode provides you with step-by-step guidance on how to configure a new plan. To configure a
plan using Wizard Mode, complete the following steps:
*Note: An asterisk (*) in the user interface indicates a mandatory field or step.
1. Enter a Plan Name and an optional Description if desired. Select Next. The Report Settings page
appears.
Compliance Guardian Installation and Administration User Guide
153
2. Configure the report settings:
•
Database Policy ─ Select a database policy from the drop-down list to store the result
data of the Compliance Scanner job. If you want to set up a new database policy, select
the New Database Policy link in the drop-down list. Refer to Configuring Database Policy
for more information.
•
Report Group ─ Select a Compliance Guardian group from the drop-down list. Once a
group is specified as the Report Group, all of the users in the specified group will be able
to view and download the reports in the Compliance Report module. Multiple groups
can be specified here; choose Select All to select all of the listed groups.
Select Next. The Scan Settings page appears.
3. Configure the scan settings:
•
Scan Policy ─ Select a scan policy from the drop-down list and it will be used to scan the
contents in the specified scope. Only one scan policy can be selected here.
•
Content Option ─ Specify the contents that will be scanned within the specified scope.
•
o
Include user content ─ This checkbox is selected by default, and only the
documents and items that are created by the end users will be scanned in the
specified scope.
o
Include system content ─ Select this checkbox to also scan the system built-in
contents in the specified scope.
Scan File/Item Versions – Specify the method of scanning file/item versions:
o
Scan the current version – Only the current versions of the files/items defined
in the job scope are supported to be scanned.
o
Scan all versions – The files/items and all their previous versions defined in the
job scope are supported to be scanned. If this option is selected, the scan result
of each file/item version will be reported in the Compliance Guardian report
separately.
•
Filter Policy ─ Specify a filter policy to filter the contents that will be scanned. By
default, the default filter policy is used, and all of the types of documents/items
supported by Compliance Guardian are included in this default filter policy. If you want
to set up a new filter policy, select the New Filter Policy link in the drop-down list. Refer
to Configuring Filter Policies for more information.
•
Alert ─ Specify whether to send out an alert e-mail when an unsupported type of
embedded file is found. An embedded file is one file that is inserted to another file. If
the type of the embedded file is supported by Compliance Scanner, it can be scanned as
usual. However, if the type of the embedded file is not supported by Compliance
Scanner, it cannot be scanned.
If you choose to send out alert e-mails when unsupported embedded files are found,
configure the recipients by selecting the corresponding checkboxes. You must select a
154
Compliance Guardian Installation and Administration User Guide
default e-mail template before select the recipients. Select the New Notification
Template link to create a new template.
o
Creator e-mail template ─ Select this checkbox to send an alert e-mail to the
creator of the specified file where unsupported embedded files are found. If this
option is selected, you must select an e-mail template from the corresponding
drop-down list. If you do not select an e-mail template, Compliance Guardian
will use the default e-mail template.
o
Modifier e-mail template ─ Select this checkbox to send an alert e-mail to the
last modifier of the specified file where unsupported embedded files are found.
If this option is selected, you must select an e-mail template from the
corresponding drop-down list. If you do not select an e-mail template,
Compliance Guardian will use the default e-mail template.
o
User in the selected notification profile ─ Select this checkbox to send an alert
e-mail to the recipients configured in the selected alert notification profile. If
this option is selected, you must select an alert notification profile from the
appeared drop-down list. You can also select the New Notification Profile link
to create a new notification profile. For more information, refer to User
Notification Settings.
*Note: Even though there may be more than one embedded file in one file, the alert email will only be sent when the first unsupported embedded file is found. The rest of the
content in the file where the embedded file resides will be skipped and will not be
scanned.
After configuring the recipients, choose one e-mail template from the E-mail template dropdown list; you can also select the New E-mail template link to create a new e-mail template. For
more information, refer to Configuring E-mail Templates.
Select Next. The Schedule page appears.
4. Configure the schedule settings:
•
No schedule ─ Select this option to run the plan immediately and save the plan in Plan
Manager.
•
Configure the schedule myself ─ Select this option to configure a customized schedule,
and run the Compliance Scanner job by schedule. Select Add Schedule to set up a
schedule. The Add Schedule window appears. In the Options section, select a scan type
from the drop-down list. For more information, refer to Scan Schedule.
Select Next. The Advanced page appears.
5. Configure the advanced settings:
•
Agent Group ─ Select the agent group that will perform the Compliance Scanner job.
•
Notification ─ Configure the e-mail notification settings.
Compliance Guardian Installation and Administration User Guide
155
Scan Result – Select this checkbox to configure to send an e-mail to the
specified users. The e-mail contains the scan result including the failed files
and/or passed files.
Scope Level – Select a scope level. The scan result will be reported
based on each level in the e-mail.
Report Level – Select to have the failed files and passed files included in
the e-mail.
Receiver – Configure the receiver. Select E-mail Address, and then
select Add a Notification Address. Enter the address to which the e-mail
will be sent, and select a corresponding e-mail template; Select
SharePoint Group, and then select Add a SharePoint Group. Enter the
SharePoint group whose users will receive the e-mail, and then enter
the corresponding e-mail template. Note that the SharePoint group
must exist in the selected SharePoint scope.
Select Add a Notification Address or Add a SharePoint Group again to
add more addresses or groups. Select the delete (
an address or group.
) button to delete
Job Report – Select this checkbox to configure to send an e-mail with the job
information. Then, Select a previously-configured notification profile from the
Select a profile with address only drop-down list, or choose to create a new email notification profile by selecting the New Notification Profile link. Select
View to view the detailed configuration of the selected notification profile. For
more information on configuring the e-mail notification profiles, refer to
Configuring Receive E-Mail Settings.
•
User Profiles Filter – This option appears only when you select the User Profile Service
node in the tree. Configure this option if you want to filter the user profiles. Select
download a template to download the template file which is used for filtering user
profiles. Edit the file according to your own requirement and then select Upload to
upload the configured file. Refer to Editing Template File for Filtering User Profiles for
details about editing the template file.
Select Next. The Overview page appears.
6. Review and edit the plan configurations. To make changes, select the Edit button next to the
name of the each configuration field to jump to the corresponding setting page and edit the
configuration.
7. Once you are satisfied with the plan settings, choose one finishing option at the lower-right
section of the screen. Select Finish to save the configuration of the plan without running it or
Finish and Run Now to save the configuration and then run the saved plan immediately.
Scan Schedule
Configure the following settings to build a new Compliance Scanner schedule in the Add Schedule popup window:
156
Compliance Guardian Installation and Administration User Guide
•
Options ─ Select a scan type from the drop-down list.
o
Full Scan ─ Run a full scan of all of the documents and items in the specified
scope. Unlike incremental scan, all full scans are independent of one another
and do not have any dependencies on the other’s scan results. However,
because each of the full scans is comprehensive, full scan jobs take the longest
to complete of the two available options.
o
Incremental Scan ─ Run a fractional scan. It scans only the updated documents
and items since the last successful full scan or incremental scan. This kind of
scan requires less storage than a full scan and it reduces the execution time of
the scan job. However, it is important to note that for each incremental scan,
the latest full scan job in the full scan cycle must be available. If the incremental
scan is based on a former incremental scan job, the former incremental scan
must also be available.
If selecting Incremental Scan, the Reference Time option is available for
configuration.
Reference Time – Choose whether to scan contents created or modified
at a specified interval. If you choose to use a reference time, specify the
time to scan contents created or modified. Enter an integer into the
textbox and select Minute(s), Hour(s), Day(s), or Month(s) from the
drop-down list.
*Note: It is recommended that you specify a reference time when the
recurrence schedule configured in Range of Recurrence is End after 1
occurrence.
•
Schedule Settings ─ Set up the frequency for the scheduled Compliance Scanner job.
Select one time unit from Minute(s), Hour(s), Day(s), Week(s), and Month(s), and then
enter an integer into the text box. The scheduled Compliance Scanner job will be run
according to the interval configured here.
•
Range of Recurrence ─ Select the start time and end time for the schedule.
o
Start time – Set up the time to start the Compliance Scanner plan and modify
the time zone as required.
*Note: The start time cannot be earlier than the current time.
o
No end date – Select this option to repeat running the plan until being stopped
manually.
o
End after specified occurrence(s) – Select this option to stop the plan
automatically after the specified occurrences that you configure in the text box.
o
End by – Set up the time to end the recurrence of scheduled Compliance
Scanner plans.
Compliance Guardian Installation and Administration User Guide
157
Performing a Compliance Scanner Plan in Form Mode
Form Mode is recommended for users who are familiar with building Compliance Scanner plans. To
build a Compliance Scanner plan in Form Mode, select the scan scope, and then select Plan Builder >
Form Mode. Refer to Performing a Compliance Scanner Plan in Wizard Mode for detailed information
regarding each option.
*Note: If this is your first time building a plan, or if you think you would benefit from descriptions of
each plan component, it is recommended that you use the Wizard Mode.
Editing Template File for Filtering User Profiles
The following is the template file used for filtering the user profiles.
Figure 18: Filtering user profiles template file.
To edit the template file, complete the following steps:
Open the template file using Notepad.
Edit or both of the following nodes as necessary:
•
Edit the value of the <includelist> node. Specify the username in the format
domain\username. The related user profile will be scanned. You can enter multiple
usernames, use the semicolon (;) as the separator.
•
Edit the value of the <excludelist> node. Specify the username in the format
domain\username. The related user profile will be scanned. You can enter multiple
usernames, use the semicolon (;) as the separator.
Save the file.
Compliance Guardian Scanner for File System
The File System Mode allows you to configure a connection with a location and then perform a scan job
using the defined scan policy to generate the compliance scan results of all of the files within that
specified location. The users in the specified Report Group can then view the compliance scan results in
the Compliance Report module.
158
Compliance Guardian Installation and Administration User Guide
Launching Compliance Guardian Scanner File System Mode
On the Compliance Guardian Scanner Home interface, select Create on the ribbon. A drop-down list
appears. Select File System from the drop-down list, and you will be brought to the Compliance
Guardian Scanner File System Mode.
Selecting the Scan Scope
After launching the Compliance Scanner File System mode, the Scope panel on the left of the screen
displays all of the pre-configured connections. Select one or more connections. The files in the
connected locations will be scanned.
Using Plan Builder to Perform a Compliance Guardian Scanner Plan for File
System
Use the Plan Builder to set up a Compliance Scanner plan. To use Plan Builder, complete the following
steps:
1. After selecting the connections for the compliance scan, select Plan Builder on the ribbon of
Compliance Scanner page.
2. From the drop-down menu, select Wizard Mode for step-by-step guidance during configuration,
or select Form Mode (recommended for advanced users only) to set up a plan quickly.
Refer to the section below that is applicable to your choice for information about performing a
Compliance Scanner plan.
Performing a Compliance Scanner Plan in Wizard Mode
Wizard Mode provides you with step-by-step guidance on how to configure a new plan. To configure a
plan using Wizard Mode, complete the following steps:
*Note: An asterisk (*) in the user interface indicates a mandatory field or step.
1. Enter a Plan Name and an optional Description if desired. Select Next. The Report Settings page
appears.
2. Configure the report settings:
•
Database Policy ─ Select a database policy from the drop-down list to store the result
data of the Compliance Scanner job. If you want to set up a new database policy, select
the New Database Policy link in the drop-down list. Refer to Configuring Database Policy
for more information.
•
Report Group ─ Select a Compliance Guardian group from the drop-down list. Once a
group is specified as the Report Group, all of the users in the specified group will be able
to view and download the reports in the Compliance Report module. Multiple groups
can be specified here; choose Select All to select all of the listed groups.
Compliance Guardian Installation and Administration User Guide
159
Select Next. The Scan Settings page appears.
3. Configure the scan files settings:
•
Scan Policy ─ Select a scan policy from the drop-down list and it will be used to scan the
contents in the specified scope. Only one scan policy can be selected here.
•
Scan Hidden Files Option ─ Select whether or not to scan the hidden files in the
specified file system.
•
Filter Policy ─ Specify a filter policy to filter the contents that will be scanned. By
default, the default filter policy is used, and all of the types of documents/items
supported by Compliance Guardian are included in this default filter policy. If you want
to set up a new filter policy, select the New Filter Policy link in the drop-down list. Refer
to Configuring Filter Policies for more information.
•
Alert ─ If you want Compliance Guardian to send an e-mail when an error occurs during
the file scan, then select an e-mail profile to specify the users who will receive the email, and select an e-mail template. You can also select the New E-mail Template link to
create a new e-mail template. Refer to Configuring E-mail Templates for more
information.
*Note: Even though there may be more than one error when scanning a file, the alert email will only be sent when the first error occurs.
Select Next. The Schedule page appears.
4. Configure the schedule settings:
•
No schedule ─ Select this option to run the plan immediately and save the plan in Plan
Manager.
•
Configure the schedule myself ─ Select this option to configure a customized schedule,
and run the Compliance Scanner job by schedule. Select Add Schedule to set up a
schedule. The Add Schedule window appears. In the Options section, select a scan type
from the drop-down list. For more information, review to Scan Schedule.
Select Next. The Advanced page appears.
5. Configure the advanced settings:
•
Notification ─ Configure the e-mail notification settings. Select a previously-configured
notification profile from the Select a profile with address only drop-down list, or choose
to create a new e-mail notification profile by selecting the New Notification Profile link.
Select View to view the detailed configuration of the selected notification profile. For
more information on configuring the e-mail notification profiles, refer to Configuring
Receive E-Mail Settings.
Select Next. The Overview page appears.
6. Review and edit the plan configurations. To make changes, select the Edit button next to the
name of the each configuration field to jump to the corresponding setting page and edit the
configuration.
160
Compliance Guardian Installation and Administration User Guide
7. Once you are satisfied with the plan settings, choose one finishing option at the lower-right
section of the screen. Select Finish to save the configuration of the plan without running it or
Finish and Run Now to save the configuration and then run the saved plan immediately.
Scan Schedule
Configure the following settings to build a new Compliance Scanner schedule in the Add Schedule popup window.
•
Options ─ Select a scan type from the drop-down list.
o
Full Scan ─ Run a full scan of all of the documents and items in the specified
scope. Unlike incremental scan, all full scans are independent of one another
and do not have any dependencies on the other’s scan results. However,
because each of the full scans is comprehensive, full scan jobs take the longest
to complete of the two available options.
o
Incremental Scan ─ Run a fractional scan. It scans only the updated documents
and items since the last successful full scan or incremental scan. This kind of
scan requires less storage than a full scan and it reduces the execution time of
the scan job. However, it is important to note that for each incremental scan,
the latest full scan job in the full scan cycle must be available. If the incremental
scan is based on a former incremental scan job, the former incremental scan
must also be available.
If selecting Incremental Scan, the Reference Time option is available for
configuration.
Reference Time – Choose whether to scan contents created or modified
at a specified interval. If you choose to use a reference time, specify the
time to scan contents created or modified. Enter an integer into the
textbox and select Minute(s), Hour(s), Day(s), or Month(s) from the
drop-down list.
*Note: It is recommended that you specify a reference time when the
recurrence schedule configured in Range of Recurrence is End after 1
occurrence.
•
Schedule Settings ─ Set up the frequency for the scheduled Compliance Scanner job.
Select one time unit from Minute(s), Hour(s), Day(s), Week(s), and Month(s), and then
enter an integer into the text box. The scheduled Compliance Scanner job will be run
according to the interval configured here.
•
Range of Recurrence ─ Select the start time and end time for the schedule.
o
Start time – Set up the time to start the Compliance Scanner plan and modify
the time zone as required.
*Note: The start time cannot be earlier than the current time.
Compliance Guardian Installation and Administration User Guide
161
o
No end date – Select this option to repeat running the plan until being stopped
manually.
o
End after specified occurrence(s) – Select this option to stop the plan
automatically after the specified occurrences that you configure in the text box.
o
End by – Set up the time to end the recurrence of scheduled Compliance
Scanner plans.
Performing a Compliance Scanner Plan in Form Mode
Form Mode is recommended for users who are familiar with building Compliance Scanner plans. To
build a Compliance Scanner plan in Form Mode, select the scan scope, and then select Plan Builder >
Form Mode. Refer to Performing a Compliance Scanner Plan in Wizard Mode for detailed information
regarding each option.
*Note: If this is your first time building a plan, or if you think you would benefit from descriptions of
each plan component, it is recommended that you use the Wizard Mode.
Compliance Guardian Scanner for Website
The Website Mode allows you to perform a scan job using the defined scan policy to generate the
compliance scan results of all of the scanned websites. The users in the specified Report Group can then
view the compliance scan results in the Compliance Report module.
Launching Compliance Guardian Scanner in Website Mode
On the Compliance Guardian Scanner Home interface, select Create on the ribbon, and a drop-down list
appears. Select Website from the drop-down list, and you will be brought to the Compliance Guardian
Scanner Website Create Plan interface.
Using Plan Builder to Perform a Compliance Guardian Scanner Plan for
Website
In the Create Plan interface, configure the following settings for creating a Compliance Guardian
Website Scanner plan.
In the What do you want to scan? field:
•
162
Start From – Enter a URL, Compliance Guardian will scan the objects from this URL.
Optionally, you can select to use the Compliance Guardian Transaction Capture tool to
save a transaction file, and select the Use Compliance Guardian Transaction Capture.
Export the following transaction file for the scan radio button in this interface to
import a transaction file, then the recorded URLs in the transaction file will be the start
URLs. For more information on the Compliance Guardian Transaction Capture tool, refer
to Using Compliance Guardian Transaction Capture.
Compliance Guardian Installation and Administration User Guide
•
Maximum Depth – It’s used to specify the depth level needed to crawl. For example: If
you enter 1, Compliance Guardian will only crawl the start URL specified and scan the
objects in the URL. If you enter 3, Compliance Guardian will crawl the start URL
specified, the linked pages on the start URL page, and the linked pages from the pages
one level deeper. If you want to scan all the pages of an entire website, you can enter 0.
•
Maximum Pages – Specify the maximum pages allowed to crawl in a single job. -1
means unlimited. If you enter 100, Compliance Guardian will stop the job after it scans
100 pages in the website.
•
Filter Policy – Specify a defined filter policy to limit the scope of the scan job. Filter
policies are defined in Control Panel.
*Note: The filter policy still takes effect on scanning the recorded results in the
transaction file.
•
Follow Robot Exclusion Protocol – Select whether or not to follow Robot Exclusion
Protocol. By default, the checkbox is selected, which means that Compliance Guardian
will not crawl any link that is forbidden to access in Robot.txt.
•
Allow crawling redirections--Maximum Redirections allowed [] – Select whether or not
to allow crawling redirections. If you want to allow crawling redirections, specify the
maximum redirections allowed for one page. By default, the checkbox is selected, and
the default maximum allowed redirections are 10.
In the What policy do you want to use for scanning this website? field:
•
Select a Predefined Scan Policy – Specify a scan policy for scanning the defined site.
Select View beside the drop-down list to view details of the scan policy, or select New
Scan Policy from the drop-down list. For information on creating a scan policy, refer to
Creating or Editing Scan Policies.
In the How do you want to scan this website? field:
•
User Agent – Select the saved user agent profile to specify the user agent for the
backend web server when scanning the website. A pre-defined user agent profile can be
used directly. Select New User Agent to create a new user agent profile.
•
Authentication Method – Select the Authentication Profile used to connect to the
website.
•
Maximum Concurrent Threads – Allow user to specify the maximum concurrent threads
that can be used during the crawling job for the scan. If you select Breadth-first in Crawl
Mode, the default value of Maximum Concurrent Threads is 2; if you select Depth-first
in Crawl Mode, the default value of Maximum Concurrent Threads is 1.
•
Time Out of One Scan – Specify the maximum time of one entire scan job. The default
value is 24 hours.
•
Time Out of Link – Specify the maximum time of waiting for a response from a link
before skipping it during a crawl. The default value is 100 seconds.
Compliance Guardian Installation and Administration User Guide
163
*Note: By default, the crawl mode is Depth First. If you want to change the crawl mode,
you can go to the machines with Compliance Guardian Manager installed and open
the …\Compliance Guardian\Manager\Control\Config directory to find the
ComplianceSetting.config file. In the configuration file, find the DepthFirst="true" node.
True means Depth First (scans child nodes from the current node first). False means
Breadth First (scans sibling nodes from the current node, and the scan will only continue
to a lower level after the scan finishes on all the pages of one level).
•
Enable headless browser – Select whether or not to crawl the data that are loaded
dynamically using JavaScript. If you select Yes, then specify the delayed time to wait for
loading data in a webpage.
In the Where do you want to output the report data and who do you want to share the reports with?
field:
•
Select a Predefined Database Policy – Select a database policy to store the scan job
data. Database policy also includes the retention settings for the scan data.
•
Report Group – Select a Compliance Guardian report group from the drop-down list.
Once a group is specified as the Report Group, all of the users in the specified group will
be able to view and download the reports in the Compliance Report module. Multiple
groups can be specified here; choose Select All to select all of the listed groups.
In the How do you want to execute the scan? field:
•
Set a start time and/or intervals to return the scan automatically – Optionally, select
this checkbox and then choose a scheduling option:
o
No schedule – Select this option to configure the job to not run on a schedule
(the job must be manually initiated).
o
Configure the schedule myself – Configure a customized schedule, and run the
plan by schedule.
Select Add Schedule and the Add Schedule window pops up. Configure the
following settings for the schedule:
Options – Select the type of the scan for this plan: Full Scan or
Incremental Scan. Full Scan scans all of the content in the scope defined
in the plan, while Incremental Scan only scans the content that has been
modified since the last incremental or full scan job.
If selecting Incremental Scan, the Reference Time option is enabled.
164
Reference Time – Choose whether to scan contents created or modified
at a specified interval. If you choose to use a reference time, specify the
time to scan contents created or modified. Enter an integer into the
textbox and select Minute(s), Hour(s), or Day(s) from the drop-down
list.
Compliance Guardian Installation and Administration User Guide
*Note: It is recommended specifying a reference time when the
recurrence schedule configured in Range of Recurrence is End after 1
occurrence.
Schedule Settings – Specify the frequency to run the rerunning
schedule. Enter an integer into the text box and select Minute(s),
Hour(s), Day(s), Week(s), or Month(s) from the drop-down list.
Range of Recurrence – Specify when to start and end the running
recurring schedule.
−
Start time – Set up the time to start the plan and Time Zone can
be changed under the Start time.
*Note: The start time cannot be earlier than the current time.
−
No end date – Select this option to repeat running the plan until
being stopped manually.
−
End after specified occurrence(s) – Select this option to stop
the plan after specified occurrences that you configure in the
text box.
−
End by – Set up the time to end the recurrence of plans.
Select OK to save the settings. After configuring the schedule for this replication
job, select Calendar View to view the job in a calendar view.
•
Select an agent group to so that the system will pick a free agent to execute the scan
job – Select an agent group, or select New Agent Group to create an agent group.
In the What do you want to name the plan and do you want to be notified by e-mail? field:
•
Plan Name – Enter a name for the plan.
•
Description – Enter an optional description for this plan.
Then select whether or not to receive the job report after a scan job finishes. If you
want to receive the job report, select the checkbox before E-mail me the job report and
scan results, and then select a notification profile. Select New Notification Profile to
create to new notification profile.
Scanning Gmail
Compliance Guardian supports scanning the content in Gmail through Compliance Guardian Scanner for
Website.
You must configure the following settings for creating a plan to scan the content in Gmail:
•
Start From – Enter the following URLs to scan the content in Gmail.
Compliance Guardian Installation and Administration User Guide
165
https://mail.google.com/mail/h/?&s=a – Enter this URL to scan all of the e-
mail content in Gmail.
https://mail.google.com/mail/h/?&s=s – Enter this URL to scan all of the sent
e-mail content in Gmail.
https://mail.google.com/mail/h/?& – Enter this URL to scan all of the e-mail
content in Inbox of Gmail.
https://mail.google.com/mail/h/?&d=a – Enter this URL to scan all of the
drafts in Gmail.
https://mail.google.com/mail/h/?&m=a – Enter this URL to scan all of the junk
e-mails in Gmail.
https://mail.google.com/mail/h/?&t=a – Enter this URL to scan all of the
deleted e-mails in Gmail.
•
Scan Policy – Specify a scan policy for scanning the defined URL. Select View beside the
drop-down list to view details of the scan policy, or select New Scan Policy from the
drop-down list. The following type of checks are not supported for scanning Gmail:
LinkValidation
FileProperty
FindFile
Cookie
SSL
•
Maximum Pages – Specify the maximum e-mail numbers allowed to crawl in a single
job. -1 means unlimited. If you enter 100, Compliance Guardian will stop the job after it
scans 100 e-mails and the related index pages.
•
User Agent – Select the saved user agent profile to specify the user agent for the
backend web server when scanning Gmail content. Compliance Guardian recommends
you to use the default user agent profile Compliance Scanner for Website.
•
Enable headless browser – You must select the Yes radio button to scan Gmail content.
For other settings in creating a plan, refer to Using Plan Builder to Perform a Compliance Guardian
Scanner Plan for Website for more details.
Select Save to save the plan, select Save and Run Now to run the plan immediately, or you can select
Cancel to exit the Create Plan interface without any changes.
166
Compliance Guardian Installation and Administration User Guide
Compliance Guardian Scanner for Lync
The Lync Mode allows you to configure an archiving plan that is used to archive the Lync content from a
Lync server. You can then scan that content using a defined scan policy. The feature also allows you to
search the archived content.
Launching Compliance Guardian Scanner Lync Mode
From the Compliance Guardian Scanner interface, select Create on the ribbon. Select Lync from the
drop-down list. You will be redirected to the Compliance Guardian Scanner Lync Mode.
Configuring Archiving Plans
In the Compliance Guardian Scanner Lync mode or in the Compliance Guardian Scanner home page,
select Configure Archiving on the ribbon, the Configure Archiving interface appears.
You can perform the following actions to the plan:
•
Create – Create a new archiving plan. For detailed information on creating a plan, refer
to Creating and Editing an Archiving Plan.
•
View Details – View detailed settings of the selected archiving plan.
•
Edit – Edit the settings of the selected archiving plan. For detailed information on
editing a plan, refer to Creating and Editing an Archiving Plan.
•
Delete – Delete the selected archiving plans.
•
Enable – Enable the selected archiving plans.
•
Disable – Disable the selected archiving plans.
•
Run Now – Run the selected archiving plans immediately. You can select Job Monitor on
the ribbon to view the job details.
Select Job Monitor to view the job information. Select Close to close the interface.
Creating and Editing an Archiving Plan
Refer to the following steps to create or edit an archiving plan:
Select Create > Lync in the Manage group on the Configure Archiving interface. To modify an
existing plan, select the plan, and then select Edit on the ribbon.
In the Create or Edit interface, select the Lync server in the left pane. Then expand the Lync
server to the pool node. Select a pool you want to archive.
Configure the following settings in the right pane:
•
Plan Name – Enter a Plan Name and an optional Description.
Compliance Guardian Installation and Administration User Guide
167
•
Archiving Data Storage – Select the export location to store the archived file with the
archived Lync content. You can select the Enable Archived Data Retention checkbox
and then enter a number and select a unit in Keep the latest _ Months/Weeks/Days
archived data to define the range in which the archived data will be kept. Then select an
archiving database to store the archived data records used to locate the data under the
export location.
•
Full Text Index – Select the checkbox to enable full text index for users searching the
Lync content.
•
Search Group – Select a Compliance Guardian group from the drop-down list. Once a
group is designated as the Search Group, all of the users in the group will be able to use
the Search function to search the desired archived content. Multiple groups can be used
here; choose Select All to select all of the listed groups.
*Note: Users who are not part of the search group cannot search archived content.
Select Advanced to configure the advanced settings:
•
Notification –Select a notification profile from the Select a profile with address only
drop-down list, or choose to create a new e-mail notification profile by selecting the
New Notification Profile link. Select View to view the detailed configuration of the
selected notification profile.
•
Agent Group – Select the agent group that will perform the job.
•
Security Profile – Select a security profile for encrypting the archived content. Select
New Security Profile to create a new security profile. For more information, refer to
Security Profile.
•
Data Compression – Select the checkbox to enable data compression, then choose a
compression level using the slider. A low compression level results in a faster
compression rate but a larger data set, while a high compression level results in a slower
compression rate but a smaller, better quality data set.
•
Schedule – Configure a schedule.
No schedule – Select this option to configure the job and run manually.
Configure the schedule myself – Select this option to configure a customized
schedule. Select Add Schedule to set up a schedule. The Add Schedule window
appears. In the Options section, select a scan type from the drop-down list. For
more information, refer to Scan Schedule.
Select Save to save the archiving plan; select Save and Run Now to save the plan and run
immediately; select Cancel to exit the interface without saving any changes. If you edit a plan,
select Save As to save the updated plan.
Searching Lync Content
Compliance Guardian allows you to scan Lync content archived in the archiving plans.
168
Compliance Guardian Installation and Administration User Guide
Select the Search button on the ribbon of the Compliance Scanner home page to go to the Search
interface.
Refer to the following steps to search the Lync content:
Select the archiving plans you want to search in the left pane.
Enter the keyword in the search box of the right pane, and then select Search.
You can also use the Advanced search by selecting Advanced. The Configure Advanced Search
Settings window appears.
Select Add a Criterion to add a new rule of the selected category level. Configure the following
fields for the rule:
•
Rule – Select the new rule you want to create from the drop-down list.
•
Condition – Select the condition for the rule.
•
Value – Specify a value you want the rule to use in the text box.
Select the delete (
) button to delete a rule that is no longer needed.
The filter rule contains the following rule levels:
•
Initiator – Filter according to the initiator of the Lync conversation. If you select Initiator
as the rule, after you select the value link, a window appears. You can add criterion to
specify a rule, condition, and value to filter the desired users. Then, select Save to save
your configuration.
•
Participants – Filter according to the participants of the Lync conversation. If you select
Participants as the rule, after you select the value link, a window appears. You can add
criterion to specify a rule, condition and value to filter the desired users. Then, select
Save to save your configuration.
•
Subject – Filter according to the subject of the Lync conversation.
•
Start Time – Filter according to the start time of the Lync conversation.
•
End Time – Filter according to the end time of the Lync conversation.
•
Conversation Type – Filter according to the Lync conversation type.
•
Modes – Filter according to the Lync conversation mode.
•
Attachment Name – Filter according to the name of the attachment sent in a Lync
conversation.
•
Attachment Size – Filter according to the size of the attachment sent in a Lync
conversation.
•
Attachment Initiator – Filter according to the attachment initiator. If you select
Attachment Initiator as the rule, after you select the value link, a window appears. You
can add criterion to specify a rule, condition and value to filter the desired users. Then,
select Save to save your configuration.
Compliance Guardian Installation and Administration User Guide
169
Select Add a Criterion again to add more rules.
*Note: Depending on the rules you enter, you can change the order of the rules by selecting the
down arrow ( ) before the Rule value, and then select the order of the rule from the dropdown list to determine the priority of the rule.
You can also change the logical relationships between the rules. There are currently two logical
relationships: And and Or. The logic is set to And. To change the logical relationship, selecting
the down arrow ( ) after the And/Or value. The And logical relationship means that the
content which meets all of the rules will be filtered and included in the result. The Or logic
means that the content which meets any one of the rules will be filtered and included in the
result.
Select Search in the Configure Advanced Search Settings window to search the desired Lync
content.
The results of the search will be displayed in the right pane of the Search interface. Select Current Page
will display all the available conversations. Select All will display all the searched conversations and Clear
All will clear the results.
Select a conversation, to view more details on the conversation. The View Details window appears. You
can export the conversation to an EDRM file, a Concordance file or an HTML file.
Exporting Lync Data
The Lync content that has been searched can be exported to an EDRM file, a Concordance file, or an
HTML file into another location. For more information on configuring the export location, refer to
Configuring Export Settings.
Refer to the following steps to export the Lync data:
Select the searched Lync conversations that you want to export, the Export button is enabled on
the ribbon.
Select Export, then select Export to EDRM, Export to Concordance, or Export to HTML. A
window appears. Enter a request name and then select OK. For more information on the export
requests, refer to Export Requests.
Configuring Export Settings
Select Configure Export Settings on the ribbon to configure the location where the searched Lync
content will be stored, and to configure the pruning rules in the location.
170
•
Report Location – Select a location to store the exported Lync content from the dropdown list. You can select New Export Location to create a new export location.
•
Pruning Rules – Configure the pruning rules.
Compliance Guardian Installation and Administration User Guide
No Pruning – Select this radio button, all of the exported Lync content files will
not be pruned.
Keep the latest _ reports – Select this radio button and enter the number of
reports that you want to keep in the location, the other files will be pruned.
Keep the latest _ Days/Weeks/Months of reports – Select this radio button and
then enter a time range, the files exported during the entered time range will be
kept.
Select Save to save the settings in the Configure Export Settings window, or select Cancel to exit the
window without saving any changes.
Export Requests
Select Export Requests on the ribbon. All of the export requests are displayed in the Export Requests
window.
The following information is displayed:
•
Request ID – The ID of the request.
•
Request Name ─ The name of your report downloading request.
•
Category ─ The type of exported file.
•
Progress ─ The progress of the exporting process.
•
Status ─ The status of your export request.
•
Start Time ─ The start time of the report exporting process.
•
Finish Time ─ The finish time of the report exporting process.
The following actions can be performed in the Export Requests page:
•
Download ─ Select one request, and then select Download to download the file.
•
Delete ─ Select one or several requests, and then select Delete to delete the requests
from the requests’ list.
•
Stop ─ Select one request, and then select Stop to stop the report generating process.
•
Restart ─ Select one request, and then select Restart to restart the report generating
process.
Selecting the Scan Scope
After launching the Compliance Scanner Lync mode, the Scope panel on the left of the screen displays all
of the archiving plans. Select one or more plans. The data archived in the archiving plan will be scanned.
Compliance Guardian Installation and Administration User Guide
171
Using Plan Builder to Perform a Compliance Guardian Scanner Plan for
Lync
Use the Plan Builder to set up a Compliance Scanner plan. To use Plan Builder, complete the following
steps:
1. After selecting the archiving plans, select Plan Builder on the ribbon of the Compliance Scanner
page.
2. From the drop-down menu, select Wizard Mode for step-by-step guidance during configuration,
or select Form Mode (recommended for advanced users only) to set up a plan quickly.
Refer to the section below that is applicable to your choice for information about performing a
Compliance Scanner plan.
Performing a Compliance Scanner Plan in Wizard Mode
To configure a plan using Wizard Mode, complete the following steps:
*Note: An asterisk (*) in the user interface indicates a mandatory field or step.
1. Enter a Plan Name and an optional Description. Select Next. The Report Settings page appears.
2. Configure the report settings:
•
Database Policy ─ Select a database policy from the drop-down list to store the results
of a Compliance Scanner job. If you want to set up a new database policy, select the
New Database Policy link in the drop-down list.
•
Report Group ─ Select a Compliance Guardian group from the drop-down list. Once a
group is selected, all of the users in the group will be able to view and download the
reports in the Compliance Report module. Multiple groups can be selected. Choose
Select All to select all of the listed groups.
Select Next. The Scan Settings page appears.
3. Configure the scan settings:
•
Scan Policy ─ Select a scan policy from the drop-down list.
•
Filter Policy ─ Select a filter policy. If you want to set up a new filter policy, select the
New Filter Policy link in the drop-down list. Refer to Configuring Filter Policies for more
information.
•
Alert ─ If you want Compliance Guardian to send an e-mail alert when an error occurs
during a scan, select an e-mail profile to determine the users who will receive the email, and select an e-mail template. You can also select the New E-mail Template link to
create a new e-mail template.
Select Next. The Schedule page appears.
4. Configure the schedule settings:
172
Compliance Guardian Installation and Administration User Guide
•
No schedule ─ Select this option to run the plan immediately and save the plan in Plan
Manager.
•
Configure the schedule myself ─ Select this option to configure a customized schedule.
Select Add Schedule to set up a schedule. The Add Schedule window appears. In the
Options section, select a scan type from the drop-down list. For more information,
review to Scan Schedule.
Select Next. The Advanced page appears.
5. Configure the advanced settings:
•
Agent Group – Select the agent group that will perform the job.
•
Notification ─ Configure the e-mail notification settings. Select a notification profile
from the Select a profile with address only drop-down list, or choose to create a new email notification profile by selecting the New Notification Profile link. Select View to
view the detailed configuration of the selected notification profile. For more
information on configuring the e-mail notification profiles, refer to Configuring Receive
E-Mail Settings.
Select Next. The Overview page appears.
6. Review and edit the plan configurations. To make changes, select the Edit button next to the
name of the setting you wish to edit.
Select Finish to save the configuration of the plan without running it or Finish and Run Now to save the
configuration and then run the saved plan immediately.
Performing a Compliance Scanner Plan in Form Mode
Form Mode is recommended for users who are familiar with building Compliance Scanner plans. To
build a Compliance Scanner plan in Form Mode, select the scan scope, and then select Plan Builder >
Form Mode. Refer to Performing a Compliance Scanner Plan in Wizard Mode for detailed information
regarding each option.
*Note: If this is your first time building a plan, or if you think you would benefit from descriptions of
each plan component, it is recommended that you use the Wizard Mode.
Compliance Guardian Installation and Administration User Guide
173
Compliance Guardian Scanner for Database
The Database Mode allows you to configure a connection with a database and then perform a scan job
using the defined scan policy to generate the compliance scan results of the scanned content in the
database. The users in the specified Report Group can then view the compliance scan results in the
Compliance Report module.
Launching Compliance Guardian Scanner in Database Mode
On the Compliance Guardian Scanner Home interface, select Create on the ribbon, and a drop-down list
appears. Select Database from the drop-down list, and you will be brought to the Compliance Guardian
Scanner Website Create Plan interface.
Selecting the Scan Scope
After launching the Compliance Scanner Database mode, the Scope panel on the left of the screen
displays all of the connections. Select the database connection, the tables in the connected database
will load. Select the tables or select the database connections, the content in the tables will be scanned.
Using Plan Builder to Perform a Compliance Guardian Scanner Plan for
Database
Use the Plan Builder to set up a Compliance Scanner plan. To use Plan Builder, complete the following
steps:
1. After selecting the scope for the compliance scan, select Plan Builder on the ribbon of
Compliance Scanner page.
2. From the drop-down menu, select Wizard Mode for step-by-step guidance during configuration,
or select Form Mode (recommended for advanced users only) to set up a plan quickly.
Refer to the following section that is applicable to your choice for information about performing a
Compliance Scanner plan.
Performing a Compliance Scanner Plan in Wizard Mode
Wizard Mode provides you with step-by-step guidance on how to configure a new plan. To configure a
plan using Wizard Mode, complete the following steps:
*Note: An asterisk (*) in the user interface indicates a mandatory field or step.
1. Enter a Plan Name and an optional Description if desired. Select Next. The Report Settings page
appears.
2. Configure the report settings:
•
174
Database Policy ─ Select a database policy from the drop-down list to store the result
data of the Compliance Scanner job. If you want to set up a new database policy, select
Compliance Guardian Installation and Administration User Guide
the New Database Policy link in the drop-down list. Refer to Configuring Database Policy
for more information.
•
Report Group ─ Select a Compliance Guardian group from the drop-down list. Once a
group is specified as the Report Group, all of the users in the specified group will be able
to view and download the reports in the Compliance Report module. Multiple groups
can be specified here; choose Select All to select all of the listed groups.
Select Next. The Scan Settings page appears.
3. Configure the scan settings:
•
Scan Policy ─ Select a scan policy from the drop-down list and it will be used to scan the
contents in the specified scope. Only one scan policy can be selected here.
•
Maximum Scanned Rows – Enter the maximum number of table rows that will be
scanned.
•
Alert ─ If you want Compliance Guardian to send an e-mail when an error occurs during
the scan, then select an e-mail profile to specify the users who will receive the e-mail,
and select an e-mail template. You can also select the New E-mail Template link to
create a new e-mail template. Refer to Configuring E-mail Templates for more
information.
*Note: Even though there may be more than one error when scanning a row in a
database table, the alert e-mail will only be sent when the first error occurs.
Select Next. The Schedule page appears.
4. Configure the schedule settings:
•
No schedule ─ Select this option to run the plan immediately and save the plan in Plan
Manager.
•
Configure the schedule myself ─ Select this option to configure a customized schedule,
and run the Compliance Scanner job by schedule. Select Add Schedule to set up a
schedule. The Add Schedule window appears. In the Options section, select a scan type
from the drop-down list. For more information, refer to Scan Schedule.
o
Full Scan – Run a full scan of all of the content in the selected table. Unlike
incremental scan, all full scans are independent of one another and do not have
any dependencies on the other’s scan results. However, because each of the full
scans are comprehensive, full scan jobs take the longest to complete of the two
available options.
o
Incremental Scan – Run a fractional scan. It scans only the updated content
since the last successful full scan or incremental scan. This kind of scan requires
less storage than a full scan and it reduces the execution time of the scan job.
However, it is important to note that for each incremental scan, the latest full
scan job in the full scan cycle must be available. If the incremental scan is based
on a former incremental scan job, the former incremental scan must also be
available.
Compliance Guardian Installation and Administration User Guide
175
If selecting Incremental Scan, the Reference Time option is enabled.
Reference Time – Choose whether to scan content generated or
modified at a specified interval. If you choose to use a reference time,
specify the time to scan contents generated or modified. Enter an
integer into the textbox and select Minute(s), Hour(s), Day(s), or
Month(s) from the drop-down list.
*Note: It is recommended that you specify a reference time when the
recurrence schedule configured in Range of Recurrence is End after 1
occurrence.
After configuring the schedule for the Compliance Scanner plan, select Calendar View to
view the scheduled jobs by Day, Week, or Month. All of the schedules will be displayed
in the Summary table. Select X to delete a schedule.
Select Next. The Advanced page appears.
5. Configure the advanced settings:
•
Notification ─ Configure the e-mail notification settings. Select a previously-configured
notification profile from the Select a profile with address only drop-down list, or choose
to create a new e-mail notification profile by selecting the New Notification Profile link.
Select View to view the detailed configuration of the selected notification profile. For
more information on configuring the e-mail notification profiles, refer to Configuring
Receive E-Mail Settings.
Select Next. The Overview page appears.
6. Review and edit the plan configurations. To make changes, select the Edit button next to the
name of the each configuration field to jump to the corresponding setting page and edit the
configuration.
7. Once you are satisfied with the plan settings, choose one finishing option at the lower-right
section of the screen. Select Finish to save the configuration of the plan without running it or
Finish and Run Now to save the configuration and then run the saved plan immediately.
Scan Schedule
Configure the following settings to build a new Compliance Scanner schedule in the Add Schedule popup window:
•
Options ─ Select a scan type from the drop-down list.
o
176
Full Scan ─ Run a full scan of all of the content in the specified scope. Unlike
incremental scan, all full scans are independent of one another and do not have
any dependencies on the other’s scan results. However, because each of the full
scans is comprehensive, full scan jobs take the longest to complete of the two
available options.
Compliance Guardian Installation and Administration User Guide
o
Incremental Scan ─ Run a fractional scan. It scans only the updated content
since the last successful full scan or incremental scan. This kind of scan requires
less storage than a full scan and it reduces the execution time of the scan job.
However, it is important to note that for each incremental scan, the latest full
scan job in the full scan cycle must be available. If the incremental scan is based
on a former incremental scan job, the former incremental scan must also be
available.
If selecting Incremental Scan, the Reference Time option is available for
configuration.
Reference Time – Choose whether to scan content generated or
modified at a specified interval. If you choose to use a reference time,
specify the time to scan content generated or modified. Enter an integer
into the textbox and select Minute(s), Hour(s), Day(s), or Month(s) from
the drop-down list.
*Note: It is recommended that you specify a reference time when the
recurrence schedule configured in Range of Recurrence is End after 1
occurrence.
•
Schedule Settings ─ Set up the frequency for the scheduled Compliance Scanner job.
Select one time unit from Minute(s), Hour(s), Day(s), Week(s), and Month(s), and then
enter an integer into the text box. The scheduled Compliance Scanner job will be run
according to the interval configured here.
•
Range of Recurrence ─ Select the start time and end time for the schedule.
o
Start time – Set up the time to start the Compliance Scanner plan and modify
the time zone as required.
*Note: The start time cannot be earlier than the current time.
o
No end date – Select this option to repeat running the plan until being stopped
manually.
o
End after specified occurrence(s) – Select this option to stop the plan
automatically after the specified occurrences that you configure in the text box.
o
End by – Set up the time to end the recurrence of scheduled Compliance
Scanner plans.
Performing a Compliance Scanner Plan in Form Mode
Form Mode is recommended for users who are familiar with building Compliance Scanner plans. To
build a Compliance Scanner plan in Form Mode, select the scan scope, and then select Plan Builder >
Form Mode. Refer to Performing a Compliance Scanner Plan in Wizard Mode for detailed information
regarding each option.
*Note: If this is your first time building a plan, or if you think you would benefit from descriptions of
each plan component, it is recommended that you use the Wizard Mode.
Compliance Guardian Installation and Administration User Guide
177
Compliance Reports
For details about Compliance Guardian reports and procedures for how to use them, refer to the
Compliance Guardian User Guide.
Getting Started
Refer to the sections below for important information on getting started with Compliance Report.
Launching Compliance Report
To launch Compliance Report, complete the following steps:
1. Log in to Compliance Guardian. If you are already in the software, select the home page button
( ) on the top left corner go to the home page. From the home page, all of the products are
displayed.
2. Select the Compliance Report to launch its interface.
3.
Alternatively, you can select Report on the top-left corner, and select the corresponding Report
tab on the appeared navigation bar to launch Compliance Scanner.
Figure 19: Compliance Guardian module launch window.
178
Compliance Guardian Installation and Administration User Guide
User Interface Overview
The Compliance Report Dashboard interface appears after you select Compliance Report in the home
page.
Figure 20: Compliance Report Dashboard interface.
This interface shows the scan results of the selected plan. This content is dynamic; it will often change
depending on what kind of report is selected.
You can select Report on the left corner of the page, and then select the kind of report that you want to
view on the appeared navigation bar.
Compliance Guardian Installation and Administration User Guide
179
Classification Manager
Classification Manager enables you to define a scan scope, and then it performs a job to scan out the
related contents according to the scan policy, at last it will perform the specified actions to the contents
scanned out.
*Note: Compliance Guardian supports scanning Microsoft Office files that are in a 2003 or earlier format
using iFilter in this version. If you are using an earlier version of Compliance Guardian or if you updated
to Compliance Guardian 3 SP 3 from an earlier version, you must download a compatibility pack and
download an update pack to scan the Microsoft Office files (can keep the file’s accessibility attributes). If
you prefer to scan these files through installing the compatibility pack but not through iFilter, you can
install Microsoft Office Compatibility Pack for Word, Excel, and PowerPoint File Formats, and install
Microsoft Office Compatibility Pack Service Pack 3 (SP3). Then, add the following node under the
OfficeFileMapping node in the configuration file ContentComplianceConfig.xml (you can find the file
under the path …\Compliance Guardian\Agent\Bin):
<NeedConvert>
<Extension>.xls</Extension>
</NeedConvert>
Figure 21: NeedConvert node.
The value in the Extension attribute is the extension of the file that you want to scan through the
compatibility pack.
180
Compliance Guardian Installation and Administration User Guide
Classification Manager includes the Real-Time Classification Scanner and Scheduled Classification
Scanner. Refer to Real-Time Classification Scanner and Scheduled Classification Scanner for more
information.
Real-Time Classification Scanner
The Real-Time Classification Scanner is used to scan contents, classify them, and then perform actions to
the scanned contents in real time. The Real-Time Classification Scanner rule must first be applied on the
desired scope before using Real-Time Classification Scanner to scan contents in the specified scope. For
more information, refer to Creating Real-Time Classification Scanner Rules. After you apply the RealTime Classification Scanner rule, the updated content in the defined scope will be scanned and dealt
with according to the specified rule in real time.
Pre-Configurations
Configuring Scan Policies
A scan policy defines the compliance rules to be used when scanning the contents in the specified scope.
To configure the scan policies, select the Real-Time Classification Scanner, select a data source, then
select Edit on the ribbon; or select Create, and select SharePoint or Social Network from the drop-down
list. Then, select Scan Policy.
Managing Scan Policies
The Scan Policy interface displays all of the scan policies that you have previously created. In the Scan
Policy interface, you can change the number of scan policies displayed per page and the order in which
they are displayed.
To change the number of scan policies displayed per page, select the desired number from the Show
rows drop-down menu in the lower-right-hand corner. To sort the action policies, select a column
heading such as Scan Policy Name, Description, or Last Modified Time.
Perform the following actions in the Scan Policy interface:
•
Create – Select Create on the ribbon to create a new scan policy. For information about
creating a new action policy, refer to Creating and Editing Scan Policies.
•
View Details – Select View Details on the ribbon and you will see the previously
configured settings for the selected scan policy. Here you can also select Edit on the
ribbon to make changes to the scan policy’s settings. You will be brought to the Edit
Scan Policy interface where you can change this scan policy.
•
Edit – Select Edit on the ribbon to change the configurations for the selected scan
policy. For information about editing configurations for a scan policy, refer to Creating
and Editing Scan Policies.
Compliance Guardian Installation and Administration User Guide
181
•
Delete – Select Delete on the ribbon. A confirmation window will pop up and ask if you
are sure you want to proceed with the deletion. Select OK to delete the selected scan
policies, or select Cancel to return to the Scan Policy interface without deleting the
selected scan policies.
•
Export – Export the check information for the test suites included in the selected scan
policy.
Creating and Editing Scan Policies
To create a new scan policy, select Create in the Manage group of the Scan Policy page. To modify a
previously configured scan policy, select the scan policy, and then select Edit on the ribbon. In the
Create Scan Policy or Edit Scan Policy interface, configure the following settings:
•
Name and Description – Enter a name for this scan policy. You can also enter an
optional description to distinguish this scan policy from the others.
•
Select the Test Suites ─ Specify the test suites that you want to include in this scan
policy. There are two tabs in this field:
o
Tagging – The test suites used for content classification with a variety of related
actions such as embedding metadata, quarantining documents, and reacting
content are displayed under this tab.
o
Redaction – The test suites used for redacting the specified content in a file are
displayed under this tab.
You can refer to the description of each test suite for the introduction of its usage. To
add more desired test suites, select Test Suite Manager in the Settings group on the
ribbon. For more information on configuring the test suites, refer to Test Suite Manager.
After selecting some test suites, if you want to clear the selection status, select the Clear
Selection link and then specify your desired test suites again.
To change the number of test suites displayed per page, select the desired number from
the Show rows drop-down menu in the lower-right-hand corner. To sort the test suites,
select a column heading such as Test Suite or Description.
You can also perform the following actions when selecting the test suites:
o
Search – Filter the test suites to be displayed by the keyword you designate. The
keyword must be contained in a column value. At the top of the viewing pane,
enter the keyword for the action policy you want to display. You can select
Search all pages or Search current page to define the search scope. Search all
pages means that the test suites in all of the pages whose names or descriptions
contain the keywords will be displayed; while Search current page means that
only the test suites in the current page whose names or descriptions contain the
keywords will be displayed.
*Note: The search function is not case sensitive.
182
Compliance Guardian Installation and Administration User Guide
o
Manage columns ( ) – Manage which columns are displayed in the list so that
only information you want to see is shown. Select the manage columns button
( ), and then check the checkbox next to the column name to have that column
shown in the list.
o
Hide the column ( ) – Hover over a column name, and then select the hide
column button ( ) of the column you want to hide, and the column will be
hidden.
After you are satisfied with the configuration of the scan policy, select OK to save this scan policy. If you
do not want to save the current configuration, select Cancel to cancel the configuration.
Configuring Filter Policies
For more information, refer to Filter Policy.
Configuring Action Policies
Action policies allow you to define the actions to be performed on the scanned contents in the specified
scope. To configure the action policies, select the Real-Time Classification Scanner, select a data source,
then select Edit on the ribbon; or select Create, and select SharePoint or Social Network from the dropdown list. Then, select Action Policy.
Managing Action Policies
The Action Policy interface displays all of the action policies that you have previously created. In this
interface, you can change the number of action policies displayed per page and the order in which they
are displayed.
To change the number of action policies displayed per page, select the desired number from the Show
rows drop-down menu in the lower-right-hand corner. To sort the action policies, select a column
heading such as Action Policy Name, Description, or Last Modified Time.
Perform the following actions in the Action Policy interface:
•
Create – Select Create on the ribbon to create a new action policy. For information
about creating a new action policy, refer to Creating and Editing Action Policies.
•
View – Select View on the ribbon and you will see the previously configured settings for
the selected action policy. Here you can also select Edit on the ribbon to make changes
to the action policy’s settings. You will be brought to the Edit Action Policy interface
where you can change this action policy.
•
Edit – Select Edit on the ribbon to change the configurations for the selected action
policy. For information about editing configurations for an action policy, refer to
Creating and Editing Action Policies.
•
Delete – Select Delete on the ribbon. A confirmation window will appear and ask if you
are sure you want to proceed with the deletion. Select OK to delete the selected action
Compliance Guardian Installation and Administration User Guide
183
policies, or select Cancel to return to the Action Policy interface without deleting the
selected action policies.
Creating and Editing Action Policies
To create a new action policy, select Create on the ribbon. To modify a previously-configured action
policy, select the action policy, and then select Edit on the ribbon.
In the Create Action Policy interface or Edit Action Policy interface, enter a Name for the action policy,
and enter an optional Description for future reference. Then, configure the Set up the action rules
section:
•
Conditions – Configure the action policy filter rules. Select Configure. The Configure
interface appears.
Refer to the following steps to configure the action policy filter rules:
o
Select a category, select Add an Action Level Group to add a new rule of the
specified category level. Configure the following fields for the rule:
Rule – Select the new rule you want to create from the drop-down list.
Condition – Select the condition for the rule.
Value – Enter a value you want the rule to use in the text box.
Select the delete (
) button to delete the rule that is no longer needed.
The filter rule contains three category levels:
Document – Based on the SharePoint Document property value you
specified here to define the scope in which the files that are not
compliant will be affected by the specified actions.
*Note: Under this category, the filter rules Modified Time and Created
Time will not be applied to define the scope for Real-Time Classification
Scanner.
Item – Based on the SharePoint Item property value you specified here
to define the scope in which the items that are not compliant will be
affected by the specified actions.
*Note: Under the Document category and the Item category, the filter
rules Modified Time and Created Time will not be applied to define the
scope for Real-Time Classification Scanner.
184
Classification Result – Based on the tag value you specified here to
define the scope in which the files that are not compliant will be moved.
Redaction Result – Based on the result of whether the files have been
redacted to define the scope where non-compliant files are affected by
the specified actions.
Compliance Guardian Installation and Administration User Guide
To add more filters, repeat the previous step.
*Note: Depending on the filters you enter, you can change the order of the
rules by selecting the down arrow ( ) before the Rule value, and then select
the order of the rule from the appeared drop-down list to determine the
priority of the rule.
You can also change the logical relationships between the rules. There are currently two
logical relationships: And and Or. By default, the logic is set to And. To change the
logical relationship, select the logical relationship link. The And logical relationship
means that the content which meets all of the rules will be filtered and included in the
result. The Or logic means that the content which meets any one of the rules will be
filtered and included in the result.
Select OK in the interface to save the changes, or select Cancel to return to the Create
Action Policy interface or Edit Action Policy interface without saving any changes.
After you finished configuring the Conditions settings, select the right arrow ( ) after
Conditions in the Create or Edit Action Policy interface to review the configured
settings.
•
Actions – Select an action to handle the non-compliant files which are found by
performing the classification jobs. Then select Add an action.
Repeat the above step to add multiple actions. The actions then will be added. If the
Configure button appears after the added action, you must select it to configure the
settings for the action. Select the delete ( ) button after an action to deselect to add
this action. You can change the order of the action configuration by selecting the
textbox before the added action to determine the priority of the action. For details of
each action, refer to Classification Actions.
Select the right arrow (
•
) after Actions to review the configured settings.
Alert – Specify whether to send out an alert e-mail when a file is affected by the
specified actions. This is optional. Select Configure. The Configure interface appears.
Alerts – Specify whether to send an e-mail when the action fails to execute or
successfully executes to the scanned files that are not compliant, and then
specify who will receive the e-mail. You must select a default e-mail template
before select the recipients. Select the New Notification Template link to create
a new template.
Creator e-mail template – Select this checkbox to send an alert e-mail
to the creator of the specified file that will be taken action. If this option
is selected, you must select an e-mail template from the corresponding
drop-down list. If you do not select an e-mail template, Compliance
Guardian will use the default e-mail template.
Compliance Guardian Installation and Administration User Guide
185
Modifier e-mail template – Select this checkbox to send an alert e-mail
to the last modifier of the specified file that will be taken action. If this
option is selected, you must select an e-mail template from the
corresponding drop-down list. If you do not select an e-mail template,
Compliance Guardian will use the default e-mail template.
User in the selected notification profile – Select this checkbox to send
an alert e-mail to the recipients configured in the selected alert
notification profile. If this option is selected, you must select an alert
notification profile from the appeared drop-down list. You can also
select the New Notification Profile link to create a new notification
profile. For more information, refer to Configuring Receive E-Mail
Settings.
Select OK in the interface to save the changes, or select Cancel to return to the Create
Action Policy interface or Edit Action Policy interface without saving any changes.
After you finished configuring the Alert settings, select the right arrow ( ) after Alert in
the Create or Edit Action Policy interface to review the configured settings.
Select Add a Condition Group to add another condition group. Select the delete button ( )
after a condition group to delete the condition group. You can change the order of the condition
group configuration by selecting the textbox on the top of each condition group to determine
the priority of the condition group. Select the right arrow ( ) or down arrow ( ) to expand or
retract the settings of a condition group.
186
Compliance Guardian Installation and Administration User Guide
Classification Actions
Refer to the following section for details about each classification action.
Change Permission
The permissions of the files or items that are not compliant will be changed based on your settings.
When selecting Configure after the Change Permission action in the Create Action Policy or Edit Action
Policy interface, configure the following settings in the appeared Configure interface:
•
Change Permission – Configure the following settings.
o
SharePoint Group Name – Enter a group name. If the group does not exist, it
will be created.
o
Group Permissions – Specify permissions for the group. Users in the group will
have the specified permissions to the files or items that are not compliant.
Delete Files/Items
The scanned files or items that are not compliant will be deleted to the Site Collection Recycle Bin.
Encrypt
The scanned files or items that are not compliant will be encrypted. After you select Configure after the
Encrypt action in the Create Action Policy or Edit Action Policy interface, configure the following settings
in the appeared Configure interface:
•
•
Manage Encrypted Files or Items – Configure the following settings:
o
Select one or more groups from the Select the groups that have permission to
manage the encrypted data in Compliance Guardian drop-down list. The users
in the selected groups can view and manage the scanned files or items that are
not compliant in Compliance Guardian > Classification Report > Incident
Manager > Encryption.
o
Select New Group to create a new group in Control Panel. For more
information, refer to Account Manager.
Security Profile – Select a security profile for encrypting the non-compliant files or
items. Select New Security Profile to create a new security profile. For more
information, refer to Security Profile.
Encrypt and Quarantine
The scanned files or items that are not compliant will be encrypted and then quarantined. After you
select Configure after the Encrypt and Quarantine action in the Create Action Policy or Edit Action
Policy interface, configure the following settings in the Configure interface:
•
Manage Encrypted Files or Items – Configure the following settings:
o
Select one or more groups from the Specify a SharePoint group that has
permission to manage the data affected by this action in SharePoint dropdown list. The users in the selected groups can view and manage the scanned
Compliance Guardian Installation and Administration User Guide
187
files or items that are not compliant in Compliance Guardian > Classification
Report > Incident Manager > Encryption.
o
Select New Group to create a new group in Control Panel. For more
information, refer to Account Manager.
•
Security Profile – Select a security profile for encrypting the non-compliant files or
items. Select New Security Profile to create a new security profile. For more
information, refer to Security Profile.
•
Quarantine Method – Select a Quarantine Method.
o
In place quarantine – The non-compliant files or items will be quarantined. The
users in the groups selected in the Manage Encrypted Files/Items field can view
and manage these files or items in Compliance Guardian > Classification
Report > Incident Manager > Encryption.
o
Out of place quarantine – The non-compliant files or items will be quarantined
to the specified location.
o
Quarantine Location – If the Out of place quarantine option is selected, you
must select a location for storing the quarantined files or items. Select New
Export Location to create a new export location. For more information, refer to
Export Location.
Lock
The scanned Newsfeed that is not compliant will be locked. Users cannot reply to the locked newsfeed.
Move to the Allowed Location
The scanned files that are not compliant will be moved to the specified allowed location configured
previously. You can select Allowed Location in the Create Action Policy interface or Edit Action Policy
interface to go to the Control Panel > Allowed Location page. For more detailed information on how to
configure the allowed location, refer to Configuring Allowed Location.
*Note: Only the files in the document library can be moved.
After you select Configure after the Move to the Allowed Location action in the Create Action Policy or
Edit Action Policy interface, configure the following settings in the appeared Configure interface:
•
•
188
Specified Location – Select the location where the files will move.
o
Global allowed location – Select the radio button to move the files to the
previously-configured allowed location.
o
Specify the relative path of the library or folder – Select the radio button, and
then enter the relative path or full path of a library or folder to move the files to
the library or a folder within the same site. You can also enter a full path of a
library or folder to move the files to another site in the same farm.
Quarantine Option – Select the If the files fail to move, they will be quarantined
checkbox if you want to deal with the files that are failed to be moved. With this option
Compliance Guardian Installation and Administration User Guide
enabled, the files that are failed to be moved will then be quarantined. The following
conditions will lead to the failure of moving files:
o
There is no content type that matches the source file’s content type in the
target library.
o
The matched content type of the target library (where the allowed location is)
does not contain all of the source file’s columns.
o
Other unknown system issues.
If the If the files fail to move, they will be quarantined checkbox is selected, configure
the following settings:
o
Manage Quarantine Files or Items – Configure the following settings:
o
Specify a SharePoint group that has the permissions to view or
manage the quarantined data in SharePoint – Specify who can view
and manage the quarantined data in Compliance Guardian Quarantine
Manager in SharePoint. For more information on managing the
quarantined files, refer to Using Compliance Guardian Quarantine
Manager in SharePoint.
−
SharePoint Group Name – Enter a group name. If the group
does not exist, it will be created.
−
Group Permissions – Specify permissions for the group. Users in
the group will have the specified permissions to view and
manage the data that are quarantined in Compliance Guardian
Quarantine Manager in SharePoint.
Select the groups that have the permission to manage the quarantined
data in Compliance Guardian – Specify who can view and manage the
quarantined data in Compliance Guardian > Classification Report >
Incident Manager > Quarantine. Select New Group to create a new
group in Control Panel. For more information, refer to Account
Manager.
Quarantine Method – Select a Quarantine Method.
In place quarantine – The non-compliant files will be quarantined, but
they are still in SharePoint.
Out of place quarantine – The non-compliant files will be quarantined
to the specified location.
Quarantine Location – If the Out of place quarantine option is selected,
you must select a location for storing the quarantined files. Select New
Export Location to create a new export location. For more information,
refer to Configuring Export Locations.
Compliance Guardian Installation and Administration User Guide
189
Permanently Delete
The scanned Newsfeed, the replies of the Newsfeed and notes in Note Board that are not compliant will
be permanently deleted.
Quarantine Files/Items
The scanned files or items that are not compliant will be quarantined.
After you select Configure after the Quarantine Files/Items action in the Create Action Policy or Edit
Action Policy interface, configure the following settings in the appeared Configure interface.
•
Manage Quarantined Files or Items – Configure the following settings:
Specify a SharePoint group that has the permissions to view or manage the
quarantined data in SharePoint – Specify who can view and manage the
quarantined data in Compliance Guardian Quarantine Manager in SharePoint.
For more information on managing the quarantined files, refer to Using
Compliance Guardian Quarantine Manager in SharePoint.
SharePoint Group Name – Enter a group name. If the group does not
exist, it will be created.
Group Permissions – Specify permissions for the group. Users in the
group will have the specified permissions to view and manage the data
that are quarantined in Compliance Guardian Quarantine Manager in
SharePoint.
Select the groups that have the permission to manage the quarantined data in
Compliance Guardian – Specify who can view and manage the quarantined data
in Compliance Guardian > Classification Report > Incident Manager >
Quarantine. Select New Group to create a new group in Control Panel. For more
information, refer to Account Manager.
•
•
Quarantine Method – Select one of the following Quarantine Methods:
o
In place quarantine – The non-compliant files or items will be quarantined, but
they are still in SharePoint.
o
Out of place quarantine – The non-compliant files or items will be quarantined
to the specified location.
Quarantine Location – If the Out of place quarantine option is selected, you must select
a location for storing the quarantined files or items. Select New Export Location to
create a new export location. For more information, refer to Configuring Export
Locations.
Redact Files/Items
Redact the files or items that are not compliant according to the Redaction type test suite selected in
the corresponding scan policy.
190
Compliance Guardian Installation and Administration User Guide
Quarantine Before Redact
The files or items that are not compliant will be backed up, and the backed up files or items will be
quarantined to a specified location. The original files or items in SharePoint will be redacted.
After you select Configure after the Quarantine Before Redact action in the Create Action Policy or Edit
Action Policy interface, configure the following settings in the Configure interface:
•
Manage Redacted Files or Items – Select one or more groups from the Select the
groups that have the permission to manage the redacted data in Compliance Guardian
drop-down list. The users in the selected groups can view and manage the scanned files
or items that are not compliant in Compliance Guardian > Classification Report >
Incident Manager > Redaction. Select New Group to create a new group in Control
Panel. For more information, refer to Account Manager.
•
Quarantined Location – Select a location for storing the backed up, quarantined files or
items. Select New Export Location to create a new export location. For more
information, refer to Configuring Export Locations.
Alert Only
The files or items that meet the configured condition in the action policy can be recorded in an e-mail
and sent to users.
Navigate to the Create Action Policy or Edit Action Policy interface and select Alert Only > Configure.
The Configure interface appears.
•
Specify a default e-mail template – You must select a default e-mail template before
you can add recipients. Select the New Notification Template link to create a new
template.
•
Creator e-mail template – Select this checkbox to send an alert e-mail to the creator of
the file or item. If this option is selected, you must select an e-mail template from the
corresponding drop-down list. If you do not select an e-mail template, Compliance
Guardian will use the default e-mail template.
•
Modifier e-mail template – Select this checkbox to send an alert e-mail to the modifier
of the file or item. If this option is selected, you must select an e-mail template from the
corresponding drop-down list. If you do not select an e-mail template, Compliance
Guardian will use the default e-mail template.
•
User in the selected notification profile – Select this checkbox to send an alert e-mail to
the recipients configured in the selected alert notification profile. If this option is
selected, you must select an alert notification profile from the drop-down list.
Select OK to save the changes, or select Cancel to exit the Configure interface without any changes.
Compliance Guardian Installation and Administration User Guide
191
Configuring Action Policies for Social Network
Compliance Guardian allows you to take action on scanned contents in Yammer. To configure the action
policies, navigate to Real-Time Classification Scanner > Create > Social Network. Under the Social
Network tab, select Action Policy on the ribbon to go to the Action Policy interface.
Managing Action Policies
In the Action Policy interface, you can change the number of action policies displayed per page and the
order in which they are displayed.
You can perform the following actions:
•
Create – Select Create on the ribbon to create a new action policy. For information
about creating a new action policy, refer to Creating and Editing Action Policies.
•
View – Select View on the ribbon and you will see the settings for the selected action
policy. Here you can also select Edit on the ribbon to make changes to the action
policy’s settings.
•
Edit – Select Edit on the ribbon to change the configurations for the selected action
policy. For information about editing configurations for an action policy, refer to
Creating and Editing Action Policies.
•
Delete – Select Delete on the ribbon. A confirmation window will appear and ask if you
are sure you want to proceed with the deletion. Select OK to delete the selected action
policies, or select Cancel to return to the Action Policy interface without deleting the
selected action policies.
Creating and Editing Action Policies
To create a new action policy, select Create on the ribbon. To modify a previously-configured action
policy, select the action policy, and then select Edit on the ribbon.
In the Create Action Policy interface or Edit Action Policy interface, configure the following settings:
•
Name – Enter a name for the action policy.
•
Description – Enter an optional Description for future reference.
•
Type – Select the type of the action policy.
For Web Part – Select this type, the action policy will be used for the rule that
uses the AvePoint Yammer Connector Web part to achieve the post content.
For Receiver – Select this type, the action policy will be used for the rule that
uses receiver to achieve the post content.
For detailed information, refer to Using Real-Time Classification Scanner Rules in Social
Network Mode.
192
Compliance Guardian Installation and Administration User Guide
•
Social Connection – Select a social connection.
Configure the Set up the action rules section:
•
Conditions – Configure the action policy filter rules. Select Configure. The Configure
interface appears.
Refer to the following steps to configure the action policy filter rules:
o
Select a category, select Add an Action Level Group to add a new rule of the
specified category level. Configure the following fields for the rule:
Rule – Select the new rule you want to create from the drop-down list.
Condition – Select the condition for the rule.
Value – Enter a value you want the rule to use in the text box.
Select the delete (
) button to delete the rule that is no longer needed.
The filter rule contains three category levels:
Message Filter – Based on the message information you specified here
to define the scope in which content that is not compliant will be
affected by the specified actions.
Classification Result – Based on the tag value you specified here to
define the scope in which the content will be affected by the specified
actions.
Redaction Result – Based on the result of whether the content has been
redacted to define the scope where the content is affected by the
specified actions.
To add more filters, repeat the previous step.
*Note: Depending on the filters you enter, you can change the order of the
rules by selecting the down arrow ( ) before the Rule value, and then select
the order of the rule from the appeared drop-down list to determine the
priority of the rule.
You can also change the logical relationships between the rules. There are currently two
logical relationships: And and Or. By default, the logic is set to And. To change the
logical relationship, select the logical relationship link. The And logical relationship
means that the content which meets all of the rules will be filtered and included in the
result. The Or logic means that the content which meets any one of the rules will be
filtered and included in the result.
Select OK in the interface to save the changes, or select Cancel to return to the Create
Action Policy interface or Edit Action Policy interface without saving any changes.
Compliance Guardian Installation and Administration User Guide
193
After you finished configuring the Conditions settings, select the right arrow ( ) after
Conditions in the Create or Edit Action Policy interface to review the configured
settings.
•
Actions – Select an action to handle the content which is found by performing the
classification jobs. Then select Add an Action.
Repeat the above step to add multiple actions. The actions then will be added. If the Configure button
appears after the added action, you must select it to configure the settings for the action. Select the
delete ( ) button after an action to deselect to add this action. You can change the order of the action
configuration by selecting the textbox before the added action to determine the priority of the action.
For details of each action, refer to Classification Actions.
Select the right arrow (
•
) after Actions to review the configured settings.
Alert – Select Configure. The Configure interface appears.
Select whether to send out an alert e-mail if the action failed to execute or successfully
executed. Then, select an e-mail template.
Select OK in the interface to save the changes, or select Cancel to return to the Create
Action Policy interface or Edit Action Policy interface without saving any changes.
After you finished configuring the Alert settings, select the right arrow ( ) after Alert in
the Create or Edit Action Policy interface to review the configured settings.
Select Add a Condition Group to add another condition group. Select the delete button ( )
after a condition group to delete the condition group. You can change the order of the condition
group configuration by selecting the textbox on the top of each condition group to determine
the priority of the condition group. Select the right arrow ( ) or down arrow ( ) to expand or
retract the settings of a condition group.
Classification Actions
If you select For Web Part as the action type, there are three actions: Alert, Block and Redact; If you
select For Receiver as the action type, there are two actions: Alert and Delete. Refer to the following
section for details about each classification action.
Alert Only
The posts that meet the configured condition in the action policy can be recorded in an e-mail and sent
to the specified users.
After you select Configure after the Alert Only action in the Create Action Policy or Edit Action Policy
interface, configure the Alert settings in the appeared Configure interface:
194
Compliance Guardian Installation and Administration User Guide
•
Specify a default e-mail template – You must select a default e-mail template before
select the recipients. Select the New Notification Template link to create a new
template.
•
Creator e-mail template – Select this checkbox to send an alert e-mail to the creator of
the post content. If this option is selected, you must select an e-mail template from the
corresponding drop-down list. If you do not select an e-mail template, Compliance
Guardian will use the default e-mail template.
•
User in the selected notification profile – Select this checkbox to send an alert e-mail to
the recipients configured in the selected alert notification profile. If this option is
selected, you must select an alert notification profile from the appeared drop-down list.
Select OK to save the changes, or select Cancel to exit the Configure interface without any changes.
Block
The posts that meet the condition configured in the action policy will be blocked.
Redact
The posts that meet the condition configured in the action policy will be redacted according to the
Redaction type test suite selected in the corresponding scan policy.
Delete
The posts that meet the condition configured in the action policy will be deleted.
Getting Started
Refer to the sections below for important information on getting started with Real-Time Classification
Scanner.
Launching Real-Time Classification Scanner
To launch Real-Time Classification Scanner, complete the following steps:
1. Log into Compliance Guardian. If you are already in the software, select the home page button
( ) to go to the home page. From the home page, all of the products are displayed.
2. Select Classification Scanner. The Classification Scanner interface appears.
3. Select the Real-Time Classification Scanner tab.
Compliance Guardian Installation and Administration User Guide
195
4. Alternatively, you can select Administration on the top-left corner, select the Classification
Scanner tab on the appeared navigation bar, and then select the Real-Time Classification
Scanner tab in the appeared interface.
Figure 22: Launching Real-Time Classification Scanner.
196
Compliance Guardian Installation and Administration User Guide
Home Page Overview
The Real-Time Classification Scanner home page displays a list of all of your previously configured nodes
with Real-Time Classification Scanner rules applied. You can also select Create to select the Real-Time
Classification Scanner Mode to SharePoint or Social Network, and then create rules.
Figure 23: Real-Time Classification Scanner home page.
Configuring Actions on the Ribbon
The ribbon provides the following configuration options:
•
Edit – Select Edit on the ribbon to make changes to the rule of the selected node. You
will be brought to the Edit page where you can change the rule settings for the node.
Select Apply on the ribbon to save the changes and apply the rule. Select Cancel on the
ribbon to return to the home page without saving any of your changes.
•
Delete – Select Delete on the ribbon to delete the rules of the selected nodes.
Selecting Mode
Select Create on the ribbon. A drop-down list appears. Select the corresponding mode from the dropdown list: SharePoint or Yammer. Then you can enter the corresponding mode, and configure settings to
scan objects in SharePoint or Yammer.
Compliance Guardian Installation and Administration User Guide
197
Managing Nodes
The Real-Time Classification Scanner home page displays the nodes that have applied Real-Time
Classification Scanner rules, but the node that has an inherited rule is not displayed in this field. This
field also displays the Scan Policy, Action Policy, and Filter Policy that are selected in the corresponding
rule.
You may select Edit on the ribbon to make changes to the rule of the selected node. You will be brought
to the Edit page where you can change the rule settings for the node. Select Apply on the ribbon to save
the changes and apply the rule. Select Cancel on the ribbon to return to the home page without saving
any of your changes.
Real-Time Classification Scanner for SharePoint
The SharePoint mode is used to scan contents in SharePoint, classify them, and then perform actions to
the scanned contents in real time.
*Note: The posts and replies in SharePoint 2013 Newsfeed are also supported being scanned. The notes
in Note Board in SharePoint are also supported being scanned.
Launching Real-Time Classification Scanner SharePoint Mode
On the Real-Time Classification Scanner Home interface, select Create on the ribbon. A drop-down list
appears. Select SharePoint from the drop-down list to enter the Real-Time Classification SharePoint
Mode.
Using Real-Time Classification Scanner Rules in SharePoint Mode
Refer to the following section for using Real-Time Classification Scanner rules.
Creating Real-Time Classification Scanner Rules in SharePoint Mode
To create a Real-Time Classification Scanner rule, complete the following steps:
Select the scope of the content you want to scan:
a. From the Scope panel on the left, select the farm that contains the relevant SharePoint
content. You can enter a keyword into the Search box above the farm tree to.
a. Select the relevant content from which you want to perform further operations by
selecting the radio button to the left of the content.
Select Create Rule from the Rule Management group on the ribbon.
Configure the following rule settings:
•
198
Report Database – Select a Report Database for storing the Real-Time Classification
Scanner result.
Compliance Guardian Installation and Administration User Guide
•
Report Group – Select the report groups. Users in this group have permission to the
corresponding reports.
•
Scan Policy – Select a scan policy from the drop-down list or create a new scan policy to
define the scan rules for scanning content. For more information on working with scan
policies, refer to Managing Scan Policies.
If selecting the For Compliance Guardian Tag Assist Manager only checkbox below the
Scan Policy selection drop-down box, the Action Policy and Filter Policy will be grayed
out in this screen. Instead, in SharePoint, through activating the Compliance Guardian
Tag Assist Manager feature, you can manually scan the selected content based on the
scan policy defined in Compliance Guardian, you can change the search results
according to your requirements.
*Note: Only used for scanning documents. For more detailed about using the
Compliance Guardian Tag Assist Manager feature in SharePoint, refer to Using
Compliance Guardian Tag Assist Manager in SharePoint.
•
Action Policy – Select an action policy from the drop-down list or create a new action
policy to define the actions to the content that will be scanned out. For more
information on working with action policies, refer to Configuring Action Policies.
•
Alert – Specify whether to send out an alert e-mail when an error occurs during the
process of scanning a file or when a tag fails to be added to a file. If you choose to send
out alert e-mails when an error occurs, configure the recipients by selecting the
corresponding checkboxes. You must select a default e-mail template before select the
recipients. Select the New Notification Template link to create a new template.
o
Creator e-mail template – Select this checkbox to send an alert e-mail to the
creator of the specified file. If this option is selected, you must select an e-mail
template from the corresponding drop-down list. If you do not select an e-mail
template, Compliance Guardian will use the default e-mail template.
o
Modifier e-mail template – Select this checkbox to send an alert e-mail to the
last modifier of the specified file. If this option is selected, you must select an email template from the corresponding drop-down list. If you do not select an email template, Compliance Guardian will use the default e-mail template.
o
User in the selected notification file – Select this checkbox to send an alert email to the recipients configured in the selected alert notification profile. If this
option is selected, you must select an alert notification profile from the
appeared drop-down list. You can also select the New Notification Profile link
to create a new notification profile. For more information, refer to User
Notification Settings.
*Note: Even though there may be more than one error when scanning a file, the alert email will only be sent when the first error occurs.
Compliance Guardian Installation and Administration User Guide
199
After configuring the recipients, choose one e-mail template from the E-mail template
drop-down list; you can also select the New E-mail template link to create a new e-mail
template. For more information, refer to Configuring E-mail Templates.
•
Filter Policy – Select a filter policy from the drop-down list or create a new policy to limit
the scope of the job. For more information on working with filter policies, refer to
Configuring Filter Policies.
•
Custom Upload Page – Select a custom upload page. This feature will allow users to
jump to the Compliance Guardian upload page when uploading files to SharePoint. For
more information, refer to Enabling Custom Upload Page. The function supports
SharePoint 2013 and SharePoint 2010 OnPremises. SharePoint Online is not supported.
*Note: Make sure SP2013CustomUploadPage.wsp or SP2010CustomUploadPage.wsp
is deployed before using this function. For more information on deploying the solution,
refer to Solution Manager.
Applying Real-Time Classification Scanner Rules in SharePoint Mode
After creating a Real-Time Classification Scanner rule on the selected node, select Apply on the ribbon
or on the right-lower section of the screen to apply the rule.
*Note: By default, the newly created site will not inherit its parent’s Real-Time Classification Scanner
rule. You must first deploy the SP2007InstallEventReceiver.wsp or SP2010InstallEventReceiver.wsp
solution on SharePoint. For more information on deploying the solution, refer to Solution Manager.
After the SP2007InstallEventReceiver.wsp or SP2010InstallEventReceiver.wsp solution is deployed, the
Compliance Guardian Newly Created Sites Real-Time Scan feature will be enabled on the Web
application automatically. The newly created site’s corresponding Compliance Guardian Real-Time Scan
feature will also be enabled, then the newly created site will apply its parent's Real-Time Classification
rule (if the parent has applied a rule).
Inheriting and Stop Inheriting Parents' Rule in SharePoint Mode
After applied a Real-Time Classification Scanner rule on the selected node, the sub-nodes automatically
inherit this rule.
On the SharePoint tree, if a node inherits its parent node’s rule, only the inherit button ( ) is displayed
before this node; if a node does not inherit its parent node’s rule, but has its own rule, the stop inherit
button ( ) icon is also displayed before this node.
Stop Inheriting Parents Rule
Stop Inheriting logically separates the rule in the lower level-node from the upper-level node. After one
rule has been applied for a particular level (Level A), you can still configure rules directly to levels that
are higher than Level A. However, if you want to configure rules at levels that are lower than Level A,
200
Compliance Guardian Installation and Administration User Guide
you must first break the rule inheritance. To break this inheritance, select Stop Inheriting in the Manage
group on the ribbon.
Some helpful notes on the Stop Inheriting Parents rule:
•
When breaking the rule’s inheritance at a specified level, the inheritance is only broken
at this level. The rule’s inheritance of the lower levels is not broken.
•
After the rule’s inheritance is broken, you can apply new rules and edit the
corresponding rule settings at the lower level.
Inheriting Parents' Rule
Use the inheriting feature after you have stopped a node’s rule inheritance from its parent node. To
manually apply a rule inheritance to a node, select the node that will inherit the parent node’s rule, and
select Inheriting in the Manage group on the ribbon. After selecting Inheriting, this button changes to
Stop Inheriting.
Some following helpful notes on the Inheriting rule:
•
By default, the Real-Time Classification Scanner rule configured for a higher level is
inherited by the lower levels.
•
You cannot create a new rule on a node if it inherits the rules of the higher level.
Inheritance must first be broken.
•
The inherited Real-Time Classification Scanner rule cannot be edited; it can only be
viewed.
•
Once you have broken the rule inheritance on a node, if you choose to inherit the rules
of the higher level again, all of the rules that are added after breaking the inheritance on
this node will be removed from the following nodes:
o
The node that inherits the higher level rules again.
o
The nodes that inherit the rules from the node above.
Enabling Custom Upload Page
To use this feature you must first deployed the SP2013CustomUploadPage.wsp or
SP2013CustomUploadPage.wsp solution and enabled the custom upload page in an applied Real-Time
Classification Scanner rule. When you upload a file in SharePoint, Compliance Guardian’s own upload
page appears. Compliance Guardian will execute the Real-Time Classification Scanner rule immediately.
If the file has taken action according to the rule, the page with the related action information will
appear. You can customize this page. For more information on customizing the SharePoint page, refer to
Customizing SharePoint Page and Message. If the file is uploaded successfully, Compliance Guardian’s
Edit Properties page appears, allowing you to edit the uploaded file properties.
*Note: For the Redact action, the user can configure the key="FilterRedactResult" node in
RTSv2.exe.config (apply to SharePoint 2007 or SharePoint 2010) or RTSv4.exe.config (apply to
Compliance Guardian Installation and Administration User Guide
201
SharePoint 2013) in … \AvePoint\Compliance Guardian\Agent\bin. If the value of the node is True, the
page with the file’s redaction information will not appear after a file is uploaded and redacted; if the
value of the node is False, the page with the file’s redaction information will appear.
*Note: For SharePoint 2013, the solution does not support uploading files by dragging files to
SharePoint. For SharePoint 2010 and SharePoint 2013, the solution does not support uploading files in
bulk.
The solution does not work on newly created sites or libraries. You must deploy the
SP2007InstallEventReceiver.wsp or SP2010InstallEventReceiver.wsp solution if you want the newly
created sites inheriting their parent sites to apply the custom upload page function.
Compliance Guardian allows users to use SharePoint native pages when uploading files to a library.
Complete the following settings to edit the library settings
Navigate to the corresponding library, and then select Library Settings.
You can find the Compliance Guardian page settings for SharePoint 2010 or Compliance
Guardian page settings for SharePoint 2013 settings.
Select the setting, and then select whether to use Compliance Guardian upload page or the edit
properties page.
Select OK to save the settings. The SharePoint native pages will appear if the files are uploaded
to the corresponding library.
*Note: SP2013CustomUploadPage.wsp is used to deploy on a SharePoint 2013 farm, and
SP2010CustomUploadPage.wsp is used to deploy on a SharePoint 2010 farm. In SharePoint
2013, if you want to edit the library settings in a site collection that is created using the 2010
experience version, you must also deploy SP2010CustomUploadPage.wsp on the SharePoint
2013 farm.
Customizing SharePoint Page and Message
Compliance Guardian allows users to customize pages and error messages which appear when a RealTime Classification action is triggered. This does not affect SharePoint’s own behaviors. Although the
user customizes their own error message or page, when some errors occur due to the SharePoint’s own
behaviors, the SharePoint built-in error page will appears.
Basic Customization
The Basic Customization feature allows you to customize your own page. You can use Visual Studio to
create the SharePoint solution, and then create a SharePoint page. Use the code of the created page to
invoke the HttpContext.Current.Items[“ErrorText”] property for accessing the error message string.
To configure the RTS process, complete the following steps:
Open RTSv2.exe.config (apply to SharePoint 2007 or SharePoint 2010) or RTSv4.exe.config
(apply to SharePoint 2013) in … \AvePoint\Compliance Guardian\Agent\bin.
202
Compliance Guardian Installation and Administration User Guide
Find the node: <configuration><appSettings><add key="ErrorPagePath">. Change the value to
be the path of the customized page. Refer to Method to Get the Page Path.
Method to Get the Page Path
To get the customized page path, complete the following steps:
Open the IIS Manager.
Find the _layouts node in the left pane of IIS Manager.
Right-click the _layouts node. A drop-down list appears.
Select Explore and then find the customized page.
Open the page.
Copy the part after “layouts/” or “layouts/15/” of the page’s URL, and then paste it in the
<configuration><appSettings><add key="ErrorPagePath"> node.
Advanced Customization
The Advanced Customization feature allows you to customize the pop-up message.
Write the DLL file, implement the interface of
Content.Compliance.Scanner.PAL.IMailFormatter,CCS.PAL, Version=1.0.0.0, Culture=neutral,
PublicKeyToken=fffb45e56dd478e3. You can receive IEnumerable<TagResult> tagResults (storing the
tagging information), ActionScope (storing the action information), and the string template parameter
through the interface. Read and obtain the data structure, and then convert to the desired character
strings. After the character strings return, the RTS process will submit the strings to the SharePoint builtin error page, or submit the strings to the customized page.
Advanced Customization also allows you to format messages through different methods. For example,
format the message to plain text or HTML text. Refer to the following steps:
After you finish the DLL file, the user must open the Share.config file at \AvePoint\Compliance
Guardian\Agent\bin and find the following nodes:
<SharedConfig>
<config name="IMailFormatter" type="default"/>
</SharedConfig>
Modify the type value to the users’ own class.
Enter the assembly-qualified name.
Install the DLL file to GAC or put it to … \AvePoint\Compliance Guardian\Agent\bin.
*Note: The DLL file will be loaded to RTSv2.exe or RTSv4.exe, so please be careful to avoid deleting,
checking, adding, or modifying in the DLL file (these actions are not recommended).
Compliance Guardian Installation and Administration User Guide
203
Real-Time Classification Scanner for Social Network
The Social Network mode is used to scan content in your social network in real time. Currently,
Compliance Guardian only supports scanning content in Yammer.
Launching Real-Time Classification Scanner Social Network Mode
On the Real-Time Classification Scanner Home interface, select Create on the ribbon, a drop-down list
appears. Select Social Network from the drop-down list.
Configuring Connections to Yammer
You must configure the connections before scanning content in Yammer. Select Configure Connection
on the ribbon. The Configure Connection interface appears. All of the connections are displayed in this
interface.
You can perform the following actions:
•
Create – Create a new connection. For detailed information on creating a plan, refer to
Creating or Editing Connections.
•
View Details – View detailed settings of the selected connection.
•
Edit – Edit the settings of the selected connection. For detailed information on editing a
plan, refer to Creating or Editing Connections.
•
Delete – Delete the selected connections.
Creating or Editing Connections
Refer to the following steps to create or edit a connection:
Select Create in the Manage group on the Configure Connection interface. To modify a
connection, select the connection, and then select Edit on the ribbon.
Configure the following settings.
•
Name and Description – Enter a name and an optional description for the connection.
•
Yammer Client ID – Enter the Client ID and Client Secret. Register an application in
Yammer to get the Client ID and Client Secret.
*Note: When you register the application in Yammer for the Client ID and Client Secret,
you must enter the Compliance Guardian Manager URL as the Redirect URI. The format
is: https://hostname:port number. For example: https://JohnSP13:14100.
The hostname in the URL must be same as the value entered in the Control Service Host
field of the Communication Configuration step when you install Compliance Guardian
Agent. Refer to Installing Compliance Guardian Agent.
204
Compliance Guardian Installation and Administration User Guide
•
Connect to Yammer – Select the Connect to Yammer link. The Yammer Log In interface
appears. Enter the admin account username and password to log into Yammer to get
permissions to scan all Yammer messages and execute specific actions.
If a user connects to multiple networks on Yammer, for example the user is an admin in
one network, but is also an external user of another network. In this case, all of the
associated networks will be loaded. You must choose which network you want to
register in Compliance Guardian Manager. After the connection is saved, the selected
network cannot be changed. If you want to connect to another one, you must create a
new connection.
•
Report Database – Select a Report Database for storing the Real-Time Classification
Scanner result.
•
Report Group – Select a Compliance Guardian group from the drop-down list. Once a
group is designated a Report Group, all of the users in the group will be able to view and
download the reports in Classification Report > Social Report. Multiple groups can be
used here; choose Select All to select all of the listed groups.
•
Storage Location – Select an export location and a storage database. The posted
content will be backed up and stored in the export location before taking the
classification actions. The storage database is used to store the data records, and then
combined with the content backed up in the export location to display the
corresponding social report.
•
Agent Group – Select the agent group that will perform the Scheduled Classification
Scanner job.
•
Event Receiver – Select if you want to enable event receiver. Then, select an agent. If
you enable event receiver here, you can register event receiver to Yammer server to
achieve the Real-Time Classification Scan.
Select OK to save the settings, or select Cancel to exit the interface without saving any changes.
Using Real-Time Classification Scanner Rules in Social Network Mode
Refer to the following section for using Real-Time Classification Scanner rules to scan content in
Yammer.
Creating Real-Time Classification Scanner Rules
To create a Real-Time Classification Scanner rule, complete the following steps:
Select a connection in the Scope pane.
Select Create Rule from the Rule Management group on the ribbon.
Configure the following rule settings:
•
Rule Name – Enter a Rule Name and an optional Description.
Compliance Guardian Installation and Administration User Guide
205
•
Apply To – Select to use Web part or receiver to achieve the Real-Time Classification
Scan.
Web part – You must first add the AvePoint Yammer Connector Web Part to
SharePoint, each time a user posts messages through this Web part, Compliance
Guardian will synchronously capture and scan, and then execute a specific
actions. For more information about the Yammer Connector Web part, refer to
Using AvePoint Yammer Connector Web Part to Post Messages to Yammer.
*Note: The YammerConnector.wsp solution must be deployed on SharePoint in
order to use Real-Time Classification Scanner for Yammer.
Receiver – Register event receiver to Yammer server without dependency on
SharePoint. When users post messages on Yammer, the receiver will
synchronously get the event from the Yammer server then dispatch messages to
Compliance Guardian Agents to execute scan and actions.
•
User Scope – Define the user scope. The content posted by a specific user will be
scanned.
Add users – Select the radio button to add users. Select the Select Users link,
the Add specified users window appears.
In the left pane of the Add Users window, enter a keyword in the search box,
the display names and e-mail addresses of the related users who are associated
with the network are displayed in the table.
You can also select the Advanced button to filter the results by user or groups.
Select Add a Criterion.
Rule – Select Group or User as the rule.
Conditions – Select Equals or Contains.
Value – Enter the value for the rule.
Select the Delete (
) button to delete a rule.
To add more filters, select Add a Criterion again.
*Note: Depending on the filters you enter, you can change the logical
relationships between the rules by selecting And and Or.
After configuring the filter rules, select Search to search for the related users or
groups. The results are displayed in the left pane of the Add Users window.
Select the user checkboxes and then select the Add button, the users are added
into the left table. Select the Remove to cancel adding the users.
Select Save on the Add specified users window, posts of the users added in the
left pane will be scanned.
206
Compliance Guardian Installation and Administration User Guide
Add users according to the configured conditions – Select the None link, the
Add users window appears. Configure the condition to filter by groups or users.
Select Preview to review the users that meet the configured condition in the
Preview window. Select Save to save the changes and close the Add users
window. The posts of the users that meet the configured condition will be
scanned.
Import file with specified users – Select the radio button to import a file along
with the added user. You can select Download Template, and save the template
file. Edit the template file to add the users and then select Import to import the
file.
•
Scan Policy – Select a scan policy from the drop-down list or create a new scan policy to
define the scan rules for scanning content.
•
Action Policy – Select an action policy from the drop-down list or create a new action
policy to define what actions will be taken to the scanned content.
•
Alert – Send an alert e-mail when an error occurs during the scan. Select an e-mail
profile and an e-mail template. The alert e-mail will be sent to the recipients configured
in the selected alert notification profile.
•
Stop Using Next Rule – Select whether or not to use the next rule to scan content.
Select Save to save the changes, or select Cancel to exit the interface without any changes.
Managing and Applying Real-Time Classification Scanner Rules
Once a rule is created, it is listed in the Real-Time Classification Social Network interface. You can
manage the rules in the following ways:
•
Apply – Apply the rules for scanning content. If a rule is not applied, it will not be
displayed the next time you go to the Real-Time Classification Social Network interface.
•
Edit – Edit a selected rule.
•
Delete – Delete the selected rules.
•
Enable – Enable a rule. You must select Apply after selecting Enable for a rule, or the
rule will not be enabled.
•
Disable – Disabled a rule. You must select Apply after selecting Disable for a rule, or the
rule will not be disabled.
•
Order – Select the order from the Order drop-down list to define which rule is the first
to be applied for scanning content.
•
Rule Name – Select the Rule Name, the rule’s Edit interface appears. Then, you can edit
the rule’s settings.
Compliance Guardian Installation and Administration User Guide
207
Using AvePoint Yammer Connector Web Part to Post Messages to
Yammer
AvePoint Yammer Connector Web part is added in SharePoint, which is used for scanning the content
post to Yammer. You must configure a Real-Time Classification Scanner rule, and Compliance Guardian
will scan the content according to the scan policy in the rule. The scanned report can be viewed in
Compliance Guardian > Classification Report > Social Report. Ensure that YammerConnector.wsp is
deployed before using this feature. For more information on deploying the solution, refer to Solution
Manager.
*Note: This feature is supported in both SharePoint 2010 and SharePoint 2013.
Enable the AvePoint Yammer Connector Feature
Navigate to the corresponding SharePoint site where you want to add the AvePoint Yammer Connector
Web part > Site Settings > Site features, and activate the AvePoint Yammer Connector feature.
Adding the AvePoint Yammer Connector Web Part
To add the AvePoint Yammer Connector Web Part, complete the following steps:
Navigate a SharePoint page, select the Page tab.
Select Edit on the ribbon. And then select Edit from the drop-down list. The Insert tab appears.
Select the Insert tab. And then select Web Part on the ribbon.
Select Custom in the Categories field of the left pane. The AvePoint Yammer Connector Web
part appears.
Select Add in the right pane. The AvePoint Yammer Connector Web part is added.
Posting Messages to Yammer through the AvePoint Yammer Connector
Web Part
After adding the AvePoint Yammer Connector Web part to a SharePoint page, complete the following
steps to log into Yammer:
Select Log into Yammer.
Select a connection. Select Login.
Enter the account used to log into Yammer. Then, select Log In.
When you post messages, refresh data or get messages using this login account, the messages will be
scanned according to the Real-Time Classification Scanner rule configured in Compliance Guardian.
*Note: You can only post message to one group at a time using the Web part.
208
Compliance Guardian Installation and Administration User Guide
Figure 24:AvePoint Yammer Connector Web Part.
Scheduled Classification Scanner
Scheduled Classification Scanner enables you to define a scan scope, and then it performs a scheduled
or immediate job to scan out the related content according to the scan policy, at last take the specified
actions to the scanned content.
Pre-Configurations
Configuring Scan Policies
Scan policies define the compliance rules to be used when scanning the contents in the specified scope.
To configure the scan policies, select Scan Policy on the ribbon of the Scheduled Classification Scanner
page to go to the Scan Policy interface.
Compliance Guardian Installation and Administration User Guide
209
Managing Scan Policies
For more information about how to manage scan policies, refer to Managing Scan Policies in the RealTime Classification Scanner section of this guide.
Creating and Editing Scan Policies
For more information about how to create and edit scan policies, refer to Managing Scan Policies in the
Real-Time Classification Scanner section of this guide.
Configuring Filter Policies
For more information, refer to Filter Policy.
Configuring Action Policies for SharePoint
Action policies for SharePoint allow you to define the actions to the scanned contents in the specified
SharePoint scope. To configure the action policies, navigate to Scheduled Classification Scanner >
Create > SharePoint, under the SharePoint tab, and select Action Policy on the ribbon to go to the
Action Policy interface.
Managing Action Policies
For more information about how to manage action policies, refer to Managing Action Policies in the
Real-Time Classification Scanner section of this guide.
Creating and Editing Action Policies
For more information about how to create and edit action policies, refer to Creating and Editing Action
Policies in the Real-Time Classification Scanner section of this guide.
Configuring Action Policies for File System
Action policies for File System allow you to define the actions to the scanned contents in the specified
file system. To configure the action policies, navigate to Scheduled Classification Scanner > Create > File
System. Under the File System tab, select Action Policy on the ribbon to go to the Action Policy
interface.
Managing Action Policies
For more information about how to manage action policies, refer to Managing Action Policies in the
Real-Time Classification Scanner section of this guide.
210
Compliance Guardian Installation and Administration User Guide
Creating and Editing Action Policies
To create a new action policy, select Create on the ribbon of the Action Policy interface. To modify a
previously-configured action policy, select the action policy, and then select Edit on the ribbon of the
Action Policy interface.
In the Create Action Policy interface or Edit Action Policy interface, enter a Name for the action policy,
and enter an optional Description for future reference. Then, configure the Set up the action rules
section:
•
Conditions – Configure the action policy filter rules. Select Configure. The Configure
interface appears. Configure the following settings as necessary:
o
o
Select a category, select Add an Action Level Group to add a new rule of the
specified category level. Configure the following fields for the rule:
Rule – Select the new rule you want to create from the drop-down list.
Condition – Select the condition for the rule.
Value – Enter a value you want the rule to use in the text box.
Select the delete (
) button to delete a rule that is no longer needed.
The filter rule contains two category levels:
o
Document – Based on the Document property value you specified here
to define the scope in which the files that are not compliant will be
affected by the specified actions.
Classification Result – Based on the tag value you specified here to
define the scope in which the files that are not compliant will be moved.
Redaction Result – Based on the result of whether the files have been
redacted to define the scope where non-compliant files are affected by
the specified actions.
To add more filters, repeat the previous step.
*Note: Depending on the filters you enter, you can change the order of the
rules by selecting the down arrow ( ) before the Rule value, and then select the
order of the rule from the appeared drop-down list to determine the priority of
the rule.
You can also change the logical relationships between the rules. There are currently two
logical relationships: And and Or. By default, the logic is set to And. To change the
logical relationship, select the logical relationship link. The And logical relationship
means that the content which meets all of the rules will be filtered and included in the
result. The Or logic means that the content which meets any one of the rules will be
filtered and included in the result.
Compliance Guardian Installation and Administration User Guide
211
Select OK in the interface to save the changes, or select Cancel to return to the Create
Action Policy interface or Edit Action Policy interface without saving any changes.
After you finished configuring the Conditions settings, select the right arrow ( ) after
Conditions in the Create or Edit Action Policy interface to review the configured
settings.
•
Actions – Select an action to handle the non-compliant files which are found by
performing the classification jobs. Then select Add an action.
Repeat the above step to add multiple actions. The actions then will be added. If the
Configure button appears after the added action, you must select it to configure the
settings for the action. Select the delete ( ) button after an action to deselect to add
this action. You can change the order of the action configuration by selecting the
textbox before the added action to determine the priority of the action. For details of
each action, refer to Classification Actions.
Select the right arrow ( ) after Actions to review the configured settings.
•
Alert – Specify whether to send out an alert e-mail. This is optional. Select Configure.
The Configure interface appears. Configure the following settings:
o
Alerts – Configure the alert settings.
If the action failed to execute – Specify whether to send out an alert email when a file failed to be affected by the specified actions. If you
select the checkbox, you must select an alert e-mail profile from the
appeared drop-down list. You can also select the New Notification
Profile link to create a new notification profile, also you must select an
e-mail template from the appeared drop-down list. You can also select
the New E-mail Template to create a new e-mail template. For more
information, refer to User Notification Settings.
If the action successfully executed – Specify whether to send out an
alert e-mail when a file is successfully to be affected by the specified
actions. If you select the checkbox, you must select an alert e-mail
profile from the appeared drop-down list. You can also select the New
Notification Profile link to create a new notification profile, also you
must select an e-mail template from the appeared drop-down list. You
can also select the New E-mail Template to create a new e-mail
template. For more information, refer to User Notification Settings.
Select OK in the interface to save the changes, or select Cancel to return to the Create
Action Policy interface or Edit Action Policy interface without saving any changes.
After you finished configuring the Alert settings, select the right arrow ( ) after Alert in
the Create or Edit Action Policy interface to review the configured settings.
212
Compliance Guardian Installation and Administration User Guide
Select Add a Condition Group to add another condition group. Select the delete ( ) button after a
condition group to delete the condition group. You can change the order of the condition group
configuration by selecting the textbox on the top of each condition group to determine the priority of
the condition group. Select the right arrow ( ) or down arrow ( ) to expand or retract the settings of a
condition group.
Classification Actions
Refer to the following sections for details about each action.
Encrypt
The scanned files that are not compliant will be encrypted. After you select Configure after the Encrypt
action in the Create Action Policy or Edit Action Policy interface, configure the following settings in the
appeared Configure interface:
•
Manage Encrypted Files – Select one or more groups from the Select the groups that
have the permission to manage the encrypted data in Compliance Guardian dropdown list. The users in the selected groups can view and manage the scanned files that
are not compliant in Compliance Guardian > Classification Report > Incident Manager >
Encryption. Select New Group to create a new group in Control Panel. For more
information, refer to Account Manager.
•
Security Profile – Select a security profile for encrypting the non-compliant files. Select
New Security Profile to create a new security profile. For more information, refer to
Security Profile.
Encrypt and Quarantine
The scanned files that are not compliant will be encrypted and then quarantined. After you select
Configure after the Encrypt and Quarantine action in the Create Action Policy or Edit Action Policy
interface, configure the following settings in the appeared Configure interface:
•
Manage Encrypted Files – Select one or more groups from the Select the groups that
have the permission to manage the encrypted data in Compliance Guardian dropdown list. The users in the selected groups can view and manage the scanned files that
are not compliant in Compliance Guardian > Classification Report > Incident Manager >
Encryption. Select New Group to create a new group in Control Panel. For more
information, refer to Account Manager.
•
Security Profile – Select a security profile for encrypting the non-compliant files. Select
New Security Profile to create a new security profile. For more information, refer to
Security Profile.
•
Quarantine Location – Select a location for storing the quarantined files. Select New
Export Location to create a new export location. For more information, refer to Export
Location.
Compliance Guardian Installation and Administration User Guide
213
Move to the Specified Location
The scanned files that are not compliant will be moved to the specified location. After you select
Configure after the Move to the Specified location action in the Create Action Policy or Edit Action
Policy interface, specify a location where you want to move the non-compliant files in the appeared
Configure interface. Enter the location path in the format: \\admin-PC\c$\data or \\admin-PC\shared
folder.
If the path is specified in the format \\admin-PC\c$\data:
•
The agent account must have the local administrator permission to the server where
the specified location resides.
If the path is specified in the format \\admin-PC\shared folder:
•
The specified user must have the Log on as a batch job permission to the server where
the specified location resides, or the user must be the member of the Backup Operators
group of the server where the specified location resides.
•
The specified user must have the Full Control permission to the shared folder.
Quarantine Files
The scanned files that are not compliant will be quarantined. After you select Configure after the
Quarantine Files action in the Create Action Policy or Edit Action Policy interface, configure the
following settings in the appeared Configure interface:
•
Manage Quarantined Files – Select one or more groups from the Select the groups that
have the permission to manage the quarantined data in Compliance Guardian dropdown list. Users in the selected groups can view and manage the quarantined data in
Compliance Guardian > Classification Report > Incident Manager > Quarantine. Select
New Group to create a new group in Control Panel. For more information, refer to
Account Manager.
•
Quarantine Location – Select a location for storing the quarantined files. Select New
Export Location to create a new export location. For more information, refer to
Managing Export Locations.
Redact Files
Redact the files that are not compliant according to the Redaction type test suite selected in the
corresponding scan policy.
Quarantine Before Redact
The files that are not compliant will be backed up, and the backed up files will be quarantined to a
specified location. The original files will be redacted. After you select Configure after the Quarantine
Before Redact action in the Create Action Policy or Edit Action Policy interface, configure the following
settings in the appeared Configure interface:
214
Compliance Guardian Installation and Administration User Guide
Manage Redacted Files – Select one or more groups from the Select the groups that have the
permission to manage the redacted data in Compliance Guardian drop-down list. Users in the selected
groups can view and manage the quarantined data in Compliance Guardian > Classification Report >
Incident Manager > Redaction. Select New Group to create a new group in Control Panel. For more
information, refer to Account Manager.
•
Quarantined Location – Select a location for storing the quarantined files. Select New
Export Location to create a new export location. For more information, refer to Export
Location.
Alert Only
The files that meet the configured condition in the action policy can be recorded in an e-mail and sent to
the specified users.
Navigate to the Create Action Policy or Edit Action Policy interface and select Alert Only > Configure.
The Configure interface appears.
•
Specify a default e-mail template – You must select a default e-mail template before
adding recipients. Select the New Notification Template link to create a new template.
•
Creator e-mail template – Select this checkbox to send an alert e-mail to the creator of
the file. If this option is selected, you must select an e-mail template from the
corresponding drop-down list. If you do not select an e-mail template, Compliance
Guardian will use the default e-mail template.
•
Modifier e-mail template – Select this checkbox to send an alert e-mail to the modifier
of the file. If this option is selected, you must select an e-mail template from the
corresponding drop-down list. If you do not select an e-mail template, Compliance
Guardian will use the default e-mail template.
•
User in the selected notification profile – Select this checkbox to send an alert e-mail to
the recipients configured in the selected alert notification profile. If this option is
selected, you must select an alert notification profile from the appeared drop-down list.
Select OK to save the changes, or select Cancel to exit the Configure interface without any changes.
Configuring Action Policies for Social Network
Action policies for Social Network allows you to define the actions to the scanned contents in Yammer.
To configure the action policies, navigate to Scheduled Classification Scanner > Create > Social
Network. Under the Social Network tab, select Action Policy on the ribbon to go to the Action Policy
interface.
Managing Action Policies
The Action Policy interface displays all of the action policies that you have previously created. In this
interface, you can change the number of action policies displayed per page and the order in which they
are displayed.
Compliance Guardian Installation and Administration User Guide
215
You can perform the following actions in the Action Policy interface:
•
Create – Select Create on the ribbon to create a new action policy. For information
about creating a new action policy, refer to Creating and Editing Action Policies.
•
View – Select View on the ribbon and you will see the settings for the selected action
policy.
•
Edit – Select Edit on the ribbon to change the configurations for the selected action
policy. For information about editing configurations for an action policy, refer to
Creating and Editing Action Policies.
•
Delete – Select Delete on the ribbon. A confirmation window will appear and ask if you
are sure you want to proceed with the deletion. Select OK to delete the selected action
policies, or select Cancel to return to the Action Policy interface without deleting the
selected action policies.
Creating and Editing Action Policies
To create a new action policy, select Create on the ribbon. To modify an action policy, select the action
policy, and then select Edit on the ribbon.
In the Create Action Policy interface or Edit Action Policy interface, configure the following settings:
•
Name – Enter a name for the action policy.
•
Description – Enter an optional Description for future reference.
•
Social Connection – Select a social connection.
Configure the Set up the action rules section:
•
Conditions – Configure the action policy filter rules. Select Configure. The Configure
interface appears.
Refer to the following steps to configure the action policy filter rules:
o
Select a category, select Add an Action Level Group to add a new. Configure the
following fields for the rule:
Rule – Select the new rule you want to create from the drop-down list.
Condition – Select the condition for the rule.
Value – Enter a value you want the rule to use in the text box.
Select the delete (
) button to delete a rule that is no longer needed.
The filter rule contains two category levels:
216
Message Filter – Filter based on messages. Compliance Guardian will
search for content within the message. Then, take action based on the
policy that you’ve selected.
Compliance Guardian Installation and Administration User Guide
Classification Result – Filter based on tag value. Compliance Guardian
will search for that tag value and then take action on the job.
To add more filters, repeat the previous step.
*Note: Depending on the filters you enter, you can change the order of the
rules by selecting the down arrow ( ) before the Rule value, and then select
the order of the rule from the drop-down list to determine the priority of the
rule.
You can also change the logical relationships between the rules. There are currently two
logical relationships: And and Or. The logic is set to And. To change the logical
relationship, select the logical relationship link. The And logical relationship means that
the content which meets all of the rules will be filtered and included in the result. The
Or logic means that the content which meets any one of the rules will be filtered and
included in the result.
Select OK to save the changes, or select Cancel to return to the Create Action Policy
interface or Edit Action Policy interface without saving any changes.
After you have finished configuring the Conditions settings, select the right arrow ( )
after Conditions in the Create or Edit Action Policy interface to review the configured
settings.
•
Actions – Select an action to take on the posts in the classification jobs. Then select Add
an Action.
Repeat the above step to add multiple actions. In some cases the Configure button will
appear after the added action, you must select it and configure the settings for the
action. Click the delete ( ) button after an action to deselect to add this action. You
can change the order of the action configuration by selecting the text box before the
added action to determine the priority of the action. For details of each action, refer to
Classification Actions.
Select the right arrow (
•
) after Actions to review the configured settings.
Alert – Select Configure. The Configure interface appears. This is optional.
Select if you want to send an alert e-mail if the action failed to execute or successfully
executed. Then, select an e-mail template.
Select OK to save the changes, or select Cancel to return to the Create Action Policy
interface or Edit Action Policy interface without saving any changes.
After you have finished configuring the Alert settings, select the right arrow ( ) after
Alert in the Create or Edit Action Policy interface to review the configured settings.
Compliance Guardian Installation and Administration User Guide
217
Select Add a Condition Group to add another condition group. Select the delete button ( )
after a condition group to delete the condition group. You can change the order of the condition
group configuration by selecting the textbox on the top of each condition group to determine
the priority of the condition group. Select the right arrow ( ) or down arrow ( ) to expand or
retract the settings of a condition group.
Classification Actions
Refer to the following section for details about each classification action.
Alert Only
The posts that meet the configured condition in the action policy can be recorded in an e-mail and sent
to users.
Navigate to the Create Action Policy or Edit Action Policy interface and select Alert Only > Configure.
The Configure interface appears.
•
Specify a default e-mail template – You must select a default e-mail template before
you can add recipients. Select the New Notification Template link to create a new
template.
•
Creator e-mail template – Select this checkbox to send an alert e-mail to the creator of
the post content. If this option is selected, you must select an e-mail template from the
corresponding drop-down list. If you do not select an e-mail template, Compliance
Guardian will use the default e-mail template.
•
User in the selected notification profile – Select this checkbox to send an alert e-mail to
the recipients configured in the selected alert notification profile. If this option is
selected, you must select an alert notification profile from the appeared drop-down list.
Select OK to save the changes, or select Cancel to exit the Configure interface without any changes.
Delete
The posts that meet the condition configured in the action policy will be deleted.
Configuring Connections for File System
A connection is configured to be used in the Scheduled Classification Scanner File System Mode. If you
configure a connection with the file system, then the files in the connected file system are supported to
be scanned and have actions taken in Compliance Guardian.
Navigate to Scheduled Classification Scanner > Create > File System, and select Configure Connections
on the ribbon to enter the Configure Connection interface.
Managing Connections
In the Configure Connection interface, you will see a list of connections.
218
Compliance Guardian Installation and Administration User Guide
In the Configure Connection interface, you can create a new connection, view details about a
connection, edit a previously configured connection, or delete a previously configured connection. For
more information about creating or editing a connection, refer to Creating and Editing Connections.
Select Edit on the ribbon to change the configurations for the selected connection. For more
information about editing configurations for the connection, refer to Configuring Action Policies for
Social Network.
To view a connection, select it from the list of previously configured connections, and then select View
Details on the ribbon. To delete a connection, select it from the list of previously configured
connections, and then select Delete on the ribbon. A confirmation window will pop up and ask if you are
sure you want to proceed with the deletion. Select OK to delete the selected connection, or select
Cancel to return without deleting it.
Creating and Editing Connections
To create a new connection, select Create in the Manage group of the Configure Connection page. To
modify a previously configured connection, select the connection, and then select Edit on the ribbon. In
the Create Connection or Edit Connection interface, configure the following settings:
•
Name and Description – Enter a name for this connection. You can also enter an
optional description to distinguish this connection from the others.
•
Type – Select the file system type for the connection.
•
Connection – Configure the following settings:
o
Agent Group – Select the agent group that will perform the Scheduled
Classification Scanner job.
o
UNC Path – Specify a path in the format \\admin-PC\c$\data or \\adminPC\shared folder, the files in the specified location are supported to be scanned.
o
Username – Specify a username that can access the specified location.
o
Password – Specify a password.
*Note: The user must have the following permissions
If the path is specified in the format \\admin-PC\c$\data:
The specified user must have the local administrator permission to the
connected server.
If the path is specified in the format \\admin-PC\shared folder:
The specified user must have the Log on as a batch job permission to
the connected server, or the user must be the member of the Backup
Operators group of the connected server.
Compliance Guardian Installation and Administration User Guide
219
The specified user must have the Full Control permission to the shared
folder.
After you are satisfied with the configuration of the connection, select OK to save this connection. If you
do not want to save the current configuration, select Cancel to cancel the configuration.
Getting Started
Refer to the sections below for important information on getting started with Scheduled Classification
Scanner.
Launching Scheduled Classification Scanner
To launch Scheduled Classification Scanner, complete the following steps:
1. Log in to Compliance Guardian. If you are already in the software, go to the welcome page. From
the welcome page, all of the products are displayed.
2. Select the Classification Scanner to launch its interface. The Classification Scanner interface
appears. Select the Scheduled Classification Scanner tab (the default selected tab).
3. Alternatively, you can select Administration on the top-left corner, and select the Classification
Scanner tab on the appeared navigation bar. Then, select the Scheduled Classification Scanner
tab in the appeared interface.
Figure 25: Launching Scheduled Classification Scanner.
220
Compliance Guardian Installation and Administration User Guide
Home Page Overview
The Compliance Scanner home page displays a list of all of your previously created Scheduled
Classification Scanner plans. Also you can select Create to select the Scheduled Classification Scanner
Mode: SharePoint or File System, and then create a plan.
Figure 26: Scheduled Classification Scanner home page.
Selecting Mode
Select Create on the ribbon, a drop-down list appears. Select the corresponding mode from the dropdown list: SharePoint or File System. Then you can enter the corresponding mode, and configure a plan
to scan objects in SharePoint or file system, and then perform the specified actions to the files in
SharePoint or file system.
Managing Scheduled Classification Scanner Plans
The Scheduled Classification Scanner home page displays a list of all of your previously created
Scheduled Classification Scanner plans. Also it displays the scan policy and action policy that are selected
in the plan. You can also see the plan type in the Scope Type column.
You may perform any of the following actions on a selected plan:
Compliance Guardian Installation and Administration User Guide
221
•
View Details – Select View Details on the ribbon to see the details of the selected plan.
Here you can also select Edit on the ribbon to make changes to the plan’s settings. You
will be brought to the Edit page where you can change the settings for this plan. After
editing the settings, select Save on the ribbon to save the plan. To save a changed plan
as a new one, select Save As on the ribbon. At any time, select Cancel on the ribbon to
return to the Plan Manager without saving any of your changes.
•
Edit – Select Edit on the ribbon to make changes to the selected plan’s settings. You will
be brought to the Edit page where you can change the settings for this plan. Select Save
on the ribbon to save the plan. To save a changed plan as a new one, select Save As on
the ribbon. At any time, select Cancel on the ribbon to return to the Plan Manager
without saving any of your changes.
*Note: If you change the scan policy when editing a Scheduled Classification Scanner
plan, or change the database policy when editing a Scheduled Classification Scanner
plan, after you save the changes, the next time the plan will mandatorily run a full job
although you select to run an incremental job, thus to guarantee that the job can
perform correctly, as well as guarantee the job data is generated correctly.
•
Delete – Select Delete on the ribbon to delete the selected plan. A warning message will
appear to confirm the deletion. Select OK to delete the selected plan, or select Cancel to
return to Plan Manager without deleting the selected plan.
•
Test Run – Select Test Run on the ribbon to simulate the execution of the selected plan.
After you select Test Now, a pop-up window appears. You can select to run a full job or
an incremental job. If Incremental Scan is selected, the Reference Time option is
enabled.
o
Reference Time – Choose whether to scan contents created or modified at a
specified interval. If you choose to use a reference time, specify the time to scan
contents created or modified. Enter an integer into the textbox and select
Minute(s), Hour(s), Day(s), or Month(s) from the drop-down list.
*Note: It is recommended that you specify a reference time when the
recurrence schedule configured in Range of Recurrence is End after 1
occurrence.
You can see the review details about the plan’s execution in Job Monitor.
•
Run Now – Select Run Now on the ribbon to execute the plan immediately. After you
select Run Now, a pop-up window appears. You can select to run a full job or an
incremental job. If Incremental Scan is selected, the Reference Time option is enabled.
o
222
Reference Time – Choose whether to scan contents created or modified at a
specified interval. If you choose to use a reference time, specify the time to scan
contents created or modified. Enter an integer into the textbox and select
Minute(s), Hour(s), Day(s), or Month(s) from the drop-down list.
Compliance Guardian Installation and Administration User Guide
*Note: It is recommended that you specify a reference time when the
recurrence schedule configured in Range of Recurrence is End after 1
occurrence.
You can see the review details about the plan’s execution in Job Monitor.
Scheduled Classification Scanner for SharePoint
The SharePoint Mode allows you to define a scan scope in SharePoint, and then it performs a scheduled
or immediate job to scan out the related content according to the scan policy, at last take the specified
actions to the scanned content.
*Note: The posts and replies in SharePoint 2013 Newsfeed and the notes in Note Board in SharePoint
are also supported to be scanned.
Launching Scheduled Classification Scanner SharePoint Mode
On the Scheduled Classification Scanner Home interface, select Create on the ribbon, a drop-down list
appears. Select SharePoint from the drop-down list, then you will be brought to the Scheduled
Classification SharePoint Mode.
Scanning User Profiles
Compliance Guardian supports scanning user properties and social notes in user profiles. Compliance
Guardian accesses the user profiles through the personal site. Select the related personal site node in
the farm tree to scan user properties in the corresponding user profile. However, if the personal site is
not created, you cannot scan the corresponding user profile since there is no personal site node in the
tree. Compliance Guardian Scheduled Classification Scanner provides a method to scan the user profile
when the personal site is not created: The User Profile Services node is loaded on the farm tree by
changing the UserProfile Used="false" (change the value false to true) node in the
ComplianceSetting.config file. Refer to Configuring to Scan User Profiles for details. Then, select the
corresponding User Profile Service node, and configure the related plan settings to scan the user
properties and notes.
Compliance Guardian Installation and Administration User Guide
223
Figure 27: User Profile Service node in Scheduled Classification Scanner.
Performing a Scheduled Classification Scanner Plan in Wizard Mode
To configure a Scheduled Classification Scanner plan using Wizard Mode, complete the following steps:
Select the scope of the content you want to scan:
a. From the Scope panel on the left, select the farm that contains the relevant SharePoint
content. You can enter a keyword into the Search box above the farm tree to filter out
the relevant SharePoint content.
b. Select the relevant content from which you want to perform further operations by
selecting the checkboxes to the left of the content.
Select Plan Builder from the Plan Management group on the ribbon, select Wizard Mode from
the drop-down menu, or you can directly select Start with Wizard Mode on the landing page.
Enter a Plan Name for the plan and an optional Description.
Select Next on the ribbon or on the lower-right section of the screen. The Report Settings
screen appears.
Configure the following report settings:
224
•
Report Database – Select a report database for storing the job result.
•
Report Group – Select a Compliance Guardian group from the drop-down list. Once a
group is specified as the Report Group, all of the users in the specified group will be able
to access the Classification Report > Action Report module and perform actions to the
Compliance Guardian Installation and Administration User Guide
related files. Multiple groups can be specified here. Choose Select All to select all of the
listed groups.
Select Next on the ribbon or on the lower-right section of the screen. The Scan Settings screen
appears.
Configure the following scan settings:
•
Action Policy – Select an action policy from the drop-down list or create a new action
policy to define the actions to the content that will be scanned out. For more
information on working with action policies, refer to Managing Action Policies.
•
Scan Policy – Select a scan policy from the drop-down list or create a new scan policy to
define the scan rules for scanning content. For more information on working with scan
policies, refer to Configuring Scan Policies.
•
Scan File/Item Versions – Specify the method for scanning file/item versions:
•
o
Scan the current version – Only the current versions of the files/items defined
in the job scope are supported to be scanned. The files/items that are not
compliant will be treated according to actions defined in the action policy.
o
Scan all versions – The files/items and all their previous versions defined in the
job scope are supported to be scanned. If the current version of a scanned
file/item or one of its previous versions is not compliant, the entire file/item
(the current version of the file/item along with its previous versions) will be
treated according to actions defined in the action policy.
Alert – Specify whether to send out an alert e-mail when an error occurs during the
process of scanning a file or when a tag fails to be added to a file. If you choose to send
out alert e-mails when an error occurs, configure the recipients by selecting the
corresponding checkboxes. You must select a default e-mail template before select the
recipients. Select the New Notification Template link to create a new template.
o
Creator e-mail template – Select this checkbox to send an alert e-mail to the
creator of the specified file. If this option is selected, you must select an e-mail
template from the corresponding drop-down list. If you do not select an e-mail
template, Compliance Guardian will use the default e-mail template.
o
Modifier e-mail template – Select this checkbox to send an alert e-mail to the
last modifier of the specified file. If this option is selected, you must select an email template from the corresponding drop-down list. If you do not select an email template, Compliance Guardian will use the default e-mail template.
o
User in the selected notification file – Select this checkbox to send an alert email to the recipients configured in the selected alert notification profile. If this
option is selected, you must select an alert notification profile from the
appeared drop-down list. You can also select the New Notification Profile link to
create a new notification profile. For more information, refer to User
Notification Settings.
*Note: Even though there may be more than one error when scanning a file, the alert email will only be sent when the first error occurs.
Compliance Guardian Installation and Administration User Guide
225
After configuring the recipients, choose one e-mail template from the E-mail template
drop-down list. You can also select the New E-mail template link to create a new e-mail
template. For more information, refer to Configuring E-mail Templates.
•
Filter Policy – Select a filter policy from the drop-down list or create a new policy to limit
the scope of the job. For more information on working with filter policies, refer to Filter
Policy.
Select Next on the ribbon or on the lower-right section of the screen. The Schedule screen
appears.
Select a scheduling option:
•
No schedule – Select this option to configure the job to not run on a schedule (the job
must be manually initiated).
•
Configure the schedule myself – Configure a customized schedule, and run the plan by
schedule.
Select Add Schedule and the Add Schedule window pops up. Configure the following
settings for the schedule:
o
Options – Select the type of the scan for this plan: Full Scan or Incremental
Scan. Full Scan scans all of the content in the scope defined in the plan, while
Incremental Scan only scans the content that has been modified since the last
incremental or full scan job.
If selecting Incremental Scan, the Reference Time option is enabled.
Reference Time – Choose whether to scan contents created or modified
at a specified interval. If you choose to use a reference time, specify the
time to scan contents created or modified. Enter an integer into the
textbox and select Minute(s), Hour(s), or Day(s) from the drop-down
list.
*Note: It is recommended specifying a reference time when the
recurrence schedule configured in Range of Recurrence is End after 1
occurrence.
226
o
Schedule Settings – Specify the frequency to run the rerunning schedule. Enter
an integer into the text box and select Minute(s), Hour(s), Day(s), Week(s), or
Month(s) from the drop-down list.
o
Range of Recurrence – Specify when to start and end the running recurring
schedule.
Start time – Set up the time to start the plan and Time Zone can be
changed under the Start time. Note that the start time cannot be earlier
than the current time.
No end date – Select this option to repeat running the plan until being
stopped manually.
Compliance Guardian Installation and Administration User Guide
End after specified occurrence(s) – Select this option to stop the plan
after specified occurrences that you configure in the text box.
End by – Set up the time to end the recurrence of plans.
Select OK to save the settings. After configuring the schedule for this replication job,
select Calendar View to view the job in a calendar view.
Select Next on the ribbon or on the lower-right section of the screen. The Advanced screen
appears.
Configure the following advanced settings:
•
Agent Group – Select the agent group for the Scheduled Classification Scan Plan. For
more information on working with agent groups, refer to Agent Groups.
•
Notification – Configure the e-mail notification settings.
Scan Result – Select this to send an e-mail notification to the specified users.
The e-mail contains the information of the failed files and/or passed files.
Scope Level – Select a scope level. The scan result will be reported
based on each level in the e-mail.
Report Level – Select to have the failed files and passed files included in
the e-mail.
Receiver – Configure the receiver. Select E-mail Address, and then
select Add a Notification Address. Enter the address to which the e-mail
will be sent, and select a corresponding e-mail template. Select
SharePoint Group, and then select Add a SharePoint Group. Enter the
SharePoint group whose users will receive the e-mail, and then enter
the corresponding e-mail template. Note that the SharePoint group
must exist in the selected SharePoint scope.
Select Add a Notification Address or Add a SharePoint Group again to
add more addresses or groups. Select the delete (
an address or group.
) button to delete
Job Report – Select this checkbox to send an e-mail notification with a job
report. Select a notification profile from the Select a profile with address only
drop-down list, or choose to create a new e-mail notification profile. For more
information on configuring the e-mail notification profiles, refer to Configuring
Receive E-Mail Settings.
•
User Profiles Filter – This option appears only when you select the User Profile Service
node in the tree. Configure this option if you want to filter the user profiles. Select
download a template to download the template file which is used for filtering user
profiles. Edit the file according to your own requirement and then select Upload to
upload the configured file. Refer to Editing Template File for Filtering User Profiles for
details about editing the template file.
Compliance Guardian Installation and Administration User Guide
227
Select Next on the ribbon or on the lower-right section of the screen. The Overview screen
appears.
Review and edit the plan selections on the Overview screen. To make changes, select (Edit). This
link takes you to the corresponding setting page, and allows you to edit the configuration.
Select Finish or Finish and Run Now on ribbon or on the lower-right section of the screen. The
plan is now listed in Plan Manager.
If you select Finish and Run Now, the Run Now interface pops up to allow you to choose
Options:
•
Full Scan – Scans all of the content in the scope defined in the plan.
•
Incremental Scan – Scans the content that has been modified (Add, Delete, and Modify)
since the last incremental or full scan job. If selecting Incremental Scan, the Reference
Time option is enabled.
o
Reference Time – Choose whether to replicate contents created or modified at
a specified interval. If you choose to use a reference time, specify the time to
replicate contents created or modified. Enter an integer into the text box and
select Minute(s), Hour(s), or Day(s) from the drop-down list.
*Note: The default maximum storage time of a SharePoint change log is 60 days. If the
reference time you configure is greater than 60 days, Compliance Guardian only runs an
incremental scan for the modifications within 60 days. For the modifications exceed 60 days,
Compliance Guardian runs full replication.
Select OK to run the job.
Performing a Scheduled Classification Scanner Plan in Form Mode
Form Mode offers the ability to run a quick scan job by providing a truncated version of all of the
Scheduled Classification Scan Plan Wizard screens on one page. Select the scope of the content you
want to scan, select Plan Builder from the Plan Management group on the ribbon, and then select Form
Mode from the drop-down menu, or you can directly select Start with Form Mode on the landing page.
For detailed information about how to configure the Scheduled Classification Scan Plan settings, refer to
Performing a Scheduled Classification Scanner Plan in Wizard Mode.
*Note: If you are unfamiliar with this plan creation process, it is not recommended that you use this
mode to configure settings.
Scheduled Classification Scanner for File System
The File System Mode allows you to configure connection with a location, and then perform a scheduled
or immediate job to scan out the related content according to the scan policy, at last take the specified
actions to the scanned content in the location.
228
Compliance Guardian Installation and Administration User Guide
Launching Compliance Guardian Scanner File System Mode
On the Scheduled Classification Scanner Home interface, select Create on the ribbon, a drop-down list
appears. Select File System from the drop-down list, then you will be brought to the Scheduled
Classification File System Mode.
Performing a Scheduled Classification Scanner Plan in Wizard Mode
To configure a Scheduled Classification Scanner plan using Wizard Mode, complete the following steps:
From the Scope panel on the left, select one or more connections. You can enter a keyword into
the Search box above the connections to filter out the relevant connections.
Select Plan Builder from the Plan Management group on the ribbon, select Wizard Mode from
the drop-down menu, or you can directly select Start with Wizard Mode on the landing page.
Enter a Plan Name for the plan and an optional Description.
Select Next on the ribbon or on the lower-right section of the screen. The Report Settings
screen appears. Select a Report Database for storing the job result.
Select Next on the ribbon or on the lower-right section of the screen. The Scan Settings screen
appears.
Configure the following scan settings:
•
Filter Policy – Select a filter policy from the drop-down list or create a new policy to limit
the scope of the job. For more information on working with filter policies, refer to Filter
Policy.
•
Scan Policy – Select a scan policy from the drop-down list or create a new scan policy to
define the scan rules for scanning content. For more information on working with scan
policies, refer to Configuring Scan Policies.
•
Scan Hidden Files Option – Select whether or not to scan the hidden files in the
specified file system.
•
Alert – If you want Compliance Guardian to send an e-mail when an error occurs during
the file scan, then select an e-mail profile to specify the users who will receive the email, and select an e-mail template. You can also select the New E-mail Template link to
create a new e-mail template. For more information, refer to the Configuring E-mail
Templates section in this user guide.
*Note: Even though there may be more than one error when scanning a file, the alert email will only be sent when the first error occurs.
•
Action Policy – Select an action policy from the drop-down list or create a new action
policy to define the actions to the content that will be scanned out. For more
information on working with action policies, refer to Managing Action Policies.
Select Next on the ribbon or on the lower-right section of the screen. The Schedule screen
appears.
Compliance Guardian Installation and Administration User Guide
229
Select a scheduling option:
•
No schedule – Select this option to configure the job to not run on a schedule (the job
must be manually initiated).
•
Configure the schedule myself – Configure a customized schedule, and run the plan by
schedule.
Select Add Schedule and the Add Schedule window pops up. Configure the following
settings for the schedule:
o
Options – Select the type of the scan for this plan: Full Scan or Incremental
Scan. Full Scan scans all of the content in the scope defined in the plan, while
Incremental Scan only scans the content that has been modified since the last
incremental or full scan job.
If selecting Incremental Scan, the Reference Time option is enabled.
Reference Time – Choose whether to scan contents created or modified
at a specified interval. If you choose to use a reference time, specify the
time to scan contents created or modified. Enter an integer into the
textbox and select Minute(s), Hour(s), or Day(s) from the drop-down
list.
*Note: It is recommended specifying a reference time when the
recurrence schedule configured in Range of Recurrence is End after 1
occurrence.
o
Schedule Settings – Specify the frequency to run the rerunning schedule. Enter
an integer into the text box and select Minute(s), Hour(s), Day(s), Week(s), or
Month(s) from the drop-down list.
o
Range of Recurrence – Specify when to start and end the running recurring
schedule.
Start time – Set up the time to start the plan and Time Zone can be
changed under the Start time. Note that the start time cannot be earlier
than the current time.
No end date – Select this option to repeat running the plan until being
stopped manually.
End after specified occurrence(s) – Select this option to stop the plan
after specified occurrences that you configure in the text box.
End by – Set up the time to end the recurrence of plans.
Select OK to save the settings. After configuring the schedule for this replication job,
select Calendar View to view the job in a calendar view.
Select Next on the ribbon or on the lower-right section of the screen. The Advanced screen
appears.
230
Compliance Guardian Installation and Administration User Guide
Configure the following advanced settings:
•
Notification – Allow you to choose the type of notification report, and designate which
user will receive an e-mail notification report. Select a Notification Profile you previously
created from the drop-down menu. Select View beside the drop-down menu to view
details of the Notification Profile or select New Notification Profile from the drop-down
menu. For information on creating a notification profile, refer to User Notification
Settings.
Select Next on the ribbon or on the lower-right section of the screen. The Overview screen
appears.
Review and edit the plan selections on the Overview screen. To make changes, select (Edit). This
link takes you to the corresponding setting page, and allows you to edit the configuration.
Select Finish or Finish and Run Now on ribbon or on the lower-right section of the screen. The
plan is now listed in Plan Manager.
If you select Finish and Run Now, the Run Now interface pops up to allow you to choose
Options:
•
Full Scan – Scans all of the content in the scope defined in the plan.
•
Incremental Scan – Scans the content that has been modified (Add, Delete, and Modify)
since the last incremental or full scan job. If selecting Incremental Scan, the Reference
Time option is enabled.
o
Reference Time – Choose whether to replicate contents created or modified at
a specified interval. If you choose to use a reference time, specify the time to
replicate contents created or modified. Enter an integer into the text box and
select Minute(s), Hour(s), or Day(s) from the drop-down list.
*Note: The default maximum storage time of a SharePoint change log is 60 days. If the
reference time you configure is greater than 60 days, Compliance Guardian only runs an
incremental scan for the modifications within 60 days. For the modifications exceed 60 days,
Compliance Guardian runs full replication.
Select OK to run the job.
Performing a Scheduled Classification Scanner Plan in Form Mode
Form Mode offers the ability to run a quick scan job by providing a truncated version of all of the
Scheduled Classification Scan Plan Wizard screens on one page. Select the Scope of the content you
want to scan, select Plan Builder from the Plan Management group on the ribbon, and then select Form
Mode from the drop-down menu, or you can directly select Start with Form Mode on the landing page.
For detailed information about how to configure the Scheduled Classification Scan Plan settings, refer to
Performing a Scheduled Classification Scanner Plan in Wizard Mode.
*Note: If you are unfamiliar with this plan creation process, it is not recommended that you use this
mode to configure settings.
Compliance Guardian Installation and Administration User Guide
231
Scheduled Classification Scanner for Social Network
The Social Network Mode allows you to configure connection with a social network, Currently,
Compliance Guardian only supports scanning content in Yammer. Compliance Guardian allows users to
scan content according to a predefined scan policy and then take action on that content.
Launching Scheduled Classification Scanner Social Network Mode
On the Scheduled Classification Scanner Home interface, select Create on the ribbon, a drop-down list
appears. Select Social Network from the drop-down list to enter the Scheduled Classification Social
Network Mode to scan content in Yammer.
Configuring Connections to Yammer
For more information, refer to Configuring Connections to Yammer.
Performing a Scheduled Classification Scanner Plan in Wizard Mode
To configure a Scheduled Classification Scanner plan using Wizard Mode, complete the following steps:
From the Scope panel on the left, select a connection.
Select Plan Builder from the Plan Management group on the ribbon, select Wizard Mode from
the drop-down menu, or you can directly select Start with Wizard Mode on the landing page.
Enter a Plan Name for the plan and an optional Description.
Select Next on the ribbon or on the lower right section of the screen. The User Scope screen
appears. Define the following options:
•
Add users – Select the radio button to add users. Select the Select Users link, the Add
specified users window appears.
In the left pane of the Add Users window, enter a keyword in the search box, the names
and e-mail addresses of the related users who are associated with the network are
displayed in the table.
You can also select the Advanced button to filter the results by user or groups. Select
Add a Criterion.
Rule – Select Group or User as the rule.
Conditions – Select Equals or Contains.
Value – Enter the value for the rule.
Select the Delete (
) button to delete a rule.
To add more filters, select Add a Criterion again.
232
Compliance Guardian Installation and Administration User Guide
*Note: Depending on the filters you enter, you can change the logical relationships
between the rules by selecting And and Or.
After configuring the filter rules, select Search to search for the related users or groups.
The searched out users or the users in the searched out group are displayed in the left
pane of the Add Users window.
Select the user checkboxes and then select the Add button, the users are added into the
left table. Select the Remove to cancel adding the users.
Select Save on the Add Users window, posts of the users added in the left pane will be
scanned.
•
Add users according to the configured conditions – Select the None link, the Add users
window appears. Configure the condition to filter by groups or users.
Select Preview to review the users that meet the configured condition in the Preview
window. Select Save to save the changes and close the Add users window. The posts of
the users that meet the configured condition will be scanned.
•
Import file with specified users – Select the radio button to import a file along with the
added users. You can select Download Template, and save the template file. Edit the
template file to add the users and then select Import to import the file.
Select Next on the ribbon or on the lower right section of the screen. The Scan Settings screen
appears.
Configure the following scan settings:
•
Scan Policy – Select a scan policy from the drop-down list or create a new scan policy.
•
Scan File/Note Versions – Select to scan the current version or all of the versions of the
file or note.
•
Action Policy – Select an action policy from the drop-down list or create a new action
policy.
Select Next on the ribbon or on the lower right section of the screen. The Schedule screen
appears.
Select a scheduling option:
•
No schedule – Select this option if you do not want to add a schedule and run the job
manually.
•
Configure the schedule myself – Configure a customized schedule.
Select Add Schedule and the Add Schedule window pops up. Configure the following
settings for the schedule:
o
Options – Select the type of the scan for this plan: Full Scan or Incremental
Scan. Full Scan will scan all of the content in the scope defined in the plan, while
Compliance Guardian Installation and Administration User Guide
233
an Incremental Scan only scans the content that has been modified since the
last incremental or full scan job.
If you select Incremental Scan, the Reference Time option is enabled.
Reference Time – Scans content created or modified during a selected
interval. If you choose to use a reference time, select the time to scan
contents created or modified. Enter an integer into the text box and
select Minute(s), Hour(s), or Day(s) from the drop-down list.
o
Schedule Settings – Select the frequency to which you want to run the scan. .
Enter an integer into the text box and select Minute(s), Hour(s), Day(s),
Week(s), or Month(s) from the drop-down list.
o
Range of Recurrence – Specify the Start time for the scan job. Select one of the
following options for the end time and configure its settings:
No end date – Select this option to continue running the job according
to the schedule until you manually stop it.
End after specified occurrence(s) – Select this option to stop the plan
after a selected number of times.
End by – Set up the time to end the recurrence of plans.
Select OK to save the settings. After configuring the schedule for this replication job,
select Calendar View to view the job in a calendar view.
Select Next on the ribbon or on the lower right section of the screen. The Advanced screen
appears.
Configure the following advanced settings:
•
Alert – Send an alert e-mail when an error occurs during the process of scanning
content. Select an e-mail profile, and an e-mail template. The alert e-mail will be sent to
the recipients configured in the selected alert notification profile.
•
Notification – Select a Notification Profile from the drop-down menu. Select View
beside the drop-down menu to view details of the Notification Profile or select New
Notification Profile from the drop-down menu. For information on creating a
notification profile, refer to User Notification Settings.
Select Next on the ribbon or on the lower right section of the screen. The Overview screen
appears.
To make changes, select Edit.
Select Finish or Finish and Run Now on ribbon or on the lower right section of the screen. The
plan is now listed in Plan Manager.
If you select Finish and Run Now, the Run Now interface pops-up to allow you to choose
Options:
•
234
Full Scan – Scans all of the content in the scope defined in the plan.
Compliance Guardian Installation and Administration User Guide
•
Incremental Scan – Scans the content that has been modified (Add, Delete, and Modify)
since the last incremental or full scan job. If you select Incremental Scan, the Reference
Time option is enabled.
o
Reference Time – Choose whether to replicate contents created or modified at
a specified interval. If you choose to use a reference time, specify the time to
replicate contents created or modified. Enter an integer into the text box and
select Minute(s), Hour(s), or Day(s) from the drop-down list.
Select OK to run the job.
Compliance Guardian Installation and Administration User Guide
235
Performing a Scheduled Classification Scanner Plan in Form Mode
. Select the Scope of the content you want to scan, select Plan Builder from the Plan Management
group on the ribbon. Select Form Mode from the drop-down menu, or you can directly select Start with
Form Mode on the landing page. For detailed information about how to configure the Scheduled
Classification Scan Plan settings, refer to Performing a Scheduled Classification Scanner Plan in Wizard
Mode.
*Note: If you are unfamiliar with this plan creation process, it is not recommended that you use this
mode to configure settings.
Using Compliance Guardian Features in SharePoint
Refer to the following sections about the Compliance Guardian Tag Assist Manager feature, and
Compliance Guardian Quarantine Manager features.
Using Compliance Guardian Tag Assist Manager in SharePoint
Compliance Guardian Tag Assist Manager is used in combination with the For Compliance Guardian Tag
Assist Manager only option in Real-Time Classification Scanner. It allows you to manually scan the file in
the specified scope defined in Compliance Guardian and view the scanned results, or you can directly
modify the tag values for the scanned file without modifying the checks. Ensure that
SP2007AssistManager.wsp or SP2010AssistManager.wsp or SP2013AssistManager.wsp is deployed
before using this feature. For more information on deploying the solution, refer to Solution Manager.
*Note: This feature is supported in SharePoint 2007, SharePoint 2010, and SharePoint 2013.
Refer to the following steps to use Compliance Guardian Tag Assist Manager in SharePoint 2007:
Navigate to the corresponding SharePoint site (where the content you want to scan is) > Site
Settings > Site features, and activate the Compliance Guardian Tag Assist Manager feature.
*Note: At a minimum, to use the Compliance Guardian Tag Assist Manager feature in a site, the
user must have the following required six site permissions assigned:
•
Manage Lists
•
Edit Items
•
View Items
•
View Application Pages
•
View Pages
•
Open
Navigate to the corresponding document library. Select the down arrow button ( ) before the
file you want to scan, and select Compliance Guardian Tag Assist Manager from the appeared
236
Compliance Guardian Installation and Administration User Guide
drop-down list. The Compliance Guardian Tag Assist Manager interface appears. There are three
columns in the table of this interface:
•
Tag Name – Display the tag names defined in the corresponding checks. The values in
this column cannot be changed.
•
Original Value – Display the tag values that are added for the file in the last scan. If you
have not added any tag values in the last scan, there will be no value in this column.
•
Current Value – Display the file’s current tag value based on the checks. The current
values can be modified according to your own requirements.
You can select to check the checkbox to the right of the tag value to determine which tag
(include the tag name and tag value) can be added to this file. Selecting the checkbox after the
Current Value column will select all of the tags.
Select OK or Cancel, and the Compliance Guardian Tag Assist Manager window will be closed.
•
If you select OK, the current tags will be added in the locations that are defined in the
corresponding checks. There are three locations where the tags will be:
o
In SharePoint – The single line of text column named Tag Name will be added
for the file in SharePoint, the tag values will be added in this column; If a single
line of text column named Tag Name already exists in SharePoint, then the tag
values will be added in this column; If a column named Tag Name already exists
in SharePoint, but it is not a single line of text column, then a single line of text
column named Tag Name will also be created in SharePoint for displaying the
tag values.
o
In the file – The tags will be added in the file.
o
In both the Tag Name column and the file – The tags will be added in both the
file and SharePoint.
*Note: Tags can only be added into the following file types: DOCX, XLSX, PPTX,
HTM, HTML, PDF, and ASPX.
If you define to add tags in the file in the check, but the file type is not one of
the above file types, select OK, and the tags will not be added.
•
If you select Cancel, the current tag names and tag values will not be added.
*Note: If you do not have the Manage Lists or Edit Items permission to the corresponding site,
you can only view the scanned results, the OK button will be greyed out.
Refer to the following steps to use Compliance Guardian Tag Assist Manager in SharePoint 2010:
Navigate to the corresponding SharePoint site (where the content you want to scan is) > Site
Settings > Site features and activate the Compliance Guardian Tag Assist Manager feature.
*Note: At a minimum, to use the Compliance Guardian Tag Assist Manager feature in a site, the
user must have the following required six site permissions assigned:
Compliance Guardian Installation and Administration User Guide
237
•
Manage Lists
•
Edit Items
•
View Items
•
View Application Pages
•
View Pages
•
Open
Select the corresponding document library in Quick Launch Bar, and then select the Documents
tab. The button Compliance Guardian Tag Assist Manager appears in the Compliance Guardian
Tool group on the ribbon.
Check the checkbox in front of the file that you want to scan. Select Compliance Guardian Tag
Assist Manager on the ribbon.
The Compliance Guardian Tag Assist Manager window pops up, and the message Please wait
while the page is loading… appears. After the file is finished scanning, the scan results will
appear in this window.
There are three columns in the table of this window:
•
Tag Name – Display the tag names defined in the corresponding checks. The values in
this column cannot be changed.
•
Original Value – Display the tag values that are added for the file in the last scan. If you
have not added any tag values in the last scan, there will be no value in this column.
•
Current Value – Display the file’s current tag value based on the checks. The current
values can be modified according to your own requirements.
You can select to check the checkbox to the right of the tag value to determine which tag
(include the tag name and tag value) can be added to this file. Selecting the checkbox after the
Current Value column will select all of the tags.
Select OK or Cancel, and the Compliance Guardian Tag Assist Manager window will be closed.
•
238
If you select OK, the current tags will be added in the locations that are defined in the
corresponding checks. There are three locations where the tags will be:
o
In SharePoint – If a Managed Metadata type/Choice type/Single line of text type
column named Tag Name exists in SharePoint, the tag value will be added into
this column (if the three kinds of columns all exist in SharePoint, and the name
is Tag Name, the priority of the column being added tag is Metadata type
column, Choice type column and then single line of text type column). If there is
no column (Managed Metadata type/Choice type/single line of text type
column) named Tag Name in SharePoint, a single line of text type column
named Tag Name will be created for adding the tag value.
o
In the file – The tags will be added in the file.
Compliance Guardian Installation and Administration User Guide
o
In both the Tag Name column and the file – The tags will be added in both the
file and SharePoint.
*Note: Tags can only be added into the following file types: DOCX, XLSX, PPTX,
HTM, HTML, PDF, and ASPX. If you define to add tags in the file in the check, but
the file type is not one of the above file types, select OK, the tags will not be
added.
•
If you select Cancel, the current tag names and tag values will not be added.
*Note: If you do not have the Manage Lists or Edit Items permission to the corresponding site,
you can only view the scanned results, the OK button will be greyed out.
Using Compliance Guardian Quarantine Manager in SharePoint
Compliance Guardian Quarantine Manager allows you to manage the quarantined files. Ensure that
SP2007QuarantineManager.wsp or SP2010QuarantineManager.wsp or
SP2013QuarantineManager.wsp is deployed before using this feature. For more information on
deploying the solution, refer to Solution Manager. This feature is supported in SharePoint 2007,
SharePoint 2010 and SharePoint 2013.
To use this feature in SharePoint 2007, complete the following steps:
1. Navigate to the corresponding SharePoint site > Site Settings > Site features, activate the
Compliance Guardian Quarantine Manager feature.
*Note: At a minimum, to use the Compliance Guardian Quarantine Manager feature in a site,
the user must have the following required seven site permissions assigned:
•
Manage Lists
•
Edit Items
•
View Items
•
View Application Pages
•
View Pages
•
Open
•
Browse User Information
2. Return to the Site Settings, and then select Compliance Guardian Quarantine Manager in the
Compliance Guardian Tools and Services group. You will be brought to the Compliance
Guardian Quarantine Manager interface.
3. In the Compliance Guardian Quarantine Manager interface, select Quarantine Manager tab,
you will see the following areas:
Compliance Guardian Installation and Administration User Guide
239
•
Tool Field – Use the tool field to manage the quarantined files. You can download the
files’ details, restore the files or delete the files in bulk through the corresponding
buttons in this field.
o
View Content – View the selected file’s content.
o
−
You can view the files on SharePoint site webpage.
−
You can directly edit the content of the file.
−
SharePoint items cannot be performed this action.
For the SharePoint files or items that are affected by the Out of place
quarantine method, after you select View Content:
−
The file will be downloaded.
−
SharePoint items cannot be performed this action since there is
no content in an item.
View Properties – View the file or item’s properties.
240
For the SharePoint files or items that are affected by the In place
quarantine method, after you select View Content:
For the SharePoint files or items that are affected by the In place
quarantine method, after you select View Property:
−
The corresponding SharePoint webpage appears displaying the
file’s properties.
−
The corresponding SharePoint webpage appears displaying the
item’s properties. You can open the item attachment in the
appeared SharePoint webpage, and then edit the content of the
attachment.
For the SharePoint files or items that are affected by the Out of place
quarantine method, after you select View Property:
−
All of the selected file’s properties are displayed in the
appeared View Properties page. Select Close to exit the View
Properties page.
−
All of the selected item’s properties are displayed in the
appeared View Properties page. You can select the attachment
name to download the attachment of the item, and edit the
content of the attachment, and then upload the edited item
through the Upload function which is introduced above. Select
Close to exit the View Properties page.
o
Download Details – Download the selected files.
o
Restore – Refer to Restoring Files in Quarantine Manager for details.
o
Delete – Delete the quarantined files permanently.
Compliance Guardian Installation and Administration User Guide
o
Upload Content – Upload a file.
For the SharePoint files or items that are using the In place quarantine
method, after you select Upload: Since the files or attachments of items
that are affected by the In place quarantine method are edited in the
webpage directly, this Upload function does not take effect on these
files and items.
For the SharePoint files or items that are using the Out of place
quarantine method, after you select Upload:
−
The downloaded and edited file will be uploaded and will
replace the selected file.
*Note: The uploaded file name must be same as that of the
selected file.
−
The downloaded and edited attachment of the SharePoint item
can be uploaded and replace the original attachment of the
item.
*Note: The uploaded attachment name must be same as the
original attachment name.
o
Data Range – The first time you access Quarantine Manager, the files or items in
the last 1 day are displayed. You can change it by selecting Data Range and then
enter a value in the Latest _ Days/Hours field. Select OK to save the setting. The
next time you access Quarantine Manager, the files or items that are
quarantined in the specified time range will be displayed.
•
Scope – Define the scope of the files you want to manage.
•
Files Field – View the files in the selected nodes.
•
File Details – Display a file’s detailed information.
Compliance Guardian Installation and Administration User Guide
241
Figure 28: SharePoint 2007 Compliance Guardian Quarantine Manager Interface.
4. To manage the quarantined files, complete the following steps:
a. In the scope area of the screen, select the site collection to expand to the node in which
the files you want to manage are.
b. Select the node, and you will see all of the files listed in the Files field to the right of the
Scope field.
c. Select the specific files by checking the checkbox in front of the file in the Files field. The
file details will display in the File Details field.
*Note: In the File Details field, only one file’s details can be displayed. If you select
several files, only the last selected file’s details can display in the screen. If you want to
view all of the selected files’ detailed information, you must download the details to a
CSV file using Download Details.
d. Select the checkbox next to the file you want to manage. Select the arrow ( ) button
next to the file name, and a drop-down list appears. You can choose how to manage the
file by selecting the corresponding action (View Content, View Properties, Download
Details, Restore, Upload Content, and Delete).
To use this feature in SharePoint 2010 or SharePoint 2013, complete the following steps:
1. Navigate to the corresponding SharePoint site collection > Site Settings > Manage site features,
and activate the Compliance Guardian Quarantine Manager feature.
242
Compliance Guardian Installation and Administration User Guide
*Note: At a minimum, to use the Compliance Guardian Quarantine Manager feature in a site,
the user must have the following required seven site permissions assigned:
•
Manage Lists
•
Edit Items
•
View Items
•
View Application Pages
•
View Pages
•
Open
•
Browse User Information
2. Return to the Site Settings, and then select Compliance Guardian Quarantine Manager in the
Compliance Guardian Tools and Services group. You will be brought to the Compliance
Guardian Quarantine Manager interface.
3. In the Compliance Guardian Quarantine Manager interface, select Quarantine Manager tab, you
will see the following areas:
•
Tabs – Switch between the Browse tab, and the Quarantine Manager tab.
•
Ribbon – Use the ribbon to manage the quarantined files. You can download the files’
details, restore the files or delete the files in bulk through the ribbon.
o
View Content – View the selected file’s content.
o
For the SharePoint files or items that are affected by the In place
quarantine method, after you select View Content:
−
You can view the files on SharePoint site webpage.
−
You can directly edit the content of the file.
−
SharePoint items cannot be performed this action.
For the SharePoint files or items that are affected by the Out of place
quarantine method, after you select View Content:
−
The file will be downloaded.
−
SharePoint items cannot be performed this action since there is
no content in an item.
View Properties – View the file or item’s properties.
For the SharePoint files or items that are affected by the In place
quarantine method, after you select View Properties:
−
The corresponding SharePoint webpage appears displaying the
file’s properties.
−
The corresponding SharePoint webpage appears displaying the
item’s properties. You can open the item attachment in the
Compliance Guardian Installation and Administration User Guide
243
appeared SharePoint webpage, and then edit the content of the
attachment.
For the SharePoint files or items that are affected by the Out of place
quarantine method, after you select View Properties:
−
All of the selected file’s properties are displayed in the View
Properties page. Select Close to exit the View Properties page.
−
All of the selected item’s properties are displayed in the View
Properties page. You can select the attachment name to
download the attachment of the item, edit the content of the
attachment, and then upload the edited item through the
Upload function which is introduced above. Select Close to exit
the View Properties page.
o
Download Details – Download the selected files.
o
Restore – Refer to Restoring Files in Quarantine Manager for details.
o
Delete – Delete the quarantined files permanently.
o
Upload Content – Upload a file.
For the SharePoint files or items that are affected by the In place
quarantine method, after you select Upload: Since the files or
attachments of items that are affected by the In place quarantine
method are edited in the webpage directly, this Upload function does
not take effect on these files and items.
For the SharePoint files or items that are affected by the Out of place
quarantine method, after you select Upload:
−
The downloaded and edited file will be uploaded and will
replace the selected file.
*Note: The uploaded file name must be same as that of the
selected file.
−
The downloaded and edited attachment of the SharePoint item
can be uploaded and replace the original attachment of the
item.
*Note: The uploaded attachment name must be same as the
original attachment name.
o
•
244
Data Range – The first time you access Quarantine Manager, the files or items
that have been quarantined in the last 24 hours will be displayed automatically.
You can change it by selecting Data Range and then enter a value in the Latest _
Days/Hours field. Select OK to save the setting. The next time you access
Quarantine Manager, the files or items that are quarantined in the specified
time range will be displayed.
Scope – Define the scope of the files you want to manage.
Compliance Guardian Installation and Administration User Guide
•
Files Field – View the files in the selected nodes.
•
File Details – Display a file’s detailed information.
Figure 29: SharePoint 2010 Compliance Guardian Quarantine Manager Interface.
Figure 30: SharePoint 2013 Compliance Guardian Quarantine Manager Interface.
4. To manage the quarantined files, complete the following steps:
a. In the scope field of the screen, select the site collection to expand to the node in which
the files you want to manage are.
Compliance Guardian Installation and Administration User Guide
245
b. Select the node, and then you will see all of the files will list in the Files field to the right
of the Scope field.
c. Select the specific files by checking the checkbox in front of the file in the Files field. The
file details will display in the File Details field.
*Note: The File Details field can only display information on one file at a time. If you
select several files, only the last selected file’s details can display on the screen. If you
want to view information about all of the selected files, you must download the details
to a CSV file using Download Details.
d. Select the checkbox before the file you want to manage, select next to the file name,
a drop-down list appears, and then you can select how to manage the file by selecting
the corresponding action (View Content, View Properties, Download Details, Restore,
Upload Content and Delete).
Restoring Files in Quarantine Manager
You can restore a quarantined file or item by selecting Restore.
Restoring the SharePoint Files or Items that Are Affected by the In Place Quarantine Method
After you select a SharePoint file or item that is affected by the In place quarantine method, configure
the following settings in the Restore interface:
•
Ignore this File Until the File or Policies Change – Select this checkbox, the file or item
will not be scanned until the action policy or scan policy is changed, or until the file or
item is changed.
•
Change Classification Result – If you have selected the Ignore this file until the file or
the scan/action policy is changed checkbox, this field appears. You can then select to
change the classification result by selecting the Change classification result checkbox. A
table listing all the tags that have been added to the file or item appears. You can
change the tags based on your own requirement.
•
Conflict Resolution – If there is a file (this function will not be taken effect on a
SharePoint item) whose name is same as the file name that you want to restore in the
destination, a conflict will be judged. Select a conflict resolution:
o
Replace – The conflicted destination file will be replaced with the selected file
after the restore.
o
Skip – The file will be skipped to restore to the destination.
Restoring the SharePoint Files or Items that Are Affected by the Out of Place Quarantine
Method
After you select a SharePoint file or item that is affected by the Out of place quarantine method,
configure the following settings in the appeared Restore interface:
246
Compliance Guardian Installation and Administration User Guide
•
Restore Type – Select In place restore to restore the selected file or item to its original
place. Select Out of place restore to restore the selected file or item to another place in
SharePoint.
•
Destination – If you have selected Out of place restore, this field appears. All of the
SharePoint farms appear. Browse the desired farm tree to a list level, library level, or
folder level, the file or item will be restored to the selected SharePoint list or library.
•
Agent Group – If you have selected Out of place restore, this field appears. Select an
agent group for running the restore job, or select New Agent Group to create an agent
group.
•
Ignore this File Until the File or Policies Change – Refer to Restoring the SharePoint
Files or Items that Are Affected by the In Place Quarantine Method for details.
•
Change Classification Result – Refer to Restoring the SharePoint Files or Items that Are
Affected by the In Place Quarantine Method for details.
•
Conflict Resolution – Refer to Restoring the SharePoint Files or Items that Are Affected
by the In Place Quarantine Method for details.
For the SharePoint files or items that are affected by the Out of place quarantine method, after they are
restored to SharePoint, the following related objects or properties will be affected:
•
Workflow – The original related workflows will not associate to the restored file or item.
•
ID – The file’s or item’s ID will be changed after the file or item is restored to SharePoint.
•
Web part – Refer to the following scenarios for details:
o
If the file’s Web part is not saved together with the file or item (saved in the
different tables in SharePoint database), the Web part will not exist after the file
or item is restored no matter you select In place restore or Out of place restore
as the Restore Type.
o
If the file’s Web part is saved together with the file or item (saved in the same
tables in SharePoint database) and if you select In place restore as the Restore
Type, the Web part can be restored normally along with the file or item.
o
If the file’s Web part is saved together with the file or item (saved in the same
tables in SharePoint database) and if you select Out of place restore as the
Restore Type, the Web part may be affected after the restore.
•
Permissions – The restored file or item will inherit its parent’s permissions.
•
Rating, SharePoint Tags and Notes – The restored file or item’s rating and SharePoint
tags and notes will no longer exist after it is restored.
•
Versions – The file or item’s versions will not be kept after the file or item is restored to
SharePoint. Only the version count can be kept.
Compliance Guardian Installation and Administration User Guide
247
Classification Report
For details about classification reports and procedures for how to use them, refer to the Compliance
Guardian User Guide.
The Classification Report area includes Action Report, Incident Report, and Yammer Report. It is used to
view the report results of the files affected by Classification Scanner actions, as well as provide
operations to the quarantined files, redacted files and encrypted files.
Launching Classification Report
To launch Classification Report, complete the following steps:
1. Log in to Compliance Guardian. If you are already in the software, select the home page button
( ) go to the home page. From the home page, all of the products are displayed.
2. Select Classification Report to launch its interface.
3. Alternatively, you can select Administration on the top-left corner, and select the Classification
Report tab on the appeared navigation bar to launch Classification Report.
Figure 31: Classification Report module launch window.
248
Compliance Guardian Installation and Administration User Guide
Job Monitor
Job Monitor allows you to view the status or details of jobs, download reports, and manage the jobs all
from a central interface.
Job Monitor is also integrated into other Compliance Guardian products, which enables you to manage
the jobs inside its corresponding modules with additional features specific to the product itself. These
additional features are also available in the stand-alone Job Monitor module.
Getting Started
Refer to the following sections for important information on getting started with Job Monitor.
Launching Job Monitor
To launch Job Monitor and access its functionality, complete the following steps:
1. Log in to Compliance Guardian. If you are already in the software, select the home page button (
) on the left corner to go the home page.
2. From the home page, select Job Monitor to launch the module.
Figure 32: Job Monitor module launch window.
3. Alternatively, you can select Administration on the top-left corner, and select the Job Monitor
tab on the appeared navigation bar to launch Control Panel.
Compliance Guardian Installation and Administration User Guide
249
Figure 33: Job Monitor tab on the navigation bar.
Understanding Job Monitor
Job Monitor allows you to customize the way your jobs are displayed so you can more efficiently
manage them. The following two sections will cover the different viewing options.
Job Monitor Interface
The interface in Job Monitor contains the following four areas:
1. Tabs – Switch between the Job Monitor and Scheduled Job Monitor interface.
2. Ribbon – Toolbar where you can customize the view, perform actions on selected jobs, and
configure report location settings.
3. Search – Search tool for filtering the displayed jobs.
4. Viewing pane – List of jobs displayed according to the filters you configure.
250
Compliance Guardian Installation and Administration User Guide
Figure 34: Job Monitor user interface.
Job Monitor vs. Scheduled Job Monitor
The Job Monitor module interface contains two tabs:
•
Job Monitor – Allows you to access all of the current and previous jobs.
•
Scheduled Job Monitor – Allows you to exclusively access jobs that are scheduled to run
in the future.
*Note: Differentiate between scheduled jobs (jobs scheduled to run in the future) and recurring jobs.
Scheduled jobs will only show up on the Scheduled Job Monitor tab. Recurring jobs will show up on both
tabs.
Configuring the Viewing Pane
In both the Job Monitor and Scheduled Job Monitor tabs, there is a View toolbar and a Filter toolbar on
the ribbon with further configurable options to help you more efficiently manage your current and
previous jobs.
The View Toolbar
This toolbar allows you to choose to have your jobs displayed in List View or Calendar View:
•
List View – Displays your jobs in a table. You can add or remove a column to customize
your view by selecting the manage columns button ( ). Select the desired column for
Compliance Guardian Installation and Administration User Guide
251
this view by checking the checkbox next to its name in the drop-down menu. Select OK
to save your choices, or select Cancel to close the drop-down menu without saving your
choices.
•
Calendar View – Displays your jobs in a calendar. You can configure Calendar View to
display in Day, Week, or Month format by selecting the respective button in the upper
right-hand corner. To see detailed information about a job, place your mouse cursor
over its time slot.
You can also configure the Time Zone in this toolbar by specifying one of the options below to display in
the job information.
•
Default – Displays the time zone of the machine where the control service is installed. In
the Scheduled Job Monitor tab, the default time zone is based on the time zone
configured for each schedule.
•
Local – Displays the time zone that the Internet Explorer (IE) browser used to access
Compliance Guardian.
By default, the time zone of the job information is set to Default.
*Note: In Calendar View, the time zone is set to Local and cannot be altered. To change the time zone,
select the drop-down menu, and select Local.
The Filter Toolbar
This toolbar allows you to filter the jobs listed in the viewing pane by Date Range or Module.
•
Date Range – Allows you to limit the jobs displayed by specifying a time frame.
•
Module – Allows you to limit the jobs displayed by specifying the module where the jobs
are run.
Searching Jobs
Job Monitor also allows you to search for jobs to further customize which jobs are displayed to you. The
search interface is located under the toolbar ribbon. Select the corresponding radio button to either
Search all pages or Search current page. Placing your cursor over the Search text box will bring up a
tooltip informing you of the searchable parameters.
*Note: The search function is not case sensitive.
Since the Job ID includes the start time for the job, you can search for a job by start time. Enter the time
as a numerical string in the text box, then select the magnifying glass ( ) (for example, search for 201101-01 17:05:10 by typing 20110101170510 in the search text box).
252
Compliance Guardian Installation and Administration User Guide
Managing Jobs
The Job Monitor tab and the Scheduled Job Monitor tab offer different sets of tools more suitable for
managing the different types of jobs.
*Note: If one tool is not supported for the selected job of the specified product, the corresponding
button of this tool will be greyed out and not available to select.
Operations in the Job Monitor Tab
The Job Monitor tab provides you with a number of tools that allow you to perform actions to jobs you
are currently running or have run in the past.
The Manage Toolbar
This toolbar provides you with the following functionality:
•
View Details – Allows you to view a job report of the selected job. Select the job by
checking the corresponding checkbox. Select View Details on the ribbon. The Job Details
tab appears with the job report displayed in the viewing pane with the Summary tab
selected. The Summary tab displays general information about the job. For more indepth information, select the Details tab in the viewing pane. Select Download to
download the job report. Select TXT, CSV, or XLS as the format for the report, then
select to download the Current columns or All columns from the Details tab, and then
select OK to download the report, or Cancel to return to the Job Details tab.
•
Delete – Deletes job information without sending a notification to anyone. Select the
checkboxes before the jobs, and then select Delete. A confirmation pop-up window will
appear to confirm the operation. Select OK to delete the selected jobs, or select Cancel
to return to the interface without deleting the jobs.
•
Download – Allows you to download the job report of the selected jobs to a specified
location. You have the option to set the Report Format to download in TXT, CSV, or XLS
format. Here you can only choose to download All columns from the Details tab.
*Note: Prior to downloading the job report, make sure the Internet Explorer (IE)
download settings are configured properly.
You can configure the download settings for IE by following the steps below.
Navigate to Internet Explorer > Tools > Internet Options.
Switch to the Security tab and select a zone.
Select the Custom level button inside the Security level for this zone field.
Scroll down to the Downloads setting.
Compliance Guardian Installation and Administration User Guide
253
Change the detailed settings according to the screenshot below.
Figure 35: IE security settings.
The Actions Toolbar
When you select one or more jobs, the toolbar appears. This toolbar provides you with the Stop action
to stop the selected in-progress job immediately. The job status will change to Stopped, but the job
information will be retained, as well as any data aggregated by the job.
*Note: Once a job is stopped, in order to run it again, you must launch the respective module you used
to run that job. Select the Plan Manager tab, and then select the plan by checking the checkbox, and
select Run Now. When you run the same job again, it will be considered a new job, so the previous data
is retained.
The Settings Toolbar
This toolbar provides access to the Report Location tool that allows you to specify a location for storing
the reports generated after running the jobs. If you do not configure this tool, the job reports will be
stored in the default location (...\AvePoint\Compliance Guardian\Manager\work).
To store the job reports on a network share:
1. Check the Use the Net Share path as the report location checkbox.
2. Enter the UNC Path.
3. Enter the Username.
4. Enter the Password.
5. Select OK.
254
Compliance Guardian Installation and Administration User Guide
Operations in the Scheduled Job Monitor Tab
The Scheduled Job Monitor tab provides you with two toolbars that allow you to perform actions to jobs
that you have scheduled to run in the future. The following sections explain what these tools do in
detail.
The Actions Toolbar
This toolbar provides the following actions for a scheduled job:
•
Enable – If the status of the selected jobs is disabled, you will have the option to select
this button to enable it.
•
Disable – If the status of the selected jobs is enabled, you will have the option to select
this button to disable it.
The Filter Toolbar
This toolbar provides the following filter options for a scheduled job:
•
Date Range – Allows you to limit the jobs displayed by specifying a time frame.
•
Module – Allows you to limit the jobs displayed by specifying the module where the jobs
are run.
Compliance Guardian Installation and Administration User Guide
255
Using Check Validator Tool
The Check Validator tool is used to verify if the custom check that is created using Compliance Guardian
is correct, and also used to verify if you can get the type of scan results you want.
To use the Check Validator, complete the following steps:
1. Go to the machine with Compliance Guardian Agent installed and open
the …\AvePoint\Compliance Guardian\Agent\bin directory to find the CCE.TDFValidator.exe file.
2. Open the CCE.TDFValidator.exe to start this tool.
Figure 36: Check Validator interface.
3. Select the Check/Test Suite (T) button (or you can press T on your keyboard), a pop-up window
appears, select the check or test suite that you want to validate, and then select Open in the
pop-up window. The full path of the selected check/test suite will be displayed on the tool
interface.
4. Select the Test File (F) button (or you can press F on your keyboard), a pop-up window appears,
select the file you want to test, and then select Open in the pop-up window. The full path of the
selected file will be displayed on the tool interface.
256
Compliance Guardian Installation and Administration User Guide
5. Select the Scan button, the file then will be tested according to the rules defined in the selected
check or test suite.
6. The scan results will be displayed in the Scan Result field of this tool. In the Scan Result field, the
Check ID, Check Name, the count of the instances that are found and the status of each check
will be displayed. If one of the statuses of the checks is Failed, the Scan Result will be Failed. The
time that the scan takes will also be displayed.
Figure 37: Scan results of Check Validator.
7. Select Export Report to generate the scan result. After you select the Export Report button, a
pop-up window appears, select the location where you want to save the report, and select OK
on the window. The detailed scan report will be saved in the specified location. You can check
the report to verify if the scan results are what you wanted.
8. Before scanning the selected file, the tool will first validate if the check or test suite is correct, if
the selected check or test suite is not correct, after you select the Scan button, the error
message will be displayed on the tool interface, you can then review the logs for the detailed
information.
9. After the scan job, a report is also generated in …\AvePoint\Compliance
Guardian\Agent\bin\TDFValidatorReport. The report contains three kinds of files:
•
The file that is scanned by Check Validator.
Compliance Guardian Installation and Administration User Guide
257
•
The HTML format of the scanned file.
•
The report that contains all of the scanned file’s violations as well as the violation’s
locations.
Figure 38: Check Validation report.
Related Configuration File
The tool has a related configuration file named CCE.TDFValidator.exe.config, the file is located under
the directory …\AvePoint\Compliance Guardian\Agent\bin directory.
Figure 39: CCE.TDFValidator.exe.config file overview.
You can configure the Value attribute to specify the maximum scan time. If the time that the scan takes
exceeds the specified scan time, an error message will be displayed on the tool interface, and the scan
will stop. By default, the value for the Value attribute is 180 seconds.
258
Compliance Guardian Installation and Administration User Guide
Using Detailed Risk Report Analysis Tool
Compliance Guardian supports exports of detailed risk report information of all the files in a site
collection level Compliance Guardian Scanner for SharePoint job.
*Note: The DocAve Auditor database must be connected so as to get the related auditing information.
Generating the Report
To generate the report, complete the following steps:
Go to the machine with Compliance Guardian Agent installed and open
the …\AvePoint\Compliance Guardian\Agent\bin directory to find the
CCR.RiskReportTool.exe.config file.
Open the CCR.RiskReportTool.exe.config and configure the following attributes:
Figure 40: Attributes for generating the report.
•
Database Name – Specify the database file name as the value of the DBName
attribute. To get the database file name, go to the report location, and find the
request’s corresponding TXT file (the name of the TXT file is the Request ID + _ + the
Request Name). Open the TXT file. You will find all the plans contained in this request.
The database file name follows the corresponding plan. Then go back to the report
location, basing on the database file name in the TXT file, you will find the database
file’s full name (the database name +.db) of the desired plan whose detailed risk
information is going to be exported. .
•
Export Location – Specify the location as the value of the excelLocation attribute. The
report will be generated into this location.
•
File Show Count – Specify the number of the files as the value of the fileShowCount
attribute. The files are displayed according to their risk scores calculated by the Raw
type risk formula. For example, if you specify 10 as the value, then the risk information
of 10 files that have the top 10 risk scores (calculated by the Raw type risk formula) will
be displayed in the report. Each file’s risk information is displayed in one sheet in the
report excel.
•
Auditing Item Count – Specify the number of the Auditing items that will be displayed
in the report. The information of the most recent activities to the file will be displayed
in the report.
After configuring the attributes, save the configuration file.
Compliance Guardian Installation and Administration User Guide
259
Under the same directory (…\AvePoint\Compliance Guardian\Agent\bin), find the
CCR.RiskReportTool.exe file and select to Run As Administrator. After the
CCR.RiskReportTool.exe file has been opened, wait until the following message appears,
indicating the report has been generated into the specified location: The report has been
generated. Press any key to exit.
Figure 41: The CCR.RiskReportTool.exe file interface.
Information Included in the Exported Excel File
The generated risk report excel contains the BasicInformation sheet that displays the basic information
of the risk files. Each risk file has its own sheet for displaying the file’s risk information. The number of
the files whose risk information will be displayed in the report is based on the value of fileShowCount
attribute that you specify in the CCR.RiskReportTool.exe.config file.
You can view the following information in the exported report:
•
•
260
Basic information sheet:
o
The risk scores (the risk scores calculated by the Raw type risk formula, the risk
scores calculated by the Stepped type risk formula and the risk scores calculated
by the Weighted type risk formula) of each site collection in the job. A bar chart
is displayed to help you view the information intuitively.
o
The information of risk files that violated the regulations (check) in the job. A pie
chart is displayed to help you view the information intuitively.
o
The detailed information of the risk files in each site collection, including the risk
scores, the number of the Passed files, Failed files, User Review Required files,
Not Applicable files, Not Tested files and Error files, and the percentage of the
failed files. A bar chart is displayed for each site collection to help you view the
information intuitively.
Risk information of each file:
o
The file information, the risk scores, and the regulations (checks) that the file
violated.
o
The related auditing information, including the access time to the file, the user
who accessed the file, the action type and some related details.
o
The security information related information.
Compliance Guardian Installation and Administration User Guide
Generate Detailed Risk Report of a File
Compliance Guardian supports to export the detailed risk report information of a file through the
ccr.sp2010riskananlyzer.exe or CCR.SP2007RiskAnalyzer.exe files. Compared with the Risk Report that
is displayed in the Compliance Guardian Report, or generated from Compliance Guardian Report, the
detailed risk report combines all of the risk report information of a file to one CSV file, thus for user
conveniently checking and viewing.
Before You Begin
In order to generate the detailed risk report, the ccr.sp2010riskananlyzer.exe or
CCR.SP2007RiskAnalyzer.exe file must be run in the Command Line. The DocAve Auditor database must
be connected so as to get the related auditing information.
To get the risk report, complete the following steps:
1. Go to the machine with Compliance Guardian Agent installed and open the …
\AvePoint\Compliance Guardian\Agent\bin directory to find the ccr.sp2010riskananlyzer.exe
file (CCR.SP2007RiskAnalyzer.exe is for the files in SharePoint 2007, here we take the
ccr.sp2010riskananlyzer.exe as an example).
Figure 42: The EXE file location.
2. On the machine, navigate to Start > All Programs > Accessories > Command Prompt.
3. In the command-line interface, enter the directory. For example, C:\Program
Files\AvePoint\Compliance Guardian\Agent\bin, and press Enter.
Figure 43: The command line overview 1.
Compliance Guardian Installation and Administration User Guide
261
4. Enter the –fullpath command, and then enter the full path of the file whose detailed risk report
will be generated.
5. Enter the –dbname command, and then enter the database file name of the plan whose
detailed risk report information will be exported.
To get the database file name, go to the report location, and find the request’s corresponding
TXT file (the name of the TXF file is the Request ID + _ + the Request Name). Open the TXT file,
you will find all the plans contained in this request, the database file name is following the
corresponding plan. Then go back to the report location, basing on the database file name in the
TXF file, you will find the database file’s full name (the database name +.db) of the desired plan
whose detailed risk information is going to be exported.
6. Enter the -exportlocation command, and then enter the export location where the detailed risk
report will be generated.
The –exportlocation command is optional, if you do not enter the command and do not specify
an export location, by default, the report will be generated under the
directory …\AvePoint\Compliance Guardian\Agent\bin\Risk Analyzer.
Figure 44: The command line overview 2.
7. Press Enter to execute the job. After the job completes, a prompt is shown as below.
Figure 45: The command line overview
8.
262
You can then navigate to the specified export location to view the risk report.
Compliance Guardian Installation and Administration User Guide
Using Compliance Guardian Transaction Capture
Compliance Guardian Transaction Capture is used to record the webpages that you access, and then you
can save the recorded results as a transaction file, which is used by Compliance Guardian Website
Scanner. The recorded URLs in the transaction file will be the start URLs used in Compliance Guardian
scans.
*Note: Make sure Microsoft Visual C++ 2010 x86 Redistributable and Microsoft .NET Framework 3.5 or
above version must be installed before using Compliance Guardian Transaction Capture.
System Requirements for Using Compliance Guardian Transaction
Capture
Compliance Guardian Transaction Capture includes two versions:
AgentToolWebSiteRecorder_.NETv2.msi and AgentToolWebSiteRecorder_.NETv4.msi.
Refer to the following table for the system requirements of the two versions:
Compliance Guardian Transaction Capture Installation File
Versions
AgentToolWebSiteRecorder_.NETv2.msi
AgentToolWebSiteRecorder_.NETv4.msi
Requirements
Windows XP
Windows Server 2003
Windows Vista
Windows Server 2008
Windows 7
Windows Server 2008
R2
Windows Thin PC
Windows 8
Windows Server 2012
Windows 8.1
Windows Server 2012
R2
Installing Compliance Guardian Transaction Capture
To install Compliance Guardian Transaction Capture, complete the following steps:
Find the AgentToolWebSiteRecorder_.NETv2.msi or AgentToolWebSiteRecorder_.NETv4.msi
file in ...\Compliance Guardian\Agent\bin\WebSiteRecorderInstallFiles.
Open the AgentToolWebSiteRecorder_.NETv2.msi or AgentToolWebSiteRecorder_.NETv4.msi.
Compliance Guardian Installation and Administration User Guide
263
*Note: You can decide the version to install according to your system. Refer to Compliance
Guardian Prerequisites and System Requirements.
Select Install in the appeared drop-down menu. The Compliance Guardian Transaction Script
Recorder Setup wizard appears, which helps you to install the Compliance Guardian Transaction
Capture tool.
Select Next on the wizard welcome page.
Select a folder where the related files of this tool will reside. The default location is: C:\Program
Files (x86)\AvePoint\CG Transaction Script Recorder\. You can select Browse to select another
location.
Select the Disk Cost… button under the Browse button to view the drives you can install the
tool, and each drive's available and required disk space of the tool.
Select Next on this page.
Confirm the installation on the Confirm Installation page, and select Next.
The tool will begin installing.
After the installation completes, select Close to exit the installation wizard.
Using the Tool
To use Compliance Guardian Transaction Capture, open Windows Internet Explorer (x86) from the
path …\Program Files (x86)\Internet Explorer, select View on the Menu Bar, and select Explorer Bars.
You will find Compliance Guardian Transaction Capture in the drop-down menu that appears. Select
Compliance Guardian Transaction Capture to open this tool. The tool interface appears on the bottom
of the current webpage. Refer to the following screenshot:
Figure 46: The Compliance Guardian Transaction Capture interface.
•
264
Operation Field – You can perform the following actions in this field:
o
Record – On the webpage you want to record, select the Record button.
Compliance Guardian Transaction Capture will then start to record the
webpages you access from this current webpage. The URLs that are recorded
will be displayed on the Recorded Information Field.
o
Stop – Select the Stop button to stop recording the webpages.
Compliance Guardian Installation and Administration User Guide
•
o
Play – Select the Play button. The series of webpages that you have recorded
will automatically play as they are accessed.
o
Reset – Select the Reset button, all the recorded results will be cleared up.
o
Save – Select the Save button to save the series of operation results as a
transaction file. After select the Save button, the Save As window pops up.
Select a location, and then select Save on the Save As window to save the
transaction file, which will be used for Compliance Guardian Website Scanner.
o
Options – Select the Options button, a pop-up window appears. Select the
checkbox before Capture the Ajax Request (XMLHttpRequest). Then
Compliance Guardian Transaction Capture can record the webpages that use
the Ajax Request.
o
Delete – Select a record in the Recorded Information Field, and select Delete,
the record then will be deleted.
o
Import – Import a previously saved transaction file. You can view the results
that the transaction file records by selecting Play.
o
Help – Select the Help button to view the Help information.
Recorded Information Field – The recorded results will be displayed in this field.
o
URL – The webpage URLs that have been recorded.
o
Status – The status code of a webpage.
o
Domain – The domain of the URL.
o
Scan – Select the checkboxes under this column. The corresponding URL will be
signed. After you save the related transaction file for Compliance Guardian
Website Scanner, only the URLs that are signed here can be used as the Start
URLs to be scanned. Only the checkbox of the URL whose corresponding status
code is 200 can be selected and scanned.
Select the close button ( ) on the top-right corner to close the Compliance Guardian Transaction
Capture tool.
Compliance Guardian Installation and Administration User Guide
265
Exporting Action Reports and Social Reports to Event
Viewer
Compliance Guardian supports exporting the action reports and social reports to Windows Event
Viewer.
Refer to the following steps to export the action report:
Go to the machine with Compliance Guardian Agent installed and open
the …\AvePoint\Compliance Guardian\Agent\bin directory to find the
AgentToolExportClassificationResults.exe file.
Right-click on AgentToolExportClassificationResults.exe and select Run as administrator to run
it.
Figure 47: The interface of running AgentToolExportClassificationResults.exe.
The action reports and social reports are exported to Event Viewer after the exporting job
finishes. Select Start on the machine, find Event Viewer and select it. Select Applications and
Services Logs > ComplianceGuardian in the Event Viewer interface. Then, you will find the
events in the right pane. Select each event to view the related action report or social report.
266
Compliance Guardian Installation and Administration User Guide
Figure 48: Event Viewer interface.
Compliance Guardian Installation and Administration User Guide
267
Monitoring Compliance Guardian Job Performance in
Performance Monitor
Compliance Guardian allows you to monitor the Compliance Guardian job performance in Performance
Monitor.
On the machine where Compliance Guardian agent is installed, select Start > Administrative
Tools > Performance Monitor.
Select Performance Monitor in the left pane, and then select the Add (
pane. The Add Counters window appears.
) button in the right
Find the Compliance Guardian category, then add the corresponding counters.
Then, you can view the Compliance Guardian job performance.
You can also create a new data set and then view the Compliance Guardian job performance
report. Refer to the following steps:
a. Expand Data Collector Sets in the left pane.
b. Right-click User Defined under Data Collector Sets. Select New in the appeared dropdown list. Then, select Data Collector Set.
c. Select the Create manually (Advanced) radio button, and enter a name in the Create
new Data Collector Set window. Select Next.
d. Select the Performance counter checkbox and then select Next.
e. Select Add. Then, add the Compliance Guardian category counters in the appeared
window, and select OK in the appeared window. Specify the interval and units for
collecting data. Select Next.
f.
Select a directory to store the report. Select Next.
g. Select Finish. The new data set is created. Select the data set under User Defined and
then select Start to start collecting the data. Select the data set and select Stop to stop
collecting data. Then, you can view the report.
268
Compliance Guardian Installation and Administration User Guide
Using the Fingerprinting Tool
The fingerprinting tool is used to compare the files and then help you to have a general view of file
similarity for using the Fingerprinting type check.
The tool can achieve the following functions:
Add some files as templates in a Fingerprinting type check
Compare a file with other files in a folder
Compare files in a folder and generate a matrix file reporting the similarity of these files
Based on the matrix report generated in function 3, generate a file grouping the files whose
similarity is greater than the specified similarity threshold
In order to realize the functions, the CCE.FingerPrintingTool.exe file must be run in the Command Line.
Go to the machine with Compliance Guardian Agent installed and open the …\AvePoint\Compliance
Guardian\Agent\bin directory to find the CCE.FingerPrintingTool.exe file.
On the machine, navigate to Start > All Programs > Accessories > Command Prompt. In the commandline interface, enter the directory. For example, C:\Program Files\AvePoint\Compliance
Guardian\Agent\bin\ CCE.FingerPrintingTool.exe, and press Enter.
To add some files as templates in a Fingerprinting type check, refer to the following steps:
Enter the –o registerfile command.
Enter the –file command, and then enter the template file path. You can also use * to match
files. For example, enter C:\12*.docx, then all of the DOCX files that start with 12 under disk C
will be used as the template files.
Enter the –tdf command, and then enter the check file path. The template files will be used in
this check.
Press Enter.
Figure 49: Using the –o registerfile command.
To compare a file with other files in a folder, refer to the following steps:
Enter the –o comparefile command.
Enter the –file command, and then enter the file path.
Compliance Guardian Installation and Administration User Guide
269
Enter the –folder command after the file path, and then enter the folder path. The files in the
first level of the folder will be used to compare with the specified file, the files in the sub folders
of the specified folder will not be used to compare with the specified file.
Enter the –type command and then enter RAW, TEXT or EXACT to specify the matching form.
For more information on the matching form, refer to Fingerprinting.
Enter the –output command and then enter the full path of the generated CSV report.
Press Enter. The specified CSV report will be generated in the specified path.
Figure 50: Using the –o comparefile command.
To compare files in a folder and generate a matrix file reporting the similarity of these files, refer to the
following steps:
Enter the –o buildcomparematrix command.
Enter the –folder command, and then enter the folder path. The files in these folders will
compare with each other.
Enter the –type command and then enter RAW, TEXT or EXACT to specify the matching form.
Enter the –output command and then enter a full path of the generated CSV report.
Press Enter. The matrix CSV report will be generated in the specified path.
Figure 51: Using the –o comparefile command.
To generate a report grouping the files whose similarity is greater than the specified similarity threshold
based on the function 3, refer to the following steps:
Enter the –o reportcluster command.
Enter the –matrix command, and then enter the full path of the matrix CSV report.
Enter the –threshold command, and then enter the similarity threshold.
Enter the –output command, and then enter a full path of the generated report.
270
Compliance Guardian Installation and Administration User Guide
Press Enter. The report will be generated under the specified path. The files whose similarity is
equal to or greater than the specified threshold will be grouped in one row in the CSV file.
Figure 52: Using the –o reportcluster command.
Compliance Guardian Installation and Administration User Guide
271
Appendix A: Accessing Hot Key Mode
In order to work faster and improve your productivity, Compliance Guardian supports hot key mode for you to perform corresponding actions
quickly using your keyboard. To access hot key mode in the Compliance Guardian interface, press Ctrl + Alt + Z on your keyboard.
The following table provides a list of hot keys for the top level. Each time you want to go back to the top level after accessing the lower level
interface, press Ctrl + Alt + Z.
Operation Interface
Compliance Guardian
Report
Administration
User: admin
Help and About Information
Compliance Guardian Official Website
1
2
3
4
5
6
Hot Key
Compliance Scanner Page
The following table provides a list of hot keys for the functionalities on the ribbon of the Compliance Scanner page.
Compliance Guardian
Report
Administration
Complianc P Create
e Scanner
272
C SharePoi
nt
S
Functionality Name and Hot Key
1
2
3
SharePoin S
t Tab
Plan
C
Wizard M Back
Builder
Mode
Next
Finish
Finish and Run
Now
B
N
R
O
Compliance Guardian Installation and Administration User Guide
Functionality Name and Hot Key
Cancel
Form
L Save
Mode
Save and Run
Now
Cancel
Scan
S
Create
C
Policy
View
V
Details
Edit
E
Delete
D
Export
W
Close
X
Filter
F
Create
N
Policy
View
V
Details
Edit
E
Delete
D
Close
X
Database D
Create
C
Manager
View
V
Details
Edit
E
Delete
D
Close
X
Account
A
Groups
G Add Group
Manager
Edit Group
Show Users
Delete Group
Compliance Guardian Installation and Administration User Guide
C
R
O
C
AG
E
S
D
273
Functionality Name and Hot Key
Users
File
System
F
Job
Monitor
Close
File
System
Tab
Plan
Builder
J
P
Back
Next
Finish
Finish and
Run Now
Cancel
Save
Save and Run
Now
B
N
R
O
AM
X
AU
E
DU
AC
DA
P
AM
X
X
F
C
Wizar
d
Mode
Form
Mode
274
Permission
Level
Authenticatio
n Manager
Close
U Add User
Edit User
Delete User
Activate
Deactivate
Permission
Level
Authenticatio
n Manager
Close
M
L
C
R
O
Compliance Guardian Installation and Administration User Guide
Functionality Name and Hot Key
Configure
Connectio
n
Scan
Policy
Filter
Policy
Database
Manager
N
S
F
D
Compliance Guardian Installation and Administration User Guide
Create
View
Detail
s
Edit
Delete
Close
Create
View
Detail
s
Edit
Delete
Export
Close
Create
View
Detail
s
Edit
Delete
Close
Create
View
Detail
s
Edit
Delete
Close
C
V
Cancel
C
E
D
X
C
V
E
D
W
X
N
V
E
D
X
C
V
E
D
X
275
Functionality Name and Hot Key
Account
A
Group G Add Group
Manager
s
Edit Group
Show Users
Delete Group
Permission
Level
Authenticatio
n Manager
Users
Website
276
Job
J
Monitor
Close
X
W Create Plan Tab
Scan Policy
Close
U Add User
Edit User
Delete User
Activate
Deactivate
Permission
Level
Authenticatio
n Manager
Close
W
S Create
View Details
Edit
Delete
Export
Close
AG
E
S
D
P
AM
X
AU
E
DU
AC
DA
P
AM
X
C
V
E
D
W
X
Compliance Guardian Installation and Administration User Guide
Database
D
Functionality Name and Hot Key
Filter Policy
F Create
View Details
Edit
Delete
Close
Database Manager
D Create
View Details
Edit
Delete
Close
Save
R
Save and Run Now
O
Cancel
C
Database Tab
D
Plan Builder C
Wizard Mode
Form Mode
Configure
Database
Connection
N
Scan Policy
S
D
Compliance Guardian Installation and Administration User Guide
N
V
E
D
X
C
V
E
D
X
M
L
Create
C
View Details
Edit
Delete
Close
Create
View Details
Edit
Delete
Export
Close
Create
V
E
D
X
C
V
E
D
W
X
C
277
Functionality Name and Hot Key
Database
View Details
Manager
Edit
Delete
Close
Account
A Group G
Manager
s
Users
View
Details
Edit
Delete
Run
Now
278
V
Job Monitor
Close
J
X
U
V
E
D
X
Add Group
Edit Group
Show Users
Delete Group
Permission Level
Authentication
Manager
Close
Add User
Edit User
Delete User
Activate
Deactivate
Permission Level
Authentication
Manager
Close
AG
E
S
D
P
AM
X
AU
E
DU
AC
DA
P
AM
X
E
D
R
Compliance Guardian Installation and Administration User Guide
Configu
re
Archivi
ng
A
Search
S
Create
View Details
Edit
Delete
Enable
Disable
Run Now
Job Monitor
Close
Lync
Export
Configure
Export
Settings
Export
Requests
Close
Functionality Name and Hot Key
C
Lync L
Save
Save and Run Now
Cancel
V
U
R
E
D
R
J
X
L
E
Export to EDRM
E
Export to Concordance
C
Export to HTML
H
C
O
R
C
R
X
Compliance Scanner for Lync Page
Complian
ce
Scanner
P
Create
C Lync
L
Functionality Name and Hot Key
Lync tab
H
Plan Builder
P Wizard
M Back
Mode
Next
Finish
Compliance Guardian Installation and Administration User Guide
B
N
R
279
Finish and Run
Now
Cancel
Form
Mode
L
C
Create
C
V
Scan Policy
S
Filter Policy
F
View
Details
Edit
Delete
Enable
Disable
Run Now
Job
Monitor
Close
Create
View Details
Edit
Delete
Export
Close
Create
View Details
Edit
Delete
Close
Configure
Archiving
280
O
C
Save
R
Save and Run Now O
Cancel
C
Lync L
Save
Save and Run Now
Cancel
O
R
C
U
R
E
D
R
J
X
C
V
E
D
W
X
N
V
E
D
X
Compliance Guardian Installation and Administration User Guide
Database
Manager
D
Account
Manager
A
Create
View Details
Edit
Delete
Close
Groups G
Users
Job Monitor
Close
J
X
U
C
V
E
D
X
Add Group
Edit Group
Show Users
Delete Group
Permission Level
Authentication
Manager
Close
Add User
Edit User
Delete User
Activate
Deactivate
Permission Level
Authentication
Manager
Close
AG
E
S
D
P
AM
X
AU
E
DU
AC
DA
P
AM
X
Classification Scanner Page
The following table provides a list of hot keys for the Scheduled Classification Scanner and Real-Time Classification Scanner in Classification
Scanner module.
Compliance Guardian Installation and Administration User Guide
281
Compliance Guardian
Report
Administration
Scheduled Classification Scanner
Real-Time Classification Scanner
Functionality Name and Hot Key
1
2
3
P
H
Scheduled Classification Scanner Page
The following table provides a list of hot keys for the functionalities on the ribbon of the Scheduled Classification Scanner page.
Scheduled
Classification
Scanner
282
P Creat
e
Functionality Name and Hot Key
C SharePoin S SharePoin S
t
t Tab
Plan
C
M Back
Builder
Wizard
Next
Mode
Finish
Finish and
Run Now
Cancel
Form
L
Save
Mode
Save and
Run Now
Cancel
Scan
S Create
C
Policy
View Details V
Edit
E
Delete
D
Export
W
Close
X
B
N
R
O
C
R
O
C
Compliance Guardian Installation and Administration User Guide
Functionality Name and Hot Key
Filter
F Create
N
Policy
View Details V
Edit
E
Delete
D
Close
X
Action
A Create
C
Policy
View Details V
Database
Manager
File
System
Job
Monitor
Close
F File
System
Tab
Plan
Builder
D
J
Edit
E
Delete
D
Close
Create
View Details
Edit
Delete
Close
X
C
V
E
D
X
X
F
C
Wizard Mode
Form Mode
Compliance Guardian Installation and Administration User Guide
M
L
Back
Next
Finish
Finish and Run
Now
Cancel
Save
B
N
R
O
C
R
283
Functionality Name and Hot Key
Configure
Connectio
n
N
Scan
Policy
S
Filter
Policy
F
Action
Policy
A
Database
Manager
284
D
Create
View Details
Edit
Delete
Close
Create
View Details
Edit
Delete
Export
Close
Create
View Details
Edit
Delete
Close
Create
View Details
Edit
C
V
E
D
X
C
V
E
D
W
X
N
V
E
D
X
C
V
E
Delete
Close
Create
View Details
Edit
Delete
Close
D
X
C
V
E
D
X
Save and Run
Now
Cancel
O
C
Compliance Guardian Installation and Administration User Guide
View
Detail
s
Edit
Delet
e
Run
Now
Test
Run
Functionality Name and Hot Key
Job
J
Monitor
Close
X
V
E
D
R
T
Scheduled Classification Scanner for Social Network Page
Scheduled
P
Classification
Scanner
Create C
Social
Network
D
Functionality Name and Hot Key
Social
L
Network
tab
Plan
C Wizard Mode M
Builder
Form Mode
Compliance Guardian Installation and Administration User Guide
L
Back
Next
Finish
Finish and Run
Now
Cancel
Save
Save and Run
Now
Cancel
B
N
R
O
C
R
O
C
285
Configure
N
Connection
Scan Policy
S
Action
Policy
A
Database
Manager
D
Job
Monitor
Close
J
Create
View Details
Edit
Delete
Close
Create
View Details
Edit
Delete
Export
Close
Create
View Details
Edit
Delete
Close
Create
View Details
Edit
Delete
Close
C
W
E
D
X
C
V
E
D
W
X
C
V
E
D
X
C
V
E
D
X
X
Real-Time Classification Scanner page
The following table provides a list of hot keys for the functionalities on the ribbon of the Real-Time Classification Scanner page.
286
Compliance Guardian Installation and Administration User Guide
Real-Time
Classification
Scanner
H Create
C SharePoint
Functionality Name and Hot Key
S
SharePoint Tab
S
Stop Inheriting/
T
Inheriting
Scan Policy
S
Create
View Details
Edit
Delete
Export
Close
Filter Policy
F
Create
View Details
Edit
Delete
Close
Action Policy
A
Create
View
Edit
Delete
Close
Database Manager D
Create
View Details
Edit
Delete
Close
Apply
P
Create Rule
R
Job Monitor
J
Close
X
C
Social Network
L
Compliance Guardian Installation and Administration User Guide
C
V
E
D
W
X
N
V
E
D
X
C
V
E
D
X
C
V
E
D
X
287
Social
Network
Real-Time
Classification
Scanner
288
H Edit
Delete
E
D
Functionality Name and Hot Key
Edit
E
Delete
D
Enable
B
Disable
I
Configure
N
Create
Connection
View Details
Edit
Delete
Close
Scan Policy
S
Create
View Details
Edit
Delete
Export
Close
Action Policy
A
Create
View Details
Edit
Delete
Close
Apply
P
Create Rule
R
Job Monitor
J
Close
X
C
V
E
D
X
C
V
E
D
W
X
C
V
E
D
X
Compliance Guardian Installation and Administration User Guide
Job Monitor Page
The following table provides a list of hot keys for the functionalities on the ribbon of the Job Monitor page. For example, continue pressing M on
your keyboard to enter the Module interface.
List View
Calendar View
Time Zone
View Details
LV
CV
TZ
VD
Download
DL
Pause
Resume
Stop
Start
Delete
Date Range
Module
P
RE
SP
ST
DE
DR
M
RL
Report Location
Functionality Name and Hot Key
Job Details Page
V
Download
Close
OK
Cancel
D
X
O
C
OK
Cancel
Delete without Notification
D
OK
Back
O
B
Compliance Guardian Installation and Administration User Guide
O
C
289
Scheduled Job Monitor Page
To access the Scheduled Job Monitor page by using hot keys from within the Job Monitor interface, press Ctrl + Alt + Z on your keyboard to
access the hot key mode, and then press S on the keyboard to enter the Scheduled Job Monitor page.
The following table provides a list of hot keys for the functionalities on the ribbon of the Scheduled Job Monitor page. For example, continue
pressing L to enter the List View interface.
Functionality Name and Hot Key
L
C
TZ
E
D
R
M
List View
Calendar View
Time Zone
Enable
Disable
Date Range
Module
Control Panel Page
The following table provides a list of hot keys for the functionalities on the ribbon of the Control Panel page.
Control Panel
290
P
Functionality Name and Hot Key
Compliance Guardian Installation and Administration User Guide
Appendix B: Configuring Checks and Test Suites
When editing checks and test suites in the Test Suite Manager in Compliance Guardian, you will use
detailed configuration screens to set the attributes and values.
•
If you are editing a single check (per the Editing a Check section earlier in this
document), refer to Configuring Check Type Attributes in this Appendix to configure the
details according to the specific test definition file type.
•
If you are editing a test suite (per the Editing Test Suite section earlier in this document),
refer to Configuring Test Suite File Attributes in this Appendix to configure the details
according to the specific type of test suite file.
Configuring Check Type Attributes
Based on the different kinds of checks you can run, there are the following types of checks:
•
Element Type
•
EnhancedElement Type
•
MatchedElement Type
•
FindText Type
•
ComplexFindText Type
•
RegularExpression Type
•
ComplexRegEx Type
•
Dictionary Type
•
Cookie Type
•
SSL Type
•
WebBeacons Type
•
FindFile Type
•
LinkValidation Type
•
FileProperty Type
•
Redaction Type Check
•
CustomScan
Details about configuring each of these check types are provided in the following sections.
Compliance Guardian Installation and Administration User Guide
291
Element Type Check
The Element type check is used to validate whether HTML/XML elements have particular settings on
attributes or contents. The following section provides a general introduction about configuring
attributes for this type of check, as well as a test example for you to understand the test logic.
Configuring Attributes for Element Type Check
Configure the attributes for the Element type check according to the instructions in the following
sections.
Element
Configure the following attributes under the Element section:
•
Name – Specify the element name that will be tested.
•
CaseSensitive – Specify if the element name being tested for must match the case
exactly.
•
ResultNA – Specify a result when the specified element is not found. If TrueResult is
selected, then if the specified element is not found, the True result will be returned. If
FalseResult is selected, then if the specified element is not found, the False result will be
returned. If NAResult is selected, then if the specified element is not found, the status
of the tested file will be Not Applicable, which will be displayed in the Compliance
Guardian report. In other words, you have the option to set the result to Not Applicable
if none of the elements are found.
•
TrueIf – There are two values for this attribute: All and One. If One is selected, the scan
will stop when one instance is found (to save scan time). If All is selected, the scan will
only stop when all instances are found.
•
ValidWhen – This is used to indicate if the result is valid when the condition is one of
two values: True or False.
ListLoc
Configure the following attributes under the ListLoc section:
292
•
Type – There are two values for this attribute, Valid and Invalid. All elements that are
considered valid or invalid are stored to the database (the Location).
•
Status – This is used to indicate the disposition of the element and the severity selected
by the user. Note that in the Report Text step, if the status set for True Result or False
Result is Failed, the value for the Status attribute will be Fail, and the value cannot be
changed.
Compliance Guardian Installation and Administration User Guide
ElementRepeat
If you want to configure the ElementRepeat section, select the checkbox before the element (this
section is optional):
•
Alert – Specify whether to check for repeating elements.
•
Value – Specify the maximum times the element can repeat before the check is
determined False.
TextCompare
If you want to configure the TextCompare section, select the checkbox before the element (this section
is optional):
•
CompareType – Specify a compare type. The attributes for CompareType are
MustContain, MustNotContain, MustEqual, MustNotEqual, MustMatch, and
MustNotMatch
•
Separator – Specify a separator if multiple values are specified.
•
CaseSensitive – Specify if the element being tested for must match the case exactly.
•
Value – Define one or more values for the test, use the separator specified before to
separate the values.
Attributes
If you want to configure the Attributes section, select the checkbox before the element (this section is
optional):
•
Name – Specify attribute name that will be tested.
•
CaseSensitive – Specify if the attribute name being tested for must match the case
exactly.
•
AllowNull – Specify whether the attribute that has no value will be tested.
•
MustExist – Specify whether or not the attribute has to exist. If it is set to True, then the
test will fail if the specified attribute does not exist.
Select the delete button (
) to delete this check rule.
The following elements with specific attributes appear within the optional Attributes section:
•
Length – This element is optional. Select the checkbox before this element, and the
following attributes appear:
o
CompareType – Specify a compare type for this length compare. The attributes
for CompareType are GreaterThan, LessThan, GreaterOrEqualThan,
LessOrEqualThan, Equal, and NotEqual.
Compliance Guardian Installation and Administration User Guide
293
o
Characters – Specify the number of the characters used for the compare.
Select the delete button ( ) to delete this check rule. Select Add Another
Length to add another rule.
•
TextCompare – This element is optional. Select the checkbox before this element, and
the following attributes appear:
o
CompareType – Specify a compare type. The attributes for CompareType are
MustContain, MustNotContain, MustEqual, MustNotEqual, MustMatch, and
MustNotMatch.
o
Separator – Specify a separator if multiple values are specified.
o
CaseSensitive – Specify if the attribute values being tested for must match the
case exactly.
o
Value – Define one or more values for the test, use the separator specified
before to separate the values.
Select the delete button ( ) to delete this check rule. Select Add Another
TextCompare to add another rule.
•
WordsRepeat – This element is optional. Select the checkbox before this element, the
following attribute appears:
o
Number – Define the number of times that words can repeat in the attribute
value before the test fails.
Select Add Another Attribute to add another Attributes check rule.
ElementContent
If you want to configure the ElementContent section, select the checkbox before the element (this
section is optional):
•
ContentReq – Specify whether the specified element must contain content. If Yes is
selected, then the element must contain content, or the check for this section will be
False.
The following elements with specific attributes are within the optional ElementContent section:
•
Length – This section is optional. Select the checkbox before this element, the following
attributes appear:
o
CompareType – Specify a compare type for this length compare. The attributes
for CompareType are GreaterThan, LessThan, GreaterOrEqualThan,
LessOrEqualThan, Equal and NotEqual.
o
Characters – Specify the number of the characters used for the compare.
Select the delete button (
add another rule.
294
) to delete this check rule. Select Add Another Length to
Compliance Guardian Installation and Administration User Guide
•
TextCompare – This section is optional. Select the checkbox before this element, the
following attributes appear:
o
CompareType – Specify a compare type. The attributes for CompareType are
MustContain, MustNotContain, MustEqual and MustNotEqual.
o
Separator – Specify a separator if multiple values are specified.
o
CaseSensitive – Specify if the content being tested for must match the case
exactly.
o
Value – Define one or more values for the test, use the separator specified
before to separate the values.
Select the delete button ( ) to delete this check rule. Select Add Another
TextCompare to add another rule.
ChildElement
If you want to configure the ChildElement section, select the checkbox before the element (this section
is optional):
•
Name – Specify the name of the child element that will be tested.
•
CaseSensitive – Specify if the element name being tested for must match the case
exactly.
•
MustExist – Specify whether or not the child element must exist. If True is selected,
then the test will fail if there is No child element.
The following elements with specific attributes are within the optional ChildElement section:
•
•
ElementRepeat – This section is optional. Select the checkbox before this element, the
following attributes appear:
o
Alert – Specify whether to check for repeating elements.
o
Value – Specify the maximum times the element can repeat before the check is
determined False
Attributes – This section is optional. Select the checkbox before this element, the
following attributes appear:
o
Name – Specify the attribute name that will be tested.
o
CaseSensitive – Specify if the attribute name being tested for must match the
case exactly.
o
AllowNull – Specify whether the attribute that has no value will be tested.
o
MustExist – Specify whether or not the attribute has to exist. If True is selected,
then the test will fail if the specified attribute does not exist.
Compliance Guardian Installation and Administration User Guide
295
The following elements with specific attributes are within the optional Attributes
section:
o
Length – This section is optional. Select the checkbox before this element, the
following attributes appear:
CompareType – Specify a compare type for this length compare. The
attributes for CompareType are GreaterThan, LessThan,
GreaterOrEqualThan, LessOrEqualThan, Equal and NotEqual.
Characters – Specify the number of the characters used for the
compare.
Select the delete button ( ) to delete this check rule. Select Add Another
Length to add another rule.
o
TextCompare – This section is optional. Select the checkbox before this
element, the following attributes appear:
CompareType – Specify a compare type. The attributes for
CompareType are MustContain, MustNotContain, MustEqual, and
MustNotEqual.
Separator – Specify a separator if multiple values are specified.
CaseSensitive – Specify if the attribute being tested for must match the
case exactly.
Value – Define one or more values for the test, use the separator
specified before to separate the values.
Select the delete button ( ) to delete this check rule. Select Add Another
TextCompare to add another check rule.
o
WordsRepeat – This section is optional. Select the checkbox before this
element, the following attribute appears:
o
Number – Define the number of times that words can repeat in the
attribute value before the test fails.
ElementContent – This section is optional. Select the checkbox before this
element, the following attribute appears:
ContentReq – Specify whether the specified element must contain
content. If Yes is selected, then the element must contain content, or
the check for this section will be False.
The following elements with specific attributes are within the optional
ElementContent section:
296
Compliance Guardian Installation and Administration User Guide
Length – This section is optional. Select the checkbox before this
element, the following attributes appear:
−
CompareType – Specify a compare type for this length
compare. The attributes for CompareType are GreaterThan,
LessThan, GreaterOrEqualThan, LessOrEqualThan, Equal, and
NotEqual.
−
Characters – Specify the number of the characters used for the
compare.
Select the delete button ( ) to delete this check rule. Select Add
Another Length to add another check rule.
TextCompare – This section is optional. Select the checkbox before this
element, the following attributes appear:
−
CompareType – Specify a compare type. The attributes for
CompareType are MustContain, MustNotContain, MustEqual,
MustNotEqual, MustMatch, and MustNotMatch
−
Separator – Specify a separator if multiple values are specified.
−
CaseSensitive – Specify if the attribute being tested for must
match the case exactly.
−
Value – Define one or more values for the test, use the
separator specified before to separate the values.
Select the delete button ( ) to delete this check rule. Select Add
Another TextCompare to add another check rule.
Filter
The content that meets the condition configured in this element field can be tested. The following
elements with specific attributes are available in the optional Filter section:
•
Attributes – For the details about the attributes, refer to Attributes.
•
ElementContent – For the details about the attributes, refer to ElementContent.
Element Check Test Logic Example
Refer to the following example to better understand the test logic of the Element type check.
The selected file A will be tested. It contains two nodes:
<img src="attribute.png" url="another.png" />
<img src="//msstonojsmsdn.112.2o7.net/b/ss/msstonojsmsdn/1/H.20.2--NS/0" height="1" width="1"
border="0" alt="" />
Compliance Guardian Installation and Administration User Guide
297
Create and configure the Element Type check test logic:
Create an Element type check. In the Report Text step, in the False Result and Message field,
select User Review Required in the False Result drop-down list.
Configure the Element section:
•
Specify the element name IMG for the Name attribute.
•
Select No in the drop-down list under the CaseSensitive attribute.
•
Select ResultNA in the drop-down list under the ResultNA attribute.
•
Select One in the drop-down list under the TrueIf attribute.
•
Select False in the drop-down list under the ValidWhen attribute.
Configure the ListLoc section:
•
Select Invalid in the drop-down list under the Type attribute.
•
Select Warn in the drop-down list under the Status attribute.
Select the checkbox before the ElementRepeat element, and then select Yes in the drop-down
list under the Alert attribute. Enter 2 in the Value field.
Select the checkbox before the TextCompare element:
•
Select MustContain in the drop-down list under the CompareType attribute.
•
Enter ; as the separator.
•
Select No in the drop-down list under the CaseSensitive attribute.
•
Enter A in the Value field.
Save the check.
Run a Compliance Scanner job. The test suite used in this job contains the check configured
above.
Review the check test logic:
298
•
See the ElementRepeat section. The element IMG is continuously repeated 2 times in
the file A, so the check in the ElementRepeat section is False.
•
See the TextCompare section. The node in the file contains the value A, so the check in
the TextCompare section is True.
•
From the above example, the check result of this check is False (any of the check results
is False, the check result of this check is False). According to the settings in False Result
and Message in the Report Text step, the returning status is User Review Required,
which will be displayed in the Compliance Guardian report.
•
See the attributes under Element: True has been selected in the drop-down list under
ValidWhen, but the check result of this check is False, so the result for the ValidWhen
attribute is Invalid.
Compliance Guardian Installation and Administration User Guide
•
See the ListLoc section. The result for ValidWhen is Invalid, so the check status will be
Warn, and this check status will be recorded in the Compliance Guardian database,
users cannot see the status in the Compliance Guardian GUI.
EnhancedElement Type Check
The EnhancedElement type check is used to validate two kinds of elements in one check during the
scanning progress. The functionality of the EnhancedElement type check is similar to the Element type
check. The following section provides a general introduction about configuring attributes for this type of
check, as well as a test example for you to understand the test logic.
Configuring Attributes for EnhancedElement Type Check
Configure the attributes for the EnhancedElement type check according to the instructions in the
following sections.
EnhancedElement
There are the five attributes under this element. For the details about the five attributes, refer to the
Configuring Attributes for Element Type section.
ListLoc
There are the two attributes under this element. For the details about the two attributes, refer to the
Configuring Attributes for Element Type section.
ElementRepeat
This section is optional. For the details about the attributes under this element, refer to the Configuring
Attributes for Element Type section.
TextCompare
This section is optional. For the details about the attributes under this element, refer to the Configuring
Attributes for Element Type section.
Attributes
This section is optional. For the details about the attributes under this element, refer to the Configuring
Attributes for Element Type section.
ElementContent
This section is optional. For the details about the attributes under this element, refer to the Configuring
Attributes for Element Type section.
Compliance Guardian Installation and Administration User Guide
299
ChildElement
This section is optional. For the details about the attributes under this element, refer to the Configuring
Attributes for Element Type section.
SecondaryElement
This section is optional. Select the checkbox before this element, the following attributes appear:
•
Name – Specify the secondary element that will be tested.
•
CaseSensitive – Specify if the element name being tested for must match the case
exactly.
•
MustExist – Specify whether the secondary element must exist.
•
TrueIf – There are two values for this attribute: All and One. If One is selected, the scan
will stop when one instance is found (to save scan time). If All is selected, the scan will
only stop when all instances are found.
•
MustNext – Specify whether the secondary element must be next to the primary
element (the element you specified above in this check). If you select Yes in the dropdown list under this attribute, only the secondary element that is next to the primary
element will be checked. If you select No in the drop-down list under this attribute, then
all the specified secondary elements will be checked.
The following elements with specific attributes are within the optional SecondaryElement section:
•
•
ElementRepeat – This section is optional. Select the checkbox before this element, the
following attributes appear:
o
Alert – Specify whether to check for repeating elements.
o
Value – Specify the maximum times the element can repeat before the check is
determined False.
Attributes – This section is optional. Select the checkbox before this element, the
following attributes appear:
o
Name – Specify the attribute name that will be tested.
o
CaseSensitive – Specify if the attribute name being tested for must match the
case exactly.
o
AllowNull – Specify whether the attribute that has no value will be tested.
o
MustExist – Specify whether or not the attribute has to exist. If True is selected,
then the test will fail if the specified attribute does not exist.
Select the delete button (
300
) to delete this Attributes check rule.
Compliance Guardian Installation and Administration User Guide
The following elements with specific attributes are within the optional Attributes
section:
o
Length – This section is optional. Select the checkbox before this element, the
following attributes appear:
CompareType – Specify a compare type for this length compare. The
attributes for CompareType are GreaterThan, LessThan,
GreaterOrEqualThan, LessOrEqualThan, Equal, and NotEqual.
Characters – Specify the number of the characters used for the
compare.
Select the delete button ( ) to delete this check rule. Select Add Another
Length to add another rule.
o
TextCompare – This section is optional. Select the checkbox before this
element, the following attributes appear:
CompareType – Specify a compare type. The attributes for
CompareType are MustContain, MustNotContain, MustEqual,
MustNotEqual, MustMatch, and MustNotMatch
Separator – Specify a separator if multiple values are specified.
CaseSensitive – Specify if the attribute being tested for must match the
case exactly.
Value – Define one or more values for the test, use the Separator
specified before to separate the values.
Select the delete button ( ) to delete this check rule. Select Add Another
TextCompare to add another rule.
o
WordsRepeat – This section is optional. Select the checkbox before this
element, the following attribute appears.
•
Number – Define the number of times that words can repeat in the
attribute value before the test fails.
ElementContent – This section is optional. Select the checkbox before this element, the
following attribute appears:
o
ContentReq – Specify whether the specified element must contain content. If
Yes is selected, then the element must contain content, or the check for this
section will be False.
The following elements with specific attributes are within the optional ElementContent
section:
o
Length – This section is optional. Select the checkbox before this element, the
following attributes appear:
Compliance Guardian Installation and Administration User Guide
301
CompareType – Specify a compare type for this length compare. The
attributes for CompareType are GreaterThan, LessThan,
GreaterOrEqualThan, LessOrEqualThan, Equal, and NotEqual.
Characters – Specify the number of the characters used for the
compare.
Select the delete button ( ) to delete this check rule. Select Add Another
Length to add another rule.
o
TextCompare – This section is optional. Select the checkbox before this
element, the following attributes appear:
CompareType – Specify a compare type. The attributes for
CompareType are MustContain, MustNotContain,
MustEqual,MustNotEqual, MustMatch, and MustNotMatch
Separator – Specify a separator if multiple values are specified.
CaseSensitive – Specify if the attribute being tested for must match the
case exactly.
Value – Define one or more values for the test, use the separator
specified before to separate the values.
Select the delete button ( ) to delete this check rule. Select Add Another
TextCompare to add another rule.
•
ChildElement – This section is optional. Select the checkbox before this element, the
following attributes appear:
o
Name – Specify the name of the child element that will be tested.
o
CaseSensitive – Specify whether the element name being tested for must match
the case exactly.
o
MustExist – Specify whether or not the child element must exist. If True is
selected, then the test will fail if there is No child element.
The following elements with specific attributes are within the optional ChildElement
section:
o
o
ElementRepeat – This section is optional. Select the checkbox before this
element, the following attributes appear:
Alert – Specify whether to check for repeating elements.
Value – Specify the maximum times the element can repeat before the
check is determined False.
Attributes – This section is optional. Select the checkbox before this element,
the following attributes appear:
302
Name – Specify the attribute name that will be tested.
Compliance Guardian Installation and Administration User Guide
CaseSensitive – Specify if the attribute name being tested for must
match the case exactly.
AllowNull – Specify whether the attribute that has no value will be
tested.
MustExist – Specify whether or not the attribute has to exist. If True is
selected, then the test will fail if the specified attribute does not exist.
The following elements with specific attributes are within the optional
Attributes section:
o
Length – This section is optional. Select the checkbox before this element, the
following attributes appear:
CompareType – Specify a compare type for this length compare. The
attributes for CompareType are GreaterThan, LessThan,
GreaterOrEqualThan, LessOrEqualThan, Equal, and NotEqual.
Characters – Specify the number of the characters used for the
compare.
Select the delete button ( ) to delete this check rule. Select Add Another
Length to add another rule.
Filter
The content that meets the condition configured in this element field can be tested. The following
elements with specific attributes are available in the optional Filter section:
•
Attributes – For the details about the attributes, refer to Attributes.
•
ElementContent – For the details about the attributes, refer to ElementContent.
EnhancedElement Check Test Logic Example
Refer to the following example to better understand the test logic of the EnhancedElement type check.
The following nodes are contained in the selected file A that will be tested:
<a href="http://www.google.com <http://www.google.com/> >google</a>
<img src=""http://www.google.com/1.jpeg" alt="this is a test test img"/>
<img src=""http://www.google.com/2.jpeg" alt="this is a test img"/>
Create and configure the EnhancedElement check test logic:
Create an EnhancedElement type check. In the Report Text step, in the False Result and
Message field, select User Review Required in the False Result drop-down list.
Configure the Element section:
•
Specify the element name A for the Name attribute.
•
Select No in the drop-down list under the CaseSensitive attribute.
Compliance Guardian Installation and Administration User Guide
303
•
Select ResultNA in the drop-down list under the ResultNA attribute.
•
Select One in the drop-down list under the TrueIf attribute.
•
Select False in the drop-down list under the ValidWhen attribute.
In the ListLoc section:
•
Select Valid in the drop-down list under the Type attribute.
•
Select Warn in the drop-down list under the Status attribute.
Select the checkbox before TextCompare, and configure the following attributes:
•
Select MustContain in the drop-down list under the CompareType attribute.
•
Enter ; as the separator.
•
Select Yes in the drop-down list under the CaseSensitive attribute.
•
Enter google in the Value field.
Select the checkbox before SecondaryElement, and configure the following attributes:
•
Specify the element name IMG for the Name attribute.
•
Select No in the drop-down list under the CaseSensitive attribute.
•
Select Yes in the drop-down list under the MustExist attribute.
•
Select One in the drop-down list under the TrueIf attribute.
•
Select Yes in the drop-down list under the MustNext attribute.
•
Select the checkbox before Attributes, and configure the following attributes:
o
Specify the attribute name alt for the Name attribute.
o
Select No in the drop-down list under the CaseSensitive attribute.
o
Select Yes in the drop-down list under the AllowNull attribute.
o
Select Yes in the drop-down list under the MustExist attribute.
o
Select the checkbox before the WordsRepeat element, and then enter 2 in the
Number field.
Save the check.
Run a Compliance Scanner job. The test suite used in this job contains the check configured
above.
Review the check test logic:
•
304
See the TextCompare section: the node <a href="http://www.google.com
<http://www.google.com/> >google</a> in the file contains the value google, so the
check result in the TextCompare section is True.
Compliance Guardian Installation and Administration User Guide
•
See the attributes under Element: True has been selected in the drop-down list under
ValidWhen, and the check result for the element A in this check is True, so the result for
ValidWhen section is Valid.
•
See the ListLoc section: the result for ValidWhen is Valid, so the location of the node <a
href="http://www.google.com <http://www.google.com/> >google</a> will be
temporarily recorded (the location of the node is TEMPORARILY recorded, but is NOT
really recorded in the Compliance Guardian database. For this type of check, only the
location of the instance found by the SecondaryElement check can be recorded).
•
See the SecondaryElement section: because we have set Yes for the MustNext
attribute, the node <img src=""http://www.google.com/1.jpeg" alt="this is a test test
img"/> in file A will be checked, the node <img src=""http://www.google.com/2.jpeg"
alt="this is a test img"/> will not be checked:
o
See the Attributes section under SecondaryElement: we have specified 2 in the
Number field under the WordsRepeat attribute, the value in the node <img
src=""http://www.google.com/1.jpeg" alt="this is a test test img"/> contains
two repeated words: test, so the check for Attributes is False.
o
See the attributes under Element: True has been selected in the drop-down list
under ValidWhen, but the check result of this check is False, so the result for
ValidWhen field is Invalid.
o
See the ListLoc section: the result for ValidWhen is Invalid, so the check status
is Warn, and this check status will be recorded in the Compliance Guardian
database, users cannot see the status in the Compliance Guardian GUI.
•
For this type of check, if there are nothing temporarily recorded in the
EnhancedElement check section, the SecondaryElement check will not start, and the
check result of this check will be True. If there are something that are recorded in the
EnhancedElement check section, the SecondaryElement check will start. If there are
something recorded based on the SecondaryElement check, the result of this check will
be False. On the contrary, if there are nothing recorded based on the SecondaryElement
check, the result of this check will be True.
•
Since there is something recorded in the Compliance Guardian database in this use case,
the check result of this check is False. According to the setting in False Result and
Message in the Report Text step, the returning status is User Review Required, which
will be displayed in the Compliance Guardian report.
MatchedElement Type Check
The MatchedElement type check is used to validate the matching relationship between two elements.
The following section provides a general introduction about configuring attributes for this type of check,
as well as a test example for you to understand the test logic.
Compliance Guardian Installation and Administration User Guide
305
Configuring Attributes for MatchedElement Type Check
Configure the attributes for the MatchedElement type check according to the instructions in the
following sections.
MatchElement
There are the five attributes under this element. For the details about the five attributes, refer to the
Configuring Attributes for Element Type section.
ListLoc
There are two attributes under this element. For the details about the two attributes, refer to the
Configuring Attributes for Element Type section.
Attributes
This section is optional. For the details about the attributes under this element, refer to the Configuring
Attributes for Element Type section.
ElementContent
This section is optional. The details about the attributes under this element, refer to the Configuring
Attributes for Element Type section.
ChildElement
This section is optional. The details about the attributes under this element, refer to the Configuring
Attributes for Element Type section.
SecondaryMatch
This section is optional. Select the checkbox before the element, and configure the following attributes:
•
306
SecondaryMatch – Configure the following attributes for this element:
o
Name – Specify the element that will be tested.
o
CaseSensitive – Specify if the element name being tested for must match the
case exactly.
o
ResultNA – Specify a result when the specified element is not found. If
TrueResult is selected, then if the specified element is not found, the True result
will be returned. If FalseResult is selected, then if the specified element is not
found, the False result will be returned. If NAResult is selected, then if the
specified element is not found, the status of the tested file will be Not
Applicable, which will be displayed in the Compliance Guardian report. This is
basically stating that you have the option to set the result to Not Applicable if
none of the elements are found.
Compliance Guardian Installation and Administration User Guide
•
•
o
TrueIf – There are two values for this attribute: All and One. If One is selected,
the scan will stop when one instance is found (to save scan time). If All is
selected, the scan will only stop when all instances are found.
o
ValidWhen – This is used to indicate if the result is valid when the condition is
one of two values: True or False.
Attribute – Configure the following attributes for this element:
o
Name – Specify the name of the attribute to be tested.
o
CaseSensitive – Specify if the attribute name being tested for must match the
case exactly.
o
AllowNull – Specify whether the attribute that has no value will be tested.
o
MustExist – Specify whether or not the attribute has to exist. If True is selected,
then the test will fail if the specified attribute does not exist.
TextCompare – Configure the following attributes for this element:
o
o
MatchElementValue – If the Attributes element under the MatchElement
section has been configured, this radio button will be selectable. If this radio
button is selected, configure the following attributes:
Name – All the attribute names configured under the MatchElement
section will be loaded. Select a name from the drop-down list for the
test.
CaseSensitive – Specify if the attribute name being tested for must
match the case exactly.
CompareType – There are two values for this attribute: MustContain
and MustNotContain. If MustContain is selected, the test condition is:
the value of the attribute under the SecondaryMatch section must
contain the value of the attribute under the MatchElement section, or
the check will be failed; If MustNotContain is selected, the test
condition is: the value of the attribute under the SecondaryMatch
section must not contain the value of the attribute under the
MatchElement section, or the check will be failed.
TextCompare – If this radio button is selected, configure the following
attributes:
CompareType – Specify a compare type. The attributes for
CompareType are MustContain, MustNotContain, MustEqual, and
MustNotEqual.
Separator – Specify a separator if multiple values are specified.
CaseSensitive – Specify if the attribute being tested for must match the
case exactly.
Value – Define one or more values for the test, use the separator
specified before to separate the values.
Compliance Guardian Installation and Administration User Guide
307
Filter
The content that meets the condition configured in this element field can be tested. The following
elements with specific attributes are available in the optional Filter section:
•
Attributes – For the details about the attributes, refer to Attributes.
•
ElementContent – For the details about the attributes, refer to ElementContent.
MatchedElement Check Test Logic Example
Refer to the following example to better understand the test logic of the MatchedElement type check.
The selected file A that will be tested contains the following nodes:
<Input id="search-keyword"/>
<Input id=".docx">
<label For=".docx">
<label For="keyword"/>
Create and configure the MatchedElement check test logic:
Create a MatchedElement type check. In the Report Text step, in the True Result and Message
field, select Passed in the True Result drop-down list.
Configure the Element section:
•
Specify the element name Input for the Name attribute.
•
Select No in the drop-down list under the CaseSensitive attribute.
•
Select ResultNA in the drop-down list under the ResultNA attribute.
•
Select One in the drop-down list under the TrueIf attribute.
•
Select True in the drop-down list under the ValidWhen attribute.
Configure the ListLoc section:
•
Select Valid in the drop-down list under the Type attribute.
•
Select Note in the drop-down list under the Status attribute.
Select the checkbox before Attributes, and configure the following attributes:
•
Specify the attribute name ID for the Name attribute
•
Select No in the drop-down list under the CaseSensitive attribute.
•
Select Yes in the drop-down list under the AllowNull attribute.
•
Select True in the drop-down list under the MustExist attribute.
•
Select the checkbox before Length, and configure the following attributes:
o
308
Select GreaterThan in the drop-down list under the CompareType attribute.
Compliance Guardian Installation and Administration User Guide
o
Enter 5 as the value of the Characters attribute.
Select the checkbox before SecondaryMatch:
•
•
•
Configure the following attributes:
o
Specify the element name Label for the Name attribute.
o
Select No in the drop-down list under the CaseSensitive attribute.
o
Select ResultNA in the drop-down list under the ResultNA attribute.
o
Select One in the drop-down list under the TrueIf attribute.
o
Select False in the drop-down list under the ValidWhen attribute.
In the Attributes section:
o
Specify the attribute name FOR for the Name attribute.
o
Select No in the drop-down list under the CaseSensitive attribute.
o
Select Yes in the drop-down list under the AllowNull attribute.
o
Select True in the drop-down list under the MustExist attribute.
In the TextCompare section, select the MatchElementValue radio button:
o
Select the attribute name ID for the Name attribute.
o
Select No in the drop-down list under the CaseSensitive attribute.
o
Select MustContain in the drop-down list under the CompareType attribute.
Save the check.
Run a Compliance Scanner job, the test suite used in this job contains the check configured
above.
Review the check test logic:
•
See the Attributes section under MatchElement: under the Length element: we have
set GreaterThan for the CompareType attribute, and set 5 for the Characters attribute,
that means the check for the node <Input id="keyword"/> in file A is True, while the
check for the node <Input id=".docx"> is False, and according to the value set for
ValidWhen, the node <Input id="keyword"/> will be valid. According to the logic of the
ListLoc section, the location of the node <Input id="keyword"/> will be TEMPORARILY
recorded (the location of the node <Input id=" keyword"/> is TEMPORARILY recorded,
but is Not really recorded in the Compliance Guardian database, only there are
something temporarily recorded in the MatchElement check section, can the
SecondaryMatch section check start. If there are nothing recorded in the
MatchElement check, the SecondaryMatch section check will not start, and the result of
the check will be True).
•
In the SecondaryMatch section, see the following nodes in file A:
<Input id="keyword"/>
<Input id=".docx">
Compliance Guardian Installation and Administration User Guide
309
<label For=".docx">
<label For="search-keyword"/>
•
o
According to the logic set in the MatchElement section, the node <Input id="
keyword"/> meets the condition and is taken to participate to the secondary
check.
o
See the Attributes section under SecondaryMatch section, see the node: <label
For="search-keyword"/>, the value of the attribute For (search-keyword)
contains the value of the attribute id, so the check result of the
SecondaryMatch section is True.
o
See the ValidWhen attribute under SecondaryMatch, False has been selected in
the drop-down list under ValidWhen, but the check result of this check is True,
so the result for ValidWhen attribute is Invalid.
o
See the ListLoc field, the result for ValidWhen is Invalid, so the check status
(Note) and the location of the node <Input id="keyword"/> (the location of the
attribute specified in the SecondaryMatch section will not be recorded, the
location of the attribute that is specified in the MatchElement and meets the
condition will be recorded in the database) will be recorded in Compliance
Guardian database, users cannot see the status in the Compliance Guardian
GUI.
In the SecondaryMatch section, if you select the MatchElementValue radio button
under the TextCompare section, the result of this check is not determined by the check
result of the MatchElement section, and not determined by the check result of the
SecondaryMatch section either. In the MatchElement section, if there are nothing
temporarily recorded, the SecondaryMatch section check will not start, and the result
of this check will be True; while in the MatchElement section, if there are something
temporarily recorded, the SecondaryMatch section check will start. According to the
logic in the SecondaryMatch section, if there are something recorded in the
SecondaryMatch check, the result of this check will be False. While if there are nothing
recorded in the SecondaryMatch check, the result of this check will be True.
In this use case, according to the SecondaryMatch section, the node <Input
id="keyword"/> will be recorded in Compliance Guardian database. So the result of this
check will be False.
•
310
In the SecondaryMatch section, if you select TextCompare radio button under the
TextCompare section, if the element specified in the MatchElement section is not
found, the result of this check will be the value set for the ResultNA attribute; if the
element specified in the MatchElement section is found, the check result will be
determined by the logic in the SecondaryMatch section, the attributes configured in the
MatchElement section will not affect the result of this check.
Compliance Guardian Installation and Administration User Guide
FindText Type Check
The FindText type check is used to find specified text in a document. The following section provides a
general introduction about configuring attributes for this type of check, as well as a test example for you
to understand the test logic.
Configuring Attributes for FindText Type Check
Configure the attributes for the FindText type check according to the instructions in the following
sections.
FindText
This element has the following attributes:
•
TrueIf – Specify the condition when the check result is True. If Found is selected in the
drop-down list under the TrueIf attribute, when finding an instance, the check result of
this check will be True. If NotFound is selected in the drop-down list under the TrueIf
attribute, when finding an instance, the check result of this check will be False.
•
SearchAll – Specify whether or not to check the comments and scripts.
•
ListLocation – Specify whether or not to record the instance’s location in the
Compliance Guardian database. If Yes is selected in the drop-down list under the
ListLocation attribute, then every location of the instance found will be recorded in the
Compliance Guardian database. If No is selected in the drop-down list under the
ListLocation attribute, the check continues, but the locations of the instances found will
not be recorded in the database.
•
ListLocStatus – Specify the status for the instance that is found. The status will be
recorded in the Compliance Guardian database. Note that if the status set for True
Result or False Result is Failed in the Report Text step, the value for the ListLocStatus
attribute will be Fail, and the value cannot be changed.
•
CaseSensitive – Specify if the text being tested for must match the case exactly.
•
MustRepeat – Specify the amount of times a word or phrase must be found before
considering the condition to be Found. When configuring the check, if you do not enter
a value for this attribute, the value for this attribute will be considered 1 in the test.
•
CompareType – Select MustContain or MustEqual for this attribute.
•
Value – Specify a scanned value.
Compliance Guardian Installation and Administration User Guide
311
FindText Check Test Logic Example
Refer to the following example to better understand the test logic of the FindText type check.
The content of the file A that will be tested contains the following two values: 508, 508. Create and
configure the FindText check test logic:
Create a FindText Type check. In the Report Text step, in the False Result and Message field,
select User Review Required in the False Result drop-down list.
Configure the elements in the check:
•
Select NotFound in the drop-down list under the TrueIf attribute.
•
Select Yes in the drop-down list under the SearchAll attribute.
•
Select Yes in the drop-down list under the ListLocation attribute.
•
Select Note in the drop-down list under the ListLocStatus attribute.
•
Select No in the drop-down list under the CaseSensitive attribute.
•
Enter 2 as the value for the MustRepeat attribute.
•
Select MustEqual for the CompareType attribute.
•
Enter 508 in the Value field.
Save the check.
Run a Compliance Scanner job. The test suite used in this job contains the check configured
above.
Review the FindText Check test logic:
312
•
If MustEqual is selected for the CompareType attribute, then the content must exactly
equal the value we specified in order to be found. If MustContain is selected for this
attribute, then the content only needs to contain the value in order to be found. For
example, if the tested file contains the word Front-end, and we select MustEqual for the
CompareType attribute with the value specified as end, then the word Front-end will
not be found, but if we select MustContain for the CompareType attribute, the word
Front-end will be found.
•
We have set 2 for the MustRepeat attribute, and the value 508 has repeated 2 times in
the file A, so the check is Found. We have set NotFound for the TrueIf value, so the
check result of this check is False. According to the setting in False Result and Message
in the Report Text step, the returning status is User Review Required, which will be
displayed in the Compliance Guardian report.
•
We have set Yes for the ListLocation attribute, and have set Note as the status, so the
location of 508 in the file A will be recorded in the Compliance Guardian database, the
status is Note.
Compliance Guardian Installation and Administration User Guide
ComplexFindText Type Check
The ComplexFindText type check offers a more complex way to detect if two text strings are coexisting
in one document. The functionality of the ComplexFindText type check is similar to the FindText type
check. The following section provides a general introduction about configuring attributes for this type of
check, as well as a test example for you to better understand the test logic.
Configuring Attributes for ComplexFindText Type Check
Configure the attributes for the ComplexFindText type check according to the instructions in the
following sections.
Primary
Configure the following attributes in this section:
•
TrueIf – Specify the condition when the check result is True. If Found is selected in the
drop-down list under the TrueIf attribute: when finding an instance, the check result of
this check will be True. If NotFound is selected in the drop-down list under the TrueIf
attribute: when finding an instance, the check result of this check will be False.
•
SearchAll – Specify whether or not to check the comments and scripts.
•
ListLocation – Specify whether or not to record the instance’s location in the
Compliance Guardian database. If Yes is selected in the drop-down list under the
ListLocation attribute, then every location of the instance found will be recorded in the
Compliance Guardian database. If No is selected in the drop-down list under the
ListLocation attribute, the check continues, but the locations of the instances found will
not be recorded in the database.
•
ListLocStatus – Specify the status for the instance that is found. The status will be
recorded in the Compliance Guardian database. Note that if the status set for True
Result or False Result is Failed in the Report Text step, the value for the ListLocStatus
attribute will be Fail, and the value cannot be changed.
•
CaseSensitive – Specify if the text being tested for must match the case exactly.
•
MustRepeat – Specify the amount of times a word or phrase must be found before
considering the condition to be True. When configuring the check, if you do not enter a
value for this attribute, the value for this attribute will be considered 1 in the test.
•
CompareType – Select MustContain or MustEqual for this attribute.
•
ResultNA – If the primary check in this check is not fulfilled, the scan status will be the
value you selected for the ResultNA attribute.
•
Value – Specify a scanned value for the primary check section.
Compliance Guardian Installation and Administration User Guide
313
Secondary
Configure the following attributes in this section:
•
TrueIf – Specify the condition when the check result is True. If Found is selected in the
drop-down list under the TrueIf attribute: when finding an instance, the check result of
this check will be True. If NotFound is selected in the drop-down list under the TrueIf
attribute: when finding an instance, the check result of this check will be False.
•
SearchAll – Specify whether or not to check the comments and scripts.
•
ListLocation – Specify whether or not to record the instance’s location in the
Compliance Guardian database. If Yes is selected in the drop-down list under the
ListLocation attribute, then every location of the instance found will be recorded in the
Compliance Guardian database. If No is selected in the drop-down list under the
ListLocation attribute, the check continues, but the locations of the instances found will
not be recorded in the database.
•
ListLocStatus – Specify the status for the instance that is found. The status will be
recorded in the Compliance Guardian database. Note that if the status set for True
Result or False Result is Failed in the Report Text step, the value for the ListLocStatus
attribute will be Fail, and the value cannot be changed.
•
CaseSensitive – Specify if the text being tested for must match the case exactly.
•
MustRepeat – Specify the amount of times a word or phrase must be found before
considering the condition to be True. When configuring the check, if you do not enter a
value for this attribute, the value for this attribute will be considered 1 in the test.
•
CompareType – Select MustContain or MustEqual for this attribute.
•
MaxDistanceToPrimary – Specify the number of the characters. The scan engine
extracts text as the scanning contents. In the contents, if the characters between a
primary check instance (instance found in the primary check) and the secondary check
instance (instance found in the secondary check) are less than the number specified
here, the secondary check is Found.
•
Value – Specify a scanned value for the secondary check section.
ComplexFindText Check Test Logic Example
Refer to the following example for better understanding the test logic of the ComplexFindText type
check.
The content of the selected file A that will be tested contains the following values: 508, Justice.
Create and configure the ComplexFindText check test logic:
Create a FindText Type check. In the Report Text step, in the False Result and Message field,
select User Review Required in the False Result drop-down list.
314
Compliance Guardian Installation and Administration User Guide
Configure the Primary section:
•
Select Found in the drop-down list under the TrueIf attribute.
•
Select Yes in the drop-down list under the SearchAll attribute.
•
Select Yes in the drop-down list under the ListLocation attribute.
•
Select Note in the drop-down list under the ListLocStatus attribute.
•
Select No in the drop-down list under the CaseSensitive attribute.
•
Select MustContain in the drop-down list under the CompareType attribute.
•
Select FalseResult in the drop-down list under the ResultNA attribute.
•
Enter 508 in the Value field.
Configure the Secondary section:
•
Select NotFound in the drop-down list under the TrueIf attribute.
•
Select Yes in the drop-down list under the SearchAll attribute.
•
Select Yes in the drop-down list under the ListLocation attribute.
•
Select Note in the drop-down list under the ListLocStatus attribute.
•
Select No in the drop-down list under the CaseSensitive attribute.
•
Select MustContain in the drop-down list under the CompareType attribute.
•
Enter 10 in the MaxDistanceToPrimary attribute field.
•
Enter JUSTICE in the Value field.
Save the check.
Run a Compliance Scanner job, the test suite used in this job contains the check configured
above.
Review the check test logic:
•
If MustEqual is selected for the CompareType attribute, then the content must exactly
equal the value we specified in order to be found. If MustContain is selected for this
attribute, then the content only needs to contain the value in order to be found. For
example, if the tested file contains the word Front-end, and we select MustEqual for the
CompareType attribute with the value specified as end, then the word Front-end will
not be found, but if we select MustContain for the CompareType attribute, the word
Front-end will be found.
•
In this type of check, if the result of the primary check is True, the secondary check can
start for this check. If the result of the primary check is False, the secondary check will
not start for this check and the result of this check will be determined by the primary
check. For the ResultNA attribute, if TrueResult is set as the value of this attribute, the
result of this check will be True. If FalseResult is set as the value of this attribute, the
result of this check will be False. If NAResult is set as the value of this attribute, the
Compliance Guardian Installation and Administration User Guide
315
status of the tested file will be Not Applicable, and Not Applicable will be displayed in
the Compliance Guardian report.
•
•
According to the MaxDistanceToPrimary attribute, if the secondary check starts in the
extracted file content:
o
If the characters between the instance found in the primary check and the
instance found in the secondary check are less than the number of characters
specified in the MaxDistanceToPrimary attribute, the result of the secondary
check is Found.
o
If the characters between the instance found in the primary check and instance
found in the secondary check are greater than the number of characters
specified in the MaxDistanceToPrimary attribute, the result of the secondary
check is Not Found.
In this use case:
o
In the primary check, the value that will be searched for in the file is 508, which
can be found in the file A, so the result is Found. According to the logic of the
TrueIf attribute, the result of the primary check is True. The secondary check
will start.
o
In the secondary check, the value that will be searched for in the file is JUSTICE,
which can be found in the file A. In the extracted file content, the characters
between JUSTICE and 508 are less than 10 characters, so the result of the
secondary check is Found. According to the logic of the TrueIf attribute, the
result of the secondary check is False. According to the setting in False Result
and Message in the Report Text step, the returning status is User Review
Required which will be displayed in the Compliance Guardian report.
RegularExpression Type Check
The RegularExpression type check is used to find a string of text that fits the format of the defined
regular expression. The following section provides a general introduction about configuring attributes
for this type of check, as well as a test example for you to understand the test logic.
Configuring Attributes for RegularExpression Type Check
Configure the attributes for the RegularExpression type check according to the instructions in the
following sections.
RegularExpression
Configure the following attributes in this section:
•
316
IsFindText – Specify whether or not to extract the text as the scanning content. If Yes is
selected in the drop-down list under this attribute, the scan engine will extract the text
as the scanning content. if No is selected in the drop-down list under this attribute, the
scan engine will use the source code as the scanning content.
Compliance Guardian Installation and Administration User Guide
•
SearchAll – Specify whether or not to check the comments and scripts.
•
CaseSensitive – Specify if the text being tested for must match the case exactly.
•
TrueIf – Specify the condition when the check result is True. If Found is selected in the
drop-down list under the TrueIf attribute: when finding an instance, the check result of
this check will be True. If NotFound is selected in the drop-down list under the TrueIf
attribute: when finding an instance, the check result of this check will be False.
•
ListLocation – Specify whether or not to record the instance’s location in the
Compliance Guardian database. If Yes is selected in the drop-down list under the
ListLocation attribute, then every location of the instance found will be recorded in the
Compliance Guardian database. If No is selected in the drop-down list under the
ListLocation attribute, the check continues, but the locations of the instances found will
not be recorded in the database.
•
ListLocStatus – Specify the status for the instance that is found. The status will be
recorded in the Compliance Guardian database. Note that if the status set for True
Result or False Result is Failed in the Report Text step, the value for the ListLocStatus
attribute will be Fail, and the value cannot be changed.
•
MustRepeat – Specify the amount of times the value that matches the regular
expression must be found before considering the condition to be True. When
configuring the check, if you do not enter a value for this attribute, the value for this
attribute will be considered 1 in the test.
•
CustomCheck – Enter a CustomCheck name for this attribute. The CustomCheck is used
to calculate check digit on the result of the regular expressions, in order to validate the
result. For more information on CustomCheck, refer to Using CustomScan in Compliance
Guardian. This attribute is optional.
Filter
If you want to configure the Filter section, select the checkbox before the element (this section is
optional). Select the checkbox before Text if you want to configure the Text section:
•
CaseSensitive – Specify if the element being tested must match the case exactly.
•
Separator – Specify a separator if multiple values are specified.
•
Value – Define one or more values for the test, and use the separator specified before
to separate the values. If the scanned result that matches the specified regular
expression exactly matches the value specified here, this result will be filtered out.
Select Add Another Text to add another Text filter check rule. Select the delete button (
Text filter check rule.
) to delete a
Select the checkbox before Regex if you want to configure the Regex section:
•
CaseSensitive – Specify if the element being tested must match the case exactly.
Compliance Guardian Installation and Administration User Guide
317
•
Value – Define a regular expression. If the scanned result that matches the specified
regular expression also matches the regular expression specified here, this result will be
filtered out.
Select Add Another Regex to add another Regex filter check rule. Select the delete button (
a Regex filter check rule.
) to delete
Value Field
Specify a regular expression. The value that matches the regular expression will be scanned.
RegularExpression Check Test Logic Example
Refer to the following example to better understand the test logic of the RegularExpression type check.
The file A that will be tested contains two words: Server-Side and front-end.
Create and configure the RegularExpression type check:
Create a RegularExpression Type check. In the Report Text step, in the True Result and
Message field, select Passed in the False Result drop-down list.
Configure the elements in the RegularExpression section:
•
Select Yes in the drop-down list under the IsFindText attribute.
•
Select Yes in the drop-down list under the SearchAll attribute.
•
Select No in the drop-down list under the CaseSensitive attribute.
•
Select Found in the drop-down list under the TrueIf attribute.
•
Select Yes in the drop-down list under the ListLocation attribute.
•
Select Warn in the drop-down list under the ListLocStatus attribute.
Select the checkbox before Filter, and select the checkbox before Text. Configure the following
attributes in the Text section:
•
Select No in the drop-down list under the CaseSensitive attribute.
•
Enter ; as the separator.
•
Enter front-end;Server-Side in the Value field.
Enter the regular expression \b[a-zA-Z]+-[a-zA-Z]+\b in the Value field. A word that contains a
hyphen can match the regular expression.
Save the check.
Run a Compliance Scanner job. The test suite used in this job contains the check configured
above.
Review the check test logic.
•
318
In this case, in the file A, the words Server-Side and front-end match the specified
regular expression, but according to the logic we configured in the Filter section, the
Compliance Guardian Installation and Administration User Guide
two words will be filtered out, so the result is Not Found. We set NotFound for the
TrueIf value, so the check result of this check is True. According to the setting in True
Result and Message in the Report Text step, the returning status is Passed, which will
be displayed in the Compliance Guardian report.
•
We set Yes for the ListLocation attribute, but no result that meets the condition in the
check was found. No location will be recorded in the Compliance Guardian database.
ComplexRegEx Type Check
The ComplexRegEx type check offers a more complex way to detect if two strings of text are coexisting
in one document. The functionality of the ComplexRegEx type check is similar to the RegularExpression
type check. The following section provides a general introduction about configuring attributes for this
type of check, as well as a test example to better understand the test logic.
Configuring Attributes for ComplexRegEx Type Check
Configure the attributes for the ComplexRegEx type check according to the instructions in the following
sections.
ComplexRegex
Configure the following attribute in this section:
•
IsFindText – Specify whether or not to extract the text as the scanning content. If Yes is
selected in the drop-down list under this attribute, the scan engine will extract the text
as the scanning content; if No is selected in the drop-down list under this attribute, the
scan engine will use the source code as the scanning content.
Primary Check
Configure the following attributes in this section:
•
SearchAll – Specify whether or not to check the comments and scripts.
•
CaseSensitive – Specify if the text being tested for must match the case exactly.
•
TrueIf – Specify the condition when the check result is True. If Found is selected in the
drop-down list under the TrueIf attribute: when finding an instance, the check result of
this check will be True. If NotFound is selected in the drop-down list under the TrueIf
attribute: when finding an instance, the check result of this check will be False.
•
ListLocation – Specify whether or not to record the instance’s location in the
Compliance Guardian database. If Yes is selected in the drop-down list under the
ListLocation attribute, then every location of the instance found will be recorded in the
Compliance Guardian database. If No is selected in the drop-down list under the
ListLocation attribute, the check continues, but the locations of the instances found will
not be recorded in the database.
Compliance Guardian Installation and Administration User Guide
319
•
ListLocStatus – Specify the status for the instance that is found. The status will be
recorded in the Compliance Guardian database. Note that if the status set for True
Result or False Result is Failed in the Report Text step, the value for the ListLocStatus
attribute will be Fail, and the value cannot be changed.
•
MustRepeat – Specify the amount of times the value that matches the regular
expression must be found before considering the condition to be True. When
configuring the check, if you do not enter a value for this attribute, the value for this
attribute will be considered 1 in the test.
•
CustomCheck – Enter a CustomCheck name for this attribute. The CustomCheck is used
to calculate the check digit on the result of the regular expressions, in order to validate
the result. For more information about CustomCheck, refer to Using CustomScan in
Compliance Guardian. This is optional.
•
ResultNA – If the primary check in this check is not fulfilled, the scan status will be the
value you selected for the ResultNA attribute.
•
Filter – This field is optional. Select the checkbox before Filter, the Text section and the
Regex section appear:
o
Text – Select the checkbox before Text, and configure the following attributes:
CaseSensitive – Specify if the element being tested for must match the
case exactly.
Separator – Specify a separator if multiple values are specified.
Value – Define one or more values for the test, and use the separator
specified before to separate the values. If the scanned result that
matches the specified regular expression exactly matches the value
specified here, this result will be filtered out.
Select Add Another Text to add another Text filter check rule. Select the delete
button ( ) to delete this check rule.
o
Regex – Select the checkbox before Text, and configure the following attributes:
CaseSensitive – Specify if the element being tested for must match the
case exactly.
Separator – Specify a separator if multiple values are specified.
Value – Define a regular expression. If the scanned result that matches
the specified regular expression also matches the regular expression
specified here, this result will be filtered out.
Select Add Another Regex to add another Text filter check rule. Select the
delete button ( ) to delete this Regex filter check rule.
•
320
Value – Specify a regular expression for the secondary check section. The value that
matches the regular expression will be scanned.
Compliance Guardian Installation and Administration User Guide
Secondary Check
Configure the following attributes in this section:
•
SearchAll – Specify whether or not to check the comments and scripts.
•
CaseSensitive – Specify if the text being tested for must match the case exactly.
•
TrueIf – Specify the condition when the check result is True. If Found is selected in the
drop-down list under the TrueIf attribute, when finding an instance, the check result of
this check will be True. If NotFound is selected in the drop-down list under the TrueIf
attribute, when finding an instance, the check result of this check will be False.
•
ListLocation – Specify whether or not to record the instance’s location in the
Compliance Guardian database. If Yes is selected in the drop-down list under the
ListLocation attribute, then every location of the instance found will be recorded in the
Compliance Guardian database. If No is selected in the drop-down list under the
ListLocation attribute, the check continues, but the locations of the instances found will
not be recorded in the database.
•
ListLocStatus – Specify the status for the instance that is found. The status will be
recorded in the Compliance Guardian database. Note that if the status set for True
Result or False Result is Failed in the Report Text step, the value for the ListLocStatus
attribute will be Fail, and the value cannot be changed.
•
MustRepeat – Specify the amount of times the value that matches the regular
expression must be found before considering the condition to be True. When
configuring the check, if you do not enter a value for this attribute, the value for this
attribute will be considered 1 in the test.
•
CustomCheck – Enter a CustomCheck name for this attribute. The CustomCheck is used
to calculate check digit on the result of the regular expressions, in order to validate the
result. For more information on CustomCheck, refer to Using CustomScan in Compliance
Guardian. This attribute is optional.
•
MaxDistanceToPrimary – Specify the number of the characters. The scan engine
extracts text as the scanning contents. In the contents, if the characters between a
primary check instance (instance found in the primary check) and the secondary check
instance (instance found in the secondary check) are less than the number specified
here, the secondary check is Found.
•
Filter – This is optional. Select the checkbox before Filter, the Text section and the
Regex section appear:
o
Text – Select the checkbox before Text, and configure the following attributes:
CaseSensitive – Specify if the element being tested for must match the
case exactly.
Separator – Specify a separator if multiple values are specified.
Value – Define one or more values for the test, and use the separator
specified before to separate the values. If the scanned result that
Compliance Guardian Installation and Administration User Guide
321
matches the specified regular expression exactly matches the value
specified here, this result will be filtered out.
Select Add Another Text to add another Text filter check rule. Select the delete
button ( ) to delete this filter check rule.
o
Regex – Select the checkbox before Text, and configure the following attributes:
CaseSensitive – Specify if the element being tested for must match the
case exactly.
Separator – Specify a separator if multiple values are specified.
Value – Define a regular expression. If the scanned result that matches
the specified regular expression also matches the regular expression
specified here, this result will be filtered out.
Select Add Another Regex to add another Text filter check rule. Select the
delete button ( ) to delete this Regex filter check rule.
•
Value – Specify a regular expression for the secondary check section. The value that
matches the regular expression will be scanned.
ComplexRegEx Check Test Logic Example
Refer to the following example to better understand the test logic of the ComplexRegEx type check.
The file A that will be tested contains a word Server-Side, and contains the Canadian Social Insurance
Number: 046-454-286.
Create and configure the ComplexRegEx check test logic:
Create a ComplexRegEx Type check. In the Report Text step, in the False Result and Message
field, select User Review Required in the False Result drop-down list.
Configure the elements in the check:
322
•
Select Yes for the IsFindText attribute.
•
In the Primary section:
o
Select No in the drop-down list under the SearchAll attribute.
o
Select No in the drop-down list under the CaseSensitive attribute.
o
Select Found in the drop-down list under the TrueIf attribute.
o
Select No in the drop-down list under the ListLocation attribute.
o
Select FalseResult in the drop-down list under the ResultNA attribute.
o
Enter 1 for the MustRepeat attribute.
o
Enter the regular expression \b[a-zA-Z]+-[a-zA-Z]+\b in the Value field. A word
that contains a hyphen can match the regular expression.
Compliance Guardian Installation and Administration User Guide
•
In the Secondary section:
o
Select No in the drop-down list under the SearchAll attribute.
o
Select No in the drop-down list under the CaseSensitive attribute.
o
Select Found in the drop-down list under the TrueIf attribute.
o
Select No in the drop-down list under the ListLocation attribute.
o
Enter 1 for the MustRepeat attribute.
o
Enter 10 in the MaxDistanceToPrimary attribute field.
o
Enter the regular expression (?<=^|\b)\d{3}([- ])\d{3}(\1)\d{3}(?=$|\b) in the
Value field. The Social Insurance Number can match the regular expression.
Save the check.
Run a Compliance Scanner job. The test suite used in this job contains the check configured
above.
Review the check test logic:
•
In this type of check, if the result of the primary check is True, the secondary check can
start for this check. If the result of the primary check is False, the secondary check will
not start for this check and the result of this check will be determined by the primary
check. For the ResultNA attribute, if TrueResult is set as the value of this attribute, the
result of this check will be True. If FalseResult is set as the value of this attribute, the
result of this check will be False. If NAResult is set as the value of this attribute, the
status of the tested file will be Not Applicable, and Not Applicable will be displayed in
the Compliance Guardian report.
•
According to the MaxDistanceToPrimary attribute, if the secondary check starts in the
extracted file content:
o
If the characters between the instance found in the primary check and the
instance found in the secondary check are less than the number of characters
specified in the MaxDistanceToPrimary attribute, the result of the secondary
check is Found.
o
If the characters between the instance found in the primary check and instance
found in the secondary check are greater than the number of characters
specified in the MaxDistanceToPrimary attribute, the result of the secondary
check is Not Found.
•
In the primary and secondary check section, we have set No for the ListLocation
attribute. The location of the instance will not be recorded in the Compliance Guardian
database, so the value for LisLocStatus is not required to be set.
•
In this use case:
o
In the primary check, the value that matches the regular expression in the file is
Server-Side, so the result is Found. According to the logic set of the TrueIf
Compliance Guardian Installation and Administration User Guide
323
attribute, the result of the primary check is True. So the secondary check will be
used.
o
In the secondary check, the value that matches the regular expression in the file
is 046-454-286. In the extracted file content, the characters between 046-454286 and Server-Side are less than 10 characters, so the result of the secondary
check is Found. According to the logic set of the TrueIf attribute, the result of
the secondary check is False. So the result of this check is False. According to the
setting in False Result and Message in the Report Text step, the returning
status is User Review Required, which will be displayed in the Compliance
Guardian report.
Dictionary Type Check
The Dictionary type check groups FindText check and RegularExpression check in one check, and take
the AND operation on the search result. The dictionary settings enable end users to define multiple
checking in each FindText or RegularExpression section. The following section provides a general
introduction about configuring attributes for this type of check, as well as a test example for you to
understand the test logic.
Configuring Attributes for Dictionary Type Check
Configure the attributes for the Dictionary type check according to the instructions in the following
sections.
Dictionary
Configure the following attribute:
•
BreakIfFound – Select Yes or No for this attribute. If Yes is selected, the scan will stop
when one instance is found (to save scan time). If No is selected, the scan will only stop
when all instances are found.
FindText
This section is optional. Configure the following attributes:
•
324
Select the checkbox before FindText, the following attributes appear:
o
TrueIf – Specify the condition when the check result is True. If Found is selected
in the drop-down list under the TrueIf attribute, when finding an instance, the
check result of this check will be True. If NotFound is selected in the drop-down
list under the TrueIf attribute, when finding an instance, the check result of this
check will be False.
o
SearchAll – Specify whether or not to check the comments and scripts.
o
ListLocation – Specify whether or not to record the instance’s location in the
Compliance Guardian database. If Yes is selected in the drop-down list under
the ListLocation attribute, then every location of the instance found will be
Compliance Guardian Installation and Administration User Guide
recorded in the Compliance Guardian database. If No is selected in the dropdown list under the ListLocation attribute, the check continues, but the
locations of the instances found will not be recorded in the database.
•
o
ListLocStatus – Specify the status for the instance that is found. The status will
be recorded in the Compliance Guardian database. Note that if the status set for
True Result or False Result is Failed in the Report Text step, the value for the
ListLocStatus will be Fail, and the value cannot be changed.
o
CaseSensitive – Specify if the text being tested for must match the case exactly.
o
CompareType – Select MustContain or MustEqual for this attribute.
Dictionary – Configure the following attributes:
o
Separator – Specify a separator if multiple values are specified.
o
Value – Define one or more values for the test, use the separator specified
before to separate the values.
Select the delete button ( ) to delete this Dictionary check rule. Select Add Another
Dictionary to add another rule.
Regex
This section is optional. Configure the following attributes:
•
Select the checkbox before Regex, the following attributes appear:
o
TrueIf – Specify the condition when the check result is True. If Found is selected
in the drop-down list under the TrueIf attribute, when finding an instance, the
check result of this check will be True. If NotFound is selected in the drop-down
list under the TrueIf attribute, when finding an instance, the check result of this
check will be False.
o
SearchAll – Specify whether or not to check the comments and scripts.
o
ListLocation – Specify whether or not to record the instance’s location in the
Compliance Guardian database. If Yes is selected in the drop-down list under
the ListLocation attribute, then every location of the instance found will be
recorded in the Compliance Guardian database. If No is selected in the dropdown list under the ListLocation attribute, the check continues, but the
locations of the instances found will not be recorded in the database.
o
ListLocStatus – Specify the status for the instance that is found. The status will
be recorded in the Compliance Guardian database. Note that if the status set for
True Result or False Result is Failed in the Report Text step, the value for the
ListLocStatus attribute will be Fail, and the value cannot be changed.
o
CaseSensitive – Specify if the text being tested for must match the case exactly.
o
CustomCheck – Enter a CustomCheck name for this attribute. The CustomCheck
is used to calculate the check digit on the result of the regular expressions, in
Compliance Guardian Installation and Administration User Guide
325
order to validate the result. For more information on CustomCheck, refer to
Using CustomScan in Compliance Guardian. This is optional.
•
Dictionary – Configure the following attributes:
o
Separator – Specify a separator if multiple values are specified.
o
Value – Define one or more values for the test, use the separator specified
before to separate the values.
Select the delete button ( ) to delete this Dictionary check rule. Select Add Another
Dictionary to add another rule.
•
Filter – This is optional. Select the checkbox before Filter, the Text section and the
Regex section appear:
o
Text – Select the checkbox before Text, and configure the following attributes:
CaseSensitive – Specify if the element being tested for must match the
case exactly.
Separator – Specify a separator if multiple values are specified.
Value – Define one or more values for the test, and use the separator
specified before to separate the values. If the scanned result that
matches the specified regular expression exactly matches the value
specified here, this result will be filtered out.
Select Add Another Text to add another Text filter check rule. Select the delete
button ( ) to delete this filter check rule.
o
Regex – Select the checkbox before Regex, and configure the following
attributes:
CaseSensitive – Specify if the element being tested for must match the
case exactly.
Separator – Specify a separator if multiple values are specified.
Value – Define a regular expression. If the scanned result that matches
the specified regular expression also matches the regular expression
specified here, this result will be filtered out.
Select Add Another Regex to add another Text check rule. Select the delete
button ( ) to delete this Regex filter check rule.
326
Compliance Guardian Installation and Administration User Guide
Dictionary Check Test Logic Example
Refer to the following example for better understanding the test logic of the Dictionary type check. The
file A that will be tested contains a word Server, and contains the Canadian Social Insurance Number:
046-454-286.
Create and configure the Dictionary check test logic:
Create a Dictionary Type check. In the Report Text step, in the True Result and Message field,
select Passed in the True Result drop-down list.
Configure the elements in the check:
•
Select Yes in the drop-down list under the BreakIfFound attribute.
•
In the FindText section:
•
o
Select Found in the drop-down list under the TrueIf attribute.
o
Select Yes in the drop-down list under the SearchAll attribute.
o
Select No in the drop-down list under the ListLocation attribute.
o
Select MustContain in the drop-down list under the CompareType attribute.
o
Select No in the drop-down list under the CaseSensitive attribute.
o
Enter server in the Value field.
In the Regex section:
o
Select Found in the drop-down list under the TrueIf attribute.
o
Select Yes in the drop-down list under the SearchAll attribute.
o
Select Yes in the drop-down list under the ListLocation attribute.
o
Select Note in the drop-down list under the ListLocStatus attribute.
o
Select No in the drop-down list under the CaseSensitive attribute.
o
Enter the regular expression (?<=^|\b)\d{3}([- ])\d{3}(\1)\d{3}(?=$|\b) in the
Value field. The Social Insurance Number can match the regular expression.
Save the check.
Run a Compliance Scanner job. The test suite used in this job contains the check configured
above.
Review the Dictionary Check test logic:
•
For the CompareType attribute in FindText section, if MustEqual is selected for this
attribute, then the content must be exactly equal to the value we specified in order to
be found. If MustContain is selected for this attribute, the content will be found if the
content contains the value we specified. For example, if the tested file contains the
word Front-end, and we select MustEqual for the CompareType attribute with the
Compliance Guardian Installation and Administration User Guide
327
value specified as end, then the word Front-end will not be found, but if we select
MustContain for the CompareType attribute, the word Front-end will be found.
•
See the logic set in the FindText section, the value that will be searched for in the file is
server, so the result is Found. According to the logic of the TrueIf attribute, the result of
the FindText section is True.
•
According to the logic of the BreakIfFound attribute, if one instance is found, the scan
will stop, so the test of the Regex section will not be continued.
•
So the result of this check is True. According to the setting in True Result and Message
in the Report Text step, the returning status is Passed, which will be displayed in the
Compliance Guardian report.
Cookie Type Check
The Cookie type check is used to validate cookie domain and expiration dates. The following section
provides a general introduction about configuring attributes for this type of check.
Configuring Attributes for Cookie Type Check
Configure the attributes for the Cookie type check according to the instructions in the following
sections.
Cookie
Configure the following attributes under this element:
•
ThirdParty – Instruct the scan engine to check if the cookie is from a third party.
•
PrivacyLinReq – Instruct the scan engine (based on the cookie condition) to check for a
privacy link.
•
ResultNA – Specify a result when the specified element is not found. If TrueResult is
selected, then if the specified element is not found, the True result will be returned; if
FalseResult is selected, then if the specified element is not found, the False result will be
returned. If NAResult is selected, then if the specified element is not found, the status
of the tested file will be Not Applicable, which will be displayed in the Compliance
Guardian report. This is basically stating that you have the option to set the result to Not
Applicable if none of the elements are found.
•
Expires – Instruct the testing core to check when the cookie expires in N seconds.
•
cPIITDF – Instruct the testing core to use the specified check to identify PII in the
webpage.
•
CType – Identify the cookie type to test for (allowed values 1, 2, 3):
o
328
1 – Single session. This tier encompasses any use of single session Web
measurement and customization technologies.
Compliance Guardian Installation and Administration User Guide
•
o
2 – Multi-session without PII. This tier encompasses any use of multi-session
Web measurement and customization technologies when no PII is collected
(including when the agency is unable to identify an individual as a result of its
use of those technologies).
o
3 – Multi-session with PII. This tier encompasses any use of multi-session Web
measurement and customization technologies when PII is collected (including
when the agency is able to identify an individual as a result of its use of those
technologies).
PrivacyLink – Enter a value in this field, if the privacy link in the file contains the value,
this check will be True.
Cookie Check Test Logic Example
Refer to the following example for better understanding the test logic of the Cookie type check. A user’s
session cookie will be tested. Create and configure the Cookie check test logic:
Create a Cookie type check. In the Report Text step, in the True Result and Message field, select
Passed in the True Result drop-down list.
Configure the elements in the check:
•
Select True in the drop-down list under the ThirdParty attribute.
•
Select True in the drop-down list under the PrivacyLinkReq attribute.
•
Select TrueResult in the drop-down list under the ResultNA attribute.
•
Select 1 in the drop-down list under the CType attribute.
•
Enter privacy.htm in the PrivacyLink field.
Save the check.
Run a Compliance Scanner job. The test suite used in this job contains the check configured
above.
Review the Cookie check test logic:
•
If the cookie is from a third party, the check result for this attribute will be True.
•
Since we have selected True in the drop-down list under the PrivacyLinkReq attribute,
and specified privacy.htm in the PrivacyLink field, so if the privacy link of the cookie
contains privacy.htm, the check result for this attribute will be True.
•
In this use case, if the check result for the ThirdParty attribute is True, and the check
result for the PrivacyLinkReq attribute is True, the check result of this check will be
True.
Compliance Guardian Installation and Administration User Guide
329
SSL Type Check
The SSL type check is used to validate HTTPS protocol encryption levels. The following section provides a
general introduction about configuring attributes for this type of check, as well as a test example for you
to understand the test logic.
Configuring Attributes for SSL Type Check
Configure the attributes for the SSL type check according to the instructions in the following sections.
SSL
Configure the following attributes under this element:
•
ElementName – This is the element that will be tested.
•
CaseSensitive – Instruct the testing core if the element name being tested for must
match the case exactly.
•
ResultNA – Specify a result when the specified element is not found. If TrueResult is
selected, then if the specified element is not found, the True result will be returned. If
FalseResult is selected, then if the specified element is not found, the False result will be
returned; if NAResult is selected, then if the specified element is not found, the status
of the tested file will be Not Applicable, which will be displayed in the Compliance
Guardian report. In other words, you have the option to set the result to Not Applicable
if none of the elements are found.
•
AttrName – This is the attribute that will be tested.
•
AttrCaseSensitive – Instruct the testing core if the attribute name being tested for must
match the case exactly.
•
MinLevel – Represent the minimum HTTPS protocol encryption level required by the
check.
TextCompare
This section is optional. Select the checkbox before this element, and the following attributes appear:
•
CompareType – Specify a compare type. The attributes for CompareType are
MustContain, MustNotContain, MustEqual, MustNotEqual, MustMatch, and
MustNotMatch
•
Separator – Specify a separator if multiple values are specified.
•
CaseSensitive – Specify if the attribute being tested for must match the case exactly.
•
Value – Define one or more values for the test, use the separator specified before to
separate the values.
Select the delete button (
rule.
330
) to delete this check rule. Select Add Another TextCompare to add another
Compliance Guardian Installation and Administration User Guide
TextCompare Check Test Logic Example
Refer to the following example for better understanding the test logic of the SSL type check. The
webpage that will be scanned contains a node: <input type="password" name="Passwd" id="Passwd">.
Create and configure the SSL check test logic:
Create a SSL Type check. In the Report Text step, in the True Result and Message field, select
Passed in the True Result drop-down list.
Configure the elements in the check:
•
Specify the element name input for the ElementName attribute.
•
Select No in the drop-down list under the CaseSensitive attribute.
•
Select ResultNA in the drop-down list under the ResultNA attribute.
•
Specify the attribute name id for the AttrName attribute.
•
Select No in the drop-down list under the AttrCaseSensitive attribute.
•
Enter 128 for the MinLevel attribute.
•
Select the checkbox before TextCompare, and configure the following attributes:
o
Select MustContain in the drop-down list under the CompareType attribute.
o
Enter ; as the separator.
o
Select No in the drop-down list under the CaseSensitive attribute.
o
Enter Pass in the Value field.
Save the check.
Run a Compliance Scanner job. The test suite used in this job contains the check configured
above.
Review the TextCompare check test logic:
•
The webpage contains the node <input type="password" name="Passwd" id="Passwd">,
the value of the attribute id contains the value Pass, so the webpage meets the
condition.
•
If the minimum HTTPS protocol encryption level of the webpage is higher than 128, the
result of this check will be True, or the result will be False.
WebBeacons Type Check
The WebBeacons type check is used to detect if Web Beacons are present on a webpage. The following
section provides a general introduction about configuring attributes for this type of check, as well as a
test example for you to understand the test logic.
Compliance Guardian Installation and Administration User Guide
331
Configuring Attributes for WebBeacons Type Check
Configure the attributes for the WebBeacons type check according to the instructions in the following
sections.
WebBeacons
Configure the following attributes under this element:
•
ElementName – Specify the element name that will be tested.
•
CaseSensitive – Specify if the element name being tested for must match the case
exactly.
•
ResultNA – Specify a result when the specified element is not found. If TrueResult is
selected, then if the specified element is not found, the True result will be returned; if
FalseResult is selected, then if the specified element is not found, the False result will be
returned; if NAResult is selected, then if the specified element is not found, the status
of the tested file will be Not Applicable, which will be displayed in the Compliance
Guardian report. This is basically stating that you have the option to set the result to Not
Applicable if none of the elements are found.
•
AttrName – Specify the attribute name that will be tested.
•
AttrCaseSensitive – Specify if the attribute name being tested for must match the case
exactly.
•
ValidWhen – This is used to indicate if the result is valid when the condition is one of
two values: True or False.
Elements
Configure the following attribute under this element:
•
Scope – There are two values for this attribute: All and One. If One is selected, the scan
will stop when one instance is found (to save scan time). If All is selected, the scan will
only stop when all instances are found.
ListLoc
Configure the following attributes under this element:
332
•
Type – There are two values for this attribute, Valid and Invalid. All elements that are
considered valid or invalid are stored to the database (the Location).
•
Status – This is used to indicate the disposition of the element and the severity selected
by the user. Note that in the Report Text step, if the status set for True Result or False
Result is Failed, the value for the Status attribute will be Fail, and the value cannot be
changed.
Compliance Guardian Installation and Administration User Guide
DomainExclude
Configure the following attributes under this element:
•
Separator – Specify a separator if multiple values are specified.
•
Value – Enter one or more domains here, the links that are located in these domains will
not be checked. Use the separator specified before to separate the values.
WebBeacons Check Test Logic Example
Refer to the following example to better understand the test logic of the WebBeacons type check. The
webpage that will be tested contains the following nodes:
<html>
<body>
<div><img src="http://www.hello.com/img/img01.jpeg"/></div>
</body>
</html>
The domain of this webpage is simer.com.
Create and configure the WebBeacons check test logic:
Create a WebBeacons Type check. In the Report Text step, in the True Result and Message
field, select Passed in the True Result drop-down list.
Configure the elements in the check:
•
•
In the WebBeacons section:
o
Specify img for the ElementName attribute.
o
Select No in the drop-down list under the CaseSensitive attribute.
o
Select TrueResult in the drop-down list under the ResultNA attribute.
o
Specify src for the AttrName attribute.
o
Select No in the drop-down list under the AttrCaseSensitive attribute.
o
Select Yes in the drop-down list under the ValidWhen attribute.
In the Elements section:
o
•
Select One in the drop-down list under the Scope attribute.
In the ListLoc section:
o
Select Invalid in the drop-down list under the Type attribute.
o
Select Warn in the drop-down list under the Status attribute.
Compliance Guardian Installation and Administration User Guide
333
•
In the DomainExclude section:
o
Enter http://www.hello.com in the Value field under the DomainExclude
attribute.
Save the check.
Run a Compliance Scanner job. The test suite used in this job contains the check configured
above.
Review the check test logic:
•
According to the logic set in the WebBeacons section, the node <img
src="http://www.hello.com/img/img01.jpeg"/> meets the condition.
•
The domain of this webpage is simer.com, while the domain of the link in the node <img
src="http://www.hello.com/img/img01.jpeg"/> is hello.com, but according to the value
we specified for the DomainExclude attribute, the domain hello.com will not be
checked. So the result of this check is True.
•
According to the logic set for the ValidWhen attribute as well as the logic set in the
ListLoc section, the location of this node will not be recorded in the Compliance
Guardian database.
•
According to the setting in True Result and Message in the Report Text step, the
returning status is Passed, which will be displayed in the Compliance Guardian report.
FindFile Type Check
The FindFile type check is used to find a specified file. The following section provides a general
introduction about configuring attributes for this type of check, as well as a test example for you to
understand the test logic.
Configuring Attributes for FindFile Type Check
Configure the following attributes:
•
TrueIf – Specify the condition when the check result is True. If Yes is selected in the
drop-down list under the TrueIf attribute, when finding an instance, the check result of
this check will be True; If No is selected in the drop-down list under the TrueIf attribute:
when finding an instance, the check result of this check will be False.
•
Path – Enter the file’s relative path or full path.
FindFile Check Test Logic Example
Refer to the following example to better understand the test logic of the FindFile type check. Create and
configure the FindFile check test logic:
Create a FindFile type check. In the Report Text step, in the True Result and Message field,
select Passed in the True Result drop-down list.
334
Compliance Guardian Installation and Administration User Guide
Configure the elements in the check:
•
Select Yes in the drop-down list under the TrueIf attribute.
•
Enter http://sharepoint.avepoint.net/file/findthis.txt for the Path attribute.
Save the check.
Run a Compliance Scanner job. The test suite used in this job contains the check configured
above.
Review the FindFile check test logic:
•
If the file findthis.txt exists, the result will be Found. Note that if you enter a relative
URL file/findthis.txt for the Path attribute, by default, the full path of this file that
Compliance Guardian will scan is http://host name (IP address) + relative URL. For
example: if the URL of the selected site that will be performed a Compliance Guardian
job is http://avepoint2010a:10086/sites/1229url/0112site, and the relative URL
specified for the Path attribute in this check is file/findthis.txt, then CCE will scan the
URL http://avepoint2010a/file/findthis.txt to check if the file exists.
•
According to the logic set in the TrueIf attribute, the result of this check will be True.
•
According to the setting in True Result and Message in the Report Text step, the
returning status is Passed, which will be displayed in the Compliance Guardian report.
LinkValidation Type Check
The LinkValidation check is a check type that tests for the validity of links or bookmarks within any
content that can contain links or bookmark references. The following section provides a general
introduction about configuring attributes for this type of check, as well as a test example for you to
understand the test logic.
Configuring Attributes for LinkValidation Type Check
Configure the attributes for the LinkValidation type check according to the instructions in the following
sections.
LinkValidation
Configure the following attributes under this element:
•
ValidWhen – This is used to indicate if the result is valid when the condition is one of
two values: True or False.
•
TrueIf – There are two values for this attribute: All and One. If One is selected, the scan
will stop when one instance is found (to save scan time). If All is selected, the scan will
only stop when all instances are found.
•
ResultNA – Specify a result when no link is found. If TrueResult is selected, then if no
link is found, the True result will be returned. If FalseResult is selected, then if no link is
found, the False result will be returned. If NAResult is selected, then if no link is found,
Compliance Guardian Installation and Administration User Guide
335
the status of the tested file will be Not Applicable, which will be displayed in the
Compliance Guardian report. In other words, you have the option to set the result to
Not Applicable if none of the links are found.
•
ValidateBookmarks – Select True or False for this attribute. If True is selected, the
check will check whether the bookmarks work. If False is selected, the check will not
check the bookmarks.
•
GetAllowCallHead – Select True or False for this attribute. If True is selected, the link
will be checked using the HEAD method, if the corresponding server does not support
the HEAD method, the GET method will be used. If False is selected, the link will be
checked using the HEAD method, if the corresponding server does not support the
HEAD method, the GET method will not be used.
ListLoc
Configure the following attributes under this element:
•
Type – There are two values for this attribute, Valid and Invalid. All elements that are
considered valid or invalid are stored to the database (the Location).
•
Status – This is used to indicate the disposition of the element and the severity
selected by the user. In the Report Text step, if the status set for True Result or False
Result is Failed, the value for the Status attribute will be Fail, and the value cannot be
changed.
TextCompare
Configure the following attributes under this element:
•
CompareType – Specify a compare type. The attributes for CompareType are
MustContain, MustNotContain, MustEqual, MustNotEqual, MustMatch, and
MustNotMatch
•
Separator – Specify a separator if multiple values are specified.
•
CaseSensitive – Specify if the attribute name being tested for must match the case
exactly.
•
Value – Define one or more values for the test, use the separator specified before to
separate the values.
Select the delete button (
rule.
) to delete this check rule. Select Add Another TextCompare to add another
Attributes
Configure the following attributes under this element:
336
•
Node – Enter the node that you want to test.
•
Value – Enter the corresponding node value.
Compliance Guardian Installation and Administration User Guide
Select the delete button (
rule.
) to delete this check rule. Select Add Another Attribute to add another
LinkValidation Check Test Logic Example
Refer to the following example to better understand the test logic of the LinkValidation type check. The
selected file 1 will be tested. It contains two links, one of the two links contain a character A, while the
other one does not.
Create and configure the LinkValidation check test logic:
Create a LinkValidation type check. In the Report Text step, in the True Result and Message
field, select Passed in the True Result drop-down list.
Configure the LinkValidation section:
•
Select True in the drop-down list under the ValidWhen attribute.
•
Select All in the drop-down list under the TrueIf attribute.
•
Select ResultNA in the drop-down list under the ResultNA attribute.
•
Select True in the drop-down list under the ValidateBookmarks attribute.
Configure the ListLoc section:
•
Select Invalid in the drop-down list under the Type attribute.
•
Select Warn in the drop-down list under the Status attribute.
Configure the TextCompare section:
•
Select MustContain in the drop-down list under the CompareType attribute.
•
Enter , as the separator.
•
Select No in the drop-down list under the CaseSensitive attribute.
•
Enter A,B in the Value field.
Save the check.
Run a Compliance Scanner job. The test suite used in this job contains the check configured
above.
Review the LinkValidation check test logic:
•
See the TextCompare section: since we have entered A,B in the Value field in this
check, it means that the link that contains A or B will be tested. So the link that
contains A in the selected file 1 will be tested by this check.
•
See the LinkValidation section and ListLoc section: we have selected Valid for the
ValidWhen attribute in the LinkValidation section, and have selected Invalid for the
Type attribute in ListLoc section, so the location of the link will not be recorded in the
Compliance Guardian database.
Compliance Guardian Installation and Administration User Guide
337
•
See the ValidateBookmarks attribute in the LinkValidation section: since we have
selected True for the ValidateBookmarks attribute, the check will check whether the
bookmarks in the file 1 work. If one of the bookmarks in the file does not work, this
check is False.
Although the check result in other field is True, if the check result of ValidateBookmarks
attribute field is False, the check result of this check is False.
FileProperty Type Check
The FileProperty check is a check type that test for the file properties, it is specifically designed for use
with the MobileOK standard. The following section provides a general introduction about configuring
attributes for this type of check, as well as a test example for you to understand the test logic.
Configuring Attributes for FileProperty Type Check
Configure the attributes for the FileProperty type check according to the instructions in the following
sections.
FileProperty
Configure the following attributes under this element:
•
TrueIf – There are two values for this attribute: All and One. If One is selected, the scan
will stop when one instance is found (to save scan time). If All is selected, the scan will
only stop when all instances are found.
•
ValidWhen – This is used to indicate if the result is valid when the condition is one of
two values: True or False
ListLoc
Configure the following attributes under this element:
•
Type – There are two values for this attribute, Valid and Invalid. All elements that are
considered valid or invalid are stored to the database (the Location).
•
Status – This is used to indicate the disposition of the element and the severity
selected by the user. Note that in the Report Text step, if the status set for True Result
or False Result is Failed, the value for the Status attribute will be Fail, and the value
cannot be changed.
Size
Configure the following attributes under this element:
•
338
MaxValue – Specify a value as the maximum size, select a unit in the drop-down list.
Compliance Guardian Installation and Administration User Guide
Type
Configure the following attributes under this element:
•
CompareType – Specify a compare type. The attributes for CompareType are
MustContain, and MustEqual.
•
Separator – Specify a separator if multiple values are specified.
•
CaseSensitive – Specify if the element being tested for must match the case exactly.
•
Value – Define one or more Content-types for the test, use the separator specified
before to separate the values.
Filter
This element is optional. Select the checkbox before Filter, and configure the following attributes under
this element:
•
CompareType – Specify a compare type. The attributes for CompareType are
MustNotContain, and MustNotEqual.
•
Separator – Specify a separator if multiple values are specified.
•
CaseSensitive – Specify if the element being tested for must match the case exactly.
•
Value – Define one or more values for the test, use the separator specified before to
separate the values.
Select the delete button (
) to delete this check rule. Select Add Another Filter to add another rule.
FileProperty Check Test Logic Example
Refer to the following example to better understand the test logic of the FileProperty type check. In this
example, we are testing file 1.
Create and configure the FileProperty check test logic:
Create a FileProperty type check. In the Report Text step, in the False Result and Message field,
select User Review Required in the False Result drop-down list.
Configure the FileProperty section:
•
Select All in the drop-down list under the TrueIf attribute.
•
Select True in the drop-down list under the ValidWhen attribute.
Configure the ListLoc section:
•
Select Invalid in the drop-down list under the Type attribute.
•
Select Warn in the drop-down list under the Status attribute.
Configure the Size section:
Compliance Guardian Installation and Administration User Guide
339
•
Enter 10 in the MinValue field, select KB as the unit.
•
Enter 20 in the MaxValue field, select KB as the unit.
Configure the Type section:
•
Select MustContain in the drop-down list under the CompareType attribute.
•
Enter ; as the separator.
•
Select No in the drop-down list under the CaseSensitive attribute.
•
Enter text/html;text/xml;mage/gif;image/jpeg in the Value field.
Select the checkbox before Filter, configure the Filter section:
•
Select MustNotContain in the drop-down list under the CompareType attribute.
•
Enter ; as the separator.
•
Select No in the drop-down list under the CaseSensitive attribute.
•
Enter A;B in the Value field.
Save the check. Run a Compliance Scanner job, the test suite used in this job contains the check
configured above.
Review the FileProperty check test logic:
•
In the Filter section, we only compare the values specified with the src attribute’s value
in the img element, the href attribute’s value in the link element, and the data
attribute’s value in the object element in the selected file.
In this case, we specified A;B in the Value field, and selected MustNotContain for the
CompareType value. The img elements whose values of the src attributes do not
contain the characters A and B will be tested; the link elements whose values of the
href attributes do not contain the characters A and B will be tested. The object
elements whose values of the data attributes do not contain the characters A and B will
tested.
•
In the Type section, after the check in the Filter section, the img elements, link
elements, and the object elements that meet the Filter check section (in this case, the
img elements whose values of the src attributes do not contain the characters A and B,
the link elements whose values of the href attributes do not contain the characters A
and B, and the object elements whose values of the data attributes do not contain the
characters A and B meet the Filter check section) will be taken to the check in the Type
section.
In this case, if one of the Content-types of the file or the three kinds of attributes’ (src,
href and data) values is not text/html, text/xml, mage/gif or image/jpeg, the check in
the Type section will be False.
•
340
In the Size section, the size = the file size + the size of the src attribute’s value in the
img element in the file (the corresponding image’s size) + the size of the href
Compliance Guardian Installation and Administration User Guide
attribute's value in the link element in the file (the corresponding linked file’s size) +
the size of the data attribute’s value in the object element in the file (the
corresponding image’s size). If the size is not in the range we specified in the Size
section of this check, this check result of this section will be False.
•
If the result of the Filter check or Size check is False, the check result of this check is
False.
•
If the check result of this check is False, see the ValidWhen attribute in the
FileProperty section. We have selected Valid, so the result of this attribute is Invalid. In
the ListLoc section, the result for ValidWhen is Invalid, so the check status will be
Warn, and this check status will be recorded in the Compliance Guardian database.
Users cannot see the status in the Compliance Guardian GUI.
According to the settings in False Result and Message in the Report Text step, the
returning status is User Review Required, which will be displayed in the Compliance
Guardian report.
Redaction Type Check
The Redaction check is used to redact the specified content in a file.
Configuring Attributes for Redaction Type Check
Configure the attributes for the Redaction type check according to the instructions in the following
sections.
Redaction
Configure the following attributes under this element:
•
RedactType – Select a value for this attribute: Delete or Replace. If Delete is selected,
the found instance will be deleted directly during the scan; if Replace is selected, you
must specify a value and configure the related attributes, refer to Value Configuration
Field. The found instance will be replaced with the value you specified.
FindText
This element has the following attributes:
•
SearchAll – Specify whether or not to check the comments and scripts.
•
ListLocation – Specify whether or not to record the instance’s location in the
Compliance Guardian database. If Yes is selected in the drop-down list under the
ListLocation attribute, then every location of the instance found will be recorded in the
Compliance Guardian database. If No is selected in the drop-down list under the
ListLocation attribute, the check continues, but the locations of the instances found
will not be recorded in the database.
Compliance Guardian Installation and Administration User Guide
341
•
ListLocStatus – Specify the status for the instance that is found. The status will be
recorded in the Compliance Guardian database. Note that if the status set for True
Result or False Result is Failed in the Report Text step, the value for the ListLocStatus
will be Fail, and the value cannot be changed.
•
CaseSensitive – Specify if the text being tested for must match the case exactly.
•
CompareType – Select MustContain or MustEqual for this attribute.
•
Dictionary – Configure the following attributes:
o
Separator – Specify a separator if multiple values are specified.
o
Value – Define one or more values for the test, use the separator specified
before to separate the values.
Select the delete button ( ) to delete this Dictionary check rule. Select Add Another
Dictionary to add another rule.
Regex
This element has the following attributes:
•
SearchAll – Specify whether or not to check the comments and scripts.
•
ListLocation – Specify whether or not to record the instance’s location in the
Compliance Guardian database. If Yes is selected in the drop-down list under the
ListLocation attribute, then every location of the instance found will be recorded in the
Compliance Guardian database. If No is selected in the drop-down list under the
ListLocation attribute, the check continues, but the locations of the instances found
will not be recorded in the database.
•
ListLocStatus – Specify the status for the instance that is found. The status will be
recorded in the Compliance Guardian database. Note that if the status set for True
Result or False Result is Failed in the Report Text step, the value for the ListLocStatus
attribute will be Fail, and the value cannot be changed.
•
CaseSensitive – Specify if the text being tested for must match the case exactly.
•
CustomCheck – Enter a CustomCheck name for this attribute. The CustomCheck is used
to calculate the check digit on the result of the regular expressions, in order to validate
the result. For more information on CustomCheck, refer to Using CustomScan in
Compliance Guardian.
•
Dictionary – Configure the following attributes:
o
Separator – Specify a separator if multiple values are specified.
o
Value – Define one or more values for the test, use the separator specified
before to separate the values.
Select the delete button ( ) to delete this Dictionary check rule. Select Add Another
Dictionary to add another rule.
342
Compliance Guardian Installation and Administration User Guide
•
Filter – This is optional. Select the checkbox before Filter, the Text section and the
Regex section appear:
o
Text – Select the checkbox before Text, and configure the following attributes:
CaseSensitive – Specify if the element being tested for must match the
case exactly.
Separator – Specify a separator if multiple values are specified.
Value – Define one or more values for the test, and use the separator
specified before to separate the values. If the scanned result that
matches the specified regular expression exactly matches the value
specified here, this result will be filtered out.
Select Add Another Text to add another Text filter check rule. Select the delete
button ( ) to delete this filter check rule.
o
Regex – Select the checkbox before Regex, and configure the following
attributes:
CaseSensitive – Specify if the element being tested for must match the
case exactly.
Value – Define a regular expression. If the scanned result that matches
the specified regular expression also matches the regular expression
specified here, this result will be filtered out.
Select Add Another Regex to add another Text check rule. Select the delete
button ( ) to delete this Regex filter check rule.
Value Configuration Field
If Replace is selected as the value of the RedactType attribute, this field appears. Configure the
following attributes:
•
Type – Select to redact a word or a section.
•
BeforeCount – If you select Section for the Type attribute, you must configure this
attribute. Specify the number of the characters before the value you specified. The
characters in the range of the specified number will also be redacted.
•
AfterCount – If you select Section for the Type attribute, you must configure this
attribute. Specify the number of the characters after the value you specified. The
characters in the range of the specified number will also be redacted.
•
Repeat – Specify whether or not to repeat the specified value to make sure the
replaced result keeping the same length as the original value.
•
Value – Specify the value that is used to replace the found instance.
Compliance Guardian Installation and Administration User Guide
343
Redaction Check Test Logic Example
Refer to the following example to better understand the test logic of the Redaction type check. The
selected file will be tested. It contains the content: Canadian Social Insurance Number: 046-454-286.
Create and configure the Redaction check test logic:
Create a Redaction type check. In the Report Text step, in the False Result and Message field,
select User Review Required in the False Result drop-down list.
Configure the Redaction section:
•
Select Replace in the drop-down list under the RedactType attribute.
Select the checkbox before Regex, and configure the Regex section:
•
Select Yes in the drop-down list under the SearchAll attribute.
•
Select Yes in the drop-down list under the ListLocation attribute.
•
Select Warn in the drop-down list under the ListLocStatus attribute.
•
Select No in the drop-down list under the CaseSensitive attribute.
•
Select No in the drop-down list under the CustomCheck attribute.
•
In the Dictionary section, enter the regular expression
(?<=^|\b)\d{3}([- ])\d{3}(\1)\d{3}(?=$|\b) in the Value field. The Social Insurance
Number can match the regular expression.
In the Value Configuration field, configure the following attributes:
•
Select Word in the drop-down list under the Type attribute.
•
Select True in the drop-down list under the Repeat attribute.
•
Enter * in the Value field.
Save the check. Run a Compliance Scanner job, the test suite used in this job contains the check
configured above.
Review the Redaction check test logic:
•
344
In this case:
o
In the Redaction field, we have set Replace as the RedactType, so the found
instance will be replaced.
o
In the Regex field: the Canadian Social Insurance Number 046-454-286 in the
tested file match the specified regular expression. We have set Yes for the
ListLocation attribute, so the location of the instance is recorded in the
Compliance Guardian database. The status of the instance in the database is
Warn.
o
In the Value Configuration field: the found instance is the Canadian Social
Insurance Number: 046-454-286. And we have set True for the Repeat
Compliance Guardian Installation and Administration User Guide
attribute. So the Canadian Social Insurance Number 046-454-286 is redacted to
***********.
Detailed logic introduction about the Value Configuration field:
•
o
If we select Word as the Type, and select False as the Repeat attribute. The
found instance 046-454-286 will be redacted to *.
If we select Section as the Type, enter 9 as the value of the BeforeCount
attribute, and select True as the Repeat attribute. The found instance 046-454286 will be redacted, 9 characters before the instance will also be redacted. So
the content in the tested file Canadian Social Insurance Number: 046-454-286
will be redacted to Canadian Social Insurance********************.
CustomScan
The CustomScan type check is used to implement a customized check method on the check level and
works as an extension of current check types. It is used in combination with other checks to find
information on a file and act on it.
Configuring Attributes for CustomScan Type Check
Only the attribute Class needs to be configured for the check. Specify the Namespace.Class and
AssemblyName in the Class attribute field. Use the comma (,) to separate them.
For more information, refer to Using CustomScan in Compliance Guardian.
Fingerprinting
The Fingerprinting type check allows you to use the content stored in documents or files as the search
condition to find another document or file that has the exact or similar information.
Select the forms of matching:
•
Exact matching – Based on file size and the binary signature of the file. This form is
targeted to find duplicated documents that have the exact same content.
•
Raw matching – Based on compare result from RDC Algorithm. RDC divides a file's data
into chunks by computing the local maxima of a fingerprinting function that is computed
at every byte position in the file. A fingerprinting function is a checksum function that
can be computed incrementally.
Compliance Guardian does not consider the file format or file size using this form, so
this form can not only find different versions of a file but can also identify if different
kinds of Microsoft Office files have the same or similar content.
•
Text matching – Match of discrete passages of extracted and normalized file contents.
Compliance Guardian extracts 100% of the file contents, normalizes it by removing
whitespaces, punctuation, and formatting, and then creates a checksum.
Compliance Guardian Installation and Administration User Guide
345
The behavior of Text matching is different from the other two forms, in this form of
matching, Compliance Guardian detects only the file contents that are indexed as the
template in the Fingerprinting check. For example, consider a situation where you
define a one-page document in the Fingerprinting check as the template, and that one
page document is included as part of another 100 page document. The 100-page
document is considered a 100% match because its content matches the one page
document.
This form can be used to find a PDF file that is converted from the template file.
Select the files that will be used as the templates for searching. Select Add Another File, and then select
Browse to select a file. Select Add Another File to add another file. Select the delete (
delete a selected template file.
) button to
Fingerprinting Check Test Logic Example
If you want to find the filled forms from multiple files, you can use this type of check. Select Raw
matching, and enter 75% in the Minimum percentage of context matches field in the check. Then,
select a new form as the template file. Configure the related test suite for classification and tagging
attributes and action policy to have the passed files (check result is True) moved to another location. For
details about configuring the test suite for classification and tagging, refer to Test Suite for Classification
and Tagging File Body Configuration. The scanned files whose similarity is greater than 75% of the
template file will be considered the passed files and then moved to another location. These moved files
will be the filled forms.
Context
The Context check is used to discover SharePoint site/list/item properties, file properties, and AD
properties that match the test conditions.
Configuring Attributes for Context Type Check
Configure the attributes for the Context type check according to the instructions in the following
sections.
NA
If any of the configured conditions cannot find the properties, the results will be the value selected in
the NA drop-down list: TureResult, FalseResult or NAResult.
Condition
•
346
Source – Enter the macro expression. You can define the search for SharePoint site, list
or item properties, file properties, AD properties or properties in Yammer. The format is
{$object.Name}.
Compliance Guardian Installation and Administration User Guide
SharePoint Site, List or Item Properties – If you want to search a SharePoint site,
list or item properties, the object is $SPSite, $SPWeb, $SPItem.
$SPSite – Search properties of the scanned item’s corresponding
SharePoint site collection. The format of the Source is
$SPSite.Properties[Property Name]. The Property Name can be: URL,
Title, Modified Time, Created Time, Primary Administrator, Template
Name, or Template Id.
$SPWeb – Search properties of the scanned item’s corresponding
SharePoint site. The formats of the Source can be:
−
$SPWeb.Properties[Property Name] – The Property Name can
be: URL, Title, Modified Time, Created Time, Primary
Administrator, Template Name, Template Id or the custom
properties of the site.
−
$SPWeb.Redirect[Relative Redirected URL].Props[Property
Name] – Relative Redirected URL means the site’s
corresponding Web application’s relative URL. Compliance
Guardian will search the properties of the redirected URL. The
Property Name can be: URL, Title, Modified Time, Created
Time, Primary Administrator, Template Name, Template Id or
the custom properties of the site.
−
$SPWebParent.Properties[Property Name] – Compliance
Guardian will scan the item’s corresponding site’s properties as
well as the parent sites’ properties.
For example: There is a site collection Site Collection A. The
top-level site of Site Collection A contains the site properties:
P1; there are two sites Site 1 and Site 2 under Site Collection A.
Site 1 contains the site properties: P2. Site 2 contains the site
properties: P3. The scanned item is in Site 1. If Compliance
Guardian is required to search site property P3. Site 1 and Site
1’s parent Site Collection A contains P2 and P1, but do not
contain P3. In this case, P3 is not found.
$SPItem – Search properties of an item. The format of the Source is
$SPItem.Fields.[Field Name]. Field Name is the item’s column names.
Properties of Files in File System – Search properties of a file in file system. The
format of the Source is $File.Properties[Property Name]. The Property Name
can be: Name, Created Time, Modified Time, Type, Size, or Owner.
Website Properties – Search website properties. The format of the Source is:
$SPSite.Properties[Property Name]. The Property Name can be: Content Type,
Size, URL, Modified Time, Host, Domain, or Title.
AD Properties – Search the AD properties. The format of the Source is:
$AD.Users[User Display Name].Properties[Property Name]. User Display
Compliance Guardian Installation and Administration User Guide
347
Name is the AD user’s display name. Property Name is the AD user’s properties,
like Department, Company, etc.
File Properties – Search a SharePoint file, website content or file system file’s
own properties. The format of the Source is: $Doc.Properties[Property Name].
Property Name is the file’s own properties.
Yammer – Search properties in Yammer. The format of the Source is
$Yammer.Current[Property Name]. This is used to search the current scanned
content properties. The Property Name can be:
CreatorId – Search the post’s creator ID.
CreateTime – Search the post’s created time.
Privacy – The value can be Public or Private.
SendToGroup – Search the ID of the group to which the post is sent.
MessageType – The value can be Message, File or Note.
Topics – Search the post’s topic.
The expression can also be used to search a user or group’s properties. The
format is $Yammer.Users[macro expression].Properties[Property Name] or
$Yammer.Groups[macro expression].Properties[Property Name]. The Property
Name can be: Id, Name, NetworkId, FullName, Description and Privacy.
FullName is specifically used for searching user’s full name; Description and
Privacy are specifically used for searching group’s description and privacy
properties.
For example:
$Yammer.Users[$Yammer.Current["CreatorId"]].Properties[Department]: use
this macro expression to search the current scanned post’s creator ID, and
finally search the creator’s department.
$Yammer.Groups[$Yammer.Current["SendToGroup"]].Properties[Description]
: use this macro expression to search the group to which the post is sent, and
finally search the group’s description.
•
Operator – Select AND or OR as the logical relationship.
•
Add a Compare – Select Add a Compare to configure a compare condition. Select the
delete ( ) button to delete a compare condition. The added compare conditions in
one Condition group are using the logical relationship selected in Operator.
Select Add a Condition to add another condition, and then configure the condition.
Select the delete (
348
) button after each Condition to delete the Condition.
Compliance Guardian Installation and Administration User Guide
Operator Conditions
If multiple Conditions are configured, you must specify the logical relationship among the Conditions.
The relationships are AND and OR. Arrange the operator condition expression by using the relationships,
Condition ID (the sequence of the Condition), and parentheses. For example, if you have configured
three Conditions, and you specify ((1 And 2) Or 3). The properties that meet both the Condition 1 and
Condition 2, or meet the Condition 3, will be searched out.
Context Check Test Logic Example
Refer to the following example to better understand the test logic of the Context type check.
Use a check to scan if the SharePoint files contain SSN. The files that contain SSN will be scanned by the
Context check.
Create and configure the Redaction check test logic:
Create a Context type check. In the Report Text step, in the True Result and Message field,
select Failed in the True Result drop-down list.
Configure the Context section:
•
Select NAResult in the drop-down list under the NA attribute.
Configure the Condition section:
•
Enter $SPItem.Fields[Created Time] in the Source text box.
•
Select AND in the drop-down list under the Operator attribute.
•
Select Add a Compare. Select Before as the Compare Type, and select 2014-10-20 as
the Value.
•
Select Add a Compare again. Select After as the Compare Type, and select 2014-1-20
as the Value.
•
Select Add a Condition. Configure settings in the newly added condition:
Enter $AD.Users[$SPItem.Fields[Created By]].Properties[Department] in the
Source text box.
Select AND in the drop-down list under the Operator attribute.
Select Add a Compare. Select MustEqual as the Compare Type, and enter HR as
the Value.
In the Operator Conditions field, enter 1 AND 2.
Save the check. Run a Compliance Scanner job, the test suite used in this job contains the check
configured above.
Review the Context check test logic:
Compliance Guardian Installation and Administration User Guide
349
•
According to the Condition 1, if the files or items are created before 2014-10-20 and
after 2014-1-20. The Condition is true.
•
According to the Condition 2, if the files or items whose creators belong to the HR
department, the Condition will be true.
•
According to the Operator Conditions field: the logical relationship is AND, so if both of
the two Conditions are true, the check result will be true. If the matching instance in
Condition 1 or Condition 2 is not found, the result will be the value selected in the NA
attribute.
Configuring Test Suite File Attributes
Refer to the following sections for configuring the test suite file attributes.
Test Suite for Compliance Reporting File Body Configuration
Configure the following attributes for the test suite for compliance reporting file.
RiskFormula
Select a Raw Risk Formula, Stepped Risk Formula, and a Weighted Risk Formula in the corresponding
drop-down list. You can create a new Risk Formula by selecting New Formula in the drop-down list. A
pop-up window will appear if you select New Formula. In the pop-up window, enter the name and the
optional description for the Risk formula, define your own formula, and select OK. The new Risk Formula
then will be created.
RunAsTestGroup
Group the specified checks. The checks can test files according to one checkpoint.
•
Select the checkbox before the RunAsTestGroup element, and configure the following
attributes:
o
Name – Enter a name for the test group.
o
DatabaseField – This is the location in the Compliance Guardian database where
the scan result data is stored. Compliance Guardian will automatically specify
the location for storing data.
o
ContentType – Select the content types that will be scanned. If you do not
select the content types, all the file content types that are supported to be
scanned in Compliance Guardian will be scanned. Refer to the following steps
for selecting the content types:
350
Select the text field under the ContentType attribute, a pop-up window
appears.
Compliance Guardian Installation and Administration User Guide
In the pop-up window, select the checkbox before the desired content
types, and select OK.
Select the delete button (
•
) to delete the RunAsTestGroup check rule.
o
Policy URL – Specify a URL that will link to a website defining rules for how
checks in this check group will test files.
o
Description – Enter the description for the test group. In Scan Result of
Compliance Guardian report, the description will display in the file’s
corresponding detailed report.
SubCheck – Configure the following attributes for this element:
o
CheckName – Select a check. Refer to the following steps for selecting the
check:
Select the text field under the CheckName attribute, a pop-up window
appears.
In the pop-up window, select the radio button before the desired check,
and select OK.
o
RunCheck – If True is selected for this attribute, when running a Compliance
Guardian job using the test suite, the files will be scanned according to the rule
set in this check. If False is selected for this attribute, the corresponding check
will not be used to scan the files.
o
RiskLevel(r1) – The Item Initial Risk value assigned on the initial occurrence of
the compliance failure (related to the check being tested for) in the document
or stream. Allowed values for RiskLevel(r1) are 1-10.
o
RiskLevel(r2) – The Item Additional Risk Level factor that the risk level grows at
for every additional failure at the check level (for the same type) found in the
document or stream. This number is optional where the integer “-1” means
ignore the value (allowing to use the third value). If the value is -1 then the
factor will be 1. Allowed values are -1 to 10. This is optional.
o
RiskLevel(r3) – The Item risk in relation to other checks. This Item is optional. If
this number is missing then it is assumed that its value is “1”. Allowed values are
1-10. This is optional.
According to the formulas selected in the RiskFormula section, the check will
have three risk levels after the scan job.
o
ContentType – Select the content types that will be scanned. If you do not
select the content types, all the file content types that are supported to be
scanned in Compliance Guardian will be scanned. Refer to the following steps
for selecting the content types:
Select the text field under the ContentType attribute, a pop-up window
appears.
Compliance Guardian Installation and Administration User Guide
351
In the pop-up window, select the checkbox before the desired content
types, and select OK.
Select the delete button ( ) to delete the SubCheck check rule. Select Add Another
Check to add another rule.
•
Operator – If you select the Operator checkbox, the SubCheck checkbox above the
Operator checkbox will be grayed out. You can determine the condition of the check
group’s result. Configure the following attributes for this element:
o
Type – Depending on the sub checks you added in the SubCheck field, you can
change the logical relationships between the sub check results. There are
currently two logical relationships: AND and OR. By default, the logic is set to
And.
o
Result Field – Specify the result of the check group according to the check
result. The check result will be True, False or NA, the result of the check group
will be the selected value under the corresponding check result attribute.
o
SubCheck Field – Configure the following attributes for this element:
CheckName – Select a check. Refer to the following steps for selecting
the check:
−
Select the text field under the CheckName attribute. A pop-up
window appears.
−
In the pop-up window, select the radio button before the
desired check, and select OK.
TrueIf – Select which check results will be considered True in this check
group. For example: if you just select a check, and then select Pass and
HR for the TrueIf attribute. When the result of the check is Pass or HR,
the check result in this check group is considered True.
−
When all of the checks’ results in this check group are True, the
result of this check group is considered True.
−
If you have selected AND in the Type field:
When you add multiple checks in the SubCheck field, one of the
checks’ results in this test suite is False, and the check with a
False check result is not the last check you added in the
SubCheck field, the result of the checks added in the SubCheck
field is NA. If the check with a False check result is the last check
you added in the SubCheck field, then the result of the checks
added in the SubCheck field is False.
−
If you have selected Or in the Type field:
When you add multiple checks in the SubCheck field, one of the
checks’ results in this test suite is True, and the check with a
352
Compliance Guardian Installation and Administration User Guide
True check result is not the last check you added in the
SubCheck field, the result of the checks added in the SubCheck
field is NA. If the check with a True check result is the last check
you added in the SubCheck field, the result of the checks added
in the SubCheck field is True.
RunCheck – If True is selected for this attribute, when running a
Compliance Guardian job using the test suite, the files will be scanned
according to the rule set in this check. If False is selected for this
attribute, the corresponding check will not be used to scan the files.
RiskLevel(r1) – The Item Initial Risk value assigned on the initial
occurrence of the compliance failure (related to the check being tested
for) in the document or stream. Allowed values for RiskLevel(r1) are 110.
RiskLevel(r2) – The Item Additional Risk Level factor that the risk level
grows at for every additional failure at the check level (for the same
type) found in the document or stream. This number is optional where
the integer “-1” means ignore the value (allowing to use the third
value). If the value is -1 then the factor will be 1. Allowed values are -1
to 10. This is optional.
RiskLevel(r3) – The Item risk in relation to other checks. This Item is
optional. If this number is missing then it is assumed that its value is “1”.
Allowed values are 1-10. This is optional.
According to the formulas selected in the RiskFormula section, the
check will have three risk levels after the scan job.
ContentType – Select the content types that will be scanned. If you do
not select the content types, all the file content types that are
supported to be scanned in Compliance Guardian will be scanned. Refer
to the following steps for selecting the content types:
−
Select the text field under the ContentType attribute. A pop-up
window appears.
−
In the pop-up window, select the checkbox before the desired
content types, and select OK.
Select the delete button ( ) to delete the SubCheck check rule. Select Add
Another Check to add another rule.
DoRunCheck
The specified checks will not run as a group, they scan files separately. Select the checkbox before the
RunAsTestGroup element, and then configure the following attributes:
Compliance Guardian Installation and Administration User Guide
353
•
CheckName – Select a check. Select the text field under the CheckName attribute. A
pop-up window appears. In the pop-up window, select the radio button before the
desired check, and select OK.
•
DatabaseField – This is the location in the Compliance Guardian database where the
scan result data is stored. Compliance Guardian will automatically specify the location
for storing data.
•
RunCheck – If True is selected for this attribute, when running a Compliance Guardian
job using the test suite, the files will be scanned according to the rule set in this check. If
False is selected for this attribute, the check will not be used to scan the files.
•
RiskLevel(r1) – The Item Initial Risk value assigned on the initial occurrence of the
compliance failure (related to the check being tested for) in the document or stream.
Allowed values for RiskLevel(r1) are 1-10.
•
RiskLevel(r2) – The Item Additional Risk Level factor that the risk level grows at for every
additional failure at the check level (for the same type) found in the document or
stream. This number is optional where the integer “-1” means ignore the value (allowing
to use the third value). If the value is -1 then the factor will be 1. Allowed values are -1
to 10. This is optional.
•
RiskLevel(r3) – The Item risk in relation to other checks. This Item is optional. If this
number is missing then it is assumed that its value is “1”. Allowed values are 1-10. This is
optional.
According to the formulas selected in the RiskFormula section, the check will have three
risk levels after the scan job.
•
ContentType – Select the content types that will be scanned. If you do not select the
content types, all the file content types that are supported to be scanned in Compliance
Guardian will be scanned. Select the text field under the ContentType attribute, a popup window appears. In the pop-up window, select the radio button before the desired
check, and select OK.
•
Role – Assign a role to the corresponding check.
o
MaxRow – After scanned by the check that is assigned to the MaxRow role, the
failed files will be reported in the Compliance Guardian File Errors Report, the
error type of the failed file is Maximum Row Exception.
o
DataTable – After scanned by the check that is assigned to the DataTable role,
the locations of the instances that are recorded will be reported in the
Compliance Guardian Data Table Report.
o
Cookie – The check that is assigned this role can be used for the Cookie check.
Select the delete button (
add another rule.
354
) to delete the DoRunCheck check rule. Select Add Another DoRunCheck to
Compliance Guardian Installation and Administration User Guide
Test Suite for Classification and Tagging File Body Configuration
Configure the following attributes for the test suite for classification and tagging file.
RiskFormula
If you have selected False as the value of the NoRisk attribute, you must configure the RiskFormula
field, or this field will be grayed out.
Select a Raw Risk Formula, Stepped Risk Formula, and a Weighted Risk Formula in the corresponding
drop-down list. You can create a new Risk Formula by selecting New Formula in the drop-down list. A
pop-up window will appear if you select New Formula. In the pop-up window, enter the name and the
optional description for the Risk formula, define your own formula, and select OK. The new Risk Formula
then will be created.
Test Suite Attributes
•
Tag – Specify the name of the metadata element that will be created.
•
PlaceTags – Define where the tag will be placed. There are four values for this attribute:
o
0 – Do not add tag
o
1 – Add the tag to the file only
o
2 – Add the tag to the file, and SharePoint or Yammer
o
3 – Add the tag to SharePoint or Yammer only
•
OverrideUser – If the specified metadata already exists, select whether or not to
override the original metadata.
•
OverrideCG – If the value of OverrideUser is Yes, the OverrideCG attribute will not take
effect. If the value of OverrideUser is No, the OverrideCG attribute will take effect.
If the value of OverrideCG is True, the tag value of this scan will be used to do the
corresponding Classification action.
If the value of OverrideCG is False, the original file’s tag value will be used to do the
corresponding Classification action. In this case, there are the following conditions:
o
If there is one original tag value in the file or in SharePoint, the value is used to
do the Classification action.
o
If there are two original values (one is in file, one is in SharePoint), the one that
will be used to do the action depends on the priority we specified for the
AllowedTagValues attribute in this test suite.
If the two original values are also specified for the AllowedTagValues
attribute of this test suite, the one that will be used to do the action
depends on the priority we specified for the AllowedTagValues
attribute of this test suite.
Compliance Guardian Installation and Administration User Guide
355
Select the delete button (
If one of the two original values is specified for the AllowedTagValues
attribute of this test suite, Compliance Guardian will compare the
priority of the original tag value and the tag value in this scan. The one
with the higher priority will be used to do the corresponding
Classification action.
If none of the two original values is specified in this test suite, the tag
value of this scan will be used to do the corresponding Classification
action.
) to delete the check rule.
AllowedTagValues
Configure the following attributes for this element:
•
Priority – Specify the priority of the tag value. When scanning a file, different checks will
return different scan results. This is used to determine which tag value will be added to
the file.
•
Type – Select Static or Dynamic as the type.
Static – Select this type to specify a certain value that will be used as the tag
value.
Dynamic – Select this type, and then specify a macro expression to search the
corresponding value that will be used as the tag value.
356
•
HolderName – This feature is only available if you choose Dynamic. If Static is selected
as the type, this field will be grayed out. If Dynamic is selected as the type, you must
enter a holder name. You can enter any value as the holder name as long as it is not
duplicated in another AllowedTagValues nodes. The holder name is used when the
Compliance Guardian engine analyzes the macro expression and finds the corresponding
values.
•
Value – If Static is selected as the type, specify the tag value. If you do not want to add a
tag value to a scanned file, enter None or none. The field is not case sensitive. If
Dynamic is selected as the type, enter a macro expression to search the corresponding
properties. The results will be added to the file, SharePoint, and/or Yammer. The
method of using the macro expression here are same as that of the macro expression
specified in the Source field of the Context check. For more details, refer to Condition in
the Context check section.
•
NA – If Dynamic is selected as the type, you can enter a value as this attribute. If no
properties are found according to the macro expression, this value will be used as the
tag value to add to a file. The default value is $Empty, then no value will be added.
•
DefaultRiskValue_Raw – Enter a value as the raw risk score of the file. The attribute will
take effect when the value of OverrideUser is No. When the original file’s metadata is
not overridden, the risk score is not calculated by the Raw type risk formula that is
selected in the RiskFormula element field of the test suite. The risk core is the value you
specified here.
Compliance Guardian Installation and Administration User Guide
•
DefaultRiskValue_Stepped – Enter a value as the stepped risk score of the file. The
attribute will take effect when the value of OverrideUser is No. When the original file’s
metadata is not overridden, the risk score is not calculated by the Stepped type risk
formula that is selected in the RiskFormula element field of the test suite. The risk core
is the value you specified here.
•
DefaultRiskValue_Weighted – Enter a value as the weighted risk score of the file. The
attribute will take effect when the value of OverrideUser is No. When the original file’s
metadata is not overridden, the risk score is not calculated by the Weighted type risk
formula that is selected in the RiskFormula element field of the test suite. The risk core
is the value you specified here.
Select the delete button (
) to delete the rule. Select Add Another Tag Value to add another tag value.
CheckIdGroup
Configure the following attributes for this element:
•
CheckName – Select a check. Select the text field under the CheckName attribute, a
pop-up window appears. In the pop-up window, select the radio button before the
desired check, and then select OK.
•
True – Select a value. If the test of this check evaluates to True, then the tag value will
be this one.
•
False – Select a value. If the test of this check evaluates to False, then the tag value will
be this one.
•
N/A – Select a value. If the test of this check evaluates to N/A, then the tag value will be
this one.
•
RiskLevel(r1) – The Item Initial Risk value assigned on the initial occurrence of the
compliance failure (related to the check being tested for) in the document or stream.
Allowed values for RiskLevel(r1) are 1-10.
•
RiskLevel(r2) – The Item Additional Risk Level factor that the risk level grows at for every
additional failure at the check level (for the same type) found in the document or
stream. This number is optional where the integer “-1” means ignore the value (allowing
to use the third value). If the value is -1 then the factor will be 1. Allowed values are -1
to 10. This is optional.
•
RiskLevel(r3) – The Item risk in relation to other checks. This Item is optional. If this
number is missing then it is assumed that its value is “1”. Allowed values are 1-10. This is
optional.
According to the formulas selected in the RiskFormula section, the check will have three
risk levels after the scan job.
Select the delete button (
) to delete a rule. Select Add Another Check to another rule.
Compliance Guardian Installation and Administration User Guide
357
Operator
Select the checkbox before Operator, and configure the attributes for this element. You can determine
the condition of the check group’s result.
•
Type – Depending on the sub checks you added in the SubCheck field, you can change
the logical relationships between the sub check results. There are currently two logical
relationships: AND and OR. By default, the logic is set to And.
•
Result Field – Specify the result of the check group according to the check result. The
check result will be True, False or NA, the result of the check group will be the selected
value under the corresponding check result attribute.
•
SubCheck Field – Configure the following attributes for this element:
o
o
CheckName – Select a check. Refer to the following steps for selecting the
check:
Select the text field under the CheckName attribute. A pop-up window
appears.
In the pop-up window, select the radio button before the desired check,
and select OK.
TrueIf – Select which check results will be considered True in this check group.
For example, if you just select a check, and then select Pass and HR for the
TrueIf attribute. When the result of the check is Pass or HR, the check result in
this check group is considered True.
When all of the checks’ results in this check group are True, the result of
this check group is considered True.
If you have selected AND in the Type field:
When you add multiple checks in the SubCheck field, one of the checks’
results in this test suite is False, and the check with a False check result
is not the last check you added in the SubCheck field, the result of the
checks added in the SubCheck field is NA. If the check with a False check
result is the last check you added in the SubCheck field, the result of the
checks added in the SubCheck field is False.
If you have selected Or in the Type field:
When you add multiple checks in the SubCheck field, one of the checks’
results in this test suite is True, and the check with a True check result is
not the last check you added in the SubCheck field, the result of the
checks added in the SubCheck field is NA. If the check with a True check
358
Compliance Guardian Installation and Administration User Guide
result is the last check you added in the SubCheck field: the result of the
checks added in the SubCheck field is True.
o
RiskLevel(r1) – The Item Initial Risk value assigned on the initial occurrence of
the compliance failure (related to the check being tested for) in the document
or stream. Allowed values for RiskLevel(r1) are 1-10.
o
RiskLevel(r2) – The Item Additional Risk Level factor that the risk level grows at
for every additional failure at the check level (for the same type) found in the
document or stream. This number is optional where the integer “-1” means
ignore the value (allowing to use the third value). If the value is -1 then the
factor will be 1. Allowed values are -1 to 10. This is optional.
o
RiskLevel(r3) – The Item risk in relation to other checks. This Item is optional. If
this number is missing then it is assumed that its value is “1”. Allowed values are
1-10. This is optional.
According to the formulas selected in the RiskFormula section, the check will
have three risk levels after the scan job.
Select the delete button ( ) to delete the SubCheck check rule. Select Add Another
Check to add another rule.
Select Add Another Tag to add another test suite rule.
Test Suite for Redaction
Configure the following attributes for the test suite for redaction file.
RiskFormula
If you have selected False as the value of the NoRisk attribute, you must configure the RiskFormula
field, or this field will be grayed out.
Select a Raw Risk Formula, Stepped Risk Formula, and a Weighted Risk Formula in the corresponding
drop-down list. You can create a new Risk Formula by selecting New Formula in the drop-down list. A
pop-up window will appear if you select New Formula. In the pop-up window, enter the name and the
optional description for the Risk formula, define your own formula, and select OK. The new Risk Formula
then will be created.
Test Suite Attributes
Configure the following attributes:
•
CheckName – Select a check. Select the text field under the CheckName attribute, a
pop-up window appears. All of the Redaction type checks are displayed in the pop-up
window. Select the radio button before the desired Redaction check, and then select
OK.
Compliance Guardian Installation and Administration User Guide
359
•
RiskLevel(r1) – The Item Initial Risk value assigned on the initial occurrence of the
compliance failure (related to the check being tested for) in the document or stream.
Allowed values for RiskLevel(r1) are 1-10.
•
RiskLevel(r2) – The Item Additional Risk Level factor that the risk level grows at for every
additional failure at the check level (for the same type) found in the document or
stream. This number is optional where the integer “-1” means ignore the value (allowing
to use the third value). If the value is -1 then the factor will be 1. Allowed values are -1
to 10. This is optional.
•
RiskLevel(r3) – The Item risk in relation to other checks. This Item is optional. If this
number is missing then it is assumed that its value is “1”. Allowed values are 1-10. This is
optional.
Select the delete button (
add another rule.
) to delete the SubCheck check rule. Select Add Another DoRunCheck to
Using CustomScan in Compliance Guardian
CustomScan is used to implement a customized check method on the check level, works as an extension
of current check types. It is used in combination with other checks to find information on a file and act
on it.
Method
Define an Interface ICustomTDF in CCE, all the implementation classes need to implement the interface.
This interface is initially defined as:
public interface ICustomTDF
{
ReportResult TrueResult { get; set; }
ReportResult FalseResult { get; set; }
TDFContentType ContentType { get; set; }
TestResult Scan(ScanContext context, ScanContent content);
}
ScanContext and ScanContent include everything a built-in check needs for scanning:
public class ScanContent
{
// File extension
public string FileType;
public string Url;
360
Compliance Guardian Installation and Administration User Guide
// Original file path
public string FilePath;
// including cookie, SSL level, SharePoint metadata etc.
public IDictionary<string, object> Metadata;
}
The following code is the check:
<Tdf TdfID="CustomTDFID">
<ReportText>
<Name>CustomTDF</Name>
<PolicyURL>http://www.avepoint.com</PolicyURL>
<Description>CustomTDF definition</Description>
<True result="Pass">Passed</True>
<False result="Fail">Failed</False>
</ReportText>
<CustomTDF Class="Namespace.Class, DllName" />
</Tdf>
Refer to the following helpful notes:
•
The custom DLL should implement the interface defined as above.
•
When scanning, CCE calls the constructor, passing the XML content as parameter. Then
CCE calls the scan() method defined in the interface.
•
The result returned by the scan() method should be treated as a regular check result.
The following is an example of a regular check result:
public class TestResult
{
public string TdfId;
public ReportResult Status;
//Check Result
// A list of all violations
public List<TestResultUnit> ResultList;
}
Compliance Guardian Installation and Administration User Guide
361
public class TestResultUnit
{
public string TdfId;
public int Line;
// Location of violations (which lines the violations
appear).
public int Column;
violations appear).
// Location of violations (which columns the
public int StartIndex;
public int Length;
defining the actual result.
// Location by start index
// Start Index and Length are used together for
public ListLocStatus Result;
// Note, Warn, Fail
public string MatchResult;
// The actual matched value.
}
After writing the check DLL file, you must put it in …\Compliance Guardian\Agent\Bin, then the
CustomScan check works.
CustomCheck
CustomCheck is used to calculate the check digit on the result of the regular expressions, in order to
validate the result.
Using CustomCheck
Refer to the following section for using the CustomCheck function.
Method
Define an Interface IValidation, all the implementation classes need to implement the interface and
expose a public method “Validate” for CCE to use them. This Interface is initially defined as:
public interface IValidation
{
string Parameters { get; set; }
bool Validate(string id);
}
362
Compliance Guardian Installation and Administration User Guide
Configuration
Define the DLL and the class configuration file “ContentComplianceConfig.xml”. The value of “Class”
should be the full name of the class and the full name of the DLL, separated by a comma(,). Name refers
to the name of the checksum algorithm. Regex will call the algorithm from this value. Node
<Parameters> is for the parameters needed for specific algorithms, all content will be passed internally
as a string.
<!-- CustomCheck Node -->
<CustomCheck Name="Credit Card Number"
Class="DocAve.ContentCompliance.Engine.Checksum, CommonChecksum">
<Parameters>
<![CDATA[ Parameter as string ]]>
</Parameters>
</CustomCheck>
*Note: In order to load the external DLLs, they must be put either in the agent\bin folder or in GAC.
Example
<!-- Canadian SIN & Credit Card Number-->
<RegEx CaseSensitive="No" ListLocStatus="Fail" ListLoc="Yes" SearchAll="True"
TrueIf="NotFound" CustomCheck="Credit Card Number">
<![CDATA[(?<=^|\b)\d{3}([- ])\d{3}(\1)\d{3}(?=$|\b)]]>
</RegEx>This is an example that how a checksum is defined in check. Note the checksum algorithm to
the RegEx is defined by CustomCheck="Credit Card Number". A Class example which implements the
interface:
public class LuhnAlgorithm : IValidation
{
public string Parameters { get; set; }
public LuhnAlgorithm(string parameters)
{
this.Parameters = parameters;
}
public bool Validate(string number)
{
Compliance Guardian Installation and Administration User Guide
363
if (string.IsNullOrEmpty(this.Parameters))
{
return ValidateInternal(number);
}
else
{
return ValidateInternal(number, this.Parameters);
}
}
public bool ValidateInternal(string number)
{
//
Method without parameter
}
public bool ValidateInternal(string number, string parameters)
{
//
Method with parameter
}
}
Related Configuration File
The configuration file ContentComplianceConfig.xml provides several built-in CustomCheck methods.
The configuration file resides in …\Compliance Guardian\Agent\Bin. You can add your customized
CustomCheck methods in the configuration file.
364
Compliance Guardian Installation and Administration User Guide
Appendix C: Supported File Types in Compliance
Guardian
Condition
Supported for Scanning
Supported for Adding Tag
DOC
DOCX
XLS
XLSX
PPT
PPTX
PDF
ASP
ASPX
HTM
HTML
TXT
XML
ZIP
JSP
PHP
DOCX
XLSX
PDF
HTM
HTML
ASPX
PPTX
PPT
DOC
XLS
File Type
*Note: Compliance Guardian currently supports to scan Microsoft Office 2003 files after installing a
compatibility pack. In the XLS file and the XLSX file, the hidden sheet whose Visible property is set to 2 –
xlSheetVeryHidden is also supported to be scanned.
*Note: PDFs with unstructured textual content are not supported to be scanned in Compliance
Guardian.
Compliance Guardian Installation and Administration User Guide
365
Appendix D: Compliance Guardian Configuration File
When a user uploads checks or test suites to Compliance Guardian, the ZIP file of the checks or test
suites will be temporarily unzipped to a default directory. The default directory is …\Compliance
Guardian\Manager\Work. The full path of the checks or test suites that will be uploaded
is …\Compliance Guardian\Manager\Work\Test Suite Name\Check Name or …\Compliance
Guardian\Manager\Work\Test Suite Name. Due to the limitation of Microsoft Windows, the length of
the check or test suite’s full path cannot exceed 260 characters, or the check or test suite will not be
uploaded to Compliance Guardian.
Compliance Guardian has a configuration file named ComplianceSetting.config that allows you to
customize the directory where the checks or test suites will be temporarily unzipped through the
customized directory to reduce the length of the check or test suite’s full path.
To change the default directory where the checks or test suites will be temporarily unzipped, complete
the following steps:
1. Go to the machines with Compliance Guardian Manager installed and open the …\Compliance
Guardian\Manager\Control\Config directory to find the ComplianceSetting.config file.
2. Open the ComplianceSetting.config file and find the ConfigureFilePath node.
3. Change the value of the IsConfigured attribute to True. Then specify a path for the path
attribute. Restart the Compliance Guardian Timer Service. The checks or test suites will be
temporarily unzipped under the specified path.
*Note: The path that you specified for the path attribute must exist.
366
Compliance Guardian Installation and Administration User Guide
Appendix E: Using the Scan Engine API
Refer to the information below to use the Scan Engine API.
*IMPORTANT: In this appendix, all references to TDFs refer to checks, and all references to TDF
collections refer to test suite.
Initialize the ScanEngine Class
The use of Scan Engine API requires the support of the Compliance Guardian license. The third-party
project must be compiled in the operating system where the Compliance Guardian agent is installed,
and the third-party project must reference the CCE.Engine.dll in the bin folder of the Compliance
Guardian agent installation path.
Currently, the Scan Engine supports to perform the single thread scan. When initializing the ScanEngine
class, the constructor requires taking one argument with ScanSetting Class. The following coding sample
indicates the construction:
Figure 53: Coding sample 1.
Parameters of the ScanEngine.Scan Method
The following parameters are used for this method for completing the scan progress.
Figure 54: Parameters used for the ScanEngine.Scan method.
•
string xml – A string in the XML format, it combines the CCC/MCC XML string with the
TDF XML string.
•
string url – The original URL of the file that will be scanned.
•
string filePath – The physical storage path of the file that will be scanned.
•
IDictionary<string, object> metadata – A dictionary which holds the scanned file’s
related metadata information.
Compliance Guardian Installation and Administration User Guide
367
Usage Example
Refer to the following examples to understand how to scan files using CCC (the configuration file of TDF
collection used for the Compliance Scanner) and MCC (the configuration file of TDF collection used for
the Classification Scanner).
Scan Files Using CCC
To combine files using CCC, complete the following steps:
Combine TDFs according to the CCC XML file.
Figure 55: The CCC XML file.
Figure 56: Related TDF - 508.office.a.1.xml.
368
Compliance Guardian Installation and Administration User Guide
Figure 57: Related TDF - 508.office.j.xml.
With all CCC XML files and TDFs available, by using the GetC3sDefinition method in
ContentComplianceCollectionDefinitionUtility class, the required argument string xml required
by ScanEngine.Scan can be returned.
Figure 58: Coding sample 2.
Set the original URL of the file that will be scanned.
Figure 59: Set the original URL.
Set the physical storage path of the file that will be scanned.
Figure 60: Set the physical storage path.
Set the scanned file’s related metadata information.
Figure 61: Set the scanned file’s related metadata information.
Compliance Guardian Installation and Administration User Guide
369
Call the ScanEngine.Scan method.
Figure 62: Call the ScanEngine.Scan method.
Result Explanation
The screenshot shows the sample word document containing a picture without Alt Text, which violates
the scan language defined in the TDF 508.office.a.1.xml.
Figure 63: Screenshot of the sample Microsoft Word document 1.
The screenshot shows the pages in a sample word document with a page number set up. This fulfills the
TDF 508.office.j.xml.
370
Compliance Guardian Installation and Administration User Guide
Figure 64: Screenshot of the sample Microsoft Word document 2.
Basing this sample document settings, the scan result status for this word document should be Fail (the
GetStatus value in the screenshot. Furthermore, when drilling down to the details, the status (in the
TestResultList) for the TDF 508.office.a.1.xml is Fail, and the status for TDF 508.office.j.xml is Pass.
Figure 65: Scanned result 1.
Figure 66: Scanned result 2.
Compliance Guardian Installation and Administration User Guide
371
Figure 67: Scanned result 3.
Scan Files Using MCC
To scan files using MCC, complete the following steps:
Combine TDFs according to the MCC XML file.
Figure 68: The MCC XML file.
372
Compliance Guardian Installation and Administration User Guide
The related TDFs:
Figure 69: HAV.xml.
Figure 70: HIV.xml.
With all MCC and TDF XMLs available, by using the GetMCCDefinition method in
ContentComplianceCollectionDefinitionUtility class, the required argument string xml required
by ScanEngine.Scan can be returned.
Figure 71: Coding sample 3.
Set the original URL of the file that will be scanned.
Figure 72: Set the original URL.
Compliance Guardian Installation and Administration User Guide
373
Set the physical storage path of the file that will be scanned.
Figure 73: Set the physical storage path.
Set the scanned file’s related metadata information.
Figure 74: Set the scanned file’s related metadata information.
Call the ScanEngine.Scan method.
Figure 75: Call the ScanEngine.Scan method.
Result Explanation
Refer to the following screenshot for a sample of the Microsoft Word document.
Figure 76: Screenshot of the sample Microsoft Word document 3.
The screen shows the sample word document containing sensitive information HIV and HAV. According
to the Language defined in the MCC’s TDF HAV.xml, the true result for HAV.xml was set with the value
Medium, when the scan engine found HAV, TagValue will be set as Medium. However, as what was
defined in the MCC, since the value High for HIV has a higher priority, when the scan engine found HIV
in the document, the final value for TagValue was overwritten by High. In this case, the scan result will
be shown as the screenshot below.
374
Compliance Guardian Installation and Administration User Guide
Figure 77: Scanned result 4.
Scan Metadata
Regarding the TDF language, the user is able to define a customized TDF to perform a customized scan
according to their requirements. Among all kinds of supported TDF types, the SSL and Cookie Validation
type TDFs will require the scan engine to test the SSL level or Cookie domain and expiration. The
Compliance Guardian SharePoint metadata test is supported in the installation package.
Therefore, for Scan Engine API, the scan method requires the SSL level, Cookie information, or
SharePoint Metadata for the source document, to be passed via an argument metadata if the
corresponding SSL/Cookie /Metadata checking is defined and used in MCC/CCC.
Dictionary<string, object> metadata = new Dictionary<string, object>();
For SSL Level information, if the source site is under the HTTPS protocol and SSL level checking TDF is
used, the SSL level for the source site should be set in metadata. The key for the scan engine to
recognize SSL information is PublicKeySize, and the security level value should be an Integer.
Figure 78: The key and value for SSL Level information.
For cookie information, if the cookie validation TDF is used in the CCC, the cookie collection should be
passed via the metadata Dictionary. The Key should be Cookie and the value should be a
System.Net.CookieCollection object, which contains all the cookie objects retrieved from the source
environment.
Compliance Guardian Installation and Administration User Guide
375
Figure 79: The key and value for cookie information.
For SharePoint Metadata information, the Key should be Metadata, however the Value object should
be another Dictionary<string, string> instance, which uses the SharePoint column name as the key, and
uses the SharePoint column value as the value.
*Notes: For SharePoint build-in columns, the key should end with \0\0. The indicator \0\0 tells the scan
engine that the column is a SharePoint build-in column, which will be ignored by the scan engine during
the scanning progress.
Figure 80: The key and value for SharePoint metadata.
376
Compliance Guardian Installation and Administration User Guide
CCE.EngineWorker.exe Mode
Use the parameter of the ScanSetting’s object to modify the method of starting CCE.EngineWorker.exe.
After the ScanSetting’s object setting is created, the attribute CommunicationSetting of the
ScanSetting’s object is used to configure the method of starting CCE.EngineWorker.exe:
Figure 81: The condition after the ScanSetting’s object setting is created.
•
IsSingleProcess – This attribute is used to configure if the CCE.EngineWorker.exe is
started using the singe process. The default value is false.
o
If the value of this attribute is set to false: After creating the engine object, the
ScanEngine.Scan method will be called and the CCE.EngineWorker.exe will start
to scan files.
Figure 82: The CCE.EngineWorker.exe starts.
o
•
If the value of this attribute is set to true: The CCE.EngineWorker.exe will not be
started for scanning files.
IsRemote – The attribute will take affect when the value of IsSingleProcess is set to
false. It is used to configure whether the CCE.EngineWorker.exe process and the user
process that is creating the engine object are running in a same machine where the
corresponding agent is installed.
o
If the value of this attribute is set to true, the CCE.EngineWorker.exe process
can run on another machine where another agent (this agent and the agent that
is used to create engine object must connect to a same server) is installed. The
values of the RemoteIp node and the RemotePort node must be specified. The
default values are the IP and port of the machine where the agent that creates
the engine object is installed. The CCE.EngineWorker.exe process will run on
Compliance Guardian Installation and Administration User Guide
377
the specified machine (according to the values you specified for the RemoteIp
node and the RemotePort node).
o
378
If the value of this attribute is set to false, the CCE.EngineWorker.exe process
will run on the machine where the agent that creates the engine object. The
values of the RemoteIp node and the RemotePort node are invalid, and do not
need to be specified.
•
ScanTimeOut – The attribute will take effect when the value of the IsSingleProcess
attribute is false. It is used to configure the timeout period. The default value is 180.
The unit is seconds.
•
RetryTimes – The attribute will take effect when the value of the IsSingleProcess
attribute is false. It is used to define the times of retrying when an error occurred
during scanning a file. The default value is 3.
•
CheckInterval – The attribute will take effect when the value of the IsSingleProcess
attribute is false. It is used to define the interval of checking the Keepalive thread. The
default value is 60. The unit is seconds.
Compliance Guardian Installation and Administration User Guide
Appendix F: Using the ComplianceSetting.config file
The ComplianceSetting.config file can be used to realize the following functions.
Configuring to Scan User Profiles
Compliance Guardian supports scanning user properties and social notes in user profiles. Compliance
Guardian accesses the user profiles through the personal site. However, if the personal site is not
created, you cannot scan the corresponding user profile since there is no personal site node in the tree.
Compliance Guardian provides a method to scan the user profile in Compliance Scanner and Scheduled
Classification Scanner when the personal site is not created. The User Profile Service node is loaded on
the farm tree by changing the UserProfile Used="false" node in the ComplianceSetting.config file.
To change the node for displaying the User Profile Service node in the tree, complete the following
steps:
Go to the machines with Compliance Guardian Manager installed.
Open the …\Compliance Guardian\Manager\Control\Config directory to find the
ComplianceSetting.config file.
Open the ComplianceSetting.config file.
Locate the UserProfile node.
Change the value of the Used attribute to true.
Save the file. The User Profile Service node appears in the farm tree in Compliance Scanner and
Scheduled Classification Scanner.
Configuring Restricted Attachment Types and Modifying the Allowed
Maximum Size of Uploaded Attachments in Incident Manager
Incident Manager allows the option to upload attachments when you add a comment to a quarantined,
encrypted or redacted file. You can configure the file types that are restricted to upload to Classification
Report > Incident Manager as attachments, and modify the allowed maximum size of the uploaded file
by configuring the ComplianceSetting.config file.
Refer to the following steps:
Go to the machines with Compliance Guardian Manager installed.
Open the …\Compliance Guardian\Manager\Control\Config directory to find the
ComplianceSetting.config file.
Open the ComplianceSetting.config file.
Locate the IMSAttachmentSetting node:
Compliance Guardian Installation and Administration User Guide
379
•
SingleFileSizeMax – The value is the current allowed maximum size of uploading each
attachment. You can change the value to the desired size. You can also change the unit
of the size by change the value of SizeUnit.
•
Blacklist – The values are the files that are currently restricted to upload to Compliance
Guardian. Add the extension of the file types that are restricted to upload to AvePoint
Privacy Impact Assessment in the node. Use the comma (,) as the separator.
Figure 83: The IMSAttachmentSetting node in the configuration file.
Save the file.
380
Compliance Guardian Installation and Administration User Guide
Appendix G: Displaying Only Violations in the Error
Highlight Report
This function is used for Compliance Guardian Scan Result > Failed Files > Error Highlight Report. If a
file size is quite large, it may affect the performance to display the whole file in the Error Highlight
Report. Compliance Guardian provides you with a way to control whether the whole file with the
violations (non-compliant content) is displayed in the Error Highlight Report, or just the file’s violations
(non-compliant content) are displayed in the report.
The configuration file ContentComplianceConfig.xml provides you with a node to provide this function.
The configuration file resides in …\Compliance Guardian\Agent\Bin.
Open the file, and find the node <ViolationSummaryThreshold aCount="20"
bCount="40">600</ViolationSummaryThreshold>:
•
aCount – The value of this attribute means the number of the characters after the noncompliant content that can be displayed in the error highlight report. The default value
is 20. You can customize the value.
•
bCount – The value of this attribute means the number of the characters before the
non-compliant content that can be displayed in error highlight report. The default value
is 40. You can customize the value.
•
Node Value – If a file size is greater than the node value, the whole file will not be
displayed in the Error Highlight Report for the performance consideration, only the
violations (non-compliant content) along with the characters next to the violations (the
characters before the violations and the characters after the violations) are displayed in
the report. The default node value is 600 KB. You can customize the value.
Compliance Guardian Installation and Administration User Guide
381
Appendix H: Configuring for Supporting Load Balancing
Configuring for Supporting Network Load Balancing
Compliance Guardian supports Network Load Balancing.
Working Process
For the Compliance Guardian Agents in agent group:
•
Users first configure several file share locations on the Compliance Guardian Agent
servers.
•
The Agents run jobs from Compliance Guardian Manager.
•
The Agents send the files that will be scanned to the file share locations, and then pass
the UNC path of the temporary file in file share locations to Compliance Guardian
engine workers (The Compliance Guardian Agents added in cluster are used as the
Compliance Guardian engine workers).
For the Compliance Guardian Agents in NLB cluster:
•
The Compliance Guardian Agents are used as Compliance Guardian engine workers.
They are not assigned jobs from Compliance Guardian Manager.
•
The Compliance Guardian Agents scan the files in file share locations.
Installing Network Load Balancing Feature
The Network Load Balancing feature must be installed in the Compliance Guardian Agent servers that
you want to be used as Compliance Guardian engine workers. Ensure that two network interface cards
must be installed on the machines before installing the feature.
To install the NLB feature, complete the following steps:
Navigate to Administrative Tools > Server Manager.
Select Features in the left pane.
Select Add Features in the right pane.
In the Add Features Wizard, select the checkbox before Network Load Balancing in the
Features field of the middle pane.
Select Install.
382
Compliance Guardian Installation and Administration User Guide
Editing Network Load Balancing Cluster Properties
After installing the NLB feature, open Network Load Balancing Manager, and then add a cluster. Add the
Compliance Agent servers that you want to be used as Compliance Guardian engine workers to the
cluster. You must edit the cluster properties.
To edit the cluster properties, complete the following steps:
Double select the cluster.
Select Cluster Properties in the drop-down list. The Cluster Properties window appears.
Select the Cluster Parameters tab, and make sure the Unicast mode is selected.
Select the Port Rules tab.
Select Edit…. The Add/Edit Port Rule window appears.
Edit the following settings in the Add/Edit Port Rule window:
•
Deselect the checkbox before All in the Cluster IP address field.
•
Select TCP in the Protocols field.
•
Select None for Affinity in the Filtering mode field.
Select OK in the Add/Edit Port Rule window.
Select OK in the Cluster Properties window.
Configuring File Share Locations
File share locations must be configured for storing the files that will be scanned temporarily. All of the
Compliance Guardian Agents must configure the file share locations.
To configure file share locations on the Compliance Guardian Agent servers, complete the following
steps:
Find the ContentComplianceConfig.xml file under the path …\Compliance Guardian\Agent\Bin.
Open the ContentComplianceConfig.xml file with Notepad.
Find the <FileShares> node.
Specify the username and password to access the file share location.
Specify the file share path. For example:
<FileShares>
<FS>
<User>bj\administrator</User>
<Password>encrypted password</Password>
Compliance Guardian Installation and Administration User Guide
383
<Path>\\BJ\shared</Path>
</FS>
</FileShares>
You can configure several file share locations for the consideration of performance by adding
more <FS> nodes. Also you can add, edit or delete the nodes through the
CCE.EngineWorker.exe file. Refer to Doing Operations on the <FS> Node.
For security considerations, the password must be encrypted. Refer to Encrypting Passwords for
Accessing File Share Locations for how to encrypt the password.
Save the ContentComplianceConfig.xml file.
*Note: The file share settings configured for each Compliance Guardian agent servers must be same.
Using CCE.EngineService.exe file to Encrypt Passwords and Do Operations
on the <FS> Node
Refer to the following section for using CCE.EngineService.exe file to encrypt passwords and do
operations on the <FileShares> node.
Encrypting Passwords for Accessing File Share Locations
For security considerations, the password used to access the file share location must be encrypted.
Refer to the following steps to encrypt the password.
Find the cmd.exe on the servers where Compliance Guardian Agents (added in the agent group)
install.
Select cmd.exe, and then select Run as administrator. The command line interface appears.
Enter cd and the path of the CCE.EngineWorker.exe: …\Compliance Guardian\Agent\Bin. If the
file is not in the disk C, you must add \disk before the path, for example: cd /d
d:\AvePoint\Compliance Guardian\Agent\bin. Press Enter.
Enter …\Compliance Guardian\Agent\Bin\CCE.EngineWorker.exe, and then enter the command
–encrypt. Press Enter. The password will be encrypted.
Figure 84: Using CCE.EngineWorker.exe and the command –encrypt to encrypt the password.
384
Compliance Guardian Installation and Administration User Guide
*Note: You must use CCE.EngineWorker.exe and the command –encrypt to encrypt the password in all
of the servers where Compliance Guardian Agents (added in the agent group) install.
Doing Operations on the <FS> Node
You can use the CCE.EngineWorker.exe file to add, edit and delete the <FS> node.
After you encrypt the password (refer to Encrypting Passwords for Accessing File Share Locations), the
message Please select the operation <A=Add; M=Modified; D=Delete; L=List; E=Exit; H=Help> appears
in the command line.
•
A=Add – Enter A to add another <FS> node.
•
M=Modified – Enter M to modify the <FS> node.
•
D=Delete – Enter D to delete a <FS> node.
•
L=List – Enter L to list all of the <FS> nodes.
•
E=Exit – Enter E to exit the command line interface.
•
H=Help – Enter H to get the help information.
Figure 85: Doing Operations on the <FS> Node.
Configuring Communication Settings
All of the Compliance Guardian Agents must configure the communication settings for supporting
Network Load Balancing.
To configure the communication settings, complete the following steps:
Find the ContentComplianceConfig.xml file under the path …\Compliance Guardian\Agent\Bin.
Open the ContentComplianceConfig.xml file with Notepad.
Compliance Guardian Installation and Administration User Guide
385
Find the <Communication> node.
For the agent server that has been added in the cluster, the first line of the node is:
<Communication IsSingleProcess="False" IsRemote="False" InCluster="True">
For the agent server that has been added into the agent group, the first line of the node is:
<Communication IsSingleProcess="False" IsRemote="True" InCluster="False">
Configure the following attributes for the <Communication> node to support Network Load
Balancing:
•
RemoteIP – Enter the cluster IP address as the attribute’s value.
•
RemotePort – Enter the cluster IP address’ corresponding port.
•
ScanTimeOut – Enter the timeout value for a scan. This is optional. The default value is
180 seconds.
•
RetryTimes – Enter the value of the retrying scan times. This is optional. The default
value is 3 times.
•
CheckInterval – Enter the interval of checking scanning job. This is optional. The default
value is 60 seconds.
*Note: The value of the RemoteIP attribute and the value of the RemotePort attribute configured for
each server must be same.
Control Service Load Balancing
Refer to the following sections for details about the Compliance Guardian Control Service load
balancing.
Installing Compliance Guardian Manager Control Service Load
Balancing Environment
To install the Compliance Guardian Manager Control Service Load Balancing environment, complete the
following steps:
Prepare the environment.
a. Configure Windows Network Load Balancing. There are two nodes in the environment,
which are node A and node B. Node A’s IP address is IP02 and node B’s IP address is
IP03.
b. The public IP address is IP01: 10.1.4.207.
c. Node A’s IP address IP02 is 10.1.4.203, its hostname is PerfA7.
d. Node B’s IP address IP03 is 10.1.4.204, its hostname is PerfB7.
386
Compliance Guardian Installation and Administration User Guide
Install Compliance Guardian Manager Control service Control01 on node A with its own
IP02/Hostname.
Figure 86: Control Service Configuration.
Install Compliance Guardian Manager Control service Control02 on node B with its own
IP03/Hostname.
*Note: Make sure that the Database Server and Control Service database names entered in the
Control Database Server and Control Service Database Name fields are the ones used when
installing Compliance Guardian Manager Control service Control01 and the passphrase is the
one used when installing Compliance Guardian Manager service Control01.
Compliance Guardian Installation and Administration User Guide
387
Figure 87: Control Service Configuration.
When installing Compliance Guardian Agents to connect to Control Service host, ensure using
the public IP IP01 as Control Service Host.
388
Compliance Guardian Installation and Administration User Guide
Figure 88: Communication Configuration.
The installed Compliance Guardian Manager Control Service Load Balancing environment is based on
the load balancing of the Windows Network Load Balancing environment.
Compliance Guardian Manager Control Service Load Balancing fulfills Load Balancing and Control Service
High Availability.
Compliance Guardian Manager Control Service Load Balancing supports to access and operate
Compliance Guardian Manager by using the public IP address IP01. Windows Network Load Balancing
will automatically handle the received requests and send them to the optimal node. The Compliance
Guardian Manager Control service of the node that is chosen by Windows Network Load Balancing will
then handle the request.
When turning off the network of one node that has installed Compliance Guardian Manager Control
Service, other Control Services will continue working as usual.
*Note: In a Compliance Guardian Manager Control Service Load Balancing environment, all of the
Control services will operate cooperatively and are regarded as one Control service for the end users; so
issues may occur when involving the local files and local machine’s memory status. Therefore, it is
recommended configuring a UNC path as the Job Report Path before running any job.
Compliance Guardian Installation and Administration User Guide
389
Appendix I: Compliance Guardian Control Service
Disaster Recovery
Refer to the following sections for details about Compliance Guardian Control Service disaster recovery.
Preparations and Configuration
The following sections provide a solution for the Compliance Guardian Manager Control service disaster
recovery.
Prerequisite
Prepare a production (PROD) environment and a disaster recovery (DR) environment for simulating the
Control service disaster recovery process in your testing environment.
Make sure a DNS Alias Record for the machine where the Compliance Guardian Manager Control Service
on the PROD is installed has been created on your DNS server.
SQL Express is unsupported for the Compliance Guardian Manager Control Service disaster recovery.
Compliance Guardian Installation
Install the Compliance Guardian platform using SQL databases on both PROD and DR environments
respectively:
•
Install Compliance Guardian Manager Control Services for both PROD and DR
environments.
•
Make sure the name of Compliance Guardian Manager Databases of the PROD and DR
environments are the same.
o
Control Database name: ComplianceGuardian_ControlDB
*Note: The Compliance Guardian Control database must have the same passphrase in
PROD and DR environments.
•
Create the Compliance Report Database of the PROD environment.
o
•
390
Report Database name: ComplianceGuardian_ReportDB
Install Compliance Guardian Agents on both PROD and DR environments and have all of
them connected to the Compliance Guardian Manager Control service where installed
on PROD.
Compliance Guardian Installation and Administration User Guide
Figure 89: Compliance Guardian Agent Configuration.
*Note: Make sure all of the Compliance Guardian Agents are connected to the same
DNS Alias record for the machine where Compliance Guardian Manager Control Service
on the PROD is installed.
Synchronizing Databases from PROD Environment to DR Environment
Refer to the following sections for details about synchronizing databases from the PROD environment to
the DR environment.
Deleting the Specified Databases from the SQL Instance at the DR Side
In order to set up SQL mirroring or log shipping, the empty database of the DR environment needs to be
deleted first. Stop the Compliance Guardian Manager Control Service at the DR side and delete the
following database: Control Database: ComplianceGuardian_ControlDB
*Note: This step is preparing for synchronizing the production Compliance Guardian Manager databases
to the SQL instance of the DR side.
Setting Up Database Synchronization
PROD SQL Instance
ComplianceGuardian_ControlDB
ComplianceGuardian_ReportDB
DR SQL Instance
ComplianceGuardian_ControlDB
ComplianceGuardian_ReportDB
There are three ways to do database synchronization: Database SQL Log Shipping, SQL Mirroring, and
Availability Group (if SQL 2012).
*Note: Change the Recovery Mode of the Compliance Guardian databases to full before setting up the
Synchronization.
Simulating the Disaster Recovery Process
To simulate the disaster recovery process, complete the following steps:
•
Shut down the PROD environment (for testing purposes).
•
Start up the database on DR environment.
•
Start the Compliance Guardian Manager Control Service at the DR side. Start all of the
Compliance Guardian Manager Control Services within the DR environment. Make sure
Compliance Guardian Installation and Administration User Guide
391
all of the Compliance Guardian Manager Control Services are started before proceeding
to the next step.
•
392
Switch to the DR Compliance Guardian Manager Control Service in DNS Alias Record. Go
to the DNS server and change the IP address of the DNS alias record. Modify the IP
address to the one of the machine where the Compliance Guardian Manager Control
Service is installed on DR environment.
Compliance Guardian Installation and Administration User Guide
Appendix J: Limitations of Scanning Oracle Database
and SQL Server
Prerequisite and Limitation of Scanning Oracle Database
Compliance Guardian supports scanning Oracle Database. Before you can begin a scan in Oracle you
have to complete the prerequisites. There are some limitation to this feature.
Prerequisite
Before you run an Oracle Database scan make sure the .Net framework version 4.0 or above is installed
and ODF.NET Provider is installed.
Installing ODP.NET Provider
Refer to the following steps to install ODP.NET Provider:
*Note: You must have the local administrator permission for installing ODP.NET Provider.
Open the hyperlink http://www.oracle.com/technetwork/topics/dotnet/downloads/index.html.
If your computer is 32-bit, select 32-bit ODAC Xcopy Downloads; if your computer is 64-bit,
select 64-bit ODAC Downloads in the opened webpage.
Figure 90: Oracle Data Access Components (ODAC) for Windows Downloads interface.
The Downloads interface appears after you select 32-bit ODAC Xcopy Downloads or 64-bit
ODAC Downloads. Select ODP.NET_MangedSerialNumber.zip to download.
Compliance Guardian Installation and Administration User Guide
393
Figure 91: 32-bit Oracle Data Access Components (ODAC) Downloads interface.
Figure 92: 64-bit Oracle Data Access Components (ODAC) Downloads interface.
After download the Zip file, unzip it to a specified location, for example:
C:\ODP.NET_Managed121012.
Open the unzipped folder ODP.NET_ManagedSerialNumber\odp.net\managed\64 or
ODP.NET_Managedxxx\odp.net\managed\32, and then find configure.bat. Right-click
configure.bat, and select Run as administrator to install ODP.NET Provider.
394
Compliance Guardian Installation and Administration User Guide
Figure 93: Finding configure.bat.
Limitation of Scanning Oracle Database
There are some limitations for scanning Oracle database:
•
The table must include primary key or index to be scanned in Compliance Guardian. A
table that does include a primary key or index will not be scanned.
Function-based Indexes are not supported.
The field in the object type cannot be defined as index.
•
If you want to perform the incremental scan job, Change Data Capture must be enabled.
For details about how to enable Change Data Capture and the related performance
details, refer to
http://docs.oracle.com/cd/B28359_01/server.111/b28313/cdc.htm#i1025455. Note
that Oracle 9i only supports Synchronous Change Data Capture.
o
The captured columns must include a complete unique index list, or include the
primary key columns.
o
Before enabling Change Data Capture, make sure the time zone of the database
is same as the host where the database service resides.
o
When enabling Change Data Capture, pass the parameter "timestamp=>'Y'" to
DBMS_CDC_PUBLISH.CREATE_CHANGE_TABLE to generate the timestamp
column.
o
After enabling Change Data Capture, if you use a user (for example, user1) to
connect to the Oracle database, but the Change Data Capture publisher is
another user (for example, user2), you must run the following command to
grant the user1 the SELECT permission to the captured table, or the result of
querying the table will not return:
GRANT SELECT ON “publisher user name”.”captured table name” to the user
used to connect to the Oracle database.
For example: GRANT SELECT ON "user2".”table1” to user2.
Compliance Guardian Installation and Administration User Guide
395
Limitation of Scanning SQL Server
There are some limitation when scanning SQL server in Compliance Guardian. The table must include
primary key or unique index to be scanned in Compliance Guardian.
•
The column whose type is CLR is not supported.
•
If the table contains multiple unique indexes and also contains the primary key, the key
has the priority to be picked up to identify the table row; if the table does not have key,
Compliance Guardian will select the index whose size is the smallest one to identify the
table row.
•
If you want to perform the incremental scan job, Change Data Capture must be enabled.
For details about how to enable Change Data Capture, refer to
http://msdn.microsoft.com/en-us/library/cc627369.aspx; for details about the
performance details after enabling Change Data Capture, refer to
http://technet.microsoft.com/en-us/library/dd266396%28v=SQL.100%29.aspx; for
details about the increase of the disk space, refer to the Remarks section in
http://msdn.microsoft.com/en-us/library/bb510627.aspx.
•
396
o
The captured columns must include a complete unique index list, or include the
primary key columns.
o
You must adjust the schedule of Change Data Capture cleanup job and adjust
the Compliance Guardian incremental job schedule. For details about the
Change Data Capture cleanup job schedule, refer to
http://technet.microsoft.com/en-us/library/cc645885%28v=sql.105%29.aspx.
o
If you have enabled multiple Change Data Capture instances (only two Change
Data Capture instances can be enabled on one table at most) on a table,
Compliance Guardian first selects the Change Data Capture instance that
contains the columns of the unique index (whose size is the smallest) to scan
content; if both of the Change Data Capture instances contain the columns of
the unique index, the instance that captured more columns will be used.
SQL Server 2005 does not support Change Data Capture. The incremental scan job will
fail if Compliance Guardian scans SQL Server 2005 database.
Compliance Guardian Installation and Administration User Guide
Appendix K: Customizing the Interval of Retrieving
Social Report Data
Compliance Guardian retrieves social report data from the report database and updates the social
report every hour. You can customize the interval by modifying the related configuration file.
Complete the following steps to modify the interval:
Go to the machines with Compliance Guardian Manager installed.
Open the …\Compliance Guardian\Manager\Control\Config\CastleConfigs directory to find the
ControlActionReportsCastle.config file.
Open the ControlActionReportsCastle.config file with Notepad.
Locate the Interval node.
The value of Interval is 3600 seconds. You can modify to meet your requirement. The unit is
seconds.
Save the file.
Compliance Guardian Installation and Administration User Guide
397
Appendix L: Using the Discovery Function
Compliance Guardian supports a discovery function to achieve the following requirements:
•
Discover the number of files and items in the SharePoint scopes (site collection, site or
list).
•
Calculate the number of file types and the number of files in each file type.
•
Discover the number of files scanned by the Compliance Guardian engine, and the
number of files scanned by iFilter.
•
Calculate the total size of files and items in each SharePoint scope (site collection, site or
list).
•
Calculate the size of files in each file type.
There are two methods:
•
Using the EXE File
•
Using the BAT File
Using the EXE File
Go to the machines with Compliance Guardian Agent installed and open the …\Compliance
Guardian\Agent\Bin directory to find the CCS.Toolkit.v2.exe or CCS.Toolkit.v4.exe file.
In the SharePoint 2007 or SharePoint 2010 environment, select CCS.Toolkit.v2.exe; in the
SharePoint 2013 environment, select CCS.Toolkit.v4.exe.
Select Run as administrator. The command line interface appears.
Enter spd to select the Discovery SharePoint function.
Enter the job mode.
•
1 – Enter 1 and then enter the URL of the site collection, site or list that will be
discovered. Then, enter the scope level.
•
2 – Enter 2 and then enter a path of a CSV file containing the URLs that will be
discovered. You can discovery multiple site collections, sites or lists by entering 2. For
details on configuring the CSV file, refer to Configuring the CSV File.
Figure 94: Enter the job mode.
398
Compliance Guardian Installation and Administration User Guide
Enter the folder path of the exported file that contains the discovery results.
The tool take action and then export a file with the discovery results in the specified folder path.
Using the BAT File
Refer to the following step to create a BAT file to realize the function.
Create an XML file under the directory …\Compliance Guardian\Agent\Bin.
Configure the file:
•
cd – Enter the path of the CCS.Toolkit.v2.exe or CCS.Toolkit.v4.exe file that will be
invoked.
•
–o – Enter spd to use the discovery function.
•
-Location – Enter the scope URL or enter a path of a CSV file that contains the URLs that
will be discovered. For details on configuring the CSV file, refer to xx. If you enter a
scope URL, you must enter –scope and then enter the scope level.
•
-path – Enter the path of the exported file with the discovery results.
Figure 95: The XML File.
Save the file.
Change the file’s extension from .xml to .bat.
Double-click the BAT file. The discovery progress will start. Once the process has finished you
can check the results in the specified folder.
Configuring the CSV File
You must specify two columns in the CSV file: URL and Type:
•
URL – The URL of the site collection, site or list.
•
Type – The scope type: Site Collection, Site or List.
Figure 96: The CSV File.
Compliance Guardian Installation and Administration User Guide
399
Notices and Copyright Information
Notice
The materials contained in this publication are owned or provided by AvePoint, Inc. and are the property
of AvePoint or its licensors, and are protected by copyright, trademark and other intellectual property
laws. No trademark or copyright notice in this publication may be removed or altered in any way.
Copyright
Copyright ©2013-2015 AvePoint, Inc. All rights reserved. All materials contained in this publication are
protected by United States and international copyright laws and no part of this publication may be
reproduced, modified, displayed, stored in a retrieval system, or transmitted in any form or by any
means, electronic, mechanical, photocopying, recording or otherwise, without the prior written consent
of AvePoint, 3 Second Street, Jersey City, NJ 07311, USA or, in the case of materials in this publication
owned by third parties, without such third party’s consent. Notwithstanding the foregoing, to the extent
any AvePoint material in this publication is reproduced or modified in any way (including derivative
works and transformative works), by you or on your behalf, then such reproduced or modified materials
shall be automatically assigned to AvePoint without any further act and you agree on behalf of yourself
and your successors, assigns, heirs, beneficiaries, and executors, to promptly do all things and sign all
documents to confirm the transfer of such reproduced or modified materials to AvePoint.
Trademarks
AvePoint®, DocAve®, the AvePoint logo, and the AvePoint Pyramid logo are registered trademarks of
AvePoint, Inc. with the United States Patent and Trademark Office. These registered trademarks, along
with all other trademarks of AvePoint used in this publication are the exclusive property of AvePoint and
may not be used without prior written consent.
Microsoft, MS-DOS, Internet Explorer, Office, Office 365, SharePoint, Windows PowerShell, SQL Server,
Outlook, Windows Server, Active Directory, and Dynamics CRM 2013 are either registered trademarks or
trademarks of Microsoft Corporation in the United States and/or other countries.
Adobe Acrobat and Acrobat Reader are trademarks of Adobe Systems, Inc.
All other trademarks contained in this publication are the property of their respective owners and may
not be used without such party’s consent.
Changes
The material in this publication is for information purposes only and is subject to change without notice.
While reasonable efforts have been made in the preparation of this publication to ensure its accuracy,
AvePoint makes no representation or warranty, expressed or implied, as to its completeness, accuracy,
or suitability, and assumes no liability resulting from errors or omissions in this publication or from the
use of the information contained herein. AvePoint reserves the right to make changes in the Graphical
User Interface of the AvePoint software without reservation and without notification to its users.
AvePoint, Inc.
Harborside Financial Center, Plaza 10
3 Second Street, 9th Floor
Jersey City, New Jersey 07311
USA
400
Compliance Guardian Installation and Administration User Guide