1
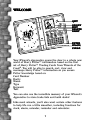
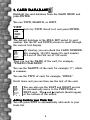
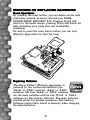
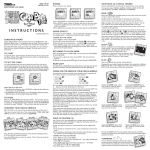
AGES 5 & UP
Wizard’s
Apprentice
INSTRUCTION
Item No. 36284
200102270IWTI-01
Contents
WELCOME
2
MAIN MENU
3
1. CARD DATABASE
4
2. TRADE LIST
7
3. DECK BUILDER
10
4. CLOCK
12
5. CALENDAR
13
6. CALCULATOR
15
INSERTING OR REPLACING BATTERIES
16
CAUTION
18
DEFECT OR DAMAGE
19
90-DAY LIMITED WARRANTY
20
1
WELCOME
QUIT
ON/OFF
EDIT
DELETE
RESET
ENTER
SPACE/
CLEAR
Your Wizard’s Apprentice opens the door to a whole new
world of Harry Potter™ information based on the first
set of Harry Potter™ Trading Cards from Wizards of the
Coast®. You will be able to search, sort, view and
rearrange Harry Potter™ information as you access
Potter knowledge based on:
Card Number
Rarity
Name
Type
Keyword
Text
You can also use the incredible memory of your Wizard’s
Apprentice to store trade lists and build decks!
Like most wizards, you’ll also want certain other features
to help life run a little smoother, including functions for
clock, alarm, calendar, reminder and calculator.
2
MAIN MENU
Turn ON the unit. You’ll see the opening animation as
well as the time and the date followed by a menu screen
with six icons on it. You’ll see a “select” arrow
highlighting one of the icons.
If the current day is a “reminder” day, then the day will
flash and you will also hear a “reminder” alarm.
These six icons on screen represent the MAIN MENU.
Use the four arrow buttons to scroll to the icon of your
choice (the “select” on-screen arrow will move as you
toggle) and press ENTER to select the function of your
choice.
CARD DATABASE
CLOCK
TRADE LIST
CALENDAR
3
DECK BUILDER
CALCULATOR
1. CARD DATABASE
Highlight the card database from the MAIN MENU and
press ENTER.
You can VIEW, SEARCH, or SORT.
VIEW
Let’s try VIEW. Scroll to it and press ENTER.
The default database is the FULL SET sorted by card
number. Use the UP and DOWN arrows to scroll through
the current text display.
By viewing, you can check the CARD NUMBER.
For example, 114/118 means it’s card number
114 out of the first set of 118 cards.
Then you see the NAME of the card, for example,
“WIZARD CRACKERS”.
You see the RARITY of the card, for example “C”, which
is common.
You see the TYPE of card, for example, “SPELL”.
Scroll down and you can then see the text of the card.
You can also use the LEFT and RIGHT arrows
to automatically move to the PREVIOUS or
NEXT card. The < and > symbols should appear
at the bottom of the screen.
Adding Cards to your Trade List
You can press EDIT to automatically add cards to your
trade list.
4
When you press EDIT, a new screen will come
up that says ‘ADD TO TRADE LIST? Y/N’.
If you answer “Y”, then the words WANTED and FOR
TRADE are displayed.
Use your UP and DOWN arows to choose either of these
two lists, and press ENTER to confirm.
Let’s say you add the card or you press “N” instead. Your
Wizard's Apprentice will then back out of this menu
screen and return to viewing.
SECRET TIPS
If the card you’re looking at on screen has a TIP
on it, then you will see a “?” between the < and >
symbols at the bottom of the screen.
Press ENTER and you can view the TIP! You will only
get to see one tip per day, so make sure you pay careful
attention!
SEARCH
Scroll to SEARCH and press ENTER.
You will see
You can then use the left and right arrows to toggle
between the different ways to search, which are:
NUMBER
RARITY
NAME
TYPE
KEYWORD
TEXT
5
When you highlight and of the six groups above, you will
see “PLEASE ENTER SEARCH ITEM”.
Example 1: Search by NUMBER. Enter in a number, for
example, “89” and then press ENTER. Your Wizard’s
Apprentice will find all the cards that have that number.
After the database is done searching, it will return to the
DATABASE submenu.
On screen, you will see
Highlight VIEW and press ENTER.
You will see all the information for card 89/118, which
happens to be:
FOUL BREW
RARITY: C
TYPE: SPELL
COST: 5
DO 2 DAMAGE TO YOUR OPPONENT OR TO A
CREATURE OF YOUR CHOICE.
Example 2: Search by NAME:
Enter a few letters, for example “QU” and press ENTER.
You will see VIEW, SEARCH, or SORT. Press VIEW
and the database will find all the cards that contain those
letters in the NAME field.
You’ll see the cards for:
106/118 SNAPE’S QUESTION
107/118 SQUIGGLE QUILL
because these are the two cards with a “QU” in the name
field.
6
SORT
The SORT function allows you to sort cards before
viewing. Scroll to SORT and press ENTER and you will
be able to sort in a sub-menu of 5 choices:
SORT BY:
NUMBER
RARITY
NAME
TYPE
KEYWORD
After the database is sorted, you will return to the
DATABASE submenu.
2. TRADE LIST
Highlight TRADE LIST from the main menu. To add
cards to your Trade List, select WANTED or FOR
TRADE.
Use your UP and DOWN arrows to toggle between the
two options and press ENTER to select.
Highlight WANTED and press ENTER. If you haven’t
entered anything yet, it will say “NO RECORD”.
Highlight FOR TRADE and press ENTER. If you
haven’t entered anything yet, it will say “NO RECORD”.
If the card is already in the WANTED list, it can’t be
added to the FOR TRADE list. The reverse is also trueif the card is already in your FOR TRADE list, it can’t
be added to your WANTED list.
The WANTED and FOR TRADE lists can support up to
1000 cards, including up to 99 of any single card.
Press QUIT to go back to the main menu.
Let’s look at the “WANTED” and “FOR TRADE”
features a little more closely:
7
WANTED
When the word WANTED appears at the top of the
screen, press ENTER to display all of the cards currently
on the WANTED list. When the list is empty, “NO
RECORD” appears at the middle of the screen. The
number of the current card is highlighted.
Use your UP and DOWN arrows to scroll through the
highlighted card.
You can press ENTER to bring up the TEXT of the
currently highlighted card, or you can press DELETE to
remove the currently highlighted card from the list.
When the card is the last one in your list, you will be
prompted with “DELETE: Y/N” before anything else
happens on screen.
You can also press EDIT to add cards to your WANTED
list. Each time you press EDIT, the highlighted card will
increase by 1. (To add a completely new card to your list,
you must follow the instructions above for the
DATABASE.)
You can also press EDIT to add cards to your FOR
TRADE list. Each time you press EDIT, the highlighted
card will increase by 1. (To add a completely new card to
your list, you must follow the instructions above for the
DATABASE.)
Press QUIT to go back to the main menu.
FOR TRADE
You can also view your FOR TRADE entries.
When the word FOR TRADE appears at the top of the
screen, press ENTER to display all of the cards currently
on the FOR TRADE list. When the list is empty, the
words NO RECORD appear at the middle of the screen.
If there are entries on the list, the number of the current
card will be highlighted. Use your UP and DOWN arrows
8
to scroll and highlight different cards.
Press ENTER to bring up the TEXT of a highlighted
card.
Press DELETE to remove a highlighted card from your
list. When the card is the last one in a list, you will be
prompted with “DELETE: Y/N” before the final delete
happens.
Press EDIT to add a highlighted card into the FOR
TRADE list.
Press QUIT to return to the Main Menu.
9
3. DECK BUILDER
This function allows you to make a group of cards into a
single ‘deck’. You must define all the cards that will be in
the deck. There are three sub-menus: VIEW, BUILD, and
PRACTICE.
Use your UP and DOWN arrows to select from the three
choices in the sub-menu. Then press ENTER to enter the
sub-menus function of either VIEW, BUILD or
PRACTICE. When you’re done, press QUIT to return to
the Main Menu.
Let’s go through these three functions more closely:
VIEW
When you select VIEW, you will see a list of all cards
currently in your deck. The top line of this entry is always
the total number of cards in the deck, for example,
TOTAL : XX.
When the deck list is empty, the words NO RECORD
appear in the middle of the screen. The number of the
card is highlighted. The maximum number of cards you
can put in your deck is 60 plus one Wizard card.
The number of each card is limited to 4, except for the
Lesson cards.
Use the UP and DOWN arrows to scroll and highlight
cards.
Press ENTER to bring up the TEXT of the currently
highlighted card.
Press DELETE to remove the currently
highlighted card from your deck list. When the
card is the last one in your list, you’ll be
prompted with “DELETE: Y/N” before the final
delete.
10
Press EDIT to add a highlighted card to your deck list.
Press QUIT to go back to the sub-menu.
BUILD
When you select BUILD, you will see all 118 cards from
the first set listed. These are the cards you can build
from. Use your “down” arrow to scroll down through the
set. You can scroll through all 118 cards.
Press ENTER to bring up the TEXT of the highlighted
card.
Press EDIT to add the first of the highlighted cards to
your deck list. If this card is already in your list, you will
see the message, “THIS CARD IS ALREADY IN DECK
LIST”.
Press QUIT to go back to the sub-menu.
PRACTICE
From the sub-menu of VIEW, BUILD, PRACTICE, select
PRACTICE and press ENTER.
If there are no entries, you will see “THE DECK LIST IS
EMPTY”. The unit will automatically go back to the
sub-menu VIEW, BUILD, PRACTICE.
Use the “PRACTICE” option to shuffle and deal a
sample hand. All of the cards in the deck are
randomized. Your Wizard’s Apprentice will show a deck
shuffling and dealing animation. Then you will see the
first SEVEN cards randomly dealt from the deck. The
first card displayed is highlighted.
Use your UP and DOWN arrows to scroll through and
highlight each card. Press ENTER to bring up the TEXT
of the highlighted card.
11
Press DELETE to discard the currently
highlighted card from your hand. You will be
prompted with “DISCARD THIS CARD? Y/N”
before the deletion takes place.
Press EDIT to deal another random single card. The new
card is added to the bottom of the current list of cards in
your hand.
Press QUIT to go back to the sub-menu directory.
4. CLOCK
The clock shows the time and the date.
The current time is at the top of the screen and the
current date is at the bottom of the screen. If the current
day is a REMINDER day, the current day will flash and
you will hear an alarm. Press EDIT to go into the SET
CLOCK MODE.
CLOCK SETTING
When you are in the SET CLOCK MODE you
will see the CLOCK and ALARM icons. Use your
LEFT and RIGHT arrows to select the CLOCK
icon and then press ENTER to begin editing the
time.
When the HOUR is flashing, use your UP and DOWN
arrows to enter the hour. The AM/PM icon will
automatically change. Press ENTER to confirm.
The MINUTE will flash next. Use your UP and DOWN
arrows to enter the minute you want to set. Press
ENTER to confirm.
When the clock setting is completed, you will see the
current time and the current date.
Press QUIT to return to the Main Menu.
12
ALARM SETTING
Use the LEFT and RIGHT arrows to select the
ALARM icon, then press ENTER to set the
alarm.
When the HOUR is flashing, use your UP and DOWN
arrows to enter the hour. The AM/PM icon will
automatically change. Use LEFT or RIGHT arrows to
turn the Alarm on or off. Press ENTER to confirm.
The MINUTE will flash next. Use your UP and DOWN
arrows to enter the minute you want to set. Press
ENTER to confirm.
When the alarm setting is completed, the time will go
back to show the current time and the current date.
Press QUIT to return to the Main Menu.
5. CALENDAR
This is your calendar. You can use it to set the
correct date as well as to set reminders for
yourself.
You will see a screen showing the months and the year.
Use your UP and DOWN arrows to select the correct
month. Use your LEFT and RIGHT arrows to select the
correct year.
Press ENTER to see the calendar of the current month
or press EDIT to go directly to SET DATE MODE.
After the calendar of the current month is displayed (if
the reminder date is in this month), then the date will
flash and you will hear the alarm.
Press EDIT to enter SET DATE MODE.
13
In SET DATE MODE, you will see the calendar
and reminder icon. Use your LEFT and RIGHT
arrows to select the calendar and then press
ENTER to begin editing.
MONTH
When the month is flashing, use your UP and DOWN
arrows to enter the month you want to set. Press
ENTER to confirm.
DATE
When the date is flashing, use your UP and DOWN
arrows to enter the date you want to set. Press ENTER
to confirm.
YEAR
When the year is flashing, use your UP and DOWN
arrows to enter the year you want to set. Press ENTER
to confirm.
Your Wizard’s Apprentice will then go back to the SET
DATE MODE screen.
Press QUIT to return to the Main Menu.
REMINDER SETTING
The settings of day, month and year are the same as the
calendar settings. Use your UP and DOWN arrows to
select the month you want to see. Use your LEFT and
RIGHT arrows to select the year you want to see. You
can press ENTER to see the calendar of this month or
you can press EDIT to go directly to SET DATE MODE.
In the SET DATE MODE, you will see the calendar and
reminder icon. Use your LEFT and RIGHT arrows to
select reminder and press ENTER to show the reminder
date and the reminder status (on/off).
14
If you want to change the reminder status, press
LEFT or RIGHT arrows to turn the reminder
function on or off. If you want to change the
reminder date, press EDIT.
When the month is flashing, use your UP and DOWN
arrows to enter the month you want to set. Press
ENTER to confirm.
When the date is flashing, use your UP and DOWN
arrows to enter the date you want to set. Press ENTER
to confirm.
When the year is flashing, use your UP and DOWN
arrows to enter the year you want to set. Press ENTER
to confirm.
Your Wizard’s Apprentice will go back to the SET DATE
MODE screen.
You can press QUIT to return to the Main Menu.
6. CALCULATOR
This is your calculator. When you enter into the
“calcuator” mode, you will see a “0” in the bottom right
hand corner of your screen.
Use the NUMBER keys to type in numbers.
When you want to CLEAR a number, press the “SPACE”
button.
Press QUIT to return to the Main Menu.
15
INSERTING OR REPLACING BATTERIES
Reset Operations:
By pressing the reset button, you can delete all the data
previously entered. A screen will ask you, DATA
FOUND! KEEP RECORD? Y/N. Pressing Y(yes) will
return to the initial screen, pressing N(no) will delete all
data (including your trade lists and deckbuilder
functions).
Be sure to press the reset button before you use your
Wizard's Apprentice for the first time.
Replacing Batteries:
This Harry Potter™ Wizard's Apprentice is
powered by two button-cell batteries type
"G13A" or "LR44" and four "AAA" or "LR03"
batteries. The four "AAA" or "LR03" batteries
are the main batteries and the two "G13A" or "LR44"
batteries are the back-up batteries. The main batteries
provide power for normal operations. The back-up
batteries protect data stored in memory when changing
the main batteries.
16
Important:
Incorrect use of batteries can cause them to burst or
leak, possibly damaging the interior of the Harry Potter™
Wizard's Apprentice. Note the following precautions:
Never leave dead batteries in the battery compartment.
To avoid damage to the unit from leaky batteries, replace
both the main battery and the back-up battery every
three years. Batteries should be replaced no matter how
much you use the diary during that time.
Warning:
Never try to recharge the batteries supplied with Harry
Potter™ Wizard's Apprentice.
Do not expose batteries to direct heat.
Keep batteries out of the reach of small children. If
swallowed, consult a physician immediately.
To Replace The Main Battery:
1. Switch power off, loosen the screws that hold the
battery compartment cover in place, then remove the
battery compartment cover.
2. Remove the old battery.
Warning:
DO NOT CLOSE THE BATTERY DOOR ONCE YOU
REMOVE THE MAIN BATTERY. YOU MUST
REPLACE MAIN BATTERY BEFORE CLOSING
BATTERY COMPARTMENT OR ALL FILES WILL BE
DELETED!
3. Insert the new battery into the Harry Potter™
Wizard's Apprentice, making sure to align "+" and "-"
as shown.
4. Replace the battery compartment cover and the screws
that secure it in place.
To Replace the Back-Up Battery:
1. Be sure always to leave main battery in place to
protect memory contents before you replace back-up
battery.
2. Loosen the screw that holds the back-up battery cover
in place. Remove the cover.
17
3. Then remove the old battery with a thin pointed, nonmetallic object.
4. Wipe the surfaces of a new battery with a soft, dry
cloth. Insert the new battery into the Harry Potter™
Wizard's Apprentice, making sure that its positive (+)
side is facing up (so that you can see it).
5. Replace the battery compartment cover and the screws
that secure it in place.
CAUTION:
To ensure proper function:
• Do not mix old and new batteries.
• Do not mix alkaline, standard or rechargeable
batteries.
• Battery installation should be done by an adult.
• Non-rechargeable batteries are not to be recharged.
• Rechargeable batteries are to be removed from the toy
before being charged (If removable).
• Rechargeable batteries are only to be charged under
adult supervision (If removable).
• Only batteries of the same or equivalent type as
recommended are to be used.
• Batteries are to be inserted with the correct polarity.
• Exhausted batteries are to be removed from the toy.
• The supply terminals are not to be short circuited.
• Replace with new batteries at the first sign of erratic
operation.
DO NOT DISPOSE OF BATTERIES IN FIRE,
BATTERIES MAY EXPLODE OR LEAK.
18
DEFECT OR DAMAGE
Replace batteries at the first sign of erratic operation.
If a part of your game is damaged or something has been
left out, DO NOT RETURN THE GAME TO THE
STORE. The store doesn’t have replacement parts.
Instead, write to us at:
Tiger Repair Department
1000 N. Butterfield Road, Unit 1023
Vernon Hills, IL 60061, U.S.A.
In your note, mention the name of your game, your
game’s model number, and tell us briefly what the
problem is. Also include sales slip, date, place of
purchase and price paid. We will do our best to help.
CAUTION : Batteries should be replaced by an adult.
Not suitable for children under 36 months, may contain
small parts.
If the LCD display becomes dim, this means you should
turn off the Harry Potter™ Wizard's Apprentice and
replace the main batteries. Your Harry Potter™ Wizard's
Apprentice is protected by the back-up batteries during
main battery replacement.
Memory contents are lost when the back-up batteries are
removed or need to be replaced. Be sure to always leave
the back-up batteries in place to protect memory
contents when you are changing the main batteries.
However, when you remove the main batteries at any
time, memory retention will depend entirely on the
condition of the back-up batteries in place. If back-up
batteries are not in place, memory contents are likely to
be damaged. If memory seems corrupted, clear it using
the reset.
Normally the back-up batteries can support over 180
days of data back up, even when no main batteries have
been installed. However, in order to guarantee your data
is stored, never leave the unit without main batteries for
a whole day. Otherwise, you could lose your data. For
regular maintenance, please exchange the back-up
batteries once a year.
19
90-DAY LIMITED WARRANTY
Tiger Electronics. (Tiger) warrants to the original
consumer purchaser of this product that the product will
be free from defects in materials or workmanship for 90
days from the date of original purchase. This warranty
does not cover damages resulting from accident,
negligence, improper service or use or other causes not
arising out of defects in materials or workmanship.
During this 90-day warranty period, the product will
either be repaired or replaced (at Tiger’s option) without
charge to the purchaser, when returned with proof of the
date of purchase to either the dealer or to Tiger.
Product returned to Tiger without proof of the date of
purchase or after the 90-day warranty period has expired,
but prior to one year from the original date of purchase,
will be repaired or replaced (at Tiger’s option) for a
service fee of U.S.$17.00. Payments must be by check or
money order payable to Tiger Electronics.
The foregoing states the purchaser’s sole and exclusive
remedy for any breach of warranty with respect to the
product.
All product returned must be shipped prepaid and
insured for loss or damage to:
Tiger Repair Department
1000 N. Butterfield Road, Unit 1023
Vernon Hills, IL 60061, USA
The product should be carefully packed in the original
box or other packing materials sufficient to avoid
damage during shipment. Include a complete written
description of the defect, a check if product is beyond
the 90-day warranty period, and your printed name,
address and telephone number.
THIS WARRANTY IS IN LIEU OF ALL OTHER
WARRANTIES AND NO OTHER REPRESENTATIONS OR
CLAIMS OF ANY NATURE SHALL BE BINDING ON OR
OBLIGATE TIGER IN ANY WAY. ANY IMPLIED
WARRANTIES APPLICABLE TO THIS PRODUCT,
INCLUDING WARRANTIES OF MERCHANTABILITY AND
FITNESS FOR A PARTICULAR PURPOSE, ARE LIMITED TO
20
THE NINETY (90) DAY PERIOD DESCRIBED ABOVE. IN NO
EVENT WILL TIGER BE LIABLE FOR ANY SPECIAL,
INCIDENTAL, OR CONSEQUENTIAL DAMAGES RESULTING
FROM POSSESSION, USE, OR MALFUNCTION OF THIS
TIGER PRODUCT.
Some states do not allow limitations as to how long an
implied warranty lasts and/or exclusions or limitations of
incidental or consequential damages, so the above
limitations and/or exclusions of liability may not apply to
you. This warranty gives you specific rights, and you may
also have other rights which vary from state to state.
For more information about Tiger Electronics,
our products and special promotions, please visit
our Web Site at: www.tigertoys.com
This device complies with Part 15 of the FCC Rules.
Operation is subject to the following two conditions :
(1) this device may not cause harmful interference, and
(2) this device must accept any interference received,
including interference that may cause undesired
operation.
Warning: Changes or modifications to this unit not
expressly approved by the party responsible for
compliance could void the user’s authority to operate the
equipment.
NOTE: This equipment has been tested and found to
comply with the limits for a Class B digital device,
pursuant to Part 15 of the FCC Rules. These limits are
designed to provide reasonable protection against
harmful interference in a residential installation. This
equipment generates, uses, and can radiate radio
frequency energy and, if not installed and used in
accordance with the instructions, may cause harmful
interference to radio communications. However, there is
no guarantee that interference will not occur in a
particular installation. If this equipment does cause
harmful interference to radio or television reception,
which can be determined by turning the equipment off
and on, the user is encouraged to try to correct the
interference by one or more of the following measures:
21
- Reorient or relocate the receiving antenna.
- Increase the separation between the equipment and
receiver.
- Connect the equipment into an outlet on a circuit
different from that to which the receiver is connected.
- Consult the dealer or an experienced radio TV
technician for help.
22