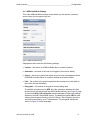
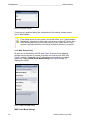
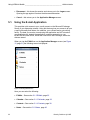
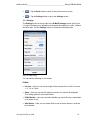
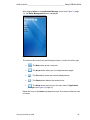
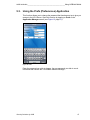
1
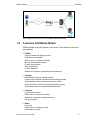
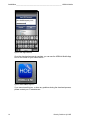
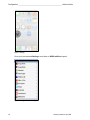
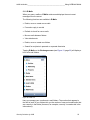
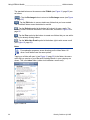
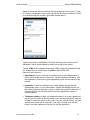
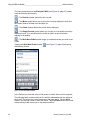
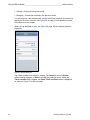
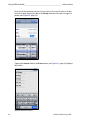
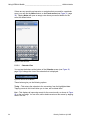
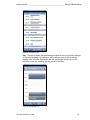
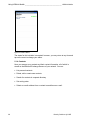
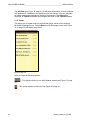
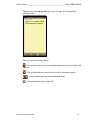
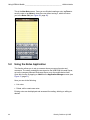
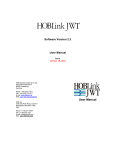
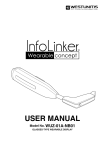
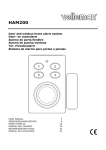
User Guide
HOBLink Mobile
Document version: 1.0
Software version: 1.6
Issue: January 2013
HOB GmbH & Co. KG
Schwadermühlstraße 3
90556 Cadolzburg
Germany
HOB, Inc.
Headquarters NY
245 Saw Mill River Road Suite # 106
Hawthorne, NY 10532, USA
Phone:
Fax:
+49 9103 715 0
+49 9103 715 3271
Phone:
Fax:
+1 866 914 9970
+49 9103 715 3299
E-mail:
Web:
[email protected]
www.hob.de
E-mail:
Web:
[email protected]
www.hobsoft.com
HOBLink Mobile Software and Documentation
All information in this document is subject to change without notice, and does not represent a commitment on the
part of HOB.
All rights are reserved. Reproduction of editorial or pictorial contents without express permission is prohibited.
HOBLink Mobile software and documentation have been tested and reviewed. Nevertheless, HOB will not be
liable for any loss or damage whatsoever arising from the use of any information or particulars in, or any error or
omission in, this document.
Microsoft and Microsoft Exchange Server are registered trademarks of Microsoft Corporation. All other product
names are trademarks or registered trademarks of their respective corporations.
Issued: January 23, 2013
2
Security Solutions by HOB
Purpose of this Guide
This guide is designed to provide users with detailed information concerning
HOBLink Mobile and to help them make the best possible use of the application.
The procedures for configuring the individual software components are documented in
detail with step-by-step instructions.
Symbols and Conventions
This manual uses certain conventions and abbreviations, which are explained here:
This symbol indicates useful tips that can make your work easier.
This symbol indicates additional informative text.
This symbol indicates an important tip or procedure that may have far-reaching
effects. Please consider carefully the consequences of any changes and
settings you make here.
• Keys or key combinations are displayed in square brackets, e.g. [Space].
• References to program commands and dialog boxes are printed in bold type, e.g.
Select the command Open….
• Cross-references to Section headings and Figures with numbers are marked in color as
follows: section 1 Overview.
• Screen displays, file names and text to be entered by the user are displayed in the font
Courier New. This input is – unless otherwise mentioned - case sensitive.
• In this documentation, product names are abbreviated as follows:
Product name
Abbreviation
HOBCOM Universal Server
HCU
HOB WebSecureProxy
WSP
Security Solutions by HOB
3
4
Security Solutions by HOB
Contents
1.
Overview
7
1.1.
What are HOBLink Mobile and HOBCOM Universal Server?– ...................... 7
1.2.
Features of HOBLink Mobile–........................................................................ 7
1.3.
Connecting HOBLink Mobile to your network– .............................................. 8
1.4.
Functions of HOBLink Mobile– ...................................................................... 9
2.
System Requirements
11
3.
Installation
13
3.1.
4.
Configuration
4.1.
5.
Installation of HOBLink Mobile–................................................................... 13
15
Configuring HOBLink Mobile– ..................................................................... 15
Using HOBLink Mobile
21
5.1.
Using the E-mail Application– ...................................................................... 22
5.2.
Using the Notes Application–....................................................................... 44
5.3.
Using the Prefs (Preferences) Application– ................................................. 47
6.
Frequently Asked Questions
49
7.
Information and Support
51
Security Solutions by HOB
5
6
Security Solutions by HOB
HOBLink Mobile _________________________________________________________ Overview
1. Overview
1.1. What are HOBLink Mobile and
HOBCOM Universal Server?–
HOBLink Mobile and HOBCOM Universal Server are the two components of the
software solution from HOB that work together to give you secure mobile access
to the resources in your corporate network using your iPhone, iPod touch or iPad.
HOBLink Mobile is an application that runs on your mobile device to give secure
access to your corporate e-mails, attachments, calendar entries, contacts and
notes.
HOBCOM Universal Server (HCU) is the installation within your corporate network
that makes this access possible. HCU is installed in your enterprise network
(LAN) by your IT administrators and this is what communicates with the Microsoft
Exchange Server to retrieve the data
Data you access with your mobile device are not permanently stored on the
device, so logging out or closing the app completely removes all data from your
device, leaving no trace behind. Therefore, data are never exposed to security
risks, even if the device is lost or stolen.
The currently available versions are:
• HOBLink Mobile Version 1.6
• HOBCOM Universal Server Version 2.1
1.2. Features of HOBLink Mobile–
With HOBLink Mobile you have the following benefits:
• Simple download and installation of the HOBLink Mobile app on your device
• Highly secure access to your corporate e-mails, attachments, calendar entries,
contacts and notes
• Low resource requirements (memory, bandwidth, etc.) giving you high
performance and low connectivity costs
• A VPN connection is not necessary, a working Internet connection is sufficient
• You can reconnect to the same session without any data loss if the Internet
connection is unwantedly interrupted
• No data are stored on your mobile device: all data is kept safe within the
company network, even if the device is lost or stolen
Security Solutions by HOB
7
Overview _________________________________________________________ HOBLink Mobile
1.3. Connecting HOBLink Mobile to your network–
There are two communication scenarios that are possible for HOBLink Mobile,
either of which will be set up by your IT administrators:
1. Direct communication between HOBLink Mobile and
HOBCOM Universal Server. This is always encrypted with AES (128 bit)
encryption. The advantage of using direct communication is that it is easy to
use and offers security.
Figure 1: Diagram of Direct Communication
2. Communication between HOBLink Mobile and HOBCOM Universal Server
over the HOB RD VPN WebSecureProxy (WSP). HOB RD VPN is a software
solution that is specially designed to give you secure remote access over the
Internet to the resources in your corporate network. WSP is the central server
component of HOB RD VPN. The advantage of using communication over the
WSP is that it offers an even higher level of security requiring certificates as it
is encrypted with SSL in addition to the standard AES encryption.
HOB WebSecureProxy is not included in the HOBLink Mobile App.
WSP can be obtained at an additional cost. If your company uses
WSP, please contact your IT administrator for configuration details.
8
Security Solutions by HOB
HOBLink Mobile _________________________________________________________ Overview
Figure 2: Diagram of Communication over the HOB RD VPN WebSecureProxy
1.4. Functions of HOBLink Mobile–
HOBLink Mobile supports complete e-mail access. The following functions are
also available:
• E-Mails:
Create, forward and reply to e-mails
Hide/show e-mail details
Delete, move or create new folders
Move e-mails between folders
E-mails short preview
View attachments
Custom signature
Search for recipients in personal/corporate directory
• Calendar:
Month/Day/List view of calendar entries
Create, edit and delete calendar entries/meeting requests
Add availability status, invitees and notes to entries
Quick search for invitees in personal/corporate directory
Set invitation state as accepted/tentative/declined
• Contacts:
List personal contacts
Delete, edit or create new contacts
Search for contacts in corporate directory
Set sorting order
• Notes:
List notes
Delete, edit or create new notes
Send notes via e-mail
Security Solutions by HOB
9
Overview _________________________________________________________ HOBLink Mobile
10
Security Solutions by HOB
HOBLink Mobile ______________________________________________ System Requirements
2. System Requirements
HOBLink Mobile is the client component of the secure mobile access software
solution from HOB.
HOBLink Mobile supports the following Apple products:
• iPhone
• iPod touch
• iPad
HOBLink Mobile requires the following OS to be installed on all Apple devices:
• iOS 4.3 or later
Security Solutions by HOB
11
System Requirements ______________________________________________ HOBLink Mobile
12
Security Solutions by HOB
HOBLink Mobile ________________________________________________________ Installation
3. Installation
3.1. Installation of HOBLink Mobile–
HOBLink Mobile can be downloaded to your iPhone, iPod touch or iPad and
installed exactly as any other iPhone application (app) via the App Store. You only
need to have an iTunes account with an Apple ID. HOBLink Mobile is available for
download free from the Apple App Store.
1. Open the App Store.
2. Search for HOBLink Mobile.
Figure 3: App Information
This application is downloaded in the same way as any other app, by tapping
Install App and entering your Apple ID and Password.
Security Solutions by HOB
13
Installation ________________________________________________________ HOBLink Mobile
Figure 4: Enter Apple ID Screen
Once the download process is complete, you can see the HOBLink Mobile App
icon on the screen of your mobile device
Figure 5: HOBLink Mobile App Icon
If you cannot see this icon, or have any problems during the download process,
please contact your IT administrator.
14
Security Solutions by HOB
HOBLink Mobile ______________________________________________________ Configuration
4. Configuration
In order to use HOBLink Mobile, you must be correctly authenticated. Therefore,
you must enter your user name, password and the name of the server you wish to
connect to. Your IT administrator will be able to give you this information. This
data will already be in your user account under HOBCOM Universal Server.
HOBLink Mobile places no restrictions on the username or password that you
use, but this information must be compatible with the username and password
conventions of your network.
Username and password are case sensitive.
You may enter this data directly into the fields of the logon window each time you
start the application, or you can store this information in Settings (see section
4.1.1 HOBLink Mobile Settings, page 17) so that it need not be entered each time.
Figure 6: Logon Screen
4.1. Configuring HOBLink Mobile–
To pre-configure your HOBLink Mobile connection, tap Settings (see Figure 7,
page 16) on the main menu of your mobile device.
Security Solutions by HOB
15
Configuration _____________________________________________________ HOBLink Mobile
Figure 7: Settings
Once you have selected Settings, scroll down to HOBLink M and open it.
Figure 8: Settings of the Installed Apps
16
Security Solutions by HOB
HOBLink Mobile ______________________________________________________ Configuration
4.1.1. HOBLink Mobile Settings
This is the HOBLink Mobile settings screen where you can specify username,
server name, port, encryption type, etc.
Figure 9: HOBLink Mobile Settings
Displayed on this screen are the following settings:
• Version – the version of HOBLink Mobile that is currently installed
• Username – the name of the user to be logged in (this can be edited)
• Server – the server to which the mobile device is to be connected and where
HOBCOM Universal Server is currently installed (this can be edited)
• Port – the number of the port through which the connection is to be made to
the server (this can be edited)
• Encryption – the method of encryption currently being used
The default encryption level is AES, but if the connection between the client
and the server is made through the HOB WebSecureProxy (see Figure 2, page
9), then both AES + SSL encryption must be selected and the proxy settings
entered in the WSP Socks Mode section. The default encryption AES is used
when a client connects directly to the HCU Server. The encryption type to be
used will be specified by your IT administrator. The encryption settings are
shown in Figure 10 on the next page.
Security Solutions by HOB
17
Configuration _____________________________________________________ HOBLink Mobile
Figure 10: Encryption Settings
If you have any problems during the configuration of the settings, please contact
your IT administrator.
If the mobile device is lost or stolen, you should inform your IT administrators
immediately, who can then block your user account on the HCU Server. Also,
HOB recommends that you use code locking on your mobile device in any
case as a general precaution even though no data is stored on your device.
4.1.2. Web Secure Proxy
Be sure you’ve switched on the SSL (see Figure 10 above) as the following
settings are only relevant if you plan to connect to the server over WSP (see
Figure 2, page 9). Please ask your IT administrator what settings you should
make here. Tapping WSP Socks Mode Settings (see Figure 9, page 17)
displays this screen:
Figure 11: WSP Socks Mode Settings
WSP Socks Mode Settings
18
Security Solutions by HOB
HOBLink Mobile ______________________________________________________ Configuration
• WSP Socks Mode – Turn WSP Socks Mode ON if you want to connect to the
HCU server over WSP. Turn this mode OFF if you want to connect to the HCU
directly.
• Servername – If WSP Socks Mode is ON, you can enter the name of the
server to be connected to here. If WSP Socks Mode is OFF, you can still enter
the server name here. This way, you will have the server name ready if you
decide to go back and turn WSP Socks Mode on.
WSP Authentication
• User defined – Turn this ON to enable the Username and Password fields
and then enter in your username and password. If this is OFF, you can still
enter your username and password. This way, you will have the logon
information ready if you decide to go back and turn User defined on.
• Username – Enter your user name for the WSP here.
• Password – Enter your password for the WSP here.
4.1.3. HOBLink Mobile Info
HOBLink Mobile Info displays a page containing information about the installed
version of the HOBLink Mobile app and contact details for HOB.
Security Solutions by HOB
19
Configuration _____________________________________________________ HOBLink Mobile
20
Security Solutions by HOB
HOBLink Mobile ______________________________________________Using HOBLink Mobile
5. Using HOBLink Mobile
After logging on (see Figure 6, page 15), the Application Manager screen of
HOBLink Mobile appears. Here you can access e-mail, notes and preferences,
view HOBLink Mobile information and logoff or disconnect from the session.
On this screen you have the following three icons:
• E-Mail – see section 5.1 Using the E-mail Application, page 22.
• Notes – see section 5.2 Using the Notes Application, page 44.
• Prefs – see section 5.3 Using the Prefs (Preferences) Application, page 47.
Figure 12: Application Manager
There are also three buttons displayed on this screen:
Refresh – this refreshes the connection with the HOBCOM Universal Server.
Info – this contains information about the installed version of the
HOBLink Mobile app, along with contact details for HOB.
Action – this gives you three options:
• Logoff – this terminates the session on the server and returns you to the
Logon screen (see Figure 6, page 15).
Security Solutions by HOB
21
Using HOBLink Mobile _____________________________________________ HOBLink Mobile
• Disconnect – this closes the session and returns you to the Logon screen.
Opening the app again will restore the disconnected session.
• Cancel – this returns you to the Application Manager screen.
5.1. Using the E-mail Application–
This provides quick access to your e-mail account on the Microsoft Exchange
Server of your enterprise network. Using this feature gives you access to all your
e-mail functionality and folders, the calendar, your contacts and a note writing
facility. The data you receive or send using this application are NOT stored on
your mobile device; instead the application creates a connection to your
HOBCOM Universal Server, which then connects to MS Exchange, where the
data are stored.
When you tap the E-Mail icon on the Application Manager screen (see Figure
12, page 21) the following screen is displayed:
Figure 13: Exchange Main Screen
Here you can select the following:
• E-Mails – See section 5.1.2 E-Mails, page 25
• Calendar – See section 5.1.3 Calendar, page 29
• Contacts – See section 5.1.4 Contacts, page 38
• Notes – See section 5.1.5 Notes, page 42
22
Security Solutions by HOB
HOBLink Mobile ______________________________________________Using HOBLink Mobile
•
– Tap the Back button to return to the previous menu screen.
•
– Tap the Settings button to go to the Settings screen.
5.1.1. Settings
The Settings button at the top right of the E-Mail Exchange screen (see Figure
13, page 22) allows you to determine some preferred settings for e-mail, contacts
and auto login. Tap the Settings button to access the following screen.
Figure 14: E-Mail Settings
You can edit the following on this screen:
E-Mails
• Preview – Here you can set the length of the preview of an e-mail to no lines,
1, 2, 3, 4 or 5 lines.
• Show – Here you can set the maximum amount of e-mails to be displayed.
This setting applies to all e-email folders.
• E-Mail Details – Here you can select whether you would like the e-mail details
to be shown or not.
• After Delete – Here you can select which e-mail is shown after an e-mail has
been deleted.
Security Solutions by HOB
23
Using HOBLink Mobile _____________________________________________ HOBLink Mobile
• Signature – Here you can enter what you would like to have appended to
each e-mail that you send. The signature is shown in the Signature setting
field.
• Minimum Font Size – Here you can select the font size used when viewing
e-mails.
Contacts
• Sort Order – Here you can select how your contacts are to be sorted.
• Display Order – Here you can select in which way your contacts are to be
displayed.
Autologin
A further setting includes the Autologin setting where you can save your login
information for the MS Exchange Server. This can be disabled with a simple tap
here. You will then be required to log in each time you want to use the e-mail
application. This button will not be shown unless the Save option is enabled on
the password Authentication screen, as shown here:
Figure 15: Password Authentication
Tap the Done button to log on or the Cancel button to return to the previous
screen without saving the changes.
The Save field appears only if the IT administrator has allowed saving
the password for a specific user.
24
Security Solutions by HOB
HOBLink Mobile ______________________________________________Using HOBLink Mobile
5.1.2. E-Mails
When you open a mailbox, E-Mails retrieves and displays the most recent
messages from the server.
The following functions are available in E-Mails:
• Delete, move or create new e-mails
• Forward or reply to e-mails
• Refresh to check for new e-mails
• Move e-mails between folders
• View attachments
• Delete, move or create new folders
• Search for recipients in personal or corporate directories
Tapping E-Mails on the Exchange screen (see Figure 13, page 22) will display a
list of all e-mail folders:
Figure 16: Folder List
Here you manage your e-mails and e-mail folders. The number that appears in
the field of each of your folders tells you the number of new and unread mails that
are currently in that folder (there are, for example, currently 3 unread mails in the
Inbox above).
Security Solutions by HOB
25
Using HOBLink Mobile _____________________________________________ HOBLink Mobile
The standard buttons on the screens under E-Mails (see Figure 16, page 25) are
as follows:
– Tap the Exchange button to return to the Exchange screen (see Figure
13, page 22).
– Tap the Edit button to move or delete any folders that you have created.
The six default folders cannot be deleted or moved.
– Tap the Refresh symbol at the bottom left to check for new e-mails. The
number of new e-mails will be shown in the Inbox field, as shown in Figure 16 on
page 25.
– Tap the Plus symbol at the bottom to create new folders that you can add to
any of your already existing folders.
– Tap the Write New E-mail symbol at the bottom right to write a new e-mail
(see Figure 19, page 28).
Inbox
For explanation purposes, we are showing you the Inbox folder. All
other e-mail folders have the same options.
Tapping on a folder will open it (see Figure 16, page 25).In the folder, the new emails that you receive on your Microsoft Exchange Server in your company are
shown. This is the Inbox folder (a blue circle indicates a new e-mail):
Figure 17: E-Mail List
26
Security Solutions by HOB
HOBLink Mobile ______________________________________________Using HOBLink Mobile
Select an e-mail you want to read from this list by tapping it (see Figure 17, page
26). Once it is displayed on the screen, tap the two arrow keys at the top to move
up or down through the e-mails in this folder (shown below).
Figure 18: Example E-Mail
Tapping the names in the From: or To: fields will display the contact’s e-mail
addresses. Tap an e-mail address to write a new e-mail to the contact.
Tap the HTML arrow to display the e-mail in HTML format without address fields
etc. instead of as an e-mail format. Tap Hide to hide the To: field.
Options in the e-mail text:
• Attachments: If your e-mail has an attachment like in the example above, it
will be shown at the bottom of the e-mail. Tap the attachment window to view
the attachment. All document types supported by Apple can be viewed in this
manner.
• Hyperlinks: If there is a hyperlink in an e-mail, tapping the hyperlink will
automatically open it in your web browser. Tapping and holding will give you
the option to open the hyperlink, copy it or cancel and go back to the e-mail. If
you copy this link, you can also paste it into other applications outside of
HOBLink Mobile.
• Telephone numbers: If there is a telephone number in an e-mail, tapping on it
will give you the option to add the number to an existing/new contact, copy the
number or cancel and return to the e-mail. If you are using an iPhone, you can
also call the number with a single tap. If you copy a number, you can also
paste it into other applications just like you can with hyperlinks.
Security Solutions by HOB
27
Using HOBLink Mobile _____________________________________________ HOBLink Mobile
The icons at the bottom of the Example E-Mail (see Figure 18, page 27) screen
have the following functionality:
– The Refresh symbol checks for new e-mails.
– The Move symbol allows you to move the currently displayed e-mail from
the current folder to a folder from the folder list.
– The Delete symbol deletes the e-mail that is displayed.
– The Reply/Forward symbol allows you to reply to or forward the currently
displayed e-mail. You may also edit the e-mail or type in a new text before
replying or forwarding.
– The Write New E-Mail symbol brings up a screen that lets you write a new
e-mail.
Tapping the Write New E-mail symbol
the following screen:
(see Figure 17, page 26) brings up
Figure 19: Write New E-Mail Example
In the To field you enter the name of the person to whom the e-mail is being sent.
The following fields contain entries for Cc and Bcc addressees and the subject of
the e-mail. The text for the e-mail is entered in the lower panel. Tap the Send
button in the top right corner to send the e-mail. Tapping Cancel closes the e-mail
without saving it and returns you to the previous screen.
28
Security Solutions by HOB
HOBLink Mobile ______________________________________________Using HOBLink Mobile
5.1.3. Calendar
Here you access your calendar. In the calendar you have the following options:
• View calendar entries according to a month, day or list display.
• Create, delete and edit calendar entries and meeting requests.
• Set your availability, invite others to meetings and write notes as reminders.
• Do a quick search for invitees in personal and corporate directories.
• Set an invitation state as accepted, tentative or declined.
Figure 20: Calendar Month View
Tap the Plus (+) symbol at the top to add new events to the calendar (see Figure
21, page 30). Tapping the left and right arrows will take you to the previous or
next month, showing you the events for that month. The buttons at the bottom of
the screen change the view of the calendar and let you view invitations, for more
detailed information see section 5.1.3.1 Calendar View, on page 34.
Dates with events will be shown with a small colored icon displaying the number
of events on that day. The colors that are used have the following meanings:
• Green – Events for today
• Red – Future events
• Blue – Past events
Security Solutions by HOB
29
Using HOBLink Mobile _____________________________________________ HOBLink Mobile
• Orange – Events occurring next month
• Blue/gray – Events that occurred in the previous month
You can also view, edit or delete past, present and future events on this screen by
tapping on the event in the list. See Figure 28 on page 34 for a detailed overview
of the options on this screen.
When you tap the Plus (+) icon (see Figure 20, page 29) the following screen is
displayed:
Figure 21: Calendar New Event
Tap a field to select it for editing or viewing. Tap Cancel to return to Events
without making changes, or Done to exit with any changes saved. When the
Title & Location field is tapped, the Event Title & Location screen is displayed,
as shown in Figure 22 on the next page.
30
Security Solutions by HOB
HOBLink Mobile ______________________________________________Using HOBLink Mobile
Figure 22: Event Title & Location
Here you enter the meeting title and location for your planned meeting. When
finished, tap Save and you will be returned to the Event screen (see Figure 21,
page 30).
Tapping the Starts & Ends field on the Event screen displays this screen:
Figure 23: Event Start & End Date & Time
Security Solutions by HOB
31
Using HOBLink Mobile _____________________________________________ HOBLink Mobile
Here you set the start and end time of your event. If the event is to be an all-day
event, then drag the switch to On in the All-day field and times will no longer be
shown (see Figure 24, page 32).
Figure 24: Event All-Day
Tapping the Invitees field on the Event screen (see Figure 21, page 30) displays
this screen:
Figure 25: Add Invitees to Event
32
Security Solutions by HOB
HOBLink Mobile ______________________________________________Using HOBLink Mobile
Here you specify who will be attending your event. Use the search bar to locate
and select invitees that are in your contact list. Tap Done to save your changes
and return to the Event screen (see Figure 21, page 30) or tap Cancel to return
to the Event screen without saving.
Tapping the Availability field on the Event screen displays the following:
Figure 26: Availability for Event
Here you can set your availability for a particular event. You can choose from
Busy, Free, Tentative or Out of Office.
Security Solutions by HOB
33
Using HOBLink Mobile _____________________________________________ HOBLink Mobile
If there are any special requirements, or reminders that you need for a particular
event, you can use the Notes feature on the Event screen (see Figure 21, page
30). Tapping Notes will open an empty note where you can set details for the
event, as shown below.
Figure 27: Notes for Event
5.1.3.1.
Calendar View
You can tap the buttons at the bottom of the Calendar screen (see Figure 20,
page 29) to change the view of the calendar that is displayed:
Figure 28: Calendar Screen Buttons
These buttons give you the following options:
Today – This returns the calendar to the current day from the highlighted date.
Tapping events in this list will allow you to view, edit or delete them.
List – This displays all upcoming events for the current month, as shown in Figure
29 on the next page. You can view, edit or delete events on this screen by tapping
them in the list.
34
Security Solutions by HOB
HOBLink Mobile ______________________________________________Using HOBLink Mobile
Figure 29: Calendar List View
Day – Tap this to display the selected day divided into hourly time slots, showing
all events on that day. You can view, edit or delete events on this screen by
tapping them in the list. Tapping the left and right arrows will take you to the
previous or next day, showing you the events for that day.
Figure 30: Calendar Day View
Security Solutions by HOB
35
Using HOBLink Mobile _____________________________________________ HOBLink Mobile
Month – Tap this to display the calendar for the selected month, with colored
icons indicating scheduled events for the days of that month (see Figure 20, page
29). The Month view is the default view for the Calendar.
If there are upcoming events planned for the month being displayed in the view
option, then that event is displayed in the field below the calendar (see Figure 20,
page 29). This field can be scrolled from left ( ) to right ( ) to show all upcoming
events.
5.1.3.2. Invitations
This icon (seen at the bottom right corner of Figure 30 on page 35) can be
used to check on the invitations you have received from others. If you have
received an invitation, a red badge will appear in the corner of this icon displaying
the number of invitations received (see Figure 28, page 34). Tapping this icon will
display a list of your invitations, as shown below:
Figure 31: Invitations List
Here you see a list of all invitations received. A blue circle next to an event
indicates a new invitation. Tap the invitation to display the event details, as shown
in Figure 32 on the next page.
36
Security Solutions by HOB
HOBLink Mobile ______________________________________________Using HOBLink Mobile
Figure 32: Invitation Info
Here you have the following options:
Tap Invitations to return to the Invitations List (see Figure 31, page 36). At the
bottom of the screen you can choose to accept, say maybe to or decline the
invitation. After making a choice, you will be returned to the Invitations List.
Depending on what you have chosen above, your status for the event will be
displayed on the Invitations List screen, as shown in Figure 33 on the next page.
Security Solutions by HOB
37
Using HOBLink Mobile _____________________________________________ HOBLink Mobile
Figure 33: Invitation Status
The status for this invitation is accepted; however, you may return at any time and
tap on the event to change your status.
5.1.4. Contacts
Here you manage your contacts and their contact information, all of which is
stored on the Microsoft Exchange Servers of your network. You can:
• List personal contacts
• Delete, edit or create new contacts
• Search for contacts in corporate directory
• Set sorting order
• Select an e-mail address from a contact to send them an e-mail.
38
Security Solutions by HOB
HOBLink Mobile ______________________________________________Using HOBLink Mobile
Tapping on Contacts on the Application Manager screen (see Figure 12, page
21) will display a list of your contacts, as shown here:
Figure 34: Contacts
Use the search field at the top to find the contact you wish to see, or just scroll
through the list displayed on screen. When you have found the contact you are
looking for, tap on the contact to display their details.
If you have created a folder, folders will be displayed instead of the list of
contacts. Tap the folder to see the list of contacts.
Global Address List – Here you can see the address book that is currently
stored on your company Microsoft Exchange Server (the address book is not
stored on your mobile device).
Outlook Address Book – Here you can access all the information currently
stored in your Microsoft Outlook address book on your company Microsoft
Exchange Server.
Security Solutions by HOB
39
Using HOBLink Mobile _____________________________________________ HOBLink Mobile
Once you have selected a contact, you can access all the information that you
have entered for them, and update, edit or delete it. Once displayed the contact
details may be edited by using the Edit button at the top:
Figure 35: Contacts Info
Here you can also do the following:
• Tap a telephone number to call the contact if you are using an iPhone.
• Tap an e-mail address to write an e-mail to the contact.
• Tap a homepage to open the contact’s homepage in your web browser.
40
Security Solutions by HOB
HOBLink Mobile ______________________________________________Using HOBLink Mobile
Tap the Plus (+) symbol (see Figure 34, page 39) to add new contacts to this list.
This brings up the following screen:
Figure 36: Add New Contact
Here you enter the details for your new contact. Tap on the required field to enter
the data, and the keypad will be shown, as follows:
Figure 37: Add New Contact with Keypad
Security Solutions by HOB
41
Using HOBLink Mobile _____________________________________________ HOBLink Mobile
Tap add field (see Figure 36, page 41) to add extra information such as a job title
and department, a birthday or an anniversary for your contact. You can also add
an instant messenger username or a note for this contact. Tap Done when
complete, or Cancel to abandon the changes and return to the Contacts screen.
5.1.5. Notes
This allows you to create notes for yourself that will be stored on the company
Microsoft Exchange Server. Tapping Notes on the Exchange screen (see Figure
13 on page 22) will display your notes:
Figure 38: Notes List
Here you have the following options:
– This symbol returns you to the Exchange screen (see Figure 13, page
22).
– This symbol creates a new note. See Figure 40, page 44.
42
Security Solutions by HOB
HOBLink Mobile ______________________________________________Using HOBLink Mobile
Tapping a note on the Notes List (see Figure 38, page 42) will display the
following screen:
Figure 39: Note Text
Here you have the following options:
– This symbol closes the current note and creates a new note (see Figure 40,
page 44).
– This symbol sends the current note by e-mail to a selected recipient.
– These symbols allow you to move between notes.
– This symbol deletes the current note.
Security Solutions by HOB
43
Using HOBLink Mobile _____________________________________________ HOBLink Mobile
This is the New Note screen. Once you are finished creating a note, tap Done to
save the note or tap Notes to close the note without saving it, which will return
you to the Notes List (see Figure 38, page 42).
Figure 40: New Note Screen
5.2. Using the Notes Application–
This function allows you to set up a screen where you can write notes and
comments. The notes created here are stored on the HOBCOM Universal Server,
not on the company Microsoft Exchange Server or on the mobile device itself.
Open this function by tapping on Notes on the Application Manager screen (see
Figure 12, page 21).
Here you can do the following:
• List notes
• Delete, edit or create new notes
Existing notes can be displayed and accessed for reading, deleting or editing as
desired.
44
Security Solutions by HOB
HOBLink Mobile ______________________________________________Using HOBLink Mobile
After tapping Notes on the Application Manager screen (see Figure 12, page
21), the Notes Management screen is displayed:
Figure 41: Notes Management
The icons on this screen have the following functions, in order from left to right:
•
– The New button opens a new note.
•
– The Arrow button allows you to navigate between pages.
•
– The Save button saves the currently displayed note.
•
– The Delete button deletes the selected note.
•
– The Home button returns you to the main menu of Application
Manager (see Figure 12, page 21).
Below the icons on the Notes management screen, the notes are listed for ease
of access.
Security Solutions by HOB
45
Using HOBLink Mobile _____________________________________________ HOBLink Mobile
To access a note, just tap the entry in the list on the Notes Management screen
(see Figure 41, page 45). The note opens, showing the name of the note and the
text, as shown here:
Figure 42: Notes Text
Here you have the same icons as on the Notes Management screen (see Figure
41, page 45) except that the Arrow button has been replaced by the Folder
button.
•
46
– The Folder button returns you to the Notes management screen.
Security Solutions by HOB
HOBLink Mobile ______________________________________________Using HOBLink Mobile
5.3. Using the Prefs (Preferences) Application–
This function allows you to change the password that has been set up to give you
access to the HCU Server. Open this function by tapping on Prefs on the
Application Manager screen (see Figure 12, page 21).
Figure 43: Prefs
Enter the password you wish to change, the new password you wish to use in
future and then confirm this. Click OK to make the change.
Security Solutions by HOB
47
Using HOBLink Mobile _____________________________________________ HOBLink Mobile
48
Security Solutions by HOB
HOBLink Mobile _________________________________________Frequently Asked Questions
6. Frequently Asked Questions
• How can the password of a user be changed?
Users can change the password themselves in the client under the application
Prefs. The administrator can reset the password under user management in
the Web Administration by clicking on the username and then clicking
Settings.
• What is the difference between disconnecting and logging off from a session?
A session will be restored at the next login after a disconnection, while a
session will be deleted following a log off. This is a similar process to the
Windows Terminal Server.
• Is the communication between the HCU server and the Microsoft Exchange
Server encrypted?
Yes, it is always AES encrypted. It can additionally have SSL encryption as
well, but this is not compulsory.
Security Solutions by HOB
49
Frequently Asked Questions ________________________________________ HOBLink Mobile
50
Security Solutions by HOB
HOBLink Mobile ____________________________________________ Information and Support
7. Information and Support
If you would like further information about HOBLink Mobile or if you need product
support, please contact us at:
U.S.A. and Canada
Phone: +1 866 914 9970
Fax:
+49 9103 715 3299
E-mail:
[email protected]
Germany
Phone:
+49 9103 715 3161
Fax:
+49 9103 715 3299
E-mail:
[email protected]
From Other Countries
Phone:
+49 9103 715 3103
Fax:
+49 9103 715 3299
E-mail:
[email protected]
Security Solutions by HOB
51