1
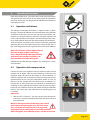
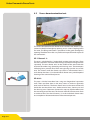
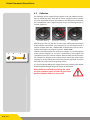
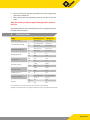
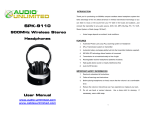
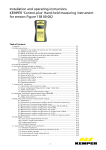
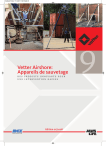
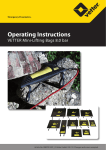
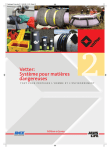
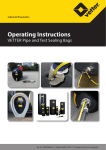
Emergency Pneumatics.
Operating Instructions
VETTER Pneumatic Decon Tents Article No. 9987018005 | © Vetter GmbH I 09/14 I Changes and errors excepted.
Vetter Pneumatic Decon Tents
Contents
1. Important preliminary remarks. . . . . . . . . . . . . . . . . . . . . . . . . . . . . . . . . . . . 2
2. Description of the product. . . . . . . . . . . . . . . . . . . . . . . . . . . . . . . . . . . . . . . . 2
2.1
Scope of delivery. . . . . . . . . . . . . . . . . . . . . . . . . . . . . . . . . . . . . . . . . . . 2
2.2
Optional accessories. . . . . . . . . . . . . . . . . . . . . . . . . . . . . . . . . . . . . . . . 3
2.3
Correct handling and usage. . . . . . . . . . . . . . . . . . . . . . . . . . . . . . . . . 3
2.4
Safety instructions. . . . . . . . . . . . . . . . . . . . . . . . . . . . . . . . . . . . . . . . . . 3
3. Preparing the product for use. . . . . . . . . . . . . . . . . . . . . . . . . . . . . . . . . . . . . 3
3.1
Preparations for operation. . . . . . . . . . . . . . . . . . . . . . . . . . . . . . . . . . 3
4. Operating Instructions. . . . . . . . . . . . . . . . . . . . . . . . . . . . . . . . . . . . . . . . . . . 4
4.1
Operation with blower. . . . . . . . . . . . . . . . . . . . . . . . . . . . . . . . . . . . . . 4
4.2
Operation with compressed air. . . . . . . . . . . . . . . . . . . . . . . . . . . . . . 4
4.3
Use as decontamination tent. . . . . . . . . . . . . . . . . . . . . . . . . . . . . . . . 5
4.4
Instructions of the showers . . . . . . . . . . . . . . . . . . . . . . . . . . . . . . . . . 6
4.5Deflation. . . . . . . . . . . . . . . . . . . . . . . . . . . . . . . . . . . . . . . . . . . . . . . . . . . 7
4.6
Folding Plan. . . . . . . . . . . . . . . . . . . . . . . . . . . . . . . . . . . . . . . . . . . . . . . . 8
5. Practical Tips. . . . . . . . . . . . . . . . . . . . . . . . . . . . . . . . . . . . . . . . . . . . . . . . . . . . . . 9
6. Repeated Inspections. . . . . . . . . . . . . . . . . . . . . . . . . . . . . . . . . . . . . . . . . . . . . 9
7. Repair Instructions. . . . . . . . . . . . . . . . . . . . . . . . . . . . . . . . . . . . . . . . . . . . . . . . 9
8. Technical data. . . . . . . . . . . . . . . . . . . . . . . . . . . . . . . . . . . . . . . . . . . . . . . . . . . 10
Page 1/11
1.
Important preliminary remarks
These instructions must be read carefully and complied with at all times to ensure this product is used properly
and as intended, to ensure this product provides the greatest possible benefit, and that the entitlements within
the scope of the Vetter warranty are preserved.
Each use/operation of the pneumatic universal tent requires detailed knowledge and compliance of these instructions.
The operating instructions given here are to be regarded as part of the product and are to be kept for the complete life duration of the product. In case the product should be passed on to a successive user then the operating
instructions must also be included
2.
Description of the product
2.1 Scope of delivery
Article No.
Description
PZ 40 3 L
(1520047000) (1520035500)
1520034500
Tent frame PZ 40 3 L incl. tension rope
1520046600
Tent frame PZ 17 Decon 2 L
1520034600
Tent floor PZ 40 3 L
1520046400
Tent floor PZ 17 Decon 2 L
1520034800
Tent cover PZ 40 3 L
1520046800
Tent cover PZ 17 Decon 2 L
1520034900
2 x Entry covers type PZ 40 3 L with 3 doors
1520046900
2 x Entry covers type PZ 17 Decon 2 L with 2 doors
1520035000
2 x Separation wall, longitudinal PZ 40 3 L
1520046500
Separation wall for PZ 17 Decon 2 L
1520034700
Collection tub for PZ 40 3 L
1520046300
Collection tub for PZ 17 Decon 2 L
1520035300
Shower hose PZ 40 3 L
1520046700
Shower hose PZ 17 Decon 2 L
1520035100
Shower cover type PZ 40 3 L left/right
X
1520035200
Shower cover type PZ 40 3 L centre
X
1520031100
2 x Shower cover type PZ 17 Decon 2 L
1510014700
Decon hand shower
1520000500
Packing bag (110 x 85 x 60 cm)
1520011500
Packing bag (110 x 85 x 85 cm)
1520002400
18 x Square earthing pins
1520033500
24 x iron tent pegs, 30 cm
1520028301
Repair material
X
1520002500
Bag, red, for tent pegs
X
1523013900
Bag, red, for tent pegs
1523006800
Hammer
PZ 17 Decon 2 L
X
X
X
X
X
X
X
X
X
X
X
X
X
X
X
4X
12 X
X
X
X
X
X
X
X
X
Page 2/11
Vetter Pneumatic Decon Tents
2.2 Optional accessories
Article No.
Description
1523003700
Valise for PZ 17 Decon 2 L, 265 x 150 cm (104 x 59 inch), yellow, Incl. auto belt latch
1523013300
Valise for PZ 40 3 L, 330 x 160 cm (130 x 63 inch), yellow, incl. auto belt latch
2.3 Correct handling and usage
Always use compressed air with the pneumatic decon tents - ever use flammable or aggressive gases. Only Vetter original fittings and parts may be used for the pneumatic decon tents.
2.4 Safety instructions
Only trained, reliable, and responsible employees are permitted to use and operate this product.
Wear the required protective gear and clothing. Please contact the manufacturer or authorized retailer when detecting cracks, fissures, holes, or leakages on the pneumatic supporting frame during
the product inspection. Such defects can lead to bursting. Always avoid contact with hot or sharpedged materials.
Due to the light design of the pneumatic tents, it is possible that heavy winds may cause stability problems.
Always fasten tents with anchoring ropes or use ballast containers. Comply with DIN 7716 if storing
the pneumatic universal tents long-term.
3.
Preparing the product for use
3.1 Preparations for operation
Inspect the pneumatic decon tent before and after each operation to ensure correct and perfect
condition. It is imperative that the recommended folding instructions be observed.
Page 3/11
4.
Operating Instructions
Open the packing cover. Lay out the tent at the required location.
The ground area must be free of any sharp-edged or pointed objects! The decon tents are designed to be inflated with a blower or
with compressed air.
4.1 Operation with blower
The inflation connection for blowers is opened when air flows
through. Connect the inflation hose of the blower to the inflation
connection of the tent. Unscrew the cap from the inflation connection in a counter-clockwise direction and check whether the
valve is closed. Make certain there is perfect locking of the couplings of the inflation hose with the tent coupling and the blower.
e.g. Tent blower 0.23-0.47 bar
(Art. no. 1523017700)
Start the blower and fill the tent until the maximum permitted
operating pressure. The medical tent erects automatically. The safety valve integrated into the support frame avoids over-inflation.
Note! Should parts of the support frame become caught up during erection
then switch off the blower immediately
and rectify the problem. Inflation can
then be continued after doing this.
Replace the cap after filling and tighten it by turning it in a clockwise direction.
4.2 Operation with compressed air
Connect the pressure regulator with the knurled wheel on the
compressed air bottle. Close the hand wheel (3) of the pressure
regulator. Open the valve on the bottle (5). The manometer (1)
indicates the pressure in the bottle. Adjust the back-pressure to
approximately 10 bar using the adjustment wheel (4). The set
pressure can be checked on the back-pressure manometer (2).
Connect the air hose of the pressure regulator (6) with the brass
coupling (7) of the inflation connection. Open the pressure regulator and start inflation. Observe the shower during the inflation
process. Close the hand valve when the max. operating pressure
is reached.
2
1
5
3
6
4
7
Attention!
99 With the PZ 17 Decon 2 L you must ensure that the connection hose is correctly connected between the tent frame and
the shower tub
Note! If, during erection of the tent, parts of the
tent frame become caught up in the tent cover,
then close the valve on the pressure regulator
immediately and rectify the cause of the problem. After doing this, the inflation process can be continued.
Page 4/11
Vetter Pneumatic Decon Tents
4.3 Use as decontamination tent
The water connection for the shower heads and the hand showers is positioned in the blue throughway opening and is a Storz Coupling Size D
for water. The filling connection is positioned in the green throughway
opening. Therefore this makes any confusion impossible with respect to
the connections.
PZ 17 Decon 2 L:
1
The tent is subdivided by 1 longitudinal partition into two lines. There
are two each doors in the entrance awnings to enable entering the lines
separately. The two shower units in the middle of the tent divide the
tent into the undressing, showering and dressing areas. The continuous
collecting basin prevents fluid from transgressing into the rest of the
tent. The showers with the shower cap create a self-contained unit. 2
each shower handsets (1) in the individual shower units provide optimal
cleaning of the contaminated person.
PZ 40 3 L:
The tent is divided into three lines using two longitudinal separation
walls. There are three doors in the entry covers in order to separately
enter each of the lines. The three shower units in the centre of the tent
divide the tent into three areas: clothe removal area, shower area and
the dressing area. Continuous shower tubs stop any liquid overflow into
the remaining area of the tent. The showers with the shower covers form
an enclosed unit. Four hand showers (1) in the individual shower units
ensure optimum decontamination of contaminated persons.
Page 5/11
Vetter PZ 17 Decon 2 L
The Vetter decontamination path (PZ 40 3 L)
4.4 Instructions of the showers
The required amount of water can be regulated via the ball valve
(1).
In order to change the shower curtains the hand showers (2)
must firstly be uncoupled and the rubber washers (3) removed.
The shower curtain can now be removed by separating the Velcro and pile fabric connections on the vertical support hose and
unhooking the eyelets (4) on the insertion basin.
1
2
3
4
2
Page 6/11
Vetter Pneumatic Decon Tents
4.5 Deflation
The deflation of the support frame happens over the inflation connection. To deflate the tent, close the air source (compressed air cylinder,
etc.) and disconnect the pressure reducer or the filling hose of the blower. The deflation valve is opened by pressing-in and turning the pin (1)
counter clockwise.
1
Pin before locking
Pressing-in + turning
Valve open
Fold the tent in the way, that the air can escape (Folding to the direction
of the inflation connection). Any remaining air can be removed with a
vacuum adaptor (Item No.: 1700018300) in combination with an construction-site compressor adaptor (Item No.: 1600012000).
1
2
3
Connect the construction-site compressor adaptor (1) to the coupling
of the vacuum adaptor (2) and turn it interlocking. Then tighten the
screwable part of t the vacuum adaptor. Now connect the constructionsite compressor adaptor to the support frame. Attach the quick-action
coupling (3) to the connection hose of the pressure regulator and open
the hand valve of the pressure regulator slowly.
It is also possible to deflate the support frame with a blower with deflate
function. Follow the operating instructions of the blower.
After deflation and before packing, the valve must be unlocked again in order to guarantee perfect inflation when it is next used!
Page 7/11
4.6 Folding Plan
Before repacking, the tent frame and the frame of the shower must be
completely empty.
1. The front of the tent is folded lengthwise in four equal sections.
L
Inflation connector
Befüllanschlus
Stirnseite
Front
2. Then fold the tent five times in the direction of the inflation connector.
3. Now place the tent into the carrying bag.
Page 8/11
Vetter Pneumatic Decon Tents
5.
Practical Tips
99 The individual separating walls, floor tarps, as well as the tent
tarpaulins are removed easily and quickly if and as needed.
Hook and loop fasteners are used to attach the tarpaulin to
the pneumatic supporting frame.
99 When using tent heaters, avoid blowing heat directly onto
parts of the tent.
99 If needed, lights can be suspended from the supporting frame.
99 Additional tents are easily connected using hook and loop
overlaps.
99 After use, clean the tent with a mild cleanser before packing.
Allow the parts to dry at normal room temperature. Treat outer
surfaces with commercially available impregnating agents.
99 Follow the instructions of the folding plan to fold and pack
the tent. Make sure that the tent is folded and packed in an
orderly manner and as instructed to ensure the tent is easy to
unpack next time it is needed.
6.
Repeated Inspections
The tents should be subjected to a visual and functional inspection by a trained technician at least once a year. This requires inflating the tent to approx. 50 % of the max. working pressure (0.25
bar). Check all pressurized parts for fissures, cracks, cuts, puncture
holes, detached spots, and heat or chemical damage. If the pressure does not experience a significant drop within one hour, the
tent is ready for use.
Please contact the manufacturer in case of larger damage or if you
have any questions. Comply with DIN 7716 if storing the pneumatic universal tents long-term.
7.
Repair Instructions
Minor damage such as cracks, cuts, or punctures (max. 4 cm) can
be repaired by the operator with the enclosed repair kit. Please
follow these steps:
1. Select the size of the patch so that the patch extends approx.
4 cm beyond the damaged area on all sides.
2. Mark patch area on the supporting frame.
3. Roughen the area of the patch on the surface of the supporting frame as well as one side of the patch.
4. Apply a thin layer of the special adhesive to the roughened
spot on the supporting frame and the roughened side of the
patch.
5. Allow special adhesive to dry for approx. 10-15 minutes until
no longer sticky.
Page 9/11
6. Press patch firmly onto the pretreated area of the supporting
frame and smooth out.
7. Allow unpressurized supporting frame to rest for at least 48
hours.
Only the factory is able to repair damage that is more extensive.
A trained technician must check the tent and its supporting frame
for leaks after the repairs.
8.
Technical data
Type
PZ 17 Decon 2 L
Article No. (Set)
1520047000
1520035500
m
4.9 x 3.86 x 2.48
8 x 5.5 x 3.1
ft.
16 x 13 x 8
26 x 18 x 10
m
4.9 x 3.5 x 2.3
8 x 5.1 x 2.9
ft.
16 x 12 x 8
26 x 16 x 9
bar
0.5
0.5
psi
7.25
7.25
bar
0.65
0.65
psi
9.4
9.4
l
1,776
4,576
cu. ft.
62.72
161.6
l
2,664
6,863
cu. ft.
94.1
242
sec
60
300
m
1.1 x 0.85 x 0.6
1.1 x 0.85 x 0.85
ft.
3x2x1
3x2x2
kg
105
204
lbs
231
450
Size outside (L x W x H)
Size inside (L x W x H)
Working pressure
Test pressure
Nominal capacity
Air requirement
Inflation time ca.
Pack size (L x W x H)
Weight
PZ 40 3 L *
* Also available as a 40 m² tent with 2 lines. PZ 40 2 L (1520048900)
All rights reserved for technical changes within the scope of product improvement.
Page 10/11
Place your trust in emergency pneumatics!
We are the company who can help you, find a solution to your problem!
Vetter GmbH
A Unit of IDEX Corporation
Sales
Blatzheimer Str. 10 - 12
D-53909 Zülpich
Germany
Tel.: +49 (0) 22 52 / 30 08-0
Fax: +49 (0) 22 52 / 30 08-590
Mail: [email protected]
www.vetter.de
Article No. 9987018005 | © Vetter GmbH I 09/14 I Changes and errors excepted. | Made in Germany