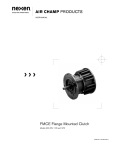
1
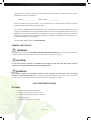
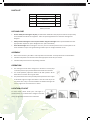
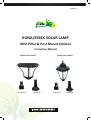
 Version 1.1
N
i
|
А,
РО wer AE
=D \
KONA/ESSEX SOLAR LAMP
With Pillar & Post Mount Options
Instruction Manual
KONA, Item # 23203 ESSEX, Item # 23201
.
3” Fitter Pole Pillar Mount 3” Fitter Pole Pillar Mount
Item# 23203/23201
Thank you very much for choosing a Nature Power Product product! For future reference, please
complete the owner’s record below:
Model: Purchase Date:
Save the receipt and these instructions. It is important that you read the entire manual to become
familiar with this product before you begin using it.
This machine is designed for certain applications only. The distributor cannot be responsible for issues
arising from modification. We strongly recommend this machine not be modified and/or used for any
application other than that for which it was designed. If you have any questions relative to a particular
application, DO NOT use the machine until you have first contacted the distributor to determine if it can
or should be performed on the product.
For technical questions please call 1-800-588-0590.
GENERAL SAFETY RULES
/N WARNING:
Read carefully and understand all ASSEMBLY AND OPERATION INSTRUCTIONS before operating. Failure to follow
the safety rules and other basic safety precautions may result in serious personal injury.
/N cauTion:
Do not allow persons to operate or assemble this solar light until they have read this manual and have
developed a thorough understanding of how the solar light works.
7 WARNING:
The warnings, cautions, and instructions discussed in this instruction manual cannot cover all possible
conditions or situations that could occur. It must be understood by the operator that common sense and caution
are factors which cannot be built into this product, but must be supplied by the operator.
SAVE THESE INSTRUCTIONS
FEATURES
> Solar rechargeable battery included
Aluminum construction makes it rust free
Powered by high quality crystalline solar cells
Warm white LED’s
Y Y Y Y
Light automatically turns on at dusk
Page? of4
PARTS LIST
Part# Description Qty. —
1 Lamp 1
2 Lamp Base 1 | |
Lamo dl
3 Large Screw 1 Scrow Y
4 Nuts 2 ма E
Lamp base Л
Nut 2 a
Battery Included
USE AND CARE
* Do not modify the solar light in any way. Unauthorized modification may impair the function and/or safety
and could affect the life of the equipment. There are specific applications for which the solar light was
designed.
© Always check of damaged or worn out parts before using the solar light. Broken parts will affect the solar
light operation. Replace or repair damaged or worn parts immediately.
© Store idle solar light. When solar light is not in use, store it in the OFF position and in a secure place out of
reach of children. Inspect it for good working condition prior to storage and before re-use.
ASSEMBLY
1. Place screw into Nut 1, place Nut 1 onto lamp base and secure Nut 1 to lamp base from inside with Nut 2.
2. Install the Lamp Base onto desired surface with appropriate screws for your surface.
3. Install the lamp head onto Nut 1 by twisting clockwise.
OPERATION
4. The solar light must be left to charge for a minimum of 2 sunny days
in the OFF position upon purchase before best results are achieved.
5. For normal operation, adjust the switch to the “ON” position. All the
LED’s will turn on when the sun goes down.
6. The performance of the solar post lamp will vary with the time of year.
It will deliver light for longer times when it has had a full day in the
sun rather than a day in overcast weather and likewise the light will
run for longer times in summer than in winter.
LOCATION OF LIGHT
For best results, please locate your solar light in a
position where it can absorb direct sunlight on the solar
ют
panel, and generally free from cover and shade.
Page3 of 4
TROUBLESHOOTING
If your solar light does not turn ON at dusk despite observance of all the instructions, please try the following
steps:
1) Make sure the solar light is not being affected by any other light source; if this is the case move your solar
light to a location where there is less light interference.
2) Make sure the solar light is not located in the shade during the day.
3) Make sure the switch is in the ON position.
4) Check that battery is installed correctly.
5) If your solar light turns on during the day, usually the sensor needs to be reset. To do this, turn the light into
the OFF position and take it into a dark room. Switch to the ON position and once the light comes on, the
sensor has been reset.
MAINTENANCE
Maintain your solar light. It is recommended that the general condition of any solar light be examined before it is
used. Clean the solar module with a damp towel to insure optimum performance of the solar light. Do not use any
type of solvent for cleaning and be careful not to put too much pressure on the module while cleaning.
LIMITED WARRANTY
Nature Power warrants our products to the original purchaser that this product is free from defects in materials
and workmanship for the period of one year from date of purchase.
Dated Proof of Purchase is required.
Please contact Nature Power Products to acquire more information or technical support:
1-800-588-0590
[email protected]
www.natu repowerprod ucts.com
Page4 of 4