1
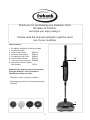
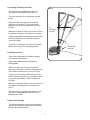
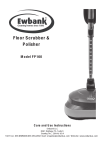
Floor Scrubber &
Polisher
Model FP160
Care and Use Instructions
Ewbank LLC
8261 Highway 73, Suite F,
Stanley, N.C. 28164, USA
Toll Free: 855-4EWBANK Email: [email protected] Website: www.ewbankus.com
Thank you for purchasing your Ewbank ® Floor
Scrubber & Polisher,
we hope you enjoy using it.
Please read the manual carefully to get the most
out of your machine.
Pack Contents:
1 - Scrubbing, Polishing and Waxing head
2 - Handle Assembly
3 - Buffing Pads (blue)
EB0129
4 - Scouring Pads (white)
EB0130
5 - Scrubbing Brush Plates
EB0131
6 - Velcro-Backed Plates
EB0132
7 - Care and Use Instructions EB0489
8 - Gloss Floor Polish Sample
(Not Shown)
FP555
2
Read the Care and Use Instructions before
using the Ewbank® Floor Scrubber &
Polisher and make sure that…
• The power cord is in perfect condition.
• All packaging materials are removed from the
machine.
3
4
5
1
6
2
Safety Instructions - CAUTION
• DO NOT move the unit by pulling on the power cord.
• DO NOT allow the unit to be used by children.
• DO NOT modify the unit in any way - this is dangerous and
will also invalidate the warranty.
• DO NOT handle the unit with wet hands.
WARNING!
• This product is not a toy.
• Always unplug the Ewbank ® Floor Scrubber & Polisher when
not in use.
• To avoid electric shock, do not expose to rain or use
outside.
• Store the unit indoors.
• NEVER pick up flammable or combustible liquids such as
petrol or other volatile substances
• NEVER use in the presence of explosive liquids, vapors or
explosive dust such as coal or grain.
• When lifting the unit, always hold it by the hand grip.
• Only use the product as detailed in these instructions.
• Only use the manufacturer’s recommended attachments
and consumables.
3
Safety Instructions - CAUTION
• Ensure unit operation switch is off before plugging unit into
a power socket-outlet.
• If the power cord is damaged, it must be replaced by
Ewbank® Products or its appointed agents to avoid a hazard.
• It is recommended that an ALCI device is fitted into the
mains supply socket-outlet for added protection against
electric shock.
4
Fig.1
Assembling the Appliance
• Insert the handle into the aperture at the top
of the body aligning the notch on the tube with
the rear of the unit, and straighten the security
collar (Fig.1).
Changing the pads and plates on your
product
• Make sure machine is not plugged in before
fitting pads.
Fig.2
• Note the orientation of the drive hubs (Fig.2).
• Place the required velcro-plate or brush plate
over the hub and rotate until the shape lines
up (Fig.3).
• Press the plate down to clip into place (Fig.4).
• Always use two plates of the same type, i.e.
not 1 brush and 1 pad (Fig.5).
Fig.3
• Simply pull the plates off to remove and
change.
Adjust the handle to suit your height (Fig.6).
Fig.6
Fig.4
Fig.5
5
Using your Ewbank® Floor Scrubber &
Polisher on various floor types
Tips for removing old polish
Take care not to slip over when polishing floors,
they can become very slippery in the process.
Only use dedicated floor products; other
inappropriate polishes and waxes may leave
the floor dangerously slippery.
• Use the white pads to scrub old polish from
the floor.
• Carefully follow the instructions for your
chosen floor polish remover.
DO NOT USE ON CARPET
Do not leave the product operating in one area
for a prolonged period of time as this may
damage your floor.
You may need a mop and bucket to clean and
prepare your hard floor, prior to polishing with
your floor polisher.
Cleaning hard floors with heavy soiling
• Use the brush heads to loosen dried-on dirt.
• Take care not to scratch the floor if hard dirt
gets stuck to the brush heads.
Applying floor treatments
• Always read and follow manufacturer’s
instructions for floor treatment products.
• Apply the treatment directly to the floor unless
instructions indicate otherwise.
The recommended polish is Ewbank® Gloss
Floor Polish (FP555) of which a sample is
supplied and available from Ewbank® stockists.
Tips for polishing wax on hard floors
Fig.7
• Once the wax polish has dried on the floor
use the blue buffing pads to polish.
• Keep the polishing head moving. Don’t stop in
one place for a long time or it will spoil the
finish.
1m
1m
• Move at a speed of about 1 minute every 1m2
and follow the diagram for an even finish
(Fig.7).
• A glossy finish is not always possible; this
depends on the wax or polish used and the
type of floor. Sometimes several coats of
polish will help to get a glossy finish.
(approx. 1minute per metre square)
6
Fig.8
Scrubbing /Cleaning the floor
• Ensure that the scrubbing brushes are
attached to the product (see page 5).
• Turn the machine on at the power sockletoutlet.
• With your foot securing the head of the
polisher on the floor (1), pull the handle
towards you (2) and the machine will start
(Fig.8).
2.
Pull back
to start
• Move the machine slowly across the surface
of the floor to loosen and collect any debris.
• Collect large debris towards the centre of the
base unit to prevent it from being spread
across the floor.
• Once this is complete, turn the machine off
before returning it to its upright position.
1.
Place foot
on base
Polishing the floor
• Clean floor thoroughly first before adding
your chosen floor polish.
• Allow to dry before buffing using blue
buffing pads.
• With your foot securing the head of the
polisher on the floor, pull the handle towards
you and the machine will start (see Fig.8).
• If you are using a floor polishing wax or oil,
refer to the manufacturer’s instructions when
using with the Ewbank® Floor Scrubber &
Polisher.
• Move at a speed of about 1 minute every 1m2
and follow the diagram for an even finish
(Fig.7).
• Do not leave the machine operating in one
area for a prolonged period as this may
damage your floor.
Power Cord Storage
• The electrical power cord can be stored on
the rear of the product using the convenient
power cord storage hooks.
7
Cleaning the floor pads
• All pads and floor attachments are washable.
• The brushes, polishing pads and scouring
pads can be washed under the tap with warm
soapy water.
• The polishing unit is not suitable for washing
in water, it must be wiped with a damp cloth.
• Smeary marks are made on floor when
polishing
- Has the polish/wax been allowed to dry?
- Does old polish/wax need to be removed?
• No gloss sheen is being produced
- Floor wax level may need to be increased, try
another coat. Allow to dry and re-polish.
- However some types of floor do not produce
gloss finish.
• Scratches are made on the floor
- Check for grit or dirt stuck to the pads or
wheels.
- Clean/replace pads or clean wheels.
• Floor is too slippery
- Check the polish/wax is designed to be used
on floors. Floor wax should produce a glossy
but gripping finish.
Technical Data
Power
Voltage
Current
Frequency
Rpm
Sound Pressure
160W
120V~
1.3A
60Hz
2100
80dB(A)approx
8
Notes
9
Notes
10
Mains Connection
This unit is a Class II appliance which means it is double-insulated for your protection, no
earthing wire is necessary.
If the power cord is damaged, it must be replaced by Ewbank® Products or our appointed
agents to avoid a hazard.
If the fitted plug is cut off from the power cord then the plug must be disposed of safely.
If you are using an extension cord it must be rated at a minimum of 10 Amps and fully unwound.
Do not operate with a lead rated less than 10 Amps as this will cause premature failure of the motor
which is not covered by the warranty.
Information on the disposal of waste electrical & electronic
equipment known as WEEE
Please do not dispose of tools with your domestic waste. It is your responsibility to
dispose of this type of waste by handing it over to a special designated collection
point for recovery and recycling.
11
Intertek
9901234
CONFORMS TO UL STD.1017
CERTIFIED TO CSA STD.
C22.2 No.243-01
Your Warranty
This product is guaranteed for a period of 12 months against faulty materials and workmanship.
While every possible care is taken by Ewbank ® Products to ensure that our products leave the
factory in good working order, Ewbank® Products cannot under any circumstances accept liability
for problems or damage caused by their subsequent use. It is the responsibility of the user to ensure
the surfaces to be treated or cleaned are suitable for vacuuming. This warranty does not affect your
statutory rights. This warranty excludes the use for rental. In the event of a fault occurring please
contact our helpline before returning the unit to our Service Department at the address below
together with a copy of your purchase receipt. All repairs will be dealt with speedily.
Some States do not allow limitations on how long an implied warranty lasts and some States do not
allow the exclusion or limitation of incidental or consequential damages, so part or all of the above
limitations or exclusions may not apply to you.
This warranty gives you specific legal rights, and you may also have other rights which vary from
State to State.
Toll Free: 855-4EWBANK
Email: [email protected]
www.ewbankus.com
Made in China
EB0489 01/14
12